3i word 2007
DESCRIPTION
MS Word 2007TRANSCRIPT

Chapter 3Microsoft Word 2007
Word ProcessorWord Processor is software that helps you to create any type of written communication like a letter, a report, a memo, or any other type of correspondence or text data. (i.e. Microsoft Word, Word Pad ,Word Star and Word Perfect are the common word processors). But the Microsoft Word is popular word processor.
MS Word 2007Microsoft Word is part of the Microsoft Office. Its main function is for producing documents that can includes text, graphics, table, clip art, etc. The most familiar application among the members of the Office is Word. This lesson will introduce you to the Word window, open Microsoft Word 2007. The Microsoft Word window appears and screen looks similar to the one shown here. Understanding Document Views In Word 2007, you can display your document in one of five views: Draft, Web Layout, Print Layout, Full Screen Reading, or Online Layout. Draft View
Draft view is the most frequently used view. You use Draft view to quickly edit your document.
Web Layout Web Layout view enables you to see your document as it would appear in a browser such as Internet Explorer.
Print Layout The Print Layout view shows the document as it will look when it is printed.
Reading Layout Reading Layout view formats your screen to make reading your document more comfortable.
Outline View Outline view displays the document in outline form. You can display headings without the text. If you move a heading, the accompanying text moves with it.
56

Microsoft Word 2007
The large rectangular region above the document is known as
the Ribbon
Office button drops the Office Menu, which is the rough equivalent of the File menu
Quick Access Toolbar contains commonly used commands
Menu Tab Strip make up the main content of the ribbon
When any object is selected its
Contextual Tabsets appear
Groups Tabs contain sets of relevant Icons controls
Control Box is used to control Word Program Window (Minimize, Restore/Maximize, Close)
7
The MiniToolbar is a collection of common formatting commands that appears above text selections
The Context menu is a short cut menu that hold common command that can apply on the selected object, appear on right click.
Status Bar is used to display document status (like, page#, Words, etc)
Task Pane display all options of specific active tasks of Ms Word
11
Scroll Bar (H,V) is used to view unseen area of document.12
Zoom (Slider)is used to magnify the document between 10 – 500 %
View Buttons is used to switch between the different views of document.
Text Area is the place where document actually written
57
The Interface

Microsoft Word 2007Creating Document
Creating a New Document: Keyboard Option 1. Press [Ctrl] + [N]. (The faster & easier way of getting a blank document)
Creating a New Document: Menu Option
1. From the OFFICE BUTTON, select NewThe New Document dialog box appears.
2. From the Blank and recent section, click BLANK DOCUMENTA new blank document appears.
Opening an Existing DocumentFollow these instructions to open already existing documents.
1. From the OFFICE BUTTON, select OpenOR Press [Ctrl]+[O] The Open dialog box appears.
2. From the Look in pull-down list, navigate to and select the desired file 3. To open the file, click OPEN. The required document is opened.
Saving a DocumentThe Save and Save As commands are located within the File menu. If you are saving a document for the first time, both selections will take you to the Save As dialog box. Saving a Document: First Time Use this option if you are saving your document for the first time or if you are saving an already saved file under a new name.
1. From the OFFICE BUTTON, select Save As NOTE: Do not click on the side arrow as it will not allow the Save As function to occur.
58

Microsoft Word 2007 The Save As dialog box appears.
2. From the Save in pull-down list, make the appropriate selection:To save to your C: drive or another drive, select (C:) or another network drive.
3. In the File name text box, type a filename (Word adds a docx extension.)4. Click SAVE The document is save on the hard-drive.
Saving a Document: Subsequent Times Use the Save command to save an existing. Use the Save command frequently to save changes to your document.
1. Press [Ctrl] + [S] OR From the OFFICE BUTTON, select Save
OR On the Quick Access Toolbar, click SAVEEditing BasicsOnce you have created a Word document and typed some text, you may want to edit your work by adding, moving, or deleting text. Insertion Point and PointersThe blinking vertical line located in the window is the insertion point. As you type, keyed text will appear to the left of the insertion point.Typing FeaturesAs starting on the document, it should be aware of some typing features in Word.Word WrapText is wrapped at the end of each line and continues on the next line; you do not have to press [Enter] or [Return]
59

Microsoft Word 2007Delete CharacterThe [Backspace] key moves the insertion point to the left one space at a time, eliminating text or space. The [Delete] key eliminates text or space to the right of the insertion point. Moving Insertion Point↑ Up one line of text ↓ Down one line of text
→ Right one character ← Left one character
Ctrl + ↑ Up one paragraph Ctrl + ↓ Down one paragraph
Ctrl + → Right one word Ctrl + ← Left one word
PgUp Up one screen PgDn Down one screen
End To end of current line Home To start of current line
Ctrl + Home To top of document Ctrl + End To bottom of document
Ctrl + PgUp Up one Page Ctrl + PgDn Down one Page
Using the Undo CommandIf text was accidentally deleted or if there was some type of editing mistake, you may be able to reverse the last action using the Undo command. Using the Undo Command: Keyboard Option
1. Press [Ctrl] + [Z]The last action is reversed.
Using the Undo Command: Ribbon and Standard Toolbar Option
1. To undo your last action, On the Quick Access Toolbar,
click UNDO2. To undo multiple actions,
a. On the Quick Access Toolbar, click the to the right of the UNDO button
b. Select the action(s) to undo. The selected action(s) are reversed.
Using the Redo Command: Ribbon and Standard Toolbar Option1. To redo your last action, On the Quick Access Toolbar, click REDO
Selecting TextSelecting text is a basic editing function used in Word. In most cases, text must be selected before it can be formatted. Several methods are available for selecting
60

Microsoft Word 2007 text. Use the option that is most convenient or use the technique that best fits for task. Keyboard shortcuts can also be used to select text.
From Keyboard (like, Ctrl+A, Use Shift Key With Insertion point Movement Keys)
From Mouse (Like Double Click, Left Click, Tripp Left Click) From Keyboard & Mouse (Like Ctrl or Alt, with left click)
Working with Spell CheckSpell Check is a feature that checks for spelling errors in a document. Spell Check can be useful in preventing embarrassing mistakes, but be aware that Spell Check is not always right. Spelling can be checked simultaneously with grammar. The Formatting TextFormat your document in areas of font, styles, alignment and spelling, bullets and numbering, borders and shadowing, document margins, and document themeFontThe Font toolbar allows you to edit aspects of the text in your document, as well as add customizations.
Name Image Description
Font style pull-down menu Selects text font
Font size pull-down menu Selects text size from pull-down menu
Font size slider Selects text size using slider
Bold Applies boldface to text
Italic Applies italics to text
Underline Applies underline to text
Strikethrough Applies strikethrough
Font color pull-down menu Selects text color
Highlight Adds highlighting to text
Superscript Creates superscript text
Subscript Creates subscript text
Small caps Applies small caps
61

Microsoft Word 2007
All caps Applies all caps
Font, Size, and Color: Menu Option1. From the Home tab, in the Font group,
click FONT The Font dialog box appears.
2. In the Font text box, type the desired font nameORFrom the Font scroll list, select the desired font
3. In the Size text box, type the desired font sizeOR From the Size scroll list, select the desired size
4. From the Font color pull-down list, select the desired font color 5. In the Effects section, select any additional font effects
EXAMPLES: Small caps, Superscript, Subscript
6. Click OKStylesThe Style toolbar allows you to add preformatted styles to your text, create your own style, as well as clear any formatting.
Name Image Description
Style display Allows you to select text with similar formatting, and displays the style of the selected text
New style Allows you to create your own style and save it
Select all Selects all text with similar formatting to the text already selected
62

Microsoft Word 2007
Style List Allows you to choose from pre-made styles including Heading 1, Heading 2, Bulleted list, and No spacing. The Clear Formatting option removes any style that has been applied to the selected text. Each option on the Style List has pull-down menu with the following options: select all, modify style, delete, update to match selection.
Style List pull-down menu
From this menu you can choose between Available Styles and All Styles. This will affect what styles are present on the Style List.
Alignment and SpacingThe Alignment and Spacing toolbar allows you to designate the horizontal and vertical alignment, text orientation, paragraph spacing, and indentation.
Name Image Description
Horizontal alignment Sets the horizontal alignment for the text at left, center, right, or justified
Vertical alignment Sets the vertical alignment for the text at top, center, or bottom
Text orientation Sets the text direction to portrait, or landscape
Paragraph spacing pull-down menus
Sets the spacing before and after paragraphs
63

Microsoft Word 2007
Indentation text boxes Sets left, right, and first line paragraph indentations
Bullets and NumberingThe Bullets and Numbering toolbar allows you to add bullets or numbering, adjust indents, customize bullets and numbering, and designate what number or letter a list starts on.
Name Image Description
Bullet type Chooses between bullets or numbering
Indent adjustment Allows you to increase or decrease the depth of indentation
Style pull-down menu
Allows you to select different types of bullets or numberingEXAMPLE: Roman numerals.
Start pull-down menu
Designates the number or letter that the list will start from
Borders and ShadingThe Borders and Shading toolbar allows you to edit a border in terms of type, style, color, size, shading, and shading pattern.
Name Image Description
Border typeSelects type of border:
Border style Selects border style
Border color Select border color
Border weight Applies border size
Shading pattern pull-down menu
Selects the degree of shading applied
Pattern color pull-down menu
Selects the color of the pattern
64

Microsoft Word 2007
Fill color pull-down menuSelects the color of the shading
Borders and Shading Options: Dialog Box Option 1. Select the paragraph(s) to which you want to add shading and/or border(s)2. From the Ribbon, select the Home command tab
3. Within the Paragraph section, click BORDERS » select Borders and Shading... The Borders and Shading dialog box appears.
Adding Shading
1. Select the paragraph(s) to which you want to add shading2. Open the Borders and Shading dialog box3. Select the Shading tab 4. From the Fill pull-down list, select the desired fill effect, Click OK
Document MarginsThe Document Margins toolbar allows you to designate the left, right, top, bottom, header, and footer margins.
Name Image Description
Left margin text box Sets the left margin
Right margin text box Sets the right margin
Top margin text box Sets the top margin
Bottom margin text box Sets the bottom margin
65

Microsoft Word 2007
Header margin text box Sets the header margin
Footer margin text box Sets the footer margin
Document ThemeThe Document Theme toolbar allows you to choose a preset theme for your document, or create and save your own theme.
Working with IndentsWord offers three types of indents: normal indents, first line indents, and hanging indents. A normal indent inserts a specified amount of space between the page margin and all of the lines in a paragraph. A first line indent inserts space between the first line and the page margin so it looks like a tab was used. A hanging indent uses a normal indent for the first line and then moves subsequent lines farther to the right.Paragraph indents can be set using the Paragraph dialog box or the Ruler.
Working with Indents: Ruler Option Instead of using the Paragraph dialog box, you can make indent adjustments using the Ruler. Shown here is a graphic of the Ruler.
Type of Indent Appearance
of Ruler Appearance of Text
Normal Indent A Normal Indent looks like this
Hanging Indent A Hanging Indent looks like this
First Line Indent A First Line Indent looks like this
Setting Tabs66

Microsoft Word 2007 Tabs allow you to position text exactly where you would like it. To avoid problems with text alignment, use tabs rather than spaces. The default tab settings for Microsoft Word are every half-inch. Tab TypesTabs come in different types which are defined by the way text aligns with the tab. The following table explains the different tab types.
Tab Type Icon Purpose
Left (Normal)
With the Left tab, text will begin at the tab position and continue to the right of the tab.
Right With the Right tab, text will end at the tab and flow to the left.
Center The Center tab works similar to centering a line of text but instead of centering between margins, text is centered at the tab location.
Decimal The Decimal tab is used to align numbers and text with a period. This is useful for a group of numbers or a list of instructions.
Bar The Bar tab is used to add a vertical line at that position. This could be used when you want to set off some text.
Setting a tab does not automatically align your text. You still have to press [Tab] at the appropriate places.Working with Tabs from the RulerWorking with tabs using the Ruler option is a quick and easy way to set and adjust tabs. The Ruler options allow you to set, move, delete, or change tabs.Working with Tabs from the Ruler: Setting Tabs
1. Select the paragraph(s) that will receive new tab settings
2. Click the TAB TYPE icon until the desired tab type is selected
3. On the Ruler, click where you want the tabNOTE: Be sure to click below any numbers or dash marks.
67

Microsoft Word 2007Working with Tabs from the Tabs Dialog Box
Access the Tabs dialog box 1. In the Tab stop position text box, type the desired value (in inches) 2. Adjust the tab alignment and leader if necessary3. Click SET4. To set additional tabs, repeat steps 2-4 5. After all tabs have been set, click OK.
Numbering PagesWord lets you easily enter page numbers in your document by using the Insert command tab. Page numbers become part of the header or footer.
1. From the Insert command tab, within the Header & Footer group, click
PAGE NUMBER 2. Select Top of Page or Bottom of Page » select a pre-formatted page
number placement 3. OPTIONAL: To specifically format the look of your page numbers,
select Format Page NumbersThe Page Number Format dialog box appears.
a. From the Number format pull-down list, select the desired format b. To continue numbering, under the Page numbering section, select
Continue from previous section
c. To specify the starting page number, select Start at and type the number
d. Click OK
Inserting Page BreaksWord has two types of page breaks. The first is a natural page break. This occurs when the information has filled an entire page and needs to flow onto the next page. The second type is forced, often referred to as a hard page break. Forced
68

Microsoft Word 2007 page breaks occur only when the user inserts a hard page break. Additional pages can also be started using section breaks.
1. Place the insertion point where the new page is to be inserted 2. From the Insert command tab, within the Pages group, click PAGE
BREAKORPress [Ctrl] + [Enter]
Removing Page Breaks1. Select the page break 2. Press [Delete]
Printing Options for Specific Pages
The Print Dialog BoxTo use the options described in this document, you must access the Print dialog box.
1. From the OFFICE BUTTON, click PRINT. The Print dialog box appears.
Specifying the Pages to PrintThis section lists options for printing and the selection or specifications
69

Microsoft Word 2007that you must make in the Page range section of the Print dialog box to achieve the desired results.
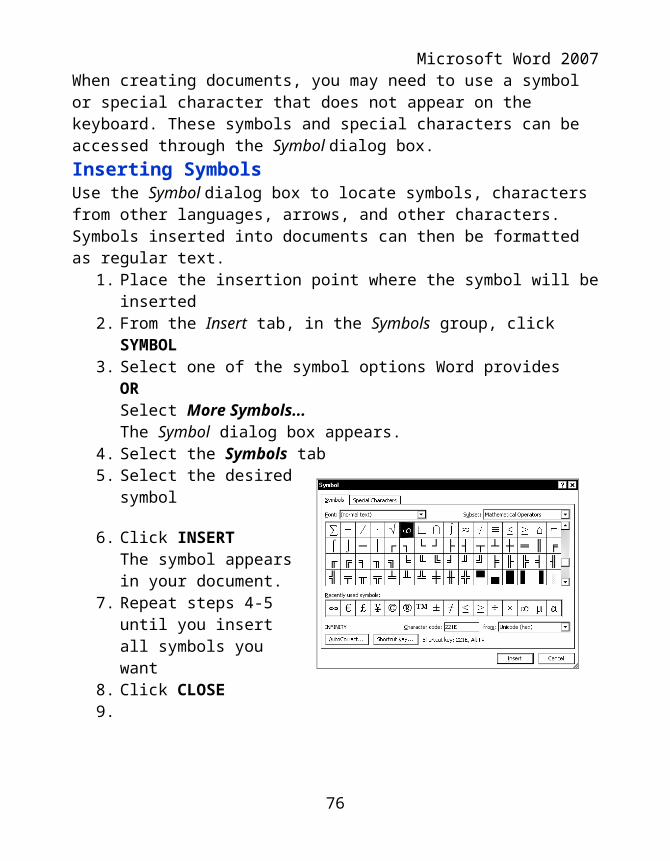
Inserting Symbols and Special CharactersWhen creating documents, you may need to use a symbol or special character that does not appear on the keyboard. These symbols and special characters can be accessed through the Symbol dialog box.Inserting SymbolsUse the Symbol dialog box to locate symbols, characters from other languages, arrows, and other characters. Symbols inserted into documents can then be formatted as regular text.
1. Place the insertion point where the symbol will be inserted 2. From the Insert tab, in the Symbols group, click SYMBOL3. Select one of the symbol options Word provides
ORSelect More Symbols... The Symbol dialog box appears.
4. Select the Symbols tab5. Select the desired symbol
6. Click INSERTThe symbol appears in your document.
7. Repeat steps 4-5 until you insert all symbols you want
8. Click CLOSE9.
Bullets and NumberingUsing Bulleted ListsWith Word, you can make bulleted lists, numbered lists, or outlines. You can create bulleted lists using the Home command tab or AutoFormatting. About Bulleted Lists
This is an example of a bulleted list When the text wraps, it does not wrap all the way to the
bullet, but only to where the first line of text began
70

Microsoft Word 2007
The BULLETS button in the Paragraph group acts like a toggle switch. Clicking once turns it on; clicking a second time turns it off
To change the bullet style or the indents, use the dialog box option
Using the Home Command Tab You can easily apply bullets to your lists from the Home command tab.Applying Bullets as You TypeWhen you are ready to add bulleted text to your document, use the following steps:
1. Place the insertion point where you want the bullets to begin
2. In the Home command tab, in the Paragraph group, click BULLETSNOTE: Word inserts the first bullet and moves the insertion point a quarter inch to the right, where you can begin typing text.
3. Type the desired textIf the text wraps, Word maintains the quarter-inch indent.
4. Press [Enter]Another bullet appears.
5. Repeat steps 3 and 4 as necessary
6. When finished typing the last line of bulleted text, press [Enter]The insertion point should appear on a blank bulleted line.
7. To end the bulleted list, in the Home command tab, in the
Paragraph group, click BULLETS The Bullets pull-down menu appears
1. Select the desired bullet option 2. If the desired option does not appear, select Define New Bullet...
The Define New Bullet dialog box appears.
71

Microsoft Word 20073. To select a symbol for your bullet,
a. Under Bullet character, click SYMBOL...The Symbol dialog box appears.
b. From the Font pull-down box, select the desired font
c. In the scroll box, select the desired bullet character
d. click OK4. To select a picture for your bullet,
a. Under Bullet character, click PICTURE...The Picture Bullet dialog box appears.
b. In the scroll box, select the desired bullet characterc. Click OK
Customizing Numbered ListsCustomizing your numbered list allows you to have a wider variety of styles for numbers. Word provides several different ways of customizing your numbers in order to create an effective numbered list. The following instructions assume that a numbered list has already been created.
1. Select the numbered list you want to customize
2. On the Home command tab, in the Paragraph group, click on the NUMBERING buttonThe Numbered List pull-down menu appears.
3. Select the desired numbering option4. If the desired option does not
appear, select Define New Number Format...The Define New Number Format dialog box appears.
72

Microsoft Word 2007 5. To change the number style, from the Number style pull-down list, select
the desired option6. To change the number format, in the Number format text box, make the
desired changesEXAMPLE: Instead of following numerals with a period (1.), you may want to follow them with a dash (1-).
7. To change the numbering alignment, from the Alignment pull-down list, select Left, Right or Centered
a. Click FONT... The Font dialog box appears. b. Under Font, Font style, Font color, or Size, select the appropriate
optionsc. Click OK
Your customized number appears in the Number format text box. 8. Click OK
Changing the Starting Number1. Select the numbered list2. On the Home command tab, in the
Paragraph group, click on the NUMBERING button
3. Select Set Numbering Value...4. In the Set value to scroll box, type or use
the nudge buttons to select the number to start the numbered list
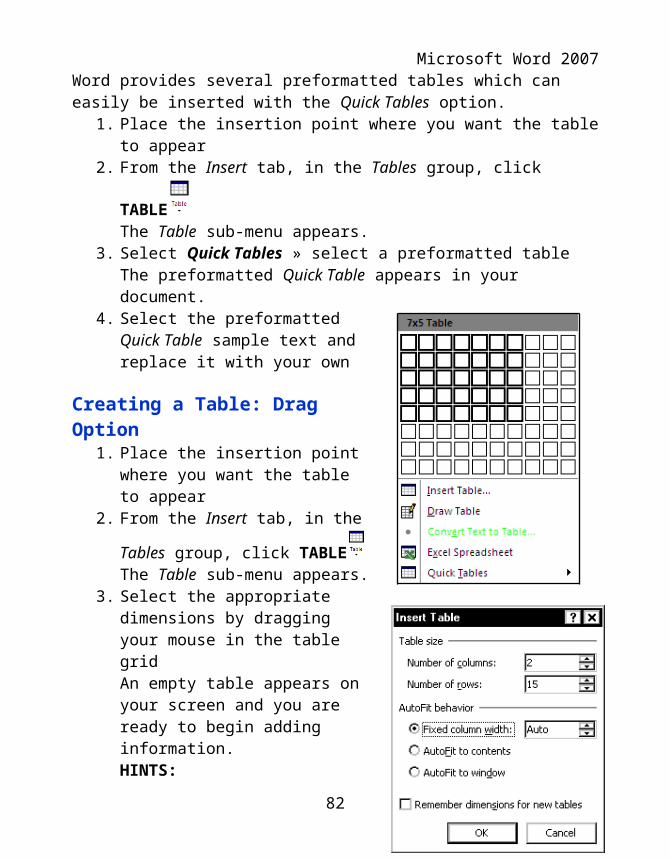
5. Click OK Table BasicsA table is a grid of cells with individual cells occurring at the intersection of corresponding rows and columns. Tables are highly customizable and are useful for a variety of tasks, from presenting numerical data to creating unique text layouts.
Left-aligned Centered Right-aligned
73

Microsoft Word 2007The following graphic is an example of a basic table with three columns and four rows. The highlighted cell is just one of the 12 cells in table.
Creating a TableCreating a Table: Quick Tables Word provides several preformatted tables which can easily be inserted with the Quick Tables option.
1. Place the insertion point where you want the table to appear
2. From the Insert tab, in the Tables group, click TABLEThe Table sub-menu appears.
3. Select Quick Tables » select a preformatted tableThe preformatted Quick Table appears in your document.
4. Select the preformatted Quick Table sample text and replace it with your own
Creating a Table: Drag Option1. Place the insertion point where you
want the table to appear2. From the Insert tab, in the Tables
group, click TABLEThe Table sub-menu appears.
3. Select the appropriate dimensions by dragging your mouse in the table gridAn empty table appears on your screen and you are ready to begin adding information.HINTS:To select columns, drag across; to select rows, drag down.Your table will appear with borders; to modify or remove the borders.
74

Microsoft Word 2007 Creating a Table: Insert Option
1. Place the insertion point where you want the table to appear
2. From the Insert tab, in the Tables group, click TABLE The Table sub-menu appears.
3. Select Insert Table...The Insert Table dialog box appears.
4. Under Table size, type a value or use the nudge buttons to specify the number of columns and rows
5. To specify column width, under AutoFit behavior, select Fixed column width and type a value or use the nudge buttons to specify the desired size To allow the table to expand as you type, under AutoFit behavior, select AutoFit to contentsTo allow the table to expand or shrink depending on the size of the window it is displayed in, under AutoFit behavior, select AutoFit to window
6. To create the table, click OKAn empty table appears on your screen, and you are ready to begin adding information.
Adding Information to the TableYou can add any text or objects to table cells that you could add to the document outside the table. To place information in separate cells, however, you will need to move your insertion point from cell to cell in the table. To move from one cell to another, use one of the following methods:
Press [Tab] Press an arrow key Using the mouse, click in the appropriate cell
Creating a Table from Existing TextThe Convert Text to Table feature allows you to create a table from existing text. You specify how columns are defined based on separators (i.e., recurring symbols or breaks) in your text. For example, if strings of text are separated by commas, each such string would be converted into a separate column. Paragraphs generally indicate rows.
75

Microsoft Word 2007EXAMPLE: Text strings separated by commas
EXAMPLE: Above text converted to a table
To create a table from existing text: 1. Select the text to be converted to a table
2. From the Insert tab, in the Tables group, click TABLE » select Convert Text to Table...The Convert Text to Table dialog box appears.
3. Under Separate text at, select where you want Word to divide your text into table cells .
4. Under Table size, review the number of columns5. Click OK. The selected text is converted to a table.
Table OptionsCreating Heading RowsTo identify the content of each column in a table, you may want to use the top row of your table as a heading row. To create a heading row, simply type the appropriate column heading in each cell across the top row and, if desired, use unique formatting to distinguish the text (e.g., bold or all caps). Repeating Rows on Subsequent PagesIf your table spans more than one page, you may want to repeat the heading row(s) on each page of the table. This makes columns easier to identify.
1. Select the heading row(s) that you want to repeat
2. From the Layout tab, in the Data group, click REPEAT
HEADER ROWS HINT: To see the repeating heading rows, you need to
76

Microsoft Word 2007 switch to the Print Layout view. You can do this from the View tab, in the Document Views group.
Changing Table PositionTables are automatically aligned to the left margin of the page. However, tables can also be positioned along the right margin, in the center, or set at a specific distance from the left margin. You can adjust table placement using the Table Properties dialog box or the indent option. Changing Table Position: Table Properties Option
1. Select the table by clicking the TABLE MOVE handle located near the table's upper left corner
2. From the Layout tab, in the Table group, click TABLE PROPERTIES
OR Right click inside the table » select Table Properties... The Table Properties dialog box appears.
3. Select the Table tab4. Under Alignment, select the desired alignment 5. OPTIONAL: If positioning the table a set distance from the left margin,
in the Indent from left text box, type or use the nudge buttons to set the desired value
6. If necessary, under Text wrapping, select a text wrap option7. Click OK
Merging and Splitting Table Cells When working with tables, you may occasionally want to merge two or more cells, or split one cell into multiple cells. Word makes this easy. Merging CellsCells can be merged either from the Quick Menu or the Ribbon.
Merging Cells: Quick Menu Option1. Select the cells you want to merge
77
Microsoft Word 20072. Right click within the selected cells » select Merge Cells
The selected cells are merged. Merging Cells: Ribbon Option
1. Select the cells you want to merge 2. From the Ribbon, select the Layout command tab
3. In the Merge group, click MERGE CELLSThe selected cells are merged.
Splitting CellsAs with merging, cells can be split from either the Quick Menu or the Ribbon. Splitting Cells: Quick Menu OptionHINTS: Word will attempt to evenly divide any text in the cell you are splitting based on the number of paragraphs.You can only split one cell at a time using the Quick Menu option.
1. Select the cell you want to split 2. Right click within the selected cell » select
Split Cells...The Split Cells dialog box appears.
3. In the Number of columns and/or Number of rows boxes, type or use the nudge buttons to select the desired number of rows and/or columns
4. Click OKThe selected cell is split according to your settings.
Splitting Cells: Ribbon Option1. Select the cell(s) you want to split
NOTE: Unlike the Quick Menu option, using the Ribbon option allows you to split multiple cells at once.
2. From the Ribbon, select the Layout command tab
3. In the Merge group, click SPLIT CELLS The Split Cells dialog box appears.
78

Microsoft Word 2007 Resizing Table ElementsAs you create your table, Word will assign it default dimensions which may not suit your purposes. This document explains how to modify and resize various table elements. Adding and Deleting Rows and ColumnsWhen working with tables, adding or deleting rows and columns is one of the most common tasks you will need to perform. Adding Rows To add a row at the bottom of a table:
1. Place your insertion point in the last cell (i.e., in the last row and last column)
2. Press [Tab]A new row is inserted at the bottom of your table.
To add a row within the table:1. Place your insertion point in a row directly above or below where you
want to add a row2. From the Ribbon, select the Layout command tab
3. In the Rows & Columns group, click either INSERT ABOVE or
INSERT BELOWA new row is inserted above or below your insertion point.
Deleting Rows1. Place your insertion point in the row to be deleted2. From the Ribbon, select the Layout command tab
3. In the Rows & Columns group, click DELETE » select Delete Rows
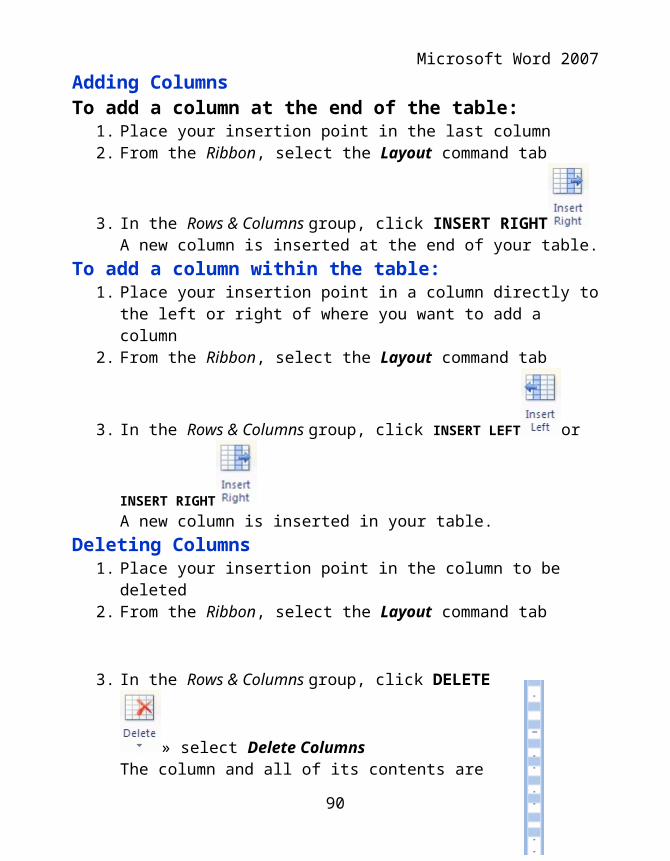
The row and all of its contents are deleted.Adding ColumnsTo add a column at the end of the table:
1. Place your insertion point in the last column2. From the Ribbon, select the Layout command tab
79

Microsoft Word 2007
3. In the Rows & Columns group, click INSERT RIGHTA new column is inserted at the end of your table.
To add a column within the table: 1. Place your insertion point in a column directly to the left or right of where
you want to add a column 2. From the Ribbon, select the Layout command tab
3. In the Rows & Columns group, click INSERT LEFT or INSERT
RIGHTA new column is inserted in your table.
Deleting Columns1. Place your insertion point in the column to be deleted2. From the Ribbon, select the Layout command tab
3. In the Rows & Columns group, click DELETE » select Delete ColumnsThe column and all of its contents are deleted.HINT: After deleting a column, you may want to resize your table to fit better within the document.
Adjusting Column and Row SizesWhen a table is first created, all columns have equal widths. If you need to adjust column widths, you can do so using the Ruler or the Ribbon. Adjusting Column and Row Sizes: Ruler OptionTo adjust column width:
1. Place your insertion point in the table you want to adjust2. Above the scroll bar, click VIEW RULER
OR
80

Microsoft Word 2007 From the View command tab, in the Show/Hide group, select RulerA horizontal ruler, with MOVE TABLE COLUMN handles for each column divider, appears under the Ribbon.
3. On the horizontal ruler, click and hold the MOVE TABLE COLUMN handle of the column you want to adjust
4. Drag the MOVE TABLE COLUMN handle to the appropriate position Release the mouse button
To adjust row height:1. Place the insertion point in the table you want to adjust3. Above the scroll bar, click VIEW RULER
ORFrom the View command tab, in the Show/Hide group, select RulerA vertical ruler, with MOVE TABLE ROW handles for each row divider, appears to the left of your document.Place the insertion point within the table
4. On the vertical ruler, click and hold the MOVE TABLE ROW handle at the bottom of the row you want to adjust ORWithin your table, click and hold the row divider at the bottom of the row you want to adjust
5. Drag the MOVE TABLE ROW handle or the table border to the desired location. Release the mouse button
Adjusting Column and Row Sizes: Ribbon OptionTo adjust column width:
1. Place the insertion point within the column you want to adjust2. From the Ribbon, select the Layout command tab 3. In the Cell Size group, type or use the Width nudge buttons to select the
appropriate column width4. OPTIONAL: To evenly distribute column width, in the Cell Size section,
click DISTRIBUTE COLUMNSTo adjust row height:
1. Place the insertion point within the row you want to adjust 2. From the Ribbon, select the Layout command tab 3. In the Cell Size group, type or use the Height nudge buttons to select the
appropriate row height
81

Microsoft Word 20074. OPTIONAL: To evenly distribute row width, in the Cell Size section,
click DISTRIBUTE ROWS Formatting TablesWord 2007 makes it easy to format your table using table styles. Table styles are predefined formatting options that can be quickly applied to any table, greatly enhancing its appearance and readability. You can add table styles to your table in just a few clicks. Applying Built-In Table Styles Word provides an extensive library of built-in table styles, which can quickly give your table a professional look by applying predefined combinations of borders, shadings, and fonts. You can control how these styles will appear in your table with the Table Style Options settings.
1. Place the insertion point inside your table2. From the Design tab, in the Table Styles group, click MORE
The Table Styles scroll box appears.3. From the Built-In section, select a style
NOTE: When you hover your mouse over a style, Word previews the style on your table.
4. To determine which aspects of the style are applied to your table, in the Table Style Options group, select or deselect the desired options
Using the Sort FeatureSorting tables is a feature designed for organizing lists that are contained within a table (e.g., experiment sites, number grades). You can sort a table by up to three columns, in either ascending or descending order. For example, you can sort a table of committee members initially by last name and then, within that sort, by first name. You can also sort numbers or dates.
82

Microsoft Word 2007 Sorting a TableSorting elements of your table is useful for organizing your data, whether that data consists of text, numbers, or dates.
1. Select the table or column(s) to be sorted
2. From the Layout tab, in the Data group, click SORTNOTE: The Layout tab appears only when your document contains a table and the table is selected. The Sort dialog box appears.
3. From the Sort by pull-down list, select the first column by which to sort.4. From the Type pull-down list, select Text, Number, or Date5. Select Ascending or Descending order6. OPTIONAL: To sort additional columns, from the Then by pull-down
lists, select the desired sorting criteria7. OPTIONAL: To make the sort case-sensitive,
a. Click OPTIONS... b. Under Sort options, select Case sensitive c. Click OK
8. Click OK Calculations within TablesFormula Examples. The following comprise the basic formula operators:
Addition + Multiplication *
Subtraction - Division /
The following table is an example of a completed travel budget, created using formulas in a Word table, that could be included in a proposal for attending a conference. Following the first table is a description of the formulas used to perform the calculations within the table (indicated by the gray shading).
83
Microsoft Word 2007
Formula forActual
Formula About the Formula
Hotel =69.95*3 Computes the total cost for the hotel stay by multiplying 69.95 by 3
Meals =50*4 Computes the total cost of the meals by multiplying 50 by 4
Total ConferenceBudget
=sum (above)
Calculates the total of the costs by adding the values above the formula (B2 through B6)
DepartmentContribution
=b6-b7 Calculates the department contribution by subtracting the grant request from the total conference budget
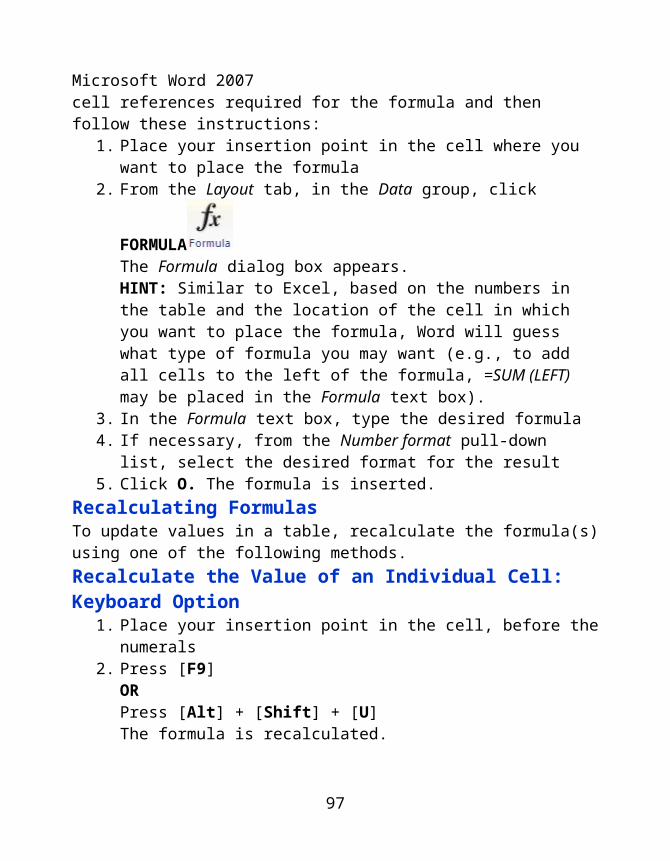
Inserting FormulasTo insert a formula, determine the values or cell references required for the formula and then follow these instructions:
1. Place your insertion point in the cell where you want to place the formula
2. From the Layout tab, in the Data group, click FORMULA
84

Microsoft Word 2007
The Formula dialog box appears.HINT: Similar to Excel, based on the numbers in the table and the location of the cell in which you want to place the formula, Word will guess what type of formula you may want (e.g., to add all cells to the left of the formula, =SUM (LEFT) may be placed in the Formula text box).
3. In the Formula text box, type the desired formula 4. If necessary, from the Number format pull-down list, select the desired
format for the result5. Click O. The formula is inserted.
Recalculating FormulasTo update values in a table, recalculate the formula(s) using one of the following methods.Recalculate the Value of an Individual Cell: Keyboard Option
1. Place your insertion point in the cell, before the numerals 2. Press [F9]
ORPress [Alt] + [Shift] + [U]The formula is recalculated.
Recalculate the Value of an Individual Cell: Mouse Option1. Place your insertion point in the cell, before the numerals 2. Right click the cell » select Update Field
The formula is recalculated. Recalculating the Values of the Entire Table
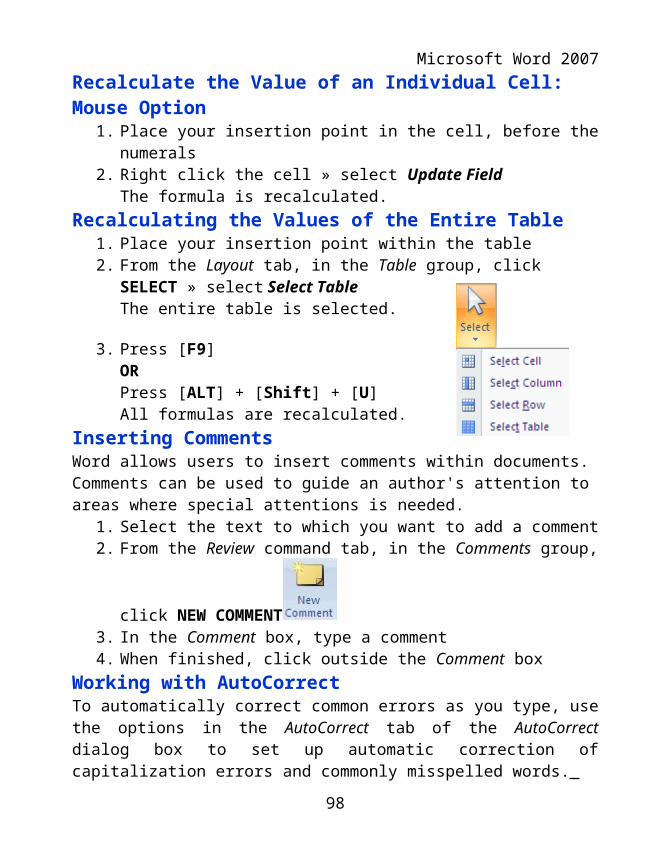
1. Place your insertion point within the table2. From the Layout tab, in the Table group, click SELECT » select Select
TableThe entire table is selected.
3. Press [F9]ORPress [ALT] + [Shift] + [U]All formulas are recalculated.
Inserting CommentsWord allows users to insert comments within documents. Comments can be used to guide an author's attention to areas where special attentions is needed.
85

Microsoft Word 20071. Select the text to which you want to add a comment2. From the Review command tab, in the Comments group, click NEW
COMMENT3. In the Comment box, type a comment4. When finished, click outside the Comment box
Working with AutoCorrectTo automatically correct common errors as you type, use the options in the AutoCorrect tab of the AutoCorrect dialog box to set up automatic correction of capitalization errors and commonly misspelled words. Accessing the AutoCorrect Dialog Box
1. From the File menu, click WORD OPTIONSThe Word Options dialog box opens.
2. In the Categories pane, select Proofing3. Under AutoCorrect options, click AUTOCORRECT OPTIONS...
The AutoCorrect dialog box appears.
86

Microsoft Word 2007
What You Type AutoCorrectionWhat Was Corrected
Ameria America spelling
ameria America capitalization only
What Is a Template?A template is a document with preset layout, formatting, and settings that acts as a basic structure for a document. Word offers templates as a guide for creating readable, uniform documents. The following list is an example of the prearranged formatting options in Word's Normal template:
Font face and sizeEXAMPLE: Calibri at 11 points
LanguageEXAMPLE: US English
AlignmentEXAMPLE: flush left
Line spacingEXAMPLE: 1.15
Other templates use modifications of the above features and may include different page layouts, text, graphics, macros, or styles. Types of TemplatesThere are two basic types of templates: built-in templates and custom templates. Built-in TemplatesBuilt-in templates provide a preset structure for several common types of documents, including:
Faxes Letters Memos Reports Resumes Web pages Documents without custom formatting
You can create documents using these basic templates as they are, or you can modify them to better suit your needs. Custom TemplatesIf you have formatting or a layout that you use frequently in your work but that is not offered in Word's collection of preset templates, you can easily create a new template using your own formatting and settings. The new template can then be
87

Microsoft Word 2007saved with Word's other templates and accessed each time you want to use the custom format.Choosing a Word Template
1. From the OFFICE BUTTON, select New... The New Document dialog box appears.
2. Under Templates, click INSTALLED TEMPLATES3. From the Installed Templates section, select the desired template 4. Click CREATE
The template is applied to your new document.Modifying the Original Template File
1. From the OFFICE BUTTON, select Open...The Open dialog box appears.
2. From the Files of type pull-down list, select All Word Templates (*.dotx; *.dotm; *.dot)
3. Using the Look in pull-down list, locate and select the template file you want to modifyNOTE: The location will vary depending on your computer setup. Generally, templates are located in C:\\Program Files\Microsoft Office\Templates\1033.
4. Click OPEN5. Modify the template by adding the desired text, graphics, and formatting
to be included in the modified template6. From the OFFICE BUTTON, select Save
Creating a New Template File Based on an Existing Template1. Open a Word template 2. Modify the template by adding the desired text, graphics, and formatting
to be included in the new template 3. From the OFFICE BUTTON, select Save As...
The Save As dialog box appears. 88

Microsoft Word 2007 4. From the Save a copy of the document pull-down list, select Word
Template5. In the File name text box, type the desired filename6. Using the Save in pull-down list, select the desired save location 7. Click SAVE
Creating a TemplateIf you have formatting that you use frequently in your work but is not offered in Word's collection of preset templates, you can easily create a new template using your own formatting and settings.
1. Create or open the file containing the formatting and settings to be included in the custom template
2. From the OFFICE BUTTON, select Save As... The Save As dialog box appears.
3. From the Save a copy of the document pull-down list, select Word Template
4. In the File name text box, type the desired filename5. Using the Save in pull-down list, select the desired save location 6. Click SAVE
Using Find and Replace Word's Find and Replace function will search your documents for specific text, which can then be highlighted, replaced with different text or formatting, or left as-is. This function provides many advanced options to help make your search as specific as necessary to find what you are looking for.
Finding TextTo find text, you must first access the Find and Replace dialog box.
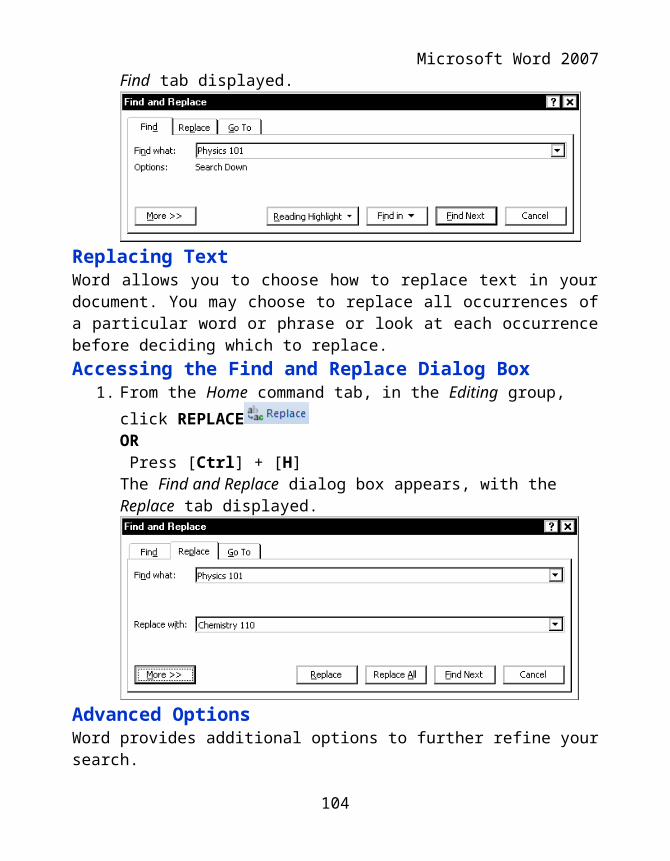
1. From the Home command tab, in the Editing group, click FIND Press [Ctrl] + [F] The Find and Replace dialog box appears, with the Find tab displayed.
Replacing Text
89

Microsoft Word 2007Word allows you to choose how to replace text in your document. You may choose to replace all occurrences of a particular word or phrase or look at each occurrence before deciding which to replace. Accessing the Find and Replace Dialog Box
1. From the Home command tab, in the Editing group, click REPLACE
OR Press [Ctrl] + [H] The Find and Replace dialog box appears, with the Replace tab displayed.
Advanced Options Word provides additional options to further refine your search.To access these options:
1. Access the Find and Replace dialog box 2. Click MORE >>
The Search Options section of the dialog box appears.
The following list defines the available search options:
90

Microsoft Word 2007 SearchSelects whether Word should search for instances of the text below the insertion point (down), above the insertion point (up), or throughout the entire document (all). The default choice is Down. Match caseReturns only those instances of the text that have the same case (i.e., uppercase or lowercase) as the text in the Find what text box. Find whole words onlyReturns matching whole words only. Word will not return words that contain your text within them. EXAMPLE: If you search for the, this option will ensure that words such as theater or theme are not included in the search results.Use wildcardsBy using certain characters, allows you to search for very specific words or phrases.EXAMPLE: Searching for b?ll will find words with any one character between b and ll, such as ball, bill, and bull.Sounds like (English)Searches for both exact matches of your text and other text that may sound or look similar to your text.EXAMPLE: Searching for color will find the words collar and caller. Find all word forms Searches for all related forms of your word.EXAMPLE: If you search for is, Word would also find the forms was and were.FormatAllows you to search for text with specific formatting, as well as replace text with specific formatting. EXAMPLE: If you search for occurrences of the word Sincerely that were in Times New Roman font, you could replace them with the words Yours Truly in Calibri font.SpecialAllows you to search for special characters (e.g., dashes or paragraphs), as well as replace them in your document.No FormattingThis will clear any formatting requirements (e.g., searching for text in a specific font) that were set in previous searches.Match Prefix Searches for words beginning with your entry.
91
Microsoft Word 2007Match SuffixSearches for words ending with your entry.Ignore punctuation characters Returns text that is similar to your text, but contains punctuation within it.EXAMPLE: If you search for recreated, your search results would also include instances of re-created.Ignore white-space charactersFinds text that is similar to your text, but may contain spaces in different places.EXAMPLE: If you search for Annamarie, your search results would also include instances of Anna Marie.Using Clip ArtYou can use clip art to add images to your document, making it more dynamic, colorful, and creative. Common Command Tab ButtonsClip art added to your Office document can be modified from the Picture Tools command tab. The following is a list of common command tab buttons and their functions.
Button Name Function
Insert Picture Inserts a picture from a file
Clip Art Opens the Clip Art task pane, which provides offline and online searching for clip art to add to your document.
Brightness Makes all color shades proportionately darker or lighter
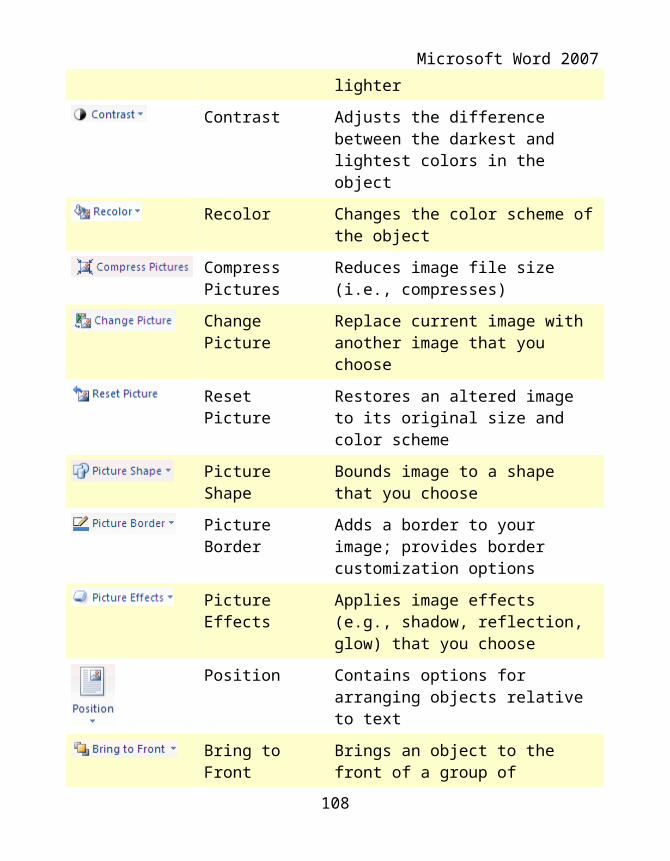
Contrast Adjusts the difference between the darkest and lightest colors in the object
Recolor Changes the color scheme of the object
Compress Pictures Reduces image file size (i.e., compresses)
Change Picture Replace current image with another image that you choose
92

Microsoft Word 2007
Reset Picture Restores an altered image to its original size and color scheme
Picture Shape Bounds image to a shape that you choose
Picture Border Adds a border to your image; provides border customization options
Picture Effects Applies image effects (e.g., shadow, reflection, glow) that you choose
Position Contains options for arranging objects relative to text
Bring to Front Brings an object to the front of a group of objects; where the objects overlap, this object will be the one seen
Send to Back Sends an object to the back of a group of objects; where the objects overlap, this object will be hidden by all other objects
Text Wrapping Provides options for alignment of text around objects
Selection Pane Opens a pane that lets you choose (i.e., select) from various images in your document
Align Provides options for positioning an object relative to other objects and/or relative to the page. Also provides options for showing or hiding grid lines
Group Lets you group several selected images or objects into one image or object
Rotate Contains options for rotating an object or flipping it along an axis
Crop Allows you to cut out unneeded areas of an object
93

Microsoft Word 2007
Shape Fill Changes the color within an AutoShape
Text Box Creates a bounded box for text
Auto Thumbnail Creates a thumbnail of the selected object
Inserting Clip ArtInserting free clip art in Office 2007 is easy and can add creativity to your document. Inserting Clip Art: Search Option
1. From the Insert tab, in the Illustrations group,
click CLIP ART
The Clip Art task pane appears..
2. In the Search for text box, type keywords related to the clip art you desire
3. Click GOIn the Results section, a list of images appears.
4. Click the image you want to insertThe clip art is now inserted into the document.The Picture Tools tab is selected and displays options for modifying the image.
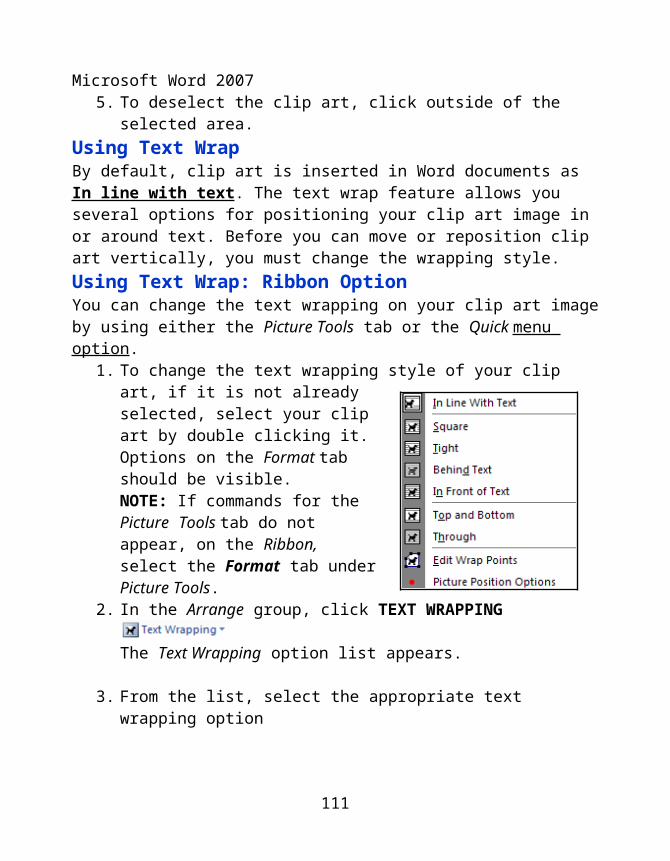
5. To deselect the clip art, click outside of the selected area. Using Text WrapBy default, clip art is inserted in Word documents as In line with text. The text wrap feature allows you several options for positioning your clip art image in or around text. Before you can move or reposition clip art vertically, you must change the wrapping style. Using Text Wrap: Ribbon OptionYou can change the text wrapping on your clip art image by using either the Picture Tools tab or the Quick menu option.
94

Microsoft Word 2007 1. To change the text wrapping style of your clip art, if it is not already
selected, select your clip art by double clicking it. Options on the Format tab should be visible. NOTE: If commands for the Picture Tools tab do not appear, on the Ribbon, select the Format tab under Picture Tools.
2. In the Arrange group, click TEXT
WRAPPINGThe Text Wrapping option list appears.
3. From the list, select the appropriate text wrapping option In line with textthe image is placed on the same line as the surrounding textSquaretext is wrapped squarely around the imageTighttext is wrapped closely and completely around the image Behind texttext is visible in front of or on top of the image In front of texttext is blocked from view but image is completely visible Top and bottomthe image is placed between lines of textThroughtext is wrapped closely around the outline of the image Edit wrap pointsyou can select where you want the text to wrap around the image
Using Text Wrap: Quick Menu OptionNOTE: The Quick Menu option does not offer the Edit wrap points option or the Top and Bottom or Through wrapping styles or that are available in the Ribbon option for text wrapping.
1. Right click on the clip art » select Text Wrapping
95

Microsoft Word 2007The Text Wrapping options list appears.
2. From the list, select the appropriate text wrapping option3. OPTIONAL: To deselect the clip art, click somewhere else in the
documentUsing WordArt in Word You can use WordArt to make display text (e.g., the heading of your document) more eye-catching. WordArt can be resized, moved, and edited to fit your needs. Creating WordArtWordArt can be added to your document using a button on the Insert command tab.
1. From the Insert command tab, in the Text group, click WORDART
The WordArt Gallery dialog box appears.
2. From the WordArt Gallery, select the desired styleThe Edit WordArt Text dialog box appears.
3. In the Text text box, type your text4. To format your text, from the Font or Size pull-down lists, make the
desired selections5. To change the font style, click BOLD or ITALIC
96

Microsoft Word 2007 6. Click OK
Your WordArt is placed in the document and the Format command tab appears.
The following table identifies buttons commonly used for working with WordArt.
Button Button Name Function(s)
Edit Text Change the character formatting (font, size, bold, italics) or text of WordArt.
Spacing Change the spacing between characters (tracking or kerning) of WordArt.
Even Height Make lowercase and uppercase letters the same height.
Vertical Text Shift a horizontal word to a vertical orientation and back again.
Alignment Choose from the following options: Left Align, Center, Right Align, Word Justify, Letter Justify, or Stretch Justify.
Shape Fill Formats the inside color of your WordArt text.
Change Shape Mold your WordArt text into a shape.
Shape Outline Change the color or pattern of the outline of your WordArt text.
Text Wrapping
Make text wrap around a WordArt object.
Adding a Shadow to WordArtDepending on the font and the WordArt shape you have selected, a shadow effect can enhance your WordArt image.
1. Select the WordArt image
97

Microsoft Word 20072. From the Format command tab, in the Shadow Effects group, click
SHADOW EFFECTS » select the desired effect
The effect is applied to the selected WordArt.
Adding a 3-D Effect to WordArtA three-dimensional effect can give depth to your WordArt image.
1. Select the WordArt image2. From the Format command tab, in the
3-D Effects group, click 3-D EFFECTS » select the desired effect
Working with ColumnsColumns can help to separate sections of your document and make them look more inviting to read. Columns are a good way to separate sections of your document on one page. Creating ColumnsYou can create columns that span a single page or the entire document. Using the button option to create columns is quick and easy.Creating Columns: Button Option Columns are easy to apply using the presets found on the COLUMNS button.
1. Place the insertion point in the document that you want formatted into columns ORSelect the text to be formatted into columns
2. From the Page Layout command tab, within the Page Setup section, click COLUMNS
3. Select the desired number and style of columns Creating Columns: Dialog Box Option To create columns on selected text only, select the More Columns... option within the Columns submenu, which brings you to the Columns dialog box. The Columns dialog box gives you more options for modifying columns. With the
98
Microsoft Word 2007 dialog box, you can adjust the width and spacing of columns. Also, the dialog box allows you to create up to 45 columns depending on the size of your paper; however, standard paper allows only 12 columns.
1. Place the insertion point in the document that you want formatted into columns ORSelect the text to be formatted into columns
2. From the Page Layout command tab, within the Page Setup section, click Columns » select More Columns ...The Columns dialog box appears.
3. To select the number of columns, in the Number of columns text box, use the nudge buttons or type the desired number of columns ORWithin the Presets section, select the desired optionNOTE: Options One, Two, and Three will give you columns with equal width. Options Left and Right will give you two columns with unequal width.
4. From the Apply to pull-down list, select Selected Text NOTE: Your choices will depend upon whether you selected the text or placed your insertion point in the text to create columns.. Click OKThe columns are applied to the selected text only.
Inserting Column BreaksInsert a column break when you want to force the end of a column and the beginning of another.
1. Place the insertion point at the point in the text where you want the column to break
From the Page Layout command tab, within the Page Setup section, select Breaks » select ColumnBalancing Column EndingsWhen using columns, often the text in the last column is of uneven length with the previous column. Inserting a continuous column break will balance the column lengths, giving your document a finished, professional look.
1. WARNING: These instructions may have inconsistent results if you have any of the following
Creating Headers and FootersYou can create headers and footers in your Word document so that information such as the author's name, document title, or page numbers will appear in the top and/or bottom margin of your document. You can create a header and footer that
99
Microsoft Word 2007appears the same on every page, or you can customize the pages with different headers and footers. Inserting a Header or a Footer By default, headers and footers appear on every page of your document. Word gives you have several presets to select from; you can also begin with a blank header or footer.
1. From the Insert command tab, in the Header & Footer section, click
HEADER or FOOTERThe scroll list of preset headers or footers appears.
2. Select the desired header or footer style HINT: To start with a blank Header/Footer, select Edit Header or Edit Footer
The Header & Footer Tools Design Tab The Header & Footer Tools Design command tab appears on the Ribbon only when an existing header or footer is active. This special command tab providing several unique header and footer formatting options.
1. To access the Design tab of the Headers & Footers Tools, double-click a header or footerA new contextual command tab appears next to the other command tabs in the Ribbon and gives you access to the header and footer functions.
Header & Footer Group The Header & Footer group lets you to format the appearance of the header or footer and/or format page numbers.Insert GroupThe buttons in the Insert group let you add graphics and preformatted text elements (e.g., time and date, document properties) to your headers and footers. Navigation Group The Navigation group buttons let you navigate between headers and footers and from the header in one section to the header in another section.Options Group This group provides the options of creating a
100

Microsoft Word 2007 different header on the first page. You can also select to have a different header/footer on the odd & even pages, this is useful if you need to adjust the alignment of the headers/footers for facing pages. If Show Document Text is deselected (i.e., there is no checkmark), then your document's text will not show--only your header/footer will show.Position Group This group allows you to adjust where your header appears on the page(s). The default setting is 0.5 inches from the top and bottom of the page. Close Header and Footer Group From here you can exit the header/footer text box and continue editing your
document. Creating a Different First Page Header and FooterIf you want the header/footer of your document to be different on your first page, you first need to create a header or footer. You can customize headers and footers in the Header & Footer Tools Design tab, which appears only when you select a header or footer.
1. On the first page of the document, double click within the header or footer
The Header & Footer Tools Design tab appears.2. From the Header & Footer Tools Design command tab, in the Options
group, select Different First Page The label on the first page header text box changes from Header to First Page Header.
3. In the First Page Header text box, insert the desired information
4. To edit the First Page Footer, click GO TO FOOTER5. In the First Page Footer text box, insert the desired information 6. To create subsequent headers and footers, in the Navigation section, click
NEXT7. In the Footer text box, insert the desired information
101
Microsoft Word 2007
8. Click GO TO HEADER9. In the Header text box, insert the desired information10. To return to your document, click CLOSE HEADER AND FOOTER
Creating Odd and Even Page Headers and FootersYou can create different odd and even page headers and footers, which display different information on the odd and even pages of your document.
1. On the first page of the document, double click within the header or footer
The Header & Footer Tools Design tab appears.2. From the Headers & Footers Tools Design tab, in the Options section,
select Different Odd & Even Pages 3. In the Odd Page Header text box, insert the desired information 4. Click GO TO FOOTER5. In the Odd Page Footer text box, insert the desired information 6. To create the header and footer for even pages, in the Navigation section,
click NEXT7. In the Even Page Footer text box, insert the desired information 8. Click GO TO HEADER9. In the Even Page Header text box, insert the desired information 10. To return to your document, click CLOSE HEADER AND FOOTER
Working with ImagesAdding visual components to your documents can enhance your message. Images from clip art collections, WordArt, the Internet, or scanned images can be added to your Word documents.This document provides instruction on how to work with images in your Word documents:Adding ImagesAdding images from a variety of sources, including scanned images, images saved from the Internet, and clip art, is easy in Word 2007.
1. Click the location where you want the image to appear
102

Microsoft Word 2007 2. From the Insert command tab, in the Illustrations section, click Picture
The Insert Picture dialog box appears. 3. Using the Look in pull-down list, locate and select the desired image 4. Click INSERT
The image appears in your document.Positioning ImagesOnce you have inserted an image into your document, you can easily position or resize it as needed.
1. Click and hold the center of the imageThe cursor turns into a four-headed arrow when you are able to move the image.
2. Drag the image to the desired location3. Release the mouse button
The image is now in the desired location.Picture Tools Command Tab OptionsOnce you have inserted a picture into your document, many options can enhance the look of your image. The Picture Tools command tab lets you change the appearance of your image by providing options such as line style, transparency, contrast, changing color, and cropping.To access the Pictures Tools command tab
1. Select an imageUnder the Picture Tools tab, the Format command tab appears.
Adjust Group Allows you to edit the picture (e.g., adjust brightness, contrast, color), and also undo any changes you make.
Picture Styles Group From here you can apply preset or custom picture styles (e.g., image shape,
103

Microsoft Word 2007border, effects).
Arrange Group Lets you to reposition, change text wrapping, arrange layers, and rotate objects.
Size Group This is where you can change image size with the Crop tool or by specifying dimensions in the Height and Width text boxes.NOTE: Changes made in the text boxes are proportional (i.e., if you change image height, its width changes proportionally).
Adding Line Numbers
1. Place the insertion point within the document to which you want to add line numberingHINT: To add numbering to only one section of a document, place the insertion point within the desired section.
2. From the Page Layout command tab, in the Page Setup group, click PAGE SETUP The Page Setup dialog box appears. The Document dialog box appears.
3. Select the Layout tab4. Click LINE NUMBERS...
The Line Numbers dialog box appears.
5. Select Add line numbering6. To start line numbering at a number other than one, in the Start at text
box, use the nudge buttons to select or type a starting number
104

Microsoft Word 2007 7. To adjust the amount of spacing between line numbers and text, in the
From text text box, use the nudge buttons to select or type (in inches) a spacing value
8. To number every nth line, in the Count by text box, use the nudge buttons to select or type a number by which to countEXAMPLE: To number every fifth line, in the Count by text box, type 5
9. To restart numbering on each page, select Restart each page To restart numbering in each section, select Restart each section To use continuous numbering, select Continuous
10. Click OK. The lines numbers are added. Mail Merge WizardTo start the Mail Merge in the new Word 2007, click on the Mailings tab. The Ribbon, the groups of commands you see on each tab, replaces the toolbars and menus. Commands are organized in groups related to activities such as you see below in the Create, Start Mail Merge, and Write & Insert Fields groups on the Mailings tab.
When you click on the arrow beside Start Mail Merge, a drop-down list appears as shown below. Select the last option, “Step by Step Mail Merge Wizard.”
105
Microsoft Word 2007
This brings up the task pane as shown below. Select Letters (or whatever type you want) as the type of document and then click on the “Next: Starting document” link at the bottom of the task pane to go to the next step to select your starting document.
Selecting a TemplateYou have options to use the current document you have open, to select a template, or to browse to an existing document not open. For this practice, select “Start from a template.” This brings up a link you click on to “Select template.”
This opens the “Select Template” dialog box shown. Select the “Letters” tab and choose “Oriel Merge Letter.” Click on OK. This takes you to Step 3 in the Mail Merge process in which you “Select recipients.” Selecting RecipientsSelect “Use an existing list” and click on the “Browse” link. Locate and open the file containing your data source. This opens the following dialog box in which you select the table (the named range defined within Excel) containing the mail merge recipients info you want to pull
106

Microsoft Word 2007 into the merge fields in your document. Select “seminar” or “training” or whatever you named the range in your spreadsheet containing the names and addresses you want to use for the mail merge ("attendees" is the defined range selected as shown below).
Make sure to check the box indicating that the “First row of data contains column headers” so that the field labels (Last Name, First Name, Address1, etc.) on your spreadsheet won’t be mistaken for data. This opens the Mail Merge Recipients dialog box shown below. Here you can select which recipients to include or deselect by unchecking the check box by the name. You can sort and filter the list using the drop-down list located on each field name indicated by the triangular black arrow. Note there are also links to Sort and Filter or Find Duplicates and recipients in the “Refine recipient list” section.
107

Microsoft Word 2007
Click on the link “Next: Write your letter” to go on to the next step to edit the mail merge template letter content. Inserting Merge FieldsNotice that the Address Block and Greeting Line fields are already inserted into this template letter. If you weren’t using a preformatted mail merge letter, you would just simply click on the links on the right to insert the Address block, Greeting line, or more items (more merge fields). You also have these same options on the Mailings toolbar at the top—you don’t have to use the wizard each time you do a mail merge. Pick the date and replace the letter content with your own and then go on to the next step to preview your letters by clicking on the link at the bottom of the task pane. Matching FieldsWhen you click on the Address block link, the following dialog box appears in
108

Microsoft Word 2007 which you can choose the format of the address. Also, you can click on the Match Fields button to match the missing address field (the Match Fields button is also on the Mailings tab in the "Write and Insert Fields" grouping).
Clicking on the Match Fields button brings up the following dialog box. Use the Address 1 drop-down list to select the Street field name from the Excel spreadsheet. Previewing ResultsYou have buttons on both the Preview Results group on the Mailings ribbon as well as the task pane to look at different recipient info before going on to the next step to complete the merge.
Completing the MergeWhen you click on the link, “Next: Complete the merge,” the following appears:
Click on the link “Edit individual letters” which you can see from the screen tip is the link to “Merge to new document.” This is also a button on the "Finish & Merge" dropdown list on the Mailings Ribbon.
109
Microsoft Word 2007
The Print link on the Task Pane or Print Documents on the Ribbon dropdown list allows you to merge directly to the printer. When you click on the link to edit the letters, the following dialog box appears:
You can choose whether to merge all or selected records. Click OK and then a new merged document entitled Letters1 is created. It contains the individual letters for each recipient. If you look at the status bar, you will see that it indicates multiple letters.
110

Microsoft Word 2007 The Manager,
Human Resources,
Milkpak Limited,
308-309 Upper Mall Lahore.
Subject: APPLICATION FOR THE POST OF COMPUTER OPERATOR/ OFFICE ASSISTANT
Respected Sir,
In response to your advertisement in daily “The Jang” dated 27th February 2000, I
enclose my resume as a first step in exploring the possibilities of employment
with your organization. I have completed my Computer Operator/Office Assistant
Course from Vocational Training Institute Bahawal Nagar. I am also ready to
work as a trainee. I hope you will consider my case favorably. If selected I, assure
you that I shall do my best to give you full satisfaction with my work and
behavior.
Thank You,
Yours truly,
(Applicant Name)Designation
111

Vocational Training Institute,Walton Lahore
College/ Institute/ Department/ Centre
WEEKLY SCHEME OF WORK(Check-Sheet)
Program: ________________ Course Title: ____________
Institute: ________________ Course Code: ___________
Weekly Activities1st Week 2nd
Week
3rd
Week
4th
Week
5th
Week
Lecture
Tutorials
Group Discussion
Seminar
Workshop
Guest Speakers
Quiz Test
Assignment
Library Day
Lab/ Practical Work
Field Work/ Industry Visit
Project
112
Microsoft Word 2007
Activities: No 1
electing the close menu item in the file menu closes the topmost document. If some changes were made to the document then a prompt asking you to save the document appears. If some changes were made to the document
then a prompt asking you to save the document appears. If some changes were made to the document then a prompt asking you to save the document appears. If some changes were made to the document then a prompt asking you to save the document appears. If some changes were made to the document then a prompt asking you to save the document appears.
S
RESULT SHEET
S.NO Name Eng Urdu Math Obtain Total
1 Asif 45 78 57 180 300
2 Shan 47 58 58 163 300
3 Shah 48 68 69 185 300
4 Khan 25 98 14 137 300
5 Noor 14 45 25 84 300
Vocational Training Institute Walton
Act
ivit
y N
o.
2
113

Computer Operator Office Assistant Chine Attaches Importance to Information and Service Industry
The Proposal of the Communist Party of China (CPC) Central
Committee for Formulating the 10th Five-Year Plan (2001-2005)
for national Economic and Social Development, which was
released today attached great important to speeding up the
development of the information industry and service industry.
The Proposal, approved at the 5th Plenary Session of the 15th
CPC-Central Committee last week, noted that the promotion
of application of information technology is the trend in
current world economic and social development and the key
link to upgrading China’s industrial structure and realizing
industrialization and modernization.
The proposal listed the construction of
information infrastructure as a preferential
task for national economic and social
development and urged the promotion of
structural innovation so as to ensure that the
information industry strides forward.
Information technology should be used extensively in all
circles of society and the use of computers and the
Internet should be wide-spread, said the proposal.
114

Microsoft Word 2007 SCHOOL/COLLEGES IN DIFFERENT CITIES OF PAKISTAN
City Name
Karachi Lahore Faisalabad Rawalpindi Multan Urban Rural Urban Rural Urban Rural Urban Rural Urban Rural
Colleges 112
345
215 89 245 38 244 37 233 18 331
522Schools 346 464 345 356 352 234 234 244
FIRST CLASS PLAYERS IN DIFFERENT GAMS
CROPS POSITION SOUTH ASIAN COUNTRIES
Category Pakistan India Sri Lanka
Bengla Desh
Nepal Maldives Bhutan
Wheat 363633 3453453 3456 3455 354 333 344
Rice 3534533 3534534 4353 3455553 345 3444 321
Sugarcane 34535 35345 34534 345345 345 344 324
Cotton 35345 3454 3534 35345 345 344 33Corn 34534 3444 345 3555 345 344 33
Lahore Stock Index Limited Lahore
Company Name Year Year of Incorporation
Paid Capital (Rs. Millions)
Dawood Cotton Mills 1963 77.567Burewala Textile Mills 1960 166.570Dawood Hercules Chemicals 1985 150.000Lawrencepur Woolen Mills 1988 202.870Orient Insurance Company 1993 186.000Dawood Fibre Limited 1996 185.000
VOCATIONAL TRAINING INSTITUTE
Game Cricket Hockey Football TennisOne-day
Test
Pakistan India
344 344 343234
233 222443
115

Walton, Lahore
Result Sheet Comprehensive Computer Skills
Course # 30 Instructor Qaisar Zahoor
Duration 14 monthsLab
AssistantMudesser Mushtaq
Trainee
Name
Roll #
Obtained MarksGrad
eWindo
w30
Word30
Excel
30
P.Point20
Inpage
20
Access
20
Total
150
INSTRUCTOR PRINCIPAL
116

Microsoft Word 2007 SYMBOLS: There is an U-limited range of symbols available in different types & styles. Select on of them and click on insert button or double click on that symbol. It will appear at that place of document where cursor is blinking.
Different Types of Symbols
♠ © ®¼ ½ ¾ (
AUTO TEXT:
The Auto Text is used for inserting different types of words in
your documents automatically. For this function you should must insert that word or words once and they are permanently stored in the memory of computer.
USE OF PICTUREInsert Clip Art
OPens the Clip Gallery where you can select the clip art images you want to insert in your file or update your clip art collection. In PowerPoint, this
command is available only in slide and notes views.
117

The art of formatting a
document is more than
just knowing definition,
but knowing the
definition is definitely a
starting point. A
typeface is a complete
set of characters with
the same general
appearance and can be
serif (cross lines at the
end of the main strokes
of each letter) or scan
serif (without the cross
lines). A type size is a
vertical measurement,
made from the top of
the tallest letter in the
character set of the
bottom of the lowest
letter in the character
set. Type style refers to
variations in the
typeface, such as
boldface and italics.
Several typefaces are
shipped with windows
including Times New
Roman, a serif typeface
and Arial, a scan serif
typeface, Times new
roman should be used
for large amounts of
text whereas of text
whereas
Arial is best used for
titles and subtitles. It is
the best not to use too
many different
typefaces in the same
document, but rather to
use only one or two and
then make the document
interesting by varying
their size and style.
Times New Roman is a
best font for titles and
subtitles we can
normally use this font
style.
The art of formatting
a document is more
than just knowing
definitions, but
knowing the
definitions is
definitely a starting
point. A typeface is a
complete set of
characters with the
same general
appearance,
and can be serif (cross
lines at the end of the
main strokes of each
letter) or scan serif
(without the cross
lines). A type size is a
vertical measurement,
made from the top of
the tallest letter in the
character set of the
bottom of the lowest
letter in the character
set. Type style refers
to variations in the
typeface, such as
boldface and italics.
118

Microsoft Word 2007
ALI JEES Group of IndustriesPlot # 90/D Main Bazar Rachna Town Near Rachna Public School Staina Road Fsd.Ph. # 0300-7999990
Notice is hereby given that in pursuance of section 178 (3) of the companies
ordinance 1984, the following persons have filed notice their intention to
offer themselves for election as director of the company at annual General
Meeting to be held on Saturday the January 27, 2007 at 4:00 P.M at Dr.
Abdul Qadeer Khan auditorium, Gate No.1, Abdullah Haron Muslim
Gymkhana,. Aiwan-e-Saddar Roiad, Karachi.
Mr. Ghulam Mohammad A. Fecto Mr. Syed Ali Imran Kazmi Mr. Moin A. Haroon
ince the number of persons who have offered themselves for election as director are not more than the number of elected director fixed by the board under section 178 (1) of the companies Ordinance 1984, the
above persons shall deem to the elected in the forthcoming Annual General Meting for the teem of three yars commencing for January 01, 2007.
SAccording to Liaqat Ali Khan, our freedom makes many demands on us. He says,” liberty does not descent upon a people, a people must rise themselves to it. It is a fruit that must be earned before it can be enjoyed”. Our first duty is to ourselves it mean that we should maintain our freedom.
We should work for it. Our
second duty is to advance our country.
Freedom does not mean freedom from
forging command. If we fail in this we
feel shame
full the fare name of our
country. But the maintenance of
freedom requires constant attention.
We should work for it. Our second
duty is to advance our country.
Freedom does not mean freedom from
forging command
119

Vocational Training Institute, Walton, Lahore
College/ Institute/ Department/ Centre
Lecture Specification Form
Course code: Course Code
Lecture No. Lecture Title
1. Lecture Objectives:a.b.c.
2. Lecture Contents (Topics to be covered)No. Title Text Book Reference Handouts
1. . .
2. . .
3. . .
3. Pedagogy or Teaching-Learning Strategiesa.b.c.
4. Instructional Aids/Resources Persona.b.c.
5. Reference Material for Lecture:a.b.c.
6. Material for Further Readinga.b.c.