woodstore - meredith corporationimages.meredith.com/wood/pdf/dp-00210.pdf · of the acrobat reader...
TRANSCRIPT
Mission Furniture
Thank You!Thank you for ordering a WOOD® magazine download. We hope you enjoy being part of our online experience and that you have fun expanding your woodworking skills.
Please remember that this copyrighted material is for your use only. It is unlawful to share this file with someone else or to reprint it in any form.
Bill KrierEditor in Chief, WOOD magazine
Adobe Acrobat Reader Troubleshooting Guide
If you can read this page, your Acrobat Reader program is working correctly! But you may still have problems or specific issues, such as printing and saving your downloadable file.
My printer won’t print the text correctlyAlmost all printing problems are due to not enough free system resources memory. The files are very memory intensive because they include graphics, text, and photos. Close all other programs/applications and print directly out of the Acrobat Reader program, not your Web browser.
Patterns are not printing full-sizeMake sure your printer is set to print at 100 percent and that “print to fit” is not checked. These settings are selected in the printer setup or printer options.
I can’t save my file now that it’s downloadedYou must save the plan when you download the file. Download the file again, except this time try right-clicking on the red download button. A menu window will open. Select “Save target as” or “Save link as” to save the file to your hard drive. Once saved, you can open it up with Adobe Acrobat Reader.
For more details on using Adobe Acrobat Reader please visit our online help section at: http://www.woodstore.net/clicherforde.html
WOOD Store Customer Favorites
WOODStore.net Browse more than 1000 plans, projects, books, techniques, & more
Visit the WOOD Store at:
WOODStore.net
Shop Tools & Accessories
Indoor Furniture
Outdoor Furniture

http://www.woodonline.com
DOWNLOADABLE ONLINE WOODWORKING PLANS
®
Page 1 of 12DP-00210 ©Copyright Meredith Corporation 2002
A GEM OF A GIFT!
Any woman appreciates having a special place to keep her small jewelry pieces neatly organized—especially when the unit looks as
exquisite as its contents. Routed drawer pulls and handles of bird’s-eye maple help put this walnut jewelry case in a class by itself.
Jewelry Box
The display carousel on the left side of the jewelry case, above, keeps hanging neck-laces within easy reach and tangle-free.
Page 2 of 12
C
A
A
A
A
A
A
A
A
B
BB
B
B
B
B
B
B
D
E
F
G
H
I
J
R
S
H
G H
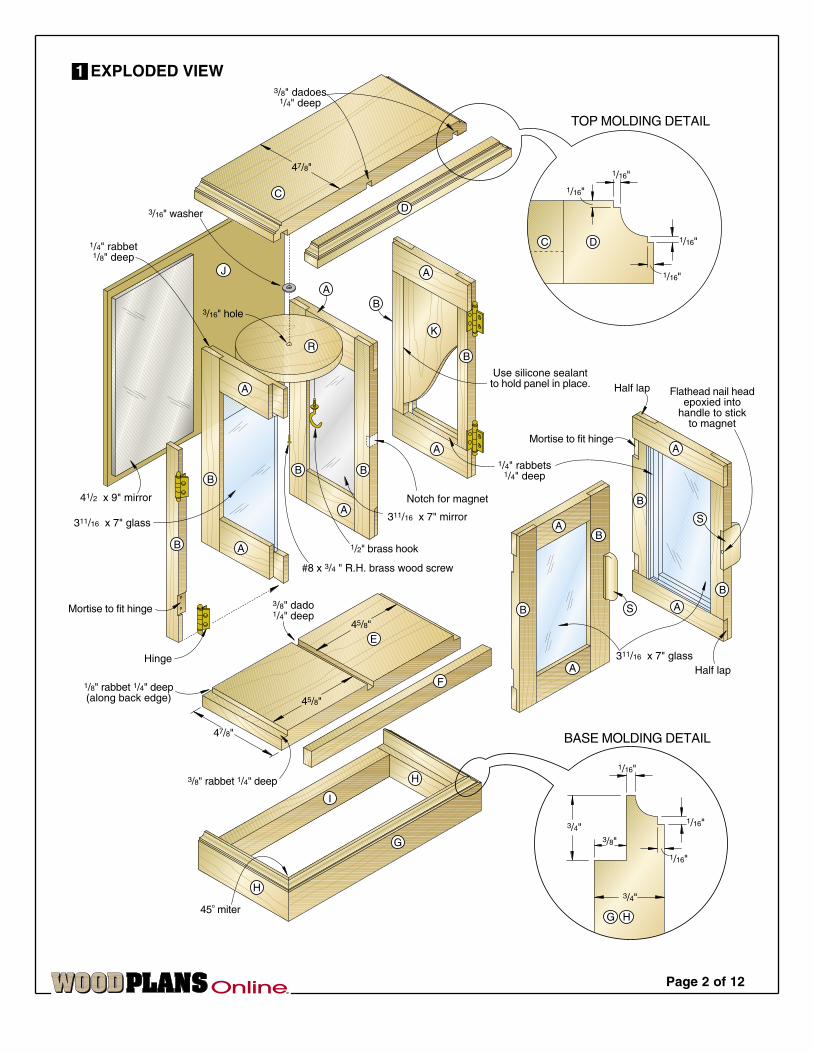
Use silicone sealantto hold panel in place.
Mortise to fit hinge
Half lap Flathead nail headepoxied into
handle to stickto magnet
Half lap
Notch for magnet
Mortise to fit hinge
Hinge
45o miter
TOP MOLDING DETAIL
BASE MOLDING DETAIL
S
A
A
K
47/8"
3/16" washer
3/16" hole
3/8" dadoes1/4" deep
1/16"
1/16"1/16"
1/16"
311/16 x 7" glass
1/4" rabbets1/4" deep
311/16 x 7" mirror
1/2" brass hook
#8 x 3/4 " R.H. brass wood screw
41/2 x 9" mirror
311/16 x 7" glass
3/8" dado1/4" deep
1/8" rabbet 1/4" deep(along back edge)
47/8"
1/4" rabbet1/8" deep
45/8"
3/8" rabbet 1/4" deep
45/8"
1/16"
1/16"
1/16"
3/4"
3/4"3/8"
B
DC
EXPLODED VIEW1

Page 3 of 12
T W L Matl. Qty.A
B
C*
D
E*
F
G*
H*
I
J
K
L
M
3/8"3/8"3/4"3/4"3/4"3/4"3/4"3/4"3/4"1/8"1/4"1/4"1/8"
11/2"
1"
47/8"3/4"
47/8"3/8"
13/4"
13/4"
1"
99/16"
311/16"
41/4"
41/4"
51/4"
99/16"
111/8"
111/8"
103/8"
103/8"
111/8"
55/8"
95/8"
101/8"
7"
9"
43/8"
W
W
W
W
W
W
W
W
W
W
W
W
H
10
10
1
1
1
1
1
2
1
1
1
2
6
FINISHED SIZE
Materials List
side rails
side stiles
top
top trim
base top
base trim
base front
base sides
base back
back
side panel
drawer uprights
drawer supports
T W L Matl. Qty.N
O
P
Q
R
S*
1/4"1/4"1/8"3/8"3/8"1/4"
15/16"
15/16"
313/16"
17/16"
7/8"
41/4"
313/16"
4"
41/2"
21/4"
BM
BM
H
W
W
BM
12
12
6
6
1
2
Materials Key: W–walnut, BM–bird’s-eye maple,H–hardboard
Supplies: #8x3/4" brass roundhead screw, 3/16" flat washer,1/2" brass cup hooks (8), double-faced tape, magnet fromrefrigerator note holder, epoxy, clear silicone sealant,1/8" glass, 1/8" mirror, finish, hinges, #17x1" flathead nails,felt, silicon sealant.
* Parts initially cut oversize. See instructions.
drawer sides
drawer fronts/backs
drawer bottoms
drawer fronts
carousel
door handles
43/8" diam.
3/8 x 51/2 x 60" Walnut
3/4 x 71/4 x 36" Walnut
1/4 x 51/2 x 36" Walnut
1/4 x 51/2 x 36" Bird’s-eye maple
1/8 x 24 x 24" Hardboard
R A A A A A AA A A A
B B B B BBBB B B
DE
F
I
J
KL
M
O
P
Q
C
L
MM
M
M
M
N NNNN NNN
N NNN OOOO OOO
O OOO
P
P
P
P
P
QQQQQ
Cutting Diagram
S S
G H H
99/16"Outside face
1" rabbet 3/16" deep
11/2" rabbet3/16" deep
51/4"
11/2"
1"
B
A
A
B
Page 4 of 12
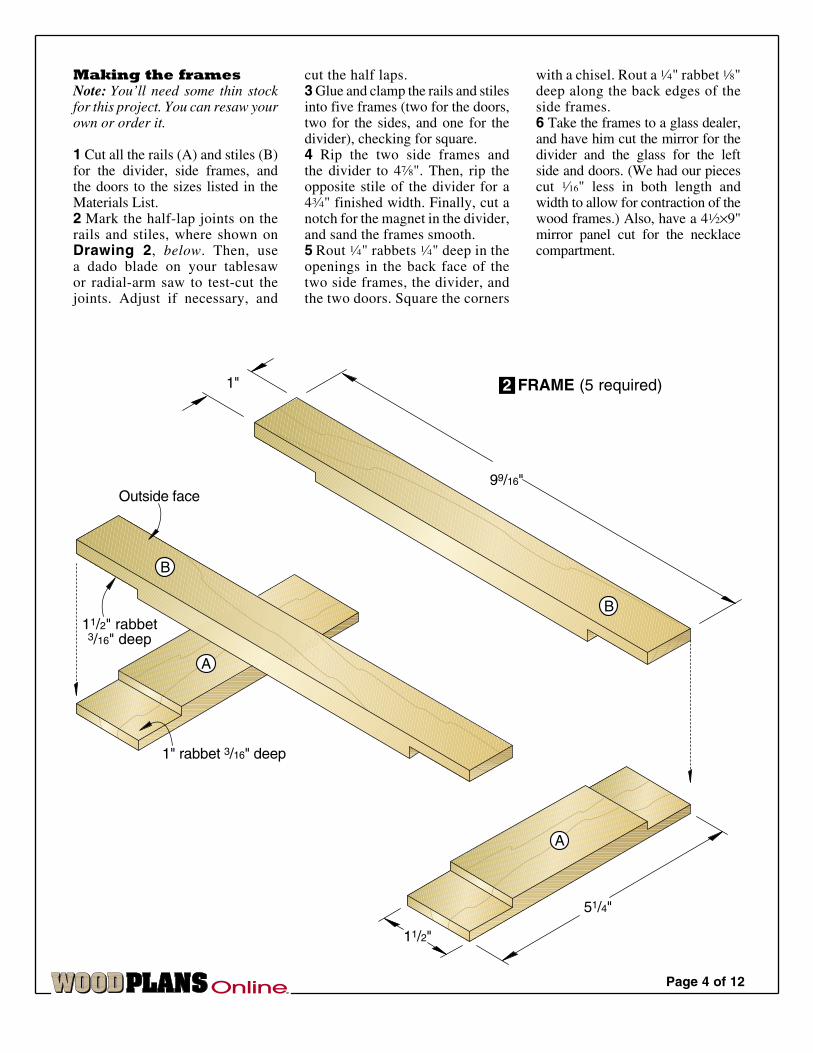
Making the framesNote: You’ll need some thin stock for this project. You can resaw your own or order it.
1 Cut all the rails (A) and stiles (B) for the divider, side frames, and the doors to the sizes listed in the Materials List. 2 Mark the half-lap joints on the rails and stiles, where shown on Drawing 2, below. Then, use a dado blade on your tablesaw or radial-arm saw to test-cut the joints. Adjust if necessary, and
cut the half laps.3 Glue and clamp the rails and stiles into five frames (two for the doors, two for the sides, and one for the divider), checking for square. 4 Rip the two side frames and the divider to 4Œ". Then, rip the opposite stile of the divider for a 4‡" finished width. Finally, cut a notch for the magnet in the divider, and sand the frames smooth. 5 Rout ‹" rabbets ‹" deep in the openings in the back face of the two side frames, the divider, and the two doors. Square the corners
with a chisel. Rout a ‹" rabbet ¤" deep along the back edges of the side frames. 6 Take the frames to a glass dealer, and have him cut the mirror for the divider and the glass for the left side and doors. (We had our pieces cut „" less in both length and width to allow for contraction of the wood frames.) Also, have a 4fi×9" mirror panel cut for the necklace compartment.
FRAME (5 required)2

Machining the case top and base Note: The parts for the top and base are cut extra wide so that you can rip the front strips (D, F) from them. This simplifies cutting the stopped dadoes and rabbets.
1 From ‡" walnut, cut two pieces to 6×11¤'' for the top (C, D) and the base (E, F). 2 Rip a ‡"-wide strip from the front edge of the top to form part D. Then, rip a ›" strip from the front edge of the base to form part F. Finally, rip the top (C) and the base (E) to finished width (4Œ").3 Cut ›" dadoes ‹" deep in the top and base, where dimensioned in Drawing 1, page 2, and Drawing 3. Next, cut the ›" rabbets ‹" deep on each end of the base. 4 Rout a ¤" rabbet ‹" deep along the back edge of the base. (See Drawing 1.) Rout a stopped rabbet the same size in the top, where shown in Drawing 3, above. (We clamped stops to our router table fence to ensure that we stopped the rabbet at the right points when rabbeting the top.) 5 Glue top trim (D) to top (C), making certain that the ends of the two parts are flush. Then, glue the base trim (F) to the base (E). Later, sand all surfaces flush.
Cutting the top and base moldings1 Start by cutting a strip of ‡" walnut to 1‡×24" for the base molding. (You'll cut parts G and H to length from this strip later.) 2 Rout the top (C/D) following Steps 1, 2, and 3 in Drawing 4. To form the molding for the bottom (G/H), follow Steps 1 and 2 only. 3 Finally, cut a ‡" rabbet ›" deep along the base molding to house the base (E/F). Set the molding strip aside for now.
Page 5 of 12
1/8" pilot hole3/8" deep
R=17/8"
3/8"
45/8"
45/8"
3/8"
1/16" pilot holesfor hooks spacedevery 45o.
3/16" hole
1/8" stopped rabbet1/4" deep
3/8" dadoes 1/4" deep
3/8"
D
R
C
ˇ"
‡" corebox bit
Routerfence
Rabbetingbit
›"
„"
Routerfence
Rabbetingbit
„"
›"
Router fence
ˇ"
Step 3
Step 2
Step 1
TOP AND CAROUSEL(As viewed from the bottom and back)
3
SHAPING THETOP MOLDING
4
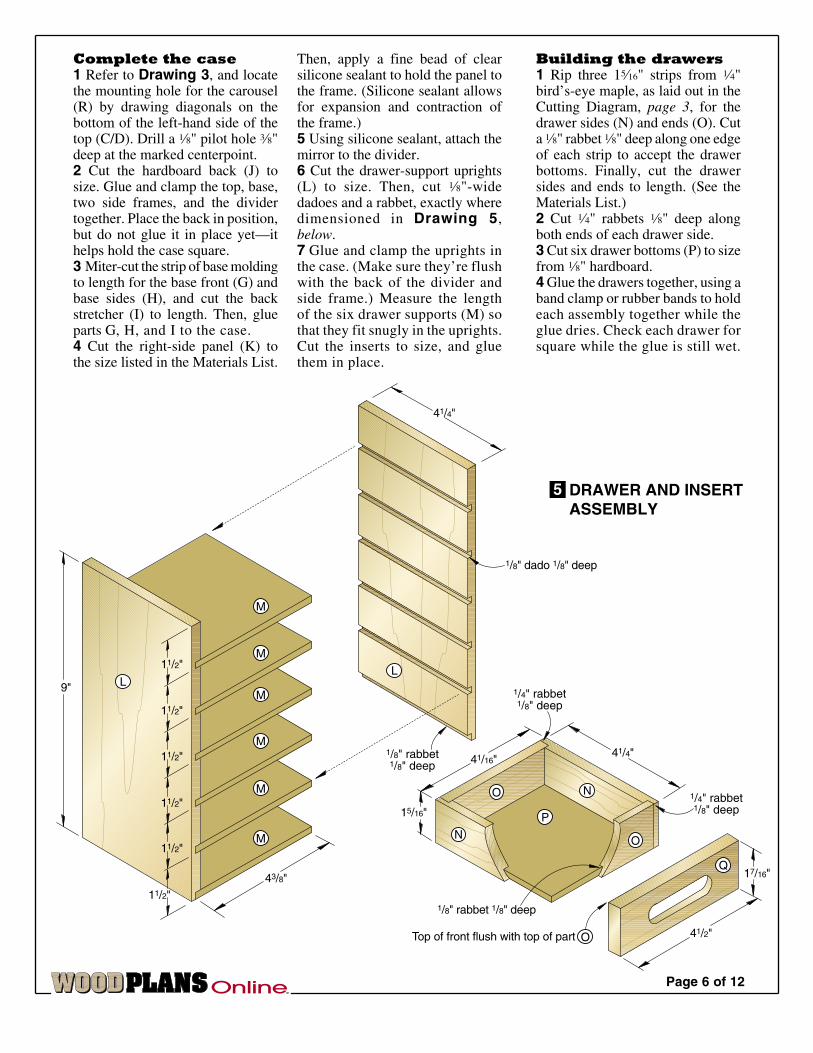
Complete the case1 Refer to Drawing 3, and locate the mounting hole for the carousel (R) by drawing diagonals on the bottom of the left-hand side of the top (C/D). Drill a ¤" pilot hole ›" deep at the marked centerpoint. 2 Cut the hardboard back (J) to size. Glue and clamp the top, base, two side frames, and the divider together. Place the back in position, but do not glue it in place yet—it helps hold the case square. 3 Miter-cut the strip of base molding to length for the base front (G) and base sides (H), and cut the back stretcher (I) to length. Then, glue parts G, H, and I to the case. 4 Cut the right-side panel (K) to the size listed in the Materials List.
Then, apply a fine bead of clear silicone sealant to hold the panel to the frame. (Silicone sealant allows for expansion and contraction of the frame.)5 Using silicone sealant, attach the mirror to the divider. 6 Cut the drawer-support uprights (L) to size. Then, cut ¤"-wide dadoes and a rabbet, exactly where dimensioned in Drawing 5, below.7 Glue and clamp the uprights in the case. (Make sure they’re flush with the back of the divider and side frame.) Measure the length of the six drawer supports (M) so that they fit snugly in the uprights. Cut the inserts to size, and glue them in place.
Building the drawers1 Rip three 1ˇ" strips from ‹" bird’s-eye maple, as laid out in the Cutting Diagram, page 3, for the drawer sides (N) and ends (O). Cut a ¤" rabbet ¤" deep along one edge of each strip to accept the drawer bottoms. Finally, cut the drawer sides and ends to length. (See the Materials List.) 2 Cut ‹" rabbets ¤" deep along both ends of each drawer side. 3 Cut six drawer bottoms (P) to size from ¤" hardboard. 4 Glue the drawers together, using a band clamp or rubber bands to hold each assembly together while the glue dries. Check each drawer for square while the glue is still wet.
41/4"
1/8" rabbet1/8" deep
1/4" rabbet1/8" deep
41/16"
1/8" dado 1/8" deep
11/2"
11/2"
11/2"
11/2"
11/2"
11/2"15/16"
41/4"
17/16"
41/2"
1/8" rabbet 1/8" deep
1/4" rabbet1/8" deep
43/8"
L
M
N
O
P
Q
M
M
M
M
M
L
O
N
9"
Top of front flush with top of part O
Page 6 of 12
DRAWER AND INSERT ASSEMBLY
5
‰" hole through the center of the walnut disc and a „'' pilot hole for each of the brass hooks, where shown on Drawing 3, page 5.
Fit the doors and make the handles1 Using a tablesaw or small hand plane, size the doors by shaving
each drawer front.) If the spacing is too tight, just sand the edge of the drawer front down a bit. When you’re finished, remove the case back (J). 3 Make the carousel (R) by cutting a 4›"-diameter disc to shape from ›" walnut with a bandsaw. Sand the edges smooth. Then, drill a
5 After the glue has dried, remove the clamps and scrape off any excess glue. Sand each drawer until smooth.
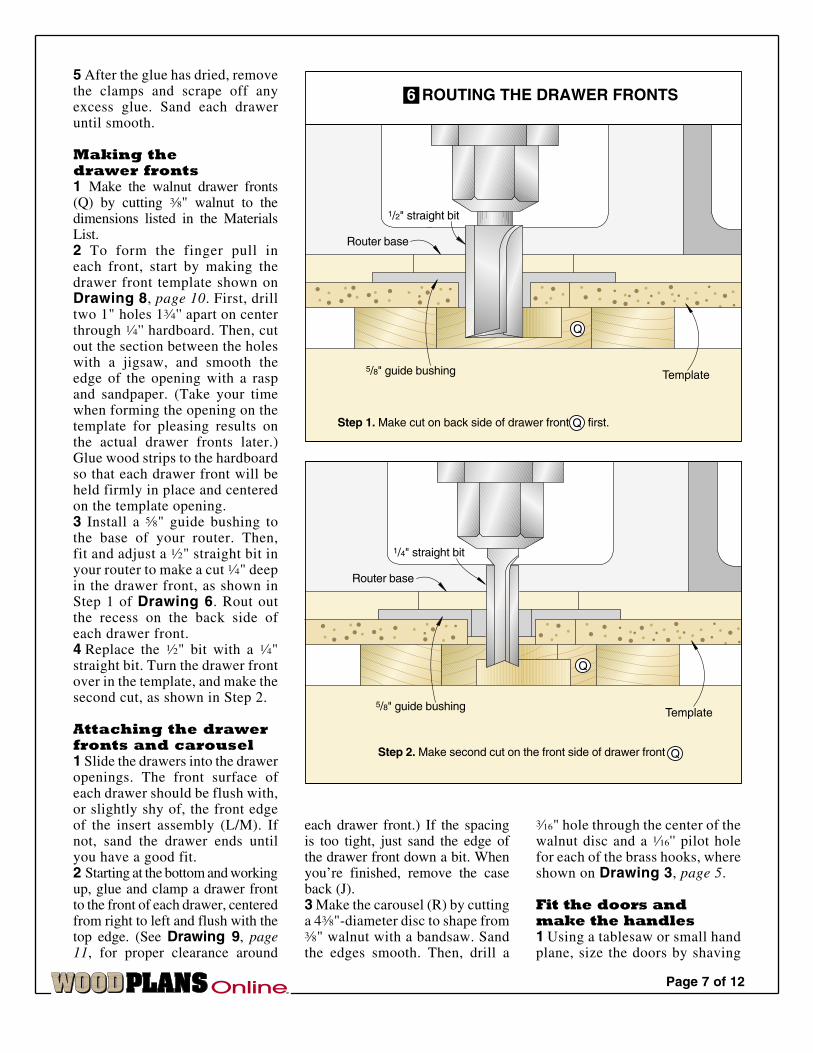
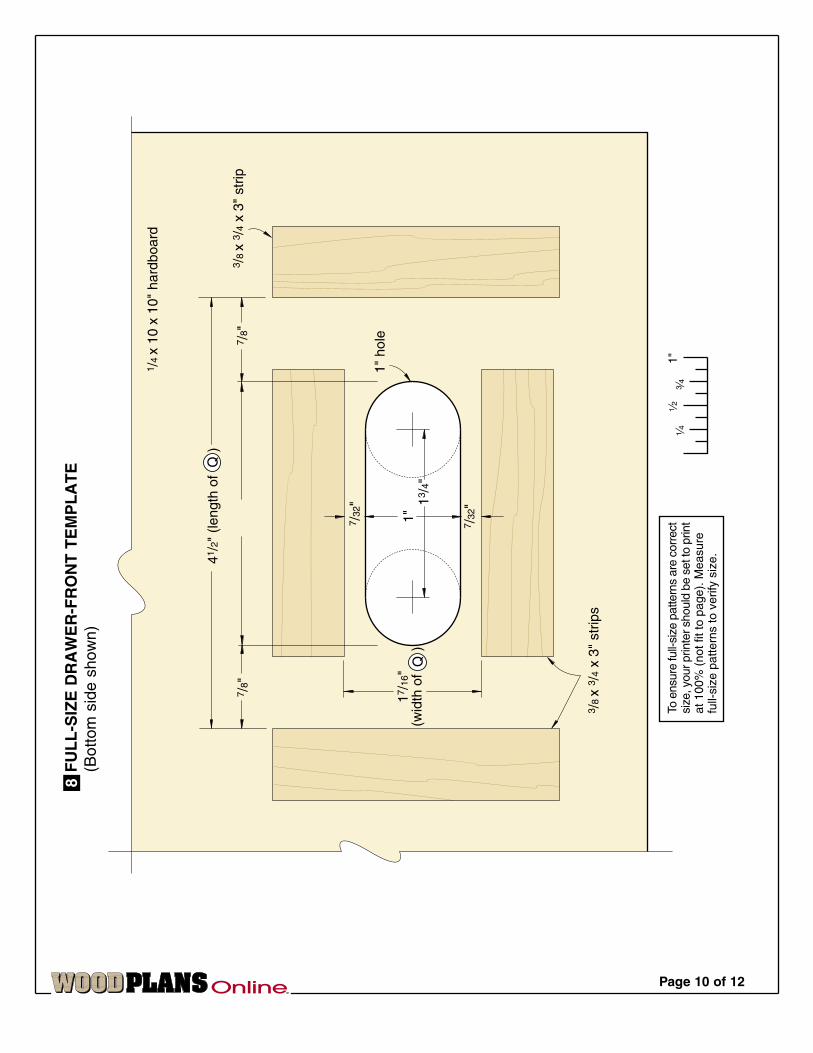
Making thedrawer fronts1 Make the walnut drawer fronts (Q) by cutting ›" walnut to the dimensions listed in the Materials List. 2 To form the finger pull in each front, start by making the drawer front template shown on Drawing 8, page 10. First, drill two 1" holes 1‡'' apart on center through ‹'' hardboard. Then, cut out the section between the holes with a jigsaw, and smooth the edge of the opening with a rasp and sandpaper. (Take your time when forming the opening on the template for pleasing results on the actual drawer fronts later.) Glue wood strips to the hardboard so that each drawer front will be held firmly in place and centered on the template opening. 3 Install a fl" guide bushing to the base of your router. Then, fit and adjust a fi" straight bit in your router to make a cut ‹" deep in the drawer front, as shown in Step 1 of Drawing 6. Rout out the recess on the back side of each drawer front. 4 Replace the fi" bit with a ‹" straight bit. Turn the drawer front over in the template, and make the second cut, as shown in Step 2.
Attaching the drawer fronts and carousel1 Slide the drawers into the drawer openings. The front surface of each drawer should be flush with, or slightly shy of, the front edge of the insert assembly (L/M). If not, sand the drawer ends until you have a good fit. 2 Starting at the bottom and working up, glue and clamp a drawer front to the front of each drawer, centered from right to left and flush with the top edge. (See Drawing 9, page 11, for proper clearance around
Page 7 of 12
Q
1/2" straight bit
5/8" guide bushing
Router base
Template
Step 1. Make cut on back side of drawer front first.Q
Q
1/4" straight bit
Router base
5/8" guide bushing Template
Step 2. Make second cut on the front side of drawer front Q
ROUTING THE DRAWER FRONTS6

7/8"
7/16"
1/8"1/4"
Step 1. Cut flute with a 3/8" core-box bit.
Waste
Step 3. Cut out 2 pieces, 21/4" long each.
Step 2. Rout a round-over with a 1/4" round-over bit.
Waste
Waste
Step 4. Fasten the two pieces together with double-faced tape.
Double-faced tape
Step 5. Finish shaping by sanding a 1/4" radius on the front corners.
1/4" radius
1/4" radius
Page 8 of 12
FORMING THE HANDLES7

Page 9 of 12
The purchase of these plans does not transfer any copyright or other ownership interest in the plans, the design, or the finished project to the buyer. Buyer may neither reproduce the plans for sale nor offer for sale any copies of the finished project.
equal amounts off opposite edges. (Be careful not to remove too much stock at one time.) Fit the doors flush with the sides of the case. There should be a „'' gap between the two doors and between the doors and the top and bottom edges of the case interiors. 2 Cut mortises for hinges in the doors and case, where shown on Drawing 10, page 12. Now, drill pilot holes for the hinge screws in both doors and sides. (Because the doors are so thin, use a stop on your drill bit.) Check the length of the hinge screws against the thickness of the doors—you probably will need to shorten the screws with a file. Do not attach the doors yet. 3 To make the door handles (S), cut a strip of ‹"-thick maple to Œ×8". (Be sure to use a pushblock when ripping to prevent kickback.) Then, follow Steps 1 through 5 in Drawing 7, page 8. Use a dado blade in your tablesaw to cut a notch in each door for the handles. (See Drawing 10, page 12, for placement.) Glue and clamp a handle to each door.
Apply the finish and assemble1 Use masking tape and paper to protect the mirror in the divider. Then, apply the finish of your choice to the drawers, doors, carousel, and case. (We sprayed on one coat of sanding sealer and followed up with two coats of lacquer. Whenever we use a spray-on finish, especially a lacquer, we always use a fume-respirator mask. The mask guards against vapors and dust.) 2 Fit the back (J) onto the case, mark the position of the mirror, and remove the back. Glue the mirror to the hardboard back. Glue the back to the case. (We used rubber bands to hold the back in position until the glue dried so as not to mar the finish.) Attach the glass panes to the left frame and
Produced by Marlen Kemmet with Yosh SugiyamaProject Design: Inga VesterbyGraphic Design: Jamie DowningIllustrations: Roxanne LeMoine; Bill Zaun; Randall FosheePhotographs: Hopkins Associates©Copyright Meredith Corporation 2002
the doors. 3 Screw the cup hooks in place, and attach the carousel to the case top with a screw and washer. (The washer goes between the carousel and top.) Leave the screw just loose enough so that the carousel will turn easily. 4 Attach the doors and epoxy the magnet to the divider. Snip off all but ¤" from two #l7×1" flathead nails. Drill a pilot hole, and epoxy the nailheads in place, one on each door, centered on the magnet. (When drilling the pilot holes, be careful not to drill through the door.) 5 Line the bottom of each drawer with velvet or felt. You also can custom-fit the drawers with either dividers or padded compartments for storing rings and other accessories.¿
Page 10 of 12
41/2
" (le
ngth
of
)
7 /8"
7 /8"
13/4
"
7 /32
"
7 /32
"
3 /8
x 3 /
4 x
3" s
trip
1 /4
x 10
x 1
0" h
ardb
oard
17/1
6"(w
idth
of
)
1"
1" h
ole
3 /8
x 3 /
4 x
3" s
trip
s
Q
Q
To e
nsur
e fu
ll-si
ze p
atte
rns
are
corr
ect
size
, you
r prin
ter s
houl
d be
set
to p
rint
at 1
00%
(no
t fit
to p
age)
. Mea
sure
full-
size
pat
tern
s to
ver
ify s
ize.
1"‹
fi‡
To e
nsur
e fu
ll-si
ze p
atte
rns
are
corr
ect
size
, you
r prin
ter s
houl
d be
set
to p
rint
at 1
00%
(no
t fit
to p
age)
. Mea
sure
full-
size
pat
tern
s to
ver
ify s
ize.
1"‹
fi‡
FU
LL
-SIZ
E D
RA
WE
R-F
RO
NT
TE
MP
LA
TE
(B
otto
m s
ide
show
n)8

43/8"
25/16"
3/8"
3/8"
1/16"
45/8"3/8" 3/8"
3/8"
111/8"
45/8" 13/4"
17/16"
1/16"
17/16"
17/16"
17/16"
17/16"
17/16"
3/4"
91/16"
119/16"
1/16"
1/16"
1/16"
1/16"
1/16"
1/16"
1/16"D
B
G
Q
R
A
B
B
Q
Page 11 of 12
FRONT VIEW (Shown without doors)9

Page 12 of 12
B
H
C
S
1"
B3/8"
55/8"
3/8"
1/16"
31/4"
21/4"31/4"
1/2"
11/4"3/8"
5/8"
55/8"
11/4"
69/16"
47/8"
11/4"
B
SIDE VIEW10

Browse more than 1,000 woodworking project plans, articles, tool reviews, books, techniques, & more. Each plan includes step-by-step instructions, professional color photography, and detailed illustrations.
WOODStore.net
Plans Techniques Articles Publications
Looking for information from Leading woodworking companies?
WOODWorkersCenter.com is just the site for your woodworking tool, accessory, and service informational needs. Use the online info request feature to request these companies latest catalogs or info.
WOODWorkersCenter.comWOODmagazine.com
a weaLth of information just a cLick away
The online presence of WOOD magazine, WOODmagazine.com speaks to online users of all woodworking skill levels with free woodworking plans, helpful forums, numerous articles, to help you become a better woodworker.
WOODmagazine.com/videosprofessionaL, portaBLe Video The biggest names in woodworking help you build your skills with downloadable videos.
By woodworkers, for woodworkers Watch free videos of other woodworkers showing their stuff.
watch a demo Before you Buy Don’t spend a penny on a tool or accessory until you learn how it works and what it can do.
free magaZine support 24/7 WOOD magazine editors provide more than 120 streaming videos, from 2 to 10 minutes in length.
More from WOOD Magazine