woodstore - meredith corporationimages.meredith.com/wood/pdf/dp-00871a bitcabinet.pdfsmall leaf face...
TRANSCRIPT
Mission Furniture
Thank You!Thank you for ordering a WOOD® magazine download. We hope you enjoy being part of our online experience and that you have fun expanding your woodworking skills.
Please remember that this copyrighted material is for your use only. It is unlawful to share this file with someone else or to reprint it in any form.
Bill KrierEditor in Chief, WOOD magazine
Adobe Acrobat Reader Troubleshooting Guide
If you can read this page, your Acrobat Reader program is working correctly! But you may still have problems or specific issues, such as printing and saving your downloadable file.
My printer won’t print the text correctlyAlmost all printing problems are due to not enough free system resources memory. The files are very memory intensive because they include graphics, text, and photos. Close all other programs/applications and print directly out of the Acrobat Reader program, not your Web browser.
Patterns are not printing full-sizeMake sure your printer is set to print at 100 percent and that “print to fit” is not checked. These settings are selected in the printer setup or printer options.
I can’t save my file now that it’s downloadedYou must save the plan when you download the file. Download the file again, except this time try right-clicking on the red download button. A menu window will open. Select “Save target as” or “Save link as” to save the file to your hard drive. Once saved, you can open it up with Adobe Acrobat Reader.
For more details on using Adobe Acrobat Reader please visit our online help section at: http://www.woodstore.net/clicherforde.html
WOOD Store Customer Favorites
WOODStore.net Browse more than 1000 plans, projects, books, techniques, & more
Visit the WOOD Store at:
WOODStore.net
Shop Tools & Accessories
Indoor Furniture
Outdoor Furniture
69 WOOD magazine December 2003
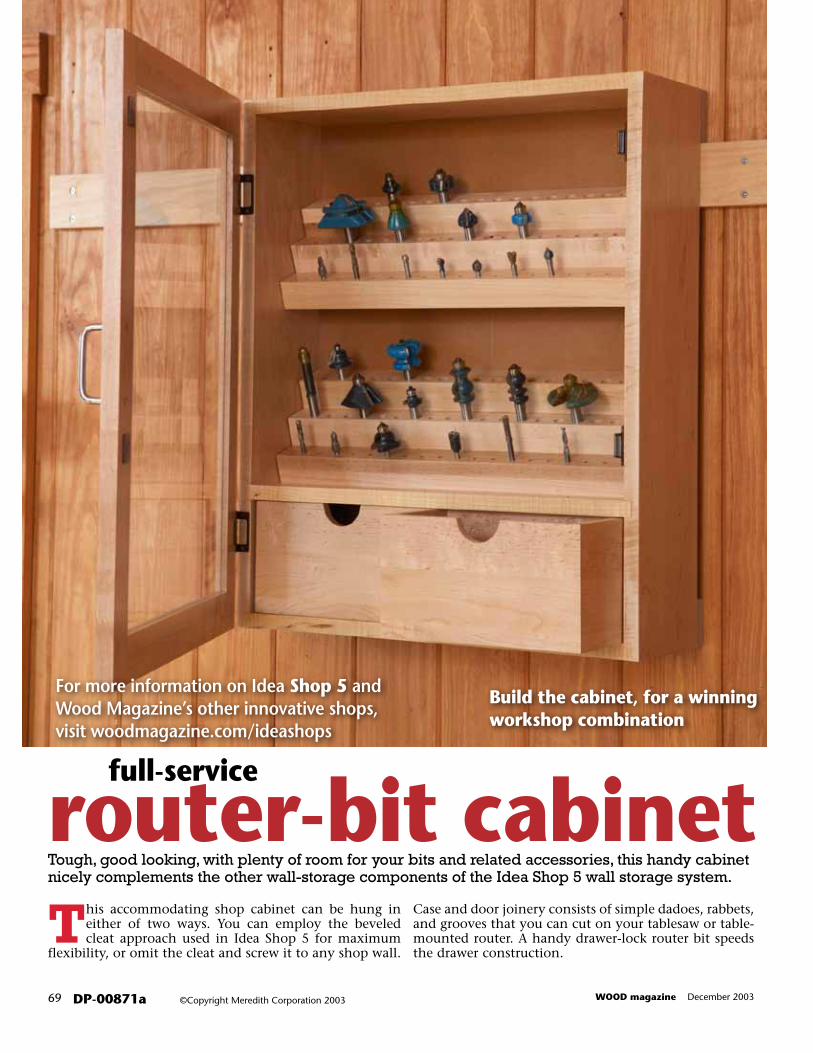
Build the cabinet, for a winningworkshop combination
DP-00871a ©Copyright Meredith Corporation 2003
full-service
router-bit cabinetTough, good looking, with plenty of room for your bits and related accessories, this handy cabinet nicely complements the other wall-storage components of the Idea Shop 5 wall storage system.
This accommodating shop cabinet can be hung in either of two ways. You can employ the beveled cleat approach used in Idea Shop 5 for maximum
flexibility, or omit the cleat and screw it to any shop wall.
Case and door joinery consists of simple dadoes, rabbets, and grooves that you can cut on your tablesaw or table-mounted router. A handy drawer-lock router bit speeds the drawer construction.
For more information on Idea Shop 5 andWood Magazine’s other innovative shops, visit woodmagazine.com/ideashops

2From ½" medi-um-density over-
lay plywood (MDO), cut the back (D) to size. Form a 3⁄8" tongue around the back’s perimeter by cutting 3⁄8" rabbets ¼" deep along its back edges, where shown on Drawing 1. Finish-sand the back.
3Apply glue to the grooves,
dadoes, and rabbets, and assemble the case, as shown in Photo A. Check to make sure the case is square and flat.
4For those adding this cabinet to the Idea Shop 5 wall-storage system, cut the cleat (E) and spacer (F) to size.
Bevel the cleat, where shown on Drawing 1a. Clamp the cleat and spacer to the case, where shown on Drawing 1, drill countersunk screw holes, and screw the parts to the case.
Build and hang the door
1Cut the stiles (G) and rails (H) to size. With a dado blade, cut centered ¼" grooves 3⁄8" deep in the parts, where
shown on Drawing 2. Then form the mating tenons on the ends of the rails.
2 From ¼" acrylic cut the panel. (We cut our panel 1⁄16" smaller than the grooved opening.)
70
K
FILENAME:153RouterB itCag1.epsDate: 9-03Lor na J .
B
A
D
H
C
3¾"
12¼"
3¾" 3⁄8" rabbets ¼" deepalong back edge
¾" rabbet3⁄8 deep
¾" rabbet 3⁄8" deep
¼" groove 3⁄8" deep¼" from back edge
¼" groove 3⁄8" deep¼" from back edge
¾" dado3⁄8" deep
3" wire pull,centered
Strike plate
¼" grooves3⁄8" deep,centered
18¾"
9⁄16" holes ¾" deep for½" shank bits
½"
1"
20½"
G
63⁄8"
6½"
26½"
B
¼" groove 3⁄8" deep¼" from back edge
2" no-mortisehinge
3¾"
21¼"6½"
Magneticcatch
#8 x 1½"F.H.
wood screws
#8 x 1½" F.H.wood screw
Magneticcatch
3⁄16" hole
G
H
I
F
9⁄32" holes¾" deep for
¼" shank bits
#8 x 1½" F.H.wood screw
5⁄32" shank hole, countersunk
L
N M
45° bevel
3"
1⁄8"
¾"
5⁄32" shank hole,countersunk
#8 x 1½" F.H.wood screw
E
E
A
WD325276.aiUpdated 10/13/10
J
K
¼ x 1811⁄16 x 233⁄16"acrylic
L
J
K9⁄16" holes ¾" deep for½" shank bits
9⁄32" holes ¾" deep for¼" shank bits
Strike plate
K
FILENAME:153RouterB itCag1.epsDate: 9-03Lor na J .
B
A
D
H
C
3¾"
12¼"
3¾" 3⁄8" rabbets ¼" deepalong back edge
¾" rabbet3⁄8 deep
¾" rabbet 3⁄8" deep
¼" groove 3⁄8" deep¼" from back edge
¼" groove 3⁄8" deep¼" from back edge
¾" dado3⁄8" deep
3" wire pull,centered
Strike plate
¼" grooves3⁄8" deep,centered
18¾"
9⁄16" holes ¾" deep for½" shank bits
½"
1"
20½"
G
63⁄8"
6½"
26½"
B
¼" groove 3⁄8" deep¼" from back edge
2" no-mortisehinge
3¾"
21¼"6½"
Magneticcatch
#8 x 1½"F.H.
wood screws
#8 x 1½" F.H.wood screw
Magneticcatch
3⁄16" hole
G
H
I
F
9⁄32" holes¾" deep for
¼" shank bits
#8 x 1½" F.H.wood screw
5⁄32" shank hole, countersunk
L
N M
45° bevel
3"
1⁄8"
¾"
5⁄32" shank hole,countersunk
#8 x 1½" F.H.wood screw
E
E
A
WD325276.aiUpdated 10/13/10
J
K
¼ x 1811⁄16 x 233⁄16"acrylic
L
J
K9⁄16" holes ¾" deep for½" shank bits
9⁄32" holes ¾" deep for¼" shank bits
Strike plate
exploded view1cleat detail1a
FILENAME:153RouterB itCag2.epsDate: 9-03Lor na J .
H
I
¼" grooves3⁄8" deep,centered
¼"
2"
2"
3⁄8"
G
¼"
WD325277.aiUpdated 10/13/10
door detail2
Start with the case
1Cut the sides (A), top and bottom (B), and the shelf (C) to the sizes listed in the Materials List. Cut ¾" rabbets 3⁄8"
deep in the sides (A), where shown on Drawing 1. To pre-vent chipout, back your cuts with an auxiliary extension attached to your miter gauge. Then, using your rip fence as a stop, cut the 3⁄8"-deep dadoes, where dimensioned. Cut ¼" grooves 3⁄8" deep in the sides, top, and bottom for the back (D). When cutting the grooves in the sides, make sure you have mirror-image parts. Finish-sand the parts.
Glue and clamp the case together. Then drill angled countersunk screw holes through the top and bottom (B), and into the sides (A). Drive #8×1½" flathead wood screws.
A
A
A
C D
B
B

3Apply glue and clamp the door together. Check to make sure the door is square and flat.
4Lay the case on its back, and position the door on it. Mark hinge locations on the side (A) and the edge of the stile (G), where
shown on Drawing 1, and as shown in Photo B. Remove the door, and transfer the location lines onto the door’s back face and side’s front edge. Position the hinges on the case, as shown in Photo C. Then position the hinges on the door, as shown in Photo D. Fasten the hinges to the door, as shown in Photo E.
5Attach the door to the case by driving screws through the counter-sunk holes in the hinges’ large leaves. Fasten the magnetic catches
to the opposite side (A), where shown on Drawing 1. Align the strike plates with the catches, and attach them to the door stile (G). Center the pull on the stile’s length and width, and mark the screw locations. Drill the holes, and fasten the pull.
Now for the bit holders
1Plane 1¾"-thick stock to 1½" thick, and cut the top, middle, and bottom bit holders (J, K, L) to size. You also can laminate two lay-
ers of ¾"-thick stock for these parts. Based on your router-bit shank diameters, drill 9⁄32" holes (for ¼"-shanked bits) and/or 9⁄16" holes (for ½"-shanked bits) in the bit holders, where shown on Drawings 1 and 3. (For clean-edged holes, we used a 9⁄32" brad-point bit and a 9⁄16" Forstner bit.) To accommodate future changes in your bit-storage needs, see the Shop Tip, at the top of next page.
Turn each hinge over so its barrel and the countersunk holes in the small leaf face up. Fasten the hinge to the door stile using the screws supplied with the hinge.
With its barrel tight against the door stile (G), align each hinge with its location mark. Using the holes in the hinge’s small leaf as guides, drill screw pilot holes.
With its barrel tight against the side (A), align each hinge with its loca-tion mark. Using the holes in the hinge’s large leaf as guides, drill screw pilot holes.
B
Position the door flush with the cabinet’s top, bottom, and sides, and clamp it in place. Then mark the location of the top of the top hinge and the bottom of the bottom hinge.
EC
D
A
G
Mark hinge location.
3¾"
G
II
H
B Locationmark
Countersinks in the small leaf face down.
Turn the hinge over with the small-leaf countersinks facing up for installation.
A
Countersinks in the large leaf face up.
Self-centering drill bit
Location mark
WD325278.aiUpdated 10/13/10
FILENAME:153RouterB itCag4.epsDate: 9-03Lor na J .
M
N
5⁄16"
3⁄8"
Drawer-lockrouter bit Router table
Fence
Inside face
Inside face
M
N
Top View
FILENAME:153RouterB itCag3.epsDate: 9-03Lor na J .
K
L
2"
3"
4"
½"
20°
9⁄32" or 9⁄16" hole¾" deep
1½"J
1½"
bit holders3

¼" rabbets ¼" deep along their bottom edges, form-ing a 1¼"-thick tongue around their perimeters. Finish-sand the parts, and glue and clamp the drawers together. Check to make sure they are square and flat.
Apply the finish and assemble
1Remove all the hardware. Sand away the hinge layout lines, and resand the other parts where
needed. Apply three coats of satin polyurethane, sanding between coats with 220-grit sandpaper.
2Apply double-faced tape to the backs of the bit holder assemblies, and adhere them to the back (D),
where shown on Drawing 1. Drill countersunk screw holes through the back and into the holders, and drive the screws.
3Rehang the door, and remount the pull, catches, and strikes. Slide the drawers into place. Hang the
cabinet by its cleat (E), or by drilling countersunk holes through the back (D), and screwing it to the wall. Now arrange your bits in the holders, and start plotting to fill any empty spaces with those new bits you need.
Written by Jan SvecProject design: Kevin BoyleIllustrations: Roxanne LeMoine; Lorna Johnson
2Tilt your tablesaw blade to 20°, and bevel the bit holders’ back edges, where shown on Drawing 3. Finish-sand the
holders, and assemble them by first gluing and clamping the top and middle bit holders (J, K) together, and then with the glue dry, adding the bottom bit holders (L). Keep the holders’ beveled faces flush, where shown.
Add the drawers
1Plane stock to ½" thick, and cut the drawer sides (M) and drawer fronts and backs (N) to size. Set aside scrap pieces to
test the drawer-lock joint router bit’s setup.
2Referring to Drawing 4, set up a drawer-lock router bit in your table-mounted router. Designating scrap pieces as
front/back and side, make test cuts, adjusting the bit and fence as necessary to achieve a tight joint. Then cut the joints in the sides (M), holding their inside faces against the fence, and the fronts and backs (N), holding their inside faces against the tabletop.
3Mark the 1¼"-radius cutouts in the drawer fronts (N), where shown on Drawing 5, and bandsaw and sand them
to shape. Then, with a dado blade, cut the ¼" grooves ¼" deep in the sides, fronts, and backs for the bottoms (O). From ½" MDO plywood, cut the bottoms to size. Then cut
Many woodworkers start out with ¼"-shank router bits, and then, after upgrading their routers, gradually replace them with ½"-shank bits. You can enlarge an existing hole in your bit holders with a regular twist drill, but it may not stay centered, and you risk chipout around the hole. A Forstner bit bores a nice clean hole, but in this case, there’s nothing to center the bit. To make it easy to enlarge your 9⁄32" holes in the future, first drill a 9⁄16" counterbore 1⁄8" deep with your Forstner bit, as shown above right. Then drill the 9⁄32" hole, centered in the counterbore. Should you need to enlarge the hole later, the counterbore centers your Forstner bit for chip-free drilling.
Make it easy to enlargethe holes in your bit holders
shop tip
WD325280.aiUpdated 10/13/10
FILENAME:153RouterB itCagTip.epsDate: 9-03Lor na J .
J L
9⁄32" hole¾" deep
9⁄16" counterbore1⁄8" deep
/ K /
72

73 WOOD magazine December 2003
WD325279.aiUpdated 10/13/10
FILENAME:153RouterB itCag5.epsDate: 9-03Lor na J .
59⁄16"
55⁄8"
59⁄16"
101⁄8"
¼" grooves¼" deep¼" from
bottom edge
51⁄16"
¼" rabbet¼" deep
N
½"
M
M
N
O
R= 1¼"
drawer(2 needed)
5
WD325278.aiUpdated 10/13/10
FILENAME:153RouterB itCag4.epsDate: 9-03Lor na J .
M
N
5⁄16"
3⁄8"
Drawer-lockrouter bit Router table
Fence
Inside face
Inside face
M
N
Top View
FILENAME:153RouterB itCag3.epsDate: 9-03Lor na J .
K
L
2"
3"
4"
½"
20°
9⁄32" or 9⁄16" hole¾" deep
1½"J
1½"
WD325278.aiUpdated 10/13/10
FILENAME:153RouterB itCag4.epsDate: 9-03Lor na J .
M
N
5⁄16"
3⁄8"
Drawer-lockrouter bit Router table
Fence
Inside face
Inside face
M
N
Top View
FILENAME:153RouterB itCag3.epsDate: 9-03Lor na J .
K
L
2"
3"
4"
½"
20°
9⁄32" or 9⁄16" hole¾" deep
1½"J
1½"
drawer-lock joint4

74woodmagazine.com
Materials List FINISHED SIZE
Case T W L Matl. Qty.
A sides ¾" 6½" 26½" M 2B top and bottom ¾" 6½" 21¼" M 2C shelf ¾" 6" 21¼" M 1D back ½" 21¼" 25¾" MDO 1E cleat ¾" 3" 22" M 1F spacer ¾" 2" 22" M 1 DoorG stiles ¾" 2" 26½" M 2H rails ¾" 2" 18¾" M 2I panel ¼" 1811⁄16" 233⁄16" A 1 Bit holders and drawersJ top bit holders 1½" 2" 20½" M 2K middle bit holders 1½" 3" 20½" M 2L bottom bit holders 1½" 4" 20½" M 2M drawer sides ½" 59⁄16" 5½" M 4N drawer fronts and backs ½" 59⁄16" 101⁄8" M 4O drawer bottoms ½" 53⁄8" 95⁄8" MDO 2Materials key: M–maple, MDO–medium-density overlay plywood, A–acrylic.
Supplies: #8×1½" flathead wood screws, double-faced tape.Blades and bits: Stack dado set, drawer-lock router bit, 9⁄32" brad-point drill bit, 9⁄16" Forstner bit.
Buying GuideHardware. 2" no-mortise hinges no. 28688; magnetic catches no. 26559 (2). Call Rockler Woodworking and Hardware, 800-279-4441, or go to www.rockler.com.3" chrome-plated wire pull no. 01W77.01. Call Lee Valley, 800-871-8158 or visit www.leevalley.com. Drawer-lock bit. Bosch #84512M. Visit boschtools.com. or go to amazon.com.Drill bits. 9⁄32" brad-point bit no. 120-275; 9⁄16" Forstner bit no. 828-881. Woodworker’s Supply, woodworker.com.
WD325281.aiUpdated 10/13/10
FILENAME:153RouterB itCagCD .epsDate: 9-03Lor na J .
B
D
C
A A B
N* N*N*N*
I
¾ x 7¼ x 96" Maple (5.3 bd. ft.)
¾ x 7¼ x 96" Maple (5.3 bd. ft.)*Plane or resaw to the thicknesses listed in the Materials List.
1¾ x 7¼ x 96" Maple (7.9 bd. ft.)
¾ x 5½ x 72" Maple (3 bd. ft.)
½ x 24 x 48" Medium-density overlay plywood ¼ x 20 x 24" Clear acrylic
M*M* M* M*
EF
G H
K* * L * LJ*
O
O
Cutting Diagram
Materials List FINISHED SIZE
Case T W L Matl. Qty.
A sides ¾" 6½" 26½" M 2B top and bottom ¾" 6½" 21¼" M 2C shelf ¾" 6" 21¼" M 1D back ½" 21¼" 25¾" MDO 1E cleat ¾" 3" 22" M 1F spacer ¾" 2" 22" M 1 DoorG stiles ¾" 2" 26½" M 2H rails ¾" 2" 18¾" M 2I panel ¼" 1811⁄16" 233⁄16" A 1 Bit holders and drawersJ top bit holders 1½" 2" 20½" M 2K middle bit holders 1½" 3" 20½" M 2L bottom bit holders 1½" 4" 20½" M 2M drawer sides ½" 59⁄16" 5½" M 4N drawer fronts and backs ½" 59⁄16" 101⁄8" M 4O drawer bottoms ½" 53⁄8" 95⁄8" MDO 2Materials key: M–maple, MDO–medium-density overlay plywood, A–acrylic.
Supplies: #8×1½" flathead wood screws, double-faced tape.Blades and bits: Stack dado set, drawer-lock router bit, 9⁄32" brad-point drill bit, 9⁄16" Forstner bit.
Buying GuideHardware. 2" no-mortise hinges no. 28688; magnetic catches no. 26559 (2). Call Rockler Woodworking and Hardware, 800-279-4441, or go to www.rockler.com.3" chrome-plated wire pull no. 01W77.01. Call Lee Valley, 800-871-8158 or visit www.leevalley.com. Drawer-lock bit. Bosch #84512M. Visit boschtools.com. or go to amazon.com.Drill bits. 9⁄32" brad-point bit no. 120-275; 9⁄16" Forstner bit no. 828-881. Woodworker’s Supply, woodworker.com.
WD325281.aiUpdated 10/13/10
FILENAME:153RouterB itCagCD .epsDate: 9-03Lor na J .
B
D
C
A A B
N* N*N*N*
I
¾ x 7¼ x 96" Maple (5.3 bd. ft.)
¾ x 7¼ x 96" Maple (5.3 bd. ft.)*Plane or resaw to the thicknesses listed in the Materials List.
1¾ x 7¼ x 96" Maple (7.9 bd. ft.)
¾ x 5½ x 72" Maple (3 bd. ft.)
½ x 24 x 48" Medium-density overlay plywood ¼ x 20 x 24" Clear acrylic
M*M* M* M*
EF
G H
K* * L * LJ*
O
O

Browse more than 1,000 woodworking project plans, articles, tool reviews, books, techniques, & more. Each plan includes step-by-step instructions, professional color photography, and detailed illustrations.
WOODStore.net
Plans Techniques Articles Publications
Looking for information from Leading woodworking companies?
WOODWorkersCenter.com is just the site for your woodworking tool, accessory, and service informational needs. Use the online info request feature to request these companies latest catalogs or info.
WOODWorkersCenter.comWOODmagazine.com
a weaLth of information just a cLick away
The online presence of WOOD magazine, WOODmagazine.com speaks to online users of all woodworking skill levels with free woodworking plans, helpful forums, numerous articles, to help you become a better woodworker.
WOODmagazine.com/videosprofessionaL, portaBLe Video The biggest names in woodworking help you build your skills with downloadable videos.
By woodworkers, for woodworkers Watch free videos of other woodworkers showing their stuff.
watch a demo Before you Buy Don’t spend a penny on a tool or accessory until you learn how it works and what it can do.
free magaZine support 24/7 WOOD magazine editors provide more than 120 streaming videos, from 2 to 10 minutes in length.
More from WOOD Magazine