webfocus mobile: webfocus reports using the … · itouch, iphone or ipad, and open the mobile...
TRANSCRIPT

WebFOCUS Mobile: WebFOCUS Reports Using the Mobile Faves App Watch Feature By Adam Lotrowski and Arin Lipman
The WebFOCUS Mobile Faves application enables the native consumption of WebFOCUS content on Apple mobile devices. This gives you normal access to WebFOCUS reports, and lets you open Active Reports and Active Dashboards sent as email attachments or saved offline, as well subscribe to reports when new versions become available. Simply put, the Mobile Faves app provides easy access to both online and offline content that is otherwise difficult to access in Apple’s enclosed and secure ecosystem.
Making all Business Intelligence content available through WebFOCUS Mobile Faves is usually as easy as right-clicking any report from within the Business Intelligence Dashboard and adding it as a Mobile Favorite. However, when it comes to subscribing to a report so that it can be pushed to the Mobile Faves app, some preliminary steps must be completed. This includes scheduling WebFOCUS reports with ReportCaster, adding them to the Report Library, and then exposing the Report Library item in the BI Dashboard.
Here’s what you do: From the BI Dashboard, navigate to the toolbar option Tools and select ReportCaster. On the left-hand side, under ReportCaster Development, you will see a folder under Schedules with the same name as the username. Right-click the folder and select New (Screen 1).
Screen 1
This opens the ReportCaster Scheduler, which is used to define what report to execute, how frequently, and what type of distribution method it will follow.

1. At the top, provide a description.
2. Select the Frequency tab.
o Select the Run Interval (more than once is suggested).
o Set the Start Schedule and End Schedule (Screen 2).
Screen 2
3. Select the Task tab.
o Set Task Type to WF Server Procedure.
o Provide a Task Name.
o Select an appropriate WebFOCUS Reporting Server (make sure the Reporting Server is running).
o Set the Execution ID with a valid user/password with access to the Reporting Server selected in step 3c.
o Select the Procedure Name to run each time (Screen 3).
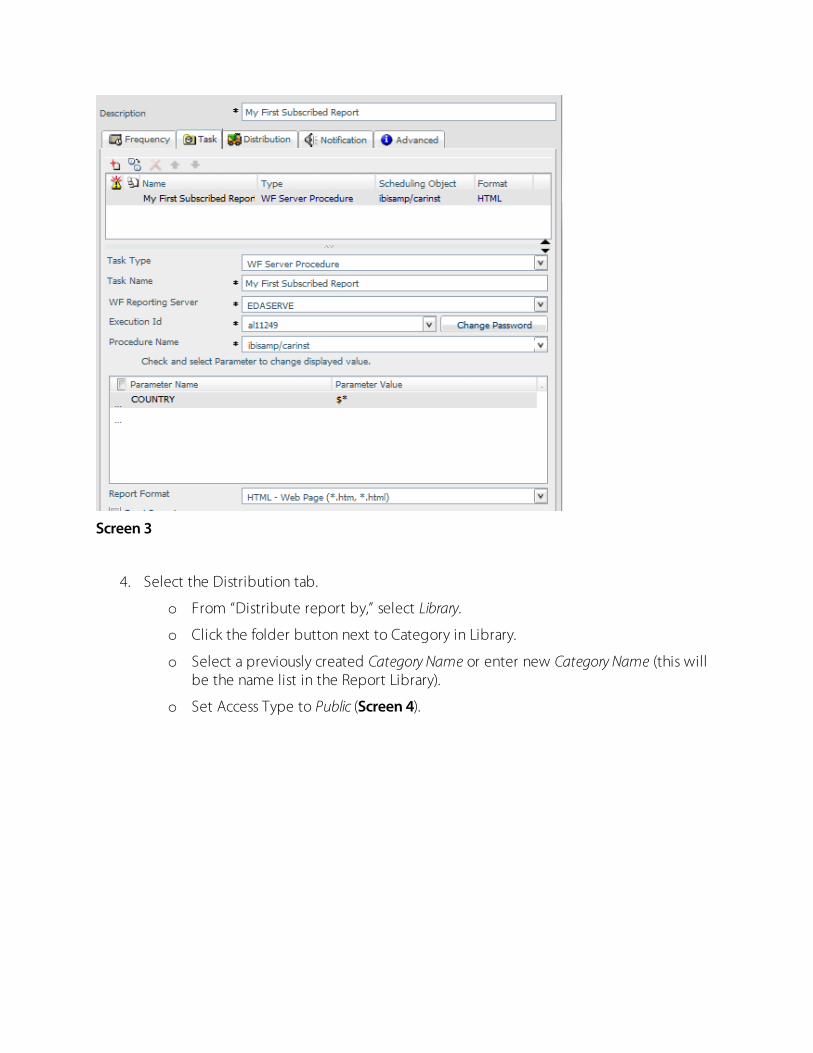
Screen 3
4. Select the Distribution tab.
o From “Distribute report by,” select Library.
o Click the folder button next to Category in Library.
o Select a previously created Category Name or enter new Category Name (this will be the name list in the Report Library).
o Set Access Type to Public (Screen 4).

Screen 4
5. Click Save and then close the ReportCaster Scheduler form.
Once you return to the ReportCaster screen, select (or double-click) on the user folder. This presents the ReportCaster task you just created. Select and right-click on the task, then select Run. Once executed, verify that under the column “Last Job Status,” it states that No Error occurred. Once validated, close ReportCaster and return to the BI Dashboard.
In addition to making sure the WebFOCUS report was added as a frequently executed job, you should verify the WebFOCUS report is added to the Report Library so that users can subscribe to it and watch for updates from the Mobile Faves app.
From within the BI Dashboard, navigate to the toolbar option Tools and select Library. Under Library Content you should see the Category folder created previously in step 4b. This is where the latest versions are tracked each time the report is executed (Screen 5). Exit the Library and return to the BI Dashboard.
Screen 5

The next step is to add a Report Library block to the BI Dashboard where the Report Library item just created can be added as Mobile Favorite. To start, from within the BI Dashboard, navigate to the toolbar option Personalize and select Content.
6. Click Add Page.
7. Provide a Page Description and click Update.
8. Click Add Block.
9. On the top select the Library tab (Managed Reporting is selected by default).
10. For Block Type select List.
11. Double-click Category in Library folder created in step 4b to add it to the Content List (Screen 6).
Screen 6
12. Click Save (returning to the Content screen).
13. Click Save and then click Done.

From within the BI Dashboard, a new section for Links is displayed with the Report Library item. Right-click the item and select Add to Mobile Favorites (Screen 7).
Screen 7
The last step is to watch/subscribe to the report from the Mobile Faves app. So break out the iTouch, iPhone or iPad, and open the Mobile Faves app. Connect to the WebFOCUS server where the above was configured and go to the Domain List and select Default.
Tap the Report Library item created to execute it. In the upper-right corner will be the Mobile Faves Watch button. When a report is not being watched (or it is not subscribed to), it will have the watching eye image (Screen 8).

Screen 8
Tap this button, and the image will change to an X. When enabled as such, anytime the report is executed from within the Report Library, it will be pushed to devices subscribing to it, and then be automatically saved to the Mobile Faves app.
Mobile Faves users are notified when this happens by a badge presented on the Mobile Faves icon, as well as next to report item in the Mobile Faves app’s report list. The badge number represents how many reports have been downloaded to the Mobile Faves app and viewed. To view the downloaded report, tap the blue Detail Disclosure button next to the subscribed report item (Screen 9).

Screen 9
To unsubscribe, simply rerun the report from within Mobile Faves and change the watch button image from an X back to the watch-eye image. To disable frequency of the Report Library item execution, return to ReportCaster Scheduler and change the frequency.
If you do not immediately see notifications, the Watch fetch interval can be changed under the Apple device Settings for MobileFaves.
Please note that when working with users across various time zones, the time on the WebFOCUS machine must be accurate.
Expanding WebFOCUS Report Output By Art Greenhaus
How often have you wished you could display aggregate records and allow them to be selectively expanded to display details? This would allow “high-level” views and support examining individual records as well. Expansion, either of columns or rows, would make finding “exceptions” that much easier, wouldn't it?

Starting with release 7.1.3, WebFOCUS has supported the concept of expanding a report output, using the '+' symbol to indicate that additional report information has been hidden, but can be displayed by clicking on the '+'. The feature SET EXPANDABLE=ON allows a report to expand or contract, by hiding or displaying columns.
An example of this feature might look like the following:
SET EXPANDABLE=ON
TABLE FILE CAR
SUM SEATS
BY COUNTRY BY CAR BY MODEL
END
An initial output would look like this:
Which could selectively expand, displaying additional columns, when the '+' is clicked, like this:

Note that after the '+' is clicked, it changes to a '-', allowing the columns to again be hidden.
Windows users may find this a bit confusing, as the Windows convention (as can be seen when running Windows Explorer), is to expand rows (not columns), when the '+' is clicked.
This type of expansion has also been implemented, effective with release 7.7.03. This feature is invoked by:
SET EXPANDBYROW={ON|OFF|n}
When set to ON, output will display the initial sort field only, allowing expansion for further details. It can also be set to a number, indicating the number of sort fields to initially display (ON is synonymous with 1).
Using the prior example, with this new SET:
SET EXPANDBYROW=ON
TABLE FILE CAR
SUM SEATS
BY COUNTRY BY CAR BY MODEL
END
Results in an initial display of:

Which can be selectively expanded, displaying additional rows, when the '+' is clicked, like this:
To implement this feature, what would normally be thought of as SUBTOTALs, are displayed prior to the detail. Internally, this is done by SET SUBTOTAL=ABOVE. The DEFAULT functionality is to add a SUBTOTAL at each sort field, except the last. No SUBTOTAL is added to the lowest sort field, as the current implementation only supports SUM or WRITE, and the SUBTOTAL at the lowest sort field would only include and equal that single record. (This limitation will be lifted in the 7.7.04 release, which will support PRINT.)
SUBTOTALing verb objects is acceptable, if there are no COMPUTEs. If COMPUTEs are present, then – again by default – the COMPUTEd values will be sub-totaled. If, instead, the user needs to do a recalculation based on subtotal values, SUMMARIZE can be used at the appropriate level, by EXPLICIT coding. However, once the user overrides the default totaling, it is the user's responsibility to ensure that a “subtotal” row is created for every sort field.

The reason for SUMMARIZE, rather than RECOMPUTE, is that SUMMARIZE will propagate to all higher sort fields. Since the SUBTOTALs are used to allow expansion, every sort field must have a SUBTOTAL available. RECOMPUTE can be used, but it is then the user’s responsibility to ensure all higher sort fields have either a sub-total (SUBTOTAL or SUB-TOTAL) or recalculation (RECOMPUTE or SUMMARIZE) performed.
As an example, assume the following procedure is to be run:
SET EXPANDBYROW=ON
TABLE FILE CAR
SUM RCOST DCOST COMPUTE PROFIT_PCT = 100 * (RCOST-DCOST)/DCOST ;
BY COUNTRY
BY CAR
BY MODEL
END
When executed, all the defaults are applied, and the result is the following:
Obviously, a profit percentage of 78.36 is suspect. Expanding the report shows what happened:

The COMPUTEd field was sub-totaled, rather than being recalculated.
By changing the request, as follows, we get the correct recalculation:
SET EXPANDBYROW=ON
TABLE FILE CAR
SUM RCOST DCOST COMPUTE PROFIT_PCT = 100 * (RCOST-DCOST)/DCOST ;
BY COUNTRY
BY CAR SUMMARIZE
BY MODEL
END
Producing:
Adding these lower level totals gives the higher total of 78.36 (some rounding has occurred)

In conclusion, see what happens when the SUMMARIZE is placed on the lowest level sort field (in the above case on MODEL); it becomes:
SET EXPANDBYROW=ON
TABLE FILE CAR
SUM RCOST DCOST COMPUTE PROFIT_PCT = 100 * (RCOST-DCOST)/DCOST ;
BY COUNTRY
BY CAR
BY MODEL SUMMARIZE
END
The output then becomes the following:

Note the duplication of rows. By taking off the SET EXPANDBYROW=ON, the reason becomes obvious:
Without expansion, we see that the subtotal, indicated by '* TOTAL' for the lowest-level sort field (MODEL), is the same as the prior row of detail, because only one row of detail is produced. This is the reason that no SUBTOTAL is inserted (by default) for the lowest sort field.

Integrating Salesforce.com With WebFOCUS By Clif Kranish
Salesforce.com is the worldwide leader in on-demand or software-as-a-service (SaaS) customer relationship management (CRM) solutions. Companies of all types and sizes turn to salesforce.com for fully integrated, completely customizable, on-demand applications that improve key customer-facing processes across the enterprise.
Now, with Information Builders’ IWAF (iWay Adapter Framework) Adapter for Salesforce, you can use Salesforce applications as a data source for integration with other internal and external systems and for Business Intelligence.
The IWAF adapters use Java, so if you don’t have at least the Java Runtime Environment (JRE) installed, you will need to get that from java.com and add its location to your path. Then be sure you have a DataMigrator or WebFOCUS Server Release 7.7.03M gen 689 or later. Two additional open-source programs are required, and you can obtain them from Information Builders Technical Support.
Once you are ready to start, the first step is to add the IWAF adapter. From the Data Management Console, using an administrator user ID, connect to your server and expand Adapters, Available, Procedures, IWAF. Right-click on IWAF and click Configure, OK, Restart Java Services and OK.
Next, under Adapters, Configured, select IWAF and right-click, and then select Add Adapter. A dialogue appears that shows all the available IWAF adapters. Select iwsforce and click Next. Now you can select the type of adapter, which for this example is service. (The other choice is event, which allows you to capture a change made to a Salesforce business object whenever it occurs.) Then click Next and enter your Salesforce user ID, password and security token. Click Configure, Restart Java Services and OK.
Now we’re ready to create a synonym for a Salesforce business object. Expand Adapters, IWAF, iwsforce. Right-click on CON01 and select Create Synonym. The Select Synonym Candidates for IWAF window opens (Screen 1). Here you see a list of all the Salesforce business objects. Expand Account to see a list of the methods for the object.

Screen 1
Select Create_Account and click on Create Synonym. The Create Synonym for IWAF window opens. Use the defaults and click on Create Synonym. The message “Created Successfully” appears and you can click Open First Synonym.
Screen 2
Note that IWAF synonyms are procedure-based like those for database stored procedures or Web services. Input and output parameters are clearly identified in the hierarchical structure of the metadata. See Screen 2.
To see the salesforce data, right-click under Name and select Sample Data. A dialogue appears with the names of the input parameters. At least one must be supplied.

Screen 3
Click the checkbox for INPUT.ISDELETED (Screen 3) and type “false” under Value to display all the active records. Click Sample Data. A report appears. See Screen 4.
Screen 4
Once you have created the synonym, a Salesforce business object can be used as a source for a DataMigrator flow either alone or joined to other data sources.
Screen 5

DataMigrator can copy data from any local data source to Salesforce business objects (using a Create or Update method). See Screen 5.
Any Salesforce business object can be used as a source for WebFOCUS reports using a Retrieve method. An input parameter is used to restrict the records retrieved. All aggregation, sorting and filtering operations can be performed on the retrieved answer set. See Screen 6.
Screen 6
Working With Business Views in Release 7.7.01 or Later By Maria Volant
With Developer Studio Release 7.7.01, when opening a real Master File in Synonym Editor, clicking on the Business View button does not automatically generate a Business View file. Instead, a Business View pane is opened and the addition of Business View attributes updates the current Master File, turning the real Master File into a Business View.
To avoid changing the original Master File, the user could open the base Master File in the Synonym Editor tool, perform a “File,Save As” to create a copy of the Master File using the desired Business View name, and then add the desired Business View attributes, leaving the original Master File unchanged. Alternatively the user can also create a new synonym via Synonym Editor with the desired name for the Business View, insert the real Master File as a cross-reference file, and then add the Business Views attributes.
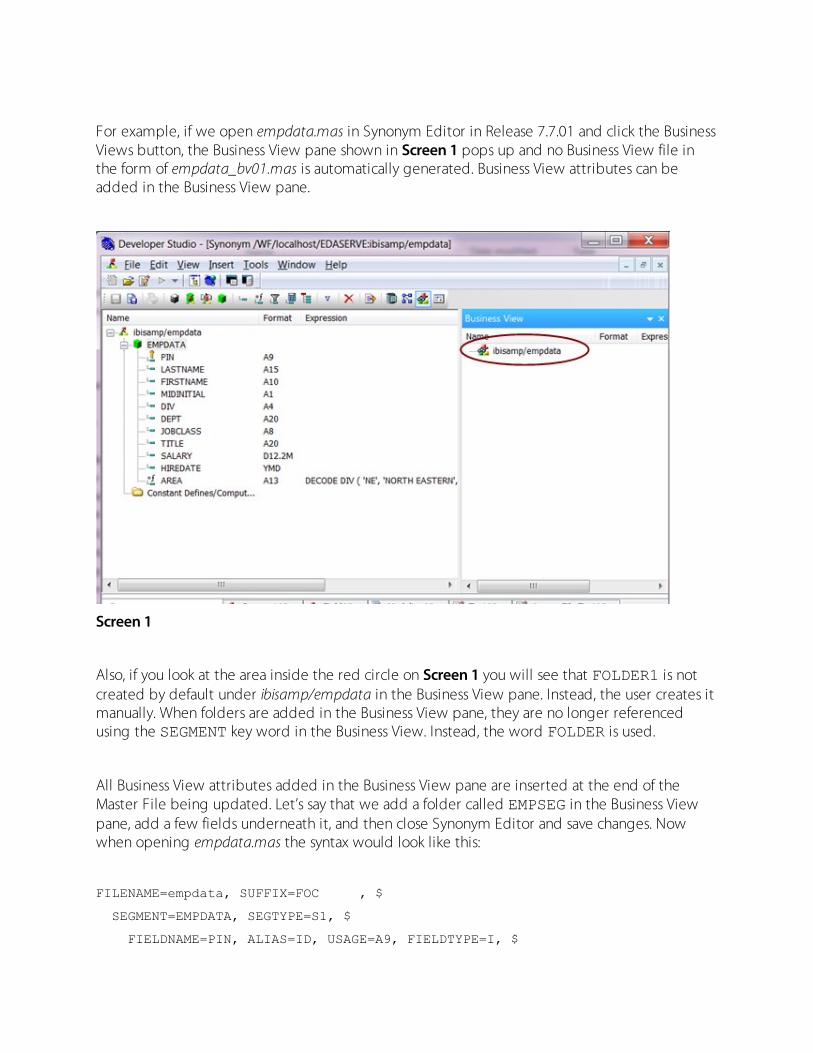
For example, if we open empdata.mas in Synonym Editor in Release 7.7.01 and click the Business Views button, the Business View pane shown in Screen 1 pops up and no Business View file in the form of empdata_bv01.mas is automatically generated. Business View attributes can be added in the Business View pane.
Screen 1
Also, if you look at the area inside the red circle on Screen 1 you will see that FOLDER1 is not created by default under ibisamp/empdata in the Business View pane. Instead, the user creates it manually. When folders are added in the Business View pane, they are no longer referenced using the SEGMENT key word in the Business View. Instead, the word FOLDER is used.
All Business View attributes added in the Business View pane are inserted at the end of the Master File being updated. Let’s say that we add a folder called EMPSEG in the Business View pane, add a few fields underneath it, and then close Synonym Editor and save changes. Now when opening empdata.mas the syntax would look like this:
FILENAME=empdata, SUFFIX=FOC , $
SEGMENT=EMPDATA, SEGTYPE=S1, $
FIELDNAME=PIN, ALIAS=ID, USAGE=A9, FIELDTYPE=I, $

FIELDNAME=LASTNAME, ALIAS=LN, USAGE=A15, $
FIELDNAME=FIRSTNAME, ALIAS=FN, USAGE=A10, $
FIELDNAME=MIDINITIAL, ALIAS=MI, USAGE=A1, $
FIELDNAME=DIV, ALIAS=CDIV, USAGE=A4, $
FIELDNAME=DEPT, ALIAS=CDEPT, USAGE=A20, $
FIELDNAME=JOBCLASS, ALIAS=CJCLAS, USAGE=A8, $
FIELDNAME=TITLE, ALIAS=CFUNC, USAGE=A20, $
FIELDNAME=SALARY, ALIAS=CSAL, USAGE=D12.2M, $
FIELDNAME=HIREDATE, ALIAS=HDAT, USAGE=YMD, $
DEFINE AREA/A13=DECODE DIV (NE 'NORTH EASTERN' SE 'SOUTH EASTERN'
CE 'CENTRAL' WE 'WESTERN' CORP 'CORPORATE' ELSE 'INVALID AREA'); $
FOLDER=EMPSEG, $
FIELDNAME=PIN, ALIAS=PIN, $
FIELDNAME=LASTNAME, ALIAS=LASTNAME, $
FIELDNAME=FIRSTNAME, ALIAS=FIRSTNAME, $
FIELDNAME=MIDINITIAL, ALIAS=MIDINITIAL, $
FIELDNAME=DEPT, ALIAS=DEPT, $
FIELDNAME=SALARY, ALIAS=SALARY, $
FIELDNAME=HIREDATE, ALIAS=HIREDATE, $
The steps performed would turn empdata.mas into a Business View. The Business View syntax (bold text) gets inserted at the end of the Master File. Again, to avoid updating empdata.mas, we can save the Business View under a different name using the “File,Save As” option before closing Synonym Editor.
To use empdata.mas as a base Master File for different Business Views, we can create a new Synonym via Synonym Editor. Let’s say we call it empdata_bv1, and then click on the Insert Reference button shown inside the red circle on Screen 2 to insert empdata.mas as a cross-reference.

Screen 2
Once empdata.mas is inserted as a cross-reference, you can open the Business View pane and add the desired Business View attributes as shown in Screen 3, for example.
Screen 3
The corresponding Business View syntax for empdata_bv1 based on the information shown on Screen 3 would look like this:
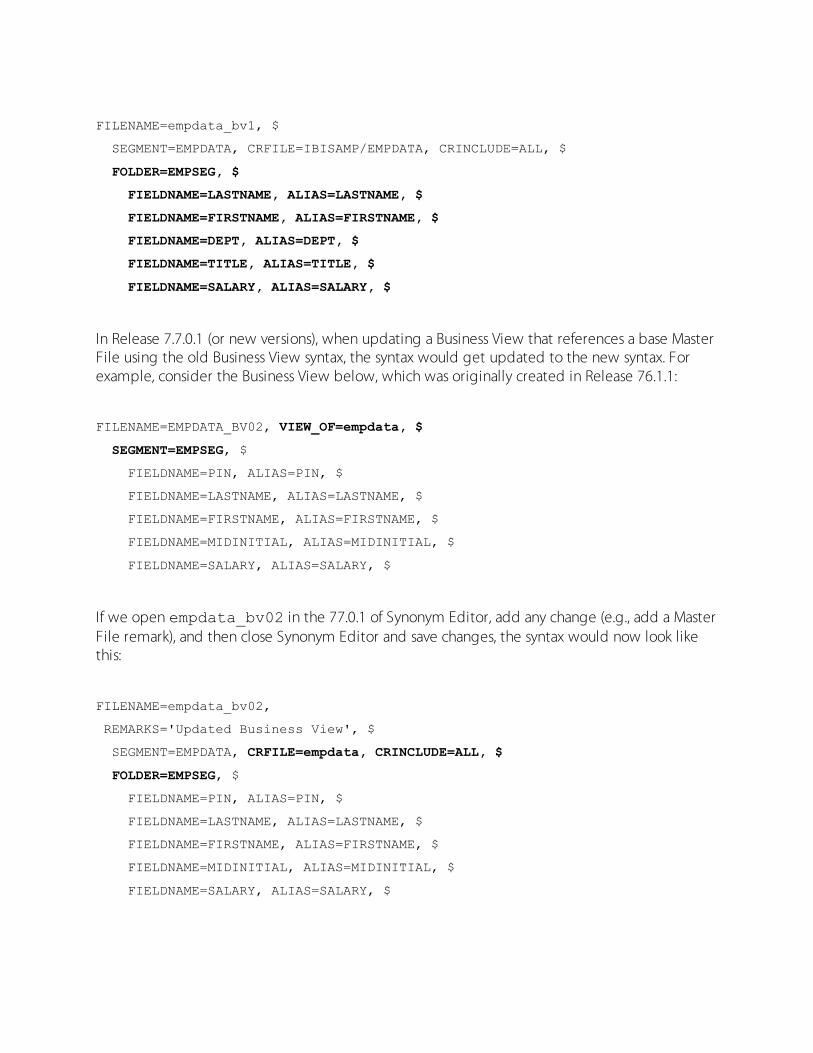
FILENAME=empdata_bv1, $
SEGMENT=EMPDATA, CRFILE=IBISAMP/EMPDATA, CRINCLUDE=ALL, $
FOLDER=EMPSEG, $
FIELDNAME=LASTNAME, ALIAS=LASTNAME, $
FIELDNAME=FIRSTNAME, ALIAS=FIRSTNAME, $
FIELDNAME=DEPT, ALIAS=DEPT, $
FIELDNAME=TITLE, ALIAS=TITLE, $
FIELDNAME=SALARY, ALIAS=SALARY, $
In Release 7.7.0.1 (or new versions), when updating a Business View that references a base Master File using the old Business View syntax, the syntax would get updated to the new syntax. For example, consider the Business View below, which was originally created in Release 76.1.1:
FILENAME=EMPDATA_BV02, VIEW_OF=empdata, $
SEGMENT=EMPSEG, $
FIELDNAME=PIN, ALIAS=PIN, $
FIELDNAME=LASTNAME, ALIAS=LASTNAME, $
FIELDNAME=FIRSTNAME, ALIAS=FIRSTNAME, $
FIELDNAME=MIDINITIAL, ALIAS=MIDINITIAL, $
FIELDNAME=SALARY, ALIAS=SALARY, $
If we open empdata_bv02 in the 77.0.1 of Synonym Editor, add any change (e.g., add a Master File remark), and then close Synonym Editor and save changes, the syntax would now look like this:
FILENAME=empdata_bv02,
REMARKS='Updated Business View', $
SEGMENT=EMPDATA, CRFILE=empdata, CRINCLUDE=ALL, $
FOLDER=EMPSEG, $
FIELDNAME=PIN, ALIAS=PIN, $
FIELDNAME=LASTNAME, ALIAS=LASTNAME, $
FIELDNAME=FIRSTNAME, ALIAS=FIRSTNAME, $
FIELDNAME=MIDINITIAL, ALIAS=MIDINITIAL, $
FIELDNAME=SALARY, ALIAS=SALARY, $

Note that in the new syntax VIEW_OF=empdata from the old syntax is changed to CRFILE=empdata, CRINCLUDE=ALL and SEGMENT=EMPSEG is changed to FOLDER=EMPSEG.
The main thing to remember when working with Business Views in Release 7.7.01 or later is that if we don’t wish to change a real Master File into a Business View, we could save the real Master File with a different name and then add the Business View attributes. As an alternative, we could create a new synonym with the desired Business View name and insert the real Master File as a cross reference file so as to use the real Master File as a base file for the Business View being created.
WebFOCUS 8: Dynamic Content By Matthew Lerner
A challenge you may have faced when working with WebFOCUS is matching the styling of your output (reports, charts, documents, etc.) to the location where you deploy them. This location may have been our Business Intelligence Dashboard or your own application. You also may have run into an issue with sizing of charts.
Both problems are easily solvable when the person designing the application is the same person building the content. In the case of the styling you would build a matching STY file to your application look. As for chart sizing, you would go back and forth until you get it just right. None of this is too bad if the output were only used in a single application.
However, if you wanted to deploy the same report in multiple applications, you either code Dialogue Manager to conditionally style the report or you maintain multiple copies of the report. As for the chart, you may have parameterized the size and written your own code to handle this. Or perhaps you keep multiple copies. Solving these problems is not fun and keeps you from solving more important issues.
WebFOCUS 8 solves both of these problems for you. When using the Business Intelligence Portal, each portal theme has a style sheet associated with it. You can choose a different sheet or even disable dynamic styling, both at the portal level or for an individual piece of output. Screens 1 and 2 show the same report dynamically styled in the Information Builders portal theme and the “purple” portal theme. As you can see, the reports match the portal without any special logic in the reports themselves.

Screen 1
Screen 2
The way this works is that when the BI Portal runs, it passes the path to a STY file as part of the request in the variable WF_STYLE. In WebFOCUS 8, you can use this in the BI Portal or you can even pass WF_STYLE in your own application. If WF_STYLE=file.sty, then file.sty must be on your Reporting Server in the server’s APP PATH.
If WF_STYLE contains an IBFS path such as WF_STYLE=IBFS://WFC/Repository/Retail/retail.sty, the style sheet referenced will be sent to the Reporting Server to be used in place of any INCLUDE= references in the procedure. Any explicit styling in the procedure will be maintained, but the INCLUDE will be done dynamically by the application.

Sizing of charts can be done in a similar fashion using the chart AutoFit feature. This feature does require some special code in the chart. Fortunately, InfoAssist takes care of this for you. In WebFOCUS 8, the Layout tab in InfoAssist allows you to set the height and width of your chart (Screen 3). By default, it also enables the AutoFit feature. When enabled, instead of hard-coding the height and width, it parameterizes them. In addition, it parameterizes the units.
Screen 3
Prior to WebFOCUS 8, the code for the height, width, and units would read:
ON GRAPH SET HAXIS 770.0 ON GRAPH SET VAXIS 405.0 ON GRAPH SET UNITS PIXELS
With AutoFit turned on, it reads:
ON GRAPH SET HAXIS &WF_STYLE_WIDTH ON GRAPH SET VAXIS &WF_STYLE_HEIGHT ON GRAPH SET UNITS &WF_STYLE_UNITS
In addition, InfoAssist issues default values at the top of the procedure in case these variables are not passed in:
-DEFAULTH &WF_STYLE_UNITS='PIXELS'; -DEFAULTH &WF_STYLE_HEIGHT='405.0'; -DEFAULTH &WF_STYLE_WIDTH='770.0';
DEFAULTH is used to stop auto prompt from asking for values. If the calling application passes values, then those are used. If not, the defaults are used.
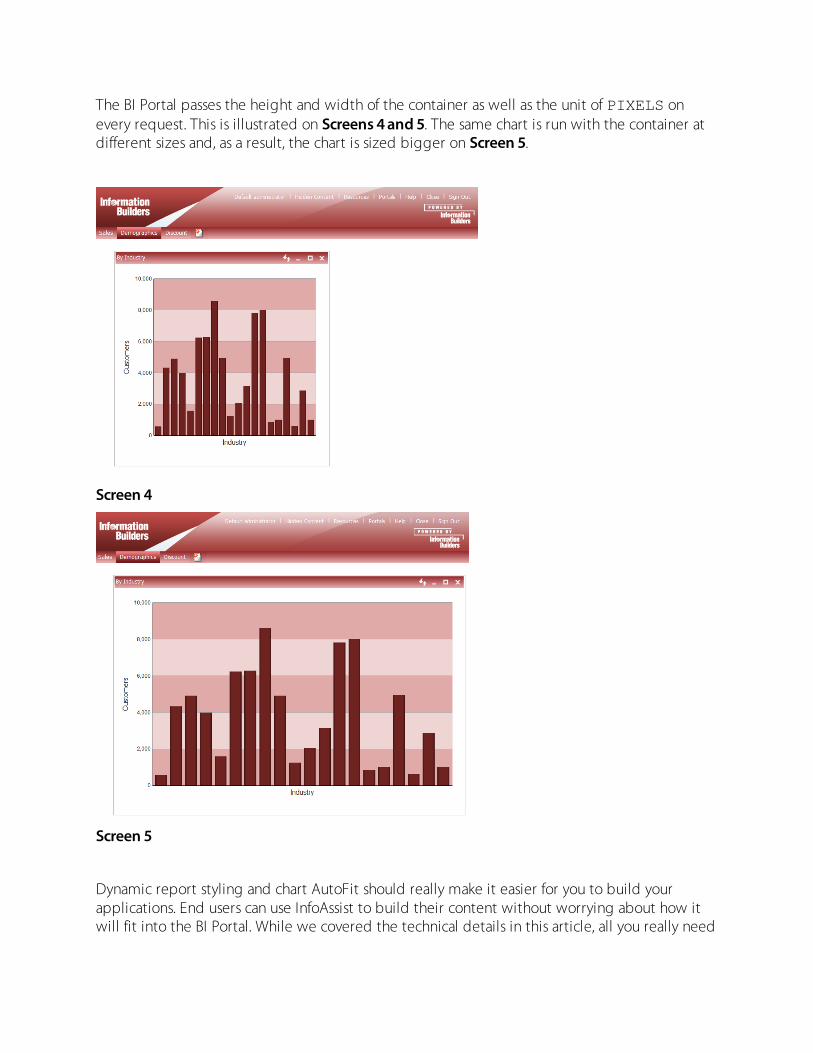
The BI Portal passes the height and width of the container as well as the unit of PIXELS on every request. This is illustrated on Screens 4 and 5. The same chart is run with the container at different sizes and, as a result, the chart is sized bigger on Screen 5.
Screen 4
Screen 5
Dynamic report styling and chart AutoFit should really make it easier for you to build your applications. End users can use InfoAssist to build their content without worrying about how it will fit into the BI Portal. While we covered the technical details in this article, all you really need
to know is that it works. Build your content once and deploy it everywhere, without any special coding on your part.
WebFOCUS Unicode Support And Configuration By Gil Rodriguez
A rapidly growing number of companies has been adapting Unicode in their systems to support multilingual applications and data. With that in mind, Information Builders has added Unicode support for the WebFOCUS Client since WebFOCUS Version 7 Release 7.02.
Prior to the 7.7.02 release, the WebFOCUS Client had support for self-service deployment only.
Unicode is now supported for the following:
• The WebFOCUS Client, including the Business Intelligence Dashboard, the Business Intelligence View Builder, the WebFOCUS Administration Console, Managed Reporting Administration, and Magnify, with the exception of the Managed Reporting Applet.
• Managed Reporting Change Management and Business Intelligence Dashboard Change Management.
• The reporting tools – Report Assistant, Graph Assistant, InfoAssist for Managed Reporting, Personal InfoAssist, Advanced Graph Assistant, and Power Painter – with the exception of Quick Data.
• ReportCaster, with the exception of the ReportCaster API and Two-Way Email.
• Developer Studio, with the exception of Maintain, Visual Discovery, and RStat.
• Migration: Unicode migration is available for customers choosing to migrate their existing WebFOCUS 7.6 Managed Reporting and Business Intelligence Dashboard environments to a Unicode-configured WebFOCUS 7.7 environment. The migration will convert specific repository data and files to Unicode. Migration from releases prior to WebFOCUS 76 are not supported.
• Self-service deployment.
What Is Unicode, and Why Use It?
Unicode is a universal character-encoding standard that assigns a different code to every character and symbol in every spoken and written language in the world. Unicode is the only encoding standard that ensures you can retrieve or combine data using any combination of languages. It is supported in many operating systems, all modern browsers, and many other

products. It is required by modern standards such as XML, Java, LDAP and other Web-based technologies.
Unicode supports data with multiple scripts such as French, Japanese, and Hebrew. It enables you to combine records from different scripts on a single report. The main benefit of a Unicode configuration is the ability to have multiple languages (European and Asian) in the following objects:
• Titles, descriptions and synonym names
• Headings, footings
• Parameter names and values in procedures
• Column names, titles, and data
• Data for supported adapters, such as Oracle, DB2 and Sybase
Configuring WebFOCUS for UTF-8 Encoding
Below are some steps for configuring a WebFOCUS environment for UTF-8 (UCS, or Universal Character Set, Transformation Format – 8-bit.)
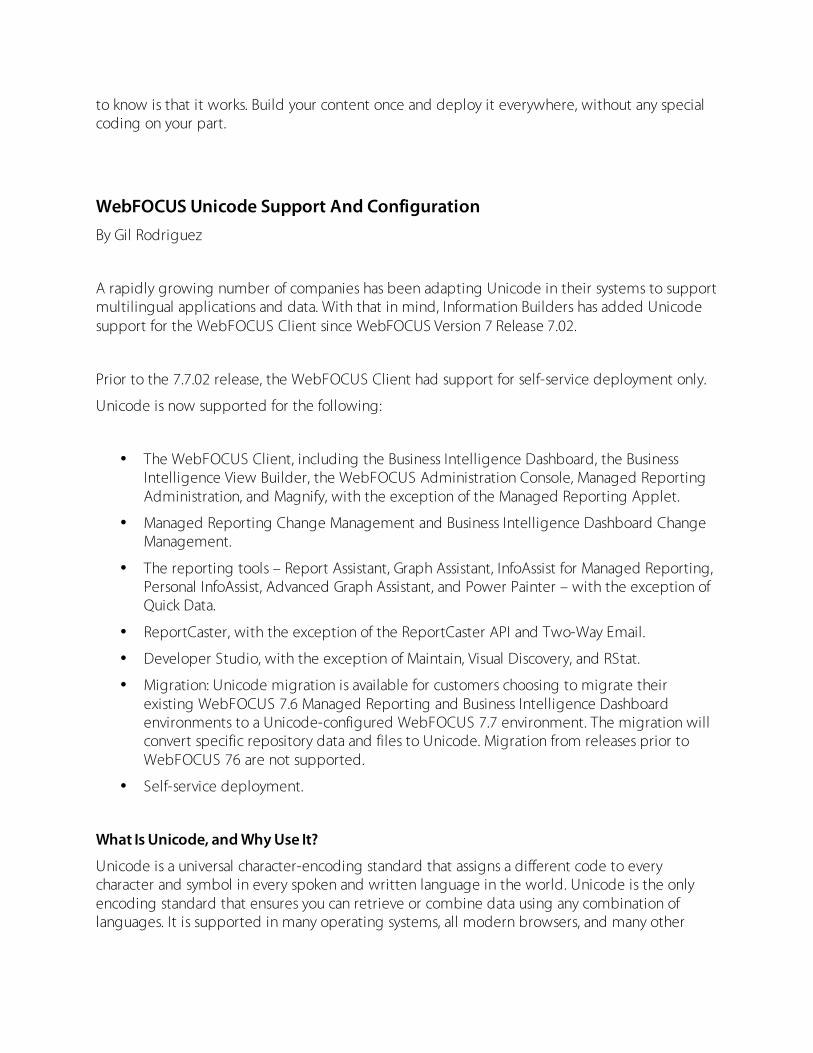
We’ll start with the application server configuration, which is Tomcat. In the Apache Tomcat Properties dialog, under the Java tab, add the following line to the Java Options (Screen 1):
-Dfile.encoding=UTF8
Screen 1
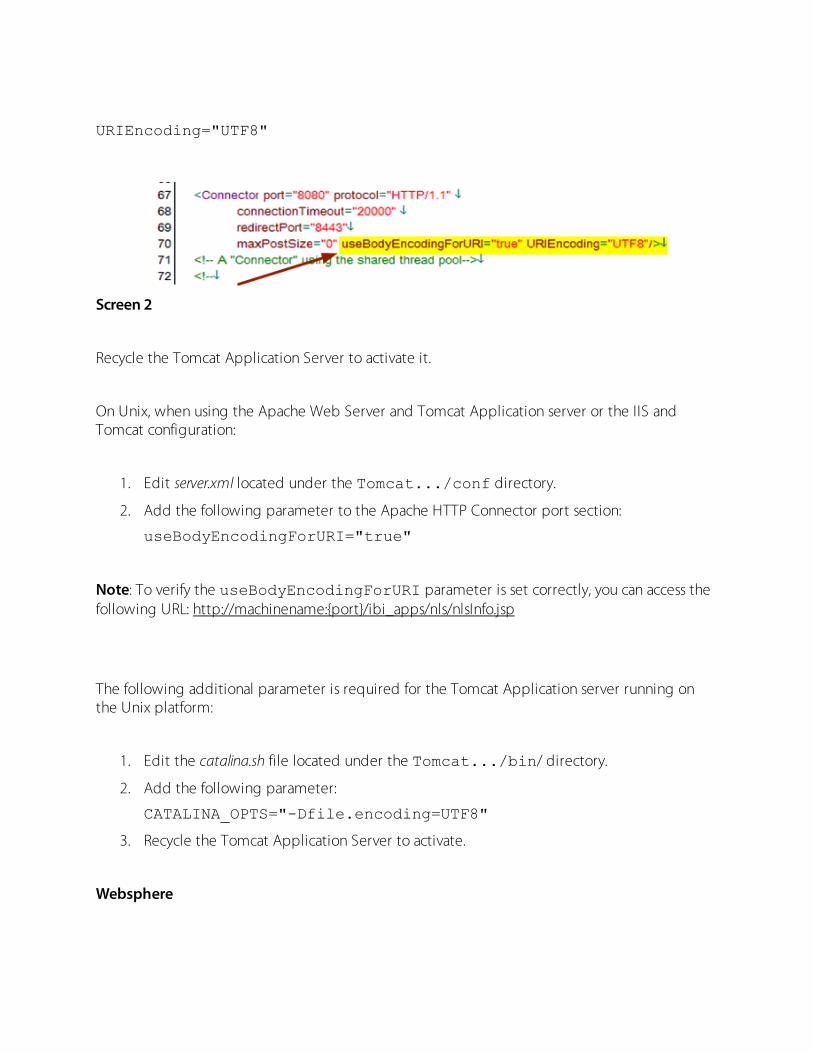
The following configuration is required to drill down to procedures named with NLS characters:
1. Edit server.xml, which is located under C:\Program Files\Apache Software Foundation\Tomcatxx\conf.
2. Add the following parameter to the connector:
useBodyEncodingForURI="true”
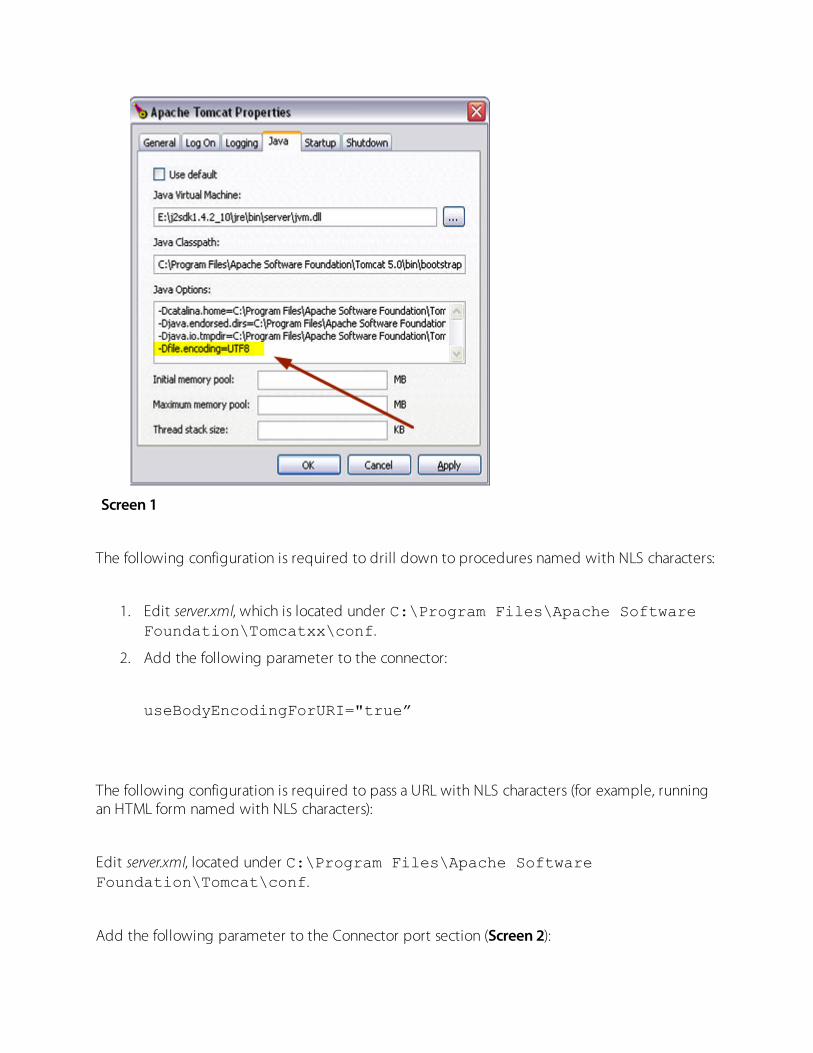
The following configuration is required to pass a URL with NLS characters (for example, running an HTML form named with NLS characters):
Edit server.xml, located under C:\Program Files\Apache Software Foundation\Tomcat\conf.
Add the following parameter to the Connector port section (Screen 2):
URIEncoding="UTF8"
Screen 2
Recycle the Tomcat Application Server to activate it.
On Unix, when using the Apache Web Server and Tomcat Application server or the IIS and Tomcat configuration:
1. Edit server.xml located under the Tomcat.../conf directory.
2. Add the following parameter to the Apache HTTP Connector port section:
useBodyEncodingForURI="true"
Note: To verify the useBodyEncodingForURI parameter is set correctly, you can access the following URL: http://machinename:{port}/ibi_apps/nls/nlsInfo.jsp
The following additional parameter is required for the Tomcat Application server running on the Unix platform:
1. Edit the catalina.sh file located under the Tomcat.../bin/ directory.
2. Add the following parameter:
CATALINA_OPTS="-Dfile.encoding=UTF8"
3. Recycle the Tomcat Application Server to activate.
Websphere

In the Integrated Solutions Console, the following line should be added to the Generic Java Virtual Machine arguments in the General Properties under Application servers > your_application_server > Process Definition > Java Virtual Machine (Screen 3):
-Dfile.encoding=UTF8 -Dclient.encoding.override=UTF8
Screen 3
International Fonts and PDF output
International Fonts must be installed in order to view international characters correctly. From the Control Panel, Open the Regional and Language Options. Select the Languages Tab and click both checkboxes under Supplemental Language Support to install additional fonts. You will need the Windows CD or access to the i386 files to complete the font installation.
The following fonts support Unicode when reporting from a Unicode data source and using PDF output format:
• Lucida Sans Unicode, which is used to display single-byte characters only. This font is available on Windows version 2000 and higher.
• Arial Unicode MS, which is used to display both single-byte and double-byte characters. This font can be installed as an option from the Microsoft Office CD, version 2000 and higher.
Note: Predefined templates may use stylesheets that refer to fonts that do not support Unicode. Please make sure to change the font if using such a stylesheet.
Code Page Configuration
The client and server code pages can be configured via the NLS sections of the WebFOCUS Administration Console and Reporting Server Web Console.

Client: 65001 (Windows and UNIX)
Server: 65001 (Windows and UNIX)
DBMS considerations
Oracle
When requesting Unicode data from an Oracle Database, the following configuration must be done in order for the unicode data to be transcoded correctly:
SET NLS_LANG=AMERICAN_AMERICA.UTF8 right below the @echo off in the /wfs/bin/edastart.bat file of the WebFOCUS Reporting Server.
ReportCaster
1. Edit the schbkr.bat file located under \ibi\WebFOCUS77\ReportCaster\bin.
2. Add the following parameter:
-Dfile.encoding=UTF8
For Derby:
1. Edit the start.bat file located under ibi\derby\bin.
2. Add the following parameter:
-Dfile.encoding=UTF8
In the ReportCaster configuration section of the WebFOCUS Administration Console, verify that the following code page values are set:
Dserver Codepage: 65001
Webserver Codepage: 65001
Zip Encoding: UTF8
WebFOCUS Developer Studio
There are no specific configurations required to configure WebFOCUS Developer Studio for Unicode.

Information Builders Customer Education is FAST By Lynn Murphy
As the economy improves and corporate budgets allow it, more companies are looking at training again as a strategic initiative. To meet that need, Information Builders offers a host of Customer Education solutions that help you effectively deploy and manage our Business Intelligence and integration technology.
Building employee skills should be considered mission-critical in every organization, and Information Builders combines traditional classroom training with a variety of tools that bring the classroom to you no matter where you are.
Meeting your needs is our top priority, and that is why we custom-design a curriculum that meets your company’s specific requirements. Your local Education Account Manager can meet with you to discuss your options and help design a training plan that is in concert with you business initiatives and corporate objectives.
In addition, Information Builders customers should make it a point to visit the Customer Education Web site, www.InformationBuilders.com/Education, where you will find information about our eLearning Store, course descriptions, new and upcoming classes, and much more.
Our education options include the following:
Worldwide training centers – Is there a training center near you? Centers are in major cities across the United States and Canada, and we offer public classes on a regular basis. A complete schedule by city can be found at our website, at www.informationbuilders.com/education.
Instructor-led online classes – Do you prefer to learn via the Web in the familiar comforts of your own office? Our instructor-led classes are the exact same as the courses taught in our training centers, but without the travel. This is a great option when you can’t travel or a course is not offered at one of our training centers at a time that works for you. Schedules and registration details are available on our Web site as well.
Instruction and mentoring at your site – Do you have a small group at your location that needs a class, or perhaps you want some mentoring to augment what you just learned in our classes? One or both of these will meet your needs, and your local Education Account Manager can assist you in determining which option is best suited to your immediate needs.

On-demand eLearning curriculum – Do you learn best when you can proceed at your own pace, or perhaps you would just like to read the course materials as time permits? Our eLearning offerings will meet your needs and give you flexibility.
WebFOCUS Certification Programs – Is certification important to you? Enhance your personal and professional credentials by becoming WebFOCUS-certified. We have specially designed certification curricula, as well as a full testing suite, to ensure your skillset and accomplishments are properly recognized.
Continuing education units – If you are working to earn college credits or looking to enhance your IT proficiency, let us know and we’ll help you plan a training plan that will increase your value in the global market.
Our education combines traditional classroom sessions with a variety of training tools that bring the classroom to you no matter where you are. Each class is crafted to offer a wealth of hands-on exercises that reinforce the key concepts necessary for understanding and maximizing WebFOCUS and iWay software solutions.
Information Builders is committed to training that is FAST – flexible, agile, strategic and timely.
Visit www.informationbuilders.com/education for more details on our course offerings, see course descriptions, learn more about our eLearning offerings, and schedule an appointment with your local Education Account Manager. Our Education Account Managers are ready to assist you and your team in planning and managing a training curriculum to help you achieve long-term success.