afsgurgaon.netafsgurgaon.net/afs/files/class-x_computer_qb.docx · web viewon selecting _____,...
TRANSCRIPT
CLASS X INFORMATION TECHNOLOGY (402)
QUESTION BANK (Class 10 )
SAMPLE PAPER
Section – A
Attempt any 10 questions (1 mark each)
1- We really enjoyed ourselves on the trip to Manali last month.
2- My house is a spacious two-bedroom flat in Mayur Lok.
3- Sound Sentry is designed to help user with auditory impairments.
4- ISP stands for Internet Service Providers
5- Paragraphs can be used to break continuous text to one or more sentences.
6- Headers can be used for inserting information at the top of each page automatically.
7- On selecting Capitalize Each Word the first character in all the words of the selected sentences will be converted to Capital Letter.
8- Conditional formatting is available under Styles group in home tab.
9- Chat option is available in Charts group under the insert tab.
10- A Calendaring Software provides the user an electronic version of a calendar.
11- Print option is available under File menu.
12- Calendar software allows the user to respond to other users meeting request.
Very short answer type questions (2 marks each). Answer any 5 questions.
13- What do you mean by P2P?
Answer - Networks in which all computers have an equal status are called P2P or peer to peer networks. Generally in such a network each terminal has an equally competent CPU.
14- What do you understand by Documents Template?
Answer - Templates or document templates refer to a sample fill-in-the-blank document that can help in saving time. Usually templates are customized documents that may have sample content, themes, etc.
For example, if you want to create a resume you can use a resume template and modify only the sections that require changes.
To view sample templates available with your word processor
Go to File > New. You will be displayed with different types of templates
For example, if you would like to create a letter, you can select the Letters option under Office.com Templates section.
15- What do you understand by Styles?
Answer - Styles or Style sets are pre-defined or customized options used for creating good looking professional documents with least efforts. You can find a number of styles available within word processor that can be applied to a document. In this exercise, you will learn to apply and manage styles.
To work with styles, open a new word document in word processor, to view list of styles, locate the Style group under Home tab
16- What do you mean by Freeze in Spreadsheet?
Answer - Freezing rows and columns is helpful feature in a spreadsheet. When you are dealing with a huge amount of data that spans several rows or columns, you may want the headers to remain constant (frozen) while you scroll through the data so that you can see the identifying names of the rows/columns.
Open a new spreadsheet. To hide a row or column, do the following:
1. In order to hide any row or column you can either select the particular row or column that is to hidden or just one cell in the corresponding row or column
2. Click on Format option available under Cells group in the Home tab
3. A drop-down list appears as shown below.
4. Click on Hide & Unhide > Hide Rows.
17- How can you insert audio clip in a presentation?
Answer - We can include audio clips to a presentation similar to that of videos. For example, you can play mild background music while making your presentation. In this exercise you will learn how to insert an audio clip in slides.
Open a new file using presentation software. Click on Sound option under Media clips group in the Insert tab, a drop down appears.
You can select the Sound from File option to insert the sound clip. A dialog box appears.
We can locate the audio clip and click OK to insert the same in the slide.
18-What do you mean by grouping object?
Answer - Grouping can help when you want to move, rotate or re-size multiple objects in a presentation. We can group objects such as pictures, clip art, shapes and text box; once grouped they appear as a single object.
To group the objects select the Group option available under Arrange group in the Format tab.
19- What do you understand by Task in Microsoft Outlook?
Answer - Tasks refers to actions that can be performed by an user, tasks may include action items such as booking a conference room, booking tickets, reminder for a task completion itself, etc.
We can create tasks in email calendar application software.
Go to File > New > Task
Short answer type questions (3 marks each). Answer any 5 questions.
20- What do you mean by prepositions ? Write any two examples of prepositions.
Answer -
Prepositions - A preposition is a word that links a noun and pronoun to other words in a sentence. For example:
1. We went to the market.
2. The market is just around the corner.
3. Many kinds of stores can be found at the market.
21- Define the following
a) Paying guest
b) Landlord
c) NoticeAnswer - a) Paying guest - Someone who lives on rent in the owner’s house.
E.g. Paying guest accommodations are easily available these days.
b) Landlord - A man who provides rooms for rent.E.g. Our landlord allows us to stay out till 10 p.m. only.
c) Notice - A formal announcement that you have to make if you want to move out/ask a tenant to leave.
E.g. The landlord has a simple rule - every tenant must give a month’s notice if they want their security back.
22- Write down the process for inserting Page Break?Answer -
23- Write short notes on the following
a) Upper Caseb) Sentence Casec) Strikethrough24- What do you understand by Slide Transition?25- What do you mean by Speaker Notes?26- What is RDBMS?
Section – B
Long answer/ Essay type questions (5 marks each). Answer any 3 questions.
27- Write down the process for transferring data on the Internet.28- Write short notes on the followinga) Web serverb) Dial upc) WiFi29- Explain different types of Charts.30- Write down the steps for creating tables in Open Office applicaion.31- What is database server? Explain Primary and Foreign key.
UNIT- 2 WEB APPLICATIONS
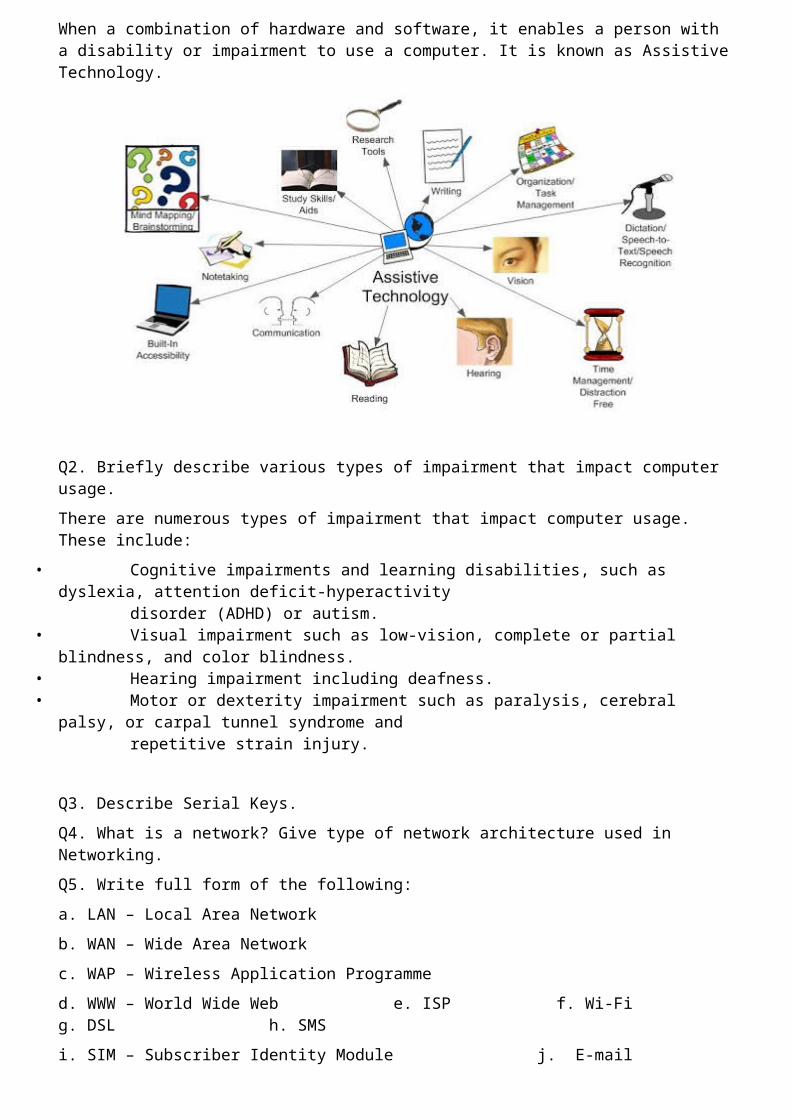
Q1. What is Assistive Technology?
Assistive Technology
When a combination of hardware and software, it enables a person with a disability or impairment to use a computer. It is known as Assistive Technology.
Q2. Briefly describe various types of impairment that impact computer usage.
There are numerous types of impairment that impact computer usage. These include:
• Cognitive impairments and learning disabilities, such as dyslexia, attention deficit-hyperactivity disorder (ADHD) or autism.• Visual impairment such as low-vision, complete or partial blindness, and color blindness.• Hearing impairment including deafness.• Motor or dexterity impairment such as paralysis, cerebral palsy, or carpal tunnel syndrome and repetitive strain injury.
Q3. Describe Serial Keys.
Q4. What is a network? Give type of network architecture used in Networking.
Q5. Write full form of the following:
a. LAN – Local Area Network
b. WAN – Wide Area Network
c. WAP – Wireless Application Programme
d. WWW – World Wide Web e. ISP f. Wi-Fi g. DSL h. SMS
i. SIM – Subscriber Identity Module j. E-mail
Q6. Write 4 advantages of using Network.
Q7. Differentiate between LAN, WAN and MAN.
Q8 What is an ISP? What is role of an ISP? Give the name of two ISP.
Q9. How is data transferred over Internet? Describe.
Q10. List any four Application Based and Web Based instant messaging software.
Q11. Explain Wired and Wireless Internet connectivity Technology.
Q12. What is major difference between IM and e-mails?
Q13. Write 5 key features of Instant Messaging?
Q14. Sate any 5 rules and etiquettes to be followed while chatting on the Internet.
Q15. Explain the purpose of a blog.
Q16. What is E-Commerce?
Q17 Explain the purpose of online transactions.
Q18. Write different kinds of online threats.
Q19. Write 7 general guidelines for making strong passwords?
Q20. Write 10 best practices one should use to protect from online threats?
Q.21 Mention four points that should be included in your resume or Curriculum Vitae.
Ans. Your details: name, address, phone number, email address
1. personal statement: a paragraph about your skills, objectives
2. Work experience
3. Education
4. skills
5. hobbies & interests
6. References
Unit 3 – Word Processing (Intermediate)
Session 1 - MODIFYING LAYOUT OF A PARAGRAPH SESSION 1. _______________ can be used to break continuous text to one or more sentences.2. Paragraph group is available under _____________.3. Default tab stop position is __________
Session 2 - MANAGING HEADERS1. ______________ can be used for inserting information at the top of each page automatically.2. Header option is available under ____________ group in Insert Tab.
Q1 – List any five items that can be added to the header area.
Session 3 - MANAGING FOOTERS1. ______________ can be used for inserting information at the bottom of each page automatically.2. The Footer option is available under ____________ group in the Insert Tab.
Session 4 - MANAGING STYLES1. __________ are customized options for creating professional looking documents with the minimum efforts.2. You can change styles by using the ____________ group under the Home tab.
Session 5 - DOCUMENT TEMPLATE1. Templates or document templates refer to a __________________ document.2. Creating a new document based on a _____________ can save you ____________ because _____________________________.
Session 6 - WORKING WITH PAGE AND SECTION BREAKS1. _____________ & _________ breaks can be used to separate a document into sections.2. Using page breaks, you can create different ____________________________.3. A section break controls the __________ of the document content that ________ it, until it reaches another section break.4. To see a section/page break, click the ________ button. Session 7 - APPLYING CHARACTER FORMATS

1. After selecting the text you need to click the _______ in the Font group to make the font size larger than the current font size.2. To remove the character formatting, select the text and click on ______in the Font group.3. On selecting _______________________, the first character in the first word of the selected sentence will be converted to Capital Letter.4. On selecting _______________________, the first character in all the words of the selected sentence will be converted to Capital Letter.Session 8 - INSERT GRAPHICAL OBJECTS AND ILLUSTRATIONS1. Embedding an object _____________ the document while linking an object does ____________ into the document files.2. Readers trying to access the linked object must also have __________ file that forms that object.3. Clip Art can help in making a document look ___________and_______________.4. Clip Art is available under ___________ Illustrations group in Insert Tab
Q1 - List any two websites that offers free clip arts.Q2 - What are Objects in a Word processing software?
Session 9 - TEXT WRAPPING1. To search for a picture, place the cursor _______ the text, click Insert Tab, and click _______ under Illustrations.2. After you have inserted the picture, you can wrap the text by using the _______ option.Q1 - List any three word wrapping options available in a word processing software.
Session 10 - INSERTING OBJECTS1. To open an embedded document, ___________ it.2. Embedded objects ______ be printed.3. When you embed objects in a document, you may have trouble emailing it because ______________________________________________.
Session 11 - INSERT SHAPES, SYMBOLS AND SPECIAL CHARACTERS1. You can insert lines, basic geometric shapes, arrows, equation shapes, flowchart shapes, stars, banners, and callouts using the ___________ option.2. Symbol option is available under _________________ group in the Insert tab.
UNIT – 4
SPREADSHEET
Autosum - Autosum is used for adding the values given in cells automatically without writing the
formula to perform the operation.
Steps to perform Autosum:
1. Select the cell in which you want sum.2. Click on Home Tab, then click the Autosum option in the Editing group.3. The values in the cell will be calculated automatically.
Note: Autosum automatically selects the values around the cells either horizontally or vertically.
Conditional Formatting - Conditional formatting allows you to change the formatting (font color, border, shading) of the cells based on the values in it. So, you specify a condition for the values in the cell, and if the condition is satisfied then automatically the formatting of the cell changes.
You can control the following formats:

Number format Font, font style, and font colour (but not font size) Fill colour and fill pattern Border colour and border style (but not border thickness)
Steps to perform Conditional Formatting:
1. Select all the cells you want to format conditionally.2. Click on Conditional Formatting option available under Styles group in the Home tab. A drop down list
appears.3. Select the desired formatting option, then specify the required values.4. Click OK
Freeze Rows and Columns - When you are dealing with a huge amount of data that spans several rows or columns, you may want the headers to remain constant (frozen) while you scroll through the data so that you can see the identifying names of the rows/columns is called Freezing of rows and columns.
Steps for Freezing Rows and Columns
1. Click on Freeze Panes option available under Window group in View tab.2. A drop down list appears as shown below. 3. Click on Freeze Panes.
Note: The panes are formed where your cursor is placed. You can also freeze the entire row or column by selecting the entire row or column and click “Freeze Panes” to freeze the entire row or column.
Hide / Unhide Rows and Columns - Sometimes you have data in rows and columns which are needed for formulas or charts, but you do not want the data to be visible. So, you can Hide / Unhide that rows and columns. The data in hidden row/column is available for calculations though not visible.
Steps to Hide a row / column:-
1. Either select the particular row/column or just one cell in the corresponding row/column.
2. Click on Format option available under Cells group in the Home tab.
3. A dropdown list appears. Click on Hide & Unhide > Hide Rows.
OR
Select the row/column, right click and select Hide.
Steps to Unhide a row / column:-
1. Select any cells before and after the cell that is hidden.
2. Click Unhide Rows in the Format option available under Home tab.
PAGE BREAKS
To print a worksheet with the exact number of pages that you want, you can adjust the page breaks in the worksheet before printing it. This feature is very useful especially when printing huge sheets.
Steps To Set Page Break
1. On the View tab, in the Workbook Views group, click Page Break Preview.2. To insert a vertical page break, select the row below where you want to insert the page break. To insert a
horizontal page break, select the column to the right of where you want to insert the page break.3. Click on Breaks down arrow under Page Setup group in the Page Layout tab.4. Click on Insert Page Break option.
5. To move a page break, simply drag the page break to the desired location.
Steps to Remove Page Break
Click the Remove Page Break option in Breaks drop down list.
Note: To return to Normal view after you finish working with the page breaks, click Normal
in the Workbook Views group under the View tab.
PAGE LAYOUT
Spread sheet software provides various page layout options for organizing pages using the Page Layout option.
Steps to set the page layout options
Click on Page Layout option under Workbook Views group on View tab. We can set
◦ Margins
◦ Orientation
◦ Page headers and footers
◦ Hide or display grid lines
◦ Size of the page
◦ Define the print area
◦ Specify the background
MARGINS
Click on Margins option under Page Setup group, a dropdown list appears.
You can either select anyone of the predefined margin options available or else you can define your own margin settings by clicking Custom Margins option and set the margin values manually from the options available under the dialog box.
ORIENTATION
You can set the orientation of the page to either Portrait or Landscape by clicking the Orientation option under Page Setup group in the Page Layout tab.
PAGE HEADERS AND FOOTERS
HIDE OR DISPLAY GRID LINES
SIZE
You can set the size of the page by clicking the Size option under Page Setup group in the Page Layout tab.
DEFINE THE PRINT AREA
Click on Set Print Area to set the selected to get printed. You can also clear the print area by clicking the Clear Print Area option.
SPECIFY THE BACKGROUND
You can specify a background for your sheet using the Background option under Page Setup in the Page Layout tab.
MANAGE WORKBOOK VIEWS
Workbook views are used for the purpose of viewing the outcome of the worksheet while printing. There are five types of views in the spreadsheet:-
1. Normal-This is the default view of the spreadsheet application. It is a collection of cells arranged in the work area.
2. Page Layout- With page layout view, you can quickly fine tune a worksheet and achieve professional looking results.
3. Page Break Preview- This option is similar to Page Layout option except you can set the area that is to be set as a page after inserting page break.
4. Custom View- With custom view, you can view selected areas of a document.5. Full Screen- Selecting this option the workbook cover the entire screen. All tabs are hidden from view.
To get back the tabs, click on File>Restore.
Multiple windows
You can open multiple windows that display the current spreadsheet and then arrange those windows in a variety of ways.
Steps to open a new window of a workbook
1. Click New Window button on the View tab, in the Window group.
Steps to arrange multiple windows
1. Click Arrange All button in the Window group. An Arrange Windows dialog box appears.2. Click either Tiled, Horizontal, Vertical, or Cascade options.3. Click OK.
APPLY CELL AND RANGE NAMES
We can assign names to cells in a worksheet and use it for quickly locating specific cells by entering the names. Range is a collection of cells.
Steps to apply range names:-
1. Keep the Ctrl key pressed and click on the cells that you want to give a name OR select the range of cells.
2. Right click and select Name a Range…. OR select Define name under Defines Names group in the Formulas tab.
3. A New Name dialog box appears. Enter the name in the Name field.4. Click OK.
CREATE MODIFY AND FORMAT CHARTS
A chart is graphical representation of data in which data is represented by symbols such as bars in a bar chart, lines in a line chart or slices in a pie chart. Spreadsheet helps to create, modify and format charts based on the data given in the spreadsheet.
Steps to create a chart:-
1. Prepare data in the spreadsheet on which you want to create the chart. Select the data.2. Click on the chart type that you want from Charts group under the Insert tab.3. A chart will be displayed in the spreadsheet.4. You can modify the chart values by making necessary modifications in the data table.
Chart has many elements, however, only some of the elements are displayed by default. Following are the elements of a chart:-
1. Chart Area2. Plot Area3. Data Points4. Horizontal and Vertical Axis5. Legend6. Chart and Axis Title7. Data Label
Chart Types
Different charts display data in very different ways. Using the best chart type and format helps you to display data visually in the most meaningful way. Following are the different types of chart:-

1. Bar charts: A bar chart (horizontal bars) emphasizes the comparison between items at a fixed period of time. This chart type also includes cylinder, cone and pyramid subtypes.
2. Column Charts: A column chart emphasizes variation over a period of time. This chart type also includes cylinder, cone and pyramid subtypes.
3. Line Charts: A line chart shows the relation of the changes in the data over a period of time.4. Pie Charts: A Pie chart shows the relationship of the parts to the whole.5. Area Charts: An area chart shows the relative importance of values over time.6. XY (Scatter) Charts: Scatter charts are useful for showing a correlation among the data points that may
not be easy to see from data alone.
SORT & FILTER DATA
Sort:- It is a feature that helps you arrange the selected data either in an ascending or descending order.
Steps to Sort Data
1. Select the data to be sorted and then click on Sort option under Sort & Filter group in the Data tab.2. Specify on what basis you need to sort the data in the Sort by field and select the order that is ascending
and descending and then click OK.
Filter:- It is a feature used for extracting particular data using some conditions.
Steps to Filter Data
1. Click the Filter option available under Sort & Filter group in the Data tab. Before applying the filter, select the data along with the header.
2. Once you click on filter, the header will be displayed with a down arrow.
CALCULATE DATA ACROSS WORKSHEETS
To summarize and report results from separate worksheets, you can consolidate data from each into a master worksheet. The worksheets can be in the same workbook as the master worksheet or in the other workbooks. The assembling of data is required so that updates and calculations can be performed easily.
Steps:-
1. Create a sheet 1 name it as year1.2. Create a sheet 2 name it as year2.3. For using sheet 1 or sheet 2 data in any of the sheets use year1! Or year2! Respectively.
For example: - if you want to add B1:B3 range of sheet 1 in sheet 2 use =SUM (year1! B1:B3).
Note: - using this feature, we can use a value of a cell located at one sheet in the another sheet.
USING MULTIPLE WORKBOOKS & LINKING CELLS
Spreadsheet also allows us to link the cells from various worksheets and from various spreadsheets to summarize data from several sources. In this way, we can create formulas that span different sources and make calculations using a combination of local and linked information. We can link the data from other spreadsheets and keep the information up to date without editing multiple locations every time, the data changes.
Steps :-
1. Open a new spreadsheet workbook.2. For example, we are using sum formula, type =sum (while the parenthesis is opened, click on Switch
Windows option under Window group in the View tab. A drop down list appears containing all the active workbooks names.
3. Click on the other workbook name eg. Book1 and select the desired cells eg. A2:A54. Press Enter. After pressing enter, we see that we are back on the previous workbook with the desired
result.
SHARING WORKSHEET DATA
Using this feature of spreadsheet, multiple users can access a single sheet simultaneously in a network location.
Steps:-
1. Click on Share workbook option under Changes group in the Review tab.2. A dialog box appears as shown below.
3. Check the option Allow changes by more than one user at the same time. This also allows workbook merging.
4. Click OK.
UNIT 5:
DIGITAL PRESENTATION (INTERMEDIATE)
SESSION 1: INSERTING A MOVIE CLIP
Movie Clips are added to the presentation in order to make the presentation colourful and meaningful.
A movie clip can be inserted in two ways:-
1. Using Insert Tab
2. Using Title and Content Layout Option
1. Steps to insert a movie in a presentation using Insert Tab are:-1) Click on Movie option under Media clips group in the Insert tab. A drop down appears.2) Select the Movie from File…option to insert the movie clip. A dialog box appears.3) Select a movie clip and click OK to insert the same in the slide. 4) A message box appears asking you how do you play the movie, i.e. Automatically or When Clicked.5) Click on any of the options available and movie clip will be inserted in the slide.
OR1) Click on Movie from Clip Organizer… option under Media clips group in the Insert tab to insert the
movie clips that are available under Clip organizer. 2) Clip Art pane will be displayed on the right side.3) Select any of the movies available and insert it in the slide.2. Steps to insert a movie in the presentation using Layout option:-1) Click on Layout option available under Slides group in the Home tab. A drop down list appears.2) Click on Title and Content option and a slide will be displayed with the same Layout.3) Insert a movie in the slide by clicking the movie icon in the Layout option. 4) A dialog box will appear. Select a movie clip and click on Open.5) A message box appears asking you how do you play the movie, i.e. Automatically or When Clicked.6) Click on any of the options available and movie clip will be inserted in the slide.
SESSION 2:- INSERTING AN AUDIO CLIP
We can include audio clips to a presentation similar to that of videos. For eg. we can play mild background music while making the presentation.
STEPS TO INSERT AN AUDIO CLIP
1. Click on Sound option under Media clips group in the Insert tab.
2. A drop down appears
3. Select the Sound from File… option to insert the sound clip.
4. A dialog box appears.
5. Locate the audio clip and click OK. The same will be inserted in the slide.
SESSION 3:- WORKING WITH TABLES
Presentation software enables the user to add tables in the slides in order to represent the statistical data meaningfully.
Tables can be inserted in two ways:-
1. Using Insert tab.
2. Using Title and Content Option
Using Insert tab:- Steps to insert table using Insert tab are:-
1. Click on Table option under Table group in the Insert tab, a drop down list appears.
2. Drag the mouse over requisite number of boxes

OR
2. Click on Insert Table … OR Draw Table options to create the table.
Using Title and Content Layout Option:- Steps to insert table using Title and Content option are:-
1. Click on Layout option available under Slides group in the Home tab. A drop down list appears, select Title and Content option.
2. Click the icon (Insert Table icon) available in the slide. A dialog box will open.
3. Enter the required number of rows and columns in the requisite boxes.
4. Click on OK button.
Session 4: Working with Charts
Presentation software enables the user to insert charts in slides to present statistical table data in a pictorial representation.
Steps to insert a chart in a slide are:-
1. Click on Chart option under Illustrations group in the Insert tab. A dialog box will appear.
2. Select a chart type among different types of the charts available.
3. Click OK. A default chart will be inserted on the slide. The default data table for that chart will be opened in a spreadsheet application separately.
4. You can edit the values in the spreadsheet and the chart will get automatically updated.
Steps to change the color and effects of the chart are:-
1. Click Chart Styles under Design tab. You can use Design tab to format the chart.
Basic guidelines for creating a chart:-
1. Convey one message per chart. Make the message the heading
2. Make the chart easy to read.
3. Make bars and columns wider than the spaces between them.
4. Be accurate.
5. Eliminate all unnecessary details.
6. Use a few (maximum four) colors per visual
Importing a table/chart in the presentation
Steps to import a table or a chart created in word/excel in the presentation are:-
1. In the Insert Object dialog box, click the Create From File option and click Browse to locate the file that contains the table or the chart.
2. Click OK, the entire document or the spreadsheet that contains the table or the chart is imported to your slide.
NOTE: If you check the Link checkbox while inserting, when you update the table in the document or the spreadsheet, then right click on the imported table or chart in the presentation, select the option Update Link, the embedded table gets updated automatically.
Session 5: Inserting Transitions
A slide transition is the visual motion when one slide changes to the next during a presentation.
Steps to insert transition effect:-
1. Select a slide.
2. Click on Animation Tab.
3. Select one of the transition effects under Transitions to this slide group and double click on it.
4. The selected effect will be applied to the selected slide.
Note:- You can set the time interval in duration option, and sound schemes in Sound option under Timing group.
Select Apply to All option under Timing group to apply the selected effect on all the slides of the presentation.
Session 6: Inserting Animations
Animations are helpful way to make your slides look more dynamic. Animation allows you to put slide elements such as text and graphics, in motion within a slide.
Steps to add animations in a presentation are:-
1. Select a slide element. Click Animations tab.
2. Click Animate under Animations group. A dropdown list appears.
3. Select any one of the animation effects. The selected animation effect will be applied to the selected element of the slide.
4. Play the slideshow to preview the effect.
Session 7: Grouping Objects
Grouping can help when you want to move, rotate or resize multiple objects in a presentation. You can group objects such as pictures, clipart, shapes and text box, once grouped they appear as a single object.
Steps to group the objects:-
1. Select all the objects that you want to group. Click the Format tab.
2. Select the Group option available under Arrange group. A drop down list appears.
3. Click on Group, to group all the selected graphical objects in the slide.
NOTE: You can ungroup the grouped objects by selecting the ungroup option available under Group dropdown list of Group option under Arrange group of Format tab.
Session 8 : Inserting Speaker Notes
Speaker Notes are guided text used by the presenter during a presentation. Speaker notes can be short or long texts that can be used as a reference by the presenter while making a presentation. Speaker notes area of the slide is hidden during slide show of the presentation.
Steps to add speaker notes:-
1. Select the slide and type the notes in the Click to add notes area located at the bottom of the presentation.
OR
1. Select View tab and click Notes page under Presentation Views group. Type the notes.
Session 9: Reviewing Content
You should always review the presentation and make changes if required before you present it to the audience. Presentation software includes options such as spell checks for correcting errors in a presentation.
Guidelines to review the presentation are:-
Do a thorough spell check across all slides
Perform a manual spell check for terms that is not included during the standard spell check.
Remove irrelevant content such as images or clipart, terms, etc. if they are not required.
Tips to make an effective presentation:-
1. Know your topic – Do the research first and know your material, think through what and how you will present the matter before making a presentation.
2. Use Key phrases about your topic – Good presenters use key phrases and include only the most important information. Highlight key points that are necessary for the audience to remember. Keep the points as short as possible.
3. Avoid too much text on each slide – Do not write whole speech on the slides. The slide show is meant to accompany your oral presentation. Summarize the content as bullet points.
4. Limit the number of slides – Too many slides in a presentation may cause you to rush to get through them and your audience will pay more attention to the changing slide than to what you are saying. On average, one slide per minute is about right in a classroom presentation.
5. Plan the layout of your slide – Make your slide easy to follow. Put the title at the top. Phrases should read left to right and top to bottom. Keep important information near the top of the slide.
6. Avoid fancy fonts – Make sure the fonts, design and colors are consistent throughout the presentation. Don’t use different styles for each slide. Use fonts that are readable. Do not use all capital letters as it may be difficult to read.
7. Use contrasting colors of text and background - Use reasonable mix of text color and background. Dark text on a light background is usually the best as this combination offers the maximum visibility.
8. Use a slide design template to keep your presentation look consistent – Always use a single background on all slides, do not use multiple backgrounds. Use a pleasant template or style set as it will attract the audience and they will not lose their focus.
9. Use animations and transitions sparingly – Always use animations and transitions in a limited amount. As using this feature in every piece and every place can be very distracting for the audience.
10. Also, always review the presentation 2 – 3 times before making a presentation – This can help in reducing or eliminating any errors in it. Remove irrelevant points during the review, add or remove images during review. Make necessary corrections before presenting it to a larger audience.
SESSION 11: PRINT A PRESENTATION
Sometimes, there is a need to provide the print outs of the presentation to the audience, as a reference material. You can print notes, handouts or outline of the presentation using the presentation software.
Steps to Print A Presentation (Notes)
1. Open the presentation and select the Print option.
2. Select the Notes Page option under print what: dropdown list.
3. Click OK.
Steps to Print A Presentation (Handouts)
1. Open the presentation and select the Print option.
2. Select the Handouts option under print what: dropdown list.
3. Select the number of slides to be printed on a single page under Slides per page dropdown under handouts group.
(This option will reduce the wastage of paper as multiple slides can be printed on a single sheet.)
Steps to Print A Presentation (Outline)
1. Open the presentation and select the Print option.
2. Select the Outline view option under print what: dropdown list.
3. Click OK
(This option will print only the text part of the presentation.)
===============CHAPTER ENDS===============

Unit 2 – Web Applications (Basics)
Session 1 - WORKING WITH ACCESSIBILITY OPTIONS
1. The option in Microsoft Windows XP used for helping users with physical disabilities and to reduce repetitive strain is Accessibility option.
2. Sound Sentry is designed to help users with auditory impairments.
3. The High Contrast option in Microsoft Windows XP is designed to assist people with vision impairments.
4. Serial Keys is designed to assist people that have difficulty using a keyboard or a mouse.
Session 1 – NETWORKING FUNDAMENTALS
1. The acronym for LAN is Local Area Network.
2. Three types of Wired Internet Connectivity are Dial-Up, DSL & Cable Internet Access.
3. Three types of Wireless Internet Connectivity are 3G, WIMAX & Wi-Fi.
Q1 - What is the definition of networking?
Answer - A computer network is a collection of computers and other hardware components interconnected by communication channels (cables or satellites) that allow sharing of resources and information.
Q2 - What are the advantages of networking?
Answer – Some of the advantages associated with networking are:
Data Sharing: One of the most important uses of networking is to allow the sharing of data. Users can send text files, spread sheets, documents, presentations, audio files, video files, etc. to other users.
Hardware Sharing: Hardware components such as printers, scanners, etc. can also be shared. For example, instead of purchasing 10 printers for each user, one printer can be purchased and shared among multiple users thus saving cost.
Internet Access Sharing: You can purchase a single Internet connection and share it among other computers in a network instead of purchasing multiple Internet connection for each computer. This is very commonly found in Internet café (browsing centres), schools, colleges, companies, etc.
Usage of network based applications: Such as web browsers, email clients, chat application, audio & video calling, etc. is another advantage.
Q3 - What are the different types of networking?
Answer – There are two major types of network Local Area Network (LAN) and Wide Area Network (WAN).
Local Area Network
A local area network (LAN) is one which connects computers and devices in a limited geographical area such as home, school, computer laboratory, office building, or closely positioned group of buildings.
Usually local area networks offer very high speeds and are used for connecting computers and peripherals such as printers, scanners, etc.
Wide Area Network
A wide area network (WAN) is one which covers a broad area (i.e., any network that links across metropolitan, regional, or national boundaries). The Internet is the most popular WAN, and is used by businesses, governments, non-profit organizations, individual consumers, artists, entertainers, and many others.

Q4 - Explain LAN and WAN.
Answer –
Local Area Network
A local area network (LAN) is one which connects computers and devices in a limited geographical area such as home, school, computer laboratory, office building, or closely positioned group of buildings.
Usually local area networks offer very high speeds and are used for connecting computers and peripherals such as printers, scanners, etc.
Wide Area Network
A wide area network (WAN) is one which covers a broad area (i.e., any network that links across metropolitan, regional, or national boundaries). The Internet is the most popular WAN, and is used by businesses, governments, non-profit organizations, individual consumers, artists, entertainers, and many others.
Session 3 – INTRODUCTION TO INSTANT MESSAGING
1. Instant messaging (IM) is a form of communication over the Internet that offers an instantaneous transmission of text-based messages from sender to receiver.
2. Microphones, Headsets, Speakers & Web Camera are required for audio and video conferencing.
Q1 - List any five application based instant messaging software.
Answer - Application based instant messaging software is downloaded and installed on user’s computer. Some of the popular instant messaging software are:
1. Google Talk
2. Yahoo! Messenger
3. Skype
4. Windows Live Messenger
5. Rediff Bol
Q2 - What do you mean by instant messages?
Answer - Instant messaging (IM) is a form of communication over the Internet that offers an instantaneous transmission of text-based messages from sender to receiver.
Most instant messaging software include the option for performing file transfers, audio chat, video calling and conferencing, sharing desktops, etc. apart from standard text chat.
Instant messaging software is widely used for personal and commercial use.
Session 4 – CHATTING WITH A CONTACT – GOOGLE TALK
Q1 - State any 03 rules and etiquettes to be followed while chatting on the Internet.
Answer - There are some general rules and etiquettes to be followed while chatting. They are almost the same as those that apply for emails.
1. Messages should be short and to the point.
2. Always introduce yourself by name if your screen name doesn’t reflect it.
3. Always ask if the other person has time to chat first - regardless of how important you think what you have to say is, it’s not going to be well received if the recipient is busy.
4. In a business environment, know exactly what you want to discuss.
5. Typing your messages in uppercase is extremely rude - it’s considered shouting and very aggressive.

6. Give people time to respond - Multiple questions sent to a recipient before they’ve had a chance to answer can seem more like an interrogation rather than a conversation.
7. Wherever possible, give the person you are communicating with your undivided attention. It’s not just a sign of respect, but if you have multiple conversations happening or are allowing other issues to distract you, you may miss an important point in the other person’s messages or lose the gist of the conversation.
8. It’s important to properly end an IM conversation - you may think the chat is over, but the other person may not. While you’re off doing other things, they may be sitting there staring at the screen waiting for further communication from you!!
Q2 - What are the basic needs to use instant messaging (chat) softwares.
Answer – Before, start using Yahoo! Messenger, a Yahoo Mail account is required. If you don’t have a Yahoo! Mail Account already you can use the built in option for creating a new Yahoo! Mail Account.
You should a list of contacts that are available for chat. If you don’t have any contacts, you can add their Yahoo Mail account to your contact list by sending an invite.
Session 5 – CREATING AND PUBLISHING WEB PAGES – BLOG
Q1 - Explain the purpose of a blog.
Answer – A blog is a discussion style site used by non-technical (or technical users) users for creating personal web pages.
Blogs are similar to an online personal diary and simple to use.
We can use a blog to convey messages about events, announcements, news, reviews, etc. Blogs are usually managed using a web browser and this requires active internet connection.
Q2 - List any 5 websites that provide blog service.
Answer – There are hundreds of websites that offer blog service for free. Some of the popular blogs include:
1. www.WordPress.com
2. www.blogger.com
3. www.blog.com
4. www.weebly.com
5. www.blogsome.com
Q3 - Difference between web page and website.
Answer – Web page and Website are relevant but distinct words.
A web page can be considered as a single entity whereas a website is a combination of web pages. Web pages are accessed through a browser while in website HTTP, and DNS protocols are used to access it.
Session 6 – USING OFFLINE BLOG EDITORS
Q1 - Explain the purpose of an offline blog editor.
Answer - If we do not have an active internet connection, we can create blogs using a blog application and publish the blog whenever internet connectivity is available.
Q2 - List any five offline blog editors.
Answer - There are several free offline blog editors available that can be downloaded and installed on the local computer such as
1. Qumana
2. Windows Live Writer
3. Blogdesk
4. MarsEdit
5. BlogJet
6. Blogo
Session 7 – ONLINE TRANSACTION
Q1 - Explain the purpose of online transactions.
Answer - Online shopping is a form of electronic commerce where customers can buy or sell goods over the Internet. Customers need to have an active internet connection for viewing goods or services offered by a seller.
Customers can pay online using a credit, debit card or by internet banking.
Online shopping could be useful in situations when:
• A customer does not have sufficient time to visit stores.
• Visiting a store is more expensive than purchasing a product online.
• A product or service that is not available in the local market is available online.
Q2 - List any five websites that allow online transactions.
Answer - Some of the popular online transaction websites are:
1. IRCTC, an online portal for booking flight and train tickets.
2. Flipkart, an online shopping portal for buying consumer products.
3. EBay, an online portal for buying and selling goods.
4. Redbus, an online portal for booking bus tickets.
5. Paytm, an online portal for recharge and paying bills.
Q3 - List any three payment tools to use online transactions.
Answer - To perform an online transaction, all you need is a web browser and an active internet connection.
In some cases where purchasing is involved, you will need a valid credit card, debit card or online banking support referred to as Net Banking Subscription. Some websites even allow COD (Cash on delivery) where the users can pay once they receive the product or service.
Session 8 – INTERNET SECURITY
Q1 - Explain the purpose of Internet Security.
Answer - Internet security is a branch of computer security specifically related to the Internet, often involving browser security but also network security. Its objective is to establish rules and measures to use against attacks over the Internet. The Internet represents an insecure channel for exchanging information leading to a high risk of intrusion or fraud, such as phishing.
Q2 - Explain different kinds of online threats.
Answer - Online threats such as Phishing, email spoofing, chat spoofing, etc. can increase the chances of users getting compromised.
Phishing –
Email Spoofing –
Chat Spoofing –
UNIT – 7
Database Development
Database – A database is an organized collection of data. For example:- In a stationary shop, detailed records of the materials available in the shop is database. Similarly in a computerized system, we need to maintain several files, we would used database programs such as Microsoft Access, OpenOffice.org Base, and MySQL. These database programs are used to organize the data as per our needs in the computer system.
Database Management System (DBMS) - A database management system is a software package with computer programs that controls the creation, maintenance and use of a database. A DBMS allows different user application programs to concurrently access the same database. Some of the DBMSs are Oracle, IBM DB2, Microsoft SQL server, Microsoft Access, PostgreSQL, MySQL, FoxPro and SQLite.
Data can be organized into two types:-
Flat File: Data is stored in a single table. Usually suitable for less amount of data.
Relational: Data is stored in multiple tables and the tables are linked using a common field. Relational is suitable for medium to large amount of data.
Database Servers – Database servers are dedicated computers that hold the actual databases and run only the DBMS and related software. Databases on the database servers are accessed through command line or graphic user interface tools referred to as Frontends; database servers are referred to as Back-ends. Such type of data access is referred to as Client-server model.
RDBMS:- A relational database management system (RDBMS) is a database management system that is based on the relational model. In the relational model of a database, all data is represented in terms of tuples (rows), grouped into relations (tables). A database organized in terms the relational model is a relational database.
Database Concepts:- Database contains objects that are used for storing and managing information.
1. Item : - Item is about which information is stored in the database.
2. Field:- Each question that we ask about our item is a Field.
3. Record:- Record is a set of information (made up of fields) stored in your database about one of the items.
4. Value:- Value is the actual text or numerical amount or date that you put in while adding information to your database.
For example,
Database :- Employee
Emp_Code
Emp_Name
Emp_Address
Emp_Designation
Emp_ContactNo
Emp_Salary
E001 ABC Meerut Manager 9876543210 Rs. 50,000
Item : Employee
Field : Emp_Code , Emp_Name , Emp_Address , Emp_Designation , Emp_ContactNo , Emp_Salary
Record :
E001 ABC Meerut Manager 9876543210 Rs. 50,000
Value : E001 , ABC , Meerut , Manager , 9876543210 , Rs. 50,000
5. Key Field :- Key Field is a value in a Field that uniquely identifies the record. Eg. E001 which is unique to every employee.
Important Question :- How data is organized in a RDBMS ?
Ans :- In RDBMS, data is organized in the form of inter linked tables.
SESSION 2:- DATA STORAGE
TABLE :- A table is a set of data elements that is organized using a model of vertical columns and horizontal rows. Each row is identified by a unique key index or the key field.
COLUMNS OR FIELD :- A column is a set of data values of a particular simple type, one for each row of the table. For eg. Emp_Code , Emp_Name , Emp_Address etc.
ROWS OR RECORDS OR TUPLES :- A row represents a single, data items in a table. Each row in a table represents a set of related data, and every row in the table has the same structure.
DATA TYPES :- Datatypes are used to identify the type of data we are going to store in the database.
Categories of data types:- Data types can be broadly classified into five categories:-
1. Numeric Types
2. Alphanumeric Types
3. Binary Types
4. Date Time
5. Other variable Types
NUMERIC TYPES:- They are used for describing numeric values like mobile number, age, etc.
The different types of numeric data types available are-
1. Boolean (Yes / No) 6. Numeric
2. TinyInt (Tiny Integer) 7. Decimal
3. SmallInt (Small Integer) 8. Real
4. Integer 9. Float
5. BigInt (Big Integer) 10. Double
ALPHANUMERIC TYPES:-
The list of different datatypes available in alphanumeric types are :-
1. LongVarChar (Memo) (Long Text)
2. Char (Text-fix) (Small Text)
3. VarChar (Text) (Text of specified Length)
4. VarChar_IgnoreCase (Text) (Comparisions are not case sensitive)
BINARY TYPES:-
Binary types are used for storing data in binary formats. It can be used for storing photos, music files or (in general file of any format) etc.
The list of different datatypes available in Binary types are :-
1. LongVarBinary (Image)
2. Binary (Binary (fix) )
3. VarBinary (Binary)
DATE TIME:-
Date time data types are used for describing date and time values for the field used in the table of a database. It can be used for storing information such as date of birth, date of admission etc.
The list of different data types available in Date Time type are :-
1. Date (Stores month, day and year information)
2. Time (Store hour , minute and second information)
3. Timestamp (Stores date and time information)
PRIMARY KEY:- A primary key is a unique value that identifies a row in a table. These keys are also indexed in the database, making it faster for the database to search a record.
FOREIGN KEY:- The foreign key identifies a column or set of columns in one (referencing) table that refers to a column or set of columns in another (referenced) table.
Note:- The “one” side of a relation is always the parent, and provides the PK(Primary Key) Attributes to be copied. The “many” side of a relation is always the child, into which the FK(Foreign Key) attributes are copied.
Memorize it : one, parent, PK (Primary Key) ; many, child , FK (Foreign Key)
SESSION 3
MANIPULATING DATA
In a database we can define the structure of the data and manipulate the data using some commands.
There are two types of languages:-

1. DDL (Data Definition Language)2. DML (Data Manipulation Language)
DATA DEFINITION / DESCRIPTION LANGUAGE:- It is a standard for commands that define the different structures in a database. DDL statements create,modify and remove database objects such as tables, indexes and users.
Common DDL Statements are:-
1. Create :- Used to create database objects.
2. Alter :- Used to modify database objects.
3. Drop :- Used to delete database objects.
DATA MANIPULATION LANGUAGE:- It is a standard for commands that enables users to access and manipulate data in a database.
Common DML Statements are:-
1. SELECT :- Used for retrieval of information from the database.
2. INSERT :- Used for insertion of new information into the database.
3. DELETE :- Used for deletion of information in the database.
4. UPDATE :- Used for modification of information in the database.
Types of DML:-
1.Procedural:- The user specifies what data is needed and how to get it.
2. Non Procedural :- The user only specifies what data is needed.
Note:- A popular data manipulation language is SQL (Structured Query Language.)