walk-in slide: au 2014 social media...
TRANSCRIPT
1. Click on the link below, this will open your web
browser
http://aucache.autodesk.com/social/visualization.html
2. Use “Extended Display” to project the website on
screen if you plan to work on your computer. Use
“Duplicate” to display same image on screen and
computer.
Walk-in Slide: AU 2014 Social Media Feed

Join us on Twitter: #AU2014
Everything Electrical for Revit MEP ®
Don Sarmiento Geoff GunnSenior CAD Technician Senior Engineer
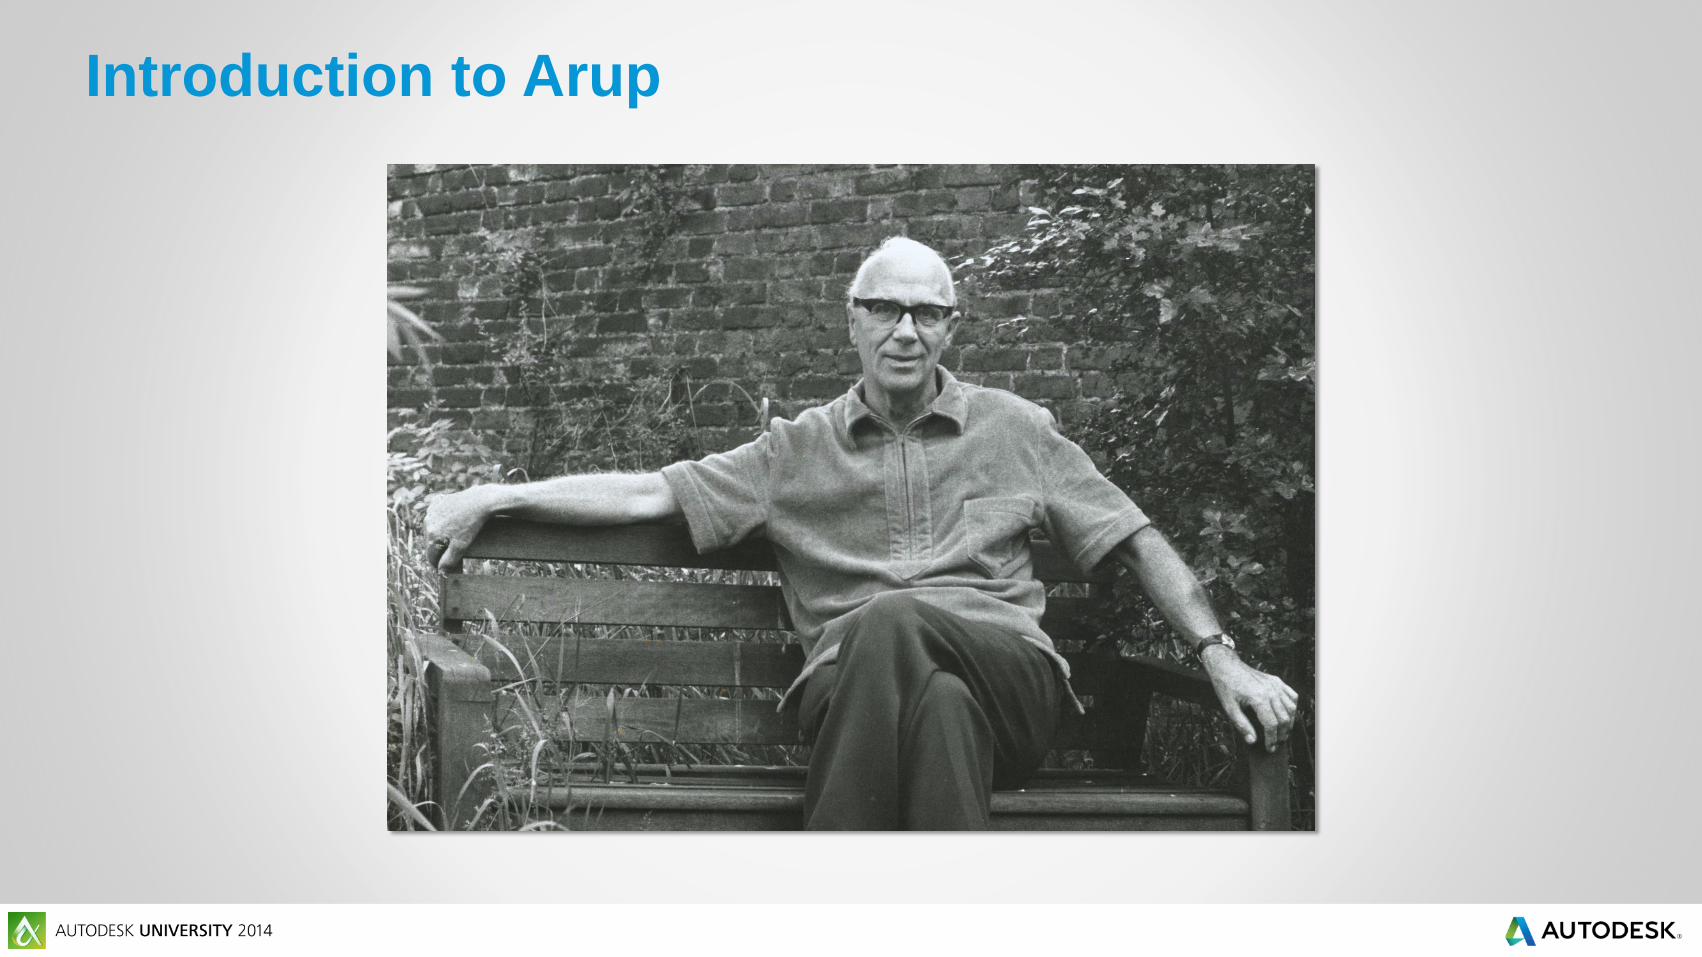
Introduction to Arup

The title of this class speaks for itself. You will learn everything you need to know
about Revit MEP software, focusing entirely on the electrical side. Topics will
include managing your project template; creating 2D annotation symbols and
electrical families; creating more efficient diagrams; using filters for your
electrical systems; and laying out fixtures. We’ll also look at devices and
equipment, circuiting, and scheduling. We will cover techniques for achieving
better coordination between disciplines (mechanical, electrical, and plumbing)
and making the most out of Revit MEP software and we will discuss some best
practices. We will also share with you an actual project that implemented items
discussed during this lecture.
Class Summary
At the end of this class, you will be able to:
Learn different techniques for efficient diagrams and discover why it's
better in Revit software—forget linked CAD files
Key Learning Objectives

At the end of this class, you will be able to:
Learn different techniques for efficient diagrams and discover why it's
better in Revit software—forget linked CAD files
Learn how to create efficient 2D annotations and electrical families and
discover that it's not always about how they look, but how they work
Using filters for better workflow. You'll be surprise what filters can do for
you
Learn about coordination practices between electrical and mechanical,
plumbing, and lighting, and discuss how we could handle this
Key Learning Objectives

Techniques for Efficient
Diagrams in Revit

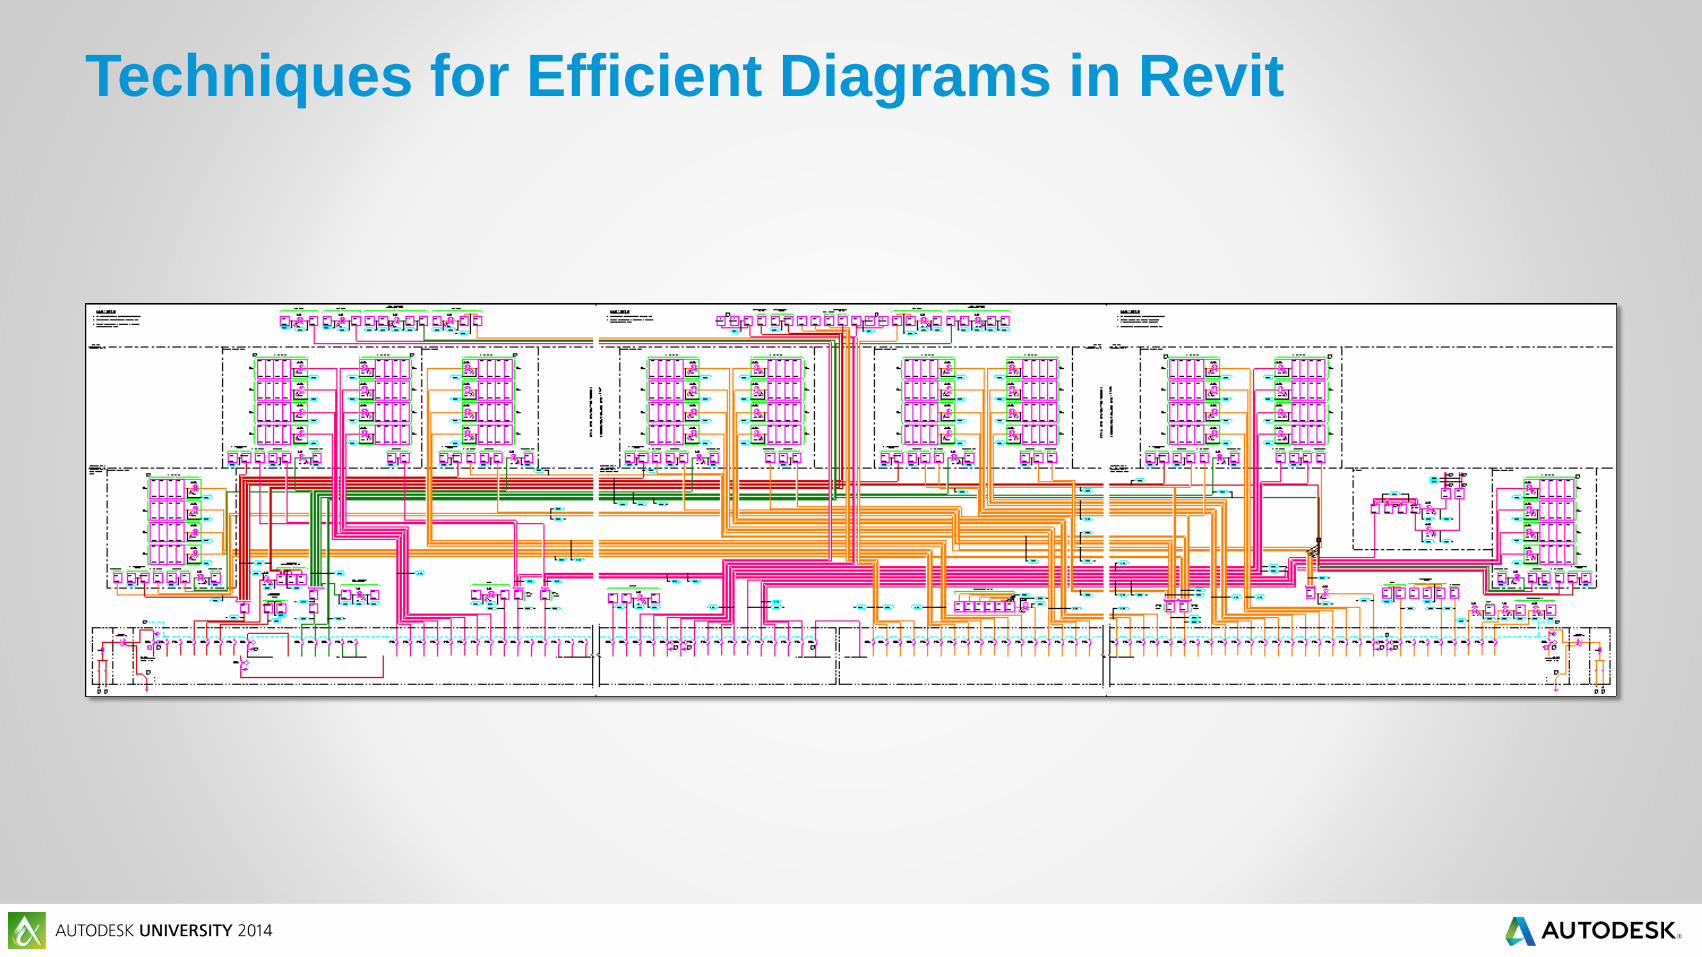
Techniques for Efficient Diagrams in Revit

Techniques for Efficient Diagrams in Revit

Techniques for Efficient Diagrams in Revit
Techniques for Efficient Diagrams in Revit
Techniques for Efficient Diagrams in Revit
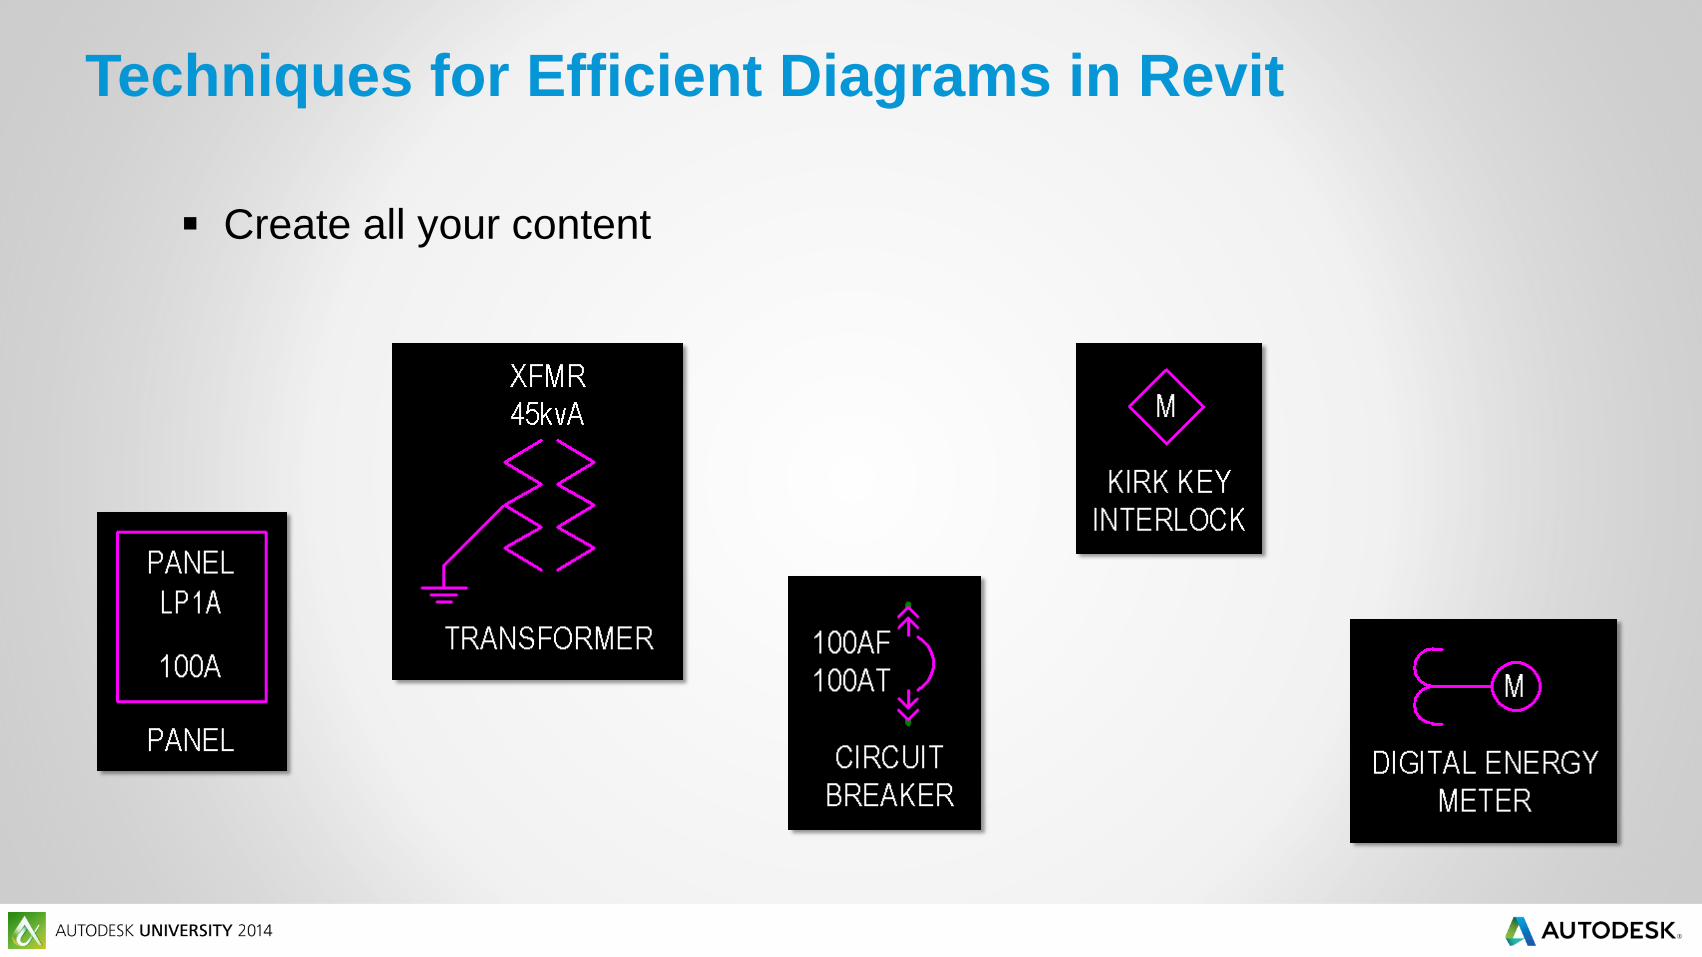
Create all your content
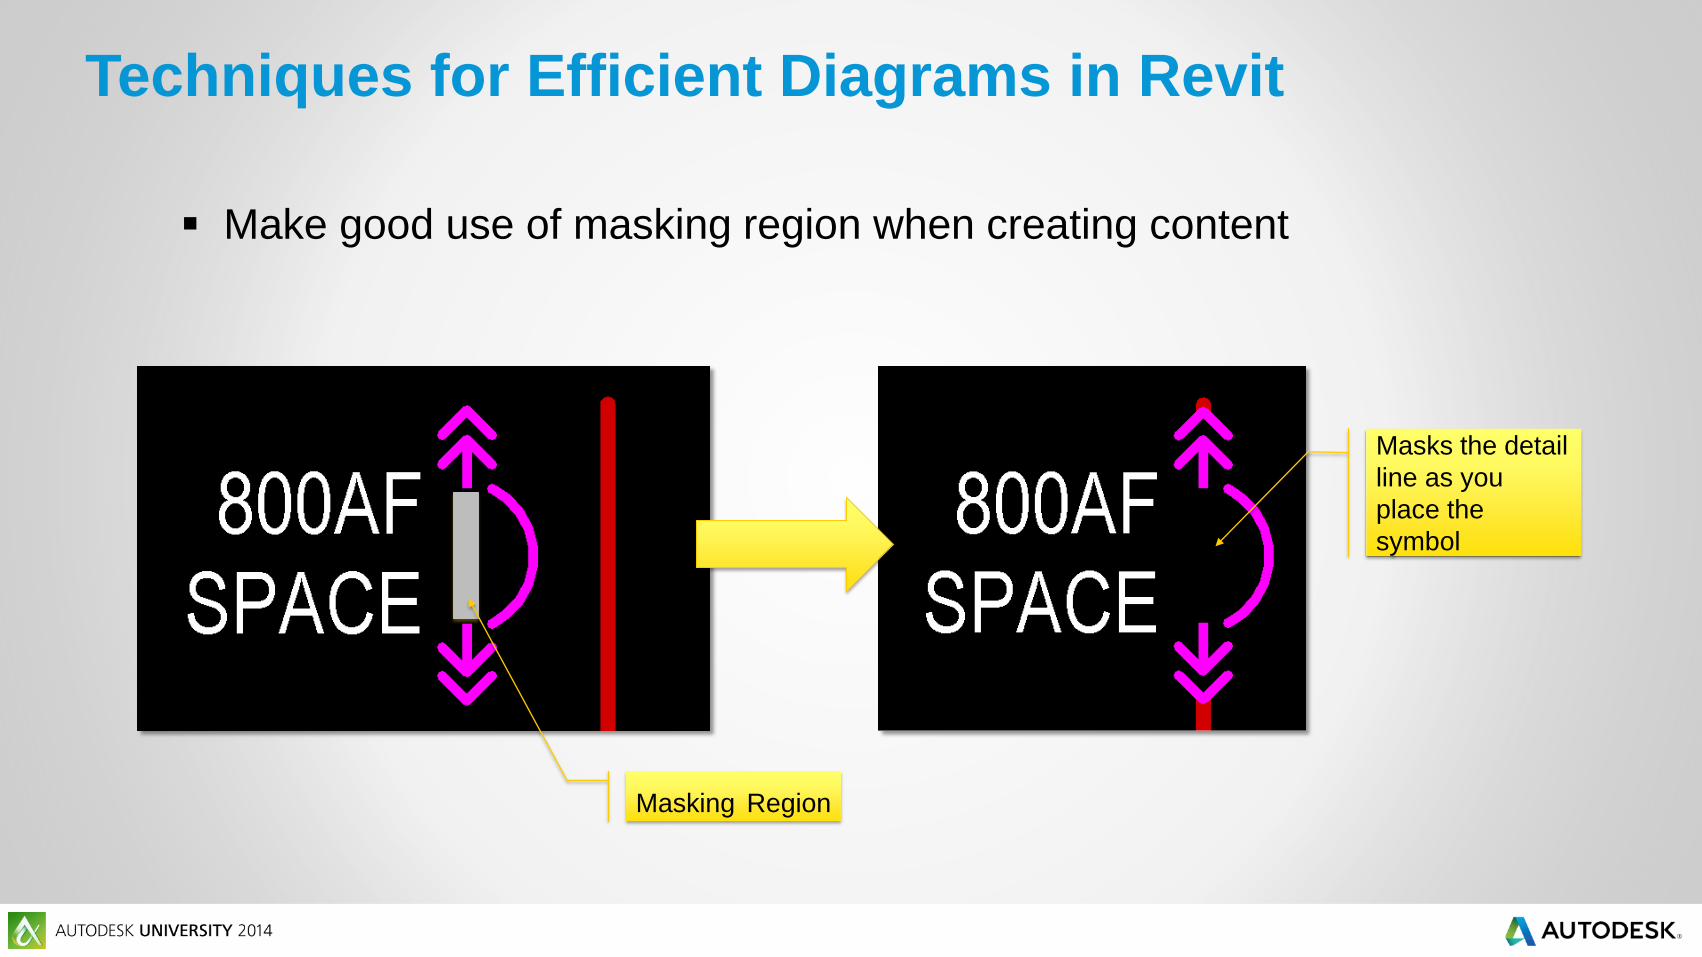
Make good use of masking region when creating content
Masking Region
Masks the detail
line as you
place the
symbol
Techniques for Efficient Diagrams in Revit


Techniques for Efficient Diagrams in Revit
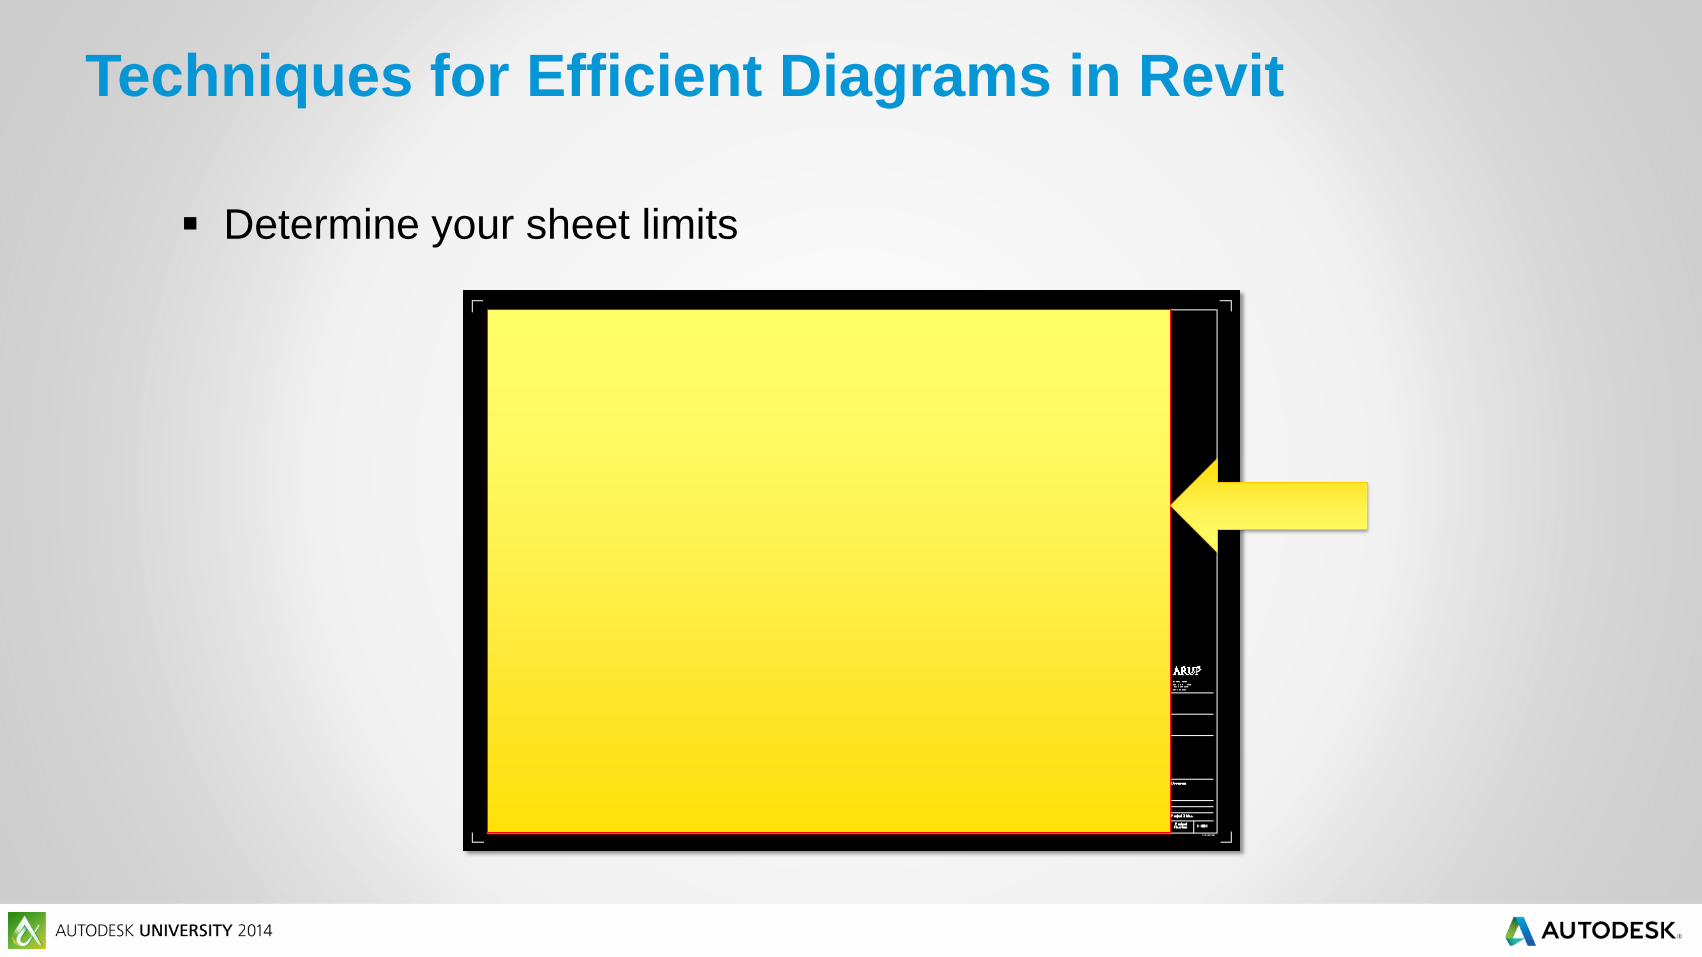
Determine your sheet limits

Techniques for Efficient Diagrams in Revit
Create a grid guide in your
drafting view or floor plan
that matches your sheet
limits
Detail Item Family Grid
Guide set at 1/8” spacing

Techniques for Efficient Diagrams in Revit
Pin the grid guide

Techniques for Efficient Diagrams in Revit
Pin the grid guide
Click on the “Select
Pinned Element” icon

Techniques for Efficient Diagrams in Revit
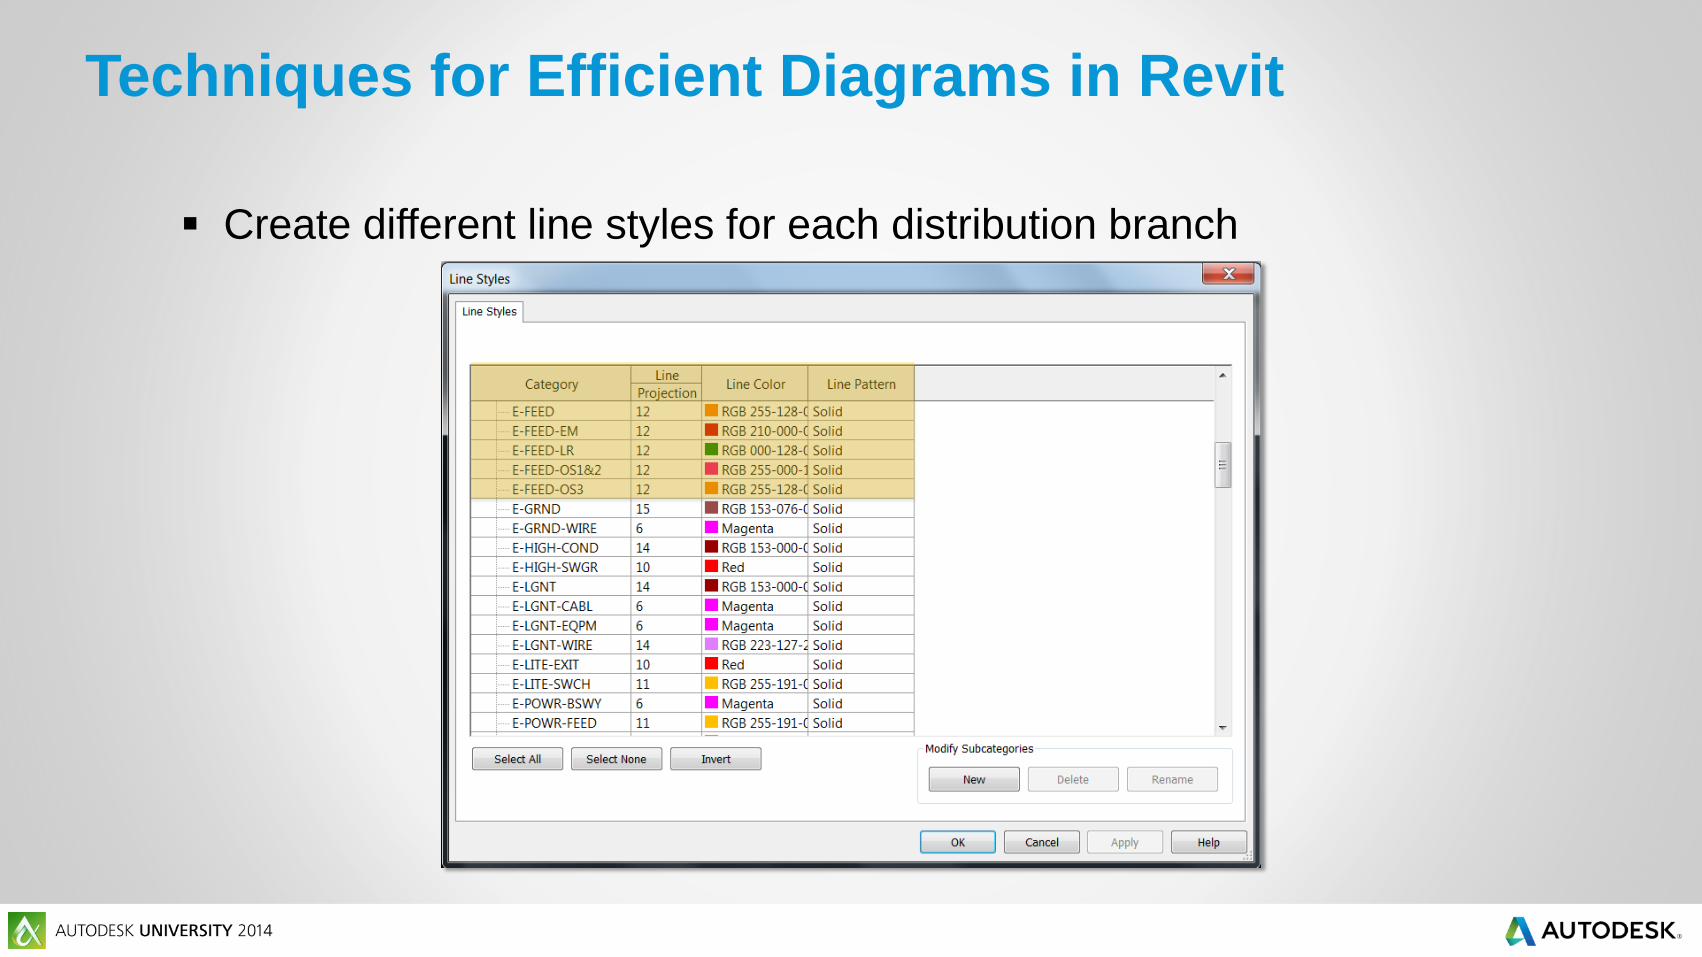
Create different line styles for each distribution branch
Techniques for Efficient Diagrams in Revit
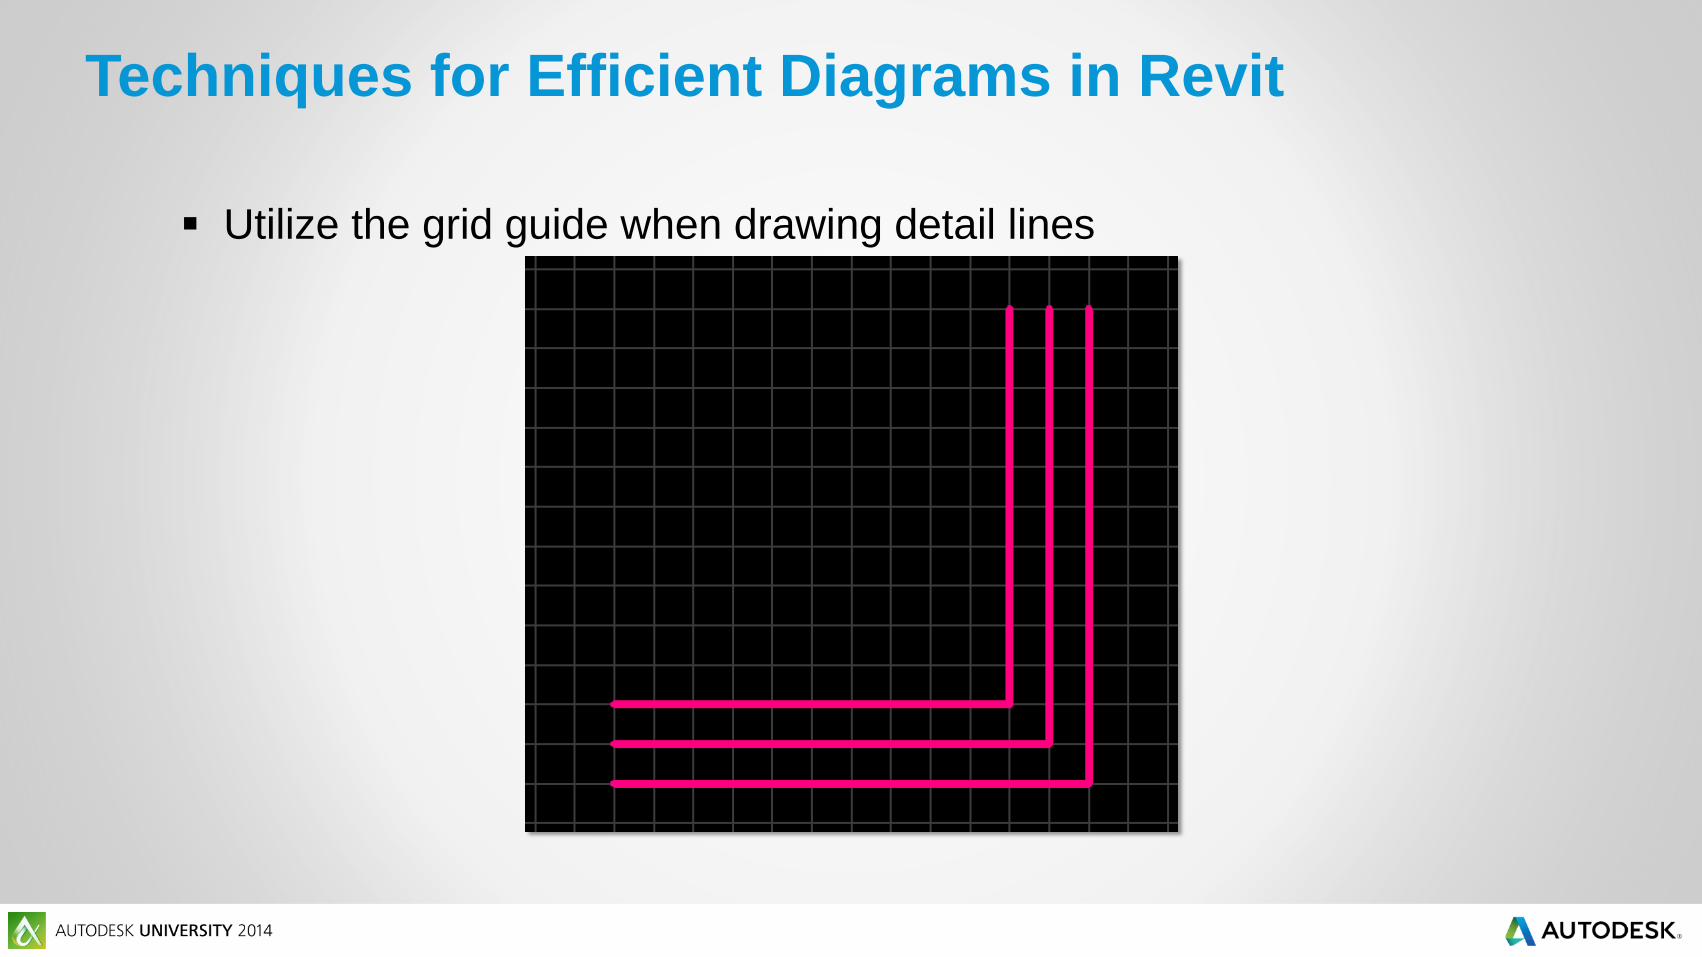
Utilize the grid guide when drawing detail lines

Techniques for Efficient Diagrams in Revit
Use masking region, instead of splitting when lines intersect
Masking Region


Techniques for Efficient Diagrams in Revit
Lock generic annotations (symbols) onto the detail lines


Techniques for Efficient Diagrams in Revit
Turn off the grid guide through visibility graphics before you print

Efficient 2D Symbols and
Modeled Families

Efficient 2D Symbols and Modeled Families
Plan ahead and develop a strategy prior to creating families and
consider the following:
Naming Standards
Visibility
Text
Label
Shared Parameters
Formulas
Type or Instance
and many more…

Efficient 2D Symbols and Modeled Families
2D Generic Annotation Families
Create all the labels and text as needed
Text

Efficient 2D Symbols and Modeled Families
Visibility using a Yes/No Parameter

For Modeled Families
Give your Reference
Planes/Lines descriptive
names
Efficient 2D Symbols and Modeled Families
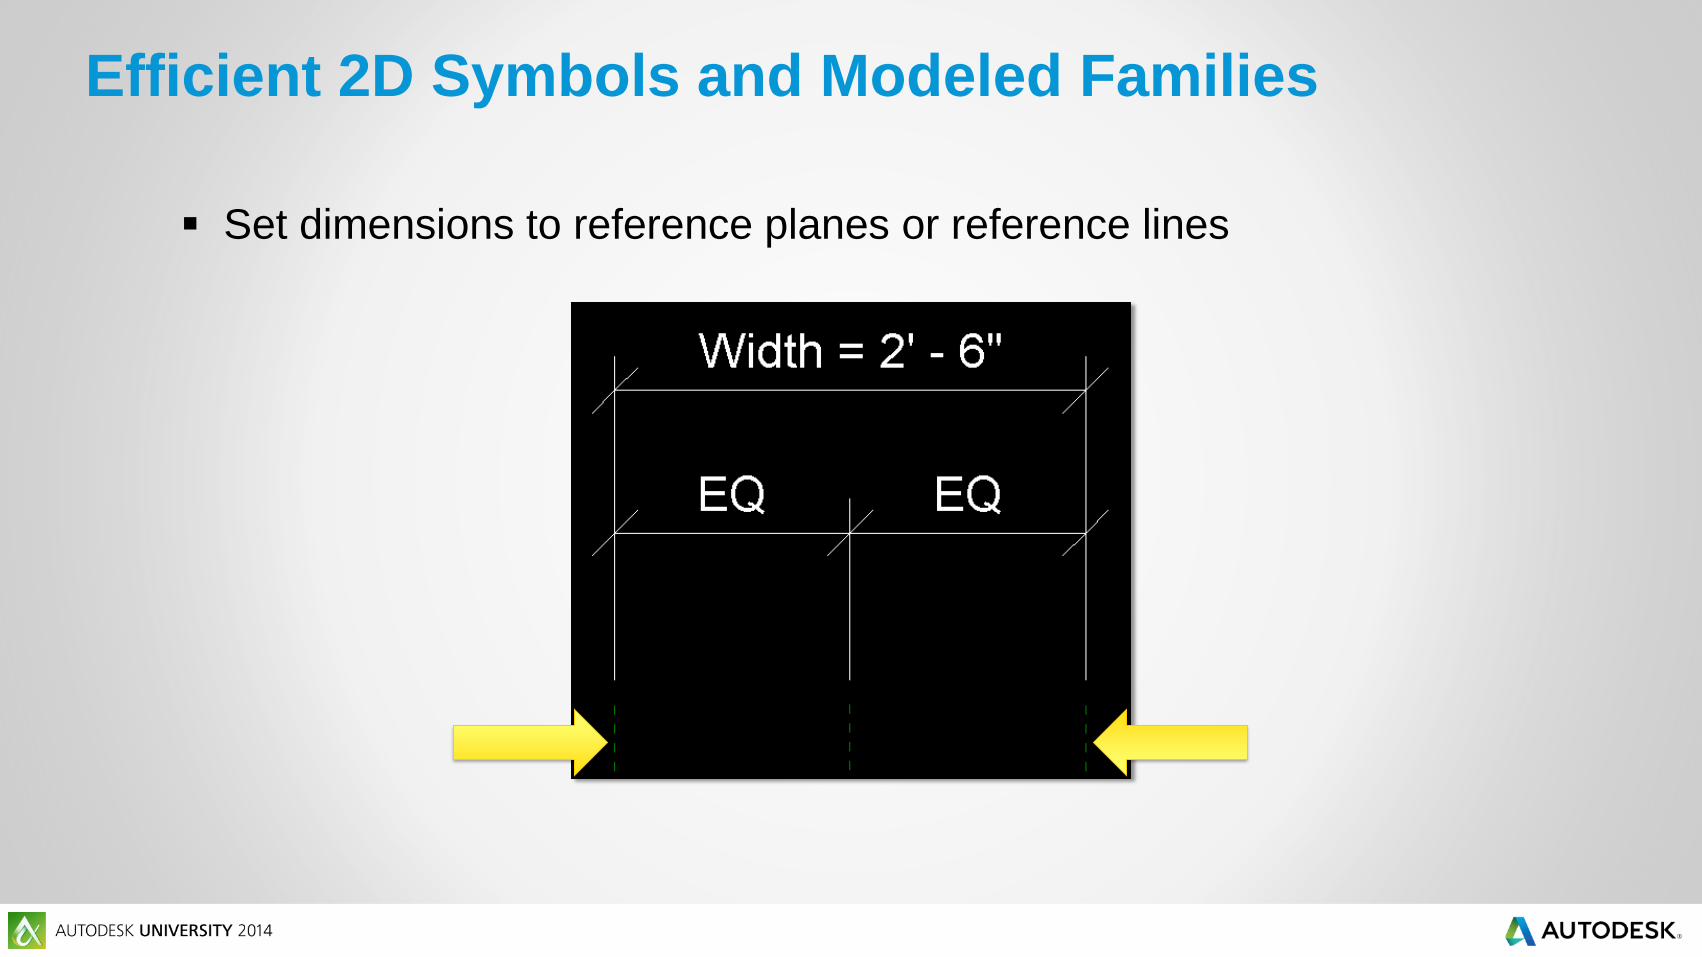
Set dimensions to reference planes or reference lines
Efficient 2D Symbols and Modeled Families

Keep the 3D Modeling simple
Efficient 2D Symbols and Modeled Families
Panelboard shown
in its overall
dimension without
the panel cover,
mounting bracket,
etc

Family Category, Parameters and Omni Class Number
Efficient 2D Symbols and Modeled Families

Part Type and Panel Configuration
Efficient 2D Symbols and Modeled Families
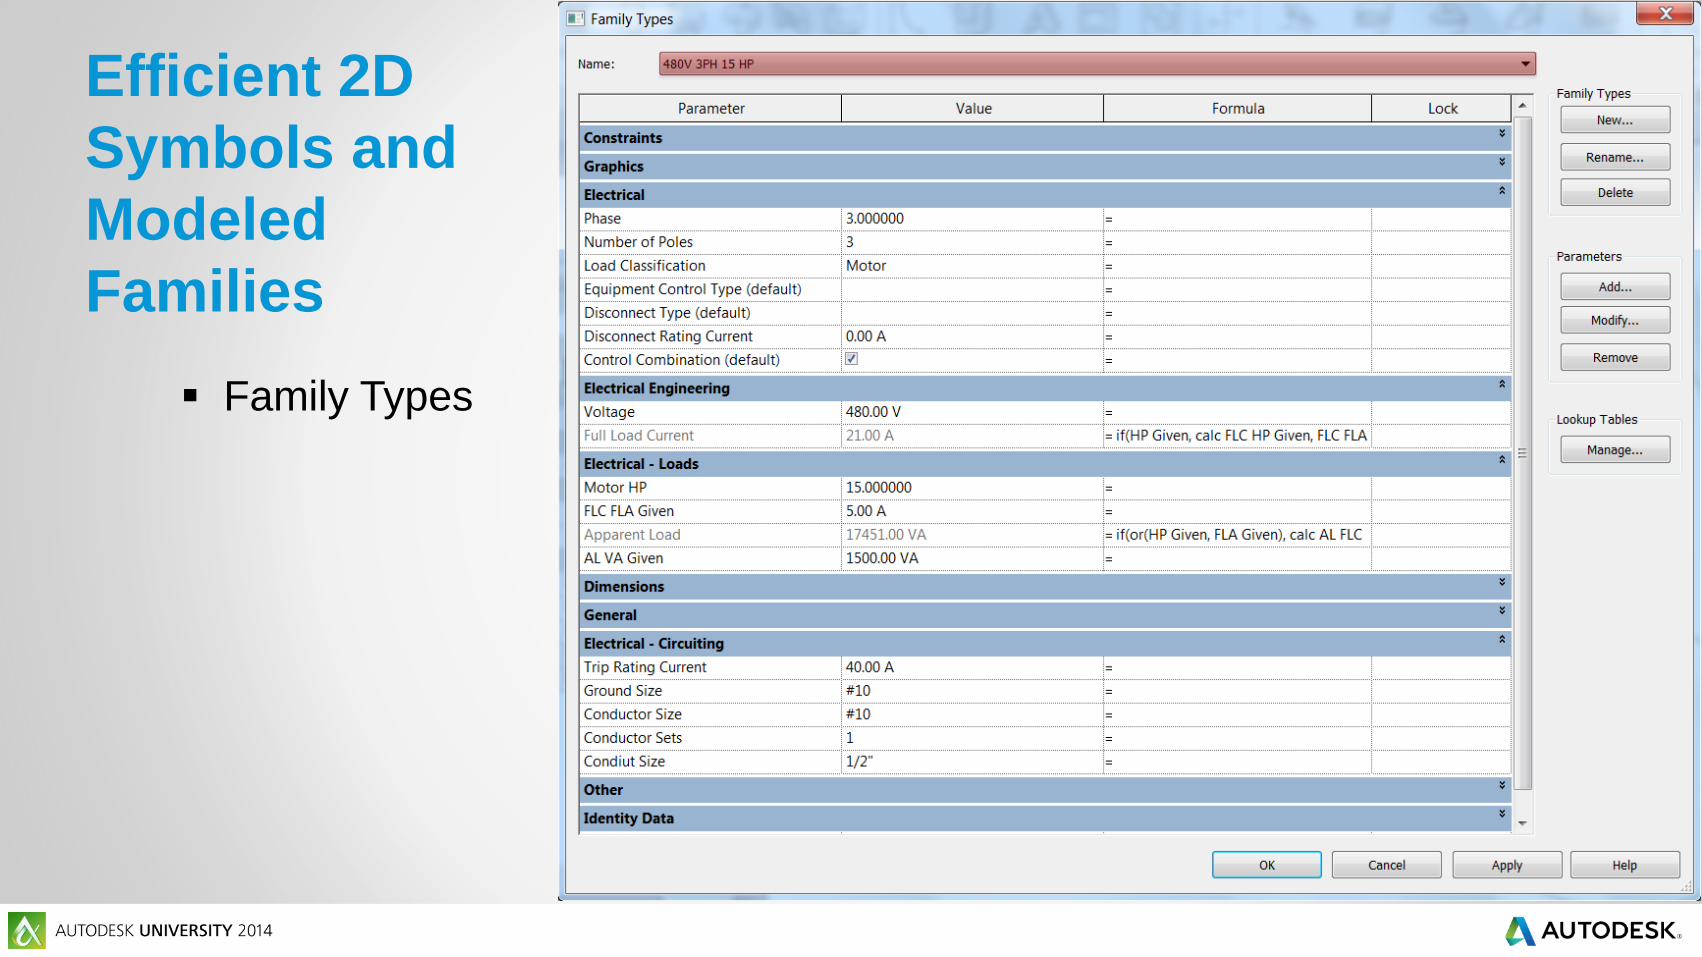
Family Types
Efficient 2D
Symbols and
Modeled
Families
Family Types
Parameters
Efficient 2D
Symbols and
Modeled
Families
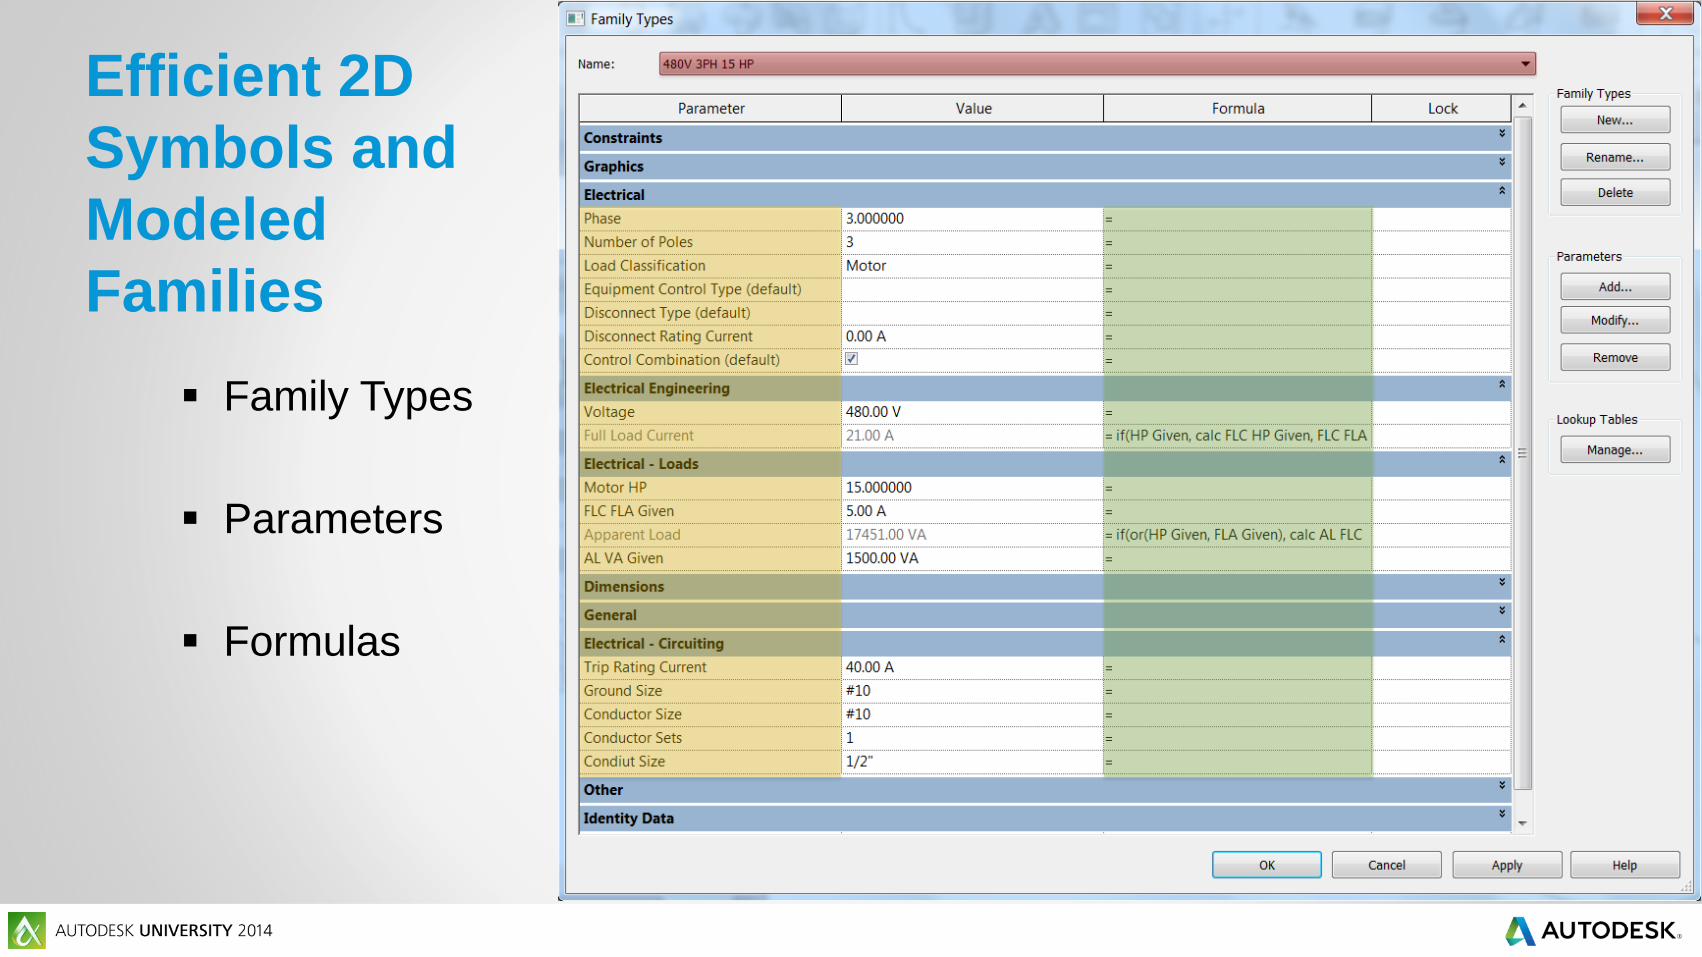
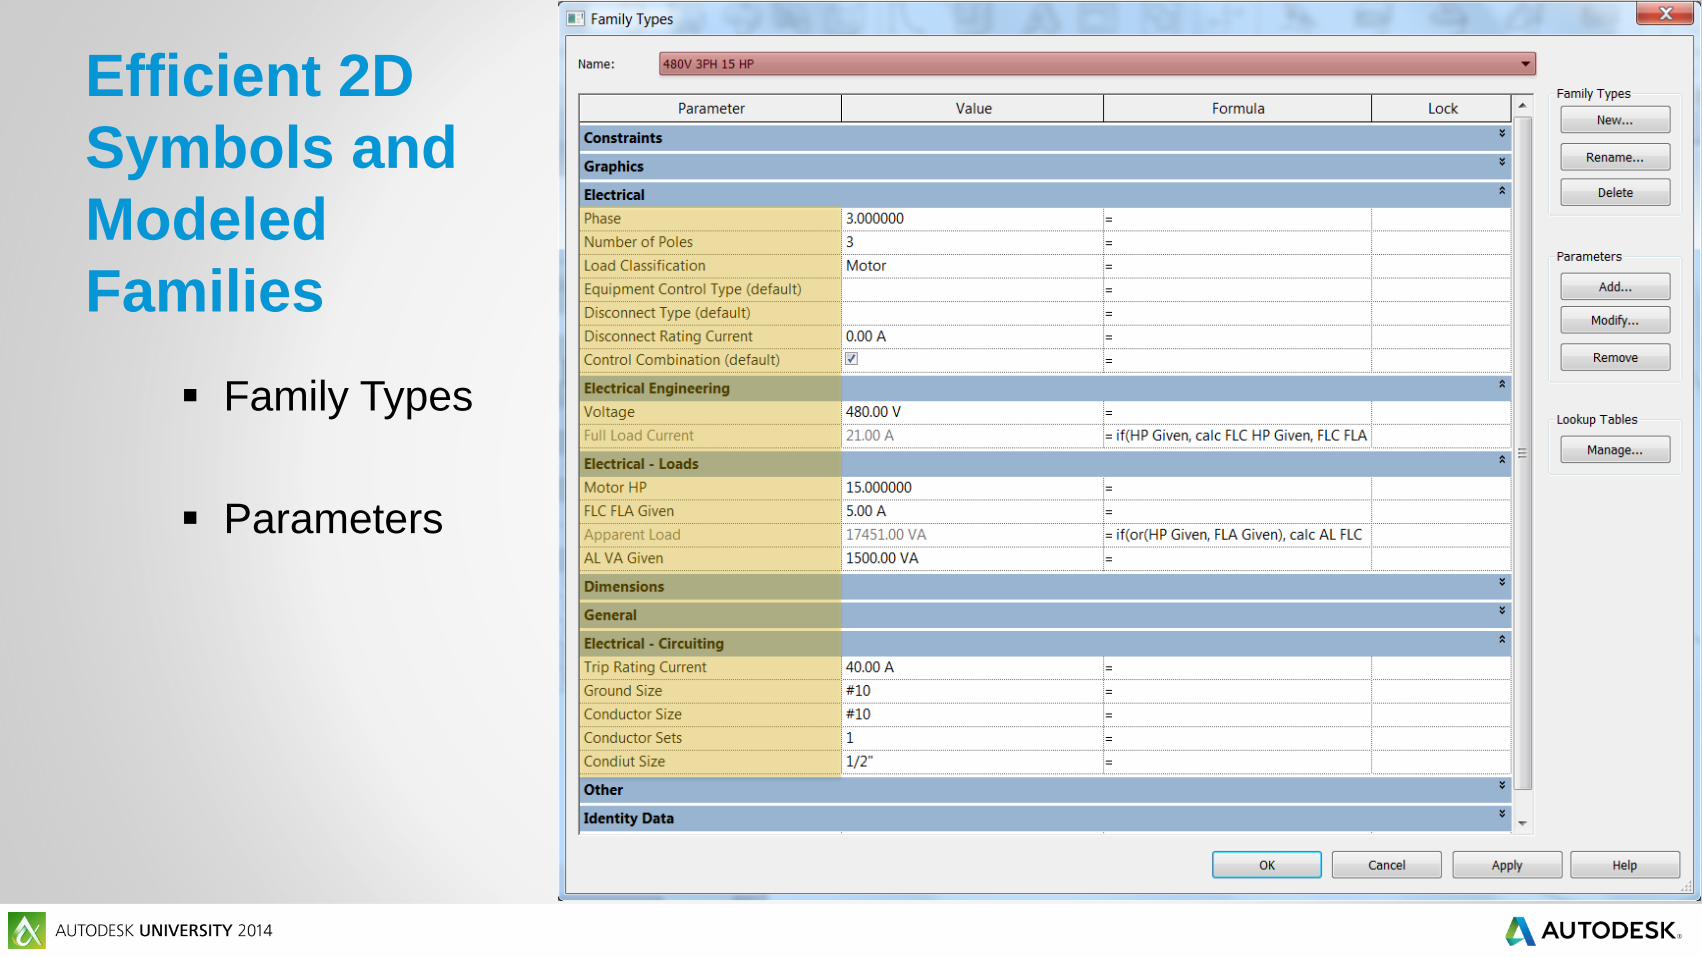
Family Types
Parameters
Formulas
Efficient 2D
Symbols and
Modeled
Families

Efficient 2D Symbols and Modeled Families
Scheduling

Efficient 2D Symbols and Modeled Families
Scheduling
Type
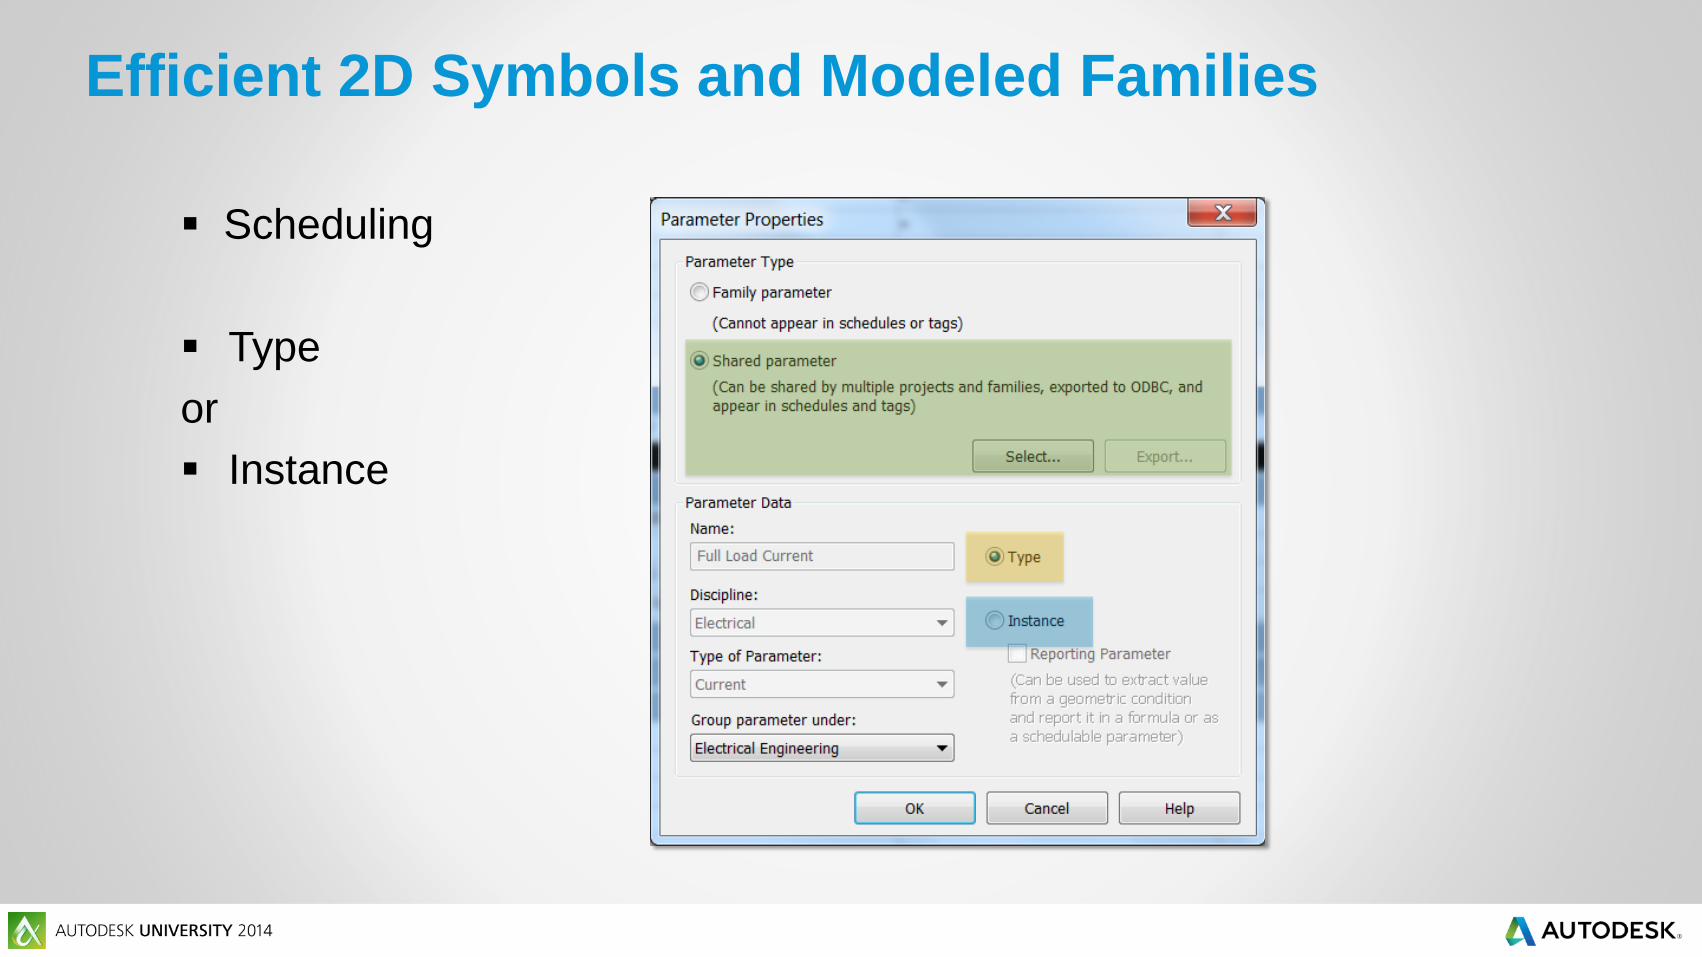
Efficient 2D Symbols and Modeled Families
Scheduling
Type
or
Instance
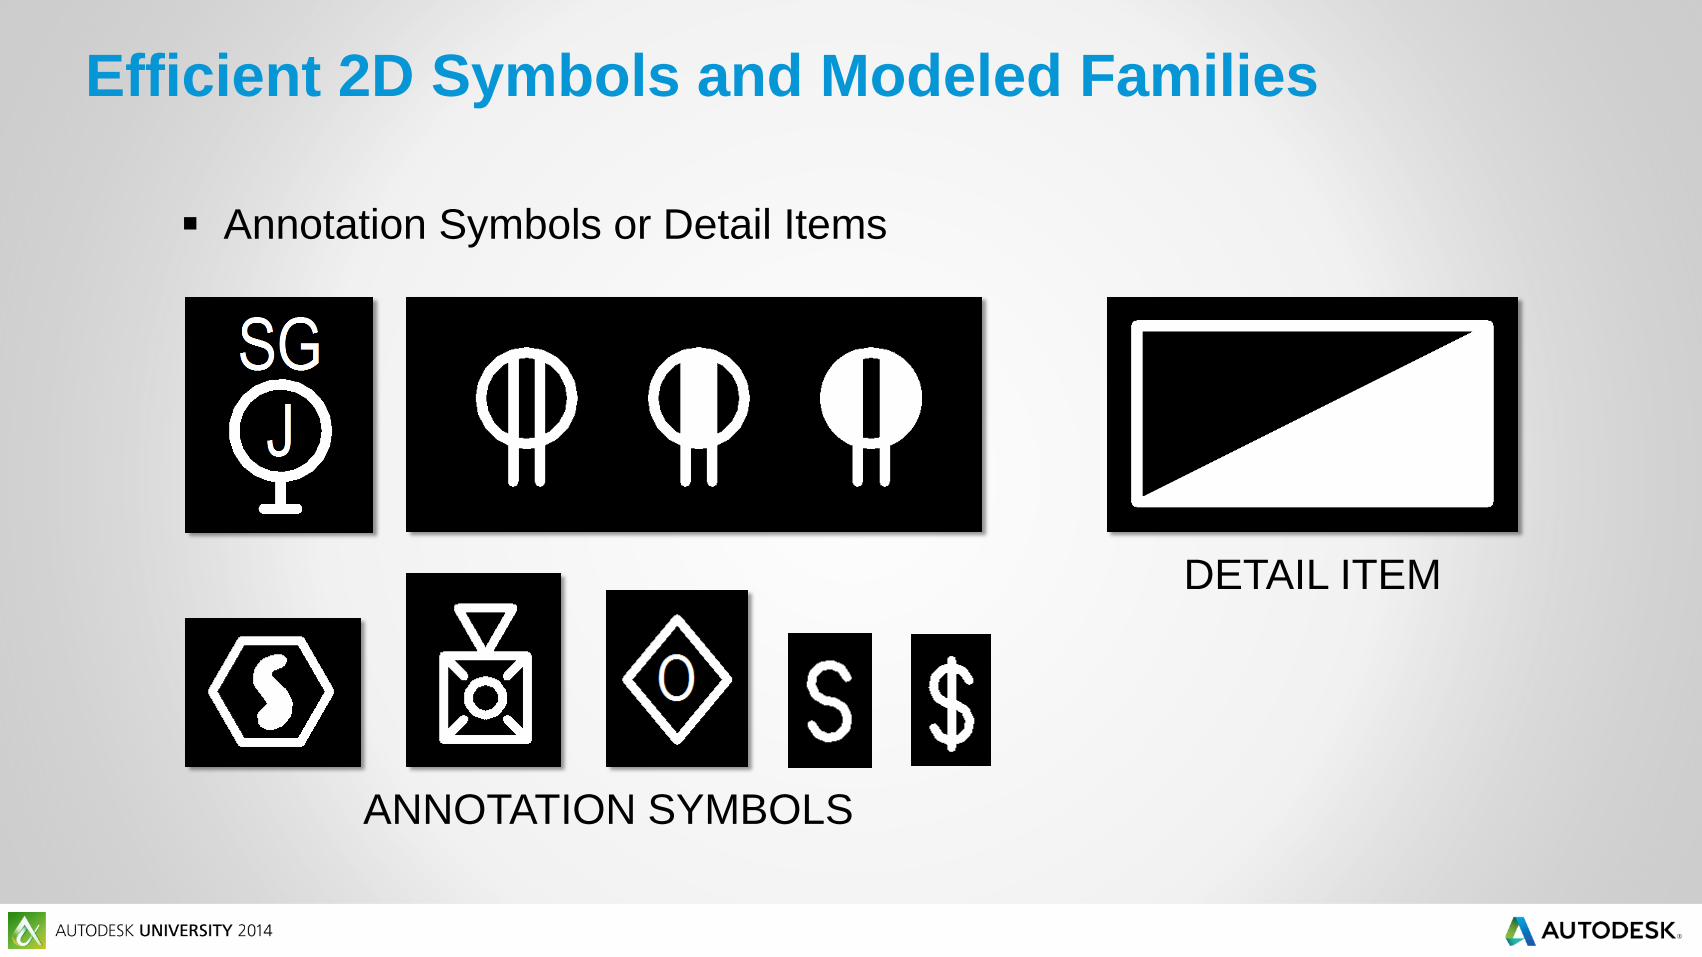
Annotation Symbols or Detail Items
Efficient 2D Symbols and Modeled Families
DETAIL ITEM
ANNOTATION SYMBOLS

Annotation Symbols or Detail Items
• Nest the Annotation Symbol/Detail Item families
Efficient 2D Symbols and Modeled Families

Annotation Symbols or Detail Items
• Nest the Annotation Symbol/Detail Item families
• Make sure Symbols are per your firms standards
Efficient 2D Symbols and Modeled Families

Annotation Symbols or Detail Items
• Nest the Annotation Symbol/Detail Item families
• Make sure Symbols are per your firms standards
• Determine if the Symbol(s) requires a Visibility option to display the Symbol or
not and set the visibility correctly with a Yes/No Parameter
Efficient 2D Symbols and Modeled Families

Annotation Symbols or Detail Items
• Set the Symbol(s) “Visibility/Graphics Overrides” to show only in Coarse and
Medium Detail Level
Efficient 2D Symbols and Modeled Families

Clearance
Efficient 2D Symbols and Modeled Families
PLAN 3D
30” MINIMUN WIDTH
6’-6” MINIMUM HEIGHT
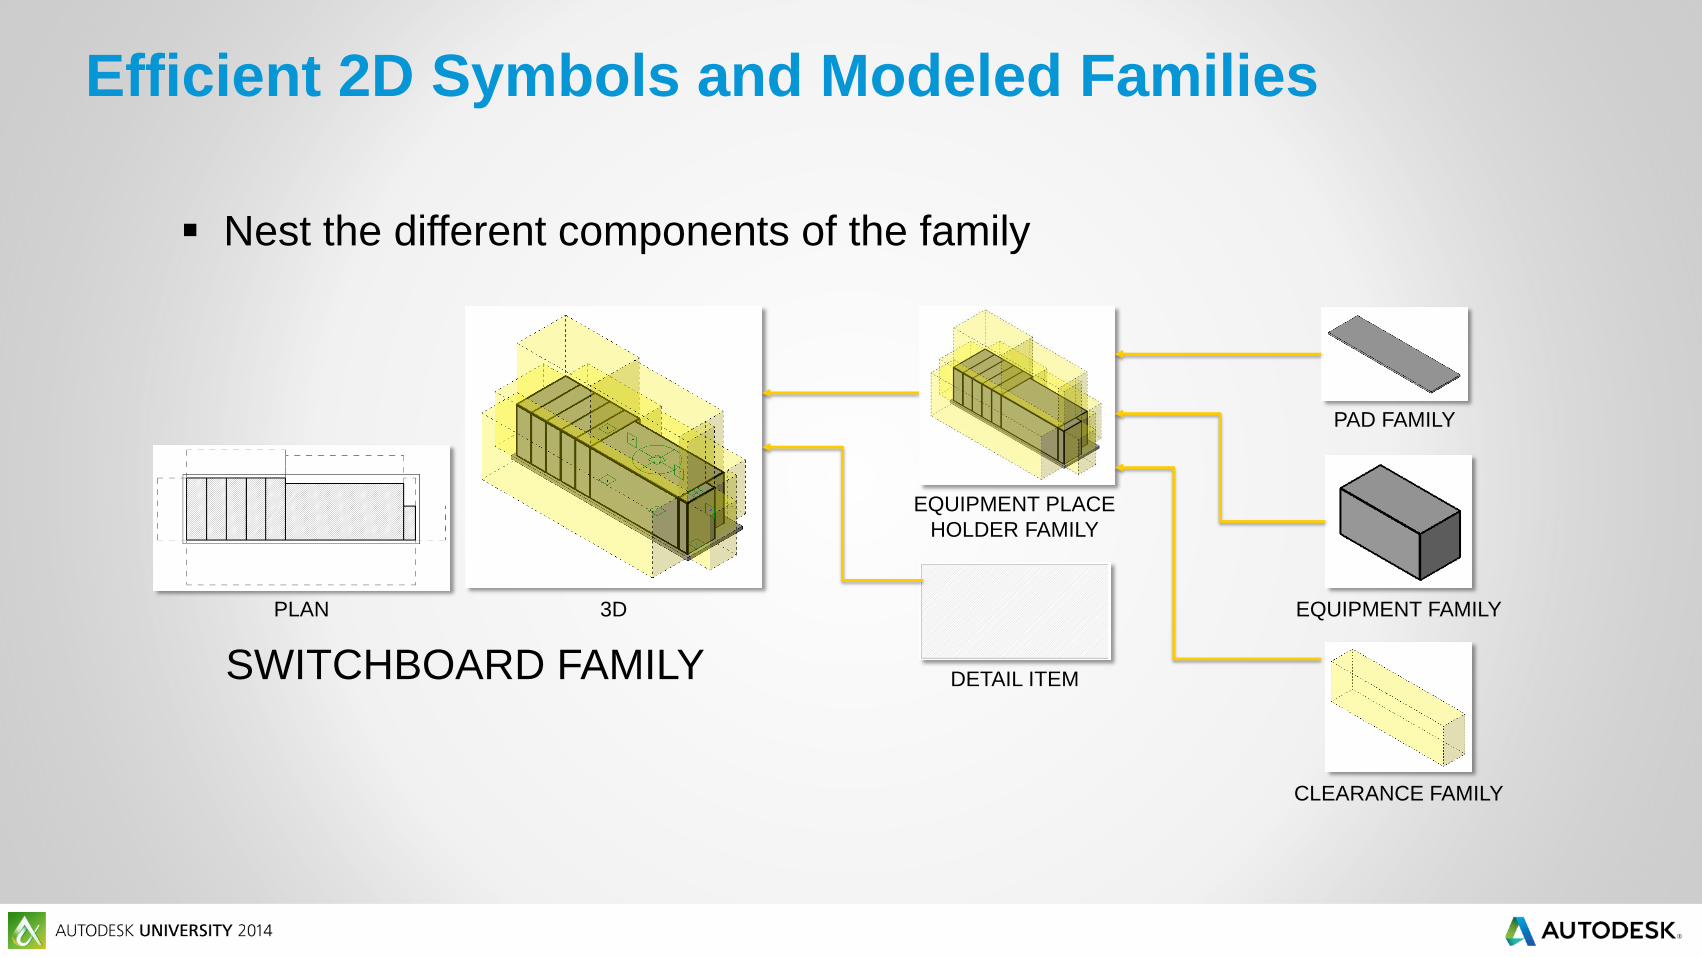
Nest the different components of the family
Efficient 2D Symbols and Modeled Families
PAD FAMILY
CLEARANCE FAMILY
EQUIPMENT FAMILY
SWITCHBOARD FAMILY
3DPLAN
DETAIL ITEM
EQUIPMENT PLACE
HOLDER FAMILY

Connectors
Efficient 2D Symbols and Modeled Families

Test your family
Efficient 2D Symbols and Modeled Families

Efficient 2D Symbols and Modeled Families

Using Filters for Electrical
Distribution Branch
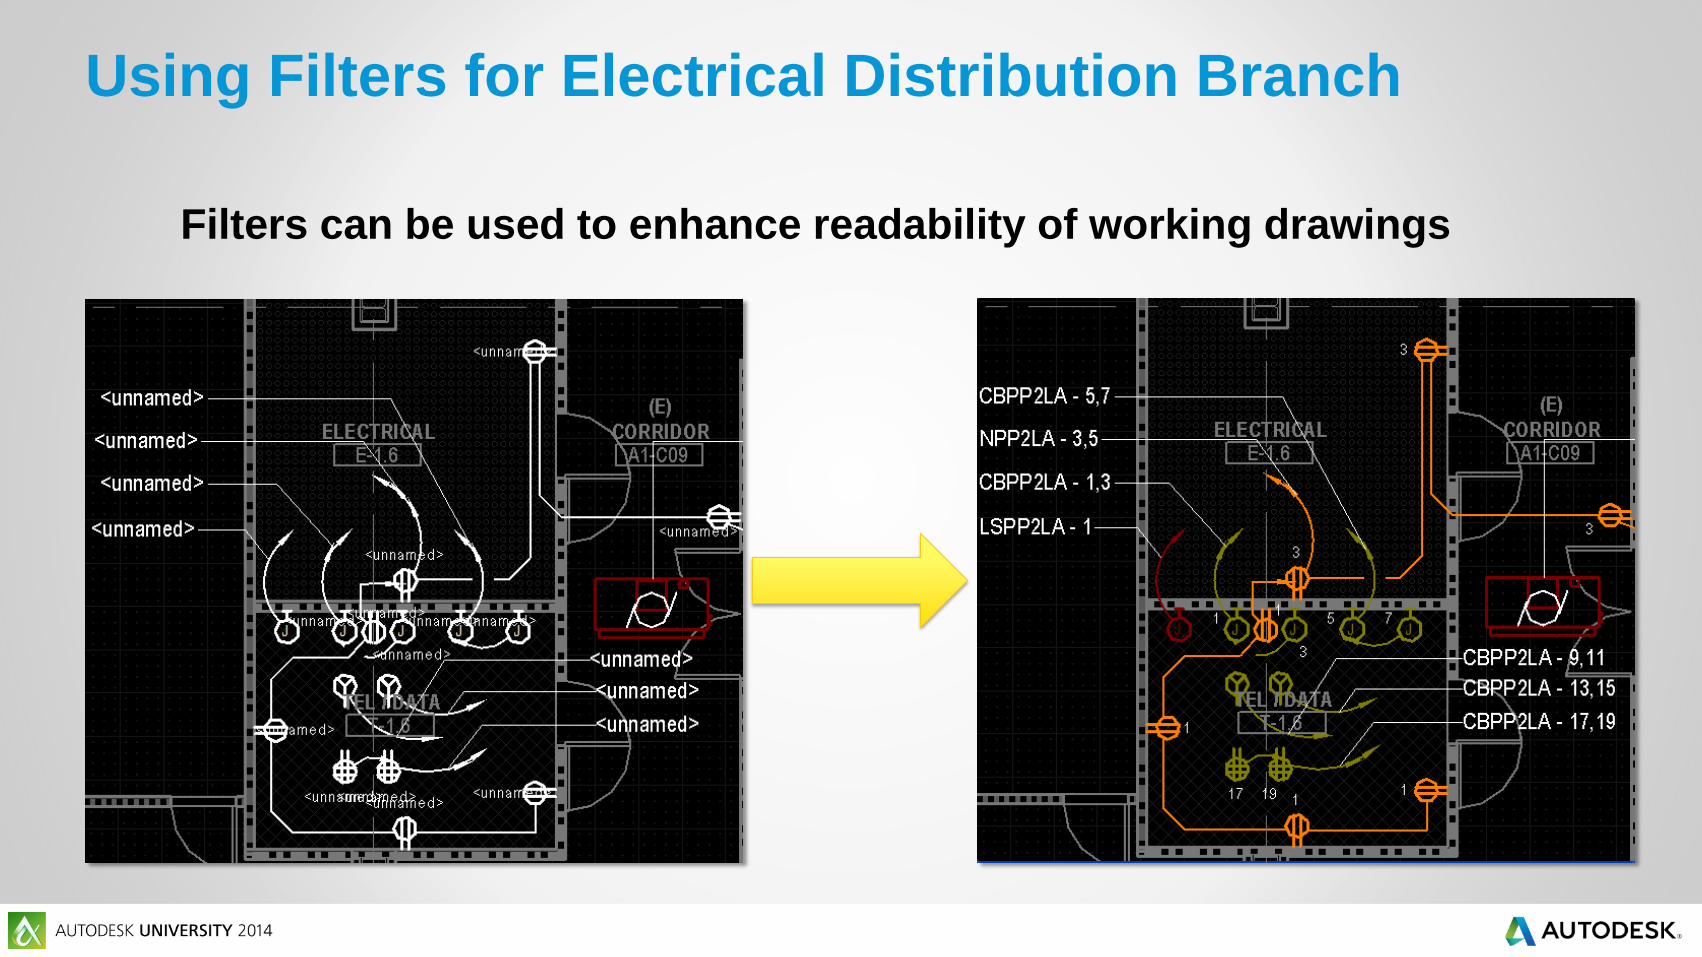
Using Filters for Electrical Distribution Branch
Filters can be used to enhance readability of working drawings
Using Filters for Electrical Distribution Branch
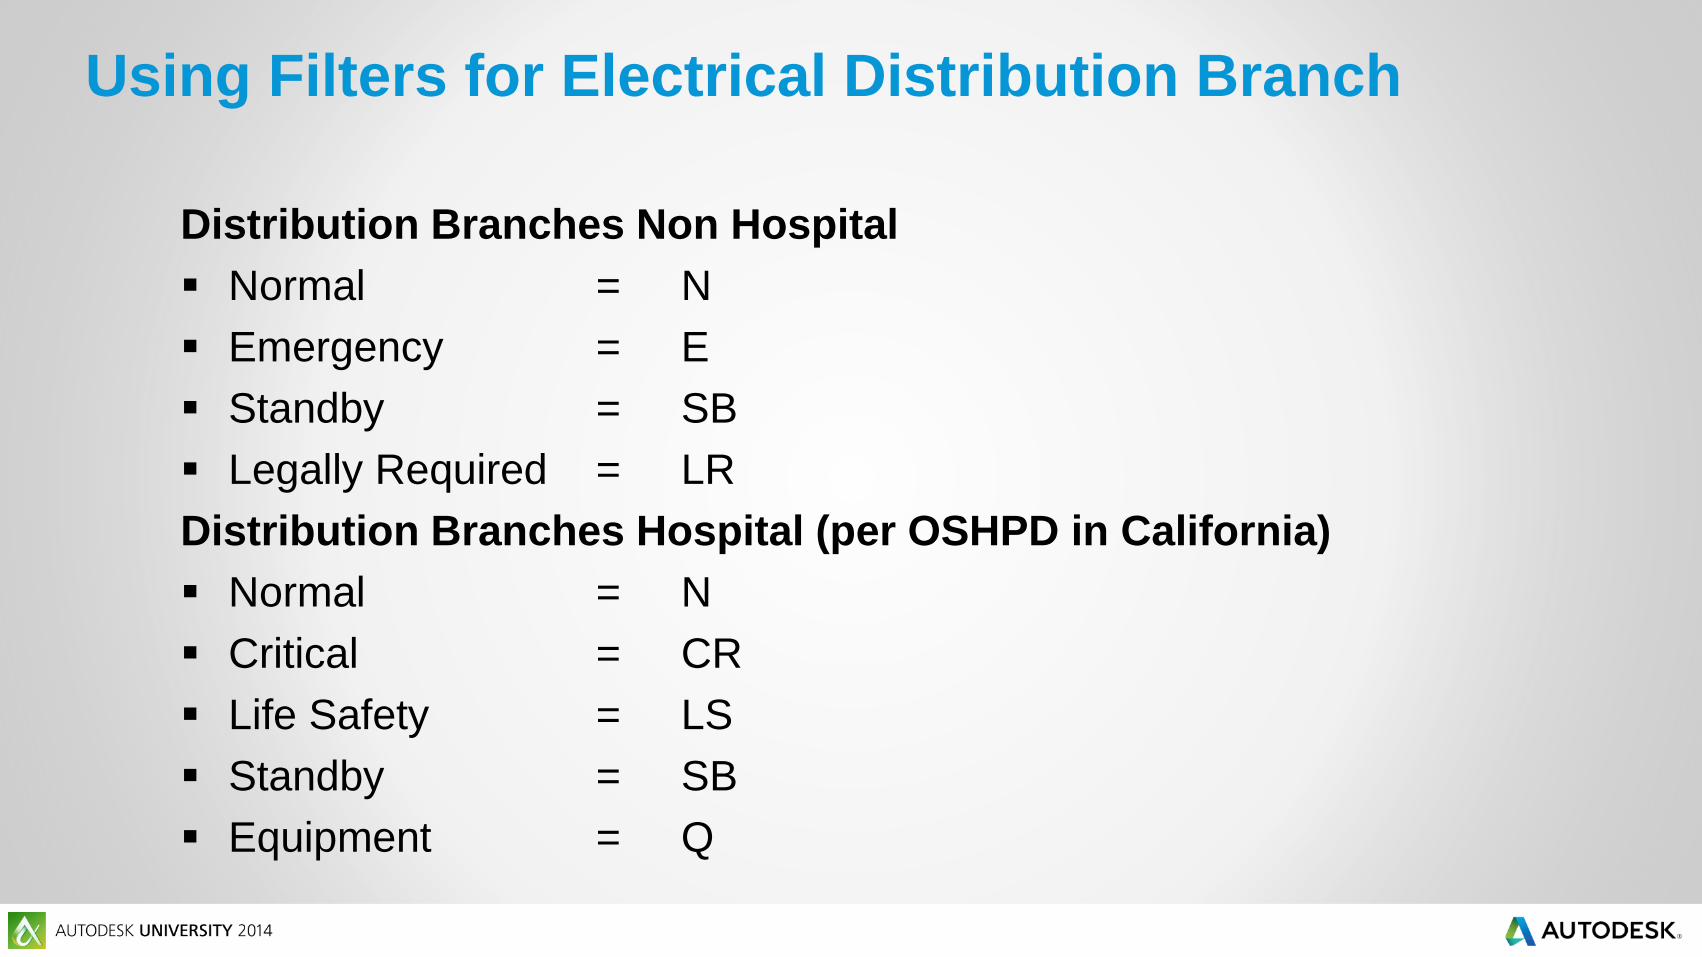
Distribution Branches Non Hospital
Normal = N
Emergency = E
Standby = SB
Legally Required = LR
Distribution Branches Hospital (per OSHPD in California)
Normal = N
Critical = CR
Life Safety = LS
Standby = SB
Equipment = Q

Using Filters for Electrical Distribution Branch
Items to Consider When Creating Filters
Filter Name
Using Filters for Electrical Distribution Branch
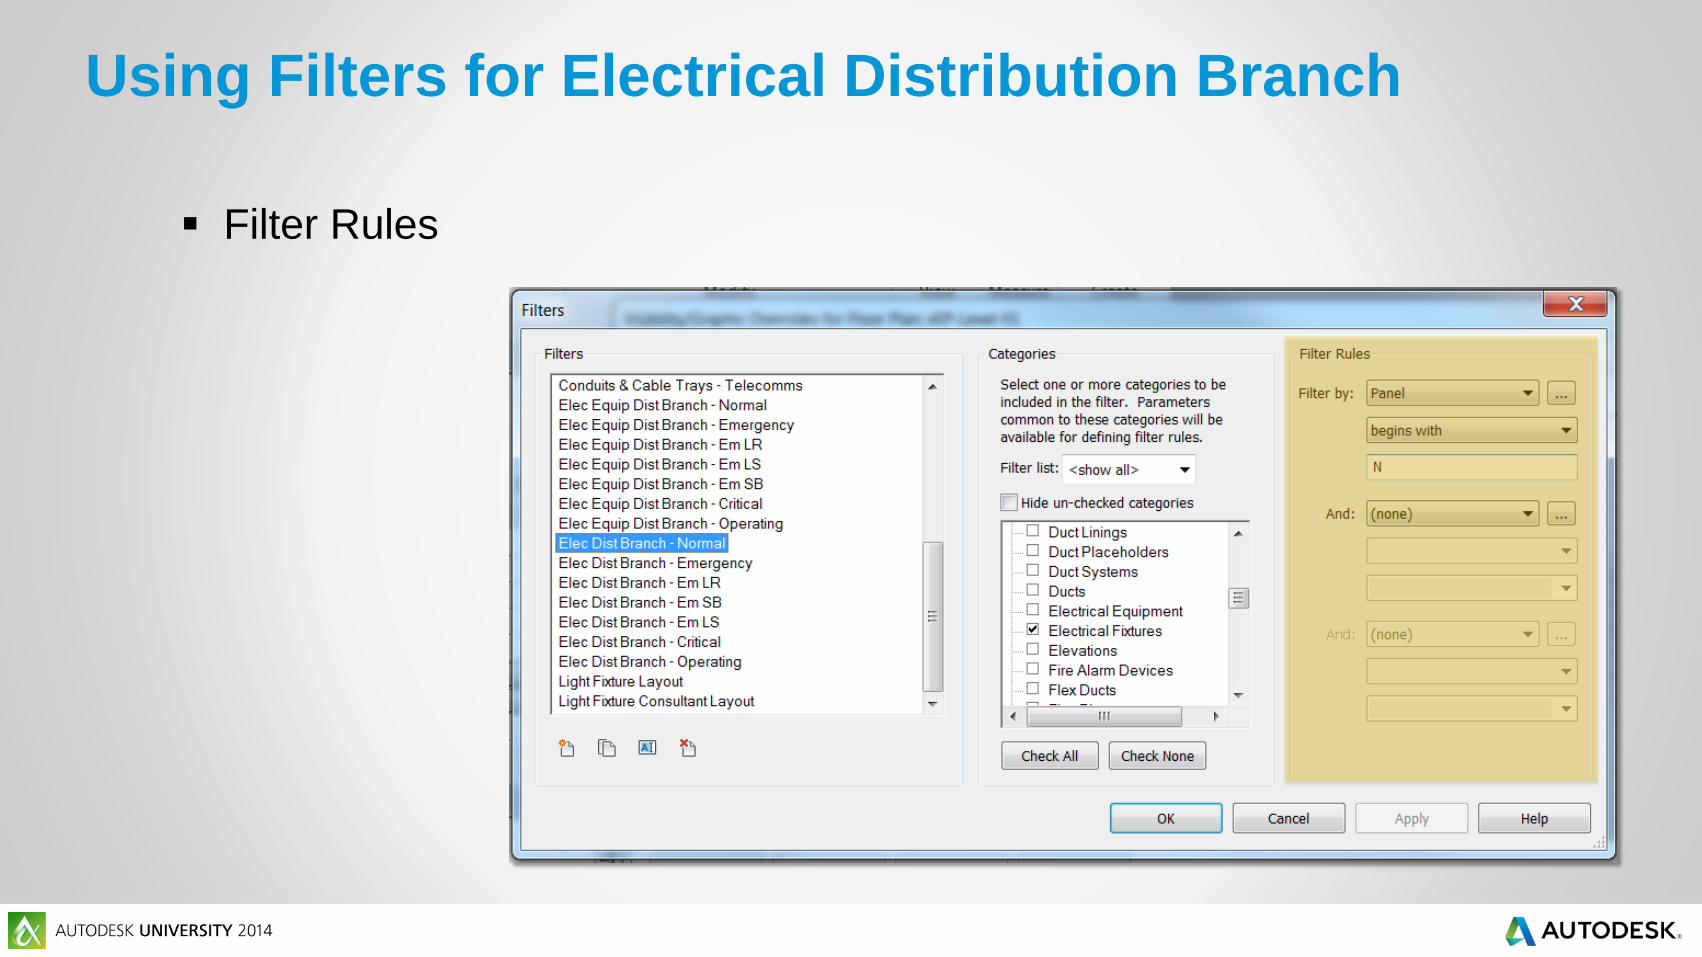
Filter Rules

Using Filters for Electrical Distribution Branch
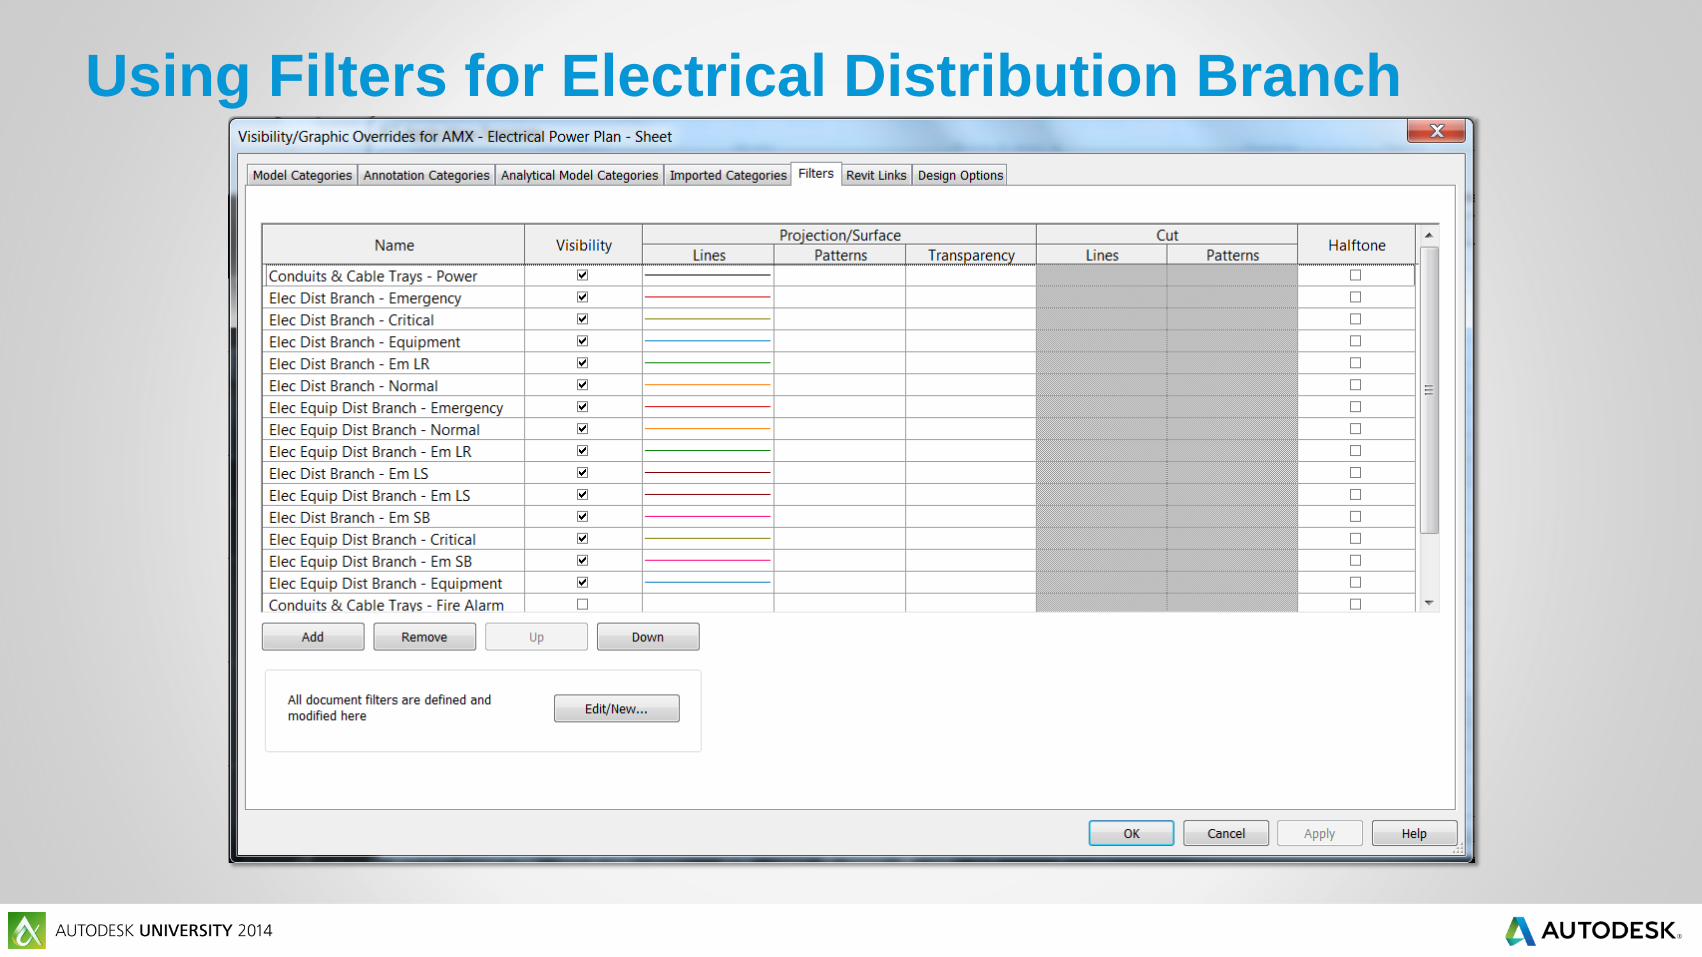
Visibility and Projection/Surface Lines

Using Filters for Electrical Distribution Branch
Filters Created Based on the Different Distribution Branches
Electrical Equipment
The filter rule we applied here, is that an electrical equipment, is filtered
by panel name, which begins with…
Electrical Devices and Wires
The filter rule we applied here, is that an electrical device, is filtered by
panel, which begins with…
We then matched the projection lines for both the electrical equipment and
the electrical device and wires.
Using Filters for Electrical Distribution Branch
Using Filters for Electrical Distribution Branch
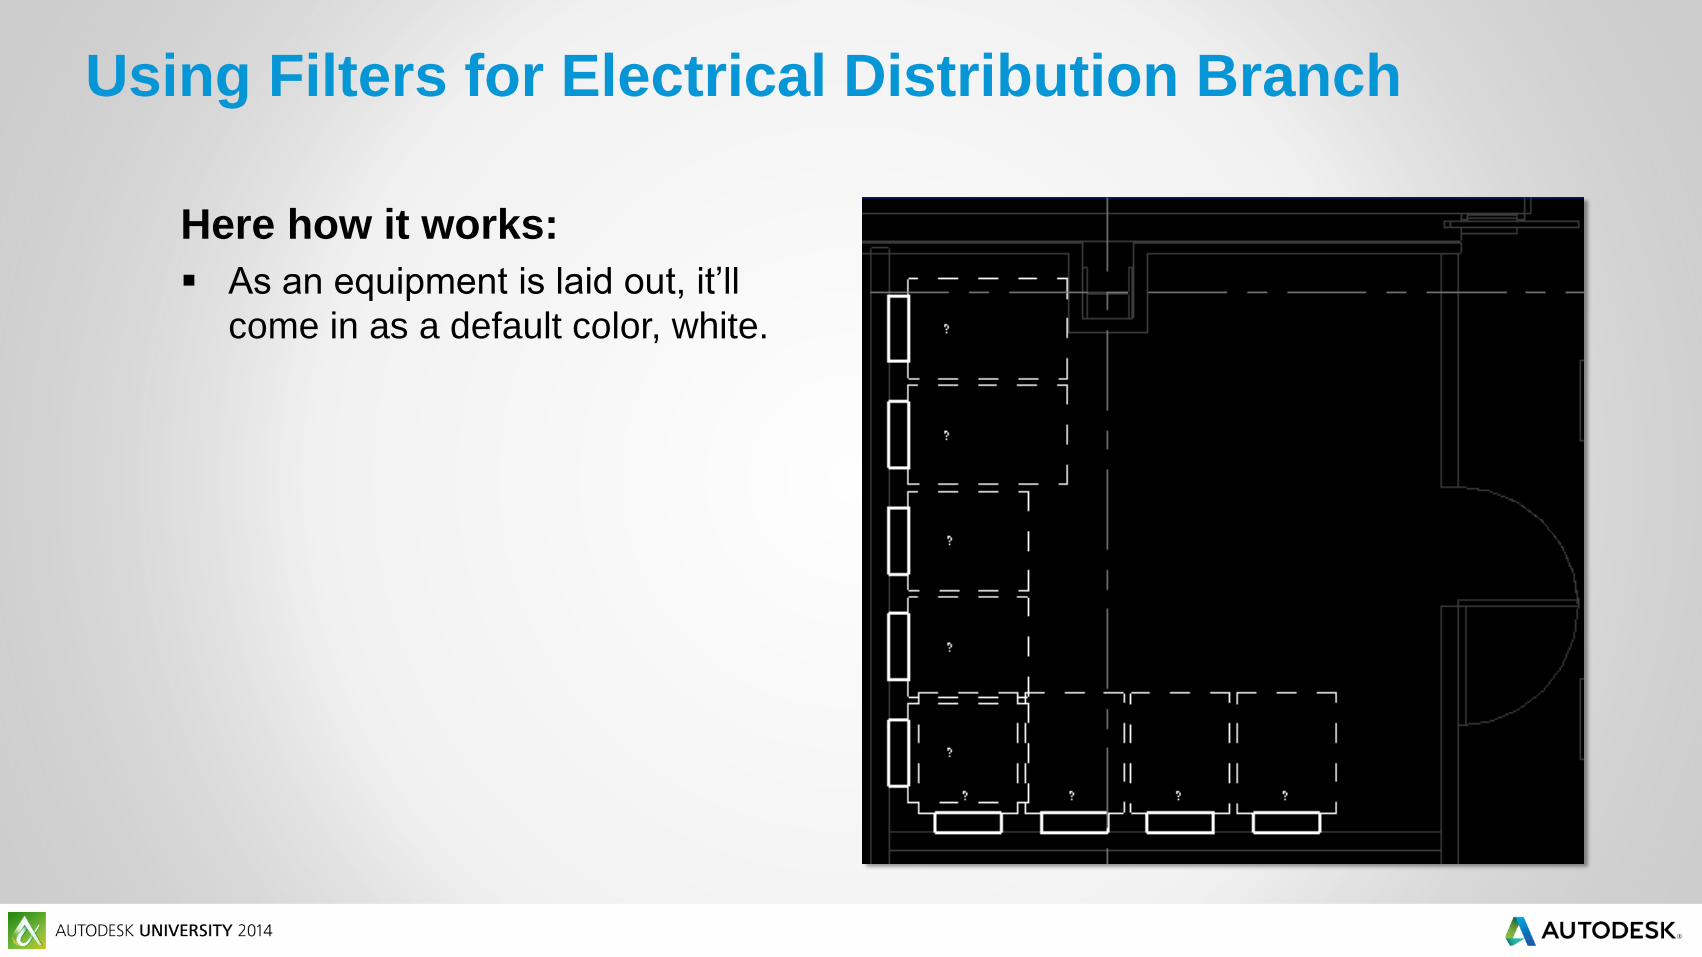
Here how it works:
As an equipment is laid out, it’ll
come in as a default color, white.
Using Filters for Electrical Distribution Branch
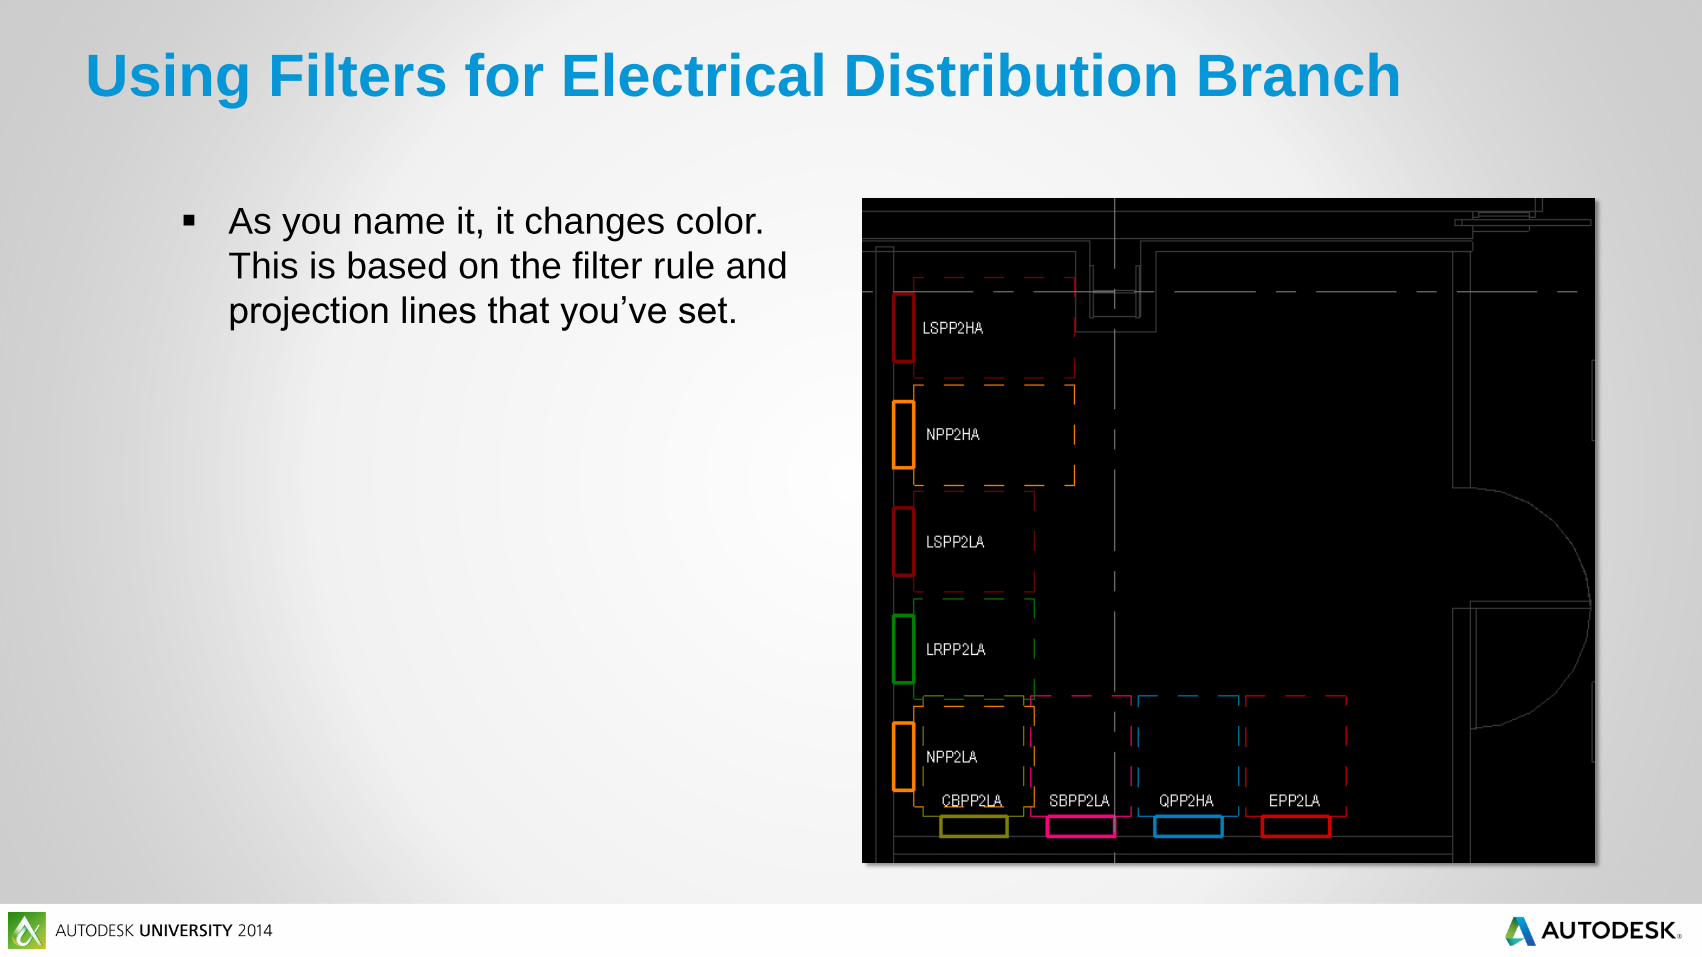
As you name it, it changes color.
This is based on the filter rule and
projection lines that you’ve set.

Using Filters for Electrical Distribution Branch
As electrical devices and wires are
laid out, they’ll come in as a default
color, white.

Using Filters for Electrical Distribution Branch
As you power them to a panel, they
change color. This is based on the
filter rule and projection lines that
you’ve set.


Using Filters for Electrical Distribution Branch
Be Creative!!!!!!!!!
Power Branch
Circuited/Uncircuited
Mechanical Equipment Visibility
Interior/Exterior
Light Fixture Layout Coordination
Etc….
Coordination between Electrical
and Other Disciplines
Coordination between Electrical and Other
Disciplines
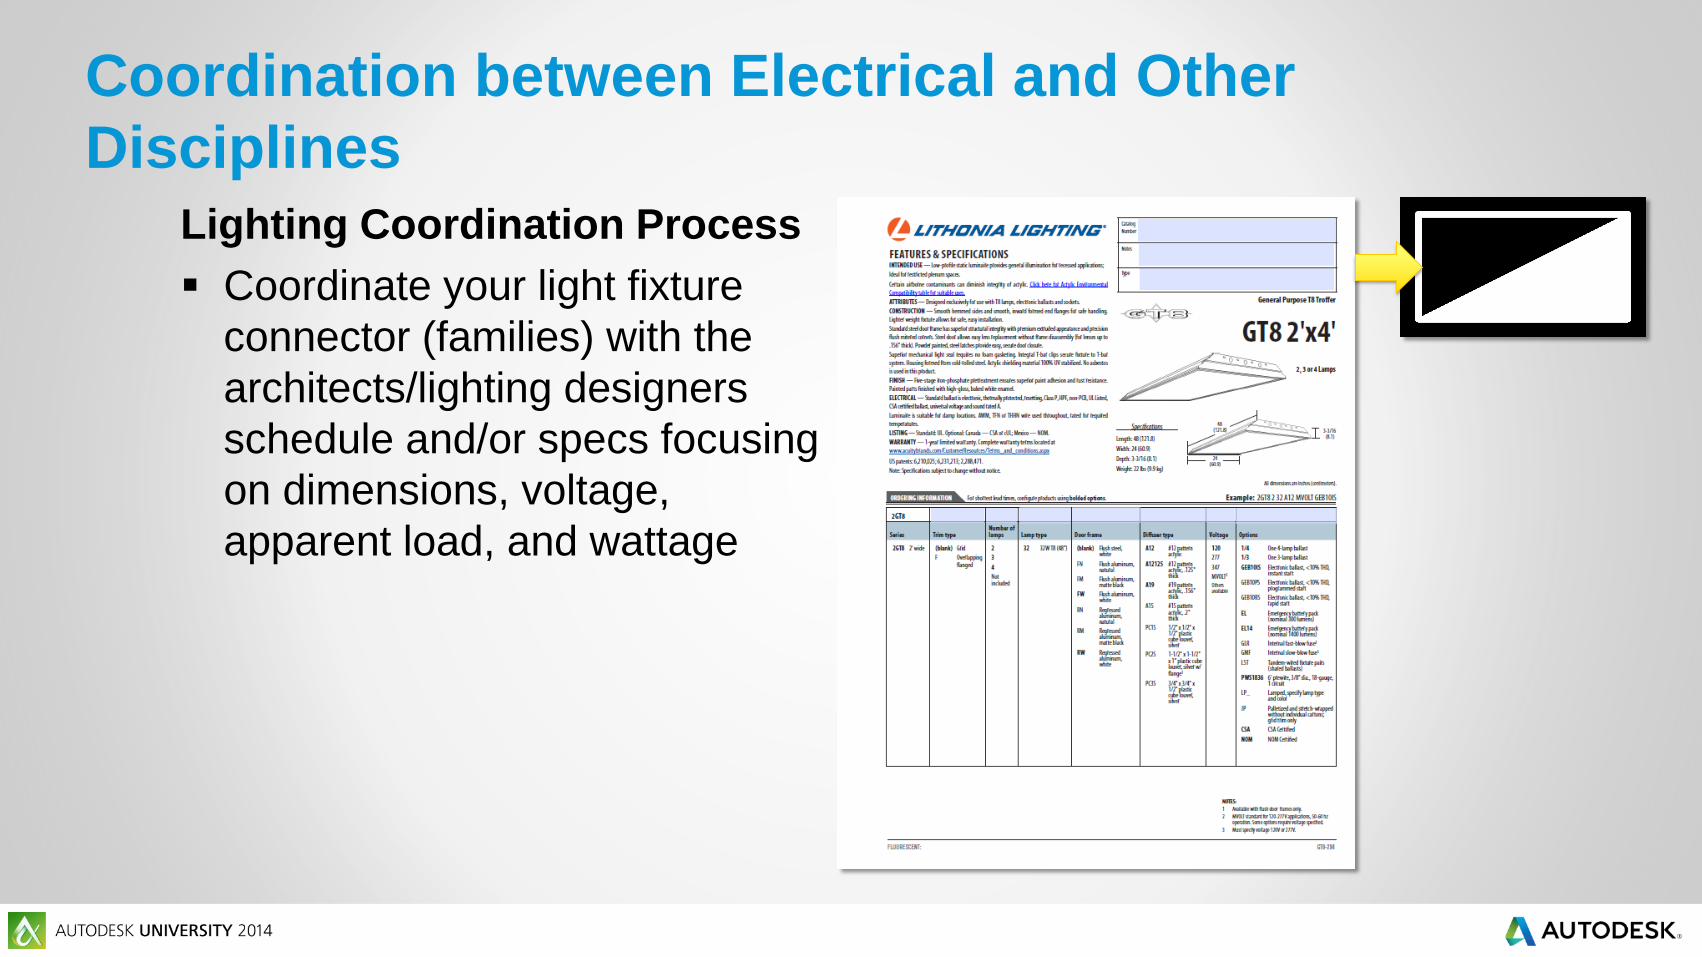
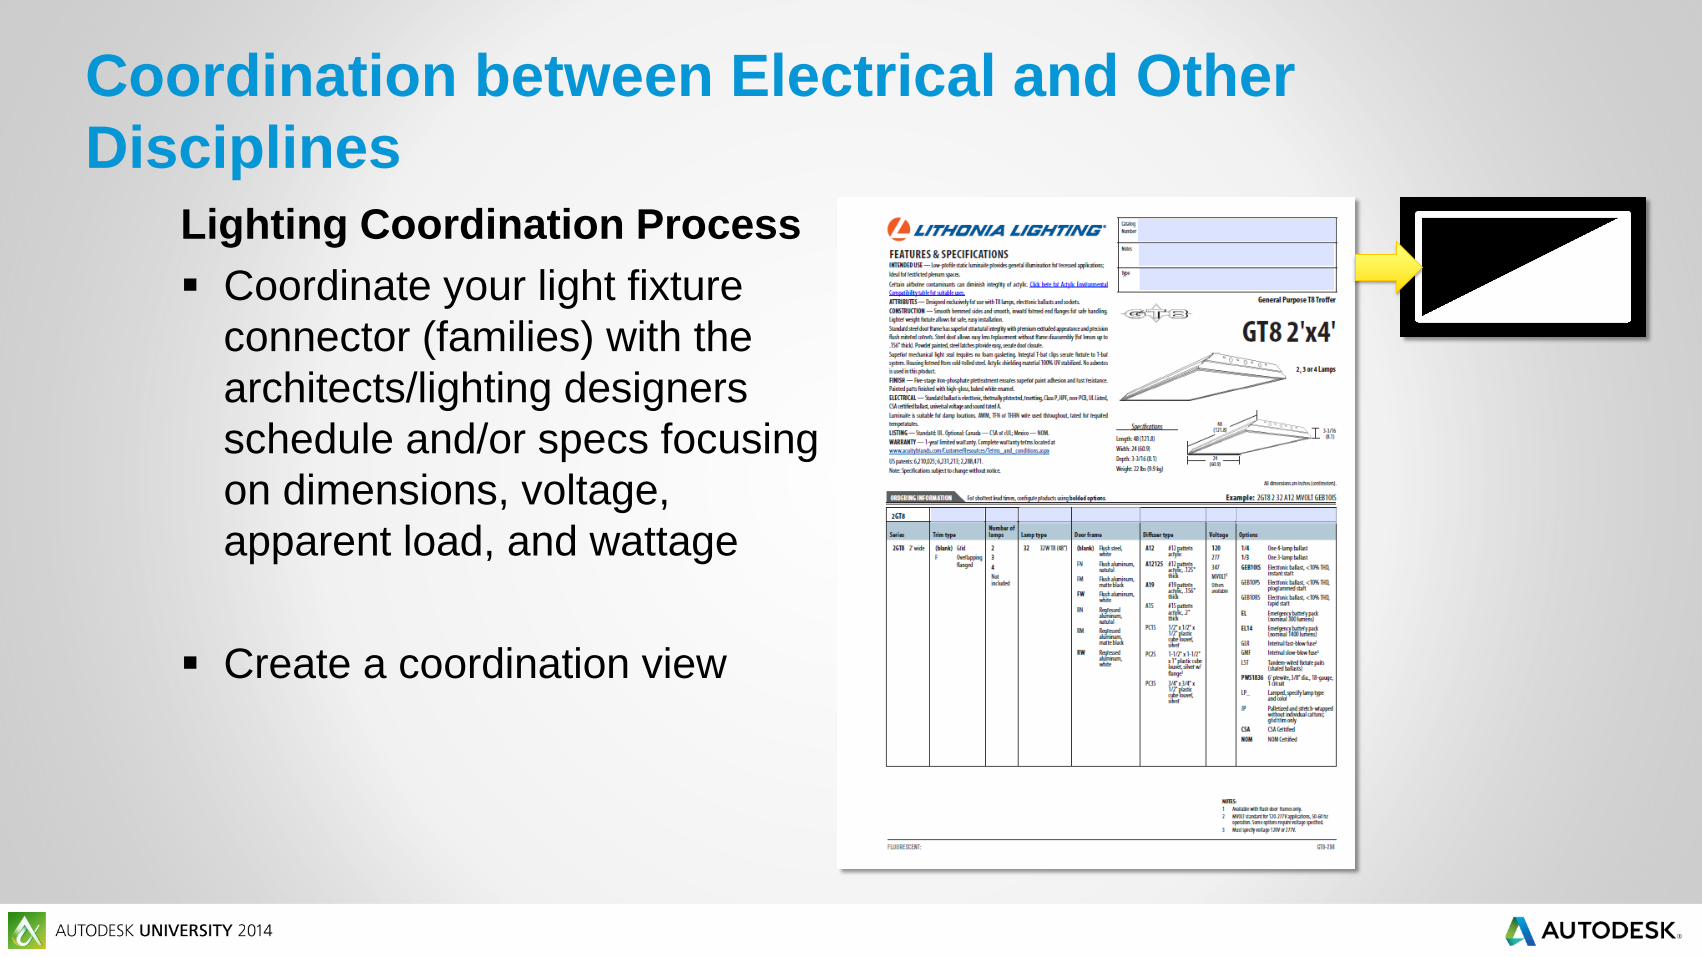
Lighting Coordination Process
Coordinate your light fixture
connector (families) with the
architects/lighting designers
schedule and/or specs focusing
on dimensions, voltage,
apparent load, and wattage
Coordination between Electrical and Other
Disciplines
Lighting Coordination Process
Coordinate your light fixture
connector (families) with the
architects/lighting designers
schedule and/or specs focusing
on dimensions, voltage,
apparent load, and wattage
Create a coordination view
Coordination between Electrical and Other
Disciplines
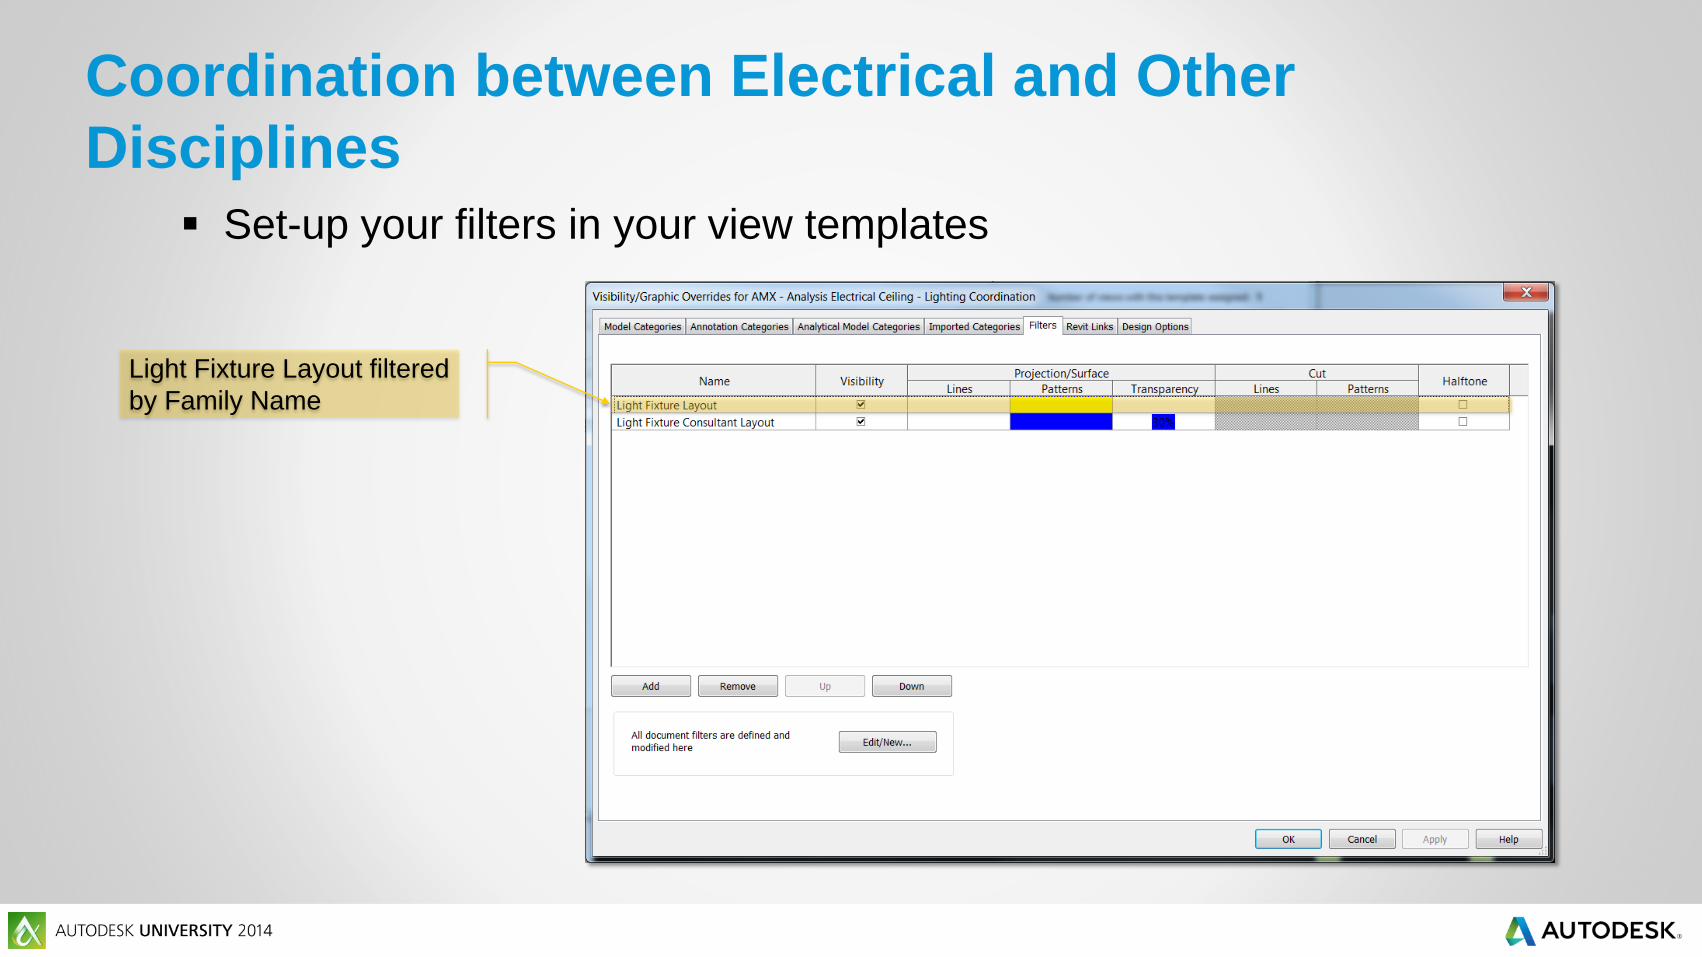
Set-up your filters in your view templates
Light Fixture Layout filtered
by Family Name

Coordination between Electrical and Other
Disciplines
Set-up your filters in your view templates
Light Fixture Consultant
Layout filtered by None
Light Fixture Layout filtered
by Family Name

Coordination between Electrical and Other
Disciplines
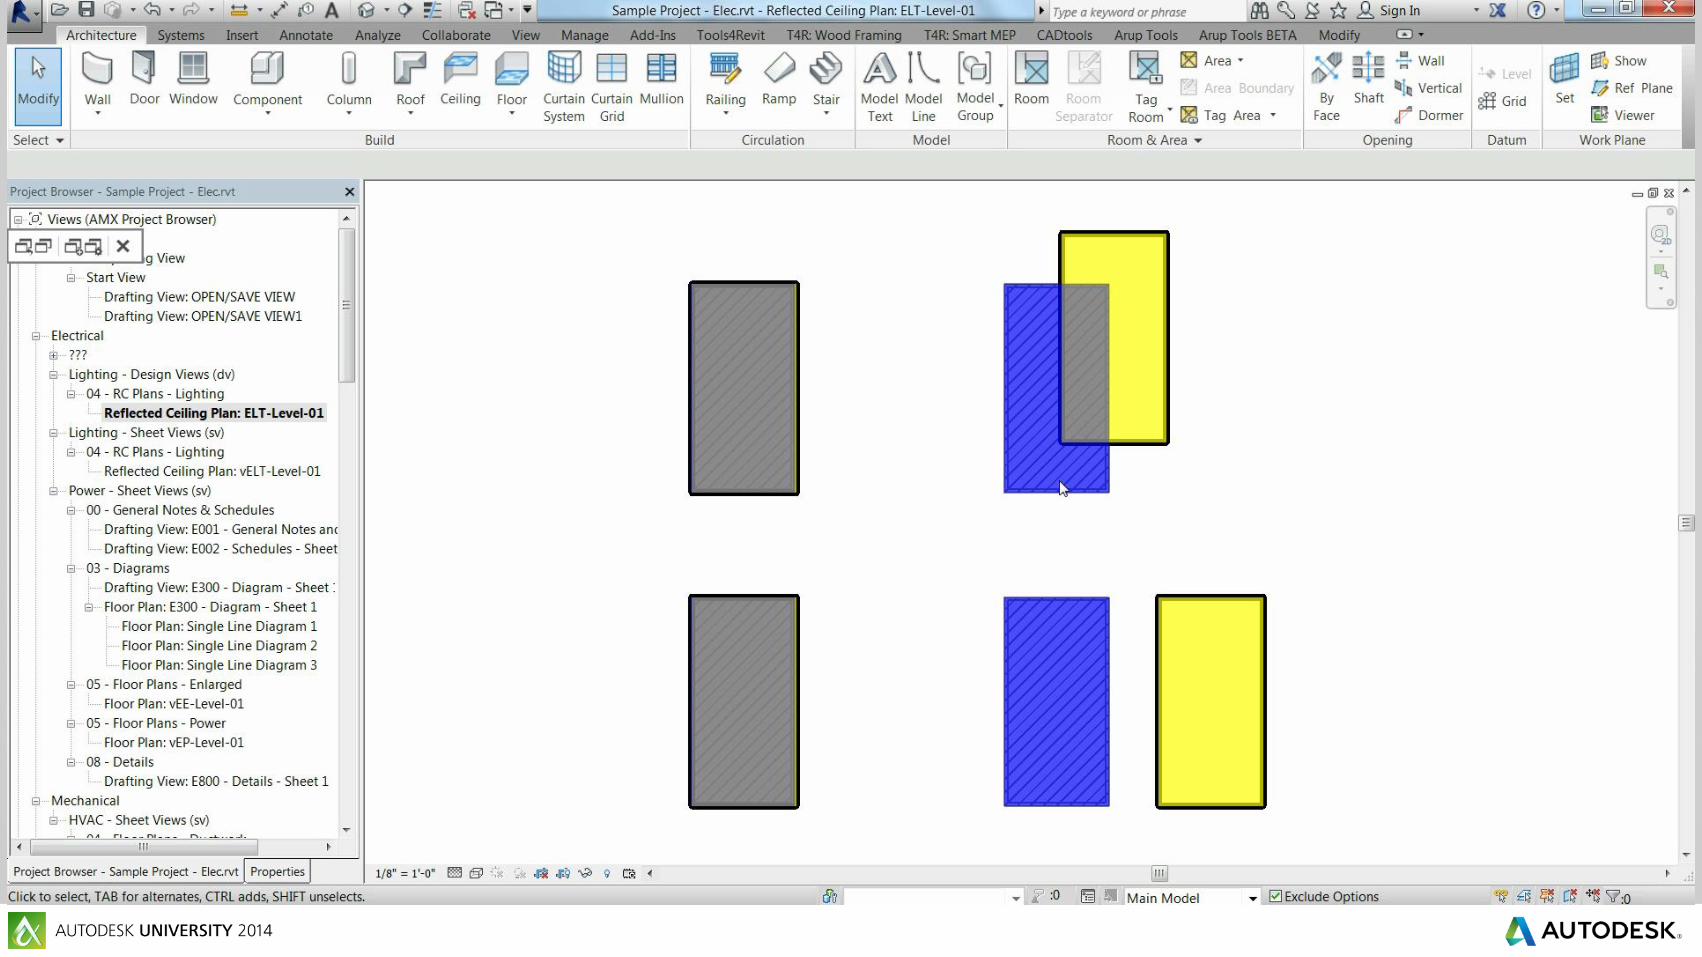
Overlay your light fixtures with the architects/lighting designers
Architect and/or lighting
designers layout

Coordination between Electrical and Other
Disciplines
Overlay your light fixtures with the architects/lighting designers
Architect and/or lighting
designers layout
Our light fixture connector

Coordination between Electrical and Other
Disciplines
Overlay your light fixtures with the architects/lighting designers
Uncoordinated layout
Architect and/or lighting
designers layout
Our light fixture connector

Coordination between Electrical and Other
Disciplines
Overlay your light fixtures with the architects/lighting designers
Uncoordinated layout
Architect and/or lighting
designers layout
Coordinated fixture layout
Our light fixture connector

Coordination between Electrical and Other
Disciplines
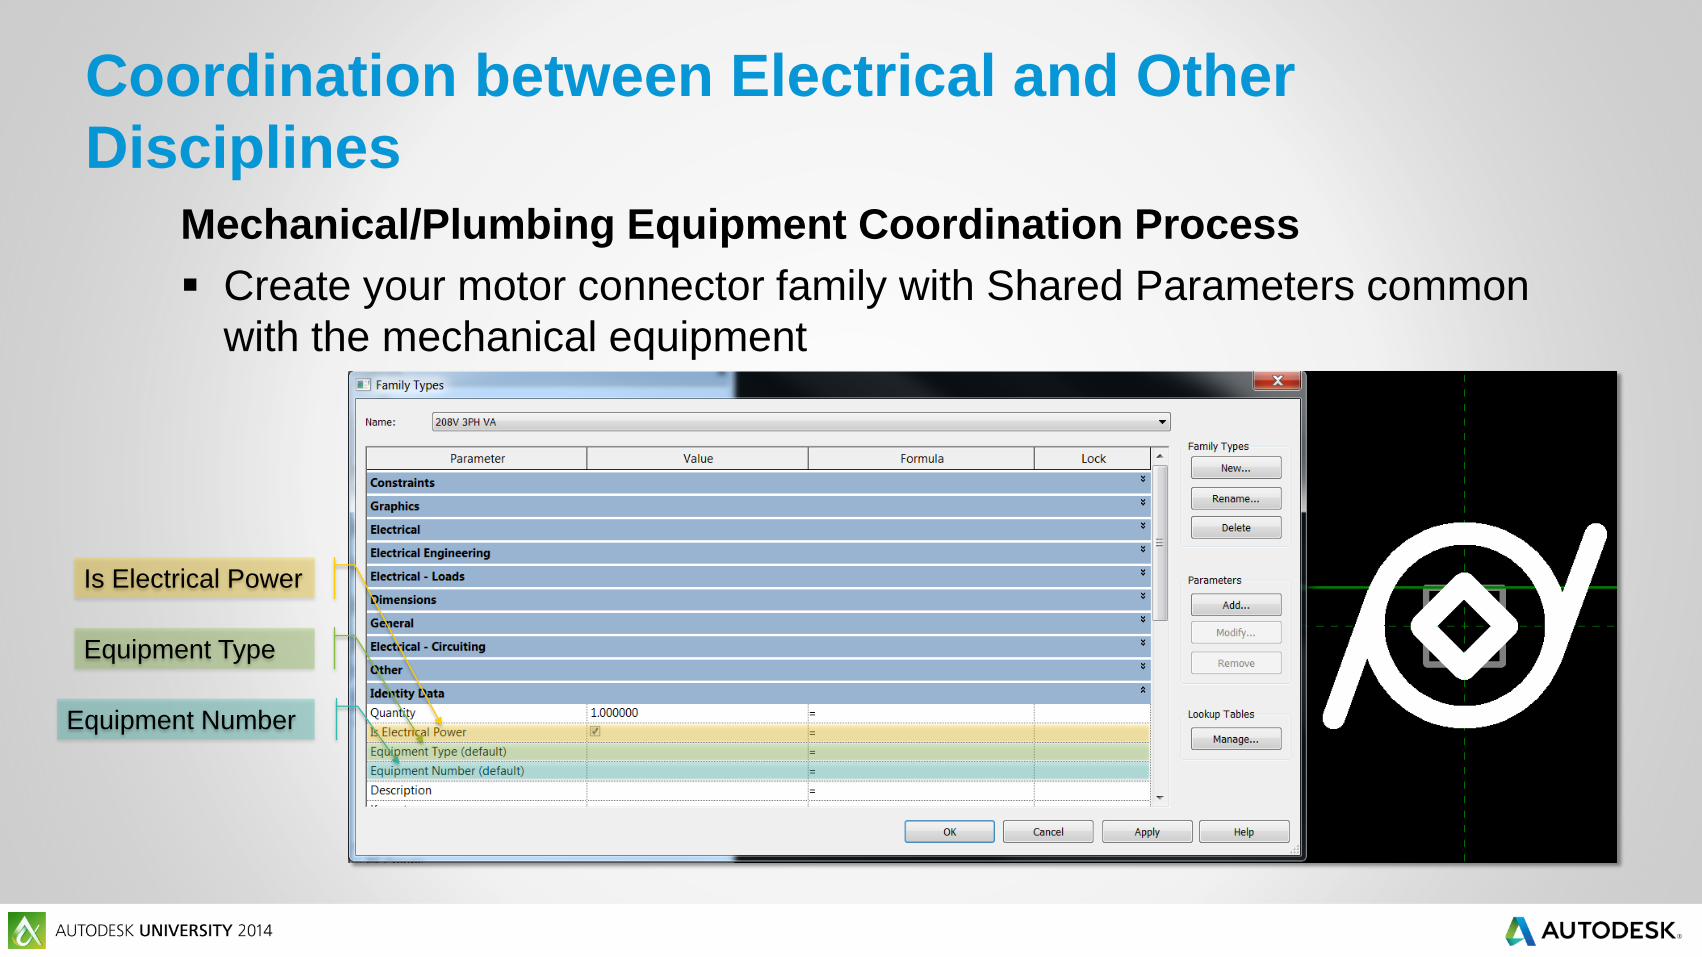
Mechanical/Plumbing Equipment Coordination Process
Create your motor connector family with Shared Parameters common
with the mechanical equipment
Is Electrical Power

Coordination between Electrical and Other
Disciplines
Mechanical/Plumbing Equipment Coordination Process
Create your motor connector family with Shared Parameters common
with the mechanical equipment
Is Electrical Power
Equipment Type
Coordination between Electrical and Other
Disciplines
Mechanical/Plumbing Equipment Coordination Process
Create your motor connector family with Shared Parameters common
with the mechanical equipment
Is Electrical Power
Equipment Type
Equipment Number

Coordination between Electrical and Other
Disciplines
Set-up your filters in your view templates
Mech Equipment Power

Coordination between Electrical and Other
Disciplines
Layout your motor connector to line up with the mechanical equipment
then lock it onto the equipment and directly tag the mechanical
equipment
Layout and lock motor
connector onto
mechanical equipment
Tag mechanical equipment

Coordination between Electrical and Other
Disciplines
Update the Shared Parameter “Equipment Type” & “Equipment Number”
to match mechanical
Update to match
mechanical
Update to match
mechanical


Coordination between Electrical and Other
Disciplines
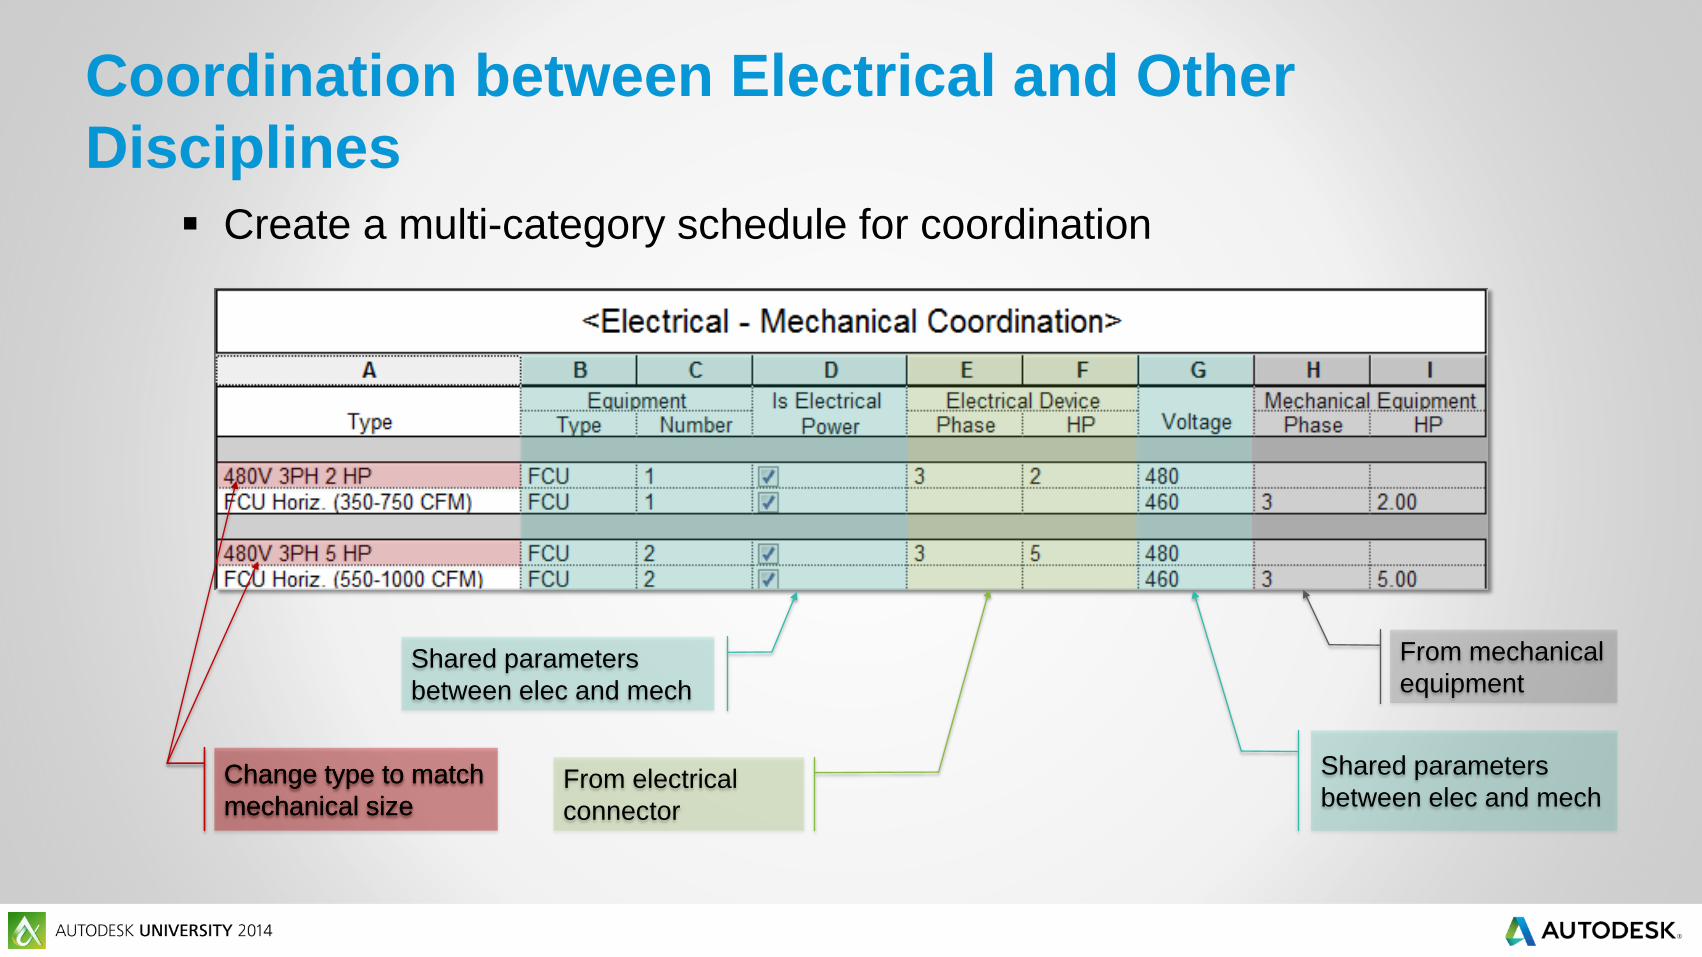
Create a multi-category schedule for coordination
Shared parameters
between elec and mech
Shared parameters
between elec and mech

Coordination between Electrical and Other
Disciplines
Create a multi-category schedule for coordination
Shared parameters
between elec and mech
From electrical
connector
Shared parameters
between elec and mech

Coordination between Electrical and Other
Disciplines
Create a multi-category schedule for coordination
Shared parameters
between elec and mech
From electrical
connector
From mechanical
equipment
Shared parameters
between elec and mech
Coordination between Electrical and Other
Disciplines
Create a multi-category schedule for coordination
Shared parameters
between elec and mech
Change type to match
mechanical sizeFrom electrical
connector
From mechanical
equipment
Change type to match
mechanical size
Shared parameters
between elec and mech
Coordination between Electrical and Other
Disciplines

Questions???
Thanks for attending!

Session Feedback
Via the Survey Stations, email or mobile device
AU 2015 passes given out each day!
Best to do it right after the session
Instructors see results in real-time

Students, educators, and schools now have
FREE access to Autodesk design software &
apps.
Download at www.autodesk.com/education

Earn your professional Autodesk Certification at AU
Visit the AU Certification Lab

Autodesk is a registered trademark of Autodesk, Inc., and/or its subsidiaries and/or affiliates in the USA and/or other countries. All other brand names, product names, or trademarks belong to their respective holders. Autodesk reserves the right to alter product and services offerings, and specifications and pricing at any time without notice, and is not responsible for typographical or graphical errors that may appear
in this document. © 2013 Autodesk, Inc. All rights reserved.