vs1680 roland
TRANSCRIPT
Thank you, and congratulations on your choice of the Roland VS-1680 V-XPANDEDDigital Studio Workstation.As the owner of the VS-1680 V-XPANDED, you can begin using all functionsimmediately. Please read the V-XPANDED Owner’s Manual (this document) togetherwith the VS-1680 Owner’s Manual (three volumes).
If you purchased the V-XPANDED system Zip disk, refer to this manual and upgradethe system software of VS-1680 (to add the V-XPANDED functions). Then, read the V-XPANDED Owner’s Manual (this document) together with the VS-1680 Owner’sManual (three volumes).
All product names mentioned in this document are trademarks or registeredtrademarks of their respective owners.
Copyright © 1999 ROLAND CORPORATIONAll rights reserved. No part of this publication may be reproduced in any form withoutthe written permission of ROLAND CORPORATION.
Roland international website: www.rolandcorp.comRoland U.S. website: www.rolandus.com
01898978 ‘99-3-E3-11T
Owner’s Manual

3
Table of Contents
Table of Contents.............................3Precautions ...................................................................4Added functionality (main features) .............................................................5
Mixdown using the VS-1680 alone......................5Additional effect algorithms ................................5Automix editing functionality .............................5Enhanced support for CD-R/CD-RW drives ............................................5Enhanced operations .............................................5Enhanced screen display ......................................5
Expanding the functionality of the VS-1680 .............................................6
If you purchased the VS-1680 V-XPANDED...........................................6If you purchased the V-XPANDED system program Zip disk ............6
Mix 16 tracks down to 2 tracks(Mastering Room).............................8
Added mastering tracks .............................................8Mixing down to the mastering tracks.......................8
Mixdown shortcut 1 ............................................10Mixdown shortcut 2 ............................................10
Playing back the mastering tracks ..........................10Mixing down while inserting effects ......................11
New effects algorithms..................14Making the volume consistent for each frequency band (Mastering Tool Kit) ..................................................14
EQ (Equalizer) ......................................................14BCut (Bass-cut filter)............................................15Enh (Enhancer).....................................................15In (Input) ...............................................................15Exp (Expander).....................................................15Cmp (Compressor) ..............................................16Mix (Mixer) ...........................................................16Lmt (Limiter) ........................................................16Out (Output).........................................................16
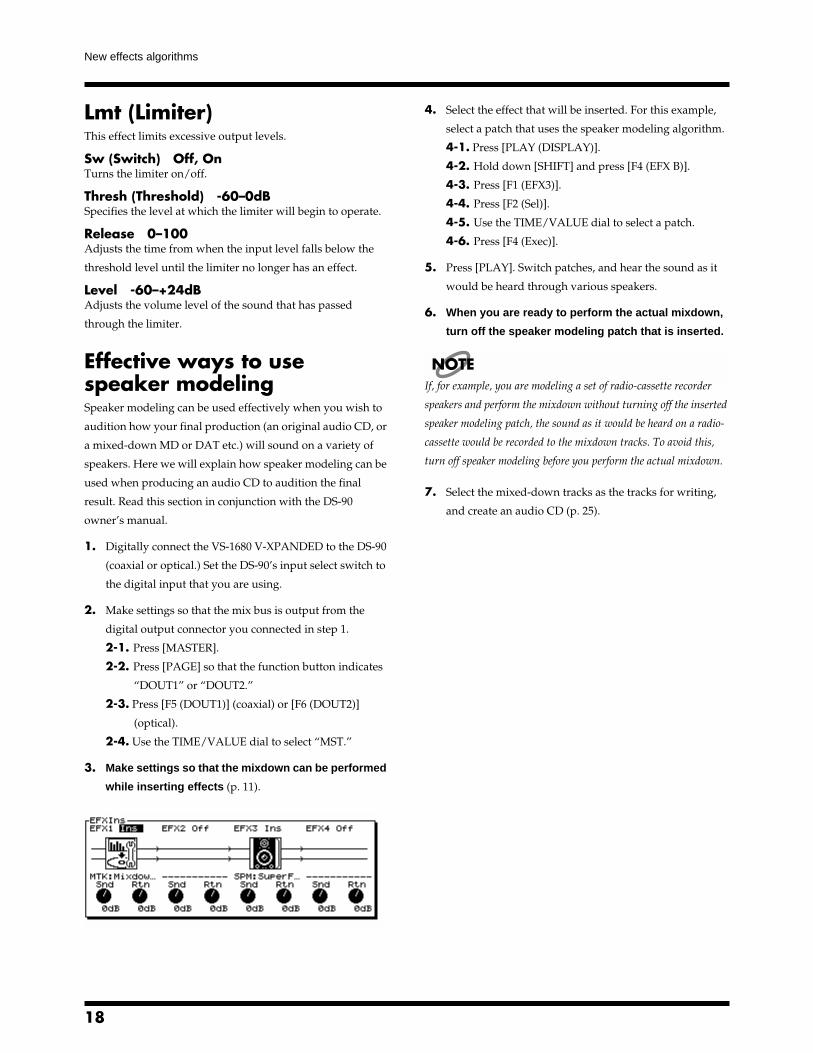
Modeling various speakers (Speaker Modeling) ..17SpMod (speaker modeling) ................................17BCut (Bass-cut filter)............................................17LFT/HFT (Frequency trimmer).........................17Lmt (Limiter) ........................................................18Effective ways to use speaker modeling ..........18
Editing an automix .........................19Erasing data from a specific area (Erase) ...............19Copying data to another location (Copy) ..............20Smooth data transitions (Gradation) ......................21Increasing or decreasing all data values (Shift/Expand) .......................................................................23
Using the VS-1680 with a CD-R/CD-RW drive..........................................25
Creating an audio CD ...............................................25Creating silence between songs (Disc At Once and Track At Once)..............................................25Specifying the writing speed (Speed) ...............25Song writing procedure ......................................25
Saving a song to a CD-RW disc (Backup) ..............27Checking whether the song was saved correctly (+Verify) ................................................................27Specifying the speed of saving (Speed) ............27Backup procedure ................................................27
Restoring songs from a CD-RW disc (Recover) ..............................................28
Specifying the speed of recovery (Speed).........28Recovery procedure.............................................28
Enhancements related to operation .30
Shortcut to the Phrase Edit window .......................30Creating a new phrase (Phrase New) .....................30
Sorting the take list (Sort) ...................................30Deleting a take (Delete) .......................................31Naming a take (Name) ........................................32
Dividing a phrase (Phrase Divide/Split) ................................................33
Automatically dividing a phrase (Phrase Divide)33Dividing a phrase into two parts (Phrase Split) ..34
Using the MONITOR knob to adjust the pan (MONITOR knob +[SELECT]).................................35Linking the faders of two or more channels (Fader Group)............................................................36Copying mixer settings.............................................37Shift Lock on/off ([SHIFT]+[YES]) .........................38Removing direct current offset from the mix bus.38
Enhancements to the display and specifications .................................39
Checking inserted effects (Icon and Patch Name display)........................................................................39Checking effects that cannot be used in other channels (Effect insertion location display) ...........39Switching the Song Select window (List display).40Easy Routing ..............................................................40
Additional template (Mastering) .......................40Immediate application of step-edited changes41
Settings not stored in a scene (Monitor Level) ......41Master Send switch display has been changed (PanÆMIX) .................................................................41
Index................................................42

4
Precautions
● Unfortunately, it may be impossible to restore the data stored on a Zip disk or other form of media
once it has been erased, initialized, or otherwise lost. Roland Corporation assumes no liability
concerning such loss of data.
● Zip disks contain a plastic disk with a thin coating of magnetic storage medium. Microscopic
precision is required to store large amounts of data on such a small surface area. To preserve their
integrity, please observe the following when handling Zip disks:
❍ Never touch the magnetic medium inside the disk.
❍ Do not use or store ZIP disks in dirty or dusty areas.
❍ Do not subject ZIP disks to temperature extremes (e.g., direct sunlight in an enclosed vehicle).
Recommended temperature range: -22 to 51 °C (-7.6 to 123.8 °F).
❍ Do not expose Zip disks to strong magnetic fields, such as those generated by loudspeakers.
● The identification label should be firmly affixed to the disk. Should the label come loose while the
disk is in the drive, it may be difficult to remove the disk.
● Store all disks in a safe place to avoid damaging them, and to protect them from dust, dirt, and
other hazards. By using a dirty or dust-ridden disk, you risk damaging the disk, as well as causing
the disk drive to malfunction.
In the interest of product improvement, the specifications and/or contents of this package are subject
to change without prior notice.

5
Added functionality (main features)
Mixdown using the VS-1680 aloneWhile playing back sixteen tracks, you can mixdown to any
two tracks of the 256 V-tracks (Mastering Room). This is
convenient when you wish to prepare tracks for mastering,
such as when you are producing an original audio CD (p. 8).
Additional effect algorithms- A compressor (an effect that makes the volume more
consistent) can be applied independently to individual
frequency bands (Mastering Tool Kit) (p. 14).
- A Speaker Modeling effect has been added, allowing you
to apply the acoustical characteristics of a variety of
speakers (p. 17).
Automix editing functionalityAutomix data (such as the level or pan of each channel, and
effect patch numbers) can be edited in a specified area by
deleting, copying, or increasing/decreasing the data values
(p. 19).
Enhanced support for CD-R/CD-RW drives- When producing an original audio CD, you can specify
the speed of writing (p. 25).
- When performing a CD-R Backup, you can check whether
the data was saved correctly (+Verify: p. 27).
- When performing a CD-R Backup, you can specify the
speed of the backup (p. 25).
- When performing a CD-R Recover, you can specify the
speed of the recover (p. 28).
Enhanced operations- In Play condition you can select a phrase for editing, and
directly display the Phrase Edit window (p. 30)
- In the Phrase New window, you can sort the Take List
(Sort: p. 30).
- In the Phrase New window, you can delete a take from the
Take List (Delete: p. 31).
- In the Phrase New window, you can change the name of a
take in the Take List (Name: p. 32)
- Phrases can be divided automatically (Phrase Divide:
p. 33).
- The MONITOR knob can be used to adjust the pan of each
channel (MONITOR knob + [SELECT]: p. 35).
- The faders of two or more channels can be adjusted as a
group (Fader Group: p. 36).
- Level and EQ settings of a channel can be copied (p. 37).
- In Play condition, Shift Lock can be turned on/off directly
([SHIFT]+[YES]: p. 38).
- Direct current offset can be removed from the mix bus
(p. 38).
Enhanced screen display- Inserted effects can be viewed as icons and patch names
(p. 39).
- Insertion positions of effects that have been inserted in
other channels are displayed (p. 39).
- A list display is provided in the Song Select window
(p. 40).
- A template (mastering) has been added to Easy Routing
(p. 40).
- The results of step editing in Easy Routing are applied
immediately (p. 41).
- The monitor level is no longer stored in a scene (p. 41).
- The Master Send switch display has been changed (p. 41).

6
Expanding the functionality of the VS-1680
There are several ways in which the new functions can be
added to the VS-1680. Please read the section that applies to
your VS-1680.
NOTEAfter you have upgraded the VS-1680, you can continue using the
hard disk that you are currently using without any changes. It is
not necessary to initialize the hard disk. However, as a precaution
against unforeseen accidents, we recommend that you back up your
song data before performing the upgrade.
If you purchased the VS-1680 V-XPANDEDIf you purchased the VS-1680 V-XPANDED, you need not
perform any procedure. Skip this section and begin reading
Chapter 2 (p.8).
If you purchased the V-XPANDED system program Zip diskYou can use the V-XPANDED system program Zip disk to
add the V-XPANDED functionality to your VS-1680. Prepare
the following items.
- VS-1680
- SCSI Zip drive
- VS-1680 V-XPANDED system program Zip disk
NOTEThe V-XPANDED system program Zip disk contains a program
which installs the software update. Be careful not to initialize it on
the VS-1680.
1. Make sure that the power is turned off on all devices.
NOTETo prevent malfunction and/or damage to speakers or other devices,
always turn down the volume, and turn off the power on all devices
before making any connections.
2. Disconnect all cables that were connected to the VS-1680.
3. Connect the SCSI Zip drive to the VS-1680. On the back
of the Zip drive, make sure the termination switch is set
to ’on’.
NOTEHave only the SCSI Zip drive connected. Do not connect any other
disk drives.
fig.1-01
4. Turn on the power of the SCSI zip drive.
5. Insert the VS-1680 V-XPANDED system program Zip
disk into the SCSI Zip drive.
6. Connect the power cable to the VS-1680.
7. Turn on the rear panel power switch of the VS-1680.
fig.1-02
8. Wait for the display to prompt “Update System
Program?” and then press [YES].
fig.1-03
MEMOIf this display does not appear, the VS-1680 was not able to
recognize the Zip disk. Turn off the power, re-insert the disk
correctly, and turn the power on once again.
9. A message will ask whether you wish to keep the user
settings that are stored in your VS-1680. Press [YES] and
proceed to step 11. If you wish to initialize (erase) the
user settings, press [NO], and proceed to step 10.
The user settings that can be left in the VS-1680 are as
follows.
- Easy routing (VS-1680 Owner’s Manual, p. 41)
- Effect user patches (VS-1680 Owner’s Manual, p. 110)
- Alarm function message
(VS-1680 Owner’s Manual, p. 193)

7
Expanding the functionality of the VS-1680
fig.1-04
10. If you pressed [NO] in step 9, an additional message will
ask you to confirm. If you wish to erase (initialize) the
user settings, press [YES]. If you press [NO] you will
return to step 9.
fig.1-05
11. The expansion procedure will begin. Please wait for
approximately 30 seconds.
NOTEYou must never under any circumstances turn off the
power until the function expansion procedure has been
completed. Doing so could damage the VS-1680 system.
fig.1-06
12. Once the following message appears, you may turn off
the power. Verify that this message has appeared, and
then turn off the rear panel power switch.
fig.1-07
13. Turn on the power once again. Verify on the display that
the system software is now 2.00 or higher.
fig.1-08
MEMOSubsequently, when starting up the VS-1680, you will not
need the V-XPANDED system program Zip disk. Keep this
Zip disk in a safe location that is not excessively warm. The
V-XPANDED system program Zip disk cannot be used on
any device other than the VS-1680.

8
Mix 16 tracks down to 2 tracks(Mastering Room)
From the 256 V-tracks you can now select any two tracks,
and mixdown to these two tracks as you play back 16 tracks
simultaneously.
Added mastering tracks
Until now, you had to use an external DAT recorder or MD
recorder if you wanted to mixdown a song that used all
sixteen tracks. For example if you wanted to produce an
original audio CD, you needed to first mixdown to an
external recorder (DAT or MD), and then re-record that song
onto the VS-1680.
fig.2-01
Now, “Mastering tracks” equivalent to this external recorder
(DAT or MD) are provided on the VS-1680 itself.
fig.2-02
Any two of the 256 V-tracks can be assigned for use as the
mastering tracks. With the factory settings, V-track 16 of
tracks 15/16 (i.e., 15-16 and 16-16) are assigned as the
mastering tracks.
For example, you can play back V-tracks 1-1, 2-1, 3-1...15-1,
and 16-1 (a total of 16 tracks), and record the result on
V-tracks 15-16 and 16-16 (a total of two tracks).
MEMOWhen the Recording mode (VS-1680 Owner’s Manual, p. 58)
is set to “MAS (mastering),” you can play back V-tracks 1-1,
2-1, 3-1...7-1, and 8-1 (a total of 8 tracks), and record on
V-tracks 7-16 and 8-16 (a total of two tracks). Tracks 9–16
cannot be used.
Mixing down to the mastering tracks
Here’s how to select the mastering tracks, and perform a
mixdown.
NOTEThe operation of playing back 16 tracks while you mixdown to the
mastering tracks (two tracks) is significantly affected by the speed
of the hard disk. For this reason, depending on the structure of the
song data (sampling rate and recording mode, or when punch-in/
out is used frequently, etc.), or depending on the drive that you use,
the display may indicate “Drive Busy,” and the operation may not
take place correctly. In order to take full advantage of the
VS-1680’s potential, such as the number of tracks that
can be recorded/played simultaneously, and the
recording capacity, we recommend that you use a hard
disk which capacity is 2.1 GB or more.
1. Press [MASTER].
2. Press [PAGE] so that [F6] indicates “M.Tr,” and then
press [F6 (M.Tr)].
fig.2-03
3. Press [ENTER (YES)].
4. Press [ ], [ ], [ ], or [ ] to move the cursor.
Use the TIME/VALUE dial to specify the value for each
parameter.
fig.2-04
TR1
MASTER
DAT
VS-1680
MIXSw
MIXL R
Digital OutSelectL R
Track 1--16
MD
MASTER OUT
DIGITAL OUT
TR1
MASTER
VS-1680
MIXSw
MIXL R
Digital OutSelectL R
Track 1--16
MASTER OUT
DIGITAL OUT
TR15-16
TR16-16
MasteringTrack

9
Mix 16 tracks down to 2 tracks (Mastering Room)
Status
Specify the status of the mastering tracks. For this example,
select “Off.”
Off: The mastering tracks will not be used.
Rec: Play back tracks 1–16 while recording them to the
mastering tracks.
Play: Play back the mastering tracks. The sound of tracks
1–16 will not be output from the MASTER jacks.
MEMOFor details on the signal flow (routing) at this time, refer to
Signal flow (routing) (p. 10).
Trk L (track L)
Trk R (track R)
Select the two V-tracks (L and R) that will be assigned as
mastering tracks. When a new song is created, V-track 16 of
tracks 15/16 (15-16, 16-16) will be assigned as the mastering
tracks.
After Rec (after recording)
Specify the time location of the mastering track to which the
mixdown will be recorded. When creating an original audio
CD, it is usually best to select “to ZERO.”
to ZERO: Place the data starting at 00h00m00s00f
to last Phrs:0S: Place the data after the end of the last
phrase in the mastering tracks.
to last Phrs:2S: Place the data two seconds after the end of
the last phrase in the mastering tracks.
to last Phrs:4S: Place the data four seconds after the end of
the last phrase in the mastering tracks.
Stay HERE: Place the data at the time location at which
it was actually recorded.
fig.2-05.e
Marker
If this is turned “On,” a track number marker will
automatically be assigned to the beginning of the phrase that
is mixed down. Normally you will set this “On.”
MEMODepending on the After Rec (After Recording) setting or on
the location relative to other markers, the display may
indicate “Can’t Set Marker,” and the track number marker
may not be assigned.
5. Hold down [STOP], and press the [STATUS] button for
all tracks (1–15/16) that you wish to mixdown. The
STATUS indicators will light green.
fig.2-06
6. Press [FADER] so that the TR (track) indicator lights.
fig.2-07.e
7. Press [PLAY]. The song will play back.
8. Raise and lower the master fader, and verify that the
volume of each track changes.
MEMOThe sound that passes through the master fader will be
recorded on the mastering tracks. In order to record at the
optimal audio quality, you should normally set this to the
0 dB position.
9. Use the channel faders (1–15/16) to adjust the volume
balance of each track. At this time the sound that is being
output from the MASTER jacks (volume levels, panning)
will be recorded to the mastering tracks. It is best to set
the volume as high as possible without causing the
volume to distort.
10. When you have finished adjusting the volume, press
[STOP].
11. Move to the location at which you wish to begin the
mixdown (such as 00h00m00s00f).
0 Time
MixdownPhrase
OriginalPhrase
0 Time 0 Time
0 Time
0 Time
0 Time
to ZERO to LastPhrs:0s to LastPhrs:2s
to LastPhrs:0s Stay HERE
LitDark

10
Mix 16 tracks down to 2 tracks (Mastering Room)
12. Use the cursor buttons and the Value dial to change the
"Status" of the tracks for mastering to “Rec.”
13. Press [REC]. The REC indicator will light in red.
14. Press [PLAY]. The PLAY indicator will light in green,
and recording will begin.
15. When you finish recording, press [STOP].●●●●●●●●●●●●●●●●●●●●●●●●●●●●●●●●●●●●●●●●●●●●●●●●●●●●●●●●●●●●●●●●●●●●●●●●●●●●●●●●●●●●●●●●●●●●●●●●●●●●
Signal flow (routing)
fig.2-08
●●●●●●●●●●●●●●●●●●●●●●●●●●●●●●●●●●●●●●●●●●●●●●●●●●●●●●●●●●●●●●●●●●●●●●●●●●●●●●●●●●●●●●●●●●●●●●●●●●●●
Mixdown shortcut 1The “Status” of the assigned mastering tracks/V-tracks can
also be set as follows.
1. Press [MASTER].
2. Press [PAGE] so that [F6] indicates “M.Tr,” and then
press [F6 (M.Tr)].
fig.2-03
3. Select the status of the mastering tracks. Make sure that
the cursor is located at “Stat,” and then rotate the
TIME/VALUE dial.
fig.2-10
4. Select the V-tracks. Use [ ] or [ ] to move the
cursor to “L:” or “R:,” and rotate the TIME/VALUE dial.
Mixdown shortcut 2The “Status” of the mastering tracks can also be set as
follows.
1. Press [PLAY (DISPLAY)].
2. Press [PAGE] so that [F6] indicates “M→***” (*** is either
Rec, Ply, or Off).
fig.2-11
3. Press [F6] to cycle between “M→Rec” → “M→Play” →
“M→Off.” The current status of the mastering tracks will
be shown by the level meters in the display.
fig.2-12.e
Playing back the mastering tracks
Here’s how you can verify the audio that was mixed down to
the mastering tracks. Tracks 1–16 will not be played back.
1. Press [PLAY (DISPLAY)].
2. Press [PAGE] so that [F6] indicates “M→***” (*** is either
Rec, Ply, or Off).
TR1
MASTER
MIXSw
MIXL R
Track 1--16
TR15-16
TR16-16
MasteringTrack
MASTER OUTMONITOR OUT
Off Record wait Status Playback Status

11
Mix 16 tracks down to 2 tracks (Mastering Room)
fig.2-11
3. Press [F6] to cycle between “M→Rec” → ”M→Play” →
”M→Off.” The current status of the mastering tracks can
be viewed in the level meter in the display. For this
example, select “M→Off” (playback status: pressing [F6]
once again will select Off).
fig.2-12.e
MEMOFor details on the signal flow at this time, refer to Signal flow
(routing) (p. 11).
4. Move to the location at which you started the mixdown.
5. Press [ ] so that you can view the playlist of the
mastering tracks.
fig.2-15
MEMOIf the bottom line of the display is surrounded by a heavy
line, you can also use the TIME/VALUE dial to check the
playlist of the mastering tracks.
6. Press [PLAY]. The mastering tracks will play back. Use
the master fader to adjust the volume to a comfortable
listening level.
At this time, the function buttons will function as follows
(Owner’s Manual, p. 182).
[F1 (ZOOM+)]: Enlarges the playlist display in the track
direction (three levels).
[F2 (ZOOM-)]: Reduces the playlist display in the track
direction (three levels).
[F3 (←→)]: Enlarges the playlist display in the time
direction (five levels).
[F4 (→←)]: Reduces the playlist display in the time
direction (five levels).
[F5 (WAVE)]: Display the sound level (waveform) that is
recorded in the tracks.
7. When playback ends, press [STOP].●●●●●●●●●●●●●●●●●●●●●●●●●●●●●●●●●●●●●●●●●●●●●●●●●●●●●●●●●●●●●●●●●●●●●●●●●●●●●●●●●●●●●●●●●●●●●●●●●●●●
Signal flow (routing)
fig.2-16
●●●●●●●●●●●●●●●●●●●●●●●●●●●●●●●●●●●●●●●●●●●●●●●●●●●●●●●●●●●●●●●●●●●●●●●●●●●●●●●●●●●●●●●●●●●●●●●●●●●●
Mixing down while inserting effects
If a separately sold VS8F-2 effect expansion board is
installed, you can insert effects while you mixdown.
MEMOWhile performing a mixdown, it is common to insert an
effect such as a parametric equalizer or a compressor. For
this example, we will insert the Mastering Tool Kit (EFX1: a
newly added algorithm; p. 14) to adjust the overall volume
balance as we mixdown.
1. Press [MASTER].
2. Press [PAGE] so that [F6] indicates “M.Tr,” and then
press [F6 (M.Tr)].
Off Record wait Status Playback Status
TR1
MASTER
MIXSw
MIXL R
Track 1--16
TR16-16
MasteringTrack
TR15-16 MASTER OUTMONITOR OUT

12
Mix 16 tracks down to 2 tracks (Mastering Room)
fig.2-03
3. Press [ENTER (YES)].
4. Use [ ], [ ], [ ], and [ ] to move the cursor
to “Status.”
fig.2-18
5. Select the “Status” of the mastering tracks. Rotate the
TIME/VALUE dial.
Status
Specify the status of the master tracks. For this example select
“Off.”
Off: The mastering tracks will not be used.
Rec: Play back tracks 1–16 and record on the mastering
tracks.
Play: Play back the mastering tracks. The sound of tracks
1–16 will not be output from the MASTER jacks.
MEMOFor details on the signal flow (routing) at this time, refer to
Signal flow (routing) (p. 13).
6. Use [ ], [ ], [ ], and [ ] to move the cursor
to “EFXIns.”
fig.2-19
7. Press [ENTER (YES)].
8. Use [ ], [ ], [ ], and [ ] to move the cursor.
Use the TIME/VALUE dial to make settings.
fig.2-20.e
EFX1 (effect insert switch 1)
Select how the effect will be connected.
Off: The effect will not be inserted.
Ins: The stereo effect will be inserted into both channels.
The inserted effects are shown as icons and as patch
names (up to ten characters).
Snd (effect send level)
Adjust the volume level of the signal that is sent to the
insertion effect (-42–6 dB). By default, this will be “0 dB.”
Rtn (effect return level)
Adjust the volume level of the signal that is output from the
insertion effect (-42–6 dB). By default, this will be “0 dB.”
9. Press [F1 (EFX1)].
10. Press [F2 (Sel)].
11. Use the TIME/VALUE dial to move the cursor to the
effect that you wish to use. For this example, select an
effect such as “P210 MTK:Mixdown.”
fig.2-21
12. After selecting an effect, press [F4 (Exec)].
13. Press [F6 (EXIT)].
Effect Insert Switch
Insert Send LevelInsert Return Level

13
Mix 16 tracks down to 2 tracks (Mastering Room)
14. Hold down [STOP], and press [STATUS] for all tracks
(1–15/16) that you wish to mixdown. The STATUS
indicator will light in green.
fig.2-06
15. Press [FADER] so that the TR (track) indicator lights.
fig.2-07.e
16. Press [PLAY]. The song will play back.
17. Raise and lower the master fader, and verify that the
volume of each track changes.
MEMOThe sound that has passed through the master fader will be
recorded on the mastering tracks. In order to record at the
optimal audio quality, you will normally set the master
fader to 0 dB.
18. Use the channel faders (1–15/16) to adjust the volume
balance of the tracks. At this time, the sound (volume
level and pan) that is output from the MASTER jacks will
be recorded “as is” to the mastering tracks. Adjust the
volume to as high a level as possible without causing
distortion.
19. When you are finished adjusting the volume, press
[STOP].
20. Move to the time location at which you wish to begin the
mixdown (e.g., 00h00m00s00f).
21. Change the “Status” of the mastering tracks to “Rec.”
22. Press [REC]. The REC indicator will light in red.
23. Press [PLAY]. The PLAY indicator will light in green,
and recording will begin.
24. When you finish recording, press [STOP].
●●●●●●●●●●●●●●●●●●●●●●●●●●●●●●●●●●●●●●●●●●●●●●●●●●●●●●●●●●●●●●●●●●●●●●●●●●●●●●●●●●●●●●●●●●●●●●●●●●●●
Signal flow (routing)
fig.2-24
●●●●●●●●●●●●●●●●●●●●●●●●●●●●●●●●●●●●●●●●●●●●●●●●●●●●●●●●●●●●●●●●●●●●●●●●●●●●●●●●●●●●●●●●●●●●●●●●●●●●
LitDark
TR1
MASTER
MIXSw
MIXL R
Track 1--16
TR15-16
TR16-16
MasteringTrack
MASTER OUTMONITOR OUT
EFX (Insert)

14
New effects algorithms
When the VS8F-2 effects expansion board is installed, the
following effects algorithms will be added.
- Making the volume consistent for each frequency band
(Mastering Tool Kit) (p. 14)
- Modeling various speakers (Speaker Modeling) (p. 17)
Making the volume consistent for each frequency band (Mastering Tool Kit)
This is a compressor that can be applied
independently to each frequency band (high, mid,
and low ranges). When mastering to MD or DAT,
or when using a CD-R disc to produce your own original
audio CDs, this allows you to master at the optimal level.
fig.3-02
NOTEThe mastering tool kit can be used in either EFX1 or EFX3. When
you use it, EFX2/EFX4 will be unavailable.
EQ (Equalizer)This is a four-band equalizer with low, low-mid, high-mid,
and high ranges.
fig.3-03
Sw (Switch) Off, OnTurns the equalizer on/off.
InputG (Input gain) -24–+12dBAdjusts the overall volume level of the signal before entering
the equalizer.
Low Type Shlv, PeakHigh Type Shlv, PeakSelects the type of the low range (Low) and high range
(High) equalizer. (Shlv: shelving type, Peak: peaking type).
Low Gain -12–+12dBLoMid Gain (Low middle gain) -12–+12dBHiMid Gain (High middle gain) -12–+12dBHigh Gain (High gain) -12–+12dBAdjust the gain (the amount of boost or cut) for each
equalizer band.
Low Freq (Low frequency) 20–2,000HzLoMid Freq (Low middle frequency) 20–8,000HzHiMid Freq (High middle frequency) 20–8,000HzHigh Freq (High frequency) 1.4–20kHzAdjust the center frequency of each equalizer band.
Low Q (Low Q) 0.3–16LoMid Q (Low middle Q) 0.3–16HiMid Q (High middle Q) 0.3–16High Q (High Q) 0.3–16Adjust the width of the area around the center frequency
(Freq) that will be affected by the Gain. As these values are
raised, a narrower range will be affected.
Lvl (Level) -24–+12dBAdjusts the overall volume of the signal that has passed
through the equalizer.
Compressor
L
R
Limiter Output
Lmt Out
Enhancer
Enh
Equalizer
EQ
Bass Cut
BCut
Expander
Exp
MixExp
MixExp
InputH
ML
In
Cmp
Cmp
Cmp
Mixer
Mix
+L
R
EQ (Peak)Gain
0
-
+
Freq
Q (0.3 – 16)Gain
0
-
+
Freq
Freq
EQ Low (Shlv)
Gain
0
-
+
Freq
EQ High (Shlv)
Gain
0
-
+

15
New effects algorithms
BCut (Bass-cut filter)This removes unwanted low-frequency components, such as
pop noise.
Sw (Switch) Off, OnTurns the bass-cut filter on/off.
Freq (Frequency) Thru, 20–2,000HzAdjusts the cutoff frequency of the bass-cut filter.
Enh (Enhancer)This effect adds a phase-shifted signal to the original signal,
enhancing the presence of the sound, and bringing it to the
foreground.
Sw (Switch) Off, OnTurns the enhancer on/off.
Sens (Sensitivity) 0–100Adjusts the degree to which the enhancer will respond to the
volume of the input signal.
Freq (Frequency) 1.0–10.0kHzAdjusts the frequency at which the enhancer will begin to
take effect. The effect is applied at frequencies above the
specified value.
MixLvl (Mix level) -24–+12dBAdjusts the amount of effect sound that will be added to the
original sound.
In (Input)The input signal is divided into three parts by frequency
band.
InputG (Input gain) -24–+12dBAdjusts the overall volume level of the signal before it enters
the expander (Exp) and compressor (Cmp).
D-Time (Detect time) 0–10msIf the original signal is slightly delayed before being input,
the expander/compressor will be able to use more
processing time, and can adjust the level more appropriately.
Adjusts the time by which the original signal is delayed.
The output signal from the Mastering Tool Kit is delayed by
the time set here.
L-SplitP (Low split point) 20–800HzH-SplitP (High split point) 1.6–16kHzSpecify the frequencies at which the original signal will be
split into three parts.
fig.3-04
Exp (Expander)This effect restricts the output by a specific ratio when low-
level signals are input.
fig.3-05
Sw (Switch) Off, OnTurns the expander on/off.
Low Thre (Low threshold) -80–0dBMid Thre (Middle threshold) -80–0dBHigh Thre (High threshold) -80–0dBSpecify the level at which the expander will begin to take
effect.
Low Ratio 1:1–1:16, 1:INFMid Ratio 1:1–1:16, 1:INFHigh Ratio 1:1–1:16, 1:INFAdjust the ratio by which the output is restricted when the
input level is below the threshold level.
Low Atck (Low attack) 0–100msMid Atck (Middle attack) 0–100msHigh Atck (High attack) 0–100msAdjust the time from when the input level falls below the
threshold level until the expander begins to take effect.
Low Rel (Low release) 50–5,000msMid Rel (Middle release) 50–5,000msHigh Rel (High release) 50–5,000msAdjust the time from when the input level exceeds the
threshold level until the expander effect is bypassed.
Freq
L-SplitP H-SplitPLevel
Low Mid High
ThresholdOut
In1:1
Ratio
1:2

16
New effects algorithms
Cmp (Compressor)When a high-level signal is input, this effect restricts the
output at a specified ratio.
fig.3-06
Sw (Switch) Off, OnTurns the compressor on/off.
Low Thre (Low threshold) -24–0dBMid Thre (Middle threshold) -24–0dBHigh Thre (High threshold) -24–0dBSpecify the level at which the compressor will begin to take
effect.
Low Ratio 1:1–1:16, 1:INFMid Ratio 1:1–1:16, 1:INFHigh Ratio 1:1–1:16, 1:INFAdjust the ratio by which the output will be restricted when
the input level exceeds the threshold level.
Low Atck (Low attack) 0–100msMid Atck (Middle attack) 0–100msHigh Atck (High attack) 0–100msAdjust the time from when the input level exceeds the
threshold level until the compressor takes effect.
fig.3-06a
Low Rel (Low release) 50–5,000msMid Rel (Middle release) 50–5,000msHigh Rel (High release) 50–5,000msAdjust the time from when the input level falls below the
threshold level until the compressor no longer has an effect.
fig.3-06b
NOTEThe compressor provides threshold (Thre) and Ratio settings that
automatically adjust a signal to the optimal level. Since
lengthening the attack (Atck) may cause distortion, a -6 dB margin
is provided. Adjust the mixer (Mix) level as necessary.
Mix (Mixer)Adjusts the volume for each of the three frequency bands
that were divided.
Low Lvl (Low level) -80–+6dBMid Lvl (Middle level) -80–+6dBHigh Lvl (High level) -80–+6dBThese adjust, for each band, the volume level of the signal
that has passed through the expander (Exp) and compressor
(Cmp).
Lmt (Limiter)This effect restricts excessive input levels.
Sw (Switch) Off, OnTurns the limiter on/off.
Thresh (Threshold) -24–0dBSpecifies the level at which the limiter will begin to operate.
Attack 0–100msAdjusts the time from when the input level exceeds the
threshold level until when the limiter begins to operate.
Release 50–5,000msAdjusts the time from when the input level falls below the
threshold level until the limiter no longer has an effect.
Out (Output)Make settings related to the overall output.
Soft Clip Off, OnThis quiets unwanted distortion that occurs when the
compressor or limiter effect is applied in an extreme fashion.
ThresholdOut
In
Ratio
1:1
1:2
1:INF
Out
Time
In
Threshold
Threshold
Time
Attack
Out
Time
In
Threshold
Threshold
Time
Release

17
New effects algorithms
Dither Off, 24–8bitBy adding a minute level of noise (dither), this smoothes the
transition between playback audio and silence.
Level -80–+6dBThis adjusts the overall volume level of the sound that has
passed through the limiter (Lmt).
Modeling various speakers (Speaker Modeling)
You can model the acoustical characteristics of a
variety of speakers, ranging from high-level
professional monitor speakers used in studios
worldwide, to the speakers of small televisions or
portable radios.
NOTESpeaker modeling has been calibrated so that the optimal effect
will be obtained when Roland DS-90 powered monitors
are connected digitally. If you are using other speakers, you
may not be able to obtain the desired effect.
fig.3-08
SpMod (speaker modeling)ModelTHRU, Super FLAT, Powered GenBlk, Powered E-Bas, Powered Mack, Small Cube, White Cone, White C +tissue, Small Radio, Small TV, Boom Box, BoomBox LoBoostSelect the speaker whose characteristics will be simulated
(modeled).
THRU: Modeling will not be applied, and the sound
will be output without change. Use this as a
comparison with the speaker-modeled sounds.
Super FLAT: Modeling is used to compensate the DS-90, to
produce an even flatter sound with a wider
range.
Powered GenBlk: A widely used model of powered
monitors (two-way type, with a woofer
diameter of 170 mm (6-1/2 inches)).
Powered E-Bas: Powered monitors characterized by a
bright tone.
Powered Mack: Powered monitors characterized by an
extended low-frequency response.
Small Cube: Small full-range speakers widely used
in recording studios.
White Cone: Sealed enclosure two-way speakers
known for their white woofers and
widely used in recording studios.
White C + tissue: A more mild sound, with tissue paper
affixed over the tweeters of the above
“White Cone” speakers.
Small Radio: Small pocket-type radio.
Small TV: Speakers built into a 14 inch size
television.
Boom Box: Radio cassette recorder.
BoomBox LoBoost:Radio cassette recorder with the Low
Boost switched on.
Phase NRM, INVSpecifies the phase of the speakers.
NRM: Same phase as the input.
INV: Opposite phase of the input.
BCut (Bass-cut filter)This removes unwanted low-frequency components, such as
pop noise.
Sw (Switch) Off, OnSwitches the bass-cut filter on/off.
Freq (Frequency) Thru, 20–2,000HzAdjusts the cutoff frequency of the bass-cut filter.
LFT/HFT (Frequency trimmer)Sw (Switch) Off, OnTurns the frequency trimmer on/off.
Gain -12–+12dBFor each trimmer, adjusts the gain (amount of boost/cut).
Freq (Frequency) 20–2,000HzFreq (Frequency) 1.0–20.0kHzSet the center frequency of each trimmer.
Bass Cut
L
RSpMod BCut
SpeakerModeling
HI Trim Limiter
HFT Lmt
Low Trim
LFT
18
New effects algorithms
Lmt (Limiter)This effect limits excessive output levels.
Sw (Switch) Off, OnTurns the limiter on/off.
Thresh (Threshold) -60–0dBSpecifies the level at which the limiter will begin to operate.
Release 0–100Adjusts the time from when the input level falls below the
threshold level until the limiter no longer has an effect.
Level -60–+24dBAdjusts the volume level of the sound that has passed
through the limiter.
Effective ways to use speaker modelingSpeaker modeling can be used effectively when you wish to
audition how your final production (an original audio CD, or
a mixed-down MD or DAT etc.) will sound on a variety of
speakers. Here we will explain how speaker modeling can be
used when producing an audio CD to audition the final
result. Read this section in conjunction with the DS-90
owner’s manual.
1. Digitally connect the VS-1680 V-XPANDED to the DS-90
(coaxial or optical.) Set the DS-90’s input select switch to
the digital input that you are using.
2. Make settings so that the mix bus is output from the
digital output connector you connected in step 1.
2-1. Press [MASTER].
2-2. Press [PAGE] so that the function button indicates
“DOUT1” or “DOUT2.”
2-3. Press [F5 (DOUT1)] (coaxial) or [F6 (DOUT2)]
(optical).
2-4. Use the TIME/VALUE dial to select “MST.”
3. Make settings so that the mixdown can be performed
while inserting effects (p. 11).
fig.3-09
4. Select the effect that will be inserted. For this example,
select a patch that uses the speaker modeling algorithm.
4-1. Press [PLAY (DISPLAY)].
4-2. Hold down [SHIFT] and press [F4 (EFX B)].
4-3. Press [F1 (EFX3)].
4-4. Press [F2 (Sel)].
4-5. Use the TIME/VALUE dial to select a patch.
4-6. Press [F4 (Exec)].
5. Press [PLAY]. Switch patches, and hear the sound as it
would be heard through various speakers.
6. When you are ready to perform the actual mixdown,
turn off the speaker modeling patch that is inserted.
NOTEIf, for example, you are modeling a set of radio-cassette recorder
speakers and perform the mixdown without turning off the inserted
speaker modeling patch, the sound as it would be heard on a radio-
cassette would be recorded to the mixdown tracks. To avoid this,
turn off speaker modeling before you perform the actual mixdown.
7. Select the mixed-down tracks as the tracks for writing,
and create an audio CD (p. 25).
19
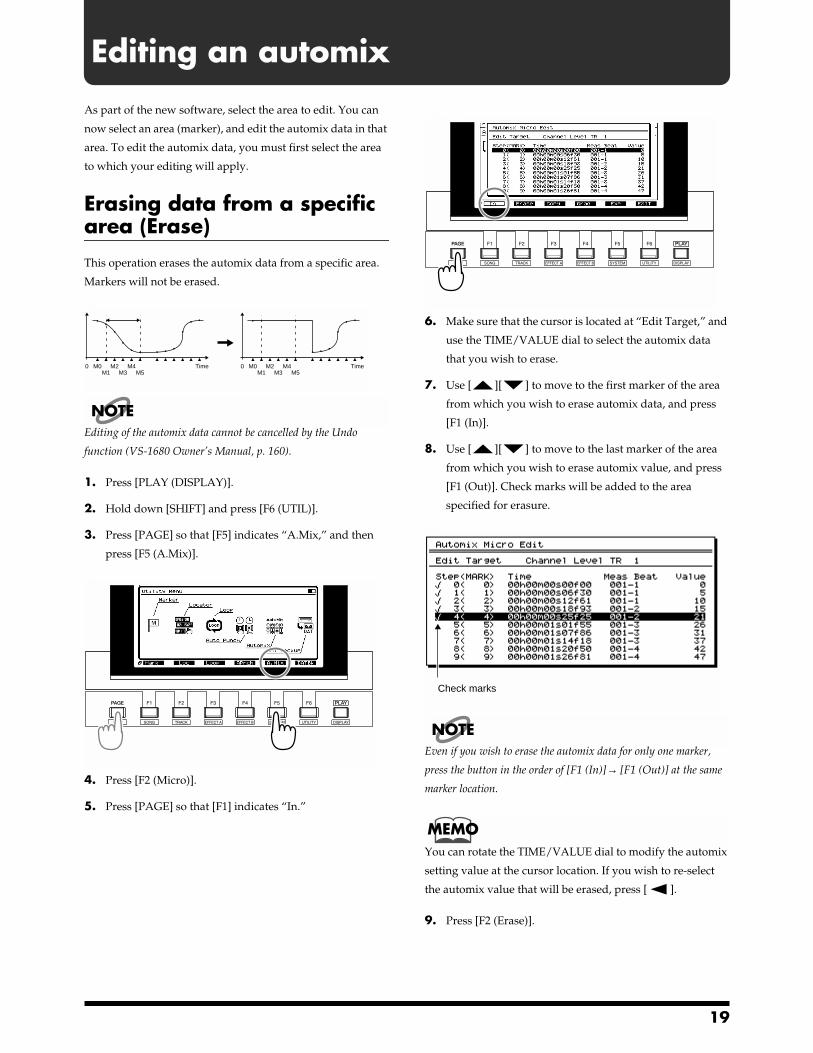
Editing an automix
As part of the new software, select the area to edit. You can
now select an area (marker), and edit the automix data in that
area. To edit the automix data, you must first select the area
to which your editing will apply.
Erasing data from a specific area (Erase)
This operation erases the automix data from a specific area.
Markers will not be erased.
fig.4-01.e
NOTEEditing of the automix data cannot be cancelled by the Undo
function (VS-1680 Owner’s Manual, p. 160).
1. Press [PLAY (DISPLAY)].
2. Hold down [SHIFT] and press [F6 (UTIL)].
3. Press [PAGE] so that [F5] indicates “A.Mix,” and then
press [F5 (A.Mix)].
fig.4-02
4. Press [F2 (Micro)].
5. Press [PAGE] so that [F1] indicates “In.”
fig.4-03
6. Make sure that the cursor is located at “Edit Target,” and
use the TIME/VALUE dial to select the automix data
that you wish to erase.
7. Use [ ][ ] to move to the first marker of the area
from which you wish to erase automix data, and press
[F1 (In)].
8. Use [ ][ ] to move to the last marker of the area
from which you wish to erase automix value, and press
[F1 (Out)]. Check marks will be added to the area
specified for erasure.
fig.4-04.e
NOTEEven if you wish to erase the automix data for only one marker,
press the button in the order of [F1 (In)]→ [F1 (Out)] at the same
marker location.
MEMOYou can rotate the TIME/VALUE dial to modify the automix
setting value at the cursor location. If you wish to re-select
the automix value that will be erased, press [ ].
9. Press [F2 (Erase)].
0 M0M1
M2M3
M4M5
Time 0 M0M1
M2M3
M4M5
Time
Check marks
20
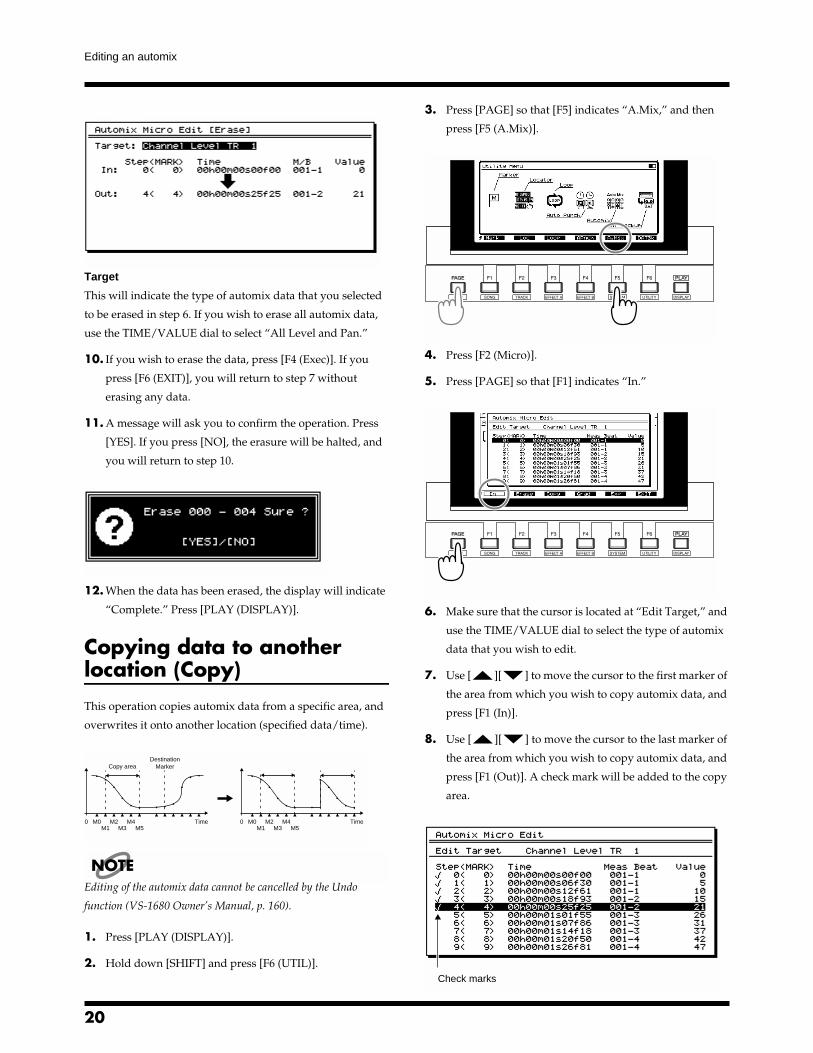
Editing an automix
fig.4-05_80
Target
This will indicate the type of automix data that you selected
to be erased in step 6. If you wish to erase all automix data,
use the TIME/VALUE dial to select “All Level and Pan.”
10. If you wish to erase the data, press [F4 (Exec)]. If you
press [F6 (EXIT)], you will return to step 7 without
erasing any data.
11. A message will ask you to confirm the operation. Press
[YES]. If you press [NO], the erasure will be halted, and
you will return to step 10.
fig.4-06
12. When the data has been erased, the display will indicate
“Complete.” Press [PLAY (DISPLAY)].
Copying data to another location (Copy)
This operation copies automix data from a specific area, and
overwrites it onto another location (specified data/time).
fig.4-07.e
NOTEEditing of the automix data cannot be cancelled by the Undo
function (VS-1680 Owner’s Manual, p. 160).
1. Press [PLAY (DISPLAY)].
2. Hold down [SHIFT] and press [F6 (UTIL)].
3. Press [PAGE] so that [F5] indicates “A.Mix,” and then
press [F5 (A.Mix)].
fig.4-02
4. Press [F2 (Micro)].
5. Press [PAGE] so that [F1] indicates “In.”
fig.4-03
6. Make sure that the cursor is located at “Edit Target,” and
use the TIME/VALUE dial to select the type of automix
data that you wish to edit.
7. Use [ ][ ] to move the cursor to the first marker of
the area from which you wish to copy automix data, and
press [F1 (In)].
8. Use [ ][ ] to move the cursor to the last marker of
the area from which you wish to copy automix data, and
press [F1 (Out)]. A check mark will be added to the copy
area.
fig.4-04.e0 M0
M1M2
M3M4
M5Time 0 M0
M1M2
M3M4
M5Time
Copy areaDestination
Marker
Check marks

21
Editing an automix
NOTEEven if there is only one marker for the automix data that you wish
to copy, press the button in the order of [F1 (In)]→ [F1 (Out)] at
the same marker location.
MEMOYou can rotate the TIME/VALUE dial to modify the automix
setting value at the cursor location. If you wish to re-select
the automix data that will be copied, press [ ].
9. Press [F3 (Copy)].
10. Use [ ][ ][ ][ ] to move the cursor. Rotate
the TIME/VALUE dial.
fig.4-08
Target
This will indicate the type of automix data that you selected
to be copied in step 6. If you wish to copy all automix data,
use the TIME/VALUE dial to select “All Level and Pan.”
Destination Target
Select the copy destination for the automix data.
MEMOThere is no limitation on the copy-source and copy-
destination data. For example you can copy the volume level
data (0–127) from a track, and overwrite it onto the pan data
(L63–0–R63). However, if you do so, the results may not be as
you expect.
Destination Mark
Select the first marker of the copy destination.
The markers that had originally been assigned to the copy
destination will remain, but the data will be rewritten. Also,
the markers from the copy source will be added.
fig.4-10.e
6, 10: The automix data of the copy-destination markers
will be rewritten.
7, 9, 11: Since copy-source markers corresponding to the
copy-destination markers do not exist, the
automix data will be erased.
8, 12: Markers with automix data will be created.
11. To copy the data, press [F4 (Exec)]. If you press
[F6 (EXIT)], you will return to step 7 without copying the
data.
12. A message will ask for confirmation. Press [YES]. If you
press [NO], the data copy operation will be halted, and
you will return to step 11.
fig.4-11
13. When the data has been copied, the display will indicate
“Complete.” Press [PLAY (DISPLAY)].
Smooth data transitions (Gradation)
This operation creates auto-mix data that smoothly connects
the first automix marker in the specified area with the last
marker.fig.4-12.e
NOTEEditing of the automix data cannot be cancelled by the Undo
function (VS-1680 Owner’s Manual, p. 160).
Copy area Destination Marker
1 2 3 4 5 6 7 8 9 10 11
Destination Marker
1 2 3 4 5 6 7 9 10 11 138 12
0 M1 M7Time
Gradation area
0 M1 M7Time
Gradation area

22
Editing an automix
1. Press [PLAY (DISPLAY)].
2. Hold down [SHIFT] and press [F6 (UTIL)].
3. Press [PAGE] so that [F5] indicates “A.Mix,” and then
press [F5 (A.Mix)].
fig.4-02
4. Press [F2 (Micro)].
5. Press [PAGE] so that [F1] indicates “In.”
fig.4-03
6. Make sure that the cursor is located at “Edit Target,” and
use the TIME/VALUE dial to select the type of automix
data to which you wish to apply the Gradation
operation.
7. Use [ ][ ] to move the cursor to the first marker of
the automix data to which you wish to apply the
Gradation operation, and press [F1 (In)].
8. Use [ ][ ] to move the cursor to the last marker of
the automix data to which you wish to apply the
Gradation operation, and press [F1 (Out)]. Check marks
will be added to the range selected for Gradation.
fig.4-04.e
MEMOYou can rotate the TIME/VALUE dial to modify the automix
setting value at the cursor location. If you wish to re-select
the type of automix data that will be edited, press [ ].
9. Press [F4 (Grad)].
10. Use [ ][ ][ ][ ] to move the cursor. Rotate
the TIME/VALUE dial to set each parameter.
fig.4-16
Value
Adjust the beginning (In:) and end (Out:) of the Gradation
area.
Gradation Curve
Select the curve by which the gradation will be created.
Linear: Linear.
Exp+: Convex above (exponential curve).
Exp-: Convex below (exponential curve).
fig.4-17
Marker Add
If this is turned “On,” markers will automatically be added
to the area specified for gradation, in the optimal locations
for the curve that you selected in “Gradation Curve.” If this
is turned “Off,” markers will not be added.
Check marks
Linear Exp+ Exp-
23
Editing an automix
fig.4-18.e
11. To execute the Gradation operation, press [F4 (Exec)]. If
you press [F6 (EXIT)], you will return to step 7 without
executing the Gradation operation.
12. A message will ask you to confirm the operation. Press
[YES]. If you press [NO], the Gradation operation will be
halted, and you will return to step 11.
fig.4-19
13. When the Gradation operation has been executed, the
display will indicate “Complete.” Press
[PLAY (DISPLAY)].
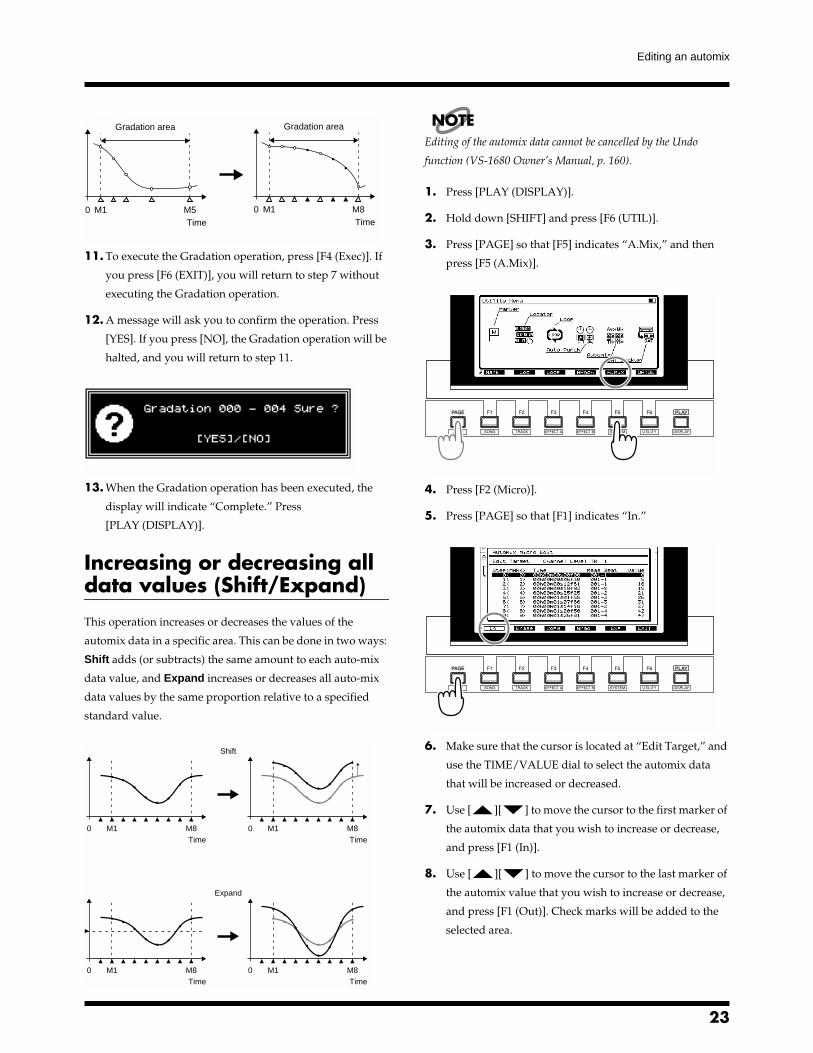
Increasing or decreasing all data values (Shift/Expand)
This operation increases or decreases the values of the
automix data in a specific area. This can be done in two ways:
Shift adds (or subtracts) the same amount to each auto-mix
data value, and Expand increases or decreases all auto-mix
data values by the same proportion relative to a specified
standard value.
fig.4-20.e
NOTEEditing of the automix data cannot be cancelled by the Undo
function (VS-1680 Owner’s Manual, p. 160).
1. Press [PLAY (DISPLAY)].
2. Hold down [SHIFT] and press [F6 (UTIL)].
3. Press [PAGE] so that [F5] indicates “A.Mix,” and then
press [F5 (A.Mix)].
fig.4-02
4. Press [F2 (Micro)].
5. Press [PAGE] so that [F1] indicates “In.”
fig.4-03
6. Make sure that the cursor is located at “Edit Target,” and
use the TIME/VALUE dial to select the automix data
that will be increased or decreased.
7. Use [ ][ ] to move the cursor to the first marker of
the automix data that you wish to increase or decrease,
and press [F1 (In)].
8. Use [ ][ ] to move the cursor to the last marker of
the automix value that you wish to increase or decrease,
and press [F1 (Out)]. Check marks will be added to the
selected area.
0 M1 M5Time
Gradation area
0 M1 M8Time
Gradation area
0 M1 M8Time
0 M1 M8Time
0 M1 M8Time
0 M1 M8Time
Shift
Expand
24
Editing an automix
fig.4-04.e
NOTEEven if there is only one marker for the automix data that you wish
to increase or decrease, press the button in the order of [F1 (In)] →
[F1 (Out)] at the same marker location.
MEMOYou can rotate the TIME/VALUE dial to modify the automix
setting value at the cursor location. If you wish to re-select
the automix data that will be edited, press [ ].
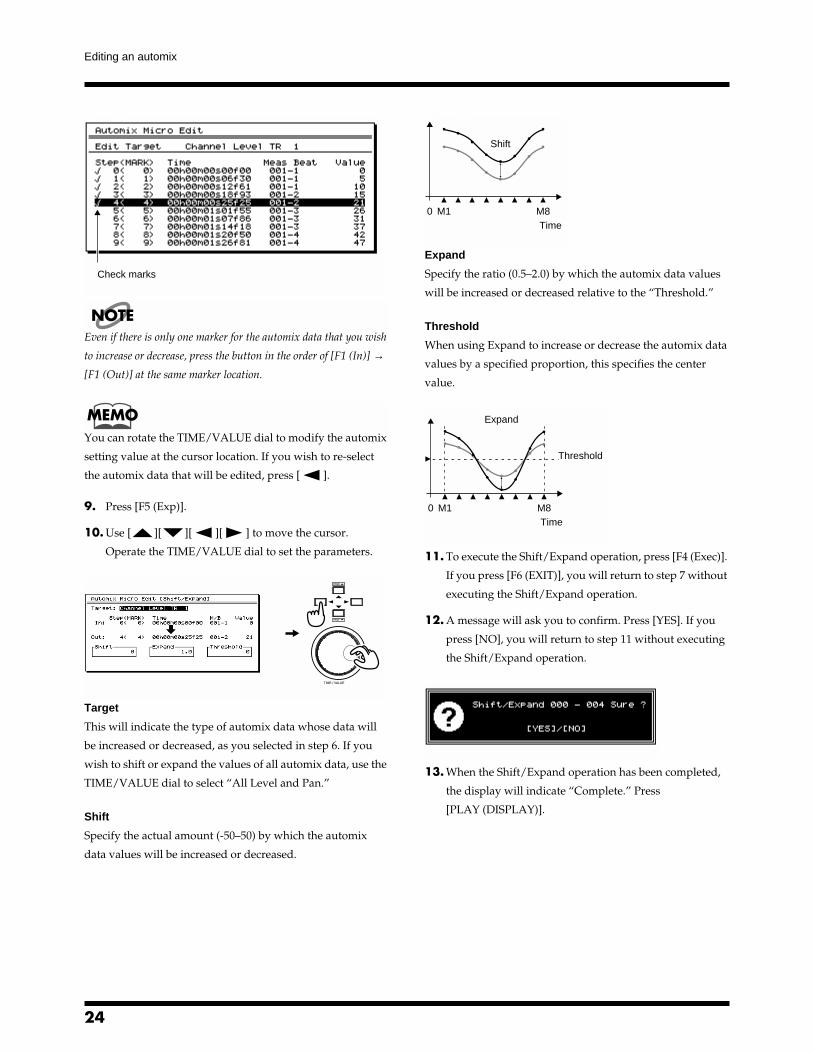
9. Press [F5 (Exp)].
10. Use [ ][ ][ ][ ] to move the cursor.
Operate the TIME/VALUE dial to set the parameters.
fig.4-24
Target
This will indicate the type of automix data whose data will
be increased or decreased, as you selected in step 6. If you
wish to shift or expand the values of all automix data, use the
TIME/VALUE dial to select “All Level and Pan.”
Shift
Specify the actual amount (-50–50) by which the automix
data values will be increased or decreased.
fig.4-25.e
Expand
Specify the ratio (0.5–2.0) by which the automix data values
will be increased or decreased relative to the “Threshold.”
Threshold
When using Expand to increase or decrease the automix data
values by a specified proportion, this specifies the center
value.
fig.4-26.e
11. To execute the Shift/Expand operation, press [F4 (Exec)].
If you press [F6 (EXIT)], you will return to step 7 without
executing the Shift/Expand operation.
12. A message will ask you to confirm. Press [YES]. If you
press [NO], you will return to step 11 without executing
the Shift/Expand operation.
fig.4-27_80
13. When the Shift/Expand operation has been completed,
the display will indicate “Complete.” Press
[PLAY (DISPLAY)].
Check marks
0 M1 M8Time
Shift
0 M1 M8Time
Expand
Threshold

25
Using the VS-1680 with a CD-R/CD-RW drive
This chapter explains how a CD-R/CD-RW drive connected
to the SCSI connector of the VS-1680 can be used to create
original audio CD’s, or to back up song data. Please also read
“Chapter 7 Use with a CD-R Drive” in the VS-1680 Owner’s
Manual (p.120).
Creating an audio CD
Creating silence between songs (Disc At Once and Track At Once)When writing two or more songs together to a CD-R disc,
you can select how the space between songs will be handled.
Disc At OnceThe song data and the track number markers attached to the
song data will be written to the CD-R disc without change.
However, additional song data cannot be added later to a
CD-R disc that was written using Disc At Once. (It will be
in the same condition as if Finalize had been performed.)
fig.5-01.e
Track At OnceTwo seconds of silence will automatically be written to the
CD-R disc before each track number marker attached to the
song data. (This is the same condition as when additional
songs are written to the disc later.) Additional song data can
be written to a CD-R disc that was written using Track At
Once.
fig.5-02.e
MEMOFor example, if you have assigned track numbers to a medley
of songs, Disc At Once would be the appropriate choice. This
is because Track At Once would add approximately two
seconds of silence, which would cause the playback to sound
fragmented.
Specifying the writing speed (Speed)When writing songs to a CD-R disc, you can now select the
speed at which the data will be written.
Song writing procedure1. Insert a CD-R disc into the drive.
2. Press [PLAY (DISPLAY)].
3. Hold down [SHIFT] and press [F1 (SONG)].
4. Press [F3 (CD Wt)]. If [F3] does not indicate “CD Wt,”
first press [PAGE] so that “CD Wt” appears, and then
press [F3 (CD Wt)].
fig.5-03
0
M1 M2 M3
Time
VS-1680
0
M1 M2 M3
Time
Audio CD
0
M1 M2 M3
Time
VS-1680
0
M1 M2 M3
Time
Audio CD
26
Using the VS-1680 with a CD-R/CD-RW drive
5. A message will ask for confirmation. Press [YES].
fig.5-04
6. The display will ask “STORE Current?” (store the current
song?). If you wish to store the current song before
writing a song to CD, press [YES]. If not, press [NO].
7. The following display will appear. Verify each item.
fig.5-05.e
NOTEIf the “Song size when written to CD-R disc” is larger than the
“Unused area on the internal IDE hard disk” or the “Unused area
on the CD-R disc,” it will not be possible to write the song data to
the CD-R disc.
MEMOThe song size is displayed in 1 MB = 1,000,000 Byte units. The
displayed size is an approximation.
8. Use [ ][ ][ ][ ] to move the cursor, and use
the TIME/VALUE dial to set the parameters.
Finalize
A TOC (Table Of Contents) will be written so that the audio
CD created by the VS-1680 can be played back on a standard
CD player. It is not possible to write additional data to an
audio CD that has been finalized.
Off: Write only the song, and do not finalize.
On: Write the song, and then finalize.
OnlyFin.: Only finalize without writing the song. Select
this if you have inserted a CD-R disc to which
you have already written songs, but which has
not yet been finalized.
TOC (Appendices p.64)
Write Method
When two or more songs are written to the disc at the same
time, select how the data will be written.
Track at Once: Approximately two seconds of silence will
be created between each song. Additional
songs can be written later as far as the disc
capacity allows.
Disc at Once: Silence will not be created between songs.
However, no further data can be written on
that disc.
MEMOEven if “Finalize” was set to “Off,” no further data can be
written on a CD-R disc that was written with “Disc at Once”
selected.
CD Speed
Select the speed at which the song will be written to the
CD-R disc.
x2 (353 KBps): The song will be written at double speed
(353 kilobytes per second).
x1 (176 KBps): The song will be written at normal speed
(176 kilobytes per second). This will
provide higher reliability.
NOTEWith some CD-R discs, the data may not be written correctly if you
select “x2 (353 KBps).” In this case, select “x1 (176 KBps).”
However, if a CD-RW disc is inserted into the CD-RW drive , it
will not be possible to select “x1 (176 KBps)” (the song will be
written at double speed).
MEMOAudio data written to a CD-RW disc cannot be played back
on a conventional CD player. In such cases, you can listen to
the data using the VS-1680’s CD Player function.
Unused area onthe internal IDE hard disk
Length of song be writingto CD-R disc
Song size when writtento CD-R disc
Number of markersfor track number
Unused area onthe CD-R disc
Used area on theinternal IDE hard disk
Number ofwritten tracks
Used disc orunused disc
Source track of right channelSource track of left channelSong Name

27
Using the VS-1680 with a CD-R/CD-RW drive
9. Press [F4 (Exec)].
10. Press [YES]. A message about the license agreement will
appear. Read the message carefully, and if you consent to
that, press [YES]. The data will begin to write to the CD-
R disc. If you do not consent, press [NO]. You will return
to step 2.
fig.5-06
MEMOThe message about the license agreement is the same as
“About the License Agreement” on the back cover of the
“VS-1680 Owner’s Manual.”
11. When the data has been written successfully, the display
will ask “Write Another ?” (write to another disc?). If you
wish to write the identical song data to another CD-R
disc, insert the new disc into the CD-RW drive, and press
[YES]. If you press [NO], you will return to step 2.
Saving a song to a CD-RW disc (Backup)
Checking whether the song was saved correctly (+Verify)After backing up a song to a CD-RW disc, you can now check
whether or not the data was saved correctly (i.e., check the
recorded state of the data).
If as a result of the +Verify operation, you are warned that
the song data has not been saved correctly, you should back
up to a different disc.
NOTEWhen backing up to a CD-R, we recommend that you use +Verify
to check whether the backup was performed correctly. However,
+Verify checks the entire surface of the disc, so it takes a
considerable amount of time.
Specifying the speed of saving (Speed)When backing up a song on a CD-RW disc, you can now
specify the speed at which the data will be written.
Backup procedure1. As the current drive, select the drive (internal IDE hard
disk) that contains the song you wish to back up.
2. Insert a CD-RW disc into the drive.
3. Press [PLAY (DISPLAY)].
4. Hold down [SHIFT] and [F6 (UTILITY)].
5. Press [F2 (CDRBk)]. If [F2] does not indicate “CDRBk,”
first press [PAGE] so that “CDRBk” is displayed, and
then press [F2 (CDRBk)].
fig.5-07
6. Use [ ][ ][ ][ ] to move the cursor, and
rotate the TIME/VALUE dial to set the parameters.
fig.5-08
Source Song
The marked songs will be backed up. Move the cursor to a
song that you wish to back up, and press [F3 (MARK)]. By
pressing [F2 (ALL)] you can mark or unmark all songs at
once. By pressing [F1 (SelSg)] you can view a list of the
songs. At this time, mark a song and press [F1 (Back)].

28
Using the VS-1680 with a CD-R/CD-RW drive
+Verify
If this is turned “On,” verification will be performed to check
whether or not the data was saved correctly after the song
data has been backed up.
CD Speed
Select the speed at which the song data will be backed up to
the CD-RW disc
x2 (353 KBps): Backup at double speed (353 kilobytes per
second).
x1 (176 KBps): Backup at normal speed (176 kilobytes per
second). This will increase the reliability.
NOTEDepending on the disc, it may not be possible to back up reliably to
a CD-R disc with a setting of “x2 (353 KBps).” In such cases,
select “x1 (176 KBps).” Also, if you insert a CD-RW disc into a
CD-RW drive, it will not be possible to select “x1 (176 KBps)”
(backup will occur at double speed).
7. If two or more drives are connected, you can press
[F5 (SelDr)] to see a list of the drives. After checking the
list of drives, press [F1 (Back)].
fig.5-09_70
8. Press [F4 (Exec)]. A message will ask you to confirm.
fig.5-10
9. Press [YES]. The display will ask “STORE Current?”
(store the current song?)
10. If you wish to save the current song, press [YES]. If not,
press [NO]. If a protected song (such as a demo song) is
selected, press [NO].
11. If the amount of song data is too large to back up onto a
single CD-RW disc, the CD-RW disc will be ejected, and
you will be prompted to “Insert Disc #” (where # is
number of each disc in the series), so that the VS-1680 can
verify the number of discs that will be required. Insert
the next CD-RW disc, and press [YES]. At this time, we
recommend that you use a soft-tipped felt marker pen to
write the disc number on the disc label so that you can
remember the sequence in which each disc should be
inserted.
fig.5-11
12. If the backup extends over two or more discs, the display
will prompt you to “Insert Disc #.” Insert each disc once
again in the correct sequence, and press [YES]. Then,
backup will begin.
13. When the CD-R backup ends, you are returned to Play
condition.
Restoring songs from a CD-RW disc (Recover)
Specifying the speed of recovery (Speed)Now you can specify the speed at which the data will be read
when recovering a song from a CD-RW disc.
Recovery procedure1. Select the loading destination (recovery destination)
drive as the current drive.
2. Insert the CD-RW disc that contains the song backup into
the drive.
3. Press [PLAY (DISPLAY)].
4. Hold down [SHIFT] and press [F6 (UTILITY)].
29
Using the VS-1680 with a CD-R/CD-RW drive
5. Press [F3 (CDRRc)]. If [F3] does not indicate “CDRRc,”
first press [PAGE] so that “CDRRc” appears, and then
press [F3 (CDRRc)].
fig.5-12
6. Use [ ][ ][ ][ ] to move the cursor, and use
the TIME/VALUE dial to set the parameters.
fig.5-13
Source Song
Marked songs will be loaded. Move the cursor to a song that
you wish to recover, and press [F4 (MARK)]. By pressing
[F3 (ALL)] you can mark or unmark all songs at once. By
pressing [F2 (SelSg)] you can view a list of the songs. At this
time, mark the desired song, and press [F1 (Back)].
If this is “On,” the current drive will be initialized before the
song data is recovered. If you wish to recover while
preserving the songs that are saved on the current drive, set
this “Off.”
CD Speed
Select the speed at which the song data will be recovered
from disc.
x6 (1058 KBps): Recover at 6x speed (1058 kilobytes per
second).
x2 (353 KBPs): Recover at double speed (353 kilobytes per
second).
x1 (176 KBPs): Recover at normal speed (176 kilobytes per
second). This will allow greater reliability.
NOTEDepending on the disc, it may not be possible to recover reliably
from some CD-R discs at speeds of “x6 (1058 KBps)” or
“x2 (353 KBPs).” In this case, select “x1 (176 KBPs).”
Even if the “CD Speed” is set to “x2 (353 KBps)” or
“x6 (1058 KBps)” the time it takes for recovery is not always 1/2 or
1/6 of the base. This is because writing to the internal hard disk can
take a lot of time, or disc read errors can sometimes occur.
7. Press [F4 (Exec)]. A message will ask you for
confirmation.
fig.5-14
8. Press [YES]. The display will ask “STORE Current?”
(store the current song?).
9. If you wish to store the current song, press [YES]. If not,
press [NO]. If a demo song is selected, press [NO].
10. The recovery operation will begin. If the data has been
backed up to multiple discs, the disc will be ejected, and
you will be prompted to “Insert Disc #” (# is the order
number of each disk). Insert the next disc and press
[YES].
fig.5-11
11. When the CD-R recovery ends, you are returned to Play
condition.Erase All Songs <<ATTENTION>>

30
Enhancements related to operation
Shortcut to the Phrase Edit window
In Play condition, you can now select the phrase that you
wish to edit, and open the editing window directly.
1. Press [PLAY (DISPLAY)].
2. Move the current time so that it falls within the phrase
that you wish to edit.
3. Use [ ][ ] to highlight the phrase that you wish to
edit.
fig.6-01.e
MEMOIf the bottom line of the display is enclosed in a heavy line,
you can also use the TIME/VALUE dial to highlight the
phrase that you wish to edit.
4. Press [PAGE] so that the function buttons display the
phrase edit menu.
fig.6-02
At this time, the function buttons will have the following
operations. Press the function button for the desired editing
operation.
[F1 (Copy)]: Opens the Phrase Copy window
(VS-1680 Owner’s Manual, p. 93).
[F2 (Move)]: Opens the Phrase Move window
(VS-1680 Owner’s Manual, p. 96).
[F3 (TrimI)]: Opens the Trim In window
(VS-1680 Owner’s Manual, p. 97).
[F4 (TrimO)]: Opens the Trim Out window
(VS-1680 Owner’s Manual, p. 98).
[F5 (Del)]: Opens the Phrase Delete window
(VS-1680 Owner’s Manual, p. 99).
[F6 (Split)]: Opens the Phrase Divide/Split window
(VS-1680 Owner’s Manual, p. 100).
Creating a new phrase (Phrase New)
In the Phrase New window (VS-1680 Owner’s Manual, p.
101), you can now sort takes and reassign names.
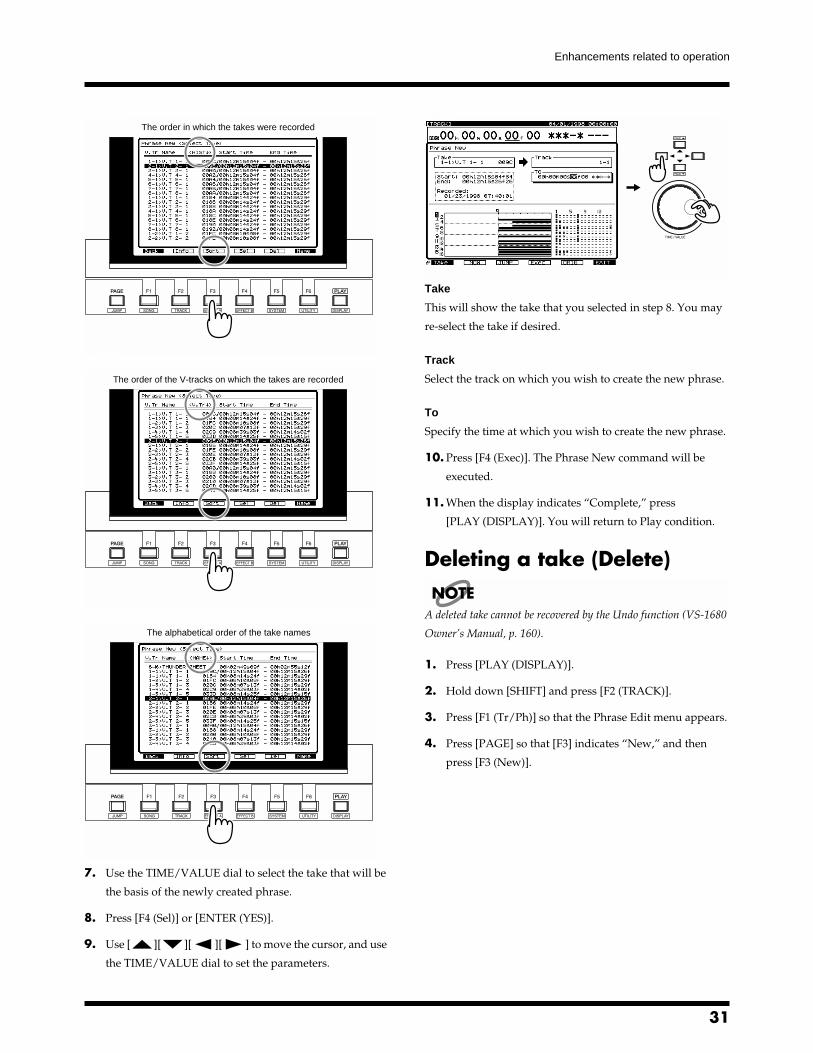
Sorting the take list (Sort)1. Press [PLAY (DISPLAY)].
2. Hold down [SHIFT] and press [F2 (TRACK)].
3. Press [F1 (Tr/Ph)] so that the Phrase Edit menu appears.
4. Press [PAGE] so that [F3] indicates “New,” and then
press [F3 (New)].
fig.6-03
5. Press [F1 (Take)].
6. At this time, pressing [F3 (Sort)] will switch the order in
which the takes are sorted, cycling through the following
choices.
HIST: The order in which the takes were recorded
V.Tr: The order of the V-tracks on which the takes
are recorded
NAME: The alphabetical order of the take names
Current time
Reverse indicationSelect the phrasefor editing
31
Enhancements related to operation
fig.6-04.e
fig.6-05.e
fig.6-06.e
7. Use the TIME/VALUE dial to select the take that will be
the basis of the newly created phrase.
8. Press [F4 (Sel)] or [ENTER (YES)].
9. Use [ ][ ][ ][ ] to move the cursor, and use
the TIME/VALUE dial to set the parameters.
fig.6-07
Take
This will show the take that you selected in step 8. You may
re-select the take if desired.
Track
Select the track on which you wish to create the new phrase.
To
Specify the time at which you wish to create the new phrase.
10. Press [F4 (Exec)]. The Phrase New command will be
executed.
11. When the display indicates “Complete,” press
[PLAY (DISPLAY)]. You will return to Play condition.
Deleting a take (Delete)
NOTEA deleted take cannot be recovered by the Undo function (VS-1680
Owner’s Manual, p. 160).
1. Press [PLAY (DISPLAY)].
2. Hold down [SHIFT] and press [F2 (TRACK)].
3. Press [F1 (Tr/Ph)] so that the Phrase Edit menu appears.
4. Press [PAGE] so that [F3] indicates “New,” and then
press [F3 (New)].
The order in which the takes were recorded
The order of the V-tracks on which the takes are recorded
The alphabetical order of the take names

32
Enhancements related to operation
fig.6-03
5. Press [F1 (Take)].
6. Use the TIME/VALUE dial to move the cursor to the
take that you wish to delete.
fig.6-09
7. Press [F5 (Del)]. A message will ask you to confirm.
fig.6-10_90
8. If you wish to delete the take, press [YES]. If you press
[NO], you will return to step 6 without deleting the take.
9. When the take has been deleted, the display will indicate
“Complete.” Press [PLAY (DISPLAY)]. You will return to
Play condition.
NOTEWhen a take is deleted, all phrases used by that take will also be
deleted.
MEMOWhen you delete a take, the song will be stored
automatically.
Naming a take (Name)You can now assign a name to a take in the Phrase New
window.
1. Press [PLAY (DISPLAY)].
2. Hold down [SHIFT] and press [F2 (TRACK)].
3. Press [F1 (Tr/Ph)] to make the Phrase Edit menu appear.
4. Press [PAGE] so that [F3] indicates “New,” and then
press [F3 (New)].
fig.6-03
5. Press [F1 (Take)].
6. Use the TIME/VALUE dial to move the cursor to the
take whose name you wish to change.
7. Press [F6 (Name)].
8. The Take Name window will appear. Use [ ] [ ]
[ ][ ] and the TIME/VALUE dial to assign a
name to the take.
fig.6-12

33
Enhancements related to operation
At this time, the function buttons have the following
operations.
[F1 (Hist)]: Each time you press the button, you will cycle
backward through the last twenty names that
were assigned.
[F2 (Clr)]: Delete all characters.
[F3 (Del)]: Delete the character at the cursor location.
[F4 (Ins)]: Insert a space at the cursor location.
[F5 (Write)]: Finalize the take name and exit the window.
[F6 (EXIT)]: Exit the window without finalizing the take
name.
9. After assigning the name, press [F5 (Write)]. A message
will ask whether you also want to change the names of
the phrases used by that take.
fig.6-13
10. If you also want to change the phrase names at this time,
press [YES]. If you press [NO], the phrase names will
remain the same, and only the take name will change.
MEMOPhrase names will be assigned by adding an incremented
number to the end of the take name. For example if the take
is named “AcousticGuitarLR,” the phrase names will be
“AcousticGuitar-1,” “AcousticGuitar-2,” etc.
11. When the display indicates “Complete,” hold down
[SHIFT] and press [STORE (ZERO)].
12. Press [YES]. The song will be saved.
13. Press [PLAY (DISPLAY)]. You will return to Play
condition.
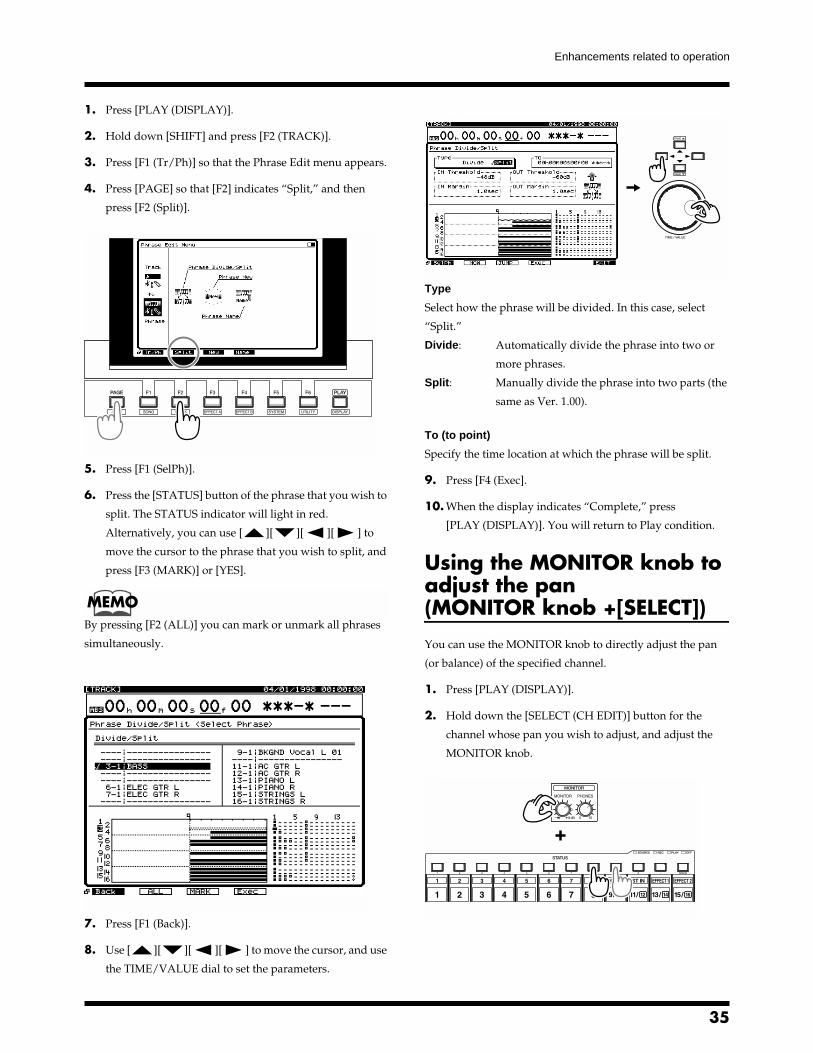
Dividing a phrase (Phrase Divide/Split)
The Phrase Split function (VS-1680 Owner’s Manual, p. 100)
has been enhanced. Now, both Phrase Divide and Phrase
Split can divide the selected phrase (or phrases) at the Now
Time location on the time axis.
Automatically dividing a phrase (Phrase Divide)This function automatically detects silent portions of a
phrase according to the volume level that you specify (the
Threshold Level), and divides the phrase into two or more
phrases at these points.
fig.6-14.e
1. Press [PLAY (DISPLAY)].
2. Hold down [SHIFT] and press [F2 (TRACK)].
3. Press [F1 (Tr/Ph)] so that the Phrase Edit menu appears.
4. Press [PAGE] so that [F2] indicates “Split,” and then
press [F2 (Split)].
fig.6-15
5. Press [F1 (SelPh)].
6. Press the [STATUS] button for the phrase that you wish
to divide. The STATUS indicator will light in red.
Alternatively, you can use [ ][ ][ ][ ] to
move the cursor to the phrase that you wish to divide,
and press [F3 (MARK)] or [YES].
MEMOBy pressing [F2 (ALL)], you can mark or unmark all phrases
simultaneously.
Time
Time

34
Enhancements related to operation
fig.6-16_70
7. Press [F1 (Back)].
8. Use [ ][ ][ ][ ] to move the cursor, and use
the TIME/VALUE dial to set the parameters.
fig.6-17
Type
Select how the phrase will be divided. In this case, select
“Divide.”
Divide: Automatically divide the phrase into two or
more phrases.
Split: Manually divide the phrase into two parts (the
same as Ver. 1.00).
IN Threshold
Specify the volume (-84—6 dB) that will be used when
searching for the point at which the phrase begins to sound.
The VS-1680 will search for a point that exceeds this level.
IN Margin
Specify the length of time (0.1–9.9 sec) that will be preserved
before reaching the “IN Threshold.”
fig.6-18.e
OUT Threshold
Specify the volume (-84—6 dB) that will be used when
searching for the point at which the phrase stops sounding.
The VS-1680 will search for a point that falls below this level.
OUT Margin
Specify the length of time (0.1–9.9 sec) that will be preserved
after reaching the “OUT Threshold.”
fig.6-19.e
9. Press [F4 (Exec].
10. When the display indicates “Complete,” press
[PLAY (DISPLAY)]. You will return to Play condition.
Dividing a phrase into two parts (Phrase Split)This operation divides a phrase into two parts at the
specified location (time) in the time axis.
fig.6-20.e
IN Threshold
IN Margin
When IN Margin is short
When IN Margin is long
OUT Threshold
OUT Margin
When OUT Margin is short
When OUT Margin is long
Time
Time
To
35
Enhancements related to operation
1. Press [PLAY (DISPLAY)].
2. Hold down [SHIFT] and press [F2 (TRACK)].
3. Press [F1 (Tr/Ph)] so that the Phrase Edit menu appears.
4. Press [PAGE] so that [F2] indicates “Split,” and then
press [F2 (Split)].
fig.6-15
5. Press [F1 (SelPh)].
6. Press the [STATUS] button of the phrase that you wish to
split. The STATUS indicator will light in red.
Alternatively, you can use [ ][ ][ ][ ] to
move the cursor to the phrase that you wish to split, and
press [F3 (MARK)] or [YES].
MEMOBy pressing [F2 (ALL)] you can mark or unmark all phrases
simultaneously.
fig.6-16_70
7. Press [F1 (Back)].
8. Use [ ][ ][ ][ ] to move the cursor, and use
the TIME/VALUE dial to set the parameters.
fig.6-23
Type
Select how the phrase will be divided. In this case, select
“Split.”
Divide: Automatically divide the phrase into two or
more phrases.
Split: Manually divide the phrase into two parts (the
same as Ver. 1.00).
To (to point)
Specify the time location at which the phrase will be split.
9. Press [F4 (Exec].
10. When the display indicates “Complete,” press
[PLAY (DISPLAY)]. You will return to Play condition.
Using the MONITOR knob to adjust the pan (MONITOR knob +[SELECT])
You can use the MONITOR knob to directly adjust the pan
(or balance) of the specified channel.
1. Press [PLAY (DISPLAY)].
2. Hold down the [SELECT (CH EDIT)] button for the
channel whose pan you wish to adjust, and adjust the
MONITOR knob.
fig.6-24
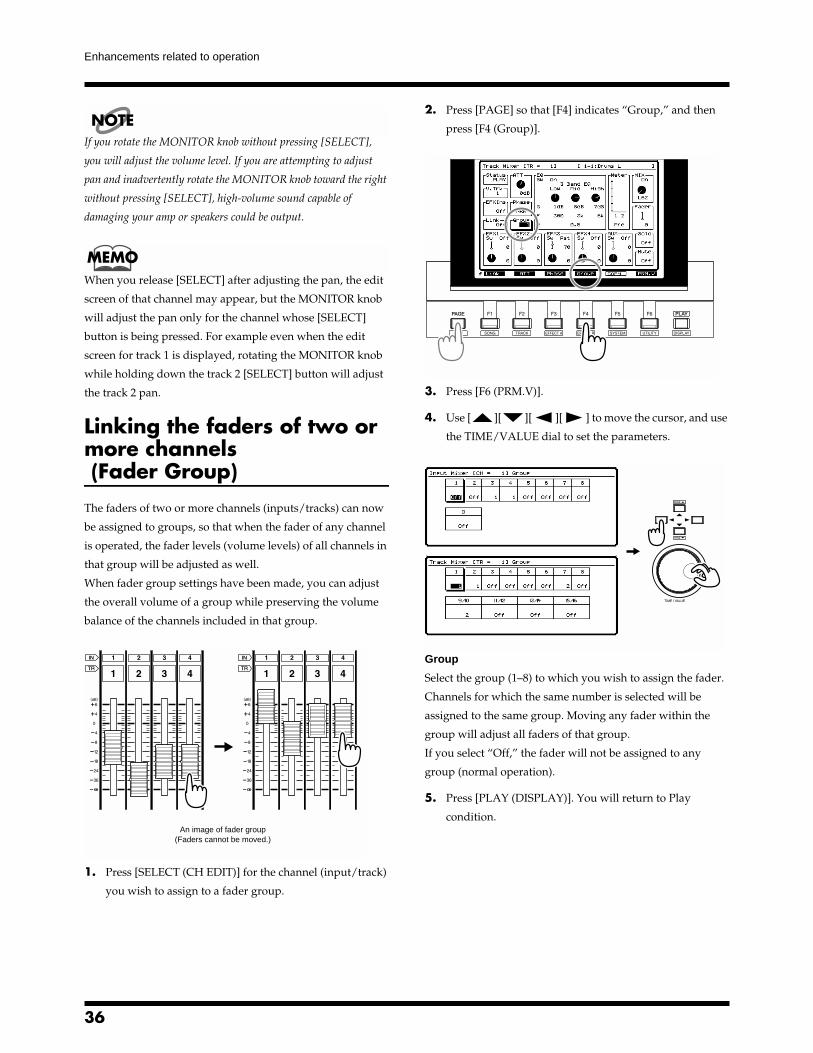
36
Enhancements related to operation
NOTEIf you rotate the MONITOR knob without pressing [SELECT],
you will adjust the volume level. If you are attempting to adjust
pan and inadvertently rotate the MONITOR knob toward the right
without pressing [SELECT], high-volume sound capable of
damaging your amp or speakers could be output.
MEMOWhen you release [SELECT] after adjusting the pan, the edit
screen of that channel may appear, but the MONITOR knob
will adjust the pan only for the channel whose [SELECT]
button is being pressed. For example even when the edit
screen for track 1 is displayed, rotating the MONITOR knob
while holding down the track 2 [SELECT] button will adjust
the track 2 pan.
Linking the faders of two or more channels (Fader Group)
The faders of two or more channels (inputs/tracks) can now
be assigned to groups, so that when the fader of any channel
is operated, the fader levels (volume levels) of all channels in
that group will be adjusted as well.
When fader group settings have been made, you can adjust
the overall volume of a group while preserving the volume
balance of the channels included in that group.
fig.6-25.e
1. Press [SELECT (CH EDIT)] for the channel (input/track)
you wish to assign to a fader group.
2. Press [PAGE] so that [F4] indicates “Group,” and then
press [F4 (Group)].
fig.6-26
3. Press [F6 (PRM.V)].
4. Use [ ][ ][ ][ ] to move the cursor, and use
the TIME/VALUE dial to set the parameters.
fig.6-27
Group
Select the group (1–8) to which you wish to assign the fader.
Channels for which the same number is selected will be
assigned to the same group. Moving any fader within the
group will adjust all faders of that group.
If you select “Off,” the fader will not be assigned to any
group (normal operation).
5. Press [PLAY (DISPLAY)]. You will return to Play
condition.An image of fader group
(Faders cannot be moved.)

37
Enhancements related to operation
Copying mixer settings
You can copy mixer settings (equalizer, level) from another
channel to the channel currently shown in the Channel Edit
page.
The following settings can be copied.
EqualizerEQ low freq.
EQ low gain
EQ mid freq.
EQ mid gain
EQ mid Q
EQ high freq.
EQ high gain
LevelATT
Phase
EFX1 insert send level
EFX1 insert return level
EFX2 insert send level
EFX2 insert return level
EFX3 insert send level
EFX3 insert return level
EFX4 insert send level
EFX4 insert return level
Fader
MASTER send pan
EFX1 send level
EFX1 send pan
EFX2 send level
EFX2 send pan
EFX3/AUX1 send level
EFX3/AUX1 send pan
EFX4/AUX2 send level
EFX4/AUX2 send pan
AUX/AUX3 send level
AUX/AUX3 send pan
1. Press [CH EDIT (SELECT)] for the copy-destination
channel.
2. Press [PAGE] so that [F5] indicates “Copy,” and then
press [F5 (Copy)].
fig.6-28
3. Use the TIME/VALUE dial to select the copy-source
channel.
fig.6-29
NOTEIf the Channel Link setting is OFF for the copy-destination
channel, the Channel Link setting of the copy-source channel will
be considered as OFF even though it may actually be ON, and only
the settings of individual channels will be copied. Similarly, when
Channel Link is ON for the copy-destination channel, Channel
Link of the copy-source channel will be considered to be ON even
though it may actually be OFF, and the settings of both channels
will be copied.
4. Use the function buttons to select the settings that will be
copied.
[F1 (CpyEQ]: Copy only the equalizer settings.
[F2 (CpyLv]: Copy only the level settings.
[F4 (Exec] or [ENTER (YES)]:
Copy both the equalizer and level settings.
[F6 (EXIT] or [EXIT (NO)]:
Exit the window without copying.
5. When the data has been copied, the display will indicate
“Complete.” Press [PLAY (DISPLAY)].

38
Enhancements related to operation
Shift Lock on/off ([SHIFT]+[YES])
It is now possible to control the Shift Lock switch (which
temporarily keeps [SHIFT] activated while it is not actually
pressed) without opening the System Parameter window
(VS-1680 Owner’s Manual, p. 187).
1. Press [PLAY (DISPLAY)].
2. Hold down [SHIFT] and press [YES].
fig.6-30
3. Thereafter, each time you hold down [SHIFT] and press
[YES], Shift Lock can be toggled on/off.
MEMOWhen Shift Lock is OFF, the SHIFT indicator will light only
while you continue pressing [SHIFT]. When Shift Lock is
ON, the SHIFT indicator will light, or go out each time you
press [SHIFT]. [SHIFT] is active when the SHIFT indicator is
lit.
Removing direct current offset from the mix bus
Direct current offset on the mix bus can be removed.
For example, in some cases the level meters of a device
(mixer etc.) connected to the output of the VS-1680 may
move even though no sound is being output. This is caused
by a direct current offset on the mix bus (MASTER output,
etc.). This component can be removed.
1. Press [PLAY (DISPLAY)].
2. Hold down [SHIFT] and press [F5 (SYSTEM)].
3. Make sure that the System menu is displayed. If not,
press [F6 (EXIT)].
4. Press [PAGE] so that [F2] indicates “GLOBL,” and then
press [F2 (GLOBL)].
5. Use [ ][ ][ ][ ] to move the cursor to
“DC Cut,” and use the TIME/VALUE dial to make the
setting.
If “DC Cut” is not shown, press [F2 (Prm2)], and use the
TIME/VALUE dial to make the setting.
fig.6-31_75
DC Cut
When this is turned “On,” any direct current offset on the
mix bus will be removed before output.
6. Press [PLAY (DISPLAY)].

39
Enhancements to the display and specifications
Checking inserted effects (Icon and Patch Name display)
Effects that have been inserted into channels/tracks can now
be confirmed through icons and patch names.
1. Press [SELECT] for the channel to which you wish to
apply an effect.
2. Press [PAGE] so that [F1] indicates “Ef1In,” and then
press [F1 (Ef1In)].
fig.7-01
MEMOIf you wish to insert EFX2–4, press [F2 (Ef2In)], [F3 (Ef3In)],
or [F4 (Ef4In)] respectively.
3. Press [YES].
4. Use the TIME/VALUE dial to select how the effect will
be inserted. At this time you can view the effect as an
icon and as a patch name (up to ten characters).
fig.7-02.e
5. Press [PLAY (DISPLAY)]. You will return to Play
condition.
Checking effects that cannot be used in other channels (Effect insertion location display)
When there are effects which cannot be used for a channel/
track (because they are inserted into another channel/track),
the location of the effect inserted is now displayed.
1. Press [SELECT] for the channel to which you wish to
apply an effect.
2. Press [PAGE] so that [F1] indicates “Ef1In,” and then
press [F1 (Ef1In)].
fig.7-01
MEMOIf you wish to insert EFX2–4, press [F2 (Ef2In)], [F3 (Ef3In)],
or [F4 (Ef4In)] respectively.
3. Press [YES].
4. Use the TIME/VALUE dial to select how the effect will
be inserted. At this time, you can view the effects that are
inserted into other channels/tracks.
Icon
Patch Name

40
Enhancements to the display and specifications
fig.7-04.e
5. Press [PLAY (DISPLAY)]. You will return to Play
condition.
Switching the Song Select window (List display)
The Song Select window can now be viewed not only as
icons but also as a list. You can also see the size of the song,
and the date and time at which it was created.
1. Press [PLAY (DISPLAY)].
2. Hold down [SHIFT] and press [F1 (SONG)].
3. Press [F1 (Sel)].
4. At this time, pressing [F1] will alternate between the icon
display and the list display.
fig.7-05.e
Also, you can press [F5] to cycle the displayed contents
between date of creation → time of creation → size.
fig.7-06.e
5. Use the TIME/VALUE to move the cursor to the song
that you wish to select.
6. Press [F4 (Exec)].
7. Press [YES].
8. The display will ask “STORE Current?” If you wish to
save the current song, press [YES]. If not, press [NO].
fig.7-07
9. After the song is selected, you are returned to Play
condition.
Easy Routing
Additional template (Mastering)A “Mastering” template for mixdown has been added to the
Easy Routing templates.
1. Press [EZ ROUTING].
2. Use [ ][ ][ ][ ] or the TIME/VALUE dial
to move the cursor to “Mastering.”
fig.7-08
When EFX1 is used in Track 6
Icon display List display
Icon / Date of creation Icon / Time of creation Icon / Size
List / Date of creation List / Time of creation List / Size

41
Enhancements to the display and specifications
3. Press [F4 (Exec)]. Alternatively, press [PAGE] so that [F4]
indicates “Exec,” and then press [F4 (Exec)].
fig.7-09
4. Press [F4 (Exec)] once again.
5. A message will ask for confirmation. Press [YES]. The
mastering template will be recalled. To cancel, press
[NO].
fig.7-10
At this time, the main settings will be as follows.
Inputs 1–8 :Master out
Tracks 1–15/16 :Playback
Mastering tracks :Off
Effect 1 :Mastering tool kit (insert)
6. You are returned to Play condition.
MEMOIf you wish to modify the mastering template, refer to
“Storing Routings as a Single List (Template)” (VS-1680
Owner’s Manual, p. 41).
Immediate application of step-edited changesChanges you make to Easy Routing settings by step-editing
(recording, mixdown, bouncing) will now be applied
immediately to the actual routing.
For example if you raise or lower the level of a channel by
step editing, the volume will now change accordingly. The
same is true for pan, output destination, effects or AUX
levels. This lets you hear the actual result while you set the
routing.
MEMOPreviously, you were asked “Apply this Routing?” when you
had completed your routing settings, and the routing
settings you made were actually applied only when you then
pressed [YES].
Settings not stored in a scene (Monitor Level)
Monitor level (the location of the MONITOR knob) is no
longer stored in a scene. Even when you recall a stored scene,
the monitor level will be determined by the current position
of the MONITOR knob.
fig.7-11
Master Send switch display has been changed (Pan→MIX)
The Master Send switch display has been changed from
“Pan” to “MIX.” When reading the previous Owner’s
Manual (including Quick Start and Appendices), please read
any reference to [F1 (Pan)] as [F1 (MIX)].
fig.7-12

42
Index
Symbols+Verify ............................................................................. 28
AAfter Rec (after recording) .............................................. 9Alarm function ................................................................. 6Automix........................................................................... 19
CCD Speed............................................................. 26, 28, 29Channel Link................................................................... 37Copy................................................................................. 20
DDestination Mark............................................................ 21Destination Target.......................................................... 21Disc At Once ................................................................... 25
EEasy Routing ............................................................... 6, 40Effect expansion board .................................................. 11EFX1 (effect insert switch 1) ......................................... 12Erase ................................................................................. 19Erase All Songs ............................................................... 29Expand....................................................................... 23, 24External recorder.............................................................. 8
FFinalize....................................................................... 25, 26
GGradation......................................................................... 21Gradation Curve............................................................. 22Group............................................................................... 36
IIcon display..................................................................... 40IN Margin........................................................................ 34IN Threshold................................................................... 34
LLicense agreement.......................................................... 27List display...................................................................... 40
MMarker................................................................................ 9Marker Add..................................................................... 22Master Send switch ........................................................ 41Mastering......................................................................... 40Mastering Room ............................................................... 8Mixdown ........................................................................... 8MONITOR knob............................................................. 35Monitor level................................................................... 41
OOUT Margin.................................................................... 34OUT Threshold............................................................... 34
PPhrase Copy .................................................................... 30
Phrase Delete................................................................... 30Phrase Move.................................................................... 30Phrase New ..................................................................... 30Phrase Split...................................................................... 34Playlist.............................................................................. 11
RRecording mode ............................................................... 8Rtn (effect return level).................................................. 12
SSampling rate .................................................................... 8Shift................................................................................... 24Snd (effect send level) .................................................... 12Source Song............................................................... 27, 29Speed .......................................................................... 27, 28Status ...................................................................... 9, 10, 12Step-editing ..................................................................... 41
TTake .................................................................................. 31Target ................................................................... 20, 21, 24Threshold......................................................................... 24To ...................................................................................... 31To (to point)..................................................................... 35Track................................................................................. 31Track At Once ................................................................. 25Track number marker ...................................................... 9Trim In ............................................................................. 30Trim Out .......................................................................... 30Trk L (track L) ................................................................... 9Trk R (track R)................................................................... 9Type............................................................................ 34, 35
UUser patch.......................................................................... 6User setting........................................................................ 6
VValue ................................................................................ 22VS-1680 V-XPANDED ..................................................... 6VS8F-2 .............................................................................. 11V-XPANDED system program Zip disk....................... 6
WWrite Method.................................................................. 26
ZZip drive ............................................................................ 6
InformationWhen you need repair service, call your nearest Roland Service Center or authorized Roland distributor in your country as shown below.
As of February 17, 1999
ARGENTINAInstrumentos Musicales S.A.Florida 656 2nd Floor Office Number 206ABuenos AiresARGENTINA, CP1005TEL: (54-11) 4- 393-6057
BRAZILRoland Brasil Ltda.R. Coronel Octaviano da Silveira 203 05522-010 Sao Paulo BRAZILTEL: (011) 843 9377
CANADA Roland Canada Music Ltd.(Head Office)5480 Parkwood Way Richmond B. C., V6V 2M4 CANADA TEL: (0604) 270 6626
Roland Canada Music Ltd.(Toronto Office)Unit 2, 109 Woodbine Downs Blvd, Etobicoke, ONM9W 6Y1 CANADA TEL: (0416) 213 9707
MEXICOCasa Veerkamp, s.a. de c.v.Av. Toluca No. 323 Col. Olivar de los Padres 01780 Mexico D.F. MEXICOTEL: (525) 668 04 80
La Casa Wagner de Guadalajara s.a. de c.v.Av. Corona No. 202 S.J. Guadalajara, Jalisco Mexico C.P.44100 MEXICO TEL: (03) 613 1414
PANAMAProductos Superiores, S.A.Apartado 655 - Panama 1REP. DE PANAMATEL: (507) 270-2200
U. S. A. Roland Corporation U.S.7200 Dominion Circle Los Angeles, CA. 90040-3696,U. S. A.TEL: (0323) 685 5141
VENEZUELAMusicland Digital C.A.Av. Francisco de Miranda,Centro Parque de Cristal, Nivel C2 Local 20 CaracasVENEZUELATEL: (02) 285 9218
AUSTRALIA Roland Corporation Australia Pty. Ltd. 38 Campbell Avenue Dee Why West. NSW 2099 AUSTRALIA TEL: (02) 9982 8266
NEW ZEALAND Roland Corporation (NZ) Ltd.97 Mt. Eden Road, Mt. Eden, Auckland 3, NEW ZEALAND TEL: (09) 3098 715
HONG KONGTom Lee Music Co., Ltd. Service Division22-32 Pun Shan Street, Tsuen Wan, New Territories, HONG KONGTEL: 2415 0911
CHINABeijing Xinghai Musical Instruments Co., Ltd.6 Huangmuchang Chao Yang District, Beijing, CHINATEL: (010) 6774 7491
INDIARivera Digitec (India) Pvt. Ltd.409, Nirman Kendra Mahalaxmi Flats, Compoundoff. Dr. Edwin Moses Road, Mumbai 400011, INDIATEL: (022) 498 3079
INDONESIAPT Galestra Inti Kompleks Perkantoran Duta Merlin Blok E No.6—7Jl. Gajah Mada No.3—5,Jakarta 10130, INDONESIATEL: (021) 6335416
MALAYSIABentley Music SDN BHD140 & 142, Jalan Bukit Bintang 55100 Kuala Lumpur,MALAYSIATEL: (03) 2443333
PHILIPPINESG.A. Yupangco & Co. Inc.339 Gil J. Puyat AvenueMakati, Metro Manila 1200,PHILIPPINESTEL: (02) 899 9801
SINGAPORESwee Lee Company150 Sims Drive,SINGAPORE 387381TEL: 748-1669
CRISTOFORI MUSIC PTE LTDBlk 3014, Bedok Industrial Park E, #02-2148, SINGAPORE 489980 TEL: 243 9555
TAIWANROLAND TAIWAN ENTERPRISE CO., LTD.Room 5, 9fl. No. 112 Chung Shan N.Road Sec.2, Taipei, TAIWAN, R.O.C.TEL: (02) 2561 3339
THAILANDTheera Music Co. , Ltd.330 Verng NakornKasem, Soi 2, Bangkok 10100, THAILANDTEL: (02) 2248821
BAHRAINMoon StoresBab Al Bahrain Road, P.O. Box 20077State of BAHRAINTEL: 211 005
VIETNAMSaigon Music138 Tran Quang Khai St., District 1Ho chi minh CityVIETNAMTEL: (8) 844-4068
ISRAELHalilit P. Greenspoon & Sons Ltd.8 Retzif Fa'aliya Hashnya St.Tel-Aviv-Yaho ISRAELTEL: (03) 6823666
JORDANAMMAN Trading Agency Prince Mohammed St. P.O. Box 825 Amman 11118 JORDANTEL: (06) 4641200
KUWAITEasa Husain Al-YousifiP.O. Box 126 Safat 13002KUWAITTEL: 5719499
LEBANONA. Chahine & FilsP.O. Box 16-5857 Gergi Zeidan St. Chahine Building, AchrafiehBeirut, LEBANONTEL: (01) 335799
OMANOHI Electronics & Trading Co. LLCP.O. Box 889 Muscat Sultanate of OMANTEL: 959085
QATARBadie Studio & StoresP.O. Box 62, DOHA QATARTEL: 423554
SAUDI ARABIAaDawliah Universal Electronics APLP.O. Box 2154 ALKHOBAR 31952, SAUDI ARABIA TEL: (03) 898 2081
SYRIATechnical Light & Sound CenterKhaled Ibn Al Walid St.P.O. Box 13520Damascus - SYRIATEL: (011) 2235 384
TURKEY Barkat Muzik aletleri ithalat ve ihracat limited ireketiSiraselvier Cad. Guney Ishani No. 86/6 Taksim, Istanbul TURKEYTEL: (0212) 2499324
U.A.E.Zak Electronics & Musical Instruments Co.Zabeel Road, Al Sherooq Bldg., No. 14, Grand Floor DUBAI U.A.E.P.O. Box 8050 DUBAI, U.A.E.TEL: (04) 360715
EGYPTAl Fanny Trading OfficeP.O. Box 2904, El Horrieh Heliopolos, Cairo, EGYPTTEL: (02) 4185531
REUNIONMaison FO - YAM Marcel25 Rue Jules MermanZL Chaudron - BP79 97491Ste Clotilde REUNIONTEL: 28 29 16
SOUTH AFRICAThat Other Music Shop (PTY) Ltd.11 Melle Street (Cnr Melle and Juta Street) Braamfontein 2001 Republic of SOUTH AFRICATEL: (011) 403 4105
Paul Bothner (PTY) Ltd.17 Werdmuller Centre Claremont 7700 Republic of SOUTH AFRICA
P.O. Box 23032Claremont, Cape TownSOUTH AFRICA, 7735TEL: (021) 64 4030
CYPRUSRadex Sound Equipment Ltd.17 Diagorou St., P.O. Box 2046, Nicosia CYPRUSTEL: (02) 453 426
DENMARK Roland Scandinavia A/SLangebrogade 6 Post Box 1937 DK-1023 Copenhagen K. DENMARK TEL: 32 95 3111
FRANCERoland France SA4, Rue Paul Henri SPAAK Parc de l'Esplanade F 77 462 St. Thibault Lagny Cedex FRANCETEL: 01 600 73 500
FINLANDRoland Scandinavia As, Filial FinlandLauttasaarentie 54 BFin-00201 Helsinki, FINLANDTEL: (9) 682 4020
GERMANY Roland Elektronische Musikinstrumente Handelsgesellschaft mbH.Oststrasse 96, 22844 Norderstedt, GERMANY TEL: (040) 52 60090
GREECEV. Dimitriadis & Co. Ltd.20, Alexandras St. & Bouboulinas 54 St. 106 82 Athens, GREECETEL: (01) 8227 775
HUNGARYIntermusica Ltd.Warehouse Area ‘DEPO’ Pf.83H-2046 Torokbalint, HUNGARYTEL: (23) 511011
IRELANDRoland IrelandAudio House, Belmont Court,Donnybrook, Dublin 4.Republic of IRELANDTEL: (01) 2603501
ITALYRoland Italy S. p. A. Viale delle Industrie, 8 20020 Arese Milano, ITALYTEL: (02) 937-78300
NORWAYRoland Scandinavia Avd. Kontor NorgeLilleakerveien 2 Postboks 95 Lilleaker N-0216 Oslo NORWAYTEL: 273 0074
POLANDP. P. H. BrzostowiczUL. Gibraltarska 4.PL-03664 Warszawa POLANDTEL: (022) 679 44 19
PORTUGALTecnologias Musica e Audio, Roland Portugal, S.A.RUA SANTA CATARINA 131 - 4000 Porto -PORTUGALTEL: (02) 208 44 56
RUSSIASlami Music CompanySadojava-Triumfalnaja st., 16 103006 Moscow, RUSSIA TEL: 095 209 2193
SPAINRoland Electronics de España, S. A. Calle Bolivia 239 08020 Barcelona, SPAINTEL: (93) 308 1000
SWITZERLANDRoland (Switzerland) AGMusitronic AG Gerberstrasse 5, CH-4410 Liestal, SWITZERLANDTEL: (061) 921 1615
SWEDEN Roland Scandinavia A/S SWEDISH SALES OFFICEDanvik Center 28, 2 tr. S-131 30 Nacka SWEDEN TEL: (08) 702 0020
UKRAINETIC-TACMira Str. 19/108P.O. Box 180 295400 Munkachevo, UKRAINETEL: (03131) 414-40
UNITED KINGDOM Roland (U.K.) Ltd.Atlantic Close, Swansea Enterprise Park SWANSEASA7 9FJ, UNITED KINGDOMTEL: (01792) 700139
KOREACosmos Corporation Service Station261 2nd Floor Nak-Won Arcade Jong-Ro ku, Seoul, KOREATEL: (02) 742 8844
AUSTRIARoland Austria GES.M.B.H.Siemensstrasse 4, P.O. Box 74,A-6063 RUM, AUSTRIATEL: (0512) 26 44 260
BELGIUM/HOLLAND/LUXEMBOURGRoland Benelux N. V.Houtstraat 3 B-2260 Oevel (Westerlo) BELGIUMTEL: (014) 575811
AFRICA
CHILEComercial Fancy S.A.Avenida Rancagua #0330Providencia Santiago, CHILETEL: 56-2-373-9100
URUGUAYTodo MusicaCuareim 1488, Montevideo,URUGUAYTEL: 5982-924-2335
EUROPE
AUSTRALIA/NEW ZEALANDASIA
CENTRAL/LATINAMERICA
NORTH AMERICA
MIDDLE EAST
AFRICA
EL SALVADOROMNI MUSIC75 Avenida Notre y Alameda Juan Pablo 2 No. 4010 San Salvador, EL SALVADORTEL: (503) 262-0788
ROMANIAFBS LINESPlata Libertatii 1.RO-4200 CheorgheniTEL: (066) 164-609