using puzzle template - kurzweil edu puzzle... · using the puzzle template 1 table of contents and...
TRANSCRIPT

Using the Puzzle Template
Tutorial
Copyright 2002, IntelliTools, Inc.
Note: This tutorial requires that you have installed IntelliPics Studio. Authoring featuresnecessary to complete this tutorial are not available when using IntelliPics Studio Player.
Copyright Notice
© 2002 IntelliTools, Inc. All rights reserved. The distribution and sale of this software and manual are authorized forthe original purchaser only. Unauthorized duplication is a violation of federal copyright law.
Images that appear in IntelliPics Studio may not be used in any commercial application without the prior consent ofIntelliTools, Inc.
Trademarks and Acknowledgments
IntelliTools, IntelliPics, IntelliKeys, IntelliTalk II, and Overlay Maker, and their respective logos are registeredtrademarks of IntelliTools, Inc. IntelliMathics, IntelliCritters, IntelliMation, IntelliQuiz, Overlay Printer, and OverlaySender are trademarks of IntelliTools, Inc.
Adobe and Acrobat Reader are registered trademarks or trademarks of Adobe Systems Incorporated, registered inthe United States and/or other countries. Macintosh, QuickTime, and QuickTime logo are registered trademarks ortrademarks of Apple Computer, Inc., registered in the U.S.A. and other countries. Windows 95, Windows 98,Windows 2000, and Windows ME are registered trademarks or trademarks of Microsoft Corporation, registered inthe U.S.A. and other countries. Other brand and product names mentioned herein are trademarks, registeredtrademarks, or trade names of their respective holders and are hereby acknowledged.
Some photographic images included with this program are from the CD-ROM, “Picture This... Professional Edition”and are the copyright of Silver Lining Multimedia, Inc. If you would like to obtain more images that can be importedinto IntelliTools products, please visit the Silver Lining Multimedia Web site: http://www.silverliningmm.com.
Over 90 of the images supplied with IntelliPics Studio are Picture Communication Symbols from the Boardmakersoftware, ©1981-2001 Mayer-Johnson, Inc. and are used with permission. Boardmaker has 3,000+ additional imagesthat can be imported into IntelliTools products. For additional information about Boardmaker images, please visit theMayer-Johnson Web site: http://www.mayer-johnson.com.
CreditsIntelliPics Studio was produced through the collaborative efforts of many staff members at IntelliTools. Design: ArjanKhalsa, Scott Schafer; Project Management: David Robertshaw; Content Development: Suzanne Feit, Arjan Khalsa,Lucinda Ray, Patty Kilroy; Software Engineering: Scott Schafer, Paul Archibald, Fred Ross-Perry; User’s Guide: AlanRhody; Teacher’s Guide: Lucinda Ray; Tutorial: Suzanne Feit, Lucinda Ray; Additional Development: PhilipNittenberg, Jeremy Bolan, Linda Finley, Meida Pang, Steve Gensler; Testing: Dale Goetsch, Lisa Carr, Mike Burns,Meida Pang, Chris Finley; Artwork: Patty Kilroy, Chris Santeramo, Michelle Graham, Mary Ann Zapalac, JeremyBolan; Support Services: Linda Finley; Packaging: Patty Kilroy.
Puzzle Template CreditsTutorial: Ann Brundige, Puzzle template, activities, and photos © 2002 annbrundige studio. [email protected], http://hometown.aol.com/annbrunstudio
Technical SupportHours: 8 a.m.– 5 p.m. Pacific Time, Monday through FridayPhone: (800) 899-6687 (U.S. and Canada)
(707) 773-2000 (local and international)Fax: (707) 773-2001Email: [email protected] (for technical information)
[email protected] (for general information)World Wide Web: http://www.intellitools.com
Important note: To insure that returns are handled correctly and without delays, please call us for a ReturnMerchandise Authorization (RMA) before returning any item.
MNL-IPS-T&T Puzzle Printed in U.S.A. 10/02

Using the Puzzle Template 1
Table of Contents and Introduction
The Puzzle activities for IntelliPics® Studio enableearly learners to complete a puzzle, one piece at atime.
In this tutorial, you will start by exploring one of thesample puzzles. Later in the tutorial, you will learn tocreate a customized puzzle, using the Puzzle template.
Universal DesignThe activities you create using the Puzzle templateand IntelliPics Studio are designed for all students,including those with physical or cognitive disabilities.Puzzle activities are ideal for inclusion classrooms,because all students can use them: with a mouse, anIntelliKeys® keyboard, or a switch. The Puzzletemplate includes a custom overlay (labeled ButtonClick Overlay).
Important Note:This tutorial requires that you have installedIntelliPics Studio. Authoring features necessary tocomplete this tutorial are not available when using theIntelliPics Studio Player.
Table of ContentsIntroduction .....1
Universal DesignBeginning from IntelliPics StudioBeginning from the IntelliPics Studio
Fun, Two, Three! CD
Sample Activity .....2
Exploring the Puzzle Activity
Part 1: Using the Puzzle Template .....3
Opening the Puzzle TemplateSelecting a Background
Part 2: Creating the Animation Finale ....4
Part 3: Finishing Up .....5
Simplify the Page for Student Use
Part 4: Behind the Scenes ....6
Transparent ButtonsPage Actions
Part 5: Customizing the Template ....7
Adding a New BackgroundAdding New Objects to Animate
Beginning from IntelliPics Studio 1. If it is not open, launch IntelliPics Studio. When
the program launches, the Home page isdisplayed.
2. Click the Open My Documents button.
3. Click the Template tab. Select the Fun, TwoThree folder and open it.
4. Select Puzzle Street. Click Open.
Beginning from the IntelliPics Studio Fun, Two, Three! CD1. Open the Fun, Two,Three! CD.
2. Click the opening screen to proceed.
3. From the Home page that displays, click thePuzzle Activities button.
4. Click the Street button. The Street puzzle opens.
IntelliPics Studio Tutorial2
Sample Activity
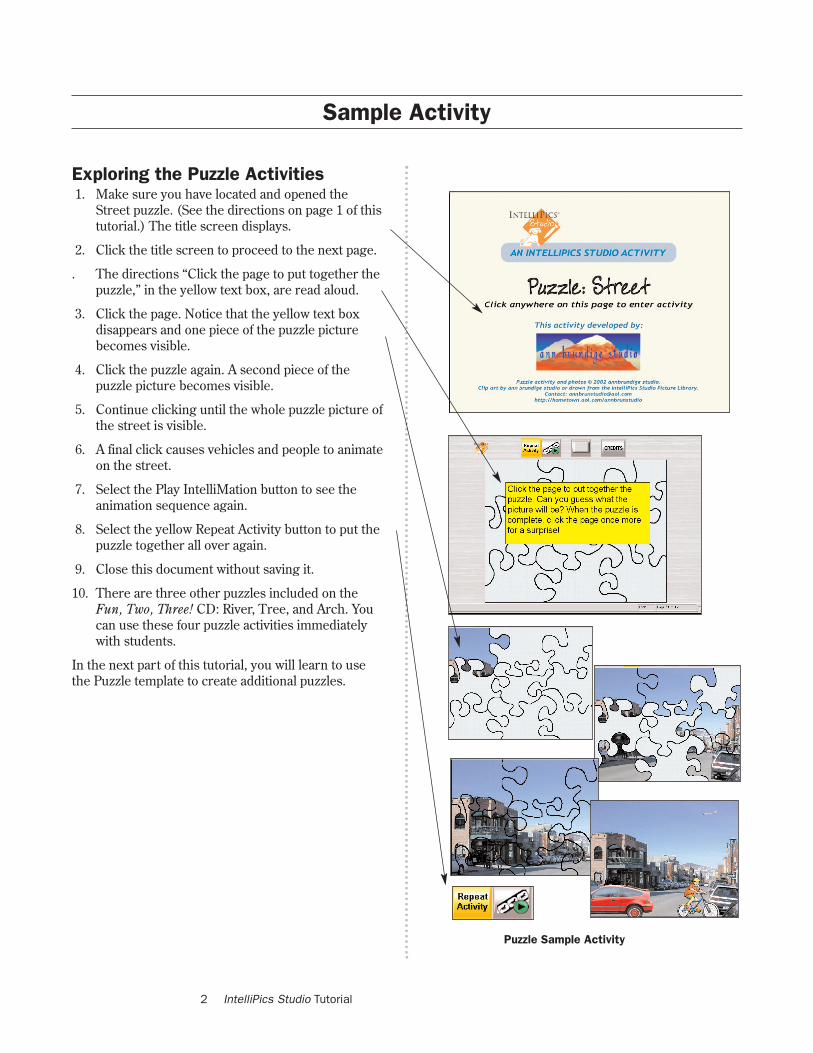
Exploring the Puzzle Activities1. Make sure you have located and opened the
Street puzzle. (See the directions on page 1 of thistutorial.) The title screen displays.
2. Click the title screen to proceed to the next page.
. The directions “Click the page to put together thepuzzle,” in the yellow text box, are read aloud.
3. Click the page. Notice that the yellow text boxdisappears and one piece of the puzzle picturebecomes visible.
4. Click the puzzle again. A second piece of thepuzzle picture becomes visible.
5. Continue clicking until the whole puzzle picture ofthe street is visible.
6. A final click causes vehicles and people to animateon the street.
7. Select the Play IntelliMation button to see theanimation sequence again.
8. Select the yellow Repeat Activity button to put thepuzzle together all over again.
9. Close this document without saving it.
10. There are three other puzzles included on theFun, Two, Three! CD: River, Tree, and Arch. Youcan use these four puzzle activities immediatelywith students.
In the next part of this tutorial, you will learn to usethe Puzzle template to create additional puzzles.
Puzzle Sample Activity
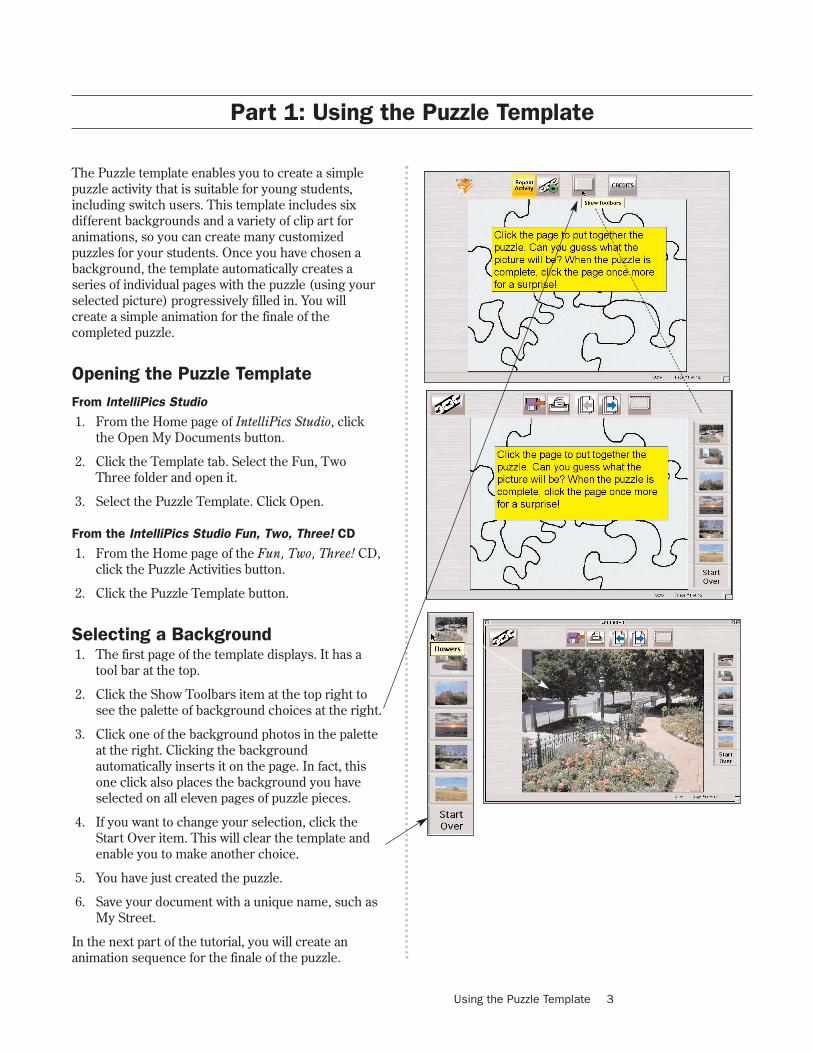
The Puzzle template enables you to create a simplepuzzle activity that is suitable for young students,including switch users. This template includes sixdifferent backgrounds and a variety of clip art foranimations, so you can create many customizedpuzzles for your students. Once you have chosen abackground, the template automatically creates aseries of individual pages with the puzzle (using yourselected picture) progressively filled in. You willcreate a simple animation for the finale of thecompleted puzzle.
Opening the Puzzle TemplateFrom IntelliPics Studio
1. From the Home page of IntelliPics Studio, clickthe Open My Documents button.
2. Click the Template tab. Select the Fun, TwoThree folder and open it.
3. Select the Puzzle Template. Click Open.
From the IntelliPics Studio Fun, Two, Three! CD
1. From the Home page of the Fun, Two, Three! CD,click the Puzzle Activities button.
2. Click the Puzzle Template button.
Selecting a Background1. The first page of the template displays. It has a
tool bar at the top.
2. Click the Show Toolbars item at the top right tosee the palette of background choices at the right.
3. Click one of the background photos in the paletteat the right. Clicking the backgroundautomatically inserts it on the page. In fact, thisone click also places the background you haveselected on all eleven pages of puzzle pieces.
4. If you want to change your selection, click theStart Over item. This will clear the template andenable you to make another choice.
5. You have just created the puzzle.
6. Save your document with a unique name, such asMy Street.
In the next part of the tutorial, you will create ananimation sequence for the finale of the puzzle.
Using the Puzzle Template 3
Part 1: Using the Puzzle Template
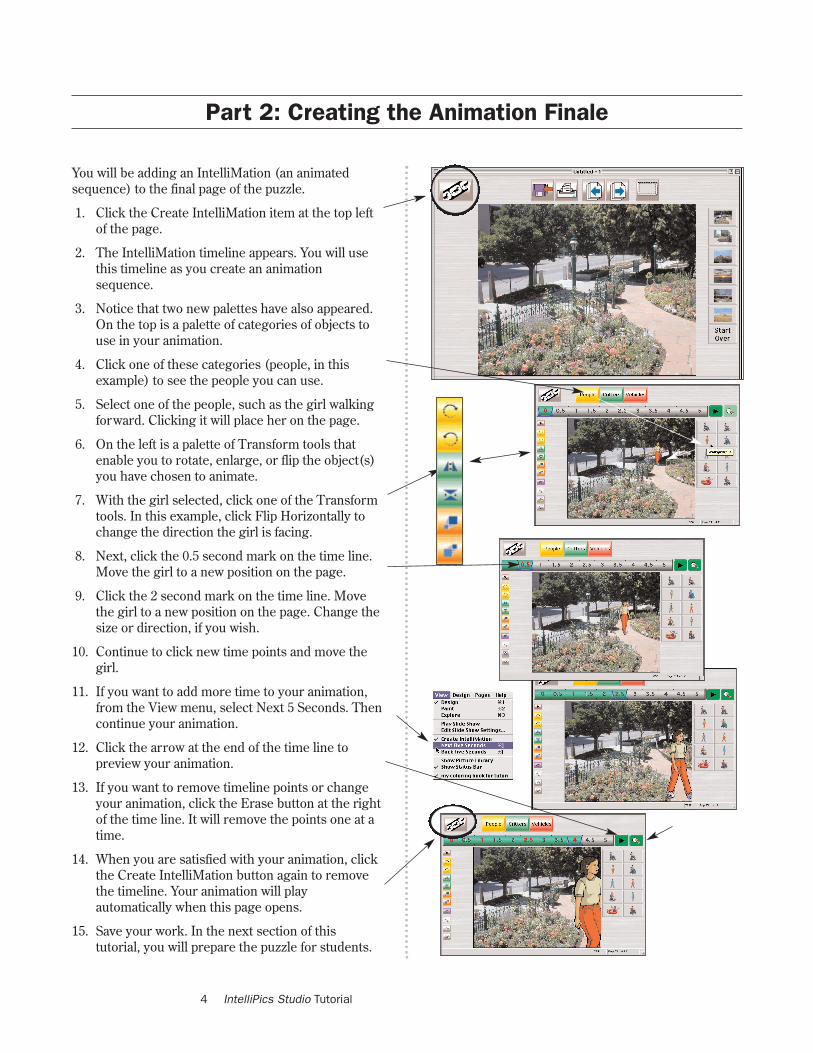
You will be adding an IntelliMation (an animatedsequence) to the final page of the puzzle.
1. Click the Create IntelliMation item at the top leftof the page.
2. The IntelliMation timeline appears. You will usethis timeline as you create an animationsequence.
3. Notice that two new palettes have also appeared.On the top is a palette of categories of objects touse in your animation.
4. Click one of these categories (people, in thisexample) to see the people you can use.
5. Select one of the people, such as the girl walkingforward. Clicking it will place her on the page.
6. On the left is a palette of Transform tools thatenable you to rotate, enlarge, or flip the object(s)you have chosen to animate.
7. With the girl selected, click one of the Transformtools. In this example, click Flip Horizontally tochange the direction the girl is facing.
8. Next, click the 0.5 second mark on the time line.Move the girl to a new position on the page.
9. Click the 2 second mark on the time line. Movethe girl to a new position on the page. Change thesize or direction, if you wish.
10. Continue to click new time points and move thegirl.
11. If you want to add more time to your animation,from the View menu, select Next 5 Seconds. Thencontinue your animation.
12. Click the arrow at the end of the time line topreview your animation.
13. If you want to remove timeline points or changeyour animation, click the Erase button at the rightof the time line. It will remove the points one at atime.
14. When you are satisfied with your animation, clickthe Create IntelliMation button again to removethe timeline. Your animation will playautomatically when this page opens.
15. Save your work. In the next section of thistutorial, you will prepare the puzzle for students.
IntelliPics Studio Tutorial4
Part 2: Creating the Animation Finale
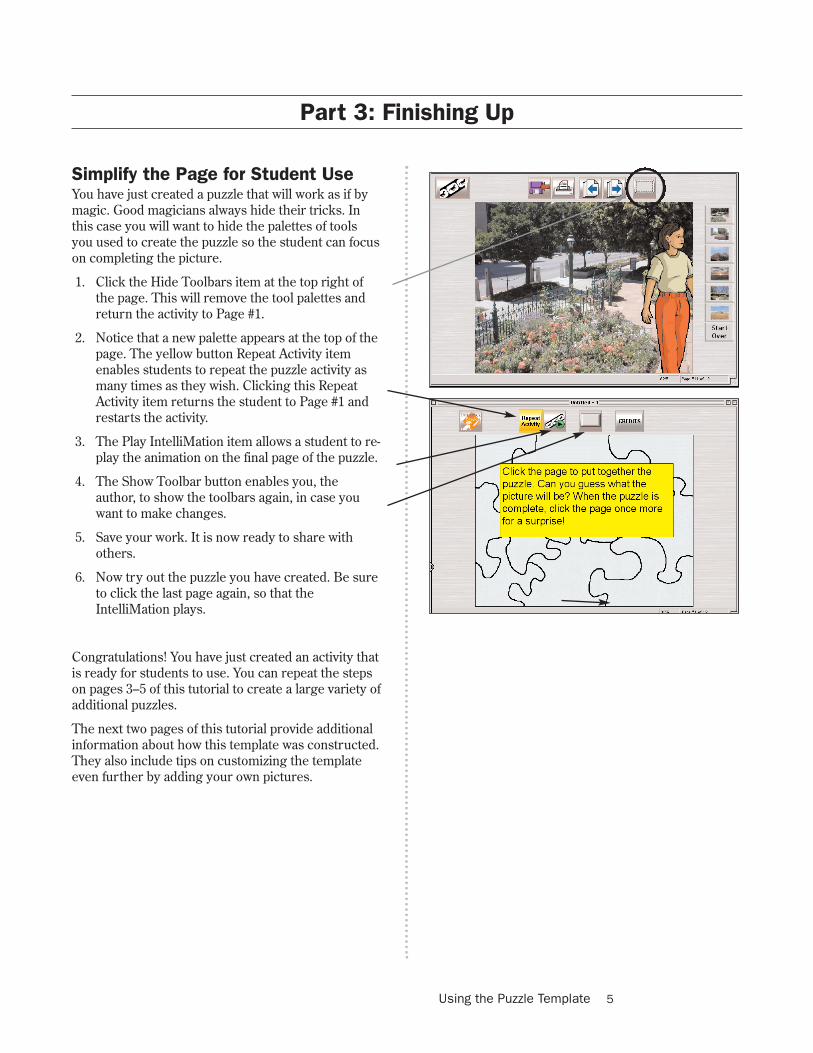
Simplify the Page for Student UseYou have just created a puzzle that will work as if bymagic. Good magicians always hide their tricks. Inthis case you will want to hide the palettes of toolsyou used to create the puzzle so the student can focuson completing the picture.
1. Click the Hide Toolbars item at the top right ofthe page. This will remove the tool palettes andreturn the activity to Page #1.
2. Notice that a new palette appears at the top of thepage. The yellow button Repeat Activity itemenables students to repeat the puzzle activity asmany times as they wish. Clicking this RepeatActivity item returns the student to Page #1 andrestarts the activity.
3. The Play IntelliMation item allows a student to re-play the animation on the final page of the puzzle.
4. The Show Toolbar button enables you, theauthor, to show the toolbars again, in case youwant to make changes.
5. Save your work. It is now ready to share withothers.
6. Now try out the puzzle you have created. Be sureto click the last page again, so that theIntelliMation plays.
Congratulations! You have just created an activity thatis ready for students to use. You can repeat the stepson pages 3–5 of this tutorial to create a large variety ofadditional puzzles.
The next two pages of this tutorial provide additionalinformation about how this template was constructed.They also include tips on customizing the templateeven further by adding your own pictures.
Using the Puzzle Template 5
Part 3: Finishing Up
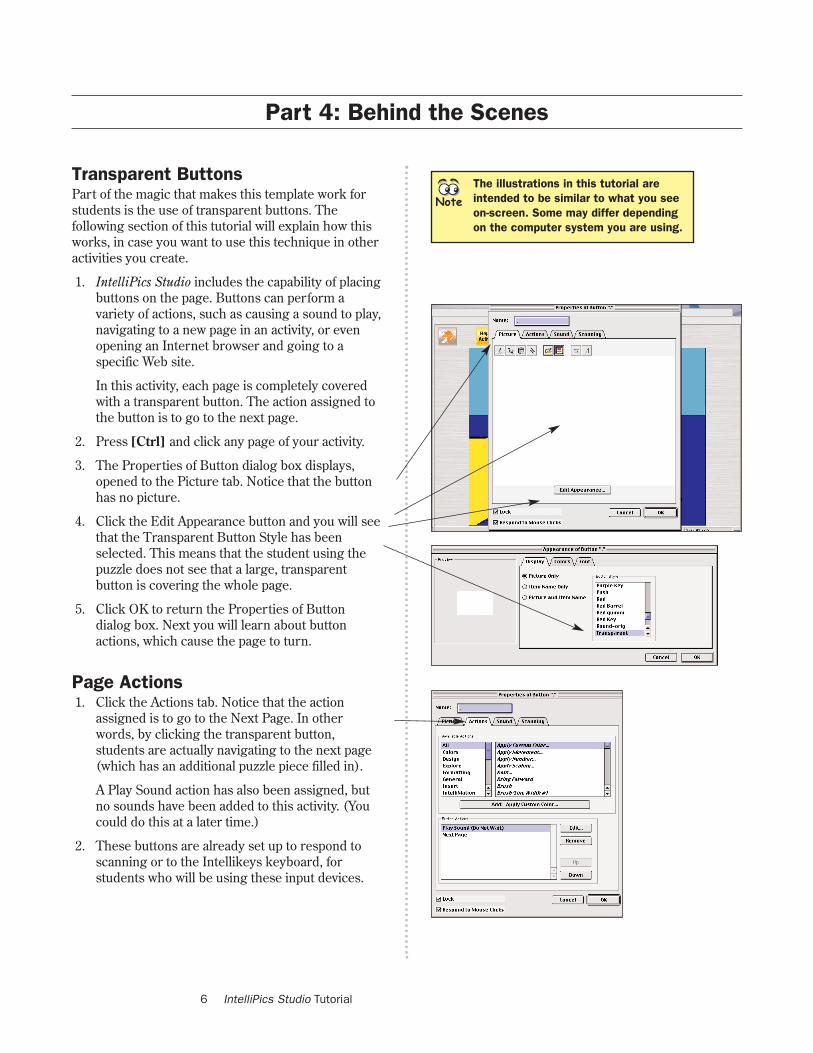
Transparent ButtonsPart of the magic that makes this template work forstudents is the use of transparent buttons. Thefollowing section of this tutorial will explain how thisworks, in case you want to use this technique in otheractivities you create.
1. IntelliPics Studio includes the capability of placingbuttons on the page. Buttons can perform avariety of actions, such as causing a sound to play,navigating to a new page in an activity, or evenopening an Internet browser and going to aspecific Web site.
In this activity, each page is completely coveredwith a transparent button. The action assigned tothe button is to go to the next page.
2. Press [Ctrl] and click any page of your activity.
3. The Properties of Button dialog box displays,opened to the Picture tab. Notice that the buttonhas no picture.
4. Click the Edit Appearance button and you will seethat the Transparent Button Style has beenselected. This means that the student using thepuzzle does not see that a large, transparentbutton is covering the whole page.
5. Click OK to return the Properties of Buttondialog box. Next you will learn about buttonactions, which cause the page to turn.
Page Actions1. Click the Actions tab. Notice that the action
assigned is to go to the Next Page. In otherwords, by clicking the transparent button,students are actually navigating to the next page(which has an additional puzzle piece filled in).
A Play Sound action has also been assigned, butno sounds have been added to this activity. (Youcould do this at a later time.)
2. These buttons are already set up to respond toscanning or to the Intellikeys keyboard, forstudents who will be using these input devices.
IntelliPics Studio Tutorial6
Part 4: Behind the Scenes
The illustrations in this tutorial areintended to be similar to what you seeon-screen. Some may differ dependingon the computer system you are using.
Note
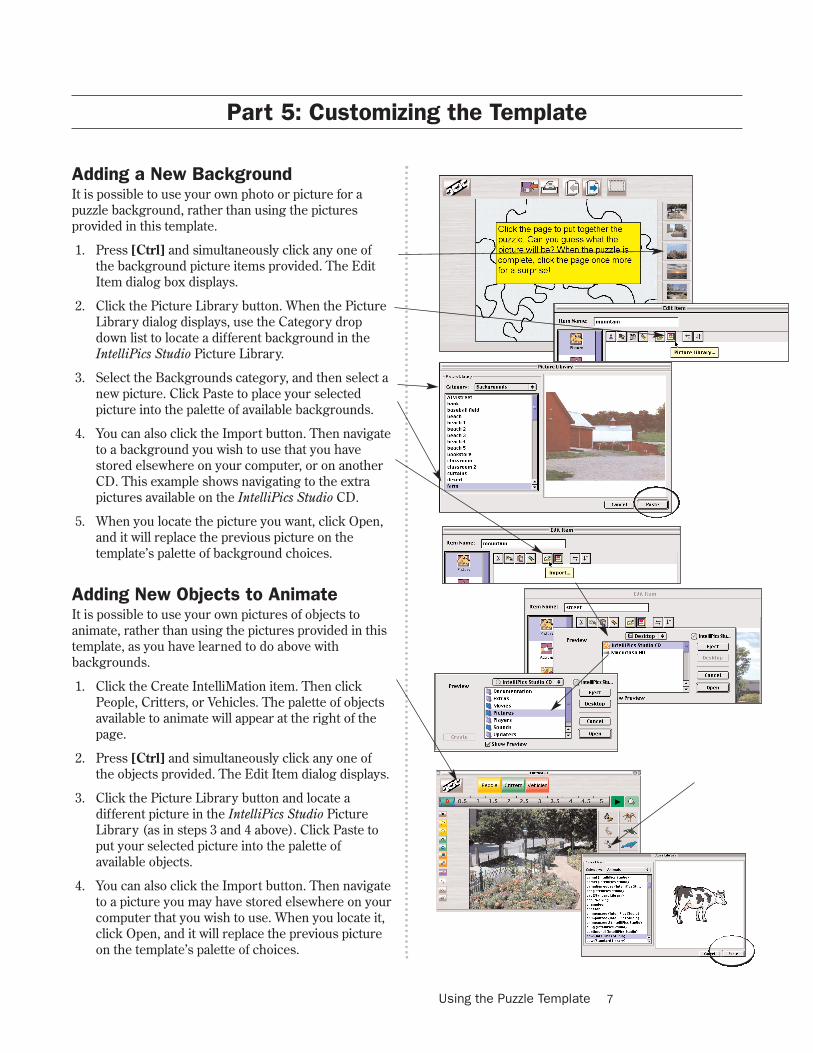
Adding a New BackgroundIt is possible to use your own photo or picture for apuzzle background, rather than using the picturesprovided in this template.
1. Press [Ctrl] and simultaneously click any one ofthe background picture items provided. The EditItem dialog box displays.
2. Click the Picture Library button. When the PictureLibrary dialog displays, use the Category dropdown list to locate a different background in theIntelliPics Studio Picture Library.
3. Select the Backgrounds category, and then select anew picture. Click Paste to place your selectedpicture into the palette of available backgrounds.
4. You can also click the Import button. Then navigateto a background you wish to use that you havestored elsewhere on your computer, or on anotherCD. This example shows navigating to the extrapictures available on the IntelliPics Studio CD.
5. When you locate the picture you want, click Open,and it will replace the previous picture on thetemplate’s palette of background choices.
Adding New Objects to AnimateIt is possible to use your own pictures of objects toanimate, rather than using the pictures provided in thistemplate, as you have learned to do above withbackgrounds.
1. Click the Create IntelliMation item. Then clickPeople, Critters, or Vehicles. The palette of objectsavailable to animate will appear at the right of thepage.
2. Press [Ctrl] and simultaneously click any one ofthe objects provided. The Edit Item dialog displays.
3. Click the Picture Library button and locate adifferent picture in the IntelliPics Studio PictureLibrary (as in steps 3 and 4 above). Click Paste toput your selected picture into the palette ofavailable objects.
4. You can also click the Import button. Then navigateto a picture you may have stored elsewhere on yourcomputer that you wish to use. When you locate it,click Open, and it will replace the previous pictureon the template’s palette of choices.
Using the Puzzle Template 7
Part 5: Customizing the Template