user’s manual xrouter pro -...
TRANSCRIPT

User’s Manual XRouter Pro(MIH-130)
R
acsense

Copyright
Copyright © 2000 by this company. All rights reserved. No part ofthis documentation may be reproduced in any form or by any meansor used to make any directive work (such as translation or transforma-tion) without permission from Xsense Connectivity, Inc. XsenseConnectivity, Inc. reserves the right to revise this documentation and tomake changes in content without obligation among XsenseConnectivity, Inc. to provide notification of such revision or change.
FCC Notice
This equipment has been tested and found to comply with the limits for a Class B digital device, pursuant to Part 15 of FCC Rules.These limits are designed to provide protection against harmful inter-ference in residential installations. This equipment generates radiofrequencies that may cause interference with radio communications ifnot used in accordance with the instructions. Interference may evenoccur with proper installation. If this equipment causes interference,the user is encouraged to correct the interference with one or more ofthe following measures:
1. Reorient or relocate the receiving antenna.
2. Increase the separation between the equipment and receiver.
3. Connect the equipment into an outlet on a circuit that is sepa-rate from the one to which the receiver is connected.
4. Consult the dealer or an experienced radio/television technicianfor help.
i

Safety Precautions
1. Follow all warnings and instructions marked on the product.
2. Slots and openings on the device are provided for ventilation.To protect it from overheating, these openings must not beblocked or covered.
3. Do not use or store this product in an environment that exceedstemperature and humidity specifications. Do not place thisproduct near a radiator or heat register, or in a built-in installa-tion unless adequate ventilation is provided.
4. Before cleaning this product, unplug from wall outlet. Do not useliquid cleaners or aerosol cleaners. Use a damp cloth for cleaning.
5. Do not place cords or cables where they may be walked on ortripped over.
6. Be sure to comply with any applicable local safety standards orregulations.
7. General purpose cables are provided with this product. Anycables or other requirements mandated by local authority areyour responsibility.
8. Cables that are attached to devices in different locations thathave different power sources and grounding may have hazardous voltage potentials. Consult a qualified electrical consultant before installing the product to see if this phenomenon exists and, if necessary, take corrective action.
9. Never touch annunciated telephone wires or terminals unlessthe line has been disconnected.
10. Avoid using telephone equipment or installing the product during an electrical storm.
11. Never install telephone jacks, lines, network cables, this product, or power connections in wet locations.
12. Never spill liquid of any kind on the product.
ii

Table of Contents
ABOUT THIS MANUAL . . . . . . . . . . . . . . . . . . . . . . . . . . . 1INTRODUCTION . . . . . . . . . . . . . . . . . . . . . . . . . . . . . . . . . 2
BEFORE YOU START . . . . . . . . . . . . . . . . . . . . . . . . . . . . 4
Package Overview . . . . . . . . . . . . . . . . . . . . . . . . . . . . . 4
Items Required . . . . . . . . . . . . . . . . . . . . . . . . . . . . . . . . 4
System Requirements . . . . . . . . . . . . . . . . . . . . . . . . . . 4
EASY INSTALLATION . . . . . . . . . . . . . . . . . . . . . . . . . . . . 5
Hardware Installation . . . . . . . . . . . . . . . . . . . . . . . . . . . 5
Software Configuration . . . . . . . . . . . . . . . . . . . . . . . . . . 8
Windows 95 TCP/IP Configuration . . . . . . . . . . . . . . . . . 8
Mac OS TCP/IP Configuration . . . . . . . . . . . . . . . . . . .12
Setting up the XRouter Pro Through a Web Browser . . .14
ADVANCED CONFIGURATION . . . . . . . . . . . . . . . . . . . . .18
DHCP Server Settings . . . . . . . . . . . . . . . . . . . . . . . . . .18
Access Control . . . . . . . . . . . . . . . . . . . . . . . . . . . . . . . .19
Virtual Server . . . . . . . . . . . . . . . . . . . . . . . . . . . . . . . . .20
Device Administration . . . . . . . . . . . . . . . . . . . . . . . . . . .21
Status Monitor . . . . . . . . . . . . . . . . . . . . . . . . . . . . . . . .21
DMZ Host . . . . . . . . . . . . . . . . . . . . . . . . . . . . . . . . . . .22
RIP . . . . . . . . . . . . . . . . . . . . . . . . . . . . . . . . . . . . . . . .22Static Routing . . . . . . . . . . . . . . . . . . . . . . . . . . . . . . . . .23
PPPoE Settings (Required by some ISPs) . . . . . . . . . . .24
Firmware Upgrade . . . . . . . . . . . . . . . . . . . . . . . . . . . . .25
TROUBLESHOOTING . . . . . . . . . . . . . . . . . . . . . . . . . . . .27
iii

APPENDIX A SPECIFICATIONS . . . . . . . . . . . . . . . . . . . .28
APPENDIX B Hardware Description . . . . . . . . . . . . . . . .29
APPENDIX C GLOSSARY . . . . . . . . . . . . . . . . . . . . . . . . .31
iv
ABOUT THIS MANUAL
This user manual describes how to connect a LAN to the Internetusing the XRouter Internet Sharing Hub, MIH-130. This manualassumes you are familiar with the basics of personal computing andnetwork environments. The material is organized as follows:
Chapter ContentIntroduction Describes the features and main
applications of the XRouter Pro
Before You Start Describes the environment needed toset up the XRouter Pro
Easy Installation Describes how to install the XRouterPro for ordinary applications
Advanced Configuration Describes the configuration options forthe XRouter Pro
Troubleshooting Lists problems and solutions one mightencounter when using the XRouter Pro
Appendix A Hardware Description
Appendix B Specifications
Appendix C Glossary
About This Manual
1

INTRODUCTION
Thank you for purchasing the XRouter Pro MIH-130 InternetSharing Hub. The XRouter Pro functions as an easy-to-use communi-cation device that allows you to connect a local area network (LAN) tothe Internet affordably. With the XRouter Pro you can get as many as252 Macintosh or PC users online simultaneously through just onecable line or DSL, and one ISP account. The XRouter Pro installsquickly and easily, and best of all, it’s a breeze to use.
Sharing Internet AccessThe XRouter Pro provides high-speed Internet access to multiple
users by splitting the bandwidth from a cable line or from DSL (DigitalSubscriber Line) into tiny portions and then routing these bandwidth“slices” to almost any number of Internet users. The fewer the numberof users online at any one time, the faster the service each individualreceives. Internet users on different nodes are not limited to looking atthe same Web pages. Each node is functionally independent from theother nodes connected to the XRouter Pro.
Modems SupportedThe XRouter Pro supports cable modems and DSL modems. The
XRouter Pro has one WAN (Wide Area Network) port for connectingthe unit to either a cable modem or a DSL modem. Either technologyshould provide more than enough bandwidth to accommodate theneeds of even large groups of Internet users.
Built-in DHCP ServerThe XRouter Pro’s built-in DHCP Server dramatically reduces the
configuration and maintenance effort by allowing you to automaticallyconfigure the TCP/IP setting of computers over a local area network.
Introduction
2

4-Port Switched Ethernet Hub InsideIn addition to providing Internet sharing capability, the XRouter Pro
also functions as an Ethernet hub, offering four 10/100BASE-Tswitched RJ-45 ports that allow you to connect a series of computersto form a small LAN.
Easy ConfigurationThe XRouter Pro can be configured through a Web browser, and
features Web-based management for a simple, intuitive set up.
Virtual ServerInternet users can set up an in-house Web server, such as WWW
or FTP, through the XRouter Pro’s Virtual Server mapping function.The Virtual Server allows you to select a particular computer in yournetwork to respond to outside Internet requests.
SecurityThe XRouter Pro provides firewall-like security through NAT
(Network Address Translation) to prevent unauthorized Internet usersfrom accessing internal files. It can also filter out Internet requestsfrom certain nodes on a local network for administrative purposes.
NAT (Network Address Translation)
The MIH-130 features NAT (Network Address Translation) as ameans of translating private IP addresses into a global IP address thatis, in turn, registered to the Internet. NAT essentially masks local IPaddresses to the outside world, allowing a group of Internet users toshare a single ISP account (which means you don’t have to buy sepa-rate accounts for each user).
Introduction
3

BEFORE YOU START
Package Overview
Please check to make sure your XRouter Pro package includesthe items listed below before setting up your XRouter Pro.
__ an XRouter Pro
__ a power adapter
__ this user manual
__ a Category-5 UTP cable with RJ-45 connectors
Items Required
__ an account from an ISP (Internet Service Provider)
__ a cable line or DSL
__ a cable modem or DSL modem
__ additional UTP cables with RJ-45 connectors (for additional
computers)
System Requirements
• Computer equipped with 10BASE-T Ethernet connection inter-face that supports TCP/IP protocol
• Windows 95/98/2000, Windows NT 4.0 or later versions
• Mac OS 7.5.3 or later versions
• Netscape Communicator 4.0 or above (Microsoft InternetExplorer 4.0 or later versions are necessary for Web configuration.)
(NOTE: For future firmware upgrades, one of the operatingsystems listed above is needed.)
Before You Start
4

EASY INSTALLATION
Hardware Installation
Before connecting the XRouter Pro to your LAN please verify that yourcable or DSL service is active and operating correctly. If you are expe-riencing difficulties with your cable or DSL service, please contact yourservice provider before proceeding with this installation.
Connecting the XRouter Pro to Your Modem
After verifying that your cable or DSL service is functioning properly,connect your cable modem or DSL modem to the XRouter Pro by fol-lowing the instructions below:
1. If you have not already done so, disconnect the Ethernet cablefrom the computer that is currently connected to the DSL or cable modem.
2. Plug the RJ-45 connector from this cable into the WAN (Wide Area Network) port on the back panel of the XRouter Pro.
(See Figure 1.1)
3. Leave the other end of this Ethernet cable connected to the DSL modem or cable modem.
5
LANWAN
Reset

Connecting Computers to the XRouter Pro
When you have finished connecting the XRouter Pro to your DSL orcable modem, you can begin connecting the Macintosh or PC comput-ers in your local area network to the XRouter Pro. There are two com-mon methods for connecting the computers in your LAN to theXRouter Pro: (1) plugging computers directly into the XRouter Pro, and(2) connecting the XRouter Pro to your LAN hub.
To connect computers directly to the XRouter Pro:
(NOTE: You will need an Ethernet cable for each additional computer you plan on connecting to the XRouter Pro.)
1. Plug one RJ-45 connector (of a standard twisted-pair Ethernetcable) to the Ethernet port on your computer.
2. Plug the other end of this cable to any one of the XRouter Pro’s four LAN ports (located on the left side of the XRouter Pro’s rear panel. Refer to Figure 1.1)
3. Repeat steps 1 and 2 for each computer you wish to provide Internet access until all four XRouter Pro LAN ports are filled.
(NOTE: To connect more than four computers to the XRouterPro, simply plug additional computers into a network hub and then plug this hub into the XRouter Pro’s uplink port. Readbelow for further instructions.)
To connect an existing LAN to the XRouter Pro:
As an alternative to connecting computers directly into the XRouterPro’s LAN ports, you can also connect a pre-existing network of com-puters to the XRouter Pro by uplinking your network’s central LAN hubto the XRouter Pro’s uplink port. (See Figure 1.2)
To connect a LAN hub to the XRouter Pro’s uplink port:
1. Set the DIP switch (located on the XRouter Pro’s rear paneljust left of the No. 4 LAN port) from “straight” to “crossover” mode.
6
Easy Installation
Switch to left forcrossover mode
Switch to right fornormal mode

2. Plug one RJ-45 connector (of a standard twisted-pair Ethernetcable) to the XRouter Pro’s No. 4 LAN port.
3. Plug the other end of this Ethernet cable into an available port on the network hub.
(NOTE: Multiple network hubs can be connected to the XRouter Pro’s LAN ports No.1-3 if these hubs are equippedwith uplink ports. By daisy-chaining a series of hubs, you can connect up to 252 users to the XRouter Pro.)
Connecting the Power Supply
To provide your XRouter Pro with power:
1. Plug the power adapter of the XRouter Pro into an AC power outlet.
2. Plug the other end of the power adapter cable into the power receptacle on the rear panel of the unit.
3. The Power LED on the XRouter Pro’s front panel should be lit immediately.
LANWAN
Reset
Easy Installation
7

Software Configuration
Setting Up TCP/IP
Congratulations on installing the XRouter Pro’s hardware! In thenext pages we will show you how to enable communication betweenthe XRouter Pro and its managing and client computers.
Part of the process of enabling communication involves setting theIP addresses for the computer that will be directly managing theXRouter Pro’s operations and the client computers that will be receiv-ing Internet access from the XRouter Pro. These computers must havetheir IP addresses configured such that they share the same subnetnumbering scheme as the XRouter Pro’s default IP address. We willexplain this in more detail later in the chapter.
Configuring the IP addresses of the managing and client comput-ers is a simple process that can be performed through your computer’scontrol panel. We have provided instructions for the configurationprocess for both Macintosh and PC users. Find the appropriate set ofinstructions in the pages that follow.
Windows 95/98 TCP/IP Configuration of Computers
1. Double-click the Control Panel icon in My Computer folder.
2. From the Control Panel, double-click the Network icon. Thenetwork interface card (installed on your computer) appearsalong with the network protocol on the Configuration list.
3. Double-click TCP/IP protocol on the list. If TCP/IP does not appear on the list, you must install the TCP/IP protocol first as illustrated in step 4. Clients with TCP/IP already installed may skip to step 5.
8
Easy Installation
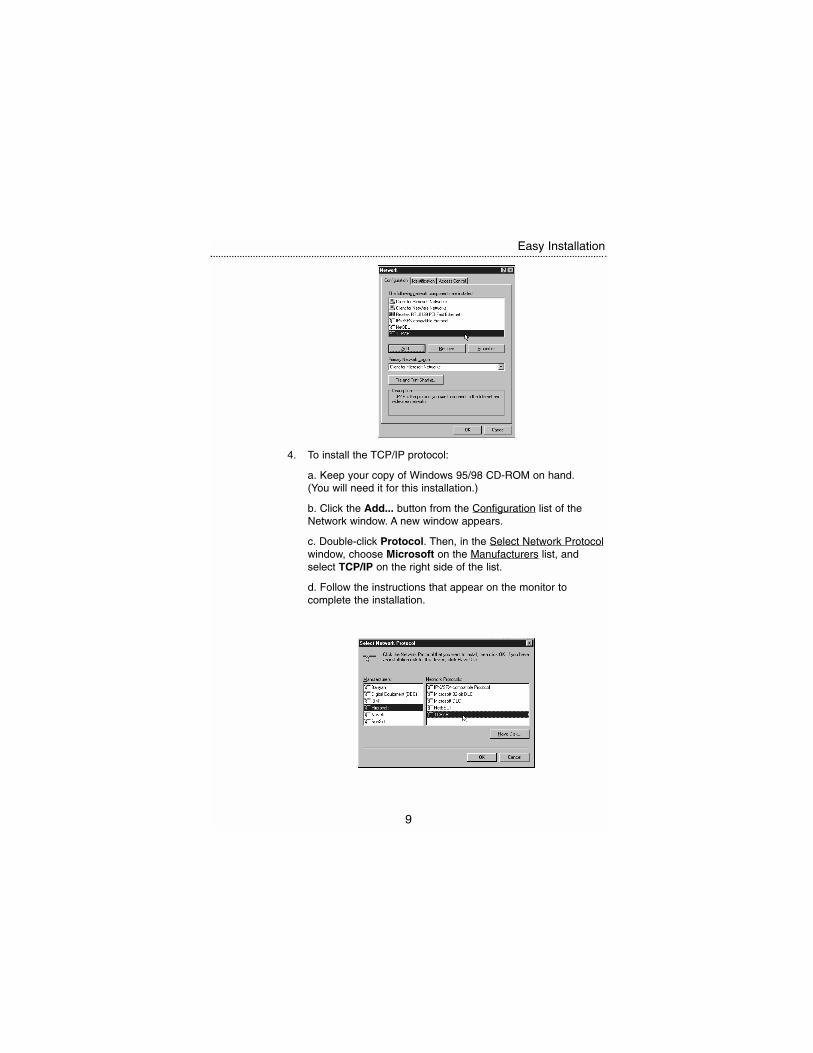
4. To install the TCP/IP protocol:
a. Keep your copy of Windows 95/98 CD-ROM on hand. (You will need it for this installation.)
b. Click the Add... button from the Configuration list of the Network window. A new window appears.
c. Double-click Protocol. Then, in the Select Network Protocolwindow, choose Microsoft on the Manufacturers list, and select TCP/IP on the right side of the list.
d. Follow the instructions that appear on the monitor to complete the installation.
Easy Installation
9

5. After double-clicking the installed TCP/IP protocol, the TCP/IPproperties window appears. To let the computer’s TCP/IPvalues be automatically assigned by the XRouter Pro’s DHCPserver:
a. Click the IP Address tab from the TCP/IP properties window.
b. Select the item Obtain IP address automatically. The XRouter Pro automatically assigns values for the computer’s Gateway, DNS Configuration, and IP Address.
6. After specifying the settings of TCP/IP click OK and then restartWindows to allow the settings to take effect.
10
Easy Installation

Assigning TCP/IP Values Manually
If you already have a DHCP server on the network, or if you prefernot using the XRouter Pro’s DHCP server to assign TCP/IP valuesautomatically, you can input these values manually.
To enter values for the managing computer’s address manually:
1. Click the IP Address tab from the TCP/IP properties window.
2. In the IP Address field enter “192.168.1.x” where x is any variable of your choice ranging from 2 - 252. Enter 255.255.255.0 in the Subnet Mask field.
(NOTE: No two computers on the same LAN can have the same IP address or an IP address conflict will occur.)
3. Click the DNS tab and enter the DNS IP addresses provided by your ISP in the DNS fields.
4. Click the Gateway tab and enter a value in the Gateway IPaddress field. The Gateway IP address value must be the same as the XRouter Pro's IP address; (the XRouter Pro’sdefault IP address is 192.168.1.1).
5. After specifying the settings of TCP/IP click OK and restartWindows to allow the settings to take effect.
Easy Installation
11

Mac OS TCP/IP Configuration
1. Open the TCP/IP control panel.
2. In the Connect via menu select the Ethernet interface that isinstalled on your computer.
3. In the Configure pull-down menu that appears, select UsingDHCP Server to allow the built-in DHCP server of the XRouterPro to assign an IP address and other TCP/IP configurationinformation to the client automatically. Do this for each clientthat needs Internet access through the XRouter Pro.
(Note: The DHCP Client ID field is not require to connect tothe XRouter Pro. It is normally used to identify computers in a DHCP network. If you desire to input the name of computer inthis field, you may. )
4. Close the TCP/IP window and save the changes.
12
Easy Installation

Assigning TCP/IP Values Manually
If you already have a DHCP server on the network, or if you prefernot using the XRouter Pro’s DHCP server to assign TCP/IP valuesautomatically, you can input these values manually.
To enter values for the managing computer’s address manually:
1. In the Connect via menu select the Ethernet interface that is installed on your computer.
2. In the Configure menu select Manually.
a. In the IP Address field, enter “192.168.1.x” where x is anyvariable of your choice ranging from 2 - 252.
(NOTE: No two computers on the same LAN can have the same IP address or an IP address conflict will occur.)
b. In the Subnet Mask field enter 255.255.255.0.
c. In the Router Address field enter 192.168.1.1, the XRouterPro’s default address.
d. In the Name Server Address field enter the DNS informationprovided by your ISP. In the Search Domains field enter the domain information provided by your ISP.
e. Close the TCP/IP window and save the changes.
Easy Installation
13

Setting Up the XRouter Pro Through a Web Browser
Now that you have finished configuring the TCP/IP addresses ofthe client and managing computers, you can begin configuring theXRouter Pro’s Internet settings. This can be done through a standardWeb browser (such as Netscape Navigator, Netscape Communicator,or Microsoft Internet Explorer).
IMPORTANT: Before following the instructions below you must findout if your ISP is providing one of following IP addressing types:
Dynamic with PPPoE - If your service is dynamic addressing withPPPoE support, you do not need to follow the instructions below.However,you will need to proceed to the “PPPoE Settings” section inthe Advanced Configuration section of this manual.
Dynamic - If your service is dynamic, you do not need to follow theinstructions below because the XRouter Pro automatically configuresthe TCP/IP information provided by your ISP and you should alreadyhave Internet access. If this is the case, you are done installing theXRouter Pro and can begin accessing the Internet from any of theclient computers.(Note: Some ISPs require the use of a MAC address (hardwareaddress of a network device) to connect to their service. If this is thecase, you will need to contact to your service provider and give themthe Public MAC address of your XRouter Pro. The Public MACaddress of your XRouter Pro can be found on the OnePage Setup ofthe XRouter Pro. To access the XRouter Pro’s OnePage Setupscreen, follow the instructions below.)
Static with PPPoE - if your ISP has provided a static IP address or ifyou would like to make further changes to the advanced features, youwill need to enter the Web-based configuration described below toconfigure the static IP address provided by your ISP. You will alsoneed to use the “PPPoE Settings” section in Advanced Configurationsection of this manual.
Static - if your ISP has provided a static IP address or if you wouldlike to make further changes to the advanced features, you will need toenter the Web-based configuration described below to configure thestatic IP address provided by your ISP .
14
Easy Installation

Enter the Web-based configuration:
1. Launch your computer’s Web browser.
(NOTE: Netscape Communicator 4.0, Internet Explorer 4.0 or above are necessary for configuring the XRouter Pro.)
2. Type the XRouter Pro's default IP address (192.168.1.1) in theURL field. This is the area where you would normally enter a Web site address such as “www.macsense.com”.
3. Press Enter. The Username and Password window appears.
4. Leave the User name field blank and type “admin“ as the default password for the XRouter Pro. You can change thepassword through a Web management page later. Click OKto enter the Web management page.
(Note: It is recommend to change the default “admin” password ofof your XRouter Pro so that others users of the network can nothave access to the web based configuration of the XRouter Pro.
This can done through “Device Admin” page of the web based configuration of the XRouter Pro. More information of about the “Device Admin” page of the XRouter Pro can be found in the Advanced Configuration section in this manual.)
Easy Installation
15

5. The OnePage Setup window appears. Note that this page isdivided into two basic sections -- Private IP Address, andPublic IP Address.
Host Name - This is an optional section. Some ISPs require a host name in order to be recognized by their systems. Your ISP should
provide this if needed for their systems.
Private IP Address - This section can be used to change the XRouter Pro’s internal IP Address that is visible to the client computerson the LAN. However, we recommend that you do not alter the defaultIP address (192.168.1.1) unless you need to make modifications to fityour network environment.
Public IP Address - This section can be used to manually enter IPaddress information provided by your ISP. You will not need to make anychanges to the default values in this section if your ISP automatically assigns IP addresses. However, if your ISP has provided you with a static IP address, you will need to enter this information by following the instructions below.
To make changes to the Public IP Address fields:
1. Select Specify an IP Address.
16
Easy Installation

2. Enter the static IP address provided by your ISP in the field located immediately to the right of “Specify an IP Address.”
3. Enter the Public Subnet Mask provided by your ISP.
4. In the Default Gateway IP Address field, enter the informationprovided by your ISP. Note that your ISP may refer to this information as a “Gateway/Router IP Address.” Also note that this number is not the same as the IP Address value that you entered in step 2.
5. Enter the DNS information provided by your ISP in the DomainName Server fields. Your ISP should provide at least two unique DNS numbers.
Easy Installation
17

ADVANCED CONFIGURATION
Please refer to the previous chapter on how to enter the WebManagement page of the XRouter Pro. The Advanced Menu containsnine sub-menus including DHCP Settings, Access Control, VirtualServer, Device Admin, Status Monitor, DMZ Host, RIP, Static Routing
and PPPoE.
DHCP Server Settings
To alter the starting IP Address range, the number of users thatare automatically assigned IP addresses on the LAN, or to disable theDHCP server, you must enter the DHCP Settings page to make
changes.
18
Advanced Configuration

Access Control
The Access Control page in the XRouter Pro can block or allowspecified web sites to the entire LAN when enabled. For example, ifyou wanted to stop users on the LAN from accessing the web site“www.yahoo.com”, you would use the Access Control page to blockURL access to this site.
To Enable or Disable the URL access feature of the XRouter Pro,select Enable or Disable for the URL Access Limit buttons.
To block access to a web site, select Block from Website Access but-tons, then type in the specific URL in one of the Site fields. For exam-ple, if access to “http://www.yahoo.com” needed to block, you wouldsimply type in www.yahoo.com into one of the Site fields. All otherweb sites would still be accessible.
To only allow access to specific web sites, select Allow from theWebsite Access buttons, then type in the specific URL in one of theSite fields. For example, if access to “http://www.yahoo.com” is need-ed, you would simply type in www.yahoo.com into one of the Sitefields. By using the Allow feature, only web sites enter into the fieldswill be allowed. All other web sites will be blocked.
19
Advanced Configuration
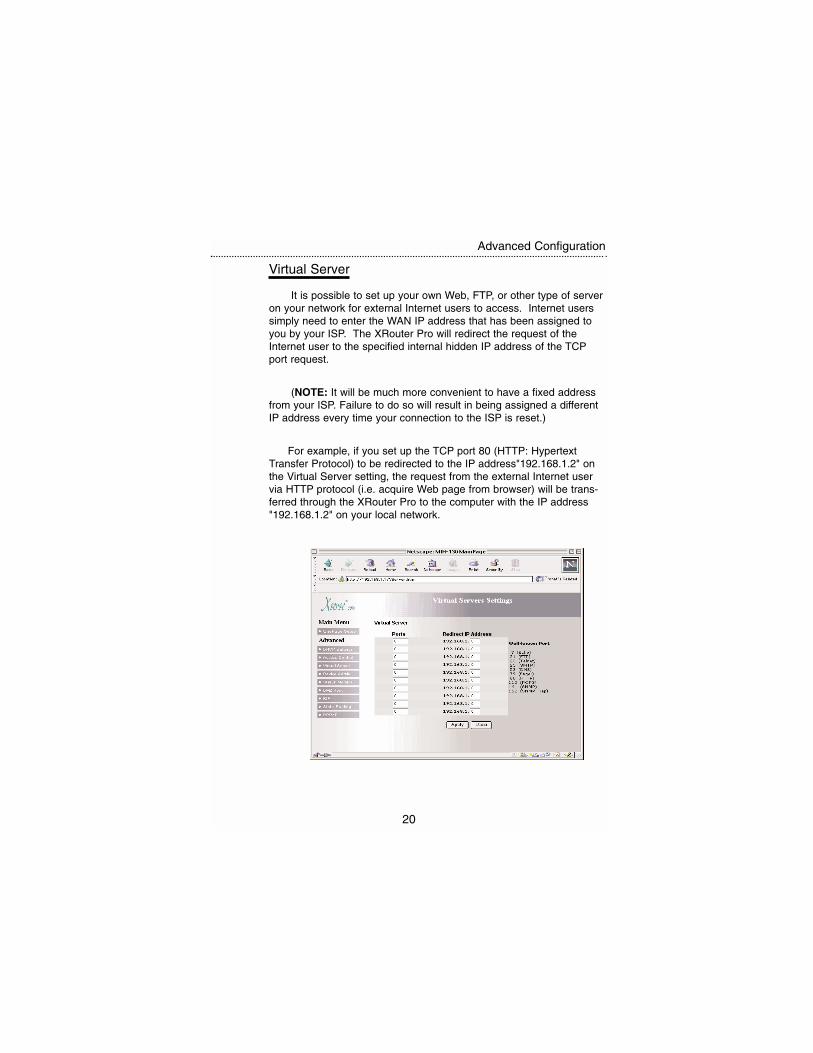
Virtual Server
It is possible to set up your own Web, FTP, or other type of serveron your network for external Internet users to access. Internet userssimply need to enter the WAN IP address that has been assigned toyou by your ISP. The XRouter Pro will redirect the request of theInternet user to the specified internal hidden IP address of the TCPport request.
(NOTE: It will be much more convenient to have a fixed addressfrom your ISP. Failure to do so will result in being assigned a differentIP address every time your connection to the ISP is reset.)
For example, if you set up the TCP port 80 (HTTP: HypertextTransfer Protocol) to be redirected to the IP address"192.168.1.2" onthe Virtual Server setting, the request from the external Internet uservia HTTP protocol (i.e. acquire Web page from browser) will be trans-ferred through the XRouter Pro to the computer with the IP address"192.168.1.2" on your local network.
20
Advanced Configuration

Device Administration
This page displays information about the firmware version of thisXRouter Pro. You can also change the password, reset the device, dis-able or enable external administrative access to the web based config-uration of the XRouter Pro.
To restore the XRouter Pro’s Factory original defaults, select Yes andthen click Apply.
To Enable or Disable External Admin access to the XRouter Pro,select Enable or Disable.
Note: It is recommend to change the default “admin” password ofof your XRouter Pro so that other users of the network can nothave access to the web based configuration of the XRouter Pro.This is especially recommend if you intend to administer the routerfrom outside your network and have External Admin featureenabled.
Status MonitorThis page provides information on the working status of the
XRouter Pro.
21
Advanced Configuration
DMZ (DeMilitarized Zone) Host
This feature will open all in/out accesses for one LAN computer.This is useful for machines that host TCP/IP services that should befully exposed to the public network. For example, Internet Gaming,NetMeeting, Timbuktu, or other types of services may require this typeof access. Please enter one LAN IP Address below. Activate this fea-ture only when required. (Entering “0” designates inactive)
RIP (Routing Information Protocol)
This feature will allow your XRouter Pro to send and receive RIPpackets to other routers on the Internet. RIP is a protocol being usedby some routers on the Internet. By sending and receiving RIP pack-ets, your XRouter Pro will learn the routes used by neighboringrouters. This can increase your XRouter Pro’s routing performance.The XRouter Pro supports RIP-1, RIP-1 compatible, and RIP-2.
RIP- 1: RIP 1 is used to exchange RIP packets with older routersthat do not support RIP 2.
RIP-1: compatible - RIP-1 compatible allows the broadcast of RIP-1 and RIP-2 multicast packets. It can can also received both types.
RIP-2: RIP-2 is used to exchange RIP packets with newer routers.When using RIP-2, you can only exchange information with RIP-2routers.
To enable RIP on the XRouter Pro, select the type of RIP youwould like to enable from the TX(transmit) and RX(receive) pull-downmenu’s.
The RIP feature is considered an advance feature, and is notrequired to use your XRouter Pro. If you are not familiar with RIP, youmay not want to enable this feature. By enabling the TX selection ofRIP, you are sending information about your router to the Internet.Sharing information about your router to the Internet may or may notbe desired
22
Advanced Configuration

Static Routing
The Static routing feature of the XRouter Pro allows the LAN tocommunicate with another router on the LAN and with their respectiveLAN segment. By setting up static routes, computers on the XRouterPro’s immediate LAN may utilize another router’s LAN and at the timeallow the other router’s LAN to utilize the XRouter’s Pro LAN. See theexample below for the setup of a Static route.
To achieve the static route in the example above, the following infor-mation would be inputted into the Static Routing page of the XRouterPro:
Static Routing: 1--Destination LAN IP: 192.168.2.0Subnet: 255.255.255.0Default Gateway: 192.168.1.3Hop Count: 1Interface: LAN
In the example above, PC-1 would have access to LAN#1, LAN#2 andthe Internet. Where as, PC-2 would have access to LAN#1 andLAN#2, but not the Internet. In order for PC-2 to have Internetaccess, a second XRouter Pro or another router with static routingcapabilities would need to be used and configured.
Static Routing is considered an advanced feature and is notrequired for basic configuration of the XRouter Pro.
Advanced Configuration
23
MIH-130
Router LAN #2192.168.2.0
LAN #1192.168.1.0
PC-2PC-1
IP: 192.168.1.99Default Gateway: 192.168.1.1
192.168.2.4
192.168.1.3
IP: 192.168.2.100Default Gateway: 192.168.2.4
Internet

PPPoE Settings
Some ISPs require the use of PPPoE to connect to their network.If your ISP uses this style of connection, you will need your input theusername and password your ISP has provided you.
Username - In this field you will need to input the username your ISP assigned you.
Password - In this field you will need to input the password yourISP assigned you.
Service Name - This field is optional and is not needed for allISPs. Input the Server Name in this field if your ISP requires it.
Connect-on-Demand - This feature allows the router to initiate aconnection with the your ISP when a Internet request is made to theXRouter Pro. For example, opening an Internet browser and request-ing a web site initiates the XRouter Pro’s Connect-on-Demand featureif enabled. We recommend having this feature enabled if you do notwish to enter the web based configuration and manually connectingevery time your need Internet access.
Disconnect when network idle - This field allows you to input theidle time required to disconnect your XRouter Pro from your ISP if no
Advanced configuration
24

activity is present. For example, if you set the idle to “10”, then theXRouter Pro will disconnect your PPP connection after 10 minutes. Touse this feature, input the time in minutes. (Note: To have the XRouterPro not disconnect automatically input “0”.)
PPPoE Management - This section provides status informationon your PPP connection and allows you manually connect and discon-nect your PPP connection. To manually connect Click Connect, and tomanually disconnect, Click Disconnect.
Please note: If you are experiencing problems connecting viaPPPoE to your ISP, please verify the that your ISPs connection isindeed working by using your computer directly with your Internet line.If you computer is working directly plugged into your Internet line,please check above settings and cables connecting your XRouter Proagain.
Firmware Upgrade
Xsense is continually improving the firmware (software pro-grammed on a PROM) in each of its products. The XRouter Pro isshipped with the most up to date software available at production time.If a firmware upgrade becomes available, it will be posted in the“Service and Support” section of our Web site. To upgrade the XRouterPro, you will need the TFTP client and the firmware file named“xxxxx.bin.” These two files can be found on our Web site atwww.macsense.com. Follow the upgrade procedure listed below.
1. Download these two files from our Web site: TFTP client, and“xxxxx.bin”
Note: These files are actually inside a single compressed folder on our web site. This means that you would only download one file. Once downloaded and decompressed, a folder will contain the needed files.
2. Double-click the TFTP client icon to run the program. Enterboth the IP address of the XRouter Pro and your password.
Advanced Configuration
25

3. Click the button beside the File Name field. A window appears.Select a location of the firmware file “xxxxx.bin”.
4. Click the Upgrade button to begin the upgrade process. Afterthe upgrade is complete, remember to reset the XRouter Proby unplugging the device and then plugging it back in.
(NOTE: Keep the firmware file name ”xxxxx.bin” unchangedor the TFTP client software won’t recognize it.)
5. If the upgrade has failed, the Ready/Test LED will be blinkingon the XRouter Pro. If this happens, try repeating steps 2 - 4of this procedure.
Advanced configuration
26

TROUBLESHOOTING
This chapter provides solutions to problems that may occur duringinstallation and operation of the XRouter Pro MIH-130.
1. The Link LED is off.
• Check that all connectors are firmly plugged-in.
• Check the power adapter making sure it is plugged into anelectrical outlet.
2. Can't connect to MIH-130 XRouter Pro via Web browser.
• Verify that the IP address 192.168.1.1 has been correctlyentered in the URL field.
• Check the network cable connection and LAN LED indicatoron the XRouter Pro.
• Check out the TCP/IP setup on your client. Type "winipcfg"on DOS prompt under Windows 95 or open the TCP/IP con-trol panel on the Mac OS platform. The client should get anIP address of 192.168.1.x (where "x" is from 1 to 252.)
4. Can't connect to MIH-130 XRouter Pro to the Internet.
• Check whether your ISP requires the use of the MACaddress of your router. Some ISPs require the MAC addressof the device your connecting to your their network. If this thecase, you will need to contact your provider and supplied themwith the correct MAC address of the router.
• If you are using a Static IP address that your ISP supplied, verify that the IP address is correct and has been correctlyentered in the URL field.
• Check your cable between the all devices.
25

APPENDIX A - Specifications
Standards Compliance
IEEE 802.3 10BASE-T and 100BASE-T
TCP/IP, DHCP, DNS
WAN Interface
One 10BASE-T RJ-45 port
LAN Interface
Four 10/100 BASE-T RJ-45 ports
Web management
Yes
LED Display
Power, Link/Activity for WAN/LAN ports, Collision/Partition for LAN
ports
Environment
Operation Temperature 0~45°C (32~113°F)
Storage Temperature -20~70°C (-4~158°F)
Humidity 0~90%
Dimensions
LxWxH (mm) 142x236x46
LxWxH (in.) 5.59x9.29x1.81
Power
AC9V, 1A
Certifications
EMI/EMC - FCC Class B / CE Mark Class A / VCCI Class 1
Safety - CUL(UL&CSA)/LVD/TÜV
28
Appendix A

APPENDIX B - Hardware Description
Power green Indicates that there is power to the unit.
Ready/Test red Flashes during boot up
WAN Port
Link green Indicates proper a connection with theInternet Ethernet connection.
Activity orange Flashing LED indicates that data packets areflowing through the WAN port.
LAN Ports
Link/ACT green Solid LED indicates a proper 100BaseT con-nection with a computer and a flashing LEDindicates that there is activity on this Ethernetport
orange Solid LED indicates a proper 10BaseT con-nection with a computer and a flashing LEDindicates that there is activity on this Ethernetport
Full/Col orange Indicates that the connection is Full Duplex
red Indicates that there is severe collision at thisport and being isolated from the other portstemporarily.
29
Appendix B

Rear Panel Description
LAN Ethernet Ports - Four 10/100BASE-T Ethernet network (RJ-45) ports used for linking hub/computer in a Local Area Network to theXRouter Pro.
WAN Ethernet Port - One Wide Area Network port for connectingthe XRouter Pro to the Internet via a cable or DSL modem.
Reset Button - Used for resetting the XRouter Pro’s IP Addressinformation and user password to the factory default settings.
5VDC Power Adapter Receptacle - Plug the power adapter cableinto this port to supply power to the XRouter Pro unit.
Uplink Switch - Used to determine the configuration of theXRouter Pro’s LAN port No. 4. Choose either parallel (normal) for con-necting LAN computers to the XRouter Pro or crossover mode (uplink)for daisy-chaining a series of hubs to the XRouter Pro.
30
Appendix B
LANWAN
Reset

APPENDIX C - Glossary
DHCP
DHCP is a protocol for automatic IP configuration. Client sidecomputer can get one IP from DHCP server automatically. UsingDHCP can save the effort of setting IP for every LAN computers.
Dynamic IP address
A dynamic IP address is an IP address that is given out automati-cally from a DHCP Server to client computers or routers on a LAN orWAN.
Domain Name
A name that identifies one or more IP addresses. For exam-ple, the domain name "microsoft.com" represents many IP addresses.Domain names are used in URLs to identify particular Web pages. Forexample, in the URL http://www.pcwebopedia.com/index.html, thedomain name is pcwebopedia.com.
IEEE
Abbreviation of Institute of Electrical and ElectronicsEngineers, pronounced "I-triple-E". Founded in 1884, the IEEE is anorganization composed of engineers, scientists, and students. TheIEEE is best known for developing standards for the computer andelectronics industry. In particular, the IEEE 802 standards for localarea networks are widely adopted.
Internet
A global network connecting millions computers. As of 1998,the Internet has more than 100 million users worldwide, and thatnumber is growing rapidly. More than 100 countries are linked intoexchanges of data, news and opinions.
31
Appendix C
IP Address
An identifier for a computer or device on a TCP/IP network.Networks using the TCP/IP protocol route messages based on the IPaddress of the destination. The format of an IP address is a 32-bitnumeric address written as four numbers separated by periods. Eachnumber's range is from 0 to 255. For example, 1.160.10.240 could bea legal IP address.
ISP
Short for Internet Service Provider, a company that providesaccess to the Internet. For a monthly fee, the service provider givesyou a software package, username, password and access phonenumber. Equipped with a modem, you can then log on to the Internetand browse the World Wide Web and USENET, and send and receivee-mail.
Local Area Network (LAN)
A computer network that spans a relatively small area. MostLANs are confined to a single building or group of buildings. However,one LAN can be connected to other LANs over any distance viatelephone lines and radio waves. A system of LANs connected in thisway is called a wide-area network (WAN)
MAC Address
Short for Media Access Control address, a hardware addressthat uniquely identifies each node of a network. In IEEE 802 networks,the Data Link Control (DLC) layer of the OSI Reference Model isdivided into two sublayers: the Logical Link Control (LLC) layer and theMedia Access Control (MAC) layer. The MAC layer communicatedirectly with the network media. Consequently, each different type ofnetwork media requires a different MAC layer.
PPPoE (Point to Point Protocol over Ethernet)
PPPoE is Point to Point Protocol that uses Ethernet to authenti-cate and connect a user’s computer or router to the ISPs network.
32
Appendix C

Static IP address
A static IP address is an IP address that does not change and ismanually set in client or computer router in a LAN or WAN.
TCP/IP
Acronym for Transmission Control Protocol/Internet Protocol,the suite of communications protocols used to connect hosts on theInternet.
33
Appendix C