user manual ims clientconnect super user clientconnect – super user 4 disclaimer data used in this...
TRANSCRIPT
User Manual
IMS ClientConnect – Super User
Updated: 3/26/2013

IMS ClientConnect – Super User
2
Table of Contents
1. IMS ClientConnect Overview .................................................................................................................................. 5
2. Login Screen .............................................................................................................................................................. 5
2.1 Logging in to IMS ClientConnect....................................................................................................................... 5
3. Top, Navigation, and Center Panels ........................................................................................................................ 8
3.1 Top Panel ............................................................................................................................................................ 9
3.1.1 Viewing/Editing your Profile ...................................................................................................................... 10
3.2 Navigation Panel ............................................................................................................................................... 13
3.3 Center/Main Panel ............................................................................................................................................ 13
4. Home Screen ............................................................................................................................................................ 14
5. New Client Registration ......................................................................................................................................... 15
5.1 Welcome Packet................................................................................................................................................ 16
5.1.1 Welcome to IMS .......................................................................................................................................... 16
5.1.2 Implementation Process ............................................................................................................................... 16
5.1.3 PM and Go-Live .......................................................................................................................................... 18
5.1.4 Client Questionnaire .................................................................................................................................... 18
5.1.5 Hardware and Network Questionnaire ........................................................................................................ 19
5.1.6 Hardware and Network Details ................................................................................................................... 20
5.2 Additional Required Information ...................................................................................................................... 20
5.2.1 Office Information Gathering ...................................................................................................................... 20
5.2.2 Data Conversion .......................................................................................................................................... 20
5.2.3 Clearing House Identification ...................................................................................................................... 20
6. Employee Registration............................................................................................................................................ 21
6.1 Adding/Deleting/Activating/Deactivating an Employee .................................................................................. 21
6.1.1 Adding an Employee ................................................................................................................................... 21
6.1.2 Deleting an Employee ................................................................................................................................. 24
6.1.3 Activating/Deactivating an Employee ......................................................................................................... 25
6.2 Editing Employee Details ................................................................................................................................. 26
6.2.1 Editing Employee Details from the Employee Registration Main Screen .................................................. 26
6.2.2 Editing Employee Details from the Update Employee Screen .................................................................... 28
6.3 Customizing IMS Role CBT ............................................................................................................................. 29
7. IMS University ........................................................................................................................................................ 31
7.1 Computer-Based Training ................................................................................................................................. 31
7.2 IMS Webinars ................................................................................................................................................... 32
7.3 IMS User Library .............................................................................................................................................. 33
8. Training Schedule ................................................................................................................................................... 34
9. Online Support ........................................................................................................................................................ 37
9.1 Contact Live Agent ........................................................................................................................................... 37
9.2 Submit Ticket .................................................................................................................................................... 38
10. Latest Releases ........................................................................................................................................................ 38
10.1 Request Update ................................................................................................................................................. 38

IMS ClientConnect – Super User
3
10.2 Download Release Notes .................................................................................................................................. 39
11. News and Events ..................................................................................................................................................... 40
11.1 Company and Industry News ............................................................................................................................ 40
11.2 Newsletter ......................................................................................................................................................... 40
12. Billing and Coding .................................................................................................................................................. 41
12.1 Clearinghouse Options ...................................................................................................................................... 41
12.2 ICD-10 Updates ................................................................................................................................................ 41
12.3 ANSI 5010 ........................................................................................................................................................ 41
13. Incentives ................................................................................................................................................................. 41
14. Feedback .................................................................................................................................................................. 41
14.1 Client Satisfaction Survey................................................................................................................................. 41
15. Sign Out ................................................................................................................................................................... 42

IMS ClientConnect – Super User
4
Disclaimer
Data used in this document such as patient’s name, provider’s name, address or similar are all test data. Resemblance to
any data, actual persons either living or dead, is purely coincidental.

IMS ClientConnect – Super User
5
1. IMS ClientConnect Overview
IMS ClientConnect helps you achieve your health care organization’s goals by allowing users to share knowledge,
explore ideas, and access tools and information. Through IMS ClientConnect, you can watch and choose from a wide
selection of computer-based training (CBT) videos, schedule Ongoing Training, access Online Support with Live
Chat, and keep yourself updated with Current and Archived Newsletters for product and industry news and events in
your local area. Billing and Coding tools, news and updates, Industry Announcements, and Shared Tips are also made
available through this site.
This manual will allow you to learn how to navigate around IMS ClientConnect; register a new client and/or
employee; access CBT videos and IMS webinars through IMS University; schedule online training; contact online
support; request the latest IMS update and download release notes; take note of current news and events; use the
billing and coding tools; familiarize with the different incentives available; and provide client feedback.
2. Login Screen
2.1 Logging in to IMS ClientConnect
Go to the site by typing in www.imsclientconnect.com. You will be asked to enter your Username and
Password, which will be provided to you by the Project Manager. Click the Sign In button after entering your
login credentials or press the Enter key.
If you have trouble accessing your account, you can click on the Can’t Access Your Account? link at the
bottom part of the screen.
Click here if you
are having trouble
signing in to your
account.
Click Sign In
after entering
your Username
and Password.
IMS ClientConnect – Super User
6
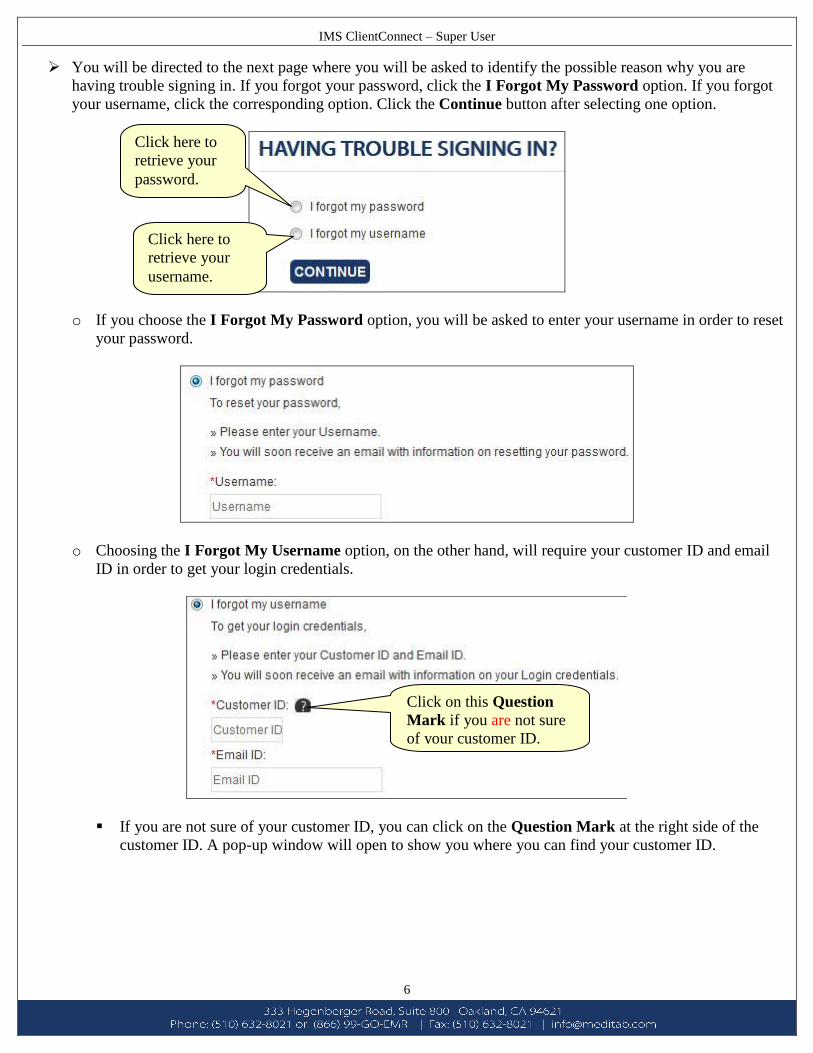
You will be directed to the next page where you will be asked to identify the possible reason why you are
having trouble signing in. If you forgot your password, click the I Forgot My Password option. If you forgot
your username, click the corresponding option. Click the Continue button after selecting one option.
o If you choose the I Forgot My Password option, you will be asked to enter your username in order to reset
your password.
o Choosing the I Forgot My Username option, on the other hand, will require your customer ID and email
ID in order to get your login credentials.
If you are not sure of your customer ID, you can click on the Question Mark at the right side of the
customer ID. A pop-up window will open to show you where you can find your customer ID.
Click here to
retrieve your
password.
Click here to
retrieve your
username.
Click on this Question
Mark if you are not sure
of your customer ID.

IMS ClientConnect – Super User
7
o After entering all the necessary information, click the Continue button. You will soon receive an email with
your login credentials.
You know you have successfully logged in because you will be taken to the Home screen of IMS
ClientConnect.

IMS ClientConnect – Super User
8
3. Top, Navigation, and Center Panels
These are the different parts of the IMS ClientConnect that you will be encountering as you navigate around the
site. These are permanent and fixed which means you will always be able to view and access these regardless of
the screen and section you are in.
Top Panel
Left Navigation
Panel
Center/Main
Panel

IMS ClientConnect – Super User
9
3.1 Top Panel
Your username will be displayed at the topmost part of the screen. Click on the dropdown button beside your
username to display more information such as customer ID, customer name, project manager, and alternate
contact. Note that this panel will always be displayed regardless of the screen you are in.
At the rightmost corner of the top panel of the screen is the Logout button. Click on the button to log out of
your account.
Click on the
dropdown button
to display more
information.

IMS ClientConnect – Super User
10
3.1.1 Viewing/Editing your Profile
You can view/edit your profile anytime regardless of the screen you are in. Click the dropdown button beside
your username as shown previously, and click on the My Profile button.

IMS ClientConnect – Super User
11
The My Profile window opens, displaying your profile information such as your first and last name, phone
number, email, username, office, job title, time zone, and computer literacy.
o First and Last Name – Refers to your first and last name.
o Phone and Email – Displays your given phone number and email address.
o Username – Refers to your username. This is the same username that is used to login to your account.
o Office – Shows your primary office.
o Job Title – Refers to your position in the office/clinic.
o Time Zone – Identifies which time zone you belong to.
o Computer Literacy – Shows your level of computer literacy. Click on the dropdown button to view the
specific skills. Select your skills by checking the box beside each skill.
Click on this link
to change your
password.
To change any information,
just click on the field you
want to change and
add/edit/delete information
accordingly.

IMS ClientConnect – Super User
12
o Receive CBT usage report via e-mail – If you are an administrator, this checkbox will be viewable in your
profile. You can check this checkbox to get a complete weekly CBT usage report of your employees in your
inbox.
To edit your profile, simply click on the field you want to change, and edit the information.
To change your password, click the Change Password link at the upper right corner of the My Profile screen.
This will open a new window that will allow you to change your password as desired.
o If you want to have your password sent to your email, check the box for Send Password via Email.
o Click the Change Password button to confirm changes.
o To return to the My Profile screen, just click on Back at the upper right corner of the window.
Back at the My Profile screen, click the Save button to save any changes.

IMS ClientConnect – Super User
13
3.2 Navigation Panel
At the left part of the screen is the Navigation Panel through which the different sections of the IMS
ClientConnect can be accessed. Like the top panel, this will always be displayed regardless of the screen you
are in.
Click on the various tabs to move from one section to another.
3.3 Center/Main Panel
The main information related to a particular section will be displayed at the center part of the screen. From here,
you can view and access topics that are related to the master screen/section.
The screen which you
are currently in will be
highlighted in black.
Click on the tabs to
access the different
sections of the site.

IMS ClientConnect – Super User
14
4. Home Screen The Home screen displays a brief introduction and overview of the IMS ClientConnect. It also provides quick
access to IMS Alerts, Company and Industry News, and other links. The IMS Alerts are also displayed right at
the top of the Home screen. This is to give an easy access to the desired news from any place in the website.
After logging in to your account, the site defaults to the Home screen.
Brief introduction or
overview of IMS
ClientConnect.
Quick access to IMS
Alerts, Company and
Industry News, and
other links.

IMS ClientConnect – Super User
15
5. New Client Registration
Client refers to the office or clinic that will be using the IMS software. To register a new client, click the New
Client Registration tab on the Navigation Panel.
o Once you have been registered, the tab no longer appears in the Navigation Panel. However, if you
wish to continue using the tab and enjoy benefits of the information available out there, you can contact
your Account Manager or Project Manager.

IMS ClientConnect – Super User
16
5.1 Welcome Packet
5.1.1 Welcome to IMS
This section provides a brief welcome note for the client. The progress bar at the top of the screen fills up as
you complete the different sections under New Client Registration.
If you want a hard copy of the welcome note, click on the Print icon at the upper right corner of the screen to
print the document.
Click the Continue button to move to the next screen. You can also manually select a section by clicking on it
on the Navigation Panel.
5.1.2 Implementation Process
This section provides an overview of the IMS implementation process and the basic guidelines and
requirements. It also serves as a user agreement.
At the top part of the screen, you have the option to edit and print the document by clicking on the
corresponding icon. These icons will be displayed in most sections.
Button
Click to
move to the
next screen.
Edit icon
Progress Bar

IMS ClientConnect – Super User
17
Click the Edit icon to go into Edit mode. Please note that you will need to click the Edit icon first before you
can make any changes to the document. Otherwise, the site will not allow you to enter information on any of the
fields.
You can choose to agree or disagree with the terms and conditions set forth by selecting the appropriate
response at the bottom part of the screen.
If you agree with the set terms and conditions, you will be asked to type your name in the provided field. If you
choose to disagree, you will be directed to a screen that says you have chosen not to continue and an email will
be sent automatically to the project manager and salesperson.
At the lowest part of the screen is a navigational toolbar. This toolbar will only show up if you are in Edit mode.
o The Back button allows you return to the previous screen.
o The Save & Continue button enables you to save the changes made to the document and move to the next
screen.
o The Skip & Continue button gives you the option to skip this section of the site and move on to the next
screen.
Choosing this option will always prompt a warning asking you if you want to continue. Click OK to
continue or Cancel to return to the previous screen.
Print icon

IMS ClientConnect – Super User
18
5.1.3 PM and Go-Live
This section provides a summary of the available training hours and allows you to identify the Clinic Project
Manager. It also enables you to put in a request for a Go Live Date.
Click the Edit icon to enter Edit mode.
Type in the required information on the provided fields for Clinic Project Manager and Date. You can type in
the date directly on the field or click on the Calendar icon to the right side of the field to select the date.
As before, choosing the I Agree option requires you to enter your name.
Click on the Back, Save & Continue, or Skip & Continue button as the need calls for it.
5.1.4 Client Questionnaire
This section allows you to enter office information as well as upload any documents in electronic format. By
completing this section, you will ensure a smoother implementation process.
To enter office details, click on the Edit icon to enter Edit mode. Type in the information under each of the
headers. Scroll to the right for more headers.
Enter information in
the provided fields.

IMS ClientConnect – Super User
19
Similarly, enter the details of the documents in the provided table by typing in the information under their
respective headers.
Choose the file you want to upload by clicking on the Browse button. Delete said file by clicking on the red X
button.
To add more offices or documents, click on the Add More option.
Click on the Back, Save & Continue, or Skip & Continue button, whichever is applicable.
5.1.5 Hardware and Network Questionnaire
This section collects your hardware information particularly on printers, scanners, patient pictures/webcam
details, and network connectivity among others.
To fill in the questionnaire, click on the Edit icon and enter the necessary details accordingly.
Refers to the name of
your office(s).
Click here to add
more offices.
Click here to
choose the file
you want to
upload.
Click here to
delete a file.

IMS ClientConnect – Super User
20
5.1.6 Hardware and Network Details
This section provides information on the specific hardware, network and other technical requirements, and
guidelines for IMS.
Click the Back button to return to the previous screen or the Submit button to submit all the gathered
information including those from the previous sections.
5.2 Additional Required Information
5.2.1 Office Information Gathering
This section allows you to enter additional information about your office. You can choose to Save & Continue
or Skip & Continue by clicking on the respective buttons.
You also have the option to print this section by clicking on the Print icon at the upper right corner of the
screen. This icon will be displayed in the succeeding sections as well.
5.2.2 Data Conversion
This section gathers information on data conversion. Click on the Back, Save & Continue or Skip & Continue
button, whichever is applicable.
5.2.3 Clearing House Identification
This section contains pertinent questions about your chosen clearing house, if any. Click on the Back button to
return to the previous screen or the Submit button to submit all entered information including those from the
previous sections.

IMS ClientConnect – Super User
21
6. Employee Registration
IMS ClientConnect allows you to register all employees who will be using IMS ClientConnect and set their
individual account settings.
6.1 Adding/Deleting/Activating/Deactivating an Employee
6.1.1 Adding an Employee
To register an employee, click on the Add button.
You will be directed to the New Employee screen, where you will be asked to enter information about the
employee.

IMS ClientConnect – Super User
22
o First and Last Name – This is where you will enter the employee’s first and last name.
o Phone and Email – This is where you will place the employee’s contact number and email address,
respectively.
o Username – This will be the name that the employee will use to login to IMS ClientConnect. This is
automatically populated as the email of the employee. If you want to change it, simply click on the field and
edit the information.
If you do not make a username, “User Not Created” will be displayed under the Status column in the
Employee Registration screen. Under the Username column, there will be a link to “Create User.”
Clicking on this link will take you the Update Employee screen, from which you can create the
employee’s username.
Click on this link to
go to the Update
Employee screen to
create the username.
Signifies that no
username has
been created.

IMS ClientConnect – Super User
23
o Office – Identifies the primary office the employee belongs to.
o Job Title – This is the employee’s designated position in the company. If the job title is not in the list,
choose “Other” and type in the job title in the provided field.
o Time Zone – Identifies to which time zone the employee belongs to.
o Computer Literacy – Identifies the employee’s level of computer literacy. Select the computer skills of the
employee by checking the respective boxes.
o Admin User – Specifies whether the employee will be given admin rights or not. A user with admin rights
has more user privileges. Choosing Yes will make the employee an admin user.
o IMS Role – Identifies the role of the employee in IMS. Select the appropriate role by checking the box
beside it.
o Status – Indicates whether the account will be active or inactive. Active accounts are accounts that can
already be used while inactive accounts are those that are not yet usable.
o Allow CBT Request – Checking this box will allow the employee to make CBT requests should he or she
wish to view CBT videos which are not assigned to his or her role.
IMS ClientConnect – Super User
24
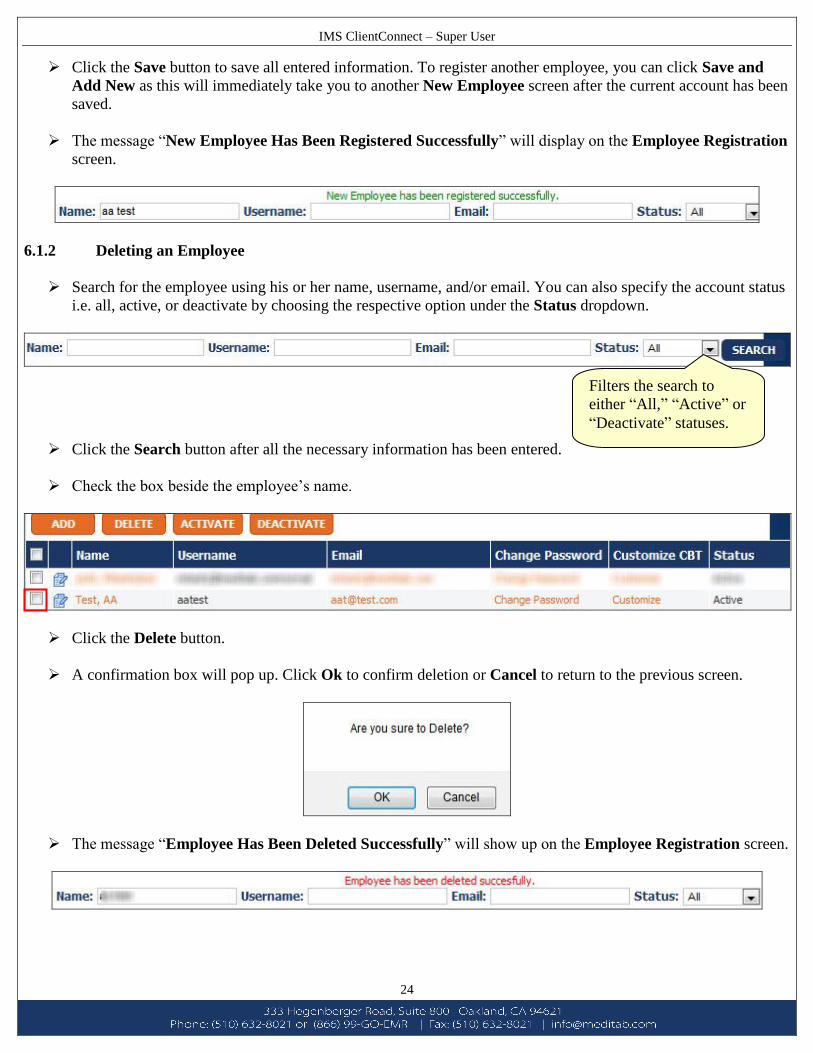
Click the Save button to save all entered information. To register another employee, you can click Save and
Add New as this will immediately take you to another New Employee screen after the current account has been
saved.
The message “New Employee Has Been Registered Successfully” will display on the Employee Registration
screen.
6.1.2 Deleting an Employee
Search for the employee using his or her name, username, and/or email. You can also specify the account status
i.e. all, active, or deactivate by choosing the respective option under the Status dropdown.
Click the Search button after all the necessary information has been entered.
Check the box beside the employee’s name.
Click the Delete button.
A confirmation box will pop up. Click Ok to confirm deletion or Cancel to return to the previous screen.
The message “Employee Has Been Deleted Successfully” will show up on the Employee Registration screen.
Filters the search to
either “All,” “Active” or
“Deactivate” statuses.

IMS ClientConnect – Super User
25
6.1.3 Activating/Deactivating an Employee
You can activate or deactivate an employee’s account. Activating an account ensures that the employee can use
and access his or her account. Deactivating an account renders an account inactive and unusable. You can opt to
deactivate rather than delete an account for employees who are on temporary leave so you will not have to
create an account all over again.
Search for the employee as previously shown.
Check the box beside the employee’s name.
Click on the Activate or Deactivate button.
A pop-up window asking for confirmation will appear. Click Ok to confirm or Cancel to return to the previous
screen.
If the employee’s account has been successfully deactivated, the status will show as Inactive.
On the other hand, if it has been successfully activated, the status will show as Active.
Click Activate to make
the account active and
usable.
Click Deactivate to make
the account inactive and
unusable.

IMS ClientConnect – Super User
26
The message “Record(s) Status Changed Successfully” will be displayed on the Employee Registration
screen.
6.2 Editing Employee Details
You can still edit the employee details after an employee has been registered.
6.2.1 Editing Employee Details from the Employee Registration Main Screen
Search for the employee using his or her name, username, and/or email. Click the Search button after all the
necessary information has been entered.
From this screen, you can see the patient’s name, username, email, and status. You can also change your
employee’s password and customize the CBTs.
To change your employee’s password, click on the Change Password link under the column of the same name.
o The Change Password screen will come up. Enter the new password in the New Password field and type it
again in the Confirm Password field.
o Please note that IMS ClientConnect requires your password to have at least five characters. Otherwise, a
warning message will pop up. Just click OK and enter a new password should this happen.

IMS ClientConnect – Super User
27
o A message will appear in the box, “Password should be atleast 5 characters long.”
o You also have the option to have your password sent via email by checking the box beside it.
o Click the Change Password button to confirm and save changes.
You can customize the CBT videos your employee can access by clicking on the Customize link under the
Customize CBT column. By default, the CBT videos your employee can view are only those that are related to
his or her IMS role.
o You will be directed to the CBT Customize for Employee screen. Expand each category by clicking on it.
o Select the specific modules the employee can have access to by checking the box beside each particular
module.
o Click on the Save button to save changes.

IMS ClientConnect – Super User
28
6.2.2 Editing Employee Details from the Update Employee Screen
Search for the employee as previously shown.
Click on the Edit Employee Detail icon to the left of the employee’s name or just click on the employee’s
name itself.
You will be directed to the Update Employee screen where you will find basically the same fields that are in
the New Employee screen. Edit the information as you deem fit by clicking on its respective field.
You can change the employee’s password from this screen by clicking on the Change Password link at the
upper part of the screen.
o The Change Password screen will come up. Change the password accordingly.
You can also customize the CBT videos your employee can access by clicking on the Customize CBT link. By
default, the CBT videos your employee can view are only those that are related to his or her IMS role.

IMS ClientConnect – Super User
29
o You will be directed to the CBT Customize For Employee screen. Customize the CBT videos for each
employee by checking the box for each module you want your employee to have access to. Click on the
Save button to save changes.
6.3 Customizing IMS Role CBT
You can customize the CBT videos specific to each IMS role through the Customizing IMS Role CBT option.
Click on the Customize IMS Role CBT button.
The CBT Customize for IMS Role screen will come up.
1. Click on the
category.

IMS ClientConnect – Super User
30
Expand each category by clicking on it.
Select the modules you want to include under each category by checking the box beside it.
Click on the module to view the CBT videos under it. Select the videos you want to include by checking the box
beside it.
o For some categories (Front Desk and Billing End and Super User), you have the option to add more videos
to the Getting Started module by clicking on the Add More Computer Based Training Under Getting
Started link.
The “Add More..” link will be available for those CBTs which are common between multiple IMS
roles.
Do the same for the other categories and modules.
Click the Save button to save changes.
2. View all the modules
under the specific role.

IMS ClientConnect – Super User
31
7. IMS University IMS University is designed to empower you with the knowledge and expertise required to quickly become
proficient with IMS products. It provides you access to CBTs or computer-based training videos, webinars, and
user manuals.
7.1 Computer-Based Training
IMS CBTs are tutorial videos for users of all levels. They are available 24/7, thus allowing you to learn at your
own pace.
This section shows a list of IMS roles as CBT categories.
Click a category to display the modules under it.
Each module has a progress bar that fills up as you complete the module.
Click a module to view the video topics under it.
A video topic is listed with its version, duration, CBT published date, view status, quiz status, and Play button.
o A Version would signify what IMS version the video topic belongs to.
o If the video has not yet been viewed, a “Pending” status will be displayed under View Status. If you have
started watching it, “In Progress” will be shown. On the other hand, if you have finished watching it, the
view status will be “Done.”
o Quiz Status keeps track of whether you have completed a particular quiz or not.
Please note that you have to disable pop-up blockers to play a CBT. Click the Play button to open the video
screen.
Progress Bar
Category
Modules

IMS ClientConnect – Super User
32
Close the screen by clicking the Exit icon in the lower right corner.
You can also search for specific CBT topics by using the Search CBT feature.
To view a report on all quizzes for employees, click the CBT Quiz Report link.
o The quiz report shows a summary report and a detailed report of employee quiz attempts. Scroll down to
view the rest of the document.
o To view the summary report of a particular employee, simply click on the employee’s name.
Click Close in the upper right corner to close the window.
7.2 IMS Webinars
IMS webinars are demonstrations and discussions of the many features and benefits of IMS offered to you for
free. Each upcoming session is offered twice to accommodate Eastern and Pacific time zones.
This section shows schedules of past and upcoming webinars.

IMS ClientConnect – Super User
33
Register for an upcoming webinar by clicking the corresponding Register Now link.
View a past webinar by clicking on the Show Past Webinar Details link.
7.3 IMS User Library
Access the IMS product reference information you want and need with only a few clicks via the new IMS
Library. This comprehensive library provides a complete reference solution for your information needs.
o You can quickly access the time saving documents like: User Guides, User Manuals, etc.
o Click a category to view set of product reference documents listed under it.
o Click the icon to view the document on the browser or click the icon to download the document onto
your system. The choice is yours.
o Note: Currently, the items listed under the System Requirements category are the ones which can also be
viewable at the following path: New Client Registration->Welcome Packet->Hardware and Network
Details.
Category
Documents

IMS ClientConnect – Super User
34
8. Training Schedule
IMS offers a flexible and comprehensive curriculum of online courses. The training plan can also be customized
based on your users’ specific needs and skill sets. This section enables you to keep track of the total training
hours available and the number of training hours used. It also shows any scheduled training per module.
The table below shows the total number of training hours available and the number of hours used per type of
training.
You can also view all the available training categories and each of their modules. To view the expanded list of
each training category, just click on the Plus Sign icon to the left of the category name. You can also expand all
the training categories by clicking the Click Here To See Expanded List Of All The Training Categories
link. The Show All Training(s) link, on the other hand, will allow you to see all available trainings.
If the topic will have a related document(s), the Document(s) icon will be displayed. Likewise, if there is an
available homework for that topic, the Homework icon will also be displayed.
Expand the module by clicking on it to display more information such as date, time, purpose, and duration of
the training, name of the trainer, meeting ID, and status.
Click on the Plus
Sign icon to expand
the category list
individually.
Click here to
expand all the
categories.
Document(s)
icon Homework icon
Click here to
view all training
sessions.

IMS ClientConnect – Super User
35
o Date – Indicates the date of the training.
o Time – Indicates the time of the training.
o Purpose – Identifies the training subject.
o Duration – Provides the estimated length of the training.
o To Be Given – Identifies who will be handling the training.
o Meeting ID – Refers to the ID that will be used for the GoToMeeting. Clicking on this link will take you to
the scheduled GoToMeeting.
o Status – Pertains to the status of the scheduled training session.
o Other Details icon – Provides other information. The GoToMeeting details are displayed here. You can
also click on the link so you will be taken directly to the scheduled GoToMeeting.
1. Click on the
module.
2. View the
training details.

IMS ClientConnect – Super User
36
o Training Outline icon – This will display the training outline.
This section also allows you to identify all the topics you have already covered. Click Yes to indicate
that the topic has already been discussed and No to indicate otherwise.
Click the Submit button at the bottom of the screen to submit entered information. Click Close in the
upper right corner of the screen or press the Esc key to return to the Training Schedule screen.

IMS ClientConnect – Super User
37
o Video(s) icon – Provides links to related videos.
9. Online Support
This section provides you access to the IMS customer support team.
9.1 Contact Live Agent
If you have already gone live, you can talk with an IMS support agent online through the Contact Live Agent
feature.
o To get your queries addressed, you will be required to enter some information. Select the agent number,
choose your problem type, and type in your query in the Question box. Click the Connect button and you
will be speaking to one of our live agents.
Type question
here then click
Connect.
Select the
Problem Type.
Select the Agent.

IMS ClientConnect – Super User
38
9.2 Submit Ticket
If you have not gone live yet, you can contact the IMS Support Department through the Submit Ticket feature.
To contact Support, type your query in the Question box and then click the Submit Ticket button.
10. Latest Releases
10.1 Request Update
This section allows you to fill a form requesting for the latest IMS release.
Fill in the required fields and then click the Submit button.
Type question here
then click Submit
Ticket.

IMS ClientConnect – Super User
39
10.2 Download Release Notes
This section allows you to download documents that detail changes or enhancements made to an IMS module or
version.
Fill in the required fields and click the Search button.
Click the Download Release Notes button to download the release notes.

IMS ClientConnect – Super User
40
11. News and Events
11.1 Company and Industry News
This section shows a list of news article titles. To read a synopsis of an article, hover your cursor over it.
Click the Read More button to open a new tab and read the full article.
11.2 Newsletter
This section provides access to the IMS newsletter archive.
Click a link to open a tab and read the corresponding newsletter.

IMS ClientConnect – Super User
41
12. Billing and Coding
12.1 Clearinghouse Options
This section shows a list of IMS-integrated clearinghouses. Click on the corresponding url link for further
information.
12.2 ICD-10 Updates
This section at present shows a countdown to the ICD-10 release date. Upon release, this page will show ICD-
10 information and updates.
12.3 ANSI 5010
The ANSI 5010 page shows information on HIPAA 5010 readiness.
13. Incentives
This section gives you information on the EHR incentive program, also known as Meaningful Use; the E-Rx or
E-Prescription incentive program; the PQRI or PQRS incentive program; and Meditab's Refer-a-Friend
program.
14. Feedback
14.1 Client Satisfaction Survey
This section allows you to complete a client satisfaction survey.
After completing the survey, click the Send button.

IMS ClientConnect – Super User
42
15. Sign Out Click this button which is located at the top right corner of the screen, to exit from the website.
The IMS ClientConnect Feedback form would pop-up. Please fill in the questionnaire to help us know what
you think about the website, so we can serve you better.