umbraco – the simple, flexible and friendly asp.net … · umbraco – the simple, flexible and...
TRANSCRIPT
UMBRACO – The Simple, Flexible and Friendly ASP.NET CMS
Umbraco
1) Download Umbraco package from the Umbraco website http://umbraco.codeplex.com/, go to downloads and get the latest version you need.
2) Give full permission to the Umbraco folder.
3) Set up the Umbraco website in IIS. [ Umbraco version 4.7 needs atleast IIS6.0 and VS3.5 ]
4) The path is c:\inetpub\wwwroot\umbracoweb (rename the “build” folder to Umbraco or some other Here we will have the default.aspx and web.config file.)
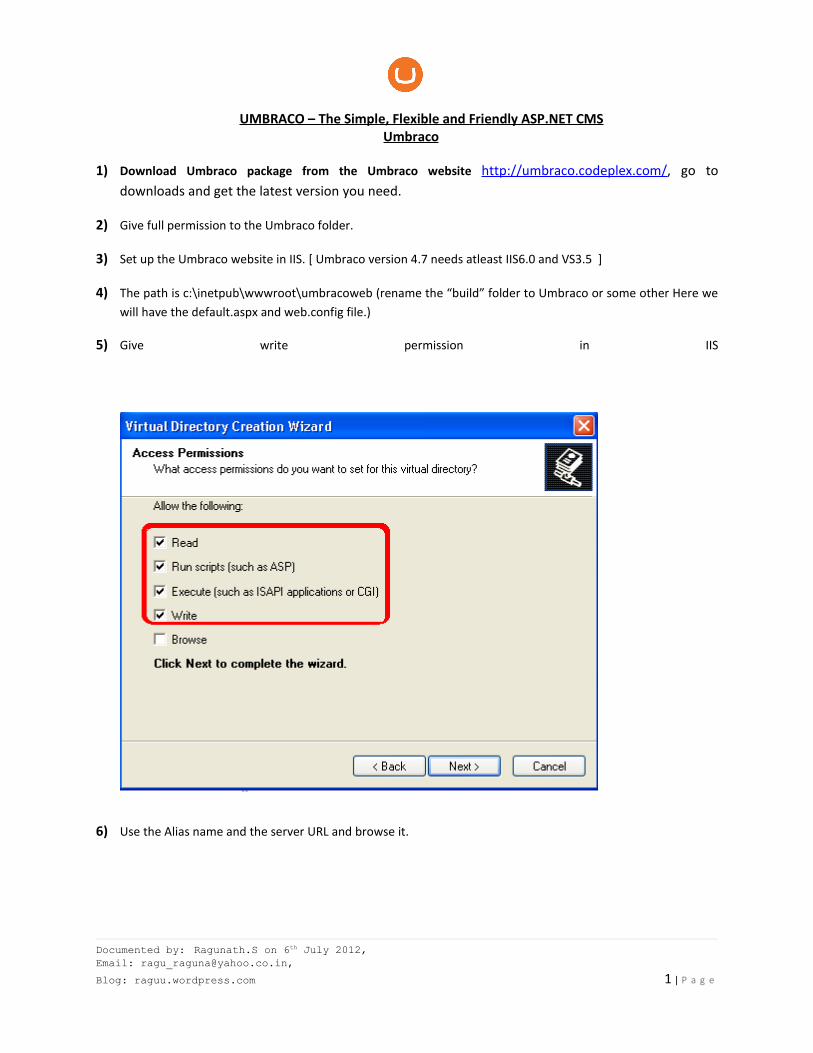
5) Give write permission in IIS
6) Use the Alias name and the server URL and browse it.
Documented by: Ragunath.S on 6th July 2012, Email: [email protected],
Blog: raguu.wordpress.com 1 | P a g e
UMBRACO – The Simple, Flexible and Friendly ASP.NET CMS
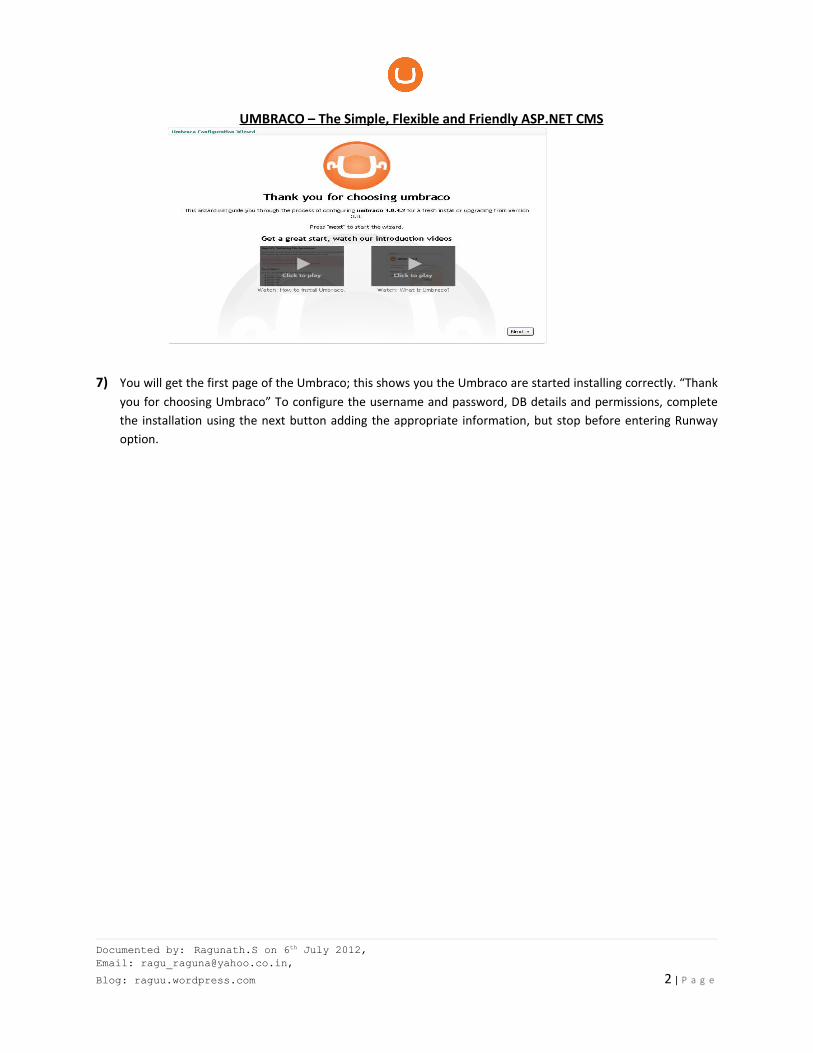
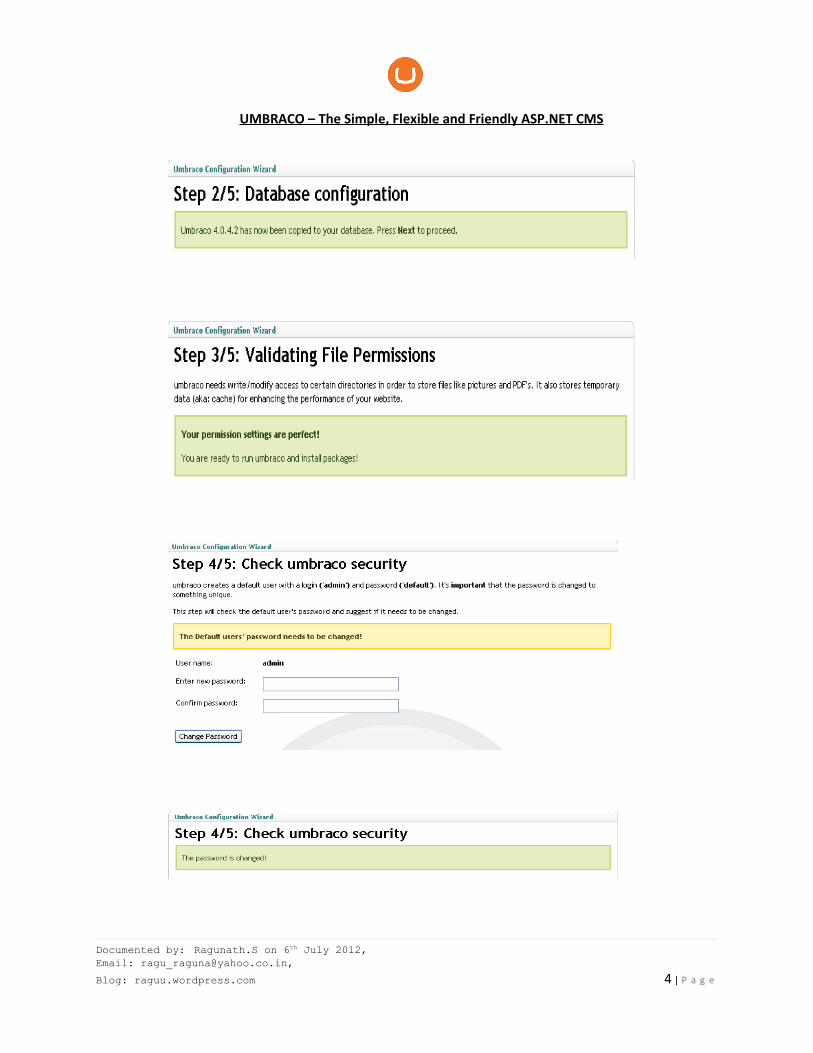
7) You will get the first page of the Umbraco; this shows you the Umbraco are started installing correctly. “Thank you for choosing Umbraco” To configure the username and password, DB details and permissions, complete the installation using the next button adding the appropriate information, but stop before entering Runway option.
Documented by: Ragunath.S on 6th July 2012, Email: [email protected],
Blog: raguu.wordpress.com 2 | P a g e
UMBRACO – The Simple, Flexible and Friendly ASP.NET CMS
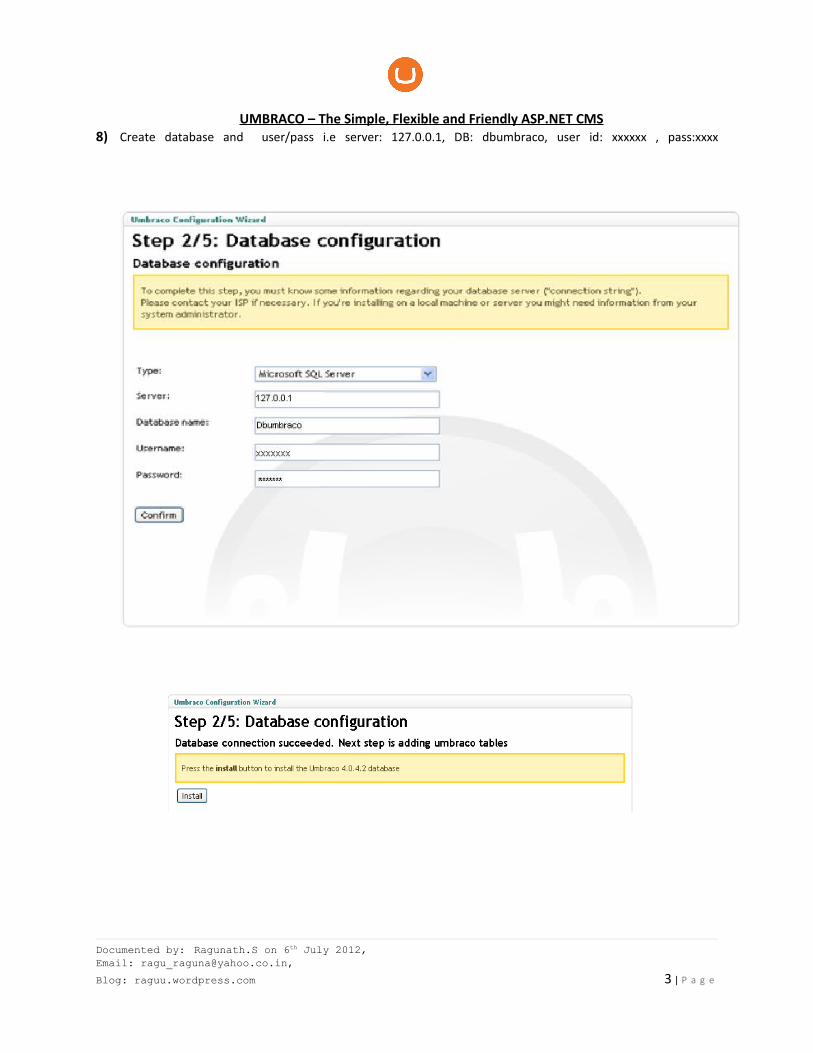
8) Create database and user/pass i.e server: 127.0.0.1, DB: dbumbraco, user id: xxxxxx , pass:xxxx
Documented by: Ragunath.S on 6th July 2012, Email: [email protected],
Blog: raguu.wordpress.com 3 | P a g e
UMBRACO – The Simple, Flexible and Friendly ASP.NET CMS
Documented by: Ragunath.S on 6th July 2012, Email: [email protected],
Blog: raguu.wordpress.com 4 | P a g e
UMBRACO – The Simple, Flexible and Friendly ASP.NET CMS
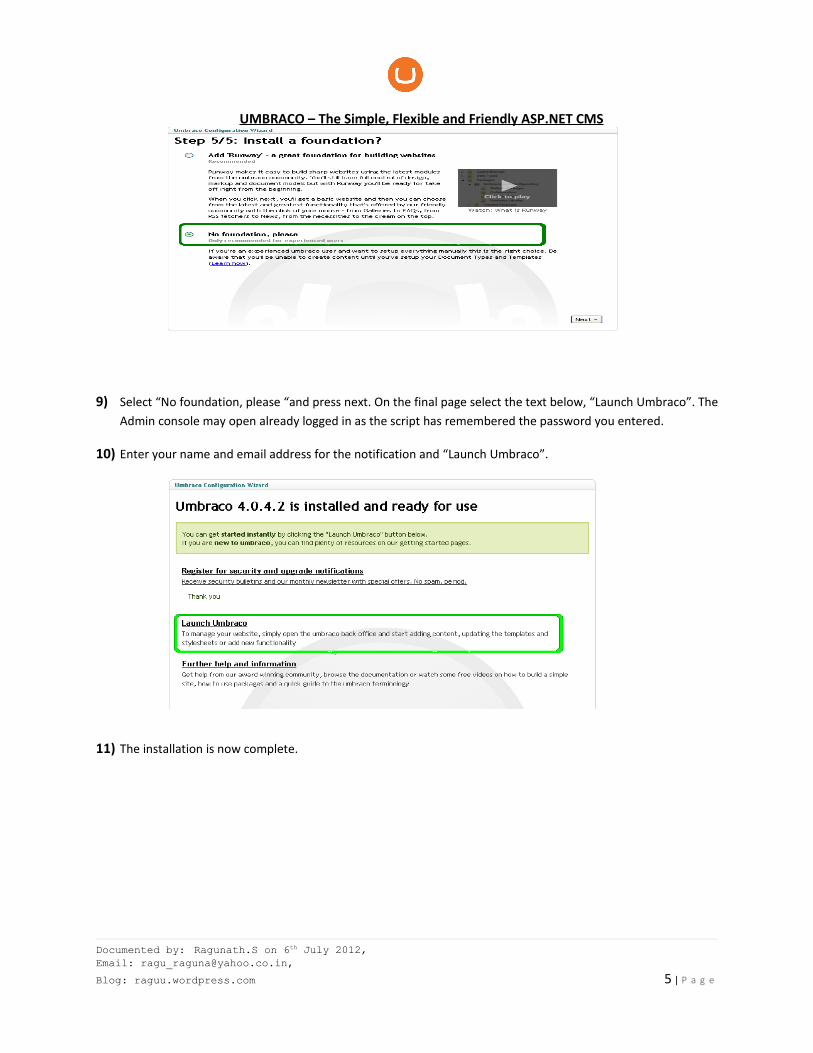
9) Select “No foundation, please “and press next. On the final page select the text below, “Launch Umbraco”. The Admin console may open already logged in as the script has remembered the password you entered.
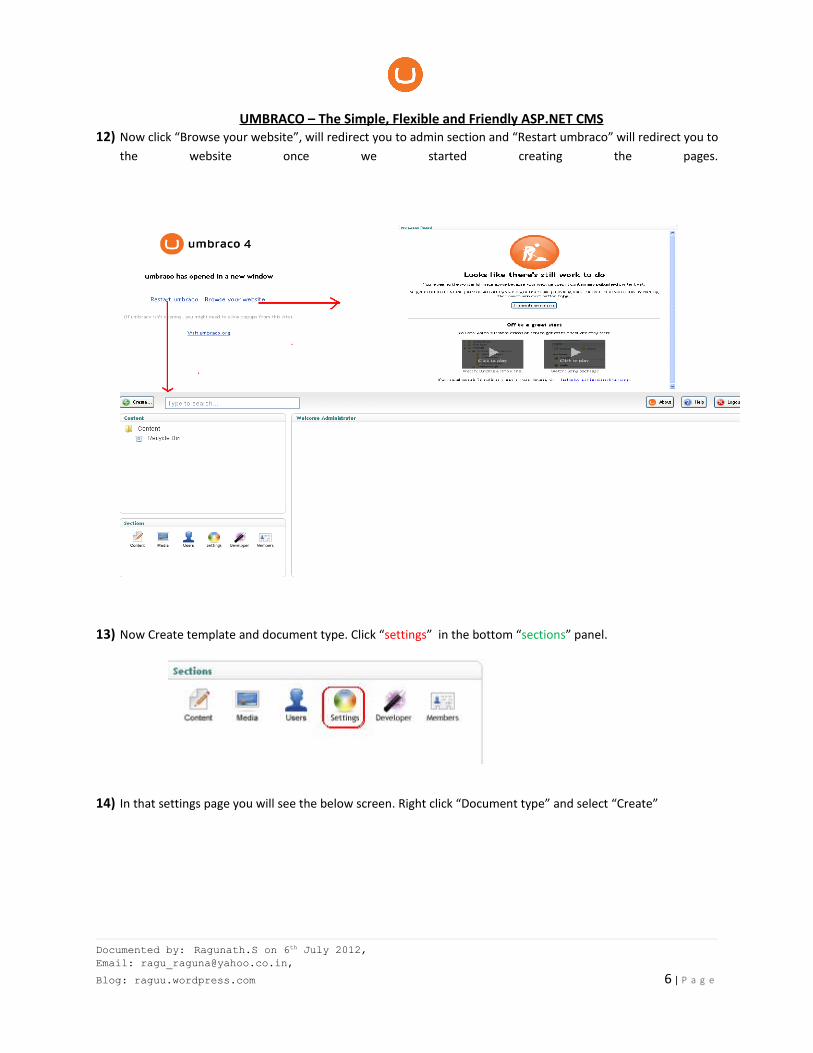
10) Enter your name and email address for the notification and “Launch Umbraco”.
11) The installation is now complete.
Documented by: Ragunath.S on 6th July 2012, Email: [email protected],
Blog: raguu.wordpress.com 5 | P a g e
UMBRACO – The Simple, Flexible and Friendly ASP.NET CMS
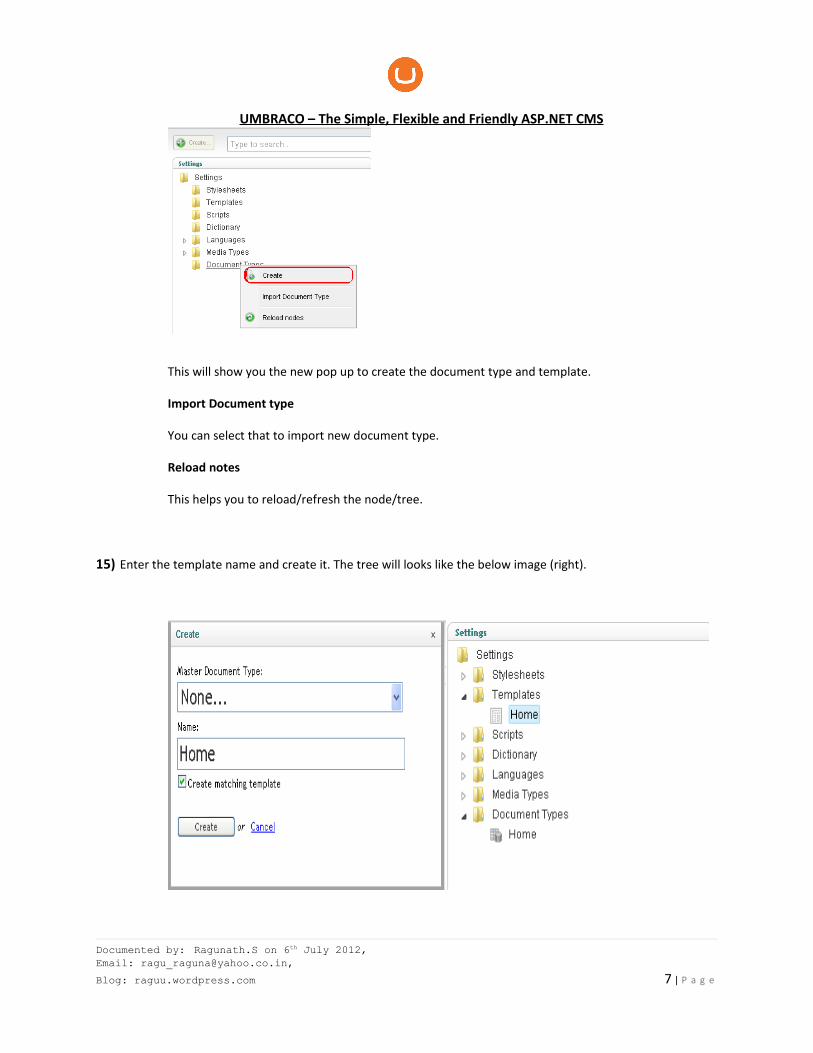
12) Now click “Browse your website”, will redirect you to admin section and “Restart umbraco” will redirect you to the website once we started creating the pages.
13) Now Create template and document type. Click “settings” in the bottom “sections” panel.
14) In that settings page you will see the below screen. Right click “Document type” and select “Create”
Documented by: Ragunath.S on 6th July 2012, Email: [email protected],
Blog: raguu.wordpress.com 6 | P a g e
UMBRACO – The Simple, Flexible and Friendly ASP.NET CMS
This will show you the new pop up to create the document type and template.
Import Document type
You can select that to import new document type.
Reload notes
This helps you to reload/refresh the node/tree.
15) Enter the template name and create it. The tree will looks like the below image (right).
Documented by: Ragunath.S on 6th July 2012, Email: [email protected],
Blog: raguu.wordpress.com 7 | P a g e

UMBRACO – The Simple, Flexible and Friendly ASP.NET CMS
16) The home template will look like below screen crap. This is the first template we created So, This is the master template. We can have any no# of template from this “Home” ( Master Template ) .
17) Add your content between the “Content tag” and design as like you need the home template.
Now, Click expand the “Document type” Home .
Enter the tab Title = Title of the template.
Documented by: Ragunath.S on 6th July 2012, Email: [email protected],
Blog: raguu.wordpress.com 8 | P a g e
UMBRACO – The Simple, Flexible and Friendly ASP.NET CMS
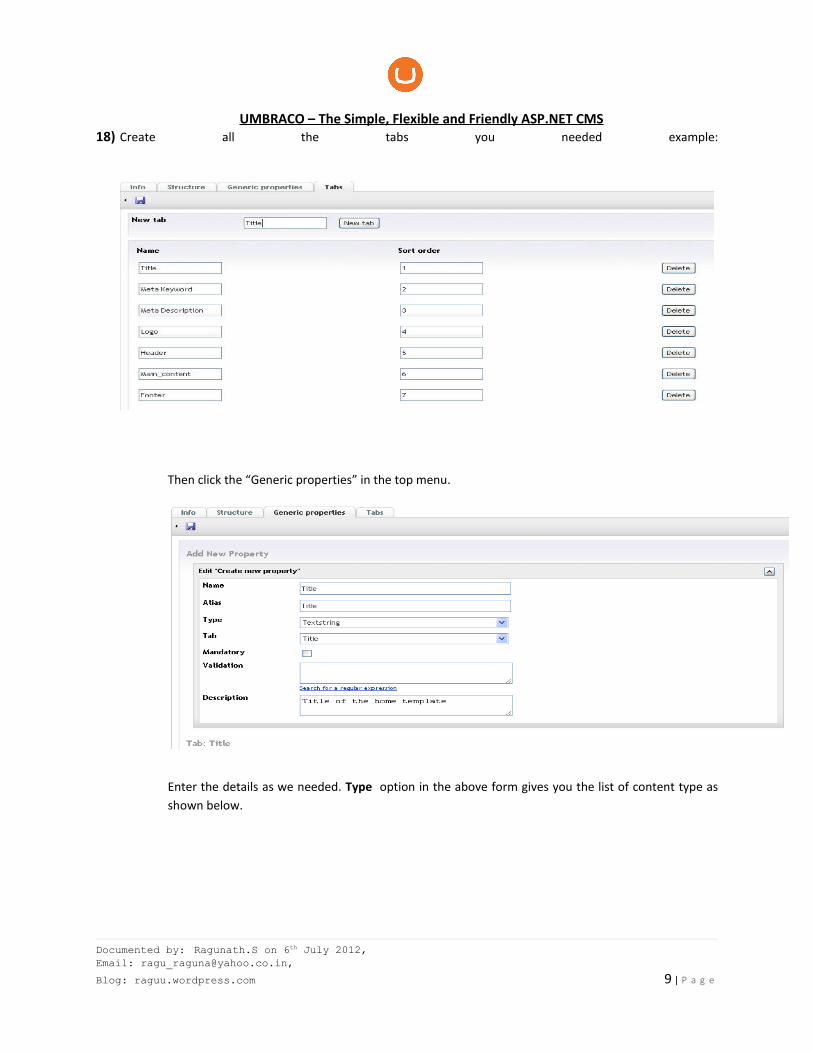
18) Create all the tabs you needed example:
Then click the “Generic properties” in the top menu.
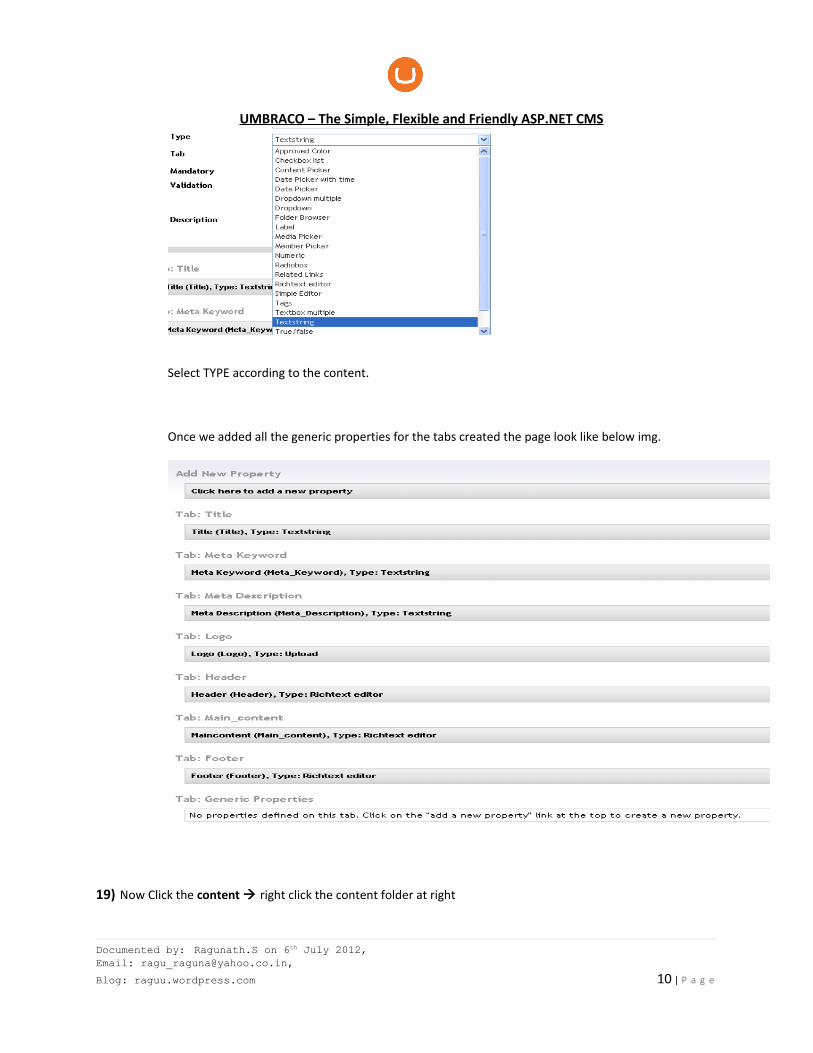
Enter the details as we needed. Type option in the above form gives you the list of content type as shown below.
Documented by: Ragunath.S on 6th July 2012, Email: [email protected],
Blog: raguu.wordpress.com 9 | P a g e
UMBRACO – The Simple, Flexible and Friendly ASP.NET CMS
Select TYPE according to the content.
Once we added all the generic properties for the tabs created the page look like below img.
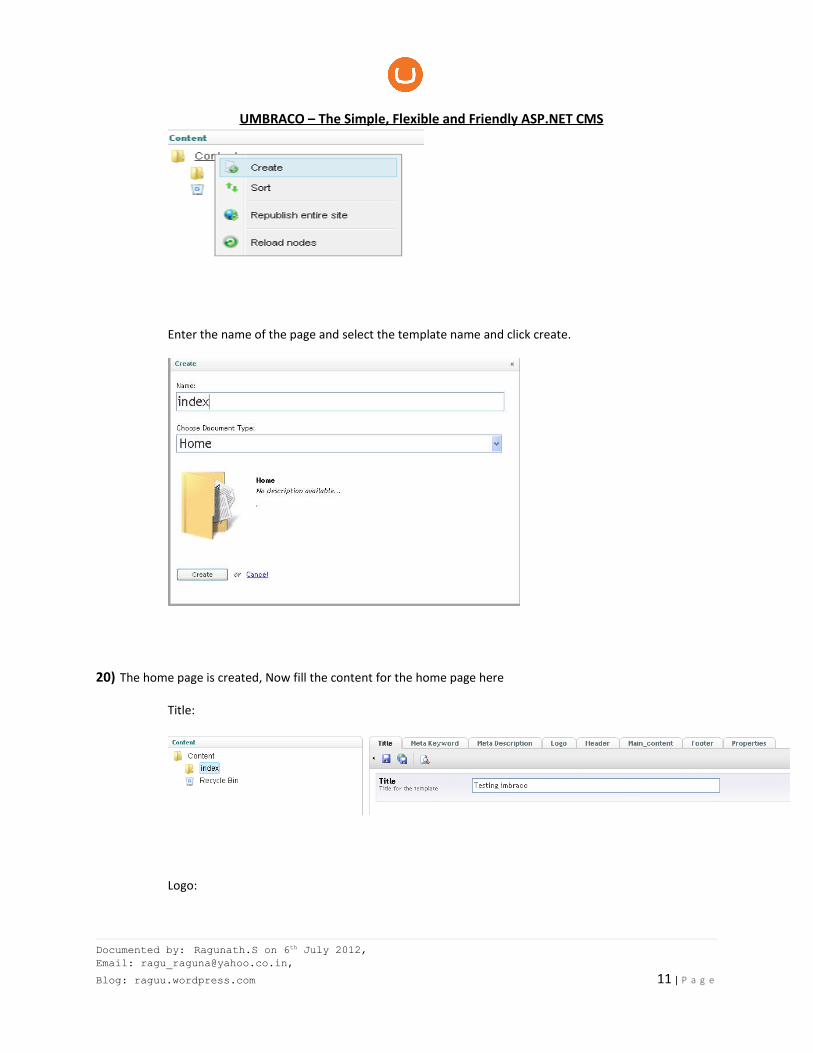
19) Now Click the content right click the content folder at right
Documented by: Ragunath.S on 6th July 2012, Email: [email protected],
Blog: raguu.wordpress.com 10 | P a g e
UMBRACO – The Simple, Flexible and Friendly ASP.NET CMS
Enter the name of the page and select the template name and click create.
20) The home page is created, Now fill the content for the home page here
Title:
Logo:
Documented by: Ragunath.S on 6th July 2012, Email: [email protected],
Blog: raguu.wordpress.com 11 | P a g e
UMBRACO – The Simple, Flexible and Friendly ASP.NET CMS
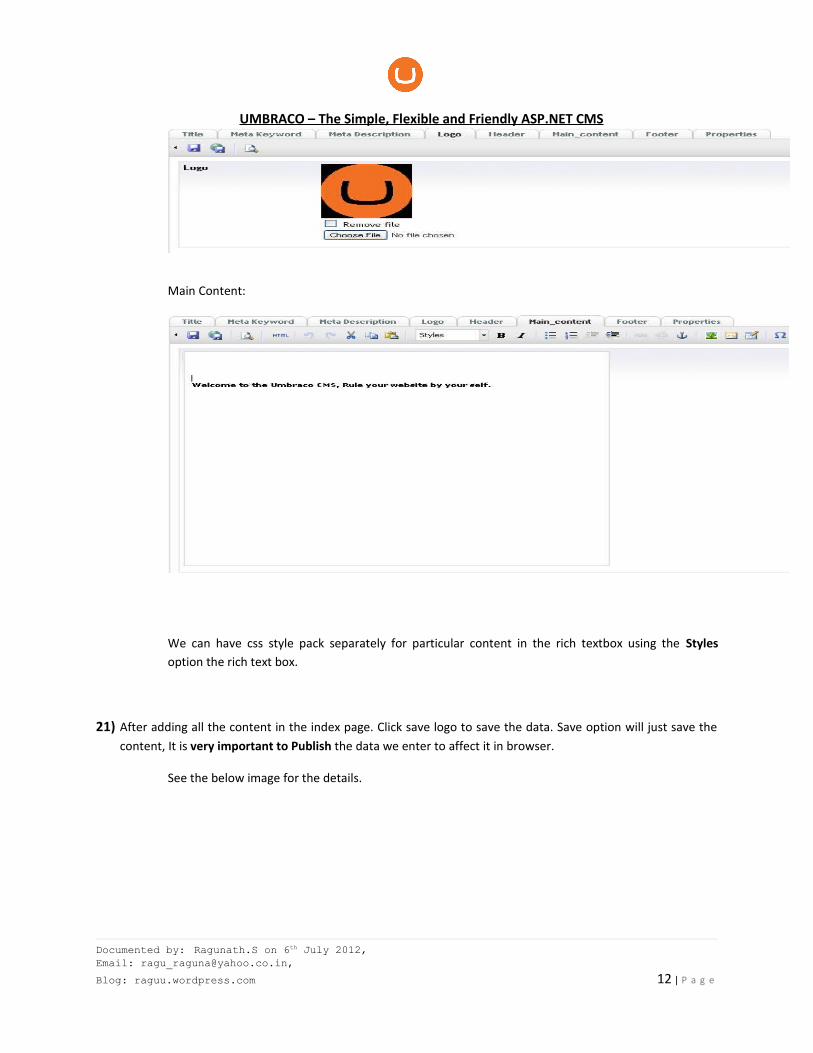
Main Content:
We can have css style pack separately for particular content in the rich textbox using the Styles option the rich text box.
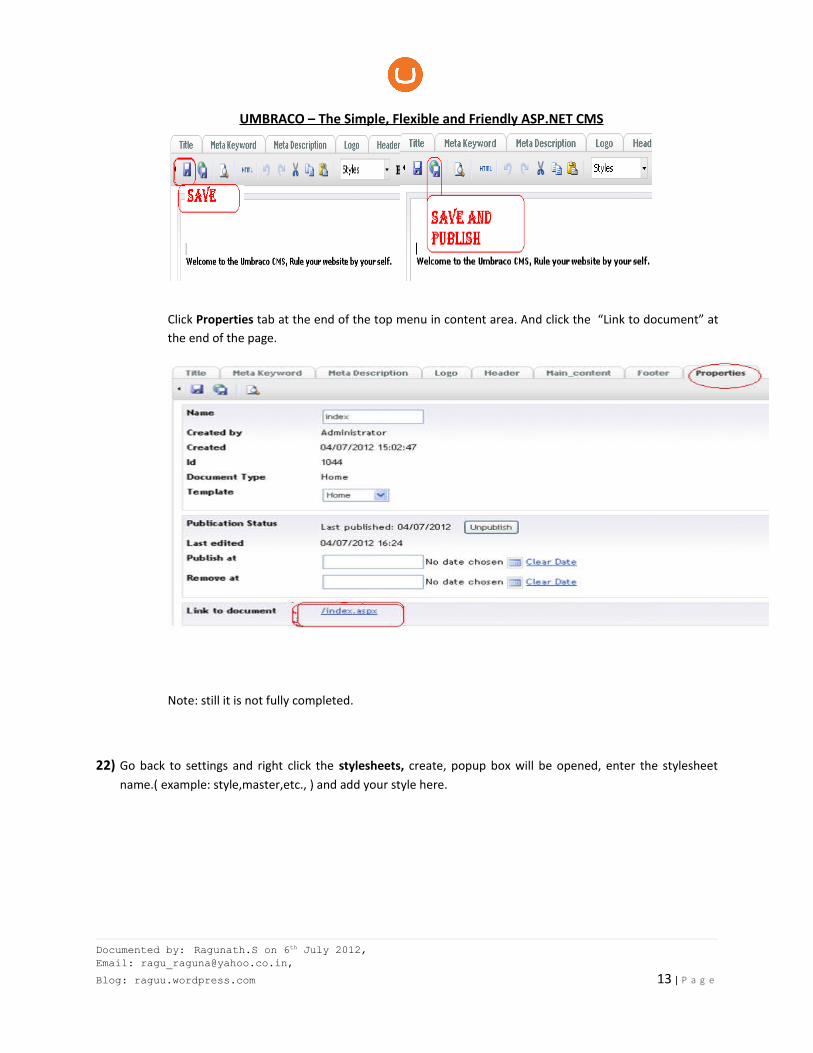
21) After adding all the content in the index page. Click save logo to save the data. Save option will just save the content, It is very important to Publish the data we enter to affect it in browser.
See the below image for the details.
Documented by: Ragunath.S on 6th July 2012, Email: [email protected],
Blog: raguu.wordpress.com 12 | P a g e
UMBRACO – The Simple, Flexible and Friendly ASP.NET CMS
Click Properties tab at the end of the top menu in content area. And click the “Link to document” at the end of the page.
Note: still it is not fully completed.
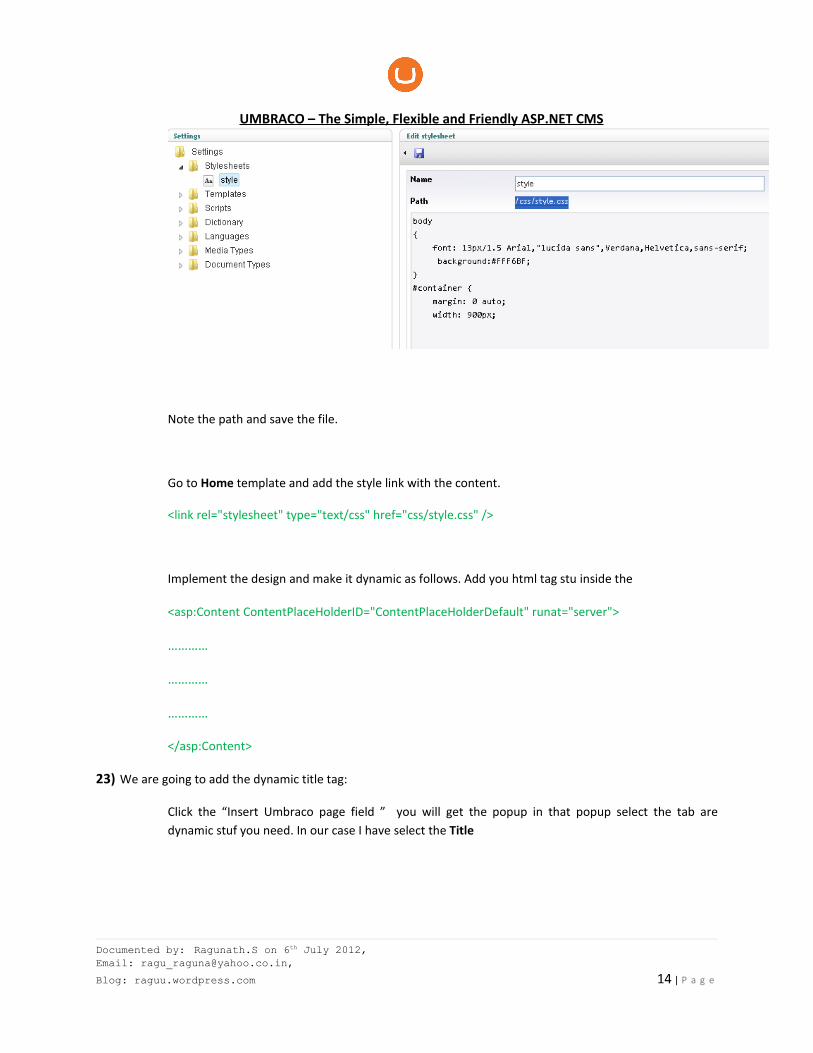
22) Go back to settings and right click the stylesheets, create, popup box will be opened, enter the stylesheet name.( example: style,master,etc., ) and add your style here.
Documented by: Ragunath.S on 6th July 2012, Email: [email protected],
Blog: raguu.wordpress.com 13 | P a g e
UMBRACO – The Simple, Flexible and Friendly ASP.NET CMS
Note the path and save the file.
Go to Home template and add the style link with the content.
<link rel="stylesheet" type="text/css" href="css/style.css" />
Implement the design and make it dynamic as follows. Add you html tag stu inside the
<asp:Content ContentPlaceHolderID="ContentPlaceHolderDefault" runat="server">
…………
…………
…………
</asp:Content>
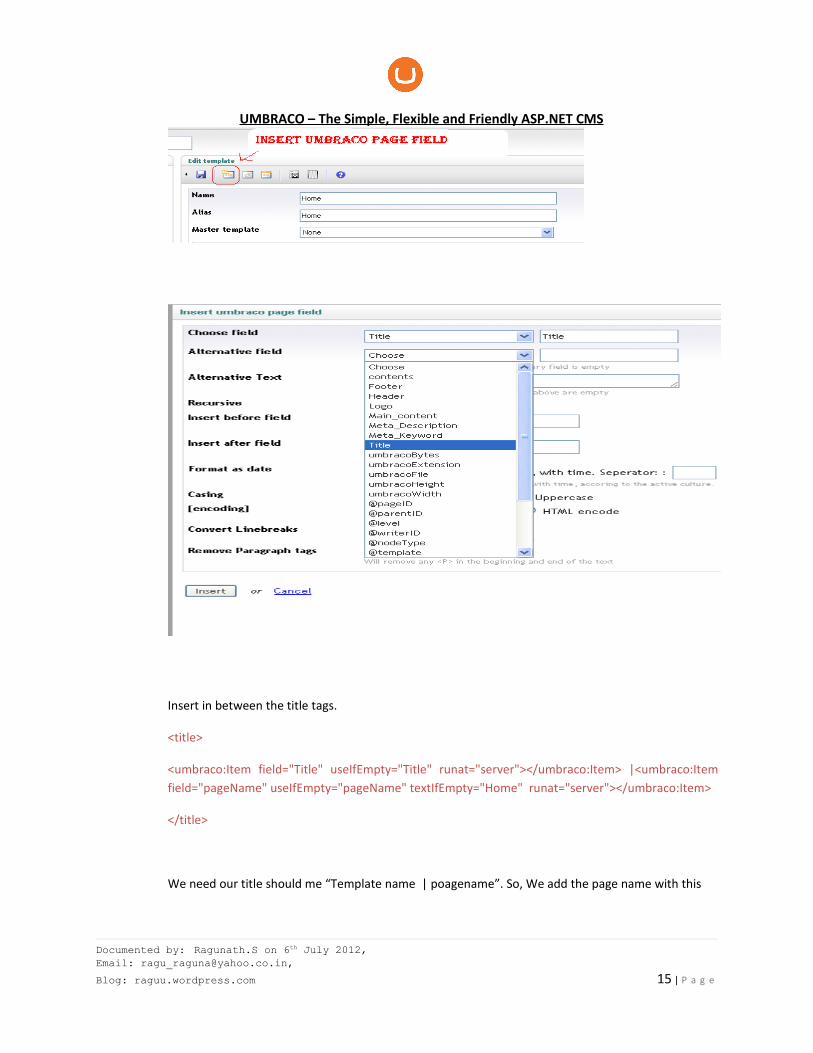
23) We are going to add the dynamic title tag:
Click the “Insert Umbraco page field ” you will get the popup in that popup select the tab are dynamic stuf you need. In our case I have select the Title
Documented by: Ragunath.S on 6th July 2012, Email: [email protected],
Blog: raguu.wordpress.com 14 | P a g e
UMBRACO – The Simple, Flexible and Friendly ASP.NET CMS
Insert in between the title tags.
<title>
<umbraco:Item field="Title" useIfEmpty="Title" runat="server"></umbraco:Item> |<umbraco:Item field="pageName" useIfEmpty="pageName" textIfEmpty="Home" runat="server"></umbraco:Item>
</title>
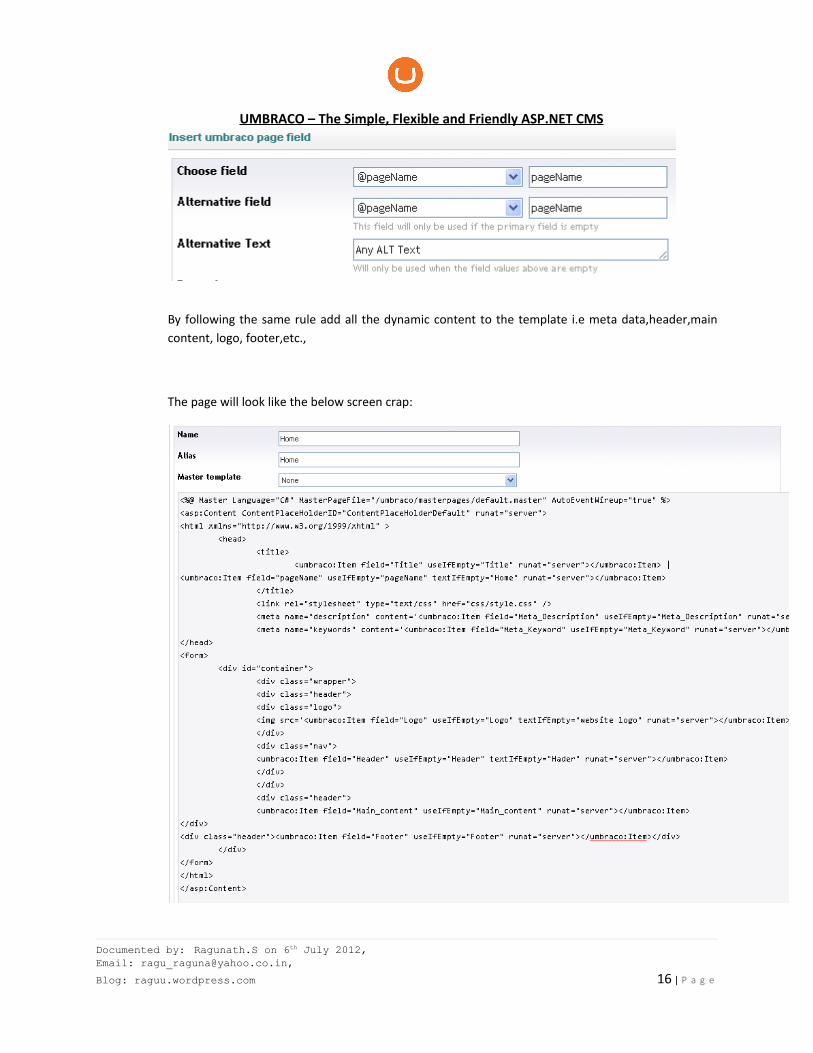
We need our title should me “Template name | poagename”. So, We add the page name with this
Documented by: Ragunath.S on 6th July 2012, Email: [email protected],
Blog: raguu.wordpress.com 15 | P a g e
UMBRACO – The Simple, Flexible and Friendly ASP.NET CMS
By following the same rule add all the dynamic content to the template i.e meta data,header,main content, logo, footer,etc.,
The page will look like the below screen crap:
Documented by: Ragunath.S on 6th July 2012, Email: [email protected],
Blog: raguu.wordpress.com 16 | P a g e
UMBRACO – The Simple, Flexible and Friendly ASP.NET CMS
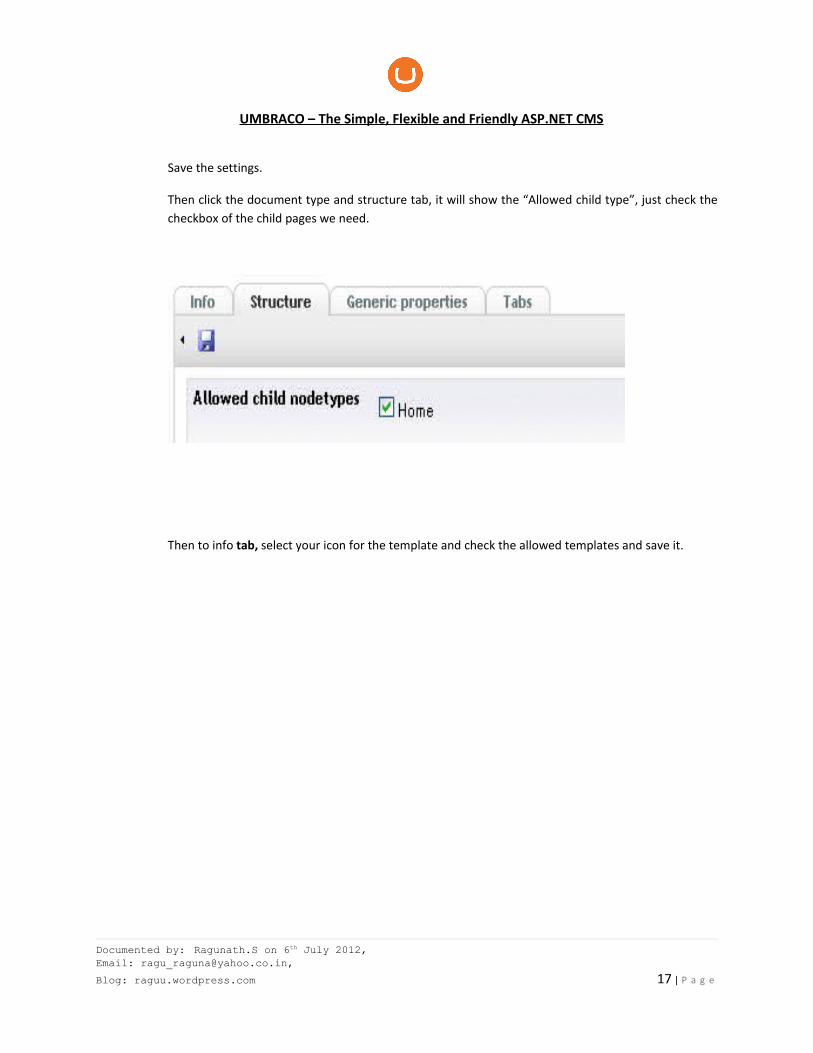
Save the settings.
Then click the document type and structure tab, it will show the “Allowed child type”, just check the checkbox of the child pages we need.
Then to info tab, select your icon for the template and check the allowed templates and save it.
Documented by: Ragunath.S on 6th July 2012, Email: [email protected],
Blog: raguu.wordpress.com 17 | P a g e
UMBRACO – The Simple, Flexible and Friendly ASP.NET CMS
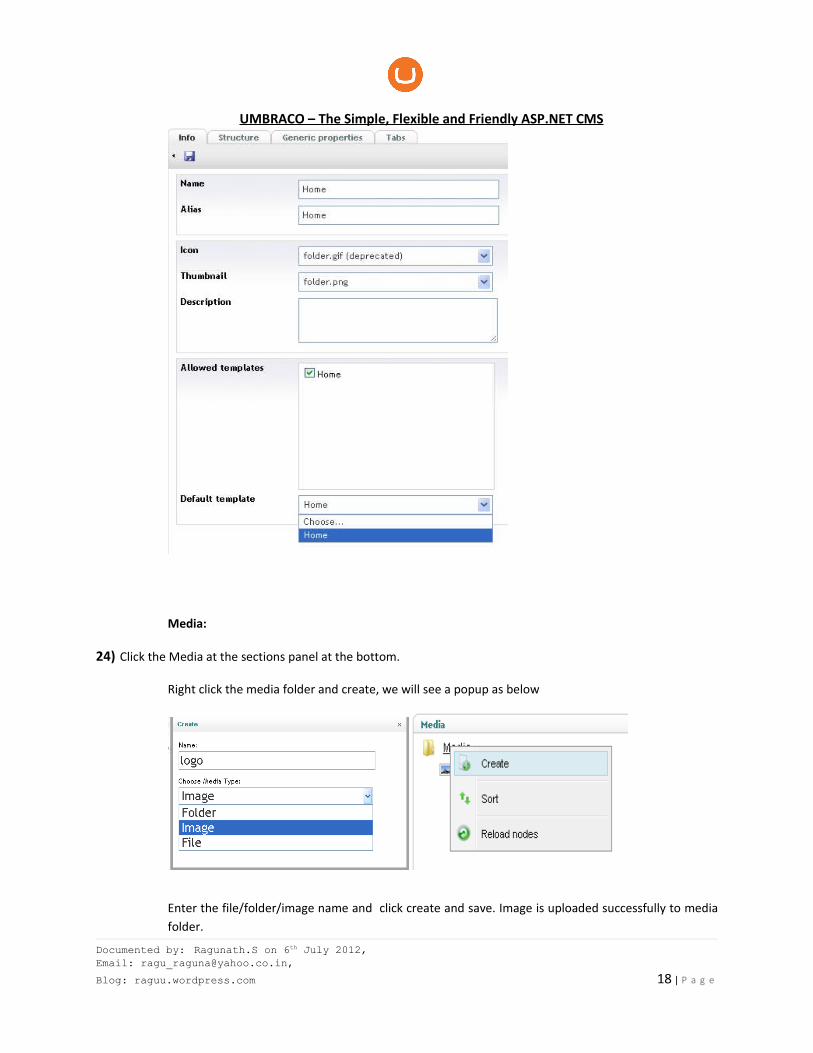
Media:
24) Click the Media at the sections panel at the bottom.
Right click the media folder and create, we will see a popup as below
Enter the file/folder/image name and click create and save. Image is uploaded successfully to media folder.
Documented by: Ragunath.S on 6th July 2012, Email: [email protected],
Blog: raguu.wordpress.com 18 | P a g e
UMBRACO – The Simple, Flexible and Friendly ASP.NET CMS
25) To create more pages under home template, add pages in the content tab.
26) We have completed the basic stuff to load the home template, Now browse
http://192.168.1.190:108/index.aspx or go to content click index page properties Link to document. We will get the index page of the website.
27) We can add different types of templates and add the pages according to the templates we design.
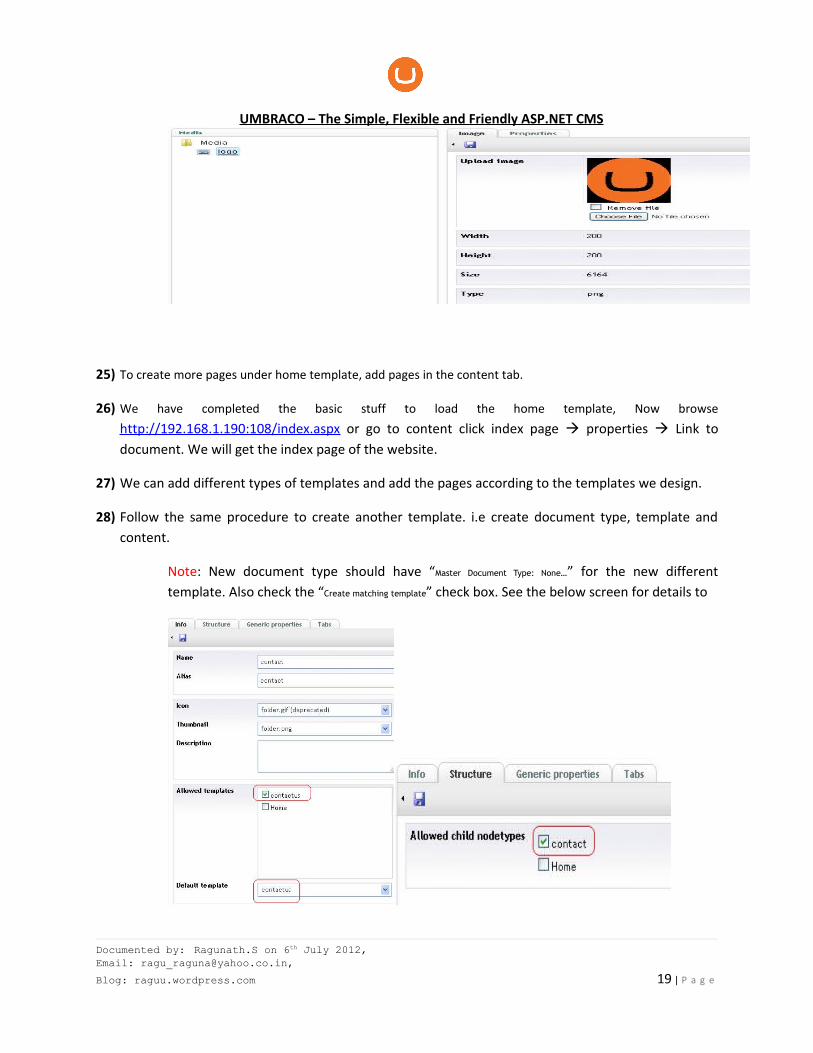
28) Follow the same procedure to create another template. i.e create document type, template and content.
Note: New document type should have “Master Document Type: None…” for the new different template. Also check the “Create matching template” check box. See the below screen for details to
Documented by: Ragunath.S on 6th July 2012, Email: [email protected],
Blog: raguu.wordpress.com 19 | P a g e
UMBRACO – The Simple, Flexible and Friendly ASP.NET CMS
Enter correct details for the Info and structure tab.
29) Using master page . Create document type in the name of master check the checkbox to create “Create
matching template”. Now create the tabs you needed for the page content.
30) Design the template in master template.
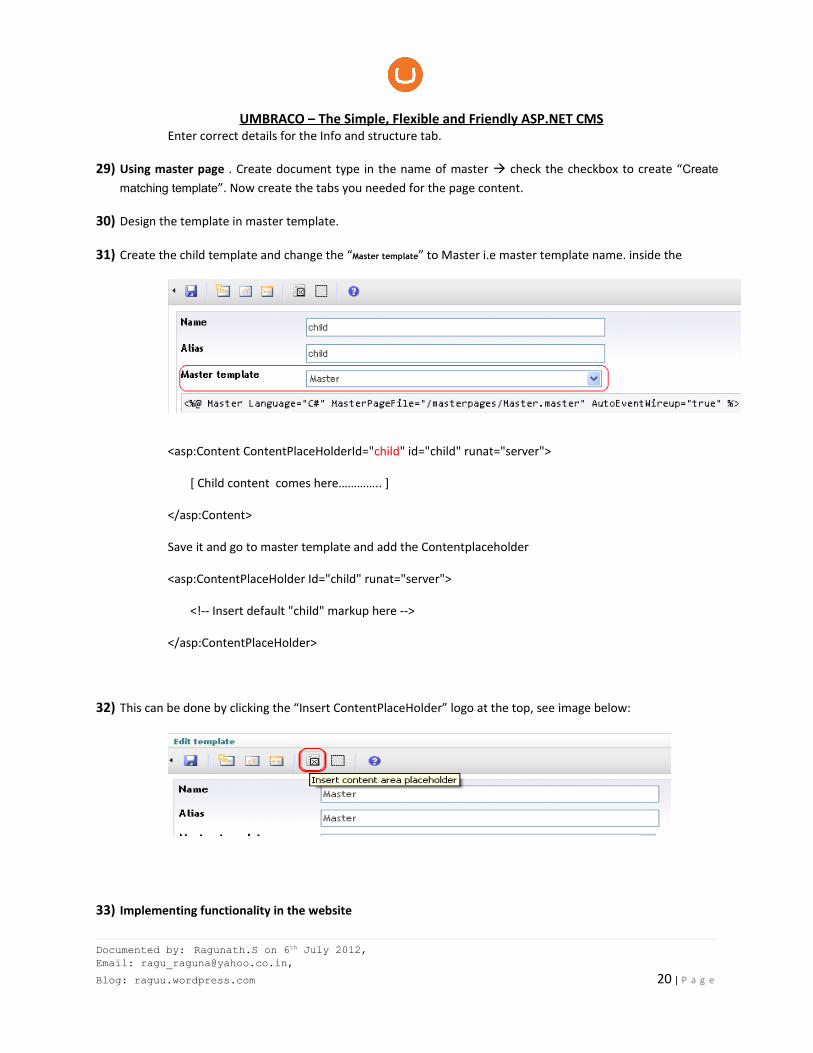
31) Create the child template and change the “Master template” to Master i.e master template name. inside the
<asp:Content ContentPlaceHolderId="child" id="child" runat="server">
[ Child content comes here………….. ]
</asp:Content>
Save it and go to master template and add the Contentplaceholder
<asp:ContentPlaceHolder Id="child" runat="server">
<!-- Insert default "child" markup here -->
</asp:ContentPlaceHolder>
32) This can be done by clicking the “Insert ContentPlaceHolder” logo at the top, see image below:
33) Implementing functionality in the website
Documented by: Ragunath.S on 6th July 2012, Email: [email protected],
Blog: raguu.wordpress.com 20 | P a g e
UMBRACO – The Simple, Flexible and Friendly ASP.NET CMS
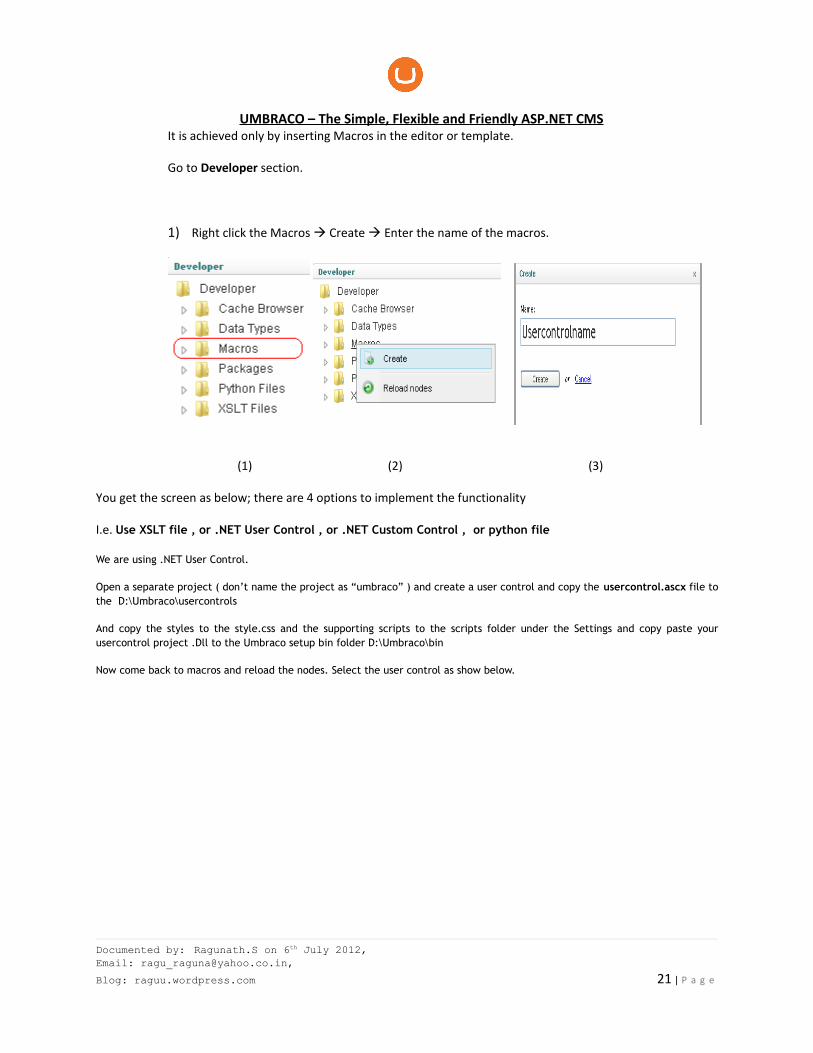
It is achieved only by inserting Macros in the editor or template.
Go to Developer section.
1) Right click the Macros Create Enter the name of the macros.
(1) (2) (3)
You get the screen as below; there are 4 options to implement the functionality
I.e. Use XSLT file , or .NET User Control , or .NET Custom Control , or python file
We are using .NET User Control.
Open a separate project ( don’t name the project as “umbraco” ) and create a user control and copy the usercontrol.ascx file to the D:\Umbraco\usercontrols
And copy the styles to the style.css and the supporting scripts to the scripts folder under the Settings and copy paste your usercontrol project .Dll to the Umbraco setup bin folder D:\Umbraco\bin
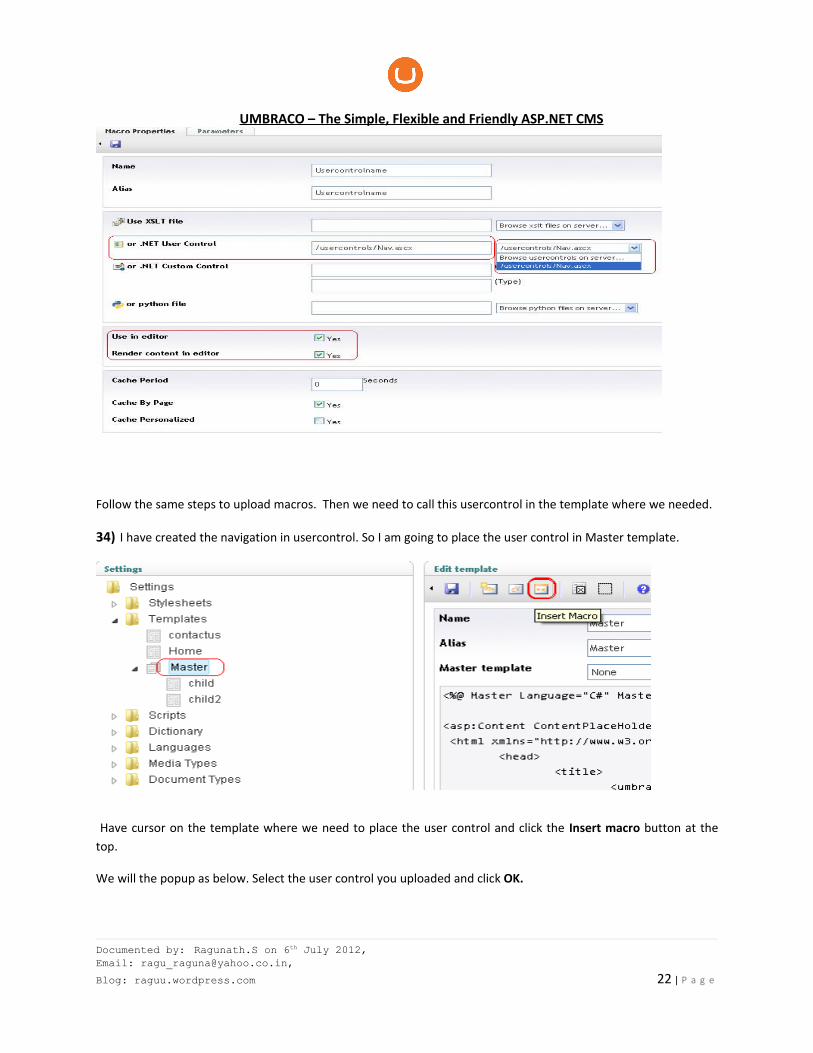
Now come back to macros and reload the nodes. Select the user control as show below.
Documented by: Ragunath.S on 6th July 2012, Email: [email protected],
Blog: raguu.wordpress.com 21 | P a g e
UMBRACO – The Simple, Flexible and Friendly ASP.NET CMS
Follow the same steps to upload macros. Then we need to call this usercontrol in the template where we needed.
34) I have created the navigation in usercontrol. So I am going to place the user control in Master template.
Have cursor on the template where we need to place the user control and click the Insert macro button at the top.
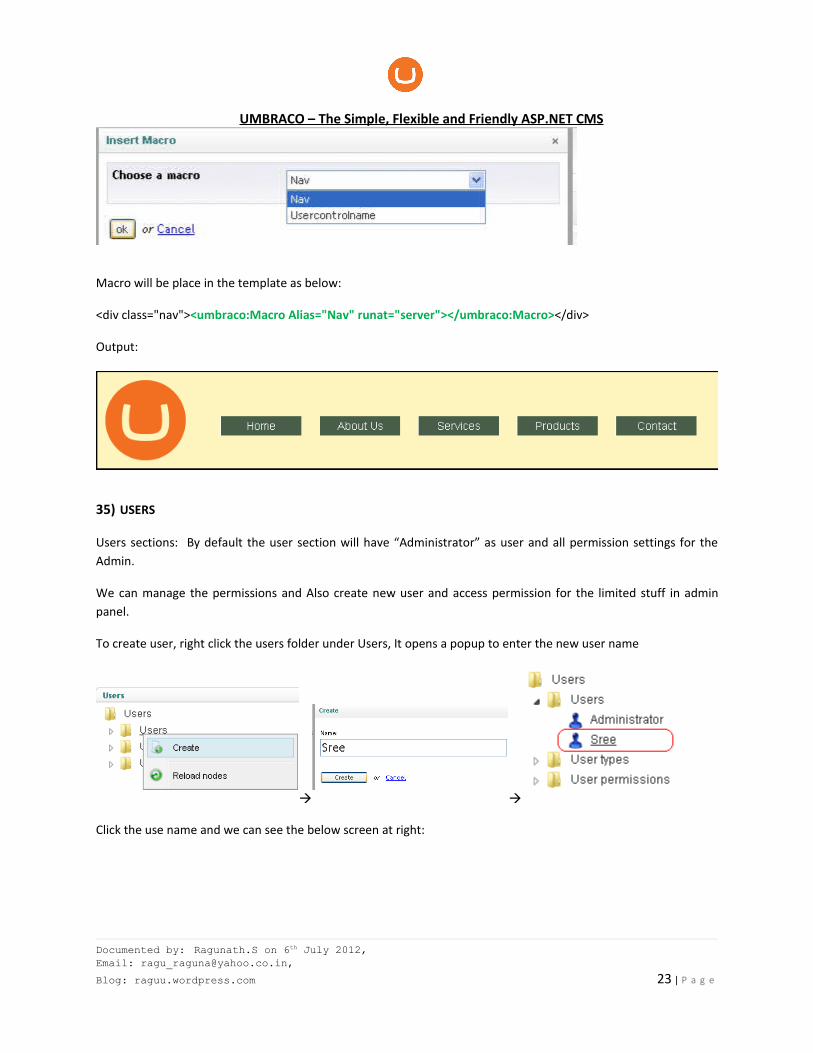
We will the popup as below. Select the user control you uploaded and click OK.
Documented by: Ragunath.S on 6th July 2012, Email: [email protected],
Blog: raguu.wordpress.com 22 | P a g e
UMBRACO – The Simple, Flexible and Friendly ASP.NET CMS
Macro will be place in the template as below:
<div class="nav"><umbraco:Macro Alias="Nav" runat="server"></umbraco:Macro></div>
Output:
35) USERS
Users sections: By default the user section will have “Administrator” as user and all permission settings for the Admin.
We can manage the permissions and Also create new user and access permission for the limited stuff in admin panel.
To create user, right click the users folder under Users, It opens a popup to enter the new user name
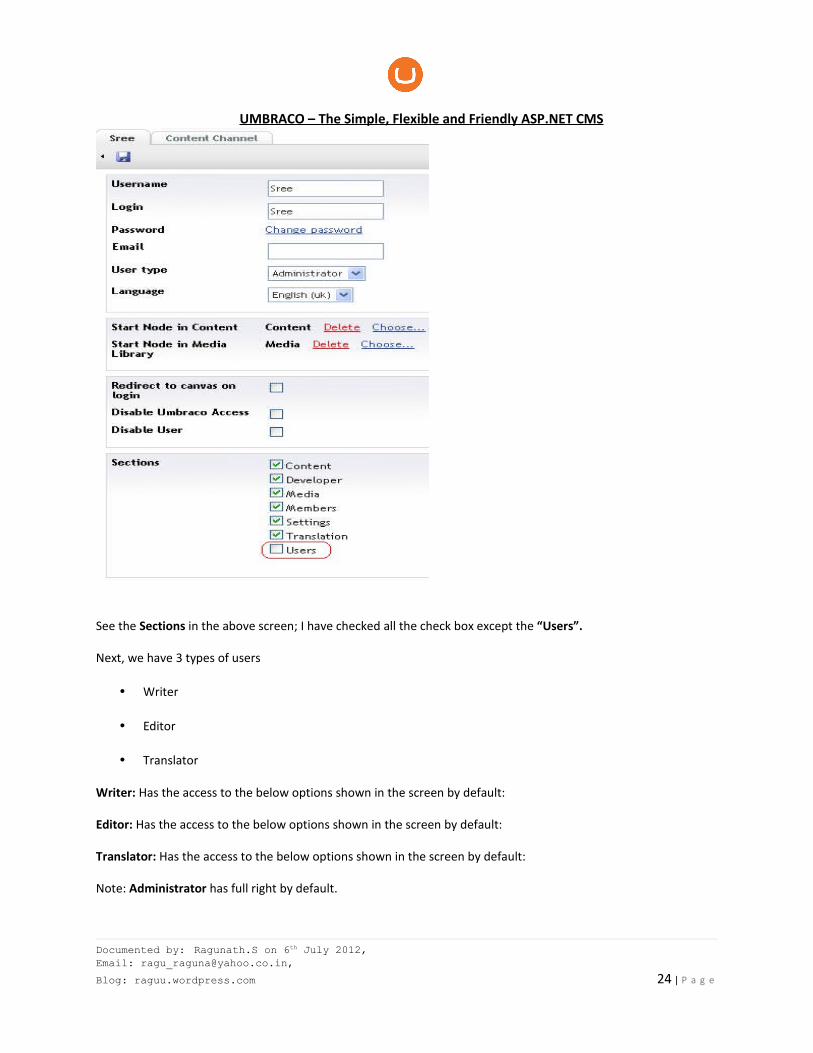
Click the use name and we can see the below screen at right:
Documented by: Ragunath.S on 6th July 2012, Email: [email protected],
Blog: raguu.wordpress.com 23 | P a g e
UMBRACO – The Simple, Flexible and Friendly ASP.NET CMS
See the Sections in the above screen; I have checked all the check box except the “Users”.
Next, we have 3 types of users
• Writer
• Editor
• Translator
Writer: Has the access to the below options shown in the screen by default:
Editor: Has the access to the below options shown in the screen by default:
Translator: Has the access to the below options shown in the screen by default:
Note: Administrator has full right by default.
Documented by: Ragunath.S on 6th July 2012, Email: [email protected],
Blog: raguu.wordpress.com 24 | P a g e

UMBRACO – The Simple, Flexible and Friendly ASP.NET CMS
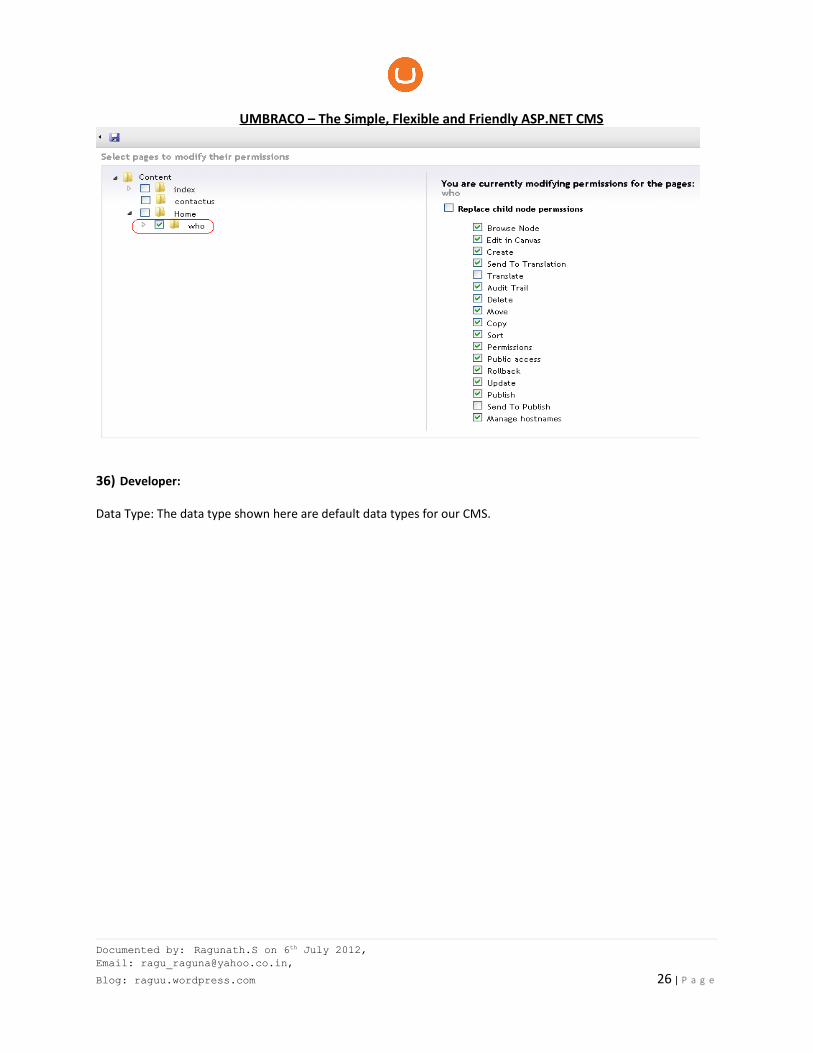
User Permissions:
Select the parent node or the child node to edit the permissions, Once you checked the checkbox to edit the page content, the permission options will be displayed.
Documented by: Ragunath.S on 6th July 2012, Email: [email protected],
Blog: raguu.wordpress.com 25 | P a g e
UMBRACO – The Simple, Flexible and Friendly ASP.NET CMS
36) Developer:
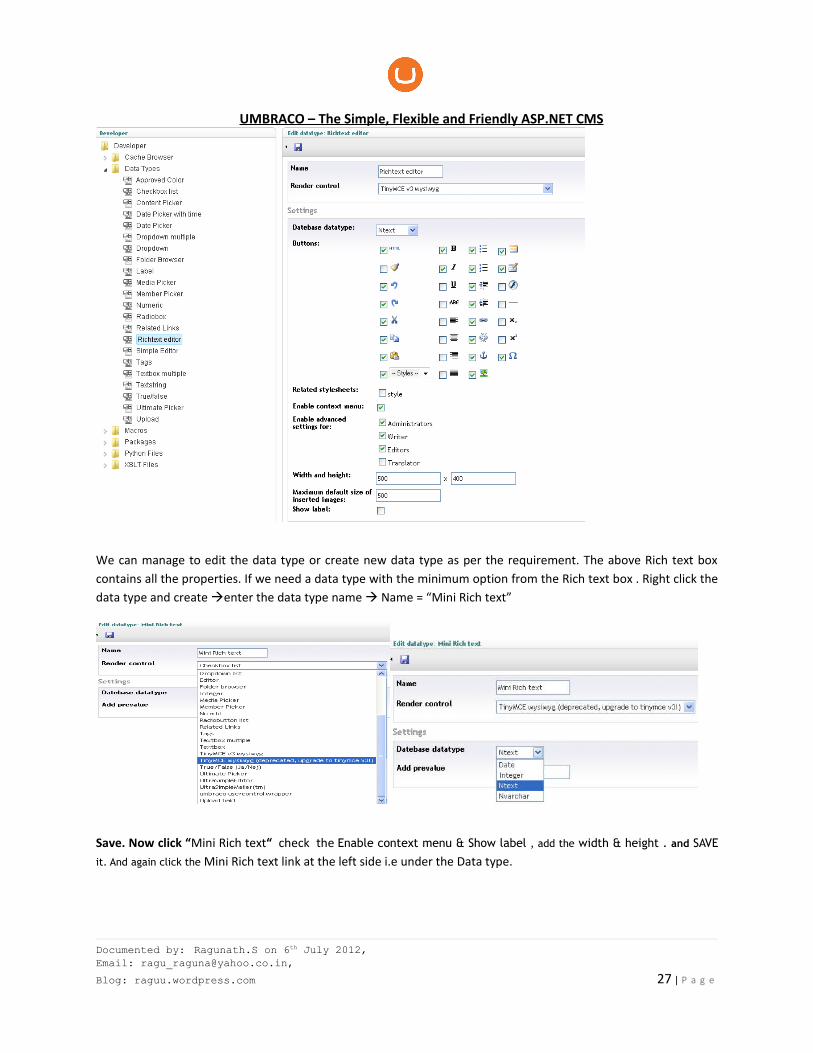
Data Type: The data type shown here are default data types for our CMS.
Documented by: Ragunath.S on 6th July 2012, Email: [email protected],
Blog: raguu.wordpress.com 26 | P a g e
UMBRACO – The Simple, Flexible and Friendly ASP.NET CMS
We can manage to edit the data type or create new data type as per the requirement. The above Rich text box contains all the properties. If we need a data type with the minimum option from the Rich text box . Right click the data type and create enter the data type name Name = “Mini Rich text”
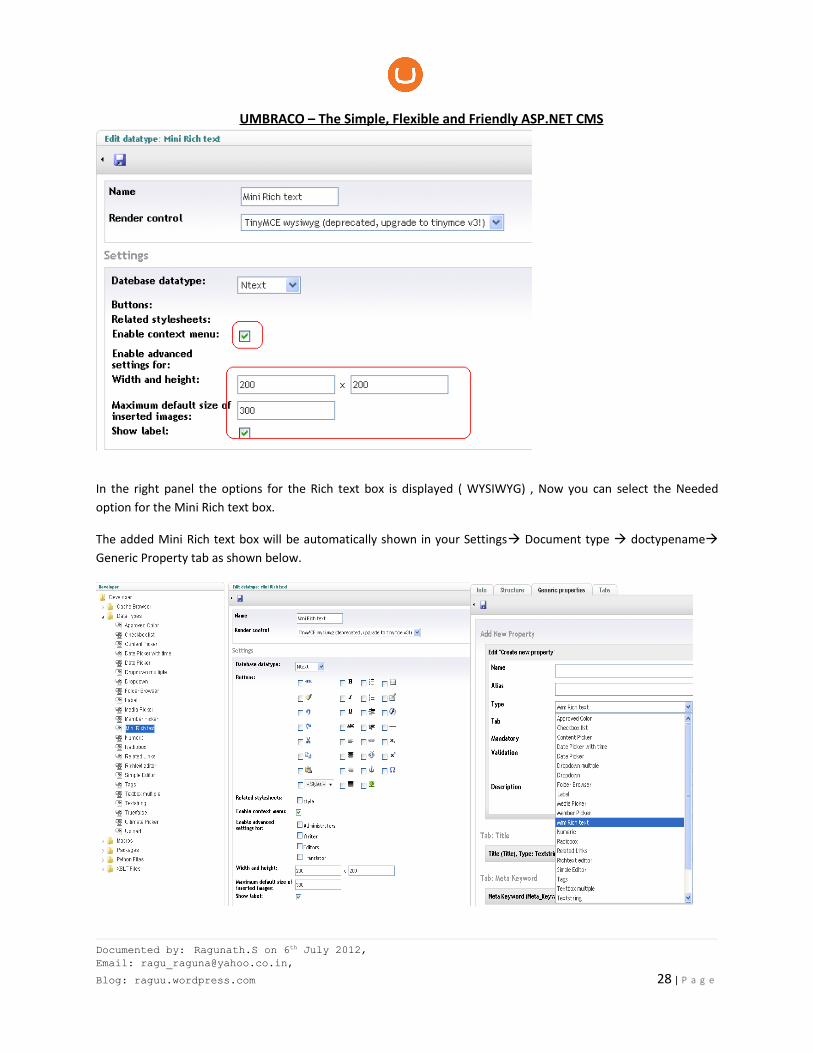
Save. Now click “Mini Rich text“ check the Enable context menu & Show label , add the width & height . and SAVE
it. And again click the Mini Rich text link at the left side i.e under the Data type.
Documented by: Ragunath.S on 6th July 2012, Email: [email protected],
Blog: raguu.wordpress.com 27 | P a g e
UMBRACO – The Simple, Flexible and Friendly ASP.NET CMS
In the right panel the options for the Rich text box is displayed ( WYSIWYG) , Now you can select the Needed option for the Mini Rich text box.
The added Mini Rich text box will be automatically shown in your Settings Document type doctypename Generic Property tab as shown below.
Documented by: Ragunath.S on 6th July 2012, Email: [email protected],
Blog: raguu.wordpress.com 28 | P a g e
UMBRACO – The Simple, Flexible and Friendly ASP.NET CMS
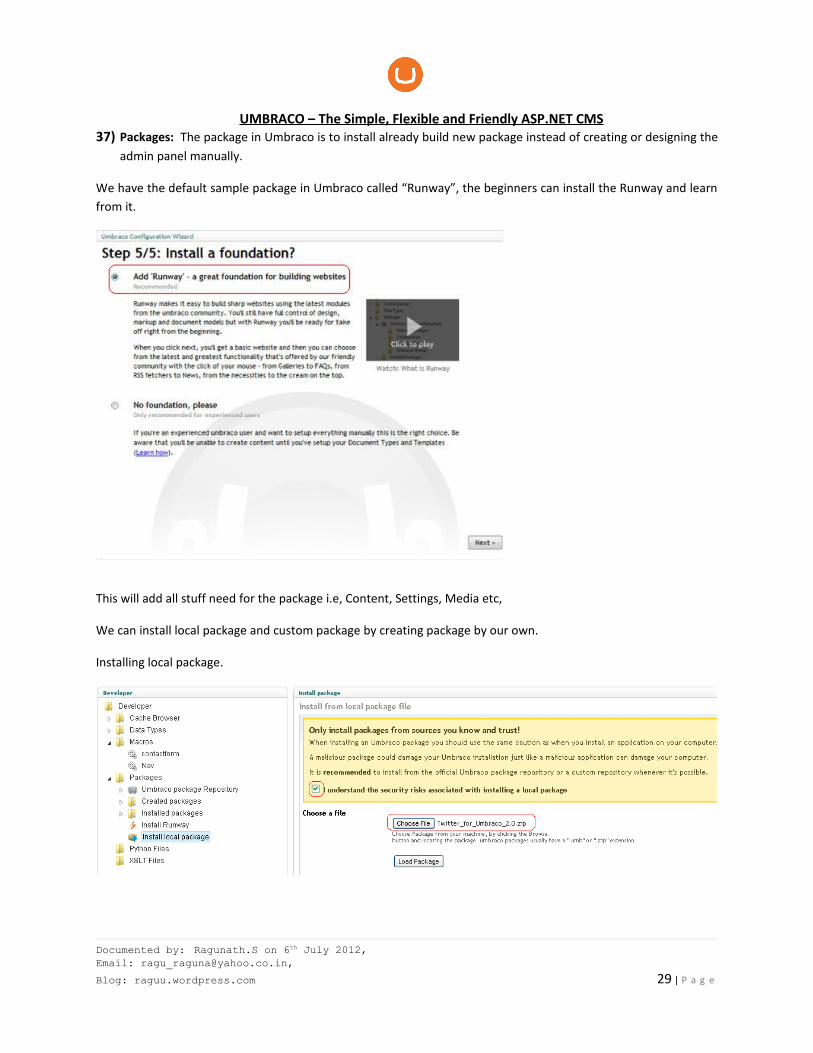
37) Packages: The package in Umbraco is to install already build new package instead of creating or designing the admin panel manually.
We have the default sample package in Umbraco called “Runway”, the beginners can install the Runway and learn from it.
This will add all stuff need for the package i.e, Content, Settings, Media etc,
We can install local package and custom package by creating package by our own.
Installing local package.
Documented by: Ragunath.S on 6th July 2012, Email: [email protected],
Blog: raguu.wordpress.com 29 | P a g e
UMBRACO – The Simple, Flexible and Friendly ASP.NET CMS
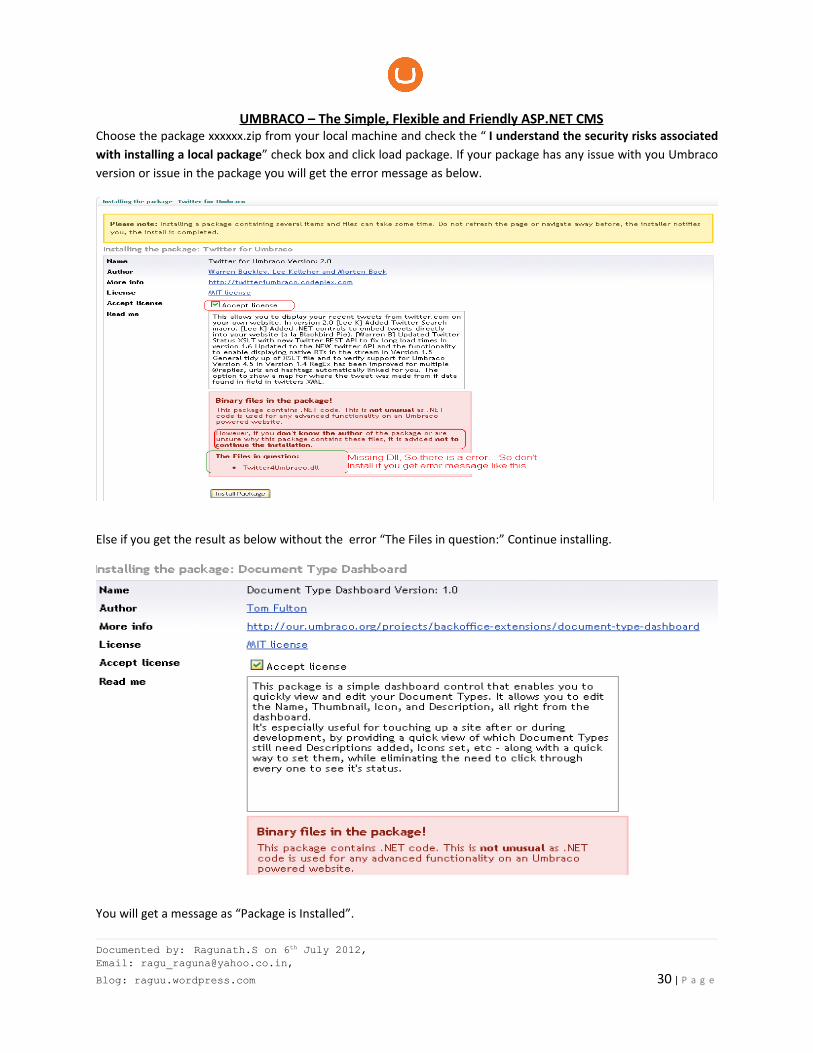
Choose the package xxxxxx.zip from your local machine and check the “ I understand the security risks associated with installing a local package” check box and click load package. If your package has any issue with you Umbraco version or issue in the package you will get the error message as below.
Else if you get the result as below without the error “The Files in question:” Continue installing.
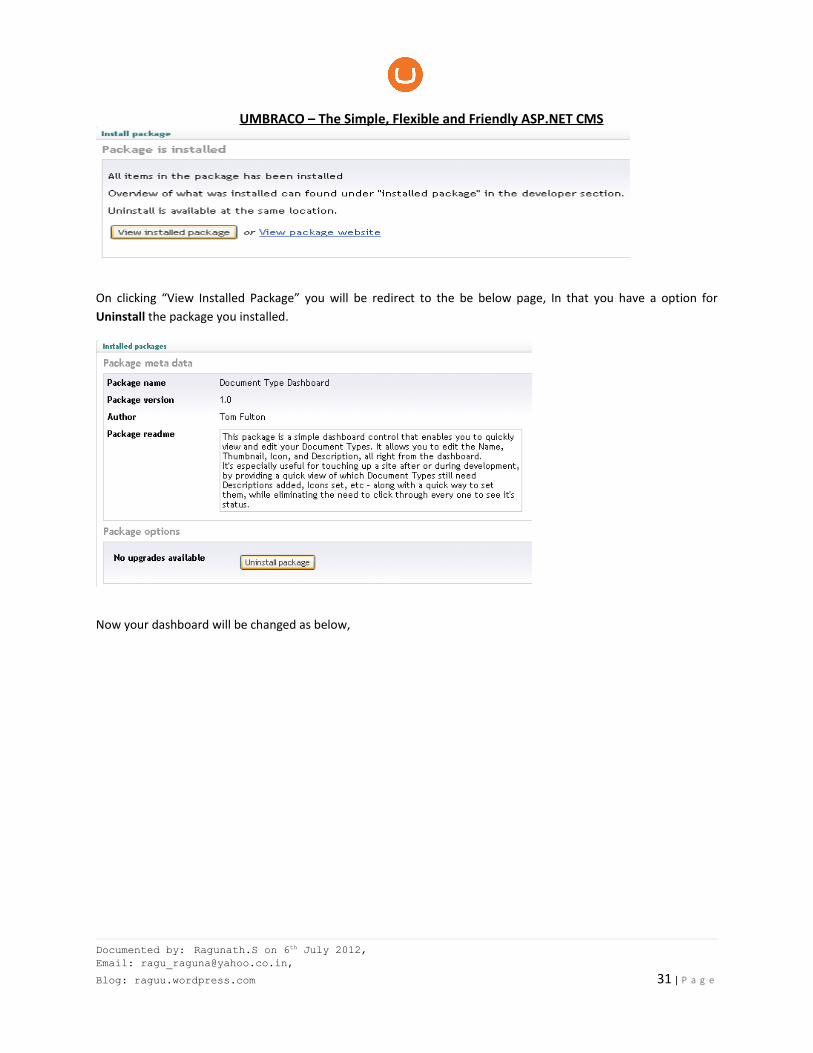
You will get a message as “Package is Installed”.
Documented by: Ragunath.S on 6th July 2012, Email: [email protected],
Blog: raguu.wordpress.com 30 | P a g e
UMBRACO – The Simple, Flexible and Friendly ASP.NET CMS
On clicking “View Installed Package” you will be redirect to the be below page, In that you have a option for Uninstall the package you installed.
Now your dashboard will be changed as below,
Documented by: Ragunath.S on 6th July 2012, Email: [email protected],
Blog: raguu.wordpress.com 31 | P a g e
UMBRACO – The Simple, Flexible and Friendly ASP.NET CMS
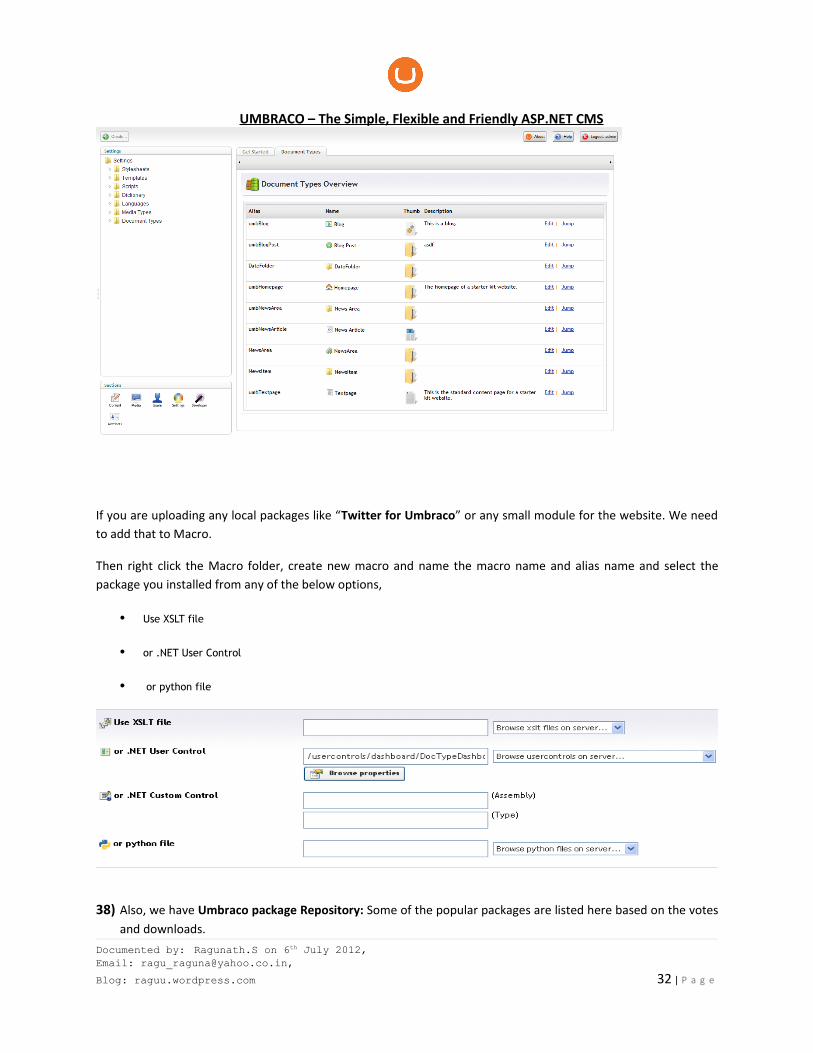
If you are uploading any local packages like “Twitter for Umbraco” or any small module for the website. We need to add that to Macro.
Then right click the Macro folder, create new macro and name the macro name and alias name and select the package you installed from any of the below options,
• Use XSLT file
• or .NET User Control
• or python file
38) Also, we have Umbraco package Repository: Some of the popular packages are listed here based on the votes and downloads.
Documented by: Ragunath.S on 6th July 2012, Email: [email protected],
Blog: raguu.wordpress.com 32 | P a g e

UMBRACO – The Simple, Flexible and Friendly ASP.NET CMS
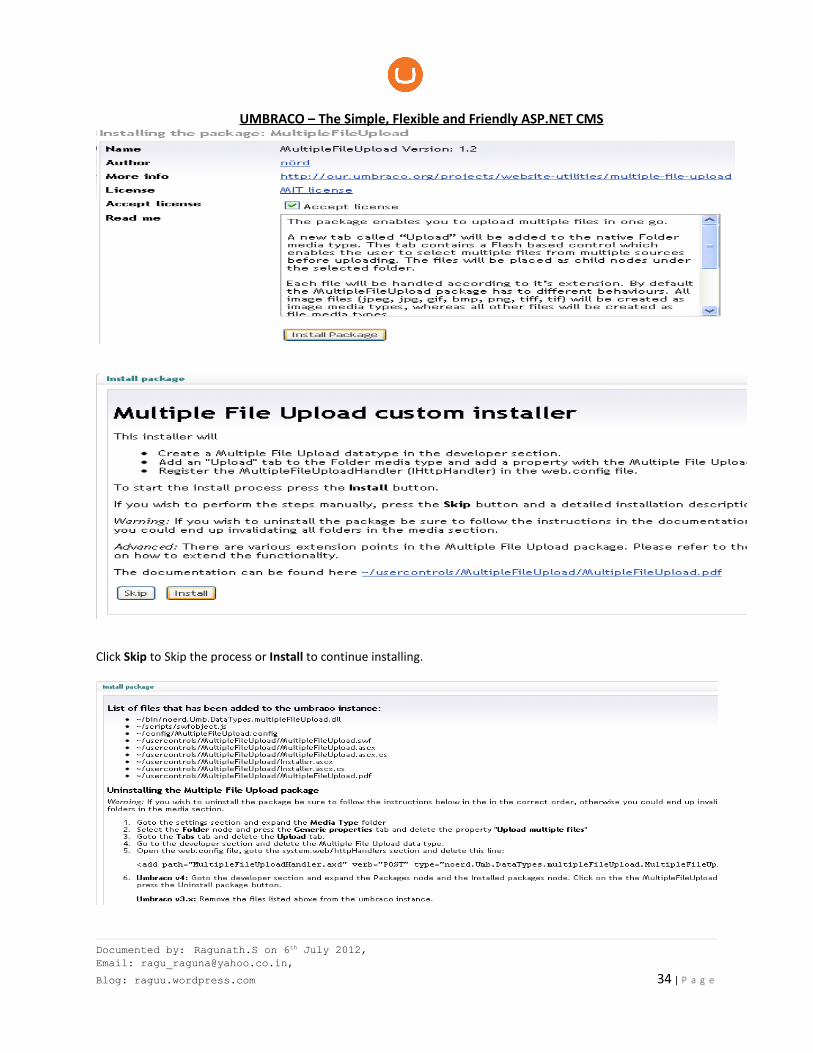
I plan to install “Multiple File Upload”, Mouse hover on the Icon you will get a popup with a option to view details and Install. Click on the view details to read more about the packages. To install click “Install Package”
Click Ok to install the package. Check the Accept license checkbox and Install package.
Documented by: Ragunath.S on 6th July 2012, Email: [email protected],
Blog: raguu.wordpress.com 33 | P a g e
UMBRACO – The Simple, Flexible and Friendly ASP.NET CMS
Click Skip to Skip the process or Install to continue installing.
Documented by: Ragunath.S on 6th July 2012, Email: [email protected],
Blog: raguu.wordpress.com 34 | P a g e
UMBRACO – The Simple, Flexible and Friendly ASP.NET CMS
Please note the below points somewhere for the future use:
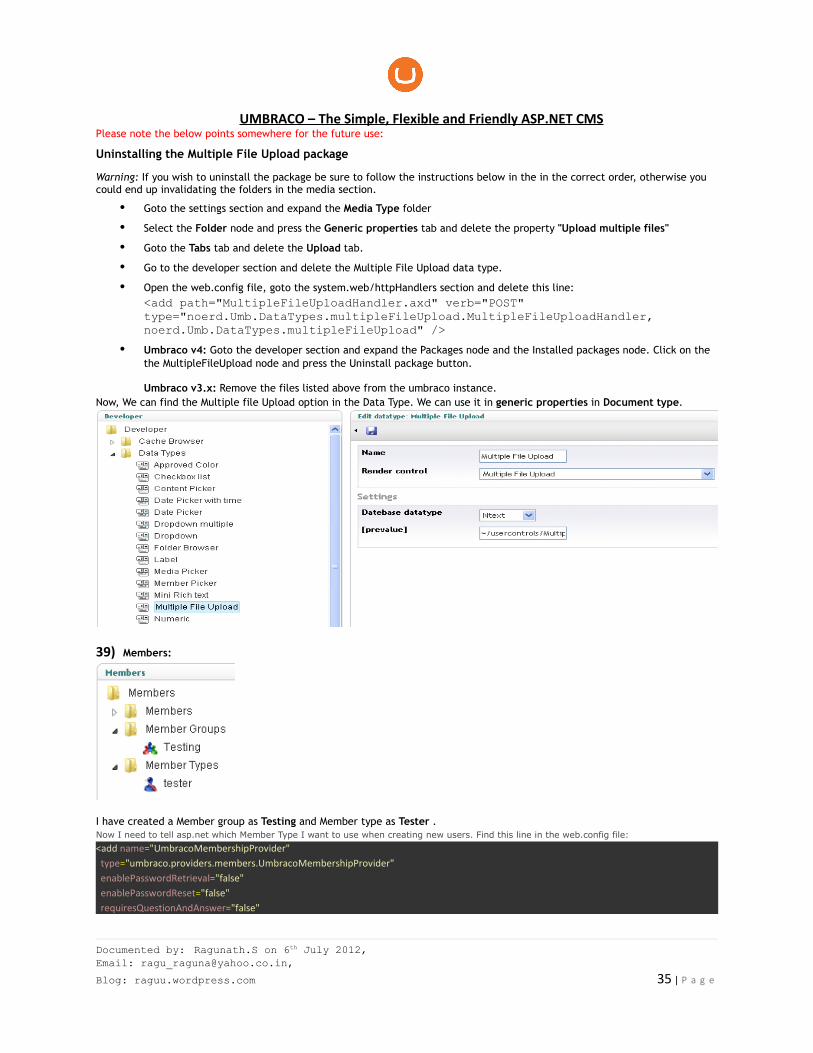
Uninstalling the Multiple File Upload package
Warning: If you wish to uninstall the package be sure to follow the instructions below in the in the correct order, otherwise you could end up invalidating the folders in the media section.
• Goto the settings section and expand the Media Type folder
• Select the Folder node and press the Generic properties tab and delete the property "Upload multiple files"
• Goto the Tabs tab and delete the Upload tab.
• Go to the developer section and delete the Multiple File Upload data type.
• Open the web.config file, goto the system.web/httpHandlers section and delete this line:<add path="MultipleFileUploadHandler.axd" verb="POST" type="noerd.Umb.DataTypes.multipleFileUpload.MultipleFileUploadHandler, noerd.Umb.DataTypes.multipleFileUpload" />
• Umbraco v4: Goto the developer section and expand the Packages node and the Installed packages node. Click on the the MultipleFileUpload node and press the Uninstall package button.
Umbraco v3.x: Remove the files listed above from the umbraco instance.Now, We can find the Multiple file Upload option in the Data Type. We can use it in generic properties in Document type.
39) Members:
I have created a Member group as Testing and Member type as Tester .Now I need to tell asp.net which Member Type I want to use when creating new users. Find this line in the web.config file:<add name="UmbracoMembershipProvider" type="umbraco.providers.members.UmbracoMembershipProvider" enablePasswordRetrieval="false" enablePasswordReset="false" requiresQuestionAndAnswer="false"
Documented by: Ragunath.S on 6th July 2012, Email: [email protected],
Blog: raguu.wordpress.com 35 | P a g e
UMBRACO – The Simple, Flexible and Friendly ASP.NET CMS
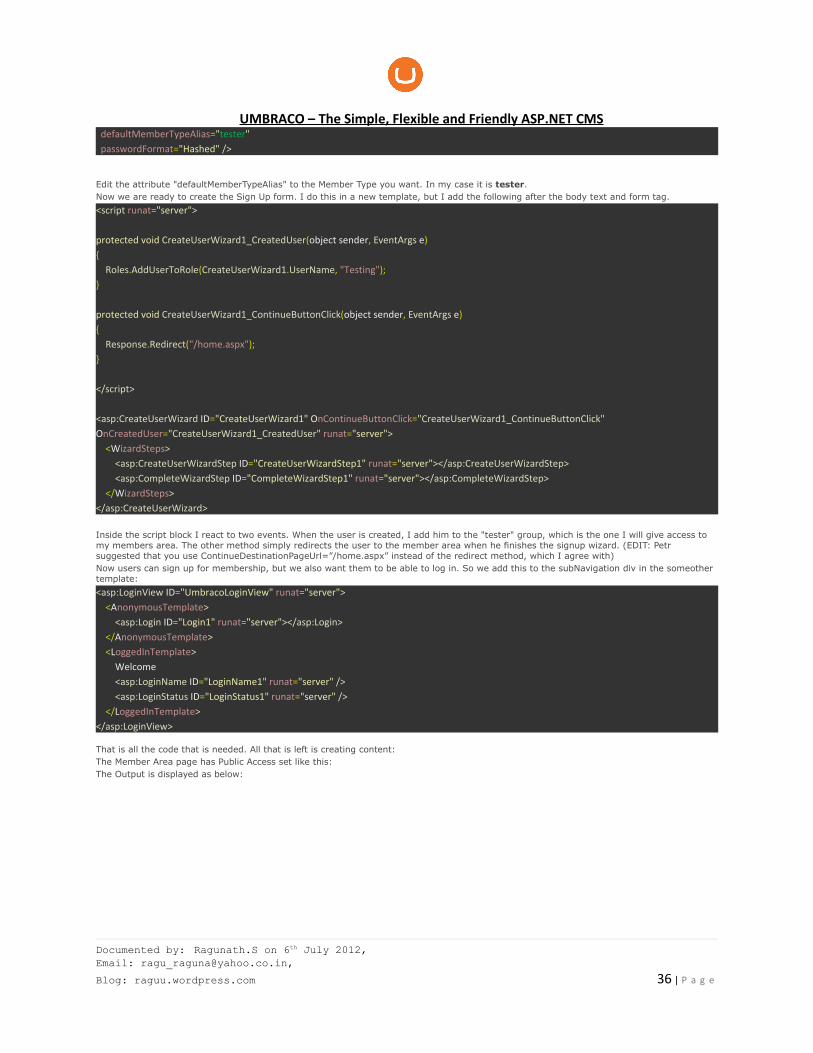
defaultMemberTypeAlias="tester" passwordFormat="Hashed" />
Edit the attribute "defaultMemberTypeAlias" to the Member Type you want. In my case it is tester.Now we are ready to create the Sign Up form. I do this in a new template, but I add the following after the body text and form tag.<script runat="server">
protected void CreateUserWizard1_CreatedUser(object sender, EventArgs e){ Roles.AddUserToRole(CreateUserWizard1.UserName, "Testing");}
protected void CreateUserWizard1_ContinueButtonClick(object sender, EventArgs e){ Response.Redirect("/home.aspx");}
</script>
<asp:CreateUserWizard ID="CreateUserWizard1" OnContinueButtonClick="CreateUserWizard1_ContinueButtonClick" OnCreatedUser="CreateUserWizard1_CreatedUser" runat="server"> <WizardSteps> <asp:CreateUserWizardStep ID="CreateUserWizardStep1" runat="server"></asp:CreateUserWizardStep> <asp:CompleteWizardStep ID="CompleteWizardStep1" runat="server"></asp:CompleteWizardStep> </WizardSteps></asp:CreateUserWizard>
Inside the script block I react to two events. When the user is created, I add him to the "tester" group, which is the one I will give access to my members area. The other method simply redirects the user to the member area when he finishes the signup wizard. (EDIT: Petr suggested that you use ContinueDestinationPageUrl=”/home.aspx” instead of the redirect method, which I agree with)Now users can sign up for membership, but we also want them to be able to log in. So we add this to the subNavigation div in the someother template:<asp:LoginView ID="UmbracoLoginView" runat="server"> <AnonymousTemplate> <asp:Login ID="Login1" runat="server"></asp:Login> </AnonymousTemplate> <LoggedInTemplate> Welcome <asp:LoginName ID="LoginName1" runat="server" /> <asp:LoginStatus ID="LoginStatus1" runat="server" /> </LoggedInTemplate></asp:LoginView>
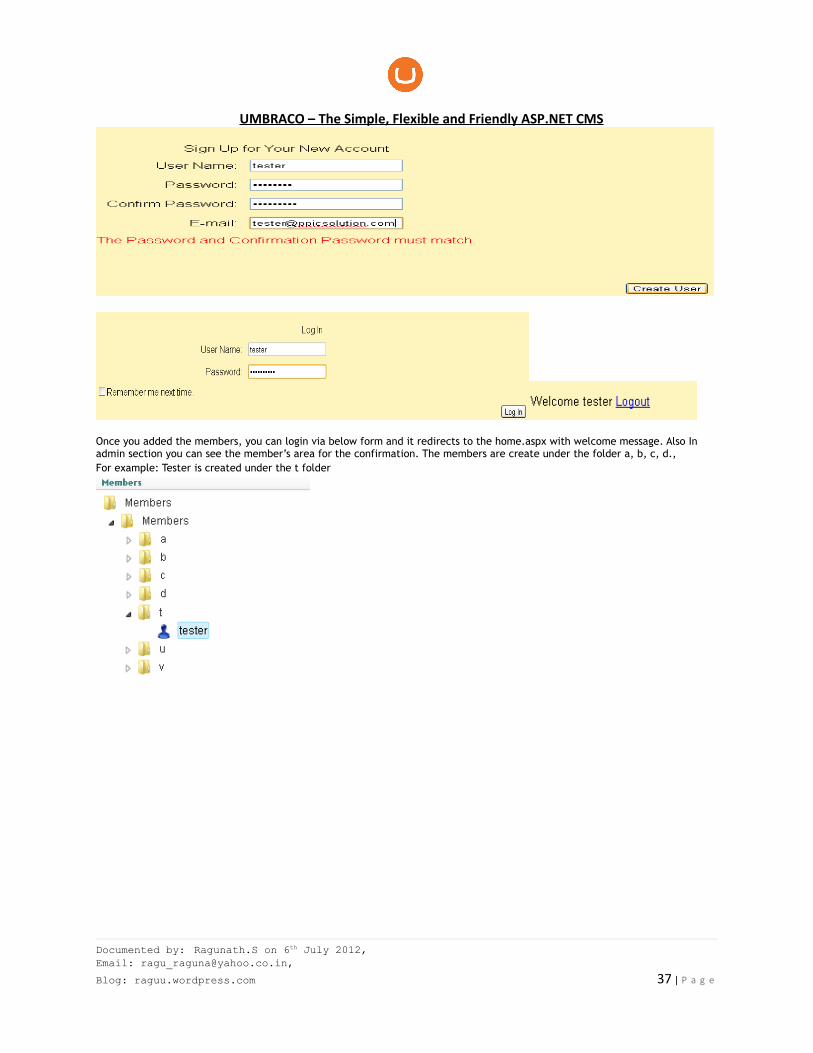
That is all the code that is needed. All that is left is creating content:The Member Area page has Public Access set like this:The Output is displayed as below:
Documented by: Ragunath.S on 6th July 2012, Email: [email protected],
Blog: raguu.wordpress.com 36 | P a g e
UMBRACO – The Simple, Flexible and Friendly ASP.NET CMS
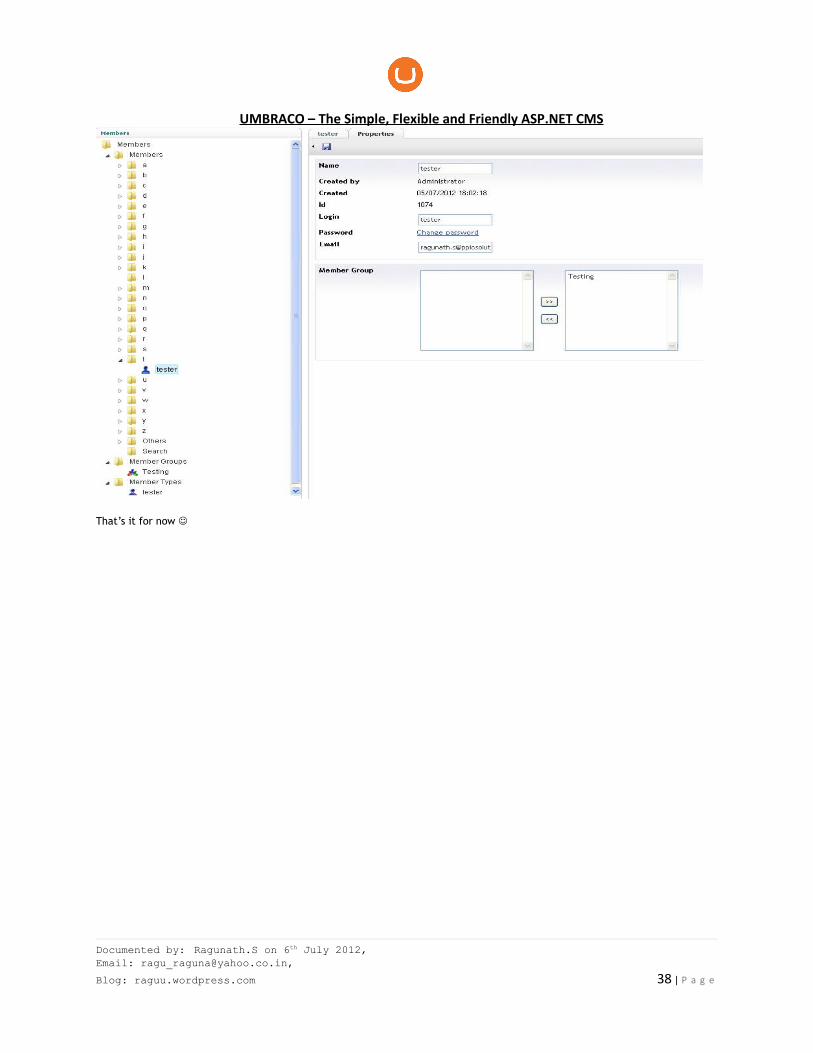
Once you added the members, you can login via below form and it redirects to the home.aspx with welcome message. Also In admin section you can see the member’s area for the confirmation. The members are create under the folder a, b, c, d.,For example: Tester is created under the t folder
Documented by: Ragunath.S on 6th July 2012, Email: [email protected],
Blog: raguu.wordpress.com 37 | P a g e
UMBRACO – The Simple, Flexible and Friendly ASP.NET CMS
That’s it for now
Documented by: Ragunath.S on 6th July 2012, Email: [email protected],
Blog: raguu.wordpress.com 38 | P a g e