total knee arthroplasty - summit medical center
TRANSCRIPT

1
Total Knee Arthroplasty
Patient and Caregiver Guide

2
Important phone numbers and locations
Summit Medical Center .............................................................................. (307) 232-6600
6350 East 2nd Street
Casper, WY 82609
Preadmission Testing Nurse ................................................. (307) 232-3248
Care Coordinator Nurse (307) 232-4055
Casper Orthopedics (307)265-7205 If you call before or after our office hours with an urgent problem, the
answering service will relay your message to the on-call doctor. He or she
will promptly return your call.
Thunder Basin Orthopedics .................................................... (307)358-6200 If you call before or after our office hours with an urgent problem, the
answering service will relay your message to the on-call doctor. He or she
will promptly return your call.
You can also visit us at https://summitmedicalcasper.com to take a virtual walk
through the hospital and to learn about upcoming events, special classes and
webinars that are available to patients and families.
If you would like a personal tour of the hospital before your stay, please call
307-232-4055. We would be happy to show you around.
3
Welcome to Summit Medical Center. We are honored to care for you.
We hope this information helps you prepare for your surgery and
recovery. If you have questions, please call and ask any one of your
healthcare team members.
This book is a guide. Your surgeon, nurses, and therapists may
change some information in this book to meet your needs.
About My Surgery
My surgery date:
My check-in location:
My arrival time:
No food, drink, water, gum, or nicotine, the morning of
surgery unless you are given different instructions from your
surgeon.
My surgeon:
My doctor:
My coach:
Emergency contact and phone number:
4
Table of Contents
About Your knee ................................................................................................ 5
Total Knee Replacement Surgery ............................................................... 6
Your Healthcare Team .......................................................................................... 7
Preparing for Your Surgery ........................................................................ 9
Your Surgery.............................................................................................. 15
Day Before Surgery ................................................................................... 16
Day of Surgery .......................................................................................... 16
After Surgery ............................................................................................. 17
When to Call Your Surgeon ......................................................................22
Preparing to Go Home ................................................................................. 23
Leaving the Hospital .................................................................................... 23
Walker and Crutches ........................................................................................ 24
Exercise Plan..................................................................................................... 28
Checklist ....................................................................................................... 32
On-Q Pain Device ................................................................................................ 33
Notes .................................................................................................................. 34
Helpful Resources ............................................................................................. 35
Pictures and Examples of Equipment ............................................................... 36
5
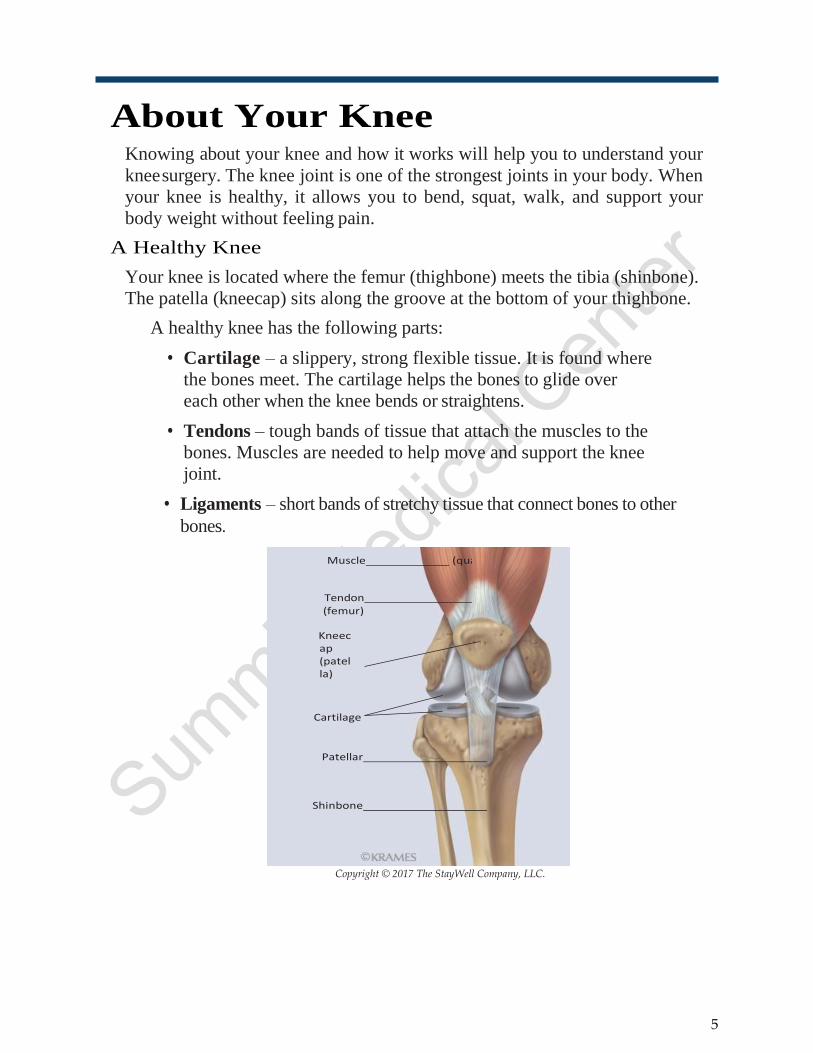
Muscle (quadriceps)
Tendon Thighbone (femur)
Kneecap (patella)
Cartilage
Patellar ligament
Shinbone (tibia)
About Your Knee Knowing about your knee and how it works will help you to understand your
knee surgery. The knee joint is one of the strongest joints in your body. When
your knee is healthy, it allows you to bend, squat, walk, and support your
body weight without feeling pain.
A Healthy Knee
Your knee is located where the femur (thighbone) meets the tibia (shinbone).
The patella (kneecap) sits along the groove at the bottom of your thighbone.
A healthy knee has the following parts:
• Cartilage – a slippery, strong flexible tissue. It is found where
the bones meet. The cartilage helps the bones to glide over
each other when the knee bends or straightens.
• Tendons – tough bands of tissue that attach the muscles to the
bones. Muscles are needed to help move and support the knee
joint.
• Ligaments – short bands of stretchy tissue that connect bones to other
bones.
Copyright © 2017 The StayWell Company, LLC.
6
Knee Replacement Surgery You may have damage to any of these parts of your knee. Depending on your
age and the amount of damage to your knee, you may need to have all or only
part of the joint replaced. Your surgeon will decide this.
Total Knee
Total knee replacement surgery removes the damaged and painful areas of
the femur (thighbone) and tibia (shinbone). These areas are replaced with
specially designed metal and plastic parts. Together, these parts make up
the implant. Some artificial joints are kept in place with special cement.
Others have surfaces into which your bone can grow.
Muscles and tendons hold natural joints in place. During surgery, these may
be cut to free a place for the new joint. When the new joint is put in place,
they are re-attached or removed. As those muscles and tendons heal, they
will also help hold your new joint in place.
Your surgeon starts by preparing the bone. The surfaces of the joint are
cleaned and shaped to hold the implant. The parts of the implant are put in
place. Your surgeon tests the fit and alignment of the implant.
When the implant fits correctly, its parts are secured to the bones. The
parts are joined, forming a new joint. Finally, the skin incision is closed.
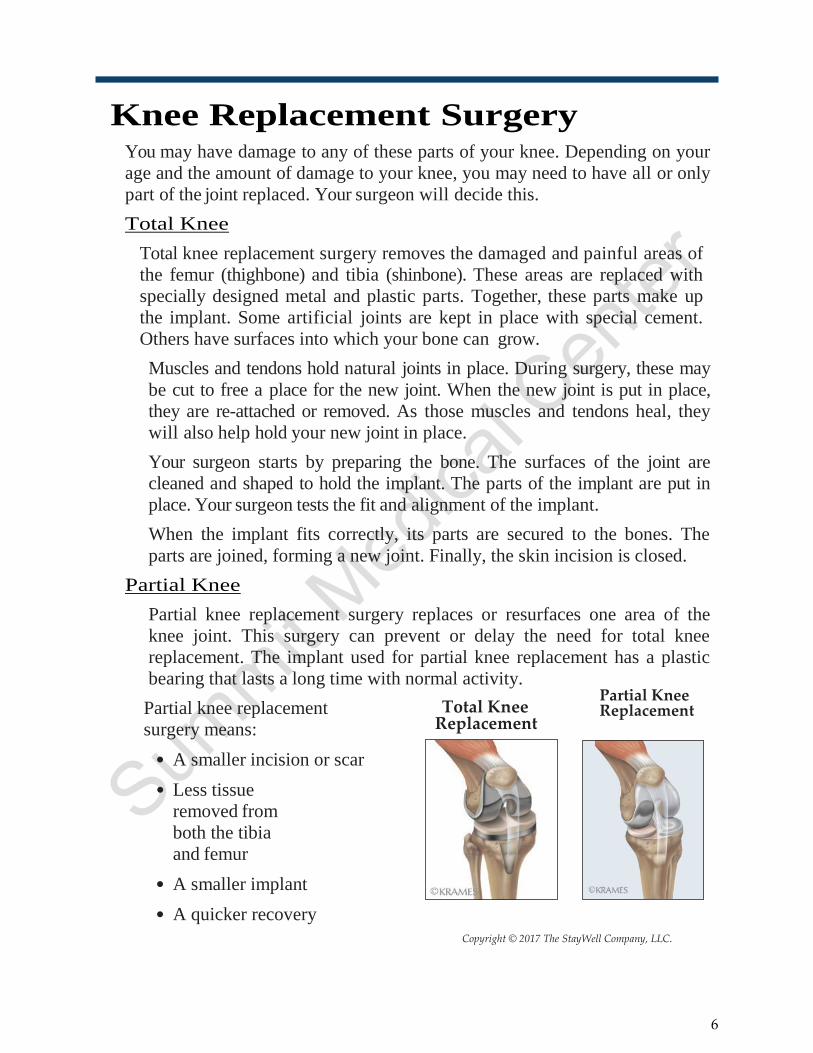
Partial Knee
Partial knee replacement surgery replaces or resurfaces one area of the
knee joint. This surgery can prevent or delay the need for total knee
replacement. The implant used for partial knee replacement has a plastic
bearing that lasts a long time with normal activity.
Partial knee replacement
surgery means:
• A smaller incision or scar
• Less tissue
removed from
both the tibia
and femur
• A smaller implant
• A quicker recovery
Total Knee Replacement
Partial Knee Replacement
Copyright © 2017 The StayWell Company, LLC.
7
Your Orthopedic Healthcare Team Your healthcare team helps get you back on your feet by preparing you for
surgery and recovery. You and your family are important members of the care
team. Please let us know if you need anything. We have many team members
who work with you and your coach for a successful recovery. Your team may
include the following:
• Orthopedic surgeon performs your knee surgery and manages your care.
• Physician Assistant assists the Orthopedic Surgeon with your
surgery and helps in managing your care.
• Anesthesiologist gives you medicine during surgery to prevent you from
feeling pain. Will place On-Q Pain device.
• Medical doctor/hospitalist may help in managing your care.
• Coach is a person you choose to support you in preparing for and
recovering from your joint replacement surgery. This person can be
a spouse, friend, or family member. Your coach will provide
support and encouragement throughout your experience.
• Nursing staff will care for you before, during, and after your
surgery. They will help keep you comfortable and safe while you
are with us.
• Physical therapists (PT) will guide you through an exercise
program to improve your strength, range of motion, and walking.
They will teach you how to use a walker or crutches, how to go up
and down stairs safely, and how to get in and out of a car.
• Occupational therapists (OT) teach you the best and safest ways
to do daily activities such as: getting dressed, getting in and out of
a chair or bed, bathroom use, household tasks, and can assist with
equipment needs.
• Case management team will help plan your move from the
hospital to your home or next level of care. They will also arrange
for any equipment or services you will need.
Other team members may include dietitians, lab technicians, and pharmacists.
The healthcare team works together to help you recover as quickly as possible.
8
Your Role
When it comes to preparing for and recovering from surgery, much of the
work is up to you. Your healthcare team will help as much as they can, but
you have the biggest role in making your surgery successful. You will need
to get your home and body ready for surgery. Following your doctor’s orders
before and after surgery will make a big difference in your recovery.
Coach Responsibilities
Your coach also plays an important part in your surgery and recovery. This
person should be a spouse, relative, significant other, or friend who will be
able to support you before, during, and after your hospital stay. Your coach
will not be expected to lift or carry you. If you are under 18 years old, you
must bring a parent or legal guardian with you. They should plan to:
• Attend the pre-op (before surgery) joint replacement class with you
• Help you with your exercises
• Give you directions and reminders
• Attend therapy with you in the hospital
• Stay with you and be available to help for at least 3 days after you leave
the hospital
9
Preparing for Your Surgery Preparing Your Home
Make your home safer and more comfortable for your recovery. Ask a friend
or family member to help you. Do as much as you can before your surgery.
Home Safety
Prevent falls and other injuries by making a few simple changes around your
home.
• Always keep your cell phone or
cordless phone with you.
• Keep your walker, cane, or other
assistive walking device within reach
at all times.
• Use chairs with straight backs and
sturdy arm rests which make it easier
to stand.
• Raise the seat height of a low chair by
adding a cushion.
• Clear clutter from pathways so you do
not fall.
• Ask someone to help clean up spills.
• Remove throw rugs.
• Tape down electric cords or tuck them behind furniture.
• Use a night-light or have a light source in every room.
• Move the items you use most often to counter height to avoid excess bending
or reaching.
• Do your laundry before having surgery.
• Clean your house before having surgery or ask others to help you clean.
• Tie a bag to your walker to carry your items.
• Wear shoes that fit and will not fall off your feet when you walk.
Do not walk around in your socks.
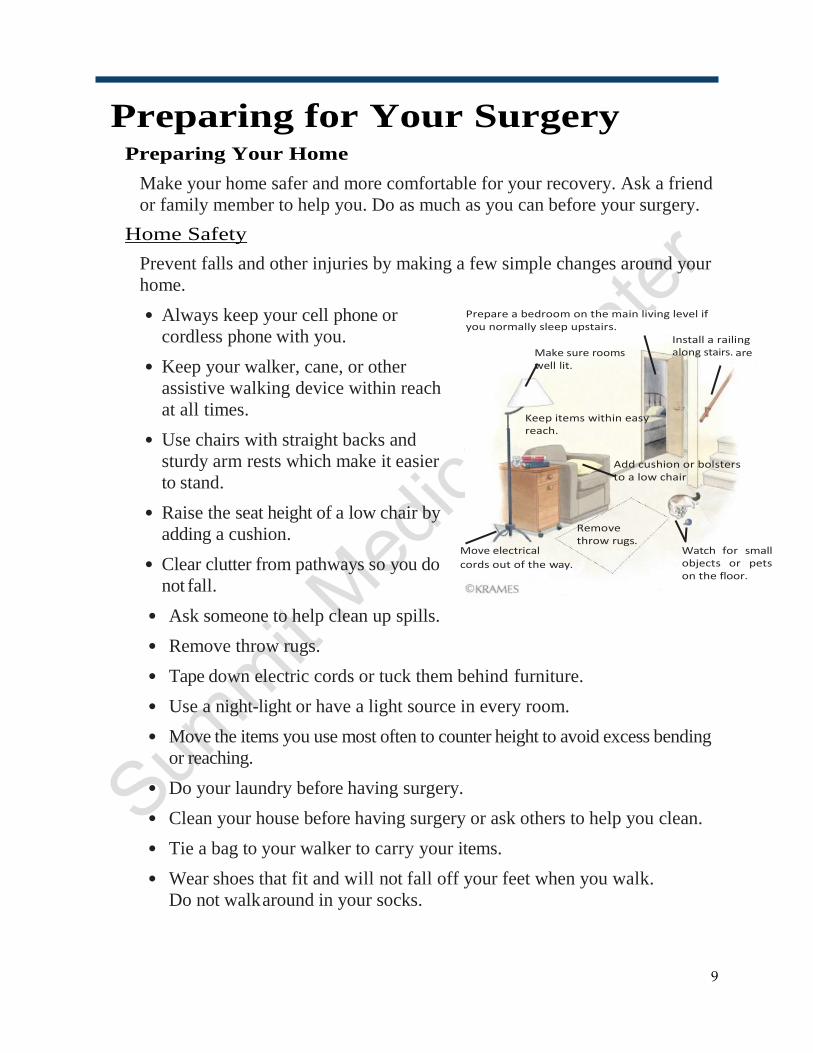
Prepare a bedroom on the main living level if you normally sleep upstairs.
Install a railing Make sure rooms along stairs. are well lit.
Keep items within easy reach.
Add cushion or bolsters to a low chair
Move electrical
Remove throw rugs.
cords out of the way.
Watch for small objects or pets on the floor.

10
Kitchen
• Plan some easy-meal menus and shop in advance.
• Make and freeze meals ahead of time. After surgery, you may want
bland/comfort foods.
• Stock up on foods that are easy to prepare.
• Many grocery stores will deliver an order right to your door. Contact
your local grocery store for more information.
Bedroom
• Sleep on a bed that you can get in and out of easily.
• Consider installing a bedrail to make getting in and out easier.
• Consider having a bedroom on the main level.
Bathroom Tips
• Prevent slips and falls by installing railings and non-slip surfaces.
• Check existing grab bars for strength and stability, and repair if needed.
• You and your therapist may discuss ways to raise the height of your toilet
seat.
• Make bathing easier by using a shower hose, liquid soap, a long-
handled sponge, and a bath bench or shower chair without a back.
That way you will not have to bend at the knee to bathe. See page 35
• Watch out for hazards, such as wet floors.
• Dry off in the shower to prevent bringing water out onto the floor.
• Stock up on toiletries and other items you will need during recovery.
Install grab bars in your shower or tub for support as you get in and out.
Use a long-handled sponge to wash hard-to-reach areas.
Use a commode chair or raised toilet seat to raise the height of
your toilet.
Use a non-slip bath
mat to help keep the
floor dry.
Install a hand-held
shower hose.
Sit on a bath bench or shower
chair while you bathe.

11
Stairs
• Arrange things so you do not have to use the stairs often.
• Make sure stairs have handrails that are securely fastened to the wall.
• Fix loose or uneven steps.
• Cover bare wood stairs with nonskid strips. If there is carpet, be sure it is
firmly attached.
Outdoors
• Try not to walk on uneven sidewalks or ground.
• When stepping off a curb, be aware of its height.
• You may want to use your cane or walker if the weather is bad, such as on
windy or rainy days or when there is snow on the ground.
• Add more outdoor lighting if needed.
• Watch for pets that could trip your feet, jump on you, or lie in your walking
path.
• Plan for a pet sitter or dog walker if needed.
• Arrange for help with yardwork or snow removal ahead of time.
• Decide which of your vehicles you can get in and out of the easiest. Be sure
you have enough legroom.
Help at Home
In the first weeks after surgery, you may want some help at home. Arrange for
this now. Family and neighbors may be able to help with meals, cleaning,
laundry, driving, and other demands. Check into community services available
in your area.
Special Equipment
Consider borrowing from others or local loan closets. Your therapists will talk
with you during your hospital stay about what equipment you may need to use
after surgery. Some of these may include:
• Walkers, crutches, cane
• Toilet riser
• Extra cushions to raise the seat of your favorite chair
• Hand held shower head and shower chair or bench
• Grab bars
• Reacher or sock aid
• Elastic shoe laces
12
Quitting Tobacco Use Tobacco use, whether in cigarette, e-cigarette, pipe, cigar, or chew form,
greatly increases the risk of complications from surgery. If you are a smoker,
now is the time to quit. Your immune system, your circulation, your airways,
and your lungs are damaged by smoking. Smoking is the leading preventable
cause of premature death in the United States.
Reasons to Quit
• Your recovery may go better. Smoking raises your chances of having
problems after total joint replacement surgery. Those who smoke
have an increased risk of:
– Bones not healing
– Total joint failure
– Pain needing more narcotic use
– Medical complications after surgery (Examples: Blood clots,
increased blood pressure, increased heart rate)
– Osteoporosis
• You will lower your risks of heart attack, stroke, many forms of
cancer, and lung disease.
• You will feel better and breathe easier.
Resources to Help You Quit
Quitting is hard, but do not give up. It may take more than one try to
quit for good. It is important to have a plan. Ask your doctor, nurse,
respiratory therapist, or pharmacist for help.
• National Quit Line (800) QUITNOW (784-8669) For Deaf and Hard
of Hearing Callers: Relay 7-1-1
• Freedom from Smoking Online: www.ffsonline.org
• National on-line website: www.smokefree.gov
• Guide to Quitting Smoking: www.cancer.org
Alcohol
Before your surgery, you may need to stop or reduce the amount of alcohol
you drink.
• Alcohol can impair your vision or your ability to walk.
• Alcohol may impair healing and increase the risk for infection.
• Ask your doctor if you need to quit or limit alcohol intake.
13
Maintaining Healthy Bones
Nutrition
Good nutrition helps wound healing. Vitamins in fruits and vegetables and
protein in meat and fish will build new tissue and prevent infection. It is
important to get enough calories and protein in your diet to heal.
Your Appetite
For a few weeks after surgery, you may notice that you do not have an
appetite or that food tastes different. Your appetite will improve over time.
Calories are needed for healing and for energy. Your recovery is not a time to
try to lose weight. If needed, a weight loss program can be started after you
have recovered from your surgery.
• If your appetite is poor, eat smaller meals instead of large ones. Eating
smaller portions 5 or 6 times a day may help you get the nutrition
that you need. Aim for 3 meals and 2 snacks every day.
• Try a nutritional supplement, such as protein bars or protein shakes,
for a snack.
• Eat something before physical therapy.
Eat a Balanced Diet
The My Plate website can help you choose the
best types and right amounts of foods to eat.
Your nutrition needs may be different
depending on your gender, age, and activity
level. Visit www.choosemyplate.gov to find
specific guidelines for you.
Why You Need Calcium
Calcium is important to prevent osteoporosis. If you have osteoporosis, your
bones can become weak and break easily.
Healthy habits can affect how well the body is able to use calcium.
• Exercise helps the body to use calcium and makes the bones stronger.
• Your body needs vitamin D and vitamin K for healthy bones.
14
Things to Bring to the Hospital
Paperwork
Forms required by your insurance carrier.
A copy of your Healthcare Directive or Durable Power of Attorney for
Healthcare if you have one. If you do not have one and would like more
information, talk with your healthcare team.
Personal items
Cases for your glasses, dentures, and/or contact lenses. Label the
containers with your name to keep them safe when not in use.
Things that help you feel comfortable and support your healing. Some
examples may be music, pictures, or religious material.
Loose, comfortable clothes.
Walking shoes.
Medicine
You will be asked to bring a complete list of the medicine you take at
home. This includes vitamins, herbals, dietary supplements, inhalers,
ointments, eye drops, and Nitroglycerin. A nurse will review the medicine
with you.
Personal Medical Equipment
If you use a CPAP machine for sleep apnea, bring the machine and cord.
Also, bring your CPAP tubing, mask, and settings.
Bring devices you use to walk at home such as a cane, walker, or brace.
If you take special medications such as Chemo therapy medication,
please bring these with you to the hospital.
Options to Protect Your Valuables
Leave your valuables at home, as you will be spending time in therapy
and away from your room. You are responsible to keep track of your
items.
Have a family member take your checkbook, wallet, credit cards, large
amounts of cash, jewelry, and sentimental items.
15
Your Surgery Being prepared will help your joint replacement surgery go more smoothly.
Make a checklist of things you need to know. Then write down your
questions. Your healthcare team will answer your questions.
Before Surgery
There are things that must be done before your surgery.
• Schedule an appointment for your physical exam with your primary
doctor. You may have more appointments with specialists as needed.
It is important to talk with your doctor about the risks and benefits of
having joint replacement surgery. Report any injuries or signs of
infection to your doctor or nurse right away. Surgery may need to be
re-scheduled until any possible source of infection is treated.
• Follow your doctor or nurse’s advice for taking medicine.
• Talk to your healthcare team about needed dental care. Schedule an
appointment with your dentist as directed by your doctor. Your mouth
could have bacteria that would be harmful to a new joint.
• Complete tests as ordered by your doctor.
• Attend a joint replacement education class.
• Review this book.
• Start preparing your home.
• Talk to your family about the care you will need when you return
home. You should have someone with you for at least 3 days after
you return home.
• Contact your insurance company for pre-authorization, pre-
certification, a second opinion, or referral form as needed.
• Have the following information ready for pre-registration:
– Insurance Card with name of insurance company, mailing
address, policy and group number.
– Your photo I.D

16
Day Before Surgery • A nurse will call you the day before your surgery. If your surgery is on
a Monday, you will be called the Friday before. The nurse will tell you
what time to come in for your surgery.
• Pack your bag.
• Shower as instructed.
• Eat a light supper and a bedtime snack.
• Nothing to eat or drink after midnight. Follow instruction about taking
medications on the day of surgery.
Day of Surgery • Shower as instructed.
• Brush your teeth. Do not swish with water or mouth wash.
• Wear clean, comfortable clothes.
• Do not use any perfume, deodorant, cream, lotion, powder, or nail
polish.
• Take only the medicine that you were instructed with a small sip of
water.
You will be given specific instructions
about showering before your surgery.
17
After Surgery • Your orthopedic surgeon will speak with your family after your
surgery.
• A volunteer will help or direct your family to your room on the
orthopedic unit.
In Your Hospital Room
After surgery, you will be taken to a hospital room where your coach can join
you. You will begin moving your knee joint and most often will start therapy
the day of surgery. Your plan of care will be reviewed with you. You will be
watched closely to keep you safe.
Equipment Used in the Hospital
Here is some of the equipment that may be used: See page 36 for pictures
• An IV line to give fluids and medicine, oxygen tubing and
oxygen monitor, sequential compression device (SCD) to help
blood flow in your legs and prevent blood clots
• An incentive spirometer to help you breathe deeply and prevent
respiratory infections like pneumonia
• A drainage tube in your joint to release fluid and reduce swelling
• An ice pack system to reduce pain and swelling
• A commode chair or raised toilet seat
Pain Management
All patients will have pain after surgery. Our goal is to help manage your
pain. You will be asked to rate your pain on a scale of 0 to 10 (10 being the
worst). Your surgeon will decide which type of pain medicine is best for you.
You will be given pain medicine that has been ordered by your surgeon.
When your pain is well managed, you are better able to perform your daily
activities. Tell your nurse if your pain is not controlled well by these
medicines.
Pain Medicine After Surgery
It is important to work with your healthcare team for good pain management.
When you begin therapy, your nurse will give you a pain pill about a half
hour before your session. Tell your nurse or surgeon about:
• Your pain. Do not wait until your pain becomes intolerable.
• The pain control methods or medicines that have helped you in the past.
• Any concerns you have about taking pain medicines.
18
Pain Control After Surgery
Summit Medical Center is a partner in opioid stewardship. We offer our
patients a non-opioid pain control option called an On-Q device. The On-Q
device is a pain control catheter that is placed by your anesthesiologist before
surgery. The On-Q delivers a local numbing agent that is opioid free but
blocks the surgical area and causes it to be numb. This helps decrease pain
and allow for less use of opioid pain medications. This decrease the chances
of complications of opioids and helps prevent extended recovery times
associated with opioid use. See attached section on On-Q Device
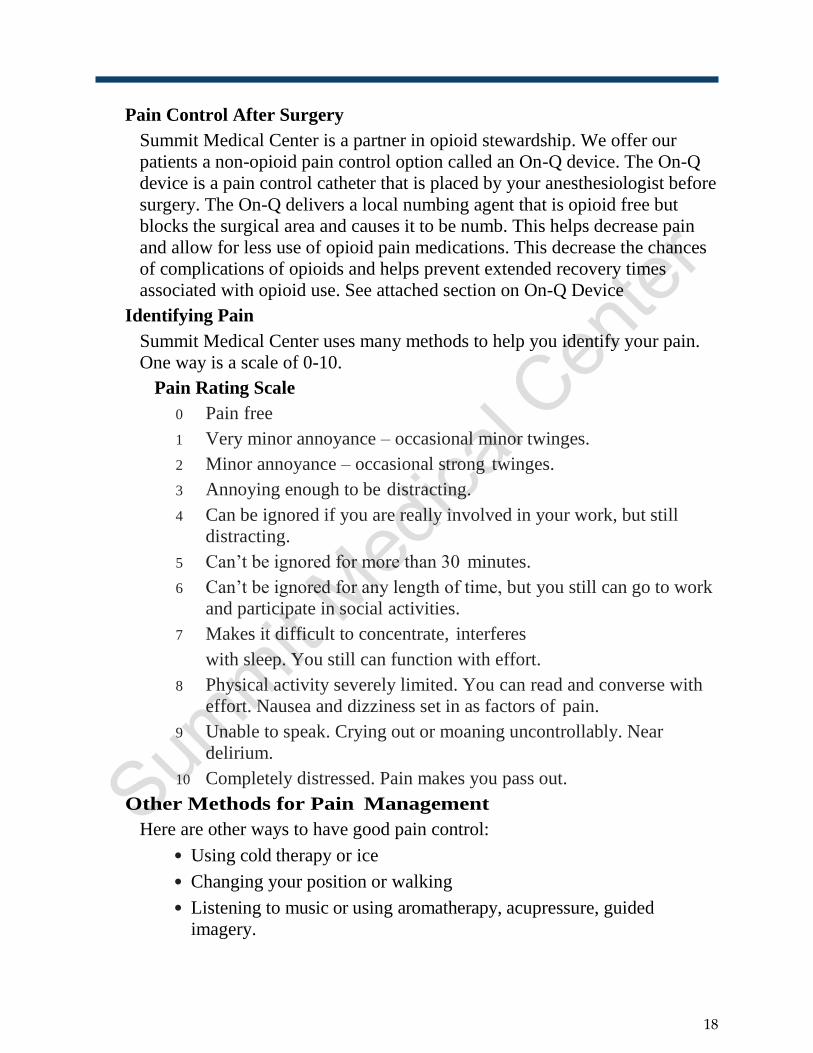
Identifying Pain
Summit Medical Center uses many methods to help you identify your pain.
One way is a scale of 0-10.
Pain Rating Scale
0 Pain free
1 Very minor annoyance – occasional minor twinges.
2 Minor annoyance – occasional strong twinges.
3 Annoying enough to be distracting.
4 Can be ignored if you are really involved in your work, but still
distracting.
5 Can’t be ignored for more than 30 minutes.
6 Can’t be ignored for any length of time, but you still can go to work
and participate in social activities.
7 Makes it difficult to concentrate, interferes
with sleep. You still can function with effort.
8 Physical activity severely limited. You can read and converse with
effort. Nausea and dizziness set in as factors of pain.
9 Unable to speak. Crying out or moaning uncontrollably. Near
delirium.
10 Completely distressed. Pain makes you pass out.
Other Methods for Pain Management
Here are other ways to have good pain control:
• Using cold therapy or ice
• Changing your position or walking
• Listening to music or using aromatherapy, acupressure, guided
imagery.

19
Preventing Falls During Your Hospital Stay
Our goal is to keep you safe from a fall. After joint replacement surgery, you
are at a high risk of falling.
Falls can happen because of:
• Changes in your balance caused by
the surgery, weakness, or numbness
from On-Q device
• Using new equipment like walkers or crutches
• Taking pain medicine
Call the nurse before you get out of bed and when you are done in the
bathroom. We may use a bed alarm during your stay to remind you to call for
help. Staff will check on you often to keep you safe. A fall may result in a
longer stay in the hospital or even another surgery. Remember, the hospital
is not your familiar environment. You may be connected to cords, pumps, or
other equipment. Even if you no longer need therapy, you still need to ask for
help to get up or walk.
Preventing Falls at Home
It is important to do what you can to lower your risk of falling. See the
section Preparing Your Home at the beginning of this book for things you
can do to make your home safer and prevent falls.
Call Don’t Fall!
Do not get up without help.
20
Preventing Infection A replacement joint is not as good at fighting germs as a natural joint. Infection
can be a serious problem after joint replacement surgery. If a new joint gets
infected, it is hard to cure. Sometimes the new joint must be removed. You can
help prevent infection by:
• Cleaning your hands with soap and water or hand sanitizer.
Clean your hands:
– Before touching your incision or changing your dressing
– After using the toilet, blowing your nose or petting animals
– After doing laundry, housework, or yard work
• Making sure your family and friends wash their hands.
• Getting your teeth checked by a dentist. Bacteria from cavities
or gum disease can be a source of infection. Brush your teeth 2
times a day.
• Being aware of any cuts, scrapes, sores or redness. These could
be a path for germs to get into your body.
• Treating bladder infections. If you have cloudy urine, your urine
smells strongly or it burns when you pass urine, you may have a
bladder infection. Tell your surgeon if you have any of these
symptoms after surgery.
Care of Your Incision
Normally, it takes about 2 weeks for your incision to heal enough to stay
closed. If you have sutures or staples, they will be removed about 2 weeks
after surgery. Over the next 6 to 8 weeks, your incision may feel tight and
itchy, which is part of normal healing. It is common to have more swelling and
pain 4 to 7 days after surgery. After about a week, swelling and pain will get
better day by day. You will continue to have some swelling over the next 6 to
12 months. To care for your incision:
• Keep your dressing clean and dry.
• You may shower (consider a shower chair). Refer to the
instructions you were given.
• Do not soak the knee or take baths until your surgeon tells you it is okay.
• Wear loose clothing that is easily washed and does not rub or irritate the
incision.
• Never dab lotion, ointment, powders, or perfume on the incision.
21
Preventing Pneumonia
Take deep breaths every hour while you are awake to clear the anesthesia
from your lungs and help prevent pneumonia. You will start this in the
hospital. You will need to continue at home until you are walking around
your home about every hour during the day. If you have an incentive
spirometer, use it as directed. See page 36
Preventing Blood Clots
A deep vein thrombosis (DVT) is a blood clot that can form in a leg vein
after knee replacement surgery. A piece of the clot can break off, travel
through the blood stream to the lung, and can cause death. Your doctors may
tell you to use:
• A sequential compression device (SCD) that improves your blood
flow by gently squeezing and releasing your leg or foot. (see page 36)
• Compression stockings (TED hose) or ACE wraps. (see page 36)
• Medicine to prevent clotting.
• Activity to help increase circulation:
– Ankle pumps while lying in bed
– Walking
Preventing Constipation
A side effect of taking pain medicine is constipation. Decreased activity can
also lead to constipation. To avoid becoming constipated:
• Gradually increase your intake of fiber-rich foods such as
fruits, vegetables, and whole grains.
• Drink 8 or more 8 oz. glasses of fluids each day.
• Stay as active as you can.
• Consider drinking prune juice each day.
• Consider taking a stool softener or laxative. Many of these are
available over-the-counter at your local store. If you have
questions, ask your doctor or pharmacist.
If constipation problems continue, call your doctor. Check with your doctor or
nurse before giving yourself an enema.

22
Rest and Sleep
After surgery, you may have a hard time sleeping. Taking your pain pills
around bedtime controls your pain so you can stay asleep. Rest will help you
get your strength back more quickly. Here are some tips to help you rest:
• Go to bed at the same time each night.
• Stop and rest for a few minutes after activity.
• Take short naps or rest periods when you are feeling tired.
When to Call Your Surgeon
Call your surgeon if:
• Your lower leg or toes feel numb, tingly, cool to the touch or
are pale
• You have a fever over 101 degrees Fahrenheit (38.3 degrees
Celsius)
• Your incision:
– Has increased redness
– Is hot to touch
– Is more painful than it has been
– Oozes a new drainage or smells bad
– Bleeds enough to come through your bandage
• Your pain medicine is not managing your pain
• You have side effects from your medicine such as an upset
stomach, throwing up, redness, rash, or itching
• You have pain or swelling in the calf of either leg
• The edges of your incision come apart
• You have any questions or concerns about your health
If you experience chest pain or trouble breathing
Call 911.
23
Preparing to Go Home It is common to feel anxious when you think about caring for yourself away from
the hospital. The more you learn, the more confident you will feel. It is best if you
have someone stay with you when you first go home. Most often, you will be
ready to go home when you are able to walk safely and do your exercises. Your
surgeon will decide when you are ready to leave the hospital. A nurse, case
manager, or social worker will visit you in the hospital to discuss any help you
may need.
Before you leave, you can expect to be given:
• Written instructions for how to care for yourself and when to call the
surgeon
• Prescriptions for pain and blood thinner medicine as ordered by your
surgeon
• Follow-up appointments
Leaving the Hospital
Your doctors and therapists will decide when you are able to go home. After you
have been given all the needed instructions, you will be ready for the trip
home. It is normal for you to feel tired and worn out. Plan rest periods in-
between your activities. Your energy level will improve in the days and weeks
ahead.
• Remember to ask for a pain pill before you leave the hospital. This
will make the ride home more comfortable.
• Plan on wearing loose-fitting street clothes that do not have tight
elastic at the waist or ankles. Your knee will have some swelling and
bandages and loose clothes will make dressing easier.
• Sit in the front passenger seat of the car and recline the backrest a
little.
• Always wear your seatbelt.
• If you are traveling a long distance, plan to get out of the car and stretch
every hour. This will keep you from getting too stiff and will also
help prevent blood clots in your legs.
24
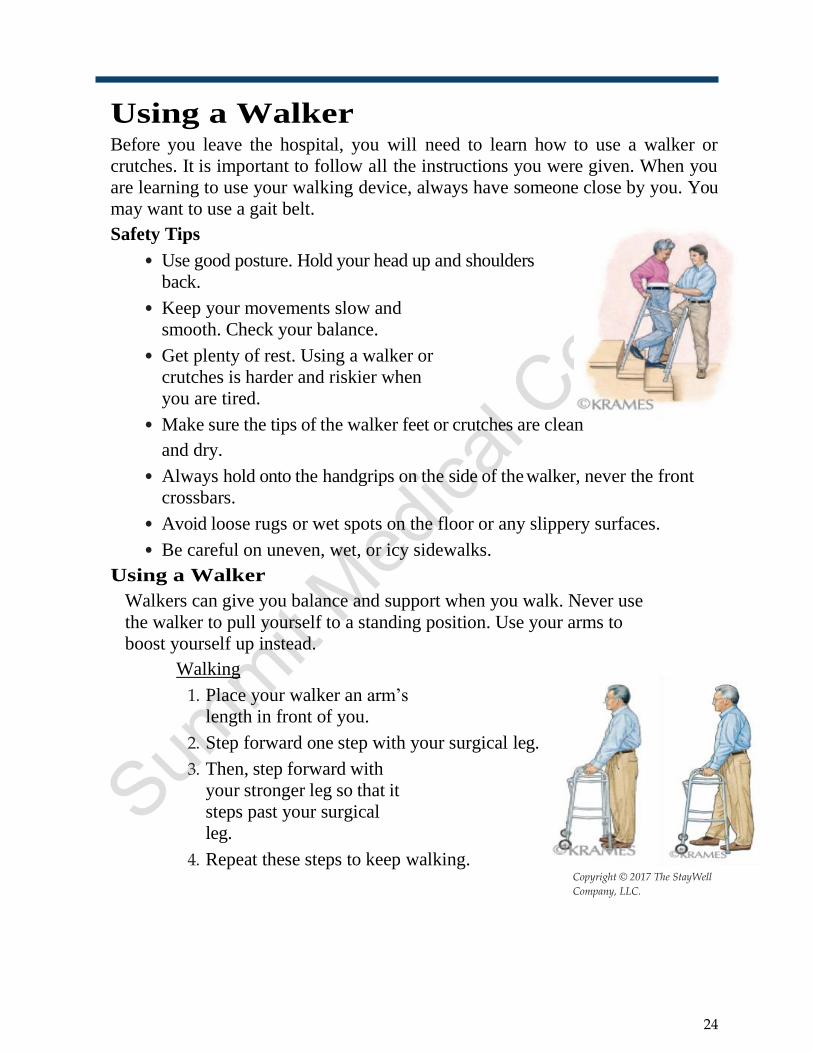
Using a Walker Before you leave the hospital, you will need to learn how to use a walker or
crutches. It is important to follow all the instructions you were given. When you
are learning to use your walking device, always have someone close by you. You
may want to use a gait belt.
Safety Tips
• Use good posture. Hold your head up and shoulders
back.
• Keep your movements slow and
smooth. Check your balance.
• Get plenty of rest. Using a walker or
crutches is harder and riskier when
you are tired.
• Make sure the tips of the walker feet or crutches are clean
and dry.
• Always hold onto the handgrips on the side of the walker, never the front
crossbars.
• Avoid loose rugs or wet spots on the floor or any slippery surfaces.
• Be careful on uneven, wet, or icy sidewalks.
Using a Walker
Walkers can give you balance and support when you walk. Never use
the walker to pull yourself to a standing position. Use your arms to
boost yourself up instead.
Walking
1. Place your walker an arm’s
length in front of you.
2. Step forward one step with your surgical leg.
3. Then, step forward with
your stronger leg so that it
steps past your surgical
leg.
4. Repeat these steps to keep walking. Copyright © 2017 The StayWell
Company, LLC.
25
Sitting and Standing with a Walker Sit to Stand with a Walker
1. Slide to the edge of the chair or bed.
2. Put your surgical leg forward, place your other foot back underneath you.
3. Place your walker in front of you.
4. Push yourself up to standing, using the armrests of the chair.
5. Then reach for your walker.
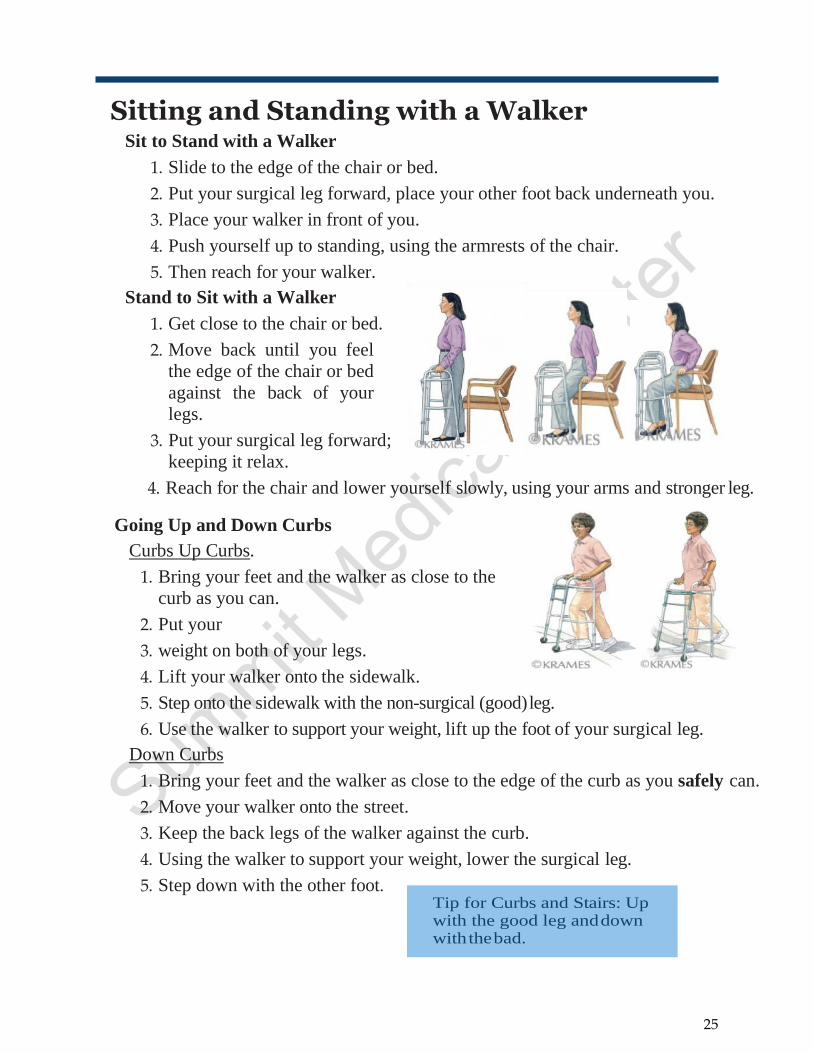
Stand to Sit with a Walker
1. Get close to the chair or bed.
2. Move back until you feel
the edge of the chair or bed
against the back of your
legs.
3. Put your surgical leg forward;
keeping it relax.
4. Reach for the chair and lower yourself slowly, using your arms and stronger leg.
Going Up and Down Curbs
Curbs Up Curbs.
1. Bring your feet and the walker as close to the
curb as you can.
2. Put your
3. weight on both of your legs.
4. Lift your walker onto the sidewalk.
5. Step onto the sidewalk with the non-surgical (good) leg.
6. Use the walker to support your weight, lift up the foot of your surgical leg.
Down Curbs
1. Bring your feet and the walker as close to the edge of the curb as you safely can.
2. Move your walker onto the street.
3. Keep the back legs of the walker against the curb.
4. Using the walker to support your weight, lower the surgical leg.
5. Step down with the other foot. Tip for Curbs and Stairs: Up with the good leg and down with the bad.
26
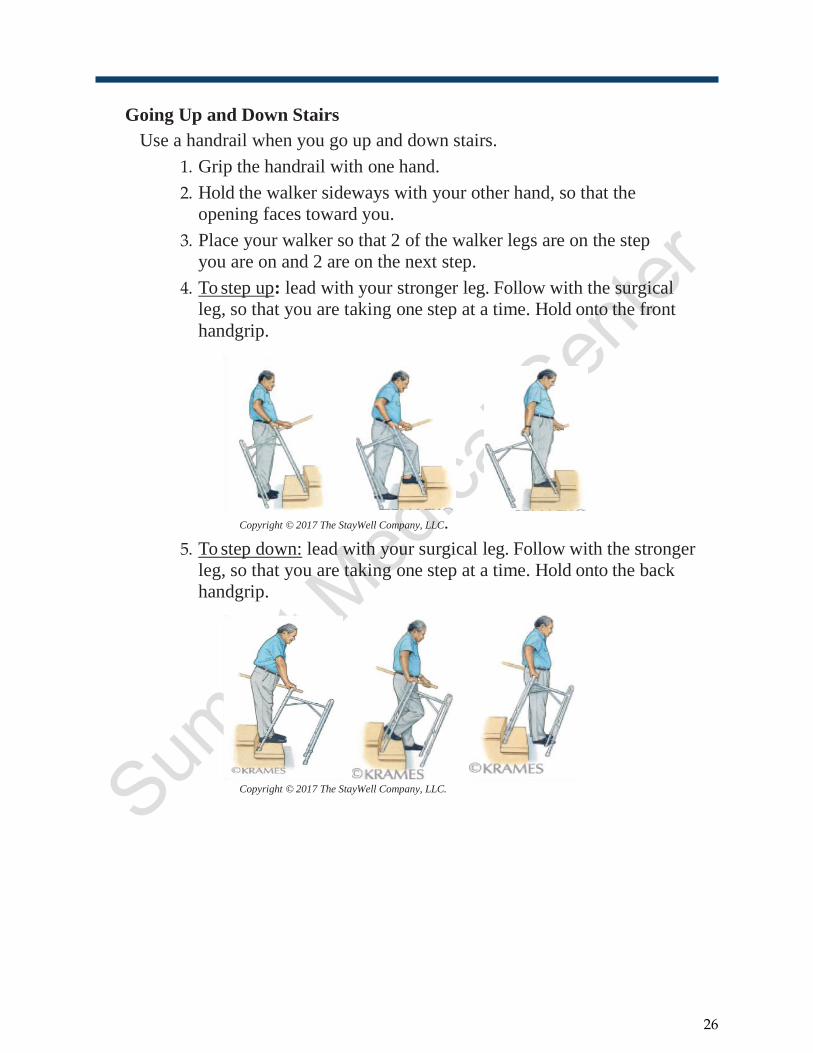
Going Up and Down Stairs
Use a handrail when you go up and down stairs.
1. Grip the handrail with one hand.
2. Hold the walker sideways with your other hand, so that the
opening faces toward you.
3. Place your walker so that 2 of the walker legs are on the step
you are on and 2 are on the next step.
4. To step up: lead with your stronger leg. Follow with the surgical
leg, so that you are taking one step at a time. Hold onto the front
handgrip.
Copyright © 2017 The StayWell Company, LLC.
5. To step down: lead with your surgical leg. Follow with the stronger
leg, so that you are taking one step at a time. Hold onto the back
handgrip.
Copyright © 2017 The StayWell Company, LLC.
27
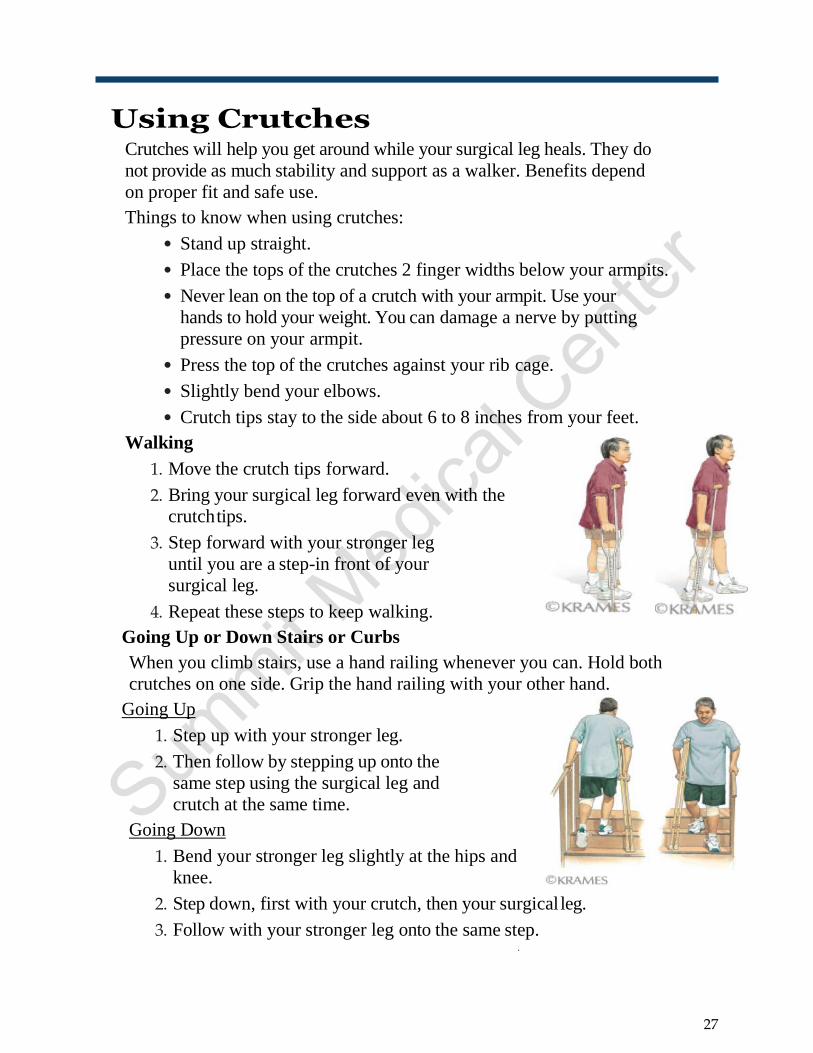
Using Crutches Crutches will help you get around while your surgical leg heals. They do
not provide as much stability and support as a walker. Benefits depend
on proper fit and safe use.
Things to know when using crutches:
• Stand up straight.
• Place the tops of the crutches 2 finger widths below your armpits.
• Never lean on the top of a crutch with your armpit. Use your
hands to hold your weight. You can damage a nerve by putting
pressure on your armpit.
• Press the top of the crutches against your rib cage.
• Slightly bend your elbows.
• Crutch tips stay to the side about 6 to 8 inches from your feet.
Walking
1. Move the crutch tips forward.
2. Bring your surgical leg forward even with the
crutch tips.
3. Step forward with your stronger leg
until you are a step-in front of your
surgical leg.
4. Repeat these steps to keep walking.
Going Up or Down Stairs or Curbs
When you climb stairs, use a hand railing whenever you can. Hold both
crutches on one side. Grip the hand railing with your other hand.
Going Up
1. Step up with your stronger leg.
2. Then follow by stepping up onto the
same step using the surgical leg and
crutch at the same time.
Going Down
1. Bend your stronger leg slightly at the hips and
knee.
2. Step down, first with your crutch, then your surgical leg.
3. Follow with your stronger leg onto the same step. .
28
1 2
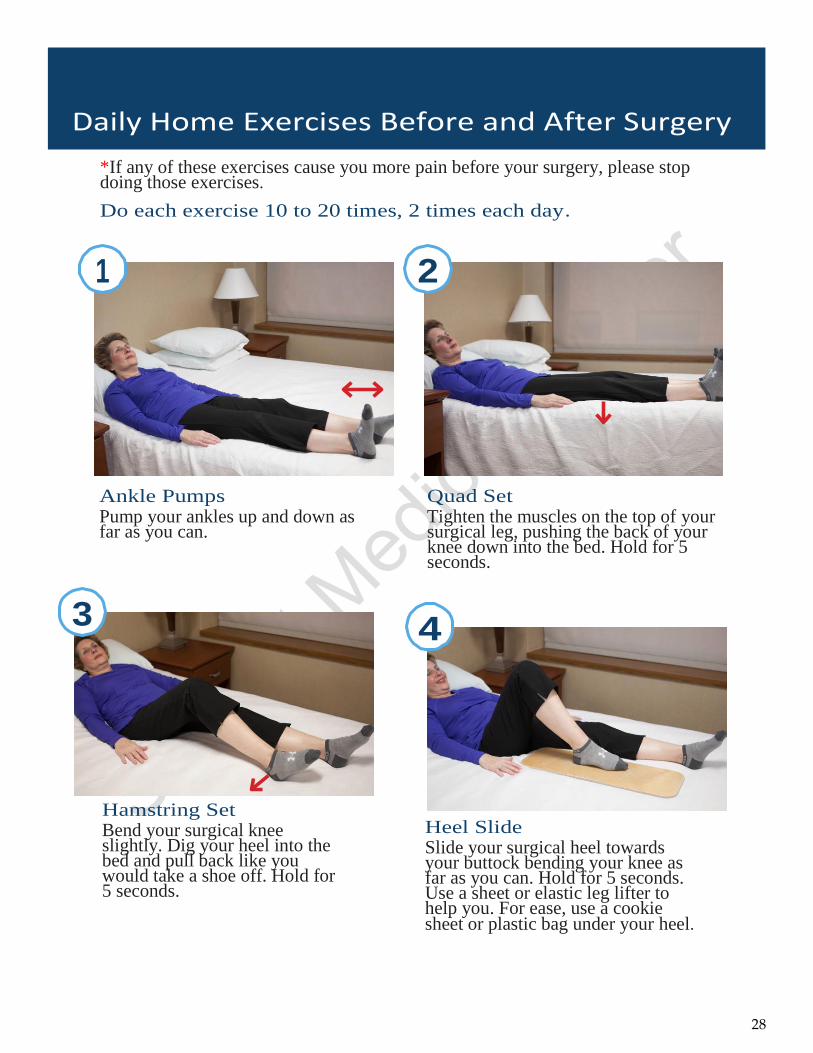
*If any of these exercises cause you more pain before your surgery, please stop doing those exercises.
Do each exercise 10 to 20 times, 2 times each day.
Ankle Pumps Pump your ankles up and down as far as you can.
Hamstring Set Bend your surgical knee slightly. Dig your heel into the bed and pull back like you would take a shoe off. Hold for 5 seconds.
Quad Set Tighten the muscles on the top of your surgical leg, pushing the back of your knee down into the bed. Hold for 5 seconds.
Heel Slide Slide your surgical heel towards your buttock bending your knee as far as you can. Hold for 5 seconds. Use a sheet or elastic leg lifter to help you. For ease, use a cookie sheet or plastic bag under your heel.
4
Daily Home Exercises Before and After Surgery
3
29
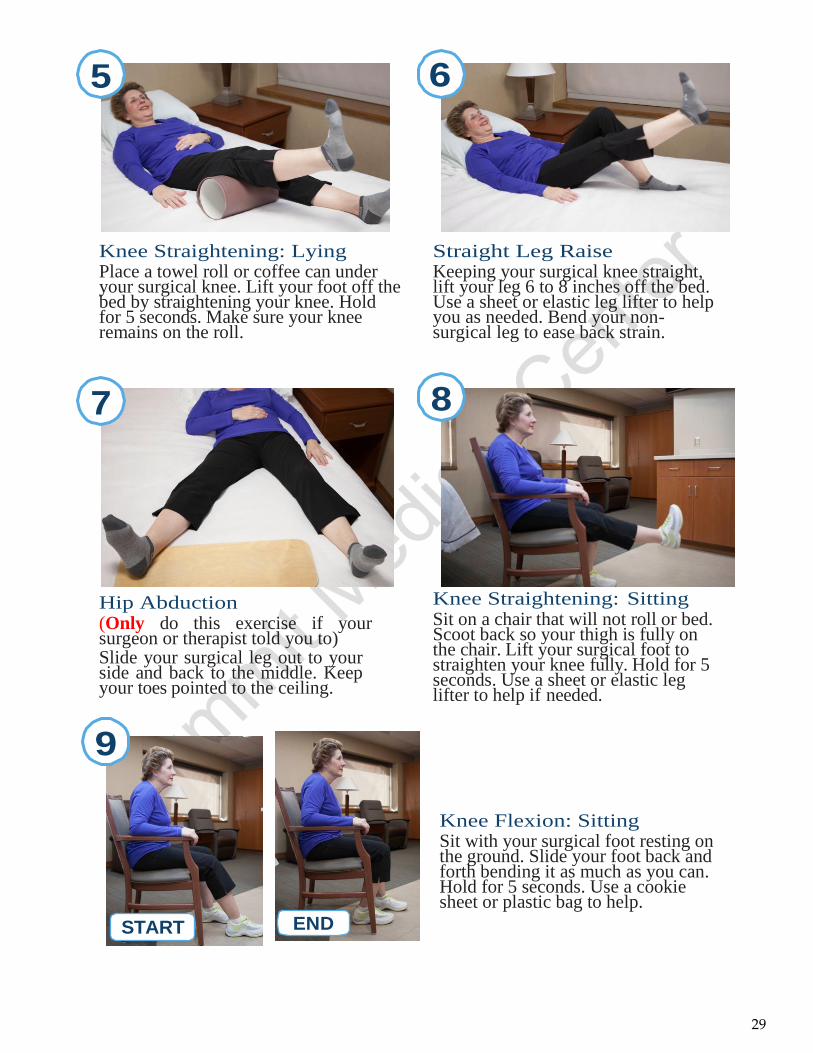
Knee Straightening: Lying Place a towel roll or coffee can under your surgical knee. Lift your foot off the bed by straightening your knee. Hold for 5 seconds. Make sure your knee remains on the roll.
Straight Leg Raise Keeping your surgical knee straight, lift your leg 6 to 8 inches off the bed. Use a sheet or elastic leg lifter to help you as needed. Bend your non-surgical leg to ease back strain.
Hip Abduction (Only do this exercise if your surgeon or therapist told you to) Slide your surgical leg out to your side and back to the middle. Keep your toes pointed to the ceiling.
Knee Straightening: Sitting Sit on a chair that will not roll or bed. Scoot back so your thigh is fully on the chair. Lift your surgical foot to straighten your knee fully. Hold for 5 seconds. Use a sheet or elastic leg lifter to help if needed.
Knee Flexion: Sitting Sit with your surgical foot resting on the ground. Slide your foot back and forth bending it as much as you can. Hold for 5 seconds. Use a cookie sheet or plastic bag to help.
8 7
6 5
9
START END
30
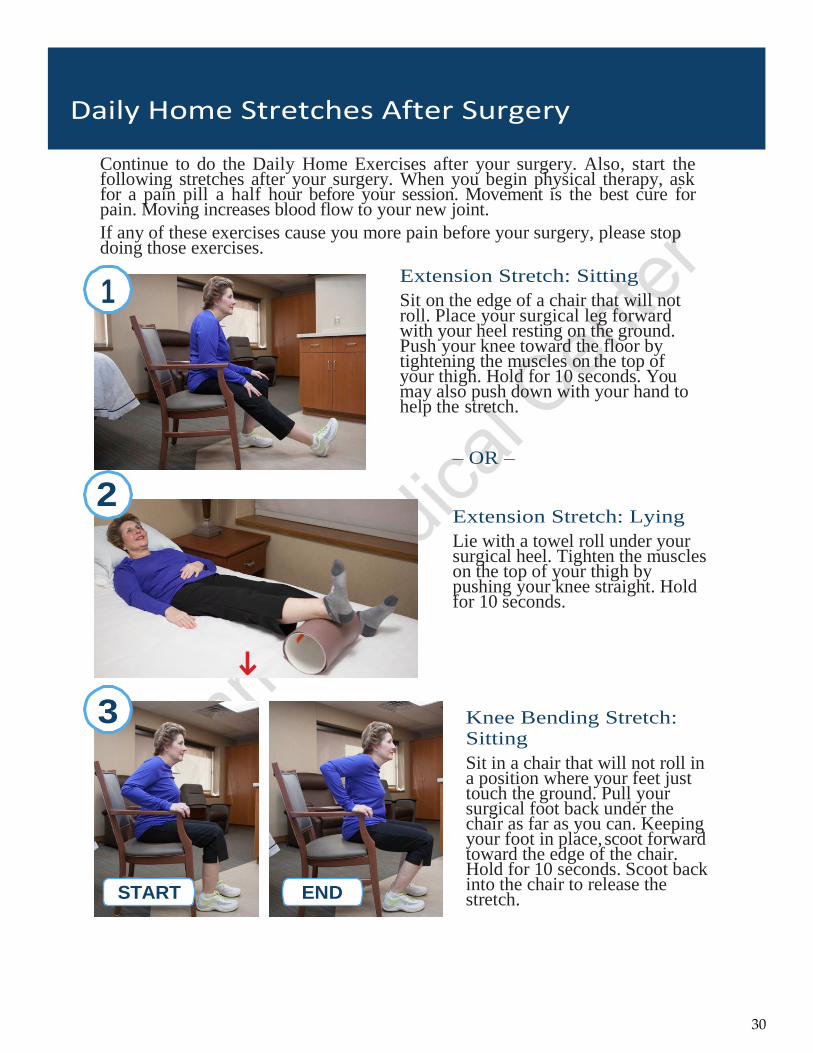
Continue to do the Daily Home Exercises after your surgery. Also, start the following stretches after your surgery. When you begin physical therapy, ask for a pain pill a half hour before your session. Movement is the best cure for pain. Moving increases blood flow to your new joint.
If any of these exercises cause you more pain before your surgery, please stop doing those exercises.
Extension Stretch: Sitting
Sit on the edge of a chair that will not roll. Place your surgical leg forward with your heel resting on the ground. Push your knee toward the floor by tightening the muscles on the top of your thigh. Hold for 10 seconds. You may also push down with your hand to help the stretch.
– OR –
Extension Stretch: Lying
Lie with a towel roll under your surgical heel. Tighten the muscles on the top of your thigh by pushing your knee straight. Hold for 10 seconds.
Knee Bending Stretch: Sitting
Sit in a chair that will not roll in a position where your feet just touch the ground. Pull your surgical foot back under the chair as far as you can. Keeping your foot in place, scoot forward toward the edge of the chair. Hold for 10 seconds. Scoot back into the chair to release the stretch.
Daily Home Stretches After Surgery
1
2
3
START END
31
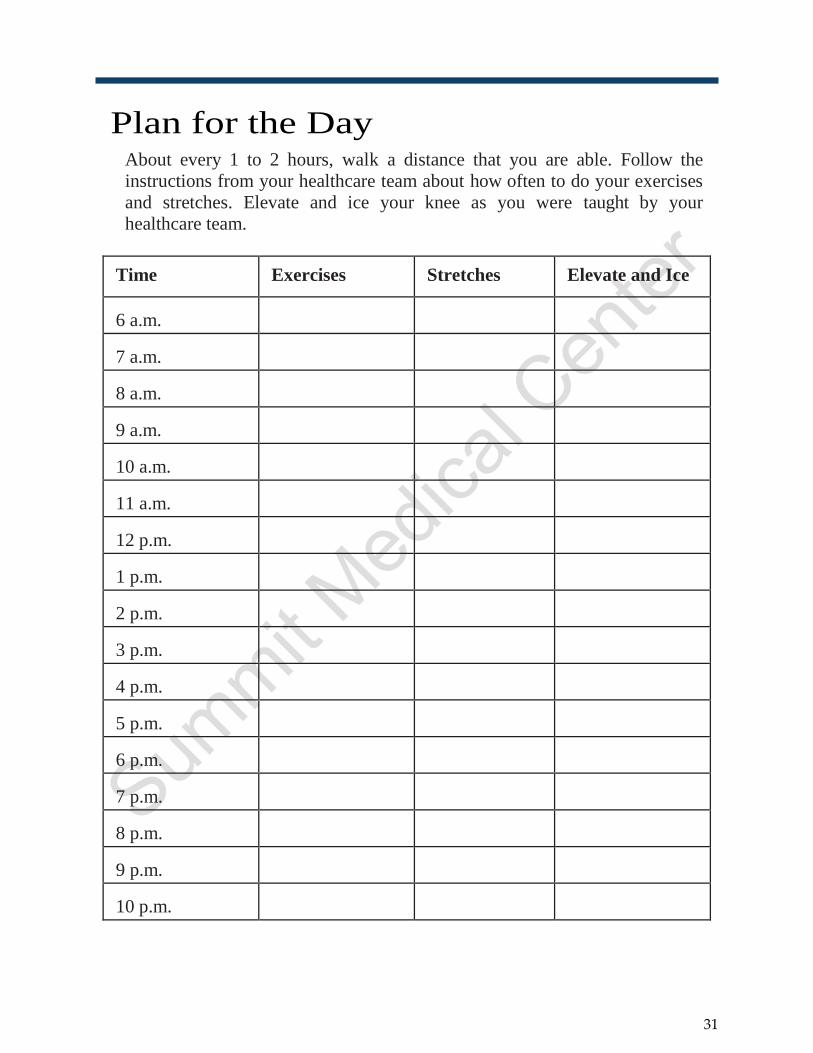
Plan for the Day About every 1 to 2 hours, walk a distance that you are able. Follow the
instructions from your healthcare team about how often to do your exercises
and stretches. Elevate and ice your knee as you were taught by your
healthcare team.
Time Exercises Stretches Elevate and Ice
6 a.m.
7 a.m.
8 a.m.
9 a.m.
10 a.m.
11 a.m.
12 p.m.
1 p.m.
2 p.m.
3 p.m.
4 p.m.
5 p.m.
6 p.m.
7 p.m.
8 p.m.
9 p.m.
10 p.m.
32
Checklist of information Check off the items on the list below when you know the answers. Ask your nurse
or doctor if you need more information.
□ When to Call the Surgeon
□ Medicine Safety
– The names of my medicine
– When and how to take each medicine
– Common side effects of my medicine
– What to do about side effects
□ Pain Control
– How to take my pain medicine
– Side effects of my pain medicine
– Other ways to help manage my pain
□ Food and Drink
– What foods I can eat
– `How much liquid I should drink
□ Incision
– Signs and symptoms of an infection
– How to care for my incision
– When my stitches or staples should be removed
□ Activity Safety
– Lifting
– Driving
– Bathing
– Walking
□ My Recovery
– My health condition or surgery
– Follow-up appointments with my doctor or surgeon
– Tools to stop smoking or using tobacco
– How to prevent blood clots and constipation
– The importance of rest and how often to rest
– Community support resources
□ Emotions
– You may have feelings of sadness or depression after surgery. These emotions are common.
– Call your doctor if these feelings do not go away. Call 911 if you feel like
33
On-Q Pain Relief System Pain Relief Right Where You Need It
The ON-Q* system is a small disposable pump filled with a local anesthetic
medication to relieve your pain after surgery. It continuously delivers medication that
blocks pain in the area of your procedure. With the ON-Q* system, you may get
better pain relief than by taking narcotics alone. You may also need to take less
narcotic medication.
How the ON-Q System Works
The pump is connected to a small catheter (tube), which is inserted by your surgeon
or anesthesiologist. Depending on your procedure, the catheter will be placed near
the surgical incision site or under the skin next to a nerve near the surgical area. The
ON-Q* pump continuously delivers the medication at a very slow flow rate. It is
completely portable and may be clipped to your clothing or placed in a small
carrying case. Please see pictures on page 36
Frequently Asked Questions
WILL THE ON-Q* SYSTEM TREAT ALL OF MY PAIN?
- Patients experience different levels of pain. The ON-Q* system works
with other medications or therapies your doctor may prescribe to manage
your pain after surgery. With the ON-Q* system, you may need less
narcotics and have better pain relief than with narcotics alone.
HOW DO I KNOW THE PUMP IS WORKING?
- The pump delivers your medication very slowly. It may take longer than
24 hours after your procedure to notice a change in the size and look of the
pump.
- As the medication is delivered, the pump (ball) will gradually become
smaller.
- You should also take any other pain medicine as instructed by your doctor.
HOW LONG WILL MY ON-Q* PUMP LAST?
- Depending on the size of your pump, it may take 2-5 days to give all the
medication.
- All the medication has been delivered when the ON-Q* pump is no
longer full. The outside bag will be flat, and a hard tube can be felt in the
center of the pump.
WHERE CAN I FIND MORE INFORMATION ABOUT MY PUMP?
- You will be provided with a Patient Guideline prior to discharge Patient
Guidelines can also be found on www.myON-Q.com.
- There is a 24-hour Product Support Hotline for questions about your
pump — 800.444.2728. You can call Summit Medical Center anytime
with questions at 307-232-6600. Please call your doctor for all medical
questions and dial 911 for an emergency.

34
Notes
35
Helpful Resources The following equipment may be recommended and helpful after your
procedure. See page 36 for examples
*Walker/Cane/Crutches
*Reacher/Grabber
*Shower Transfer Bench
*Sock Helper
*Elevated Toilet Seat
*Shower Sponge with long handle
*Shower Chair
*Shoe Horn with long handle
*Leg Lifter
*Removable Grab Bars
Please call Summit Medical Center with any questions or concerns.
The care coordinator is available to help 307-232-4055.
These items can be found online at sights such as Amazon, Walmart, and
Walgreens.
Some items may be found at local loan closets and senior centers at no charge.
The two local loan closets in Casper are:
Casper Senior Center
1831 East 4th Street
Casper, WY
307-265-4678
Open M-F 8-4p
Brain Injury Alliance
140 East K Street
Casper, WY
307-473-1767
Open M-F 9-4p
Most hotels in the Casper area offer medical rates for patients and families.
Some local hotels around Summit Medical Center are:
Main Stay Suites
307-472-7829
551 Granite Peak Casper WY
Best Western Plus
307-472-1120
651 Granite Peak Casper WY
Holiday Inn
307-577-5000
721 Granite Peak Casper WY
Residence Inn
307-234-9008
4930 East 2nd Casper WY
36
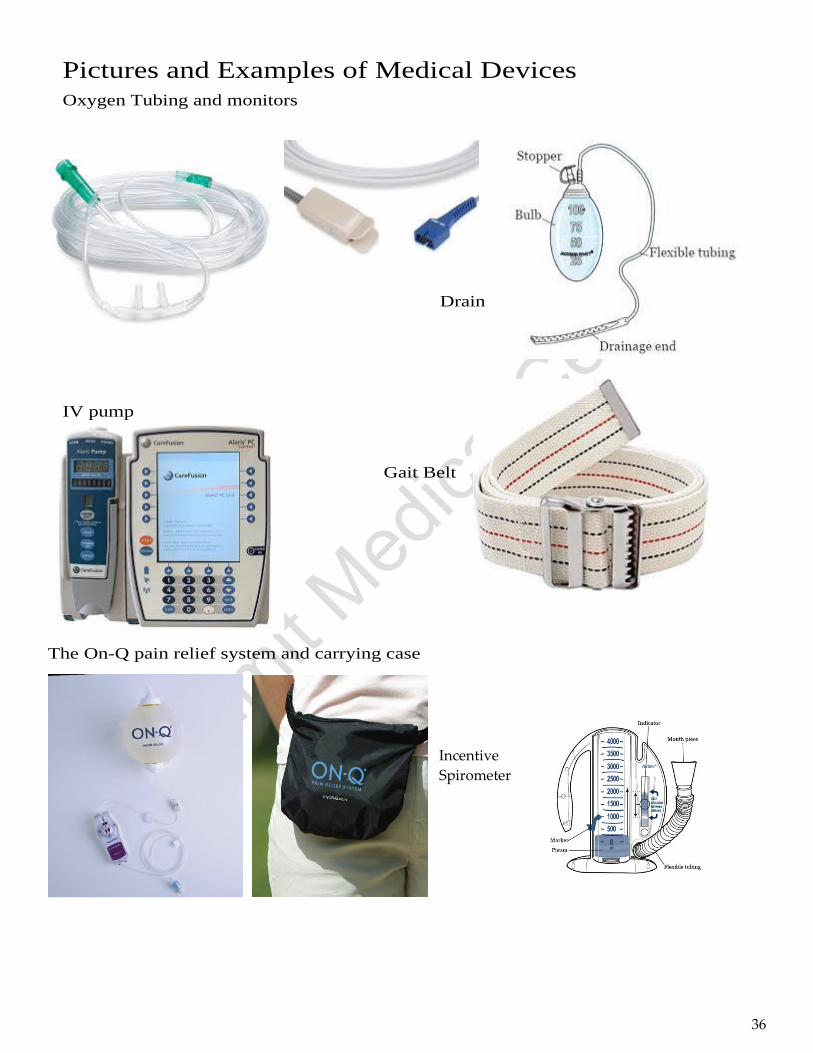
Pictures and Examples of Medical Devices
Oxygen Tubing and monitors
Drain
IV pump
Gait Belt
The On-Q pain relief system and carrying case
Incentive
Spirometer
37
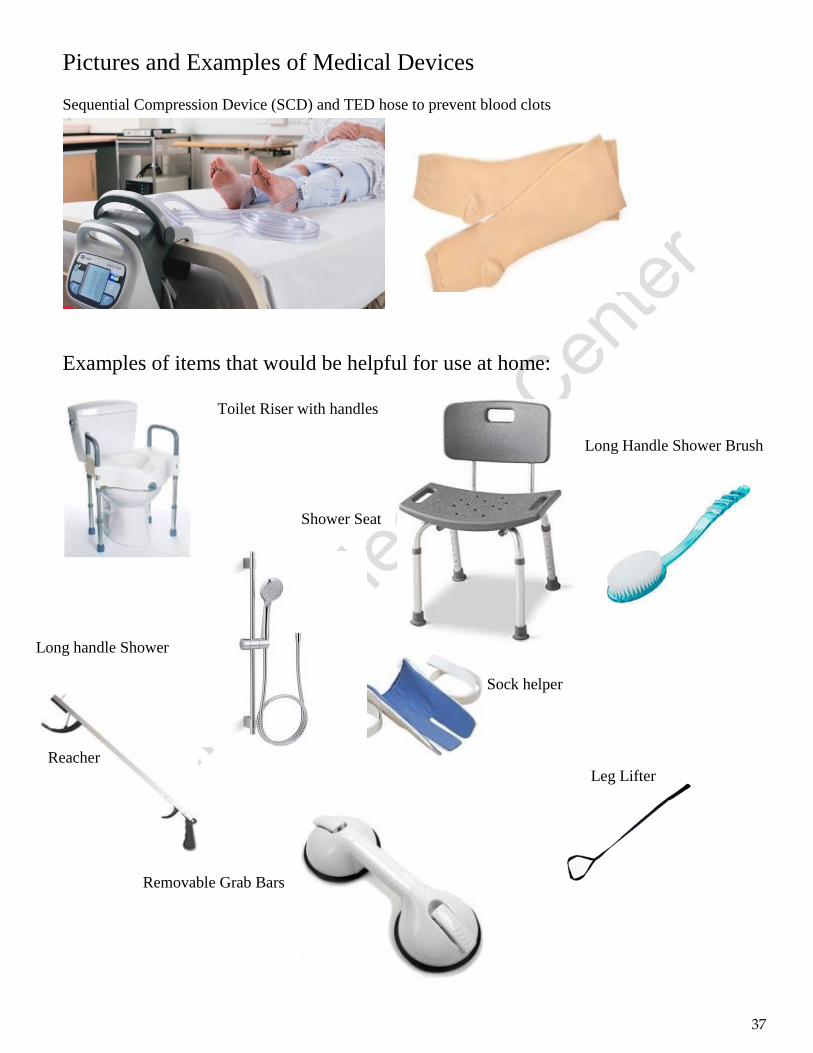
Pictures and Examples of Medical Devices
Sequential Compression Device (SCD) and TED hose to prevent blood clots
Examples of items that would be helpful for use at home:
Toilet Riser with handles
Long Handle Shower Brush
Shower Seat
Long handle Shower
Sock helper
Reacher
Leg Lifter
Removable Grab Bars

38
Summit Medical Center
6350 East 2nd Street
Casper, WY 82609
307-232-6600
summitmedicalcasper.com