torkstar ts1000 inst09-r - av-iq ts1000 utility line set by draper ... instructions for attaching...
TRANSCRIPT

Installation Instructions
TorkStar TS1000 Utility Line Set by DraperCaution
➀ Installation should be completed by a certifi ed rigger.➁ Locate and identify all parts using the hardware list and the drawings.➂ Key switch is packed in winch crate, do not discard.➃ Operates on 110-120V, 60 Hz AC.➄ Key switch to be in full view of unit during operation.➅ Wiring diagram can be found inside winch limit cover panel.➆ Instructions for attaching and wiring the winch are packed in carton.➇ TS1000 is not rated for continuous duty. Care should be used to not overheat winch while setting limit switches. Duty cycle is 10 minutes on, 20 minutes off.➈ The TorkStar Utility Lineset is not available with the Rolleramic projec- tion screen.NOTE: Unit has been tested at the factory and found to be operating correctly prior to shipment.
These instructions are meant as a guide only. They do not bind Draper, Inc. in any way and do not imply any responsibility of Draper, Inc. for improper installation or faulty work man ship at the job site.
Copyright © 2009 Draper Inc. Form TorkStar_TS1000_Inst09-R Printed in U.S.A.
®
If you encounter any diffi culties installing or servicing your TorkStar TS1000, call your dealer or Draper, Inc., Spiceland, Ind., (765) 987-7999, or fax (765) 987-7142.
Rigging Installation Procedures➀ If beams or other means of spool support are not already provided, measure and mark the location of spool support channels (beams) to be installed.➁ Install the beams or channels at the appropriate location if necessary.➂ Measure and mark the location of each winch and PosiSpool. a) Use a black medium felt tip pen; b) Using a carpenter’s square, mark center with a line across the entire bottom fl ange of the beam or channel; and c) Mark all locations of the winches and PosiSpools using a carpenter’s square with a line across the entire bottom fl ange of the beam or channel.➃ Place the winches and spools at or under the point of installation.Please Note: It is recommended that heavy items be hoisted up to the work area using appropriate machinery, i.e. hoisting lifts, block and tackle, etc.➄ Install the winches and spools. a) Remove the limit switch cover from the motor winch spool. b) Prepare the bolts, nuts, and washers. c) Install MK500 Beam Mounting Kit to winch and Posi-spools. If suspending TorkStar along length of beam, also attach TS90 Parallel Beam Adapter Plate. d) Ensuring that the lift lines will fall off the same side of all spools, lift the spools into place and attach to beam. e) Torque the nuts to 50 ft/lbs.
➅ If installing above a ceiling, and using optional ceiling fl anges, plumb for the location of the ceiling slots. a) Drop a plumb line over one end of one spool. b) Mark the top of the ceiling at the bob. c) Drop the plumb line over the other end of the same spool. d) Mark the top of the ceiling at that bob. e) Repeat for each spool in the system(s).➆ Install the lift lines on the spools. a) Find the lift line with the button end from the box. b) Thread the lift line from the interior of the spool and down the proper line port and through the ceiling slot until it is fully deployed to the fl oor. c) Repeat for each spool. d) Rotate the spools so that the lines may drop directly from the holes in the spool to the fl oor.
➇ Install the line shafts. a) Measure the distance between the spigots of each spool. b) Cut a length of 2" ID schedule 40 pipe for installation between each spool. Cut each pipe ¼" shorter than each measurement from step a). c) Drill ½" diameter holes through the pipe 1" from each end. These pipes are now the line shafts. d) Take the line shafts up above for installation. e) Remove the bolts, nuts and washers from the couplings. f) Remove the couplings from the spigots. g) Slip the couplings onto the line shafts. h) Hold the line shaft end to the end of the spigot and slide the coupling so that it straddles the two. i) Install bolts and secure with Nylok nuts.
➈ Complete the electrical hook-up and run the winch to locate the lower limit switch at its furthest end of travel.➉ Adjusting the trim: a) Install a temporary load of approximately 25 pounds at the bottom of each of the lift lines. b) Using the key switch or the remote controller turn the motor to wind the lift line onto the spools three complete windings.11 Work at the spools is complete for the moment. Go to the fl oor.12 Install the raceway/pipe brackets. (Note: If using to fl y a projection screen, see section on attaching screens to the Tork Star.)
a) Cut the cables at the same level line. About 60¼" above the fl oor is a good height. This will result in the pipe being at 48" from the fl oor. Low trim of the batten is an issue that can be determined in discussion with the user. b) Find the thimble, compression sleeve and cable clips from the box. c) Install the thimble onto the raceway/pipe bracket.
Coupling
Drive Shaft
Spigot
Grid Well Installation (No MK500 Beam Mounting Kit required)
Underhang Installation with MK500 Beam Mounting Kit (perpendicular)
Please Note: Use test cord to test winch operation on the ground before at-taching above the fl oor.
For parallel mount, add TS90 Parallel Beam Adapter Plate
Note how this end overhangs, when viewed from rope window side.( This centers the rope drum under the beam that the unit is mounted to. )
Bolt together using4 pcs 3/8" bolts, flatwashers, lockwashers and nuts.

TorkStar TS1000 Utility Line Set by Draper page 2 of 4
www.draperinc.com (765) 987-7999
d) Terminate the cable onto the thimble using either compression sleeves or cable clips.13 Install the pipe batten. a) Using the “U” bolts provided with the bracket attach the pipe to the brackets. b) Hand-tighten all “U” bolts only at fi rst with the pipe in place. c) Adjust the location of the pipe. d) When the location of the pipe is satisfactory, tighten all “U” bolt nuts.14 If appropriate, install cable management system. If optional Draper cable man- agement system is provided for electric screens, or if cable management sys- tem is provided by others, follow instructions provided with the system.15 It is best if stage lighting fi xtures can be installed onto the lighting battens at this point in the installation. Doing so will result in establishing a center of grav- ity that is as low as possible. The pipe clamp bolts must be tightened on the “C” clamps.16 Set upper limit switch. a) Set upper limit switch. b) Replace limit switch cover back onto the winch spool.17 Run the batten down and up to test three times.
Electrical Work18 Install fl ex armor (supplied by others) onto the multicables.19 Complete electrical hookup of circuits according to the hook up chart provided.20 Focus stage lighting as required in the initial scope.
TorkStar Limit Switch AdjustmentPlease Note: Two travel limit switches are provided. Which becomes the Upper one and which is the Lower one depends on the direction of rotation of the winch drum while the unit is being raised. This is de ter mined by the needs of each instal-lation.
Caution: Be careful to check which switch is for Upper and which for Lower before adjusting them. Failure to do this could result in damage to the unit as it will over-travel because of having adjusted the wrong switch. Always shut power off from the winch when working inside the electrical compartment.Setting the Upper Limit:➀ Operate unit to desired upper position.➁ Loosen the two thumb nuts holding the upper limit switch.➂ Slide the upper limit switch across until the blade contacts the limit trip rod, then slide it a little further until an audible click is heard as the switch opens. Tighten the thumb nuts. The top limit it is now set.Setting the Lower Limit:➃ Run the unit down to the desired lower stop position and set the lower limit switch in the same way.➄ Run up and down again to check the settings.
Limit Switch
Trip Rod
Thumb Screws
Blade
Limit Switch
Blade
Preparing Cable Terminations
➀ Turn back (TB) specifi ed amount of rope from thimble/loop. Apply fi rst clip one base width from dead end (DE) of rope. Use torque wrench to tighten evenly, alternating from one nut to the other until reaching the recommended torque.➁ When two clips are required, apply the second clip as near the loop/thimble as possible. Use torque wrench to tighten evenly, alternating until reaching the recommended torque. When more than two clips are required, apply the sec- ond clip as near the loop/thimble as possible, turn nuts on second clip fi rmly, but do not tighten.➂ When three or more clips are required, space additional clips equally between fi rst two. Take up the rope slack and use torque wrench to tighten on each clip evenly, alternating from one nut to the other until reaching recommended torque.IMPORTANT: Apply fi rst load to test the assembly. This load should be of equal or greater weight than loads expected in use. Next, check and use torque wrench to retighten to recommended torque. In accordance with good rigging and maintenance practices, the wire rope end termination should be inspected periodically for wear, abuse, and general adequacy. See page 2 for wire rope inspection instructions.
DeadEnd (DE)
Turn Back (TB)
Clips Rope Minimum Amount of * Torque Size Size No. of Rope to Turn in (in.) (in.) Clips Back in Inches Ft. Lbs. 3/16" 3/16" 2 4" 30
If a greater number of clips are used than shown, the amount of turnback should be increased proportionately.* The tightening torque value shown is based upon the threads being clean, dry and free of lubrication.
Draper Projection Screen Attachment For information on attaching a Draper projection screen to the TorkStar, see separate instruction sheet for specifi c screen model.
Crosby Fist Grip Clipused only for thimbled
termination of maincable to drop screen
3/16" forged galvanized wire rope clipsused only to attach safety cable to
main drop cable.
Basewidth
Basewidth
Guidelines for use of projection screens with TorkStar All motorized screens with case lengths over 220" MUST use all of the following:➀ A Projection Screen Batten (see price above or source locally). Batten MUST be 2.5" O.D. by minimum of 13 gauge.➁ The specifi c projection screen Cable Batten Kit.➂ A Projection Screen Batten Splice Kit.➃ A minimum of two (2) PosiSpools if using a TS1000 Motor Winch.
All Truss Cineperms over 220" wide MUST use the following:➀ A minimum of two (2) PosiSpools if using the TS1000 Motor.➁ Truss Cineperm Direct Cable Kit or Truss Cineperm Cable Batten Kit.➂ If using the Cable Batten Kit the Projection Screen Batten (see price above or source locally) MUST be 2.5" O.D. by minimum of 13 gauge.➃ If a Projection Screen Batten is used, then a Projection Screen Batten Splice Kit is also required. All Onyx screens being fl own from a TorkStar require optional corner reinforcement gussets in each corner of the screen frame.
*IMPORTANTUse of Large Case Premier or Large Case Targa screens with TorkStar Utility Lineset requires specially modifi ed case. DO NOT use TorkStar with standard Large Premier or Large Targa case. Onyx screens being raised and lowered by a TorkStar require optional corner reinforcement gussets on all four corners. Contact Draper for details.
TorkStar TS1000 Utility Line Set by Draper page 3 of 4
www.draperinc.com (765) 987-7999
Shown with couplingsinserted
105/8"
1¾"
17½"
21/8"
7½"
14½"
13"
43/16"
19¾"
93/16"
113/16"
23½"
shown with pipe couplings inserted
rope
rope
17½"
9¾"
7½"
23½"
13"
103/8"
O.545" dia
4.2
21/8"
113/16"
113/16"
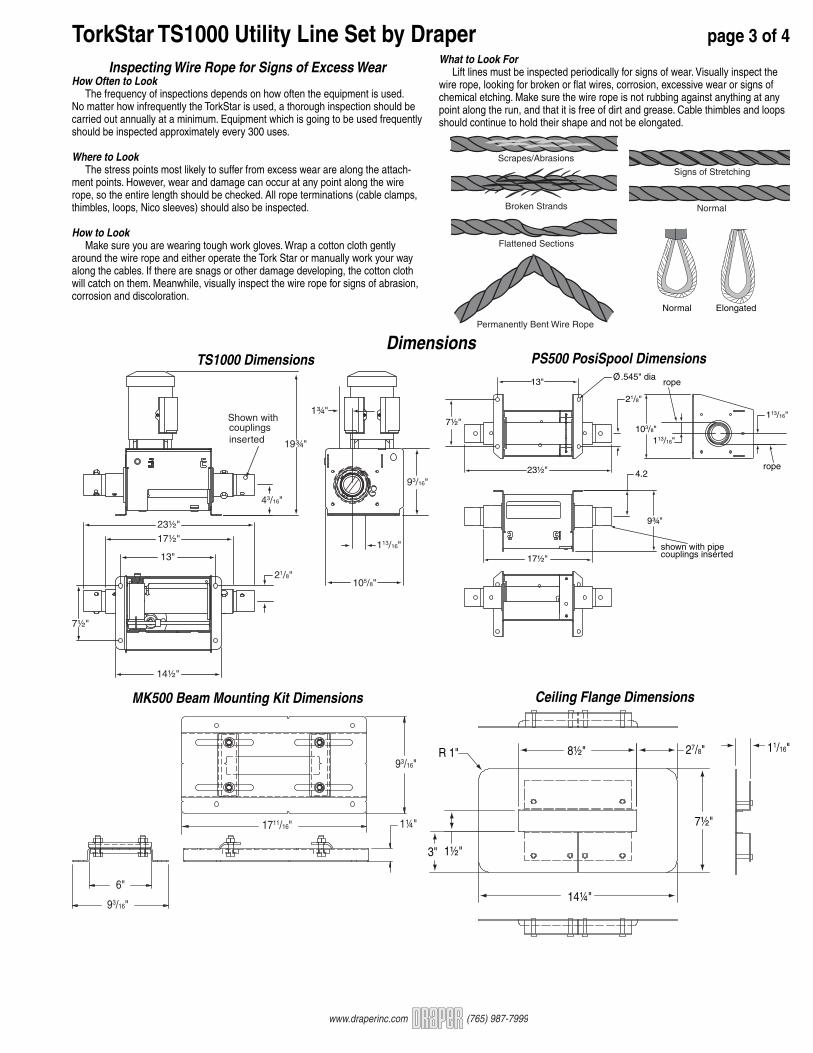
DimensionsTS1000 Dimensions PS500 PosiSpool Dimensions
Inspecting Wire Rope for Signs of Excess WearHow Often to Look The frequency of inspections depends on how often the equipment is used. No matter how infrequently the TorkStar is used, a thorough inspection should be carried out annually at a minimum. Equipment which is going to be used frequently should be inspected approximately every 300 uses.
Where to Look The stress points most likely to suffer from excess wear are along the attach-ment points. However, wear and damage can occur at any point along the wire rope, so the entire length should be checked. All rope terminations (cable clamps, thimbles, loops, Nico sleeves) should also be inspected.
How to Look Make sure you are wearing tough work gloves. Wrap a cotton cloth gently around the wire rope and either operate the Tork Star or manually work your way along the cables. If there are snags or other damage developing, the cotton cloth will catch on them. Meanwhile, visually inspect the wire rope for signs of abrasion, corrosion and discoloration.
Scrapes/Abrasions
Broken Strands
Flattened Sections
Permanently Bent Wire Rope
Signs of Stretching
Normal
Normal Elongated
What to Look For Lift lines must be inspected periodically for signs of wear. Visually inspect the wire rope, looking for broken or fl at wires, corrosion, excessive wear or signs of chemical etching. Make sure the wire rope is not rubbing against anything at any point along the run, and that it is free of dirt and grease. Cable thimbles and loops should continue to hold their shape and not be elongated.
93/16"
1711/16" 1¼"
93/16"
6"
MK500 Beam Mounting Kit Dimensions
R 1"
1½"3"
14¼"
8½"
7½"
27/8" 11/16"
Ceiling Flange Dimensions

TorkStar TS1000 Utility Line Set by Draper page 4 of 4
www.draperinc.com (765) 987-7999
Wiring Diagram Circuit breaker rated amp. 20 amp.Fused circuit rated amp. 20 amp.
Minimum Wire Size90' maximum run. . . . . . . . . 12 ga.90' to 140' run. . . . . . . . . . . .10 ga.Over 140'. . . . . . . . . . . . . . . . 8 ga.
Sizes of wall masonry boxes requiredfor single and ganged key switches--All boxes 2" (w) x 3¾" (h) x 2½" (d).
Key Switch(Momentary Operation)
Dashed wiring by electrician
Limit SwitchUp
Limit SwitchDown
Red
Blue
M Motor 1 HP 110-120V/1/60 Instant reverse
Line 1, Neutral, white 110-120 Volt, 20 Amp Service
G G
8 8
4 4
1 1
Ground
use minimum No. 12/3 wire
Black
(Hot)
Green
White
Red
KEY SWITCH
12
18
11
Wiring by factory
4½"3¼"
2¾"
Operates Tork Star in"Up" direction
Operates Tork Star in "Down" direction
Up
Down
Hot
Jumper
15/8"¼"
23/8"
5/8"
Please Note: This wiring diagram is for the TorkStar only. For wiring information on motorized screens fl own from the Tork Star, see the instructions for the specifi c model of screen being fl own.
TS1000 Specifi cationsMotor: 1 hp, .75 kwLifting Capactiy: 1,000 lb.Operating Speed: 12' per minutePower Connection: 15A, single pole, 110V ACDuty Cycle: 10 minutes on, 20 minutes offFull Load Amperage: 9.2 ampsLimit Switches: Redundant heavy duty 1 HP for high and low trim. Please Note: You can use up to 5 PosiSpools, spaced on 10-15 ft. centers (10'-12' is typical), so total width of system can be up to 50-75 ft., HOWEVER: 1. Total lift weight must not exceed lifting capacity of motor winch; and 2. Maximum weight per lift line must not exceed 500 lbs.