too much email
DESCRIPTION
Too Much EmailTRANSCRIPT

Too much email. The sheer volume is a distraction. Below is a system to reduce
the volume of email received, triage the remainder, and eliminate much of the
unnecessary waste associated with a full inbox. It is a system, not magic. It will
require some effort. But it will be worth it. The system has two components.
Though they are complements, either alone should prove useful in improving
your Outlook.
REDUCE
Start in your unread folder. [If you don’t have an unread folder, instructions here].
Sort your unread messages by oldest first [instructions]. The older the email, the
likelier it is that it can be deleted without consequence. Don’t delete it yet. These
long-ignored emails are an important source of data about your reading habits.
Never-read email cluttering up your inbox should be used to reduce the amount
of email that makes it to your inbox in the future.
Unsubscribe is a method for telling a commercial sender that you are no longer
interested in receiving a particular communication. Unsubscribing is an important
part of reducing the volume of email you receive. Use it liberally. Look for links
like these at the bottom of marketing emails:
When you do unsubscribe, you should also purge your mailbox of similar email.
Search by the sender and then mass delete [instructions].

Rules are a more flexible, user-side version of unsubscribe. Unsubscribe creates a
sender-side rule to not to send emails to you. Outlook Rules tell your mailbox
what to do with defined categories of email you receive. Rules allow you to still
receive routine emails without having them clutter up your inbox. For example,
someone in your company may send a daily report that you only need to look at
on occasion. You can create a rule to move those emails to a prescribed folder.
Instructions for creating move-to-folder rules are here. Examples of email types
that are amenable to rules that keep your inbox clean:
Regular reports
Company-wide emails
Routine notices & confirmations (e.g., meetings, travel)
Newsletters & updates
As with purging emails after you’ve unsubscribed, you will want to remove from
your inbox all the emails for which you create rules. While the default is for
Outlook to run rules based on new incoming or outgoing mail, you also have the
option of running rules on your existing corpus of emails [instructions].
If your rules are being run across a large population of email, this initial
organization will take the machine some time. Regardless, for folks tackling a
significant accretion of email, the Reduce process can be time consuming. Rather
than do it all at once, develop a new habit. I would recommend moving all old
unread mail to a new folder. I would name the folder “Reduce”. But call it
whatever you want. Instructions on creating a new folder, moving the email to
the new folder, and marking the email as read are here.
At first, I would suggest you get in a habit of going into your Reduce folder twice a
day. Once before lunch and once before you leave at night (or before a meeting—
whenever you can just let the machine run). Each time, go in unsubscribe and
purge, mark as Junk, Ignore, etc. for 5 minutes or until you reach an email that
calls for a rule. If the latter, create the rule and run it in your mailbox. Let the
machine run while you are not in the office. Repeat until you run out of either
type of email—i.e., candidates for (i) unsubscribe or (ii) a rule. At that point, cut

down your frequency to once a day. The first day you find the Reduce folder
empty, calendar a reminder to perform a Reduce session for once a week.
Maintain once a week until you are comfortable with some other interval—but do
calendar the reminder for whatever interval you select.
TRIAGE
Some may find the Triage setup slightly daunting (especially pre-Outlook 2010).
Get help. The setup only needs to be done once.
Further, I am going to suggest you buy something [instructions]. All the purchase
options—a new keyboard, mouse, or app for your tablet—have the same
functionality. They connect to your desktop and allow you to program a sequence
of steps to a single button. These buttons will allow you to fly through your email
in record time. As an example, here is the top row of a computer-connected
keyboard app on my tablet:
Quick Steps are very similar to Outlook Rules. Quick Steps permit you to assign a
series of steps to a single key combination (e.g., CTRL+SHIFT+1) [instructions].
These key combinations are then programmed to the keyboard, mouse, or app so
that instead of having to remember CTRL+SHIFT+1, you just hit one button. The
Quick Steps I recommend you create and program to a separate device are:
READ: marks an email as read and moves it to a folder entitled Read
REDUCE: marks an email as read and moves it to the Reduce folder
FLAG: flags an email for follow-up in addition to marking it as read and
moving it to the Read folder
COMPLETE: marks a previously flagged email as complete

Though they will still be searchable, you should no longer have to deal with the
READ and COMPLETE emails. The REDUCE emails you can attack on whatever
schedule you have set for yourself. Thus, you only need to be concerned with
your inbox and flagged emails. Importantly, the flagged emails can all be collected
in a custom search folder [instructions].
Combining a commitment to Reduce with this Triage technique will result in far
less email getting through and you sifting through the remaining email much
quicker than you ever have.
PUTTING IT TOGETHER AND GOING BEYOND
Studies suggest that the average worker checks email 36 times per hour, sends
and receives 105 emails per day, and loses more than an hour per day to email
interruptions. There are major productivity gains to be had in reducing email and
modifying our email habits. The productivity gains are best captured in this
graphic from the incomparable XKCD:

source: XKCD
Once setup, execution of my system is simple. You will sort your email rapidly
with the press of a few buttons and make regular progress in reducing the email
that makes it to your inbox in the first instance. My system is bare bones by
design. It is limited to two folders, four Quick Steps, and two actions, triage and
reduce. The arrangement is not inviolate. Reduce and Triage are flexible
techniques that you can adapt to your environment and preferences. For
example, your mobile email client may militate towards having a flagged items
moved to separate folder (because you can’t run a search for flagged items and
want all your to-do’s in a single folder). You may prefer a different rapid-foldering
approach, such as GTD. Make whatever modification you want.
Further, the system is not intended to be comprehensive. Rather, it is supposed
to be a baseline approach to be built upon based on your work needs and habits.
I, for example, stopped using lots of folders (except as repositories for routine

emails) once I upgraded to an Outlook version with Instant Search. The foldering
took time, and I had so many emails in each folder that I ended up using search
anyway. But there are readers who will need to maintain comprehensive folders
(e.g., lawyers with specific case or client files). Such individuals can still use Triage
to get through their inbox in the first instance but they have further opportunity
to improve the subsequent foldering of read emails with Rules, Search Folders,
Conversations, etc. And while I heartily recommend training to become an
Outlook Ninja, I also have to warn against letting the perfect be the enemy of the
good. The system outlined above will not get you to email Nirvana, but it should
still take you to a much better place.
After getting in a Reduce habit and setting yourself up for Triage, if you want to
learn more, I recommend exploring:
Quick Parts
Templates
Auto-Archive
Rules
Search Folders
Conversations
Instant Search
Flags
But, most of all, let me recommend trying to break the email addiction. This may
be impossible. For many, it is their job to monitor for important email and react
immediately. But, if you are in an environment that allows it, I heartily
recommend treating email as just another project to which you allocate set
amounts of time at regular intervals. When it is not email time, shut it down.
Focus. Mono-task.

Add Search Folders to Favorite Folders in Outlook
(The below is Outlook 2010, for 2007 click here and for 2013 click here).
The Unread Folder
Go to the Folder tab and click on New Search Folder and select Unread mail from
the popup menu.
You’ll automatically be taken to the search folder. Select Show in Favorites either
on the Folder tab or after right-clicking the folder in the Navigation Pane.
This

Or
The Flagged Folder
Go to the Folder tab and click on New Search Folder and select Mail flagged for
follow up from the popup menu.

You’ll automatically be taken to the search folder. Select Show in Favorites either
on the Folder tab or after right-clicking the folder in the Navigation Pane.
This
Or


Sort by Date
(The below is Outlook 2010, for 2007 click here and for 2013 click here. Also,
video here).
Step 1: Go to the bar above your email.
Step 2: Right-click on the left side (Arrange By) of the bar and select Date.

Step 3: Then left click on the right side of the bar so that it changes from Newest
on top to Oldest on top”

Search by Sender and Delete
(The below is Outlook 2010 and works the same in 2013, for 2007 click here)
Step 1: Run a search by right-clicking on the email and going to Find
Related>Messages From This Sender
Alternatively, you can run a manual search in the search box:
Step 2: Delete the email by selecting it all (hit CTRL+A) and then pressing DELETE


Rules
(The below is Outlook 2010. For 2013 click here, for 2007 click here)
Right-click on the email on which the rule will be based and go to Rules>Create
Rule
Alternatively, you can go to the Rules button in the Move section of the Home
ribbon:

Either way, you will be given a choice of how to treat emails based on similar
characteristics. For example, if you always want emails from a particular sender to
be placed in a particular folder check the box From under the heading When I get
e-mail with all of the selected conditions, as well as Move the item to folder under
the heading Do the following (click on Select Folder… to select the folder to which
the emails will be moved). Then click OK.

In certain instances, you may not want all mail from a particular sender to go to a
folder. You may, for example, only want emails from that sender that have a
particular subject line, are sent to a particular group, and include an attachment
(a standard set of conditions for a regularly distributed report). For this Rule,
however, you will need to go to Advanced Options to select includes an
attachment before hitting Finish.

The permutations are considerable. But the functionality is simple. Most routine
email has salient characteristics (conditions) that permit automatic filtering. That
said, there are certain Rule conditions and actions that will result in the Rule only
running when Outlook is on. When you create a “client-only” Rule, you get a
message like this:

An example above might be adding mark email as read to the Rule created above.
Only an email that has actually made it to your inbox can be marked as read. If
you use unread email as a kind of reminder system (ill advised), adding this action
will be useful. On the other hand, having Rules that run on the server even when
your personal Outlook is shutdown can be great for keeping email from buzzing
your mobile device when you are at home or traveling on business. Further, once
you are sending emails to a prescribed folder, it is really easy to mark all of them
as read by right-clicking the folder and selecting Mark all as read.

Run Rules
Importantly, you can run rules on your existing pile of email. Click the Run Rules
Now button on the Folder tab or go to the Rules button in the Move section of the
Home ribbon and select Manage Rules & Alerts and click on Run Rules Now in the
pop up menu.
or

Check the box adjacent to the rule(s) you want run and hit Run Now.
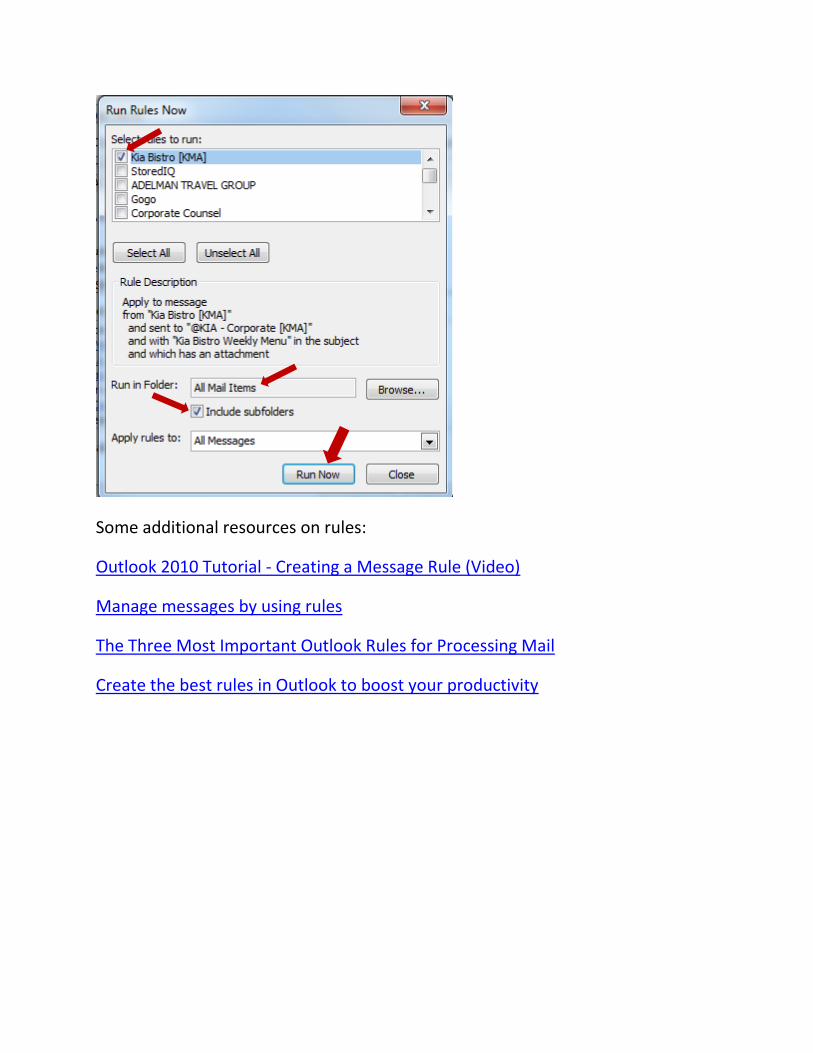
Some additional resources on rules:
Outlook 2010 Tutorial - Creating a Message Rule (Video)
Manage messages by using rules
The Three Most Important Outlook Rules for Processing Mail
Create the best rules in Outlook to boost your productivity
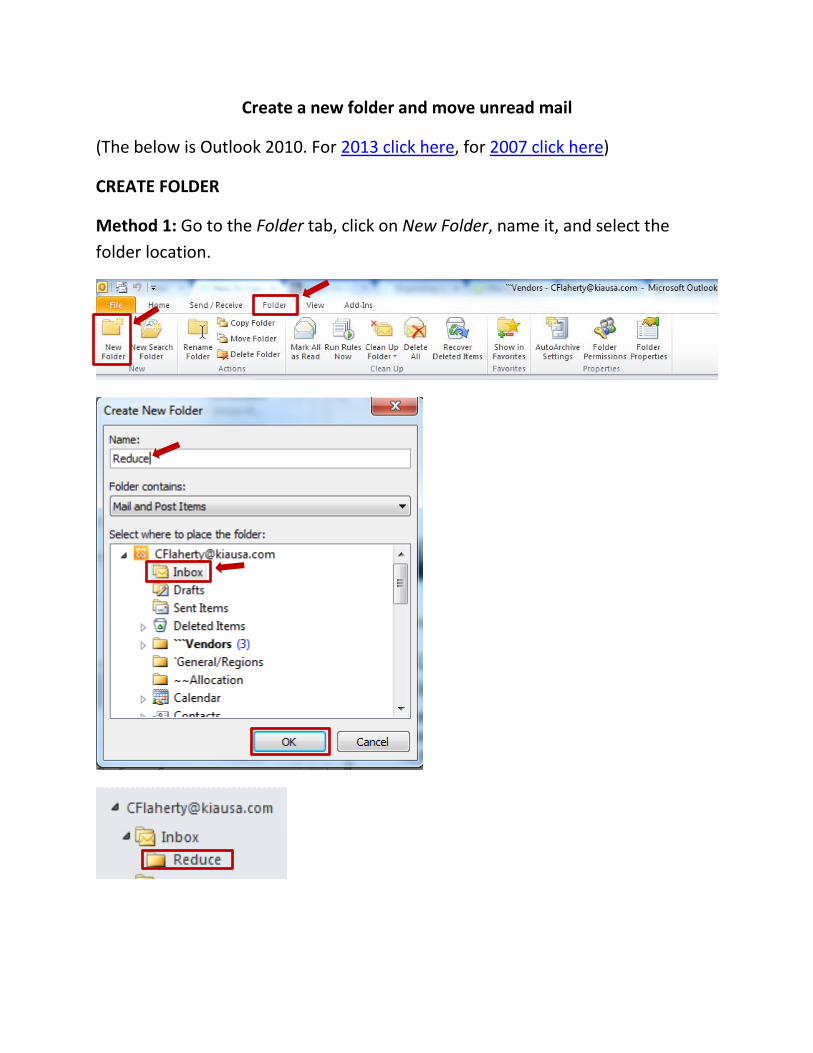
Create a new folder and move unread mail
(The below is Outlook 2010. For 2013 click here, for 2007 click here)
CREATE FOLDER
Method 1: Go to the Folder tab, click on New Folder, name it, and select the
folder location.

Method 2: Right-click on the folder location in the Navigation Pane, select New
Folder, click on New Folder, name it, select the folder location, and name the new
folder.

MOVE UNREAD EMAIL TO NEW FOLDER
Go to the Unread search folder [instructions]. Select all unread email by hitting
CTRL+A. You can drag and drop the files to your new folder. Or you can right-click,
select Move>Other Folder, and then select the folder you just created (which
should be one of the quick options).

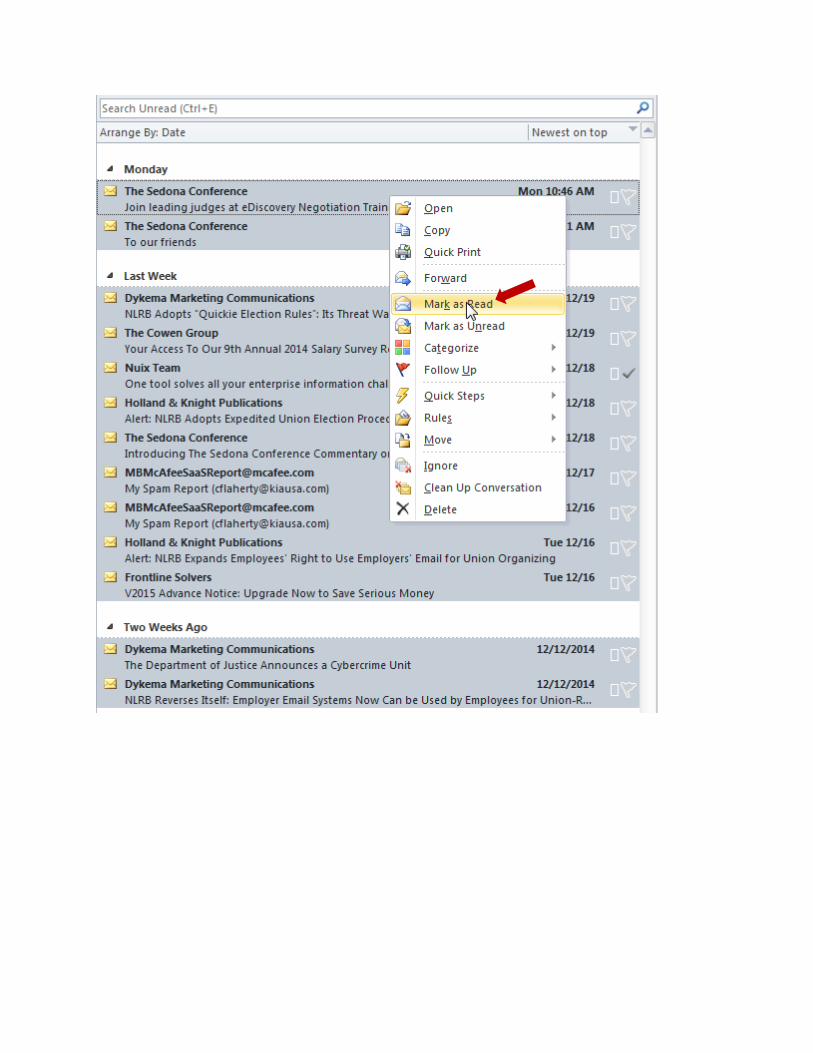
MARK EMAIL IN FOLDER AS READ
Method 1: Go to the new folder. Use the Mark All as Read button on the Folder
Ribbon
Method 2: Right-click on the folder in the Navigation Pane and select Mark All as
Read
Method 3: Go to the new folder. Select all the email by hitting CTRL+A. Mark it
read by hitting CTRL+Q

Method 4: Go to the new folder. Select all the email by hitting CTRL+A, right-click
and select Mark as Read.
OR
OR
Triage Purchase
I recommend you purchase a device that enables you to add additional keys to
your computer setup so that those keys can be programmed to execute a series
of steps with one click. If you find this intimidating, get help. Call in the IT person
or the individual on your team who takes pride in their tech savvy. The setup only
needs to be done once.
Many of the device options are designed for gaming. Gamers program the extra
keys to execute a series of actions at the press of a single key. “Macro” and “hot
keys” are semi-familiar terms that may shed light on the objective. But an
example might be highlighting a term or phrase in something you are reading on
screen and then pressing a button that (i) copies it, (ii) opens your web browser,
(iii) goes to a specific research site (e.g., Google, Wikipedia, FindLaw, GPO, etc.),
(iv) pastes the text into the search bar, and (v) executes the search. In our
context, a single button press will, for example, (a) mark an email as read, (b) flag
it for follow up, and (c) move it to a prescribed folder.
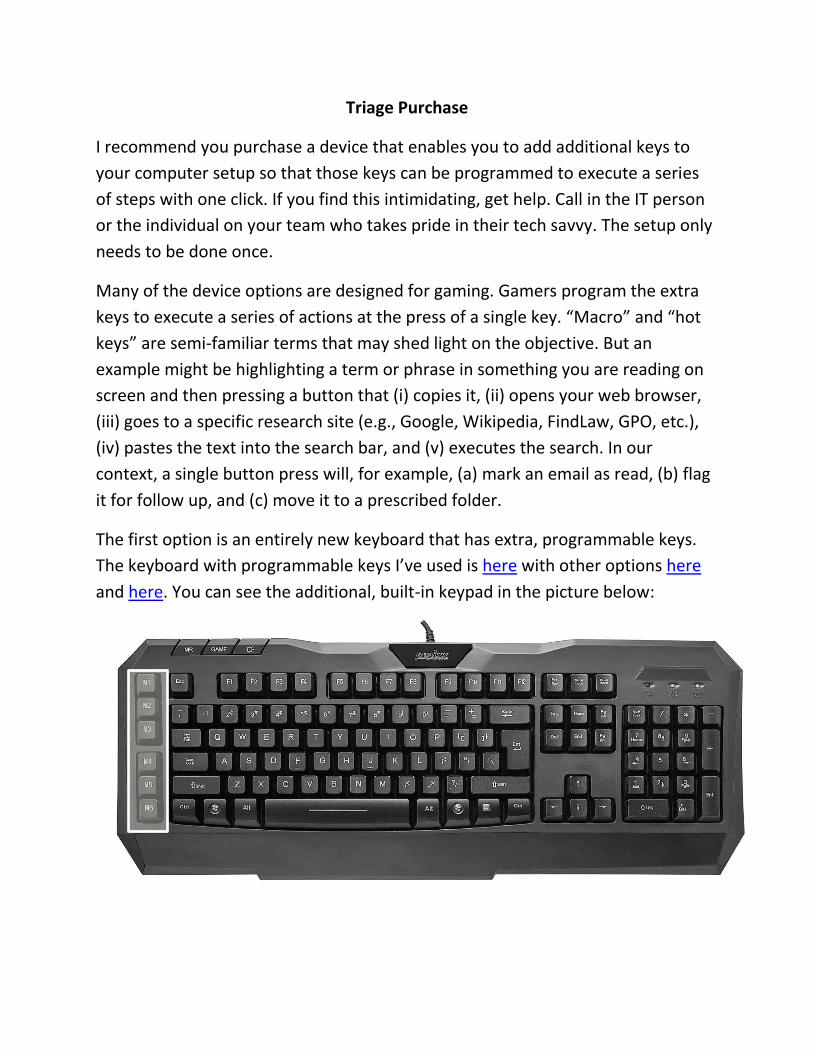
The first option is an entirely new keyboard that has extra, programmable keys.
The keyboard with programmable keys I’ve used is here with other options here
and here. You can see the additional, built-in keypad in the picture below:

Very similar is a separate, programmable mini keypad. The keypad I’ve used is
here, and other options are here and here.
Because there are not many keys, a user should learn them pretty quickly. But
you can create a legend, use inexpensive stickers, print custom stickers, or even
have custom keycaps made professionally. Labels are also very easy to create if
you decide to use an app on a tablet. The app I’ve used is here with an alternative
here. And here is an example of what the tablet interface can look like when the
app is open:
The app is probably the easiest to use at the outset. In the long run, a keyboard is
probably more of a time saver because it is always there, always on, and faster in
terms of both input and response. Another physical option with which I’ve only
had limited success is a programmable mouse. Same concept. Personally, the
buttons were just too small for me to achieve speed or accuracy (though they
work great for other things, like switching applications). The mouse I’ve used is
here with other options here and here.
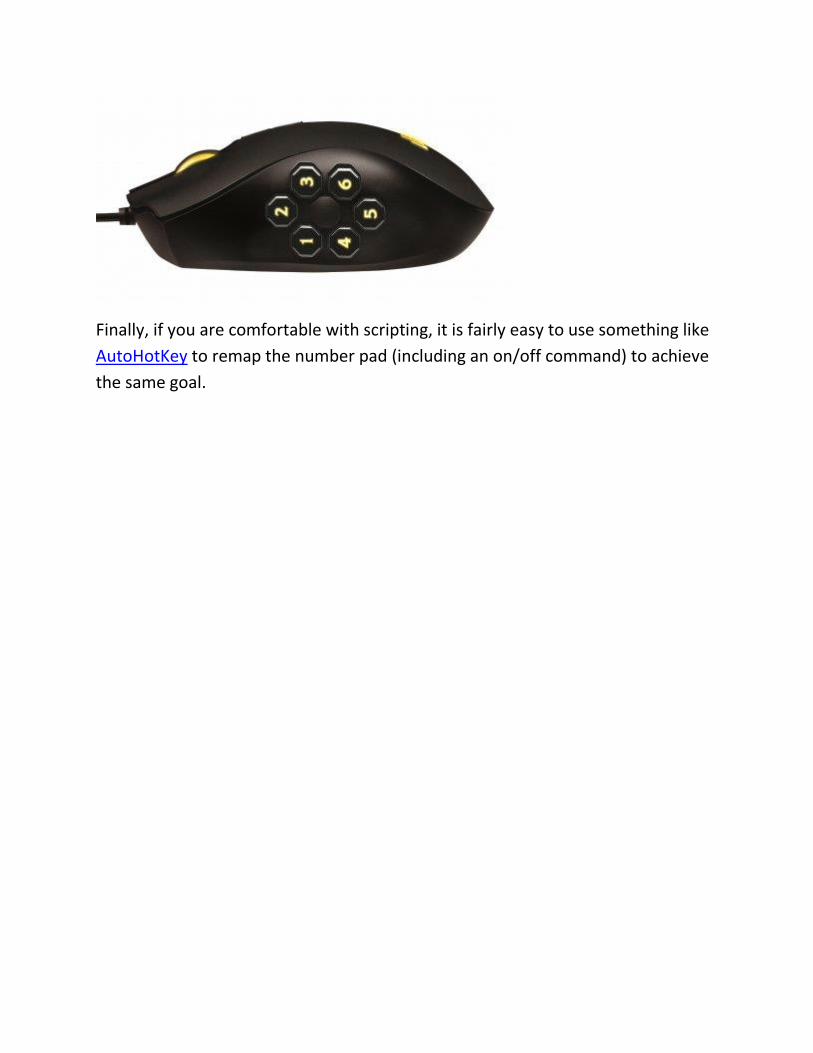
Finally, if you are comfortable with scripting, it is fairly easy to use something like
AutoHotKey to remap the number pad (including an on/off command) to achieve
the same goal.

Quick Steps
(The below is Outlook 2010. For 2013 click here. Unfortunately, Quick Steps
doesn’t exist in Outlook 2007 and before. You can achieve the same functionality
but it involves writing macros. Since I do not have Outlook 2007, I have not
created a guide for doing this.)
Before creating your first Quick Step, you will want to create a new folder for
processed email. Name it whatever you want; I would recommend “Read” or
“Processed”. Again, instructions for creating a new folder are here.
The Quick Steps you will be creating are:
READ
REDUCE
FLAG
COMPLETE
Program each of the associated shortcut keys to whatever external
programmable device you decide to try.
READ
The first Quick Step will be mark email as read and move the email from the Inbox
to the Read folder.
Step 1: Click on Create New in the Quick Steps menu on the Home ribbon.
Step 2: Name the Quick Step “Read”.

Step 3: Select Mark as Read from the Choose an Action dropdown menu.
Step 4: Click on Add Action

Step 5: Select Move to Folder from the Choose an Action dropdown menu.
Step 6: Select the Read folder.

Step 7: Now go to the bottom of the menu to Choose a shortcut. Any of the
shortcuts will do. I recommend CTRL+SHIFT+1.

Step 8: Press Finish.

REDUCE
REDUCE is the same steps as READ except: in Step 1, name the Quick Step
“Reduce”; in Step 5, choose the Reduce folder; in Step 7, choose CTRL+SHIFT+3 as
the shortcut.
FLAG
Very similar to READ and REDUCE except that you will be adding another action.
Step 1: Click on Create New in the Quick Steps menu on the Home ribbon.

Steps 2-3: Name the Quick Step “Flag” and select Mark as Read from the Choose
an Action dropdown menu.
Step 4: Click on Add Action
Step 5: Select Flag a Message from the Choose an Action dropdown menu.

Step 6: You will be given the opportunity to Choose flag. With these options, you
can setup multiple flag Quick Steps for varying (here is a resource on using flags).
I, however, would recommend against getting too complicated at the outset. For
your first FLAG Quick Step, choose Today.

Step 7: Click on Add Action

Step 8: Select Move to Folder from the Choose an Action dropdown menu.
Step 9: Select the Read folder.

Step 10: Now go to the bottom of the menu to Choose a shortcut. Any of the
shortcuts will do. I recommend CTRL+SHIFT+2.

Step 11: Press Finish.

COMPLETE
COMPLETE is the same steps as FLAG except: in Step 1, name the Quick Step
“Complete”; in Step 6, choose Mark complete as the flag; in Step 10, choose
CTRL+SHIFT+4 as the shortcut.