time crisis 2
TRANSCRIPT

TIME CRISIS 2
i !
~ ~==\\=
I
Iii! I
o
, Dlxe
"'t' • .. '~ , ' , Operators Manual
IT IS THE RESPONSIBILITY OF THE OPERATOR TO MAINTAI N CUSTOMER SAFETY
AT ALL TIMES, AND IT IS IMPERATIVE THAT THE DETAILS SET OUT IN THIS MANUAL
ARE FOLLOWED PRECI SELY.
Pa rt No. 90500049

PORTABLE APPL I ANCE TESTING
Please Note:
During testing of the machine with a portable appliance tester the insulation test will show a failure due to the fitting of two VDRs between Live/Earth and Neutral/Earth.
These components have been fitted to safeguard against high voltage surges that may occur on the mains supply to the machine and to comply with the EMC regulations.
To conduct an insulation test on this machine, the VDRs must be isolated from the circuit first.
E- -. :re that the VDRs are reconnected after the insulation test has been completed and belore the machine is placed back into service.
The VDRs used have been specified and tested as safety critical components.

eGS) No part of this publication may be reproduced by any mechanical, photographic or electronic process, or in the form of phonographic recording, nor may it be stored in a retrieval system, transmitted or otherwise copied for private or public use, without permission from NAMeO EUROPE LIMITED.
While the information contained in this manual is given in good faith and was accurate at the time of printing. NAMeO EUROPE LIMITED reserve the right to make changes and atterations without notice.
This machine has been manufactured in accordance with European Community Directives, and has been tested and complies with the Directives 89f336/EEC and 72f23/EEC by the application of EN55014-1, ENS5014-2, EN60335-1 and EN60335-2-B2 (draft)standards (see front of manual) and as such bears the C ( mari<ing. Any changes or modifications to this machine must be in accordance with the European Directives. Any unauthorised changes to this product, may contravene such Directives.
Under some cond .\ions of extreme externa l interference. e.g. radio transmissions, electrostatic discharge or mains borne transients, some degradation of performance may occu r. However the machine will recover normal performance once the source of the interterence has ceased or been removed. Following abnormally high surges on the mains sl:pply. the video monitor may need to be manualy reset by turning the machine OFF and back ON Note:-If the game processor resets due to an inle ruption or reduct ion of the mains voltage any credits established may be lost
This game is not a machine as defined by the Machinery Directive 8913921EEC
SAFETY WARNING
In order to use this machin:: safely . be sure \0 read this Operators Manual carefuHy before installation, adjustment or use of this machine .
Whenever the owner of this machine entrusts dis-assembly, insta llation, adjustment or routine maintenance to another person, the owner should ensure that that person read the appropr iate precautions and re levant sections of this manual before starting work.
In order that no accidents occur when the maclline is in operation, strictly follow the notes on safety as described below.
Th is manual along with the Installa tion Manual (whe re applicable) form an integral part of the equipment and must be available to the operating and serviCe personnel at all t lm~s
This machine is for indoor use only and should only be used for the purpose intended.
Namco ltd . bears no respons ibility for acci dents, injUry or damage resulting from unauthorized changes to, or improper use of Ihis machine .
SAFETY NOTES
The fol lowing safety notes are used tnrougiloul this manua l. Familiarize yourself with each oflhese noles and its meaning be fore in sta lling. serviCing or making adjustments to Ihis machine.
WARNING
CAUTION
Warning denotes a hazard that could resu lt in injury or death. Do not proceed beyond a warning note until the indicated conditions are fully understood and met.
Caution denotes a hazard that cou ld result in damage 10 the machine. 00 not proceed beyond a warning note until the indica ;ed conditions are fu ll y understood and met.
GENERAL SAFETY CONSIDERATIONS
Only oper.3te this machine atter checking that it tlas been installed correctly and in accordance with the manual.
If there is an error or problem wi ttl the machine, operation must be stopped Immediately and the problem rectified before any further use.
Ins tallation, serv ice, adjustment or routine maintenance should be carried out by suitably qualified persons only.
For continued protection against fire hazard, rep lace fuses with the same type and rating. The use of other fuses o r material is prohibited.
The power supply inside the monitor will remain hot and have areas of high voltage even though the machine has been turned OFF, and there is the possibil i ty of burns or electric shock. Be careful not to touch these areas.
To prevent possible electric shock due to failure, this machine MUST be fitted with a securely connected EARTHED p lug.
If at any time the mains supply lead b€comes d;lmaged, it must be replaced immediately.
Do not turn the power switch ON unti l the machine has been installed correctly.
Before connecting the mach,ne to the ma in s supply. ensure thaI the machine is set for Ihe correct voltage and that the correct fuses <'-Ie I itt ed

f Ii
(0
NOTES ON INSTALLATION
NEVER turn the power to the machine ON unti l installati on has been com pleted.
In o rder to prevent possib le e lectric shocks, be su re that th e mac hine is conne cted to the mains w ith a securely connected earthed p lug.
So that customers are not injured by the movement of the machine, ensure that there is as least SOOmm separation between alhar mach ines or walls.
In order to avoid damage 10 the mach ine due to mis-operation, ensure
thaI the voltage of the mains supply is 230'10115 AC.
Note : If the location of this machine has a polished floor, it is recommended Ihat rubber pads are fi tt ed under the le .. el adjuste rs to prevent the mach ine sliding on the noor ,
Note : In order to ga in access to Ihe Power Supply and CPU assemblies, make sure that the rear of the machine is separated from a waH or other machine by at teast SOOmm.
MOVI NG TH E MACHINE
I
/'////-0 --
.& This machine is fitted with castors to make it easier to move. Take care when moving the machine on an inc lined surlace .
.& The Header Assembly has a forward centre of gravity, so it is important that at least two people are used to
f it or remove the Header As sem bly .
.& The fitt ing position of the Header Assembly i s high, and It is important that a means of reac hing the height
safely,without stretChing , Is availab le. (e .g. Steps, Step Stool e tc.)
.& The overa ll height of the machine, with the Header Assembly fitted, is 231 0mm. Take care of any overhead
obstructions. (e. g. Lig ht Fi ttings, Elec tric Cabl es etc.)
.& When mov ing the game, ensure that the game is dis..:lssembled into 3 parts: Monitor Assy, Ride Assy and
Header Assy.
. ~
it
it
it
it
it
it
it
REMOVING AND REPLAC ING PARTS Adjustments or maintenance on this mach ine should be carried out by suitab ly qualified personnel on ly •
Do not make any alterat ion to th i s machine without prior approval. Doing so could cause u nforeseeab le danger.
Only parts specified by Namco Europe Ltd shou ld be used when replaci ng or repairing parts. (Including screws).
Ensure that the power to the machine is turned OFF befo re commencing any main tenanc e work. (Trouble s h ooting, repa i rs etc .)
If perlorming woril not described in th is manual, be sure to contact your distributor for instructions, as no respons ib il ity w ill be acceptt·d fo r damage or injury.
Parts of the Power Supply and Monitor remain hot <lnd ca rry high voltage even aher switching OFF an d
cou ld cause burns or electric shock. Take care not to touch these parts accidentally.
Make sure that the machine is sw itc hed OFF before connecting or disconnecting any plugs or conne ctors.
When remov ing the mains connecto r from the machine, or the mai ns plug from the wall outle t, alway s g rasp the ptug and not the cab te.
'---------- ---_._- --

Dieses Dokumenl dar! in kei ner Weise .... ervielfalligl werden. Jegliche Tonaufnahmen sowie d ie Speich erung auf Dalentragel (Suchsysteme). die We ilergabe oder sonstiges Kopieren fUr den gewerblichen und privalen Gebrauch sind unlersagt und bedurlen der vorhe rigen Ger.ahmigung durch NAMCD EUROPE LlMlTED.
Die informa tione n in d.ie sem Handbuch entsp rechen den Tatsa chen be i Druck legung. NAMCD EUROPE LIMITED behalt sich jedoch das Recht zu .A.nderungen ohne vorherige Bekanntgabe vor.
Oieses Gerat tragI das CE-Ze ichen und wutde gemaB den EU-Richllinien produziert. Es erfOlIt die Richtl inien 89f336fEEC und 72J23/EEC und Standards EN 55014, . EN55 104 und EN60335-1 (s. Oeckblatt des Handbuches). Afle Veranderungen an diese m Gerat mOssen in Ubere instimmung mit den EU-Richtlin ien eriolg en. Niehl genehmigte Veranderungen an d.esem Gera t verstoBen gegen diese RichUinien.
Extreme auBere Storungen. wie z.9. dutCh Radiobelrieb, eleklroslal isehe Entladung oder zeitweilige Netzschwankungen konnen zu einer leistungsminderung fUhren. Sobald diese Fakloren jedoch ausgeschaltet ode . beseitig l wurden. erre ichl das Geral se ine normale Leistun g
Achlung t Fa lls der $pietprozessor auf Grund von NeUunterbreehungen oder Abnahme der NeUspannung aussetzl , ka nn es zum Verlust von $p.elkrediten kommen.
Oiese s Gerat fa llt nieht unter die Maschinen -Richtlini e 89/392/E EC
SICHERHEITSHINWEISE
Um einen ordnungsgema r..en Betrie b d ieses Gera les zu gewahrleislen, mu o. vor Aufstellung, l nbelriebnahme und Gebrauch das Handbueh sorgfa ll'g ge lese n werden . Sobald de r BesiLzer dieses Gera1es di,:: Oemonlage, Aufs1elh.:ng. lnbel riebnahme oder den Service eine r ande ren Person Obenragt. mu~ er sieherstellen, dOl!!. diese Person vor Arbei1sbeginn die natigen Sicherhe itshinweise und die dazugehorigen Kapi!el des Handbucnes liest una verSleht. Um jegl iche Unfall e wahr en d ces Betriebes zu ve rmeiden, mussen obige Hinweise strikt befo lgt werden. Oies es Handbuch sowie das spezielle Gerale·Handbu eh (wenn vorhan den) geh6ren zu m Gerat und mOssen dem Bet reibe r und Wa rtungspetsonal stels z. uganglich se ,n. Oieses GereH 1st ausschliel1hch fur den gewerblichen Gebrauch in geschlossenen Raumen bestimmt und darf nur dart betrieben werde n NAMCO LTD. ubernimmt kel nerle i Haf:ung fli r Unfi:llie, Verletzungen oder Beschad igungen. die auf nicht genehmigte Veranderungen od !H unsachgemt.r..~ n 3ell ,eb des Gera1es zlI luck.zufUhren sind.
SICHERHEITSHINWEISE
Fclgende SlcherhellsbegllHc werden 1m gesamten Handbuch benuUt. Machen Sie s ich daher biUe vor Inbelriebnahme, Wartung und DlIrchlUhrung vor: Einstellt.:ngen am Gerat mit diesen Warnhinweisen ver1raut.
WARNUNG 6
VORSICHT CD
WARNUNG bel.cichnet eine Gefah renquelle fur Leib und Leben. Erscheint dieser Warnhi nweis,
darf erst w ci le rgearbeitet w erden, ..... enn die entsprechenden Erklarungen vollstandig verst3nden und betolg! wurden.
VORSICHT bezeichnel eine G~ fa hlen ':lue lle fOr d ie Besehadigung des Gerales . Erschein! dieser Warnhinwei~. carl ers t we itergearbeitft werden, we nn d ie entsprechenden Erk!aru ngen vol!stand ig ve/standen I.."nc be ~olg l wurden.
ALLGEMt:INE SICHERHEITSHINWE IS E
Oas Gerat dati nur betrieben w erden , nachdem es vorschri fts maB ig und in Ubereinst immung mit dem Handbuch aufgestelH wurde.
Die Warns ch i lder musscn in gul~m Zus\;lnd se in und ersetzt wer den. wenn sie n ieht mehr gut lesbar s ind.
Bei Auftreten eines Fehlers ode r Problems mull das Gerat sofort abgeschaltet w erden und dart erst nach faehgerechtc( 8ehebung des Fehlers wie d('l in Betrieb genommen w erden.
A u fstellung , Servi ce , Eins tellungen und Wart ung durien nur von dafur qualHiziertem Fachpersona l durchgefuhrt w erden.
Zur Ve rmeidung von Feuer, defekle Sicherungen nur du rch vo rge schriebene Sieherunge n ersetzen. Die Verwendung von andersani£ en Sicherung en ode r unte rsch iedlichem Material ist untersagt.
Das Netzte il im Monitor ble ibt nach Ausscha llen des Gerates noeh heiB und fOhrt weiterhin Hochspannung. Daher besteh t die Gefahr von Verblennunge n und Elek trosehlagen. Diese Bereiche d urten nicht beruhrt werden .
Zur Vermeidung von ElektroschLj gc n mufi dieses Geral mit cinem ord nungsgeman geetdeten Netzstee ker versehen sein
Bei 8eschad.gungen des Netzteiles muB dicses umgehend ersetzl w erden.
Gedit erst naeh abgesch los sener Auts tellu ng einschalten.
Vor Einslecken des Netzsleck£<rs bille sicherslellen, dan Netzspannung und Ge:atespannung ubereinSlimmen, und dIe vorgeschrieoenen S , c"erl.."ng~ n v('rwe ndel wurd..,n.

CD Hinweis:
Hinwe is:
I
I
HINWEISE ZUR AUFSTELLUNG
NIEMAl S das Geral einschalte n bevor die Aufstetlung vOHig abg eschlossen ist.
Zur Vermeidung von E ! ektroschl ~ge n muB das Gerat mit elnem ordn ungsg emaB geerde tem Netzslecker an die Stromversorgung angesch!ossen werden.
Urn %u vermeiden, dan Kunden durch die Geratebewegungen verl etzt werden, mull ei n Sicherheitsa bsta nd zu anderen Geraten und Wanden von mindestens SOcm eingehalten werden.
Zur Vermeidung von Besch.lidigungen durch Fehlbelrieb am Ge r~H siche rsle l1e n, da G. die Netzspa nnung 230 Volt betra gt.
Is! das Gera! fur einen Aufsleflpla tz mit glattern FuG.boden bes limmt, mussen die Slandbeine mil Gummiplallchen unterleg! werden, damn das Gerat fest stehl und nicht auf dam Boden hin- und herrutscht.
Zu Repa raturzwecken am Netz leil und den CPU-Komponenten muG die Ruckseile des Ger!l:les mindestens SOem von anderen Geraten und der Wand enttem\ sein.
Zum le ich tercn Tra nsport is! das Gerat m it Rollen ausgerustet. Daher besondere Vorslcht auf abschlissigem Boden
Der $chwerpunkt des Autsatzes liegt sehr we it vorn. Daher werden tilr den Ab· und Aufbau des Aufsatzes mindestens 2 Personen benotigt.
Der Au lsau wird in g roBer Hohe montiert. Daher mui1 aus Sic herhe itsgrlinden eine Steigh!lfe, wie %. B. eine Le iter, ein Tritt odet ~hntiches, verwen de! werden.
Die Gesamth6he de Ger.:ites betfa gt 2.31 rn. Daher Vors icht bei tiefer hangenden Be Jeuchtungskorpern. Fur den Trans po rt oder bei einem rlatzwechse l Gerat In drel Telie zerlegen: KopfteiJ, Vordertell, und Fahrei nhei t
AUS- UNO EINBAU VON KOMPONENTEN UNO TEILEN
Aufstellung, Service, Einstellung und Wartung durien nur von dafur qua1ifiziertem Fachpersonal durchgefuhrt werden .
Es durien keierlei Vera nderun g en ohn e vorherige Genehmigung am Gerat vorgenommen werden. Zuwiderhandtungen sletien eine Gefahre nquelle dar.
Fur die Repartur duffsn nur Otig inalersatztei te (incl. Schra ubcn) von NAMeo EUROPE LTD. verwendet werden.
Vor Beg inn aller Wartungsarbe iten (Fehlersuche, Reparatu ren etc.) mull der Notzstecker gezogen werden.
Bei Arbei!en , die nicht in diesem Han dbuch beschrieben werden , m ull vother der Hand ler zu Rate gazogen werden, da sonst kei nerlei Haftung bei Beschadigungen und V erfetzungen Gbernommen wird. Te ile des Netzte iles und Bilsch ir mes blelben nach Abschalten noch heiB u nd fuh ren Hochspan nung. Dies kann zu Verbrennungen od er eln em Elektroschlag fuhren. Diese Teilc durien ni ch bc ruhrt werden. Vat der Montage oder dem Entfernen von Sleckverbindungen u nd Sleck ern muB da s Gerat au sgescMaltet we rden.
Be i Ziehen des Gerlile stec ke rs oder des Nc t2S 1c cke rs au s dcr W andstcckdo se s tets den Slecke r gteifen und nicht das KabcL

· Oenne udgive!se ma ikke reproduceres af nogen sam he!s! mekanisk, falagrafisk eller e!eklrorn isk praces eller i form af indspdning, den ma heller ikke !agres i et efters0gningss),slem Iransmitleres ellef kopieres lit nogen form far oHentlig be nyllelse uden l illade lse fra Nameo Europe Limited.
Da informationerne i de nne manual er give t med god Ira og var kOfrekl pa udskivningstidspunklel , farbeholder Nam ea Europe Lim ited sig l etten Iii , a\ foretage rendri nge r 09 for and ringer uden va rsel .
Denne maskine er frernsl i llet i overensstemmelse med Del Europ~iske f~flesskabs direktiver og er blevet teslet 09 fuldendt med direktiverne agf336/EEC og 72/23/EEC standarde r (se manualens forside ) 09 sam sadan brerer CE m~rke \. Enhver form far a;ndr ing elter mad ifl kation af denne mask ine ska f v~re i overensstemmelse med Del Europ<eiske frellesskabs direkliver.
Iti lfre!de al fo rb igaen de ekslreme ekste rne l or styrre lser, s;,!t sam ra dio udsendelser, elektronisk afg ivelse el ler forstyrre lser poi ledningsnenel. kan nedbrydning fo rekomme. Maskinen vii dog k",re normal! sa snart forslyrre Jse n oph 'Her eller btiver fjernet.
8emcerk :- Hv is spi ileproeess oren resett er p.g .a. en forstyrre Jse elle f reduktion af hovedstr2lmmen kan de et abl edrede kreditler ga tab!.
Delle spiJ er ikke en mask ine defioerel af maskin di rekt ive\ 69/392 /EEC -
SIKKERHEDS ADVARSEL
For at betj ene denne mask ine sikke rt , Ia.)s da de nne brugemanua l grund ig t Ii" installation, justering eller brug at mask inen . Nar sam hel SI ejeren af d enne maskine overlader de monte ring, instaliat ion, justeringer eller daglig vedligeho ld I ii en anden person. skat ejeren sikre si g at denne person liEser de sikkerheds reg ler og relevante punkter i den ne manua l hH arbejdet beg ynd er. For at undgtl u!ykker nor mask inen er i gang, f0 1g n"j e de sikkerhedsregler der et beskrevet herunder. Oenne manual sammen med inst allations manuale n er en ul0seJig del al udslyret og ska l aUid vce re t it ra idig hed for de l arbe jde nde oQ se fvic eren de pe rsonale . Denne rn aski ne er kun Ii i indend 0(S brug og b0r kun bruges til det beregnede formal. Nameo Ltd. biEre r intet an svar 101 ulykker ell er skade r sam er elresultat af uautoriserede <endringer eller te jl ag lig brug af de nne rn askine.
SIKKERHEDSREGLER
De f0tge nde sikkerh edsregler e t brug t he It igenne m denne manual. G0f dig bekendl med hver enkelt af dem og meningen hera/ f0r inst allering , serv iecring eller justering af denne maskine ,
ADVARSEL it.
FORSIGTIG CD
Advarscl b etegner en epis o- tJe der kan resultere I skader eller d0d, Begiv dig Jkke forbi et adva rselsskiH f0( de indikerede betingelser er fuldslrendig forst,hl.
FOf slgt ig betegner en epis ode der kan resuHere i 0del<eggelse af maskinen , 8egiv d ig ikke forbi et odvarselsski\ l eo r de indikerede belingeser er fuldsta.:!ndig forstaet.
GENERE LLE SIKKER HE DSOVERVEJElSER
Beljen kun maskinen efter at have tjekket, at den cr korrekt installe ret og er I overensstemmelse med manu aten.
Advarselsskillene ska t altid veere i god stand og erstattes hvis de er Slid!, sa kunden tydeJigt kan l<Ese dem.
Hvis der er en fej l eller el probl em med maskinen skal betjening straks stop pes, og problemet afhj<elpes f0r yderligere brug .
Installat ions servi ce, j u stc r ing er cller daglig vedli g eho l d b0r kun udf0res af en kvalifie e re! pe rson.
Fo r forlsat beskyltel se m od brandfare, sikres al h oved sik r i ngerne kun erstattes med sam me t ype kapaci t et. Bru g at anden kapa ei te t eller maler iale er forbudl.
$trlam forsyningen inde 1 moni t oren vii forbl ive var in og have amrader med h0j spcending se lvom maskin en har ViEr et sl ukket o g der et fare for brandskadef eller elektrisk st0d. Pas pa 'med al r"re disse omrader.
Fo r at u ndga elek tr lsk s t ud p .g :a . en fe j l ska l denn e mas kine v;ere forbundet med et sikkert jords t ik .
Hvis hoved ledn i n ge rne pa nog el tidspunkt blive r bes kadigel skal de strakt erstaltes.
T ;end ikke for strommen lo r maskinen er ko rrekl instal leret.
F0r l i lsJutmng al m askin:n I II hove dsln!lmmen Slkr es , at maskinen er lndsl ill et I i i de n retle sp~nd i ng .
--,~-----------------------------
o
PUNKTER OM INSTALLATION
Ta::nd aldrig for strom men til maskinen fer installering er fuldf'Ht.
For at undga m ulige elektriske st0d sikres, at maskinen er forbundet til hove dstr0mmen med sikkert m onterede j o rdstlk.
For at kunder ik;ke kommer til skade ved spillets beva::ge !ser s ikres, at der er minds! 50cm afsta nd lil andre maskiner 09 ... cegge .
For at undga skader pa maskinen p.g.a. fejlbeljening sikres, at spaend ingen pa hovedSlr0mmen er 230 vo~ AC.
BEMA::RK : Hvis denne mask ine placeres poi et polerel gulv , anbefa les del alligge ~ .... ..-, gummimatter under jusler ings f0dderne for at undga at maskinen ~ ~~ glider P' g""1. ~ ~~
BEMtERK : For al fa adgang Iii s\r0mforsyningen 09 CPU justeringer s ikres, al bagsiden af hayed kabinettel star adskilt Ira andre maskiner eller vceggen med mindst SOcm.
& Maskin en er smu rt med o lie for at 913re den lettere bevCEgelig . Pas pa m3.r maskinen fl yttes pa en skra overf lade .
.& Hoved saktionens forreste center er meget tung, det ar dertor vigtigt, at mindst 2 personer benyttes til at montere et. flytte hoved sektionen.
& Monterins hejden af hoved sekt ionen er meget hej 09 det er vigtigt, at have hj",lpemid le r til at no s lkkert uden at skulle str3'!kke si9. (fek.s. trapper, trappestole el. 1i9n.).
& Den fulde h0jde af hoved sekt ion en er 2.31 m. Pas pa eyre forhindringer f.eks. Iys inventa r.
6. Nih spillet skal fl yttc s eller b<:eres skal det sikres at den er demonte ret i 3 dele: - Hoved se ktion - Front se ktion - Kore sekti on
AT FJERNE OG UDSKIFTE SEKTIONER OG DELE.
Justeringer elle r ved ligeh o!d at dennc maskinc ber kun udferes af kvaJifice ret persona Ie.
Skift ik ke n0get pa maski n en uden godkende!se, det kan fere til ufo ruds et fare.
Der be f kun bruges dele specifieeret af Nameo Europe Lim ited nar der skiftes eller repareres dele (ink!us iv skruer).
Sor9 for, at stremmen til maskinen er slukket fo r der foretages nogen fo rm for arbejde {fejlfind ing, reparation etc.}
Hvis der foretages arbejd e der ik ke ar beskrevet i de n ne manual, kontakt da din [everand" r fo r at fa kyndig vejledning , da intet ansva r vii blive aeee pte ret ved skader.
De le af s tremforsyningen og m onito ren forbliver varme eller beErer h oj speEn ding se lv efter maskinen ef slukket, det kan fore t i l forbrcandinger el ler elektriske stod. Pas pa ikke at rere disse dele ved et uheld.
Lce g mcerke til at maskin~n er s Jukket fer sam linger e ller stik tages ud elle r scettes i.
Na r hovedsamJingen fj ernes fra maskinen elJer h ovedsti kkct f jerne s fra vcegge n , tag da altid v ed stikket, jkk~ Jedninge n .

CD No 58 permite la reproduccion total ni parcia l de esta publica cion por ningun medic mecanico, fo\og ratico 0 electroniCD, grabaciones fonograficas, ni su almacenamiento informalico, su t ransmisi6n 0 su cepia, ya sea para usc publico 0 privado, sin permiso de NAMeO EUROPE LIM ITED. .
Si bien la informaci6n conlenida en este manual S8 da de buena 1e y es correcta en el momento de su impres i6n, NAMeD EUROPE LIMITED se reserva el derecho de hacer cambios y alteraciones sin prev ia aviso.
Esla maquina ha side fabricada segun las directrices de la Comunidad Europea, ha side probada, Y S8 ajusta a las directr ices 89/336/EEC y 72/23fEEC, median te la aplicaci6n de los esLsndares EN65014, EN65104 Y EN60335-1 (",'ease cubierta del manual) y per ende lIeva el se llo de Ja C.E . Cualqu ier cambie 0 modificaci6n que se haga a esta maquina ha de ajustarse a las directrices de la Comun idad Europea. Cualquier cambio no autorizado hecho al producto pudiera contravenir estas directrices
Bajo ciertas condiciones de extrema interferencia externa, p. ej. transmisiones de radio, descargas electrost.aticas u osci laciones de l a red electrica puede tener lugar un descenso del rendimiento . No obstante, la maquina recuperara su rendimiento normal una vez que la fuente de interferencias sea retirada 0 cese de producirlas .
Nota: Si e l procesador de juegos se reinicializa a causa de caidas 0 interrupciones en la a!imentaci6n electrica, se perderan todos los creditos.
Este juego no se ajusta a la definicion de maquina de la Normativa de Maquinaria 89/392/EEC
AVISOS DE SEGURIDAD.
Para utilizar esta mclquina con seguridad. lea cuidadosamente este Manual de Operador antes de proceder ala inslalac i6n. ajusle 0 uso de esta maquina . Cada vez que el propietar io de esta maquina con lie a terceros su desmontaje, inslalaci6n, ajusle 0 mantenimienlo rutinario debera asegurarse d e q ue tales personas lean las precauciones adecuadas y las secciones relevantes de este manual antes de comenzar su trabajo . Para que no ocurra acciden\e alguno mienlras la maqu ina se encuenlre en funcionamiento, s ig a estriclamente la s notas de seguridad ta l como mas adelante se des crib en . Este manual, junto con el Manual de Instalacion (cuando proceda), forma parte integral de l equipo y debe eslar a dispos ici 6n del persona I de mantenimiento y operaci6n en todo momento. Esta maquina es unicamente para ser usada en interiores, Y s610 debe usarse para aquello para 10 que ha sido creada Namco Ltd . queda exen ta de cualquier responsabilidad por accidenles. heridas 0 dalios causados por cambios no autorizados 0 usc indebido de esta maquina.
NOTAS DE SEGURIDAD.
En este manual se usan las no t as sigu ie ntes. Fami liaricese con cada una de elias y su significado antes de inst41l 41 r, reV ls.n , 0 hacer ajusles en esla m:iquina
AVISO. b Aviso senala un riesgo que puede ocasiona r lesiones 0 la muerte. Tras ver esla nota, no continue hasta entender completamente y cump!ir las condiciones exigidas.
PRECAUCION CD Precauclon sen03la un riesgo que puede ocasionar danos a la maquina . Tras ver esta nota, no continue hast a entender completamente y cumplir las condiciones exig idas .
CON51DERACIONES GENERALES DE SEGUR IDAO.
Opere solo con esla maquina tras comp robar que ha sido insta lada correctamente y de acu.~rdo con esle manual.
Las notas de aviso deben mantenerse siempre en buen eslado y reemplazarse si esluvieran desgastadas para que los usuarios puedan leerlas con claridad.
5i hubiera algun error 0 problema can la maquina, debe interrumpirse su operacion inmediatamente, y subsanar el problema antes de volver a usa r ia .
las revisiones de instalac ion, los ajustes, y el mantenimienlo rutinario deberan lIevarse a cabo s610 por personal cualilicado .
Para asegurar una cont inua proleccion contra riesgo de incendios, asegurese de que los fusibles eh!!ctricos sean reemplazados solamente por olros del mismo tipo y espec ifi cac iones. EI uso de otros fusibles 0 material estil prohibido.
La fuente de ali menta cion del monitor se mantiene caliente, y tiene zonas de alto voltaje incl uso cuando la maquina ha s id o desconectada, existiendo el riesgo de quemaduras y descargas electricas. Tenga cui dado de no tocar estas zonas .
Para evitar posibles descargas eJectricas por cortes , ('sta maquina debe estar provista de un enchufe debidamente conectado, con TOMA DC: TIERRA.
5i en cualquier momento el cable de alimentaci6n se dan03ra, debera ser reemplazado inmed iatamente.
No encienda el interruptor de 103 maquina hasta que esta haya sido correctamente inslalada.
Antes de enchufar [a m<iquina a la red eleclrica, a5egurese de que 103 maquina esta preparada para el voltaje correcto. y de que se us;:;n los fuslb les adecuados .

I I i
I I ,
I
t
~
! I
Notas:
Notas;
NOTAS DE INSTALACION.
JAMAs ENCIENDA la maquina antes de haber completado la Instalacion.
Para evitar posJbles descargas electricas, asegurese de que la maquina esta conectada a la red con u n enchufe provisto de toma de tierra .
Para que los usuarios no sufran les iones debldo al movlmlento del Juego, asegurese de que hay al m enos 500 mm de separac16n entre este y otras maquinas 0 las paredes.
Para evita r danos a la maquina causados por ope raci6n incorrecta, asegurese de que e! voltaje de la red es de 230 voltios, corrie n!e alte ma.
Si el lugar donde se insta lara la maquina liene un piso pulido, se recomienda colocar tacos de goma bajo los ajustadores de nivel para evitar que la maquina se deslice pOf el suelo.
Para acceder a las unidades de Fuente de Alimentaci6n y CPU, asegurese de que la parte tras era del mueble prinCipa l esla separada de m ures u otras maqu inas al menos 500 mm.
6 EI juego tiene ruedecitas para hacer mas facil su t raslado. Tenga cuidado al mover la maquina en una superficie inclinada .
.& La Unidad de Igualacion tiene el centro de gravedad despJazado hacia adelante. Es importante que su montaje y desmontaje se haga por al menos dos personas .
.& L a posicion de la Unidad de Igua la cion es bastante alta , y es importante que haya un m edio de alcanzar su altu ra con seguridad, si n estirarse (p. ej , una escalera, un tabu rete, etc.)
.6 La altura tota l de la Unidad princ ipal es de 2.31 mrn. Tenga cu i~ado de que no haya obstacu los p. ej . IUces,
&
&
&
&
&
&
&
&
Cuando traslade 0 mueva el jueg o, asegurese de q ue este haya sido desmontado en 3 pa rtes: Unidad de Igualac ion, Unidad Fronta l, y Unidad de Juego.
RETIRA R Y REEMPLAZAR PARTES Y UN IDA DES.
Las revisi ones de insta laci6n, los ajustes, y el m anten imlento rutinario deberan lIevarse a cabo 5610 por pe rsonal cua lificado.
No realice a!terac iones en esta maquina sin ap robaci6n previa . De hacerlo as I, pueden causa r pelig ros imprevisibles.
5610 de ben usarse las partes especi ficadas por NamcD Europe ltd. para reparac iones 0 reemplazos ( incluidos los tomillos).
A segurese de que la maquina esta desconectada antes de cornenzar cua lq uier trabajo de mantenl miento (reporaciones, resolu ci6n de problemas, et c.)
AI real izar trabajos no descri tos en aste manual , p6ngase en conta cto con su dis!ribuidor para recibi r instrucciones. Se declina cualqu ie r responsabilidad por darios olesiones.
Hay partes de la fuente de alimentaci6n y del monitor que se mantienen calientes 0 alm acenan alto voltajc incluso tras desconectar la maqu ina, y pued en producir quemaduras 0 d escargas electricas . Tenga cuida do de no tocar accidentalmente estas pa rtes.
As egures e de que la maquina esta apagada antes de coneclar 0 desc;onectar cualquier enchufe 0 ccnector.
A~ reli ra r el con~ctor principa l de la rnaquina, 0 la clavija de alimen tacion de l enchufe de la red, agarre slem pre la clav lja y no el cab le.

- - cil
CD Aucun element de cette publication rle sera reoroduit, ni par precede mecanique , photograph ique ou eledronique, ni pa r un moyen d'enregistement phonograph ique. Ces informations ne seront ni stockees grace a un precede de recuperation, ni transmises ou autremenl copiees pour un usage publique ell prive. sans I'autorisation de NAMeO EUROP E LIMITED.
Malgre Ie fa it que les informations comenues dans ce manuel soient donnees de bonne loi et eta ient actualisees au moment de leur impressiOl'l. NAMeO EUROPE LIMITED se reserve Ie droit de proceder a des changements eu .a des modifications sans avis preliminaire
Ce jeu a ele fabriq ue en respect des normes de 13 Communaute Europeenne. apres avoir ele leste il repond aux normes 89/336/EEC et 72123fEEC . en application des standards EN55014, EN 55104 et EN60335-1 (voir la couverture du manuel), et comme te! ;1 comporte I'autocollanl de conlonnite avec les nonnes de la Communaute Europeenne. Tout changement non aulorise sur ce produit pourrait contrevenir a ces normes,
Sous certaines condit ions ex1remes d'in\erierence exteme, par example des transmissions rad io , des decharges electrostatiques ou bien de interference s passage res sur Ie reseau, certaines degradations ou anomalies peuvent se produire. Le jeu retrouvera cependanl son etat nonnal de lonctionnement lorsQue la cause de ces anomalies aura cesse ou se trouvera deplacee.
Nofe:-Si Ie processeur du jeu se reprogramme suite a une interruption ou une reduct ion de I'alimentation, les credi'\s Qu'il aurait pu conle n;r peuvent se tro uver perdus .
Ce jeu n'esl pas une machine, telle Que definie par la norme sur les machines 89/392lEEC
MESURES DE SECURITE
Arm d'ul iliser ce jeu en loute securite , bien lire ce manuel d'uti lisali on ava nt de pro ceder a son install ation , son reg lage ou son explOitat ion . S; Ie propriE!taire de ce jeu en con l ie la demontage, !'installation, Ie reglage ou Is maintenance habituelle a une autre personne , il dews s'assurer que celte personne ait lu les conseils d 'util isa l ion et les passages du manuel se rapportanl a ce theme , avant qu'elle ne commence son {ravail. Afin d 'eviler tout accident pendan! la duree d 'exploitation de ce jeu, se conforme r strictment aux conseils de securite decril s a la suite. Ce manue l ainsi que Ie manuel d'installation du jeu (Iii ou necessaire) fonl partie des I!demenls necessaires a I'installation de la mach ine et doivent etre mis oil la disposition de I'utilisateur et du personnel de maintenance a tout moment. Ce jev est uniquemen\ destine .3 un usag e inlerieur el devra etre utilise comme tel. Namco ltd, ne sera aucunement tenu l esponsable en cas d 'accidenls , de blessure ou de dommage quelconque resultant de mod ifications non autorisees ou d'usage impropre du jeu.
REMARQUES SUR LA SECURITE
les termes de securile dlHailles a 13 suile seront utilises tout au long de la lecture de ce manuel. II convient de vous familia riser aves chacun de ces lelmes ainsi que leur sign ification avant de proceder a I'installation, .3 la maintenace ou au H!glage du jeu.
AV ERTl5SEMENT &
ATIENT ION CD
Ce terme annonce un danger Qui pourrait eventuelleme nt avo! r des consequences dommageab les ou mortelles . Ne pas passer oOtre ce signal jusqu'a ce que les condit ions ind iquces soient ent ierement comprises et effectuees.
Ce terme indique qu'un da nger menace la machine. Ne pas passer outre ce signa l jusqu'a ce Que les con ditions indiquees soient entieremen\ comprises et eHectuees
CONSIGNE5 GENERALES DE SECURITE
Allumer I'apparei! seulemen t aprflS avo;r veri f ie Qu'it a ete correctement Installe , et que les Inst ructions du manuel on t ete respec tees ,
Les notes de mise en garde do iven ! consta mment demeurer en bon etat et etre remplacees en cas de d lsparition, afin que Ie client pu lsse [e s lire clai remenl.
5'il Y una erreur ou un probleme avec [a machine, I'uti lisation dolt et re immediatement Interrompue et Ie probleme resolu avant toute nouvelle utili sa t ion,
L'instaJiation, Ie servi ce, Ie reg lage, ou la ma intenance doivent etre effectues uniquement par les personnes qua lifiees.
A fin d' ihiter un eventue l incendie, s'assurer q ue les fusi bles soient re mplaces pa r Ie meme type de fusibles et au bon vo ltage. L 'utilisation d'autres sortes de fu sib les ou autles mater iels est Interd i te,
L 'a limentation iI I'inter ieur du mon iteu r re ste chaude el comporte des zones de haute tension meme slla mach ine est ete inte. It existe donc un risq ue de brulure ou d 'eleclrocution. Attention a ne pas toucher ces endroits .
Pour preven ir une eventuelte electrocution due a un dlHaut mate riel , ce jeu DOlT etre munl d'une prise de TERRE conn ectee en to ute securite
5 i iI tout moment les fils electriQue s sont endommages, il fau t les rem plac er immediatment
Ne pas menre Ie jeu en mode de fo nctionnement avanl qu'it n'ait ele correctement installe.
Avant de connecter 1«1 machine au reseau. s'a ssurer Que la machine est insta l1ee so us la bonne te nsion et q ue les fusib les corre sponden t

Note:
Nole:
NOTES D'INSTALLATION
NE JAMAIS mettre Ie jeu en marche avant qua ['Installation ne soit ccmpletement effectuee.
Afin de prevenir une eventuelle electrocution, s'assurer qua [a machine est connectee au reseau avec une prise de terre reliee selon les normes de securite.
Afin que les clients ne soient pas blesses par les mouvements du jeu, s'assurer qu'il existe au mains 500 mm de separation aves les autres jeux ou les murs.
Afin d'eviter que Ja machine ne soit abimee suite a une mauvaise operation, s'assurer que \a tension sur Ie reseau principal soil de 230 volts AC.
Si I'endrei\ au do lt eire ins!allee la machine a un sol p6li, iI est recommande de poser des tampon s feutres sous les verins pour eviler que Ie jeu ne gli558 sur Ie sol
Afin de facili!e I'aeees aux CPU at a ['alimentation, s'assurer qu'i l y a un espace d'au moins 500 mm enlre I'arriere du meuble et Ie mur ou tout autre jeu,
Le jeu est foumi avec des rou lettes pour une meilleure mobllite, Prendre garde quand la machine est deplacee sur une surface inclince.
Le centre de gravile de la partie superieure du jeu est situe sur I'avant, II est done indispensable que
deux personnes au mains soient employees pour installer au dep[acer la partie superieure.
ill L'installation de [a partie superieure du jeu s'effectue en hauteur, iI est done important d'utiliser un
elevateur que lconque pour en eftectuer Ie montage,
ill La hauteur totale de I'assemblage pr incipal est de 2310 mm, prendre garde aux eneombrements de la
partie superieure (ex; illuminations du bandeau).
ill Quand Ie jeu est deplace ou trans porte, s'assurer qu'il est separe en 3 parties: ['assemblage du haut ([e
bandeau), ['assemblage de devant (Ia cab ine), I'assemblage mobile.
DEPLACER ET REMPLACER LES UNITES ET LES PIECES DETACHEES.
L'insta llation , Ie service , [e reglage, ou [a maintenance doivent etre effectues uniquement par [es personnes qualifiees.
Ne pas apporter de mod ifications sur cette machine sans autorisation preaJab!e, fa ute de quoi cela pourrait entrainer un danger.
Seules les pieces delachees Namco Europe Ltd, dolvent etre uli lse.es pour Ie rem placement ou la reparation de pieces (y compris les vis)
S'assurer que I'inlerrupteur sol! sor OFF avant de commencer tout travail de maintenance (localisation d'une panne, reparations , etc.)
Si dans ce manue l i l manque une information pour realiser un quelconque travail, contacler votre distributeur, car aucune res'ponsabil i te ne sera acceptee en cas de damage ou de blessure.
Les pieces de I'a l imentat ion at du monitcur restent chaudes, a tension elevee meme lorsque la machine est hors tension , elle pourrait occasionner des bnilures ou des electrocutions. Attention de ne pas toucher ces endroits accidentellement.
S'assurer que la machine soit hors tension avant de brancher ou debrancher to ute pr ise ou connecteur,
Lorsque I'on man ipu le la prise au reseau de la machine, ou lorsque les prises principales doivent etre debranchees, saisir toujours la prise, et non Ie cable.

Kovtvo p.tPOlO cruni<; TI]<; bo:&oo1']~ ocv Il'topri vo m'a lt opaXOCI J..lE ollolo5~1(ort ~1']Xo\'I .. 6 ,q:>WtoYPoq:>1I,6 ~ 'lM:ICTPOVI .. 6 !-I too , ~ J..lt J..lOPlPti q1Wv1']n .. ~<; ruoypo.~1']a1']<; Kat OVTE \'0 onOfhl',C\JTci J..l.!: OIovopSwn .. 6 cnioTljJ..lO , va J..lCloooOd ft va ovnrpalllci ria 01']J..l6010 I'J IOlwmni XPtio'l , xwpi:;; TTl" aoCID " V; NAMeQ EUROPE LIMITED.
K08t<J<; ourt<; 01 1().1']POr.:>Opi~ ae auto to QXclpiol0 txou\' So8ei J..lE ICa).~ lticnT) O:Ot OICPIIk'l<; 'tTlv wpa TTl<; n::mw(fT)~ • 1'] EtOlpdo NAlvICO EUROPE LIMITED ICpaHl£110 OI .. OIWtJa va KQ\'el ollou:oo~::or l: a.U.oyt<; xwp[<; ElSonohlOT1.
To J..l1']Xm1')J..lora txou\' Kora.O"C\loottl aUJ..l!p(llVO J..l( tOu~ 6po~ fTJ~ EupwItOh:li <; Kot\'6tTJ1ru;. "01 txoUY t:Acrl8d aUJ..lq:>Wvo IJE tou<; v6J..lou~ 89/336/EOK ICO'I 721231E0K J..l l: tTJ\' OiTljol'\ l W\, EN55014 • ENS51 04 "01 EN60335·] ofQ\'tO'Pfl; (50; J..lll:pocna atO C'f'XttpiolO) 1(01 6).0 tXOU\' TO CE O'I)J..lO , OnOIO'OI'j:tOiE o)).O'yl1 it J..l.(Tatpo:l1; at mHO 10 J..l1']Xcr.'TIJ..la lTpbtCI vo ciVQI aUJ..lqlUlVO J..lC Toul; opou~ tTt~ Eupwll:oIIC1)t; Kow6tTJro.:; ()lI.ou:ooilnotC o).).oyb; xwp (~ 0:0£10 at autO to 1tpor6\' 1l't0pCI va lIapopci cru10U~ tou<; 6pout;,
I:I: KWtO U:<; ncpmni)oc I ~ UlttpPo).IKlic; I:~WTEPIICti~ ltapE J..l poltit; ,1[ ,X, POOIO!p(llVlICtI; J.lCta06ol:l~ , l'\M:JCrpoat om :tt; 1JC'T0POAh; Ti lIapOOIKt.; £tJPo).tt;, , J..lltopci va ltapouClloolOUV t.:0.;;01£4 09).16TI]tct;, anll'1rOpouoio(fT) , nCvtUl<; TO J..l1']XQ\'TlJ..lO 80 cnilvt18£'1 otTJv q11JO\o).oYIKl'j 1!opo1JoioClT) (q:> 600v fl X'lYT) fTI<; T.o.ptJ..l Ilo),T)<; oroJ..loritol:l it 01l0J..lO't.:puI'8ti
r llJ..l£iWOIl , Ecr.' yh·£1 rcsc t Oto\, processor IOU J..l flJ.(l\'TiJ..l OIO:; ICOTO III oUlpKrla tTJ~ "",pia£; ltapoV1~, x6vrol nou tXOUY K£.poq6£1 jJJIopci va x080uv,
06.HrI['!: AE q>AAE IAI:
riO fl]V aoq:>aI.~ J.f"iOIl TOU )J '1J.(JI' it,IO:0t;" ItpbCI \'0 OIOPUO CU; TO E"fxclpiOIO xptiat)~ Ilpooc"nKCz lIplV t"1']v qKQro.OtOOT) ,tOxoOtt"1']CIT) it XPf)OT] TOU ~qXa\1')J..lOtO; QltOtCOf)n01C 0 IOIOt.:nit1']; Q'\'IOU IOU IlIl;(oVliI"OTO; <fltOCt an6 ":011010 1lp60u.l1l0 va I:'yKOraonjO(I, vo "a\'tl OltO iootinOTI: aJJ.ay~ Ti funo pouriva~ otO J..l1']X Q\'flJ..la • r.ptltCI I'a Eivol oiroupo.; 6Tl tJ:EI olapooci nt;, oOflyi(<; O\JI0U TO\) EYXClPIOIO\)71Pl\' va oPXiott va Oo\lJ..tUtl , npo~ 01l0\lluy~v O~olo\loli;'lOtC OroJ:TlJ..lOTO<; t.:Ol0 Tll" l..cHouprio TOU J..l1']X(l\'~lloro<;. cruOlTlpli><; aKOAoUOOUytal Ot oOl'\yi£<; aoq>aJ.cIO'I; 6ltw~ 5h'OI'tnt 1l0POt.:QIW Aut6 to EYXClpiolo at atJ\'o\,)oo~16 ~I( 10 C1XCtpioto C)' t.: oTaarOOTJt; (6110\1 oloti8Ctal) WloTc)..ri tva oloKlllpYl~O Iltpo<; tWI' 1fo.poxwv t.: Q\ 1l:pt:!CL va ciVOI olo8tOIJ..lO ylO TI]I' i..(ttoupyio 10;01 to ser\' i~e OItOIOOtlItOt( onwit. AUT6 10 J..l'lXQ:\'1']PO CiVO I Ylo xpi]01'] j.l61'o O( CClWICPIK6:x.wpo 1(01 60 IIpblC\ va lPI')OI)Jollolcirol j.l61'0 '1'10 rour; )..6you~ l' to tOu<; 01l0io\l~ ICorooxrulloTI]1(( . H tlDlpl:ia NAMeO Lid oC\' QtPCI Kallio £:\JOUI' I') rIa aroxitJ..lOto • 1I1.T}ytt; it t.:atootpoq:>l:; TiOU J..lllopci va lIpouq80uv alT6 o)J,ayt~ xwpi.:; aoclo o( it C\oorwycit;, O\JtOu .ou J..lqxcrI'Tl~aTO~ .
:!: H MEInJ:E IJ: AJ:q>AAE I AJ:
Ot ot.:6',ouOc~ o:WEIWOCIO; OOIPO).(IO; XPIlOIIlO:\OIOU\'fQI J..l tow <nnou IOU £)'XEIPIOiou , 61(~,paoc cUtb; 1(pooc)('tI )('Q 1'10 va y(VCI t.:aW\'Oflt 6 to VCI1lJ..l1l rO\l~ It(lll' tT]I'I:;"(ilOO:UOIl, O(PPI<; it 0ItOI00Ti7tOTCO)J..aYTi r!vcI oro J..l'lXCrv1']J..lO
n pO EI.10nOIl !~ I-I 6. Ii npo£H'i01l0rl]l:"1 oqlop6 Kh'oul'o a 01t0(0<; ).I1topd vo ((1'01 J..6y0<; 60\'u t o\l , No J..l IlV 1tPOxwpi]oCI<; ac 01tolooliltotc t.: iI'1']a ll J..lqpI out ol 01 OPO I yl\'o\ll' KOlOI'01']tol.
npO~QXH CD H Itl'00oxit aqlopa "i\'ouI'o 0 olloio; 111'0pci va Itpot.:o).toC\ np6p'-llJ..lo atO )J1']XQV1']J..lO ' No J11']v
7tPOl.WPTiocl~ O ( O:\ OIOOit"O!( "(1'1'101') )li:WI 01.l10i 01 OPO l yil'o\)\' KOTOliO l') roi.
Aq:>ou tl.CI K(lT ol'oT]Od out6 TO CYl.clpio lO, ).16 \'0 tOTC 1'0 ).c ltO\lpyJ'JO'CI TO J..l 1l J.6I' T] )J0 T\ va '1' [1'(1 t).cyxo~ CIP Dao\' txC I yl l' t l T] CY KaTOOT0011,
Eal' u:lapl.tl j.6.80~ Ii npopi, '1J..la J..lt to 11Ill.OI''1J..l0 , 11 ).cnoupyio npfT.(1 va (J'1'0~o'T6tl OJ..ltO'w ~ Ka l va olop9t<JvC'r0 1 'TO Uz60~ rrpl\' 01t OIOOt\1tOH ojj,1'] 7,p rjO'11,
r IO O'UI'tr.i] Il poatoO'io 0:16 ~Wfl6:. npow 0 1 O(J96:j,c I C~ va u\'1IKu8IOTOlh'-01 pc lot au Tlmou.H xPI\Gl'\ Q)J..c,;,v oO'q>alLIW\'1j O\'Tllo(C\J..l hw,' (llIoyopdicT<.Il,
To 'TP0tpOOO flt.: O OTO cawtcpt t.: 6 t OU PI17,(lI'li pal0~ 00 lt opa J..l t h' £1 ~C0'1'6 Kat U1tOpl.OUV 1t cpl or.f").I t u\V 1'] ).i] t u O'1'] 1[Up ' o)..o 1[OU TO )l 'll.(\I'1'])JO at\' aou).cV(I. ICOI U1I 6Pl.r.1 111tIOUVOnllu 1']j,cK'TPl t.:OIJ O'OK, npoO'oxti \'0 Ilfll' OKOU).I1[i]O't l, OUT£" 'T I; 1tcploXf~,
r iO nt\' a1toQuY11 Il).(KTjlIICt<J\' (Jo~ ).61'0 PiilP Il ';. TO J..l 1'] l.i1vll)lO Tl PE n EI \'0 tXCI npWTa cvwOd ).IcydWaTJ,
npII' nIl' xupox Ti pCli ... t:fO~ 010 J..l1']XO\"l1JO , 1'0 dool oi),oupo.:; OIl 10 voltage t.:01 oi..t.; 01 aOijl6.h:u:t;, dl'Ol oWOTcl £\'w]Jt\'a ICa l fQlIOOCtllJltvo

CD
1:HMEIn1:EI1: rIA THN En<A T ALT ALH nOTE YO PI1" OV6.PCl TO j .. lT1XaYl\PQ cav IStV t;~CL OJ..olU..TJPro9cl TJ tyKOTactr°cnt·
r ia TljV Qr. or.p \rfl'll1l.x.~pn.a;.1\' OOK npbtci 'TO pfn:lrvtJJ.lQ va tXtl TClro9cL
no TTjV (1l'1:09uril kIVOU\'OU Ot "altal OY l'(Q(KTI\ • npbtcl TO JlTU:6:VT\J.lQ va txel a r,ocrroa'l TOUi...a1.I!11'OY 500mm ClII'6 QUo /.nu:OvllPQ.q Tolxo.
rlU fTlV al!09uy~ P).IiPIJ:; oro J.ITJ:ta..'T}pu UJro )..660<; A£ITOUpylW;. II'PDtti 11 llaportl va [h'm 230voll AC ..
~HMEln!H: Em TO ltaTWPQ ala 011.0 [0 &iVQI tOIiOOcrrultvo TO J.I"X~).Ia r"-ucrtpCu:l,dVQl KaJ.6 va plltl t-.'Q KOPI.Ulrt J.iOI<tra<; r iO a1lor.pur~ jJLroidVTJO'Tl<; tau ).II1X<nll)JOTO:; C\' tilpa M:lfoupy(a::; IOU.
EHMEISTI:H; rlu "1\' c\umA" lIp6oPOO'TJ OnlY ,,"'Upiw~ l!apox~ ~ to CPU nptncl TJ 11 low 1I6pra TOU J.lT]Xtrl1)J.I(no<; \'0 WltXet TOuA.6XLOTov SOOmrn a,16 TOV Toixo ij Q)).o J.ll1X.~IlO .
~ H Kcr.poi.l\ (Ka naKI) TOU j.Il1ltl''1iJ.lOTO; d\'Ol1l0i..UIjI'lJ....6 Kat YIQUT6 Xpcl 6. ~cTall'l'pOaOX II aTIJv TonoOt TTlO"l\ "Tou. va )Ill" 7.TU1I'"(lCI,, KaTa(J'1'pocpd,
'(hov ~CTaKI\'tiTQI TO ).ITlX(h"l'j).lO, nptncl va elVal (It 3 ).I t PTl: Kcqo).'i (KM6.Kt), Mnpo(J'1'o ).I tpor; (o06vcr;), Ka9la~o
AnOMAKPYN!:fI KA I ANTIKATAl:TAl:fI MEPflN - ANTAAAAKTlKflN
,\ 16\'0 ).I tp'l nou olC\JKpn'(~O\"'O I on6 'lTJ\' CTOlptiO NA ,\l CO EUROPE Ltd jl1I'0POUV va XPT]OI).lOnOIT]OOUV "(10 O\.,.LKQtoc-roaT] 'i tl'I'L016pOwCl"l\, (au).lncpu..a).l~o\'O\.,.t KOI 01 ~Iocr;)
Eov "({Vtl KO,nOlo OO UJ..CLO O'TO j.LTl1.0\' Tl j.LO 7.wplr; "a OIl:\I"pl,'{~nol aTO t'YXl:.tpIOIO, \'0 O'!ll(on' CJ)v~aw;).Ie TOV o\'tlltp6or.:>no 'flU OOIH(C ~ 'rIOT! Kallio evOU\'T] oe\' ljlCpOI))lC 'r LO KOtOaTpOr.p tr; -q piizPcr;.
~1tp'l TaU TpO<pOOO TlIo.: OU 'Ii rou )16nTOp nopO).l tvou\' ~CO'TQ 'Ii C1.0u\' UII'Tl'A TQO'lj 01o.:6IJo KOI 6TO\' a{lt\atL TO ).I'lXQ\'ll.).IO 10.:01 ).Inopou" ''a npOI(a.i..taOl)V 1(0'4H)IO it A.tICTP006K,f lOUT6 oe\' npbtci va tPXOVTOt at cnalfl'li ).Ie Xtpw ,
To j.LTlX1h1lj.LO npDtCl \ ' 0 elva . or- ll aT6 Kora TIIV oUvoeoll it onooUvotOlJ np(~or; 'i Ko"fIo"opa.
!-\OTQ TTJ\' Ol'lOl.6 I(pu\'oT] Tr.:>V 1( (\' ~p'''W\' " O\'t"TOp and TO JlTl7.0\"l'jIJa ~ TTl:; Ktlplar; npl~a~, npblci \'0 nuhoujlc TO lIi.ocrrlKd )lCPO; I(O( 67.1 TO I(Oi..wOIO,

L
CD Nessuna pane di questa pubblic3zione pub essere riprodotta con processo me.,:canico. fotografico 0 lettronico, ne sott o forma di reg isl razione fonografica , no PUD esse re memorizz31a in un sistema di salv31a9910, trasmessa 0 in altro modo copiata per usa pubblico 0 priva ta. senza i'aulorinazione di NAMeQ EUROPE LIMITE D.
Le infor:nazioni contnute in questa manua le so no slate date in buena fede ed erane accurate al momento della pubblicazione. Tuftavia NAMeD EUROPE LIMITED. si riserva il diritto di apporre cabiamenti e variaz ioni senza aleun preawiso.
Questa apparecchio e sl alo costruita in co nformilfl aile Direttive della Comunija Europea, ed ~ stalo pravato e sodd isfa Ie Direttive 89/3351EEC e 72/23fE EC per I'applicazione degli standards delle norme EN55014, EN55104 e EN60335-1 (vedi honte del manuale), e per Questo porta it marcnio CE o Qualsiasi cambia men to 0 modifica di questo apparecchio deve essere in conformita con Ie Direttive de lla Comunita Europea ,
tn caso di condiZ lon i di estrema interferenza dall 'esterno, per esempio trasmissioni radio, scariche elenrosta tiche 0 transitori sulla linea, puo verificarsi un decadimento delle prestazioni, Comunque I'apparecchio rilomera OIl rendimento norma Ie quando 101 sorgente dell,interferenza avra cessato di emettere 0 sara stata rimossa .
Not a bene : se il process ore del gioce -resetta- a causa di una interruz ione 0 diminuzione del vollagg io di linea , un eventuale credilo , g ii! conces so, puo essere annullato.
Questo goeo non e una macchma co si come viene definita dalla Direttiva Macchine a9/3921EEC.
AWERTENZE PER LA SICUEZZA
Allo scopo di usare Ques.to apparecchio in sicurezza. leggere questo Manua le detl'operatore attentamente prima dell'insta llazione. regotazione 0 uso eli Que sta macchina. Tuite Ie volle che il proprietario d i questo appalecchio aHida 10 smontaggio, I'instatlaz ione , la regolaz ione 0 la manutenz ione ord inaria ad un 'altra persona. il propriela rio stesso deve assicurarsi che QueUa persona legga Ie precauz ioni necessarie e. paragrafi impon an ti di Questo manuale prima di iniziare a lavorare Perche non succeda alcun inc iden te quando 101 macchina it operante, seguire rlgorosamente Ie note sulla sicurezza come spec ificato piu avanti. Questo manuale insieme con il manua le di installazione (dove si puo applicare) forma una pane inlegrante deU'apparechlO e deve essere disponibile sempre OIl pers onale ope ranle e d i serviz ie. Quest macchin a deve essere usata solo in interni e deve essere usata solo per gli scopi per cui e pregettata , Namco Europe lid non si assume responsabilila per in cidenti, ferite 0 damni risultanti da cambiamenti non autorizzati 0 da uso improprio della macchina .
NOTE PER LA SICUREZZA
Le seQuent i note sulla sicurezza sono us.ale da l principio alia fine di questa manuale . Va lutare attentamente ciascuna di Queste note ed I I loro s ignif lcalo pr ima di insta\lclrl:, fare ass isle nza 0 re golazioni 5U questa macchin .. .
WARNING 6.
CAUTION 0
"Warning" evidenzi a un ris chio di ferila 0 d i morte. Non procedere oltre una nota "Warning" finche Ie avvertenze specifcate non siano completamente capi te e conosciule.
·Caution" ev iden zia un riSChio di dannegg iare la macch ina . NOn proceder oltre una nole "Caut ion " f inche Ie avven enze specificale non siano complelamen\e cap ite e conosciute .
CONSIDERAZIONI GENERALI SUlLA SICUREZZA
Mettere in funzione I'apparecchio solo dopo aver controUato che "instaJiazione s ia stata ettettuata correttam ente ed in conformiCa aile iSlruzioni de l manua [e.
Gli avvisi "Warning" devono sempre essere conservati in buone condizioni e sostitutl se consumati, cosicche jJ
c liente Ii possa leggere chiaramenle.
Se vi sono errori 0 probl emi con la macch ina, si deve interrompere il fum::ionamento Immediatamente e risolvere i! p ro blema prima d i ogni uher iore uso.
l'insta ll azione, i'assistcnza , Ie rego lazion i e la manuzcnzione ordinaria devono essere eseguite solo da person e idonee e qua l it iea te .
Per una protezi on e costante c~ntro i l r isc h io di fuoco, ass icurars i che i fus ib ili sulle alimentaz ionl siano solo sost itu iti co n 10 stesso l ipo e cara tler istiche , l'uso d i altri fusibil i 0 ma teriali e pro ibito,
l'alimentato re all'interno del mon itor rimane caldo ed ha zone d i alto voltaggio anche se 101 macchlna e stata spenta, c' e quindi la pos sibilita di brucialure 0 scosse elettriche , Fare attenzione a non toccare queste zone .
Per pr eve nire possibi li scosse elettriche dovutt? a difetti , quest macchina OEVE essere insta!lata con un connettore sicuramente MESSO A TERRA,
In caso i l cavo di alinlentazione di rete ris u ltasse danneggiato deve essere sostituito immedatamente.
Non accendere la macchina finche 101 slessa non e stata inslallata completa m ente e correttamente,
Prima di col leg are la macch ina alia rete, assicurarsi che 101 macchina sia prepa ra la per il voltaggio corretto e che siano inseriti I Iuslbih " cattl
CD
NOTES D'INSTALLA nON
NON ACCENDERE MAl ia macchina finche l' instaUazlone non e stata com pl etata.
Ali a scopo di prevenire possibili scasse elettriche. la mac china deve essere o bbJigatoriament e callegata aUa rete con un cannenore messo a terra con connessionl sleure.
Perc he I clientl non siano feriti dal movlmento del gloco, assicurarsi che cl siano almena 500mm di distanza rispetto aile altre macchine' 0 rispetto al mura.
Per evitare danni alia macchina durante la messa in ope ra , assicurarsi che II YoJtaggio della re te sia 230 valls AC.
Note: Il luogo di des(inazione della macchina deve avere il pavimento Jisclo e 5i raccomanda di sislernar e del cuscinelli di gomma sotta i piedin i di livellamento per prevenire 10 sciovolament della macchina sui pavimenlo.
Nole: Per garantire I'acces so all"alimenta\ore e alia scheda madre, assicurarsi che .1 relro del mobile principale sia separato daUa parete o da ali re macchine di almeno 500mm.
II g ioco e fo rn ito di ruote per rendere p ill facile II suo spostamento. Fare attenzione quando sl muove la macchi na su una superficie inctinata ,
La testata ha II baricen tro spostato in avanti, e percie importante che ci siano almeno 2 persone per montare 0 smontare la tes tata stessa.
La posizione di fi ssaggio della testata e molto alta, ed e Importante che cl sia un mezzo disponibile per ragg iungere tale altezza in sicurezza e senza allungamenti. (Ad esempio scalini, sca le portati ii etc,)
L 'a ltezza totale della parte pr incipale e 2310mm , fare attenzione ad eventuali ostacoll sopra la testata ovvero ad eventua li installazlon i di luc i.
Quando sl muove 0 sl lraspo rta II gloco asslcurarsi che sia smantato In 3 parti: Testata, Parte frontale, Parte mobile
RIMOZIONE E SOSTITUZIONE DI GRUPP I E PARTI STACCATE
L' jnstallazione, I'ass istenza, Ie regolazionl e la manu.zen.zione o rdinaria devono essere eseguite solo da persone idonee e qualificate.
Non apporre al cuna mod i fica aHa macchina senza autorizzazione p reventiva. Ii fare q uesta puo causare un pericoro non prevedibile.
Quando s i rimplazza 0 sl riparano delle parti (inc luse Ie viti) sl posso no usare solo parti app rovate dalJa Namco Europe Ltd.
Assicurarsi che la macchina sia SPENTA prima d i incominc iare qua lsiasllavoro di m anutenzione (guasti, r iparazioni etc.)
Se state per inizla re un lavoro non descr itto in ques to manuale, contattate il vostro d is tributore per instru:doni poiche non si accetta alcuna responsabilitll per dann; 0 fer ite.
Parti dell'afimentatore e del monitor ri m angono ca ldi 0 porta no alta te ns ione anche dopo aver spento I'apparecchiatura e possono causa re bruciature 0 scosse elettr iche. Attenzione a non toccare questa parti accidentalmente.
A ss icurars i che la macchina abbia I'!nterruttore nella posizione OFF prima di inse ri re 0 d is lnserire quals ias i connettore 0 spina.
Quando vengano rimoss i i connettorl principall dalla macch ina oppure la sp ina dell'al imentazione da lla pare te bisogna sempre af1errare il connettore e nan i l cavo.

l
® Ingen del av de nne utgiveJsen rna reproduseres av noen mekaniske, fotografiske elle elektroniske prosesser, eller i form av fOlografiske opplak . 09 ikke kan del Jagres i el gjenvinnbart system, sendt eler kopiert for offentlig ellef privat bruk , uten tiUatetse fls NAMeO EUROPE LIMITED.
oa informasjonen i denne manualen Ct g it{ i god lru og var konek! da den ble U19it!, tiUegger NAMeD EUROP LIMITED seg retten til a lage forandringer uten varse!.
Denne maskinen et produsert i samsvar med direktiver framsan av del Europeiske samfunn. Maskinen er lestel 09 samsvarer med direklivene a9/J36/EEC 09 72/231eec med anvendelse av EN55014. EN55104 09 EN60335-1 standarder (se i begynne lsen av manua len). 09 derler ba:rer CE merkel. Hvilken scm heist forandring eUer modifisering ma skje elter direktivene salt av det Europeiske samfunn. Uauloriserte forandringer pa delte produklel, kan molstride disse direktive ne.
Under noen lorhold av ekstreme ytre forstyrre lser, f.eks radio sendere, elektronisk utladning eller transiente spenninge r. kan man reg ne med noe senket ytelse. Men maskinen viI oppna normal ytelse nar kilden ti l forstyrrelsene opphl1lrer eller er fysisk fjernel.
Merk :· Hvi s spillets prosessor resettes p.g.a e\ kutl eller reduksjon av hovedspenningen kan oppsparte k red itt pa spillet forsvinne .
Oett e spi llel el ikke en maskin som er definert ved Maskin direktivet 89/392/EEC.
Sikkerhets advarsel.
For a bruke denne maskin en ulen noe form for fare, Sl1l(g far a lese denne manua len n0ye f0r insla!lasjon. justeringer eller bruk. av maskinen. Nar eieren av define maskinen overlater avmontering . inslallasjon. juslering eller ruline vedlikehold Iii en annen person , skal eie ren lorsikre seg om al de nne person en lese r de passende lorsiktighetsreglene og reteva nte de ler av manualen fl1l r han slarler p~ al"be idel . For a forhindre al ulykker inntreHer oa r maskinen er i drift. 101g strengt teksten om sikkerhet som beskrevet nedenfor. Denne manualen sammen med installasjons manua len (hvar det er anvendelig) er en inlrigert del av utstyrel og rna v<ere l ilgjengelig for drift· og servispersoneU Iii aile tider. Denne maskinen er bare for innend0rs bruk og skat bare benyttes ettef mente hensikler. Namco ltd. b<erer intet ansvar ved ulykker, kveste lse eller skade som f01ge av uautoriserte forandringer. eller for uriklig buk av maskinen.
Sikkerh ets beskjede r.
Felgende sikkerhe ls punkter er blukl ut denne manualen . Gj01 deg kjenl med disse punktene og deres mening f0r insta ll asjon. service elle r du u!f0fer noen innstill1nger pa denne mask lnen.
ADVARSEl it.
FORSIKTIG CD
Advarsel innebeerer en risiko som kan fere til kveste lse eller d0d. Ikke fortsett utover advars len f0r den er ordentlig forst.il:tt og mottil lak er Igangsatt.
Forsiklig innebeEler en risiko som kan medf0re skade pa maskinen. lkke fortsetl utover advarslen f0r den er ordenll ig forstatl og mott iltak er igangsatt.
Van lige sikkerhetstirtak.
8ruk bare denne maski nen ener a ha ko ntrollert at den er korrekt installert if01ge manualen.
A dvarsel ski ltene ma bes tandig hoi des i skikket stand og eventuel t byttes ut hvis del oppstar skade pa dem, s lik at kunden uten vanske lighet kan lese demo
Hvts det er en fe il eller et problem med maski nen , ma den straks settes ut av fu nksjon. Og ma under ingen omstendighe ter startes lo r problemet er rettel pa .
Insta llasjon, service, justcring eller rutine .... edlike hold skal bare utteres a .... k .... alifiserte personer.
For lortsatt beskyttelse mot brann. forsikre deg at hoved sikringen bare byttes ul med en av samme type og verdi. 8ruk av andre sikringer eller materia Ie er forbudl.
Str0mforsyningen inne i monitoren viiI vcere varm og ha omrader me'i h0Y spenning selv om maskinen har bl itt sla tt av o og de t er muligheter for skader og elektriske sjokk. Veer forsiktig sa du ikke be r0rer disse omradene.
For a fo rh indre mul ige elekt risk.e sjokk grunne! funksj o ns fei l, ma denne maskinen vcere ordentlig jordet.
Hvis ledn ingen ti l hoved stromforsyningen skades ma den straks byttes ul.
Ikke sli! pa maskin en ler den er korrekt installert.
Fcr du kopler maskirlcn I ii sl f ~mne !le l . fors ikre deg om al maskinen lnnstill for den korfe kle spenningen og de rik tige sikringene benylles
~------~-------

MERKNADER VED INSTALLASJON Sia ALDRI pa maskinens strlllmforsyning flllr insta llasjonen er fullf0rt.
F or a forhindre eventuelle elektriske sJokk, forsikre deg om at maskinen er koplet ur et strDmnett med ordentlig jordlng.
For a forhindre at kundene bllr skadet av spill ets bevegelige de leT. forsikre deg om at del er m ins t 500mm avsland meJlom andre maskiner elJer veg ger.
For fa forhindre sk ade pa maskinen p.g.a . fei l bruk, s"rg for at spenningen til hoved str0mforsyningen er 230Volt AC .
MERKNADER: Hvis plassen hvor spille t skal plasseres ha r polerte gulv anbefales del al du benyHer gummi sko under niva jusleringene , fo r a forh in dre al m asldne n kan flyUe pa seg.
MERKNAOE R: For a fa adgang Ii! str0mforsyningen og CPU-kort , fors ikre deg om at bakp arten av hoved kab inettet er sk ilt Ira vegger eller andre maskiner med minsl SOOmm.
Spillet har montert hjul for a gj Dre del letter a f1ytte pa. Hver forslktig nar det skal flytte s pa en hellende overl\ate.
Hoved enheten i spil let har tyngdepunktet i fronten, sa de t er v iktig at mlnst 2 personer blir brukt til a montere eller flytte denne en helen.
Monterings posisj onen til hoved enhelen er veld ig hey, og del ef viktlg at denne hayden nils s ikkert, ulen at man ma strekke seg. Benytt deg av hjelpemiddel. (f.eks slo, krakk, gardintrapp osv)
Den tota le heyden pol hoved enheten er 231 0mm. VOE r fors iktig med heye hind ringer som f.eks Iysu". NiH spillet skal flyttes, forsikre deg om at spiHet ef delt i 3 deler: lopp enhet, Front enhet, Hoved enhe
FJERNE OC UTSKIFTE ENHET EH OC DELER.
Insta lJ asj on. service, justering eller rUl lne vedlikehold skal bare utf0fes av kvalifiserte personer. Ikke lag ncen forandringer pa denne m ask inen uten godkjenning. Dette kan medf0re ufo rutsette farer. Bare deler spes ifi sen av Namco Europe Ltd . skal benyttes ved utsklfting eH er reparasjon av deler (dette gjerder ogsa skruer) .
Forsi kre deg om al slremmen er slatt av f0r du pabegy nner noe som hers t vedH keho ldsarbeid (fe iI50king, reparasjon osv.)
Hv is du utfarer arbe id som ikke er beskrevet i denne manuaren, ta kontakt med din distribut0r for instruksjon da ikke noe an5var viii bl i 'aks eplert fo r skade pa maskin elle r pa personer. Deler av Sl r0m fo~yningen og monitoren er fortsatt va rm ell er b.:e r er h0ye spenn inger se lv ette r str0m men et statt av 09 kan forsake skad er eiler eleklriske sjokk . Forsikre deg om at du ikk e bererer disse delene.
Forsi.kre deg om at maskinen er slatt 3V fe r du kopler sammen eller ta r fra hverandre plugger eller kophnger.
Nar du fjerner hoved koplingene fra maskin en , eller hoye d pJuggen I ra Sl0pse iet. ta bestandig l ak i pluggen og ikke tedningen.

. , '
Niels uit deze publikalie mag wo rden gereproduce erd door enig mechan isch, lotogral isch of eleclronisch proces , 01 in de vorm van een fonogralische opname , noch mag het opgeslagen worden in een retrieval systeem, doorgezonden 01 andersz ins gekopieerd voor publiek of privegebruik, zonder toe stemming van Namco Europe limited.
Of schoon de informalie in deze hand leiding in goed vertrouwen is gegeven en nauwkeurig was len lijde van het drukken , houdl Namco z ich het rechl voor om veranderingen en aanpass ingen te maken zonder berichl.
Deze machine is geproduceerd volgens Richtl ijnen van de Europese Gemeenschap, en is getest en is in overeenste mmlng mel de Richtlijnen 89/336/EEC en 72/23/EEC door de toepassing van de standaards EN55014, EN55104 en EN60335-1 (z ie voorin de handleid lng) en draagt als zodan ig het CE+merk. Enige verande ringen of aanpassingen aan deze machine dienen in ove reenslemmmg Ie zijn met de RichWJnen van de Europese Gemeenschap. Enige ongeauthoriseerde veranderingen aan di! produkt kunnen in slr ijd zltn met deze Rlchl lij nen.
Onder sommige omSlandigheden van extreme exlerne sloringen , bijv. radiOl ra nsmissies, electros!alische onlladingen of pieken op het nel, kan prestatieterugga ng oplreden. De machine zal echler normaal presleren zodra de stori ngsbron geslopl of verwijderd is.
let op: - als de spelprocessor res et a.g.v. een onderbreking of verm in de ring van de netstroom, dan kunnen opgebouwde credit s verlo ren gaan.
Oil spel is niel een machine zoals omschreven in de Machinery Directive 89/392/E EC.
Veiligheidsopmerkin 9 en Om deze machine veilig te kunnen gebruiken, dienl v66r installatie, aanpassing of gebruik va n deze machine , de Bedieningshandleldlng zo rgvuldig ge tezen te WOlden . Tetkens wanneer de eigenaal van deze mach ine de demontage , insla llatie , aanpassing of routine -ond erhoud loevenrouwd aan een andere persoon. dlenl de eigenaar er voor te zorgen dat deze persoon de ju iste voorzorgsmaatregelen en relevanle gedee l1es viI de handleiding teest voordal hij beg int. Om er voor te zorgen da! geen onge lukken gebeulen als de machine gebruikl wordl. dlenen onderSlaande ve ilighe idsaanwijz ingen zorgvutdig opgevolgo te worden Deze handlelding maak! samen mel de inslallal iehandle id ing (waar van toepassing) een integraal deel uit van de apparatuur en moet Ie allen hjde ler beschikk ing slaan van expJoilalie- en onderhoudspersoneei. Deze machine is aileen bedoetd voor gebruik blnnenshuis en dient aileen gebroikt Ie worden voor bedoelde doeteinden. Namco lid. IS niet ve rantwoordelijk voor onge lukken, lelsel of schade die voortkomt uil ongeoorloofde veranderingen aan of onjuisl gebruik van de l e machine
Ve i I ig h e ids 0 p m e rki ng en
De volgende veiligneic sopmerkingen worden overal in deze handleiding gebru ikl. Maak uze!f vertrouwd met deze opmerkingen en I'uJn belekenis voor inSlaliat ie , he t plegen van onderhoud of hel aanbrengen van aanpassingen aan deze machine.
WAARSCHUWING & WaOlrschuwing g99ft eon g.vaar aan d Ol t zou kunnen resu lloren in Ictscl of de dood. Ga nle l verder dan een waarschuwJngsopme rki ng totdal de aangegeven omstandigheden voliedig begrepen zij n en hieraan ,-,otdaan is .
VOORZ ICHTIG CD Voorzichtig geeft een gevaa r aa n da t zou kunnen resu lleren in schade aan de machine . Ga niel verder
o
dan een voorzichtigheidsopmerking told at de aangegeven oms tand igheden volledig begrep en zij n en hieraan vo ldaan is
Aigemene vejjigheidsoverwegingen
Stel deze mach ine ai leen in gebru ik nada! gecontroleerd is of de machine corre ct en overeenkomslig de hand leid ing is gei"nsla lleerd.
De waarschuwingsstickers dienen aWjd in goede SUlat te worden gehouden en vervangen jndien vers le ten, zodal de klan t ze goed ka n Ie zen .
Als zich een lout of prob lecm voordoe! met de machine, dan d ient de m achine onmiddellijk stopge ze t en het probleem verholpen Ie wo rden voordat de machi ne verd er g ebruikl wordt.
InSUlliatie, service , aanpassingen of routine-onderhoud dient aileen uitgevoerd te worden door hierin bekwam e personen.
Om bl ijvende bescherming legen brandgevaar te garanderen, dient ervoor gezorgd te worden dOlt de netzeker ingen all een vervangen worden door zekeringe n van heUelfde type en deze lfde sterkte. het gebruik van andere zekeringen of ander materiaal is verboden.
De voed ing in de monitor blijft warm en er kunnen componenten electrisch geladen blijven ondanks dat de machine UITgeschake ld is, waardoor er brandwo nden of electrischee schokken kunnen worden opgeJopen. Ben voorzichting en raak deze del en niet aan.
Om m oge lij ke el ect ri sche schokken a. g .v. storingen te voorkomen, MOET deze machine voorz ien zijn van een goed vastzittende aardstekker.
Moch t het netsnoer op enig mom en! besch adigd worden, dan moet deze onmiddel lijk vervangen worden.
Zel de machine n iet AAN tot da! deze correct i s gei'nsUl l leerd .
Voo rda! de macnlflC op he ! tichtnet word I "angestote n, dlen! gecontroleerd te worden 01 de mach ine op hel correcte voltaoe slaal algesteto en of de CO ffecte zekerrngen zijn aangebrachl. -
Ih ... ~-' ___ ___ ____ _____ _

Opmerkingen aangaande Insta llatie
S tul! de machine nooit aan op de stroomtoevoe( teldat de instaflatie is voltooid.
Om mogeJijke electrlsche schokken te vQorkomen, dien! ervce r gezorgd te worden dat de machine mlddels cen goed vastzittende aardstekker op het lichtnet is aanges loten.
Om ervcer te zargen dat klanten niet gewond raken door de be-weg ing van het spel, dien! ervacr gezorgd te worden dat er rninimaal 500mm ru imte is tU5sen ande re machines of muren.
Om schade aan de machine door vet1l:eerd gebruik Ie voorkomen, dien! ervaot gezorgd te worden dat het vollage van het lichtnel 23Ovolts AC bedraagl .
OPMERKI N G: Als de mach ine op een g ladde ondergrond word! gebruikt. is het raadz aam rubber ma tjes onder de ste lpooljes te bevestigen om te voorkomen dal de machin e over de v loer gaa( g lij den.
OPMERKING: Om loegang Ie krijgen lot de voeding- en de CPUassemblies, dien! ervoor gezorgd Ie word en dal de achlerkan! van het kabinet minimaal SOOmm verwijde rd is van de muur of andere machines .
Het spel is voonien van wiell jes, waardoor het gemakke lijke r is om te verplaatsen. Wees voorzichtig als de m achine op een he!!end vlak gereden wordt
Het zwa artepu nt van de Header Assembly ligt aan diens voorkant, waardoor het be langrijk is dat minimaal 2 personen de Header Assembly aanbrengen of verwijderen.
De Header Assembly moet op een hoge positie geplaatst worden en het Is d us belangrijk dat deze hoogte veillg kan worden be relkt zonde r veel Ie strekken. (bijv. midde ls een trap of een kruk)
De hoagIe ... an het hoofdgedee lte is 2310mm: kijk dus u it voor obstake ls zoals lampen.
A ls de machine verplaatst of gedrage n wordt, d ien t ervoor gezorgd te worden dat deze in 3 de len wordt afgebroken: Header Assembly, Front Assembly, Ride Assembly
Verwijde ren en vervangen van Assemblies en onderde!en
Installatie, service, aanpassingen of routine -onde rhoud d ient aileen u itge ... oe rd te w orden door hierln bekwame person en.
Maak geen ... eranderingen aan deze machine zonder goedkeuring vooraf. Oit kan onvoorzien gevaar opleveren.
Aileen onderdelen die door Namco Europe Ltd. zijn gespecificeerd dienen gebruikt Ie worden b ij het vervangen o f repa reren van onde rdelen (inc l. schroeven).
Zorg ervoor dat de machine UITgeschakeld Is voordat er enig onderhoudswerk wordt verrlcht (troubleshooting, reparaties etc.)
Bij het ve rrichte n van werkzaamheden die niet in deze handlejding slaan beschreven, dient voor instructies aUijd contact opgenomen Ie worden met de verde ler aangezien geen verantwootding wordl gen omen voor schad e of lelsel.
De!en va n de voed in g en de monitor blijven warm of behouden hoogspanning zelts nadat de machine U1Tgeschakeid is en zouden verbrand ingen of e lectrische schokken kunne n veroorz.aken. Ben voorzichting en raak deze delen nie l per onge luk aan.
Zorg ervoot dat de machine is UITgeschakeld voordat pluggen of connectors ingestoken of uitgetrokken worde n.
A is het netsnoer uit de mach ine ot uit het stopcontac l ... erwi jde rd wordt, dient altijd de stekker ... astgepakt Ie worden en niet he! sn oe r.
•

Nenhuma pa rte desta publ icacao pode ra ser reproduzida por processos mecan ograflcos, fotograficos , electroniC{)s au ainda sob a forma de gravacao sonora nem tao pouco pod era ser gravada alraves de sislemas informal icos Iransmissiveis ou de oulra forma copiados para uso publico ou privado sem aulorila~Ao expressa da NAMeO EUROPA UMITADA.
A i nfotma~ao contida nes te manual foi fornecida de boa fe . sendo rigorosa na alt ura da sua publ ica~ao . A NAMCO EUROPA LlMITADA, reserva-se 0 direilo de proceder a mudan~s e altera¢es sem qualquet aviso p revio.
ESla maquina foi fabr icada de acordo com as Directivas Comunitarias Europeias e tem sido teslada em conformidade com as seguintes Dlrectivas: 89/336fEEC e 72f23fEEC atraves dos requerimentos noonativos, EN55014, EN55104 e EN60335- 1 (ver capa froniai do manua l) e como la l sus\enla 0 cenillcado de marca de CEo Qua isqueres a lle ra~oes ou modifica~oes efecluadas nesta maquina deverAo sel em confoonidade com as Directiv as da Comunidade Europeia. Qua isquer a tlera~oes nAo aulorizadas a este equ ipamento pOderAo infrlg;r tais Dilecl ivas
o funcionamenlO normal desla maquina, pode ra ser alectado deba ixo de algumas condic6es extremas de inlerierencias externas lais como : I ransmiss6es via radio. destargas eleclroestaticas e pa ssagens de corren le na rede de alimenta yao. Contudo 0 seu funcionamenlo normal se ra restabelecido 1090 que a fonte de inlenerencias tenha cessado ou te nha side neutralizada
Nola :. Se 0 processador de jogo for inicial izado devido a uma i n terrup~o ou quebra da corrente principal. qua isqueres creditos obt ld os pode rao desaparecer
Este jogo por si s6 na~ con Ii lui uma maquina ta\ como defen ido pelas Direct ivas de Maquinaria de 891392/EEC8.
AVISOS DE SEGURAN<;:A Aflm de usaf eSla maqu in a com segurant;:.a. cert ifique-se que Ie este manual de operador atentamente antes de proceder it monlagem e afinayao ou uso da mesma. Sempte que 0 proprletario desla maquina conrlat a desmon tagem. i ns:ala ~~o , afinayAo ou manuten~~o preventiva da mesma a outra pessoa. devera eSle assegurar· se que a pessoa em queslao Ie as pretaut;:.oes apropriadas e capitulos relevante s deste manual antes de iniel ell 0 Irabalho. Afim de eV lla r Qualquer tlpO de aeidente quando a maquina estivet em funcionamento, devera seguir rigorosamente os procedlmenlOS de seguranya descfl\os abaixo. Este manual Juntame:"lle com 0 manual de mSla la~ao (aonde aplicavel), contituem parte integ rante do equipamento e dever30 eSla r sempfe dlsponiveis ao ope rador e pessoaltecnico de assislencia . Esta maqu ina destlOa-se a set operada em espa~os interiores apenas e a sua utilizatyao deve circunscrevet-se somente aos fins pfevistos. A Namco Ltd. declina qualquer responsabilidade par acidentes. fe timentos ou danos resuttantes de modifica~oes nAo autorizadas ou uso incev ido desta maqu ina.
AV ISOS DE SEGURANCA
Os seguintes av isos de segu ranr;a sao usados atraves de todo 0 manual. Familarize·se com cada urn destes avisos e respectivos sign iflc.ados antes de instalar, assistir ou efectuar qua lquer afin a~~o nesta maquina.
PERIGO
CAUTELA CD
Perigo revela uma silU ar; ao anormal que poderit resultar em ferimentos ou morte. Nao avance pa ra alem de um av iso de Perig o sem que todas as condi~oe s ind icadas estejam completament e escla reci das e resolvidas .
Caut ela reveia uma situar;Ao anorma l que poden!! te su llar em danos mate riais para a maqu ina Noa o ava:"lce para alem de um av iso de Caute la sem que todas as condit;:.oes indicadas estejam com plelamenle escla recidas e I CSOI\"l das
AVISOS DE PERI GO
Esta maquina s6 devera se t colocada em func ionamento ap6s let sido verif icado que se encontra instarada coft ecta mente e de acordo com 0 manual de Jnstrucoes.
Os avisos de perigo devem set sempre m an! idos em boas condi~oes de leitura de forma a penni!i r uma le itura c lara par pane do uti lizador, caso se encont rem danificados deverAo set substit u idos.
Caso esta maqui na m anifeste algum erro ou probl ema durante a seu luncionamento, devera set imed iatamente parada ate que 0 problema em questao seja rec ti fica do.
A montag em. ass iS lencia e af inal;oes ou manutenc ao de rotina desta maquina, deverao ser somente executadas por tecnicos ou pess oa s devidamente qua lificadas para 0 efeito.
Afim de garan tir uma protel;ao anti - lo go pe rmanen l c neSla maquina, cert ifique-se que os fusiveis de p r ote~ ! o s~o sempre subs tiluidos por fusive is de igua l val o r ou ca libre aos de origem. 0 uso de ou tro tipo de fusiveis ou materia l e proibi do.
A fonte de alimenlal;iio do mon itor encontrar·se-a quen te, te ndo zonas de alta vo ltagem, mesmo apos a maquina let sido d esligada . Oes te facto podera resulta r a ocurrencia de q ueimaduras ou choques electri cos. Seja cul dados o para ev1tar con laclo com estas zonas .
Esta m aqu ina deve estar sempre equ ipada corn urn a f icha com ci rcuito de proteccao a Terra, afim de ev itar possiveis choques electr icos, caso surga uma fa lha no sistema.
Se a qualquer altu ra 0 cabo de alimenta<;: ao principal fi car danifieado, devera ser imed iatamente substjtujdo.
Nao ligar a maquina sem que esta lenha sido c:or (ectam ente instalada .
Antes de liga r a rnaquma a tomada da rede de alimenlayao prmclpal, cenlhque-se de que a maqu ina estit preparada para a vol lagem correspondenle e de que lambem se enconlfa pfoteglda com os lusiveis apropriados.

~~--------------------------------------------------------~
NOTAS:
NOTAS:
NOTAS SOBRE A INSTALAC;AO
NUNCA li9a r a maquina sem que a lnst.ala~:io esteja com piela mente finaliz.ada.
Aflm de evilar possiveis cheques electricos, certifique-se que a maqui na esta IJgada a (ede de allmenta~ao com uma flcha proteglda com circuito de terra.
Afim de avila r ferimentos pessoais nos clientes , provocados pelo movlmento da maqu ina , certi fique.se que exis te pelo menos 500mm de separacao entre outras maquinas a u paredes.
Aflm de evil ar danos na maquina causados por tal has de oper3y3o, certi fique-se que a vollagem ds rede de alimentalYao principal e de 230voll AC.
Se asIa maquina estive r colocada sobre urn chao po lido, re comenda-se a utiliza y30 de tapetes de borra cha debaixo dcs pes niveladores, arlm de prevenir a maquina de deslizar no chao .
Quando pre cisar de aceder a fonie de a l ime nla~ao e as pia cas (CPU). cert if ique-se que a parte traze ira do m6vel central esta se parada da parade ou de outras maquinas pe lo men os 500mm 31im de ganhar espa!;o de manobra.
Esta maquina esta equ ipada com rodas arim de laei liur a sua desloeacao tenha cui dado ao mover a maquina num plano inclinado.
o bloeo Super ior (Cabet;a) tem 0 centro de g ra v idade para a frente , porconseguinte e Importante que pelo menos sejam utilizadas duas pessoas para monta r ou desm onlar es te B loeo Superior .
A posi~a o do b loeo superior quando montado na maquina e m ui to alta. Torna-se Impertante ter meies seg ures de aleanee, ta is eomOj eseadotes ou escadas arim de ev i tar riscos desneeessarios.
A altura tota l do bloco principa l, e de 2310mm, tenha eu idado com qua lquer tipo de obstrucoes existentes em altura com o por exemp lo; caJhas eJectricas ou candeiros.
Ao desloear ou transporta r a maqu i na, certifique-se que se en co ntra desmontada em 3 bl ocos: Bloco Super io r. Bloco Frontal , Bloco da eab ine de Condut;ao .
SUBSTITUI<;:AO E MONTAGEM DE PEC;AS
A montagem, ass isteneia e afinacOe s ou manutent;ao d e rotina desta maquina, daverao ser somente exeeutadas por tecnlc os ou pessoas devidamen te quallfieadas para 0 efei to.
Nao fa~a q ua lquer (ipo de aHera~ao previa nesta maqulna sem aprOVa1630 previa. Sa tal acontecer podera provocar danos e perigos imprevis ive is.
A s ubst it u iC 30 ou reparacao de pe<i as devera ser feita apenas com pecas de origem ou especificadas pela "Namco Europa Ltd." (Inelulndo parafusos)
Certifique-se que a maqui na se en con tra desl igada sempre que in ic ia r qualquer ti po de trabalho de manutent;ao. (i dentifa<iao de avarias, repara~ao etc.)
Case esteja a efectuar um traba lho nao deserito neste manual , ee rtifique-se que contacta 0 seu dis tr ibuidor pa ra obter Instru<iOes, easo contra-rio nlo se rlo ace i l es responsabil idades por dan os causados o u fer im entos.
Algum as zonas da fonte de a limenla~ao e do monitor ficam q uentes e t ransportam co rrentes de alta volta ge m. m es mo depois de a maqu ina ter s ido des l igada, podendo ca usar queimaduras e choques e lectric os. Tome cuidado para nlo toca r acidentalmente esta s zonas.
Ce rtifi que-se que a maqu ina esta des ligada ante s de l iga r ou des ligar qualquer tipo de fichas ou jun~6es .
Qu ando des l igar a ficha principal da maquina ou a f icha do ca bo de al iment.at;a o das tomadas da parede, devera sempre agarrar na flcha e nunca puxar pel o cabo da mesma.

L
Ingen de l av denna publikalion far reproduceras, varken folografiskt, eleklroniskl eller i nagon form av Ijud inspeln ing . Det far inte heller lagras i nagOI atervinningssyslem, oversandas eller pa annat satt kopieras fCir offentlig eJler prival anvandning, ulan tillstand fran NAMCO EUROPE LIMITED.
Eftersom informationen i denna manual lamnas vI i god Iro och var korre kt nl:ir den trycktes, reserverar sig NAMCD EUROPE UMITED far andringar.
Denna maskin ha r tillverkats enligt direktiv fran europeiska un ionen, ar testad och vppfyller direktiven enligt 89/336EEC och 72123/EEC med ti llampn ing av EN55014, EN55104 och EN60335·1 standard (se manualens framsida) och bl:ir dl:irmed ocksa CE·market. Varje forandring eller modifiering av denna maskin masle ske i Overens·s tammelse med EU-<1irektiven. En forandring i denna produkt, som in Ie iir aukloriserad , kan slrida mot dessa direktiv.
Under v issa omslandigheler nar del galier extrema externa slorningar, t ex radiosl:!nd ningar, elektrostatiska urladdningar elle r natburna strOmstorn ingar, kan resultera i en nagot nedsart funkt ion. Maskinen kommer dock at! aterga till normal funktion, sa snart starningen har upphort eller avlagsnats
OBSI Om spelprocessorn startar om till foljd av ett avbrott eller reducering av strommen kan registrerade krediter ga fOriora de.
Delta spel ar inle en maskin en ligt defmitionen i Maskindirektivet 89/392/EEC
SAKERHETS VARNING For atl maskinen ska kunna anvandas pa eft saker! sart. ska manualen lasas noggrant fore insta llation, anvandning eller justering .
Om agaren till maskinen anfbrtror nagon annan person at! montera isar, installera, ju stera mask inen eller utfora rut inunderhall, ska agaren fbrsakra s ig om att denna pe rson laser om fbrsik.tighetsatgarder och tillampliga deJar av denna manual innan arbelet paborjas.
For at! fbrhindra att nagon olycka hander nar maskinen ar igang, maste sakerhe!spUnklerna beskrivna nedan fOljas strikt.
Oenna manua l lilJsammans med installationsmanua len (nar tillampligt) ulgor en integre rad de l av utrustningen oeh maste 'lara standigt tillgan glig for operatore r och service personal.
Maskinen iir avsedd for inomhusbruk ocM ska endasl anvandas for delta andamal.
Nameo Ltd . bar inge! ansva r for olyckor eller skador som orsakats av ieke aukloriserade andringar i maskinen eUer felakt igt anvandande av densamma .
SAKE RH ETSANVIS NINGA R
Sakerhetsanvisningarna nedan anvands genomgaende i m anualen . Gor dig f6rtrogen med varje anvisning och dess innebord innan in::.tallation, ::.ervice eller ju::.leringar gors pa derma lIlaskill.
VARN ING
OBSERVERA o
"Varning" anger en fara som skulle kunna skada eller fororsaka d6dsfa l l. Fortsatt inte vid en sadan varningsanvising innan de pavisade f arhallandena a, forstadda och atgardade i sin he lhet.
"OBSERVERA" anger en fara som skulle ku nna fororsaka skada pa maskinen. Fortsart inte vid en sadan varn ingsanvising innan de pavisade fbrha llandena ar forstadda oeh atgardade i sin helhet.
ALLMANNASAKERHETSBEAKTANDEN
& Satt inte igang maskinen utan att ha kontrollerat at! den ar korrekt installerad och i overensstammelse med
manualen.
Varningsanvisningarna maste all tid Mallas i got! skick och ersattas nar de blir slilna, sa at! kunderna kan las a dem dem tydligt .
Om det uppstar fel eller problem med maskinen, masle anvandningen stoppas omede!bart oeM problemet rattas til! innan den ater anvands .
Instal1ation, service, justeringa r eller rutinunderha l l ska endast utfaras av en for andamalet kvalifieerad person.
For kontinuerl igt skydd mot brandfara, ska ma n forsakra sig om att huvudsakringarna endast ersatls med samma typ och specifikationer. Anvandandet av andra sakringar eller material ar forbjuden.
Stromforso rjningen inne i monitorn hailer sig varm och har omraden med hog spanning, aven nar maskinen stangts av och det finns ris k for brannskada eller elektriska stolar. Var fors iktig och vidror aid rig sadana omraden.
Fbr att forhindra en eventuel1 elektrisk stot fororsakad av fel, MAsTE maskinen \,lara forsedd med sakert ansl v ten
JORDAD kontakt.
Om stramforso rjningskabe ln pa nagot sat! skadas, maste den bylas ut omede lbart.
Vrid inte strombrytaren t ill ON innan maskinen af korrekt installerad.
Innan strbmmen satts pa lill maskinen. maste man forsakra sig om att den ar installd pa ratt spanning och at! rat! sakringar ar isatta
ATT BEAKTA VID INSTALLATION
.& Satt aJdrig pa strommen pa maskinen Innan Instalfatlonen at kl ar.
For att forhindra elektriska chocker, fors~kl"3 dig om att maskinen koppJ as ti l l stromfors orjn ing med jordad kontakt
For att undvika skador av spelets rorelser, fOrsakra d ig om att del finns ett avstiln d pa minst 500 mm tfll annan maskin eller v1l99.
FOr atl undvika skador pa maskinen p 9 a fe laktigl handhavande, fOrsakra dig om an s{romstyrkan a.r 230 vall AC.
OBSERVERA: Om maskinen ar placerad pa ett po lerat golv, rekommenderas an placera gummibrickor under nivajusteringen fOr att fOrhindra an maskinen glider pa golve! .
OBSERVERA: Fo r. an kunna komma M str15mforsorjningen och CPU , se \ill aU ~ bak sidan av huvudkabinenet ar place ra t minst 500 mm fran ~ vagg eller ann an maskin . ':'-...""'"" ,,"
!
I ,
& Spelet ar forsett med hju l for att underlatta forllyttn ingar. Va T forsiktig om spe let ska flyttas pa en $Iuttande
yta.
& Toppskylten haT tyngdpunkte n fra mtil! , darlor aT det viktlgt att minst 2 pers oner sa tte r dit eller tar bort den •
.6 To p psky ltens placer lng ar mycket hogt upp och det ar v iktl gt att sa dana hjalpmedel anvands sa att man n:llr
upp utan att stracka si9 (t ex trappstege , pa l l osv).
~ Den total a hojden ar 2310 mm, tank pa ev entuella hogt placerade h inder, t ex lampor.
& Om spe let ska flyttas eller baras, kontrol lera att spelet.lir m onterat Is.lir I 3 delar: Toppskylt. Monito renhet. Spe lkontrollenhet
ATT TA BORT ELLER BYTA UT ENHETER OCH DELAR
& Justeringar och underhall pa denna maskin skall endas t utforas av kvalificerad personal.
& GOT inga andringar poi denna maskin utan ett godkannande i forvag . Detta kan fororsaka oforutsagbar fara .
& Endast delar som ar spec lficerade av Nameo Europe Ltd. ska anvandas vld utbyten eIJer reparation av delar (inklusive skruvar) .
.6 Forsakra d ig om att strom men ar avstangd innan underhallsarbete pa borja s (felsokning. repa rati oner etc.)
& Om arb ete ska uHora s som inte ar beskrivet i denna manual , ar de t v iktig t att kontakta aterforsaljaren for instruktioner eftersom inget ansvar accepteras for 3verkan eller personskador .
.6 Delar av stromf6rsorjningen oc h mon itorn ar vanna och strom ba rand e aven efter strommen stangts av och kan o rsaka brannskador e ller elektriska stotar.
& Forsakra di g am att maskinen ar avstangd innan kontakter slitts i elJer tas ur.
6 Nar kontakten tas ur maskinen ell er u r vaggen, ta alltid tag i kontakten och inte i sladden.

L
(SF) Hsia julkaisusta ei saa oUaa missaan muodossa kopioita yksilyis- tai julkiseen kayttoOn ilman NAMeD EUROPE LlMITED :in iupaa. .
Ta ssa ohjekirjassa cleva! tiede! pitav;H julkaisuhelkella paikkansa . NAMeD EUROPE LlMITED:illl:l on kuitenk in oikeus muutoksiin ilman erillistl:i ilmoi\usta.
Tama laile on va lmistettu EC direktiivien mukaisest i. Se on lestattu ja todettu noudatta va n seuraav ia direktiiveja : 89f336/EEC ja 72J2 3/EE C (EN55014. EN55104 ja EN 60335· \ standa rdi!) . Nain ollen Ulml:i Jaile on varustellu CE·merk innalla . Ka ikki tahan lailleeseen kohdislelul muuloksel on lehlava EG- direktiivien rnukaisesti . Mika tahansa va ltuuttamattoman huollomiehen tekema muulOs voi oHa direktiivien vastainen .
l ait1een loiminla voi hairiinlya maaratyissa olosuhleissa, jotka johtuva l ~~rimmais isUI ulkoisisla sahkOMiriOisla, kuten radiol :ihetys, elektrostaattinen purkaus lai vah va virrasta syntynyt hairiO, Toiminta norma lisoituu kuitenkin heti, kun ulkoinen sahkbha irib on poistettu .
Huom:- Jos pe liprosessori reseloituu sahkokalkoksen tai vastaavan jOhdosla . voival kaikki perivaraukset Mvitii .
Hma laile ei ole 89J392/EEC direktiivien muka inen kone.
T u rv a II is u us v a roitus
Taman la illeen turvallinen kayllO edellyttaa kiiyttoohjekirjan huolellista lukemista ennen laitteen asennusla, s.llatba lai k.llyttoii .
Jos taman laitteen omislaja antaa jollekin loiselle osapuolelle tehl.llviiksi purkaa , asenlaa. sa~itaa tai muulen huo1taa laitella , on omislajan varmisluttava siita , etta toinen osapuoli on Jukenut ja ymmlirt.llnyt ka yttOOhje ki~a n aleelliset as at ennen tyohtin ryhty mista .
Turvallisuusahjeita on seurattava tarkain vahinkajen v~lnamiseks J la itteen allessa kayt6ss a ,
Tama ohje seka mahdollinen asennusohje muodoslaval laitleislon oleellisen osan ja on siksi aina oltava huollo- ia kliytlohenkiJokunnan kaytettavlssa .
Ti!ma laite on tarkoitettu va in sisalilakliyttoon . SUa ei saa kliyttali muihin larkoiluksiin .
Nameo Ltd ei vastaa niisla onnettomuuksista , loukaantumisista ta i vahingoista, jotka johtuvat la itteesee n ilma n Nameo Ltd:n Jupaa te hdyis ta muulOk.sista laitteen vaarasla kaylosla.
Turvall isu usohjeet
Tlissa kaytt6ot1jek.irjas~a on k.aytetty seu ra avia turvallisuuteen lii ttyvi~ huomautuksia . Tutustu jokaiseen nai sta , Ala asenn a, huo lla tai saada lai1teistoa. ennen k. uin olellaysin ymmartanyt mil .!:i ne ta rk.oiUavat.
VAARA it "Vaara" tark.oitta a uhkaa , job voi johtaa loukk.antumiseen tai ku olemaan, Ala k.os k.a an oh ita Vaara·merk inlaa , ennenkuin ohjeissa eSitetyt olosuhteet on ymm:irretty taysin.
VAROITUS CD ·Varoilus- tarkoittaa uhkaa, joka voi jonlaa la itteen vio ittumiseen . Ala k.oskaan ohita Vaara-merkinIU ,
YLEISET TURVALLISUUSNAKOKOHOAT
Varm ista, etta lai l e on asennettu oike in ja ohjekirj an m uka isesti ennen k~yttoonottoa.
Varoltustaulut on p idettava hyvassa kunnossa. Jos ne ovat ku lu neet, ne on ehdottamasti va ihdettava, jatta asiakk.aalla orisi mahdo ll isuus lukea niila selvasti.
Jos laltteeseen tul ee vika ta i ongelmia, on se pysaytett1iva valittomasti ja onge lma sel vitettav:i ennen u utta k.aytt66nottoa ,
Vain riittavan ammattipMevyyden omaava henkiJ6 sOIa suorittaa asennus-, huolto-, s~at6- tai multa laitteeseen k.ohd is tuvia rutiin itoimenpite ita.
Jotta palovaaraa el synty is i, saa paasulak.k.eita vaihtaa vain samankokoisiin su [ak. k.e isiin, Muiden su lak.k.eid en tai materiaa l in kay tt o on ehdottomas ti ki ellelty.
Monitorin sisalla olev a vlrtalahde pysyy kuumana ja s iina on alueita, joissa on"k.ork.eajannite vaikka laite on ky tk.etty pais paalta. Palovammoj en tai sahk6is k.un saam inen on mahdoll is ta. Ala k.oske naihin alue isiin.
Sahkoiskujen va lnamisek.si vikatapauks issa, [ai te on ehdottomasti kytkettava maadoitetu!1a johdolia maadoi te ttuun pistorasiaan.
Vioittunut verkkojohto on va1ittomasti vaihdettava.
Ala k.ytk.e laitetta paalle, ennen k.uin se on oikein asen nettu .
Varmisla ennen verk.k. oon k.ytkemi ~ta, etta virtalahteen jann itleen a~etus on asetettu oikealle jannittee lle ja etta sii na on oik.eat sulak.keet.
(
I ,
\ I
I I

CD
ASENNUSHUOMIOITA
AI~ kos kaan kytke Jaltetta p li~lIe ennen kuin asennus on suoritettu Joppuun.
Tamlin laitteen virtaHihde on kytkett3va maadoitetulla jOhdolla maadoitettuun pistoraslaan, j otta sahkoiskun vaaraa ei olis i.
Varmista, etta laitteen ja seinlin ta l toisen laittee n valissa on v:ihinlaan 500 mm, lotta asiakkaat elvat loukkaannu laitteen likkumisesta johtuen.
Varmista, etta "irtaUihteen jannite on 230 V AC, Jatta ellaite "loi t u.
Huomio: Jos lama laite sijoitelaan liukkaalle esim. "ahatulle latlialle, suositellaan laitettavaksi kumityynyt saatoja lkoihin li ikkumisen estamiseksi .
Huomio: Varmista, etta takaosan laakse jaa vahinlaan 500 mm 1110101, jotta virtalahteeseen ja CPU·korttiin paasee kasiksi.
- -\\ '-'-'
Lalla on varustettu kaantyvilHi pyori!l:t. Tl!ma on pldetUiva m leiess:i, kun laitetta sli rreUian kaitevaUa aiustaUa.
Yl:iosan pa inopiste on yi :iosan etuosassa. T:ista syysUi on y iaosaa asennettaessa tal pOistettaessa oltava vah intaan kaksi henkilo:i .
Yi:iosan asennusasento on eritUiin korkea!la. On Uirke:ia, etUi tarvittavaBe korkeudelle palisUilin valvattomasti ilman venytUim isU. (eslm. kliyUi tu kevia tuoieJa tai tikkaitaj
Laitteen kokona iskorkeus on y!l 2310 m m. Varmista, ette! katossa ole esteiUi. e5im. vaiaisimia.
Kun siirrlH tai kannat ia itetta varmista, etta la ite on pu rettu neljaa n os aan. Yiaosa, koottu, Etuosa, koottu, Liikkuva ajo-osa, koottu
Vain riittavan ammattipatevyyden omaava henkilo saa suorIttaa asennus -, huoito-, saato- tai muita iaitteeseen kohdistuvia ruti init oimenpiteiUi.
Tall e iaittee!!e ei saa tehdli m iUi1i n hyvaksymattomili muutoks ia. Se vol aiheutt.aa ennaita-arvaamattomia
vaaToja.
IA Vain Nameo Europe Ltd :n malirine lem i:i varaos ia saa kaytUia vaihtaes sasi tai korjatessasi osia. (sis~iltaen
.~ Tuuvit).
JI6 Varmista, etta la ite on kytketty POlS PAA LTA ennen tyOn aioittamista. "
. 6. Ota yhteyrta maahantuojaa n ohj eita varten, j Os joudut tekema:in ty6teht.liv ia, j o ila ct ole esiteity
I( huoitokirjassa, muuten vastuu!.a vioista tai loukkaa ntumlsista ei o le,
{c & Vlrtallihde ja monitori pysyvat kuum ina ja niissa on a1ueita, joissa on korkeajannlte valkka laite on
I) kytketty pois paa lta. Palovammojen tai sahkOiskun saam inen o n m ahdollista. A la koske naihin laitteis iin.
I~& Varmista, etta laite o n kytketty POlS PAALTA ennenjohtojen kytkemisUi ta i irrottamlsta. f
, ,f I~~& Irronaessasi ve rkkojohdon seinasta tai lai tteesta, ota kHnnl itse pistokkeesta , ei johdosta.
C

.1
\ I ~
Contents 1. SPECIFICATIONS ... .... ....... ............. ............................................. .. ... .. ...••••. .......... 1
2. HOW TO PLAY .. .... .......... .. .. ..... .. .. ...... ....... .........•..•. ..... ......... .... ......................... ... 2
3. MAJOR COMPONENTS .. ... ............. ............. ......•............ ... ... ................ .••. ............ 3
4. MOVING THE MACHINE ............... .. ... .......... .....•....•.......... .. ................................ 4
5. INSTALLATI ON .. ..... .. .................. ..... ... .. ................. ...•........ ............... .....•............. . 4
5-1 Joining the Monitor (L) and (R) Assembl ies .................... .•..... ........... ........ ......... ...... 8
5-2 Fitting the Header Assembly .... ................... .. ... .... ................... ...... ....................... . 11
5-3 Fitting the Coin Tower ............ ... ...... .. ..... .... ........... ......... •......... ......•... .. ................. 12
5-4 Fitting the Pedal Assembly ....... ... ........... .............•........ •................. ........ ........... .... 13
6. ADJUSTMENTS .... ........... .... ........ ........................... ..... .. ... .. .. ........... ...... ...... ....... 14
6-1 Turning on the Power ............ ................................................................................ 14
6-2 Adjustment Switches .................. ... .................... ....... ......... .......... .......... ....... ... ..... . 15
6-3 Test Mode .. .... ... .......................... ... ..... ........ .............. ... ........ ........ ....................... .. 16
6-3-1
6·3-2
Coin Options ... .. ..................... .. ....... ..... .. ... ... .............. " .. "'
Game Options .......................... ................ .... ........ , ... .. ....... ................ ................ .
. ... . 17
........ 18
6-3-3 110 Test ..... ...... ......... .. ......................... ...................... ... .............. ......... .. .................... . ... 19
6-3-3-1 110 PCB Check ................................................................................................................. 20
6-3-3·2 Gun Initia lize .... ............................................ ...................... ........... ............................ .. . 21
6·3·3-3 Swilch Test ...... ....................... ....... .. ................... ........ ................................. ......... . ...... 24
6-3-3-4 Solenid Test .......... ............ ........... ..... ........... ...... .. ........... .............. ...... ........ ....... ... .... ... 25
6-3-4 Mon itor Test ..... .......... ... ......... ....•.. ..... ........ .......... ............ •. ............... .............. ...... 26
6-3-5 Sound Test ................................. .................. ........... ........ ........ ...... .... ................. ... 27
6-3-6 ADS Data .......................................... .......................... .......................................... 28
6-3-7 Others ............. ... .......................... ... ................................ ........... .......... .... .•........... 28
7. REMOVING AND REPLACING ASSEMBLIES AND PARTS ....... .. .. .......... .. : ... .. 29
8.
7-1 Removing the Monitor from the Monitor Base .................... ..... ............ ........... ... .... 29
7-2 Replacing the Fluorescent Tube or Starter ............................ .......... ........ .............. 31
7-3 Replacing the Pedal Switch ..... ..... .... ...... ............... ................................................ 32
7-4 Greasing the Pedal Assy Plunger ........... ..................... ....... .... ......... ...................... 33
7-5 Replacing the Pedal Plunger ................................................................................. 34
7-6 Gun Assembly ......... ............. ..... ............. ... .................... ...... ......... .. ................... .... 35
7-6-1 Replacing the Gun Assembly .......... ...... ....... .................................... ....................... .... ... .. 35
7-6-2 Removing the Gun Slide ............ ................ ...... ..................... ......................... ..... ............. 36
7-6-3 Removing the Gun Cover .......... ... .... ......................... : ............. ....................................... 37
7-6-4 Replacing the Solenoid ............. ......................... ............. ..... ....... ..... . . ..38
. ... 39 7-6-5 Replacing the Solenoid ................... .... ... ............... ..................... . .
7-6-6 Replacing the Flexible Gun Condu it. ....... .... ........... .. .. ............. .... ... ... ... 39
PARTS .......... .... ............... .............. ... . ... .......... . ............ ... ..... . 40
g SCHEMATICS ... ... ............. ..... .. .. .................................. 50
~~--=~----------------------------------------------------------


1. SPECIFICATIONS
POWER SUPPLY:- 230volts / 450watts AC
AMBIENT OPERATI NG TEMPERATURE:
+5°C to +25°C
MONITOR:- Pioneer 50" Projector Monitor
COIN ACCEPTOR:- Mars Cash Flow 4 Channel - Dispense
DIMENSIONS:Assemb led 1500(w) x 1510(d) x 2090(h)
WEIGHT:-
Monitor Cab inet Coin Tower Header Asse mb ly Peda l Assembly
Assembled
Moni tor Cabinet Coin Tower Header Assembly Pedal Assembly
1500(w) x 1100(w) x 1460(w) x
250(w) x
279kg
205kg 42kg 24kg
4kg
790(d ) x 1730(h) 720(d) x 1110(h) 380(d) z 480(h) 250(d) X 160(h)
ACCESSORIES:- Keys: (Cash Door) ........... .......... ............. 2 (Coin Door) ..... ...... .. ......... •.. .......... 2 (Back Door) .. ............ .......... .......... 2ea
IEC Mains Lead ............ .. ......................... ...... 1
Operators Manual .. .... ... ... ...... .. ....... ............... 1
Monitor Manual ....... ...................... ........... ... .. 1
CashFlow Docu me nts ........... ...... ... .. ..... . ..... . 1
MS Security Wrench ..... ... .. ......................... 1 M6 Securi ty Wrench ...... .............. .. ................ 1
Hex Head Set Screw (M8x40) ....... ... .. ..... .... 4 Hex Head Set Screw (M8x20) ....... ......... ..... 4 Socket Head Machine Screw (M8X2S) .. .... . 4 Button Head Machine Screw (M 6x30) .4 Flat Washer - Black (M6) .. .... ... ... ... . . ... 4 Spring Washer - Black (M6) ............ .... .. ... .. 4 Socket Cap Machine Screw (MSx12) .. .. ... .. 8 Flat Washer - Blac k (MS) .... ..... .. ..... .. .... .. .. . 8 Spring Washer - Black (MS) ... ... .... ......... 8
Page 1

2. HOW TO PLAY
Th is is a gun shootin g game where players press on a foot pedal to hide beh ind an object to avoid an enemy attack, then re lease the pedal to get out from behind the object and attack the enemy.
HOW TO CONTROL
1. Step on the pedal = attack position . In this position you can shoot the enemy. You are also subject to an attack.
2. Re leas e the pedal = defence position. In this position you are hidden
MODES
behind an object and cannot be hit by the enemy. Re leasing the pedal also re loads the gun.
1 . Linked play mode: This mode is for two player co-operat ive play . If selecte d by a single player an additional pla yer can join the game after it has started.
2. Solo play mode: This mode is for a single player only. No one can join the game once it has started .
• Modes are selected on the Mode Selection Screen at the start of the game .
RULES
1. Every time you are hit by the enemy you lose a life. You also lose a life if the time pe rio d for that scene reache s ze ro. the time peri od is restored at the sta rt of a new li fe or when the scene has been completed . The game is over when all lives are lost.
2 . A player 's achievement is assessed by score at the end of the game. The high er the score, the higher the achievement.
Demonstration vide o clips be tween games can be skipped by aim ing and shoot ing the gun at the screen.
Page 2

f
I
3. MAJ OR COMPONENTS
HeaderAS'SY~~~~~~{;~---y~
Projector (L) Assy
Pedal Assy
I I
Projector (R)
Joint Assy Coin Tower
Game PCB Assy
Page 3

l
4 . MOVING THE MACHINE
i'h This machine is fitted w ith castors to make it easier to move. Take care wh en moving the mac hine on an inclined surface.
16'> The ov era ll hei g ht of t he machine is 2310mm. Take care of any ove rh ead . o bs tructi ons . (e .g. Light Fittings, Electric Cables etc .)
16'> When mov in g th e gam e, ensure that th e game is dis -assembl ed into 4 parts: Monitor Assemb l ies, Coin Towe r, and Header As sembly.
5. INSTALLA TION
Notes on Insta ll at ion
WA RNIN G •
WARN ING •
WA RNING •
CAUTION
NOTE
- PC
NEVER turn the po w er to th e machine O N until insta llation has been completed .
In order to prev ent possible e lectric shocks , be sure that the machine is connected to th e mains w ith a sec urely co nnected earth ed plug.
So that cu stom ers are not injured , ensure that th ere is at least 500mm separat ion betw een o ther machines o r wa lls.
In order to avo id .damage to the machine due to mis operat ion, ensure that the volt age of the main s supply is 230vo lts AC.
If the lo cat ion s ite of this machine has a polis hed floor it is recom mended th at rubber pads are f itted under the level adjusters to prevent the machine slid i ng on the f loor.
In order to gain access to the Powe r Supply and CPU assemblies . make sure that the rear of the mach ine is sepa rated f rom a walla r othe r machine by at least 500mm .
When install at ion is complete , it is imperative that the game is in itial ized. (See section 6-3-3-2 pag e 18)
Page 4

1. 2.
3.
4. 5 . 6.
1. 2.
3. 4. 5.
1. 2.
3. 4. 5 .
® 1. 2.
3.
4. 5 .
This machine is designed for INDOOR USE ONLY. Do not install in the following places.
Outdoors Direct Sunlight, places with excessive humidity or dust, places where there is water leakage, near air~conditioning or heating equipment, places with excessive heat or cold temperature. Places where it would be in the way of emergency exits or fire extinguishing equipment. Unstable places Dr places with excessive vibration. Places that are not level. This machine must not be cleaned with a water jet, or installed in an area where a water jet cou ld be used.
DIESES GERAT 1ST NUR FOR DIE GEWERBLICHE AUFSTELLUNG IN GESCHLOSSENEN RAUMEN BESTIMMT.
DAS GERAT DARF AN FOLGENDEN PLATZEN NICHT AUFGESTELLT WERDEN
1m Freien. In direktem Sonnenschein , an ext rem feuchten und staubigen Platzen, an Platzen mit Wasseranschlussen und moglichen Leckagen, nahe Klima- und Heizungsanlagen, an Platzen mit extrem hohen oder niedrigen Temperaturen. In der Nahe von Notausgangen oder Feuerloschgeraten. An unstabilen Platzen oder Platzen mit ubermaBiger Vibration. An Platzen, die nicht eben sind.
DENNE MASKINE ER KUN DESIGNET TIL INDEND0RSBRUG INSTALLER IKKE MASKINEN pA F0LGENDE STEDER
Udend0rs Direkte sollys, steder med h0j fugtighed el. st0V, steder med vand udslip, i m.rheden af air-condition eller varme udstyr, steder med usmdvanlig h0j el. kold temperatur. Steder hvor den vii stit i vejen for n0dudgange eller brandslukningsudstyr. Ustabile steder eller steder med for store vibrationer. Steder der ikke er plane.
ESTA MAaUINA ESTA DISENADA UNICAMENTE PARA usa EN INTERIORES . NO INSTALE LA MAaUINA EN LOS SIGUIENTES LUGARES.
Exteriores. Baja luz solar directa, en lugares con paiva 0 humedad excesiva, lugares donde hay filtraciones de agua, cerca de aparatos de calefaccion 0 de aire acondicionado, lugares con temperatura ambiente muy alta 0 muy baja. Luga res donde la maquina obstruya sa lid as de emergencia 0 equipos de extinci6n de incendios . Suelos inestables 0 Juga res con vibraciones excesivas. Lugares con suelos no nivelados.
Page 5

CD 1. 2.
3.
4. 5.
CETTE MACHINE EST DESTINEE UNIQUE MENT A UN USAGE INTERIEUR NE PAS INSTALLER LA MACHINE DANS LES ENDROITS SUIVANTS
A I'exterieur. Directement exposee au soleil, aux endroits excessivement humides au poussiereux , aux endroits ou iI y a des risques de fuite d'eau, pres de ventilate urs au source de chaleur, aux endroits tres chauds au froids. Dans des zones de proximite des sorties de secours au d'acces aux equipements d'extinction du feu. Dans des emplacements instables ou soumis ill de fortes vibrations. Dans des endroits denivelE~s.
~GDRD TO MHXANHMA EINAI l:XE61Al:MENO rIA XPHl:H 1:E El:QTEPIKO XQPO MONO
I. 2.
3. 4 5.
CD 1. 2.
3.
4. 5.
® 1. 2.
3. 4. 5.
MHN TOn00ETHl:ETE TO MHXANHMA l:TOYl: AKOAOY00Yl: XQPOY1:
Ec;w T!:p u\CJ. Am:u9tia; O'TOV tl).lO,O'E J1 EPTt 6nou 1J1l'OPXE1 uypaO'Lu Tt O'KOV1],J1e.Pll arrot) UnaPX&l uc:p90vo VEpO,KOVTQ crt air-condition Tt ill.ou doD\); 9tpJ-luvoT),IlEPll ~lf; U1H::PPO).lKtl U'+'l1i.t\ tl xu~~).~ 6EP~OKpacriu. LE J-ltPll onou ql1tooi~ouv J.1i:oa uvaYKll; lr.X. 1t1Jpocrpta"nlp f:~ iJ u)J.a. M~ o<uOEpa ~tp~ ~ ~tp~ ~E no)J",,;, Kpu6aa~ous. Mtpll nov Of:V tlVal f:ni1m5a.
QUESTA MACCH INA E' PROGETTATA PER ESSERE USATA ESCLUSIVAMENTE IN AMBIENTI INTERNI.
NON INSTALLARE LA MACCHINA NEI SEGUENTI LUOGHI.
In ambienti esterni. Alia luce diretta del sole, in posti con eccesiva umidita 0 polvere, in luoghi dove ci siano infiltrazioni d'acqua, vicino ad apparecchi di condizionamento d'aria oppure risca ldamento, in posti eccessivamente caldi 0 freddi. In luoghi dove potrebbe esserci un uscita di emergenza a un'attrezzatura per 10 spegnimento del fuoco. In posti non stabili 0 con eccessive vibrazioni. In luoghi non piani.
DENNE MASKINEN ER BARE KONSTRUERT FOR INNEND0RS BRUK IKKE INSTA LLER MASKINEN pA F0LGENDE PLASSER.
Utend0rs Konstant sollys, plasser med mye fuktighet og stav, plasser hvor det er vannlekasje, nfere luft kj01ere ell er va rme elementer, plasser med overdreven hay eller lav temperatur. Plasser hvor de! viII sta i ve ien for n"dutganger eller brannsl ukking utstyr. Ustabi le plasser eller plasser med overdreve n vibrasjon. Plas ser scm ikke er i vater.
Page 6

,
1. 2.
3. 4. 5.
® 1. 2.
3.
4. 5.
I ICD 1. 2.
3.
4. 5
, . 2.
, 3. ~. 4. . 5.
DEZE MACHINE IS ALLEEN VOOR GEBRUIK BINNENSHUIS ONTWORPEN INSTALLEER DE MACHINE NIET OP DE VOLGENDE PLAATSEN
Buiten In direct zonlicht, op plaatsen met een zeer hoge vochtigheidsgraad of met vee I stof, op pJaatsen waar een waterJek is, dichtbij aireo's of verwarmingsapparatuur, op plaatsen met een zeer hoge of koude temperatuur. Op plaatsen waar nooduitgangen of blusapparatuur worden geblokkeerd. Op onstabiele plaatsen of pJaatsen waar grate trillingen voorkomen. Op plaatsen die niet v lak zijn.
ESTA MAQUINA FOI CONCEBIDA PARA UTILlZAC;:AO EM ESPACOS INTERIORES APENAS
NAO INSTALAR A MAQUINAS NOS SEGUINTES LOCAIS:-
Exteriores. ' Luz solar directa , locais com humidade excess iva au po, locais aonde existam fugas de agua perto de ar condicionados au equipamentos calorificos e locais com temperaturas exce ssivamente quentes au frias. Locais aonde fica ria colocada no caminho de saidas de emergimcia au equipamentos extintores de fogo. Locais estruturalmente instaveis au locais com vibrac;6es excessivas. Locais nao nivelados.
DENNA MASKIN AR AVSEDD ENBART FOR INOMHUSBRUK INSTALLERA EJ MASKINEN pA FOLJANDE STALLEN
Utomhus I direkt solsken, platser med extremt hog luftfuktighet eller damm, platser dar det forekommer vattenlackage , nara luftkonditionering eller varmeelement, i extremt hog eller lag temperatur. Platser dar den skulle kunna vara i vagen for nodutgangar och bra nd slackn ings utrustn i ng. Instabila stallen eller dar stark vibration forekommer. Platser med nivaskillnad.
Ulkoti laan
TAMA LAITE ON SUUNNITEL TU VAIN SISAKAYTTOON ALA ASENNA LAITETTA SEURAAVIIN PAIKKOIHIN:
Suoraan aurinkovaloon , kosteisiin tai polyisiin paikkoihin, vesivuotopaikkojen laheisyyteen, ilmanvaihto- tai lammilyslaitteen lahistolle tai paikkoihin, jossa on erittain kuumaa tai kylmaa. Varauloskaytavien , muiden pakoteiden ta i tulensammutusvalineiden eteen. Epavakaisiin tai tariseviin paikkoihin. Kaltevalle alustalle .
Page 7
-

5-1 Joining the Mo n i tor (L) and (R) Assemb lies
1. Place t he monitor (L) and (R) assemblies together in their fi nal location and lower the eight, (4 on ea ch monito r) , level adjusters unti l the cas tors are ra ised approx 5mm from the ground.
Lock
Level ",oJus"
NOTE:- When adjusting the level adjusters, ensure that the top and front faces of the monitor assemblies are level with each other. Poor adjustment will prevent th e fitting of the Joint Assy and Header Assy.
Level wit h "och other
/l Ii-- If-- If--
I If--
I
illl iiilll .,- -T/
Tn xnr T(] flJr sp~c",
Note: If the location site of this machine has a polished floor it is recommended th at rubber pads are fitted under the level adjusters to prevent the machine sliding on the floor wh en in use.
Page 8

2. Fit the joint bracket with the supp lied 40ft flange socket head sc rews (M8x20)
Flange socket _ 1\ (M8"O)
Jomt bracket
Rear of projector (ll or (R) Assy
3. Fit the supplied 40ff flange socket head screws (M8x40) to the front of both monitor (L) and (R) assembl ies finger tight, leaving a clea ran ce of approx. 5mm.
Ii , f ront of lhe t::J I C;"" (L) '0' lei A"y
~I-N"'" I 5mm
" i I \
Flange $or::ket (MB x.O)
Page 9

4.
5.
I , I
Fit the joint assy , (sh ipped with Header Assy) , to the monitors and tighten the 40ff flange socket head screws (M8x40).
Pull the loom connectors from the monitor asse m blies.
Page 10
t .--ee--o
.1
., .

5-2 Fitting the Header Assembly
The Header Assembly has a forward centre of gravity, so it is im portant that at
least two people are used to fit or remove the Header Assembly. The fitting position of the Header Assembly is very high, and it is important
that a·means of rea ching the height safely, without stretching, is available . (e.g. steps, step stool etc.)
1. Remove 20ff tork screws (M5x15) and remove the connector cover. 2. Place the header on to the monitor cabinets and slide it backwards so that it engages under the fixing brackets at the back. 3. Connect the connector, and refit the connector cover using the 20ff tork screws (M5x15).
4 . Retain the header in position with supplied 40ff hex head screws (M6x30), flat and spring washers, and supplied washers C.
Connector cover
Tork SCfew (M5x15)
~ .. ~"~ ~~
"
Header Assy Hex head screw (M6x30) \
. with flal and spring washer _\ _ ____ c_o_n)ne.-'_d_o'_ 1---Wash., C
t ~I=r;~@
Reta ining bracket
Page 11

I "
I I . 1 "
, I
5-3 Fitting the Coin Tower
1. Place the coin tower up to the Join t Assy .
2. Fi t the supplied 40ff flange socket head screws (M8x20) to fix the Coin towe r to the Joint Assy.
3 . Pull the harness out from the coin tower.
joInt auy
4 . Connect the six connectors .
5 . Fit the joint cover us ing 40ff tork screws (M5x12) .
Co,n Towel Assy
Page 12

5-4 Fitting the Pedal A.sembly
1. Connect the connector between the pedal assy and co in tower assy.
2. Slacken the Flange socket head screws (M6x20) retaining the pedal brackets .
o
F~"9~ wcl<el (M6x20)
3. Place the pedal assy between the pedal brackets and fit , finger tight, the suppl ied 40ff flange socket head screws (M5x12) taking care not to trap any wires.
Flange SOck"e~t _~;;-@~ (M5x12h
I-r:=J "Flange socket (M6x20)
4. En sure that the pedal assy is against the floor and tighten the 40ft flange socket head screws (M5x12) Note: Make sure that the pedal assy does not lift from the floor.
5. Re-tighten the flange socket head screws (M6x20).
Page 13

6. ADJUSTMENTS
@ Adjustment or maintenance on this machine should be carried out by qualified personnel only.
@ Aufstellung, Service, Einstellung und Wartung durfen nur von dafur qualifiziertem Fachpersonal durchgefuhrt werden.
@ Justeringer eller ved lig ehold af denne maskine b"r kun udf"res af kvalificeret personale.
CD Lo s ajustes y el mantenimiento de esta maquina deben ser realizados so lo por personal cualificado.
® L'installation, Ie service, Ie reglage, ou la maintenance doivent etre effectues uniquement par les personnes qualifiees.
@ M CT(1TP07l' CS ~ £7rlOlOp8wCJCl~ O'TU /IT[xa\'~JlaTa. nptrrcl va yt\'O\,TUl ~6\'o 0.1'[0
tSOtl UlOOOT'1JlCva O:TOjlU .
CD Regolazioni e manutenzione su questa mac china devono essere fatti solo da personale specializzato.
® Justering eller ved l ikeho ld pa denne maskinen skall bare utl"res av kvalifiserte personell.
@ Aanpassingen of onderhoud aan deze machine dient aileen uitgevoerd te worden door bekwaam personee!.
® Afinac;:oes ou manutenc;:ao nesta maquina, deverao ser efectuadas somente por pessoal qualificado.
® Justeringar och underhall pa denna maskin skall endast utloras av
kvalificerad personal.
® Hita laitetta saa saata. tai huoltaa vain siihen ammattipatevyyden omaava henkilokunta.
6-1 Turning on the Power
After the machine has been installed, turn ON the power. The power sw itch is located on the rear of the monitor cab inet.
Page 14

6-2 Adjustment Switches
The Adjustment switches are located inside the coin door.
1. Service Switch . Press this switch to obta in game credits without increm enting the play meter.
2. Test Switch Slide the test switch ON to enter test mode. Test mode allows testing and the changing of game settings. (Refer to sect ion 6-3 "Test Mode" page 16)
3. Select Up/Down Switch This switch is used to select the test require d when in the Test Mode.
4 . Ente r Switch Thi s switch is used to enter a selected test and to change settings wi th in a test.
COIN COUNTER 0 • I I 2 Amp alB
(Coin Fuse) 0
0 PLAYER 1 PLAYER 2 B UP B UP {) SELEC T (J) SELECT
DOWN DOWN
0 SELECT
0 SELECT © © TES T SERVICE TEST SERVICE
1111111111 © 111111111 I ©
Page 15

"
6-3 Test Mode
1. Open th e co in door and sl ide the test switch "ON". The "Menu Screen" wi ll be displayed on Ihe monitor.
2. Se lect the tes t required by using the select upldown switch. T he colou r of the se lected test will change.
3 . Activate the test by pressing the Enter switch . Select "EXIT" in each test to ret urn to the "Menu Screen".
4. After tes ting is completed, slide the test switch to the "OFF" posit ion to return to normal game mode.
The Test Switch must a/ways be in the "OFF" position for normal game mode.
MENU
COIN OPTIONS Used to set the price of play
GAME OPTIONS Used to set the game options
110 TEST Used for testing switches & Gun
MON ITOR TEST Used for sett ing the monitor
SOUND TEST Used for sett ing the volume
ADS DATA Used to view bookkeeping
OTHERS Used for testi ng the PCB
(a ) } (b) Do not appear when OK (c) .
LINK MALFUNCTION 1 2 3 ............ . GAME DIFFI CULTY LlR:NOT THE SAME ..... ... .. .
The interna l battery's dead .................... .
SELECT SW : CHOOSE ENTER SW : ENTE R
(a) Error message re lated to link play A message appears if the lin k play is defecti ve. Th e number d isplayed represe nt s the type of error when 1 or 2 is d is played either the main PCB or memory PCB may be defective. Contact your distributor. If 3 is d isplayed , the software version on the left game PCB is different from that on the right game PCB. Contact your dis t ributor.
(b) Error message related to di ffi culty settings A message appears if the difficu lty sett ings of the left and r ight game PCBs are different . Enter GAME OPTIO NS inthe test mode and set both PCBs the same.
(c) Low battery display A message appears if the Main PCB battery is fa ulty Contact your distr ibutor .
Page 16
I I I i I I
---.------.--- - .. -.---- .---------------------

6-3-1 Co i n Options
1. Select ·COIN OPTIONS" on the menu screen to set the game cost and related settings. The following screen is displayed .
2. Use the Select Up/Down switch to choose the required item then press the Enter button .
3. Use the Up/Down switch to change the setting .
4 . Press the Enter button after the changes have been made to return to the options .
5 . Select "EXIT" and press the Ente r button to return to the men u screen.
Note:- The price of play on this machine is set within the Cashffow Coin Mech. Ensure that the Game Cost is set to 1 Coin 1 Credit.
ITEM
(a) Game Cost
(b) Continue
(c) Free Play
COIN OPTIONS
<DEF AULT IN GREEN>
GAME COST CONTINUE COST
1 CO IN (S) 1 CREDIT ...... ..... ... (a) 1 COIN (S) 1 CREDIT ............ (b)
FREE PLAY OFF (c)
EXIT
SELECT SW : CHOOSE ENTER SW : ENTER
DESCRIPTION FACTORY SET
Coins required for number of Credits - settable 1 - 9 1 Coin 1 Credit
Coins required to continue - settable 1 - 9 1 Coi n 1 Credit
No coins required for credit - On (Yes) I Off (No) OFF
Page 17

, l:
6-3-2 Game Options
1. Se lect "GAM E OPTIONS" on the menu screen to set the game variables. The following screen is displayed.
2. Use the Select UplDown switch to choose the required item then press the Enter button.
3. Use the UplDown switch to change the setting.
4 . Press the Enter button afte r the changes have been made to return to the options.
5. Select "EXIT" and press the Enter button to return to the menu screen .
GAME OPTIONS
<DEFAU LT IN GREEN>
PLAYER'S LIFE
DIF FICU L TY
ATTRACT SOUND
HI-SCORE INIT
EXIT
SELECT SW : CHOOSE
4
C (MEDIUM)
ON
NO
YES
ENTER SW : ENTER
(a)
(b)
(c)
(d)
rTEM DESCRIPTION FACTORY SET
(a) Players Life Number of lives at game start - settable 1 - 9 4
A \Very Easy) B (Easy)
(b) Difficulty C (Medium) C (Med ium) D (Hard) E \Very Hard)
(c) Attract Sound Sound in attract mode ON IOFF ON
(d) Hi-Score Init? Hi-Score initia lized at power up YESINO NO
NOTE: The game will not function correctly unless the diffi c u l ty setting ;s th e same for both players,
Page 18
"
,
,,'

6-3 -3 1/0 Test
1. Select "1/0 TEST" on the menu screen to switches and lamps. The following screen is displayed.
2. Use the Select Up/Down switch to choose the required item then press the Enter button to enter the test.
3. Select "EXIT" and press the Enter button to return to the menu screen .
I/O TEST
DIP 4 12345678 {ON:OFF} .......... ... ......... ....... ............ ... (a) LINK ON 2
I/O PCB CHECK
GUN INITIALIZE
SWITCH TEST
SOLENOID TEST
EXIT
SELECT SW : CHOOSE ENTER SW: ENTER
(b)
(c)
(d) ( e)
(f)
(a) Shows the condition .of the DIP Switches on the PCB. In norma l operation all switches are OFF. (If a switch is ON, it w il l be displayed in red .)
(b) Checks that both game PCBs are communicating . If the commun ication is good LINK ON 2 will be displayed If link data is wrong LINK OFF will be displayed. If unrecognisable data is being received LINK NG will be displayed.
(c) Checks function of 110 PCB.
(d) Used to test and init ialize the gun operation (see Section 6-3-3-2 page 21)
(e) Selecting this item allows all switches and pedal sensor to be checked . (See 6-3-3-3 pa ge 24)
(f) Selecting this item allows the testing of the gun recoil solenoid. (See 6-3-3-4 page 25)
Page 19

; i . ,
~ \', \'
6-3-3-1 1/0 PCB Check
1, Select 'I/O PCB CHECK' from the 1/0 Test Screen, The following
screen is displayed: -
110 TEST
DIP 4 12345678 [ON.RED]
LIN K ON 2
1/0 PCB CH ECK
Master TX 3536 NAMCO LTD.
Time Crisis 2 ; Ver1.00 ; JPN
1/0 PCB Connect OK namco ltd.
TS S-1/0 ;Ver2. 02; J PN; G U N-EXTE N S I ON
EXIT
SELECT SW : CHOOSE ENTER SW : ENTER
Page 20
6-3-3-2 Gun Initialize
1. Select 'GUN INITIALIZE' from the 110 Test Screen. The following screen is displayed:-
GUN INITIALIZE
GUN INITIALIZE (CRT) ........... .. . (a)
GUN INITIALIZE (PROJ ECTOR) .. . ..... '" (b)
EXIT
SELE CT SW : CHOOS E ENTER SW : ENTER
2. Use the Up/Down switch to select 'GUN INITIALIZE (PROJECTOR)', and press the Enter switch . The following screen is displayed.
GUN INITIALIZE (PROJECTOR)
+ SHOOT AT SCREEN TO CHECK GUN ACCURACY
PU SH ENTER SW : ADJUST GUN SIGHT UP SE LECT SW + ENTER SW : EXIT
3 . This sc reen allows the gun accuracy to be checked. Shoot the gun at the screen . The scree n will display the pos ition of the bullet . If the pos iti on is not where the gun was aimed press the 'En ter sw' or press on the pedal. The f ollowing screen will be dispalyed .
Page 21

AIM AT CENTER OF THE CROSS
AND PULL GUN TRIGGER
4 . The gun aim is set by aiming and shooting at three points on the screen: the middle, top and bottom.
5. While the above screen is displayed, aim at the centre of the cross displayed in the midd le of the screen. After firing the gun the fo ll owing screen is displayed.
+
AIM AT CENTER OF THE CROSS
AND PULL GUN TRIGGER
6. While the above screen is displayed, aim at the centre of the cross displayed at the top of the screen. After firing the gun the fol lowing screen is displayed.
Page 22

+ AIM AT CENTER OF THE CROSS AND PULL GUN TRIGGER
7. While the above screen is displayed , aim at the centre of the cross displayed at the bottom of the screen . After firing the gun aiming is now set , and the screen will return to the original 'G un Initialize ' screen.
8. Aim and fire the gun at the screen to check the new gun aiming . If the aiming is correct press the Up Select sw and Enter switch together to return to the ' 1/0 Test' screen. If the gun aim ing is incorrect repeat steps 3 to 8.
Page 23

I ,
I
6·3·3·3 Switch Test
1. Select "Switch Test" on the 1/0 menu sc reen to test the switches . T he following screen is disp layed.
2. T he disp lay shows the current state of the switches .
3. Press the Up Select switch and the Enter switch together to EXIT and re turn to the 1/0 menu screen
(a)
SWITCH TE ST
DIP 4 123456787 (ON/OFF] LINK ON 2
SWITCH TEST COIN 000 SERVICE OFF TEST ON UP SELECT OFF DOWN SELECT OFF ENT ER OFF TRIGGER OFF FOOT PEDAL OFF
... .. ... .... .............. la) .... ..... ............ .... . Ib)
I c) ............................. Id)
................................. (e )
............................ (f)
....... .... ... ......... (g )
................. ................ (h)
UP SELECT SW + ENTER SW : EXIT
Not Used
(b) The dis play will change from OFF to ON as each sw itch is operated.
(c) The game will return to normal play mode if this swi tch is tu rned off.
(d to h) The d isplay w ill change from OFF to ON as each switch is opera ted.
Page 24 I •
:1

6-3-3-4 Solenid Tes!
1. Select "solenoid Tes!" ·on the I/O menu screen to test the switches. The following screen is displayed.
I/O TEST
DIP 4 12345678 [ON.REo]
LINK ON 2
SOLENOID TEST
PULL GUN TRIGGER TO ACTION
EXIT
SELECT SW • CHOOSE ENTER SW : ENTER
2. The gun recoi l solenoid will operate each t im e the trigger is pres sed.
3. Se lect 'EXIT' and press the Enter button to ret urn to t he I/O menu screen .
Page 25

6-3-4 Monitor Test
1. Seleci "MONITOR TE ST" on the menu sc reen to test and adjusl the Monilor. The following screen is di splayed.
2. Use the Select Up/Down swi tch to choose the req uired item the n press the Enter button . To return to th e Monitor Tes t Me nu from a test pattern press the Enter button.
3 . Select "EXIT" and press the Enter button to return to the menu screen .
MONITOR TEST
GRADATION PATTE RN
CROSSHATCH PATTERN (CRT) CROSSHATCH PATTERN (PROJ ) WHITE WINDOW (H)
........ .. .... ..... .. .. ........... . (a)
Nole :
WHITE WIN DOW (M)
WH ITE WINDOW (L)
INTER LAC E PATTERN
VI EW ANGLE ADJUST (C RT)
V IEW ANG LE ADJUST (PROJ)
FULL WH ITE
EXIT
SELECT SW : CHOOS E ENTER SW : ENTER
Ilems (b) and (h) are nol used on th is game.
Page 26
(b)
(0)
(d)
(e) ( f)
(9) ( h)
(i)
(j)
I ,
I
J
.--~~--------.---,-.-=~--~--------

6-3-5 Sound Test
1. Select "I/O TEST" on the menu screen to switches and lamps. The following screen is displayed. .
2 . Use the Select Up/Down switch to choose the required item then press the Enter button.
3 . Use the Up/Down switch to change the setting .
4. Press the Enter button after the changes have been made to return to the options.
5 . Select "EXIT" and press the Enter button to return to the menu screen.
VOLUME
SOUND TEST <DEFAULT IN GREEN>
FRONT L SP FRONT R SP
(0-64) (0-64 )
40 ................... ......... . 40 ........ ... ..... ... ... ...... ... .. .
REQUEST SONG NO. 000, ., ..... , ..... .... , ..... , ..... ,.
MESSAGE
EXIT
SELECT SW : CHOOSE ENTER SW : ENTER SERVICE SW : REQUEST ON/OFF
(a) (b)
(c)
(d)
(a ) Vo lume sett ing fo r left channel speaker. Settable from 0 - 64 with 0 quietest and 64 loudest.
(b) Vo lume setting for right channel speaker. Settable from 0 - 64 with 0 qu ietest and 64 loudest.
(c ,) Each number will produce a different sound each t ime the Serv ice button is pressed , (for a maximum of ten seconds) 001 when se lected wi ll produce a sound from the left speaker on ly, then the right speaker only and then both speakers together as a stereo check. The message fie ld shows which speaker is active .
(d) Displays the song No. details.
Page 27

\
6-3-6 ADS Data
By selecting ADS Data from the menu screen, all of the bookkeeping deta ils can be read andlor rese t.
6-3-7 Others
1. Sele ct "OTHERS" on the menu screen. The following screen is disp layed .
2. Use the Select Up/Down switch choose the re quired item then press the Enter button.
3. Select "EXIT" and press the Enter button to ret urn to the menu screen.
OTHERS
ROM1 Ver . 97/07/07 MON 21:15:59 . ... ......... (a) . . ..
ROM2 Ver. 97/06/27 FRI 20:11:35
CLOCK 97/08/27 WED 23:1 1:12 ....... ...... . (b)
PCB TEST .............. (c)
LANG UAGE ENGLISH ................. . ............... (d)
BACKUP MEMORY INITIALIZE NO ................... .. ..... . .............. (e)
YES EXIT
SELECT SW : CHOOSE ENTER SW : ENTER
(a,) Displays game software vers io n.
(b) Allows the internal clock and ca lendar to be set.
(c) Used to test the PCB. (this function is only for factory testing)
(d) Sets the language displayed on the screen : Engl ish EN G German GER French FRA Spanish SPA Portugese POR Italian ITA
(e) When se lected the Data Ini tiali zation Menu appears . To reset a ll game sett ings to factory setting and clear all stored data , select YES from the Data Initializat ion menu then press the Enter button.
NOTE: The game will not function correctly unless the software version is the same for both players .
Page 28

7. REMOVING AND REPLACING ASSEMBLIES AND PARTS
f
• 1 I
7-1 Removing the Monitor from the Monitor Base
1.
2.
The monitor is heavy. approx 100kg At least five (5) people are required to remove the monitor.
Remove the 40ft pozi head screws (M5x35) and remove the front cover.
Disconnect the two connectors and then remove the 20ft hex head screws (M 1 Ox130) . spring washers and square flat washers
Monitor .ssy ~ Connectors
Pozi head screw
Front cover
Square flat washer~i Spring washer (M10) ~
Hex head screw (M 10x130)
\ Monitor base
Page 29
•

I , I
I I I
, . i
3. Remove the 2011 pozi head screws (M5x30) and remove the cover strip.
4. Rem ove 2011 pozi head screws (M5x30), unlock and remove the rear door.
5. Remove the 2011 hex head screws (M10x130), spring washers and square flat washers.
6.
Cover strip
11t·~~-c::::
1Ll=====~~,J ::::;:::::.-> ill ~
-rr~~ I. ~lOck C Rear door
!~ Square flat washer
~ Spring washer (M10)
Hex head screw (Ml0xt30)
Lift the Monitor approx 10cm from the monitor base and then move it forwards or backwards clear of the monitor base.
® . --~ ..
Nole: When placing Ihe monilor on 10 Ihe floor or rep/acing on 10 Ihe monilor base, lake care nollo Irap hands or fingers .
Page 30

. '
7-2 Replacing the Fluorescent Tube or Starter
1. Remove 40ff tork screw (MSx 1S) and remove the top reta ining bracket and header acrylic.
2. Replace the fluorescent tube or starter.
3. Refit the header acry lic and top reta ining bra cket.
Fluorescenl lamp Tori< screw (MSx1S) ~ Retaining braCket
~ ~~: ~:;-~~~ ~~~/l = rc./",,":::::.jr]J/ 1 tJ, fl!, ~i;;~=::::::::::-Header Acrylic
Page 31

7-3 Replacing the Pedal Sw itch
1. Remove 40ft security screw (M5x 12) and remove the switch cover plate.
Switch cover plate
2. Remove 20ft pozi head screw (M3x16) and remove the switch. Whe n replacing the switch, ensure that the wires are fitted to the correct terminals.
3. Slacken the 20ft whizztite nuts (M4) and adjust the microswitch bracket so that the switch plunger operates the switch correctly without bending the switch leve r against the switch body.
~.
II
4. Refi t t he sw itch cover plate and 4011 security screw (M5x 12).
Page 32
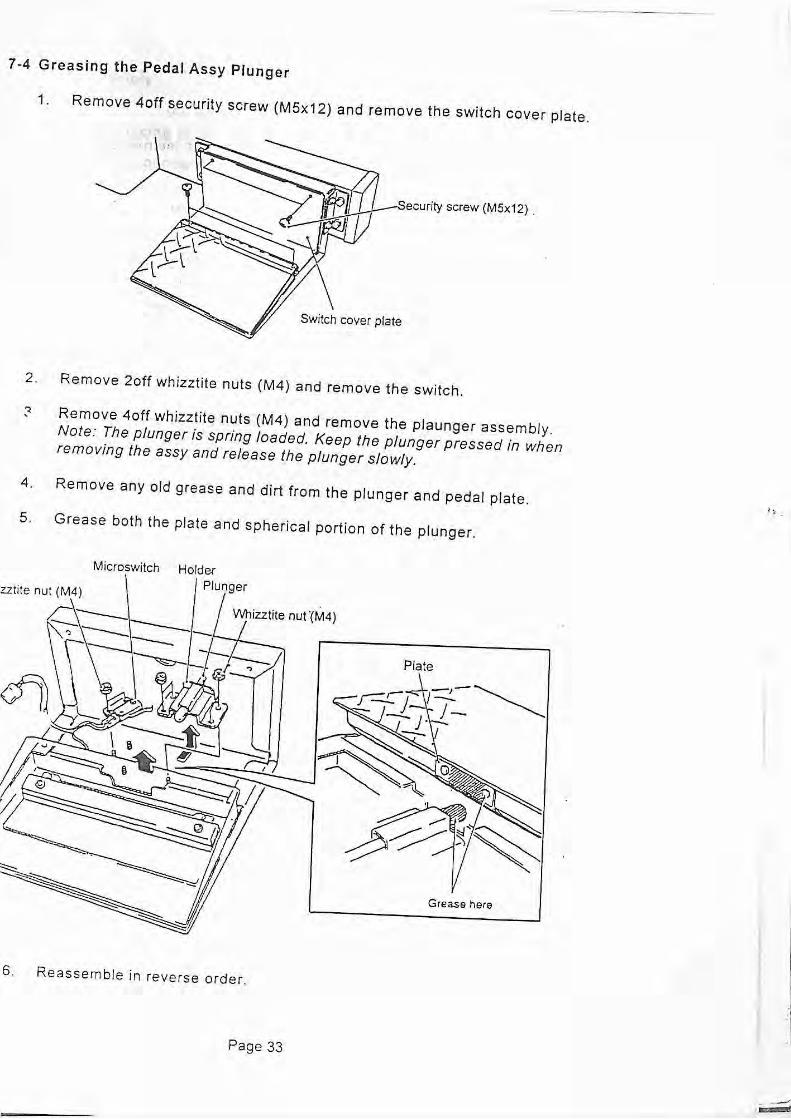
- .--- _.---
7-4 Greasing the Pedal Assy Plunger
1. Remove 40ff security screw (M5x12) and remove the switch cover plate .
Security screw (M5x12) .
2. Remove 20ft whizztite nuts (M4) and remove the switch.
:> Remove 40ff whizztite nuts (M4) and remove the plaunger assembly. Note: The plunger is spring loaded. Keep the plunger pressed in when removing the assy and release the plunger slowly.
4. Remove any old grease and dirt from the plung er and pedal plate .
5. Grease both the plate and spherical portion of the plunger.
Microswilch Holder
utile nut
Grease hera
6. Reassemble in reverse order.
Page 33
" .
.i
,- .-,

7-5 Replacing the Pedal Plunger
1. Remove the plunger assembly . (See 7-4 page 33)
2. Pull the plunger out of the holder. Replace w ith the new plunger. (The new plunger shou ld have grease applied all over prior to fitt ing).
Holder
Plu:1ger
3. W ipe off any old grease and dirt from the peda l plate and regrease .
4 . Reassemble in reverse order.
Page 34
Place
Grease here

7-6 Gun Assembly
7-6 -1 Replacing t he Gun Assembly
1. Remove 80ft security screws (M8x20) and remove the gun pod complete with the gun.
~ rr=,~ i ii
i
i i
~secur;ty screw (Mex20)
2. Disconnect the connecto rs and remove the 20ft whizztite nuts (M6).
Gun pod
Fixing plate
3. Remove the gun assembly from the gun pod .
Note: When replacing the gun assembly ensure that the earth wires are located on to the studs before filling and tightening the whizz!i!e nuts (M6)
Page 35

7-6-2 Removing the Gun Slide
1. Remove 40ft cap screws (M3x10), 10ft button screw (M4x25), and 10ft hex nut (M4), and detach the gun slides (L) and (R).
2. Reassemble in reverse order.
Gun slide (L) Bunon bolt (M4)( 10) Gun slide (R )
Cap boll (M3 x 'O) Hexagon box nut (M4) Cap bolt (M3 x 10)
®
e • o
..
Page 36
• II
• • • " ..

7-6-3 Removing the Gun Cover
1. Remove the gun slides (L) and (R). (See 7-6-2 page 36)
2. Place the gun (L) face down, and remove the 40ff button screws (M4x10) , 10ff button screw (M4x25), 40ff hex nuts (M4) , and 10ff cap screw (M3x10). Remove the gun cove r (R) taking care that the le ns does not fall out.
Button bort Gun cover (F\) (M4 X25) / Cap bott (M3 x 10)
d~!C
~J.~~:~:==~~~~ Sunon bolt (M4 x to)
Lens
Gun cover (L)
r---------- ------- - --..., , I I I I I I c I I I I I I I I I I I I I
I
I I , I
Hexagon box nut (M4)
Gun cover (L)
~----------------------~
3. Reassemble in reverse order. (Ensure that the flat face of the lens is facing the back of the gun).
o
Ensure that the flat fa ce "':u~;;;;;;;;;;;;~;~~ of the lens is toward '" ~ the back of the gun
Page 37
-

7-6-4 Replacing the Solenoid
Solenoid
1. Remove the gun cover and gun slide (R). (See 7-6-2 page 36 and 7-6-3 page 36)
2. Disconnect the solenoid connector.
3. Remove 10ft cap screw (M3x10) on the gun cover (L) and remove the solenoid bracket.
4. Remove 1 off cup screw M (M3x8) and detach the earth wire.
5. Loosen the nuts (16mm dia.) and remove the solenoid.
6. Re move 20ft cup screws M (M4x6) and detach the slide guide.
7. Pull out the so lenoid plunger, taking care not to lose the spring .
Spring
Ground wire
Cup screw (M) (M4 K 6)
Solenoid bracket
(--------------------~ i GE': (M:XI1~) i I I
I
'\ ! Gun cover (l) r
I I I I I I
.... --------- --- --- __ __ ___ ..J
Cup screw (M) (M3 x 8) Toothed Slide guide
'WaSher
8. Reasse mble in re verse order.
Solenoid
Note: When reassembling match the D-type hole of the solenoid bracket to the D shape of the solenoid and ensure that the 'E' ring and spacers are in the correct positions.
Spacers Slide guide
Solenoid bracket
Plunger E-type snap rings
Page 38
Harness outlet (if must face downwards)
I l I I I

7-6-5 Replacing the Solenoid
1. Remove Ih e gun cover and gun sl ide (R). (S ee 7-6-2 page 32 and 7 -6-3 page 37)
2. Replace the microswitch. Take care w hen replacing the switch that the co rrect wires are fitte d to the co rre ct terminals.
3. Reassemble in reverse order.
I \
Connect the black harness. Connect the blue hamess.
7-6-6 Replacing the Flexible Gun Conduit.
1. Remove the gun assembly . (See 7-6-1- page 35).
2. Remove the 20ff security screws (M4x10). then detach the connector cover.
3. Remove th e gun cover and gun slide (R) . (See 7-6-2 page 36 and 7-6-3 page 37) .
4. Detach the solenoid bracket and detach the solenoid connectors and earth wire . (see 7-6-4 page 38).
5. Disconnect the sensor and detach the fas t-on con nectors from the micro switch.
6. Remove the button head screw (M4x1 0) fixing the conduit to the gun cover (L) and detach the conduit.
7. Re assemble in reverse order.
Fasl-on terminal (microswltchl
Ground Wlre ___~ ~ C<lnneetor ($Cianoio')
--~~
Gun cover (A) Gun cover (L)
Flexible conduit
Page 39

Page 40

' . ': ,,'
. .
,
ttem Description Part No 2 Pioneer 50" Projection Monitor - JVS 84000000 3 Projector Cabinet (LHS) Front Decal 40000257 4 Projector Cabinet (RHS) Front Decal 40000285 6 Swivel Castor - 75mm 59000005 7 Adjustable Foot - M16 x 95 88300079 9 Bass Loudspeaker Grille 46000828 --10 Bass Loudspeaker - Pioneer SWM 1034 X006-115 11 Bass Loudspeaker Port 46000837 12 Projector Cabinet Side Decal (RHS) 40000253 13 Projector Cabinet Side Decal (LHS) 40000257
Page 41

=
•
\c-1F====='==/====rN 5
• •
I I
6 7 8 9
ttem Description Part No.
1 Header Rear Closing Plate 46000866
2 Header Vac-F onm (LHS) 46000863
4 Header Acrylic Closing Bracket 46000840
5 Header Vac-F onm (RHS) 46000864
6 Loudspeaker Mesh 46000865
7 Header Acryl ic 30000023
8 Fluorescent tube 4' 64500039
9 Fluorescent Assembly 4' 64000045
10 Loudspeake r 4 y," 20watt 62000006
Page 42
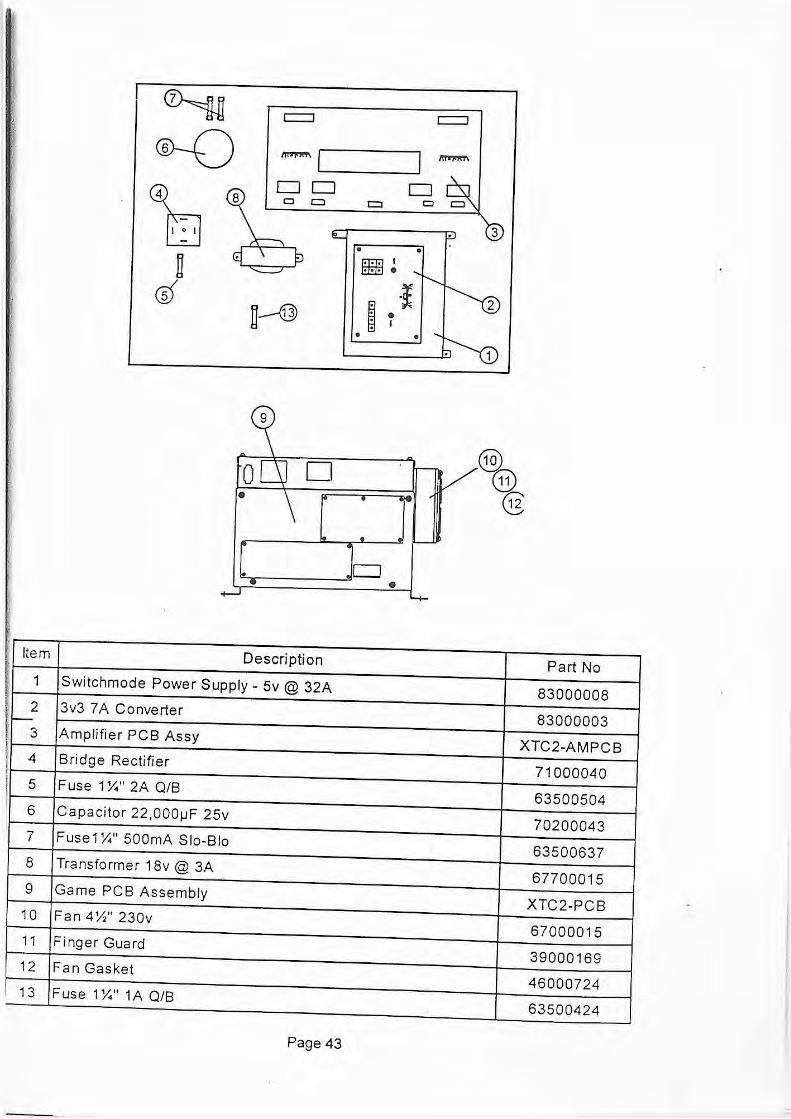
~ = = ®-() -- I """""'
tJ DO 0
c:J CJ = c:J
• •
D 1Hffil ' ... • @
D--@ ~ . !
• , • •
9
o [3: 0 - V •
'-
D • ....:r .....
Item Description Part No , 1 Switchmode Power Supply - 5v @ 32A 83000008 , 2 3v3 7 A Converter 83 000003 ,-3 Amplifier PC B Assy XTC2-AMPCB 4 Bridge Rectifier 71000040 5 Fuse 1 y." 2A Q/B 63500504 6 Capacitor 22,000 ~F 25v 70200043 7 Fuse1 y." 500mA Sio-Blo 63500637 8 Transfo rmer 18v @ 3A 677000 15 9 Game PCB Assembly XTC2-PCB 10 Fan 4 y," 230v
67000015 11 Finger Guard
39000169 12 Fan Gasket
46000724 13 Fuse 1 y." 1A Q/B
63500424
Page 43

G
EJ '". ') .'
, . ' '-
EJ <~::.: :-~.~:,] : \lC\; ~:
_ .... ___._ • . _~. v'
'1! ,. , .. ~' ~
I: . . _. ~ ...... _ 0- ___ .....
Page 44
. ,1\, . "=
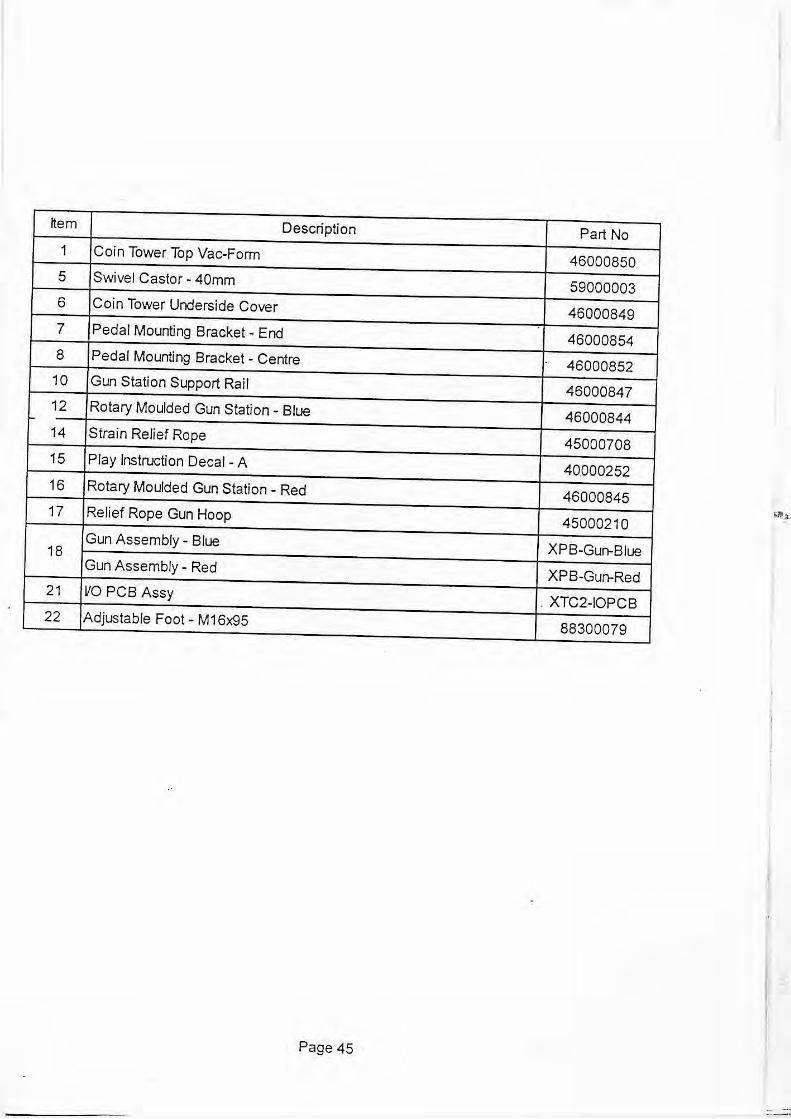
ttem Description Part No 1 Coin Tower Top Vac-Form 46000850 5 Swivel Castor - 40mm 59000003 6 Coin Tower Underside Cover 46000849 7 Pedal Mounting Bracket - End 46000854 8 Pedal Mounting Bracket - Centre 46000852 10 Gun Station Support Rail 46000847 12 Rotary Moulded Gun Station - Blue 46000844 14 Strain Relief Rope 45000708 15 Play Instruction Decal - A 40000252 16 Rotary Moulded Gun Station - Red 46000845 17 Relief Rope Gun Hoop 45000210
Gun Assembly - Blue XPB-Gun-Blue 18 Gun Assembly - Red XPB-Gun-Red
21 VO PCB Assy . XTC2-IOPCB 22 Adjustable Foot - M16x95 88300079
Page 45

@
\
Page 46
L ..
I
I I i i j
I i i I I i i
• i J J II
• "

I ttem Description
Gun Assembly - Red
Gun Assembly -Blue
1 Gun Cover (LHS) - Red
Gun Cover (LHS) - Blue
2 Trigger Spring
3 Trigger - Red
Trigger - Blue
4 Solenoid - ST-0860A2
5 Tube Bracket (A)
6 Gun Cord Harness Assy
7 Tube Bracket (B)
8 Connector Cover
9 Gun Cover (RHS) - Red
Gun Cover (RHS) - Blue
10 Gun Slide (RHS) - Red
Gun Slide (RHS) - Blue
11 Slide Rai l E20+F15R2/60L
12 E-type Snap Ring 7CR-3 (10dia)
13 Spacer
14 Slide Guide
15 Gun Slide (LHS) - Red
Gun Slide (LHS) - Blue -16 Back Spring
17 Lens NA-V1472050
18 Sensor PCB .·
19 Microswitch SS-01GI2T
20 Solenoid Bracket
21 Silencer Rubber
Page 47
Part No
XPB-Gun-Red
XPB-Gun-Blue
XPB-Cover-LR
XPB-Cover -LB
XPB -296-421
XPB-Trigger-R
XPB-Trigger-B
XPB-004-056
XPB-296-418
XPB-296-401
XP B-296-423
XPB -296-424
XPB-Cover-RR
XPB-Cover RB
XPB-Slide-RR
XPB-Slide RB
XPB-296-425
XPB-Eclip
XPB-296-422
XPB-296-417
XPB-Slide-LR
XPB-Slide -LB
XPB -296-420
XPB-296-426
XPB-296-467
XPB-000-228
XP B-296-4 16
XPB-296-428
I I I I , I
I I il

7
ttem Description
4 Spring (A)
S Spring Cover
7 Rubber Stopper
8 Plunger
10 Spring (8)
12 Microswitch - KSL 13
Page 48
Part No.
XTC-<l31 -221
XTC-<l3 1-218
XTC-631-2 17
XTC-631-219
XTC-631-222
XTC -000-027
I
• III II
• I III i
• • I I
• • I J J
• I I
•

I I I I I I I
• I I I I
• I I I I I I I
I
~em
1
2
3
4
5
o o
:r----!--J 3
o © o ©
o 1111111111 ©
Description Part No
3.5-6v Panel Mount Meter 65000002
20mnfPanei Mount Fuseholder 63500786
Fuse 20mm 2A Q/8 63500501
SPDT Toggle Switch -(momentary action) 60000010
Pushbutton Switch 7mm - Red 60000059
Miniature Slide Switch 60000023
Page 49

• II
,- ----- - --
I
I
I
I
I
I
I
'--- - -
, ,
:1 , , ,
VISS VO PCB ASSY
V185 va PCB ASSY
:[i
DID
, -
i
'i' , !
-- -----
, , j ,

- - - - - _.- - --.=...~-=-=- I B SOl[J1OIO
. "" I , ~,
.-:: ~ ":': II , , GUN ASSY __ _ ...1 - - -- - - ---- - - - -
:j>r 0---= =J t '" PEDAL ASSY - - - - -- -
I '~ '=
~ ~
-
._-
.l ,--- - -- - -,1
I
: I I
Q
~ '= I
,
, .,
I , ..?n5,. I ~ I
~ : I
0"""'_'0< .
, CASHFlOW I CREDIT DISPENSE
I I I I 1 I -
~
~ _ _ ____ ..J
1= ~ SERVICE BRACKET
;. -::- ~,
~ ~
•. ; i : ~ , ..;..
~"~ , , .. , ~--~
=~- --~=I~ I ~ ... ,
I ! =~ I j -=-11 "I' .. .-:: I ~ - ~.~ __ _ ~UNASSY __ _ _ ...1 I
-
- - - - - - - -r: 0---= J . _ _ _ -fEOAL ASSY_ _
J
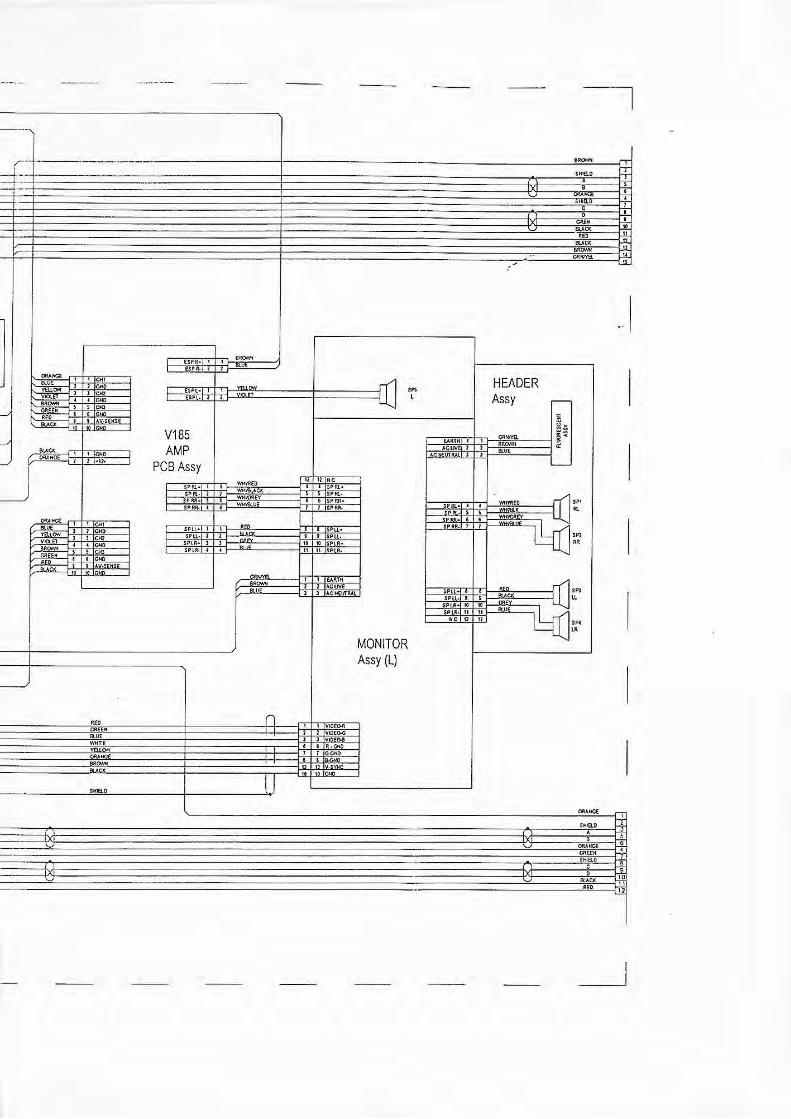
1
V185 AMP
PCB Assy
MONITOR Assy {Ll
'" , HEADER Assy
.1
, " ,

~§ ~!, ,
I I ffi " u:
I z V; z
I I I
~ ~
V185B EMI PCB Assy
SwrrCHMJOE PO'NER SUPPlY
I=y
J." pce ASSJ
EMI PCB Assy