technical white paper vsphere 5.5 with hp oneview, …h20628. · brocade 6510 provisioning ... when...
TRANSCRIPT

Technical white paper
vSphere 5.5 with HP OneView, 3PAR StoreServ 7400, Cisco Nexus 5600 and
Brocade 6510 Deployment Guide
Updated: 4/30/2015
Hongjun Ma and Marcus D'Andrea, HP DIA

vSphere 5.5 with HP OneView, 3PAR StoreServ 7400, Cisco Nexus 5600 and Brocade 6510 Deployment Guide
Page 2
Table of contents Introduction ............................................................................................................................................................................................... 4
Testing Physical Topology ..................................................................................................................................................................... 5
Networking and Storage Switching Connectivity .............................................................................................................................. 7
Cisco Nexus 5672UP Provisioning ................................................................................................................................................. 7
Brocade 6510 Provisioning ........................................................................................................................................................... 15
NPIV Configuration ................................................................................................................................................................... 16
Zone Alias Configuration ........................................................................................................................................................ 20
Zoning configuration ............................................................................................................................................................... 20
Server Infrastructure ............................................................................................................................................................................. 22
OneView Sample Initial Configuration (Using OneView Simulator) ...................................................................................... 22
Initial Login................................................................................................................................................................................. 22
Create Ethernet Networks ...................................................................................................................................................... 23
Create Network Set .................................................................................................................................................................. 27
Create Logical Interconnect Group ....................................................................................................................................... 30
Create Uplink Set ...................................................................................................................................................................... 31
Create Enclosure Group .......................................................................................................................................................... 38
Add Enclosure ........................................................................................................................................................................... 40
Verify Logical Interconnect and Upgrade Virtual Connect Firmware ............................................................................ 42
Verify Interconnect ................................................................................................................................................................... 47
Create Server Profile ............................................................................................................................................................... 49
Firmware Repository: .............................................................................................................................................................. 64
Licensing .................................................................................................................................................................................... 65
REST API and PowerShell Library ......................................................................................................................................... 67
Virtual Connect FlexFabric-20/40 F8 Module ........................................................................................................................... 69
Ports and Port Numbering ..................................................................................................................................................... 69
Server Port/MAC/WWPN Mapping ........................................................................................................................................ 70
OneView Final Config with Virtual Connect FlexFabric-20/40 F8 Module .......................................................................... 72
Networking Uplinks Configuration to Nexus 5672 ........................................................................................................... 72
SAN Uplinks Configuration to Brocade 6510 ..................................................................................................................... 76
Server Downlink Network Set Configuration ..................................................................................................................... 79
Server Profile Configuration .................................................................................................................................................. 80
HP 3PAR StoreServ 7400 Infrastructure Deployment .................................................................................................................. 81
3PAR StoreServ 7400 Hardware Overview ............................................................................................................................... 81
Node Enclosure ......................................................................................................................................................................... 81
Drive Enclosure ......................................................................................................................................................................... 82
Enclosure Cabling ..................................................................................................................................................................... 83
HP 3PAR Service Processor ................................................................................................................................................... 83

vSphere 5.5 with HP OneView, 3PAR StoreServ 7400, Cisco Nexus 5600 and Brocade 6510 Deployment Guide
Page 3
Storage System and Service Processor Initialization .............................................................................................................. 84
3PAR StoreServ 7400 Software Configuration ......................................................................................................................... 86
vSphere 5.5 Infrastructure ............................................................................................................................................................... 100
Host Networking Configuration ................................................................................................................................................. 100
Host Storage Configuration ....................................................................................................................................................... 101
HP 3PAR Storage SATP and PSP setting ................................................................................................................................. 102
HP 3PAR VAAI Plugin for ESXi 5.x ............................................................................................................................................. 104
Storage Connectivity Verification .............................................................................................................................................. 104
HP OneView Integration with HP 3PAR and Brocade Network Advisor for Auto Volume Creation and Zoning............. 107
HP OneView with 3PAR StoreServe Integration .................................................................................................................... 107
3PAR Configuration ............................................................................................................................................................... 107
OneView Configuration ......................................................................................................................................................... 107
HP OneView with Brocade Network Advisor Integration ..................................................................................................... 116
Brocade Network Advisor Configuration ........................................................................................................................... 116
OneView Configuration ......................................................................................................................................................... 119
Provisioning host LUN with 3PAR Auto Export and Brocade Auto Zoning....................................................................... 121
HP OneView and 3PAR StoreServ Integration with VMware vCenter ...................................................................................... 127
Software Installation ................................................................................................................................................................... 127
Storage Administrator Portal Configuration .......................................................................................................................... 128
vSphere Web Client Configuration ............................................................................................................................................ 129
HP Infrastructure Management................................................................................................................................................. 132
Host Networking Management ................................................................................................................................................. 133
Network Diagram ................................................................................................................................................................... 133
Network Detail ........................................................................................................................................................................ 135
HP Storage Management ..................................................................................................................................................... 139
Host Operation Management .............................................................................................................................................. 140
OneView for vCenter and Insight Control Server Provisioning Grow ESXi Cluster ................................................................ 144
HP Insight Control Server Provisioning .................................................................................................................................... 144
Insight Control Server Provisioning Custom Build Plan ....................................................................................................... 150
OneView for vCenter HP Grow Cluster ..................................................................................................................................... 150
OneView for vCenter End to End Datastore Provisioning .......................................................................................................... 161
Conclusion ............................................................................................................................................................................................ 167

vSphere 5.5 with HP OneView, 3PAR StoreServ 7400, Cisco Nexus 5600 and Brocade 6510 Deployment Guide
Page 4
Introduction
This document describes the deployment procedures for building a comprehensive infrastructure that uses technologies from HP, VMware, Cisco, and Brocade.
Beyond the fundamental Server/Storage/Networking configuration for VMware vSphere 5.5, in the later sections, we highlight some powerful features leveraging the integration among HP OneView management, HP 3PAR StoreServ Storage, Brocade Network Advisor and VMware vCenter. Such features include end-to-end vSphere cluster growing and datastore creation.
The hardware and software for vSphere 5.5 deployment testing include the following:
Infrastructure Components
Products Version
Blade server H/W HP BladeSystem C7000 Chassis with ProLiant BL460 Gen8 servers SPP2014.06
Blade server I/O HP Virtual Connect FlexFabric-20/40 F8 Module for c-Class BladeSystem 4.20
Storage HP 3PAR StoreServ 7400 2-node system 3.1.3(MU1)
Networking Cisco Nexus 5672UP Switches NX-OS 7.0(1)N1(1)
SAN Fabric Brocade 6510 Switches FOS: v7.0.2c
Management S/W Products Version
Infrastructure Management
HP OneView infrastructure management virtual appliance 1.10
HP Server/Storage vCenter Integration
HP OneView for VMware vCenter for OneView server and 3PAR storage vCenter integration
7.4.1
HP OS Provisioning HP Insight Control Server Provisioning 7.3.2
Although this is the default base design, each of the components can be scaled to support specific business requirements. For example, different quantities or combinations of blades and chassis can be deployed to increase compute capacity; additional disk shelves can be deployed to improve I/O capacity and throughput; and special hardware or software features can be added to introduce new features.

vSphere 5.5 with HP OneView, 3PAR StoreServ 7400, Cisco Nexus 5600 and Brocade 6510 Deployment Guide
Page 5
Testing Physical Topology
HP BladeSystem C7000 chassis is loaded with HP ProLiant BL460c Gen8 blades. All blade servers I/Os are provided by the Virtual Connect FlexFabric 20/40-F8 interconnect module. HP 3PAR StoreServ 7400 provides server storage for VMware datastore. 3PAR StoreServ not only provides Tier-1 storage performance and features like Adaptive Optimization but it is also is integrated with HP OneView infrastructure management platform for ease of provisioning. Ethernet networking consists of a pair of Cisco Nexus 5672UP switches. Nexus 5600 series are upgraded models over Nexus 5500 switches. The same vPC configuration guidelines with HP Virtual Connect modules discussed in this paper also apply to other Cisco Nexus product lines including Cisco Nexus 9000, Nexus 7000, Nexus 6000 and Nexus 5500. We chose the Nexus 5600 platform because Cisco Nexus 5500s are widely deployed and connected with Virtual Connect in Data Center. We wanted to validate the latest Virtual Connect FlexFabric-20/40 F8 module interoperability with Nexus 5600/5500. Virtual Connect can also work with other data center switches from HP Network, Brocade, Arista, Juniper, Extreme, etc. Future OneView releases will support FCOE uplink from Virtual Connect to Nexus switches. 40G uplink testing of Virtual Connect FlexFabric-20/40 F8 module has been covered in another separate technical white paper. The SAN fabric consists of a pair of Brocade 6510 switches. The 6510 switch is the latest Brocade Gen 5 Fibre Channel product. It offers 48x16G FC ports. We tested 8G FC speed because Virtual Connect and 3PAR StoreServ support up to 8G FC interface. We
Nexus 5672-01 Nexus 5672-02
Brocade 6510-1 Brocade 6510-2
HP 3PAR StoreServ 7400 2-Node
HP BladeSystem c7000
With
Virtual Connect FlexFabric-20/40 F8
Module
vPC101 vPC101
vPC102vPC102
MGMT
vPC Peer Link
FC
Ethernet

vSphere 5.5 with HP OneView, 3PAR StoreServ 7400, Cisco Nexus 5600 and Brocade 6510 Deployment Guide
Page 6
choose Brocade because of its leadership position in data center Fibre Channel fabric market. Meanwhile, HP OneView has built-in integration with Brocade Network Advisor to automatically provision SAN fabric for automatic zoning between servers and Fibre Channel storage array. HP OneView and Virtual Connect module can also work with Cisco MDS FC switches.
Server infrastructure management is provided by HP OneView software. HP OneView is HP’s converged infrastructure platform managing server provisioning, monitoring, and LAN/SAN networking configuration tasks.
HP OneView integrates functions of all traditional HP management software such as Onboard Administrator, Virtual Connect Manager, Virtual Connect Enterprise Manager and Insight Control software. Beyond it, it also has built-in Brocade SAN Fabric as well as HP 3PAR StoreServ storage provisioning integration.
We also tested OneView for vCenter plugin and Insight Control Server Provisioning to demonstrate ease of management for HP server provisioning and monitoring through VMware vCenter.

vSphere 5.5 with HP OneView, 3PAR StoreServ 7400, Cisco Nexus 5600 and Brocade 6510 Deployment Guide
Page 7
Networking and Storage Switching Connectivity
Cisco Nexus 5672UP Provisioning
The two Nexus 5672 UP switches are set up as vPC cluster. When deploying Virtual Connect with Nexus switches vPC technology, typically one Virtual Connect module will have one link connecting to switch-1 and another link connecting to switch-2. On Switch side, users should configure one vPC port-channel on both switches for the vPC switches communicating with this Virtual Connect module. Users should follow the same above cabling and configuration guidelines for the second Virtual Connect module. In summary, each Nexus switch should have two vPC port-channels, the first one is for communication with the first virtual connect module and the second one is for communication with the second virtual connect module. In our testing,
Eth1/2 on both Nexus 5672 switches are connected with the first VC FF-20/40 F8 module in I/O bay 3 and the two Eth1/2 are bundled under vPC port-channel 101.
Eth1/3 on both Nexus 5672 switches are connected with the second VC FF-20/40 F8 module in I/O bay 4 and the two Eth1/3 are bundled under vPC port-channel 102.
Note: The most common mistakes when configuring Virtual Connect with Nexus vPC are a) not following the above cabling guidelines and b) try to config one port-channel bundling four links together across Nexus and Virtual Connect. Virtual Connect does NOT support LACP across two modules so two vPC port-channels should be created.
Users can verify cabling between Virtual Connect and Nexus by using “show lldp neighbor” command. The following CLI captures verified the first VC FF-20/40 F8 module (with S/N: 7C94220018 in I/O Bay 3) is connecting its X5 port to Nexus 5672-01 Eth1/2 and its X6 port to Nexus 5672-02 Eth1/2. The second VC FF-20/40 F8 module (with 7C941201CR in I/O Bay 4) is connecting its X5 port to Nexus 5601 Eth 1/3 and its X6 port to Nexus 5672-02 Eth1/3.
Nexus 5672-01 Nexus 5672-02
vPC101 vPC101
vPC102 vPC102
vPC Peer Link
Ethernet
Eth1/2 Eth1/2
X5 X6
Eth1/3 Eth1/3
X5 X6

vSphere 5.5 with HP OneView, 3PAR StoreServ 7400, Cisco Nexus 5600 and Brocade 6510 Deployment Guide
Page 8
DIA-5672-01# show lldp neighbors
Device ID Local Intf Hold-time Capability Port ID
...
VC2040F8-7C94220018 SERIAL NO:7C94220018 BAY:3Eth1/2 120 X5
VC2040F8-7C941201CR SERIAL NO:7C941201CR BAY:4Eth1/3 120 X5
...
DIA-5672-02# show lldp neigh
Device ID Local Intf Hold-time Capability Port ID
...
VC2040F8-7C94220018 SERIAL NO:7C94220018 BAY:3Eth1/2 120 X6
VC2040F8-7C941201CR SERIAL NO:7C941201CR BAY:4Eth1/3 120 X6
...
When configuring Nexus port VLAN trunking with HP Virtual Connect modules, there are several things to note:
Treat virtual connect ports as regular host trunk ports. Virtual Connect does NOT use STP to communicate with upstream switches. For control signaling, Virtual Connect only uses standard LLDP and LACP with upstream switches for neighbor discovery and port bundling.
Typically users will configure trunk ports on Nexus switch when connecting with Virtual Connect in the context of hypervisor environment.
Users should config STP edge port trunk for ports connecting with Virtual Connect. This is to prevent switches STP blocking Virtual Connect uplinks for up to 30 seconds upon its connectivity restoration in the event of module upgrade and link failure.
Optionally, one VLAN could be selected as native VLAN for the trunk but OneView Uplink configuration should also mark this VLAN as native.
Optionally, users can enable BPDU guard under the interfaces or enable them as global default setting to safeguard switching domain from any devices in the server edge.
The following capture shows the vPC port-channel 101 configuration on both Nexus 5672 switches to connect with the first Virtual Connect Module.
DIA-5672-01# show run int po101 membership
interface port-channel101
switchport mode trunk
switchport trunk allowed vlan 160-164
spanning-tree port type edge trunk
spanning-tree bpduguard enable
speed 10000
vpc 101
interface Ethernet1/2
switchport mode trunk
switchport trunk allowed vlan 160-164
channel-group 101 mode active
DIA-5672-02# show run int po101 membership
interface port-channel101
switchport mode trunk
switchport trunk allowed vlan 160-164
spanning-tree port type edge trunk
spanning-tree bpduguard enable
speed 10000
vpc 101
interface Ethernet1/2
switchport mode trunk
switchport trunk allowed vlan 160-164
channel-group 101 mode active

vSphere 5.5 with HP OneView, 3PAR StoreServ 7400, Cisco Nexus 5600 and Brocade 6510 Deployment Guide
Page 9
The following capture shows the vPC port-channel 102 configuration on both Nexus 5672 switches to connect with the second Virtual Connect Module.
DIA-5672-01# show run int po102 membership
interface port-channel102
switchport mode trunk
switchport trunk allowed vlan 160-164
spanning-tree port type edge trunk
spanning-tree bpduguard enable
speed 10000
vpc 102
interface Ethernet1/3
switchport mode trunk
switchport trunk allowed vlan 160-164
channel-group 102 mode active
DIA-5672-02# show run int po102 membership
interface port-channel102
switchport mode trunk
switchport trunk allowed vlan 160-164
spanning-tree port type edge trunk
spanning-tree bpduguard enable
speed 10000
vpc 102
interface Ethernet1/3
switchport mode trunk
switchport trunk allowed vlan 160-164
channel-group 102 mode active
The following capture shows the vPC status on both nexus 5672 switches.
DIA-5672-01# show vpc
...
vPC Peer-link status
---------------------------------------------------------------------
id Port Status Active vlans
-- ---- ------ --------------------------------------------------
1 Po1 up 1,40,160-164
vPC status
----------------------------------------------------------------------------
id Port Status Consistency Reason Active vlans
------ ----------- ------ ----------- -------------------------- -----------
101 Po101 up success success 160-164
102 Po102 up success success 160-164
...
DIA-5672-02# show vpc
...
vPC Peer-link status
---------------------------------------------------------------------
id Port Status Active vlans
-- ---- ------ --------------------------------------------------
1 Po1 up 1,40,160-164
vPC status
----------------------------------------------------------------------------
id Port Status Consistency Reason Active vlans
------ ----------- ------ ----------- -------------------------- -----------
101 Po101 up success success 160-164

vSphere 5.5 with HP OneView, 3PAR StoreServ 7400, Cisco Nexus 5600 and Brocade 6510 Deployment Guide
Page 10
102 Po102 up success success 160-164
...
The following capture verifies the switches received 0 BPDU packets from Virtual Connect.
DIA-5672-01# show spanning-tree interface port-channel 101 detail
Port 4196 (port-channel101, vPC) of VLAN0160 is designated forwarding
Port path cost 1, Port priority 128, Port Identifier 128.4196
Designated root has priority 24736, address 002a.6a13.c3c1
Designated bridge has priority 61600, address 002a.6ae0.a601
Designated port id is 128.4196, designated path cost 2
Timers: message age 0, forward delay 0, hold 0
Number of transitions to forwarding state: 2
The port type is edge by port type edge trunk configuration
Link type is point-to-point by default
Bpdu guard is enabled
BPDU: sent 66545, received 0
...
Although this section focuses on Cisco Nexus configuration, it’s import for the network team to work with server team to verify connectivity so we’d like to show some OneView captures so that users can quickly relate information between Nexus and Virtual Connect uplink ports. We’ll cover detailed OneView setup in the later section.
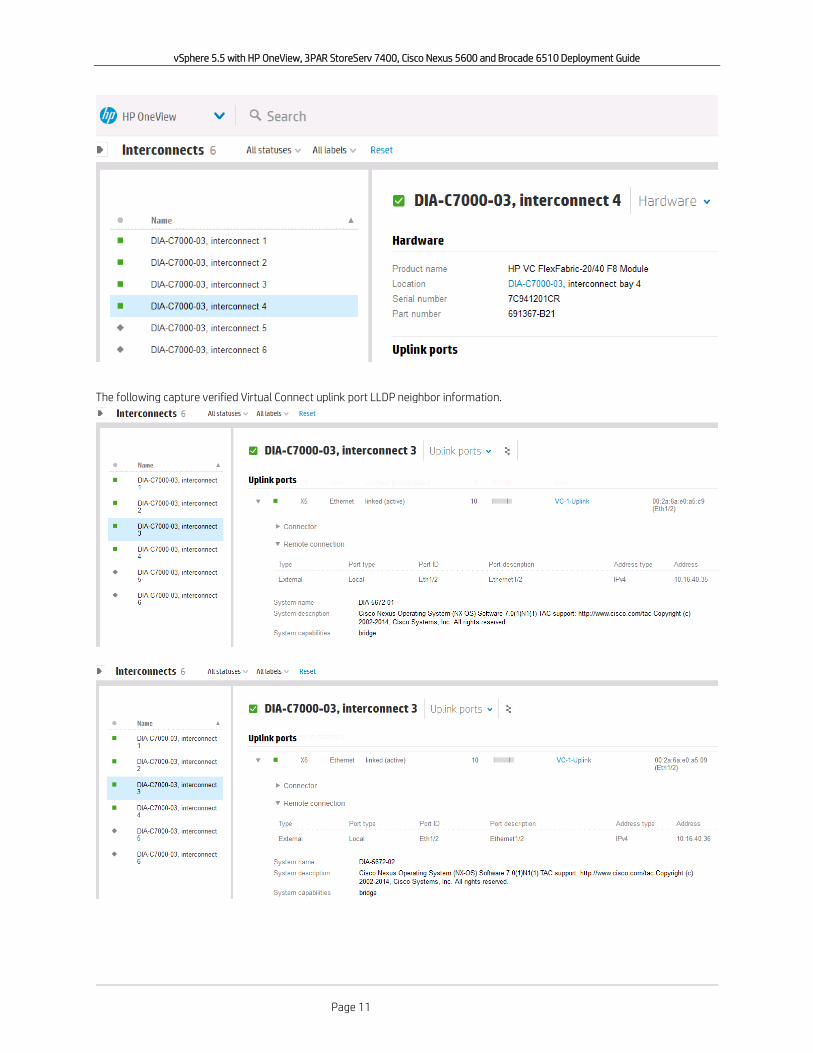
Users can verify Virtual Connect physical connectivity to Nexus switches in OneView “Interconnect” section. The following captures verified module serial number.
vSphere 5.5 with HP OneView, 3PAR StoreServ 7400, Cisco Nexus 5600 and Brocade 6510 Deployment Guide
Page 11
The following capture verified Virtual Connect uplink port LLDP neighbor information.

vSphere 5.5 with HP OneView, 3PAR StoreServ 7400, Cisco Nexus 5600 and Brocade 6510 Deployment Guide
Page 12
The following capture shows the first VC FF-20/40 F8 module LACP uplink configuration corresponding to vPC port-channel 101 on both switches.

vSphere 5.5 with HP OneView, 3PAR StoreServ 7400, Cisco Nexus 5600 and Brocade 6510 Deployment Guide
Page 13
The following capture shows the second VC FF-20/40 F8 module LACP uplink configuration corresponding to vPC port-channel 102 on both switches.

vSphere 5.5 with HP OneView, 3PAR StoreServ 7400, Cisco Nexus 5600 and Brocade 6510 Deployment Guide
Page 14

vSphere 5.5 with HP OneView, 3PAR StoreServ 7400, Cisco Nexus 5600 and Brocade 6510 Deployment Guide
Page 15
Brocade 6510 Provisioning
SAN Fabric consists of a couple of Brocade 6510 switches running Fabric OS. On HP VC FF-20/40 F8 modules, X1 and X2 for each module are configured as native FC ports with 8G FC transceivers plugged in. The first VC module is connected with 6510-1 switch for SAN Fabric-A access. The second VC module is connected with 6510-2 switch for SAN Fabric-B access. 3PAR 7400 port 0:2:3(Node1:Slot2:Port3) and 1:2:3(Node2:Slot2:Port3) are connected with 6510-1 for SAN Fabric-A access while port 0:2:4 and 1:2:4 are connected with 6510-2 for SAN Fabric-B access.
The above 3PAR mirrored cabling between 7400 paired nodes can support 3PAR Persistent Ports feature, which can provide transparent traffic switch over to server workload upon the node failure/upgrade.
SAN Fabric switches need to provision the following tasks:
Turn on NPIV for ports connecting with Virtual Connect and 3PAR 7400
Optionally set up zone alias
Zoning manually or automatically (through Brocade Network Advisor integration with OneView)
Brocade 6510-1 Brocade 6510-2
HP 3PAR StoreServ 7400 2-NodeFC
X1 X2 X1 X2
0 1
2 3
0 1
2 3
0:2:3 0:2:4
1:2:4 1:2:3

vSphere 5.5 with HP OneView, 3PAR StoreServ 7400, Cisco Nexus 5600 and Brocade 6510 Deployment Guide
Page 16
NPIV Configuration
On the Brocade 300, 5100, 5300, 6510, and 8000 switches, the Brocade 5410, 5424, 5450, 5460, 5470, and 5480 embedded switches, Brocade DCX, DCX-4S, and DCX 8510 enterprise-class platforms, and the FA4-18 blade, NPIV is enabled for every port.
DIA-BSAN-01:FID3:admin> portcfgshow
Ports of Slot 0 0 1 2 3 4 5 6 7 8 9 10 11 12 13 14 15
----------------------+---+---+---+---+-----+---+---+---+-----+---+---+---+-----+---+---+---
Octet Speed Combo 1 1 1 1 1 1 1 1 1 1 1 1 1 1 1 1
Speed AN AN AN AN AN AN AN AN AN AN AN AN AN AN AN AN
AL_PA Offset 13 .. .. .. .. .. .. .. .. .. .. .. .. .. .. .. ..
Trunk Port ON ON ON ON ON ON ON ON ON ON ON ON ON ON ON ON
Long Distance .. .. .. .. .. .. .. .. .. .. .. .. .. .. .. ..
VC Link Init .. .. .. .. .. .. .. .. .. .. .. .. .. .. .. ..
Locked L_Port .. .. .. .. .. .. .. .. .. .. .. .. .. .. .. ..
Locked G_Port ON .. .. .. .. .. .. .. .. .. .. .. .. .. .. ..
Disabled E_Port .. .. .. .. .. .. .. .. .. .. .. .. .. .. .. ..
Locked E_Port .. .. .. .. .. .. .. .. .. .. .. .. .. .. .. ..
ISL R_RDY Mode .. .. .. .. .. .. .. .. .. .. .. .. .. .. .. ..
RSCN Suppressed .. .. .. .. .. .. .. .. .. .. .. .. .. .. .. ..
Persistent Disable .. .. .. .. .. .. .. .. .. .. .. .. .. .. .. ..
LOS TOV enable .. .. .. .. .. .. .. .. .. .. .. .. .. .. .. ..
NPIV capability ON ON ON ON ON ON ON ON ON ON ON ON ON ON ON ON
<output truncated>
To verify blade servers logged into Brocade 6510 through HP Virtual Connect using NPIV, we can user “switchshow” command to verify switch port has NPIV login, in this case one blade server logged into port 1 on 6510-1 (through the first VC FF-20/40 F8 uplink port X6).
DIA-BSAN-01:FID3:admin> switchshow
switchName: DIA-BSAN-01
switchType: 109.1
switchState: Online
switchMode: Native
switchRole: Principal
switchDomain: 1
switchId: fffc01
switchWwn: 10:00:00:27:f8:c3:ce:02
zoning: ON (SAN_A)
switchBeacon: OFF
FC Router: OFF
Allow XISL Use: OFF
LS Attributes: [FID: 3, Base Switch: No, Default Switch: Yes, Address Mode 0]
Index Port Address Media Speed State Proto
==============================================
0 0 010000 id N8 Online FC F-Port 20:00:00:11:0a:04:06:e6
1 1 010100 id N8 Online FC F-Port 1 N Port + 1 NPIV public
<output truncated>
“portshow” can verify login device WWPN information. “10:00:ce:16:0f:90:00:00” is blade server HBA port 0 address. “20:01:00:11:0a:04:06:e6” is the first VC-20/40 F8 module X6 port address.
DIA-BSAN-01:FID3:admin> portshow 1
<Output truncated>
portWwn: 20:01:00:27:f8:c3:ce:02
portWwn of device(s) connected:
10:00:ce:16:0f:90:00:00
20:01:00:11:0a:04:06:e6
<output truncated>
“portloginshow” verifies Port Identifier PID is assigned to the blade HBA for routing and zoning purpose.
DIA-BSAN-01:FID3:admin> portloginshow 1
Type PID World Wide Name credit df_sz cos
=====================================================
fe 010101 10:00:ce:16:0f:90:00:00 16 2112 c scr=0x3
fe 010100 20:01:00:11:0a:04:06:e6 16 2112 c scr=0x0

vSphere 5.5 with HP OneView, 3PAR StoreServ 7400, Cisco Nexus 5600 and Brocade 6510 Deployment Guide
Page 17
ff 010101 10:00:ce:16:0f:90:00:00 0 0 8 d_id=FFFFFC
DIA-BSAN-01:FID3:admin>
From Brocade Web Tool, we can also verify the same port login information.
The following captures are from Brocade 6510-2.
You can see the same blade server logged into port 0 on 6510-2 (through the second VC FF-20/40 F8 uplink port X5).
DIA-BSAN-02:FID128:admin> switchshow
switchName: DIA-BSAN-02
switchType: 109.1
switchState: Online
switchMode: Native
switchRole: Principal
switchDomain: 1
switchId: fffc01
switchWwn: 10:00:00:27:f8:c3:40:e2
zoning: ON (SAN_B)
switchBeacon: OFF
FC Router: OFF
Allow XISL Use: OFF
LS Attributes: [FID: 128, Base Switch: No, Default Switch: Yes, Address Mode 0]
Index Port Address Media Speed State Proto
==============================================
0 0 010000 id N8 Online FC F-Port 1 N Port + 2 NPIV public
1 1 010100 id N8 Online FC F-Port 1 N Port + 1 NPIV public
<output truncated>
“10:00:ce:16:0f:90:00:02” is blade server HBA port 1 address. “20:00:00:11:0a:04:03:81” is the second VC-20/40 F8 module X5 port address.
DIA-BSAN-02:FID128:admin> portshow 0
<output truncated>
portWwn: 20:00:00:27:f8:c3:40:e2
portWwn of device(s) connected:
10:00:ce:16:0f:90:00:1e
10:00:ce:16:0f:90:00:02
20:00:00:11:0a:04:03:81
<output truncated>

vSphere 5.5 with HP OneView, 3PAR StoreServ 7400, Cisco Nexus 5600 and Brocade 6510 Deployment Guide
Page 18
DIA-BSAN-02:FID128:admin> portloginshow 0
Type PID World Wide Name credit df_sz cos
=====================================================
fe 010012 10:00:ce:16:0f:90:00:1e 16 2112 c scr=0x3
fe 010011 10:00:ce:16:0f:90:00:02 16 2112 c scr=0x3
fe 010000 20:00:00:11:0a:04:03:81 16 2112 c scr=0x0
ff 010012 10:00:ce:16:0f:90:00:1e 0 0 8 d_id=FFFFFC
ff 010011 10:00:ce:16:0f:90:00:02 0 0 8 d_id=FFFFFC
From Brocade Web Tool, we can also verify port login information.
Although this section is focusing on the Brocade configuration, we are attaching some screen captures from OneView server side and 3PAR storage side so you can easily map out ports/PWWNs across fabric. Detailed OneView and 3PAR configurations will be discussed in the following sections.
The following capture shows two VC FF-20/40 F8 modules uplink connectivity. The very right column is VC module uplink port PWWN and the column to the left is logged-in Brocade switch NWWN (verified by “switchshow” command on Brocade).

vSphere 5.5 with HP OneView, 3PAR StoreServ 7400, Cisco Nexus 5600 and Brocade 6510 Deployment Guide
Page 19
The following capture shows the blade server HBA 0 and 1 PWWN/NWWN.
3PAR port PWWN addresses can be verified through 3PAR CLI or GUI Management Console.
DIA-3PAR-01 cli% showport | grep 0:2:3 1:2:3 0:2:4 1:2:4
N:S:P Mode State ----Node_WWN---- -Port_WWN/HW_Addr- Type Protocol Label Partner FailoverState
0:2:3 target ready 2FF70002AC00ADEC 20230002AC00ADEC host FC - 1:2:3 none
0:2:4 target ready 2FF70002AC00ADEC 20240002AC00ADEC host FC - 1:2:4 none

vSphere 5.5 with HP OneView, 3PAR StoreServ 7400, Cisco Nexus 5600 and Brocade 6510 Deployment Guide
Page 20
1:2:3 target ready 2FF70002AC00ADEC 21230002AC00ADEC host FC - 0:2:3 none
1:2:4 target ready 2FF70002AC00ADEC 21240002AC00ADEC host FC - 0:2:4 none
Zone Alias Configuration
After verifying all connectivity, we can optionally create alias using Brocade Web Tool or CLI for zoning in the next step. The following capture verifies alias configuration for both switches.
DIA-BSAN-01:FID3:admin> alishow
<output truncated>
alias: HP_3PAR_Port_023
20:23:00:02:ac:00:ad:ec
alias: HP_3PAR_Port_123
21:23:00:02:ac:00:ad:ec
alias: HP_C7K_03_Blade4_Mezz1_A
10:00:ce:16:0f:90:00:00
<output truncated>
DIA-BSAN-02:FID128:admin> alishow
<output truncated>
alias: HP_3PAR_Port_024
20:24:00:02:ac:00:ad:ec
alias: HP_3PAR_Port_124
21:24:00:02:ac:00:ad:ec
alias: HP_C7K_03_Blade4_Mezz1_B
10:00:ce:16:0f:90:00:02
<output truncated>
Zoning configuration
3PAR best practice prefers one to one zoning between server initiator and 3PAR target so inside each fabric, we’ll create two zones. The first one is from server HBA to the first 3PAR port and the second is from the same server HBA to the second 3PAR port in this fabric.
The following shows the effective zone configuration from CLI and GUI.
DIA-BSAN-01:FID3:admin> zoneshow
<output truncated>
Effective configuration:
zone: Blade4_3PAR_Node0
20:23:00:02:ac:00:ad:ec
10:00:ce:16:0f:90:00:00
zone: Blade4_3PAR_Node1
21:23:00:02:ac:00:ad:ec
10:00:ce:16:0f:90:00:00
<output truncated>
DIA-BSAN-02:FID128:admin> zoneshow
<output truncated>
Effective configuration:
zone: Blade4_3PAR_Node0_FabricB
20:24:00:02:ac:00:ad:ec
10:00:ce:16:0f:90:00:02
zone: Blade4_3PAR_Node1_FabricB
21:24:00:02:ac:00:ad:ec
10:00:ce:16:0f:90:00:02

vSphere 5.5 with HP OneView, 3PAR StoreServ 7400, Cisco Nexus 5600 and Brocade 6510 Deployment Guide
Page 21

vSphere 5.5 with HP OneView, 3PAR StoreServ 7400, Cisco Nexus 5600 and Brocade 6510 Deployment Guide
Page 22
Server Infrastructure
HP BladeSystem c7000 enclosure hosts VMware hosts. Server infrastructure management is provided by HP OneView software. HP OneView is HP converged infrastructure platform managing server provisioning, monitoring, and LAN/SAN networking configuration tasks.
HP OneView integrates functions of all traditional HP management software such as Onboard Administrator, Virtual Connect Manager, Virtual Connect Enterprise Manager and Insight Control software.
First released in September, 2013, OneView version tested in the setup was 1.10.
OneView software is packaged as VMware virtual appliance ova format. Users can download software at http://www.hp.com/go/oneview. Detailed HP OneView installation and initial setup procedure are discussed in HP OneView 1.10 Deployment and Management Guide.
OneView Sample Initial Configuration (Using OneView Simulator)
The following sections will help users to walk-through a typical OneView setup scenario starting from importing a HP BladeSystem C7000 chassis to complete provisioning of a server profile.
Note: The following screens were captured using OneView simulator with Virtual Connect FlexFabric 10Gb/24-port modules where VLAN 125 was MGMT vlan, 160 was vMotion and 161 was NFS. In this white paper, VLAN 160 is MGMT where VLAN 162 is vMotion. Corresponding OneView final configuration for this paper matching Nexus and Brocade will be shown in the following section.
Initial Login
Upon finishing the OneView initial installation, users should be able to browse its address and login. The address was set up during virtual machine installation process.
After login using the username/password set up during the installation process, users will be presented with default dashboard view. The dashboard will show zero for all entries upon initial login.

vSphere 5.5 with HP OneView, 3PAR StoreServ 7400, Cisco Nexus 5600 and Brocade 6510 Deployment Guide
Page 23
The next step naturally is importing BladeSystem c7000 enclosures so users can access server hardware and then define server profile for server LAN/SAN/BIOS settings.
In order to import a c7000 enclosure, users have to create an “Enclosure Group” first. OneView uses the concept of “Enclosure Group” to logically group all c7000 enclosures with the same I/O modules configuration. Inside “Enclosure Group”, “Logical Interconnect Group” specifically defines these I/O module layout and configuration from a template perspective. Template settings for a “Logical Interconnect Group” include VLANs and SAN fabric inside Virtual Connect modules, Virtual Connect uplink port trunk allowed vlan configuration and physical ports assignment for the trunks.
From the configuration steps perspective, users need to create VLAN, SAN fabrics inside Virtual Connect module to be ready for “Logical Interconnect Group” configuration. After successful creation of “Logical Interconnect Group”, “Enclosure Group” can then be defined and ready for importing a c7000 enclosure. Attempting to create “Logical Interconnect Group” without VLAN and SAN fabric defined will fail with the error that no Ethernet networks (vlans) are included in “Logical Interconnect Group”.
Create Ethernet Networks
Select “Networks” menu from top down list
Select “Create Network”

vSphere 5.5 with HP OneView, 3PAR StoreServ 7400, Cisco Nexus 5600 and Brocade 6510 Deployment Guide
Page 24
Type in network name. The suffix “-1” was chosen because this network will be assigned to Virtual Connect Module in I/O bay 1. The suffix string can be anything easier to identify vlans on different Virtual Connect Module.
Select Type as “Ethernet” to have the network defined as an internal Ethernet vlan. “Fibre Channel” option will be used later when defining Virtual Connect internal SAN fabric.
Select “Tagged” as vlan type so it can be used as one of vlans in “Uplink Set” contained in “Logical Interconnect Group” or “Logical Interconnect”. Even though it’s marked as “Tagged” here, users will have the option to set the vlan as “native” in “Logical Interconnect Group” or “Logical interconnect”. In server downlinks, users can assign the single network to any server connect ion and the network will be “untagged”. Multiple networks can be assigned to a single server connection using “Network Set” and within “Network Set”, one of networks can be selected as “Untagged”. Other VLAN types like “Untagged” or “Tunnel”
Type in “125” as vlan ID for management vlan.
Leave “Purpose” as default “General”. This field is for some information correlation with HP OneView for vCenter. It has no operation impact or significance for OneView operation.
Leave “Preferred bandwidth” as default 2.5Gbs. This parameter will preset the minimum guaranteed bandwidth value when this network is assigned to server NIC through server profile later. This value will only take effect when server is having congestion when sending traffic to Virtual Connect module.
Leave “Maximum bandwidth” as default 10Gbs. If you have Virtual Connect Flexfabric-20/40 F8 and 20G adapters on servers, you can set this value to 20Gb. This parameter will preset the maximum allowed bandwidth value when this network is assigned to server NIC through server profile later.
Leave “Smart Link” as checked by default so Virtual Connect can deactivate server downlinks when its uplinks failed. This will ensure server NIC teaming/bonding drive correctly failover to alternative path.
Leave “Private Network” as unchecked by default. This option will block blade servers to communicate with each other on the same network when enabled.

vSphere 5.5 with HP OneView, 3PAR StoreServ 7400, Cisco Nexus 5600 and Brocade 6510 Deployment Guide
Page 25
Click “Create” button to finish creation of the network and back to overview view or “Create+” button if users want to create other networks. Create all other required Ethernet networks as above
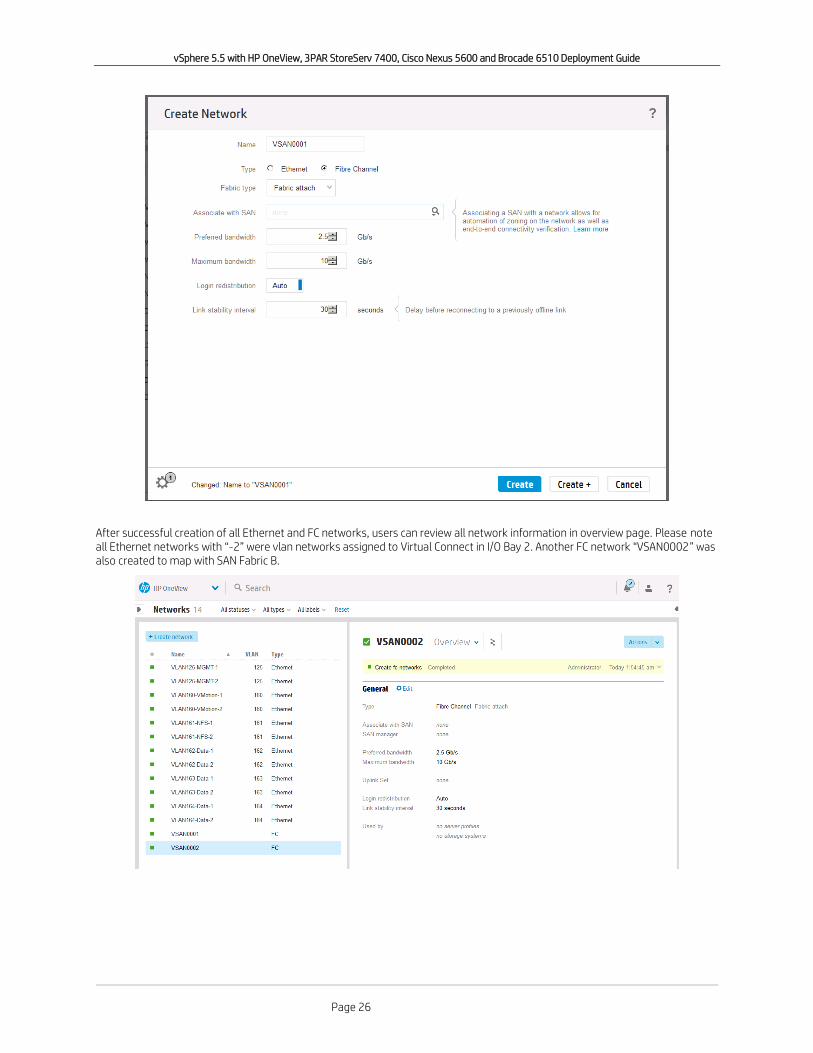
After successful creation of Ethernet networks, users can continue to create FC networks as below if Fibre Channel will be used.
Type in a network name corresponding to SAN Fabric A.
Select “Fibre Channel” as network type.
Leave Fabric Type as “Fabric Attach” by default. The other option “Direct Attach” is for Virtual Connect uplink FC ports directly connect with HP 3PAR storage array.
Leave “Associate with SAN” as blank by default. This field is used when OneView is configured with Brocade BNA integration for SAN fabric provision automation. The discussion is out of scope of this white paper.
Leave all other fields as default and click “Create” or “Create+” button.
vSphere 5.5 with HP OneView, 3PAR StoreServ 7400, Cisco Nexus 5600 and Brocade 6510 Deployment Guide
Page 26
After successful creation of all Ethernet and FC networks, users can review all network information in overview page. Please note all Ethernet networks with “-2” were vlan networks assigned to Virtual Connect in I/O Bay 2. Another FC network “VSAN0002” was also created to map with SAN Fabric B.

vSphere 5.5 with HP OneView, 3PAR StoreServ 7400, Cisco Nexus 5600 and Brocade 6510 Deployment Guide
Page 27
Create Network Set
The next optional step is to create “Network Sets”. “Network Sets” concept is strictly for Virtual Connect server downlinks. The use case will be to patch multiple Ethernet networks over a single server profile connection. Inside “Network Sets”, one network can be optionally set to “untagged” to match any server vlans requiring untagged packets like PXE network.
Select “Network Sets” from top down menu.
Select “Create network set”.
Type in a network set name and click “Add networks”
In VLAN selection window, users can filter vlan by type in “-1” string, this will show only Ethernet networks with “-1” in the name, Use “CTRL” or “SHIFT” to select all networks assigned to Virtual Connect module 1. These networks will be patched together using this “Network Set” towards server connections mapping to Virtual Connect module 1 later during server profile creation.

vSphere 5.5 with HP OneView, 3PAR StoreServ 7400, Cisco Nexus 5600 and Brocade 6510 Deployment Guide
Page 28
Leave “Preferred bandwidth” as default 2.5Gbs. This parameter will preset the minimum guaranteed bandwidth value when this network set is assigned to server NIC through server profile later. This value will only take effect when server is having congestion when sending traffic to Virtual Connect module.
Leave “Maximum bandwidth” as default 10Gbs. If you have Virtual Connect Flexfabric-20/40 F8 and 20G adapters on servers, you can set this value to 20Gb. This parameter will preset the maximum allowed bandwidth value when this network set is assigned to server NIC through server profile later.
Click “Add” to confirm adding networks to the network set and back to overview view.
Optionally, users can set one network as “Untagged”. VLAN125-MGMT-1 was set as “Untagged” for VMware management network and PXE booting.

vSphere 5.5 with HP OneView, 3PAR StoreServ 7400, Cisco Nexus 5600 and Brocade 6510 Deployment Guide
Page 29
Create another network set as below to include all networks assigned to Virtual Connect module 2.

vSphere 5.5 with HP OneView, 3PAR StoreServ 7400, Cisco Nexus 5600 and Brocade 6510 Deployment Guide
Page 30
Review both network sets created.
Create Logical Interconnect Group
With all Ethernet networks/network sets and FC networks created, users are ready to create Logical Interconnect Groups. We’ll define two uplink trunk template, one for VC module in I/O bay 1 and the other will be for VC module in I/O Bay 2.
Select “Logical Interconnect Groups” from top down list.
Select “Create Logical Interconnect Group”
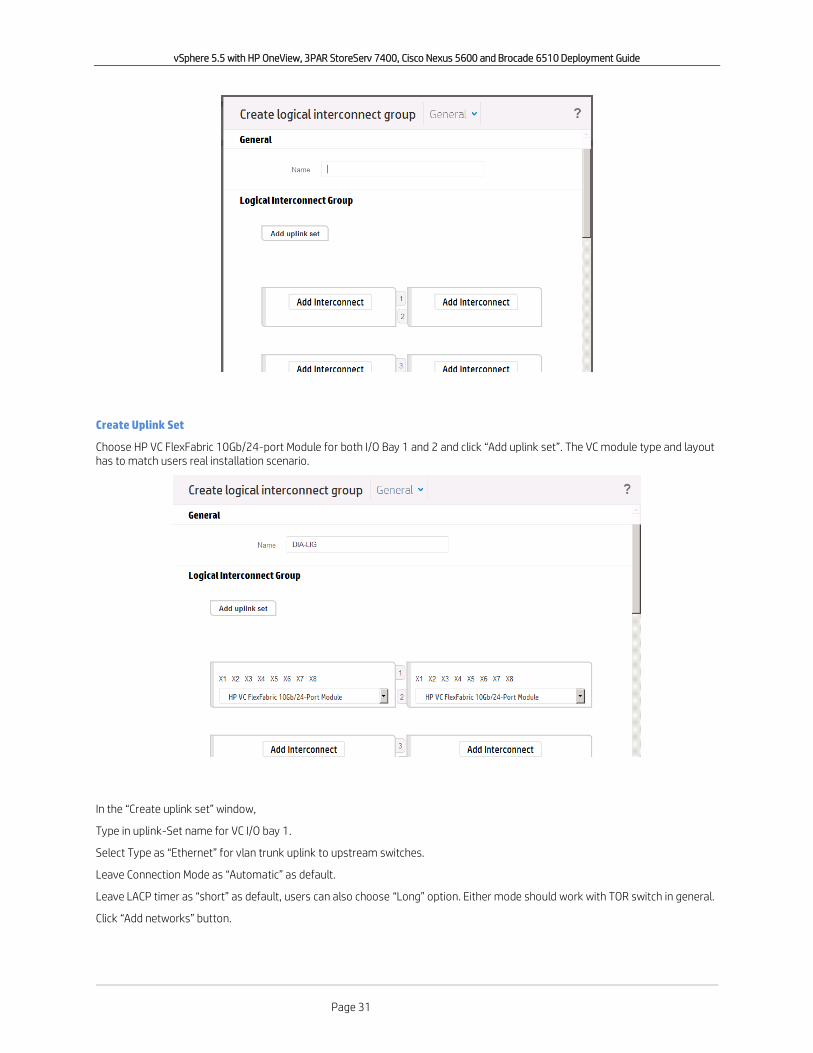
Type in LIG name and select “Add Interconnect” for I/O bay 1.
vSphere 5.5 with HP OneView, 3PAR StoreServ 7400, Cisco Nexus 5600 and Brocade 6510 Deployment Guide
Page 31
Create Uplink Set
Choose HP VC FlexFabric 10Gb/24-port Module for both I/O Bay 1 and 2 and click “Add uplink set”. The VC module type and layout has to match users real installation scenario.
In the “Create uplink set” window,
Type in uplink-Set name for VC I/O bay 1.
Select Type as “Ethernet” for vlan trunk uplink to upstream switches.
Leave Connection Mode as “Automatic” as default.
Leave LACP timer as “short” as default, users can also choose “Long” option. Either mode should work with TOR switch in general.
Click “Add networks” button.

vSphere 5.5 with HP OneView, 3PAR StoreServ 7400, Cisco Nexus 5600 and Brocade 6510 Deployment Guide
Page 32
Use searching with filter string of “-1” to filter all vlans assigned to VC module 1, use CTRL or SHIFT to multi-select the networks and click “Add” button

vSphere 5.5 with HP OneView, 3PAR StoreServ 7400, Cisco Nexus 5600 and Brocade 6510 Deployment Guide
Page 33
Review all networks added and optionally configure one network as “Native”. If a native vlan is needed, the native vlan has to match with upstream switch native vlan setting.
Click “Add uplink ports” button.
Use CTRL or SHIFT to multi-select all physical ports on VC module 1 assigned to this uplink set, VC module 1 port X5 and X6 were selected in this case.

vSphere 5.5 with HP OneView, 3PAR StoreServ 7400, Cisco Nexus 5600 and Brocade 6510 Deployment Guide
Page 34
Review all networks inside the uplink set and all ports allocated and click “Create” button.
Follow the same procedure to create another uplink set for VC module 2 and select all networks with “-2” suffix and allocated VC module 2 port X5 and X6.
vSphere 5.5 with HP OneView, 3PAR StoreServ 7400, Cisco Nexus 5600 and Brocade 6510 Deployment Guide
Page 35
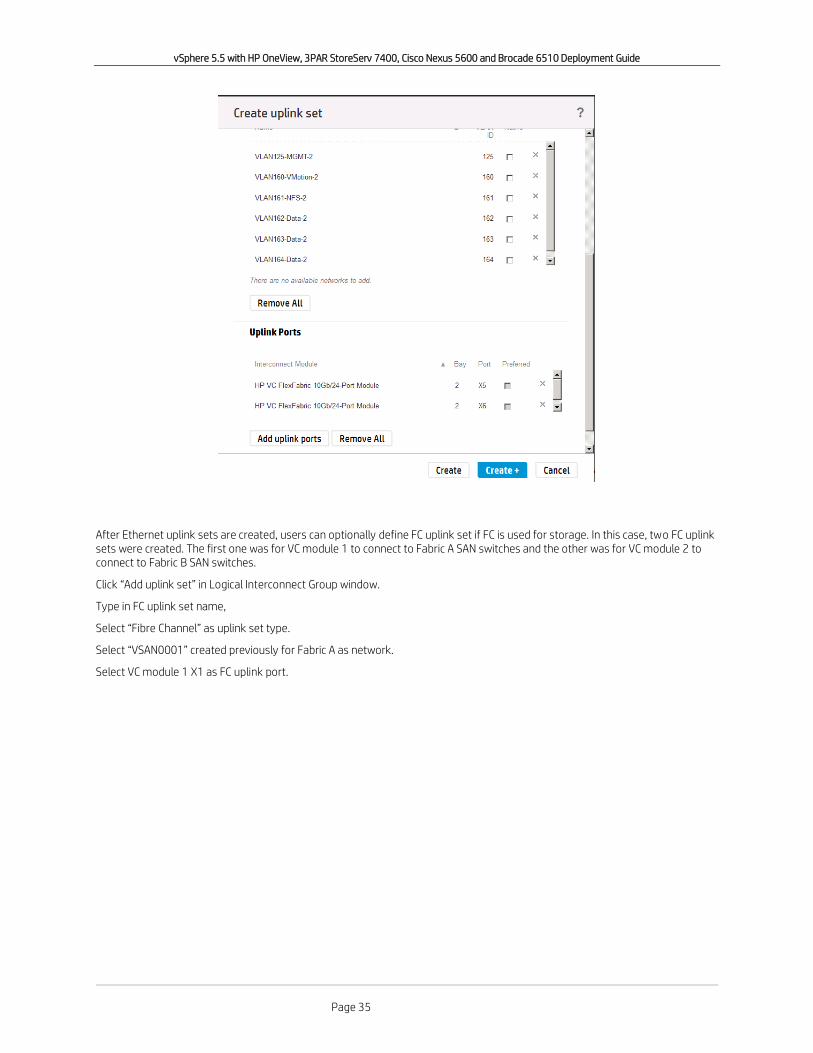
After Ethernet uplink sets are created, users can optionally define FC uplink set if FC is used for storage. In this case, two FC uplink sets were created. The first one was for VC module 1 to connect to Fabric A SAN switches and the other was for VC module 2 to connect to Fabric B SAN switches.
Click “Add uplink set” in Logical Interconnect Group window.
Type in FC uplink set name,
Select “Fibre Channel” as uplink set type.
Select “VSAN0001” created previously for Fabric A as network.
Select VC module 1 X1 as FC uplink port.

vSphere 5.5 with HP OneView, 3PAR StoreServ 7400, Cisco Nexus 5600 and Brocade 6510 Deployment Guide
Page 36
Follow the same procedure to create the second FC uplink set for SAN Fabric B and select VSAN0002 as FC network, choose VC module 2 X1 as physical port.

vSphere 5.5 with HP OneView, 3PAR StoreServ 7400, Cisco Nexus 5600 and Brocade 6510 Deployment Guide
Page 37
Review Logical Interconnect Group configuration and click Create.

vSphere 5.5 with HP OneView, 3PAR StoreServ 7400, Cisco Nexus 5600 and Brocade 6510 Deployment Guide
Page 38
Review LIG just created.
Create Enclosure Group
With the Logical Interconnect Group created, users can go ahead to create Enclosure Group to include this logical interconnect group.
Select “Enclosure Groups” from top down list.
Select “Create enclosure group”

vSphere 5.5 with HP OneView, 3PAR StoreServ 7400, Cisco Nexus 5600 and Brocade 6510 Deployment Guide
Page 39
Type in enclosure group name and select the logical interconnect group we just created and click “Create” button.
Review enclosure group just created.
Now OneView is ready to import enclosures with enclosure group just created.
Select “Enclosures” from top down list

vSphere 5.5 with HP OneView, 3PAR StoreServ 7400, Cisco Nexus 5600 and Brocade 6510 Deployment Guide
Page 40
Add Enclosure
Select “Add enclosure”.
In “Add Enclosure” windows,
Type in BladeSystem c7000 OA IP address or hostname, the OA IP should be set during enclosure initial installation.
Provide OA username/password in Credentials fields.
Select enclosure group just created.
Optionally select Firmware baseline in OneView firmware repository (detailed in later section). Specify firmware SPP bundle here will upgrade OA, iLO firmware if they are older version than what’s included in SPP baseline. The option “Manage Manually” wi ll not upgrade OA, iLO versions if they meet OneView minimum required versions. However, if enclosure and blade iLO versions are below OneView requirement, OneView will still upgrade OA and iLO even when set to “Manage Manually”.
As of version 1.10, OneView will NOT upgrade Virtual Connect firmware version during enclosure import process. Users have the option to upgrade VC firmware separately after enclosure import process.
Server BIOS, CNA/HBA firmware could be upgraded when creating server profile and associate firmware baseline in the profile.
Click “Add” button

vSphere 5.5 with HP OneView, 3PAR StoreServ 7400, Cisco Nexus 5600 and Brocade 6510 Deployment Guide
Page 41
After the enclosure is imported, users should verify enclosure information. Enclosure status should be “Configured”. Some warnings may be normal behavior, for the warnings below, users can click drop arrow sign to the right and see more details and it’s concluded that no OneView license has been applied to the blades. Adding OneView license will be discussed in later sect ion.

vSphere 5.5 with HP OneView, 3PAR StoreServ 7400, Cisco Nexus 5600 and Brocade 6510 Deployment Guide
Page 42
Verify Logical Interconnect and Upgrade Virtual Connect Firmware
After importing enclosures using Enclosure Group and Logical Internet Group template, each c7000 enclosure will have a “Logical Interconnect” associated with it. The logical interconnect will have all LAN/SAN uplink configuration as we defined in logica l interconnect group template.
The difference between Logical Interconnect Group and Logical Group is that the former is a template concept while the latter is the real layer 2 configuration applied to a particular c7000 enclosure. Each c7000 enclosure will have one specific Logical Interconnect associated with it inside an enclosure group. Logical Interconnects for all c7000s will inherit the same configurations from the single Logical Interconnect Group template during enclosure import process.
However, users can choose to change Logical Interconnect settings later for a specific c7000 enclosure. In that case, the Logical Interconnect configuration will different from original Logical Interconnect Template configuration. Users will get a warning message from OneView indicating the mismatch of the two and have the option to choose “Update from Group” from LI action menu or just leave this enclosure as a different configuration as the rest of enclosures in the same group.
On the other side, in the case that users change the configuration of Logical Interconnect Group, all existing Logical Interconnects in the same enclosure group will be in the configuration mismatch status. OneView will warn the users for the status. Users should go to each enclosure Logical Interconnect and choose “Update from group” from LI action menu to acknowledge for configuration sync up from the template.
As previous noted, during enclosure import process, VC firmware will not be updated. The next step after enclosure import is to go to Logical Interconnect for this enclosure to verify its firmware and status.
Select “Logical Interconnects” from top down list.
If the Virtual Connect firmware doesn’t meet OneView minimum requirement, the Logical Interconnect will be in “Unmanaged” State. Users should select “Action” at top right corner and then select “Update firmware” to upgrade VC firmware.
In this case, VC version met the minimum required version but was below the version contained inside firmware baseline so OneView will warn users to upgrade VC firmware to the newer version.
Select “Overview” next to logical interconnect name.

vSphere 5.5 with HP OneView, 3PAR StoreServ 7400, Cisco Nexus 5600 and Brocade 6510 Deployment Guide
Page 43
Click "General" to display all Logical Interconnect information
Scroll down to “Firmware” section to verify the current VC firmware version and the version contained in the firmware baseline.

vSphere 5.5 with HP OneView, 3PAR StoreServ 7400, Cisco Nexus 5600 and Brocade 6510 Deployment Guide
Page 44
Select “Action” and then “Update Firmware”
Update window will display the default upgrade method. Accept default values and click OK.
VC firmware update will be in progress.

vSphere 5.5 with HP OneView, 3PAR StoreServ 7400, Cisco Nexus 5600 and Brocade 6510 Deployment Guide
Page 45
After VC firmware upgrade, verify firmware status
After the VC firmware is updated, verify Logical Interconnect configuration inherited and this specific enclosure uplink connectivity through logical interconnect. Select “Logical Interconnects” from top down list.
Select "View” next to logical interconnect name and select “Uplink Sets” section

vSphere 5.5 with HP OneView, 3PAR StoreServ 7400, Cisco Nexus 5600 and Brocade 6510 Deployment Guide
Page 46
Verify all network definitions inherited from Logical Interconnect Group and uplinks LACP status and Link connectivity. Verify all links status as “Linked (Active)” indicating successful LACP negotiation with upstream Cisco Nexus5500 switches running vPC. LAG ID is VC internal LACP bundle ID. “Connected to” indicates Nexus5500 port MAC address and interface number.
Verify FC uplink connectivity status as “Linked (logged in)”. “Connected to” field shows upstream FC local switch WWNN. “Port WWN” field is VC local port WWPN.

vSphere 5.5 with HP OneView, 3PAR StoreServ 7400, Cisco Nexus 5600 and Brocade 6510 Deployment Guide
Page 47
Verify Interconnect
To check information on physical counters and transceivers, users can check “Interconnects”. The difference between “Logical Interconnects” and “interconnects” is the former focus mainly on layer 2 configuration such as VLAN, vlan tagging and LACP parameters where the latter focus on low level counters like packet statistics and transceiver status.
Select “Interconnects” from top list menu.
Select Interconnect 1 which refers to VC module in I/O bay 1, users can check FC uplink port counters and traffic information.

vSphere 5.5 with HP OneView, 3PAR StoreServ 7400, Cisco Nexus 5600 and Brocade 6510 Deployment Guide
Page 48
Users can also select Ethernet uplink and downlink ports and check physical transceivers and counters.
Users can also check detailed LLDP neighbor information to show VC is connected with Nexus5500 eth1/1 interface.

vSphere 5.5 with HP OneView, 3PAR StoreServ 7400, Cisco Nexus 5600 and Brocade 6510 Deployment Guide
Page 49
After successfully configuring and verifying Virtual Connect module uplink status, users can check server hardware information and start to provision server profile.
Create Server Profile
Select “Server Hardware” from top down list.
Review all server blade information, please note “Server Profile” column is none for all server bays, which means no server hardware is associated with any server profile

vSphere 5.5 with HP OneView, 3PAR StoreServ 7400, Cisco Nexus 5600 and Brocade 6510 Deployment Guide
Page 50
After verifying server hardware, users are ready to create server profiles. OneView implements server connectivity through attaching a server profile to any given server hardware.
OneView can also create a server profile and assign to an empty server bay to pre-populate MAC and WWPN lists. Finally, OneView can create a profile and have the profile as “unassigned” status.
Select “Server profiles” in top down list.
Select “Create Profile” to create a new server profile.
Please Note: If the server profile will be applied to a server blade, the server blade needs to be powered off in order for profile assignment. Users can go to Server Hardware section and select the server blade and click “Power Off” to power down the blade .

vSphere 5.5 with HP OneView, 3PAR StoreServ 7400, Cisco Nexus 5600 and Brocade 6510 Deployment Guide
Page 51
Type in a name for server profile
Select which server bay the profile will be assigned to in “Server Hardware” field.
“Server hardware Type” and “Enclosure Group” should be populated automatically after users specify server hardware.
Leave “Affinity” field as “device bay” by default. This option controls if server profile can be applied if original server is unplugged and another server is plugged in. If the new server matches the server hardware type of the original server, the profile will be applied with device bay affinity. If the options is set to “Device bay + Server Hardware”, the profile will only be applied if the serial number of the blade matches the original blade.
Optionally set “Firmware Baseline” to any SPP package you specified, the server profile will initiate the server to upgrade to firmware specified after profile creation.
Click “Add Connections” to start specify vlan and SAN fabric for server physical NICs, CNAs and HBAs.
In “Add Connection” window, specify Device Type as Ethernet and specify VLANs over this Ethernet NIC. In this case, we’ll create two vmnics on VMware host. The first vmnic will be mapped to the first VC module and will carry all vlans created for VC module 1. The second vmnic will be mapped to the second VC module and will carry all vlans created for VC module 2.
As previously noted, OneView uses the concept of “Network Set” to carry multiple vlans on a single NIC. From the network list below, users can select only ONE network or network set. If one network is specified, this network will carry the corresponding vlan traffic untagged to and from the server. In this case, “VLAN-ALL-1” was selected to carry multiple vlans on the first NIC. This connection will be corresponding to “vmnic0” on VMware host.

vSphere 5.5 with HP OneView, 3PAR StoreServ 7400, Cisco Nexus 5600 and Brocade 6510 Deployment Guide
Page 52
Optionally users can specify which FlexNIC this connection will be used. In most cases, default “Auto” will work as required.
Leave “Requested bandwidth” as default 2.5Gbps. The value 2.5Gbps here is derived from previous “Preferred bandwidth” when creating network set “VLAN-ALL-1”. This is the minimum guaranteed bandwidth value for this network set when server is having congestion when sending traffic to Virtual Connect module. Users can optionally change the value here to overwrite previous defined “preferred bandwidth” specified in network or network set creation.
“Boot” parameter specifies if this FlexNIC is allowed to do network PXE booting. In this case, it’s changed from default “Not bootable” to “Primary” to allow PXE booting.
Click “Add+” to create this FlexNIC (vmnic0) and continue to create the 2nd FlexNIC (vmnic1).

vSphere 5.5 with HP OneView, 3PAR StoreServ 7400, Cisco Nexus 5600 and Brocade 6510 Deployment Guide
Page 53
Follow the same steps to configure the second FlexNIC and select “VLAN-ALL-2” as network set because this FlexNIC will be mapped to VC module 2.
Click “Add+” to create next FCOE/FC connection.
Select “Fibre Channel” as device type and select “VSAN0001” as FC network because the first FCOE connection will be mapped to VC Module 1 for SAN Fabric A.

vSphere 5.5 with HP OneView, 3PAR StoreServ 7400, Cisco Nexus 5600 and Brocade 6510 Deployment Guide
Page 54
Leave requested bandwidth and port as default. If users don’t require BFS, the first FCOE or FC connection configuration is completed.
In this case, this particular blade will do BFS so “Boot” field was changed from default “Not Bootable” to “Primary”. Users then need to type in storage array port WWPN connecting to SAN Fabric A and BFS LUN ID.
Click “Add+” to create second FCOE/FC connection for this server.
Follow the same steps above and specify “VSAN0002” as FC network because this FCOE connection will be mapped to second VC module for SAN Fabric B. Users then need to type in storage array port WWPN connecting to SAN Fabric B and BFS LUN ID.
Click “Add” to create second FCOE connection and back to server profile creation window.

vSphere 5.5 with HP OneView, 3PAR StoreServ 7400, Cisco Nexus 5600 and Brocade 6510 Deployment Guide
Page 55
Verify the connections just created.
Scroll down to the rest of server profile configuration. Optionally set “Local Storage” policy below.

vSphere 5.5 with HP OneView, 3PAR StoreServ 7400, Cisco Nexus 5600 and Brocade 6510 Deployment Guide
Page 56
SAN Storage is application after OneView integration with HP 3PAR storage array. In this case, we’ll not define this option.
Users can optionally to use mouse drag/drop to change boot order.
In this case, we’ll move PXE and Hard Disk boot ahead of Floppy and USB.

vSphere 5.5 with HP OneView, 3PAR StoreServ 7400, Cisco Nexus 5600 and Brocade 6510 Deployment Guide
Page 57
Optionally, users can change server BIOS settings. In this case, we’ll check the option and click “Edit BIOS settings”.
Scroll down until “Power Management Options”.

vSphere 5.5 with HP OneView, 3PAR StoreServ 7400, Cisco Nexus 5600 and Brocade 6510 Deployment Guide
Page 58
In this case, we’ll change HP Power profile from default balanced power to Maximum Performance.
Click “OK” to finish BIOS configuration.

vSphere 5.5 with HP OneView, 3PAR StoreServ 7400, Cisco Nexus 5600 and Brocade 6510 Deployment Guide
Page 59
Review server profile configuration

vSphere 5.5 with HP OneView, 3PAR StoreServ 7400, Cisco Nexus 5600 and Brocade 6510 Deployment Guide
Page 60
Optionally users can click bottom left setting button to review what has changed in the profile configuration.
After verifying configuration, click “Create” to apply the profile to the server blade.
Some settings like Firmware, BIOS and local storage policy will cause server to boot into embedded Intelligent Provisioning to configure server to match the profile configuration.

vSphere 5.5 with HP OneView, 3PAR StoreServ 7400, Cisco Nexus 5600 and Brocade 6510 Deployment Guide
Page 61
After profile is created, verify the connection status and optionally users can select Actions->Launch Control to open HP ILO remote console.
Users may get an installation message for remote console software installation or users can use Jave plug-in console.

vSphere 5.5 with HP OneView, 3PAR StoreServ 7400, Cisco Nexus 5600 and Brocade 6510 Deployment Guide
Page 62
Sample ILO remote console window will look like the following.
Users can optionally create a profile “template” using a working server profile and leave the “template” as unassigned so it can be copied into individual profile and applied to the rest of server blades.
Select a working profile and select Actions->Copy.

vSphere 5.5 with HP OneView, 3PAR StoreServ 7400, Cisco Nexus 5600 and Brocade 6510 Deployment Guide
Page 63
Give the template profile a name and select “Unassigned” for server hardware and click “Create”.
Review the server profile “template” just created.

vSphere 5.5 with HP OneView, 3PAR StoreServ 7400, Cisco Nexus 5600 and Brocade 6510 Deployment Guide
Page 64
Firmware Repository:
The HP OneView appliance ships with a default SPP that contains the necessary firmware to successfully import and manage an enclosure. It is unnecessary to upload an SPP into the appliance. Optionally you can upgrade a newer or custom version of SPP into OneView if needed.
From top level menu, select “Firmware Bundles”:
Examine the bundled SPP baseline package inside OneView appliance and select top left “Add Firmware Bundle”:
Drag and drop your SPP file into the upload window:

vSphere 5.5 with HP OneView, 3PAR StoreServ 7400, Cisco Nexus 5600 and Brocade 6510 Deployment Guide
Page 65
Upload progress will be displayed upon user confirmation. After successful import the new SPP file, users will have the option to select which SPP to use when importing or upgrading enclosure, Virtual Connect module and server firmware.
Licensing
By default, OneView installation will include 60-day trial license. During this evaluation period, HP OneView will not enable iLO Advanced features or functionality. The ILO Advanced license (trial or retail) is also required for server and enclosure power and performance monitoring.
To add OneView license, please select “Settings” from drop down menu.
Inside “Setting” view, click “Overview” link:

vSphere 5.5 with HP OneView, 3PAR StoreServ 7400, Cisco Nexus 5600 and Brocade 6510 Deployment Guide
Page 66
From the dropdown menu, scroll down and select “Licenses”:
Select “Add” to add the new OneView License.
Cut and paste license key into pop up dialog window:
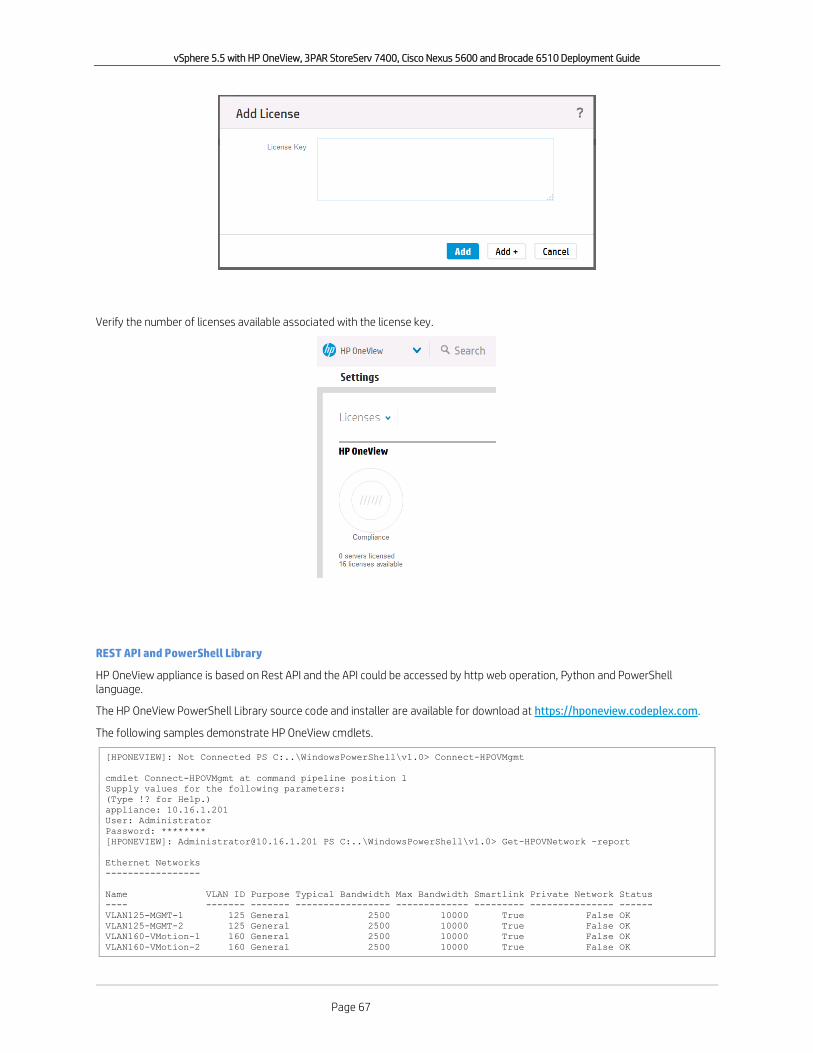
vSphere 5.5 with HP OneView, 3PAR StoreServ 7400, Cisco Nexus 5600 and Brocade 6510 Deployment Guide
Page 67
Verify the number of licenses available associated with the license key.
REST API and PowerShell Library
HP OneView appliance is based on Rest API and the API could be accessed by http web operation, Python and PowerShell language.
The HP OneView PowerShell Library source code and installer are available for download at https://hponeview.codeplex.com.
The following samples demonstrate HP OneView cmdlets.
[HPONEVIEW]: Not Connected PS C:..\WindowsPowerShell\v1.0> Connect-HPOVMgmt
cmdlet Connect-HPOVMgmt at command pipeline position 1
Supply values for the following parameters:
(Type !? for Help.)
appliance: 10.16.1.201
User: Administrator
Password: ********
[HPONEVIEW]: [email protected] PS C:..\WindowsPowerShell\v1.0> Get-HPOVNetwork -report
Ethernet Networks
-----------------
Name VLAN ID Purpose Typical Bandwidth Max Bandwidth Smartlink Private Network Status
---- ------- ------- ----------------- ------------- --------- --------------- ------
VLAN125-MGMT-1 125 General 2500 10000 True False OK
VLAN125-MGMT-2 125 General 2500 10000 True False OK
VLAN160-VMotion-1 160 General 2500 10000 True False OK
VLAN160-VMotion-2 160 General 2500 10000 True False OK

vSphere 5.5 with HP OneView, 3PAR StoreServ 7400, Cisco Nexus 5600 and Brocade 6510 Deployment Guide
Page 68
VLAN161-NFS-1 161 General 2500 10000 True False OK
VLAN161-NFS-2 161 General 2500 10000 True False OK
VLAN162-Data-1 162 General 2500 10000 True False OK
VLAN162-Data-2 162 General 2500 10000 True False OK
VLAN163-Data-1 163 General 2500 10000 True False OK
VLAN163-Data-2 163 General 2500 10000 True False OK
VLAN164-Data-1 164 General 2500 10000 True False OK
VLAN164-Data-2 164 General 2500 10000 True False OK
FC Networks
-----------
Name Fabric Type Uplink Bandwidth Link Stability Time (sec) Auto Login Redistribution Status
---- ----------- ---------------- ------------------------- ------------------------- ------
VSAN0001 FabricAttach Auto 30 True OK
VSAN0002 FabricAttach Auto 30 True OK
[HPONEVIEW]: [email protected] PS C:..\WindowsPowerShell\v1.0> gcm -Name "New-hpov*"
CommandType Name ModuleName
----------- ---- ----------
Function New-HPOVAddressRange HPOneView
Function New-HPOVBackup HPOneView
Function New-HPOVEnclosure HPOneView
Function New-HPOVEnclosureGroup HPOneView
Function New-HPOVLdap HPOneView
Function New-HPOVLdapGroup HPOneView
Function New-HPOVLdapServer HPOneView
Function New-HPOVLicense HPOneView
Function New-HPOVLogicalInterconnectGroup HPOneView
Function New-HPOVNetwork HPOneView
Function New-HPOVNetworkSet HPOneView
Function New-HPOVPowerDevice HPOneView
Function New-HPOVProfile HPOneView
Function New-HPOVProfileConnection HPOneView
Function New-HPOVResource HPOneView
Function New-HPOVRestore HPOneView
Function New-HPOVServer HPOneView
Function New-HPOVSupportDump HPOneView
Function New-HPOVUnmanagedDevice HPOneView
Function New-HPOVUplinkSet HPOneView
Function New-HPOVUser HPOneView

vSphere 5.5 with HP OneView, 3PAR StoreServ 7400, Cisco Nexus 5600 and Brocade 6510 Deployment Guide
Page 69
Virtual Connect FlexFabric-20/40 F8 Module
After going over the typical OneView set up procedures, it’s important to share more detailed information on Virtual Connect FlexFabric-20/40 F8 module.
Ports and Port Numbering
The HP Virtual Connect FlexFabric–20/40 F8 Module has 4x40G QSPF+ and 8x1/10G SFP+ Ethernet or 2/4/8GB FC interfaces as uplink ports. For the downlink ports, you have 16x10/20Gb Ethernet links towards HP BladeSystem C7000 server bays with a single downlink to a server support up to 3 FlexNICs and 1 FlexHBA or 4 FlexNICs. A FlexHBA can be configured to transport either FCOE or Accelerated iSCSI.
The 4xQSFP port numbers start with Q1.1 and end with Q4.4. If you decide to leverage a breakout cable you will have 4 10Gb ports per QSFP slot so Q1.1 through Q1.4 would be available for 10Gb. If a 40Gb QSFP is placed in Q1 then Q1.1 will appear as populated and port Q1.2-Q1.4 will be unavailable. Below is an example of how a 40Gb port would appear in OneView with the 20/40 Module.
Reset
UID Q1
HP VC FlexFabric- 20/40 F8 Module
Q2 Q3 Q4
4321 4321 4321 4321
X4X3X2X1
X8X7X6X5
L/A
PID
Paired
Paired
4 QSFP+ Ports4x40GE or 16x10GE
Q1 Q2 Q3 Q4
16 Internal 1/10/20GE Ports to Server Bays
X5 X6 X7 X8
SFP+ Paired
FlexPorts
SFP+ Paired
FlexPorts
X1 X2 X3 X4
X9
X10
2x20GE
Internal
Stacking
SFP+ FlexPorts
(1/10GE or 2/4/8G FC)
(1/10GE or 2/4/8G FC)

vSphere 5.5 with HP OneView, 3PAR StoreServ 7400, Cisco Nexus 5600 and Brocade 6510 Deployment Guide
Page 70
The 8xSFP+ port numbers start from X1 and end with X8. These ports can accommodate 1/10Gb Ethernet or 2/4/8GB FC connections. Below you can see a variety of different connections options and how they would appear in OneView include FC, Ethernet, and stacking between Virtual Connect Modules.
Ports X5-X6 and X7-X8 are called paired ports and each paired port can be set to Ethernet or Fiber Channel but mixing of both traffic types in the same paired set is not allowed. An example of a configuration that would not be allowed is putting a 10Gb Ethernet in port X7 and then trying to enable Fiber Channel on port X8. However, you could have FCOE on port X8 because it would be running at 10Gb. You cannot mix 1Gb and 10Gb on the same paired port set as well. They are paired in terms of internal clocking source but there is no performance penalty by using paired ports comparing with individual ports X1-X4.
Ports X9 and X10 are dedicated internal horizontal cross-connects which provide 2x20Gb connectivity.
Server Port/MAC/WWPN Mapping
Through the OneView Interconnect view, users can get information on how FlexFabric - 20/40 F8 Module internal downlink server ports are mapped to server CNA MAC/WWPN addresses.

vSphere 5.5 with HP OneView, 3PAR StoreServ 7400, Cisco Nexus 5600 and Brocade 6510 Deployment Guide
Page 71

vSphere 5.5 with HP OneView, 3PAR StoreServ 7400, Cisco Nexus 5600 and Brocade 6510 Deployment Guide
Page 72
OneView Final Config with Virtual Connect FlexFabric-20/40 F8 Module
After getting familiar with the general OneView setup flow and VC FF-20/40 F8 hardware, users can check the following sections for final OneView Configuration corresponding to networking, SAN Fabric and server profiles.
The following capture shows OneView LAN and SAN uplink configurations for VC FF-20/40 F8 module.
Users can focus on VC FF20/40 F8 modules in I/O bay 3 and 4 and uplink ports and definitions highlighted in colors. VC FF 10Gb/24-Port modules in I/O bay 1 and 2 are for other testings.
VC FF-20/80 F8 in I/O Bay 3:
X1, X2: 8G FC ports using “VSAN-01” FC Uplink Set to connect with Brocade 6510-1
X5, X6: 10G Ethernet ports using “VC-1-Uplink” Ethernet Uplink Set to connect with Nexus 5672-1
X7: VC vertical stacking to VC FF 10Gb/24-Port module in I/O Bay 1, a requirement if multiple VC modules inside one enclosure. Not needed if only two VC modules in one enclosure
X9, X10: 2x20G internal horizontal stacking links between VC modules.
VC FF-20/80 F8 in I/O Bay 4:
X1, X2: 8G FC ports using “VSAN-02” FC Uplink Set to connect with Brocade 6510-2
X5, X6: 10G Ethernet ports using “VC-2-Uplink” Ethernet Uplink Set to connect with Nexus 5672-2
X7: VC vertical stacking to VC FF 10Gb/24-Port module in I/O Bay 2, a requirement if multiple VC modules inside one enclosure. Not needed if only two VC modules in one enclosure
X9, X10: 2x20G internal horizontal stacking links between VC modules.
Networking Uplinks Configuration to Nexus 5672
The following captures verified module serial number so users can relate LLDP connectivity with networking team.

vSphere 5.5 with HP OneView, 3PAR StoreServ 7400, Cisco Nexus 5600 and Brocade 6510 Deployment Guide
Page 73
The following capture verified Virtual Connect uplink port LLDP neighbor information.

vSphere 5.5 with HP OneView, 3PAR StoreServ 7400, Cisco Nexus 5600 and Brocade 6510 Deployment Guide
Page 74
The following capture shows the first VC FF-20/40 F8 module LACP uplink configuration corresponding to vPC port-channel 101 on both switches.

vSphere 5.5 with HP OneView, 3PAR StoreServ 7400, Cisco Nexus 5600 and Brocade 6510 Deployment Guide
Page 75
The following capture shows the second VC FF-20/40 F8 module LACP uplink configuration corresponding to vPC port-channel 102 on both switches.

vSphere 5.5 with HP OneView, 3PAR StoreServ 7400, Cisco Nexus 5600 and Brocade 6510 Deployment Guide
Page 76
SAN Uplinks Configuration to Brocade 6510
The following capture shows two VC FF-20/40 F8 modules with uplink connectivity. The very right column is VC module uplink port PWWN and the column to the left is logged-in Brocade switch NWWN (verified by “switchshow” command on Brocade).

vSphere 5.5 with HP OneView, 3PAR StoreServ 7400, Cisco Nexus 5600 and Brocade 6510 Deployment Guide
Page 77
The following two captures show Virtual Connect internal SAN Fabric configuration.
Note: The field of “Associate with SAN’ is related with Brocade Network Advisor (BNA) and OneView integration. We’ll cover this field in more details in the later section of OneView/3PAR/BNA integration. Users can ignore this field if not using Brocade BNA integration.

vSphere 5.5 with HP OneView, 3PAR StoreServ 7400, Cisco Nexus 5600 and Brocade 6510 Deployment Guide
Page 78
The following captures display the two SAN fabric uplink configuration for Virtual Connect.

vSphere 5.5 with HP OneView, 3PAR StoreServ 7400, Cisco Nexus 5600 and Brocade 6510 Deployment Guide
Page 79
Server Downlink Network Set Configuration
The following shows two network sets definition ready to be assigned to the server downlinks.
Note: We changed Max bandwidth value from 10Gb to 20Gb as one server has HP FlexFabric 20Gb 630M adapter (Broadcom based).

vSphere 5.5 with HP OneView, 3PAR StoreServ 7400, Cisco Nexus 5600 and Brocade 6510 Deployment Guide
Page 80
Server Profile Configuration
The following capture displays the blade server profile definition for LAN and SAN connectivity. The step by step profile configuration is covered in previous initial OneView setup section.

vSphere 5.5 with HP OneView, 3PAR StoreServ 7400, Cisco Nexus 5600 and Brocade 6510 Deployment Guide
Page 81
HP 3PAR StoreServ 7400 Infrastructure Deployment
3PAR StoreServ product lines are HP flagship storage array offering ONE Architecture from midrange to high-end storage arrays.
Currently product offering includes mid-range 7200, 7400(2-Node and 4-Node), 7450 All-Flash array and high end 10400 and 10800 series. Users can manage all products using the same CLI and GUI interface.
HP 3PAR offers many advanced features for VMware virtualization including wide striping, mesh-active clustered architecture, hardware assisted support of VMware VAAI , Thin Provisioning technologies, Dynamic and Adaptive Optimization, Priority Optimization, and HP 3PAR Recovery Manager for VMware .
With latest OneView 1.10 and OneView for vCenter 7.4.1, users can manage features like volume creation and exporting in OneView and vCenter directly.
3PAR StoreServ 7400 Hardware Overview
Node Enclosure
HP 3PAR StoreServ 7400 system offer 2-node and 4-node configurations. We used 7400 2-Node system in the setup.
The HP 3PAR StoreServ 7200 and 7400 controller enclosures hold up to 24, 2.5 inch SFF SAS disk drives arranged, vertically in a single row at the front of the enclosure (numbered 0 to 23).
The following picture shows the font and back picture of 7400 2-Node configuration. The port numbers are marked for easier identification when users cable and configure the storage system.
The heart of node system is the 7000 controller node and the following picture shows the port layout details.
HP 3PAR StoreServ 7400 2-Node System (2U) Back
1
0
1
0
Disconnect all powerfor complete isolation
CAUTION
764W PCM
Disconnect all powerfor complete isolation
CAUTION
764W PCM
Disconnect all powerfor complete isolation
CAUTION
764W PCMDisconnect all powerfor complete isolation
CAUTION
764W PCMMfg
PC
I-H
BA
UID
DP
-1
DP
-2
RC
-1M
GM
T
FC
-1FC
-2
HP
3P
AR
74
00
0123 0123
Intr
0
Intr
1
1234
Mfg
PC
I-HB
A
UID
DP
-1
DP
-2
RC
-1M
GM
T
FC
-1FC
-2
HP
3P
AR
74
00
0 1 2 30 1 2 3
Intr 0
Intr 1
1 2 3 4
0:2:1 0:2:2 0:2:3 0:2:4
0:3:10:0:1 0:0:2
0:1:1
0:1:2
1:2:1 1:2:2 1:2:3 1:2:4
1:3:1 1:0:11:0:2
1:1:1
1:1:2
12
110 23
3PARStoreServ
7400
HP 3PAR StoreServ 7400 2-Node System (2U 24xSFF) Front

vSphere 5.5 with HP OneView, 3PAR StoreServ 7400, Cisco Nexus 5600 and Brocade 6510 Deployment Guide
Page 82
Drive Enclosure
The base node enclosure can be linked up with multiple disk enclosures. The storage system can include the following types of drive enclosures:
• The HP M6710 Drive Enclosure (2U24) holds up to 24, 2.5 inch small form factor (SFF) Serial Attached SCSI (SAS) disk drives, arranged vertically in a single row at the front of the enclosure (numbered 0 to 23).
• The HP M6720 Drive Enclosure (4U24) holds up to 24, 3.5 inch large form factor (LFF) SAS disk drives, arranged horizontally with four columns of six disk drives at the front of the enclosure (numbered 0 to 23).
We used M6710 SFF drive enclosure in the testing and the following is the front and back picture of the M6710 drive enclosure.
Users can verify the node and drive enclosure summary using “showcage” command.
DIA-3PAR-01 cli% showcage
Id Name LoopA Pos.A LoopB Pos.B Drives Temp RevA RevB Model Side
0 cage0 1:0:1 0 0:0:1 0 16 28-30 3211 3211 DCN1 n/a

vSphere 5.5 with HP OneView, 3PAR StoreServ 7400, Cisco Nexus 5600 and Brocade 6510 Deployment Guide
Page 83
1 cage1 1:0:1 4 0:0:1 1 16 30-34 3211 3211 DCS2 n/a
2 cage2 1:0:1 3 0:0:1 2 16 30-34 3211 3211 DCS2 n/a
3 cage3 1:0:1 2 0:0:1 3 16 30-34 3211 3211 DCS2 n/a
4 cage4 1:0:1 1 0:0:1 4 16 29-33 3211 3211 DCS2 n/a
5 cage5 1:0:2 3 0:0:2 0 16 30-35 3211 3211 DCS2 n/a
6 cage6 1:0:2 2 0:0:2 1 16 30-34 3211 3211 DCS2 n/a
7 cage7 1:0:2 1 0:0:2 2 16 30-34 3211 3211 DCS2 n/a
8 cage8 1:0:2 0 0:0:2 3 16 25-27 3211 3211 DCS2 n/a
• DCN1 is a Node cage with 2 nodes and up to 24 SFF (Small Form Factor) drives.
• DCS1 is a M6720 Drive chassis with up to 24 LFF (Large Form Factor) drives.
• DCS2 is a M6710 Drive chassis with up to 24 SFF (Small Form Factor) drives.
Enclosure Cabling
To cable node enclosure with multiple drive enclosures, users should following 3PAR cabling guide. There are multiple cabling guides depending on node and drive enclosure models. The following diagram is from 2-node System with the M6710 SFF drive enclosures.
HP 3PAR Service Processor
The HP 3PAR Service Processor (SP) software is available in both physical and virtual versions.
The SP is designed to provide remote error detection, and reporting and to support diagnostic and maintenance activities involving the HP 3PAR Storage system. The data collected by the SP is used to maintain, troubleshoot, and upgrade the SP and HP 3PAR Storage system at the customer’s operating site. The SP software is built on top of a Linux distribution.
The physical SP is a hardware device mounted in the rack of HP 3PAR Storage system. If the customer chooses a physical SP, each storage system installed at the operating site includes a physical SP installed in the same cabinet as the system’s controller nodes.

vSphere 5.5 with HP OneView, 3PAR StoreServ 7400, Cisco Nexus 5600 and Brocade 6510 Deployment Guide
Page 84
The HP 3PAR Virtual Service Processor is deployed as a virtual machine (VM). The VSP is provided in an Open Virtual Format (OVF) for VMware vSphere Hypervisor and self-extractable virtual hard disk (VHD) package for Microsoft® Hyper-V.
Storage System and Service Processor Initialization
Users should follow HP 3PAR StoreServ 7000 Storage Installation Guide for initial installation task.
Service processor is an integral process during the initial setup process. More detailed information on Service Processor setup is discussed in HP 3PAR Service Process User Guide.
The following captures display service processor GUI interface.

vSphere 5.5 with HP OneView, 3PAR StoreServ 7400, Cisco Nexus 5600 and Brocade 6510 Deployment Guide
Page 85
HP also offers SmartStart software to help users streamline the setup of new service processors and storage systems.

vSphere 5.5 with HP OneView, 3PAR StoreServ 7400, Cisco Nexus 5600 and Brocade 6510 Deployment Guide
Page 86
Please see HP 3PAR StoreServ 7000 Storage SmartStart Software User Guide for more details on initial configuration of the system.
3PAR StoreServ 7400 Software Configuration
An HP 3PAR storage system is composed of the following logical data layers:

vSphere 5.5 with HP OneView, 3PAR StoreServ 7400, Cisco Nexus 5600 and Brocade 6510 Deployment Guide
Page 87
Physical Drives are divided in Chunklets (E-, F-, S- and T-Class: 256MB; 7000 and 10000: 1GB)
Logical Disks: Collections of chunklets which are arranged as rows of RAID sets. LDs are automatically created when required and provide the space for Virtual Volumes, Snapshot and Logging Disks
Common Provisioning Groups (CPG): User created virtual pools of Logical Disks that allocates space to virtual volumes on demand. The CPG defines RAID level, drive type and number, striping pattern etc.
Virtual Volumes (VV) – Exported LUNs: User created fat or thin provisioned volumes composed of LDs according to the specified CPG policies. User exports VV as LUN
3PAR can be configured by 3PAR Manage Console GUI or CLI.
A typical 3PAR configuration flow is as below.

vSphere 5.5 with HP OneView, 3PAR StoreServ 7400, Cisco Nexus 5600 and Brocade 6510 Deployment Guide
Page 88
The fabric facing ports should be defined to gain fabric access to Brocade 6510 switches. The ports should be defined be defined as “Host” for Connection Mode and “Point” for Connection Type.
In our setup, Node 0 controller 0:2:3 and Node 1 controller 1:2:3 are connecting with Brocade 6710-1for SAN Fabric A access. Node 0 controller 0:2:4 and Node 1 controller 1:2:4 are connecting with Brocade 6710-2 for SAN Fabric B access.

vSphere 5.5 with HP OneView, 3PAR StoreServ 7400, Cisco Nexus 5600 and Brocade 6510 Deployment Guide
Page 89
To create a host, we can select left panel “Hosts” menu and right click “Hosts” entry and select “Create Host”.
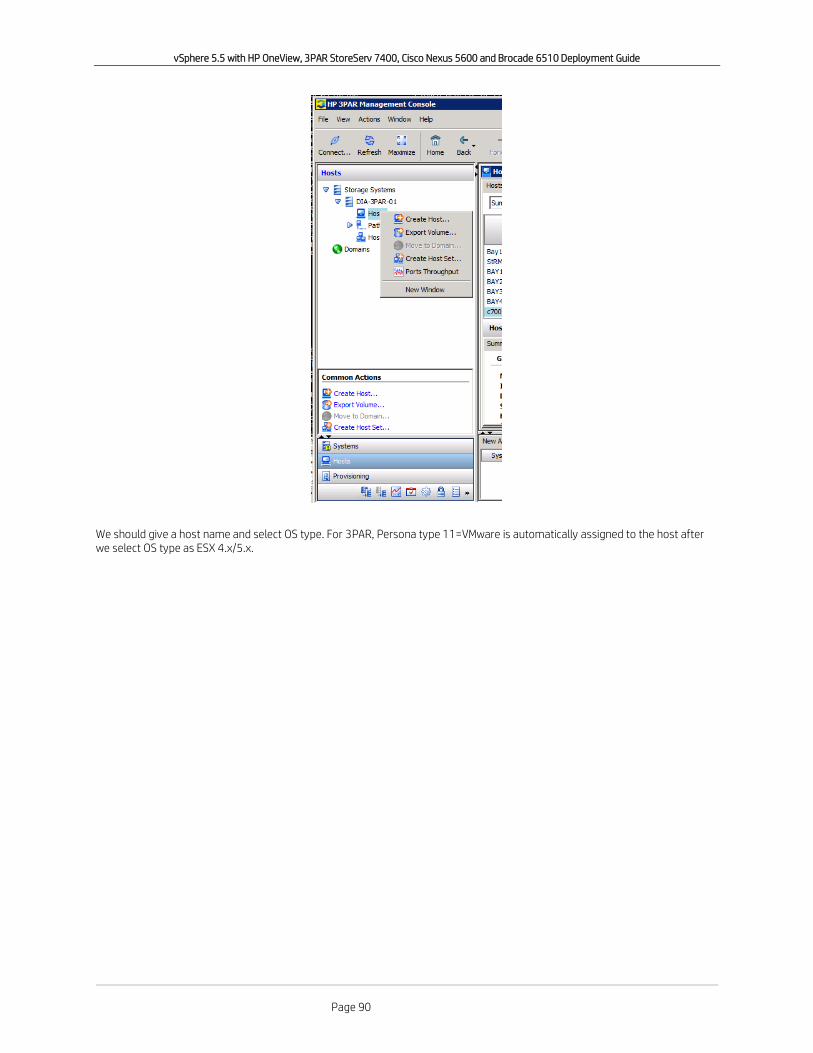
vSphere 5.5 with HP OneView, 3PAR StoreServ 7400, Cisco Nexus 5600 and Brocade 6510 Deployment Guide
Page 90
We should give a host name and select OS type. For 3PAR, Persona type 11=VMware is automatically assigned to the host after we select OS type as ESX 4.x/5.x.

vSphere 5.5 with HP OneView, 3PAR StoreServ 7400, Cisco Nexus 5600 and Brocade 6510 Deployment Guide
Page 91
In the next screen, we can choose available WWNs logged into 3PAR from Brocade fabric if the servers have booted up and Brocade has the right zoning in place. If OneView has pre-populated server WWPN from profile, users can manually type or cut/paste server HBA WWPNs in OneView profile to define the host.
Note: To manually type or cut/paste server WWPN, input the value without “:” character.

vSphere 5.5 with HP OneView, 3PAR StoreServ 7400, Cisco Nexus 5600 and Brocade 6510 Deployment Guide
Page 92
For volume creation, first we need to decide which Common Provisioning Groups (CPG) the volume should be based on. CPG is the policy container where users define RAID policy and drive type along with optionally advanced parameters like striping pattern. Users can check existing pre-defined CPG under “Provisioning->CPG” section.
If needed, users can define their own CPG by right click CPG and choose “Create CPG”.

vSphere 5.5 with HP OneView, 3PAR StoreServ 7400, Cisco Nexus 5600 and Brocade 6510 Deployment Guide
Page 93
For CPG creation, users will need to provide CPG name and select “Device Type” and “Raid Type” and optionally check “Show Advanced Options” to adjust other advanced settings.
Note: Because the way 3PAR internal Chunklets are built across disks, RAID 1, 5 and 6 are essentially RAID 10, 50 and 60.

vSphere 5.5 with HP OneView, 3PAR StoreServ 7400, Cisco Nexus 5600 and Brocade 6510 Deployment Guide
Page 94
With CPGs ready to be used by virtual volumes, we can create any new virtual volumes by right clicking “Create Virtual Volume” as the capture below displayed.

vSphere 5.5 with HP OneView, 3PAR StoreServ 7400, Cisco Nexus 5600 and Brocade 6510 Deployment Guide
Page 95
Users will need to provide the volume size and thin/thick provisioning for space allocation and the most importantly, which CPG the volume should be based on. Optionally users can choose same or different CPG to store COPY, which are snapshots of this virtual volume.

vSphere 5.5 with HP OneView, 3PAR StoreServ 7400, Cisco Nexus 5600 and Brocade 6510 Deployment Guide
Page 96
After the virtual volume is created, users can export the volume to the host or host set by selecting “Export” option.

vSphere 5.5 with HP OneView, 3PAR StoreServ 7400, Cisco Nexus 5600 and Brocade 6510 Deployment Guide
Page 97
Users then will choose from hosts or host set to export this volume to. Users can manually choose LUN ID or choose Auto option.

vSphere 5.5 with HP OneView, 3PAR StoreServ 7400, Cisco Nexus 5600 and Brocade 6510 Deployment Guide
Page 98
Users can verify the volume export status from Hosts entry or Virtual Volume entry.
3PAR CLI can be also used for various operations such as display virtual volumes and their export status.
DIA-3PAR-01 cli% showvv
----Rsvd(MB)----- -(MB)--
Id Name Prov Type CopyOf BsId Rd -Detailed_State- Adm Snp Usr VSize
<output truncated>
32 C7000-03-Blade4-ESXi-Boot tpvv base --- 32 RW normal 256 0 1024 5120
<output truncated>

vSphere 5.5 with HP OneView, 3PAR StoreServ 7400, Cisco Nexus 5600 and Brocade 6510 Deployment Guide
Page 99
DIA-3PAR-01 cli% showvlun -v C7000-03-Blade4-ESXi-Boot
Active VLUNs
Lun VVName HostName -Host_WWN/iSCSI_Name- Port Type Status ID
0 C7000-03-Blade4-ESXi-Boot c7000-03-Blade4 1000CE160F900000 0:2:3 host active 1
0 C7000-03-Blade4-ESXi-Boot c7000-03-Blade4 1000CE160F900002 0:2:4 host active 1
0 C7000-03-Blade4-ESXi-Boot c7000-03-Blade4 1000CE160F900000 1:2:3 host active 1
0 C7000-03-Blade4-ESXi-Boot c7000-03-Blade4 1000CE160F900002 1:2:4 host active 1
----------------------------------------------------------------------------------------
4 total
VLUN Templates
Lun VVName HostName -Host_WWN/iSCSI_Name- Port Type
0 C7000-03-Blade4-ESXi-Boot c7000-03-Blade4 ---------------- --- host
-----------------------------------------------------------------------------
1 total
DIA-3PAR-01 cli% showhost c7000-03-Blade4
Id Name Persona -WWN/iSCSI_Name- Port
10 c7000-03-Blade4 VMware 1000CE160F900002 1:2:4
1000CE160F900000 0:2:3
1000CE160F900000 1:2:3
1000CE160F900002 0:2:4

vSphere 5.5 with HP OneView, 3PAR StoreServ 7400, Cisco Nexus 5600 and Brocade 6510 Deployment Guide
Page 100
vSphere 5.5 Infrastructure
Host Networking Configuration
The following captures shows a typical vSwitch configuration corresponding to the server discussed in the previous sections. Virtual Connect also fully supports VMware vDS and other vSwitch solutions like Cisco Nexus 1000v.
For NIC teaming, Virtual Connect supports default teaming policy and other advanced policy like load-based teaming method in vDS. Virtual Connect does NOT support LACP or link channeling teaming policy.
Users can optionally config jumbo frame on VMkernal interface and Nexus switches. Virtual Connect always have jumbo frame of 9K bytes enabled by default.
The following captures can verify NIC physical MAC address and it’s corresponding OneView profile port address.

vSphere 5.5 with HP OneView, 3PAR StoreServ 7400, Cisco Nexus 5600 and Brocade 6510 Deployment Guide
Page 101
Host Storage Configuration We can see the VMware host have 2 FCOE HBAs installed and their WWPN/WWNN are matching OneView Profile definition.
Note: Broadcom NetXtreme II adapter may not have FCOE enabled by default in ESXi. HP adapters based on the chipset are Flexfabric 630, 534 cards and possibly any other cards with the digit “3” in the middle of HP card model number. Please follow this VMware KB article to enable the FCOE offload capacity of the adapter.
So far the host can only see the private 5G BFS LUN.

vSphere 5.5 with HP OneView, 3PAR StoreServ 7400, Cisco Nexus 5600 and Brocade 6510 Deployment Guide
Page 102
We can manually create another LUN for this blade for testing.
After rescanning the storage connectivity on the host, the 15G LUN showed up in the host and is ready for datastore provisioning.
HP 3PAR Storage SATP and PSP setting For 3PAR storage provision in VMware environment, users can review the following documentations for design and recommendation under HP Enterprise Information Library :
HP 3PAR StoreServ Storage best practices guide HP 3PAR StoreServ Storage and VMware vSphere 5 best practices HP 3PAR VMware ESX Implementation Guide

vSphere 5.5 with HP OneView, 3PAR StoreServ 7400, Cisco Nexus 5600 and Brocade 6510 Deployment Guide
Page 103
As users can see from the screen capture right above this section, a 3PAR LUN will be discovered by default as VMW_SATP_ALUA and use Most Recent Used as PSP policy. 3PAR recommends using PSP Round Robin policy and changed default Round Robin new path selection rule from 1000 IOPS to 1 IOPS. Users can automate the above operation by using the following ESXCLI operation to add a custom VMware NMP rule by matching 3PAR vendor name and model number.
~ # esxcli storage nmp satp rule add --satp="VMW_SATP_ALUA" --psp="VMW_PSP_RR" --
vendor="3PARdata" --model="VV" --psp-option="iops=1" --claim-option="tpgs_on" --
description="HP 3PAR Custom Rule"
~ #
~ #
The following screen capture verifies the new rule has been created. This rule will be used for newly discovered 3PAR LUN.
For existing LUNs already discovered as MRU PSP policy, users can issue a reclaim operation in ESXCLI storage section or reboot the host for the new rule to take effect. The following capture verifies the original MRU rule and the new RR rule after LUN reclaim.
~ # esxcli storage nmp device list --device=naa.60002ac000000000000000440000adec
naa.60002ac000000000000000440000adec
Device Display Name: 3PARdata Fibre Channel Over Ethernet Disk
(naa.60002ac000000000000000440000adec)
Storage Array Type: VMW_SATP_ALUA
Storage Array Type Device Config: {implicit_support=on;explicit_support=off;
explicit_allow=on;alua_followover=on;{TPG_id=1,TPG_state=AO}}
Path Selection Policy: VMW_PSP_MRU
Path Selection Policy Device Config: Current Path=vmhba33:C0:T0:L1
Path Selection Policy Device Custom Config:
Working Paths: vmhba33:C0:T0:L1
Is Local SAS Device: false
Is Boot USB Device: false
~ #
~ #
~ #
~ # esxcli storage core claiming reclaim --device=naa.60002ac000000000000000440000adec
~ #
~ #
~ # esxcli storage nmp device list --device=naa.60002ac000000000000000440000adec
naa.60002ac000000000000000440000adec
Device Display Name: 3PARdata Fibre Channel Over Ethernet Disk
(naa.60002ac000000000000000440000adec)
Storage Array Type: VMW_SATP_ALUA
Storage Array Type Device Config: {implicit_support=on;explicit_support=off;
explicit_allow=on;alua_followover=on;{TPG_id=1,TPG_state=AO}}
Path Selection Policy: VMW_PSP_RR
Path Selection Policy Device Config: {policy=rr,iops=1,bytes=10485760,useANO=0;
lastPathIndex=0: NumIOsPending=0,numBytesPending=0}
Path Selection Policy Device Custom Config:
Working Paths: vmhba32:C0:T0:L1, vmhba32:C0:T1:L1, vmhba33:C0:T1:L1, vmhba33:C0:T0:L1
Is Local SAS Device: false
Is Boot USB Device: false
~ #

vSphere 5.5 with HP OneView, 3PAR StoreServ 7400, Cisco Nexus 5600 and Brocade 6510 Deployment Guide
Page 104
HP 3PAR VAAI Plugin for ESXi 5.x
With HP 3PAR 3.1.3 MU1 and ESXi 5.5, 3PAR VAAI primitives are handled by the default T10 VMware plug-in and users do not require to install any HP 3PAR VAAI plug-in.
For VAAI requirements of earlier versions of ESXi and 3PAR OS, please check HP 3PAR VMware ESX Implementation Guide for more details.
~ # esxcli storage core device vaai status get
naa.60002ac000000000000000200000adec
VAAI Plugin Name:
ATS Status: supported
Clone Status: supported
Zero Status: supported
Delete Status: supported
naa.60002ac000000000000000450000adec
VAAI Plugin Name:
ATS Status: supported
Clone Status: supported
Zero Status: supported
Delete Status: supported
Storage Connectivity Verification We used VMware IO Analyzer to create some random IO flows to test 3PAR and Virtual Connect active/active forwarding for a given LUN matching VMware Round Robin PSP policy.

vSphere 5.5 with HP OneView, 3PAR StoreServ 7400, Cisco Nexus 5600 and Brocade 6510 Deployment Guide
Page 105
On 3PAR, users can easily monitor I/O through GUI with several mouse clicks and also from CLI directly.

vSphere 5.5 with HP OneView, 3PAR StoreServ 7400, Cisco Nexus 5600 and Brocade 6510 Deployment Guide
Page 106
DIA-3PAR-01 cli% statport
12:54:42 09/27/2014 r/w I/O per second KBytes per sec Svt ms IOSz KB
Port D/C Cur Avg Max Cur Avg Max Cur Avg Cur Avg Qlen
0:0:1 Data t 5172 5172 5172 49298 49298 49298 14.65 14.65 9.5 9.5 46
0:0:2 Data t 3964 3964 3964 38461 38461 38461 13.18 13.18 9.7 9.7 16
0:1:1 Data t 0 0 0 0 0 0 0.00 0.00 0.0 0.0 0
0:1:2 Data t 0 0 0 0 0 0 0.00 0.00 0.0 0.0 0
0:2:1 Data t 0 0 0 0 0 0 0.00 0.00 0.0 0.0 0
0:2:2 Data t 26 26 26 163 163 163 0.26 0.26 6.3 6.3 0
0:2:3 Data t 1356 1356 1356 11107 11107 11107 2.95 2.95 8.2 8.2 5
0:2:4 Data t 1356 1356 1356 11111 11111 11111 2.71 2.71 8.2 8.2 4
1:0:1 Data t 4602 4602 4602 43710 43710 43710 11.30 11.30 9.5 9.5 1
1:0:2 Data t 3765 3765 3765 35178 35178 35178 12.54 12.54 9.3 9.3 2
1:1:1 Data t 0 0 0 0 0 0 0.00 0.00 0.0 0.0 0
1:1:2 Data t 0 0 0 0 0 0 0.00 0.00 0.0 0.0 0
1:2:1 Data t 7 7 7 114 114 114 0.32 0.32 16.4 16.4 0
1:2:2 Data t 0 0 0 0 0 0 0.00 0.00 0.0 0.0 0
1:2:3 Data t 1356 1356 1356 11111 11111 11111 2.53 2.53 8.2 8.2 5
1:2:4 Data t 1358 1358 1358 11127 11127 11127 2.61 2.61 8.2 8.2 2
---------------------------------------------------------------------------------------
16 Data t 22963 22963 211381 211381 10.53 10.53 9.2 9.2 81
Press the enter key to stop...

vSphere 5.5 with HP OneView, 3PAR StoreServ 7400, Cisco Nexus 5600 and Brocade 6510 Deployment Guide
Page 107
HP OneView Integration with HP 3PAR and Brocade Network Advisor for Auto Volume Creation and Zoning
We have going through the typical VMware server/storage provisioning in previous sections. With the HP OneView 1.10 release, users can provision 3PAR volume and host creation and export as well as Brocade zoning automatically by integrating 3PAR and Brocade Network Advisor. This section will go through the end to end process on how users can configure and leverage this functionality.
HP OneView with 3PAR StoreServe Integration
3PAR Configuration
Before configuring OneView to connect with 3PAR management interface, we need to first enable 3PAR WebAPI and CIM services. To start 3PAR web API and CIM services, please use the following commands and users can check 3PAR Command Line Interface Reference for more details.
DIA-3PAR-01 cli% startwsapi
WSAPI Server is already Enabled.
DIA-3PAR-01 cli% startcim
CIM server will start in about 90 seconds
DIA-3PAR-01 cli% showwsapi
-Service- -State- -HTTP_State- HTTP_Port -HTTPS_State- HTTPS_Port -Version-
Enabled Active Disabled 8008 Enabled 8080 1.3.1
DIA-3PAR-01 cli% showcim
-Service- -State- --SLP-- SLPPort -HTTP-- HTTPPort -HTTPS- HTTPSPort PGVer CIMVer
Enabled Active Enabled 427 Enabled 5988 Enabled 5989 2.9.1 3.1.3
OneView Configuration
After verifying the services are started on 3PAR side, we can select Storage Systems in OneView.
Click “Add Storage System”

vSphere 5.5 with HP OneView, 3PAR StoreServ 7400, Cisco Nexus 5600 and Brocade 6510 Deployment Guide
Page 108
We need to provide 3PAR IP address and credential to login.
After authentication, OneView should retrieve the storage system information and we need to select “Add Storage Pools”

vSphere 5.5 with HP OneView, 3PAR StoreServ 7400, Cisco Nexus 5600 and Brocade 6510 Deployment Guide
Page 109
The available storage pools from 3PAR will be displayed for users to add into OneView. The “storage pool” term is OneView corresponds to 3PAR Common Provisioning Group (CPG) concept and users should see the same set of CPG lists under 3PAR management console.

vSphere 5.5 with HP OneView, 3PAR StoreServ 7400, Cisco Nexus 5600 and Brocade 6510 Deployment Guide
Page 110
Users should map OneView Virtual Connect fabric definition to remote 3PAR target ports. In this setup, we know • Virtual Connect VSAN0001 FC fabric is connected with Brocade 6510-1 and then 3PAR port 0:2:3 and 1:2:3.
• Virtual Connect VSAN0002 FC fabric is connected with Brocade 6510-2 and then 3PAR port 0:24 and 1:2:4
Please make sure you select the right mapping per your physical connectivity.
The following capture verifies the imported 3PAR 7400 system.

vSphere 5.5 with HP OneView, 3PAR StoreServ 7400, Cisco Nexus 5600 and Brocade 6510 Deployment Guide
Page 111
We can review the imported storage pools(CPG in 3PAR term) by selecting Storage Pools section.
Review the available CPG definitions.
Optionally we can select any CPG not being imported previously.

vSphere 5.5 with HP OneView, 3PAR StoreServ 7400, Cisco Nexus 5600 and Brocade 6510 Deployment Guide
Page 112
Optionally, we can choose to create a volume definition template to simplify the future volume creation in OneView. In the template, we can define the CPG, Think/Thick provisioning, private/shared and the size of the volume.

vSphere 5.5 with HP OneView, 3PAR StoreServ 7400, Cisco Nexus 5600 and Brocade 6510 Deployment Guide
Page 113
Users must create a volume in OneView before add this volume in OneView Server profile. The same volume name will show up in 3PAR GUI/CLI after creation. We can select Volumes menu as below.
Select Create Volume.

vSphere 5.5 with HP OneView, 3PAR StoreServ 7400, Cisco Nexus 5600 and Brocade 6510 Deployment Guide
Page 114
In volume creation window, we can manually define size, thin/thick reservation and etc or select a template defined previously so these settings can populate automatically. In the following example, we created a 10G shared volume.
We can review the volume just created in the overview section.
We can also see the same volume created in 3PAR OS. Please note, the volume export host list is empty as we only created a volume in OneView/3PAR without adding this volume to any OneView profile so this volume is not exported to any host.

vSphere 5.5 with HP OneView, 3PAR StoreServ 7400, Cisco Nexus 5600 and Brocade 6510 Deployment Guide
Page 115
This above process finishes the initial 3PAR import process. If users don’t have Brocade SAN switch or Brocade Network Advisor, they can add this volume into OneView profile shown in the following section. However, we’d like to test Brocade Network Advisor integration so we’ll cover BNA integration first before applying this volume into profile.

vSphere 5.5 with HP OneView, 3PAR StoreServ 7400, Cisco Nexus 5600 and Brocade 6510 Deployment Guide
Page 116
HP OneView with Brocade Network Advisor Integration
Brocade Network Advisor is Brocade’s core management software to help users proactively manage end-to-end network health, performance and aids troubleshooting. Administrators can quickly identify network issues with customizable dashboards and drill-down to isolate and fix problems. Network Advisor supports the entire Brocade IP and SAN portfolio, for unified network visibility and control.
Brocade Network Advisor Configuration
Users can get access to the software from Brocade account teams or download BNA software through Brocade web site given the right access level. Users should have a windows server reserved for the software installation. Please check Brocade documentation for detailed H/W and S/W requirement for the server.
Full-featured BNA is a licensed product to support end to end Brocade fabric monitoring. However, if users are only interested with this particular OneView with BNA integration, the installation process should give users an option to install SMI agent only, which is a free sub-service for BNA software.
After BNA installation process, users should continue with “Discover Fabric” and provide two 6510 switch IP address and login credentials so BNA can discover existing SAN fabric.

vSphere 5.5 with HP OneView, 3PAR StoreServ 7400, Cisco Nexus 5600 and Brocade 6510 Deployment Guide
Page 117
Optionally, users can login to BNA to view dashboard and switch SAN configuration and status.

vSphere 5.5 with HP OneView, 3PAR StoreServ 7400, Cisco Nexus 5600 and Brocade 6510 Deployment Guide
Page 118
To integrate with HP OneView, users need to assure that SMI agent is enabled with default port number. If port number is changed for SMI agent in BNA, users also need to change on OneView side to match in later steps. To confirm SMI status, please select “Network Advisor Configuration”.
One of steps is to enable SMI agent with the port number.

vSphere 5.5 with HP OneView, 3PAR StoreServ 7400, Cisco Nexus 5600 and Brocade 6510 Deployment Guide
Page 119
Users can verify windows server is listening on default port 5989 and check the process ID associated with it.
C:\Users\Administrator>netstat -o -n -a | find "5989"
TCP 10.16.170.50:5989 0.0.0.0:0 LISTENING 6536
TCP 10.16.170.50:5989 10.16.40.240:52855 ESTABLISHED 6536
C:\Users\Administrator>tasklist /fi "PID eq 6536"
Image Name PID Session Name Session# Mem Usage
========================= ======== ================ =========== ============
cimomsrv.exe 6536 Services 0 356,812 K
OneView Configuration
After we finished BNA setup, we can select OneView SAN Managers to import BNA.
Select “Add SAN Manager”.
Provide BNA IP address, port number and login credential.

vSphere 5.5 with HP OneView, 3PAR StoreServ 7400, Cisco Nexus 5600 and Brocade 6510 Deployment Guide
Page 120
Verify discovered BNA and its associated SAN fabric.
Next we need to go back to OneView Network configuration and select two VSAN network we created earlier and select the right Virtual Connect FC fabric with Brocade FC Switching fabric in “Associated with SAN” field. This will enable Brocade SAN fabric automatically zoning.

vSphere 5.5 with HP OneView, 3PAR StoreServ 7400, Cisco Nexus 5600 and Brocade 6510 Deployment Guide
Page 121
Provisioning host LUN with 3PAR Auto Export and Brocade Auto Zoning With both 3PAR and BNA integration steps complete, now it’s time to prove this end to end host LUN provisioning. We’ll select the previous blade server as the first time, we’ll edit its profile and enable SAN storage with ESXi host type and click “Add volume”.

vSphere 5.5 with HP OneView, 3PAR StoreServ 7400, Cisco Nexus 5600 and Brocade 6510 Deployment Guide
Page 122
In the pop-up window, we select the previous created volume “blade4-san-volume-1” and click “Add”.
Verify the volume information in profile page.
Apply the profile and profile status should change to “Configure SAN storage”.
Note: You don’t need to power down server for SAN volume provisioning.

vSphere 5.5 with HP OneView, 3PAR StoreServ 7400, Cisco Nexus 5600 and Brocade 6510 Deployment Guide
Page 123
After provisioning, we can see “blade4-san-volume-1” has been exported automatically by 3PAR to this blade.
Users can verify the LUN is accessible in vSphere web client.
The above process is a good start but if you have noticed, C7000-03-blade4 host has been manually created in 3PAR and manually zoned in Brocade 6510s. Now let’s verify to provision the same shared volume with another ESXi blade server which has not been configured in 3PAR and Brocade switches. We’ll edit blade server 10 profile and add the same “blade4-san-volume-1” to this blade. The reason this blade can see the same volume is that in OneView, we originally set this volume as shared volume.

vSphere 5.5 with HP OneView, 3PAR StoreServ 7400, Cisco Nexus 5600 and Brocade 6510 Deployment Guide
Page 124
After server profile is applied, we can see the following Brocade 6510 captures, OneView and BNA automatically created zoning for this blade to the target 3PAR ports.
DIA-BSAN-01:FID3:admin> zoneshow
<output truncated>
zone: FF2040Bay10_1000CE160F90001C
10:00:ce:16:0f:90:00:1c
20:23:00:02:ac:00:ad:ec
21:23:00:02:ac:00:ad:ec
<output truncated>
DIA-BSAN-02:FID128:admin> zoneshow
<output truncated>
zone: FF2040Bay10_1000CE160F90001E
10:00:ce:16:0f:90:00:1e
21:24:00:02:ac:00:ad:ec
20:24:00:02:ac:00:ad:ec
<output truncated>
On 3PAR side, we can see a new host was created with the host name as the same as OneView profile name.

vSphere 5.5 with HP OneView, 3PAR StoreServ 7400, Cisco Nexus 5600 and Brocade 6510 Deployment Guide
Page 125
And this same volume is exported to both hosts at the same time.
On blade 10 host, we can verify the LUN was discovered correctly.

vSphere 5.5 with HP OneView, 3PAR StoreServ 7400, Cisco Nexus 5600 and Brocade 6510 Deployment Guide
Page 126

vSphere 5.5 with HP OneView, 3PAR StoreServ 7400, Cisco Nexus 5600 and Brocade 6510 Deployment Guide
Page 127
HP OneView and 3PAR StoreServ Integration with VMware vCenter
With HP advanced integration with 3PAR and Brocade, users can provision VMware infrastructure more easily. At the same time, OneView for vCenter (OV4VC) enables VMware admins to manage and provisioning HP server and storage infrastructure without leaving vCenter console.
HP OneView for VMware vCenter integrates the manageability features of HP OneView, HP ProLiant servers, HP BladeSystem and HP Storage into the VMware vCenter console.
HP OneView for VMware vCenter—Includes support for the following components:
• HP OneView for VMware vCenter Server module—Adds HP ProLiant and HP BladeSystem hardware monitoring into the HP OneView for vCenter console. Provides server hardware management capabilities, including comprehensive monitoring, firmware update, vSphere 5.x/ESXi 5.x image deployment, remote control, end-to-end monitoring for Virtual Connect, and power optimization for HP servers in the VMware environment. The Server module is not required for RMV installation.
• HP OneView for VMware vCenter StoreFront Module—Provides storage configuration and status information for mapping VMs, datastores, and hosts to LUNs on HP storage arrays. The Storage Module enables you to register HP Storage arrays and use the VASA provider. Supports provisioning on HP 3PAR StoreServ, HP StoreVirtual, HP MSA, and HP EVA storage systems. Supported provisioning tasks include creating, expanding, or deleting a datastore, and creating or cloning a VM. Displays view-only information for the HP StoreOnce Backup systems.
• HP 3PAR Recovery Manager for vCenter—Installs RMV plugin with vSphere Client and vSphere Web Client integration.
The OneView for vCenter software can be downloaded at HP OneView Partner Integrations.
For detailed documentations, please check HP Enterprise Information Library and select HP Insight Management->HP OneView for VMware vCenter.
HP OneView for VMware vCenter Installation Guide HP OneView for VMware vCenter User Guide
Software Installation
A windows server should be reserved for the software installation and please check the above installation guide for the details. The software is downloaded as an .exe file format.
During the installation process, users need to provide vCenter address and login credential.
Note: It’s extremely important to make sure DNS lookup/reverse lookup for OV4VC server, OneView server and vCenter server. Many of internal communications between the servers are based on hostname instead of DNS. Without DNS implementation, some communications will be broken and unstable.

vSphere 5.5 with HP OneView, 3PAR StoreServ 7400, Cisco Nexus 5600 and Brocade 6510 Deployment Guide
Page 128
Storage Administrator Portal Configuration After the installation of server and storage module, users need to login to OV4VC storage administrator portal (by clicking its desktop icon) and import 3PAR storage. The login credential should be your vCenter login credential.
At the following screen, users can click “Add” to import any storage array.

vSphere 5.5 with HP OneView, 3PAR StoreServ 7400, Cisco Nexus 5600 and Brocade 6510 Deployment Guide
Page 129
Select 3PAR as storage type.
Provide 3PAR storage system address and login credential to import the array.
vSphere Web Client Configuration After finishing the installation and the storage administrator portal configuration. Users can login to vCenter to provide some credentials for OV4VC server module such as OA, iLO and ESXi login and OneView login information. Users should see the “HP

vSphere 5.5 with HP OneView, 3PAR StoreServ 7400, Cisco Nexus 5600 and Brocade 6510 Deployment Guide
Page 130
Management Administrator” blue icon at the bottom.
User can click “HP Management Administration” icon to view OV4VC get started page.
Provide ESXi, iLO and OA login credential. Since we are using OneView to manage Virtual Connect, we can leave “Virtual Connect Username” and “Virtual Connect Password” fields empty. They are for legacy Virtual Connect Manager. We manage Virtual Connect through OneView credentials in the following steps. After finishing this tab, we can click the tab of “Credent ials for HP Management Software Integration”.

vSphere 5.5 with HP OneView, 3PAR StoreServ 7400, Cisco Nexus 5600 and Brocade 6510 Deployment Guide
Page 131
Provide OneView ip address and login information. We also provide HP Insight Control Server Provisioning (ICSP) credential here to provision host OS through ICSP. We’ll cover more ICSP details in the following sections.

vSphere 5.5 with HP OneView, 3PAR StoreServ 7400, Cisco Nexus 5600 and Brocade 6510 Deployment Guide
Page 132
Storage Administrator Portal tab can let us view-only information for the previous 3PAR storage information. Additional privilege could be setup for this tab and users can check OV4VC installation guide for more details.
HP Infrastructure Management After finishing setting up all credentials for inter-communications, users can go to vCenter home page and click “HP Infrastructure” icon at the Inventory section.

vSphere 5.5 with HP OneView, 3PAR StoreServ 7400, Cisco Nexus 5600 and Brocade 6510 Deployment Guide
Page 133
We can see the HP enclosure and 3PAR info from vCenter,
Host Networking Management
Network Diagram
With OV4VC, users can gain much more visibility for HP servers providing vSphere infrastructure environment. Users can select any ESXi host and select “Manage->HP Management->Networking->Network Diagram” to see the visual mapping between ESXi

vSphere 5.5 with HP OneView, 3PAR StoreServ 7400, Cisco Nexus 5600 and Brocade 6510 Deployment Guide
Page 134
vSwitch/vDS, Virtual Connect and TOR switch level.
Users can save the topology map in PNG image format.

vSphere 5.5 with HP OneView, 3PAR StoreServ 7400, Cisco Nexus 5600 and Brocade 6510 Deployment Guide
Page 135
Network Detail
The purpose of Network Detail tab is to help users to configure their vSwitch/vDS according to OneView server profile configuration. Before using this function, users will have to understand OneView profile networking configuration and manually created mapping VSS/VDS config on vSphere side. The configuration on this tab is optional. Without it, vSphere hosting can be still configured using the method described above. However, if customers want to leverage “HP Grow Cluster” function inside OV4VC to automatically do ESXi OS deployment on servers and add servers in the vSphere cluster. This tab needs to be set up ahead of time and that will lead us to an important concept inside this tab called “Reference host”. The concept of “Reference host” has similarity of vSphere “Host Profile”. The purpose of the reference host for OV4VC is to set one host inside a cluster as a baseline host in regard to OneView profile networking and vSphere host networking configuration. OV4VC will compare the select host to the reference host in regard to OneView profile configuration to see if they have the same networking config, if they do, the compliance status for “Server Profile Status”. Then OV4VC will compare this host OneView Profile networking config with its local VSS/VDS configuration to see if they are matching and if not, OV4VC will list the recommended config changes to users and if users choose to mitigate this inconsistence, users will select “Apply recommendations” button and OV4VC will start to configure VSS/VDS to match its recommendation. If the action is successful, “Host Network Status” compliance status should turn. To prepare setting up this tab, users need to first label their networks in related to VMkernel network in OneView Network configuration so OV4VC will understand which vlan is for host VMkernal and which vlan is for VM data traffic.
Even after finishing the above OneView Network config, the page will still show every field as “?” mark to indicate that the OV4VC doesn’t have enough information to make recommendation.

vSphere 5.5 with HP OneView, 3PAR StoreServ 7400, Cisco Nexus 5600 and Brocade 6510 Deployment Guide
Page 136
The next step we need to do is to select a host as reference host and click “Set Reference Host” as below in that specific host.
After the above step, the “Server Profile Status” should turn green assuming hosts OneVew networking config is consistent with the reference host OneView networking config. We can also see the listed recommended actions for OV4VC to change VSS/VDS to make it consistent with the OneView profile networking config.
If users choose to apply the recommended actions by clicking “Apply Recommended Actions” and confirming it, the OV4VC will start to make a change on vSphere VSS/VDS side.

vSphere 5.5 with HP OneView, 3PAR StoreServ 7400, Cisco Nexus 5600 and Brocade 6510 Deployment Guide
Page 137
Note: The host will be put into maintenance mode and OV4VC will require all VMs to be evacuated from this host in order to make the change. Without meeting the above requirement, OV4VC will fail the task and display the failure reason in its Tasks history.
After finishing the task, the “Host Network Status” field will turn green and the “Host Network Configuration Status” will turn green as well. The “Host Network Configuration Status” naming may be confusing, its status is just the combination of the status of both “Server Profile Status” (OneView profile networking config) and “Host Network Status” (vSphere VSS/VDS config).
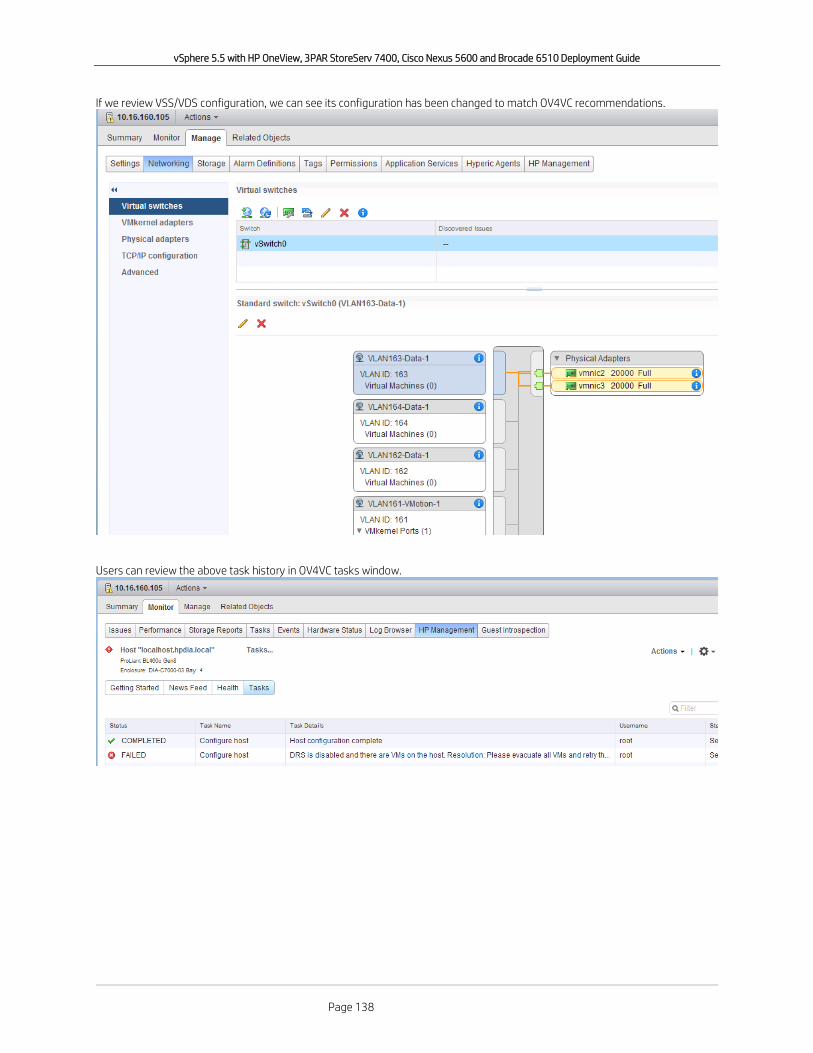
vSphere 5.5 with HP OneView, 3PAR StoreServ 7400, Cisco Nexus 5600 and Brocade 6510 Deployment Guide
Page 138
If we review VSS/VDS configuration, we can see its configuration has been changed to match OV4VC recommendations.
Users can review the above task history in OV4VC tasks window.

vSphere 5.5 with HP OneView, 3PAR StoreServ 7400, Cisco Nexus 5600 and Brocade 6510 Deployment Guide
Page 139
Users can also view additional information in vCenter Tasks window.
HP Storage Management
OV4VC storage module provides detailed information in vCenter for users to view their HP Storage information

vSphere 5.5 with HP OneView, 3PAR StoreServ 7400, Cisco Nexus 5600 and Brocade 6510 Deployment Guide
Page 140
Like host networking, storage module also provides the visual mapping between virtual machine disks and their datastore path information like below. Users can even create datastore inside vCenter using OV4VC. This will be discussed more in later sections.
Host Operation Management
Inside HP Management tab, users can also hover the mouse over OV icon and select Server Profile to have a separate web page launched into OneView profile definition for this particular host.

vSphere 5.5 with HP OneView, 3PAR StoreServ 7400, Cisco Nexus 5600 and Brocade 6510 Deployment Guide
Page 141
Hover the mouse over iLO icon will give users links for iLO services such as Remote Console.

vSphere 5.5 with HP OneView, 3PAR StoreServ 7400, Cisco Nexus 5600 and Brocade 6510 Deployment Guide
Page 142
Users can view detailed HP firmware/driver information under Software/Firmware tab.
Users have the option to upgrade host firmware inside vCenter.

vSphere 5.5 with HP OneView, 3PAR StoreServ 7400, Cisco Nexus 5600 and Brocade 6510 Deployment Guide
Page 143

vSphere 5.5 with HP OneView, 3PAR StoreServ 7400, Cisco Nexus 5600 and Brocade 6510 Deployment Guide
Page 144
OneView for vCenter and Insight Control Server Provisioning Grow ESXi Cluster
When OneView for vCenter working together with HP Insight Control Server Provisioning (ICSP), these two products offer a powerful solution inside vCenter where users can select new/unused Proliant servers and ICSP will automatically provision user selected ESXi OS image to the servers and OV4VC will then add the provisioned servers into the existing cluster. Corresponding OneView profiles for these new servers will also be created in OneView. The deployment process is driven by a wizard where users only need to provide some basic information and login credentials. Before we dive into the whole process, it’s important for users to have a basic understanding on HP Insight Control Server Provisioning product.
HP Insight Control Server Provisioning Insight Control server provisioning is a virtual appliance used to install and configure HP ProLiant servers. Insight Control server provisioning uses resources such as OS Build Plans and scripts to run deployment jobs. IC server provisioning allows you to: • Install Windows, Linux, and ESXi on ProLiant servers
• Deploy operating systems to Virtual Machines (VMs)
• Update drivers, utilities, and firmware on ProLiant servers using the HP Service Packs for ProLiant (SPPs)
• Configure ProLiant system hardware, iLOs, BIOS, HP Smart Array and Fibre Channel HBA
• Deploy to target servers with or without using PXE (for HP ProLiant Gen8 servers or later. You can do PXE-less deployment on these servers without any special configuration because they come with built-in service OSs as part of the embedded intelligent provisioning feature)
• Run deployment jobs on multiple servers simultaneously
• Customize your ProLiant deployments via an easy to use browser-based interface
• Create and run customized Build Plans to perform additional configuration tasks either before or after OS deployment
• Migrate from HP Insight Control server deployment (RDP) to Insight Control server provisioning.
The in-depth discussion of ICSP architecture and deployment is out of the scope of this paper but we’d like to have some quick start information for users below.
ICSP can be downloaded from Insight Control Server Provisioning product page.
ICSP user guide and technical white papers can be found at HP Enterprise Information Library. In the main portal, users should follow “HP Insight Management->HP Insight Control” link. The following and other guides are available.
• HP Insight Control Server Provisioning Technology White Paper
• HP Insight Control Server Provisioning 7.3 Update 2 Online Help
• HP Insight Control Server Provisioning 7.3 Update 2 Installation Guide
• HP Insight Control Server Provisioning 7.3 Update 2 Administrator Guide
• HP Insight Control Server Provisioning 7.3 Update 2 Build Plans Reference Guide
• HP Insight Management 7.3 Update 2 Support Matrix
The following are some ICSP quick start information.
The ICSP itself is installed in vCenter as ova/ovf format.

vSphere 5.5 with HP OneView, 3PAR StoreServ 7400, Cisco Nexus 5600 and Brocade 6510 Deployment Guide
Page 145
ICSP virtual appliance needs another separate windows or Linux server as its media server to hold all OS images. For windows media server, users can login from the server into ICSP appliance and download a setup utility exe file on desktop and use its wizard to streamline media server installation.

vSphere 5.5 with HP OneView, 3PAR StoreServ 7400, Cisco Nexus 5600 and Brocade 6510 Deployment Guide
Page 146
The following is the supported OS images for ICSP 7.3.2
After media server is setup, users should provide media server IP address, directory and credentials for ICSP so the virtual appliance can establish communication with the media server.
To start with server OS provisioning, users need to add candidate servers from “Servers” menu.

vSphere 5.5 with HP OneView, 3PAR StoreServ 7400, Cisco Nexus 5600 and Brocade 6510 Deployment Guide
Page 147
Servers have to be discovered by ICSP in order to execute the OS deployment job. There are two ways for ICSP to discover servers. • Servers traditional PXE booting into ICSP
The DHCP server in customer networks can point ICSP appliance as PXE server so servers can start communication with ICSP in or the appliance to inject a small service OS into server
• ProLiant Gen8 and later servers can optionally be added into ICSP using server iLO address (PXE-less provisioning)
ProLiant Gen8 and later servers have built-in Intelligent Provisioning service OS. ICSP can directly communicate with the service OS through iLO port and provision OS even without PXE network infrastructure.
To add a ProLiant Gen8 and later server by iLO, users need to provide iLO IP address and login credential.
After the server is added, we can see the server status. Server state is “UNREACHABLE” just means the server is not in Maintenance mode where service OS is loaded into memory. Service OS in server memory is in charge of communicating with ICSP for OS provisioning. The server is in this state because in the previous step, we advise ICSP not to boot the server into maintenance mode. The next step is to run an OS Build Plan on this server. Users can click Actions menu in this server and select “Run OS Build Plans”

vSphere 5.5 with HP OneView, 3PAR StoreServ 7400, Cisco Nexus 5600 and Brocade 6510 Deployment Guide
Page 148
Click “Add” to add a new build plan for this server.
Select the OS you want to deploy and click “Add” and click “OK” to confirm OS deployment. Then ICSP will try to boot server into maintenance OS and use server service OS to communicate for the OS deployment.

vSphere 5.5 with HP OneView, 3PAR StoreServ 7400, Cisco Nexus 5600 and Brocade 6510 Deployment Guide
Page 149
The nature of a build plan is a collection of pre-defined scripts like the following. Users have the options to change script parameters or create their own build plans.
The above steps summarized to add a server by iLO. To add servers by PXE, users will need to configure the network DHCP server to PXE boot server into ICSP and the server will show up in Servers list. ICSP has a built-in DHCP server which users can optionally enable it. If users want to use existing DHCP server, some configuration will be needed on DHCP server to point PXE server as ICSP virtual appliance, users can check more details in HP Insight Control Server Provisioning 7.3 Update 2 Installation Guide.
The following is the configuration highlights for MS DHCP server definition

vSphere 5.5 with HP OneView, 3PAR StoreServ 7400, Cisco Nexus 5600 and Brocade 6510 Deployment Guide
Page 150
The following capture shows the DHCP server settings for ICSP in our setup.
Insight Control Server Provisioning Custom Build Plan
Users have the option to create their own OS build plan. The typical process is to make a copy of ICSP built-in build plan and make the relevant changes over it.
For OneView for vCenter HP Grow Cluster to work, Users need to create a custom build plan based on ICSP default ESXi5.5 build plan.
The details on how to create this build plan is described in HP OneView for VMware vCenter User Guide Appendix B.
The key of this custom build plan is to insert the following scripts into kickstart file.
<output truncated>
# Set the network to DHCP on the network adapater
network --bootproto=dhcp
## IC4VC custom values
%firstboot
VMNIC=$(esxcli network nic list | grep -i @mgmt_mac_address@ | awk -F " " '{ print $1 }')
esxcli network vswitch standard uplink remove --uplink-name=vmnic0 --vswitch-name=vSwitch0
esxcli network vswitch standard uplink add --uplink-name=$VMNIC --vswitch-name=vSwitch0
esxcli network ip interface ipv4 set --interface-name=vmk0 --ipv4=@ip_address@ --
netmask=@net_mask@ --type=static
esxcli network ip route ipv4 add --gateway @gate_way@ --network default
esxcli network ip dns server remove --server "" -a
esxcli network ip dns server add --server @primary_dns_server@
esxcli network ip dns server add --server @alternate_dns_server@
esxcli system hostname set --host @host_name@ --domain @domain_name@
# If vlan tagging is not used then vlan_id value should be 0 # A vlan_id of 0 disables
vlan_tagging in
ESX and causes Mgmt to use interface of vswitch
esxcli network vswitch standard portgroup set --portgroup-name "Management Network" --vlan-id
@vlan_id@
services.sh restart
## post-install script
<output truncated>
Note: If you want to cut/paste the above scripts from OV4VC user guide, please make sure the option “--type=static” is in the same line as the previous “esxcli network ip interface ipv4 set” command.
OneView for vCenter HP Grow Cluster
With users have a basic understand of Insight Control Server provisioning, now we can go ahead to test OneView for vCenter “HP Grow Cluster” function. To get this step to work, there are several prerequisites need to be met.

vSphere 5.5 with HP OneView, 3PAR StoreServ 7400, Cisco Nexus 5600 and Brocade 6510 Deployment Guide
Page 151
• ICSP and DHCP servers are set up as the previous section
• OV4VC server module configuration management tab has the valid ICSP IP address and login credential
• Existing ESXi cluster need to have a host set up as OV4VC “Reference host” in vCenter Management->HP Management->Networking->Network Details.
• On ICSP, we need to create a custom build plan described in previous section.
To start to grow ESXi cluster, please select the ESXi cluster we’d like to expand and right click cluster entry.
Choose second entry for advanced deployment.

vSphere 5.5 with HP OneView, 3PAR StoreServ 7400, Cisco Nexus 5600 and Brocade 6510 Deployment Guide
Page 152
OV4VC will communicate with OneView and return any available servers which don’t have any profile assigned yet. In our example, we have 2 new blades 10 and 11.

vSphere 5.5 with HP OneView, 3PAR StoreServ 7400, Cisco Nexus 5600 and Brocade 6510 Deployment Guide
Page 153
Select the custom build plan we created in the previous section.
Select the two hosts we want to deploy ESXi image and add to this cluster.

vSphere 5.5 with HP OneView, 3PAR StoreServ 7400, Cisco Nexus 5600 and Brocade 6510 Deployment Guide
Page 154
Provide some TCP/IP information including static IP for the hosts.
Note: ESXi root password can be copied down using the small green arrow to the right.
Review the confirmation page and confirm to deploy hosts.

vSphere 5.5 with HP OneView, 3PAR StoreServ 7400, Cisco Nexus 5600 and Brocade 6510 Deployment Guide
Page 155
A pop-up window will confirm OV4VC starts to execute grow cluster function.
We can monitor the progress in HP Management->Tasks panel, notice the progress below indicated that right now OneView is creating server profiles for two blades.

vSphere 5.5 with HP OneView, 3PAR StoreServ 7400, Cisco Nexus 5600 and Brocade 6510 Deployment Guide
Page 156
Users can monitor server profile creation process in the OneView window at the same time.
Server booting process can be monitored in iLO remote console window. We should see the servers are PXE booted into ICSP appliance.
Both servers should eventually booted into Maintenance Mode

vSphere 5.5 with HP OneView, 3PAR StoreServ 7400, Cisco Nexus 5600 and Brocade 6510 Deployment Guide
Page 157
At this moment, we can monitor ICSP server status and both servers show up in ICSP servers list.

vSphere 5.5 with HP OneView, 3PAR StoreServ 7400, Cisco Nexus 5600 and Brocade 6510 Deployment Guide
Page 158
After ICSP injects service OS into the servers, the build plan will continue to deploy ESXi images into servers.
ICSP provision job status for this deployment should eventually succeed.
vCenter cluster should have two hosts added into the cluster in the maintenance mode so OV4VC can provision VSS according to reference host configuration.

vSphere 5.5 with HP OneView, 3PAR StoreServ 7400, Cisco Nexus 5600 and Brocade 6510 Deployment Guide
Page 159
The newly created host should have the same configuration as the reference host.
the new hosts’s VSS should be configured the same as reference hosts as well.

vSphere 5.5 with HP OneView, 3PAR StoreServ 7400, Cisco Nexus 5600 and Brocade 6510 Deployment Guide
Page 160

vSphere 5.5 with HP OneView, 3PAR StoreServ 7400, Cisco Nexus 5600 and Brocade 6510 Deployment Guide
Page 161
OneView for vCenter End to End Datastore Provisioning
Another powerful feature of OneView for vCenter with 3PAR/OneView integration is that users can create a datastore for the entire cluster without leaving vCenter.
The vCenter datastore creation wizard only takes a few mouse clicks but at the background, OV4VC finishes all of the following without users manual provisioning.
• OneView to attach SAN volume in server profile
• 3PAR to create hosts, volume and export the volume to the hosts
• Brocade SAN fabric for auto zoning
• vCenter cluster remote LUN access and create the user-defined datastore
To use this feature, we can first select the cluster we want to create the datastore and select “All HP Management Actions-> HP Create Datastore”.
Select the cluster we want to create datastore.

vSphere 5.5 with HP OneView, 3PAR StoreServ 7400, Cisco Nexus 5600 and Brocade 6510 Deployment Guide
Page 162
Define the number of capacity of the datastore and which 3PAR Common Provision Group the volume will be based on.
Provide the name of the datastore.

vSphere 5.5 with HP OneView, 3PAR StoreServ 7400, Cisco Nexus 5600 and Brocade 6510 Deployment Guide
Page 163
Confirm the policy defined previously and Finish.
After the process finishes, we can se on 3PAR, the two hosts were automatically created matching the two ESXi hosts in the cluster.

vSphere 5.5 with HP OneView, 3PAR StoreServ 7400, Cisco Nexus 5600 and Brocade 6510 Deployment Guide
Page 164
One volume was created and exported to the two ESXi hosts.
In OneView, both hosts profiles have a new SAN storage volume provisioned.
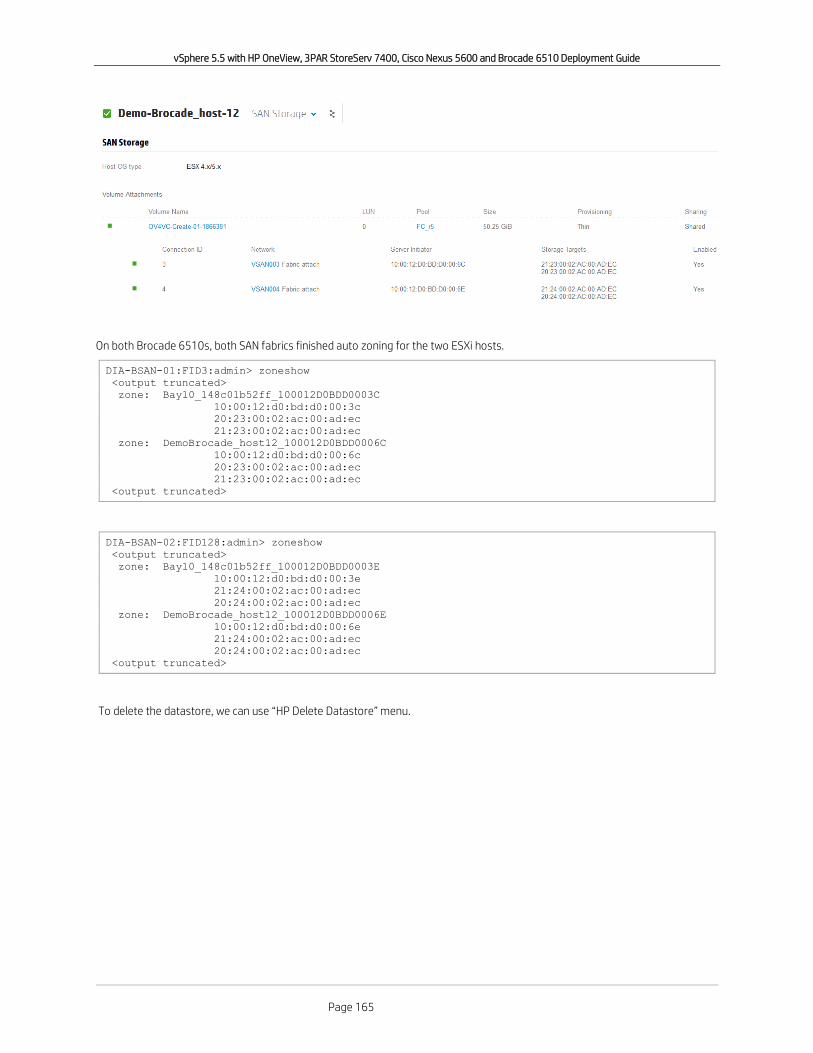
vSphere 5.5 with HP OneView, 3PAR StoreServ 7400, Cisco Nexus 5600 and Brocade 6510 Deployment Guide
Page 165
On both Brocade 6510s, both SAN fabrics finished auto zoning for the two ESXi hosts.
DIA-BSAN-01:FID3:admin> zoneshow
<output truncated>
zone: Bay10_148c01b52ff_100012D0BDD0003C
10:00:12:d0:bd:d0:00:3c
20:23:00:02:ac:00:ad:ec
21:23:00:02:ac:00:ad:ec
zone: DemoBrocade_host12_100012D0BDD0006C
10:00:12:d0:bd:d0:00:6c
20:23:00:02:ac:00:ad:ec
21:23:00:02:ac:00:ad:ec
<output truncated>
DIA-BSAN-02:FID128:admin> zoneshow
<output truncated>
zone: Bay10_148c01b52ff_100012D0BDD0003E
10:00:12:d0:bd:d0:00:3e
21:24:00:02:ac:00:ad:ec
20:24:00:02:ac:00:ad:ec
zone: DemoBrocade_host12_100012D0BDD0006E
10:00:12:d0:bd:d0:00:6e
21:24:00:02:ac:00:ad:ec
20:24:00:02:ac:00:ad:ec
<output truncated>
To delete the datastore, we can use “HP Delete Datastore” menu.

vSphere 5.5 with HP OneView, 3PAR StoreServ 7400, Cisco Nexus 5600 and Brocade 6510 Deployment Guide
Page 166
After confirmation, the datastore/LUN will be deleted at ESXi level, OneView profile will remove the SAN volume related to this datastore in server profiles, 3PAR will delete hosts and volume created and finally Brocade will remove the auto zoning created.

vSphere 5.5 with HP OneView, 3PAR StoreServ 7400, Cisco Nexus 5600 and Brocade 6510 Deployment Guide
Page 167
Conclusion
This paper is a technical deployment document that should allow the end reader to successfully deploy and deliver a comprehensive infrastructure of network, compute, and storage with a mix of vendor technologies.
Furthermore, this document highlights the true power of VMware vCenter integration with HP OneView Infrastructure Management, 3PAR StoreServ Storage and Virtual Connect Networking.