hp-ux sysfaultmgmt (system fault management) (sfm) …h20628. · 2019-01-17 ·...
TRANSCRIPT
HP-UX SysFaultMgmt (System FaultManagement) (SFM) Administrator GuideHP-UX 11i v3
HP Part Number: 762798-001Published: March 2014Edition: 1

Legal Notices
Copyright 2003, 2014 Hewlett-Packard Development Company, L.P.
Confidential computer software. Valid license from HP required for possession, use or copying. Consistent with FAR 12.211 and 12.212, CommercialComputer Software, Computer Software Documentation, and Technical Data for Commercial Items are licensed to the U.S. Government undervendor’s standard commercial license.
The information contained herein is subject to change without notice. The only warranties for HP products and services are set forth in the expresswarranty statements accompanying such products and services. Nothing here should be construed as constituting an additional warranty. HP shallnot be liable for technical or editorial errors or omissions contained herein.
UNIX is a registered trademark of The Open Group.
PostScript is a trademark of Adobe Systems Incorporated.
Intel and Itanium are trademarks of Intel Corporation in the U.S. and other countries.
ContentsHP secure development lifecycle......................................................................81 Introduction...............................................................................................9
Overview................................................................................................................................9Features and benefits..............................................................................................................10Components of SysFaultMgmt (System Fault Management) (SFM)..................................................11
EVWEB............................................................................................................................11EMT.................................................................................................................................11CIMUtil............................................................................................................................11IPMI event viewer...............................................................................................................11Providers...........................................................................................................................11
Instance providers.........................................................................................................11Indication providers.......................................................................................................14
User interfaces.......................................................................................................................18HP SIM (Systems Insight Manager).......................................................................................19HP SMH (System Management Homepage)...........................................................................19
Architecture...........................................................................................................................192 Installing SysFaultMgmt (System Fault Management) (SFM) software................21
Prerequisites...........................................................................................................................21On web................................................................................................................................21Installing SysFaultMgmt (System Fault Management) (SFM) software from the media........................22
Installing using the TUI........................................................................................................22Installing using the CLI........................................................................................................25
Installing SysFaultMgmt (System Fault Management) (SFM) software from the web...........................26On web............................................................................................................................26Installing and upgrading products from the bundle.................................................................26
Verifying the installation..........................................................................................................27Verifying the installation using the TUI...................................................................................27Verifying the installation using the CLI...................................................................................28
Removing SysFaultMgmt (System Fault Management) (SFM) software.............................................29Removing the software using the TUI.....................................................................................29Removing the software using the CLI.....................................................................................32
Verifying removal of SysFaultMgmt (System Fault Management) (SFM) software...............................33Verifying removal using the TUI............................................................................................33Verifying removal using the CLI............................................................................................33
3 Configuring indication providers.................................................................34Configuring indication filters....................................................................................................34Configuring error logging in SysFaultMgmt (System Fault Management) (SFM)................................35Configuring the monitoring mode.............................................................................................35
4 Administering indications and instances using HP SIM..................................37Creating subscriptions and viewing indications using HP SIM ......................................................37
Creating subscriptions........................................................................................................37Viewing Indications............................................................................................................42
Viewing instances...................................................................................................................485 SysFaultMgmt (System Fault Management) (SFM) support for different virtualizationenvironments...............................................................................................50
Introduction to various virtualization environments.......................................................................50HP-UX vPars and Integrity VM 6.x (referred as vPar Guest and VM Guest).................................50
Inventory handling........................................................................................................50Indication handling.......................................................................................................50
Contents 3
Error log processing on a 6.x (vPar/VM) Guest.................................................................50HP-UX Virtual Partitions (vPars) (referred as Legacy vPars).........................................................51Integrity Virtual Machine (VM) 4.x (referred as HPVM)............................................................51
Inventory handling........................................................................................................51Indication handling.......................................................................................................51
Summary of various virtualization environments..........................................................................516 Administering indications and instances using HP SMH.................................53
Viewing instances...................................................................................................................53Viewing information about processors...................................................................................53Viewing information about memory......................................................................................54Viewing information about System Summary..........................................................................55Viewing information about Cooling Devices...........................................................................55Viewing Power Supply instances..........................................................................................55Viewing Temperature status and events.................................................................................55Viewing Voltage status and events........................................................................................55Viewing FRU information.....................................................................................................55Viewing information about Management Processor.................................................................56Viewing information about Mem Error..................................................................................56Viewing information about Firmware information....................................................................56Viewing information about Onboard Administrator.................................................................56Viewing information about Complex-wide info.......................................................................56Viewing information about Cell Board..................................................................................56Viewing Partition information...............................................................................................57Viewing information about Blade.........................................................................................57Viewing information about Cell Blade...................................................................................57Viewing Health Test report of Memory..................................................................................57Viewing Health Test report of processors...............................................................................57
Administering indications using Evweb......................................................................................58Evweb overview.................................................................................................................58Launching Evweb for administration......................................................................................59Creating Evweb event subscriptions......................................................................................59
Creating an event subscription using the GUI....................................................................60Creating an event subscription using the CLI.....................................................................60Copying and creating a new event subscription using the GUI............................................61
Modifying Evweb event subscriptions....................................................................................61Modifying an event subscription using GUI.......................................................................62Modifying an event subscription using CLI........................................................................62Copying and modifying an event subscription using the GUI...............................................63
Deleting Evweb event subscriptions.......................................................................................64Deleting an event subscription using the GUI....................................................................64Deleting an event subscription using the CLI......................................................................64
Configuring email consumer................................................................................................65Viewing event subscriptions using Evweb...................................................................................65
Viewing Evweb event subscriptions.......................................................................................66Viewing a summary of an Evweb event subscription using the GUI.......................................66Viewing a Summary of an Evweb event Subscription using the CLI.......................................66Viewing details of an event subscription using the GUI.......................................................67Viewing details of an event subscription using the CLI........................................................67
Viewing external event subscriptions.....................................................................................68Viewing an external event subscription using the GUI.........................................................68Viewing external event subscriptions using the CLI.............................................................68
Viewing indications using Evweb..............................................................................................69Launching Evweb for viewing WBEM indications...................................................................69Searching for the subscribed WBEM events...........................................................................70
4 Contents
Filtering WBEM events using the GUI...............................................................................70Searching for the subscribed WBEM events using the GUI..................................................70Searching for the subscribed WBEM events using the CLI...................................................70
Viewing summary information about WBEM events................................................................71Viewing summary information using GUI..........................................................................71Viewing summary information using CLI...........................................................................71
Viewing detailed information about WBEM events.................................................................71Viewing detailed information using GUI...........................................................................71Viewing Detailed Information using CLI............................................................................72
Deleting WBEM Events from the Event Archive.......................................................................72Deleting an Event using GUI...........................................................................................72Deleting an Event using CLI............................................................................................72
Viewing Low Level Logs using Evweb.........................................................................................73Overview..........................................................................................................................73Searching Low Level Logs using Simple Search.......................................................................74Searching Low Level Logs using Advanced Search..................................................................75
Searching Low Level Logs using CLI..................................................................................75Viewing List of Low Level Logs..............................................................................................75
Viewing List Of Low Level Logs using GUI.........................................................................75Viewing List Of Low Level Logs using CLI...........................................................................76
Viewing Details of Low Level Logs.........................................................................................76Viewing Details Of Low Level Logs using GUI....................................................................76Viewing Details Of Low Level Logs using CLI.....................................................................77
Tracing Evweb........................................................................................................................77Enabling Tracing using the Evweb GUI.................................................................................79Enabling Tracing using the Evweb CLI...................................................................................79Modifying Tracing using the Evweb GUI...............................................................................80Modifying Tracing using the Evweb CLI.................................................................................80Disabling Tracing using the Evweb GUI................................................................................80Disabling Tracing using the Evweb CLI..................................................................................81
Querying the Common Error Repository.....................................................................................81EMT Overview...................................................................................................................81Launching EMT..................................................................................................................82Querying the CER using Simple Search................................................................................82
Querying CER for Events using the GUI............................................................................82Querying CER for Events using the CLI.............................................................................82
Querying CER using Advanced Search.................................................................................83Viewing an Event from CER.................................................................................................83
Viewing Summary Information using the GUI....................................................................83Viewing Summary Information using the CLI......................................................................83Viewing Detailed Information using the GUI......................................................................84Viewing Detailed Information using the CLI.......................................................................84
Administering Events in CER.....................................................................................................84Adding a Custom Solution..................................................................................................84
Adding a Custom Solution using the GUI..........................................................................84Adding a Custom Solution using the CLI...........................................................................85
Modifying a Custom Solution...............................................................................................85Modifying a Custom Solution using the GUI......................................................................85Modifying a Custom Solution using the CLI.......................................................................86
Deleting a Custom Solution ................................................................................................86Deleting a Custom Solution using the GUI........................................................................86Deleting a Custom Solution using the CLI..........................................................................86
Tracing EMT..........................................................................................................................87Enabling Tracing using the EMT GUI....................................................................................87Enabling Tracing using the EMT CLI......................................................................................88
Contents 5
Modifying Tracing using the EMT GUI..................................................................................88Modifying Tracing using the EMT CLI....................................................................................88Disabling Tracing using the EMT GUI...................................................................................88Disabling Tracing using the EMT CLI.....................................................................................89
7 Troubleshooting SysFaultMgmt (System Fault Management) (SFM)...................90Troubleshooting instance providers............................................................................................90Troubleshooting indication providers.........................................................................................95Troubleshooting EVWEB........................................................................................................100
A EMT Message Definition.........................................................................105B Interpretation of HP SMH instances...........................................................108
Processor instances...............................................................................................................109Memory instances................................................................................................................110System Summary instances.....................................................................................................113Cooling Device instances.......................................................................................................115Power supply instances..........................................................................................................116Temperature instances...........................................................................................................117Voltage instances..................................................................................................................118FRU Information instances......................................................................................................119Management Processor instances...........................................................................................120Memory Error instances.........................................................................................................121Firmware Information instances...............................................................................................124Enclosure Information instances..............................................................................................125Complex-wide Info instances..................................................................................................126Cell Board instances.............................................................................................................128Partition Information instances................................................................................................130Blade instances....................................................................................................................132Cell Blade instances..............................................................................................................133Launch the Onboard Administrator.........................................................................................134
C Syslog property order.............................................................................136D Syslog facility and level...........................................................................137E SysFaultMgmt (System Fault Management) (SFM) configuration files...............138
DBConfig.xml.......................................................................................................................138FMLoggerConfig.xml.............................................................................................................139evweb.conf..........................................................................................................................140InternalHealthDaemon.cfg.....................................................................................................140SFMConfig.xml....................................................................................................................141
F Interdependency between SysFaultMgmt (System Fault Management) (SFM) andSysFW.....................................................................................................142Glossary..................................................................................................143Index.......................................................................................................1468 Support and other resources....................................................................148
About this document ............................................................................................................148Intended audience................................................................................................................148Publishing history..................................................................................................................148Document organization.........................................................................................................148
Typographic conventions...................................................................................................149HP-UX release name and release identifier..........................................................................149
New and changed information in this edition...........................................................................150Related information...............................................................................................................150
6 Contents

9 Documentation feedback.........................................................................151
Contents 7

HP secure development lifecycleStarting with HP-UX 11i v3 March 2013 update release, HP secure development lifecycle providesthe ability to authenticate HP-UX software. Software delivered through this release has been digitallysigned using HP's private key. You can now verify the authenticity of the software, before installingthe products, delivered through this release.To verify the software signatures in signed depot, the following products must be installed on yoursystem:• B.11.31.1303 or later of SD (Software Distributor)
• A.01.01.07 or later of HP-UX Whitelisting (WhiteListInf)To verify the signatures, run: /usr/sbin/swsign -v -s <depot_path>
For more information, see Software Distributor documentation at http://www.hp.com/go/sd-docs.
NOTE: Ignite-UX software delivered with HP-UX 11i v3 March 2014 release or later supportsverification of the software signatures in signed depot or media, during cold installation. For moreinformation, see Ignite-UX documentation at http://www.hp.com/go/ignite-ux-docs.
8

1 IntroductionThis document is about administration and the most recent product information on HP-UX WBEMSysFaultMgmt, also known as System Fault Management or SFM, which is supported on HP-UX11i v3 operating systems. Table 1 (page 9) lists the product version for which the document isapplicable.
Table 1 Documentation Support for SysFaultMgmt (System Fault Management) (SFM)
VersionOperating system
C.07.12.06.01HP-UX 11i v3
SysFaultMgmt (System Fault Management) (SFM) supports HP Integrity Superdome 2(HP Superdome 2), HP Integrity BL860c i2, BL870c i2 and BL890c i2 ServerBlades, rx2800 i2, HP Integrity BL860c i4, BL870c i4, BL890c i4, rx2800i4 and rx2900 i4 in addition to other HP Integrity Servers. All the features supported on systemsrunning the HP-UX 11i v3 operating system are available for HP Integrity Servers.This chapter introduces you to the SysFaultMgmt (System Fault Management) (SFM) softwareand the tools that SysFaultMgmt (System Fault Management) (SFM) includes.The chapter discusses the following topics:
• “Overview” (page 9)
• “Features and benefits” (page 10)
• “Components of SysFaultMgmt (System Fault Management) (SFM)” (page 11)
• “User interfaces” (page 18)
• “Architecture” (page 19)
OverviewSysFaultMgmt (System Fault Management) (SFM) software is a collection of tools used to monitorthe health of HP servers running HP-UX that report hardware errors and take corrective measures,where applicable, to ensure availability and reliability of the server. SysFaultMgmt (System FaultManagement) (SFM) retrieves information about a system’s hardware devices such as CPU, memory,power supply, and cooling devices. SysFaultMgmt (System Fault Management) (SFM) operateswithin the Web-Based Enterprise Management (WBEM) environment.WBEM is an industry-wide standards-based initiative to aid the management of large scale systems.HP-UX WBEM environment has the following components:• A WBEM infrastructure, such as HP WBEM services. SysFaultMgmt (System Fault
Management) (SFM) uses the Common Information Model Object Manager (CIMOM) WBEMservice to route query requests and responses between WBEM providers and clients. Clientsmust be compliant with the Common Information Model (CIM) (2.8 or later) schema of theDistributed Management Task Force (DMTF).
• A WBEM-based network management application, such as the HP Systems Insight Manager(HP SIM) and HP System Management Homepage (HP SMH), a user interface for controllingand monitoring resources within a large-scale system. SysFaultMgmt (System FaultManagement) (SFM) can use HP SIM to display query information for local systems.
• WBEM providers that obtain information. SysFaultMgmt (System Fault Management) (SFM)includes instance and indication providers, which are one set of WBEM providers amongmany. SysFaultMgmt (System Fault Management) (SFM) providers query and provide systemhardware property and event information.
Overview 9
You must be familiar with WBEM technology before reading this guide. For more information onWBEM technology, see the HP WBEM Services for HP-UX and Linux System Administrator's Guideand HP WBEM Services Release Notes at:http://www.hp.com/go/hpux-networking-docs.
Features and benefitsSysFaultMgmt (System Fault Management) (SFM) dynamically queries property informationabout a hardware device on a local system. It offers the following features and benefits:
• Displays information on standards-compliant graphical and command-line system managementapplications, such as HP WEBES, HP SIM, and HP SMH.
• Operates within the WBEM environment.
• Supports the Central Management Server (CMS) running on HP-UX, Linux, or Windows.
• Enables you to view and administer WBEM indications.
• Provides the same features and benefits as those found in the EMS hardware monitors.
10 Introduction
Components of SysFaultMgmt (System Fault Management) (SFM)This section discusses the following topics:
• EVWEB
• Error Management Technology (EMT)
• CIMUtil
• IPMI Event Viewer
• providers
EVWEBEVWEB is a component of SysFaultMgmt (System Fault Management) (SFM) that enables youto administer and view WBEM indications generated on the local system on which SysFaultMgmt(System Fault Management) (SFM) is installed. For more information on EVWEB, see “Evweboverview” (page 58).
EMTEMT is a component of SysFaultMgmt (System Fault Management) (SFM) that enables you toview and administer information about errors which can occur on the server. For more informationon EMT, see “EMT Overview” (page 81).
CIMUtilUsing CIMUtil, you can enumerate instances related to various devices and create filters, handlers,and subscriptions supported by SysFaultMgmt (System Fault Management) (SFM). For moreinformation on CIMUtil, see man CIMUtil.
IPMI event viewerStarting March 2009 release, the IPMI Event Viewer, slview will be delivered as part ofSysFaultMgmt. In the earlier releases it was delivered as part of Online Diagnostics bundle.IPMI Event Viewer is used to display low-level system log information.Starting September 2009 release, the IPMI Event Viewer support will be available for the new IPMIevent format.
ProvidersSysFaultMgmt (System Fault Management) (SFM) providers are components of SysFaultMgmt(System Fault Management) (SFM) that retrieve information about the inventory on a system andthe events that occur on the hardware resources. SysFaultMgmt (System Fault Management)(SFM) providers can be classified as instance providers or as indication providers.
Instance providersOn request, an SysFaultMgmt (System Fault Management) (SFM) instance provider dynamicallyqueries the local or remote system for the property information described in Table 2 and reportsthe information to the CIMOM.
Table 2 Instance providers
DescriptionInstance provider
Blade instance provider retrieves the following information:Blade instance provider:BladeProvider • Blade IDBladeStatusProvider • Blade Physical location
• Blade Hardware path
Components of SysFaultMgmt (System Fault Management) (SFM) 11
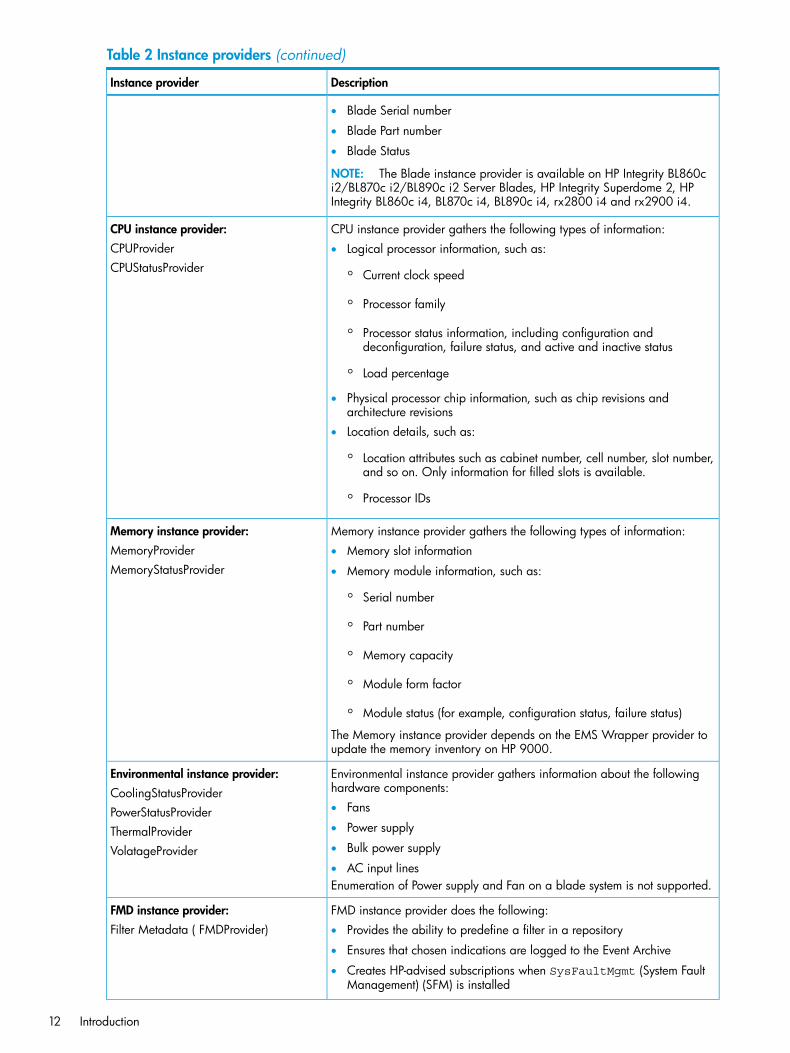
Table 2 Instance providers (continued)
DescriptionInstance provider
• Blade Serial number
• Blade Part number
• Blade Status
NOTE: The Blade instance provider is available on HP Integrity BL860ci2/BL870c i2/BL890c i2 Server Blades, HP Integrity Superdome 2, HPIntegrity BL860c i4, BL870c i4, BL890c i4, rx2800 i4 and rx2900 i4.
CPU instance provider gathers the following types of information:CPU instance provider:CPUProvider • Logical processor information, such as:
Current clock speedCPUStatusProvider ◦◦ Processor family
◦ Processor status information, including configuration anddeconfiguration, failure status, and active and inactive status
◦ Load percentage
• Physical processor chip information, such as chip revisions andarchitecture revisions
• Location details, such as:
◦ Location attributes such as cabinet number, cell number, slot number,and so on. Only information for filled slots is available.
◦ Processor IDs
Memory instance provider gathers the following types of information:Memory instance provider:MemoryProvider • Memory slot informationMemoryStatusProvider • Memory module information, such as:
◦ Serial number
◦ Part number
◦ Memory capacity
◦ Module form factor
◦ Module status (for example, configuration status, failure status)
The Memory instance provider depends on the EMS Wrapper provider toupdate the memory inventory on HP 9000.
Environmental instance provider gathers information about the followinghardware components:
Environmental instance provider:CoolingStatusProvider
• FansPowerStatusProvider• Power supplyThermalProvider• Bulk power supplyVolatageProvider• AC input linesEnumeration of Power supply and Fan on a blade system is not supported.
FMD instance provider does the following:FMD instance provider:Filter Metadata ( FMDProvider) • Provides the ability to predefine a filter in a repository
• Ensures that chosen indications are logged to the Event Archive
• Creates HP-advised subscriptions when SysFaultMgmt (System FaultManagement) (SFM) is installed
12 Introduction
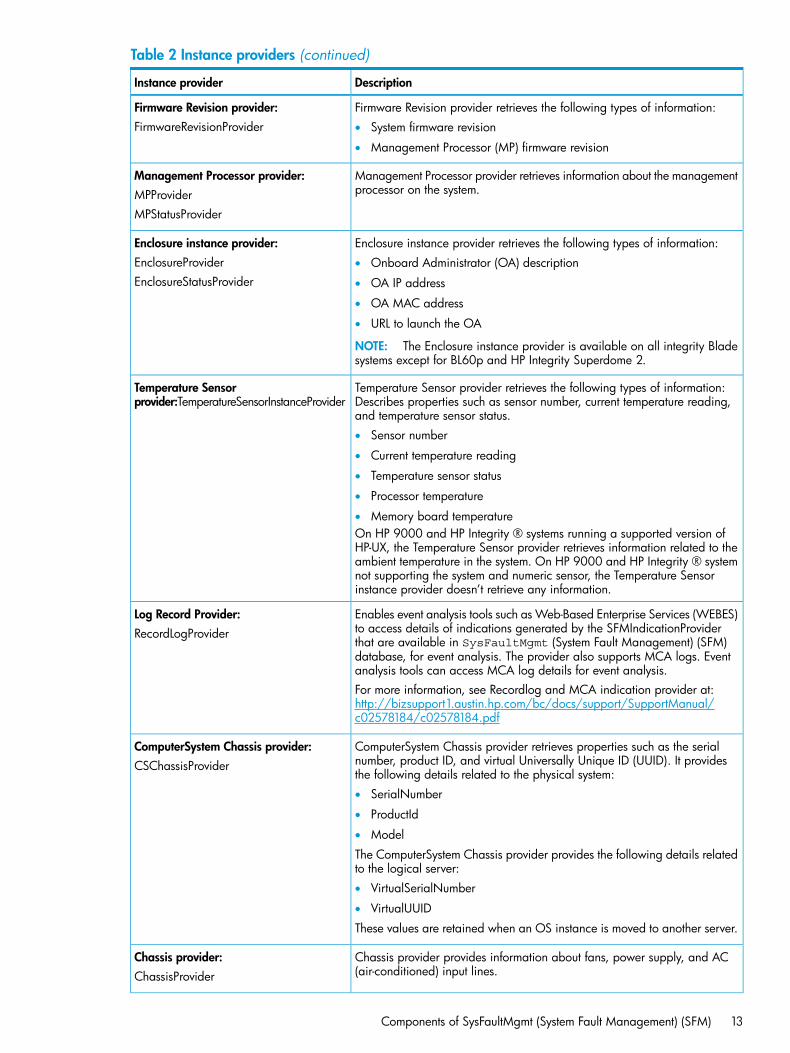
Table 2 Instance providers (continued)
DescriptionInstance provider
Firmware Revision provider retrieves the following types of information:Firmware Revision provider:FirmwareRevisionProvider • System firmware revision
• Management Processor (MP) firmware revision
Management Processor provider retrieves information about the managementprocessor on the system.
Management Processor provider:MPProviderMPStatusProvider
Enclosure instance provider retrieves the following types of information:Enclosure instance provider:EnclosureProvider • Onboard Administrator (OA) descriptionEnclosureStatusProvider • OA IP address
• OA MAC address
• URL to launch the OA
NOTE: The Enclosure instance provider is available on all integrity Bladesystems except for BL60p and HP Integrity Superdome 2.
Temperature Sensor provider retrieves the following types of information:Describes properties such as sensor number, current temperature reading,and temperature sensor status.
Temperature Sensorprovider:TemperatureSensorInstanceProvider
• Sensor number
• Current temperature reading
• Temperature sensor status
• Processor temperature
• Memory board temperatureOn HP 9000 and HP Integrity ® systems running a supported version ofHP-UX, the Temperature Sensor provider retrieves information related to theambient temperature in the system. On HP 9000 and HP Integrity ® systemnot supporting the system and numeric sensor, the Temperature Sensorinstance provider doesn’t retrieve any information.
Enables event analysis tools such as Web-Based Enterprise Services (WEBES)to access details of indications generated by the SFMIndicationProvider
Log Record Provider:RecordLogProvider
that are available in SysFaultMgmt (System Fault Management) (SFM)database, for event analysis. The provider also supports MCA logs. Eventanalysis tools can access MCA log details for event analysis.For more information, see Recordlog and MCA indication provider at:http://bizsupport1.austin.hp.com/bc/docs/support/SupportManual/c02578184/c02578184.pdf
ComputerSystem Chassis provider retrieves properties such as the serialnumber, product ID, and virtual Universally Unique ID (UUID). It providesthe following details related to the physical system:
ComputerSystem Chassis provider:CSChassisProvider
• SerialNumber
• ProductId
• Model
The ComputerSystem Chassis provider provides the following details relatedto the logical server:• VirtualSerialNumber
• VirtualUUID
These values are retained when an OS instance is moved to another server.
Chassis provider provides information about fans, power supply, and AC(air-conditioned) input lines.
Chassis provider:ChassisProvider
Components of SysFaultMgmt (System Fault Management) (SFM) 13
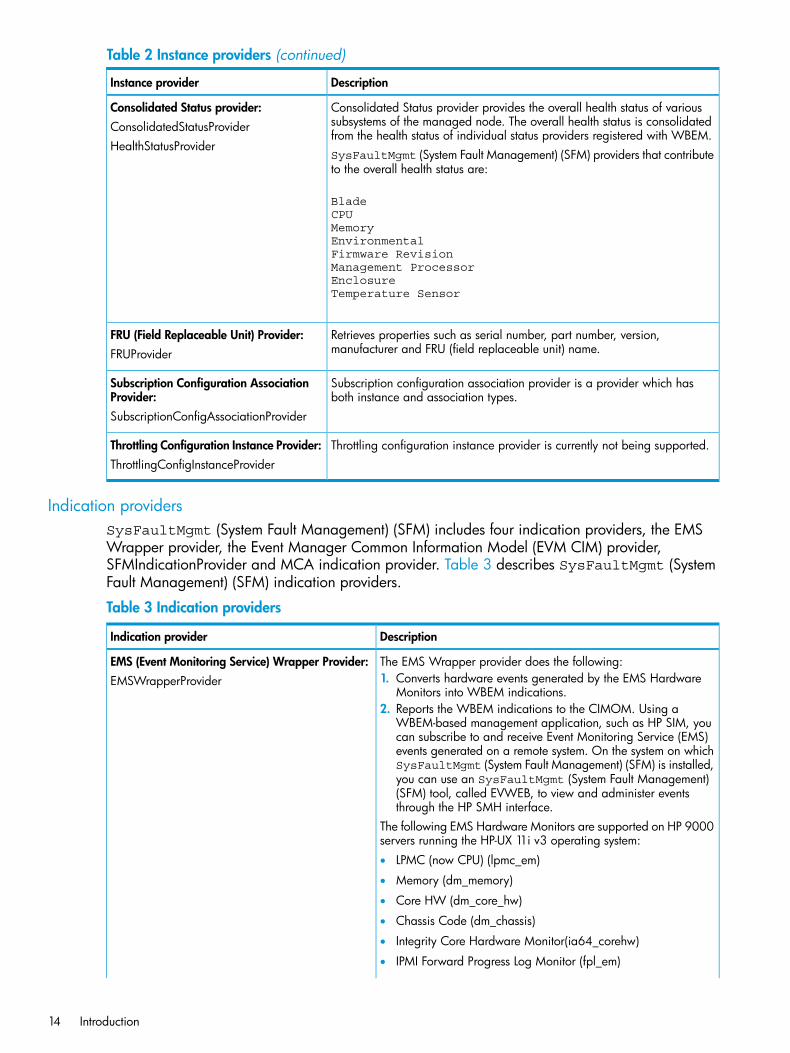
Table 2 Instance providers (continued)
DescriptionInstance provider
Consolidated Status provider provides the overall health status of varioussubsystems of the managed node. The overall health status is consolidatedfrom the health status of individual status providers registered with WBEM.
Consolidated Status provider:ConsolidatedStatusProviderHealthStatusProvider
SysFaultMgmt (System Fault Management) (SFM) providers that contributeto the overall health status are:
BladeCPUMemoryEnvironmentalFirmware RevisionManagement ProcessorEnclosureTemperature Sensor
Retrieves properties such as serial number, part number, version,manufacturer and FRU (field replaceable unit) name.
FRU (Field Replaceable Unit) Provider:FRUProvider
Subscription configuration association provider is a provider which hasboth instance and association types.
Subscription Configuration AssociationProvider:SubscriptionConfigAssociationProvider
Throttling configuration instance provider is currently not being supported.Throttling Configuration Instance Provider:ThrottlingConfigInstanceProvider
Indication providersSysFaultMgmt (System Fault Management) (SFM) includes four indication providers, the EMSWrapper provider, the Event Manager Common Information Model (EVM CIM) provider,SFMIndicationProvider and MCA indication provider. Table 3 describes SysFaultMgmt (SystemFault Management) (SFM) indication providers.
Table 3 Indication providers
DescriptionIndication provider
The EMS Wrapper provider does the following:EMS (Event Monitoring Service) Wrapper Provider:EMSWrapperProvider 1. Converts hardware events generated by the EMS Hardware
Monitors into WBEM indications.2. Reports the WBEM indications to the CIMOM. Using a
WBEM-based management application, such as HP SIM, youcan subscribe to and receive Event Monitoring Service (EMS)events generated on a remote system. On the system on whichSysFaultMgmt (System Fault Management) (SFM) is installed,you can use an SysFaultMgmt (System Fault Management)(SFM) tool, called EVWEB, to view and administer eventsthrough the HP SMH interface.
The following EMS Hardware Monitors are supported on HP 9000servers running the HP-UX 11i v3 operating system:• LPMC (now CPU) (lpmc_em)
• Memory (dm_memory)
• Core HW (dm_core_hw)
• Chassis Code (dm_chassis)
• Integrity Core Hardware Monitor(ia64_corehw)
• IPMI Forward Progress Log Monitor (fpl_em)
14 Introduction
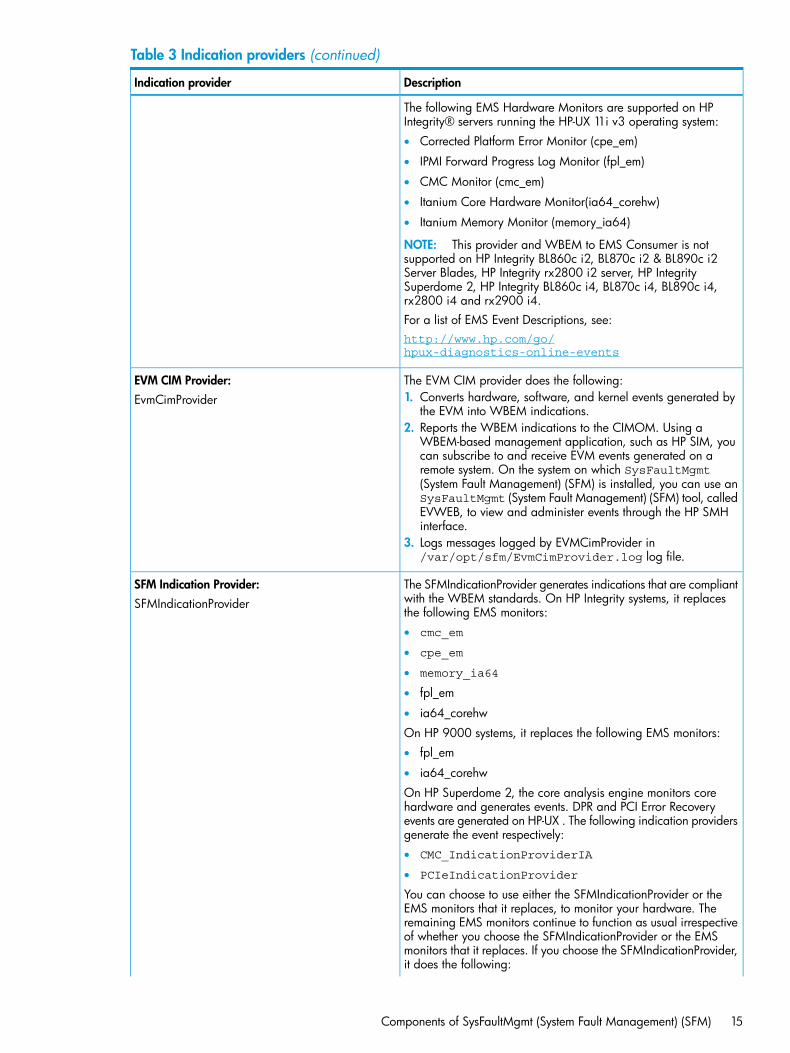
Table 3 Indication providers (continued)
DescriptionIndication provider
The following EMS Hardware Monitors are supported on HPIntegrity® servers running the HP-UX 11i v3 operating system:• Corrected Platform Error Monitor (cpe_em)
• IPMI Forward Progress Log Monitor (fpl_em)
• CMC Monitor (cmc_em)
• Itanium Core Hardware Monitor(ia64_corehw)
• Itanium Memory Monitor (memory_ia64)
NOTE: This provider and WBEM to EMS Consumer is notsupported on HP Integrity BL860c i2, BL870c i2 & BL890c i2Server Blades, HP Integrity rx2800 i2 server, HP IntegritySuperdome 2, HP Integrity BL860c i4, BL870c i4, BL890c i4,rx2800 i4 and rx2900 i4.For a list of EMS Event Descriptions, see:http://www.hp.com/go/hpux-diagnostics-online-events
The EVM CIM provider does the following:EVM CIM Provider:EvmCimProvider 1. Converts hardware, software, and kernel events generated by
the EVM into WBEM indications.2. Reports the WBEM indications to the CIMOM. Using a
WBEM-based management application, such as HP SIM, youcan subscribe to and receive EVM events generated on aremote system. On the system on which SysFaultMgmt(System Fault Management) (SFM) is installed, you can use anSysFaultMgmt (System Fault Management) (SFM) tool, calledEVWEB, to view and administer events through the HP SMHinterface.
3. Logs messages logged by EVMCimProvider in/var/opt/sfm/EvmCimProvider.log log file.
The SFMIndicationProvider generates indications that are compliantwith the WBEM standards. On HP Integrity systems, it replacesthe following EMS monitors:
SFM Indication Provider:SFMIndicationProvider
• cmc_em
• cpe_em
• memory_ia64
• fpl_em
• ia64_corehw
On HP 9000 systems, it replaces the following EMS monitors:• fpl_em
• ia64_corehw
On HP Superdome 2, the core analysis engine monitors corehardware and generates events. DPR and PCI Error Recoveryevents are generated on HP-UX . The following indication providersgenerate the event respectively:• CMC_IndicationProviderIA
• PCIeIndicationProvider
You can choose to use either the SFMIndicationProvider or theEMS monitors that it replaces, to monitor your hardware. Theremaining EMS monitors continue to function as usual irrespectiveof whether you choose the SFMIndicationProvider or the EMSmonitors that it replaces. If you choose the SFMIndicationProvider,it does the following:
Components of SysFaultMgmt (System Fault Management) (SFM) 15
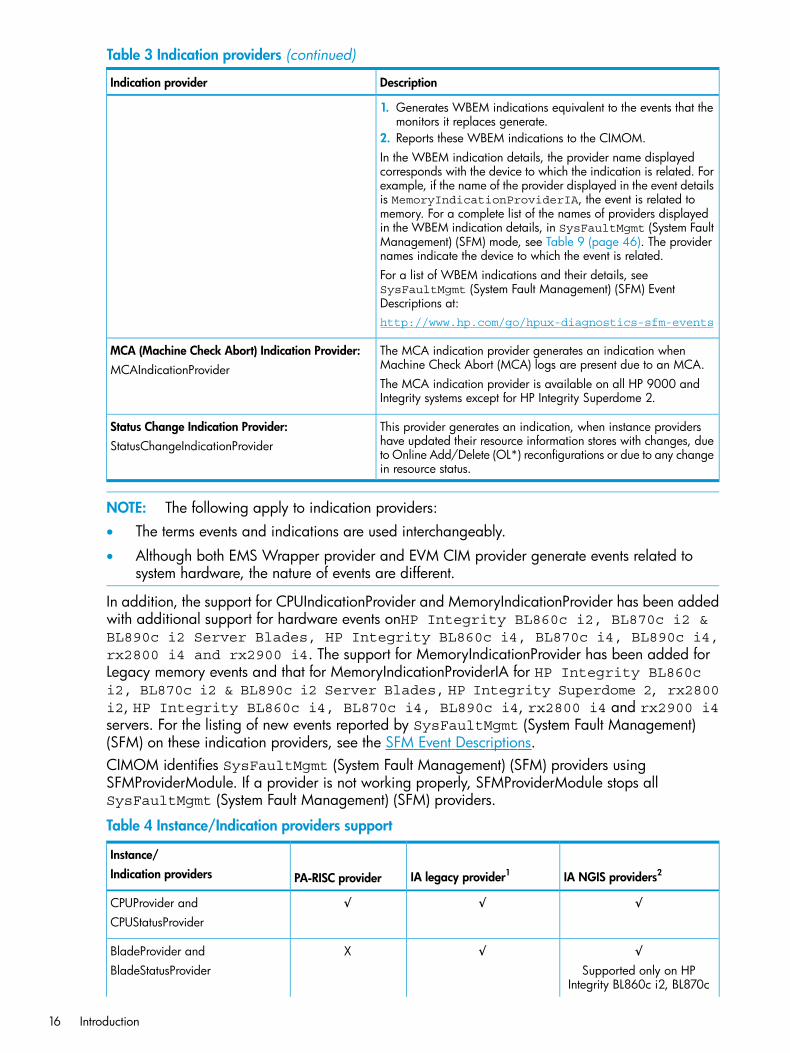
Table 3 Indication providers (continued)
DescriptionIndication provider
1. Generates WBEM indications equivalent to the events that themonitors it replaces generate.
2. Reports these WBEM indications to the CIMOM.In the WBEM indication details, the provider name displayedcorresponds with the device to which the indication is related. Forexample, if the name of the provider displayed in the event detailsis MemoryIndicationProviderIA, the event is related tomemory. For a complete list of the names of providers displayedin the WBEM indication details, in SysFaultMgmt (System FaultManagement) (SFM) mode, see Table 9 (page 46). The providernames indicate the device to which the event is related.For a list of WBEM indications and their details, seeSysFaultMgmt (System Fault Management) (SFM) EventDescriptions at:http://www.hp.com/go/hpux-diagnostics-sfm-events
The MCA indication provider generates an indication whenMachine Check Abort (MCA) logs are present due to an MCA.
MCA (Machine Check Abort) Indication Provider:MCAIndicationProvider
The MCA indication provider is available on all HP 9000 andIntegrity systems except for HP Integrity Superdome 2.
This provider generates an indication, when instance providershave updated their resource information stores with changes, due
Status Change Indication Provider:StatusChangeIndicationProvider
to Online Add/Delete (OL*) reconfigurations or due to any changein resource status.
NOTE: The following apply to indication providers:• The terms events and indications are used interchangeably.
• Although both EMS Wrapper provider and EVM CIM provider generate events related tosystem hardware, the nature of events are different.
In addition, the support for CPUIndicationProvider and MemoryIndicationProvider has been addedwith additional support for hardware events onHP Integrity BL860c i2, BL870c i2 &BL890c i2 Server Blades, HP Integrity BL860c i4, BL870c i4, BL890c i4,rx2800 i4 and rx2900 i4. The support for MemoryIndicationProvider has been added forLegacy memory events and that for MemoryIndicationProviderIA for HP Integrity BL860ci2, BL870c i2 & BL890c i2 Server Blades, HP Integrity Superdome 2, rx2800i2, HP Integrity BL860c i4, BL870c i4, BL890c i4, rx2800 i4 and rx2900 i4servers. For the listing of new events reported by SysFaultMgmt (System Fault Management)(SFM) on these indication providers, see the SFM Event Descriptions.CIMOM identifies SysFaultMgmt (System Fault Management) (SFM) providers usingSFMProviderModule. If a provider is not working properly, SFMProviderModule stops allSysFaultMgmt (System Fault Management) (SFM) providers.
Table 4 Instance/Indication providers support
IA NGIS providers2IA legacy provider1PA-RISC provider
Instance/Indication providers
√√√CPUProvider andCPUStatusProvider
√√ХBladeProvider andSupported only on HP
Integrity BL860c i2, BL870cBladeStatusProvider
16 Introduction
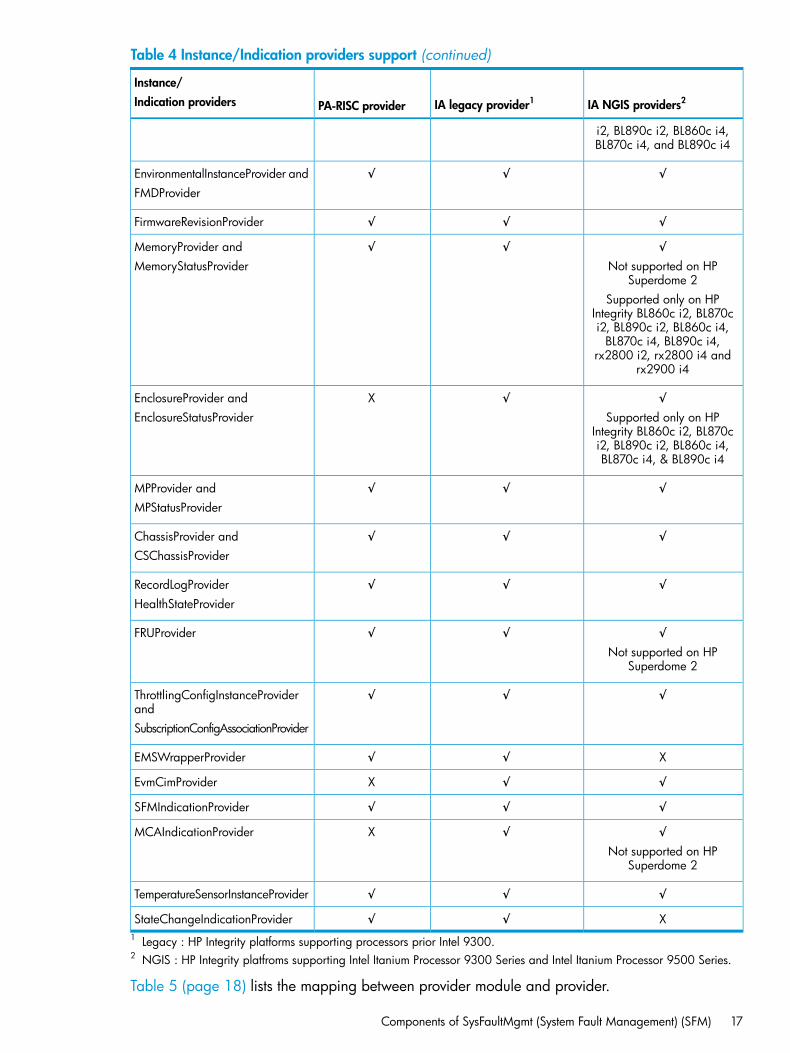
Table 4 Instance/Indication providers support (continued)
IA NGIS providers2IA legacy provider1PA-RISC provider
Instance/Indication providers
i2, BL890c i2, BL860c i4,BL870c i4, and BL890c i4
√√√EnvironmentalInstanceProvider andFMDProvider
√√√FirmwareRevisionProvider
√√√MemoryProvider andNot supported on HP
Superdome 2MemoryStatusProvider
Supported only on HPIntegrity BL860c i2, BL870ci2, BL890c i2, BL860c i4,
BL870c i4, BL890c i4,rx2800 i2, rx2800 i4 and
rx2900 i4
√√ХEnclosureProvider andSupported only on HP
Integrity BL860c i2, BL870cEnclosureStatusProvider
i2, BL890c i2, BL860c i4,BL870c i4, & BL890c i4
√√√MPProvider andMPStatusProvider
√√√ChassisProvider andCSChassisProvider
√√√RecordLogProviderHealthStateProvider
√√√FRUProviderNot supported on HP
Superdome 2
√√√ThrottlingConfigInstanceProviderandSubscriptionConfigAssociationProvider
Х√√EMSWrapperProvider
√√ХEvmCimProvider
√√√SFMIndicationProvider
√√XMCAIndicationProviderNot supported on HP
Superdome 2
√√√TemperatureSensorInstanceProvider
X√√StateChangeIndicationProvider1 Legacy : HP Integrity platforms supporting processors prior Intel 9300.2 NGIS : HP Integrity platfroms supporting Intel Itanium Processor 9300 Series and Intel Itanium Processor 9500 Series.
Table 5 (page 18) lists the mapping between provider module and provider.
Components of SysFaultMgmt (System Fault Management) (SFM) 17
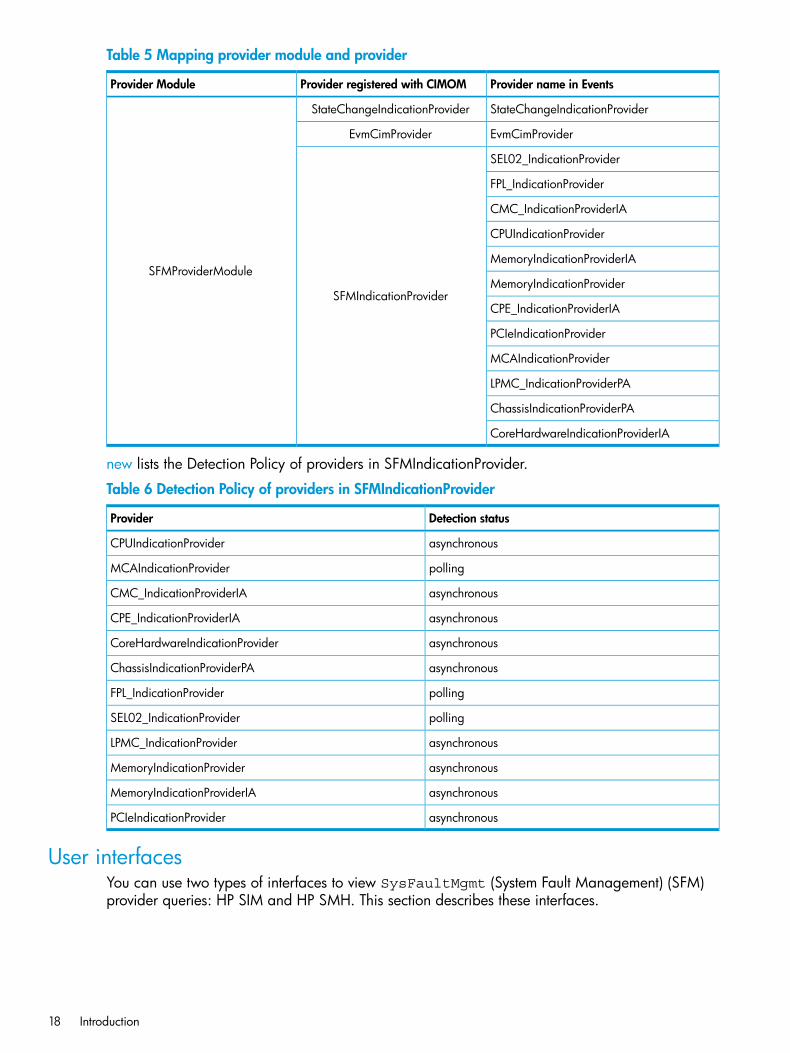
Table 5 Mapping provider module and provider
Provider name in EventsProvider registered with CIMOMProvider Module
StateChangeIndicationProviderStateChangeIndicationProvider
SFMProviderModule
EvmCimProviderEvmCimProvider
SEL02_IndicationProvider
SFMIndicationProvider
FPL_IndicationProvider
CMC_IndicationProviderIA
CPUIndicationProvider
MemoryIndicationProviderIA
MemoryIndicationProvider
CPE_IndicationProviderIA
PCIeIndicationProvider
MCAIndicationProvider
LPMC_IndicationProviderPA
ChassisIndicationProviderPA
CoreHardwareIndicationProviderIA
new lists the Detection Policy of providers in SFMIndicationProvider.
Table 6 Detection Policy of providers in SFMIndicationProvider
Detection statusProvider
asynchronousCPUIndicationProvider
pollingMCAIndicationProvider
asynchronousCMC_IndicationProviderIA
asynchronousCPE_IndicationProviderIA
asynchronousCoreHardwareIndicationProvider
asynchronousChassisIndicationProviderPA
pollingFPL_IndicationProvider
pollingSEL02_IndicationProvider
asynchronousLPMC_IndicationProvider
asynchronousMemoryIndicationProvider
asynchronousMemoryIndicationProviderIA
asynchronousPCIeIndicationProvider
User interfacesYou can use two types of interfaces to view SysFaultMgmt (System Fault Management) (SFM)provider queries: HP SIM and HP SMH. This section describes these interfaces.
18 Introduction
HP SIM (Systems Insight Manager)HP SIM is a WBEM based user interface for controlling and monitoring resources within a large-scalesystem. You can use HP SIM to create subscriptions and to view indications and instances on aremote system. You must install HP SIM on the CMS. You can use HP SIM to launch HP SMH.
HP SMH (System Management Homepage)HP SMH is a secure, Web-based management application. You must install HP SMH on a localsystem to view hardware configuration, status data, performance metrics, system thresholds, andsoftware version control information. You can also launch HP SMH from HP SIM remotely.
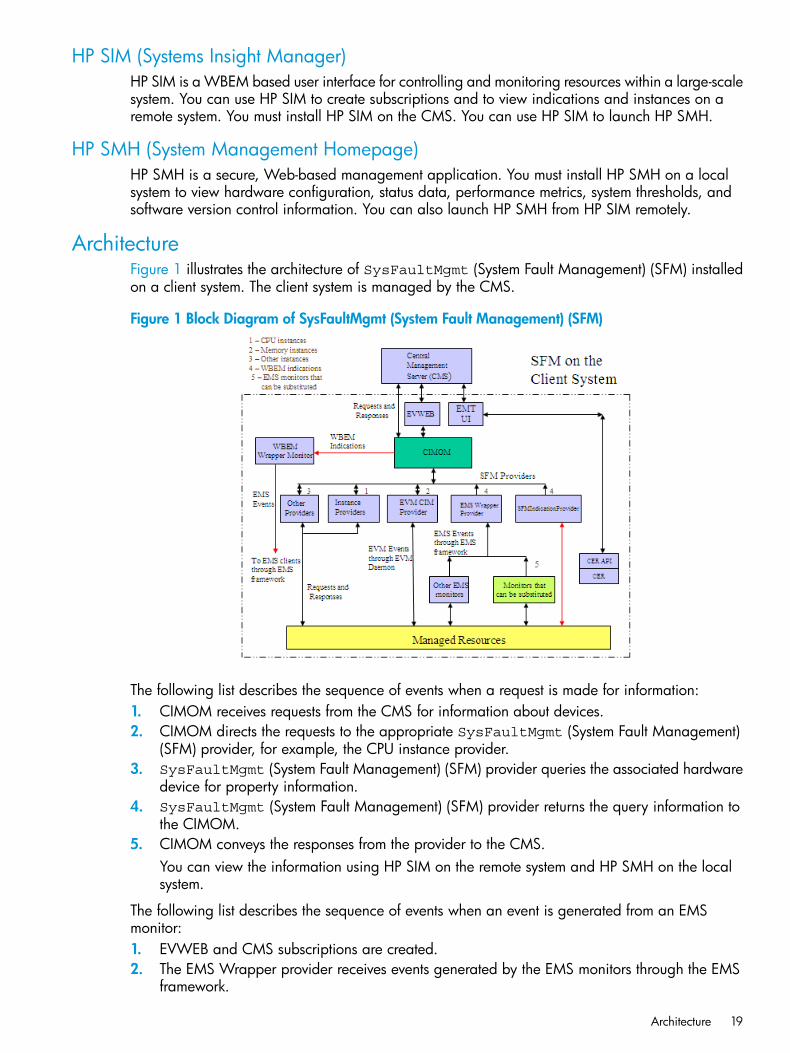
ArchitectureFigure 1 illustrates the architecture of SysFaultMgmt (System Fault Management) (SFM) installedon a client system. The client system is managed by the CMS.
Figure 1 Block Diagram of SysFaultMgmt (System Fault Management) (SFM)
The following list describes the sequence of events when a request is made for information:1. CIMOM receives requests from the CMS for information about devices.2. CIMOM directs the requests to the appropriate SysFaultMgmt (System Fault Management)
(SFM) provider, for example, the CPU instance provider.3. SysFaultMgmt (System Fault Management) (SFM) provider queries the associated hardware
device for property information.4. SysFaultMgmt (System Fault Management) (SFM) provider returns the query information to
the CIMOM.5. CIMOM conveys the responses from the provider to the CMS.
You can view the information using HP SIM on the remote system and HP SMH on the localsystem.
The following list describes the sequence of events when an event is generated from an EMSmonitor:1. EVWEB and CMS subscriptions are created.2. The EMS Wrapper provider receives events generated by the EMS monitors through the EMS
framework.
Architecture 19

3. The provider converts these events into WBEM indications and reports these indications to theCIMOM.
4. CIMOM directs these indications to the CMS that has created subscriptions for indications.EVWEB retrieves the errors that occurred on the local system and stores the indications eitherin the Event Archive or in your Email box, or both, depending on your configuration.You can view indications using HP SIM on the remote system and HP SMH on the local system.
The sequence of events if you choose to use the SFMIndicationProvider instead of the EMS monitorsit substitutes, is as follows:1. EVWEB and CMS subscriptions are created.2. The SFMIndicationProvider generates WBEM indications that are triggered by errors on devices
that it monitors.3. The provider reports these WBEM indications to the CIMOM.4. The CIMOM directs these indications to EVWEB and to the CMS that has created subscriptions
for indications. EVWEB then stores the indications either in the Event Archive, in Syslog, orin your email box, or all, depending on your configuration.Indications can be viewed using HP SIM on the remote system and HP SMH on the localsystem.
5. The indications generated by the SFMIndicationProvider, and reported to the CIMOM, canalso be directed to the EMS framework through the WBEM Wrapper Monitor. The WBEMWrapper Monitor converts the WBEM indications into EMS events and directs them to theEMS framework.EMS clients can receive these events, along with the other events generated by the EMSmonitors, through the EMS framework.
NOTE:a. Only those indications that are generated by the SFMIndicationProvider in SysFaultMgmt
(System Fault Management) (SFM) monitoring mode, can be directed to the EMS frameworkthrough the WBEM Wrapper Monitor. Indications generated by the EMS Wrapperprovider in the EMS monitoring mode, cannot be directed to the EMS framework.
b. You can continue to receive all events from EMS Hardware Monitors through the EMSframework along with the indications on EVWEB and CMS.
The following list describes the sequence of events when an event is generated by EVM:1. EVWEB and CMS subscriptions are created.2. The EVM CIM provider receives events posted by the posting clients through the EVM Daemon.3. The provider converts these events into WBEM indications and reports these indications to the
CIMOM.4. CIMOM directs these indications to EMT and the CMS that has created subscriptions for
indications. EVWEB retrieves the errors that occurred on the local system and stores theindications either in the Event Archive, in Syslog, or in your email box, or all, depending onyour configuration.You can view indications using HP SIM on the remote system and HP SMH on the local system.
20 Introduction

2 Installing SysFaultMgmt (System Fault Management) (SFM)software
This chapter discusses the following topics:• “Prerequisites” (page 21)
• “Installing SysFaultMgmt (System Fault Management) (SFM) software from the media” (page22)
• “Installing SysFaultMgmt (System Fault Management) (SFM) software from the web” (page26)
• “Verifying the installation” (page 27)
• “Removing SysFaultMgmt (System Fault Management) (SFM) software” (page 29)
• “Verifying removal of SysFaultMgmt (System Fault Management) (SFM) software” (page 33)
PrerequisitesSysFaultMgmt (System Fault Management) (SFM) depot is available for download on the OEmedia and web. Starting from HP-UX 11i v3 September 2011 release, all the products namelyProviderSvcsBase (PSB), SysFaultMgmt (System Fault Management) (SFM), the I/O Providersnamely HP-UX WBEM RAIDSA Provider, HP-UX WBEM SAS Provider, HP-UX WBEM FC(Fibre-Channel) Provider, HP-UX WBEM DAS (Direct Attached Storage) Provider must be installedtogether to maintain compatibility among the diagnostic products.
On webSeptember 2011 web release onwards, all the HP-UX 11i v3 version of WBEM providers andDiagnostics products, are available for download on the WBEM Management bundle for HP-UX11i v3 bundle page at https://h20392.www2.hp.com/portal/swdepot/displayProductInfo.do?productNumber=WBEMMgmtBundle.
NOTE: HP's WBEM Management bundle is released only on the web. All the products from theWBEM Management bundle must be installed together. This is due to product interdependency.These products might not work if they are installed individually.
Following are the prerequisites for installing the September 2013 version of SysFaultMgmt(System Fault Management) (SFM) software:
• HP-UX 11i v3 February 2007 release or later
• OpenSSL Version A.00.09.08g.001 or later
• EVM-EventMgr B.11.31 September 2007 or later
• SysMgmtBase Version B.00.02.03 (Interface) or later
• WBEMSvcs Version A.02.09.02 or later (WBEMSvcs A.02.11.02, September 2013 releaseis the latest version)
• PHCO_40289 (for Itanium only)
• PHSS_35055 - aC++ Runtime (IA: A.06.10, PA: A.03.71)
• SysMgmtWeb (HP-UX Web-Based System Management User Interface) Version A.3.0.0.2,September 2009 release or later
• HP Systems Insight Manager (HP SIM) Version C.06.01 or later
• ProviderSvcsBase Version C.12.00.04.01, March 2012 release or later (ProviderSvcsBaseC.13.00.06.01, September 2013 release is the latest version)
Prerequisites 21
• SysMgmtPlus Version A.04.00, September 2010 release or later
• OnlineDiag Version B.11.31.06.xx on HP 9000 systems only, September 2009 release orlater (OnlineDiag B.11.31.22.02, September 2013 release is the latest version)
A.04.20.31EMS Version
D.06.00STM Version
NOTE:• The listed versions of the software are the minimum supported requirements. Subsequent
versions are compatible with this version of SysFaultMgmt (System Fault Management)(SFM) unless otherwise noted.
• WBEM Services, Online Diagnostics, SysMgmtWeb, and HP SIM are available on theOperating Environment (OE) media and can be selected for install during SysFaultMgmt(System Fault Management) (SFM) installation.
• HP System Management Homepage (SMH) – bundled in SysMgmtWeb. You cannot accessthe EvWEB GUI (Event Viewer, Subscription Administration and Log Viewer interface), EMT(ErrorManagement Technology) GUI and IPMI Event Viewer GUI without HP SMH. The commandline interface for EVWEB, EMT and IPMI Event Viewer (Slview) will still be accessible.
• HP Systems Insight Manager (HP SIM) is an optional install. However, HP recommends usingthe latest available version to remotely administer indications and instances available on HPSIM page.
• Starting from HP-UX 11i v3 September 2011 release, all the products namelyProviderSvcsBase (PSB), SysFaultMgmt (System Fault Management) (SFM), the I/OProviders namely HP-UX WBEM RAIDSA Provider, HP-UX WBEM SAS Provider, HP-UX WBEMFC (Fibre-Channel) Provider, HP-UX WBEM DAS (Direct Attached Storage) Provider must beinstalled together to maintain compatibility among the diagnostic products.
Installing SysFaultMgmt (System Fault Management) (SFM) software fromthe media
This section describes the two ways in which you can install SysFaultMgmt (System FaultManagement) (SFM) software from the HP-UX 11i v3 OE media:
• Using the terminal user interface (TUI)
• Using the command-line interface (CLI)
Installing using the TUITo install SysFaultMgmt (System Fault Management) (SFM) software using the TUI, complete thefollowing steps:1. Log in to the system as a superuser.2. Mount the CD to a location of your choice as in the following example:
# mount /dev/dsk/c1t2d0 /tmp/cdrom
3. Enter the following command at the HP-UX prompt:# swinstall
The SD Install - Software Selection window appears as shown in the following figure:
22 Installing SysFaultMgmt (System Fault Management) (SFM) software

4. In the Specify Source window, select the appropriate location and click OK. The SD Install -Software Selection window is displayed.
5. In the SD Install - Software Selection window, select Options-> Autoselect dependencies whenmarking software.
6. Select Enforce dependency analysis errors in agent, and click OK, as shown in the followingfigure. The Note window is displayed.
Selecting these options automatically installs all the dependencies.
NOTE: The system selects some options by default. However, you must select the two optionsmentioned in step 5 to automatically install the prerequisites.
7. Click OK in the Note window to confirm the selection of dependencies.8. In the SD Install - Software Selection window, select Actions->Install, as shown in the following
figure. You will need to install SysFaultMgmt (System Fault Management) (SFM), OnlineDiagand ProviderSvcsBase (PSB) product together from the DiagProdCollection bundle dueto the product dependency. Verify the depot by using swverify command.
NOTE: SysFaultMgmt (System Fault Management) (SFM) is automatically configured afterit is installed.
Installing SysFaultMgmt (System Fault Management) (SFM) software from the media 23

The following figure displays the beginning of the configuration phase:
When SysFaultMgmt (System Fault Management) (SFM) software installs, the Install windowappears indicating that SysFaultMgmt (System Fault Management) (SFM) software is installedsuccessfully, as shown in the following figure:
24 Installing SysFaultMgmt (System Fault Management) (SFM) software
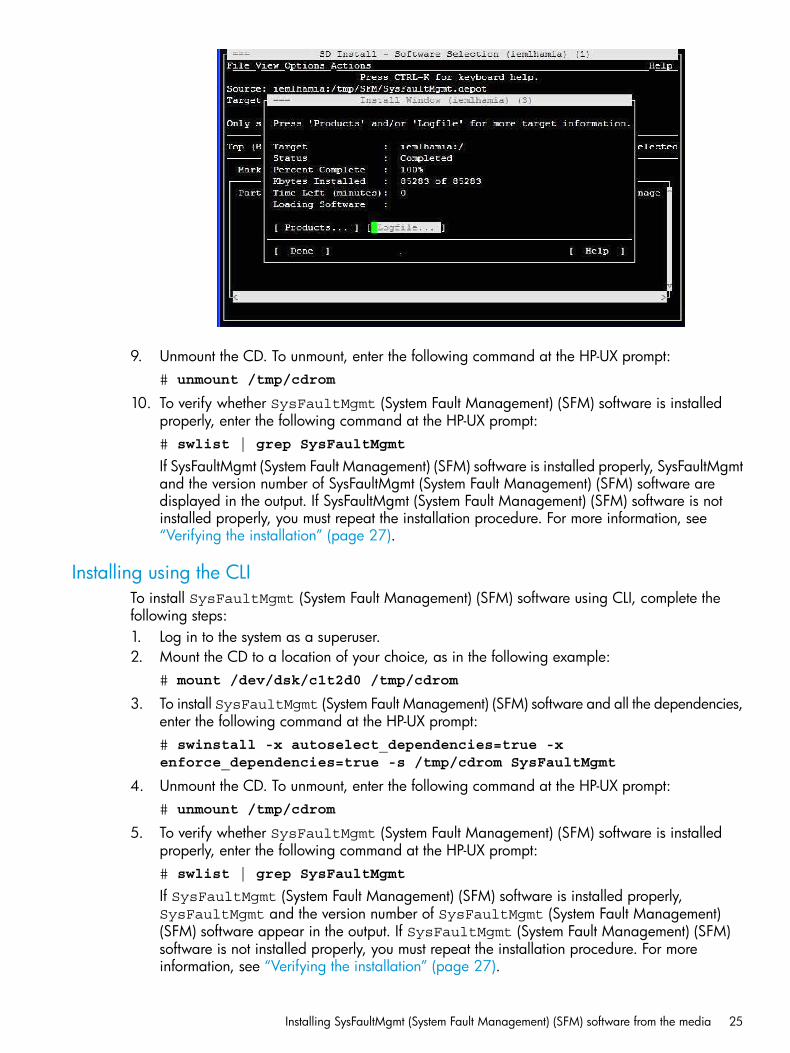
9. Unmount the CD. To unmount, enter the following command at the HP-UX prompt:# unmount /tmp/cdrom
10. To verify whether SysFaultMgmt (System Fault Management) (SFM) software is installedproperly, enter the following command at the HP-UX prompt:# swlist | grep SysFaultMgmt
If SysFaultMgmt (System Fault Management) (SFM) software is installed properly, SysFaultMgmtand the version number of SysFaultMgmt (System Fault Management) (SFM) software aredisplayed in the output. If SysFaultMgmt (System Fault Management) (SFM) software is notinstalled properly, you must repeat the installation procedure. For more information, see“Verifying the installation” (page 27).
Installing using the CLITo install SysFaultMgmt (System Fault Management) (SFM) software using CLI, complete thefollowing steps:1. Log in to the system as a superuser.2. Mount the CD to a location of your choice, as in the following example:
# mount /dev/dsk/c1t2d0 /tmp/cdrom
3. To install SysFaultMgmt (System Fault Management) (SFM) software and all the dependencies,enter the following command at the HP-UX prompt:# swinstall -x autoselect_dependencies=true -xenforce_dependencies=true -s /tmp/cdrom SysFaultMgmt
4. Unmount the CD. To unmount, enter the following command at the HP-UX prompt:# unmount /tmp/cdrom
5. To verify whether SysFaultMgmt (System Fault Management) (SFM) software is installedproperly, enter the following command at the HP-UX prompt:# swlist | grep SysFaultMgmt
If SysFaultMgmt (System Fault Management) (SFM) software is installed properly,SysFaultMgmt and the version number of SysFaultMgmt (System Fault Management)(SFM) software appear in the output. If SysFaultMgmt (System Fault Management) (SFM)software is not installed properly, you must repeat the installation procedure. For moreinformation, see “Verifying the installation” (page 27).
Installing SysFaultMgmt (System Fault Management) (SFM) software from the media 25

Installing SysFaultMgmt (System Fault Management) (SFM) software fromthe web
SysFaultMgmt (System Fault Management) (SFM) depot is available for download on the OEmedia and web. Starting from HP-UX 11i v3 September 2011 release, all the products namelyProviderSvcsBase (PSB), SysFaultMgmt (System Fault Management) (SFM), the I/O Providersnamely HP-UX WBEM RAIDSA Provider, HP-UX WBEM SAS Provider, HP-UX WBEM FC(Fibre-Channel) Provider, HP-UX WBEM DAS (Direct Attached Storage) Provider must be installedtogether to maintain compatibility among the diagnostic products.
On webSeptember 2011 web release onwards, all the HP-UX 11i v3 version of WBEM providers andDiagnostics products, are available for download on the WBEM Management bundle for HP-UX11i v3 bundle page at https://h20392.www2.hp.com/portal/swdepot/displayProductInfo.do?productNumber=WBEMMgmtBundle.
NOTE: WBEM Management bundle of HP is released only on the web. All the products from theWBEM Management bundle must be installed together. This is due to product interdependency.These products might not work if they are installed individually.
Installing and upgrading products from the bundleYou need to install and upgrade the products from the bundle, as mentioned in the followingprocedure.1. Go to HP Software Depot at http://software.hp.com/.2. Search for WBEMMgmtBundle and select WBEM Management bundle for HP-UX 11i v3. The
Overview page is displayed. This page provides the details of solution for installation/upgradeof WBEM Management products bundle.
3. Go to the Installation page and review Prerequisites to ensure that your system meets therequirements.
4. Select the Receive for Free >> option at the bottom right of the page.5. Select the appropriate release of the HP-UX operating system.6. Enter your registration information. Read and accept the terms and conditions.7. Click Next >> at the bottom right of the page.8. Click the appropriate link under Download Software to download the software. on to your
local system and install the bundle using the following command:# swinstall -s / WBEMMgmtBundle
9. To verify if products in WBEMMgmtBundle are installed successfully, run the following commandat the HP-UX prompt:# swverify <product name>
For example: Use the following command to verify SysFaultMgmt (System Fault Management)(SFM) product# swverify SFM-CORE
If the product is installed successfully on your system, the following message is displayed:Verification succeeded
If the products are not installed successfully on your system, run the following command at theHP-UX prompt to view the log file for errors:# grep -i error /var/adm/sw/swagent.log
Fix the error and reinstall the product.
26 Installing SysFaultMgmt (System Fault Management) (SFM) software
Verifying the installationThis section describes how to verify SysFaultMgmt (System Fault Management) (SFM) softwareinstallation using the TUI and the CLI.
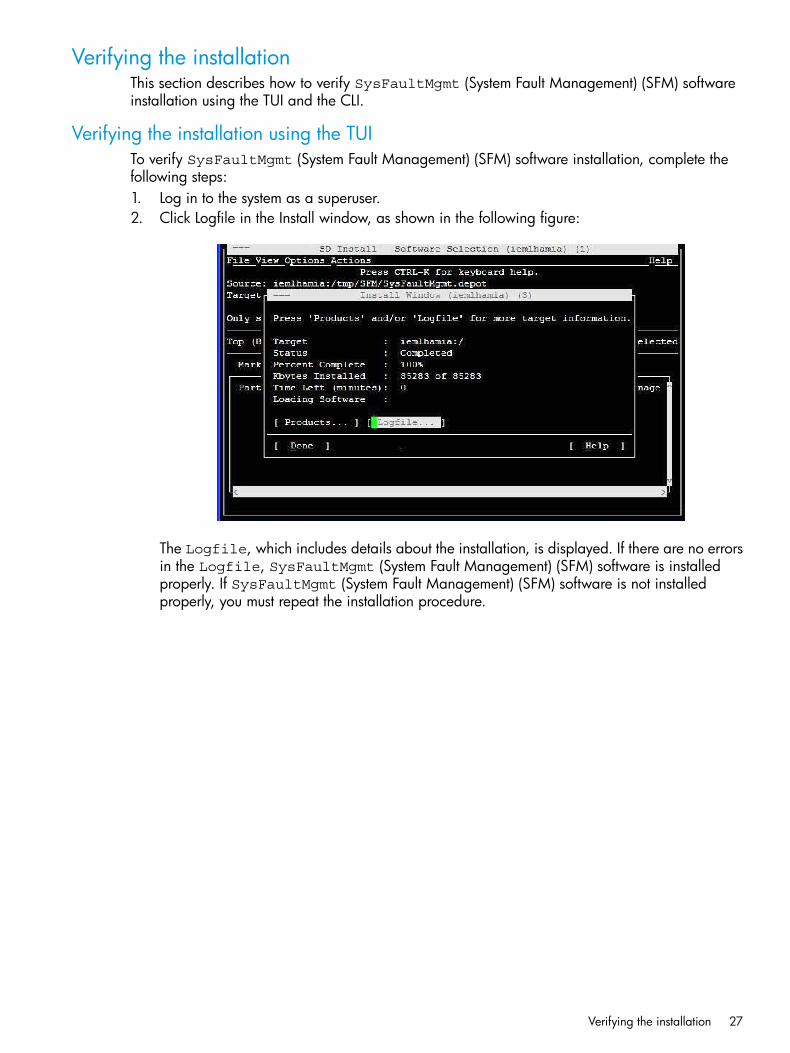
Verifying the installation using the TUITo verify SysFaultMgmt (System Fault Management) (SFM) software installation, complete thefollowing steps:1. Log in to the system as a superuser.2. Click Logfile in the Install window, as shown in the following figure:
The Logfile, which includes details about the installation, is displayed. If there are no errorsin the Logfile, SysFaultMgmt (System Fault Management) (SFM) software is installedproperly. If SysFaultMgmt (System Fault Management) (SFM) software is not installedproperly, you must repeat the installation procedure.
Verifying the installation 27
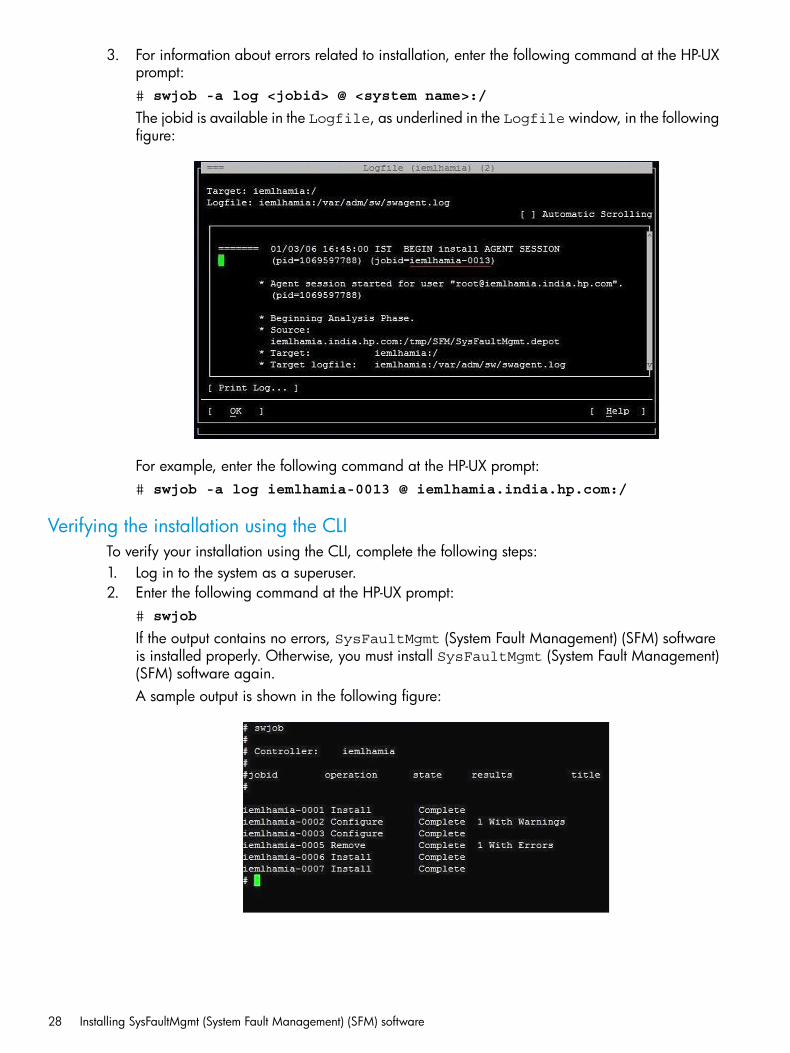
3. For information about errors related to installation, enter the following command at the HP-UXprompt:# swjob -a log <jobid> @ <system name>:/
The jobid is available in the Logfile, as underlined in the Logfile window, in the followingfigure:
For example, enter the following command at the HP-UX prompt:# swjob -a log iemlhamia-0013 @ iemlhamia.india.hp.com:/
Verifying the installation using the CLITo verify your installation using the CLI, complete the following steps:1. Log in to the system as a superuser.2. Enter the following command at the HP-UX prompt:
# swjob
If the output contains no errors, SysFaultMgmt (System Fault Management) (SFM) softwareis installed properly. Otherwise, you must install SysFaultMgmt (System Fault Management)(SFM) software again.A sample output is shown in the following figure:
28 Installing SysFaultMgmt (System Fault Management) (SFM) software

3. For information about installation-related errors, enter the following command at the HP-UXprompt:# swjob -a log <jobid> @ <system name>:/
For example, enter the following command at the HP-UX prompt:# swjob -a log iemlhamia-0005 @ iemlhamia.india.hp.com:/
NOTE: The logs to /var/opt/sfm/log/install.log are written when SysFaultMgmt(System Fault Management) (SFM) is getting installed.
NOTE: Ignore the error Unable to connect to EVM, retrying, and subsequent messages fromsfm.log file, after an upgrade/installation. The retrial is expected until EVM starts acceptingconnection after a reboot.
Removing SysFaultMgmt (System Fault Management) (SFM) softwareThis section describes how to remove of SysFaultMgmt (System Fault Management) (SFM)software using the TUI and the CLI.
CAUTION: Removing SysFaultMgmt (System Fault Management) (SFM) software makes yoursystem vulnerable to failure. Also, all the software products that depend on SysFaultMgmt (SystemFault Management) (SFM) software may not work properly.
Removing the software using the TUITo remove SysFaultMgmt (System Fault Management) (SFM) software from your system, completethe following steps:1. Log in to the system as a superuser.2. Enter the following command at the HP-UX prompt:
# swremove
3. Select SysFaultMgmt in the SD Remove window, as shown in the following figure:
Removing SysFaultMgmt (System Fault Management) (SFM) software 29
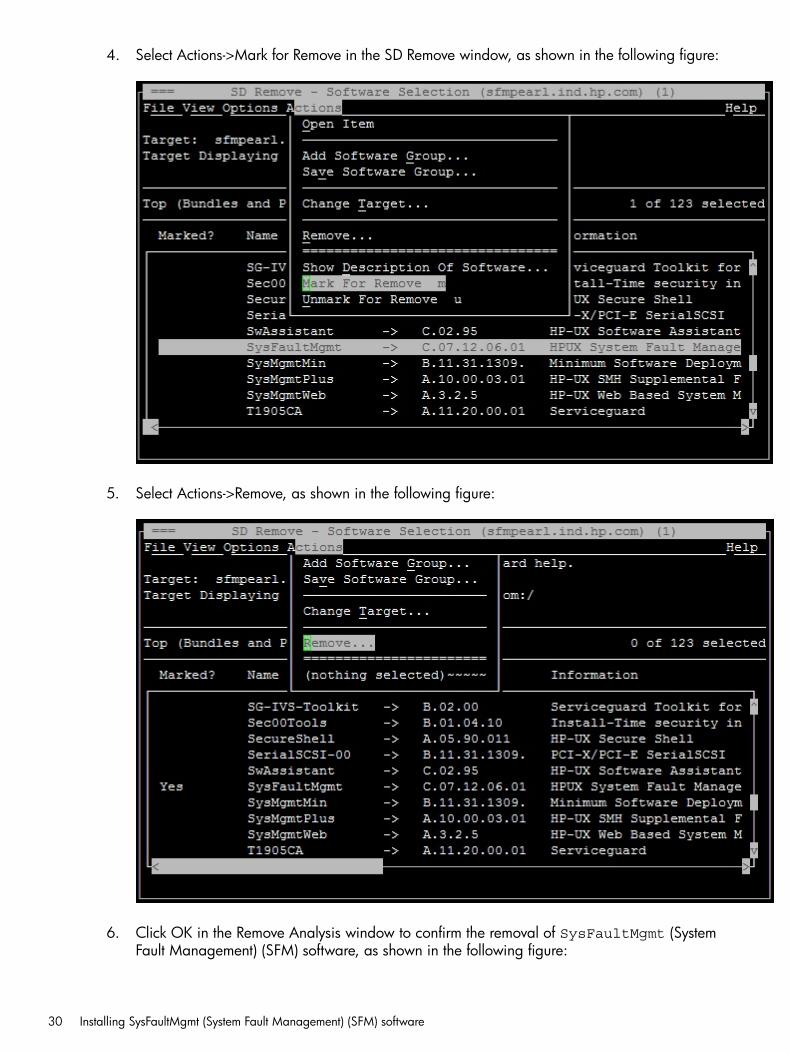
4. Select Actions->Mark for Remove in the SD Remove window, as shown in the following figure:
5. Select Actions->Remove, as shown in the following figure:
6. Click OK in the Remove Analysis window to confirm the removal of SysFaultMgmt (SystemFault Management) (SFM) software, as shown in the following figure:
30 Installing SysFaultMgmt (System Fault Management) (SFM) software
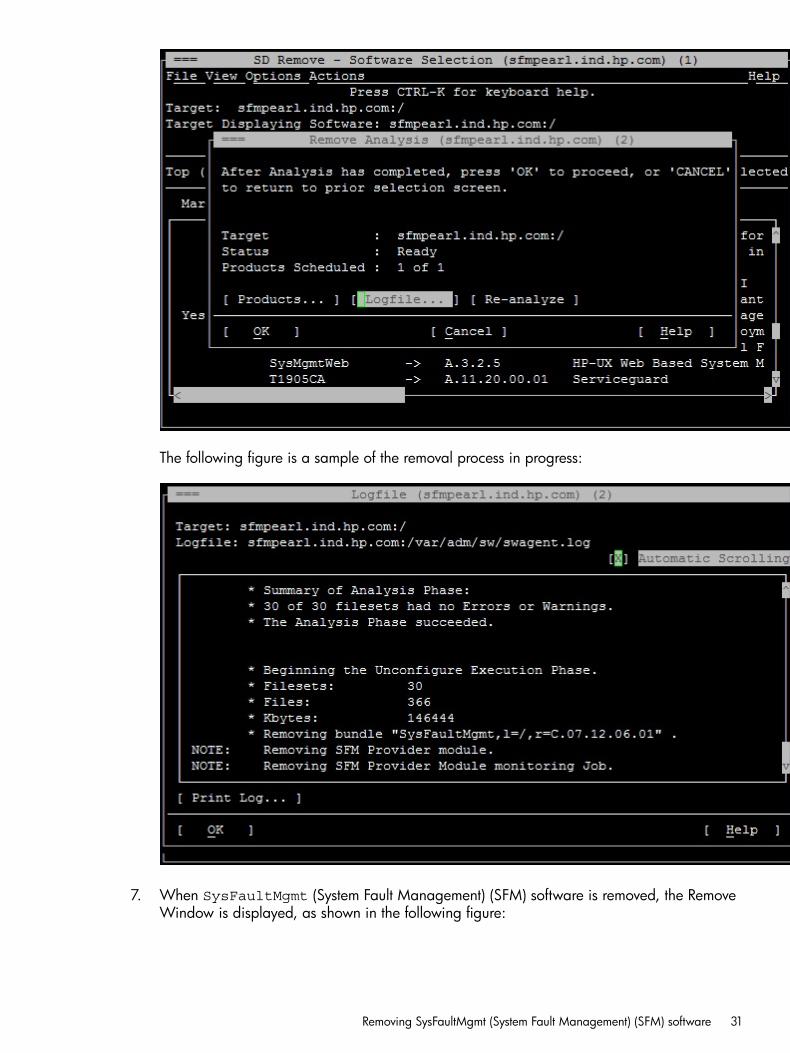
The following figure is a sample of the removal process in progress:
7. When SysFaultMgmt (System Fault Management) (SFM) software is removed, the RemoveWindow is displayed, as shown in the following figure:
Removing SysFaultMgmt (System Fault Management) (SFM) software 31

8. To verify whether SysFaultMgmt (System Fault Management) (SFM) software is removedproperly, enter the following command at the HP-UX prompt:# swlist | grep SysFaultMgmt
If SysFaultMgmt (System Fault Management) (SFM) software is removed properly,SysFaultMgmt (System Fault Management) (SFM) and the version number of SysFaultMgmt(System Fault Management) (SFM) software does not appear in the output. If SysFaultMgmt(System Fault Management) (SFM) software is not removed properly, you must repeat theremoval procedure. For more information, see “Verifying removal of SysFaultMgmt (SystemFault Management) (SFM) software” (page 33).
Removing the software using the CLITo remove SysFaultMgmt (System Fault Management) (SFM) software from your system, completethe following steps:1. Log in to the system as a superuser.2. Enter the following command at the HP-UX command prompt:
# swremove -x enforce_dependencies=false SysFaultMgmt
3. To verify whether SysFaultMgmt (System Fault Management) (SFM) software is removedproperly, enter the following command at the HP-UX prompt:# swlist | grep SysFaultMgmt
If SysFaultMgmt (System Fault Management) (SFM) software is removed properly,SysFaultMgmt (System Fault Management) (SFM) and the version number of SysFaultMgmt(System Fault Management) (SFM) software do not appear in the output. If SysFaultMgmt(System Fault Management) (SFM) software is not removed properly, you must repeat theremoval procedure. For more information, see “Verifying removal of SysFaultMgmt (SystemFault Management) (SFM) software” (page 33).
32 Installing SysFaultMgmt (System Fault Management) (SFM) software
Verifying removal of SysFaultMgmt (System Fault Management) (SFM)software
This section describes how to use the TUI and the CLI to verify whether SysFaultMgmt (SystemFault Management) (SFM) software is removed successfully.
Verifying removal using the TUITo verify whether SysFaultMgmt (System Fault Management) (SFM) software is removedsuccessfully, complete the following steps:1. Log in to the system as a superuser.2. Click Logfile in the Remove Window.
If there are no errors in the Logfile, SysFaultMgmt (System Fault Management) (SFM)software is removed successfully. If SysFaultMgmt (System Fault Management) (SFM) softwareis not removed properly, you must repeat the removal procedure. See “Removing SysFaultMgmt(System Fault Management) (SFM) software” (page 29) for instructions on how to removeSysFaultMgmt (System Fault Management) (SFM) software.
3. For information about errors related to the removal of SysFaultMgmt (System FaultManagement) (SFM), enter the following command at the HP-UX prompt:# swjob -a log <jobid> @ <system name>:/
The jobid is available in the Logfile.
Verifying removal using the CLITo verify if SysFaultMgmt (System Fault Management) (SFM) software is removed successfully,complete the following steps:1. Log in to the system as a superuser.2. Enter the following command at the HP-UX prompt:
# swjob
If the output contains no errors, SysFaultMgmt (System Fault Management) (SFM) softwareis removed successfully. If SysFaultMgmt (System Fault Management) (SFM) software is notremoved properly, you must repeat the removal procedure. See “Removing SysFaultMgmt(System Fault Management) (SFM) software” (page 29) for instructions on how to removeSysFaultMgmt (System Fault Management) (SFM) software.
3. For information about errors related to the removal of SysFaultMgmt (System FaultManagement) (SFM) software, enter the following command at the HP-UX prompt:# swjob -a log <jobid> @ <system name>:/
The jobid is available in the output of the swjob command.
Verifying removal of SysFaultMgmt (System Fault Management) (SFM) software 33
3 Configuring indication providersThis chapter describes the following topics:• “Configuring indication filters” (page 34)
• “Configuring error logging in SysFaultMgmt (System Fault Management) (SFM)” (page 35)
• “Configuring the monitoring mode” (page 35)
Configuring indication filtersYou must configure the indication filters to view desired indications. You use the Filter Metadataprovider (FMD) to configure indication filters that deliver important or desired indications, forexample, indications with a certain severity. The provider also ensures that all the indications thatHP recommends for system management are logged in the Event Archive, available at/var/opt/psb/db/pgsql. Logging indications in the archive helps track all the events that aregenerated.Filters are classified as follows:
• HP-Defined FiltersHP-Defined filters are defined by HP, and are present in the FMD repository at the time ofinstallation. You can list, enable or disable the HP-Defined filters. Indications fulfilling theconditions in the HP-Defined filters are logged in the Event Archive. To confirm the HP-DefinedFilters, enter the following command at the HP-UX prompt:# sfmconfig -m list -t HP
The following output is displayed:Filter Name : General FilterFilter Type : HP Defined FilterFilter Unique Identifier : 1Filter Query : Select * from HP_DeviceIndicationFilter Query Language : WQLFilter Source Namespace : root/cimv2Filter Description : General Device Indications.Filter State : Enabled Filter StateFilter Last Operation : No Operation
To disable the HP-Defined filters, enter the following command at the HP-UX prompt:# sfmconfig -m disable -t HP -n 'General Filter' -u 1
To revert the settings, enter the following command at the HP-UX prompt:# sfmconfig -m enable -t HP -n 'General Filter' -u 1
• Admin-Defined FiltersAdmin-Defined filters are defined by the administrator. HP does not provide any Admin-Definedfilter. To list, create, delete, modify, enable, and disable Admin-Defined filters, use thesfmconfig command. By default, the FMD provider does not log indications fulfilling theconditions in the Admin-Defined filters, in the Event Archive. You must modify the Admin-Definedfilters to log indications in the Event Archive.To add an Admin-Defined Filter, enter the following command at the HP-UX prompt:# sfmconfig -m add -n <filter name> -s {ENABLE|DISABLE} -l {WQL|CQL}-q <query> -ns <name space> -d <description>
For example,# sfmconfig -m add -n AdminFilter_2 -s ENABLE -l WQL -q "Select *from HP_AlertIndication where (PerceivedSeverity >= 4)" -nsroot/cimv2 -d "Admin Filter"
34 Configuring indication providers
The following output is displayed:Filter Name : AdminFilter_2Filter Type : Admin Defined FilterFilter Unique Identifier : 10002Filter Query : Select * from HP_AlertIndication where (PerceivedSeverity >= 4)Filter Query Language : WQLFilter Source Namespace : root/cimv2Filter Description : Admin FilterFilter State : Enabled Filter StateFilter Last Operation : Add Filter
HP_AlertIndication is derived from CIM_AlertIndication and HP_DeviceIndication is derivedfrom HP_HardwareIndication. HP_HardwareIndication is derived from HP_AlertIndication.WBEM severities must be used while specifying the filter query. For more information on theWBEM severity, see Table 7 (page 44).For more information on the sfmconfig command, and its options, see the sfmconfig(1M) manpage.
Configuring error logging in SysFaultMgmt (System Fault Management)(SFM)
Logging information about the internal operational errors of SysFaultMgmt (System FaultManagement) (SFM) such as system call errors is called, error logging. You can configure errorlogging parameters, such as severity, logging target, and the number of backup files by using thesfmconfig command. To configure these parameters, complete the following steps:1. Modify the /var/opt/sfm/conf/FMLoggerConfig.xml configuration file using a text
editor.2. For the changes made in the /var/opt/sfm/conf/FMLoggerConfig.xml configuration
file to take effect, enter the following command at the HP-UX prompt:# sfmconfig -c /var/opt/sfm/conf/FMLoggerConfig.xml
For more information about the sfmconfig command, enter the following command at the HP-UXprompt:# man sfmconfig
NOTE: You can configure the parameters by using the command-line interface (CLI) only.
Configuring the monitoring modeThis section describes how to configure the monitor mode. It also describes how to switch themonitor mode between SysFaultMgmt (System Fault Management) (SFM) and EMS.To confirm the current monitoring mode, enter the following command at the HP-UX prompt:# /opt/sfm/bin/sfmconfig -w -q
To switch the monitoring mode from EMS to SysFaultMgmt (System Fault Management) (SFM),enter the following command at the HP-UX prompt:# /opt/sfm/bin/sfmconfig -w -s
The log file /var/opt/sfm/log/.sfmconfig.log gets created in the switch script whileswitching modes.
NOTE: Starting with HP-UX 11i v3 March 2008 release, SysFaultMgmt (System FaultManagement) (SFM) is the default monitoring mode. However, you can switch to the OnlineDiagmonitoring mode. Switching the monitoring mode from SysFaultMgmt (System Fault Management)(SFM) to EMS on HP Integrity BL860c i2, BL870c i2 & BL890c i2 Server Blades, rx2800 i2, HPSuperdome 2 servers, HP Integrity BL860c i4, BL870c i4, BL890c i4, rx2800 i4 and rx2900 i4is not available.
Configuring error logging in SysFaultMgmt (System Fault Management) (SFM) 35
To check whether the SFMIndicationProvider is working properly, send a memory test event byentering the following command at the HP-UX prompt:# /opt/sfm/bin/sfmconfig -t -m
The following output indicates that the SFMIndicationProvider is working properly:Sending test event for memory monitor.
NOTE: You can also send test events for other devices that the SFMIndicationProvider monitors.
For information on the devices monitored by the SFMIndicationProvider, see Table 3 (page 14).To view the list of events, enter the following command at the HP-UX prompt:# evweb eventviewer -L
A list of events along with the details such as event archive number, severity, and event categoryare displayed by querying the Event Archive.To view the details of an event, enter the following command at the HP-UX prompt:# evweb eventviewer -E -n <event archive number>
The details of the specified event such as the summary, description, probable cause, andrecommended actions for the error are displayed.For details on SysFaultMgmt (System Fault Management) (SFM) event information, see theevent.log file at:/var/opt/sfm/log/event.log
For all events, and for severities logged to Syslog, see Table 7 (page 44).To switch back from SysFaultMgmt (System Fault Management) (SFM) monitoring mode to theEMS monitoring mode, enter the following command at the HP-UX prompt:# /opt/sfm/bin/sfmconfig -w -e
36 Configuring indication providers
4 Administering indications and instances using HP SIMThis chapter describes SysFaultMgmt (System Fault Management) (SFM) administration on aremote system using HP Systems Insight Manager (HP SIM).
NOTE: You can perform similar tasks using other management applications that are compliantwith the Common Information Model (CIM) (2.8) schema (or later) of the Distributed ManagementTask Force (DMTF).The terms events and indications are used interchangeably in this document.
This chapter addresses the following topics:
• “Creating subscriptions and viewing indications using HP SIM ” (page 37)
• “Viewing instances” (page 53)
Creating subscriptions and viewing indications using HP SIMTo view instances and events generated on a managed system, you must create subscriptions.When you create subscriptions on the Central Management Server (CMS) using HP SIM, indicationsare delivered to the CMS whenever an event occurs on the managed system.
NOTE: By default, cimserver does not allow non-privileged user to create subscriptions. Thisoperation can be performed only by a superuser.However, you can override this default behavior by setting the configuration parameterenableSubscriptionsForNonprivilegedUsers to true in the cimserver using thecimconfig command. Since enableSubscriptionsForNonprivilegedUsers is not adynamic configuration property, you cannot change it when cimserver is running. For moreinformation, view cimcofig manpage.
This section discusses the following topics:
• “Creating subscriptions” (page 37)
• “ Viewing Indications” (page 42)
Creating subscriptionsTo create subscriptions using HP SIM, complete the following steps:1. Enter the following URL to launch HP SIM on your browser: http://<system name>:<port
number>/The system name is the name of the CMS.For example: http://abc.com:280/The HP SIM home page is launched.
Creating subscriptions and viewing indications using HP SIM 37
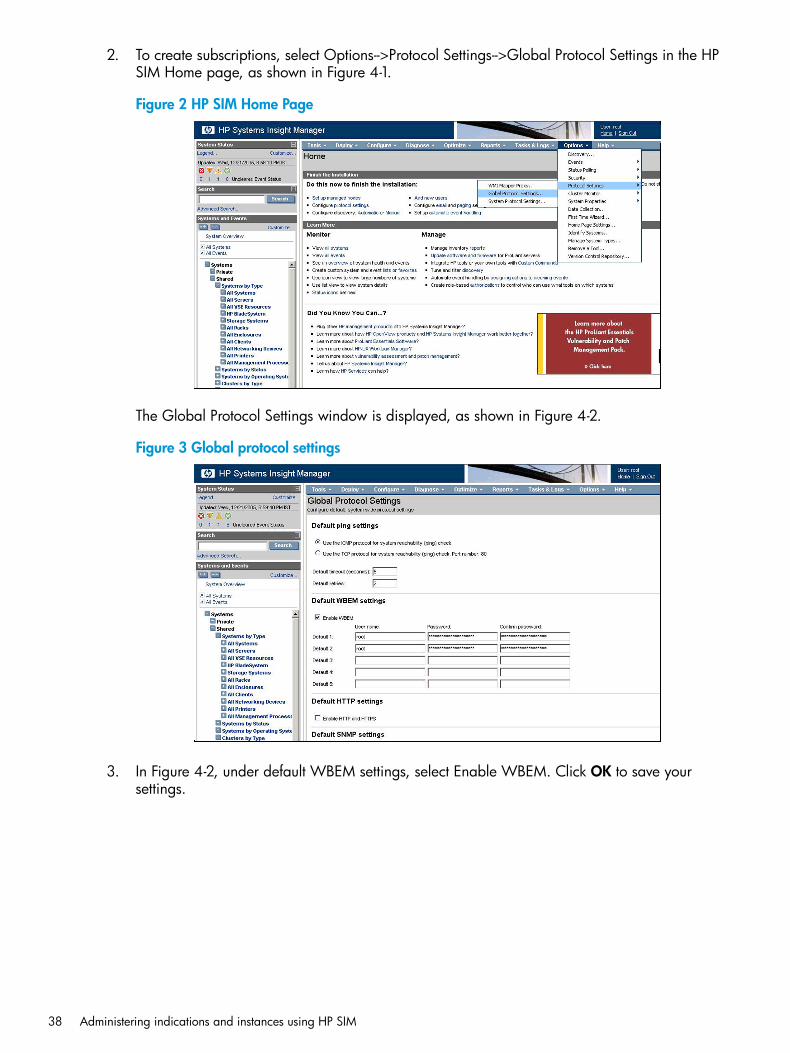
2. To create subscriptions, select Options-->Protocol Settings-->Global Protocol Settings in the HPSIM Home page, as shown in Figure 4-1.
Figure 2 HP SIM Home Page
The Global Protocol Settings window is displayed, as shown in Figure 4-2.
Figure 3 Global protocol settings
3. In Figure 4-2, under default WBEM settings, select Enable WBEM. Click OK to save yoursettings.
38 Administering indications and instances using HP SIM
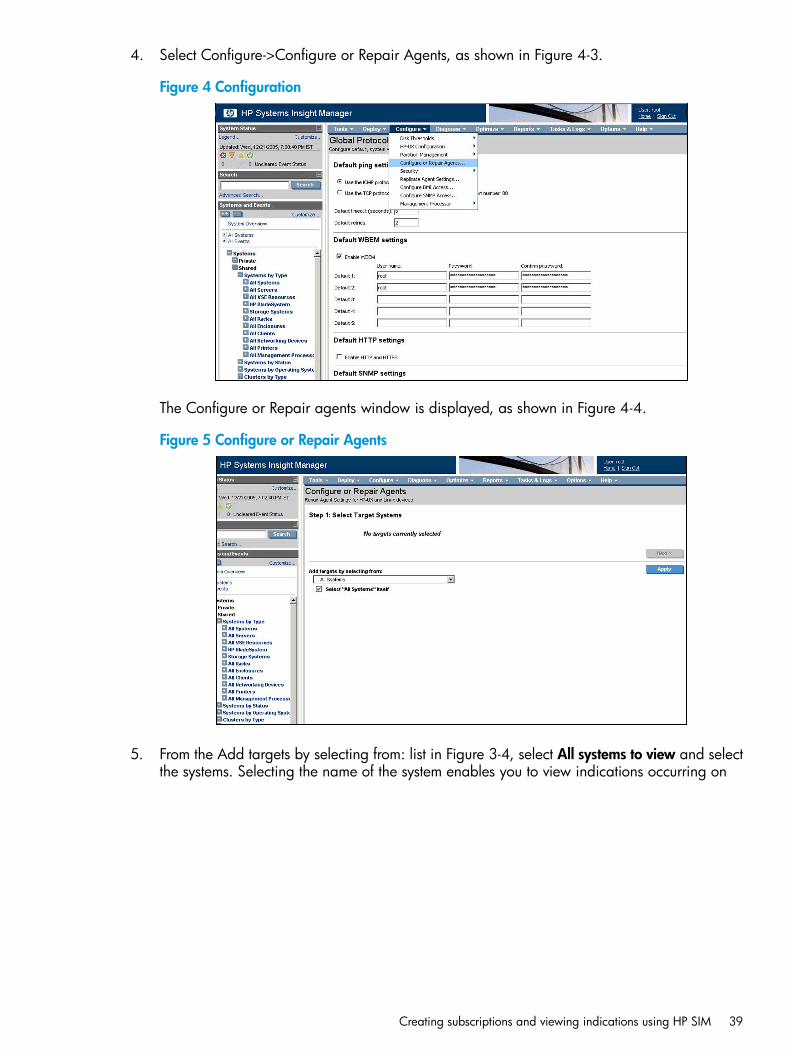
4. Select Configure->Configure or Repair Agents, as shown in Figure 4-3.
Figure 4 Configuration
The Configure or Repair agents window is displayed, as shown in Figure 4-4.
Figure 5 Configure or Repair Agents
5. From the Add targets by selecting from: list in Figure 3-4, select All systems to view and selectthe systems. Selecting the name of the system enables you to view indications occurring on
Creating subscriptions and viewing indications using HP SIM 39
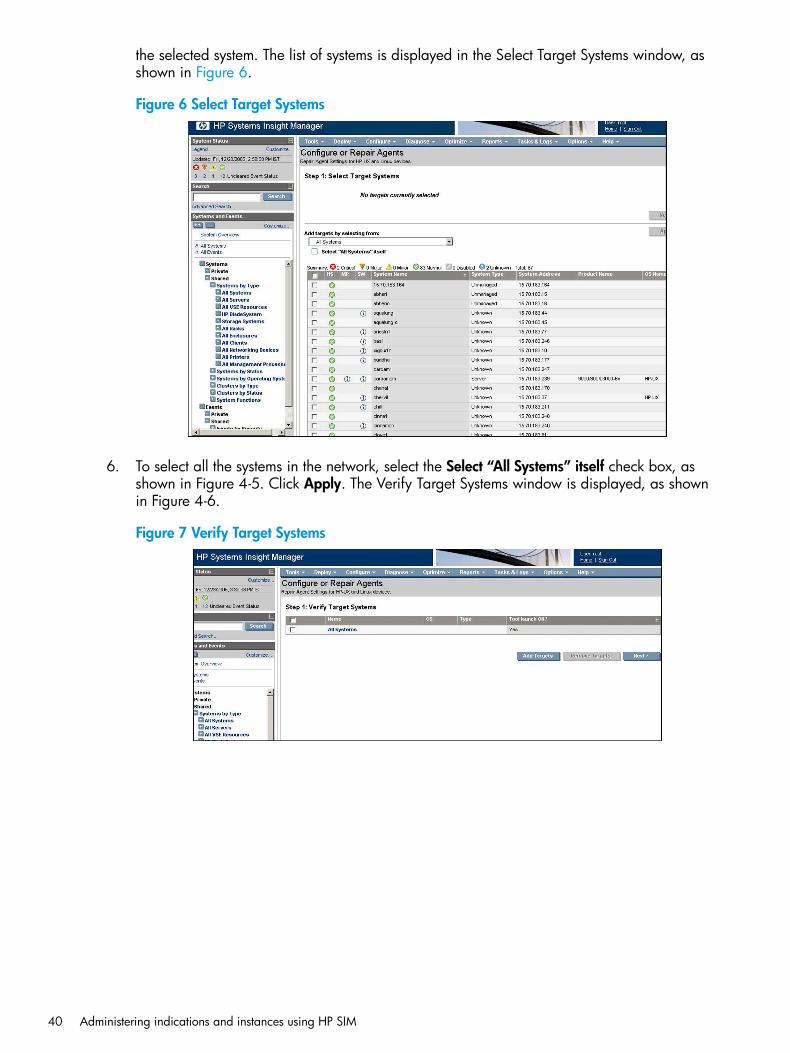
the selected system. The list of systems is displayed in the Select Target Systems window, asshown in Figure 6.
Figure 6 Select Target Systems
6. To select all the systems in the network, select the Select “All Systems” itself check box, asshown in Figure 4-5. Click Apply. The Verify Target Systems window is displayed, as shownin Figure 4-6.
Figure 7 Verify Target Systems
40 Administering indications and instances using HP SIM
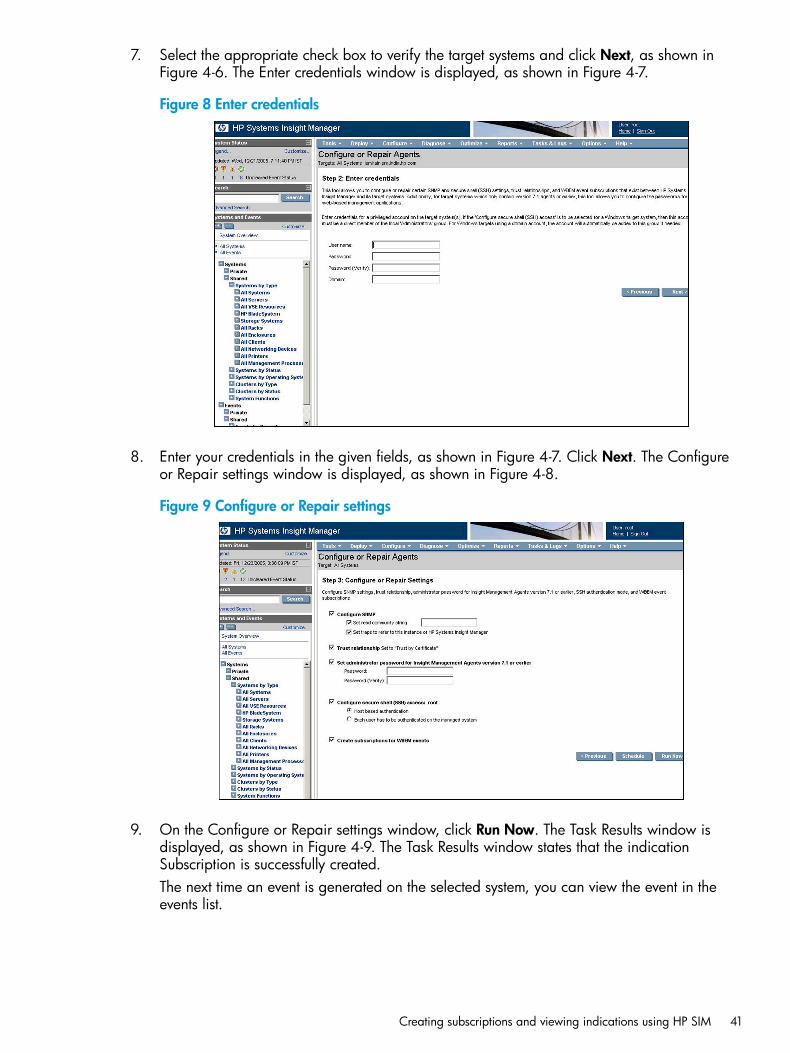
7. Select the appropriate check box to verify the target systems and click Next, as shown inFigure 4-6. The Enter credentials window is displayed, as shown in Figure 4-7.
Figure 8 Enter credentials
8. Enter your credentials in the given fields, as shown in Figure 4-7. Click Next. The Configureor Repair settings window is displayed, as shown in Figure 4-8.
Figure 9 Configure or Repair settings
9. On the Configure or Repair settings window, click Run Now. The Task Results window isdisplayed, as shown in Figure 4-9. The Task Results window states that the indicationSubscription is successfully created.The next time an event is generated on the selected system, you can view the event in theevents list.
Creating subscriptions and viewing indications using HP SIM 41
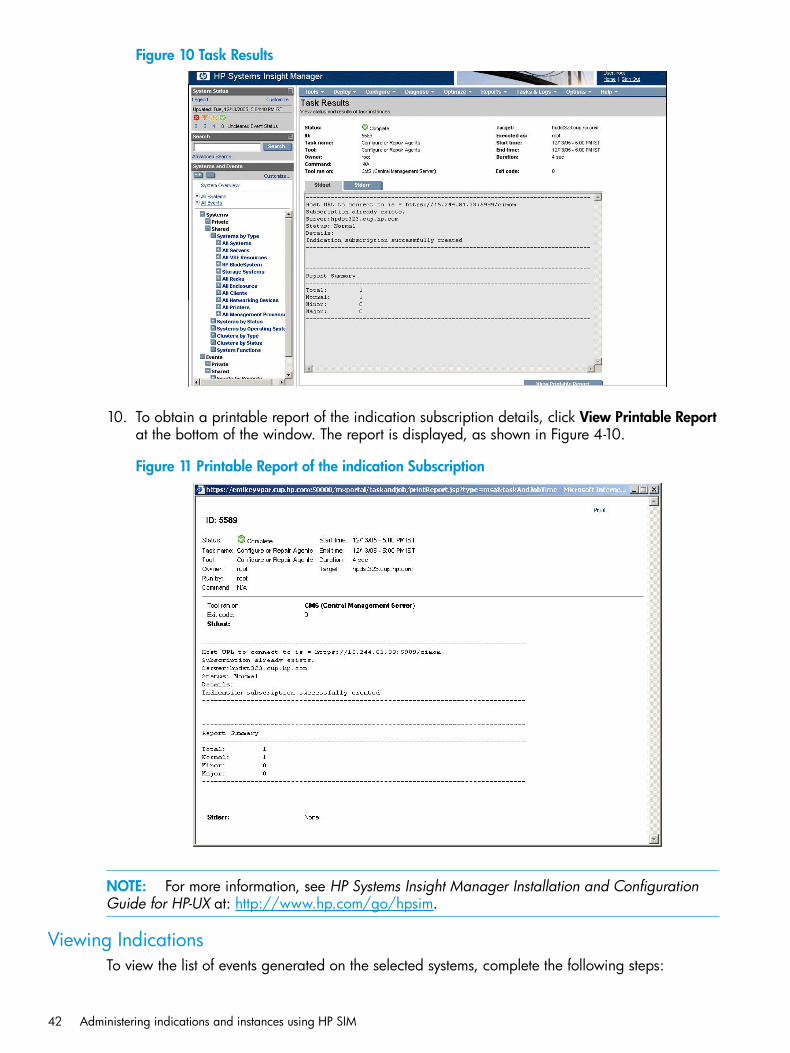
Figure 10 Task Results
10. To obtain a printable report of the indication subscription details, click View Printable Reportat the bottom of the window. The report is displayed, as shown in Figure 4-10.
Figure 11 Printable Report of the indication Subscription
NOTE: For more information, see HP Systems Insight Manager Installation and ConfigurationGuide for HP-UX at: http://www.hp.com/go/hpsim.
Viewing IndicationsTo view the list of events generated on the selected systems, complete the following steps:
42 Administering indications and instances using HP SIM
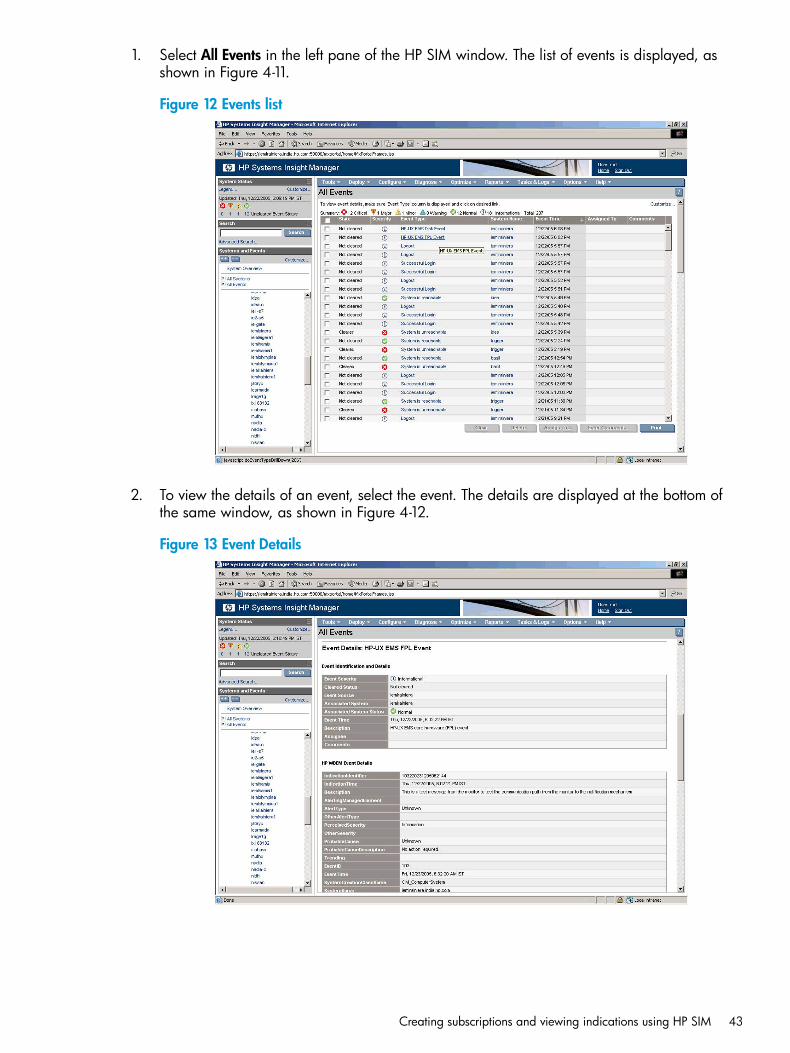
1. Select All Events in the left pane of the HP SIM window. The list of events is displayed, asshown in Figure 4-11.
Figure 12 Events list
2. To view the details of an event, select the event. The details are displayed at the bottom ofthe same window, as shown in Figure 4-12.
Figure 13 Event Details
Creating subscriptions and viewing indications using HP SIM 43
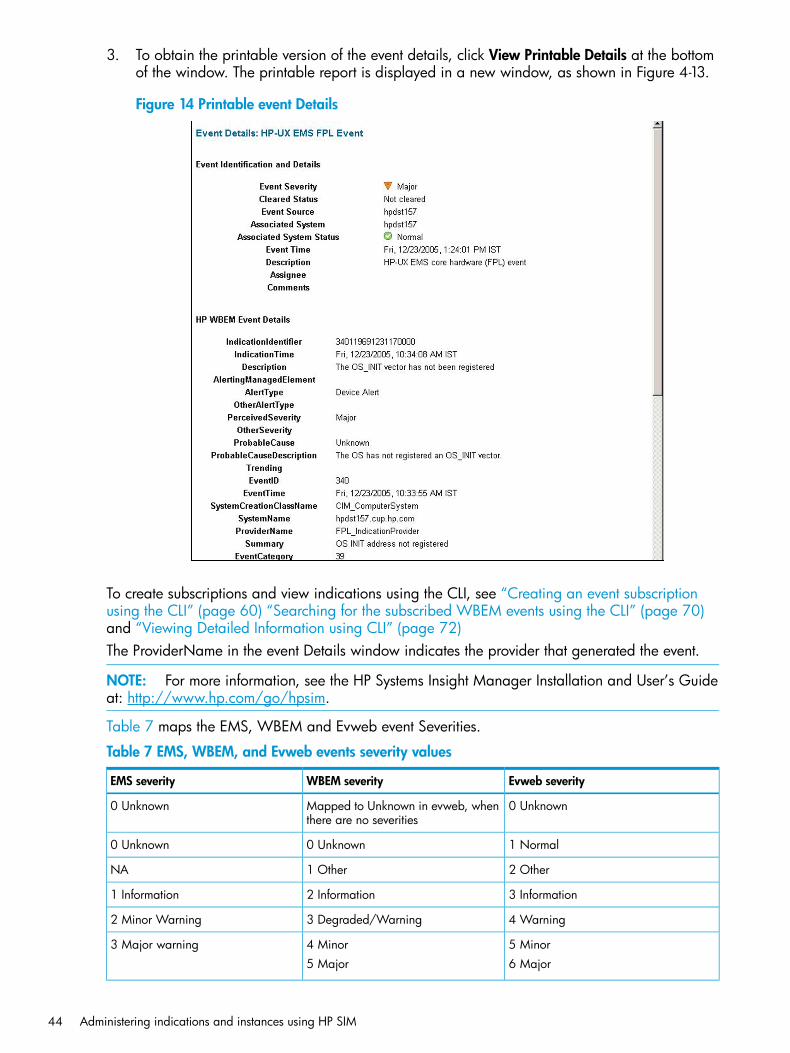
3. To obtain the printable version of the event details, click View Printable Details at the bottomof the window. The printable report is displayed in a new window, as shown in Figure 4-13.
Figure 14 Printable event Details
To create subscriptions and view indications using the CLI, see “Creating an event subscriptionusing the CLI” (page 60) “Searching for the subscribed WBEM events using the CLI” (page 70)and “Viewing Detailed Information using CLI” (page 72)The ProviderName in the event Details window indicates the provider that generated the event.
NOTE: For more information, see the HP Systems Insight Manager Installation and User’s Guideat: http://www.hp.com/go/hpsim.
Table 7 maps the EMS, WBEM and Evweb event Severities.
Table 7 EMS, WBEM, and Evweb events severity values
Evweb severityWBEM severityEMS severity
0 UnknownMapped to Unknown in evweb, whenthere are no severities
0 Unknown
1 Normal0 Unknown0 Unknown
2 Other1 OtherNA
3 Information2 Information1 Information
4 Warning3 Degraded/Warning2 Minor Warning
5 Minor4 Minor3 Major warning6 Major5 Major
44 Administering indications and instances using HP SIM
Table 7 EMS, WBEM, and Evweb events severity values (continued)
Evweb severityWBEM severityEMS severity
7 Critical6 Critical4 Serious
7 Critical7 Fatal/Non-recoverable5 Critical
NOTE:• Perceived severities in Syslog is same as WBEM severities.
• The WBEM severities are standard. Their number can be seen as the severity value for theactual events recorded in /var/opt/sfm/log/event.log. The Evweb severity numberingmatches the HP SMH system status. It is one number more than the WBEM severity. However,HP SMH uses the corresponding severity strings to display the system status, Therefore theseverity string is more important than the severity number.
• Evweb is a plug -in in HP SMH, it adapts Evweb severity to HP SMH. The WBEM severitiesdescription is different from Evweb severities description. The following are the differences inmapping reasons:
◦ "Fatal/Non-recoverable” in WBEM is regarded as “Critical” in Evweb.
◦ "Unknown" in WBEM means that WBEM can get the status of event/entity, and it is NOTother errors (like, Fatal), so Evweb regards it as “Normal”.
◦ "NA" in WBEM means that WBEM cannot get the status of event/entity, so Evweb regardsit as "Unknown".
• Table 8 (page 45) describes about each WBEM severity in detail.
Table 8 WBEM severities
Description of the severityWBEM severities
The AlertIndication severity is simply unknown.Unknown0
The Severity value can be found in the OtherSeverityproperty.
Other1
The AlertIndication is purely informational.Information2
You should determine if action is needed.Degraded/
Warning
3
Your action is needed, but the situation is not serious atthis time.
Minor4
Your action is needed NOW.Major5
Your action is needed NOW and the scope is broad(perhaps an imminent outage to a critical resource willresult).
Critical6
An error occurred, but it's too late to take remedialaction.
Fatal/
NonRecoverable
7
In SysFaultMgmt (System Fault Management) (SFM) mode although the SFMIndicationProvideris generating the events, the name of the provider displayed in the event details is one of thefollowing providers mentioned under provider in Table 4–2, depending on the device to which
Creating subscriptions and viewing indications using HP SIM 45
the event is related. Table 9 (page 46) maps the EMS Hardware Monitors and the correspondingWBEM providers.
Table 9 Representation of monitors
IA NGIS providers2IA legacy provider1PA-RISC providerMonitor
CPUIndicationProviderCMC_IndicationProviderIACMC_IndicationProviderIAcmc_emCMC_IndicationProviderIA
PCIeIndicationProviderCPE_IndicationProviderIA3CPE_IndicationProviderIAcpe_em
CoreHardwareIndicationProviderdm_core_hw
ChassisIndicationProviderPAdm_chassis
DiskIndicationProvider4DiskIndicationProvider4DiskIndicationProviderdisk_em
FPL_IndicationProviderFPL_IndicationProviderFPL_IndicationProviderfpl_em
SEL02_IndicationProviderSEL02_IndicationProviderSEL02_IndicationProvideria64_corehw
——LPMC_IndicationProviderlpmc_em
MemoryIndicationProviderMemoryIndicationProviderIAMemoryIndicationProviderPAmemory_ia641 Legacy : HP Integrity platforms supporting processors prior Intel 9300.2 NGIS : HP Integrity platforms supporting Intel Itanium processor 9300 or 9500 Series.3 Supported additionally on HP Integrity BL860c i2, BL870c i2 & BL890c i2 Server Blades, rx2800 i2, HP Integrity BL860c
i4, BL870c i4, BL890c i4, rx2800 i4 and rx2900 i44 This provider is not shipped as part of SysFaultMgmt (System Fault Management) (SFM) from March 2009 release.
Table 10 compares the EMS Hardware Monitors properties with the equivalent EMS Wrapperprovider / Native indication provider properties.
Table 10 Property Representation
EMS wrapper provider / Native indication providerEMS Hardware Monitors
EventTimeEvent Time
PerceivedSeveritySeverity
EventIDEvent
SystemNameSystem
SummarySummary
DescriptionDescription of Error
ProbableCauseDescription andRecommendedAction (these two are separate fields)
Probable Cause/ Recommended Action
SystemSerialNumberSystem Serial Number
HWManufacturerInquiryVendorID
HWLogicalLocationPhysical Device Path
DeviceModelInquiryProductID
DeviceControllerLogicalLocationPhysicalDevicePath
46 Administering indications and instances using HP SIM

Table 11 Command Representation
In SysFaultMgmt (System Fault Management)(SFM)In EMSTask
# evweb subscribe -D -f -n<subscription name>
# /etc/opt/resmon/lbin/monconfig
Enter D at the main menu selection prompt.Deleting amonitoring request
# sfmconfig -t -<valid monitorname>
#/etc/opt/resmon/lbin/send_test_event<monitor name>
Sending a test event
# sfmconfig -a -r -t <device name>-d <device id>
# set_fixed -n <resource name>Changing the statusof a device to UP.
# evweb eventviewer -E -n <eventarchive number>
# resdata -r <resource name> -R<request id> -a|-m|-u [-n <notify
Viewing details of anevent
id>] [-h <host name>] -M <monitorkey>]
Table 12 Default event destinations for Online Diagnostics
Online DiagnosticsSeverity levelsDefault notification method
textlog: /var/opt/resmon/log/event.logAllTextlog
AvailableMAJOR WARNINGSyslogSERIOUS
CRITICAL
email address: rootMAJOR WARNINGemailSERIOUS
CRITICAL
AvailableAllEvweb DB(evweb eventviewer -L)
NOTE: The Severity levels in Table 10 indicate EMS severity.
Table 13 Default event destinations for SysFaultMgmt (System Fault Management) (SFM)
SysFaultMgmt (System Fault Management) (SFM)Severity levelsDefault notificationmethod
textlog: /var/opt/sfm/log/event.logAllTextlog
AvailableMAJORSyslogCRITICAL
FATAL/NON-RECOVERABLE
Not AvailableNoneemail
AvailableAllEvweb DB(evweb eventviewer -L)
NOTE: The Severity levels in Table 11 indicate WBEM severity.
For a list of WBEM indications generated by all the monitors, see the EMS event descriptions at:http://www.hp.com/go/hpux-diagnostics-online-events
Table 14 (page 48) lists all the values as Status in sfmconfig -a -L.
Creating subscriptions and viewing indications using HP SIM 47
Table 14 Status values
Status values
UNKNOWN
OTHER
OK
DEGRADED
STRESSED
PREDICTIVE FAILURE
ERROR
NONRECOVERABLE ERROR
STARTING
STOPPING
STOPPED
IN SERVICE
NO CONTACT
LOST COMMUNICATION
ABORTED
DORMANT
SUPPORTING ENTITY IN ERROR
COMPLETED
The sfmconfig -a -r command is used to change the state of a subsystem. When this commandis not working with processor, the user should check for errors. When a CPU is deactivated on asystem due to an action taken against an error symptom, the user tries to use sfmconfig commandto make the CPU state back to OK The change does not happen unless the processor which isfaulty is replaced or it is acquitted from the Onboard Administrator on HP Superdome 2.
Viewing instancesTo view information about processors, memory, cooling devices, power supplies, and disks,complete the following steps:
48 Administering indications and instances using HP SIM
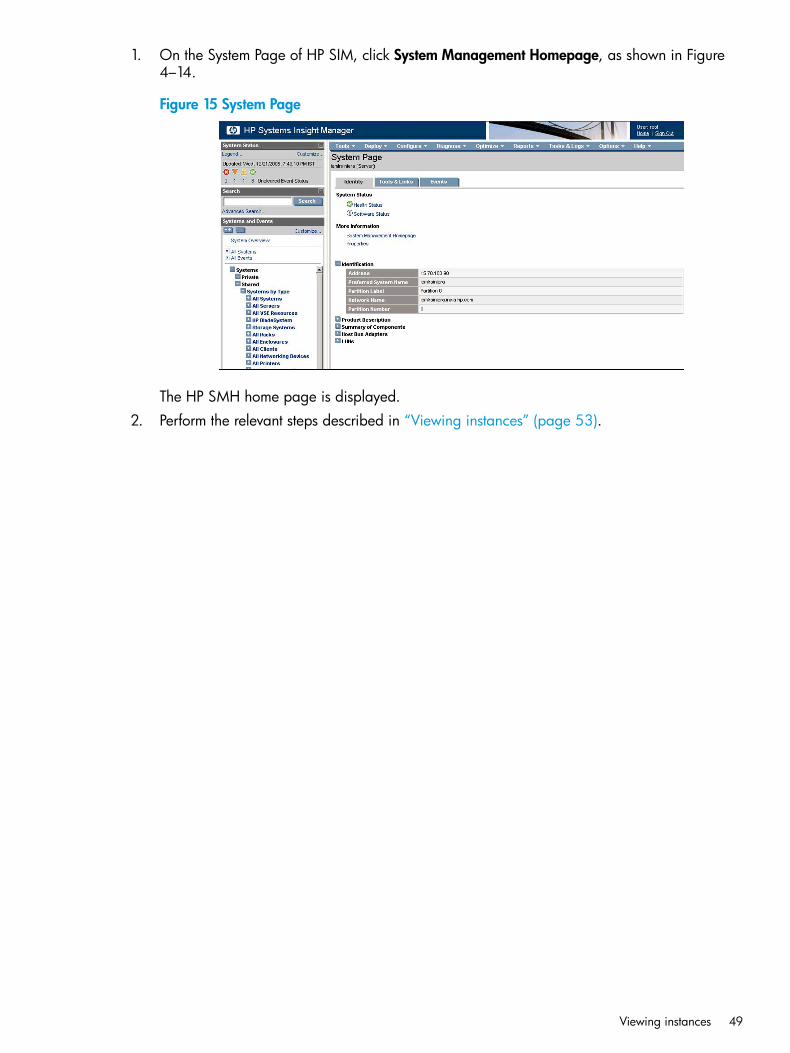
1. On the System Page of HP SIM, click System Management Homepage, as shown in Figure4–14.
Figure 15 System Page
The HP SMH home page is displayed.2. Perform the relevant steps described in “Viewing instances” (page 53).
Viewing instances 49
5 SysFaultMgmt (System Fault Management) (SFM) supportfor different virtualization environments
This chapter discusses about the following topics:• “Introduction to various virtualization environments” (page 50)
• “Summary of various virtualization environments” (page 51)
Introduction to various virtualization environmentsThis section describes about the support and behavior of SysFaultMgmt (System FaultManagement) (SFM) on different virtualized environments. Following are the most relevant usecases of virtualized environment:• “HP-UX vPars and Integrity VM 6.x (referred as vPar Guest and VM Guest)” (page 50)
• “HP-UX Virtual Partitions (vPars) (referred as Legacy vPars)” (page 51)
• “Integrity Virtual Machine (VM) 4.x (referred as HPVM)” (page 51)
HP-UX vPars and Integrity VM 6.x (referred as vPar Guest and VM Guest)HP-UX vPars and Integrity VM 6.x are also referred as vPar Guest and VM Guest respectively. Forthe ease of user benefit and understanding, HP-UX vPars and Integrity VM 6.x are mentioned asvPar Guest and VM Guest respectively, in this document.
Inventory handlingHP–UX 11i v3 vPar Guest and VM Guest support only HP_ComputerSystemChassis andHP_ComputerSystemPackage inventory classes. Both vPar Guest and VM Guest do not supportinventory classes.When requested to enumerate any non-supported inventory classes, SysFaultMgmt (System FaultManagement) (SFM) throws an error message: “CIM_ERR_NOT_SUPPORTED: This operation isnot supported on this configuration”.
Indication handlingvPar Guest supports both FPL and SEL02 indications, whereas VM Guest supports only FPL. TheAdmin user must check the Virtualization Services Platform (VSP) for all other reported events.
Error log processing on a 6.x (vPar/VM) GuestSysFaultMgmt (System Fault Management) (SFM) acts as a passive component, where most ofits functions are delegated to the instances on VSP. The Diagnostic Agent (diagtxtd) availablein 6.x Guest (both vPar and VM) is responsible for collecting all the error logs (/var/opt/psb/oselog) and it sends the same to VSP over virtual IPMI channel provided by HPVM.SysFaultMgmt (System Fault Management) (SFM) instance at VSP starts processing the receivederror data and generates the required event, if qualified.
50 SysFaultMgmt (System Fault Management) (SFM) support for different virtualization environments
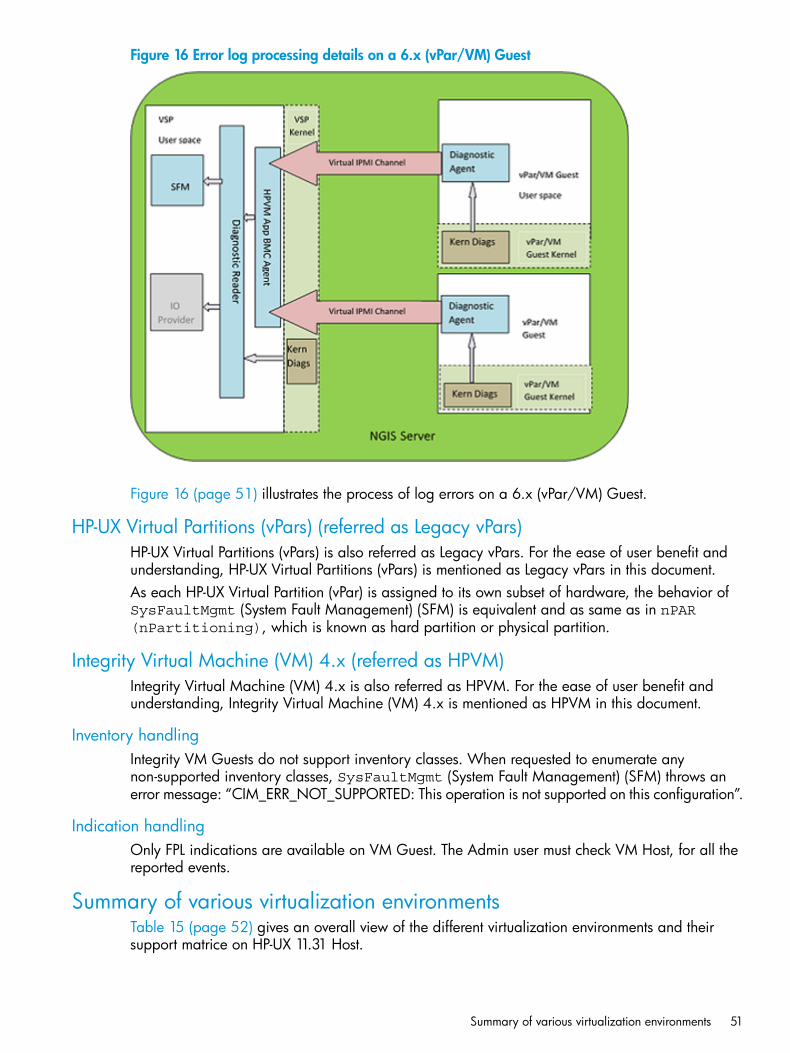
Figure 16 Error log processing details on a 6.x (vPar/VM) Guest
Figure 16 (page 51) illustrates the process of log errors on a 6.x (vPar/VM) Guest.
HP-UX Virtual Partitions (vPars) (referred as Legacy vPars)HP-UX Virtual Partitions (vPars) is also referred as Legacy vPars. For the ease of user benefit andunderstanding, HP-UX Virtual Partitions (vPars) is mentioned as Legacy vPars in this document.As each HP-UX Virtual Partition (vPar) is assigned to its own subset of hardware, the behavior ofSysFaultMgmt (System Fault Management) (SFM) is equivalent and as same as in nPAR(nPartitioning), which is known as hard partition or physical partition.
Integrity Virtual Machine (VM) 4.x (referred as HPVM)Integrity Virtual Machine (VM) 4.x is also referred as HPVM. For the ease of user benefit andunderstanding, Integrity Virtual Machine (VM) 4.x is mentioned as HPVM in this document.
Inventory handlingIntegrity VM Guests do not support inventory classes. When requested to enumerate anynon-supported inventory classes, SysFaultMgmt (System Fault Management) (SFM) throws anerror message: “CIM_ERR_NOT_SUPPORTED: This operation is not supported on this configuration”.
Indication handlingOnly FPL indications are available on VM Guest. The Admin user must check VM Host, for all thereported events.
Summary of various virtualization environmentsTable 15 (page 52) gives an overall view of the different virtualization environments and theirsupport matrice on HP-UX 11.31 Host.
Summary of various virtualization environments 51
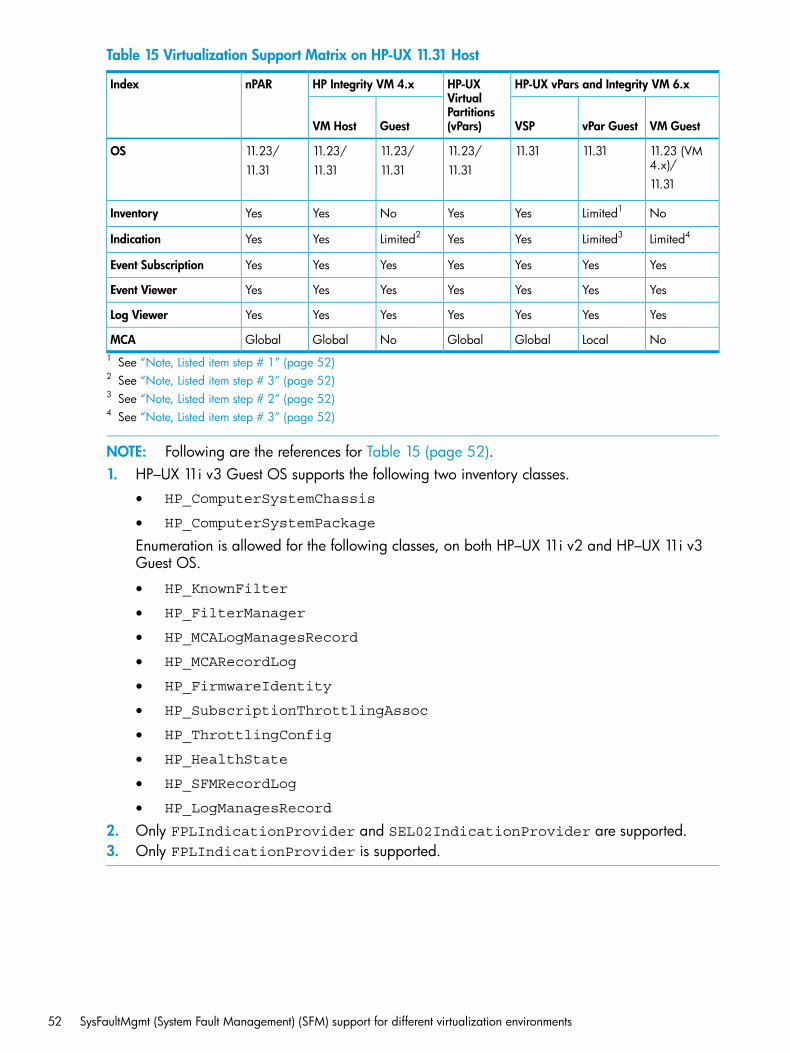
Table 15 Virtualization Support Matrix on HP-UX 11.31 Host
HP-UX vPars and Integrity VM 6.xHP-UXVirtual
HP Integrity VM 4.xnPARIndex
VM GuestvPar GuestVSPGuestVM HostPartitions(vPars)
11.23 (VM4.x)/
11.3111.3111.23/11.31
11.23/11.31
11.23/11.31
11.23/11.31
OS
11.31
NoLimited1YesYesNoYesYesInventory
Limited4Limited3YesYesLimited2YesYesIndication
YesYesYesYesYesYesYesEvent Subscription
YesYesYesYesYesYesYesEvent Viewer
YesYesYesYesYesYesYesLog Viewer
NoLocalGlobalGlobalNoGlobalGlobalMCA1 See “Note, Listed item step # 1” (page 52)2 See “Note, Listed item step # 3” (page 52)3 See “Note, Listed item step # 2” (page 52)4 See “Note, Listed item step # 3” (page 52)
NOTE: Following are the references for Table 15 (page 52).1. HP–UX 11i v3 Guest OS supports the following two inventory classes.
• HP_ComputerSystemChassis
• HP_ComputerSystemPackage
Enumeration is allowed for the following classes, on both HP–UX 11i v2 and HP–UX 11i v3Guest OS.
• HP_KnownFilter
• HP_FilterManager
• HP_MCALogManagesRecord
• HP_MCARecordLog
• HP_FirmwareIdentity
• HP_SubscriptionThrottlingAssoc
• HP_ThrottlingConfig
• HP_HealthState
• HP_SFMRecordLog
• HP_LogManagesRecord
2. Only FPLIndicationProvider and SEL02IndicationProvider are supported.3. Only FPLIndicationProvider is supported.
52 SysFaultMgmt (System Fault Management) (SFM) support for different virtualization environments
6 Administering indications and instances using HP SMHThis chapter describes SysFaultMgmt (System Fault Management) (SFM) administration tasksthat you can perform using HP SMH on a local system.This chapter addresses the following topics:• “Viewing instances” (page 53)
• “Administering indications using Evweb” (page 58)
• “Viewing event subscriptions using Evweb” (page 65)
• “Viewing indications using Evweb” (page 69)
• “Tracing Evweb” (page 77)
• “EMT Overview” (page 81)
• “Querying the Common Error Repository” (page 81)
• “Administering Events in CER” (page 84)
• “Tracing EMT” (page 87)
Viewing instancesThis section describes the tasks you must perform to view instances. This section discusses thefollowing topics:
• “Viewing information about processors” (page 53)
• “Viewing information about memory” (page 54)
• “Viewing information about System Summary” (page 55)
• “Viewing information about Cooling Devices” (page 55)
• “Viewing Power Supply instances” (page 55)
• “Viewing Temperature status and events” (page 55)
• “Viewing Voltage status and events” (page 55)
• “Viewing FRU information” (page 55)
• “Viewing information about Management Processor” (page 56)
• “Viewing information about Mem Error” (page 56)
• “Viewing information about Firmware information” (page 56)
• “Viewing information about Onboard Administrator” (page 56)
• “Viewing information about Complex-wide info” (page 56)
• “Viewing information about Cell Board” (page 56)
• “Viewing Partition information” (page 57)
• “Viewing information about Blade” (page 57)
• “Viewing information about Cell Blade” (page 57)
• “Viewing Health Test report of Memory” (page 57)
• “Viewing Health Test report of processors” (page 57)
Viewing information about processorsTo obtain information about processors, such as the processor type, architecture revision, andprocessor speed, complete the following steps:
Viewing instances 53
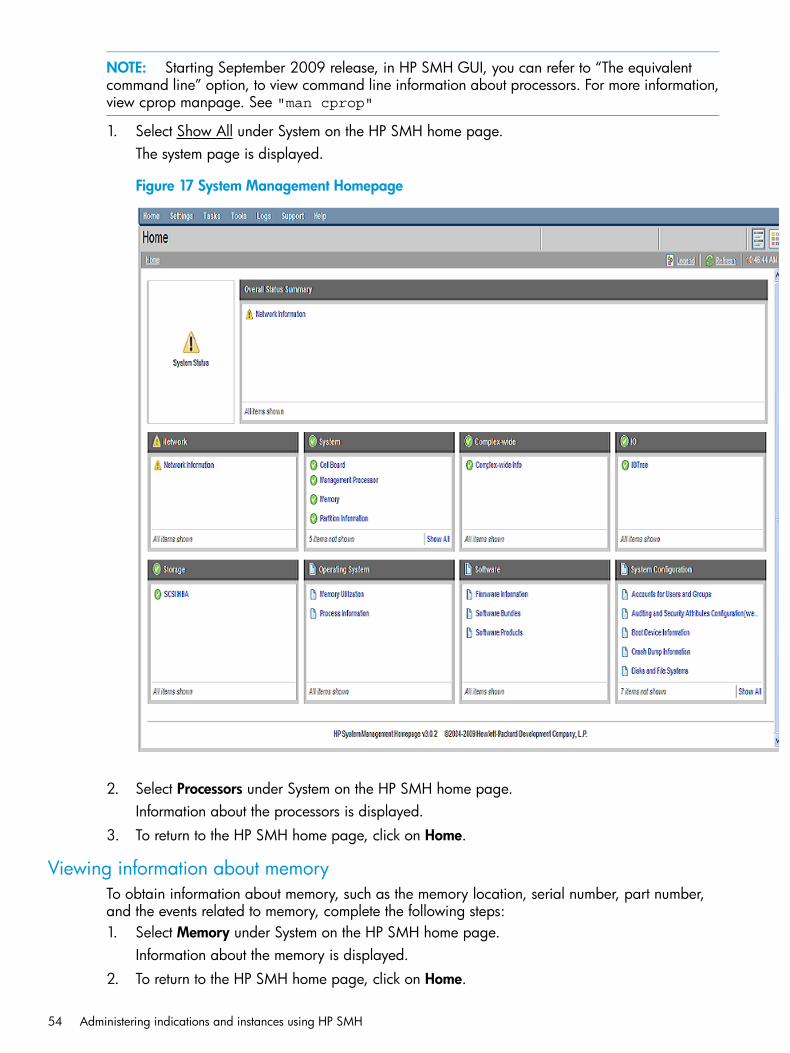
NOTE: Starting September 2009 release, in HP SMH GUI, you can refer to “The equivalentcommand line” option, to view command line information about processors. For more information,view cprop manpage. See "man cprop"
1. Select Show All under System on the HP SMH home page.The system page is displayed.
Figure 17 System Management Homepage
2. Select Processors under System on the HP SMH home page.Information about the processors is displayed.
3. To return to the HP SMH home page, click on Home.
Viewing information about memoryTo obtain information about memory, such as the memory location, serial number, part number,and the events related to memory, complete the following steps:1. Select Memory under System on the HP SMH home page.
Information about the memory is displayed.2. To return to the HP SMH home page, click on Home.
54 Administering indications and instances using HP SMH

Viewing information about System SummaryTo obtain information about system summary, such as the model, role, UUID, UUID (Logical), Serialnumber, Serial number (Logical) and many more, complete the following steps:1. Select System Summary under System on the HP SMH home page.
System summary information is displayed.2. To return to the HP SMH home page, click on Home.
Viewing information about Cooling DevicesTo view information about the cooling devices on the system, such as the status, location, the typeof fans, and HashID, complete the following steps:1. Select Cooling under System on the HP SMH home page.
Information about cooling devices is displayed in the Cooling Status window.2. To return to the HP SMH home page, click on Home.
Viewing Power Supply instancesTo view information about the power supplies, such as the status, power supply type, part numberand serial number, complete the following steps:1. Select Show All under System on the HP SMH home page.
The system page is displayed.2. Select Power under System on the HP SMH home page.
Information about the power status is displayed in the Power Status window.3. To return to the System Management Homepage home, click on Home.
Viewing Temperature status and eventsTo view the temperature status and events related to temperature, complete the following steps:1. Select Show All under System on the HP SMH home page.
The system page is displayed.2. Select Temperature on the system page.
The temperature status of the system is displayed in the Temperature Status window.3. To return to the System Management Homepage home, click on Home.
Viewing Voltage status and eventsTo view the voltage status and events related to voltage, complete the following steps:1. Select Show All under System on the HP SMH home page.2. Select Voltage on the system page.
The voltage status of the system and the events related to voltage are displayed in the VoltageStatus window.
3. To return to the HP SMH home page, click on Home.
Viewing FRU informationTo obtain the FRU (Field Replaceable Unit) Information, such as name, serial number, and HashID,complete the following steps:1. Select FRU information under System on the HP SMH home page.
Information about the FRU is displayed.2. To return to the HP SMH home page, click on Home.
Viewing instances 55

Viewing information about Management ProcessorTo obtain information about the Management Processor (MP), such as its IP address, status, andURL, complete the following steps:1. Select Management Processor under System on the HP SMH home page.
Information about the management processor is displayed.2. To return to the HP SMH home page, click on Home.
Viewing information about Mem ErrorTo obtain information about the memory error, complete the following steps:1. Select Show All under System on the HP SMH home page.
The system page is displayed.2. Select Mem Error under System on the HP SMH home page.
Information about the memory error is displayed.3. To return to the HP SMH home page, click on Home.
Viewing information about Firmware informationTo obtain information about the firmware information, such as the system firmware informationand the MP firmware version, complete the following steps:1. Select Firmware information under Software on the HP SMH home page.
The Firmware information is displayed.2. To return to the HP SMH home page, click on Home.
Viewing information about Onboard AdministratorTo obtain information about the Onboard Administrator (OA), such as the OA description, OA IPaddress, and OA MAC address, complete the following steps:1. Select Enclosure Information under Enclosure on the HP SMH home page.
Information about the OA is displayed.2. To return to the HP SMH home page, click on Home.
Viewing information about Complex-wide infoTo obtain information about the Complex-wide Info, such as the Complex name, Model inComplex-wide Info page; Cabinet ID, Type in Cabinet Info page; and Cell Slot, Architecture inComplex Cell page, complete the following steps:1. Select Complex-wide Info under Enclosure on the HP SMH home page.
Information about the Complex—wide Info is displayed.2. To return to the HP SMH home page, click on Home.
Viewing information about Cell BoardTo obtain information about the Cell Board, such as the Firmware Version, Status, and Core IO,complete the following steps:1. Select Cell Board under System on the HP SMH home page.
Information about the Cell Board is displayed.2. To return to the HP SMH home page, click on Home.
56 Administering indications and instances using HP SMH
Viewing Partition informationTo obtain the Partition Information, such as the Partition Name, Type, and ID, complete the followingsteps:1. Select Partition Information under System on the HP SMH home page.
Information about the Partition Information is displayed.2. To return to the HP SMH home page, click on Home.
Viewing information about BladeTo obtain information about the Blade, such as the Onboard Administrator and HashID, completethe following steps:1. Select Blade under System on the HP SMH home page.
Information about the Blade is displayed.2. To return to the HP SMH home page, click on Home.
Viewing information about Cell BladeTo obtain information about the Cell Blade, such as the Status, Hardware Path and OA partitionInformation of the enclosures, complete the following steps:1. Select Cell Blade under System on the HP SMH home page.
Information about the Cell Blade is displayed.2. To return to the HP SMH home page, click on Home.
Viewing Health Test report of Memory
NOTE: Health Test support is available when the feature is installed by ProviderSvcsBase. Forinformation on installing Health Test feature, see ProviderSvcsBase Release Notes
To obtain information about the Health Test for Memory, such as Component, Device, Test Name,Test Description, Impact on System, Logging Level, and many more, complete the following steps:1. Select Memory under System on the HP SMH home page.
Information about the Memory is displayed.2. Select Health Test tab on the Memory page to run a configured Health Test.3. Select the option Basic Health Test to run basic test configured in the system.4. Click Run to execute the Memory Health Test.
The Memory Health Test results are displayed in the View Health Test Results pane.
NOTE: Memory Health Test Results can also be viewed from the command line interface(CLI).
5. To return to the HP SMH home page, click on Home.For more information, see HP System Management Homepage Online Help. In HP SMH, go to theHelp menu.
Viewing Health Test report of processors
NOTE: Health Test support is available when the feature is installed by ProviderSvcsBase. Forinformation on installing Health Test feature, see ProviderSvcsBase Release Notes
To obtain information about the Health Test for Processor/CPU, such as Component, Device, TestName, Test Description, Impact on System, Logging Level, and many more, complete the followingsteps:
Viewing instances 57
1. Select Processors under System on the HP SMH home page.Information about the Processors is displayed.
2. Select Health Test tab on the Processors page to run a configured Health Test.3. Select the option Basic Health Test to run basic test configured in the system.4. Click Run to execute the CPU Health Test.
The CPU Health Test results are displayed in the View Health Test Results pane.
NOTE: CPU Health Test Results can also be viewed from the command line interface (CLI).
5. To return to the HP SMH home page, click on Home.For more information, see HP System Management Homepage Online Help. In HP SMH, go to theHelp menu.
Administering indications using EvwebThis section provides an overview of Evweb and describes how to use Evweb for administrativetasks, such as creating and managing subscriptions for indications.This section addresses the following topics:• “Evweb overview” (page 58)
• “Launching Evweb for administration” (page 59)
• “Creating Evweb event subscriptions” (page 59)
• “Modifying Evweb event subscriptions” (page 61)
• “Deleting Evweb event subscriptions” (page 64)
• “Configuring email consumer” (page 65)
NOTE: You must be an administrator to create, modify, and delete event subscriptions.
Evweb overviewSysFaultMgmt (System Fault Management) (SFM) includes a user component called Evweb,which enables you to administer and view WBEM indications generated on the local system onwhich SysFaultMgmt (System Fault Management) (SFM) is installed.Evweb includes the following components:
• Event Subscription Administration – to subscribe to indications
• Event Archive database – to store indications you have subscribed to
• Event Viewer – to view indications present in the Event ArchiveEvweb provides the following user interfaces to create and manage event subscriptions and viewindications:
• Browser-based Graphical User Interface (GUI)
• Command-Line Interface (CLI)Evweb supports the following user groups:
• Administrator
• Non-administratorIn the CLI, any user with root privileges is an administrator. However, in the HP SMH GUI, theuser groups in Evweb are mapped internally to the user groups defined in HP SMH.The Administrator user group in HP SMH maps to administrators in Evweb. The Operator and theUser user group in HP SMH map to non-administrators in Evweb.
58 Administering indications and instances using HP SMH
For information on how to configure user groups in HP SMH, see the HP System ManagementHomepage User’s Guide at http://www.hp.com/go/smh-docsEVWEB supports new IO & Storage native indication providers to display additional info for thefollowing providers:HPUXSASNativeIndicationProviderModuleHPUXRAIDSANativeIndicationProviderModuleHPUXFCNativeIndicationProviderModuleHPUXStorageNativeProviderModuleThese native indication provider support is available on the HP Integrity Servers.
Launching Evweb for administrationYou can launch Evweb either through the CLI or through the HP SMH GUI.To launch Evweb for administering event subscriptions using the CLI, enter the following commandat the HP-UX prompt:# evweb subscribe <option [parameter]>
To use HP SMH GUI to launch Evweb for administering event subscription, complete the followingsteps:1. Log in to HP SMH.
To log in to HP SMH, enter http://<hostname>:2301 in the address bar of the Webbrowser. The HP SMH login screen is displayed.
2. Enter your user name and password in the appropriate text boxes.3. Click Sign In on the login screen.
The HP SMH home page is displayed.4. Select Tools in the main menu.
The Tools page is displayed. This page displays the applications that are plugged into HPSMH.
5. Select Subscription administration in Evweb.The Event subscription administration page is displayed.
You can perform various administrative tasks such as creating, modifying, and deleting eventsubscriptions on this page.
Creating Evweb event subscriptionsYou can create event subscriptions for the WBEM indications that you want to monitor. You cancreate the following event subscription types using Evweb:• Admin Defined event subscriptions – Event Subscriptions created using the sfmconfig
command are called Admin Defined event subscriptions. You can modify and delete AdminDefined event subscriptions using the sfmconfig command. For more information aboutcustomizing event filters via sfmconfig command, see “Configuring indication filters” (page
Administering indications using Evweb 59
34). You cannot use the evweb list, evweb subscribe, or the evweb eventviewer command tocreate and delete Admin Defined event subscriptions.
• Event subscriptions created using the HP SMH GUI (Event subscription administration) – Youcan create these event subscriptions using the GUI or the CLI. You can modify and delete theevent subscriptions that are created using Event subscription administration.To create an event subscription using Event subscription administration, you must specify thefollowing:
◦ A unique name for the event subscription.
◦ Criteria such as device, event ID, and the severity of the event.
◦ The destination, where the event must be stored.
You can create an event subscription using the following methods:• Create a completely new event subscription.
• Copy an existing event subscription and modify it.
Creating an event subscription using the GUITo create a new event subscription, complete the following steps:1. Repeat steps 1-5 from “Launching Evweb for administration” (page 59).2. Select Create subscription in the action pane on the top right corner of the Event subscription
administration page.The Create subscription page is displayed.
3. Provide appropriate information in the fields present in the Create subscription page.
NOTE: It is mandatory to specify a unique name for creating an event subscription.
4. To view the command line equivalent of creating event subscriptions using GUI, click Previewon the Create subscription page. This step is optional.
5. Select Create on the Create subscription page.Evweb creates the event subscription and displays a confirmation message.
6. Click OK on the confirmation message window.For more information on creating subscription using the HP SMH GUI, select Help on the actionpane of the Create subscription page.
Creating an event subscription using the CLITo create an event subscription using the CLI, enter the following command at the HP-UX prompt:# evweb subscribe -C -n <subscription name>Where:-C is an option used to create event subscriptions.-n is a switch used to specify a name for an event subscriptions.A message stating that the execution of the evweb subscribe command was successful isdisplayed on the screen.
NOTE: The -n switch is mandatory.
You can also use the following switches with the -C option:• (-e [eq|ne|le|ge|bw]: <EVWEB_severity_level1>[,<EVWEB_severity_level2>])
• (-m [eq|ne|le|ge|bw]: <WBEM_severity_level1>[,<WBEM_severity_level2>])
60 Administering indications and instances using HP SMH
• (-i <EventID>)
• (-v <event category name>)
• (-o <provider name>)
• (-t [archive|email][handler_properties]
• (-s <Syslog>)
• -h
For more information on creating event subscriptions using CLI, see evweb_subscribe(1).
Copying and creating a new event subscription using the GUIYou can reuse the existing subscriptions to create another subscription. To create an eventsubscription by copying an existing event subscription, complete the following steps:1. Repeat steps 1-5 from “Launching Evweb for administration” (page 59).2. Select the event subscription you want to copy, from the event subscription table.3. Select Copy and create subscription in the action pane on the top right corner of the Event
subscription administration page.The Copy and create subscription page is displayed.
4. Modify the required fields.
IMPORTANT: The subscription criteria is not copied when you copy an HP Advised eventsubscription. Therefore, ensure that you specify the subscription criteria in the Copy and createsubscription page.
NOTE: It is mandatory to specify a unique name in the Subscription name.
5. Select Create on the Copy and create subscription page.Evweb creates the event subscription and displays a confirmation message.
6. Click OK on the confirmation message window.
NOTE: There is no CLI equivalent for this action. The Copy and create subscription featureis available only on the HP SMH GUI.
For more information on creating an event subscription by copying an existing event subscriptionusing the HP SMH GUI, select Help on the action pane of the Copy and create subscription page.
Modifying Evweb event subscriptionsYou can modify an event subscription by modifying the criteria and destination. However, thefields that you are allowed to modify, depend on the type of event subscription you select. Youcan modify more than one subscription at a time.
NOTE: The HP Known event subscriptions are classified as HP Advised and Admin Defined.
In HP Advised event subscriptions, the events are stored in the event archive by default. The defaultdestination of the events cannot be modified. However, you can direct the events to your emailaddress or to the Syslog. You cannot change any other subscription criteria.In Admin Defined event subscriptions, the events are stored in the event archive by default. Thedefault destination of the events can be modified. You can store events in the Event Archive, inSyslog, or direct them to your email address, or do all. You cannot change any other subscriptioncriteria.In event subscriptions created using Evweb, you can change all criteria except the name of thesubscription.
Administering indications using Evweb 61
You can modify an event subscription in the following ways:• Modify a single event subscription.
You can modify a single event subscription using the modify feature by selecting the eventsubscription from the event subscription table.
• Modify similar criteria in multiple event subscriptions.You can modify similar criteria in multiple event subscriptions by using the Copy and modifysubscription feature.
Modifying an event subscription using GUITo modify an event subscription, complete the following steps:1. Repeat steps 1-5 from “Launching Evweb for administration” (page 59).2. Select Modify subscription in the action pane on the top right corner of the page.
The Modify subscription page is displayed.3. Select the event subscription, which you want to modify, from the Event subscription Table.4. Modify the required fields.5. To view the command line equivalent of modifying event subscriptions using the GUI, click
Preview on the Modify subscription page. This step is optional.6. Select Modify in the Modify subscription page.
Evweb modifies the event subscription and displays a confirmation message.7. Click OK on the confirmation message window.For more information on modifying an event subscription using the HP SMH GUI, select Help onthe action pane of the Modify event subscription page.
Modifying an event subscription using CLITo modify an event subscription using the CLI, enter the following command at the HP-UX prompt:# evweb subscribe -M -n<subscription name>Where:-M is an option used to modify event subscriptions.-n is a switch used to specify a name for an event subscriptions.A message stating that the execution of the evweb subscribe command was successful isdisplayed on the screen.
NOTE: The -n switch is mandatory.
You can also use the following switches with the -M option:• (-e [eq|ne|le|ge|bw][:] <EVWEB_severity level1>[,<EVWEB_severity
level2>])• (-v <Event category name>)
• (-i <EventID>)
• (-m <[eq|ne|le|ge|bw]:WBEM_severity_level1[,WBEM_severity_level2]>)
• -r
• -h
To modify an event subscription, you must specify the criteria and the destination. Following arethe ways in which you can modify an event subscription:
62 Administering indications and instances using HP SMH

If you specify only the subscription criteria and not the destination, then:• If you do not specify -r option, the current destination is removed and the subscription
criteria are updated.• If you specify -r option, the current destination is retained and only the subscription criteria
are updated.
Example 1 Example
The existing subscription criteria won't be retained. If email or Syslog destination is configured,the destination will be changed to EventArchive.# evweb subscribe -L
Subscription Name HP Known Is Deprecated Event Archive email Syslog
====================== ======== ============== ============== ======== ========
HP_defaultSyslog FALSE FALSE FALSE FALSE TRUE
test FALSE FALSE TRUE FALSE FALSE
HP_General Filter@1_V1 TRUE FALSE TRUE FALSE FALSE
# evweb subscribe -Mn test -r
The execution of 'evweb subscribe' command was successful.
# evweb subscribe -L
Subscription Name HP Known Is Deprecated Event Archive Email Syslog
====================== ======== ============== ============== ======== ========
HP_defaultSyslog FALSE FALSE FALSE FALSE TRUE
test FALSE FALSE TRUE FALSE FALSE
HP_General Filter@1_V1 TRUE FALSE TRUE FALSE FALSE
• If you specify both subscription criteria and location, then both of them are updated.
• If you specify the location but not the criteria, the location is updated but the original criteriaare retained.
For more information on modifying event subscriptions using the CLI, see evweb_subscribe(1).
Copying and modifying an event subscription using the GUITo modify an event subscription by copying an existing event subscription, complete the followingsteps:1. Repeat steps 1-5 from “Launching Evweb for administration” (page 59).2. Select the event subscriptions you want to copy, from the event subscription table.3. Select Copy and modify subscription in the action pane on the top right corner of the page.
The criteria and the destination information is copied. The copy and modify subscription pageis displayed.
4. Select the event subscriptions you want to modify by selecting the respective check boxes.5. Modify the required fields.
NOTE: You can modify multiple subscriptions at-a-time. You must specify a unique name inthe Subscription name.
Administering indications using Evweb 63
6. Select Modify in the Copy and modify subscription page.Evweb modifies the event subscriptions and displays a confirmation message.
7. Click OK on the confirmation message window.
NOTE: The Copy and modify subscription feature is available only on the GUI.
IMPORTANT: The subscription criteria are not copied when you copy an HP Advised eventsubscription. Therefore, ensure that you specify the subscription criteria in the Copy and modifysubscription page.
For more information on copying and modifying an event subscription using the HP SMH GUI,select Help on the action pane of the Copy and Modify event Subscription page.
Deleting Evweb event subscriptionsYou must periodically delete event subscriptions that are not required. You can delete a singleevent subscription or multiple event subscriptions at a time.
NOTE: Delete the subscriptions created by evweb using evweb only. These subscriptions existsand can still be viewed if they are deleted or updated by tools provided by HP WBEM services.For more information on tools, see the HP-UX WBEM Services Administrator Guide.
Deleting an event subscription using the GUITo delete an event subscription, complete the following steps:1. Repeat steps 1-5 from “Launching Evweb for administration” (page 59).2. Select Delete subscription in the action pane on the top right corner of the Event Subscription
Administration page.The Delete subscriptions page is displayed.
3. Select the event subscriptions you want to delete, by selecting the appropriate check boxes.4. Select Delete on the Delete subscription page.
The event subscriptions are deleted and a confirmation message is displayed.5. Click OK on the confirmation message window.
NOTE: You cannot delete HP Advised event subscriptions and Admin Defined event subscriptions.
For more information on deleting an event subscription using the HP SMH GUI, select Help on theaction pane of the Delete event subscription page.
NOTE: HP recommends deleting all unwanted event subscriptions. Retaining a large number ofevent subscriptions may increase the size of the Event Archive, and may affect the tasks you performusing Event subscriptions administration.
Deleting an event subscription using the CLITo delete an event subscription using the CLI, enter the following command at the HP-UX prompt:# evweb subscribe -D -f -n <subscription name>
NOTE: The -n switch is mandatory.
Where:-D is an option used to delete event subscriptions.-n is a switch used to specify a name for an event subscriptions.
64 Administering indications and instances using HP SMH
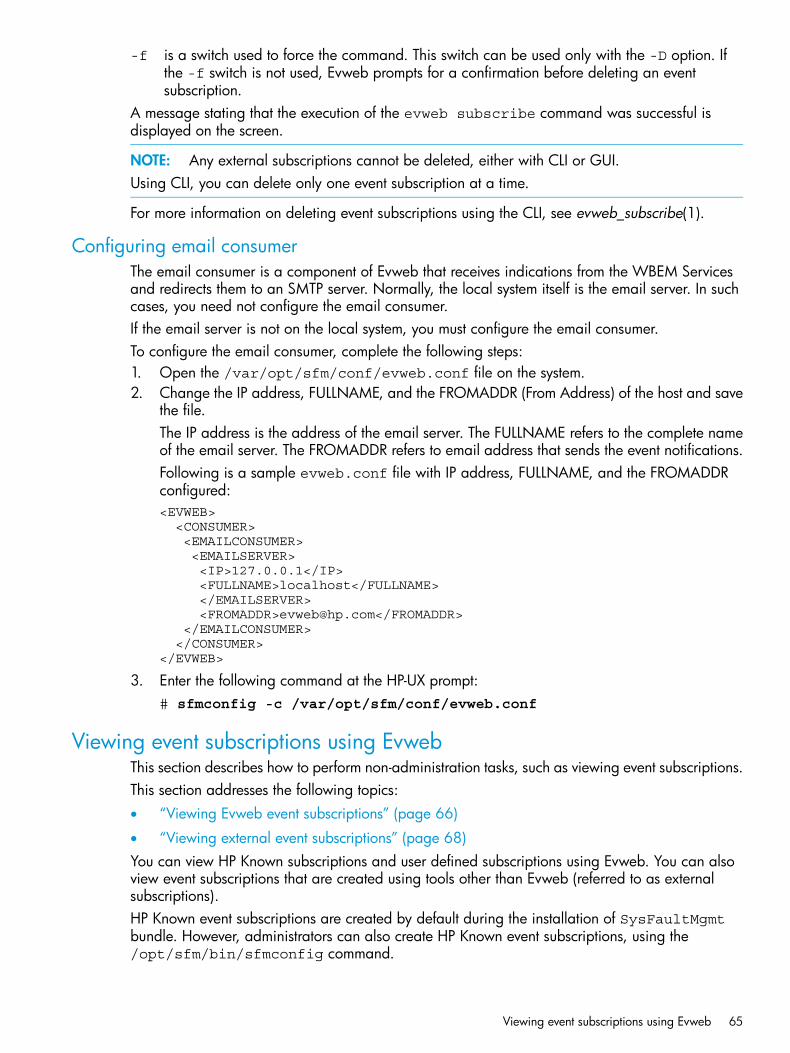
-f is a switch used to force the command. This switch can be used only with the -D option. Ifthe -f switch is not used, Evweb prompts for a confirmation before deleting an eventsubscription.
A message stating that the execution of the evweb subscribe command was successful isdisplayed on the screen.
NOTE: Any external subscriptions cannot be deleted, either with CLI or GUI.Using CLI, you can delete only one event subscription at a time.
For more information on deleting event subscriptions using the CLI, see evweb_subscribe(1).
Configuring email consumerThe email consumer is a component of Evweb that receives indications from the WBEM Servicesand redirects them to an SMTP server. Normally, the local system itself is the email server. In suchcases, you need not configure the email consumer.If the email server is not on the local system, you must configure the email consumer.To configure the email consumer, complete the following steps:1. Open the /var/opt/sfm/conf/evweb.conf file on the system.2. Change the IP address, FULLNAME, and the FROMADDR (From Address) of the host and save
the file.The IP address is the address of the email server. The FULLNAME refers to the complete nameof the email server. The FROMADDR refers to email address that sends the event notifications.Following is a sample evweb.conf file with IP address, FULLNAME, and the FROMADDRconfigured:<EVWEB> <CONSUMER> <EMAILCONSUMER> <EMAILSERVER> <IP>127.0.0.1</IP> <FULLNAME>localhost</FULLNAME> </EMAILSERVER> <FROMADDR>[email protected]</FROMADDR> </EMAILCONSUMER> </CONSUMER></EVWEB>
3. Enter the following command at the HP-UX prompt:# sfmconfig -c /var/opt/sfm/conf/evweb.conf
Viewing event subscriptions using EvwebThis section describes how to perform non-administration tasks, such as viewing event subscriptions.This section addresses the following topics:• “Viewing Evweb event subscriptions” (page 66)
• “Viewing external event subscriptions” (page 68)You can view HP Known subscriptions and user defined subscriptions using Evweb. You can alsoview event subscriptions that are created using tools other than Evweb (referred to as externalsubscriptions).HP Known event subscriptions are created by default during the installation of SysFaultMgmtbundle. However, administrators can also create HP Known event subscriptions, using the/opt/sfm/bin/sfmconfig command.
Viewing event subscriptions using Evweb 65

HP provides some event subscriptions with Evweb. These event subscriptions are known as HPAdvised event subscriptions. By default, the HP Advised event subscriptions store the events in theEvent Archive.
Viewing Evweb event subscriptionsYou can view summary and detailed information about event subscriptions using Evweb.
Viewing a summary of an Evweb event subscription using the GUITo view a summary of the event subscriptions, repeat steps 1-5 from “Launching Evweb foradministration” (page 59).The Event subscription administration page is displayed.The Event subscription administration page displays a summary of the the event subscriptions, ina tabular format. In this document, this table is referred to as the event subscription summary table.For more information on viewing a summary of an evweb event subscription using the HP SMHGUI, select Help on the action pane of the event subscription page.
Viewing a Summary of an Evweb event Subscription using the CLITo view the summary of an Evweb event subscription using the CLI, enter the following commandat the HP-UX prompt:# evweb subscribe -L -b internal
Where:-L is an option used to list all the event subscriptions.-b is a switch used to display information about event subscriptions in brief.internal is an argument used to display information about HP kown event subscriptions and
event subscriptions created using Evweb.A summary of event subscriptions is displayed in a tabular format, as shown in Figure 18.
Figure 18 Summary of Evweb event Subscriptions
Table 16 describes the fields in the event Subscription Summary table.
Table 16 Evweb event subscriptions
DescriptionField
Displays the name of an event subscription.Subscription Name
Displays TRUE if the subscription is HP Known. Displays FALSE if thesubscription is not HP Known.
HP Known
Displays TRUE if the subscription is deprecated. Displays FALSE if thesubscription is not deprecated. This field is applicable to Admin-Definedsubscriptions only.
Is Deprecated
Displays TRUE if the subscription criterion is configured to store the WBEMindications in the Event Archive. Displays FALSE if the subscription criterionis not configured to store the WBEM indications in the Event archive.
Event Archive
66 Administering indications and instances using HP SMH
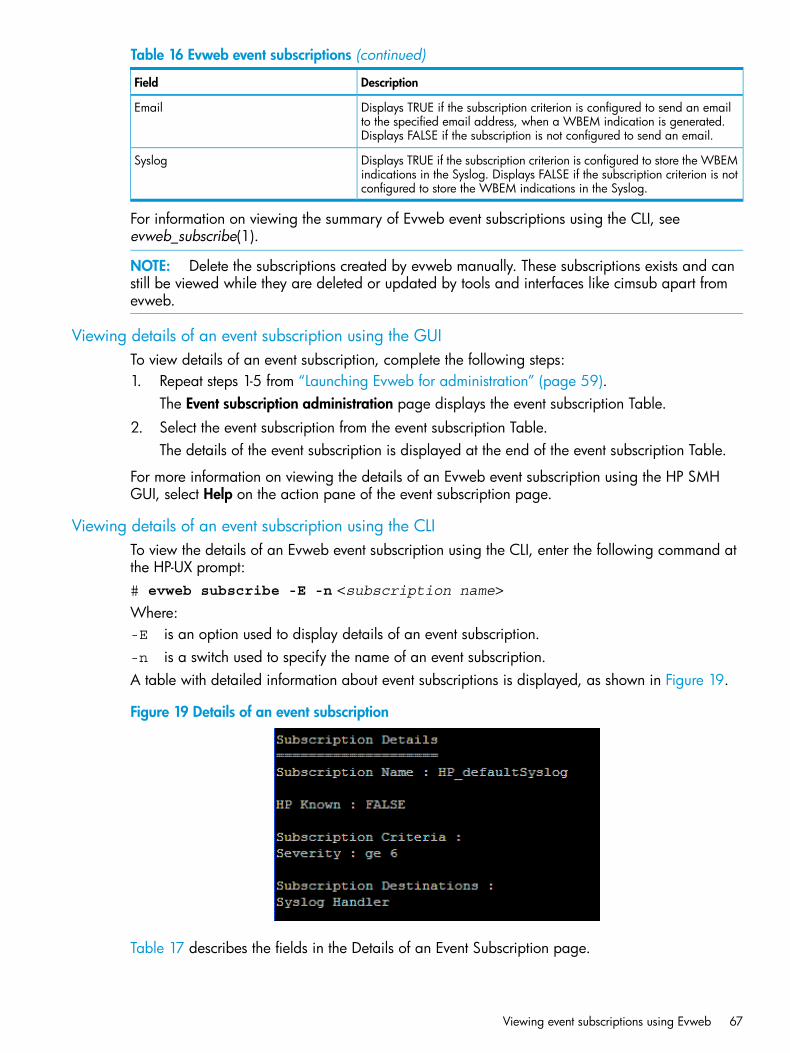
Table 16 Evweb event subscriptions (continued)
DescriptionField
Displays TRUE if the subscription criterion is configured to send an emailto the specified email address, when a WBEM indication is generated.Displays FALSE if the subscription is not configured to send an email.
Displays TRUE if the subscription criterion is configured to store the WBEMindications in the Syslog. Displays FALSE if the subscription criterion is notconfigured to store the WBEM indications in the Syslog.
Syslog
For information on viewing the summary of Evweb event subscriptions using the CLI, seeevweb_subscribe(1).
NOTE: Delete the subscriptions created by evweb manually. These subscriptions exists and canstill be viewed while they are deleted or updated by tools and interfaces like cimsub apart fromevweb.
Viewing details of an event subscription using the GUITo view details of an event subscription, complete the following steps:1. Repeat steps 1-5 from “Launching Evweb for administration” (page 59).
The Event subscription administration page displays the event subscription Table.2. Select the event subscription from the event subscription Table.
The details of the event subscription is displayed at the end of the event subscription Table.
For more information on viewing the details of an Evweb event subscription using the HP SMHGUI, select Help on the action pane of the event subscription page.
Viewing details of an event subscription using the CLITo view the details of an Evweb event subscription using the CLI, enter the following command atthe HP-UX prompt:# evweb subscribe -E -n <subscription name>Where:-E is an option used to display details of an event subscription.-n is a switch used to specify the name of an event subscription.A table with detailed information about event subscriptions is displayed, as shown in Figure 19.
Figure 19 Details of an event subscription
Table 17 describes the fields in the Details of an Event Subscription page.
Viewing event subscriptions using Evweb 67
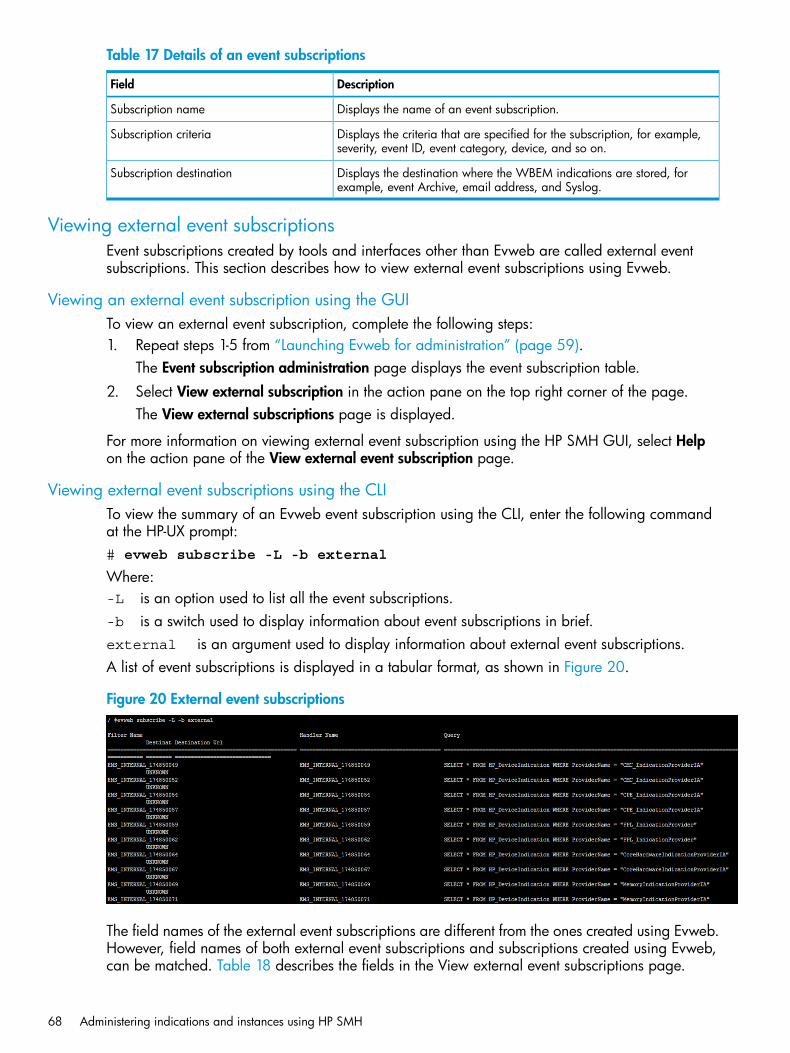
Table 17 Details of an event subscriptions
DescriptionField
Displays the name of an event subscription.Subscription name
Displays the criteria that are specified for the subscription, for example,severity, event ID, event category, device, and so on.
Subscription criteria
Displays the destination where the WBEM indications are stored, forexample, event Archive, email address, and Syslog.
Subscription destination
Viewing external event subscriptionsEvent subscriptions created by tools and interfaces other than Evweb are called external eventsubscriptions. This section describes how to view external event subscriptions using Evweb.
Viewing an external event subscription using the GUITo view an external event subscription, complete the following steps:1. Repeat steps 1-5 from “Launching Evweb for administration” (page 59).
The Event subscription administration page displays the event subscription table.2. Select View external subscription in the action pane on the top right corner of the page.
The View external subscriptions page is displayed.
For more information on viewing external event subscription using the HP SMH GUI, select Helpon the action pane of the View external event subscription page.
Viewing external event subscriptions using the CLITo view the summary of an Evweb event subscription using the CLI, enter the following commandat the HP-UX prompt:# evweb subscribe -L -b external
Where:-L is an option used to list all the event subscriptions.-b is a switch used to display information about event subscriptions in brief.external is an argument used to display information about external event subscriptions.A list of event subscriptions is displayed in a tabular format, as shown in Figure 20.
Figure 20 External event subscriptions
The field names of the external event subscriptions are different from the ones created using Evweb.However, field names of both external event subscriptions and subscriptions created using Evweb,can be matched. Table 18 describes the fields in the View external event subscriptions page.
68 Administering indications and instances using HP SMH
Table 18 External event subscriptions
DescriptionField
Displays the filter name consisting of an event subscriptions.Filter name
Displays the handler name consisting of an event subscriptions.Handler name
Displays the destination where the indications are stored.Destination URL
Displays the subscription criteria.Query
For information on viewing external subscriptions using the CLI, see evweb_subscribe(1).
Viewing indications using EvwebThis section describes how to perform non-administration tasks related to viewing WBEM indicationsusing Evweb.This section addresses the following topics:
• “Launching Evweb for viewing WBEM indications” (page 69)
• “Searching for the subscribed WBEM events” (page 70)
• “Viewing summary information about WBEM events” (page 71)
• “Viewing detailed information about WBEM events” (page 71)
• “Deleting WBEM Events from the Event Archive” (page 72)
NOTE: Evweb enables both administrators and non-administrators to search and view WBEMevents. However, only administrators can delete WBEM events.
The Event Viewer enables you to view, search, and delete WBEM events that are present in theEvent Archive. It also enables you to view both detailed and summary information of WBEM events.You can also search for WBEM events stored in the Event Archive using the advanced searchfeature. To enhance search results, the Event Archive is divided into Current and History Eventarchive. By default, the Current event archive contains the latest events that are generated on anHP-UX 11i v3 system.The events stored in the Current event archive are automatically moved to the History Event Archivebased on the following parameters, which ever occurs first:• The events are older than 10 days.
• The page size of the Current event archive is greater than 100.
• Events older than 365 days are purged from the history event archive. This results in a phasedelimination of old events.
These values are defined as XML elements surrounded by <EvwebDBConfig> tag in /var/opt/sfm/conf/DBConfig.xml. If they are changed, enter the following command at the HP-UXprompt:# sfmconfig -c /var/opt/sfm/conf/DBConfig.xml
Launching Evweb for viewing WBEM indicationsYou can launch Evweb either through the CLI or through the HP SMH GUI.To launch Evweb using the CLI, enter the following command at the HP-UX prompt:# evweb eventviewer –L
To launch Evweb for viewing WBEM indications using the HP SMH GUI, complete the followingsteps:
Viewing indications using Evweb 69

1. Log in to the HP SMH.To log in to HP SMH, enter http://<hostname>:2301 in the address bar of the Webbrowser. The HP SMH login screen is displayed.
2. Enter your user name and password in the appropriate text boxes.3. Click Sign In on the login screen.
The HP SMH home page is displayed.4. Select Logs in the main menu.
The Logs page is displayed. This page displays the applications that are plugged in to HPSMH.
5. Select Event viewer in Evweb.The Event viewer page is displayed.
You can view and delete WBEM indications using the Event viewer.
Searching for the subscribed WBEM eventsEvweb enables you to search the Event archive for subscribed WBEM events. The Evweb GUIprovides a link, EMT Search, using which you can obtain error, cause, and recommended solutionsfor errors that may be generated on an HP-UX 11i v3 system. For more information about how touse EMT to search for WBEM events, see “Querying the Common Error Repository” (page 81).
Filtering WBEM events using the GUIThe Event Viewer GUI enables you to filter the WBEM events based on their severity level.To filter the WBEM events based on their severity, complete the following steps:1. Repeat steps 1-5 from “Launching Evweb for viewing WBEM indications” (page 69).2. Select Critical to search for critical events.
Similarly, select Major, Minor, Warning, Information, Other, Normal, or Unknown to searchfor the respective WBEM events.
3. To view all events, select All Events.For more information on performing a quick search of WBEM events using the HP SMH GUI, selectHelp on the action pane of the List Events page.
Searching for the subscribed WBEM events using the GUITo perform an advanced search of the WBEM events, complete the following steps:1. Repeat steps 1-5 from “Launching Evweb for viewing WBEM indications” (page 69).2. Select advanced search on the right pane of the Event Viewer page.
The advanced search page is displayed.3. Provide appropriate information in the text boxes and fields present in the advanced search
page.4. Click search on the advanced search page.Based on the search criteria, the WBEM events are displayed in a tabular format in the Eventviewer page.For more information on searching for the WBEM events using the HP SMH GUI, select Help onthe action pane of the advanced search page.
Searching for the subscribed WBEM events using the CLITo search WBEM events using the CLI, enter the following command at the HP-UX prompt:# evweb eventviewer -L
70 Administering indications and instances using HP SMH
Where:-L is an option used to list all the WBEM events.A list of WBEM events is displayed.You can also use the following switches with the -L option:
• -a(<number for age>(:)(yy|mm|dd|hh)
• -b [history|current]
• -e [eq|ne|le|ge|bw][:] <severity level1>[,<severity level2>]
• -h
• -i <EventID>
• -o(<offset number>) -c(<count of events>)
• -r[is|be|en|co][:](<string to be searched>)
• -s[asc|desc] (<summary list column name>)
• -t[eq|le|ge|bw] (<mm:dd:yyyy:hh:mi:ss>)[,<mm:dd:yyyy:hh:mi:ss>]
• -v <event category names>
• -x
For information on searching the WBEM events using the CLI, see evweb_eventviewer(1).
Viewing summary information about WBEM eventsYou can view summary information about events stored in the Event Archive database.
Viewing summary information using GUITo view summary information about WBEM events, repeat steps 1-5 from “Launching Evweb forviewing WBEM indications” (page 69).The List Events page is displayed. The List Events table displays summary information about theWBEM events that are stored in the Event Archive.For more information on viewing summary information of the WBEM events using the HP SMHGUI, select Help on the action pane of the List Events page.
Viewing summary information using CLITo view WBEM events using the CLI, enter the following command at the HP-UX prompt:# evweb eventviewer -L -x -f
Where:-L is an option used to list all the WBEM events.-x is a switch used to display the summary and detailed information of all events matching the
search criteria.-f is an optional switch used to force the command. The -f switch can be used only with the
-x switch.A list of WBEM events is displayed on the screen.
Viewing detailed information about WBEM eventsYou can view the details of a WBEM event using Evweb.
Viewing detailed information using GUITo view detailed information about the WBEM events, complete the following steps:1. Repeat steps 1-5 from “Launching Evweb for viewing WBEM indications” (page 69).
Viewing indications using Evweb 71
2. Select the desired WBEM event in the List Events table.The Details of the Event page is displayed. This page includes a table that provides detailedinformation about the WBEM events.
For information on viewing detailed information of the WBEM events using the HP SMH GUI, selectHelp on the action pane of the List Events page.
Viewing Detailed Information using CLITo view detailed information on WBEM events using the CLI, enter the following command at theHP-UX prompt:# evweb eventviewer -E -n <event archive number>Where:-E is an option used to view details of a WBEM event.-n is a switch used specify the event archive number of the WBEM event.The screen displays detailed information about the WBEM events.For information on viewing detailed information of WBEM events using the CLI, seeevweb_eventviewer(1).
Deleting WBEM Events from the Event ArchiveYou can delete a single event or multiple events at a time.
Deleting an Event using GUITo delete an event, complete the following steps:1. Repeat steps 1-5 from “Launching Evweb for viewing WBEM indications” (page 69).2. Select Delete Events in the action pane on the top right corner of the page.
The Delete Events page is displayed.3. Select the event you want to delete by selecting the appropriate check box.
You can delete more than one WEBM event at a time.4. Select Delete in the List Events page.
Evweb deletes the event from the event archive database and displays a confirmation message.5. Click OK on the confirmation message window.For information on deleting WBEM events using the HP SMH GUI, select Help on the action paneof the Delete Events page.
Deleting an Event using CLITo delete WBEM events using the CLI, enter the following command at the HP-UX prompt:# evweb eventviewer -D
Where:-D is an option used to delete all the WBEM events.You can also use the following switches with the -D option:• -e [eq|ne|le|ge|bw][:]<severity level1>[,<severity level2>]
• -v <cevent category names>
• -i <EventID>
• -r[is|be|en|co][:](<string to be searched>)
• -a(<number for age>(:)(yy|mm|dd|hh)
• -t[eq|le|ge|bw] (<mm:dd:yyyy:hh:mi:ss>)[,<mm:dd:yyyy:hh:mi:ss>]
72 Administering indications and instances using HP SMH
• -s[asc|desc] (<summary list column name>)
• -f
• -n <comma separated Event Archive Numbers>
• -b [history|current]For information on deleting WBEM events using the CLI, see evweb_eventviewer(1).
Viewing Low Level Logs using EvwebThis section describes how to perform administration tasks such as searching and viewing lowlevel log information.This section discusses the following topics:
• “Overview” (page 73)
• “Searching Low Level Logs using Simple Search” (page 74)
• “Searching Low Level Logs using Advanced Search” (page 75)
• “Viewing List of Low Level Logs” (page 75)
• “Viewing Details of Low Level Logs” (page 76)
OverviewThe low level log is required to view information about hardware details and system errors.The Log Viewer enables you to view low level log information from the log database on a localHP-UX system. The low level log information include Log Id, Log Index, Device Id, Device Type,and Time of occurrence.You can find the low level log information in both Current Log Database and Archive Log Database.By default, the most recent low level log information is stored in the current log database.The low level log information is automatically transferred from the Current Log Database to theArchive Log Database based on either of the following criterion, or whichever occurs first:
• The age of the log is greater than 10 days. Logs older than 10 days are automatically storedin the Archive Log Database.
• The page size of the database exceeds 140.Records in the archive log database are saved for one year. The number of pages in the ArchiveLog Database size is 340. These values are defined as XML elements surrounded by <DBConfig>tag in /var/opt/sfm/conf/DBConfig.xml. If they are changed, enter the following commandat the HP-UX prompt:# sfmconfig -c /var/opt/sfm/conf/DBConfig.xml
sfmDBUtilTo create a backup of Postgres database, sfmDBUtil utility is used./opt/sfm/bin/sfmDBUtil
It can also be used for the following:• To restore the backup of Postgres database.
• Deleting the contents of the database tables.
• Displaying disk space usage by databases.
• Corresponding with database tables.
Viewing Low Level Logs using Evweb 73
Four operations can be performed using the utility:
• Backup: Back up is the process of taking backup of all the databases including current andarchived database. It is initiated by the administrator. The administrator must execute thisutility with the argument bkup with the destination file name. The data directory is consideredto be the destination./opt/sfm/bin/sfmDBUtil bkup dbbackup
• Restore: Restore is the process of restoring backed up data and it is initiated by theadministrator. The administrator must execute this utility with the argument restore with thesource file name. The data directory is considered to be the source./opt/sfm/bin/sfmDBUtil restore dbbackup
NOTE: Reconfigure the product SysFaultMgmt (System Fault Management) (SFM) (for HP9000 systems) and PSB (for HP Integrity systems) to complete the DB restoration.
• Clean: Clean option deletes contents of the specified database. It is initiated by theadministrator. The administrator must execute the sfmDBUtil command with argument cleanand the valid diagnostic database name./opt/sfm/bin/sfmDBUtil clean <DBName>
• Size: The size option displays disk space usage by databases and corresponding databasetables.It is initiated by the administrator. The administrator must execute sfmDBUtil command withargument size and a valid database name./opt/sfm/bin/sfmDBUtil size <DBName>
NOTE: Only diagnostics databases and corresponding tables are exposed to the end user.See sfmDBUtil Manpage for a valid database name.
Searching Low Level Logs using Simple SearchTo search the log database for low level logs using Log Viewer, complete the following steps:1. Log in to the System Management Homepage.
To log in to HP SMH, enter http://<hostname>:2301 in the address bar of a Webbrowser. The HP SMH login screen is displayed.
2. Enter your user name and password in the appropriate text boxes.3. Click Sign In on the login screen.
The HP SMH home page is displayed.4. Select Logs on the main menu.
The Logs page is displayed.5. Select Log Viewer in the Evweb box.
The Log Viewer page is displayed.6. Provide appropriate information in the fields present in the Log Viewer page.7. Click Search on the Log Viewer page.
Based on the search criteria, the log records are displayed in a tabular format.
For information on searching the log database using GUI, select Help on the action pane of theLog Viewer page.
74 Administering indications and instances using HP SMH
Searching Low Level Logs using Advanced SearchTo search the log database for low level logs using Log Viewer, complete the following steps:1. Repeat steps 1-5 from “Searching Low Level Logs using Simple Search” (page 74).2. Select Advanced Search on the right pane of the Log Viewer page.
The Advanced Search page is displayed.3. Provide appropriate information in the fields present in the Advanced Search page.4. Click Search on the Advanced Search page.
Based on the search criteria, the log records are displayed in a tabular format in the LogViewer page.
For information on searching the log database using GUI, select Help on the action pane of theAdvanced Search page present on the Log Viewer page.
Searching Low Level Logs using CLITo search for low level log information using the CLI, enter the following command at the HP-UXprompt:# evweb logviewer -L -e
Where:-L is an option used to obtain a list of low level log summary.-e is an option used to specify whether the –L option must include the low level details and the
summary information of the low level logs.You can also use the following switches with the -L option:• -i <Log ID>
• -n <Log Index>
• -j <Log Type>
• -x <Device ID>
• -y <Device Type>
• -a age_number[:][yy|mm|dd]
• -t [eq|le|ge|bw][:]<mm:dd:yyyy>[,mm:dd:yyyy]
NOTE: The -a and the -t switches are mutually exclusive and can be used with the -Loption only.
• -s [LogId|LogIndex|DeviceId|DeviceType|TimeOfOccurence]
• -o <Offset Number> -c <Number of Logs>
NOTE: The -s, -o,and the -c switches can be used with the -L option only.
For information on searching for low level log information using the CLI, see evweb_logviewer(1).
Viewing List of Low Level LogsYou can view a list of low level logs summary using the Log Viewer. The list of low level logs aretabulated and include information, such as Log ID, Log Index, Device ID, Device Type, and Timeof occurrence. In this document, this table is referred to as the Logs Summary Table. The LogsSummary Table is a result of the search operation.
Viewing List Of Low Level Logs using GUITo view a list of low level logs using Log Viewer, complete the following steps:
Viewing Low Level Logs using Evweb 75
1. Repeat steps 1-5 from “Searching Low Level Logs using Simple Search” (page 74).2. Depending on the information you have, perform either a simple search or an advanced
search.Based on the search criteria, the log records are displayed in a tabular format.
For information on viewing the low level logs using GUI, select Help on the action pane of the LogViewer page.
Viewing List Of Low Level Logs using CLITo view a list of low level logs using the CLI, enter the following command at the HP-UX prompt:# evweb logviewer -L
Where:-L is an option used to obtain a list of low level log summary.You can also use the following switches with the -L option:• -i <Log ID>
• -n <Log Index>
• -j <Log Type>
• -x <Device ID>
• -y <Device Type>
• -a age_number[:][yy|mm|dd]
• -t [eq|le|ge|bw][:]<mm:dd:yyyy>[,mm:dd:yyyy]
NOTE: The -a and the -t switches are mutually exclusive and can be used with the -Loption only.
• -s [LogId|LogIndex|DeviceId|DeviceType|TimeOfOccurence]
• -o <Offset Number> -c <Number of Logs>
NOTE: The -s, -o,and the -c switches can be used with the -L option only.
Following is an example of how the low level logs are listed using the following command:# evweb logviewer -L
Log Id Log Index Device Id Device Type Time of detection====== ========= ========= =========== =======================41 0 0 Memory Wed Dec 30 2009 00:36:140 0 0 Memory Thu Dec 10 2009 20:38:239 0 0 Memory Thu Dec 10 2009 20:31:338 0 0 Memory Thu Dec 10 2009 20:25:037 0 0 Memory Sun Dec 6 2009 23:37:08
For information on viewing a list of low level logs using the CLI, see evweb_logviewer(1).
Viewing Details of Low Level LogsYou can view a details of low level logs using the Log Viewer. The detailed information about thelow level logs include information, such as Log ID, Log Index, Log Type, Device ID, Device Type,Time of occurrence, and dump of the low level logs in hexadecimal format.
Viewing Details Of Low Level Logs using GUITo view details of low level logs using Log Viewer, complete the following steps:1. Repeat steps 1-5 from “Searching Low Level Logs using Simple Search” (page 74).
76 Administering indications and instances using HP SMH
2. Depending on the information you have, perform either a simple search or an advancedsearch.Based on the search criteria, the log records are displayed in the Log Summary Table.
3. Select the desired low level log from the Log Summary Table.The details of a low level log is displayed in the Log Viewer page.
For information on viewing the low level logs using GUI, select Help on the action pane of the LogViewer page.
Viewing Details Of Low Level Logs using CLITo view details of low level logs using the CLI, enter the following command at the HP-UX prompt:# evweb logviewer -E -i <Log ID> -n <Log Index>Where:-E is an option used to obtain details of low level log information.-i is a switch used to specify the Log ID.-n is a switch used to specify the Log Index.You can also use the following switch with the -E option:• -r
Following is an example of how the low level logs details are displayed using the command options:# evweb logviewer -Ei 40 -r
Low Level Log Details=====================Log Id : 40Log Index : 0Log Type : ServerDevice Id : 0Device Type : MemoryTime of occurence : Thu Dec 10 2009 19:38:25Buffer0000000 0 2bc 0 0 4b21 beb1 0 d300000010 509 0 0 0 500 200 300d 00000020 2538 300 1112 920 0 0 0 00000030 0 0 0 0 f7fa 29e4 b73c d4110000040 bca7 80 c73c 8881 500 0 80d 00000050 4000 0 0 0 0 0 0 00000060 0 0 0 0 0 0 0 0
For information on viewing details of low level logs using the CLI, see evweb_logviewer(1).
Tracing EvwebThis section provides an overview of tracing and information about the various trace levels inEvweb. This section also describes administrative tasks, such as enabling, modifying, and disablingtracing.This section addresses the following topics:
• “Enabling Tracing using the Evweb GUI” (page 79)
• “Enabling Tracing using the Evweb CLI” (page 79)
• “Modifying Tracing using the Evweb GUI” (page 80)
• “Modifying Tracing using the Evweb CLI” (page 80)
• “Disabling Tracing using the Evweb GUI” (page 80)
• “Disabling Tracing using the Evweb CLI” (page 81)
Tracing Evweb 77
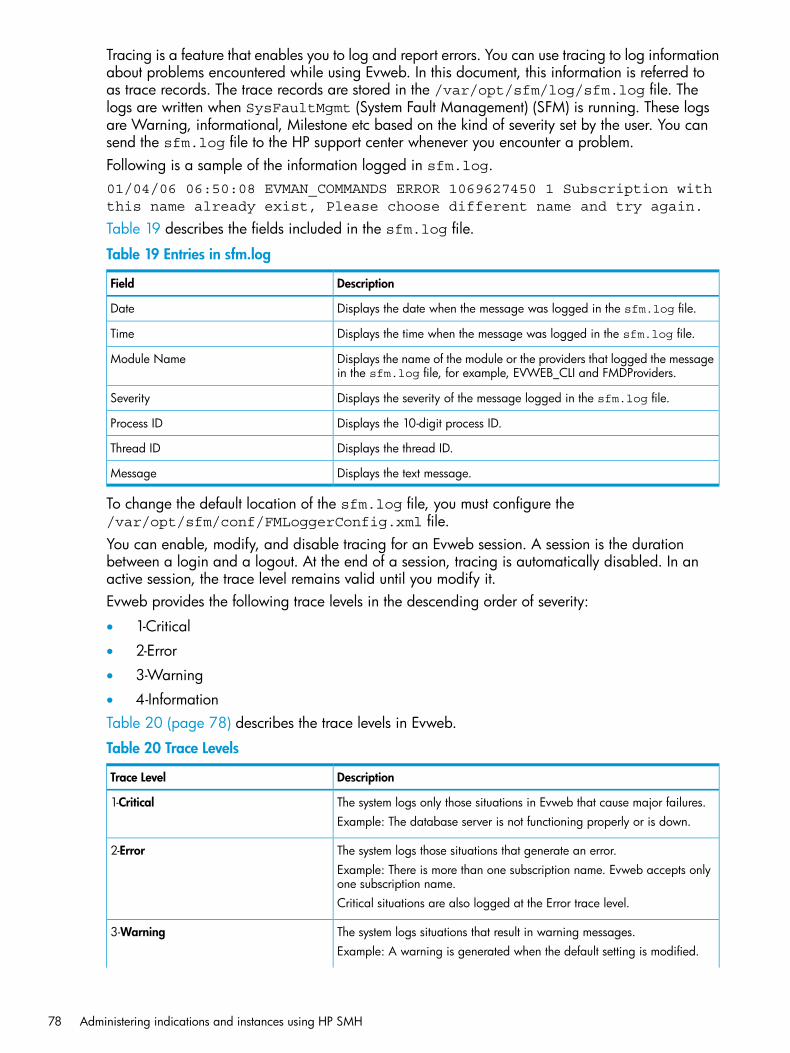
Tracing is a feature that enables you to log and report errors. You can use tracing to log informationabout problems encountered while using Evweb. In this document, this information is referred toas trace records. The trace records are stored in the /var/opt/sfm/log/sfm.log file. Thelogs are written when SysFaultMgmt (System Fault Management) (SFM) is running. These logsare Warning, informational, Milestone etc based on the kind of severity set by the user. You cansend the sfm.log file to the HP support center whenever you encounter a problem.Following is a sample of the information logged in sfm.log.01/04/06 06:50:08 EVMAN_COMMANDS ERROR 1069627450 1 Subscription withthis name already exist, Please choose different name and try again.
Table 19 describes the fields included in the sfm.log file.
Table 19 Entries in sfm.log
DescriptionField
Displays the date when the message was logged in the sfm.log file.Date
Displays the time when the message was logged in the sfm.log file.Time
Displays the name of the module or the providers that logged the messagein the sfm.log file, for example, EVWEB_CLI and FMDProviders.
Module Name
Displays the severity of the message logged in the sfm.log file.Severity
Displays the 10-digit process ID.Process ID
Displays the thread ID.Thread ID
Displays the text message.Message
To change the default location of the sfm.log file, you must configure the/var/opt/sfm/conf/FMLoggerConfig.xml file.You can enable, modify, and disable tracing for an Evweb session. A session is the durationbetween a login and a logout. At the end of a session, tracing is automatically disabled. In anactive session, the trace level remains valid until you modify it.Evweb provides the following trace levels in the descending order of severity:
• 1-Critical
• 2-Error
• 3-Warning
• 4-InformationTable 20 (page 78) describes the trace levels in Evweb.
Table 20 Trace Levels
DescriptionTrace Level
The system logs only those situations in Evweb that cause major failures.1-CriticalExample: The database server is not functioning properly or is down.
The system logs those situations that generate an error.2-ErrorExample: There is more than one subscription name. Evweb accepts onlyone subscription name.Critical situations are also logged at the Error trace level.
The system logs situations that result in warning messages.3-WarningExample: A warning is generated when the default setting is modified.
78 Administering indications and instances using HP SMH
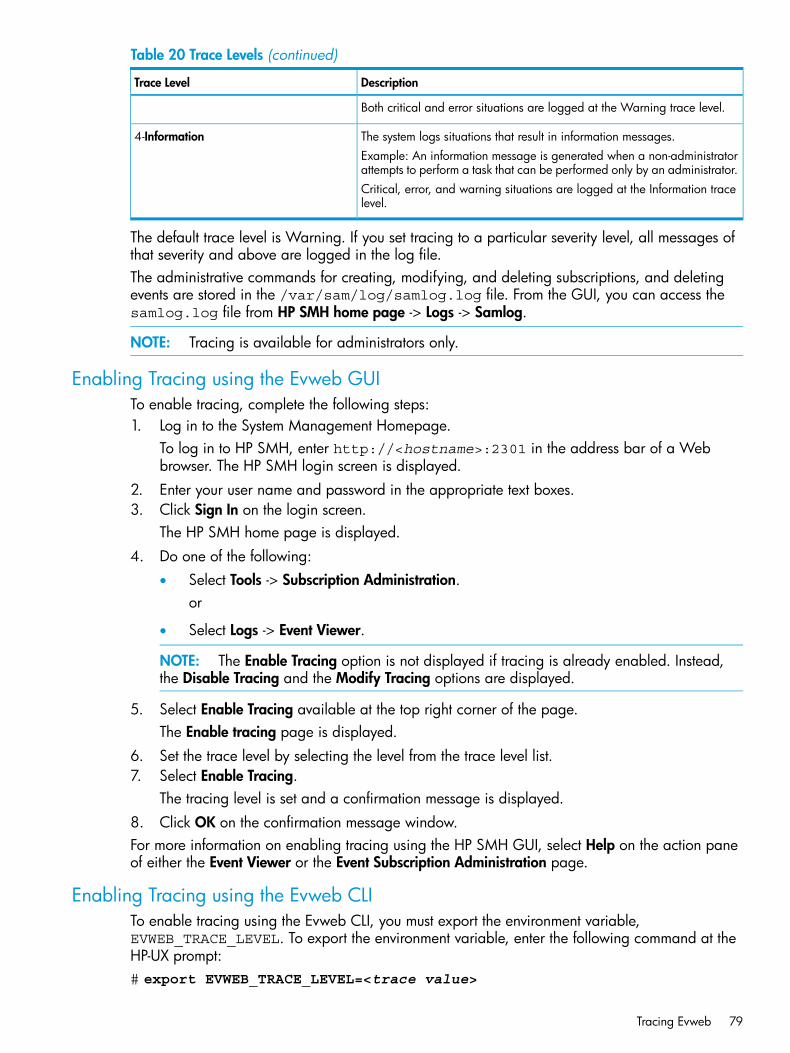
Table 20 Trace Levels (continued)
DescriptionTrace Level
Both critical and error situations are logged at the Warning trace level.
The system logs situations that result in information messages.4-InformationExample: An information message is generated when a non-administratorattempts to perform a task that can be performed only by an administrator.Critical, error, and warning situations are logged at the Information tracelevel.
The default trace level is Warning. If you set tracing to a particular severity level, all messages ofthat severity and above are logged in the log file.The administrative commands for creating, modifying, and deleting subscriptions, and deletingevents are stored in the /var/sam/log/samlog.log file. From the GUI, you can access thesamlog.log file from HP SMH home page -> Logs -> Samlog.
NOTE: Tracing is available for administrators only.
Enabling Tracing using the Evweb GUITo enable tracing, complete the following steps:1. Log in to the System Management Homepage.
To log in to HP SMH, enter http://<hostname>:2301 in the address bar of a Webbrowser. The HP SMH login screen is displayed.
2. Enter your user name and password in the appropriate text boxes.3. Click Sign In on the login screen.
The HP SMH home page is displayed.4. Do one of the following:
• Select Tools -> Subscription Administration.or
• Select Logs -> Event Viewer.
NOTE: The Enable Tracing option is not displayed if tracing is already enabled. Instead,the Disable Tracing and the Modify Tracing options are displayed.
5. Select Enable Tracing available at the top right corner of the page.The Enable tracing page is displayed.
6. Set the trace level by selecting the level from the trace level list.7. Select Enable Tracing.
The tracing level is set and a confirmation message is displayed.8. Click OK on the confirmation message window.For more information on enabling tracing using the HP SMH GUI, select Help on the action paneof either the Event Viewer or the Event Subscription Administration page.
Enabling Tracing using the Evweb CLITo enable tracing using the Evweb CLI, you must export the environment variable,EVWEB_TRACE_LEVEL. To export the environment variable, enter the following command at theHP-UX prompt:# export EVWEB_TRACE_LEVEL=<trace value>
Tracing Evweb 79
Tracing is now enabled. The trace value is the trace level that you have set.
Modifying Tracing using the Evweb GUITo modify tracing, complete the following steps:1. Log in to the System Management Homepage.
To log in to HP SMH, enter http://<hostname>:2301 in the address bar of a Webbrowser. The HP SMH login screen is displayed.
2. Enter your user name and password in the appropriate text boxes.3. Click Sign In on the login screen.
The HP SMH home page is displayed.4. Do one of the following:
• Select Tools -> Subscription Administration.or
• Select Logs -> Event Viewer.
NOTE: The Modify Tracing option is not displayed if tracing is not enabled.
5. Select Modify Tracing available at the top right corner of the page.The Modify Tracing page is displayed.
6. Change the trace level by selecting the level from the trace level list.7. Select Modify Tracing.
The tracing level is modified and a confirmation message is displayed.8. Click OK on the confirmation message window.For more information about modifying tracing using the HP SMH GUI, select Help on the actionpane of either the Event Viewer or the Event Subscription Administration page.
Modifying Tracing using the Evweb CLITo modify tracing using the Evweb CLI, enter the following command at the HP-UX prompt:# export EVWEB_TRACE_LEVEL=<new trace value>
Tracing is now modified. The new trace value is the trace level that you have set.
Disabling Tracing using the Evweb GUITo disable tracing, complete the following steps:1. Log in to the System Management Homepage.
To log in to HP SMH, enter http://<hostname>:2301 in the address bar of a Webbrowser. The HP SMH login screen is displayed.
2. Enter your user name and password in the appropriate text boxes.3. Click Sign In on the login screen.
The HP SMH home page is displayed.4. Do one of the following:
• Select Tools -> Subscription Administration.or
• Select Logs -> Event Viewer.
NOTE: The Disable Tracing option is not displayed if tracing is not enabled.
80 Administering indications and instances using HP SMH
5. Select Disable Tracing available on the top right corner of the page.The tracing is disabled and a confirmation message is displayed.
6. Click OK on the confirmation message window.For more information on disabling tracing using the HP SMH GUI, select Help on the action paneof either the Event Viewer or the Event Subscription Administration page.
Disabling Tracing using the Evweb CLITo disable tracing using the Evweb CLI, you must reset the trace value. To reset the trace value,enter the following command at the HP-UX prompt:# unset EVWEB_TRACE_LEVEL
Tracing is now disabled.
NOTE: Tracing is automatically disabled at the end of an Evweb session.
Querying the Common Error RepositoryThis section provides an overview of Error Management Technology (EMT), and describes how toquery and view events present in Common Error Repository (CER).This section addresses the following topics:
• “EMT Overview” (page 81)
• “Launching EMT” (page 82)
• “Querying the CER using Simple Search” (page 82)
• “Querying CER using Advanced Search” (page 83)
• “Viewing an Event from CER” (page 83)
EMT OverviewSysFaultMgmt (System Fault Management) (SFM) includes a user component called EMT, whichenables you to view the error messages that are generated on an HP-UX 11i v3 system. The EMTincludes Common Error Repository (CER), which is an online, searchable, and updateable errorrepository. The CER contains error metadata. Error metadata is collective information about anerror such as error description, error number, error type, severity, cause of the error, and correctiveactions. The EMT also includes the cerupdate tool, which enables you to update CER with productspecific error information.The EMT supports the following user interfaces:
• Browser-based Graphical User Interface (GUI)
• Command-Line Interface (CLI)The EMT supports the following user groups:
• Administrator
• Non-administratorIn the CLI, any user with superuser privileges is an administrator. However, in the HP SystemManagement Homepage (HP SMH) GUI, the user groups in EMT are mapped internally to the usergroups defined in the HP SMH.The Administrator user group in the HP SMH maps to administrators in EMT. The Operator andthe User user groups in the HP SMH map to non-administrators in EMT.For information about configuring user groups in HP SMH, see the HP System ManagementHomepage User’s Guide at:http://www.hp.com/go/smh-docs
Querying the Common Error Repository 81
Launching EMTYou can launch EMT either through the CLI or the GUI.To launch EMT using the CLI, enter the following command at the HP-UX prompt:# /opt/sfm/bin/emtui
To launch EMT using the HP SMH GUI, complete the following steps:1. Log in to the HP SMH.
To log in to the HP SMH, enter http://<hostname>:2301 in the address bar of the Webbrowser.The HP SMH login screen is displayed.
2. Enter your user name and password in the appropriate text boxes.3. Click Sign In on the login screen.
The HP SMH home page is displayed.4. Select Tools in the main menu.
The Tools page is displayed. This page displays various applications that are plugged in tothe HP SMH.
5. Select Query or Customize Error Data in Error Management Technology.The Simple Search page is displayed.
Querying the CER using Simple SearchTo query the CER using the Simple Search feature, you can use either the HP SMH GUI or the CLI.EMT enables you to query the CER for system-specific events. This feature reduces the query time,and is available in both GUI and CLI modes
Querying CER for Events using the GUITo query the CER for events using the HP SMH GUI, complete the following steps:1. Repeat steps 1-5 from “Launching EMT” (page 82).2. Provide appropriate information in the text boxes and fields present in the Simple Search
page.3. Click Search on the Simple Search page.Based on the search criteria, the Simple Search page displays the events in a tabular format.For more information about querying CER using HP SMH GUI, select Help on the action pane ofthe Simple Search page.
Querying CER for Events using the CLITo query CER for events using the CLI, enter the following command at the HP-UX prompt:#emtui { -q <querystring> [-w<matchtype>]} | { -i <errornum> }Where:-q is an option that enables you to specify a query string to query the CER for information about
errors, cause, and recommended actions.-w is an option that enables you to specify the match type.
82 Administering indications and instances using HP SMH
Following are the match types:• any (default) - Searches for at least one word specified in the query string.
• all - Searches for all words specified in the query string.
• phrase - Searches for the exact phrase specified in the query string.
-i is an option that enables you to specify the error number. Error number is a uniqueidentification number for the errors present in CER.
You can also use the following switches with the -q option:
• -c { all | <category> }
• -l { lt| le | eq | ge | gt } [ <severity> ]
• -s { all | hp | other}
For more information on querying CER using the CLI, see emtui(1).
Querying CER using Advanced SearchTo query the CER for events using the Advanced Search feature HP SMH GUI, complete the followingsteps:1. Repeat steps 1-5 from “Launching EMT” (page 82).2. Select Advanced Search on the right pane of the Simple Search page.
The Advanced Search page is displayed.3. Provide appropriate information in the text boxes and fields present in the Advanced Search
page.4. Click Search on the Advanced Search page.Based on the search criteria, the Advanced Search page displays the events in a tabular format.For more information about querying the CER using the Advanced Search feature on the HP SMHGUI, select Help on the action pane of the Advanced Search page.
Viewing an Event from CERYou can view the summary of events and detailed information about an event present in CER. TheList Events page displays the search results in a tabular format. In this document, this table is referredto as the Error Summary Table.
Viewing Summary Information using the GUIThe Error Summary Table displays the summary information of events present in CER. The eventsare displayed in the reverse chronological order. You can sort the events by the column heading.By default, the Error Summary Table is sorted in the descending order of severity level. To togglethe sort order, click on the column heading. You can sort only one column at a time.To view summary information about events stored in CER using the HP SMH GUI, complete thefollowing steps:1. Repeat steps 1-5 from “Launching EMT” (page 82).2. Query CER for error metadata using the Simple Search or the Advanced Search feature.The List Events page, which contains the Error Summary Table, is displayed.For information about viewing summary information of events in CER using the HP SMH GUI, selectHelp on the action pane of the List Events page.
Viewing Summary Information using the CLITo view summary information about events in CER using the CLI, enter the following command atthe HP-UX prompt:
Querying the Common Error Repository 83
# emtui -b
Where:-b is an option used to view information about events in brief.A list of events in CER is displayed.For more information on viewing summary information about an event in CER using the CLI, seeemtui(1).
Viewing Detailed Information using the GUIYou can view detailed information about an event by clicking on any row in the Error SummaryTable.To view detailed information about an event stored in CER using the HP SMH GUI, complete thefollowing steps:1. Repeat steps 1-5 from “Launching EMT” (page 82).2. Query CER for error metadata using the Simple Search or the Advanced Search feature.3. Click on the desired row in the Error Summary Table.The Detailed Error Information pane is displayed. The Detailed Error Information pane displaysdetailed information about the event.For information on viewing detailed information about an event using the HP SMH GUI, selectHelp on the action pane of the Detailed Error Information pane.
Viewing Detailed Information using the CLITo view detailed information about an event in CER using the CLI, enter the following commandat the HP-UX prompt:# emtui -v
Where:-v is an option used to view detailed information about an event from the CER.For more information on viewing details of an event using the CLI, see emtui(1).
Administering Events in CERThis section describes how to administer events using EMT.This section addresses the following topics:
• “Adding a Custom Solution” (page 84)
• “Modifying a Custom Solution” (page 85)
• “Deleting a Custom Solution ” (page 86)Apart from querying and viewing events stored in CER, EMT enables you to add, modify, anddelete solutions. The solution that you add for an event is called a custom solution. You can add,modify, and delete custom solutions to multiple causes at a time.
Adding a Custom SolutionIf you are a system administrator, you can add your own solution for an error generated on aHP-UX system. The custom solution is permanently stored in CER and is available to all EMT users.
Adding a Custom Solution using the GUITo add a custom solution using the HP SMH GUI, complete the following steps:1. Repeat steps 1-5 from “Launching EMT” (page 82).2. Search for the event from CER using either the Simple Search or the Advanced Search feature.
84 Administering indications and instances using HP SMH
3. Click on the desired event from the Event Summary Table.The details of the event is displayed in the Detailed Error Information (Administrative View)pane.
4. If there is no cause associated with the event, skip to “Step 5” (page 85). If a cause isassociated with the event, select the cause for the event from the Detailed Error Information(Administrative View) pane.You can select multiple causes for an event.
5. Click Add Solution to Selected Causes on the right corner of the Detailed Error Information(Administrative View) pane.The Add a Custom Solution page is displayed.
6. Provide appropriate information in the text boxes in the Add a Custom Solution page, andclick Add Solution.A confirmation message is displayed.
7. Click OK on the confirmation message window.The new custom solution is displayed on the Detailed Error Information (Administrative View)pane.
For more information about adding a custom solution using the HP SMH GUI, select Help on theaction pane of the Add a Custom Solution page.
Adding a Custom Solution using the CLITo add a custom solution using the CLI, enter the following command at the HP-UX prompt:# emtui -a<solution text>
Where:-a is an option used to add a custom solution.You can also use the following switches with the -a option:• -c <cause number>
• -i <error number>
For information about adding a custom solution using the CLI, see emtui(1).
Modifying a Custom SolutionYou can use either the HP SMH GUI or the CLI to modify a custom solution in CER.
Modifying a Custom Solution using the GUITo modify a custom solution using the HP SMH GUI, complete the following steps:1. Repeat steps 1-5 from “Launching EMT” (page 82).2. Repeat “Step 2, Adding a Custom Solution using the GUI” (page 84)and “Step 3, Adding a
Custom Solution using the GUI” (page 85) from “Adding a Custom Solution using the GUI”(page 84).
3. If there is no cause associated with the event, skip to “Step 4, Modifying a Custom Solutionusing the GUI” (page 85).If a cause is associated with the event, select the cause for the event from the Detailed ErrorInformation (Administrative View) pane.You can select multiple causes for an event.
4. Click Modify Selected Solution on the right corner of the Detailed Error Information(Administrative View) pane.The Modify a Custom Solution page is displayed.
Administering Events in CER 85
5. Modify the information in the text boxes in the Modify a Custom Solution page, and clickModify Solution.A confirmation message is displayed.
6. Click OK on the confirmation message window.The modified custom solution is displayed on the Detailed Error Information (AdministrativeView) pane.For more information about modifying a custom solution using the HP SMH GUI, select Helpon the action pane of the Modify a Custom Solution page.
Modifying a Custom Solution using the CLITo modify a custom solution using the CLI, enter the following command at the HP-UX prompt:# emtui -m <modified text>
Where:-m is an option used to modify a custom solution.You can also use the following switches with the -m option:
• -c <cause number>
• -i <error number>
For information about modifying a custom solution using the CLI, see emtui(1).
Deleting a Custom SolutionYou can use either the HP SMH GUI or the CLI to delete a custom solution present in the CER.
Deleting a Custom Solution using the GUITo delete a custom solution using the HP SMH GUI, complete the following steps:1. Repeat steps 1-5 from “Launching EMT” (page 82).2. Repeat steps “Step 2, Adding a Custom Solution using the GUI” (page 84) and “Step 3,
Adding a Custom Solution using the GUI” (page 85) from “Adding a Custom Solution usingthe GUI” (page 84).
3. Click Delete Selected Solution on the Detailed Error Information (Administrative View) pane.The Delete a Custom Solution page is displayed. This page displays the custom solution andthe error metadata.
4. Click Delete Selected Solution on the Delete a Custom Solution page.A confirmation message is displayed.
5. Click OK on the message box.The custom solution is permanently removed from the CER.
For more information about deleting a custom solution using the HP SMH GUI, select Help on theaction pane of the Delete a Custom Solution page.
Deleting a Custom Solution using the CLITo delete a custom solution using the CLI, enter the following command at the HP-UX prompt:# emtui -d -u <user solution number>
Where:-d is an option used to delete a custom solution present in the CER.-u is an option used to specify the number associated with the custom solution that you want to
delete.
86 Administering indications and instances using HP SMH
You can also use the following switches with the -m option:
• -c<cause number>
• -i <error number>For information on deleting custom solution in the CER using the CLI, see emtui(1).
Tracing EMTThis section provides an overview of tracing and information about the various trace levels in EMT.This section also describes how to enable, modify, and disable tracing.This section addresses the following topics:
• “Enabling Tracing using the EMT GUI” (page 87)
• “Enabling Tracing using the EMT CLI” (page 88)
• “Modifying Tracing using the EMT GUI” (page 88)
• “Modifying Tracing using the EMT CLI” (page 88)
• “Disabling Tracing using the EMT GUI” (page 88)
• “Disabling Tracing using the EMT CLI” (page 89)Tracing is a feature that enables you to log and report errors. You can use tracing to log informationabout problems encountered while using EMT. In this document, this information is called tracerecords. The trace records are stored in the /var/opt/hpsmh/logs/error_log file. You cansend the error_log file to the HP support center whenever you encounter a problem.Following is a sample of the information logged in the error_log file.[Mon Nov 06 01:10:07 2006] [error] [client 15.76.96.40] 11/06/06 01:10:07 emtuicmd INFORMATIONAL 22253 1 Processing request to add action data, referer: <address>.
Table 21 describes the fields included in the error_log file.
Table 21 Entries in error_log
DescriptionField
Displays the date when the message was logged in the error_log file.Date
Displays the time when the message was logged in the error_log file.Time
Displays the severity of the error.Trace level
Displays the IP address of the client system.IP address
Displays messages that are generated on the client system.Message
Displays the program that has generated the log.Address
To change the default location of the error_log file, you must configure the /opt/hpsmh/conf/smhpd.conffile.Tracing using EMT is similar to tracing using Evweb. For information about the various trace levels,see “Tracing Evweb” (page 77).
Enabling Tracing using the EMT GUITo enable tracing using the EMT GUI, complete the following steps:1. Repeat steps 1-5 from “Launching EMT” (page 82).
NOTE: The Enable Tracing option is not displayed if tracing is already enabled. Instead,the Disable Tracing and the Modify Tracing option are displayed.
Tracing EMT 87
2. Select Enable Tracing on the top right corner of the page.The Enable Tracing page is displayed.
3. Set the trace level by selecting the level from the trace level list.4. Select Enable Tracing.
The tracing level is set and a confirmation message is displayed.5. Click OK on the confirmation message window.For more information about enabling tracing using the HP SMH GUI, select Help on the actionpane of the Enable Tracing page.
Enabling Tracing using the EMT CLITo enable tracing using the EMT CLI, you must export the environment variable, EMTUI_TRACE.To export EMTUI_TRACE, enter the following command at the HP-UX prompt:# export EMTUI_TRACE=<trace value>
Tracing is now enabled. The trace value is the trace level that you want to set.
Modifying Tracing using the EMT GUITo modify tracing the HP SMH GUI, complete the following steps:1. Repeat steps 1-5 from “Launching EMT” (page 82).
NOTE: The Modify Tracing option is not displayed if tracing is not enabled.
2. Select Modify Tracing on the top right corner of the page.The Modify Tracing page is displayed.
3. Change the trace level by selecting the level from the trace level list.4. Select Modify Tracing.
The tracing level is modified and a confirmation message is displayed.5. Click OK on the confirmation message window.For more information about modifying tracing using the HP SMH GUI, select Help on the actionpane of the Modify Tracing page.
Modifying Tracing using the EMT CLITo modify tracing using the EMT CLI, enter the following command at the HP-UX prompt:# export EMT_TRACE_LEVEL=<new trace value>
Tracing is now modified. The new trace value is the trace level that you want to set.
Disabling Tracing using the EMT GUITo disable tracing using the HP SMH GUI, complete the following steps:1. Repeat steps 1-5 from “Launching EMT” (page 82).
NOTE: The Disable Tracing option is not displayed if tracing is not enabled.
2. Select Disable Tracing on the top right corner of the Simple Search page.The tracing is disabled and a confirmation message is displayed.
3. Click OK on the confirmation message window.For more information about disabling tracing using the HP SMH GUI, select Help on the actionpane of the Disable Tracing page.
88 Administering indications and instances using HP SMH

Disabling Tracing using the EMT CLITo disable tracing using the EMT CLI, you must reset the trace value. To reset the trace value, enterthe following command at the HP-UX prompt:# unset EMT_TRACE_LEVEL
Tracing is now disabled.
NOTE: Tracing is automatically disabled at the end of an EMT session.
Tracing EMT 89
7 Troubleshooting SysFaultMgmt (System Fault Management)(SFM)
This chapter describes how to troubleshoot SysFaultMgmt (System Fault Management) (SFM)providers and EVWEB. This chapter addresses the following topics:
• “Troubleshooting instance providers” (page 90)
• “Troubleshooting indication providers” (page 95)
• “Troubleshooting EVWEB” (page 100)For information on Upgrade Installation of the Postgres 8.4.8, see the Installation scenarios ofPostgres 8.4.8 at www.hp.com/go/hpux-diagnostics-sfm-docs
NOTE: For information on issues with oserrorlogd, see Using PSB Components section of theProviderSvcsBase administrator guide.
Troubleshooting instance providersThis section describes techniques for troubleshooting instance providers, such as the CPU instanceprovider, Memory instance provider, Filter Metadata (FMD) provider, and Environmental providers.
Table 22 Troubleshooting instance providers
SolutionCauseProblem
Enter the following command at the HP-UX prompt:Cause 1Requests for instances donot return any value. # ps -eaf | grep cimserverThe Common Information Model
Object Manager (CIMOM) is notrunning.
If the name cimserver is displayed in the output,the CIMOM is running properly. If cimserver is notdisplayed in the output, stop the CIMOM by enteringthe following command at the HP-UX prompt:# cimserver -s
To restart the CIMOM, enter the following commandat the HP-UX prompt:# cimserver
To register the provider, complete the following steps:Cause 2The provider is not registeredproperly.
1. Enter the following command at the HP-UX prompt:# cimprovider -ls | grepSFMProviderModule
2. If the following output is displayed, all theproviders are registered properly:SFMProviderModule OK
3. If the output displayed is different from this output,the provider module is not registered. To registerthe provider module, enter the following commandat the HP-UX prompt:# cimmof -nroot/PG_InterOp/opt/sfm/schemas/mof/SFMProvidersR.mof
4. If no errors are displayed, the provider module isregistered successfully. Ignore this step and moveto step 6. If errors are displayed, restart theCIMOM by entering the following commands atthe HP-UX prompt:# cimserver -s
# cimserver
90 Troubleshooting SysFaultMgmt (System Fault Management) (SFM)
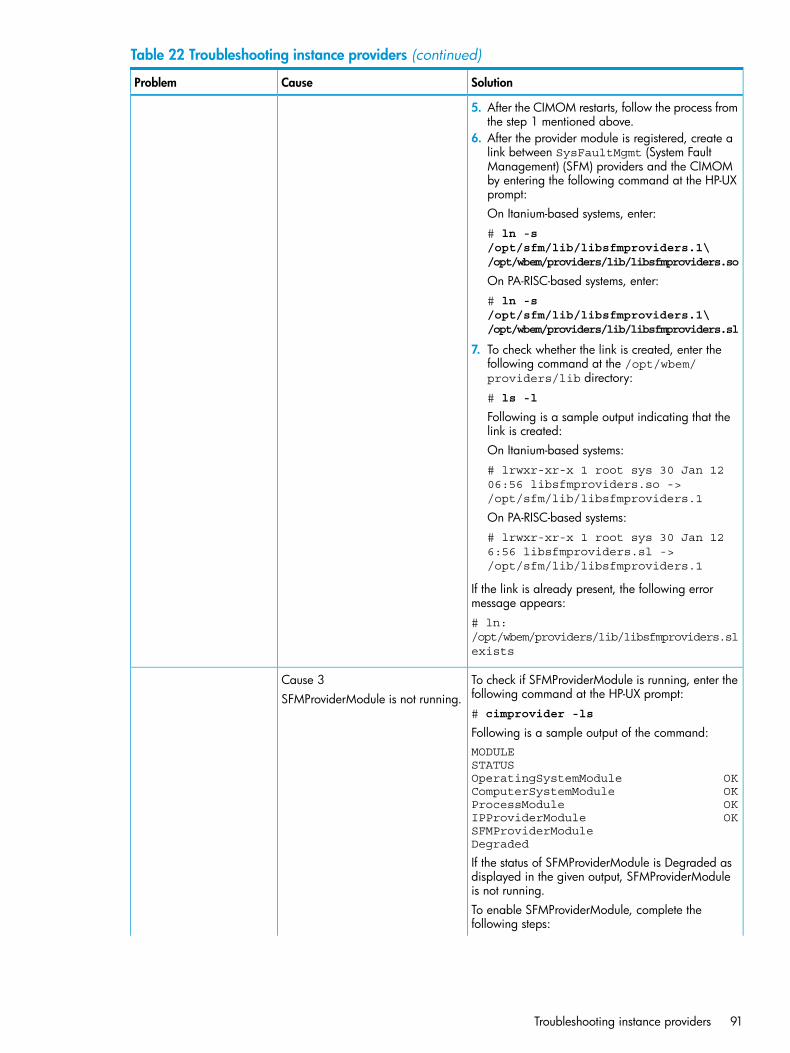
Table 22 Troubleshooting instance providers (continued)
SolutionCauseProblem
5. After the CIMOM restarts, follow the process fromthe step 1 mentioned above.
6. After the provider module is registered, create alink between SysFaultMgmt (System FaultManagement) (SFM) providers and the CIMOMby entering the following command at the HP-UXprompt:On Itanium-based systems, enter:# ln -s/opt/sfm/lib/libsfmproviders.1\/opt/wbem/providers/lib/libsfmproviders.so
On PA-RISC-based systems, enter:# ln -s/opt/sfm/lib/libsfmproviders.1\/opt/wbem/providers/lib/libsfmproviders.sl
7. To check whether the link is created, enter thefollowing command at the /opt/wbem/providers/lib directory:# ls -l
Following is a sample output indicating that thelink is created:On Itanium-based systems:# lrwxr-xr-x 1 root sys 30 Jan 1206:56 libsfmproviders.so ->/opt/sfm/lib/libsfmproviders.1
On PA-RISC-based systems:# lrwxr-xr-x 1 root sys 30 Jan 126:56 libsfmproviders.sl ->/opt/sfm/lib/libsfmproviders.1
If the link is already present, the following errormessage appears:# ln:/opt/wbem/providers/lib/libsfmproviders.slexists
To check if SFMProviderModule is running, enter thefollowing command at the HP-UX prompt:
Cause 3SFMProviderModule is not running.
# cimprovider -ls
Following is a sample output of the command:MODULE STATUSOperatingSystemModule OKComputerSystemModule OKProcessModule OKIPProviderModule OKSFMProviderModule Degraded
If the status of SFMProviderModule is Degraded asdisplayed in the given output, SFMProviderModuleis not running.To enable SFMProviderModule, complete thefollowing steps:
Troubleshooting instance providers 91
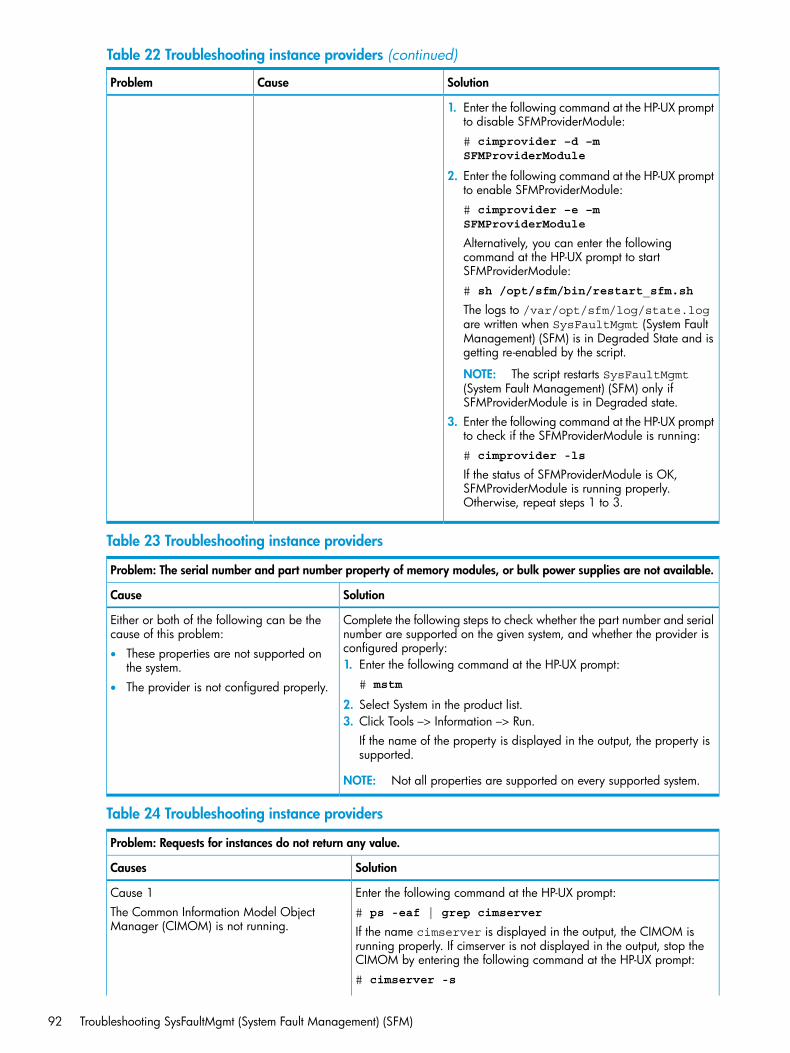
Table 22 Troubleshooting instance providers (continued)
SolutionCauseProblem
1. Enter the following command at the HP-UX promptto disable SFMProviderModule:# cimprovider –d –mSFMProviderModule
2. Enter the following command at the HP-UX promptto enable SFMProviderModule:# cimprovider –e –mSFMProviderModule
Alternatively, you can enter the followingcommand at the HP-UX prompt to startSFMProviderModule:# sh /opt/sfm/bin/restart_sfm.sh
The logs to /var/opt/sfm/log/state.logare written when SysFaultMgmt (System FaultManagement) (SFM) is in Degraded State and isgetting re-enabled by the script.
NOTE: The script restarts SysFaultMgmt(System Fault Management) (SFM) only ifSFMProviderModule is in Degraded state.
3. Enter the following command at the HP-UX promptto check if the SFMProviderModule is running:# cimprovider -ls
If the status of SFMProviderModule is OK,SFMProviderModule is running properly.Otherwise, repeat steps 1 to 3.
Table 23 Troubleshooting instance providers
Problem: The serial number and part number property of memory modules, or bulk power supplies are not available.
SolutionCause
Complete the following steps to check whether the part number and serialnumber are supported on the given system, and whether the provider isconfigured properly:
Either or both of the following can be thecause of this problem:• These properties are not supported on
the system. 1. Enter the following command at the HP-UX prompt:# mstm• The provider is not configured properly.
2. Select System in the product list.3. Click Tools –> Information –> Run.
If the name of the property is displayed in the output, the property issupported.
NOTE: Not all properties are supported on every supported system.
Table 24 Troubleshooting instance providers
Problem: Requests for instances do not return any value.
SolutionCauses
Enter the following command at the HP-UX prompt:Cause 1# ps -eaf | grep cimserverThe Common Information Model Object
Manager (CIMOM) is not running. If the name cimserver is displayed in the output, the CIMOM isrunning properly. If cimserver is not displayed in the output, stop theCIMOM by entering the following command at the HP-UX prompt:# cimserver -s
92 Troubleshooting SysFaultMgmt (System Fault Management) (SFM)

Table 24 Troubleshooting instance providers (continued)
Problem: Requests for instances do not return any value.
SolutionCauses
To restart the CIMOM, enter the following command at the HP-UXprompt:# cimserver
To register the provider, complete the following steps:Cause 2The provider is not registered properly. 1. Enter the following command at the HP-UX prompt:
# cimprovider -ls | grep SFMProviderModule
2. If the following output is displayed, all the providers are registeredproperly:SFMProviderModule OK
3. If the output displayed is different from this output, the providermodule is not registered. To register the provider module, enter thefollowing command at the HP-UX prompt:# cimmof -nroot/PG_InterOp/opt/sfm/schemas/mof/SFMProvidersR.mof
4. If no errors are displayed, the provider module is registeredsuccessfully. Ignore this step and move to step 6. If errors aredisplayed, restart the CIMOM by entering the following commandsat the HP-UX prompt:# cimserver -s
# cimserver
5. After the CIMOM restarts, follow the process from the step 1mentioned above.
6. After the provider module is registered, create a link betweenSysFaultMgmt (System Fault Management) (SFM) providers andthe CIMOM by entering the following command at the HP-UXprompt:On Itanium-based systems, enter:# ln -s /opt/sfm/lib/libsfmproviders.1\/opt/wbem/providers/lib/libsfmproviders.so
On PA-RISC-based systems, enter:# ln -s /opt/sfm/lib/libsfmproviders.1\/opt/wbem/providers/lib/libsfmproviders.sl
7. To check whether the link is created, enter the following commandat the /opt/wbem/providers/lib directory:# ls -l
Following is a sample output indicating that the link is created:On Itanium-based systems:# lrwxr-xr-x 1 root sys 30 Jan 12 06:56libsfmproviders.so ->/opt/sfm/lib/libsfmproviders.1
On PA-RISC-based systems:# lrwxr-xr-x 1 root sys 30 Jan 12 6:56libsfmproviders.sl ->/opt/sfm/lib/libsfmproviders.1
If the link is already present, the following error message appears:# ln: /opt/wbem/providers/lib/libsfmproviders.slexists
To check if SFMProviderModule is running, enter the followingcommand at the HP-UX prompt:
Cause 3SFMProviderModule is not running.
Troubleshooting instance providers 93
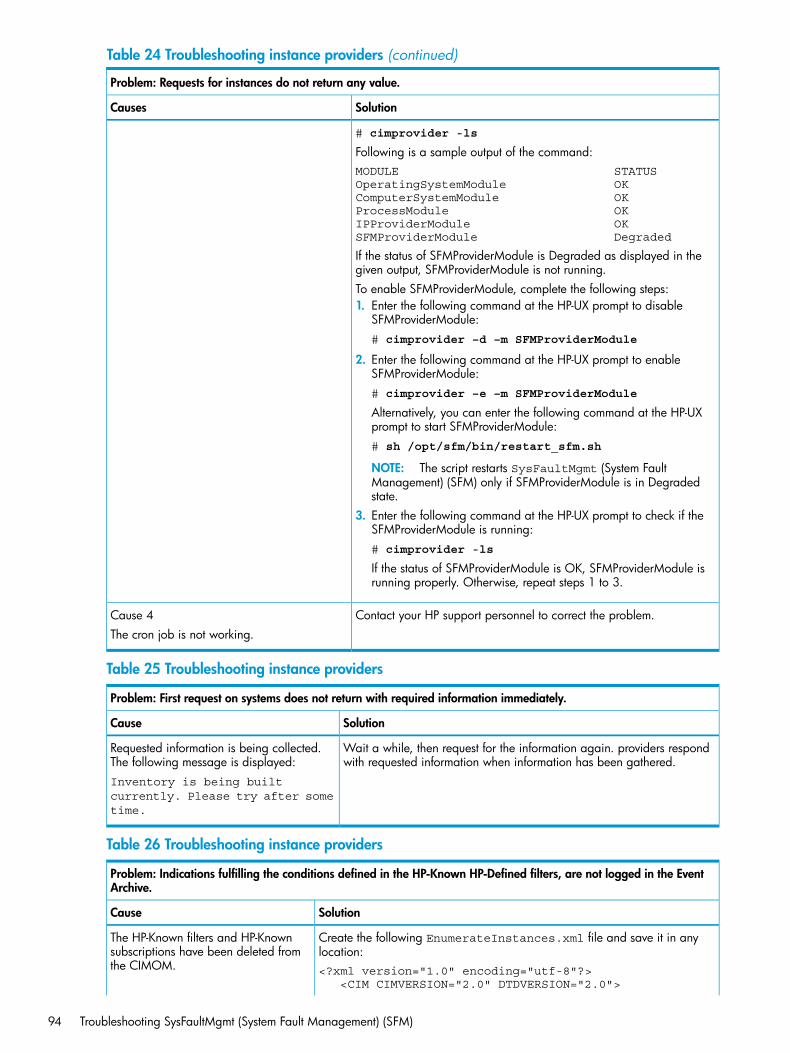
Table 24 Troubleshooting instance providers (continued)
Problem: Requests for instances do not return any value.
SolutionCauses
# cimprovider -ls
Following is a sample output of the command:MODULE STATUSOperatingSystemModule OKComputerSystemModule OKProcessModule OKIPProviderModule OKSFMProviderModule Degraded
If the status of SFMProviderModule is Degraded as displayed in thegiven output, SFMProviderModule is not running.To enable SFMProviderModule, complete the following steps:1. Enter the following command at the HP-UX prompt to disable
SFMProviderModule:# cimprovider –d –m SFMProviderModule
2. Enter the following command at the HP-UX prompt to enableSFMProviderModule:# cimprovider –e –m SFMProviderModule
Alternatively, you can enter the following command at the HP-UXprompt to start SFMProviderModule:# sh /opt/sfm/bin/restart_sfm.sh
NOTE: The script restarts SysFaultMgmt (System FaultManagement) (SFM) only if SFMProviderModule is in Degradedstate.
3. Enter the following command at the HP-UX prompt to check if theSFMProviderModule is running:# cimprovider -ls
If the status of SFMProviderModule is OK, SFMProviderModule isrunning properly. Otherwise, repeat steps 1 to 3.
Contact your HP support personnel to correct the problem.Cause 4The cron job is not working.
Table 25 Troubleshooting instance providers
Problem: First request on systems does not return with required information immediately.
SolutionCause
Wait a while, then request for the information again. providers respondwith requested information when information has been gathered.
Requested information is being collected.The following message is displayed:Inventory is being builtcurrently. Please try after sometime.
Table 26 Troubleshooting instance providers
Problem: Indications fulfilling the conditions defined in the HP-Known HP-Defined filters, are not logged in the EventArchive.
SolutionCause
Create the following EnumerateInstances.xml file and save it in anylocation:
The HP-Known filters and HP-Knownsubscriptions have been deleted fromthe CIMOM. <?xml version="1.0" encoding="utf-8"?>
<CIM CIMVERSION="2.0" DTDVERSION="2.0">
94 Troubleshooting SysFaultMgmt (System Fault Management) (SFM)
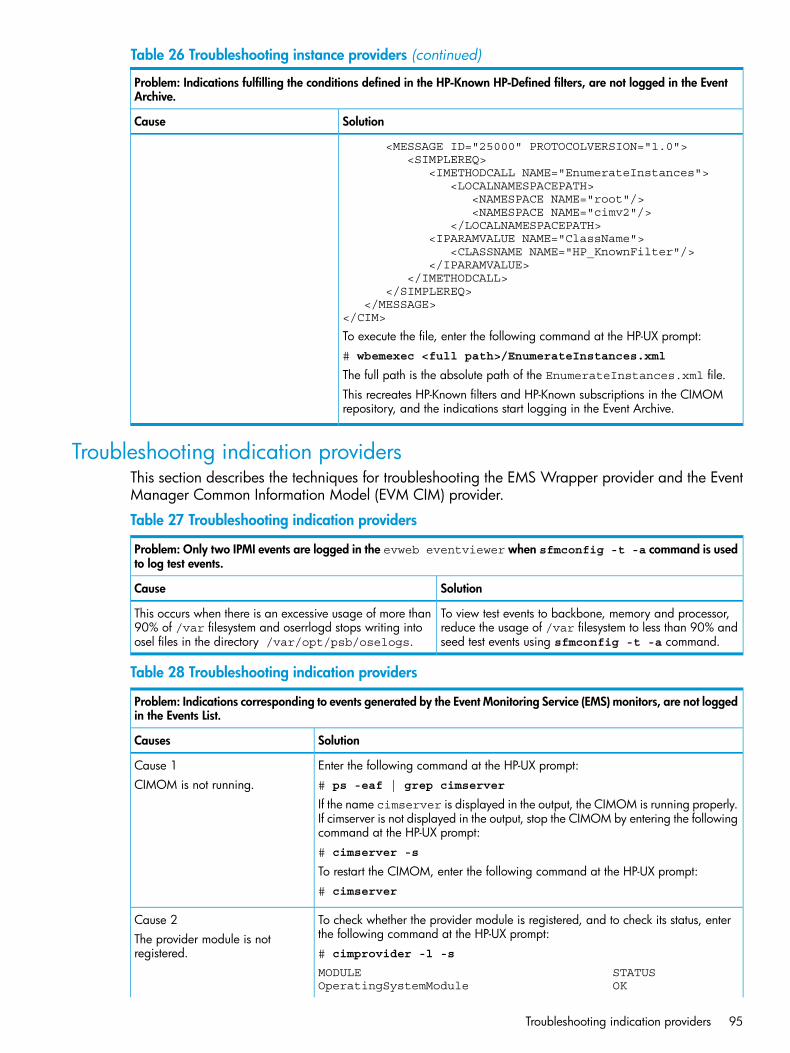
Table 26 Troubleshooting instance providers (continued)
Problem: Indications fulfilling the conditions defined in the HP-Known HP-Defined filters, are not logged in the EventArchive.
SolutionCause
<MESSAGE ID="25000" PROTOCOLVERSION="1.0"> <SIMPLEREQ> <IMETHODCALL NAME="EnumerateInstances"> <LOCALNAMESPACEPATH> <NAMESPACE NAME="root"/> <NAMESPACE NAME="cimv2"/> </LOCALNAMESPACEPATH> <IPARAMVALUE NAME="ClassName"> <CLASSNAME NAME="HP_KnownFilter"/> </IPARAMVALUE> </IMETHODCALL> </SIMPLEREQ> </MESSAGE></CIM>
To execute the file, enter the following command at the HP-UX prompt:# wbemexec <full path>/EnumerateInstances.xml
The full path is the absolute path of the EnumerateInstances.xml file.This recreates HP-Known filters and HP-Known subscriptions in the CIMOMrepository, and the indications start logging in the Event Archive.
Troubleshooting indication providersThis section describes the techniques for troubleshooting the EMS Wrapper provider and the EventManager Common Information Model (EVM CIM) provider.
Table 27 Troubleshooting indication providers
Problem: Only two IPMI events are logged in the evweb eventviewer when sfmconfig -t -a command is usedto log test events.
SolutionCause
To view test events to backbone, memory and processor,reduce the usage of /var filesystem to less than 90% andseed test events using sfmconfig -t -a command.
This occurs when there is an excessive usage of more than90% of /var filesystem and oserrlogd stops writing intoosel files in the directory /var/opt/psb/oselogs.
Table 28 Troubleshooting indication providers
Problem: Indications corresponding to events generated by the Event Monitoring Service (EMS) monitors, are not loggedin the Events List.
SolutionCauses
Enter the following command at the HP-UX prompt:Cause 1# ps -eaf | grep cimserverCIMOM is not running.If the name cimserver is displayed in the output, the CIMOM is running properly.If cimserver is not displayed in the output, stop the CIMOM by entering the followingcommand at the HP-UX prompt:# cimserver -s
To restart the CIMOM, enter the following command at the HP-UX prompt:# cimserver
To check whether the provider module is registered, and to check its status, enterthe following command at the HP-UX prompt:
Cause 2The provider module is notregistered. # cimprovider -l -s
MODULE STATUSOperatingSystemModule OK
Troubleshooting indication providers 95
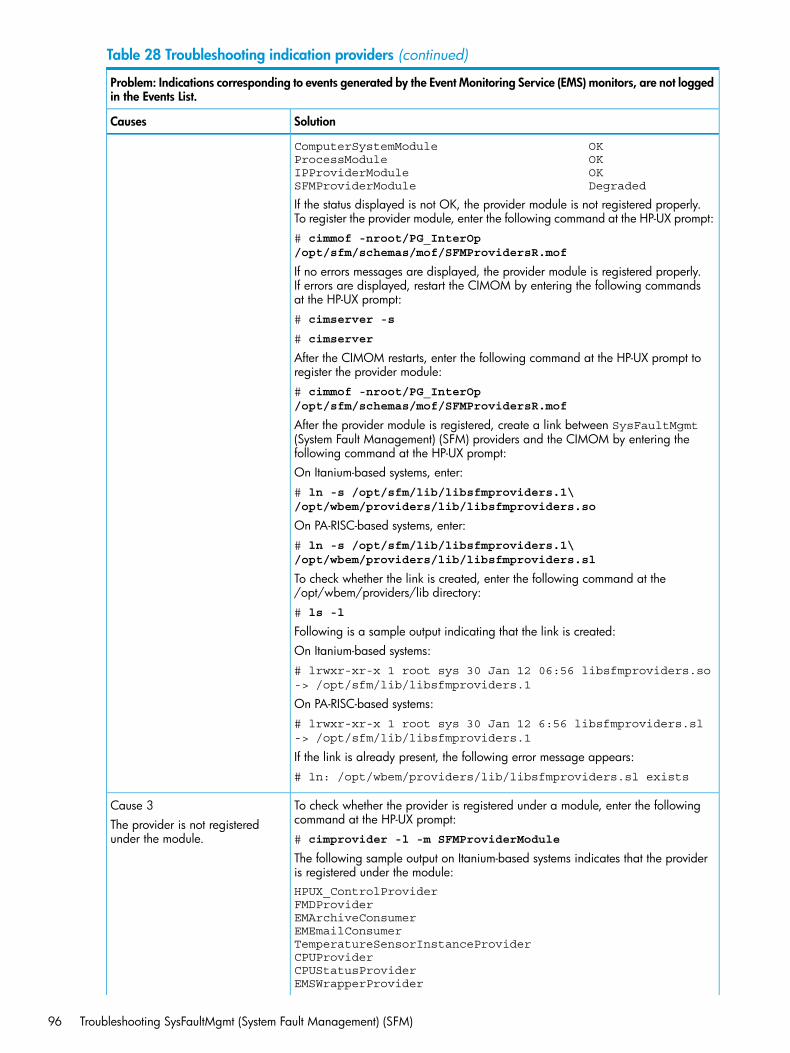
Table 28 Troubleshooting indication providers (continued)
Problem: Indications corresponding to events generated by the Event Monitoring Service (EMS) monitors, are not loggedin the Events List.
SolutionCauses
ComputerSystemModule OKProcessModule OKIPProviderModule OKSFMProviderModule Degraded
If the status displayed is not OK, the provider module is not registered properly.To register the provider module, enter the following command at the HP-UX prompt:# cimmof -nroot/PG_InterOp/opt/sfm/schemas/mof/SFMProvidersR.mof
If no errors messages are displayed, the provider module is registered properly.If errors are displayed, restart the CIMOM by entering the following commandsat the HP-UX prompt:# cimserver -s
# cimserver
After the CIMOM restarts, enter the following command at the HP-UX prompt toregister the provider module:# cimmof -nroot/PG_InterOp/opt/sfm/schemas/mof/SFMProvidersR.mof
After the provider module is registered, create a link between SysFaultMgmt(System Fault Management) (SFM) providers and the CIMOM by entering thefollowing command at the HP-UX prompt:On Itanium-based systems, enter:# ln -s /opt/sfm/lib/libsfmproviders.1\/opt/wbem/providers/lib/libsfmproviders.so
On PA-RISC-based systems, enter:# ln -s /opt/sfm/lib/libsfmproviders.1\/opt/wbem/providers/lib/libsfmproviders.sl
To check whether the link is created, enter the following command at the/opt/wbem/providers/lib directory:# ls -l
Following is a sample output indicating that the link is created:On Itanium-based systems:# lrwxr-xr-x 1 root sys 30 Jan 12 06:56 libsfmproviders.so-> /opt/sfm/lib/libsfmproviders.1
On PA-RISC-based systems:# lrwxr-xr-x 1 root sys 30 Jan 12 6:56 libsfmproviders.sl-> /opt/sfm/lib/libsfmproviders.1
If the link is already present, the following error message appears:# ln: /opt/wbem/providers/lib/libsfmproviders.sl exists
To check whether the provider is registered under a module, enter the followingcommand at the HP-UX prompt:
Cause 3The provider is not registeredunder the module. # cimprovider -l -m SFMProviderModule
The following sample output on Itanium-based systems indicates that the provideris registered under the module:HPUX_ControlProviderFMDProviderEMArchiveConsumerEMEmailConsumerTemperatureSensorInstanceProviderCPUProviderCPUStatusProviderEMSWrapperProvider
96 Troubleshooting SysFaultMgmt (System Fault Management) (SFM)
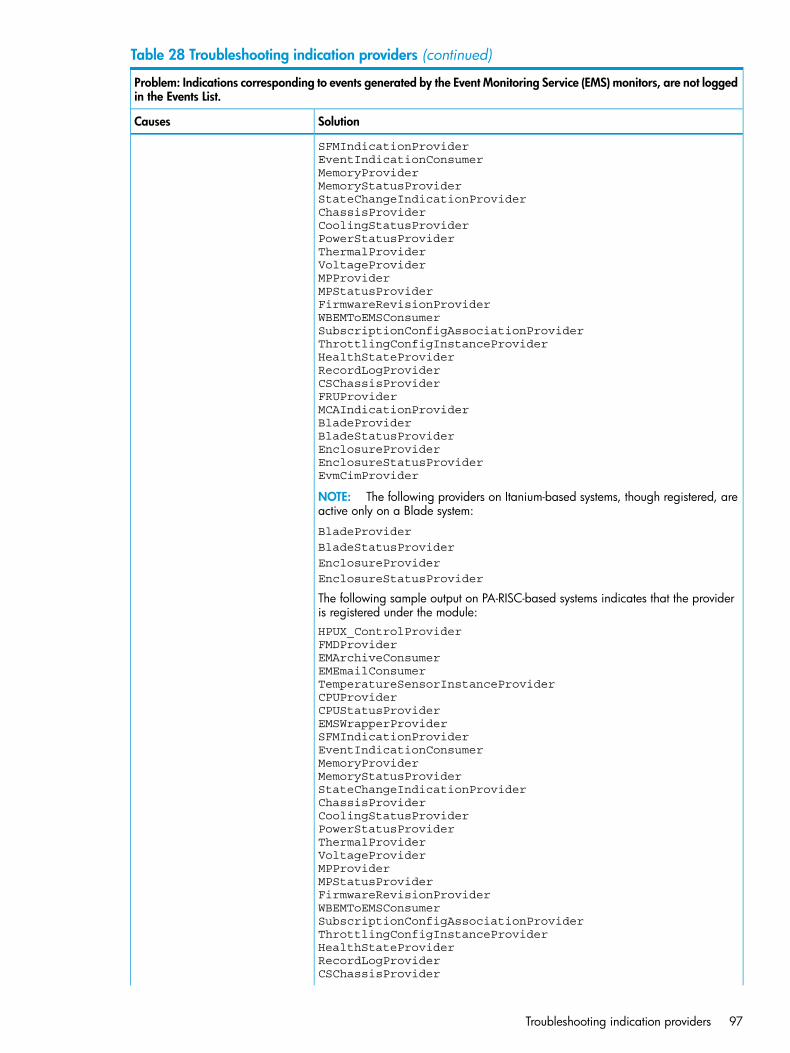
Table 28 Troubleshooting indication providers (continued)
Problem: Indications corresponding to events generated by the Event Monitoring Service (EMS) monitors, are not loggedin the Events List.
SolutionCauses
SFMIndicationProviderEventIndicationConsumerMemoryProviderMemoryStatusProviderStateChangeIndicationProviderChassisProviderCoolingStatusProviderPowerStatusProviderThermalProviderVoltageProviderMPProviderMPStatusProviderFirmwareRevisionProviderWBEMToEMSConsumerSubscriptionConfigAssociationProviderThrottlingConfigInstanceProviderHealthStateProviderRecordLogProviderCSChassisProviderFRUProviderMCAIndicationProviderBladeProviderBladeStatusProviderEnclosureProviderEnclosureStatusProviderEvmCimProvider
NOTE: The following providers on Itanium-based systems, though registered, areactive only on a Blade system:
BladeProviderBladeStatusProviderEnclosureProviderEnclosureStatusProvider
The following sample output on PA-RISC-based systems indicates that the provideris registered under the module:HPUX_ControlProviderFMDProviderEMArchiveConsumerEMEmailConsumerTemperatureSensorInstanceProviderCPUProviderCPUStatusProviderEMSWrapperProviderSFMIndicationProviderEventIndicationConsumerMemoryProviderMemoryStatusProviderStateChangeIndicationProviderChassisProviderCoolingStatusProviderPowerStatusProviderThermalProviderVoltageProviderMPProviderMPStatusProviderFirmwareRevisionProviderWBEMToEMSConsumerSubscriptionConfigAssociationProviderThrottlingConfigInstanceProviderHealthStateProviderRecordLogProviderCSChassisProvider
Troubleshooting indication providers 97
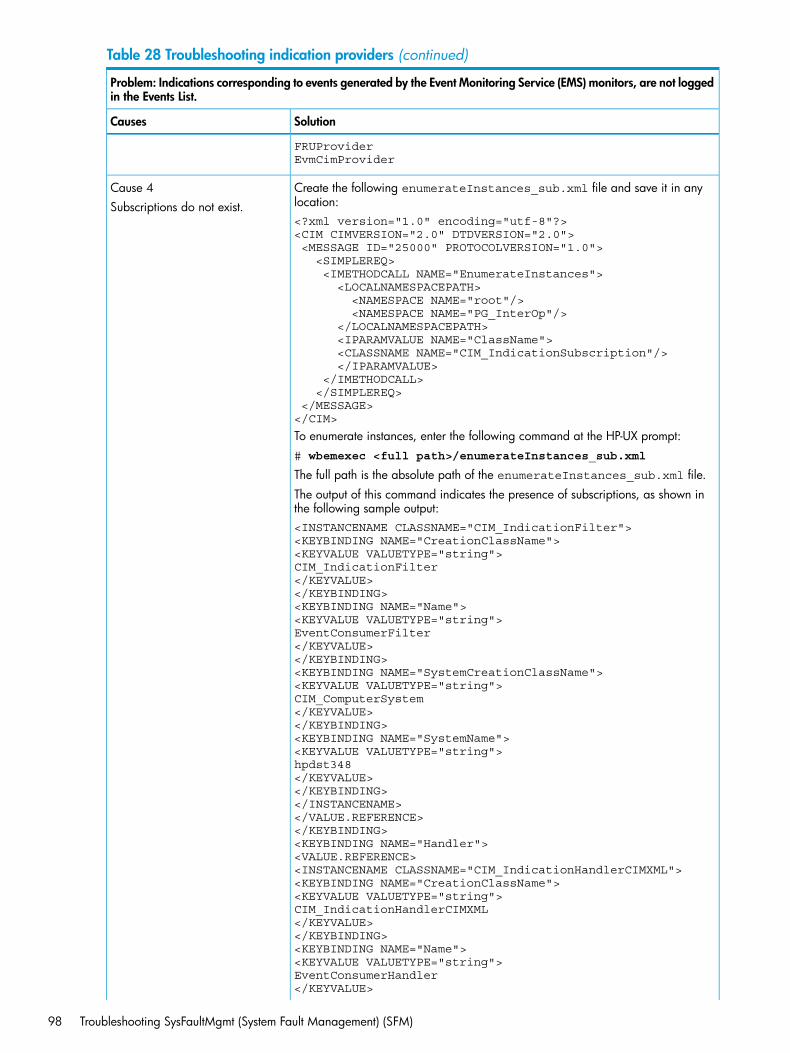
Table 28 Troubleshooting indication providers (continued)
Problem: Indications corresponding to events generated by the Event Monitoring Service (EMS) monitors, are not loggedin the Events List.
SolutionCauses
FRUProviderEvmCimProvider
Create the following enumerateInstances_sub.xml file and save it in anylocation:
Cause 4Subscriptions do not exist.
<?xml version="1.0" encoding="utf-8"?><CIM CIMVERSION="2.0" DTDVERSION="2.0"> <MESSAGE ID="25000" PROTOCOLVERSION="1.0"> <SIMPLEREQ> <IMETHODCALL NAME="EnumerateInstances"> <LOCALNAMESPACEPATH> <NAMESPACE NAME="root"/> <NAMESPACE NAME="PG_InterOp"/> </LOCALNAMESPACEPATH> <IPARAMVALUE NAME="ClassName"> <CLASSNAME NAME="CIM_IndicationSubscription"/> </IPARAMVALUE> </IMETHODCALL> </SIMPLEREQ> </MESSAGE></CIM>
To enumerate instances, enter the following command at the HP-UX prompt:# wbemexec <full path>/enumerateInstances_sub.xml
The full path is the absolute path of the enumerateInstances_sub.xml file.The output of this command indicates the presence of subscriptions, as shown inthe following sample output:<INSTANCENAME CLASSNAME="CIM_IndicationFilter"><KEYBINDING NAME="CreationClassName"><KEYVALUE VALUETYPE="string">CIM_IndicationFilter</KEYVALUE></KEYBINDING><KEYBINDING NAME="Name"><KEYVALUE VALUETYPE="string">EventConsumerFilter</KEYVALUE></KEYBINDING><KEYBINDING NAME="SystemCreationClassName"><KEYVALUE VALUETYPE="string">CIM_ComputerSystem</KEYVALUE></KEYBINDING><KEYBINDING NAME="SystemName"><KEYVALUE VALUETYPE="string">hpdst348</KEYVALUE></KEYBINDING></INSTANCENAME></VALUE.REFERENCE></KEYBINDING><KEYBINDING NAME="Handler"><VALUE.REFERENCE><INSTANCENAME CLASSNAME="CIM_IndicationHandlerCIMXML"><KEYBINDING NAME="CreationClassName"><KEYVALUE VALUETYPE="string">CIM_IndicationHandlerCIMXML</KEYVALUE></KEYBINDING><KEYBINDING NAME="Name"><KEYVALUE VALUETYPE="string">EventConsumerHandler</KEYVALUE>
98 Troubleshooting SysFaultMgmt (System Fault Management) (SFM)
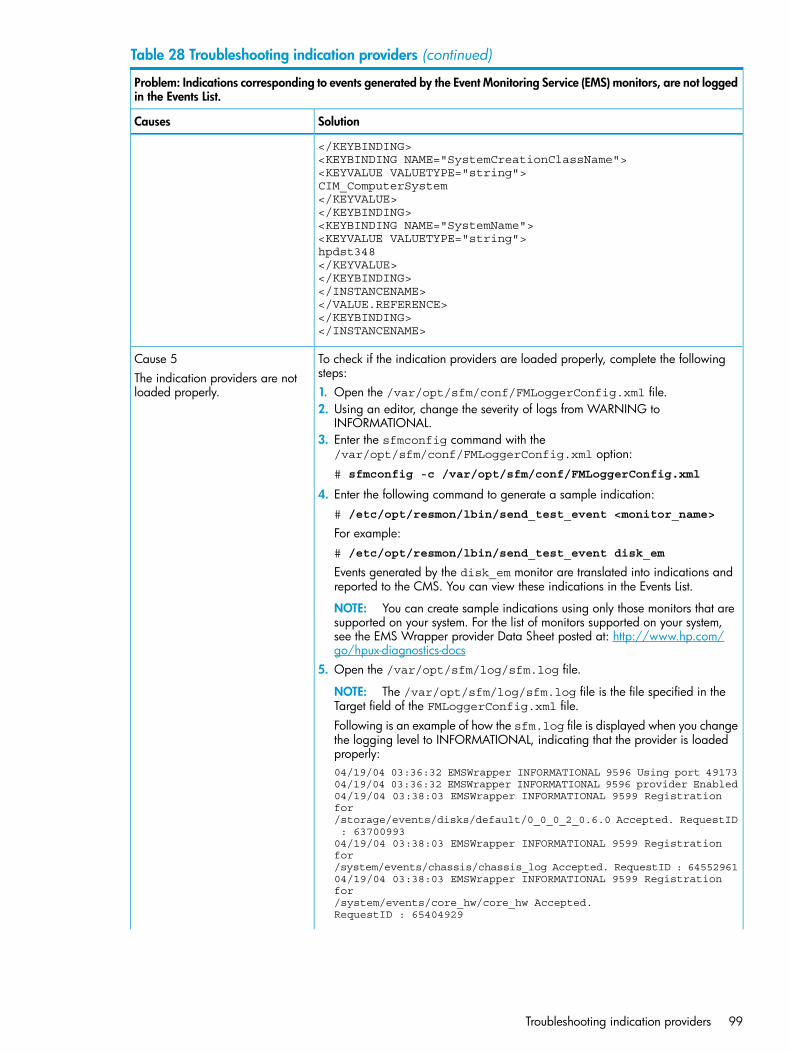
Table 28 Troubleshooting indication providers (continued)
Problem: Indications corresponding to events generated by the Event Monitoring Service (EMS) monitors, are not loggedin the Events List.
SolutionCauses
</KEYBINDING><KEYBINDING NAME="SystemCreationClassName"><KEYVALUE VALUETYPE="string">CIM_ComputerSystem</KEYVALUE></KEYBINDING><KEYBINDING NAME="SystemName"><KEYVALUE VALUETYPE="string">hpdst348</KEYVALUE></KEYBINDING></INSTANCENAME></VALUE.REFERENCE></KEYBINDING></INSTANCENAME>
To check if the indication providers are loaded properly, complete the followingsteps:
Cause 5The indication providers are notloaded properly. 1. Open the /var/opt/sfm/conf/FMLoggerConfig.xml file.
2. Using an editor, change the severity of logs from WARNING toINFORMATIONAL.
3. Enter the sfmconfig command with the/var/opt/sfm/conf/FMLoggerConfig.xml option:# sfmconfig -c /var/opt/sfm/conf/FMLoggerConfig.xml
4. Enter the following command to generate a sample indication:# /etc/opt/resmon/lbin/send_test_event <monitor_name>
For example:# /etc/opt/resmon/lbin/send_test_event disk_em
Events generated by the disk_em monitor are translated into indications andreported to the CMS. You can view these indications in the Events List.
NOTE: You can create sample indications using only those monitors that aresupported on your system. For the list of monitors supported on your system,see the EMS Wrapper provider Data Sheet posted at: http://www.hp.com/go/hpux-diagnostics-docs
5. Open the /var/opt/sfm/log/sfm.log file.
NOTE: The /var/opt/sfm/log/sfm.log file is the file specified in theTarget field of the FMLoggerConfig.xml file.Following is an example of how the sfm.log file is displayed when you changethe logging level to INFORMATIONAL, indicating that the provider is loadedproperly:04/19/04 03:36:32 EMSWrapper INFORMATIONAL 9596 Using port 4917304/19/04 03:36:32 EMSWrapper INFORMATIONAL 9596 provider Enabled04/19/04 03:38:03 EMSWrapper INFORMATIONAL 9599 Registration for/storage/events/disks/default/0_0_0_2_0.6.0 Accepted. RequestID : 6370099304/19/04 03:38:03 EMSWrapper INFORMATIONAL 9599 Registration for/system/events/chassis/chassis_log Accepted. RequestID : 6455296104/19/04 03:38:03 EMSWrapper INFORMATIONAL 9599 Registration for/system/events/core_hw/core_hw Accepted.RequestID : 65404929
Troubleshooting indication providers 99
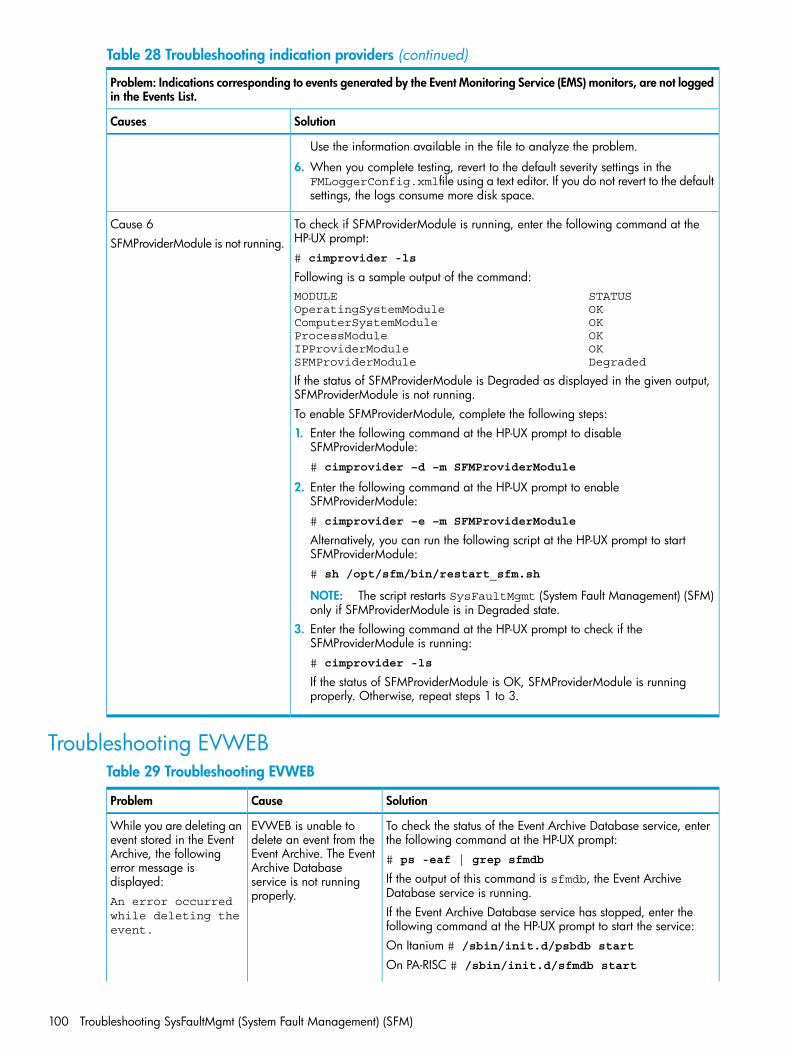
Table 28 Troubleshooting indication providers (continued)
Problem: Indications corresponding to events generated by the Event Monitoring Service (EMS) monitors, are not loggedin the Events List.
SolutionCauses
Use the information available in the file to analyze the problem.
6. When you complete testing, revert to the default severity settings in theFMLoggerConfig.xmlfile using a text editor. If you do not revert to the defaultsettings, the logs consume more disk space.
To check if SFMProviderModule is running, enter the following command at theHP-UX prompt:
Cause 6SFMProviderModule is not running.
# cimprovider -ls
Following is a sample output of the command:MODULE STATUSOperatingSystemModule OKComputerSystemModule OKProcessModule OKIPProviderModule OKSFMProviderModule Degraded
If the status of SFMProviderModule is Degraded as displayed in the given output,SFMProviderModule is not running.To enable SFMProviderModule, complete the following steps:1. Enter the following command at the HP-UX prompt to disable
SFMProviderModule:# cimprovider –d –m SFMProviderModule
2. Enter the following command at the HP-UX prompt to enableSFMProviderModule:# cimprovider –e –m SFMProviderModule
Alternatively, you can run the following script at the HP-UX prompt to startSFMProviderModule:# sh /opt/sfm/bin/restart_sfm.sh
NOTE: The script restarts SysFaultMgmt (System Fault Management) (SFM)only if SFMProviderModule is in Degraded state.
3. Enter the following command at the HP-UX prompt to check if theSFMProviderModule is running:# cimprovider -ls
If the status of SFMProviderModule is OK, SFMProviderModule is runningproperly. Otherwise, repeat steps 1 to 3.
Troubleshooting EVWEBTable 29 Troubleshooting EVWEB
SolutionCauseProblem
To check the status of the Event Archive Database service, enterthe following command at the HP-UX prompt:
EVWEB is unable todelete an event from the
While you are deleting anevent stored in the Event
# ps -eaf | grep sfmdbEvent Archive. The EventArchive Database
Archive, the followingerror message isdisplayed: If the output of this command is sfmdb, the Event Archive
Database service is running.service is not runningproperly.An error occurred
while deleting theevent.
If the Event Archive Database service has stopped, enter thefollowing command at the HP-UX prompt to start the service:On Itanium # /sbin/init.d/psbdb start
On PA-RISC # /sbin/init.d/sfmdb start
100 Troubleshooting SysFaultMgmt (System Fault Management) (SFM)
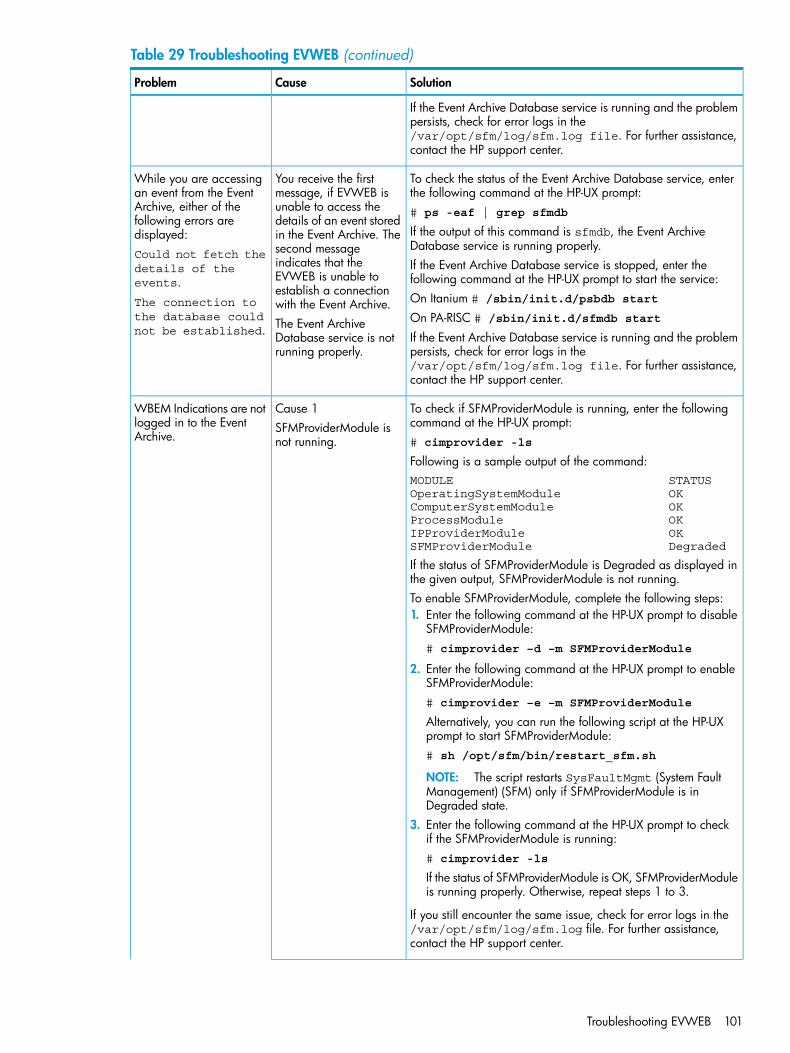
Table 29 Troubleshooting EVWEB (continued)
SolutionCauseProblem
If the Event Archive Database service is running and the problempersists, check for error logs in the/var/opt/sfm/log/sfm.log file. For further assistance,contact the HP support center.
To check the status of the Event Archive Database service, enterthe following command at the HP-UX prompt:
You receive the firstmessage, if EVWEB is
While you are accessingan event from the Event
# ps -eaf | grep sfmdbunable to access thedetails of an event stored
Archive, either of thefollowing errors aredisplayed: If the output of this command is sfmdb, the Event Archive
Database service is running properly.in the Event Archive. Thesecond messageCould not fetch the
details of theevents.
If the Event Archive Database service is stopped, enter thefollowing command at the HP-UX prompt to start the service:
indicates that theEVWEB is unable toestablish a connectionwith the Event Archive.The connection to
the database couldnot be established.
On Itanium # /sbin/init.d/psbdb start
On PA-RISC # /sbin/init.d/sfmdb start
If the Event Archive Database service is running and the problempersists, check for error logs in the
The Event ArchiveDatabase service is notrunning properly.
/var/opt/sfm/log/sfm.log file. For further assistance,contact the HP support center.
To check if SFMProviderModule is running, enter the followingcommand at the HP-UX prompt:
Cause 1SFMProviderModule isnot running.
WBEM Indications are notlogged in to the EventArchive. # cimprovider -ls
Following is a sample output of the command:MODULE STATUSOperatingSystemModule OKComputerSystemModule OKProcessModule OKIPProviderModule OKSFMProviderModule Degraded
If the status of SFMProviderModule is Degraded as displayed inthe given output, SFMProviderModule is not running.To enable SFMProviderModule, complete the following steps:1. Enter the following command at the HP-UX prompt to disable
SFMProviderModule:# cimprovider –d –m SFMProviderModule
2. Enter the following command at the HP-UX prompt to enableSFMProviderModule:# cimprovider –e –m SFMProviderModule
Alternatively, you can run the following script at the HP-UXprompt to start SFMProviderModule:# sh /opt/sfm/bin/restart_sfm.sh
NOTE: The script restarts SysFaultMgmt (System FaultManagement) (SFM) only if SFMProviderModule is inDegraded state.
3. Enter the following command at the HP-UX prompt to checkif the SFMProviderModule is running:# cimprovider -ls
If the status of SFMProviderModule is OK, SFMProviderModuleis running properly. Otherwise, repeat steps 1 to 3.
If you still encounter the same issue, check for error logs in the/var/opt/sfm/log/sfm.log file. For further assistance,contact the HP support center.
Troubleshooting EVWEB 101
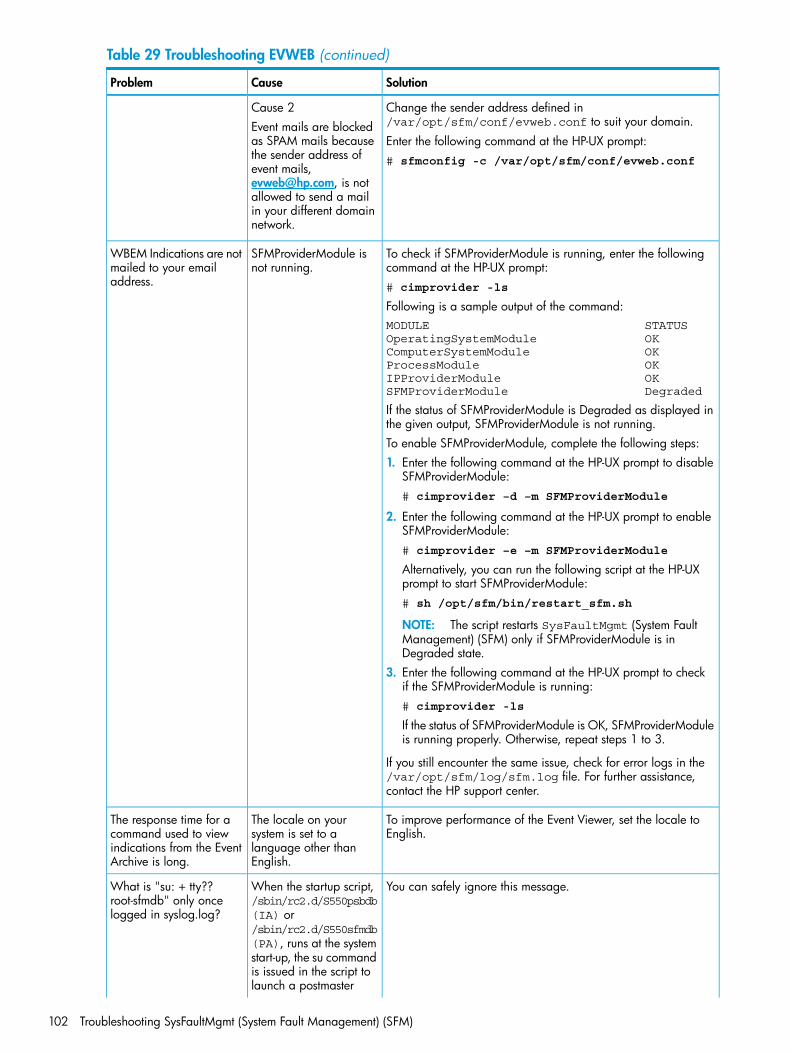
Table 29 Troubleshooting EVWEB (continued)
SolutionCauseProblem
Change the sender address defined in/var/opt/sfm/conf/evweb.conf to suit your domain.
Cause 2Event mails are blockedas SPAM mails because Enter the following command at the HP-UX prompt:the sender address of # sfmconfig -c /var/opt/sfm/conf/evweb.confevent mails,[email protected], is notallowed to send a mailin your different domainnetwork.
To check if SFMProviderModule is running, enter the followingcommand at the HP-UX prompt:
SFMProviderModule isnot running.
WBEM Indications are notmailed to your emailaddress. # cimprovider -ls
Following is a sample output of the command:MODULE STATUSOperatingSystemModule OKComputerSystemModule OKProcessModule OKIPProviderModule OKSFMProviderModule Degraded
If the status of SFMProviderModule is Degraded as displayed inthe given output, SFMProviderModule is not running.To enable SFMProviderModule, complete the following steps:1. Enter the following command at the HP-UX prompt to disable
SFMProviderModule:# cimprovider –d –m SFMProviderModule
2. Enter the following command at the HP-UX prompt to enableSFMProviderModule:# cimprovider –e –m SFMProviderModule
Alternatively, you can run the following script at the HP-UXprompt to start SFMProviderModule:# sh /opt/sfm/bin/restart_sfm.sh
NOTE: The script restarts SysFaultMgmt (System FaultManagement) (SFM) only if SFMProviderModule is inDegraded state.
3. Enter the following command at the HP-UX prompt to checkif the SFMProviderModule is running:# cimprovider -ls
If the status of SFMProviderModule is OK, SFMProviderModuleis running properly. Otherwise, repeat steps 1 to 3.
If you still encounter the same issue, check for error logs in the/var/opt/sfm/log/sfm.log file. For further assistance,contact the HP support center.
To improve performance of the Event Viewer, set the locale toEnglish.
The locale on yoursystem is set to a
The response time for acommand used to view
language other thanEnglish.
indications from the EventArchive is long.
You can safely ignore this message.When the startup script,/sbin/rc2.d/S550psbdb
What is "su: + tty??root-sfmdb" only oncelogged in syslog.log? (IA) or
/sbin/rc2.d/S550sfmdb(PA), runs at the systemstart-up, the su commandis issued in the script tolaunch a postmaster
102 Troubleshooting SysFaultMgmt (System Fault Management) (SFM)
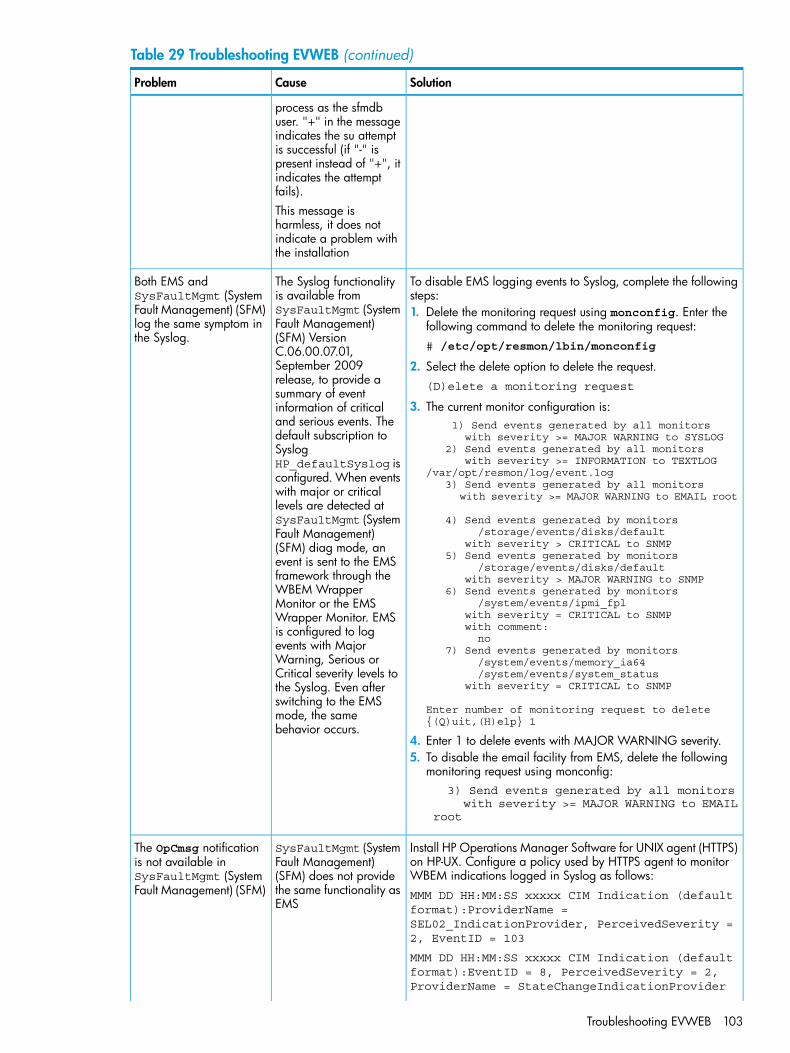
Table 29 Troubleshooting EVWEB (continued)
SolutionCauseProblem
process as the sfmdbuser. "+" in the messageindicates the su attemptis successful (if "-" ispresent instead of "+", itindicates the attemptfails).This message isharmless, it does notindicate a problem withthe installation
To disable EMS logging events to Syslog, complete the followingsteps:
The Syslog functionalityis available fromSysFaultMgmt (System
Both EMS andSysFaultMgmt (SystemFault Management) (SFM) 1. Delete the monitoring request using monconfig. Enter the
following command to delete the monitoring request:# /etc/opt/resmon/lbin/monconfig
Fault Management)(SFM) VersionC.06.00.07.01,
log the same symptom inthe Syslog.
September 2009 2. Select the delete option to delete the request.(D)elete a monitoring requestrelease, to provide a
summary of event3. The current monitor configuration is:
1) Send events generated by all monitors with severity >= MAJOR WARNING to SYSLOG
information of criticaland serious events. Thedefault subscription toSyslog 2) Send events generated by all monitors
with severity >= INFORMATION to TEXTLOG HP_defaultSyslog is/var/opt/resmon/log/event.logconfigured. When events 3) Send events generated by all monitors
with major or critical with severity >= MAJOR WARNING to EMAIL rootlevels are detected atSysFaultMgmt (System 4) Send events generated by monitors
/storage/events/disks/defaultFault Management) with severity > CRITICAL to SNMP(SFM) diag mode, an 5) Send events generated by monitorsevent is sent to the EMS /storage/events/disks/default
framework through the with severity > MAJOR WARNING to SNMPWBEM Wrapper 6) Send events generated by monitorsMonitor or the EMS /system/events/ipmi_fpl
with severity = CRITICAL to SNMPWrapper Monitor. EMS with comment:is configured to log noevents with Major 7) Send events generated by monitors
Warning, Serious or /system/events/memory_ia64Critical severity levels to /system/events/system_status
with severity = CRITICAL to SNMPthe Syslog. Even afterswitching to the EMS
Enter number of monitoring request to delete {(Q)uit,(H)elp} 1mode, the same
behavior occurs.4. Enter 1 to delete events with MAJOR WARNING severity.5. To disable the email facility from EMS, delete the following
monitoring request using monconfig: 3) Send events generated by all monitors with severity >= MAJOR WARNING to EMAIL root
Install HP Operations Manager Software for UNIX agent (HTTPS)on HP-UX. Configure a policy used by HTTPS agent to monitorWBEM indications logged in Syslog as follows:
SysFaultMgmt (SystemFault Management)(SFM) does not provide
The OpCmsg notificationis not available inSysFaultMgmt (SystemFault Management) (SFM) MMM DD HH:MM:SS xxxxx CIM Indication (default
format):ProviderName =
the same functionality asEMS
SEL02_IndicationProvider, PerceivedSeverity =2, EventID = 103
MMM DD HH:MM:SS xxxxx CIM Indication (defaultformat):EventID = 8, PerceivedSeverity = 2,ProviderName = StateChangeIndicationProvider
Troubleshooting EVWEB 103

Table 29 Troubleshooting EVWEB (continued)
SolutionCauseProblem
For more information, see the HP Operations Manager Softwarefor UNIX documentation.For the property order logged in Syslog, see “Syslog propertyorder” (page 136)
104 Troubleshooting SysFaultMgmt (System Fault Management) (SFM)
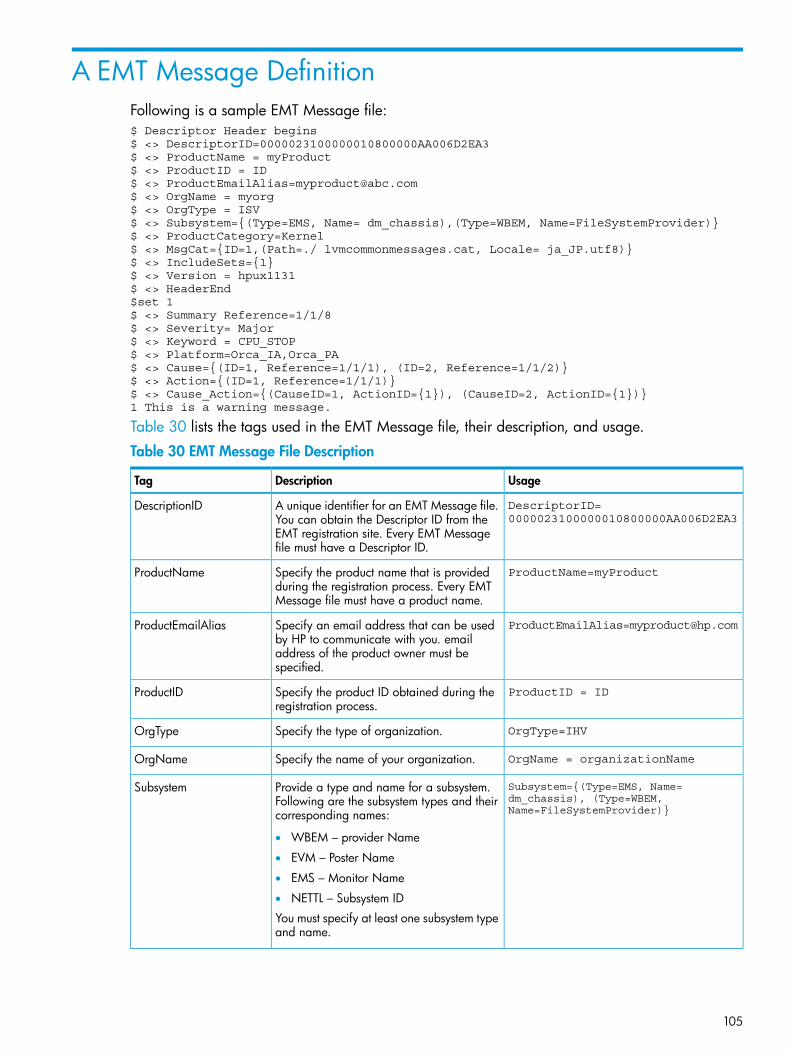
A EMT Message DefinitionFollowing is a sample EMT Message file:$ Descriptor Header begins$ <> DescriptorID=0000023100000010800000AA006D2EA3$ <> ProductName = myProduct$ <> ProductID = ID$ <> [email protected]$ <> OrgName = myorg$ <> OrgType = ISV$ <> Subsystem={(Type=EMS, Name= dm_chassis),(Type=WBEM, Name=FileSystemProvider)}$ <> ProductCategory=Kernel$ <> MsgCat={ID=1,(Path=./ lvmcommonmessages.cat, Locale= ja_JP.utf8)}$ <> IncludeSets={1}$ <> Version = hpux1131$ <> HeaderEnd$set 1$ <> Summary Reference=1/1/8$ <> Severity= Major$ <> Keyword = CPU_STOP$ <> Platform=Orca_IA,Orca_PA$ <> Cause={(ID=1, Reference=1/1/1), (ID=2, Reference=1/1/2)}$ <> Action={(ID=1, Reference=1/1/1)}$ <> Cause_Action={(CauseID=1, ActionID={1}), (CauseID=2, ActionID={1})}1 This is a warning message.
Table 30 lists the tags used in the EMT Message file, their description, and usage.
Table 30 EMT Message File Description
UsageDescriptionTag
DescriptorID= 0000023100000010800000AA006D2EA3
A unique identifier for an EMT Message file.You can obtain the Descriptor ID from theEMT registration site. Every EMT Messagefile must have a Descriptor ID.
DescriptionID
ProductName=myProductSpecify the product name that is providedduring the registration process. Every EMTMessage file must have a product name.
ProductName
[email protected] an email address that can be usedby HP to communicate with you. email
ProductEmailAlias
address of the product owner must bespecified.
ProductID = IDSpecify the product ID obtained during theregistration process.
ProductID
OrgType=IHVSpecify the type of organization.OrgType
OrgName = organizationNameSpecify the name of your organization.OrgName
Subsystem={(Type=EMS, Name= dm_chassis), (Type=WBEM, Name=FileSystemProvider)}
Provide a type and name for a subsystem.Following are the subsystem types and theircorresponding names:
Subsystem
• WBEM – provider Name
• EVM – Poster Name
• EMS – Monitor Name
• NETTL – Subsystem ID
You must specify at least one subsystem typeand name.
105
Table 30 EMT Message File Description (continued)
UsageDescriptionTag
ProductCategory= Kernel,IO,Network
Specify one or more of the following productcategories that best describes your product:
ProductCategory
• Hardware
• Network
• IO
• Kernel
• Commands
• Others
MsgCat={(ID=1, Path=../../../bin/cat/en_US.iso88591/module1.cat,LocaleName=
Specify a list of message catalogs. TheMsgCat tag has the following attribute:
MsgCat
en_US.utf8),(Path=../../../bin/cat/en_US.iso88591/module2.cat,Locale= ja_JP.utf8)}ID – A unique number used to identify an
error message.
IncludeSets={1-4,5,7,8-11}Specify a number or a set of numbersassociated with the error message.
IncludeSets
Version=HPUX1131Specify the version number of the product.The version number is mandatory.
Version
HeaderEndMarks the end of the header.HeaderEnd
Summary Reference=2/3/5Specify the reference to the catalog file,which contains the summary for the error
Summary
message. For example, if you specifySummary Reference=2/3/5, the string fromcatalog Id=2, set Id=3, and message Id=5is read.
Keyword = CPU_STOPSpecify a keyword for the error.Keyword
Severity=4Specify severity of the message.Severity
Platform=GenericSpecify the platform to which the errormessage is associated with. You cannotshare error metadata across platforms.
Platform
Cause={(ID=1, Reference=1/1/1), (ID=2, Reference=2/3/8), (ID=3, Reference=2/4/6), (ID=4, Reference=2/4/12)}
Specify the cause for an error. The Causetag is mandatory and has the followingattributes:
Cause
• ID – A unique number used to identifythe cause of an error.
• Reference – Points to another errormessage, which is the cause for thecurrent error message.
Action={(ID=1, Reference=1/3/3), (ID=2, Reference=3/2/7), (ID=3, Reference=2/2/5), (ID=4, Reference=2/2/16)}
Specify the corrective action for an error.The Action tag is mandatory and has thefollowing attributes:
Action
• ID – A unique number used to identifythe corrective action for an error.
• Reference – Points to another errormessage, which has the same correctiveaction as that of the current error.
Cause_Action={(CauseID=1, ActionID={1,2}), (CauseID=2, ActionID=3), (CauseID=3, ActionID={2,3})}
Used to associate a cause with an action fora specific error message. The Cause_Actiontag is mandatory if there is more than one
Cause_Action
cause and at least one corrective action for
106 EMT Message Definition

Table 30 EMT Message File Description (continued)
UsageDescriptionTag
a given error message. However, if there isonly one cause and one or more correctiveaction for a given error message, the Actiontags are associated with the Cause tag. Insuch a situation, the Cause_Action tag is notmandatory. For any error, a cause can bespecified without specifying the correctiveaction. However, a corrective action cannotbe specified without specifying a cause.
WBEMDetail EventID=123, AlertType=1, ProbableCause=7,
Specify WBEM specific details of amessage. The WBEMDetail tag is mandatory
WBEMDetailEventCategory=21,OtherAlertType=”My own alert type”OtherSeverity=”My own Severity”OtherEventCategory=”My own category”
if one of the subsystems specified in theHeader is of type WBEM. The WBEMDetailtag has the following attributes:
• EventID – This ID must be unique withina WBEM provider.
• AlertType – The value ranges from 1 to8.
• ProbableCause – The value ranges from0 to130.
• EventCategory – The value ranges from0 to 46.
• OtherSeverity – Required only if Severity= 1, else it can be omitted.
• OtherAlertType – Required only ifAlertType = 1, else it can be omitted.
• OtherEventCategory – Required only ifEventCategory = 1, else it can beomitted.
Monitordetail EventNumber=123Specify the details of a message pertainingto EMS Monitor. The MonitorDetail tag is
MonitorDetail
mandatory if one of the subsystems specifiedin the Header is of type MonitorDetail. Forerror messages that are generated by EMSMonitors or the EMS framework, theMonitorDetail tag must not be used.
EVMDetail EVMName=sys.unix.filesystem
Specify the details of a message pertainingto EVM. The EVMDetail tag is mandatory ifone of the subsystems specified in theHeader is of type EVM.
EVMDetail
NETTLDetail ErrorID=7,Severity=Information
Specify the details of a message pertainingto NETTL. The NETTLDetail tag is mandatoryif one of the subsystems specified in theHeader is of type NETTL.
NETTLDetail
107
B Interpretation of HP SMH instancesThis appendix describes the fields and enables you to interpret the instances in the HP SMH propertypages. It addresses the following topics:• “Processor instances” (page 109)• “Memory instances” (page 110)• “System Summary instances” (page 113)• “Cooling Device instances” (page 115)• “Power supply instances” (page 116)• “Temperature instances” (page 117)• “Voltage instances” (page 118)• “FRU Information instances” (page 119)• “Management Processor instances” (page 120)• “Viewing information about Mem Error” (page 56)• “Firmware Information instances” (page 124)• “Enclosure Information instances” (page 125)• “Complex-wide Info instances” (page 126)• “Cell Board instances” (page 128)• “Partition Information instances” (page 130)• “Blade instances” (page 132)• “Cell Blade instances” (page 133)• “Launch the Onboard Administrator” (page 134)
108 Interpretation of HP SMH instances
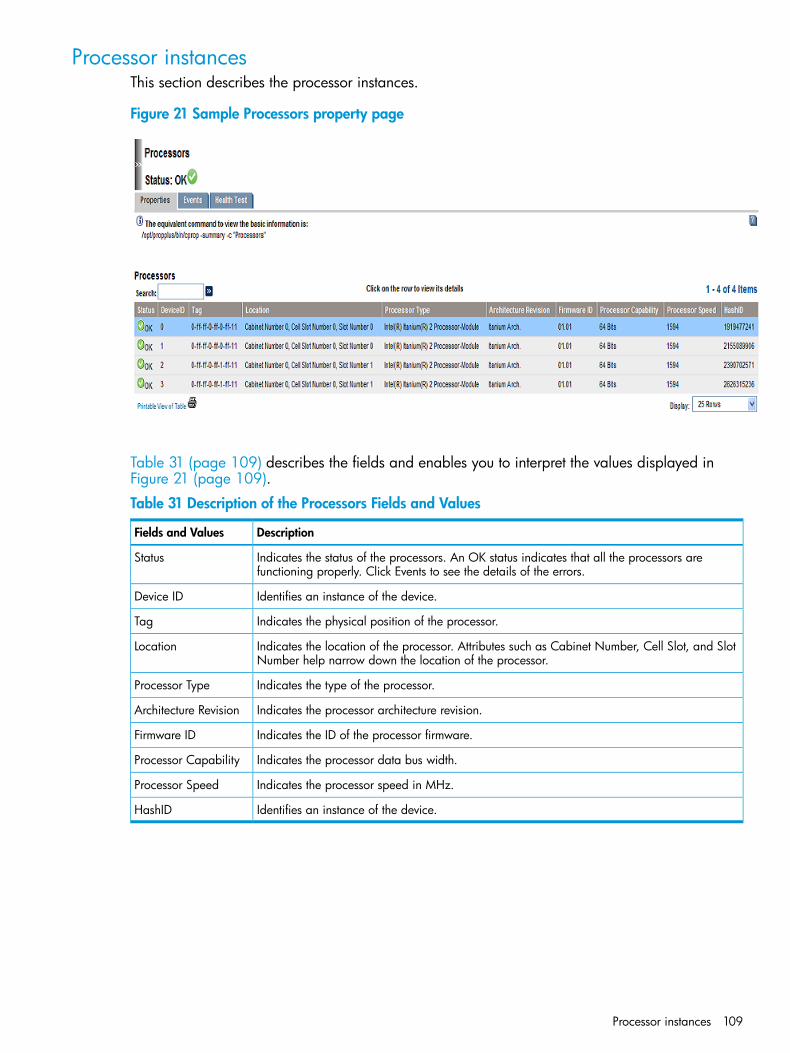
Processor instancesThis section describes the processor instances.
Figure 21 Sample Processors property page
Table 31 (page 109) describes the fields and enables you to interpret the values displayed inFigure 21 (page 109).
Table 31 Description of the Processors Fields and Values
DescriptionFields and Values
Indicates the status of the processors. An OK status indicates that all the processors arefunctioning properly. Click Events to see the details of the errors.
Status
Identifies an instance of the device.Device ID
Indicates the physical position of the processor.Tag
Indicates the location of the processor. Attributes such as Cabinet Number, Cell Slot, and SlotNumber help narrow down the location of the processor.
Location
Indicates the type of the processor.Processor Type
Indicates the processor architecture revision.Architecture Revision
Indicates the ID of the processor firmware.Firmware ID
Indicates the processor data bus width.Processor Capability
Indicates the processor speed in MHz.Processor Speed
Identifies an instance of the device.HashID
Processor instances 109

Memory instancesThis section describes the memory instances.
Figure 22 Sample Memory property page
Table 32 (page 110) and Table 33 (page 111) describes the fields and enables you to interpret thevalues displayed in Figure 22 (page 110).
Table 32 Description of the Memory Slots Fields and Values
DescriptionFields and Values
Indicates the status of the memory module. An OK status indicates that all the modules areconfigured properly. If the status of the memory module indicates an error, click Events to seethe details of the errors.
Status
Indicates the location of the memory. Attributes such as Cabinet Number, Cell Slot, and DIMMSlot help narrow down the location of the memory module.
Location
Indicates the capacity of the memory.Size
Indicates the type of the module.Module Type
Indicates the type of the memory.Memory Type
Indicates the serial number of the memory.Serial Number
110 Interpretation of HP SMH instances
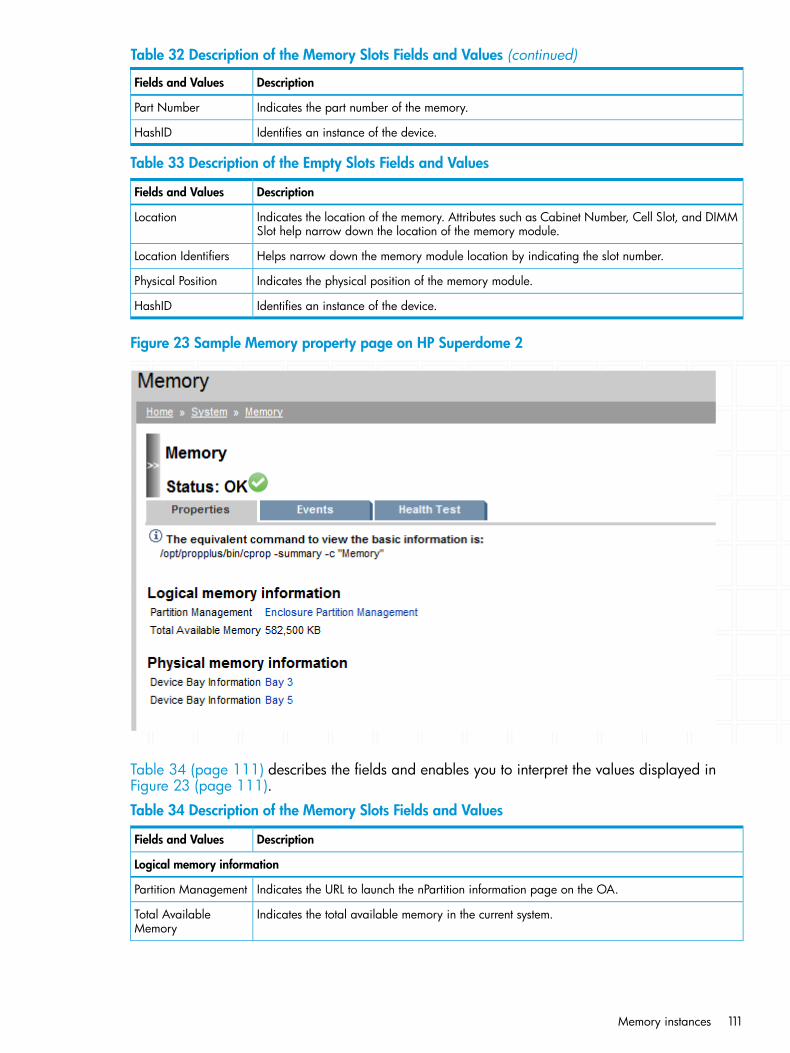
Table 32 Description of the Memory Slots Fields and Values (continued)
DescriptionFields and Values
Indicates the part number of the memory.Part Number
Identifies an instance of the device.HashID
Table 33 Description of the Empty Slots Fields and Values
DescriptionFields and Values
Indicates the location of the memory. Attributes such as Cabinet Number, Cell Slot, and DIMMSlot help narrow down the location of the memory module.
Location
Helps narrow down the memory module location by indicating the slot number.Location Identifiers
Indicates the physical position of the memory module.Physical Position
Identifies an instance of the device.HashID
Figure 23 Sample Memory property page on HP Superdome 2
Table 34 (page 111) describes the fields and enables you to interpret the values displayed inFigure 23 (page 111).
Table 34 Description of the Memory Slots Fields and Values
DescriptionFields and Values
Logical memory information
Indicates the URL to launch the nPartition information page on the OA.Partition Management
Indicates the total available memory in the current system.Total AvailableMemory
Memory instances 111

Table 34 Description of the Memory Slots Fields and Values (continued)
DescriptionFields and Values
Logical memory information
Physical memory information
Indicates the URL to launch the blade information page on the OA.Device BayInformation
NOTE: Memory information displayed is as viewed from a hard partition (nPar).
112 Interpretation of HP SMH instances

System Summary instancesThis section describes the system summary instances.
Figure 24 Sample System Summary property page
Table 35 (page 113), Table 36 (page 114) and Table 37 (page 114) describes the fields and enablesyou to interpret the values displayed in Figure 24 (page 113).
Table 35 Description of the General Information Fields and Values
DescriptionFields and Values
Describes the system model.Model
Specifies the administrator-defined roles this system is assigned in the managed environment.An administrator can assign multiple roles to a system.
Role
Universally Unique ID (UUID) indicates the asset number of the system.UUID
System Summary instances 113

Table 35 Description of the General Information Fields and Values (continued)
DescriptionFields and Values
Indicates the UUID of the logical server. A logical server is a software configuration that canbe applied to a server blade or a virtual machine. Also, you can move a logical server from
UUID (Logical)
one server blade or a virtual machine to another. However, when you move a logical server,the logical server identities are retained. The Virtual UUID is one of the identities that is retainedwhen you move a logical server.
NOTE: UUID (Logical) will be displayed only when available.
Indicates the operating system that is running on the system.OS Name
Identifies an instance of the device.HashID
Table 36 Description of the Description Fields and Values
DescriptionFields and Values
Indicates the host name of the system.Name
Indicates the contact details of the primary system owner.Contact Information
Indicates the operating system version.OS Version
Indicates the operating system capability.OS Capability
Indicates when the system was last booted.Last Boot Up Time
Indicates how long the system has been up and running.Up Time
Indicates the time zone in which the system is operating.Time Zone
Indicates the IPv4 Address of the system.IPv4 AddressIndicates the IPv6 Address of the system.IPv6 Address
NOTE: IPv4 Address or IPv6 Address will be displayed only when available.
Indicates the ROM version on the system.ROM Version
Identifies an instance of the device.HashID
Table 37 Description of the Asset Control information Fields and Values
DescriptionFields and Values
Indicates the system serial number.Serial Number
Indicates the serial number of the logical server. The Virtual Serial Number is one of theidentities that is retained when you move a logical server.
NOTE: Serial Number (Logical) will be displayed only when available.
Serial Number (Logical)
Indicates the number to uniquely identify the system.Product Number
Identifies an instance of the device.HashID
114 Interpretation of HP SMH instances
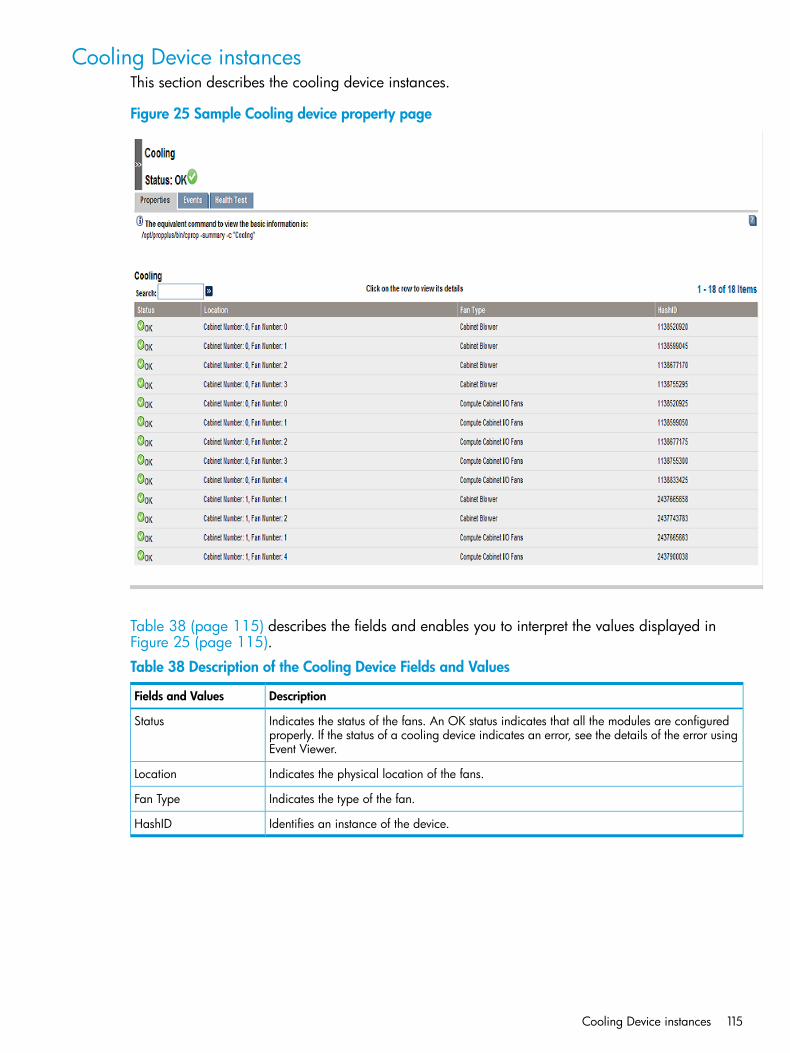
Cooling Device instancesThis section describes the cooling device instances.
Figure 25 Sample Cooling device property page
Table 38 (page 115) describes the fields and enables you to interpret the values displayed inFigure 25 (page 115).
Table 38 Description of the Cooling Device Fields and Values
DescriptionFields and Values
Indicates the status of the fans. An OK status indicates that all the modules are configuredproperly. If the status of a cooling device indicates an error, see the details of the error usingEvent Viewer.
Status
Indicates the physical location of the fans.Location
Indicates the type of the fan.Fan Type
Identifies an instance of the device.HashID
Cooling Device instances 115
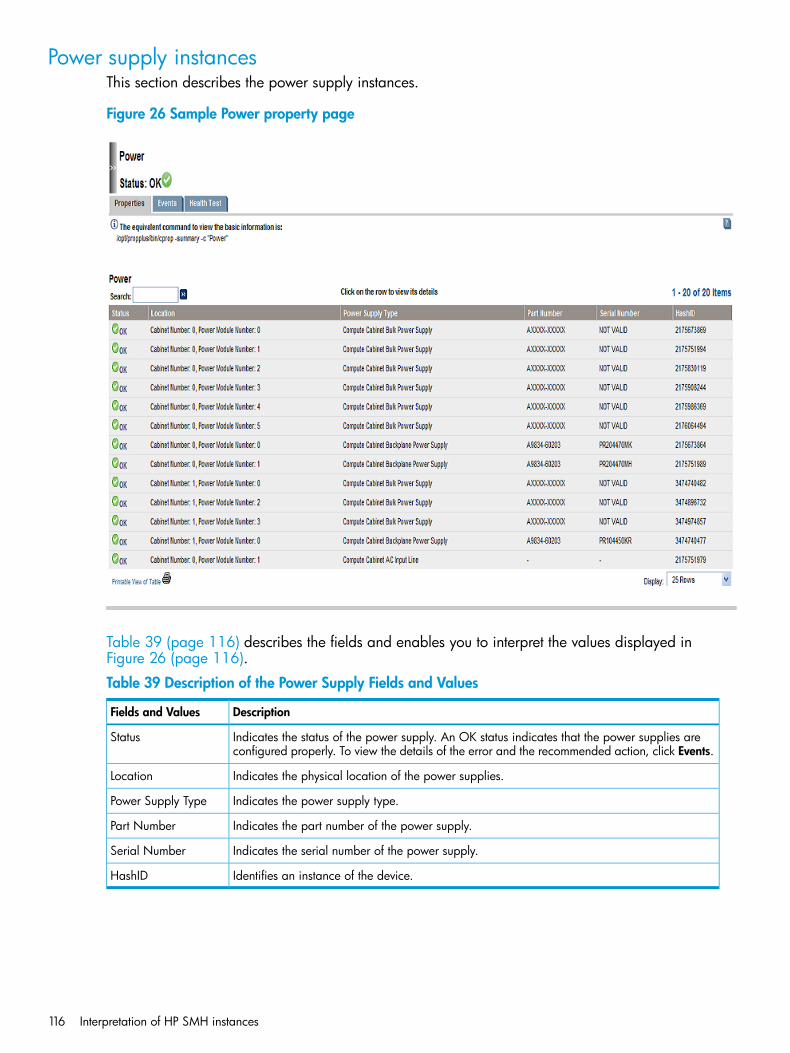
Power supply instancesThis section describes the power supply instances.
Figure 26 Sample Power property page
Table 39 (page 116) describes the fields and enables you to interpret the values displayed inFigure 26 (page 116).
Table 39 Description of the Power Supply Fields and Values
DescriptionFields and Values
Indicates the status of the power supply. An OK status indicates that the power supplies areconfigured properly. To view the details of the error and the recommended action, click Events.
Status
Indicates the physical location of the power supplies.Location
Indicates the power supply type.Power Supply Type
Indicates the part number of the power supply.Part Number
Indicates the serial number of the power supply.Serial Number
Identifies an instance of the device.HashID
116 Interpretation of HP SMH instances

Temperature instancesThis section describes the temperature instances.
Figure 27 Sample Temperature property page
Table 40 (page 117) describes the fields and enables you to interpret the values displayed inFigure 27 (page 117).
Table 40 Description of the Temperature Fields and Values
DescriptionFields and Values
Indicates whether the sensor temperature in the system is normal or not. However, the statusof the sensor temperature does not reflect the status of the cooling devices. If a cooling devicehas failed, but the sensor temperature is still normal, the status is displayed as OK.
Status
Indicates the name of the sensor.Sensor
Indicates the location of the sensor.Location
Indicates the temperature in Celsius, as measured by the sensor.Temp
Indicates the threshold temperature in Celsius.Threshold
Identifies an instance of the device.HashID
Temperature instances 117
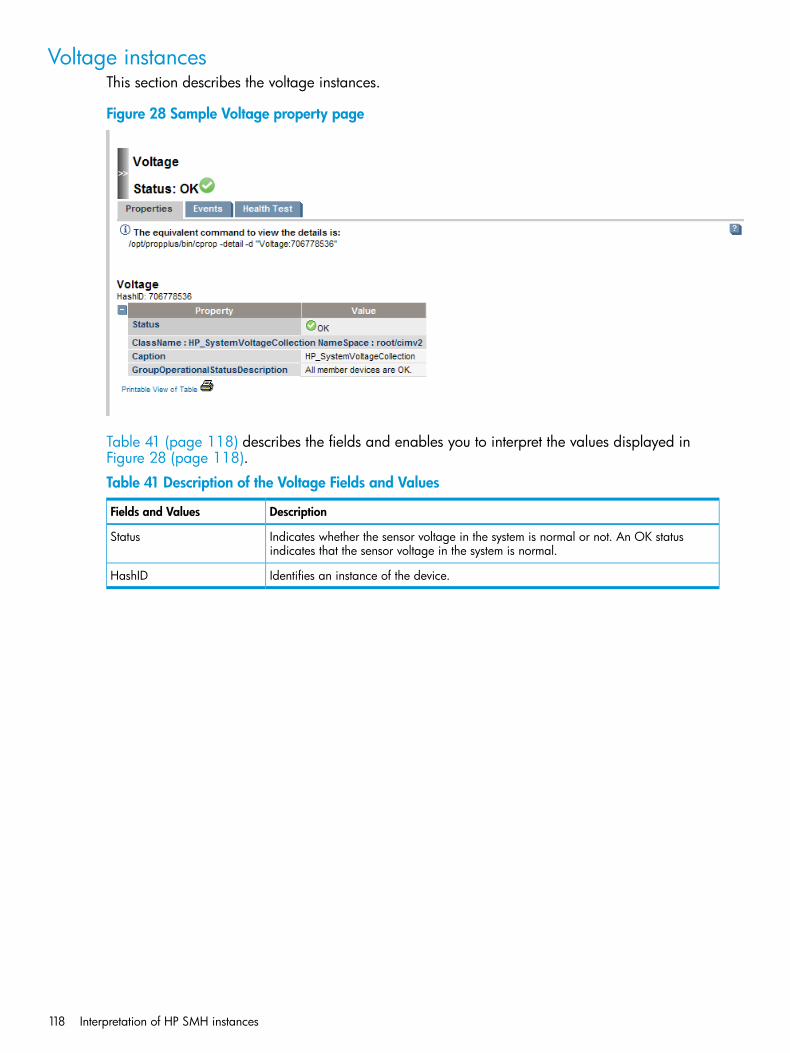
Voltage instancesThis section describes the voltage instances.
Figure 28 Sample Voltage property page
Table 41 (page 118) describes the fields and enables you to interpret the values displayed inFigure 28 (page 118).
Table 41 Description of the Voltage Fields and Values
DescriptionFields and Values
Indicates whether the sensor voltage in the system is normal or not. An OK statusindicates that the sensor voltage in the system is normal.
Status
Identifies an instance of the device.HashID
118 Interpretation of HP SMH instances

FRU Information instancesThis section describes the FRU Information instances.
Figure 29 Sample FRU Information property page
Table 42 (page 119) describes the fields and enables you to interpret the values displayed inFigure 29 (page 119).
Table 42 Description of the MP Fields and Values
DescriptionFields and Values
Indicates the FRU Name of the Physical Element.Name
Indicates the serial number of the FRU.Serial Number
Identifies an instance of the device.HashID
FRU Information instances 119
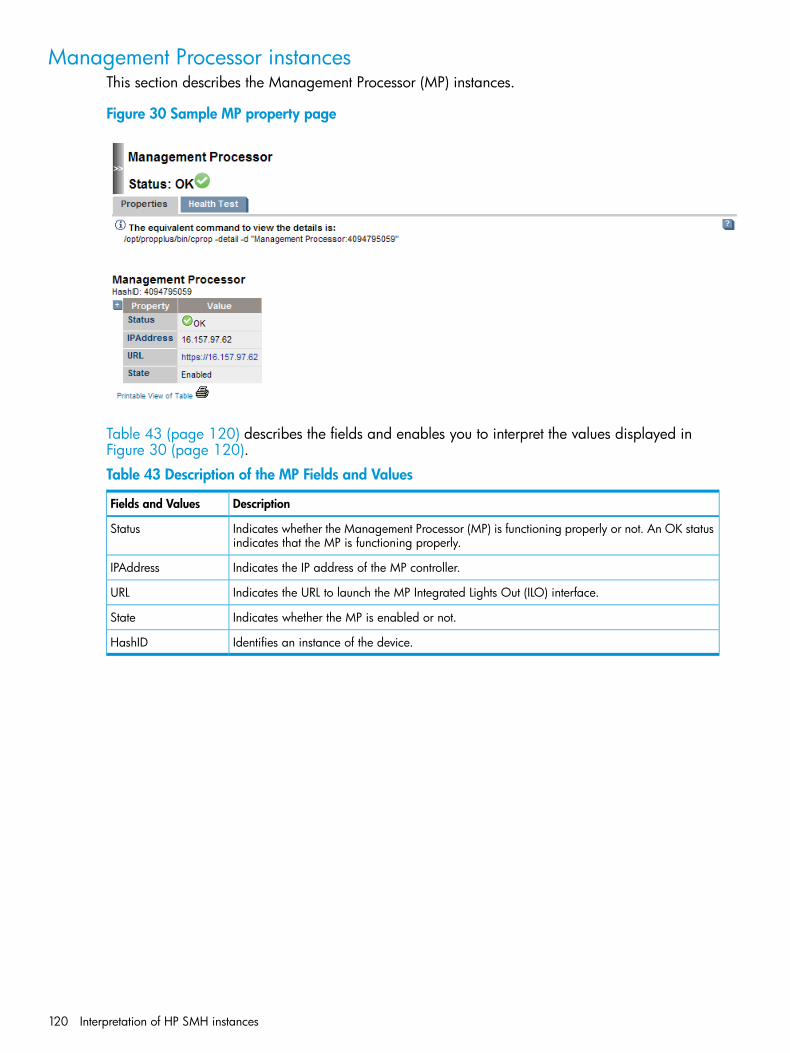
Management Processor instancesThis section describes the Management Processor (MP) instances.
Figure 30 Sample MP property page
Table 43 (page 120) describes the fields and enables you to interpret the values displayed inFigure 30 (page 120).
Table 43 Description of the MP Fields and Values
DescriptionFields and Values
Indicates whether the Management Processor (MP) is functioning properly or not. An OK statusindicates that the MP is functioning properly.
Status
Indicates the IP address of the MP controller.IPAddress
Indicates the URL to launch the MP Integrated Lights Out (ILO) interface.URL
Indicates whether the MP is enabled or not.State
Identifies an instance of the device.HashID
120 Interpretation of HP SMH instances
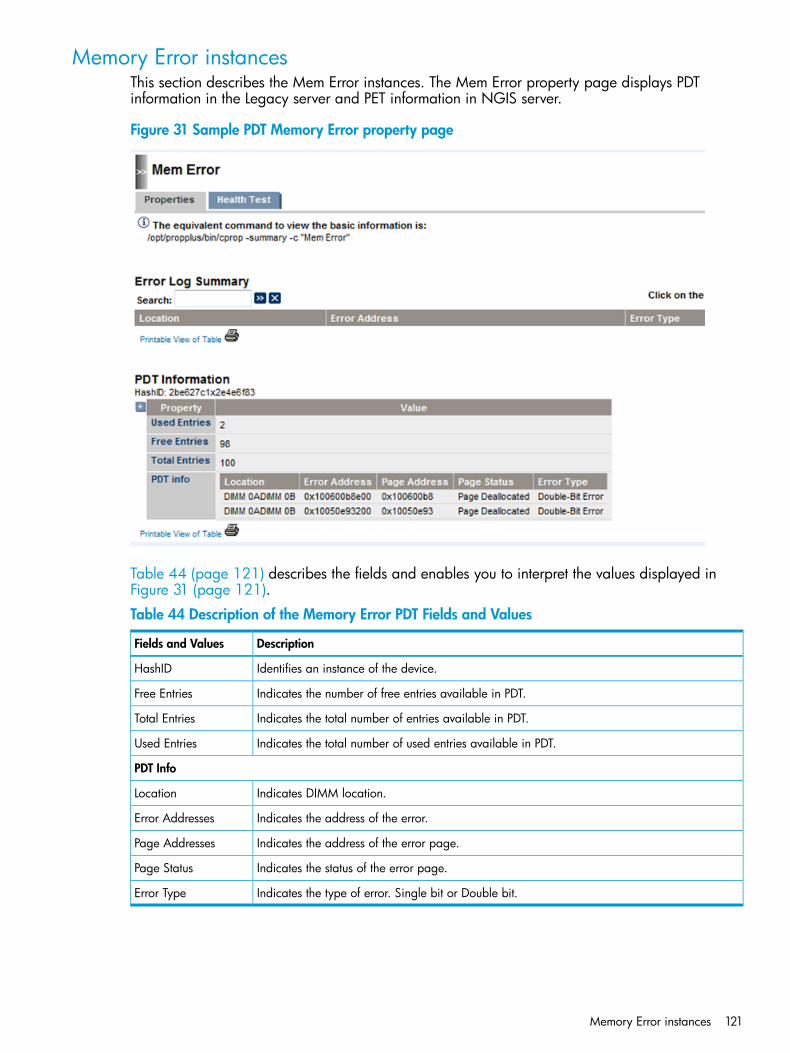
Memory Error instancesThis section describes the Mem Error instances. The Mem Error property page displays PDTinformation in the Legacy server and PET information in NGIS server.
Figure 31 Sample PDT Memory Error property page
Table 44 (page 121) describes the fields and enables you to interpret the values displayed inFigure 31 (page 121).
Table 44 Description of the Memory Error PDT Fields and Values
DescriptionFields and Values
Identifies an instance of the device.HashID
Indicates the number of free entries available in PDT.Free Entries
Indicates the total number of entries available in PDT.Total Entries
Indicates the total number of used entries available in PDT.Used Entries
PDT Info
Indicates DIMM location.Location
Indicates the address of the error.Error Addresses
Indicates the address of the error page.Page Addresses
Indicates the status of the error page.Page Status
Indicates the type of error. Single bit or Double bit.Error Type
Memory Error instances 121
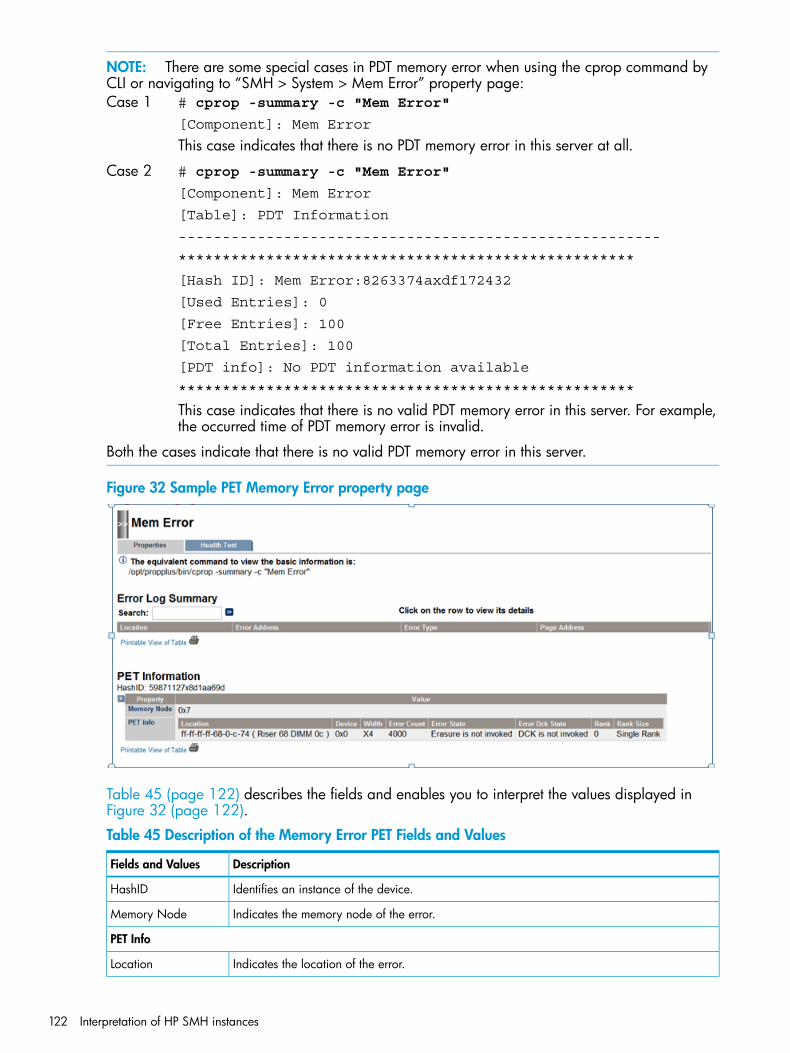
NOTE: There are some special cases in PDT memory error when using the cprop command byCLI or navigating to “SMH > System > Mem Error” property page:Case 1 # cprop -summary -c "Mem Error"
[Component]: Mem Error
This case indicates that there is no PDT memory error in this server at all.
Case 2 # cprop -summary -c "Mem Error"
[Component]: Mem Error
[Table]: PDT Information
-------------------------------------------------------
****************************************************
[Hash ID]: Mem Error:8263374axdf172432
[Used Entries]: 0
[Free Entries]: 100
[Total Entries]: 100
[PDT info]: No PDT information available
****************************************************
This case indicates that there is no valid PDT memory error in this server. For example,the occurred time of PDT memory error is invalid.
Both the cases indicate that there is no valid PDT memory error in this server.
Figure 32 Sample PET Memory Error property page
Table 45 (page 122) describes the fields and enables you to interpret the values displayed inFigure 32 (page 122).
Table 45 Description of the Memory Error PET Fields and Values
DescriptionFields and Values
Identifies an instance of the device.HashID
Indicates the memory node of the error.Memory Node
PET Info
Indicates the location of the error.Location
122 Interpretation of HP SMH instances
Table 45 Description of the Memory Error PET Fields and Values (continued)
DescriptionFields and Values
Indicates in which device the error is found.Device
Indicates the width of the device.Width
Error count occurred in each DRAM.Error Count
Indicates the state of the error.Error State
Indicates the state of DCK error.Error DCK State
Indicates the rank of the error.Rank
Indicates the entries of the memory rank sizes.Rank Size
NOTE: There are some special cases in PET memory error when using the cprop command byCLI or navigating to “SMH > System > Mem Error” property page:Case 1 # cprop -summary -c "Mem Error"
[Component]: Mem Error
This case indicates that there is no PET memory error in this server at all.
Memory Error instances 123
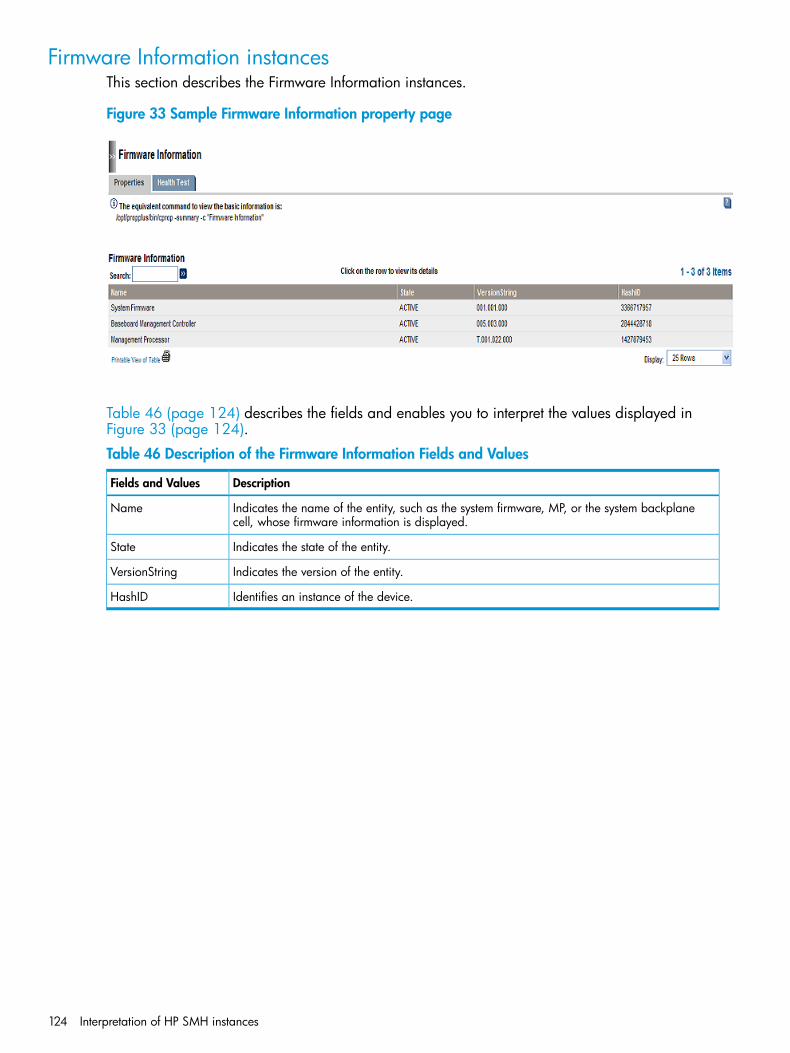
Firmware Information instancesThis section describes the Firmware Information instances.
Figure 33 Sample Firmware Information property page
Table 46 (page 124) describes the fields and enables you to interpret the values displayed inFigure 33 (page 124).
Table 46 Description of the Firmware Information Fields and Values
DescriptionFields and Values
Indicates the name of the entity, such as the system firmware, MP, or the system backplanecell, whose firmware information is displayed.
Name
Indicates the state of the entity.State
Indicates the version of the entity.VersionString
Identifies an instance of the device.HashID
124 Interpretation of HP SMH instances
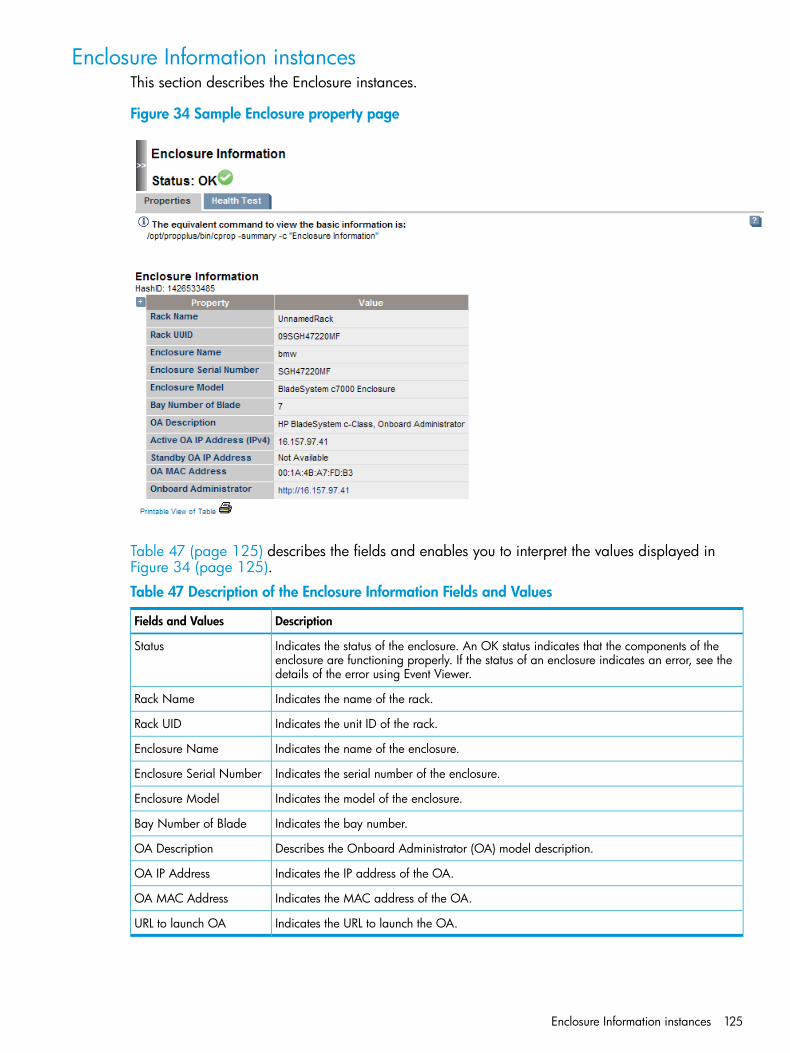
Enclosure Information instancesThis section describes the Enclosure instances.
Figure 34 Sample Enclosure property page
Table 47 (page 125) describes the fields and enables you to interpret the values displayed inFigure 34 (page 125).
Table 47 Description of the Enclosure Information Fields and Values
DescriptionFields and Values
Indicates the status of the enclosure. An OK status indicates that the components of theenclosure are functioning properly. If the status of an enclosure indicates an error, see thedetails of the error using Event Viewer.
Status
Indicates the name of the rack.Rack Name
Indicates the unit ID of the rack.Rack UID
Indicates the name of the enclosure.Enclosure Name
Indicates the serial number of the enclosure.Enclosure Serial Number
Indicates the model of the enclosure.Enclosure Model
Indicates the bay number.Bay Number of Blade
Describes the Onboard Administrator (OA) model description.OA Description
Indicates the IP address of the OA.OA IP Address
Indicates the MAC address of the OA.OA MAC Address
Indicates the URL to launch the OA.URL to launch OA
Enclosure Information instances 125
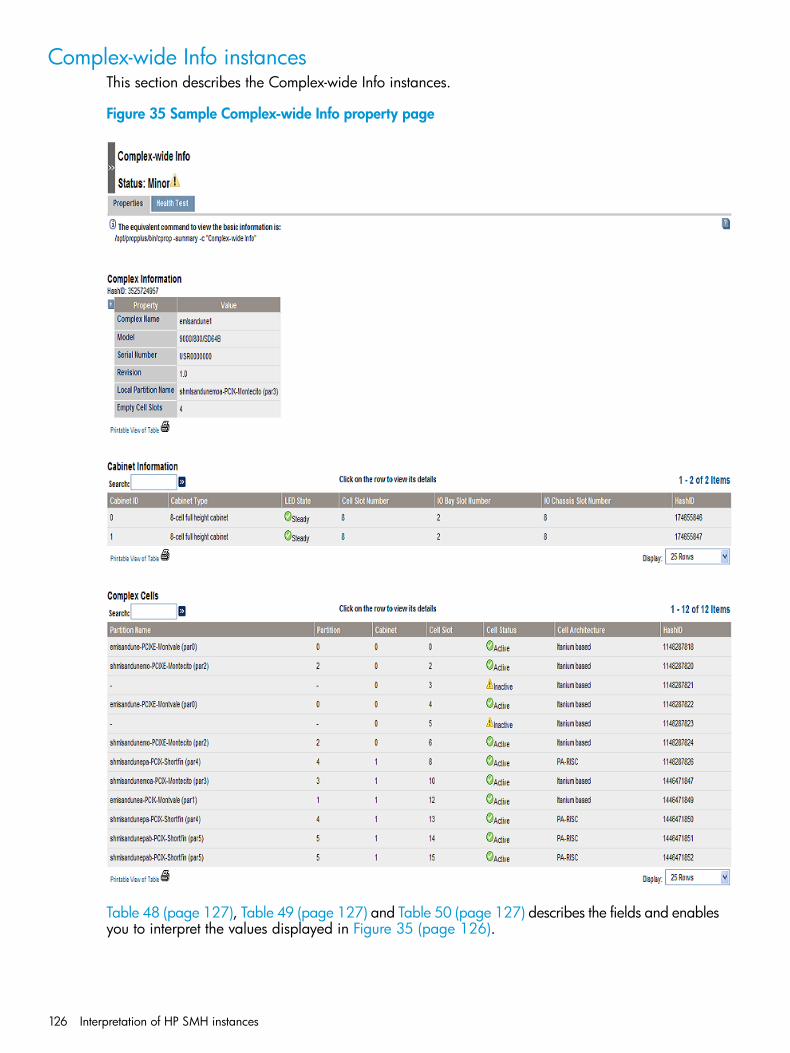
Complex-wide Info instancesThis section describes the Complex-wide Info instances.
Figure 35 Sample Complex-wide Info property page
Table 48 (page 127), Table 49 (page 127) and Table 50 (page 127) describes the fields and enablesyou to interpret the values displayed in Figure 35 (page 126).
126 Interpretation of HP SMH instances
Table 48 Description of the Complex Information Fields and Values
DescriptionFields and Values
Describes user defined name for the complex.Complex Name
Defines Model identification string.Model
Indicates the serial number of the complex as assigned by the original manufacturer.Serial Number
Displays string for the revision number of the profile, consisting of the major and minorrevision numbers concatenated with a period as a separator.
Revision
User defined name with the numeric label for the Partition in the complex on which theprovider is running.
Local Partition Name
Indicates the number of cell slots which are not occupied by a component.Empty Cell Slots
Table 49 Description of the Cabinet Information Fields and Values
DescriptionFields and Values
Indicates the ID of the Cabinet in the Complex.Cabinet ID
Indicates the type of Cabinet. The Cabinet Values are: Unknown(0), Other(1),8-cell full height cabinet(2), 4-cell full height cabinet(3),
Cabinet Type
4-cell half-height cabinet(4), 2-cell cabinet(5), and I/Oexpansion cabinet(6).
Displays the state of the Cabinet number LED for the Cabinet (also called. theCabinet LCD).
LED State
Indicates the number of cell slots in the Cabinet.Cell Slot Number
Indicates the number of I/O bays in the Cabinet.IO Bay Slot Number
Indicates the number of I/O chassis slots in the Cabinet.IO Chassis Slot Number
Identifies an instance of the device.HashID
Table 50 Description of the Complex Cells Fields and Values
DescriptionFields and Values
User defined name for the nPartition, which need not be unique within the complex.Partition Name
Indicates the ID of this nPartition in the complex.Partition
Indicates the ID of the cabinet in which the slot is located.Cabinet
Indicates the ID of the HP_NParCellSlot in which the cell is located.Cell Slot
Indicates the status of the Component. The Component Values are: Unknown(0),Other(1), Powered Off(2), Powering On(3), Inactive(4), andActive(5).
Cell Status
Displays the architecture of the processors on this cell. The Architecture Values are:Unknown(0), Other(1), PA-RISC(2), and Itanium-based(3).
Cell Architecture
Identifies an instance of the device.HashID
Complex-wide Info instances 127
Cell Board instancesThis section describes the Cell Board instances.
Figure 36 Sample Cell Board property page
Table 51 (page 128) describes the fields and enables you to interpret the values displayed inFigure 36 (page 128).
Table 51 Description of the Cabinet Fields and Values
DescriptionFields and Values
Displays string for the firmware revision number, consisting of the major number separatedfrom the minor number by a period.
Firmware Version
Indicates the status of the component. The status values are Unknown(0), Other(1),Powered Off(2), Powering On(3), Inactive(4), and Active(5).
Status
Defines the value to True, if the I/O chassis connected to the cell has a core I/O card. False,if the cell is not connected to an I/O chassis or the I/O chassis does not have a core I/Ocard.
Core IO
Displays the I/O Chassis ID of the chassis to which the cell is connected. The property is notpresent if ConnectedToIOChassis is false.
IO Chassis Connected
128 Interpretation of HP SMH instances
Table 51 Description of the Cabinet Fields and Values (continued)
DescriptionFields and Values
Indicates the number of processor module slots on the cell.Total Processor Slots
Indicates the number of all empty processor slots.Total Empty ProcessorSlots
Indicates the number of processors per processor module on the cell.Processors Per Module
Indicates the number of all installed processor modules in the cell.Total Installed ProcessorModules
Indicates the number of all configured processor modules in the cell.Total ConfiguredProcessor Modules
Indicates the number of all deconfigured processor modules in the cell.Total DeconfiguredProcessor Modules
Defines the value to True if the CPUs on the cell support Hyper-Threading.ProcessorHyperThreadingCapable
Defines the value to True if Multithreading is enabled.ProcessorHyperThreading Enabled
Indicates the number of DIMM slots on the cell.Total Memory DIMMSlots
Indicates the number of all populated DIMM slots on the cell.Total Populated MemoryDIMM Slots
Indicates the number of all empty DIMM slots on the cell.Total Empty MemoryDIMM Slots
Defines the amount of memory installed on the cell, in megabytes.Total Installed CellMemory
Defines the percent of CLM memory in total memory.Requested CLM MemoryPercent
Defines the amount of Cell Local Memory (CLM) memory that is configured for the cell.Requested CLM Memory
Defines the amount of Cell Local Memory (CLM) memory allocated on the cell.Allocated CLM (CellLocal Memory)
Displays the Value 1 when there is no CLM memory; value 2 when CLM memory percentageis 100% ; value 3 when CLM memory percentage is between 0% - 100%.
CLM Memory Setting
Defines the amount of functional memory installed on the cell, in megabytes.Total Functional CellMemory
Defines the amount of memory in megabytes allocated from the cell to the correspondinginterleave region.
Total InterleavedMemory
Cell Board instances 129
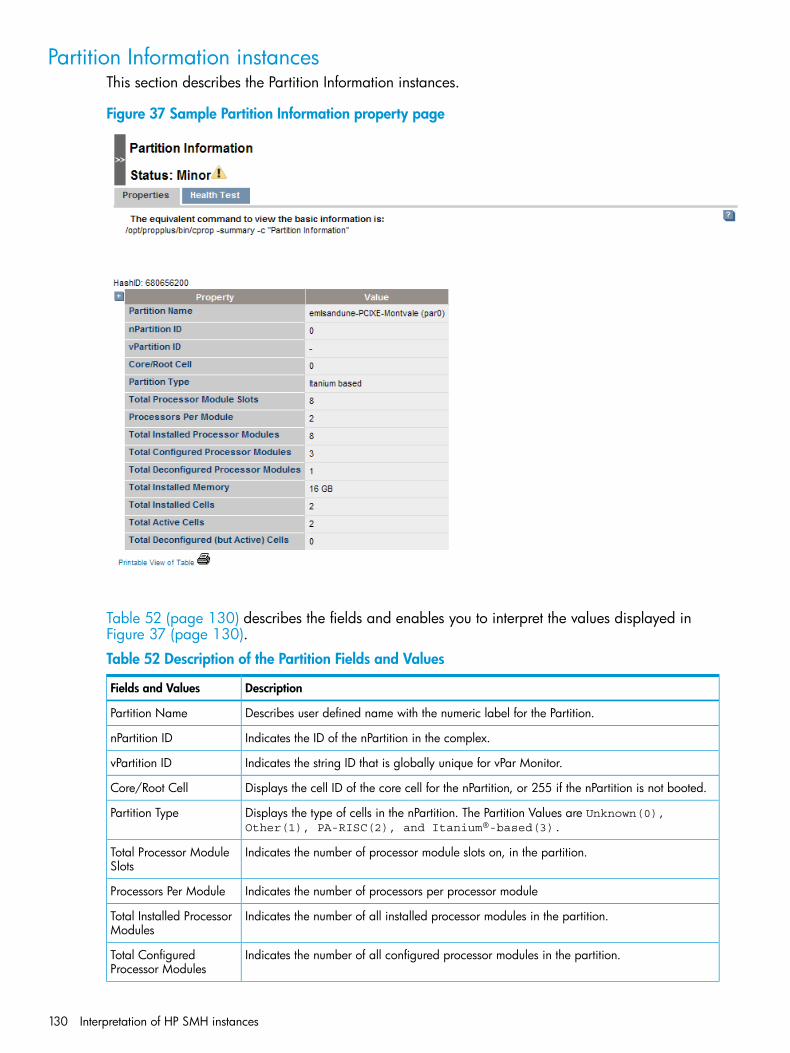
Partition Information instancesThis section describes the Partition Information instances.
Figure 37 Sample Partition Information property page
Table 52 (page 130) describes the fields and enables you to interpret the values displayed inFigure 37 (page 130).
Table 52 Description of the Partition Fields and Values
DescriptionFields and Values
Describes user defined name with the numeric label for the Partition.Partition Name
Indicates the ID of the nPartition in the complex.nPartition ID
Indicates the string ID that is globally unique for vPar Monitor.vPartition ID
Displays the cell ID of the core cell for the nPartition, or 255 if the nPartition is not booted.Core/Root Cell
Displays the type of cells in the nPartition. The Partition Values are Unknown(0),Other(1), PA-RISC(2), and Itanium®-based(3).
Partition Type
Indicates the number of processor module slots on, in the partition.Total Processor ModuleSlots
Indicates the number of processors per processor moduleProcessors Per Module
Indicates the number of all installed processor modules in the partition.Total Installed ProcessorModules
Indicates the number of all configured processor modules in the partition.Total ConfiguredProcessor Modules
130 Interpretation of HP SMH instances
Table 52 Description of the Partition Fields and Values (continued)
DescriptionFields and Values
Indicates the number of all deconfigured processor modules in the partition.Total DeconfiguredProcessor Modules
Displays the total amount of memory installed in the partition, in megabytes.Total Installed Memory
Indicates the number of all cells installed in the partition.Total Installed Cells
Indicates the number of all active cells in the partition.Total Active Cells
Indicates the number of all deconfigured but active cells in the partition.Total Deconfigured (butActive) Cells
Partition Information instances 131
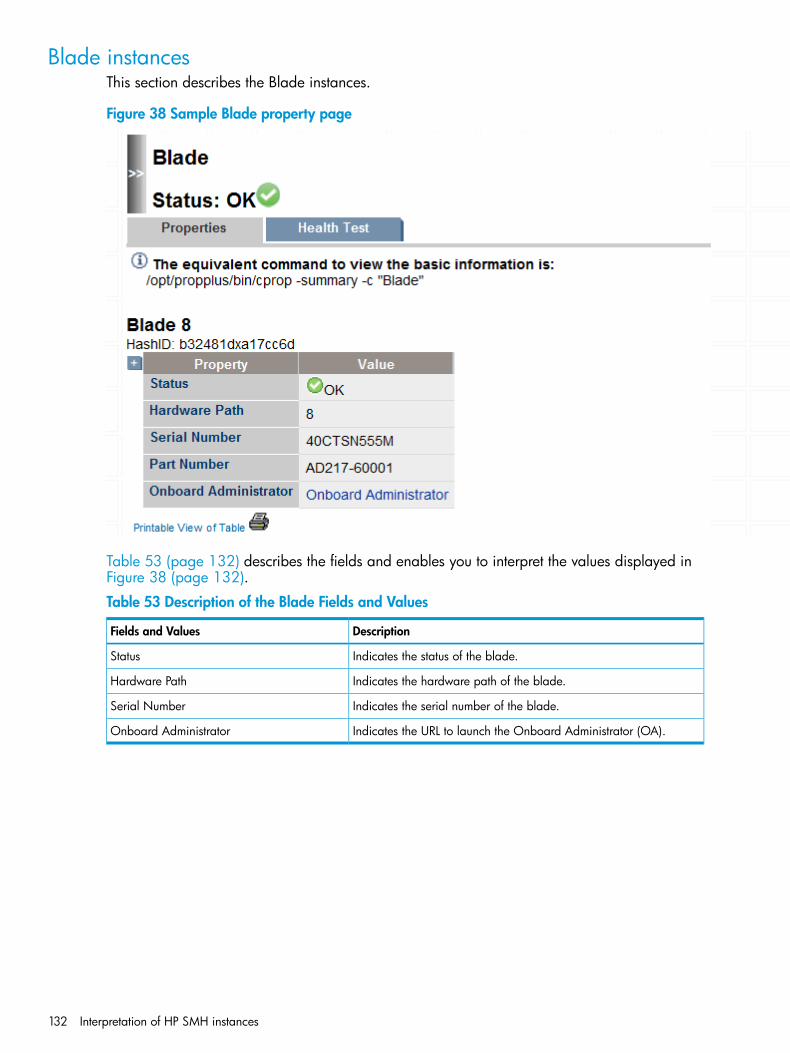
Blade instancesThis section describes the Blade instances.
Figure 38 Sample Blade property page
Table 53 (page 132) describes the fields and enables you to interpret the values displayed inFigure 38 (page 132).
Table 53 Description of the Blade Fields and Values
DescriptionFields and Values
Indicates the status of the blade.Status
Indicates the hardware path of the blade.Hardware Path
Indicates the serial number of the blade.Serial Number
Indicates the URL to launch the Onboard Administrator (OA).Onboard Administrator
132 Interpretation of HP SMH instances
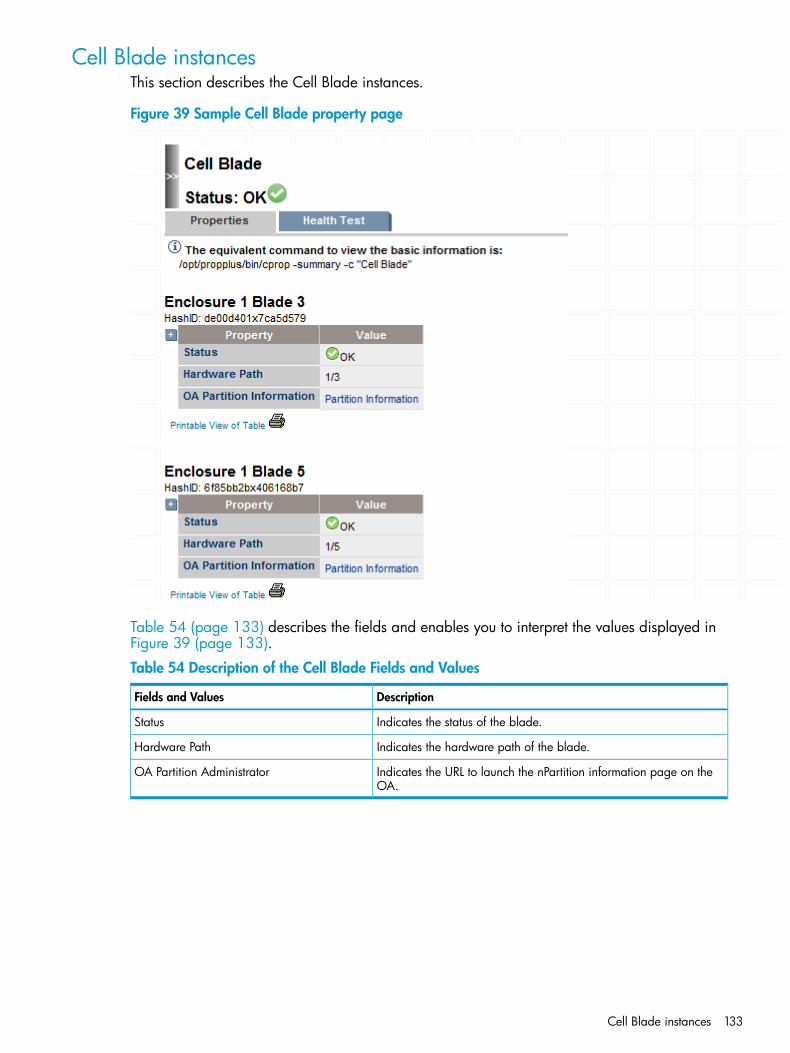
Cell Blade instancesThis section describes the Cell Blade instances.
Figure 39 Sample Cell Blade property page
Table 54 (page 133) describes the fields and enables you to interpret the values displayed inFigure 39 (page 133).
Table 54 Description of the Cell Blade Fields and Values
DescriptionFields and Values
Indicates the status of the blade.Status
Indicates the hardware path of the blade.Hardware Path
Indicates the URL to launch the nPartition information page on theOA.
OA Partition Administrator
Cell Blade instances 133
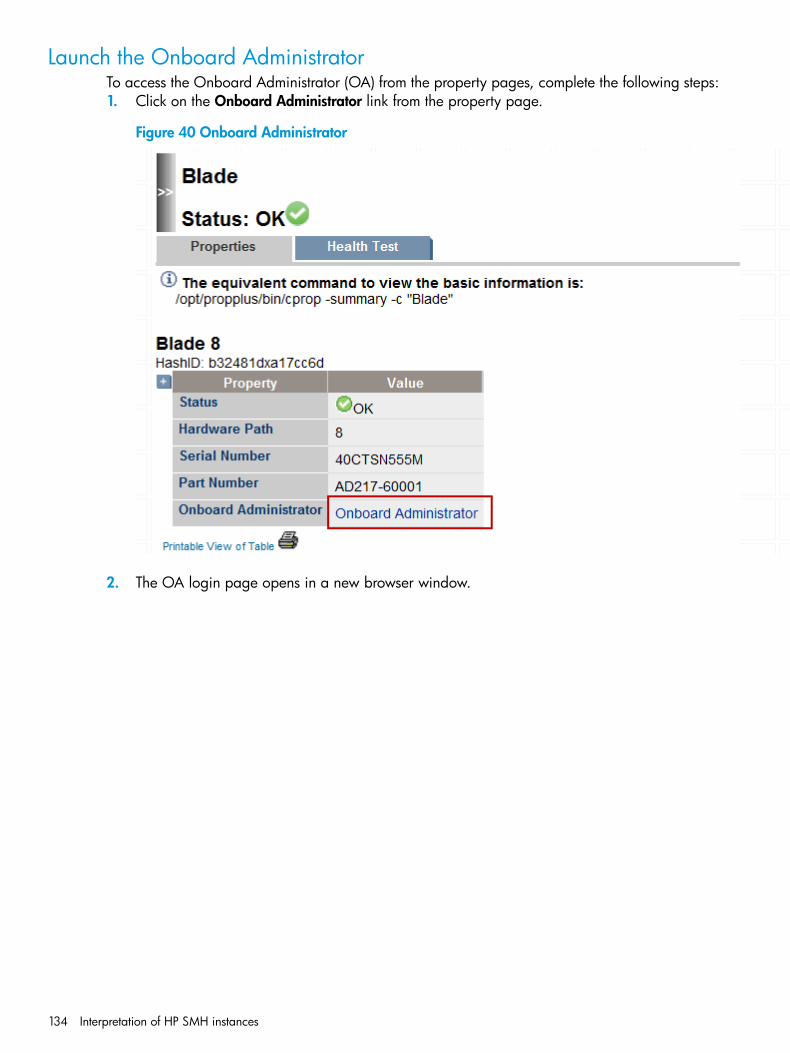
Launch the Onboard AdministratorTo access the Onboard Administrator (OA) from the property pages, complete the following steps:1. Click on the Onboard Administrator link from the property page.
Figure 40 Onboard Administrator
2. The OA login page opens in a new browser window.
134 Interpretation of HP SMH instances
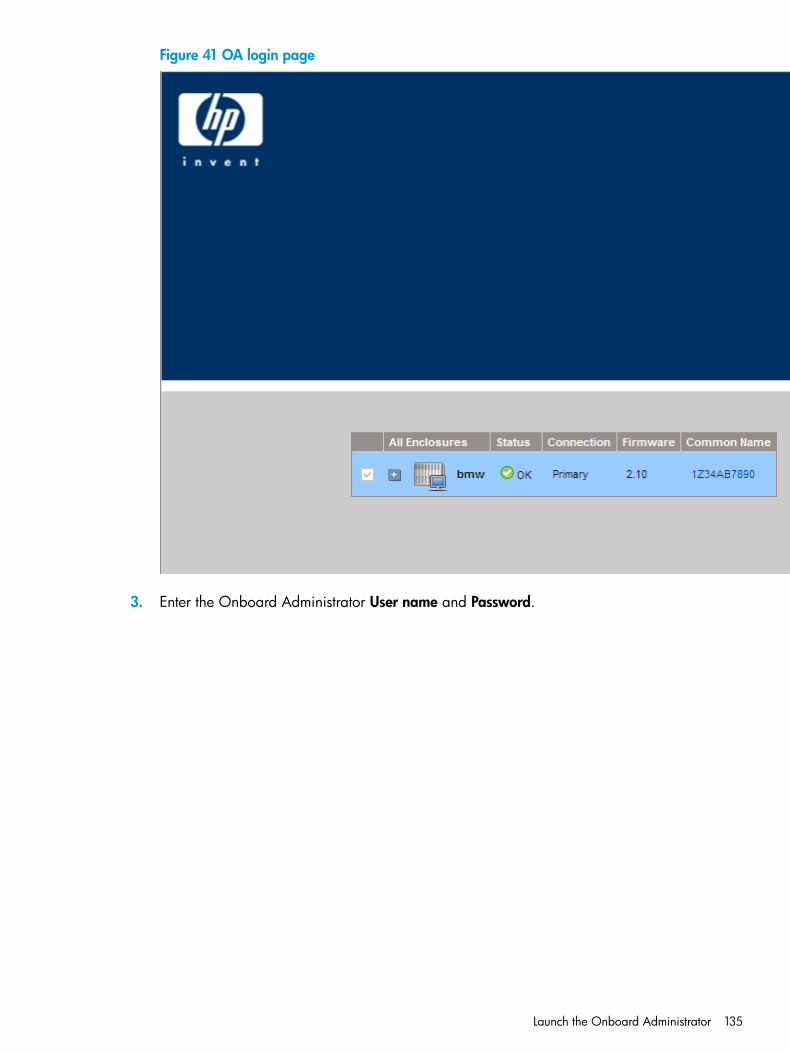
Figure 41 OA login page
3. Enter the Onboard Administrator User name and Password.
Launch the Onboard Administrator 135

C Syslog property orderThis appendix describes the order for the properties (IndicationIdentifier, EventID, PerceivedSeverity,ProviderName and Summary) in the event message which is written in Syslog by theHP_defaultSyslog subscription.
NOTE: The term “Legacy” refers to HP Integrity Servers with Intel(R) Itanium(R) processors, whichare older than 9300. The term “HP Integrity Servers” refers to those, with Intel(R) Itanium(R)Processors with 9300 or 9500 Series.
Table 55 IndicationIdentifier, EventID, PerceivedSeverity, ProviderName, Summary
PlatformProvider Name
Legacy and HP Integrity ServersStateChangeIndicationProvider
LegacyEVM Indications
LegacyMCA_IndicationProviderIA
Table 56 IndicationIdentifier, PerceivedSeverity, EventID, ProviderName, Summary
PlatformProvider Name
LegacyCoreHardwareIndicationProvider1
LegacyDiskIndicationProvider
LegacyEMSWrapper1 It can be viewed on systems with SysFaultMgmt (System Fault Management) (SFM) older than C.06.00.07.01 September
2009. In addition, CoreHardwareIndicationProvider is available in SEL02_IndicationProvider.
Table 57 IndicationIdentifier, ProviderName, PerceivedSeverity, EventID, Summary
PlatformProvider Name
Legacy and HP Integrity ServersCMC_IndicationProviderIA
Legacy and HP Integrity ServersCPE_IndicationProviderIA
Legacy and HP Integrity ServersFPL_IndicationProvider
Legacy and HP Integrity ServersMemoryIndicationProviderIA
Legacy and HP Integrity ServersSEL02_IndicationProvider
HP Integrity ServersDiskIndicationProvider1
HP Integrity ServersCPUIndicationProviderIA
HP Integrity ServersPCIeIndicationProvider1 This provider is not shipped as part of SysFaultMgmt (System Fault Management) (SFM) from March 2009 release.
NOTE: Evweb writes more details into Syslog for events encountered in the user system bychanging the HP_defaultSyslog subscription as follows:# evweb subscribe -D -n HP_defaultSyslog
# evweb subscribe -F -e ge:6 -w
For more information on evweb subscribe and the -F option, see evweb_subscribe (1M)manpage.
136 Syslog property order
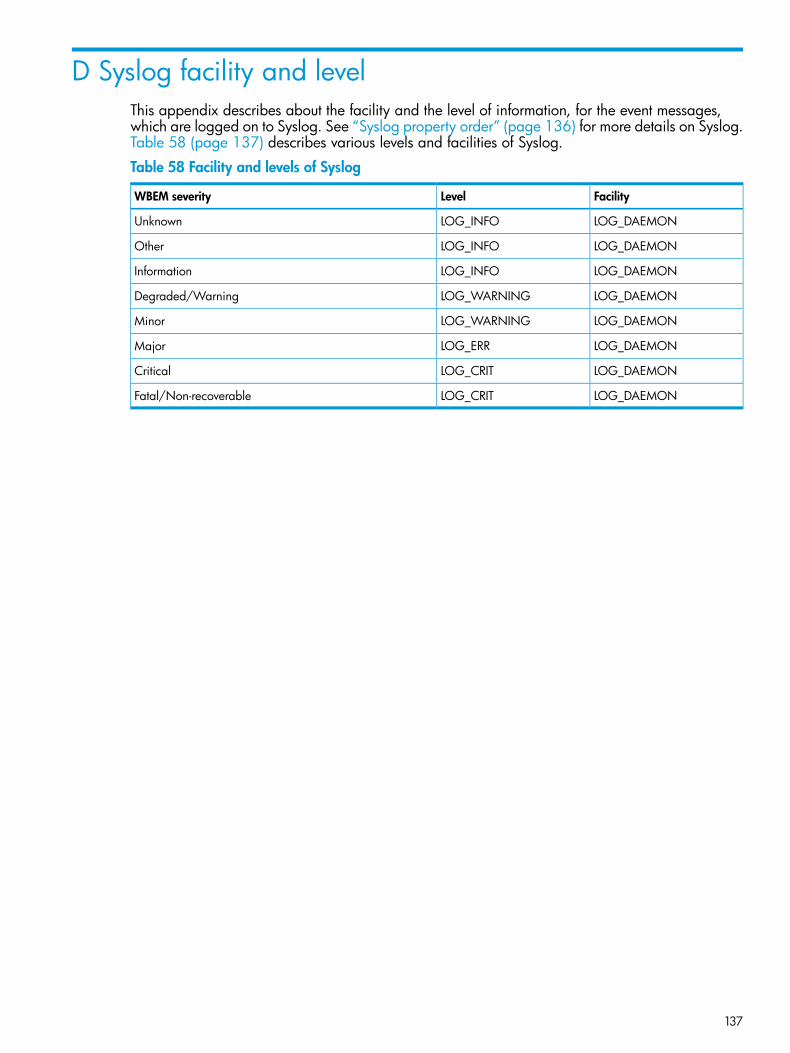
D Syslog facility and levelThis appendix describes about the facility and the level of information, for the event messages,which are logged on to Syslog. See “Syslog property order” (page 136) for more details on Syslog.Table 58 (page 137) describes various levels and facilities of Syslog.
Table 58 Facility and levels of Syslog
FacilityLevelWBEM severity
LOG_DAEMONLOG_INFOUnknown
LOG_DAEMONLOG_INFOOther
LOG_DAEMONLOG_INFOInformation
LOG_DAEMONLOG_WARNINGDegraded/Warning
LOG_DAEMONLOG_WARNINGMinor
LOG_DAEMONLOG_ERRMajor
LOG_DAEMONLOG_CRITCritical
LOG_DAEMONLOG_CRITFatal/Non-recoverable
137
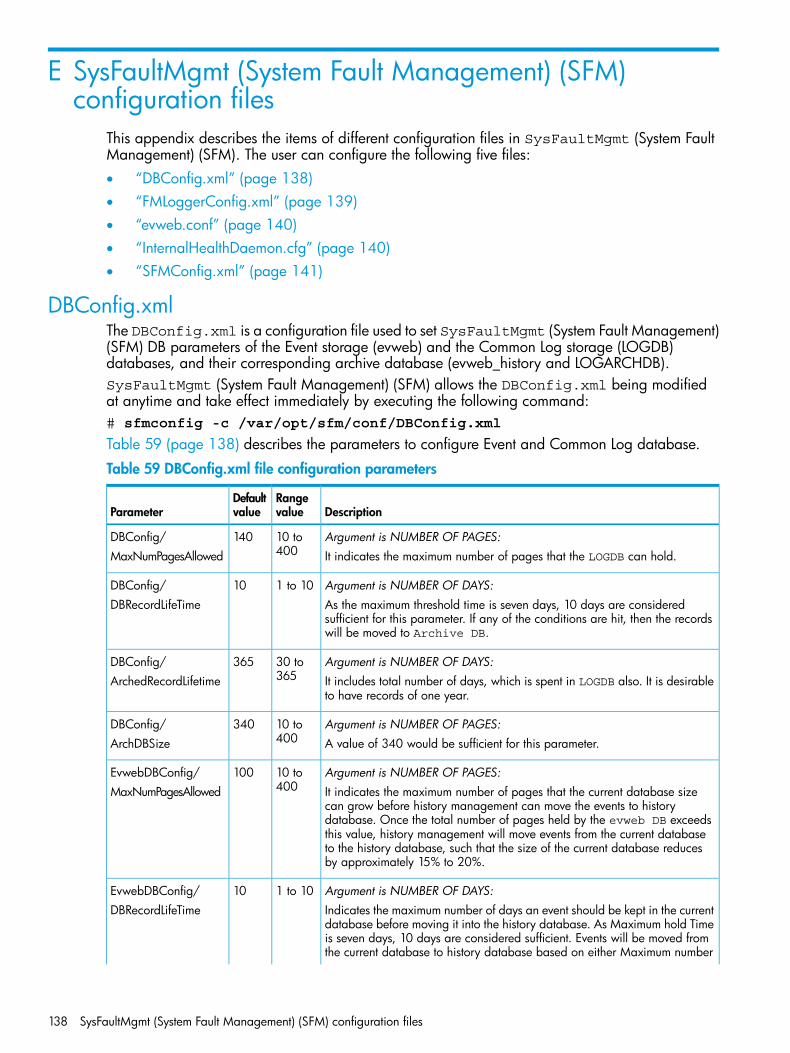
E SysFaultMgmt (System Fault Management) (SFM)configuration files
This appendix describes the items of different configuration files in SysFaultMgmt (System FaultManagement) (SFM). The user can configure the following five files:• “DBConfig.xml” (page 138)• “FMLoggerConfig.xml” (page 139)• “evweb.conf” (page 140)• “InternalHealthDaemon.cfg” (page 140)• “SFMConfig.xml” (page 141)
DBConfig.xmlThe DBConfig.xml is a configuration file used to set SysFaultMgmt (System Fault Management)(SFM) DB parameters of the Event storage (evweb) and the Common Log storage (LOGDB)databases, and their corresponding archive database (evweb_history and LOGARCHDB).SysFaultMgmt (System Fault Management) (SFM) allows the DBConfig.xml being modifiedat anytime and take effect immediately by executing the following command:# sfmconfig -c /var/opt/sfm/conf/DBConfig.xml
Table 59 (page 138) describes the parameters to configure Event and Common Log database.
Table 59 DBConfig.xml file configuration parameters
DescriptionRangevalue
DefaultvalueParameter
Argument is NUMBER OF PAGES:10 to400
140DBConfig/MaxNumPagesAllowed It indicates the maximum number of pages that the LOGDB can hold.
Argument is NUMBER OF DAYS:1 to 1010DBConfig/As the maximum threshold time is seven days, 10 days are consideredsufficient for this parameter. If any of the conditions are hit, then the recordswill be moved to Archive DB.
DBRecordLifeTime
Argument is NUMBER OF DAYS:30 to365
365DBConfig/ArchedRecordLifetime It includes total number of days, which is spent in LOGDB also. It is desirable
to have records of one year.
Argument is NUMBER OF PAGES:10 to400
340DBConfig/ArchDBSize A value of 340 would be sufficient for this parameter.
Argument is NUMBER OF PAGES:10 to400
100EvwebDBConfig/MaxNumPagesAllowed It indicates the maximum number of pages that the current database size
can grow before history management can move the events to historydatabase. Once the total number of pages held by the evweb DB exceedsthis value, history management will move events from the current databaseto the history database, such that the size of the current database reducesby approximately 15% to 20%.
Argument is NUMBER OF DAYS:1 to 1010EvwebDBConfig/Indicates the maximum number of days an event should be kept in the currentdatabase before moving it into the history database. As Maximum hold Time
DBRecordLifeTime
is seven days, 10 days are considered sufficient. Events will be moved fromthe current database to history database based on either Maximum number
138 SysFaultMgmt (System Fault Management) (SFM) configuration files

Table 59 DBConfig.xml file configuration parameters (continued)
DescriptionRangevalue
DefaultvalueParameter
of pages that the DB can hold or DBRecordLifeTime criteria, whicheveris met first.
Argument is NUMBER OF DAYS:30 to365
365EvwebDBConfig/ArchedRecordLifetime Indicates the number of days that the events are kept in the history database,
before deleting them permanently.
FMLoggerConfig.xmlThe FMLoggerConfig.xml is a common configuration file used to set parameters for log messagesfiles generated by SysFaultMgmt (System Fault Management) (SFM) and evweb.SysFaultMgmt (System Fault Management) (SFM) allows the FMLoggerConfig.xml beingmodified at anytime and take effect immediately by executing the following command:# sfmconfig –c /var/opt/sfm/conf/FMLoggerConfig.xml
Table 60 (page 139) describes the parameters to configure
Table 60 FMLoggerConfig.xml file configuration parameters
DescriptionRange valueDefault valueParameter
This tag defines minimum severity of messages written intolog file.
MILESTONE,INFORMATIONAL,
WARNINGSeverity
The INFORMATIONAL logging severity will generate a lotof log messages.
WARNING, ERROR,CRITICAL,STOPLOGGING
It is strongly advised not to use this severity level for a longtime, as it may result in the usage of huge disk space forthe generated log files.The default (and recommended) threshold in the runtimeenvironment is WARNING.
This tag defines about the log filename with absolute path.Possible valuesinclude:
/var/opt/sfm/log/sfm.log
Target
• STDOUT: All logmessages aredelivered toconsole.
• The complete pathto the file wherethe log messagesare to be written.
This field defines the maximum size of the log file to thelogging subsystem.
2 KB to 1048576 KB(1 GB)
20480FileSize
When the log file reaches the maximum file size definedby “FileSize” tag, the logging subsystem takes the backupof the current log file and then truncates it.
1 to 103NBackupFiles
This variable defines how many backup files will bepreserved by logging subsystem.
NOTE: The current implementation of the logging mechanism assumes that the path to the logfile (target specified in the configuration file) is already existing.It means, if the target is specified as “/abc/def/ghi.log”, the path “/abc/def/” should bealready existing, and should be writable by root-user.
FMLoggerConfig.xml 139
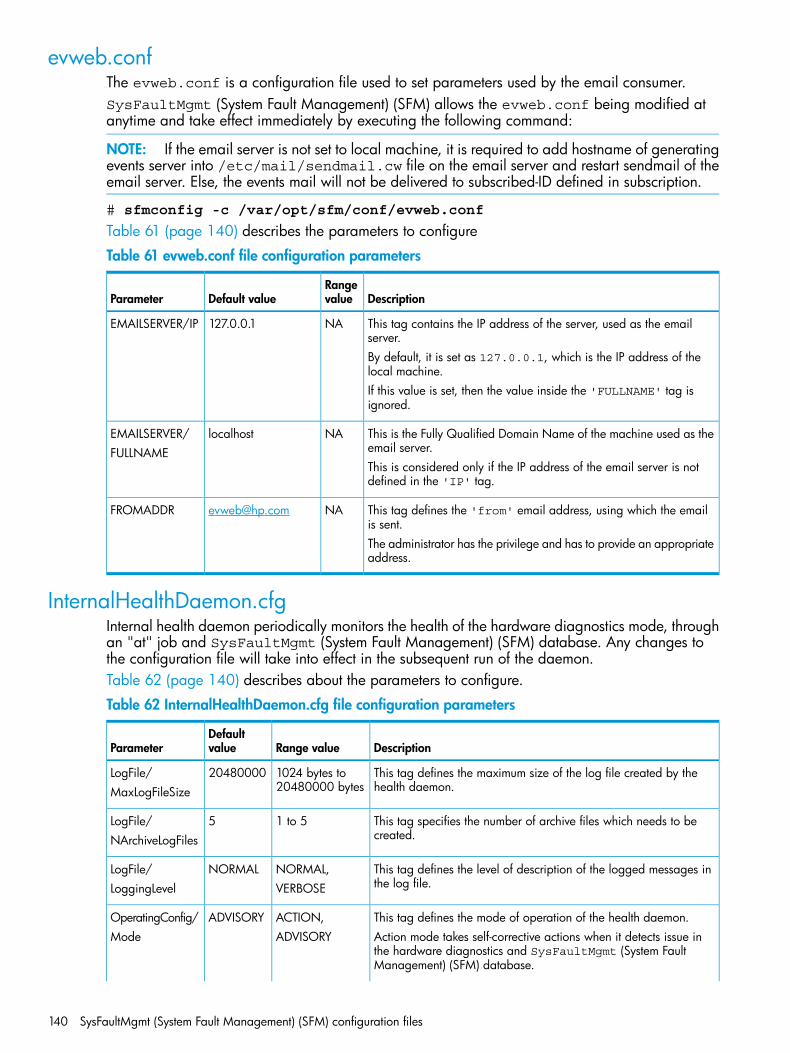
evweb.confThe evweb.conf is a configuration file used to set parameters used by the email consumer.SysFaultMgmt (System Fault Management) (SFM) allows the evweb.conf being modified atanytime and take effect immediately by executing the following command:
NOTE: If the email server is not set to local machine, it is required to add hostname of generatingevents server into /etc/mail/sendmail.cw file on the email server and restart sendmail of theemail server. Else, the events mail will not be delivered to subscribed-ID defined in subscription.
# sfmconfig -c /var/opt/sfm/conf/evweb.conf
Table 61 (page 140) describes the parameters to configure
Table 61 evweb.conf file configuration parameters
DescriptionRangevalueDefault valueParameter
This tag contains the IP address of the server, used as the emailserver.
NA127.0.0.1EMAILSERVER/IP
By default, it is set as 127.0.0.1, which is the IP address of thelocal machine.If this value is set, then the value inside the 'FULLNAME' tag isignored.
This is the Fully Qualified Domain Name of the machine used as theemail server.
NAlocalhostEMAILSERVER/FULLNAME
This is considered only if the IP address of the email server is notdefined in the 'IP' tag.
This tag defines the 'from' email address, using which the emailis sent.
The administrator has the privilege and has to provide an appropriateaddress.
InternalHealthDaemon.cfgInternal health daemon periodically monitors the health of the hardware diagnostics mode, throughan "at" job and SysFaultMgmt (System Fault Management) (SFM) database. Any changes tothe configuration file will take into effect in the subsequent run of the daemon.Table 62 (page 140) describes about the parameters to configure.
Table 62 InternalHealthDaemon.cfg file configuration parameters
DescriptionRange valueDefaultvalueParameter
This tag defines the maximum size of the log file created by thehealth daemon.
1024 bytes to20480000 bytes
20480000LogFile/MaxLogFileSize
This tag specifies the number of archive files which needs to becreated.
1 to 55LogFile/NArchiveLogFiles
This tag defines the level of description of the logged messages inthe log file.
NORMAL,VERBOSE
NORMALLogFile/LoggingLevel
This tag defines the mode of operation of the health daemon.ACTION,ADVISORYOperatingConfig/Action mode takes self-corrective actions when it detects issue inthe hardware diagnostics and SysFaultMgmt (System FaultManagement) (SFM) database.
ADVISORYMode
140 SysFaultMgmt (System Fault Management) (SFM) configuration files
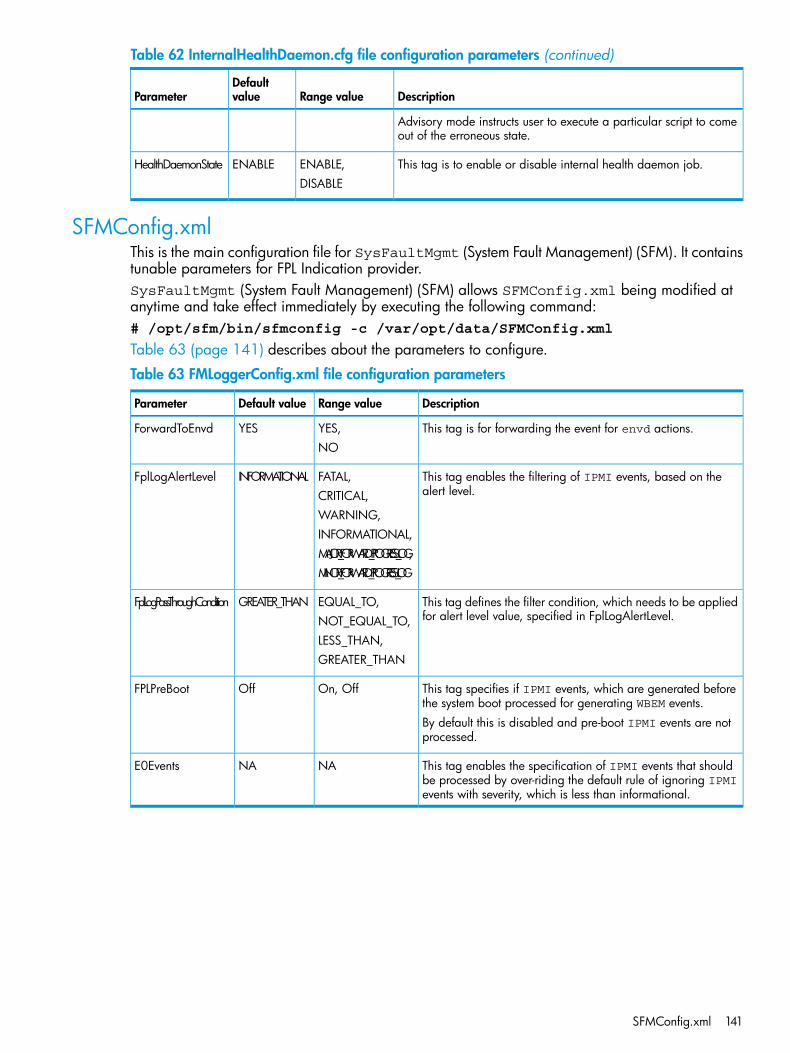
Table 62 InternalHealthDaemon.cfg file configuration parameters (continued)
DescriptionRange valueDefaultvalueParameter
Advisory mode instructs user to execute a particular script to comeout of the erroneous state.
This tag is to enable or disable internal health daemon job.ENABLE,ENABLEHealthDaemonStateDISABLE
SFMConfig.xmlThis is the main configuration file for SysFaultMgmt (System Fault Management) (SFM). It containstunable parameters for FPL Indication provider.SysFaultMgmt (System Fault Management) (SFM) allows SFMConfig.xml being modified atanytime and take effect immediately by executing the following command:# /opt/sfm/bin/sfmconfig -c /var/opt/data/SFMConfig.xml
Table 63 (page 141) describes about the parameters to configure.
Table 63 FMLoggerConfig.xml file configuration parameters
DescriptionRange valueDefault valueParameter
This tag is for forwarding the event for envd actions.YES,NO
YESForwardToEnvd
This tag enables the filtering of IPMI events, based on thealert level.
FATAL,CRITICAL,
INFORMATIONALFplLogAlertLevel
WARNING,INFORMATIONAL,MAJOR_FORWARD_PROGRESS_LOG,MINOR_FORWARD_PROGRESS_LOG
This tag defines the filter condition, which needs to be appliedfor alert level value, specified in FplLogAlertLevel.
EQUAL_TO,NOT_EQUAL_TO,
GREATER_THANFplLogPassThroughCondition
LESS_THAN,GREATER_THAN
This tag specifies if IPMI events, which are generated beforethe system boot processed for generating WBEM events.
On, OffOffFPLPreBoot
By default this is disabled and pre-boot IPMI events are notprocessed.
This tag enables the specification of IPMI events that shouldbe processed by over-riding the default rule of ignoring IPMIevents with severity, which is less than informational.
NANAE0Events
SFMConfig.xml 141

F Interdependency between SysFaultMgmt (System FaultManagement) (SFM) and SysFW
This section describes about the special interdependency, that exists between SysFaultMgmt(System Fault Management) (SFM) and SysFW on BL860c i4, BL870c i4, BL890c i4, rx2800i4 and rx2900 i4.On the prior mentioned servers, SysFaultMgmt (System Fault Management) (SFM) (versionC.07.12 or later) or WBEMMgmtBundle (version C.07.01 or later) require SysFW version 44.01or later, which needs to be installed for advanced memory error analysis algorithm to take effect.
NOTE: SysFaultMgmt (System Fault Management) (SFM) (version C.07.12 or later) orWBEMMgmtBundle (version C.07.01 or later) is referred as SFM in remainder of this section.
The following scenarios describe the recommended sequence of installation.1. Scenario 1: Install SFM/SysFW on i4 server with SysFW version, lower than 44.01
• Install SFM• Install SysFW 44.01 or later• Reboot the system
2. Scenario 2: Add DIMMs to i4 server with SysFW version lower than 44.01• Install SFM• Install SysFW 44.01 or later• Power off the system• Add DIMMs• Boot the system
3. Scenario 3: Install SFM on i4 server with SysFW 44.01 or later• Install SFM• Reboot the system
4. Scenario 4: Add DIMMs to i4 server with SysFW 44.01 or later• Install SFM• Power off the system• Install DIMMs• Boot the system
142 Interdependency between SysFaultMgmt (System Fault Management) (SFM) and SysFW

GlossaryA-B
Admin-definedevent subscription
Subscriptions created by the administrator using the CLI. These subscriptions cannot be deleted.
Admin-definedfilters
Filters that can be created, deleted, and modified to set the criteria for indications that must belogged.
C
CentralManagementServer (CMS)
The server monitoring the client systems in the network using SysFaultMgmt (System FaultManagement) (SFM).
CIM client An entity in WBEM architecture which sends CIM Operation requests and receives CIM Operationresponses. For example, HP SIM and other network management applications are consideredCIM clients.
CIM server The component of WBEM that manages the interaction between the providers and other modulesin the WBEM environment. It is also known as CIMOM.
Common ErrorRepository (CER)
An online, searchable, and updateable error repository.
CommonInformation Model(CIM)
An object-based model for describing managed resources. CIM uses the object-oriented paradigm,where managed objects are modeled using the concepts of classes and instances.
CommonInformation ModelObject Manager(CIMOM)
The component of WBEM that manages the interaction between the providers and other modulesin the WBEM environment. CIMOM manages CIM objects. It receives and processes CIM operationrequests and issues responses.
consumer A recipient of services. For example, an indication consumer will receive indications (events) thatoccur in system hardware components.
Custom solution The solution to an error message that is provided by the administrator.
D
disk_em An EMS monitor that monitors hard disks.DistributedManagement TaskForce (DMTF)
An industry organization involved in the development, adoption, and interoperability ofmanagement standards and initiatives for enterprise and Internet environments.
E
enumerateinstances
To check whether subscriptions to indications are present.
Error ManagementTechnology (EMT)
A user component that enables you to obtain information about errors generated on an HP-UX11i v3 system.
Error metadata Information about errors such as error description, error number, error type, severity, cause ofthe error, and corrective actions.
event An alert generated when an unusual activity is detected on a monitored hardware device.Event Archive Database for indications. Indications generated on hardware devices are logged in this location.Event SubscriptionAdministration
A component of EVWEB used to subscribe to indications.
Event Viewer A component of EVWEB used to view indications present in the Event Archive.
143

EVWEB User component that enables administering and viewing WBEM indications generated on thesystem on which SysFaultMgmt (System Fault Management) (SFM) is installed.
Externalsubscriptions
These are subscriptions created by tools other than EVWEB.
H
HP SystemManagementHomepage (HPSMH)
HP's management application installed on the local system that uses WBEM instrumentation onoperating systems such as HP-UX, Linux, and Windows.
HP Systems InsightManager (HP SIM)
HP's management application installed on the CMS that uses WBEM instrumentation on operatingsystems such as HP-UX, Linux, and Windows.
HP WEBES HP WEBES has additional functionalities of HP SIM like MCA analysis, identifying the failurecomponent, and raise a service call request with the Customer Support Center based on the typeof event
HP-advised eventsubscription
Subscriptions that are provided by HP.
HP-defined filters Filters defined by HP, and present in the FMD repository at the time of installation.HP-known eventsubscription
Subscriptions that are provided by HP. These subscriptions include both Admin-Definedsubscriptions and HP-Advised subscriptions.
I-K
indication An alert or a warning about the failure of a monitored hardware device. It is equivalent to anevent in the Event Monitoring Service (EMS) framework.
Indicationconsumer
A component of EVWEB for Event Archive to store indications in the Event Archive.
Indicationconsumer for Email
A component of EVWEB to send indications to the configured email address.
indication filters They are configured by the Filter Metadata (FMD) provider to set the criteria for the indicationsthat must be logged.
indication provider It translates events generated by the Event Monitoring Service (EMS) monitors into WBEMindications, and reports them to the CIMOM.
instance A representation of the actual physical object that belongs to a class.instance provider It provides information about devices, such as model number and serial number of a CPU. In the
Support Tools Manager (STM), this functionality is accomplished by Information (Info) Tools.
L
Logfile A file that includes details about SysFaultMgmt (System Fault Management) (SFM) softwareinstallation and removal.
M-O
managed resource A hardware device that is monitored.managementapplication
Any application that can be used to query for information about monitored devices and viewindications and instances. Examples: HP Systems Insight Manager (SIM), HP System ManagementHomepage (HP SMH).
mstm STM command to display the properties supported on the system.
P-R
Provider ServicesBase
Software to support WBEM providers delivered in SysFaultMgmt (System Fault Management)(SFM) and Provider default bundle.
ProviderSvcsBase The name of the bundle that includes PSB software.
144 Glossary

S
sfmdb The output of a command that indicates that Event Archive Database service is running properly.subscription Configuring SysFaultMgmt (System Fault Management) (SFM) for consumers to receive
indications. For example, HP SIM could subscribe to indications generating on hardware deviceson a system.
SysFaultMgmt(System FaultManagement)(SFM)
The name of the bundle that includes SysFaultMgmt (System Fault Management) (SFM) software.
T-V
Tracing Tracing is an error-logging and reporting facility provided by EVWEB and EMT.
W-Z
WBEM(Web-BasedEnterpriseManagement)
A collection of standards that aid large-scale systems management. WBEM allows managementapplications to monitor systems in a network.
145
Index
Aadministrator, 58, 81Autoselect dependency, 23
Bbenefits
SFM, 10
CCentral Management Server see CMSCER, 81CIMOM, 19cimserver, 90, 93
-s option, 90, 92cimserver -s, 90, 93CMS, 19command-line interface, 22Common Information Model Object Manager see CIMOMconfiguration
monitor mode, 35SFM, 23
cooling devices on a system, 55creation
subscription, 37custom solution
adding, 84deleting, 86modifying, 85
Ddelete
event subscription, 64WBEM indication, 72
documentationproviding feedback on,
EEmail Consumer
configuring, 65EMS hardware monitor
property, 46EMS Wrapper Provider
property, 46EMS Wrapper provider
no subscription error, 98not loaded properly error, 99
EMT, 81custom solution, 84error metadata, 81Error Summary Table, 83user groups, 81using CLI, 82using GUI, 82view, 83
Enforce dependency, 23
error metadata, 81Event Archive, 34, 101
HP-Known HP-Defined filter, 95troubleshooting, 100, 101, 102
event list, 42Event Monitoring Services see EMSevent subscription
Admin-Defined, 59copying, 61, 64creating, 58, 60, 61, 81deleting, 64external subscription, 65HP-Advised, 66HP-Known, 61managing, 58, 81modifying, 62, 64viewing external event subscription, 68
EVWEB, 11local administration, 11
Evweb, 58CLI, 58, 69, 81component, 58GUI, 58, 69, 81, 84local administration, 58tracing, 77, 87user interface, 58, 81using CLI, 59using GUI, 59
Ffeatures
SFM, 10Filter Metadata, 12FMD, 12FMD repository, 34
HHP SIM, 14, 15HP SMH, 18
logging, 59, 70, 82HP-Defined filters, 34HP-Known HP-Defined filter, 95
Iindication, 101
troubleshooting, 100, 101viewing, 58, 81
indication provider, 11SFMIndicationProvider, 15
indications, 37instance provider, 11
CPU, 11, 90Environmental, 11, 90Filter Metadata, 90Memory, 11, 90
IPMI Event Viewer
146 Index
slview, 11
Jjobid, 28
LLog Viewer, 73
Archive Log Database, 73Current Log Database, 73
Logfile, 27, 28logs
/var/opt/sfm/log/sfm.log file, 78, 87/var/sam/log/samlog.log file, 79
Mmodify
event subscription, 62module troubleshooting, 96
Nnon-administrator, 58, 81
O/var/opt/sfm/conf/evweb.conf file, 65OpCmsg, 103
Ppower status, 55printable report, 42property information, 11provider
indication provider, 11instance provider, 11
PSBProviderSvcsBase, 90
Ssearch
WBEM indication, 70, 82, 85SFM, 9, 10
indication provider, 14provider, 9, 11
SFM instance providertype of query, 18
SFMIndicationProvider, 15SFMProviderModule, 16Simple Mail Transfer Protocol see SMTPSMTP, 65subscription
creating, 58managing, 58
subscriptionscreating, 37
swinstall command, 25swjob, 28, 29swlist command, 25swremove command, 29SysFaultMgmt, 25, 32System Fault Management see SFM
System Page of HP SIM, 49
Ttemperature status, 55terminal user interface, 22tracing, 77, 87troubleshooting, 101
EMS Wrapper Provider, 98, 99Event Archive, 100, 101, 102module, 96
V/var/sam/log/samlog.log file, 79verify
SFM, 25view
Evweb event subscription, 66, 67external event subscription, 68WBEM indication, 71, 83, 84
view indications, 39voltage status, 55
WWBEM, 9
administer, 11, 58component, 9HP Systems Insight Manager, 9HP WBEM services, 9viewing, 11, 58
WBEM Indicationadminister, 58summary, 71, 83, 84
WBEM indicationdelete, 72search, 70
WBEM provider, 9Web-Based Enterprise Management see WBEM
147
8 Support and other resourcesAbout this document
This document describes how to install, administer, and troubleshoot SysFaultMgmt (SystemFault Management) (SFM) software and its components.Document updates may be issued between editions to correct errors or to document productchanges. To ensure that you receive the updated or new editions, subscribe to the appropriateproduct support service. Contact your local HP sales representative for more information.This document can also be found online at:http://www.hp.com/go/hpux-diagnostics-docs
Intended audienceThis document is intended for system administrators responsible for installing, and managing remotesystems using SysFaultMgmt (System Fault Management) (SFM). This document is also intendedfor users working on the client systems. Administrators and users are expected to have knowledgeof operating system concepts, commands, and online diagnostics tools.This document is not a tutorial.
Publishing historyTable 1 lists the publishing history of this document.
Table 64 Publishing history
Publication dateOperating Systems supportedDocument Manufacturing Part Number
March 2010HP-UX 11i v35969–7013
September 2009HP-UX 11i v35900-0167
March 2009HP-UX 11i v35992-6257
September 2008HP-UX 11i v35992–4854
March 2008HP-UX 11i v35992–3901
September 2007HP-UX 11i v35992–1318
February 2007HP-UX 11i v35991–6689
Document organizationSystem Fault Management Administrator’s Guide is divided into several chapters. Each chaptercontains information on installing and administering SysFaultMgmt (System Fault Management)(SFM).Chapter 1 Introduction Introduces SysFaultMgmt (System Fault
Management) (SFM) software, SysFaultMgmt (SystemFault Management) (SFM) features and benefits,SysFaultMgmt (System Fault Management) (SFM)providers, user interfaces, EVWEB, Error ManagementTechnology (EMT), and the architecture of SysFaultMgmt(System Fault Management) (SFM).
Chapter 2 Installing SysFaultMgmt (System Fault Management) (SFM)Software Instructs how to install, verify, and removeSysFaultMgmt (System Fault Management) (SFM) software.
148 Support and other resources
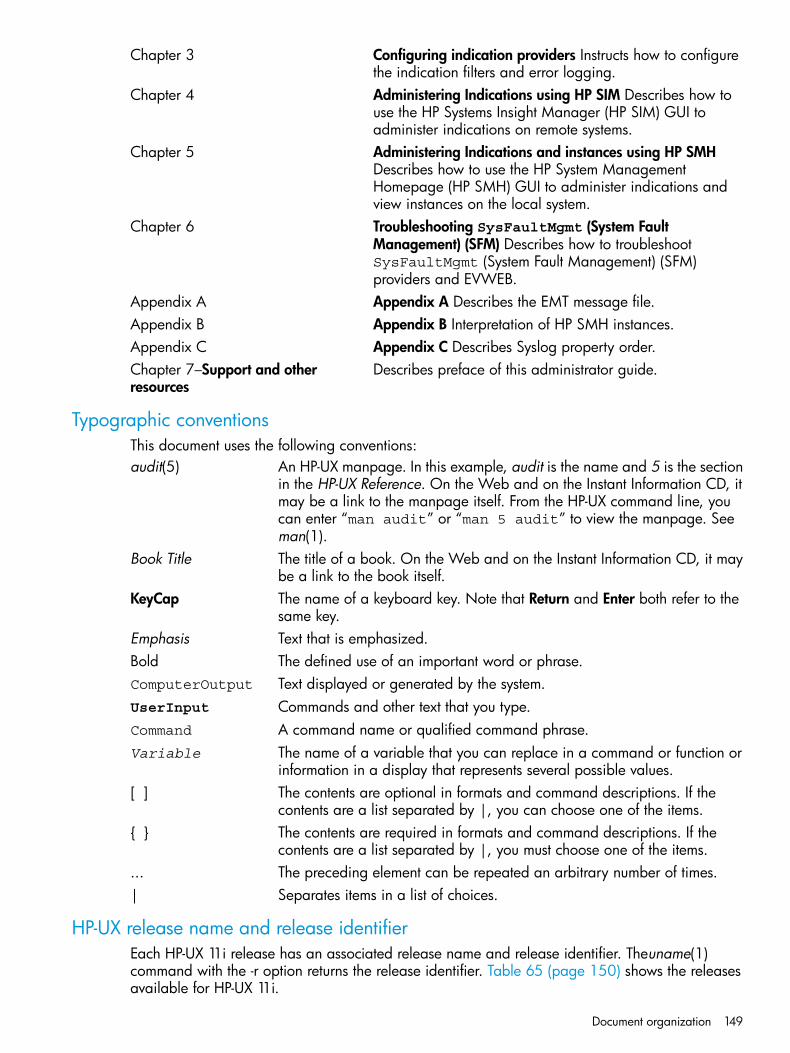
Chapter 3 Configuring indication providers Instructs how to configurethe indication filters and error logging.
Chapter 4 Administering Indications using HP SIM Describes how touse the HP Systems Insight Manager (HP SIM) GUI toadminister indications on remote systems.
Chapter 5 Administering Indications and instances using HP SMHDescribes how to use the HP System ManagementHomepage (HP SMH) GUI to administer indications andview instances on the local system.
Chapter 6 Troubleshooting SysFaultMgmt (System FaultManagement) (SFM) Describes how to troubleshootSysFaultMgmt (System Fault Management) (SFM)providers and EVWEB.
Appendix A Appendix A Describes the EMT message file.Appendix B Appendix B Interpretation of HP SMH instances.Appendix C Appendix C Describes Syslog property order.Chapter 7–Support and otherresources
Describes preface of this administrator guide.
Typographic conventionsThis document uses the following conventions:audit(5) An HP-UX manpage. In this example, audit is the name and 5 is the section
in the HP-UX Reference. On the Web and on the Instant Information CD, itmay be a link to the manpage itself. From the HP-UX command line, youcan enter “man audit” or “man 5 audit” to view the manpage. Seeman(1).
Book Title The title of a book. On the Web and on the Instant Information CD, it maybe a link to the book itself.
KeyCap The name of a keyboard key. Note that Return and Enter both refer to thesame key.
Emphasis Text that is emphasized.Bold The defined use of an important word or phrase.ComputerOutput Text displayed or generated by the system.UserInput Commands and other text that you type.Command A command name or qualified command phrase.Variable The name of a variable that you can replace in a command or function or
information in a display that represents several possible values.[ ] The contents are optional in formats and command descriptions. If the
contents are a list separated by |, you can choose one of the items.{ } The contents are required in formats and command descriptions. If the
contents are a list separated by |, you must choose one of the items.... The preceding element can be repeated an arbitrary number of times.| Separates items in a list of choices.
HP-UX release name and release identifierEach HP-UX 11i release has an associated release name and release identifier. Theuname(1)command with the -r option returns the release identifier. Table 65 (page 150) shows the releasesavailable for HP-UX 11i.
Document organization 149
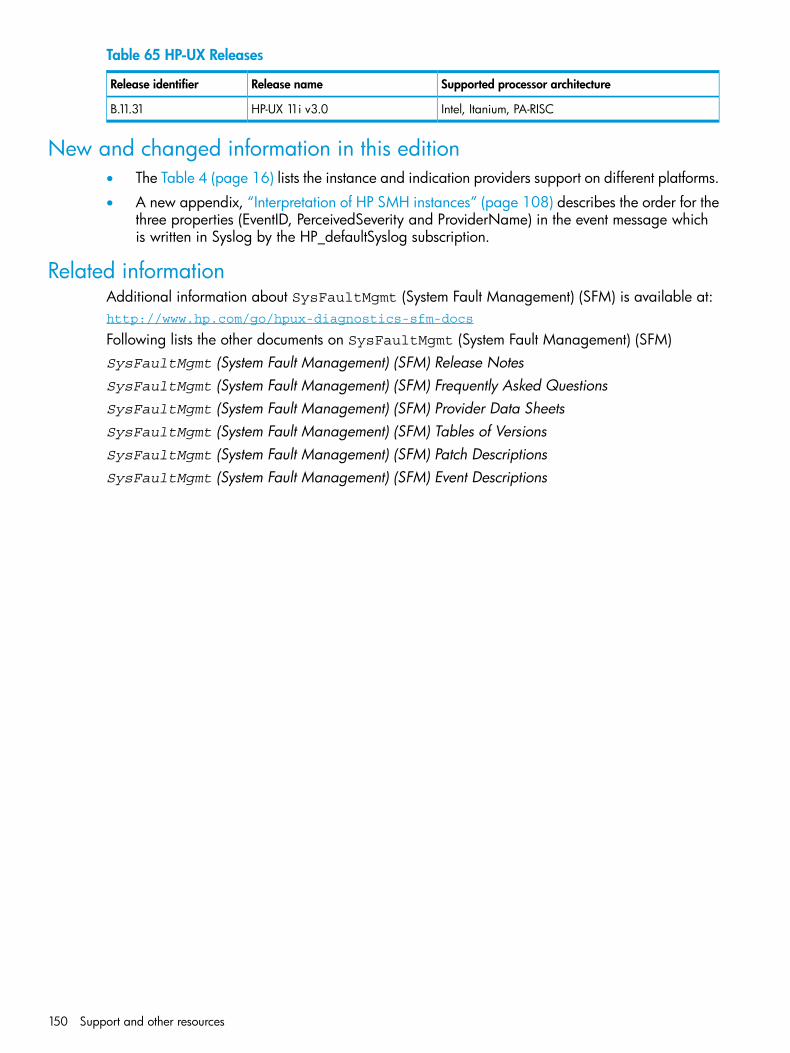
Table 65 HP-UX Releases
Supported processor architectureRelease nameRelease identifier
Intel, Itanium, PA-RISCHP-UX 11i v3.0B.11.31
New and changed information in this edition• The Table 4 (page 16) lists the instance and indication providers support on different platforms.
• A new appendix, “Interpretation of HP SMH instances” (page 108) describes the order for thethree properties (EventID, PerceivedSeverity and ProviderName) in the event message whichis written in Syslog by the HP_defaultSyslog subscription.
Related informationAdditional information about SysFaultMgmt (System Fault Management) (SFM) is available at:http://www.hp.com/go/hpux-diagnostics-sfm-docs
Following lists the other documents on SysFaultMgmt (System Fault Management) (SFM)SysFaultMgmt (System Fault Management) (SFM) Release NotesSysFaultMgmt (System Fault Management) (SFM) Frequently Asked QuestionsSysFaultMgmt (System Fault Management) (SFM) Provider Data SheetsSysFaultMgmt (System Fault Management) (SFM) Tables of VersionsSysFaultMgmt (System Fault Management) (SFM) Patch DescriptionsSysFaultMgmt (System Fault Management) (SFM) Event Descriptions
150 Support and other resources

9 Documentation feedbackHP is committed to providing documentation that meets your needs. To help us improve thedocumentation, send any errors, suggestions, or comments to Documentation Feedback([email protected]). Include the document title and part number, version number, or the URLwhen submitting your feedback.
151