system admin _ oracle apps reference
TRANSCRIPT

8/19/2019 System Admin _ Oracle Apps Reference
http://slidepdf.com/reader/full/system-admin-oracle-apps-reference 1/24
Oracle Apps Reference
stay updated via rss
Archive for the ‘System Admin’ Category
Shorthand Aliases in KFF
Posted: October 23, 2013 in System Admin0
Shorthand Aliases let you label certain groupings of values for a multi-segment flexfield. Wheneveryou need one of these groupings of values, you can use the alias for that grouping to enter the entiregroup.
If the same combination is frequently being entered into a multi-segment flexfield, you should consider
defining an alias for that value combination. You can then use the alias to generate the complete set of
values for the flexfield. Entering a shorthand alias automatically inserts the values for that alias into thekey flexfield.
An alias can represent a complete flexfield combination or a set of partial segment values:
If most combinations vary only in a single segment, create an alias with that segment blank andvalues specified for the remaining segments.
If the alias represents a complete combination, once the alias name has been selected or entered,the shorthand window closes and the cursor moves to the next field.
If the alias represents a partial flexfield value, the full flexfield window pops up with the cursor onthe first empty segment.
Users can override values generated by aliases as appropriate.
Aliases definitions are tied to key flexfield structures. If you make changes to a flexfield structureduring setup you must update associated alias definitions. Such changes include:
Changing the order of flexfield segments
Adding a new segmentDisabling a segmentChanging a segment length
Steps to Setup Shorthand Aliases
1. Set the profile “Flexfields:Shorthand Entry” value to “Always” at user level
2. Navigate to System Administrator->Application->Flexfield->Key->Aliases
em Admin | Oracle Apps Reference https://govoracleapps.wordpress.com/category/system-admin/
24 3/29/2016 1:44 PM

8/19/2019 System Admin _ Oracle Apps Reference
http://slidepdf.com/reader/full/system-admin-oracle-apps-reference 2/24
3. Query the Application,Titile and Structure.Then add the Alias name,Template value and Aliasdescription.
In our example, we have created the alias for a code combination of accounting flexfield structure.Sothe template value is the code combination value.Here we have only mentioned the value for Companyand Department segments. We have set Account as blank and Sub-account & Product as null.
(hps://govoracleapps.files.wordpress.com/2013/10/alias.jpg)
4. Now unfreeze,freeze and re-compile the accounting flexfield structure(From KFF form).
5. Navigate to General Ledger Super User->Setup->Account->Combinations
Now if you click on the browse buon, new window prompting for the Alias Name will appear. In ourexample, once you enter name and click okay buon,it will prompt to enter the account value.Enterthe required value and save. Using the Alias,we can create multiple combination using same companyand department but different account.
(hps://govoracleapps.files.wordpress.com/2013/10/alias1.jpg)
em Admin | Oracle Apps Reference https://govoracleapps.wordpress.com/category/system-admin/
24 3/29/2016 1:44 PM

8/19/2019 System Admin _ Oracle Apps Reference
http://slidepdf.com/reader/full/system-admin-oracle-apps-reference 3/24
(hps://govoracleapps.files.wordpress.com/2013/10/alias2.jpg)
Key Flexfield
Posted: October 23, 2013 in System Admin
0Key flexfields are used to capture mandatory or Key Business information of the
Organization.Key flexfields are used to create entity identifiers required by OracleApplications.Generally, the identifier you create using a key flexfield is required by the application.
Key flexfields have dual purpose:
Collect information required by Oracle Applications.Provide users with ability to configure structure and appearance.
Although it is possible for a key flexfield to use multiple structures, it is much less typical than with
descriptive flexfields. Most key flexfields use only one structure. However, key flexfields still allow theuser to control the structure of the flexfield.Eg: Each business defines an accounting flexfield that reflects its operating structure.
A key flexfield appears as a normal field on a form and key flexfields store their data in columns called
SEGMENTn, where n is a number.
Intelligent keys are multi-part key values in which each part of the key contains meaningfulinformation. You use key flexfields to build the intelligent keys required by Oracle Applications.
Major Capabilities of KFF are
Dynamic insertion of new values1.
Cross-validation2.
Security rules3.
em Admin | Oracle Apps Reference https://govoracleapps.wordpress.com/category/system-admin/
24 3/29/2016 1:44 PM

8/19/2019 System Admin _ Oracle Apps Reference
http://slidepdf.com/reader/full/system-admin-oracle-apps-reference 4/24
Shorthand aliases4.
Dynamic insertion of new values:
Dynamic insertion allows users to enter new values in display windows in addition to the typical codecombination entry window.
Cross-validation:
Cross-validation rules let you control the combination of values entered for a key flexfield.
Cross-validation rules consist of an Include element that includes all possible combinations, andone or more Exclude elements that restrict various segment value combinations. Unspecified valuesare always excluded, so every rule needs at least one Include statement. Otherwise nocombinations will ever pass validation.
Before you can add cross-validation rules to an existing flexfield definition, you must unfreeze it inthe Key Flexfield Segments window.After defining cross-validation rules, you must refreeze andrecompile the flexfield definition in the Key Flexfield Segments window for the new validation
rules to take effect.
The Cross-Validation Rule Violation Report offers a listing of all the previously created flexfield
combinations that violate the cross-validation rules for a given structure. The report program canalso disable the existing combinations that violate the new rules.
Reports to Maintain Cross-Validation Rules:
The Cross-Validation Rule Violation Report offers a listing of all the previously created flexfield
combinations that violate the cross-validation rules for a given structure. The report program can
also disable the existing combinations that violate the new rules.
1.
The Cross-Validation Rules Listing Report lists all the cross-validation rules that exist for a
particular flexfield structure.
2.
Security Rule:
You may want to allow users to only enter or view specific values for flexfields. You can create asecurity rule to restrict values available to a given responsibility. Security rules let you controlflexfield access to data. Once you associate that rule to the appropriate responsibility, all users ofthat responsibility are restricted to the values allowed by that security rule.
You can apply security to the value sets used by key flexfield segments, descriptive flexfieldssegments, and request parameters.
Security rules have no effect for segments or parameters that use value sets with a validation typeof None, Special, Pair, Translatable Independent, or Translatable Dependent, or for segmentswithout a value set.
If you are using a parent and child value hierarchy with the Accounting Flexfield, you can enable
hierarchical value security on your value sets. With hierarchical value security, any security rulethat applies to a parent value also applies to its child values.
You can apply security rules to more than one responsibility, and a single responsibility can havemore than one security rule associated with it.
Since a responsibility can have multiple security rules for the same value set, it is important toconsider the interaction of security rules.
em Admin | Oracle Apps Reference https://govoracleapps.wordpress.com/category/system-admin/
24 3/29/2016 1:44 PM

8/19/2019 System Admin _ Oracle Apps Reference
http://slidepdf.com/reader/full/system-admin-oracle-apps-reference 5/24

8/19/2019 System Admin _ Oracle Apps Reference
http://slidepdf.com/reader/full/system-admin-oracle-apps-reference 6/24
Descriptive flexfield
Posted: October 21, 2013 in System Admin
1DFF are used to capture the additional or extra Business information of the organization. You usedescriptive flexfields to collect information beyond what is collected by Oracle Applications.
A descriptive flexfield appears on a form as a double-character field enclosed by brackets. All DFFcolumns are defined as Aribute Columns. Descriptive flexfields store their data in columns calledATTRIBUTEn, where n is a number. In some cases there may be multiple descriptive flexfields for use
with the same form. There are around 5000+ DFF available with the package.
DFF have two different types of Segments
1. Global DFF: Displays information common to all contexts.2. Context Sensitive DFF: Displays information appropriate only to a particular context.
Steps to find the Title and Application of DFF:
1. Click on a field in the same form in which the descriptive flexfield appears.
2. Select Help->Diagnostics->Examine. This opens a window showing information on the selected field.Note the name of the block in which the field is located.
(Field should be “DESC_FLEX”)
(hps://govoracleapps.files.wordpress.com/2013/10/11.jpg)
3. Click the Block list of values buon to display a list of the available blocks for this form and select
“$DESCRIPTIVE_FLEXFIELD$”
4. Click on the the Field list of values buon.Each entry is prefixed by the name of the block in which
the descriptive flexfield appears. Find the entries for the block whose name you determined in step 2.
em Admin | Oracle Apps Reference https://govoracleapps.wordpress.com/category/system-admin/
24 3/29/2016 1:44 PM

8/19/2019 System Admin _ Oracle Apps Reference
http://slidepdf.com/reader/full/system-admin-oracle-apps-reference 7/24
Field value will be like “Block Name.Field”, Eg: DAILY_RATE_TYPE.DESC_FLEX
(hps://govoracleapps.files.wordpress.com/2013/10/2.jpg)
5. Value in the value field indicates the DFF Application and Title.In above example,General Ledger isthe Application and Daily Rates is the Title.
Note=> To remove the Diagnostics Password Screen, set “Utilities:Diagnostics” profile value to Yes at
user level
Steps to Register DFF:
1. Navigate to Application Developer Responsibility-> Flexfield-> Descriptive -> Register and query the
Title and Application.
2. You can change the Context Prompt to a meaningful name if needed. Also Can enabled anycolumns in additional to aribute columns if needed by clicking “Column” buon.Then save.
Use Column window to specify the columns your descriptive flexfield can use as segment columns.
(hps://govoracleapps.files.wordpress.com/2013/10/32.jpg)
Steps to Define DFF:
1. Navigate to System Administrator Responsibility->Application->Flexfield-> Descriptive-> Segments
& query the application and title.
2. Enable the Required and Displayed check-box of Context field. Then add the context field valuesand enter the segment details for Global Data Elements and other context field values. Also enable theDisplayed, Enabled & Required check-boxes of Context field value segments accordingly.
If you have any context-sensitive segments for your flexfield, you should always check the Displayedcheck box if you do not specify either a default value or a reference field.
em Admin | Oracle Apps Reference https://govoracleapps.wordpress.com/category/system-admin/
24 3/29/2016 1:44 PM
8/19/2019 System Admin _ Oracle Apps Reference
http://slidepdf.com/reader/full/system-admin-oracle-apps-reference 8/24
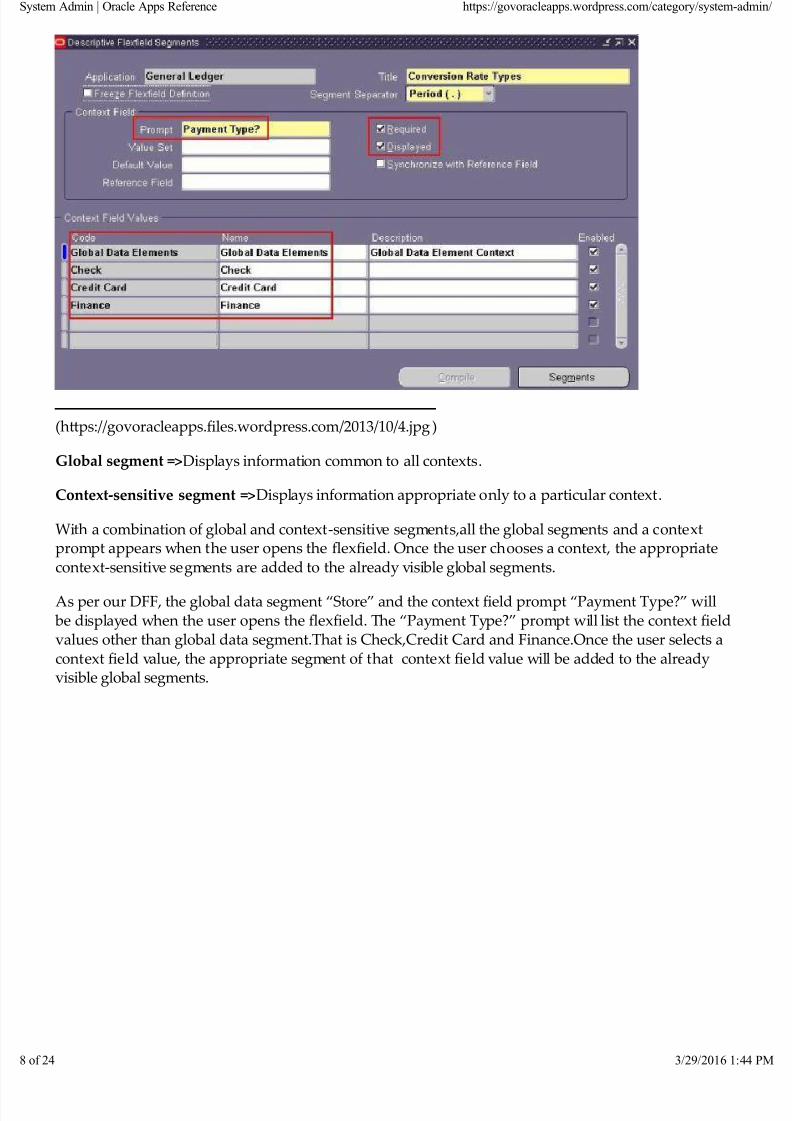
(hps://govoracleapps.files.wordpress.com/2013/10/4.jpg)
Global segment =>Displays information common to all contexts.
Context-sensitive segment =>Displays information appropriate only to a particular context.
With a combination of global and context-sensitive segments,all the global segments and a contextprompt appears when the user opens the flexfield. Once the user chooses a context, the appropriate
context-sensitive segments are added to the already visible global segments.
As per our DFF, the global data segment “Store” and the context field prompt “Payment Type?” will be displayed when the user opens the flexfield. The “Payment Type?” prompt will list the context fieldvalues other than global data segment.That is Check,Credit Card and Finance.Once the user selects acontext field value, the appropriate segment of that context field value will be added to the alreadyvisible global segments.
em Admin | Oracle Apps Reference https://govoracleapps.wordpress.com/category/system-admin/
24 3/29/2016 1:44 PM

8/19/2019 System Admin _ Oracle Apps Reference
http://slidepdf.com/reader/full/system-admin-oracle-apps-reference 9/24
(hps://govoracleapps.files.wordpress.com/2013/10/5.jpg)
5. Then Freeze the flexfield and compile it.
Now if you navigate to the Conversion Rate Type window and click on the DFF, you can see the globaldata segment “Store” and the context field prompt “Payment Type?”.If you select Payment type as
“Check” then Check context field segment will be displayed along with “Store” and “Payment Type?”fields. Similarly for “Credit Card” and “Finance”.
em Admin | Oracle Apps Reference https://govoracleapps.wordpress.com/category/system-admin/
24 3/29/2016 1:44 PM

8/19/2019 System Admin _ Oracle Apps Reference
http://slidepdf.com/reader/full/system-admin-oracle-apps-reference 10/24
(hps://govoracleapps.files.wordpress.com/2013/10/6.jpg)
Steps to Register and Define Reference field based DFF
Context Field=> A field created in the descriptive flexfield structure that is used to allow the user to
em Admin | Oracle Apps Reference https://govoracleapps.wordpress.com/category/system-admin/
f 24 3/29/2016 1:44 PM

8/19/2019 System Admin _ Oracle Apps Reference
http://slidepdf.com/reader/full/system-admin-oracle-apps-reference 11/24
manually select different contexts.
Reference Field=> A field on the existing form whose value is used to automatically distinguish between contexts.
We are going to create a DFF in Asset Workbench form with reference to the Category field in thesame form.
1. Click on the Category field and navigate to Diagnostics->Examine form to get the field name.
(hps://govoracleapps.files.wordpress.com/2013/10/12.jpg)
2. Get the Application and title details of the DFF by navigating to Diagnostics-> Examine
(hps://govoracleapps.files.wordpress.com/2013/10/21.jpg)
3. Navigate to Application Developer Responsibility-> Flexfield-> Descriptive -> Register and query theTitle and Application.Add the field name which we got from step 1 as reference field after clicking the
“Reference Fields” buon.
(hps://govoracleapps.files.wordpress.com/2013/10/33.jpg)
em Admin | Oracle Apps Reference https://govoracleapps.wordpress.com/category/system-admin/
f 24 3/29/2016 1:44 PM
8/19/2019 System Admin _ Oracle Apps Reference
http://slidepdf.com/reader/full/system-admin-oracle-apps-reference 12/24
Also enable the columns your descriptive flexfield can use as segment columns by clicking the
“Column” buon, if any.
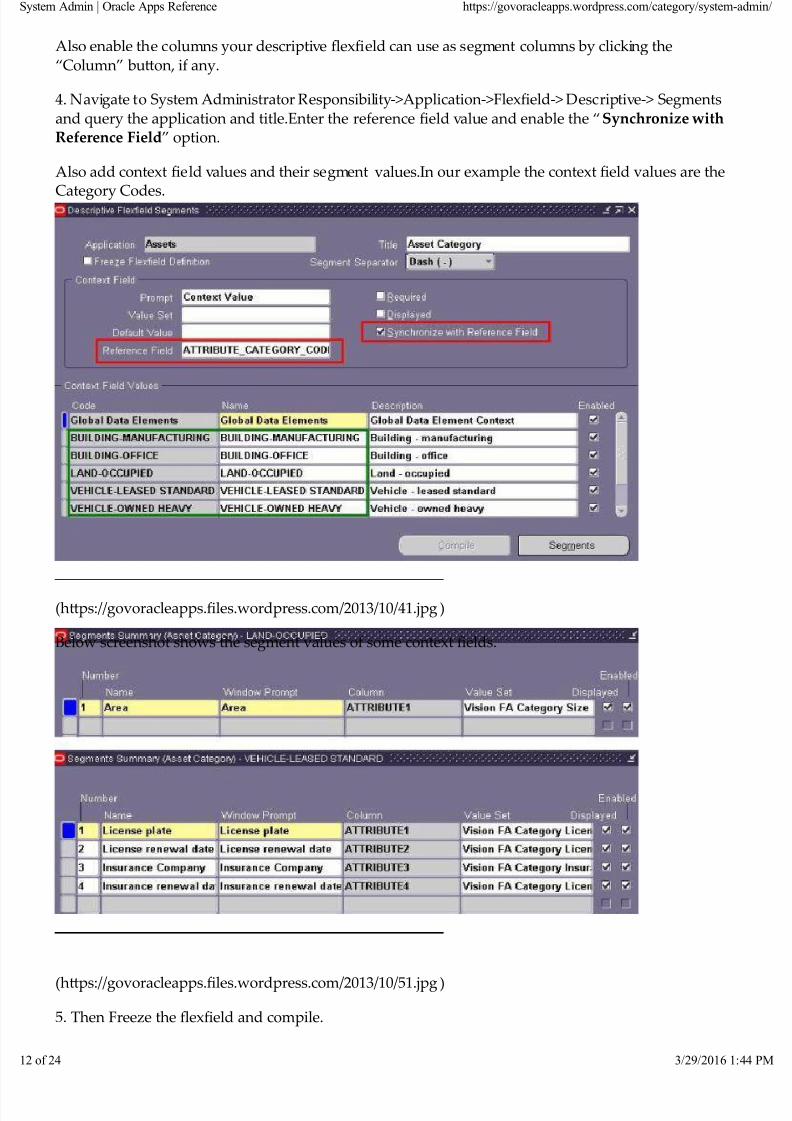
4. Navigate to System Administrator Responsibility->Application->Flexfield-> Descriptive-> Segments
and query the application and title.Enter the reference field value and enable the “Synchronize withReference Field” option.
Also add context field values and their segment values.In our example the context field values are the
Category Codes.
(hps://govoracleapps.files.wordpress.com/2013/10/41.jpg)
Below screenshot shows the segment values of some context fields.
(hps://govoracleapps.files.wordpress.com/2013/10/51.jpg)
5. Then Freeze the flexfield and compile.
em Admin | Oracle Apps Reference https://govoracleapps.wordpress.com/category/system-admin/
f 24 3/29/2016 1:44 PM

8/19/2019 System Admin _ Oracle Apps Reference
http://slidepdf.com/reader/full/system-admin-oracle-apps-reference 13/24
Now navigate to the Assets Workbench form.After selecting the Category, click on the DFF to enteradditional details.
(hps://govoracleapps.files.wordpress.com/2013/10/61.jpg)
Printer Setup
Posted: October 12, 2013 in System Admin0
Oracle Applications provides you with predefined printer types, print styles, and printer drivers.Whenyou register a printer with Oracle Applications, you identify the printer by its operating system name,and assign it a printer type.
(hps://govoracleapps.files.wordpress.com/2013/10/pr1.jpg)
Printer Types=>You must define any printer types (i.e., manufacturer and model) used at yoursite.Also, for each print style you wish to output from a particular printer type, you need to assign to
the printer type a combination of a print style and a printer driver.
Print Styles=>To generate a report, the print style values for columns and rows are passed by theconcurrent manager to Oracle Reports. A print style determines the dimensions of your report, or the:Number of lines per page (number of rows or page height).
em Admin | Oracle Apps Reference https://govoracleapps.wordpress.com/category/system-admin/
f 24 3/29/2016 1:44 PM

8/19/2019 System Admin _ Oracle Apps Reference
http://slidepdf.com/reader/full/system-admin-oracle-apps-reference 14/24
Width of each line (number of columns or page width).
Printer Drivers=>A printer driver includes the initialization and reset strings that format and restart aprinter. You need a defined printer driver for each print style that you plan to use with a specific
printer type, on a specific platform.
Many printers can be registered as a particular printer type.A printer type can support multiple printstyles.A printer driver must be assigned to a printer type for each print style.
(hps://govoracleapps.files.wordpress.com/2013/10/pr2.jpg)
Steps to Configure Printer
1. Firstly the Printer should be defined at Unix OS level.Printer status can be checked at Unix level byusing the following command:lpstat -a
2. Define the printer Driver by navigating to System Administrator responsibility->Install-> Printer->Driver
3. Define the printer Style by navigating to System Administrator responsibility->Install-> Printer->Style
3. Define the printer Type by navigating to System Administrator responsibility->Install-> Printer->Type
4. Register the printer by navigating to System Administrator responsibility->Install-> Printer-> Register
Note: Bouncing of concurrent manager is required to reflect changes.
em Admin | Oracle Apps Reference https://govoracleapps.wordpress.com/category/system-admin/
f 24 3/29/2016 1:44 PM
8/19/2019 System Admin _ Oracle Apps Reference
http://slidepdf.com/reader/full/system-admin-oracle-apps-reference 15/24
Printer Setup with Pasta
Pasta is an Oracle E-Business Suite utility that converts text report files to PostScript and also enablesthe printing of custom PostScript reports from Oracle E-Business Suite. The reports can then bedirected to any PostScript printer.
Seing up your system to use Pasta is much simpler than the standard Oracle E-Business Suite printersetup procedure. The Printer Type, Printer Driver, and SRW driver files are provided. The only setup
required to begin printing is the registration of the printer with Oracle E-Business Suite.
Many printing options can be defined using the Pasta configuration file (pasta.cfg).Pasta is provided asan executable named FNDPSTAX.
Steps:
1. Enter your printer’s name as defined in the operating system and applications.
2. Select “–Pasta Universal Printer” from the list of values for the printer Type.
Tables:
FND_PRINTERFND_PRINTER_INFORMATIONFND_PRINTER_STYLESFND_PRINTER_DRIVERS
Administer Folder Setup
Posted: October 11, 2013 in System Admin0
A folder is a flexible entry.It displays a window in which you can choose the fields you want to see.Italso displays the location where each field appears in the window.Administer folders definitions can
be assigned either to a specific user or to a responsibility.The ownership of a folder also can bechanged.
Behaviour modes for Folder assignment are:
No restrictions – End user can perform all folder functions.Restrict fields and folder functions – End user cannot perform any folder functions. When useropens a folder in restricted mode, all folder functionality is disabled.This is “Restricted Mode”.
Steps to setup Administer Folder
1. We are going to create a folder for Invoice Workbench to display all Standard invoices for “VisionOperations” Operating Unit.Navigate to Payable Manager->Invoices->Entry->Invoices and Query records with Invoice type as“Standard” and Operating Unit as “Vision Operations”2. If you want to add additional fields to the workbench,click Folder->Show Field and add thefields.Here we are adding “Payment Amount” field.
em Admin | Oracle Apps Reference https://govoracleapps.wordpress.com/category/system-admin/
f 24 3/29/2016 1:44 PM

8/19/2019 System Admin _ Oracle Apps Reference
http://slidepdf.com/reader/full/system-admin-oracle-apps-reference 16/24
(hps://govoracleapps.files.wordpress.com/2013/10/f0.jpg)
Additional field can be also added using the folder tool->Show Field
(hps://govoracleapps.files.wordpress.com/2013/10/f2.jpg)
3. Now click on Folder->Save As4. Enter the Folder Name and check Public & Include Query Option,then click Okay.(Click “Showquery to see the query”)
(hps://govoracleapps.files.wordpress.com/2013/10/f1.jpg)
5. Navigate to System administrator->Application->Administer Folder
6. Select “Default Folder Assignments by User” option,enter username and click find.
em Admin | Oracle Apps Reference https://govoracleapps.wordpress.com/category/system-admin/
f 24 3/29/2016 1:44 PM

8/19/2019 System Admin _ Oracle Apps Reference
http://slidepdf.com/reader/full/system-admin-oracle-apps-reference 17/24
(hps://govoracleapps.files.wordpress.com
/2013/10/f3.jpg)
7. Enter the Folder Set,Folder Name and select behaviour mode
(hps://govoracleapps.files.wordpress.com/2013/10/f4.jpg)
7. Navigate back to Payable Manager->Invoices->Entry->Invoices.It will prompt to show all records ofthis folder and on clicking yes,will show all the data.
Note:
If your system administrator sets the profile option “Folders: Allow Customization” to “No”, youcannot create or customize folders. So ensure its not set to “No”
Profiles
Posted: October 11, 2013 in System Admin
em Admin | Oracle Apps Reference https://govoracleapps.wordpress.com/category/system-admin/
f 24 3/29/2016 1:44 PM

8/19/2019 System Admin _ Oracle Apps Reference
http://slidepdf.com/reader/full/system-admin-oracle-apps-reference 18/24
0
Profiles are the changeable options which affect the way Oracle Application runs. It enables to linkresponsibility to operating unit and enables to change the behavior of the application process.
The profiles are of two types those are given below.
1. System Profiles
2. User Profiles
The Profile values can be set in 6 different levels. They are:
1. Site: This field displays the current value, if set, for all users at the installation site.2. Application: This field displays the current value, if set, for all users working under responsibilities
owned by the application identified in the Find Profile Values block.3. Responsibility: This field displays the current value, if set, for all users working under the
responsibility identified in the Find Profile Values block.4. User: This field displays the current value, if set, for the application user identified in the FindProfile Values block.
5. Server: This field displays the current value, if set, for the server identified in the Find Profile Values block.6. Organization: This field displays the current value, if set, for the organization identified in the FindProfile Values block.
Hierarchies:
There are three types of hierarchies for the system profiles. You can set profiles at different levels,using one of the three hierarchies. The three types of hierarchies are
1. Security: (Security type is most widely used):
Most profile options use the Security hierarchy. Seings in the user profile affect application usersacross one of four different levels. The different levels are: site level, application level, responsibilitylevel, and user level.
(hps://govoracleapps.files.wordpress.com/2013/10/22.jpg)
em Admin | Oracle Apps Reference https://govoracleapps.wordpress.com/category/system-admin/
f 24 3/29/2016 1:44 PM

8/19/2019 System Admin _ Oracle Apps Reference
http://slidepdf.com/reader/full/system-admin-oracle-apps-reference 19/24
2. Organization:
The second hierarchy type is the organization. Organization refers to the operating unit. There arethree levels in this hierarchy are site, organization, and user. The organization hierarchy type allowssystem administrators to set a profile option at the organization level, so that all users within thatorganization will use the same profile. Profiles using the organization type use the hierarchy site –
organization – user, where a user level option overrides the organization level option, which in turnoverrides the site level option.
(hps://govoracleapps.files.wordpress.com/2013/10/23.jpg)
3. Server:
The server hierarchy type is used when the system needs to determine the server on which the user’ssession is running. There are three levels in this hierarchy: site, server, and user. The seing of thisprofile option can differ for an internal server versus an external one. Profiles using the server type usethe hierarchy Site – Server – User, where a user level option overrides the server level option, whichfurther overrides the site level option. Example of a profile option using the Server hierarchy type isNode Trust Level or Application Object Library.
em Admin | Oracle Apps Reference https://govoracleapps.wordpress.com/category/system-admin/
f 24 3/29/2016 1:44 PM

8/19/2019 System Admin _ Oracle Apps Reference
http://slidepdf.com/reader/full/system-admin-oracle-apps-reference 20/24
(hps://govoracleapps.files.wordpress.com/2013/10/24.jpg)
Profile Definition
If you want profile option to provide a list of values (LOV) when the system administrator or user setsprofile options,follow below steps:
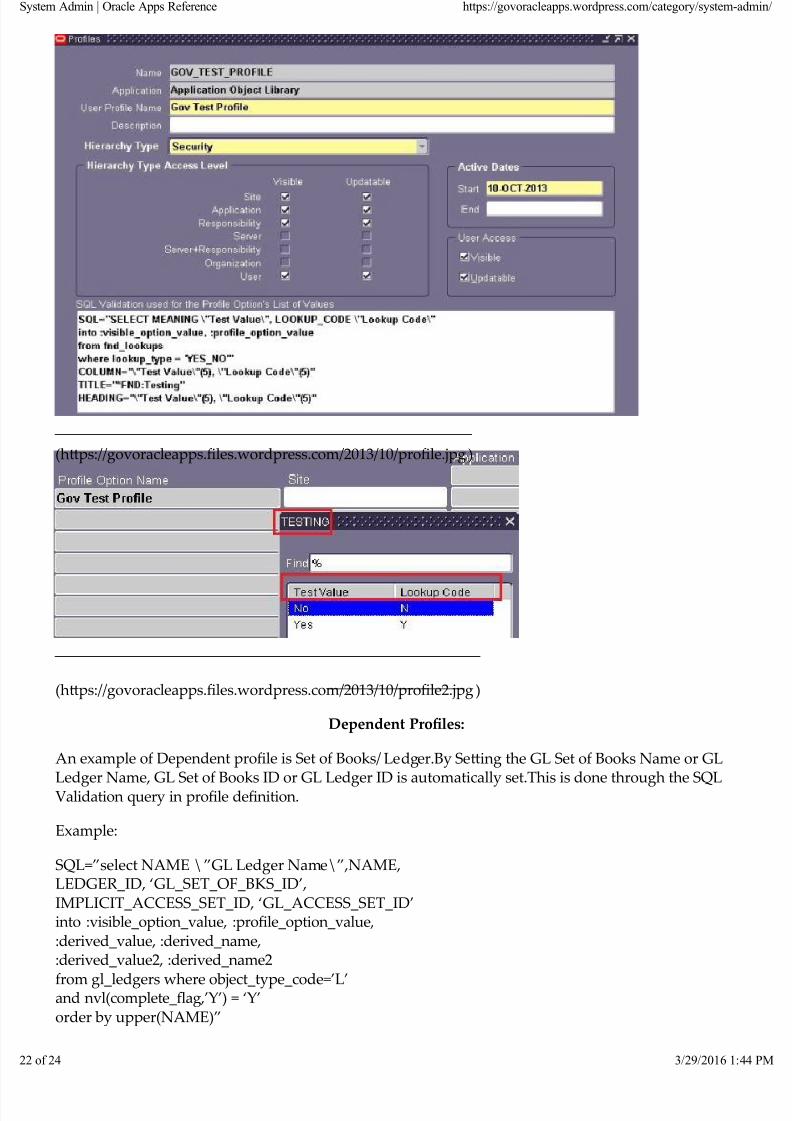
1. Navigate to Application Developer Responsibility->Profile
2. Enter the Name,Application and User Profile Name.Also select Hierarchy Level.
3. Select Hierarchy Type Access Level,
Visible – Indicate whether your system administrator can see your profile option while seing userprofile option values for the specified profile level.Updatable – Indicate whether your system administrator can change the value of your profileoption while seing user profile option values for the profile level you select.
4. Also select User Access,
Visible – Indicate whether your end users can see and query this profile option in their personal
profiles.Updatable – Indicate whether your end users can change the value of this profile option using their
Profile Values window.
5. In SQL Validation field, enter the SQL validation query. The basic syntax for that is
SQL="SQL select statement"COLUMN="column1(length), column2(length),..."[TITLE="{title text|*application shortname:message name}"][HEADING="{heading1(length), heading2(length),...
|*application shortname:message name|N}"]
To validate your user profile option, select the profile option value into the fields :
PROFILE_OPTION_VALUE and :VISIBLE_OPTION_VALUE.
em Admin | Oracle Apps Reference https://govoracleapps.wordpress.com/category/system-admin/
f 24 3/29/2016 1:44 PM

8/19/2019 System Admin _ Oracle Apps Reference
http://slidepdf.com/reader/full/system-admin-oracle-apps-reference 21/24
COLUMN:Lists the names of columns (or column aliases) you want to display in your LOVwindow, the order in which to display them, and their display widths.Column aliases cannot belonger than 30 characters.You can specify a dynamic width column by placing an asterisk instead ofa number in the parentheses following the column name.
Eg: COLUMN=”Department(20), LOCATION(*)”
TITLE:Text you want to display centered and highlighted on the top line of your LOV window. The
default is no title.
HEADING:Lets you specify a list of column headings and column widths, separated by spaces orcommas. There should be one heading in the HEADING=”…” parameter for each column in theCOLUMN=”…” parameter. Specify column widths as numbers in parentheses following thecolumn name, or as an asterisk in parenthesis for a dynamic column width. Column widths youspecify in the HEADING =”…” parameter override columns widths you specify in theCOLUMN=”…”
3. If you want to include spaces in your column aliases, you must put a backslash and double quotes
both before and after the column alias, so that the LOV routine recognizes the double quotes as realdouble quotes, rather than the end of your parameter.
4. If Oracle Application Object Library cannot successfully perform your validation, it does not displayyour profile option the user queries profiles options. If the profile option Utilities:Diagnostics is No,then no error messages appear either.
Example:
SQL=”SELECT MEANING \”Test Value\”, LOOKUP_CODE \”Lookup Code\”into :visible_option_value, :profile_option_valuefrom fnd_lookupswhere lookup_type = ‘YES_NOʹ”COLUMN=”\”Test Value\”(5), \”Lookup Code\”(5)”TITLE=”*FND:Testing”HEADING=”\”Test Value\”(5), \”Lookup Code\”(5)”
em Admin | Oracle Apps Reference https://govoracleapps.wordpress.com/category/system-admin/
f 24 3/29/2016 1:44 PM
8/19/2019 System Admin _ Oracle Apps Reference
http://slidepdf.com/reader/full/system-admin-oracle-apps-reference 22/24
(hps://govoracleapps.files.wordpress.com/2013/10/profile.jpg)
(hps://govoracleapps.files.wordpress.com/2013/10/profile2.jpg)
Dependent Profiles:
An example of Dependent profile is Set of Books/Ledger.By Seing the GL Set of Books Name or GLLedger Name, GL Set of Books ID or GL Ledger ID is automatically set.This is done through the SQLValidation query in profile definition.
Example:
SQL=”select NAME \”GL Ledger Name\”,NAME,LEDGER_ID, ‘GL_SET_OF_BKS_ID’,IMPLICIT_ACCESS_SET_ID, ‘GL_ACCESS_SET_ID’into :visible_option_value, :profile_option_value,
:derived_value, :derived_name,:derived_value2, :derived_name2from gl_ledgers where object_type_code=’L’and nvl(complete_flag,’Y’) = ‘Y’
order by upper(NAME)”
em Admin | Oracle Apps Reference https://govoracleapps.wordpress.com/category/system-admin/
f 24 3/29/2016 1:44 PM

8/19/2019 System Admin _ Oracle Apps Reference
http://slidepdf.com/reader/full/system-admin-oracle-apps-reference 23/24
COLUMN=”\”GL Ledger Name\”(30)”
In this, profile name “GL_SET_OF_BKS_ID” is assigned to “:derived_name” and Ledger Id (fromgl_ledgers table) is assigned to “:derived_value”.So the Ledger Id is automatically generated onceLedger name is set.
(hps://govoracleapps.files.wordpress.com/2013/10/profile3.jpg)
Mandatory profiles for Multi Org
Posted: July 20, 2013 in System Admin
0HR:User Type
It limits field access on windows shared between Oracle Human Resources and Oracle Payroll. Its setat responsibility level.Below values can be assigned
HR UserHR with Payroll UserPayroll User
If you do not use Oracle Payroll, it must be set to HR User.
HR: Security Profile
It restricts access to the organization, positions and payrolls defined in the security profile. This optionis predefined at Site Level with the view-all security profile created for the Setup Business Group.
If you use Standard HRMS security you must set up the HR: Security Profile profile option for each
responsibility.
If you use Security Groups Enabled security, you must not set up the HR: Security Profile profileoption. This is set up automatically when you assign security profiles using the Assign Security Profilewindow.
HR:Business Group
This profile option determines the business group linked to a responsibility. The Setup Business Group
is defaulted at Site level.
If you use Standard HRMS security this option is automatically set up when you enter the HR: Security
em Admin | Oracle Apps Reference https://govoracleapps.wordpress.com/category/system-admin/
f 24 3/29/2016 1:44 PM

8/19/2019 System Admin _ Oracle Apps Reference
http://slidepdf.com/reader/full/system-admin-oracle-apps-reference 24/24
Profile profile option, except in cases where you are using a global security profile (that is, a securityprofile that does not specify a business group). In this case, you must specifically set up this option foreach responsibility.
MO: Security Profile
Assign this profile option to a responsibility,so that a user with this responsibility can access multiple
operating units.
After you define your security profiles and run the Security List Maintenance program, you canassign them to responsibilities or users using the MO: Security Profile profile option. If you set theMO: Security Profile profile option, you can also set the MO: Default Operating Unit profile option to
specify a default operating unit.
If the MO: Security Profile is set, then the MO: Operating Unit profile is ignored.
MO: Operating Unit
Assign this profile option to an application responsibility, so that user with this responsibility can
access one operating unit.
MO: Default Operating Unit
Use this profile option to specify a default operating unit from the list of operating units assigned toyour responsibility through the MO: Operating Unit or MO: Security Profile.
Note: If the MO: Operating Unit is set or you have assigned only one operating unit in the MO:Security Profile profile option, then that single operating unit will be your default operating unit.
GL: Data Access Set
Oracle General Ledger uses the GL: Data Access Set profile option to determine the ledgers you have
access to. If you want users to access different ledgers for different operating units from the sameresponsibility, you should define a data access set and then assign it to the GL: Data Access Set profile
option for each General Ledger responsibility. You can group multiple ledgers that share the samechart of accounts, calendar, and period type in a data access set or a ledger set
GL Ledger Name & GL Ledger ID
This profile is for assigning the Ledger to a responsibility. This profile option controls the ledger that
each subledger will use for transaction processing.The ledger assigned to the GL Ledger Name profileoption will automatically be assigned to the GL: Data Access Set profile option.
GL Set of Books Name & GL Set of Books ID
This profile is for assigning the set of books to a responsibility
Blog at WordPress.com. | The Greyzed Theme.
em Admin | Oracle Apps Reference https://govoracleapps.wordpress.com/category/system-admin/