sportident organiser guide · sportident organiser guide, revision 1, february 2018 ... it is the...
TRANSCRIPT

SPORTident Organiser GuideSPORTident GmbH
Version 1, February 2018

Table of Contents
Introduction . . . . . . . . . . . . . . . . . . . . . . . . . . . . . . . . . . . . . . . . . . . . . . . . . . . . . . . . . . . . . . . . . . . 1
Quick overview . . . . . . . . . . . . . . . . . . . . . . . . . . . . . . . . . . . . . . . . . . . . . . . . . . . . . . . . . . . . . . . . 2
Classic punching system . . . . . . . . . . . . . . . . . . . . . . . . . . . . . . . . . . . . . . . . . . . . . . . . . . . . . . 2
Contactless punching system AIR+ . . . . . . . . . . . . . . . . . . . . . . . . . . . . . . . . . . . . . . . . . . . . . . 3
Types of SI-Cards . . . . . . . . . . . . . . . . . . . . . . . . . . . . . . . . . . . . . . . . . . . . . . . . . . . . . . . . . . . . 3
Types of SI-Stations . . . . . . . . . . . . . . . . . . . . . . . . . . . . . . . . . . . . . . . . . . . . . . . . . . . . . . . . . . 4
Classic punching system . . . . . . . . . . . . . . . . . . . . . . . . . . . . . . . . . . . . . . . . . . . . . . . . . . . . . . . . 6
Description . . . . . . . . . . . . . . . . . . . . . . . . . . . . . . . . . . . . . . . . . . . . . . . . . . . . . . . . . . . . . . . . . 6
At the start . . . . . . . . . . . . . . . . . . . . . . . . . . . . . . . . . . . . . . . . . . . . . . . . . . . . . . . . . . . . . . . 6
During the race . . . . . . . . . . . . . . . . . . . . . . . . . . . . . . . . . . . . . . . . . . . . . . . . . . . . . . . . . . . . 6
At the finish . . . . . . . . . . . . . . . . . . . . . . . . . . . . . . . . . . . . . . . . . . . . . . . . . . . . . . . . . . . . . . . 7
Featured SI-Stations . . . . . . . . . . . . . . . . . . . . . . . . . . . . . . . . . . . . . . . . . . . . . . . . . . . . . . . . . . 7
Featured SI-Cards . . . . . . . . . . . . . . . . . . . . . . . . . . . . . . . . . . . . . . . . . . . . . . . . . . . . . . . . . . . 8
Basic accessories . . . . . . . . . . . . . . . . . . . . . . . . . . . . . . . . . . . . . . . . . . . . . . . . . . . . . . . . . . . . 9
Contactless punching system AIR+ . . . . . . . . . . . . . . . . . . . . . . . . . . . . . . . . . . . . . . . . . . . . . . . 10
Description . . . . . . . . . . . . . . . . . . . . . . . . . . . . . . . . . . . . . . . . . . . . . . . . . . . . . . . . . . . . . . . . 10
SIAC activation / deactivation . . . . . . . . . . . . . . . . . . . . . . . . . . . . . . . . . . . . . . . . . . . . . . . . . . 11
SIAC mounting . . . . . . . . . . . . . . . . . . . . . . . . . . . . . . . . . . . . . . . . . . . . . . . . . . . . . . . . . . . . . 11
For orienteers . . . . . . . . . . . . . . . . . . . . . . . . . . . . . . . . . . . . . . . . . . . . . . . . . . . . . . . . . . . . 11
For trail runners . . . . . . . . . . . . . . . . . . . . . . . . . . . . . . . . . . . . . . . . . . . . . . . . . . . . . . . . . . 12
For mountain bikers . . . . . . . . . . . . . . . . . . . . . . . . . . . . . . . . . . . . . . . . . . . . . . . . . . . . . . . 12
How not to mount the SIAC . . . . . . . . . . . . . . . . . . . . . . . . . . . . . . . . . . . . . . . . . . . . . . . . . 12
BSF7/8 for AIR+ . . . . . . . . . . . . . . . . . . . . . . . . . . . . . . . . . . . . . . . . . . . . . . . . . . . . . . . . . . . . 13
Configuration of BSF7/8 . . . . . . . . . . . . . . . . . . . . . . . . . . . . . . . . . . . . . . . . . . . . . . . . . . . . 13
Special operating modes . . . . . . . . . . . . . . . . . . . . . . . . . . . . . . . . . . . . . . . . . . . . . . . . . . . 15
BS11 for AIR+ . . . . . . . . . . . . . . . . . . . . . . . . . . . . . . . . . . . . . . . . . . . . . . . . . . . . . . . . . . . . . . 16
Charging . . . . . . . . . . . . . . . . . . . . . . . . . . . . . . . . . . . . . . . . . . . . . . . . . . . . . . . . . . . . . . . . 18
Configuration of BS11. . . . . . . . . . . . . . . . . . . . . . . . . . . . . . . . . . . . . . . . . . . . . . . . . . . . . . 18
Mounting . . . . . . . . . . . . . . . . . . . . . . . . . . . . . . . . . . . . . . . . . . . . . . . . . . . . . . . . . . . . . . . . 21
Activation / deactivation . . . . . . . . . . . . . . . . . . . . . . . . . . . . . . . . . . . . . . . . . . . . . . . . . . . . 21
Gate mode . . . . . . . . . . . . . . . . . . . . . . . . . . . . . . . . . . . . . . . . . . . . . . . . . . . . . . . . . . . . . . 22
Config+ . . . . . . . . . . . . . . . . . . . . . . . . . . . . . . . . . . . . . . . . . . . . . . . . . . . . . . . . . . . . . . . . . . . . . 24
Device connection. . . . . . . . . . . . . . . . . . . . . . . . . . . . . . . . . . . . . . . . . . . . . . . . . . . . . . . . . . . 24
Direct mode . . . . . . . . . . . . . . . . . . . . . . . . . . . . . . . . . . . . . . . . . . . . . . . . . . . . . . . . . . . . . 24
Settings overview . . . . . . . . . . . . . . . . . . . . . . . . . . . . . . . . . . . . . . . . . . . . . . . . . . . . . . . . . 25
Remote mode . . . . . . . . . . . . . . . . . . . . . . . . . . . . . . . . . . . . . . . . . . . . . . . . . . . . . . . . . . . . 25
Basic configuration . . . . . . . . . . . . . . . . . . . . . . . . . . . . . . . . . . . . . . . . . . . . . . . . . . . . . . . . . . 26
Configuration procedure . . . . . . . . . . . . . . . . . . . . . . . . . . . . . . . . . . . . . . . . . . . . . . . . . . . . 27
Switch off feature . . . . . . . . . . . . . . . . . . . . . . . . . . . . . . . . . . . . . . . . . . . . . . . . . . . . . . . . . 29
Operating time . . . . . . . . . . . . . . . . . . . . . . . . . . . . . . . . . . . . . . . . . . . . . . . . . . . . . . . . . . . 29

Time synchronisation . . . . . . . . . . . . . . . . . . . . . . . . . . . . . . . . . . . . . . . . . . . . . . . . . . . . . . . . 29
Synchronisation with SI-Master . . . . . . . . . . . . . . . . . . . . . . . . . . . . . . . . . . . . . . . . . . . . . . 30
SI-Master additional features . . . . . . . . . . . . . . . . . . . . . . . . . . . . . . . . . . . . . . . . . . . . . . . . 32
Battery status . . . . . . . . . . . . . . . . . . . . . . . . . . . . . . . . . . . . . . . . . . . . . . . . . . . . . . . . . . . . . . 33
Advanced settings. . . . . . . . . . . . . . . . . . . . . . . . . . . . . . . . . . . . . . . . . . . . . . . . . . . . . . . . . . . 34
Read backup. . . . . . . . . . . . . . . . . . . . . . . . . . . . . . . . . . . . . . . . . . . . . . . . . . . . . . . . . . . . . . . 35
Firmware update . . . . . . . . . . . . . . . . . . . . . . . . . . . . . . . . . . . . . . . . . . . . . . . . . . . . . . . . . . . . 37
Read SI-Cards . . . . . . . . . . . . . . . . . . . . . . . . . . . . . . . . . . . . . . . . . . . . . . . . . . . . . . . . . . . . . 40
Config SI-Cards . . . . . . . . . . . . . . . . . . . . . . . . . . . . . . . . . . . . . . . . . . . . . . . . . . . . . . . . . . . . 42
Short range radio . . . . . . . . . . . . . . . . . . . . . . . . . . . . . . . . . . . . . . . . . . . . . . . . . . . . . . . . . . . . . 45
Sender device: BSF8-SRR . . . . . . . . . . . . . . . . . . . . . . . . . . . . . . . . . . . . . . . . . . . . . . . . . . . . 45
Sender device: SIAC radio . . . . . . . . . . . . . . . . . . . . . . . . . . . . . . . . . . . . . . . . . . . . . . . . . . . . 46
Receiver device: SRR USB Dongle . . . . . . . . . . . . . . . . . . . . . . . . . . . . . . . . . . . . . . . . . . . . . 47
Receiver device: SIGSM-DN . . . . . . . . . . . . . . . . . . . . . . . . . . . . . . . . . . . . . . . . . . . . . . . . . . 49
Show received data in Config+ . . . . . . . . . . . . . . . . . . . . . . . . . . . . . . . . . . . . . . . . . . . . . . . . . 51
Live data . . . . . . . . . . . . . . . . . . . . . . . . . . . . . . . . . . . . . . . . . . . . . . . . . . . . . . . . . . . . . . . . . . . . 53
Introduction . . . . . . . . . . . . . . . . . . . . . . . . . . . . . . . . . . . . . . . . . . . . . . . . . . . . . . . . . . . . . . . . 53
Software and web services . . . . . . . . . . . . . . . . . . . . . . . . . . . . . . . . . . . . . . . . . . . . . . . . . . . . 53
SI Center. . . . . . . . . . . . . . . . . . . . . . . . . . . . . . . . . . . . . . . . . . . . . . . . . . . . . . . . . . . . . . . . . . 54
Events. . . . . . . . . . . . . . . . . . . . . . . . . . . . . . . . . . . . . . . . . . . . . . . . . . . . . . . . . . . . . . . . . . 54
Modems . . . . . . . . . . . . . . . . . . . . . . . . . . . . . . . . . . . . . . . . . . . . . . . . . . . . . . . . . . . . . . . . 55
Monitor . . . . . . . . . . . . . . . . . . . . . . . . . . . . . . . . . . . . . . . . . . . . . . . . . . . . . . . . . . . . . . . . . 55
Data upload with SI-Reader . . . . . . . . . . . . . . . . . . . . . . . . . . . . . . . . . . . . . . . . . . . . . . . . . . . 56
LCD display information . . . . . . . . . . . . . . . . . . . . . . . . . . . . . . . . . . . . . . . . . . . . . . . . . . . . . . . . 59
SI-Stations BSx7/8 . . . . . . . . . . . . . . . . . . . . . . . . . . . . . . . . . . . . . . . . . . . . . . . . . . . . . . . . . . 59
SI-Stations BS11. . . . . . . . . . . . . . . . . . . . . . . . . . . . . . . . . . . . . . . . . . . . . . . . . . . . . . . . . . . . 60

Introduction
This guide provides detailed information about the operation, use and configuration of the
SPORTident timing system. The information is given for both the classic and the AIR+ system.
For both cases, the system will be explained, followed by detailed instructions on how to set up
the system with the configuration software Config+. The aim is to guide you gradually through the
possibilities of the system, from the pure basics to the advanced features. SPORTident’s slogan
is Make the most of your sport! This guide supports you with that.
Both beginners and more experienced users of the SPORTident system will find useful
information in this guide. All features are explained step by step to be able to get the most out of
the system.
The SPORTident Organiser Guide
This book is designed and written by Luc Cloosterman and Sebastian Gaßdorf. Made with
Asciidoctor.
We are looking forward to receive your feedback on the Organiser Guide. Please submit
suggestions, improvements, and questions via the feedback form on our webseite.
Made with in Arnstadt. Copyright © 2018 SPORTident GmbH.
SPORTident Organiser Guide, Revision 1, February 2018
SPORTident GmbH • www.sportident.com • [email protected] • Arnstadt • Germany 1/61

Quick overview
Classic punching system
The SPORTident system is comprised of two basic elements: SI-Stations and SI-Cards. Most SI-
Stations are technically identical and can be configured to fulfil different functions (such as
START, FINISH, or control stations) by using the configuration software Config+. SI-Stations are
placed at the start, at control points on the race track and at the finish line. Each control station
has a unique control number. Every athlete carries his/her SI-Card, which records the time and
control number as he or she passes the SI-Stations during the race.
SI-Cards
For competitors, usage of the SPORTident system is simple: with the SPORTident classic
system, the athlete has to directly punch the station, i.e. insert the tip of the card into the hole of
the control station to record the time and control number to his or her SI-Card. The data is stored
in the competitor’s card and backed up to the control stations.
SI-Stations
SI-Stations are working autonomously without battery change for several years. The athlete gets
an immediate optical and acoustic feedback after a correct punch.
Before the start, some special stations must be punched by the athlete. The CLEAR station will
empty the SI-Card. This step can be verified with the CHECK station, which will only give a
feedback signal if the SI-Card is empty. Depending on the type of start, the START station has to
be punched (with free start time) or not (with mass start or pre-allocated start time). At the end of
the race, the FINISH station has to be punched.
Race evaluation
After the race, the SI-Card holds the athlete’s start and finish times, as well as the split times with
all control numbers. The system can be operated without a computer by printing out the data
SPORTident Organiser Guide, Revision 1, February 2018
SPORTident GmbH • www.sportident.com • [email protected] • Arnstadt • Germany 2/61

directly on a small battery-operated thermal printer. Alternatively, the data can be evaluated by
using one of the evaluation programs that are designed for SPORTident equipment.
As one of the key features, the SPORTident system produces an individual sheet of paper with
results and split times right after the runner has passed the finish line.
Contactless punching system AIR+
The setup of the AIR+ system is similar to the classic system but offers the possibility of touch
free punching. This removes the need for the athlete to slow down at the controls or check points.
Regular SI-Stations can be configured to operate in ‘beacon mode’ to support touch free
punching. For the athlete, a special SPORTident ActiveCard (SIAC) is needed to ‘punch’ the
controls from a distance in this touch free punching mode.
This contactless punching system is especially well-suited for applications such as (sprint)
orienteering, trail running, mountain biking, Nordic sports and other adventure sports. With this
system it is no longer necessary to bring the card and station into direct contact. Time and control
numbers are recorded to the athlete’s SIAC as he or she passes the station in a distance of no
more than 50 cm at a speed of max. 40 km/h.
With special stations (BS11), the maximum allowed distance can be increased up to six metres.
When passing a control station, competitors using a SIAC will receive a series of vivid flashes
and loud beeps as confirmation that the data has been recorded.
Types of SI-Cards
SIAC
ActiveCard (SIAC) is compatible with the classic and the contactless
punching system. This SI-Card can store up to 128 punches.
SI-Card 8
SI-Card 8 is compatible with the classic punching system. This SI-Card can
store up to 30 punches.
SI-Card 9
SI-Card 9 is compatible with the classic punching system. This SI-Card can
store up to 50 punches.
SI-Card 10
SI-Card 10 is compatible with the classic punching system. This SI-Card can
store up to 128 punches.
SPORTident Organiser Guide, Revision 1, February 2018
SPORTident GmbH • www.sportident.com • [email protected] • Arnstadt • Germany 3/61

ComCard Pro
ComCard Pro is compatible with the classic punching system. This SI-Card
can store up to 128 punches.
ComCard Up
ComCard Up is compatible with the classic punching system. This SI-Card
can store up to 30 punches.
pCard
pCard is compatible with the classic punching system. This SI-Card can
store up to 20 punches.
SI-Card 5, SI-Card 6 and SI-Card 11 are no longer produced and therefore not
listed in this documentation.
Types of SI-Stations
BSF8-DB
Base Station Field 8 (display bottom) features classic and contactless
punching. The station is available in red or blue.
Operating modes: CLEAR, CHECK, START, FINISH, SIAC Test, SIAC On,
SIAC Off, SIAC Radio readout, SIAC Battery test, BC START, BC FINISH,
BC CONTROL
BSF8-DT
Base Station Field 8 (display top) features classic and contactless punching.
Operating modes: CLEAR, CHECK, START, FINISH, SIAC Test, SIAC On,
SIAC Off, SIAC Radio readout, SIAC Battery test, BC START, BC FINISH,
BC CONTROL
BSF8-DT SI-Master
Base Station Field 8 (display top) features classic and contactless punching.
Operating modes: CLEAR, CHECK, START, FINISH, SIAC Test, SIAC On,
SIAC Off, SIAC Radio readout, SIAC Battery test, BC START, BC FINISH,
BC CONTROL
SPORTident Organiser Guide, Revision 1, February 2018
SPORTident GmbH • www.sportident.com • [email protected] • Arnstadt • Germany 4/61

BS11-BS
Base Station 11 (beacon small) features contactless timing with a range of
180 cm.
Operating modes: BC START, BC FINISH, BC CONTROL
BS11-BS
Base Station 11 (beacon large) features contactless timing with a range of
300 cm.
Operating modes: BC START, BC FINISH, BC CONTROL
BS11-LA
Base Station 11 (loop antenna) features contactless timing with an external
ground antenna of up to a length of 600 cm.
Operating modes: BC START, BC FINISH, BC CONTROL
BSM8-D-USB
Base Station Main 8 (USB) is a readout station that can be connected to a
computer via a USB cable. This station can work in direct mode (e.g. to read
SI-Card data with a computer) or can be used to remote control SI-Stations
BSF7, BSF8-DB, BSF8-DT, BSF8-DT SI-Master.
BSF7-DB
Base Station Field 7 (display bottom) features classic and contactless
punching. The station is available in red or black.
Operating modes: CLEAR, CHECK, START, FINISH, SIAC Test, SIAC On,
SIAC Off, SIAC Radio readout, SIAC Battery test, BC START, BC FINISH,
BC CONTROL
BSM7-D-USB
Base Station Main 7 (USB) is a readout station that can be connected to a
computer via a USB cable. This station can work in direct mode (e.g. to read
SI-Card data with a computer) or can be used to remote control SI-Stations
BSF7, BSF8-DB, BSF8-DT, BSF8-DT SI-Master. The included battery allows
autonomous usage without a connection to a computer. BSM7-D is also
available as RS232 version for serial connection.
SPORTident Organiser Guide, Revision 1, February 2018
SPORTident GmbH • www.sportident.com • [email protected] • Arnstadt • Germany 5/61

Classic punching system
Description
The SI-Stations are active (battery powered) and the SI-Card is passive. Every station has a 24
hours clock, a day of week counter and a week counter. This makes it possible to use the
SPORTident system without reservation in competitions that run past midnight, for example for
night orienteering or rogaining.
At the start
Competitors have to clear and check their SI-Card before entering the start box. The CLEAR
station will empty the SI-Card and will provide a feedback signal (an audio signal and a blinking
LED) upon completion of the process. This can be verified with the CHECK station, which will
only provide a feedback signal if the SI-Card is empty. These stations shall be positioned clearly
visible in the starting area.
At the start, the runner just punches the START station. His/her start time will be written on the SI-
Card and he/she will get confirmation by a feedback signal. The start station will NOT give a
feedback signal if the SI-Card is not empty! It is the runners’ responsibility to pay attention to the
start procedure. It is the organiser’s responsibility to explain the start procedure to the
participants.
For events with pre-allocated start times, where punching starts are not required, competitors do
not need to punch on the start line. However, they must clear and check their SI-Card before the
start line. The start time is based on the allocated start, and not on a start punch. In this case, it is
important to ensure that the computers and start clocks are synchronised to the race time to get
accurate and consistent timing.
The times of the actions clear, check and start are recorded on the SI-Card in special allocated
fields and can always be verified afterwards.
During the race
During the race, the competitor punches by inserting his/her SI-Card into the hole of the SI-
Station. The SI-Station reads the SI-Card and writes the control code and time into the SI-Card’s
memory. The station reads the competitor’s SI-Card again to verify that it has been written
correctly and then beeps and flashes to provide confirmation to the athlete. SI-Card number and
time are also written into the station’s backup memory.
Depending on the type of SI-Card, from 20 to 128 data slots are available. If there are no empty
data fields available on the SI-Card, the SI-Station will not write anything to the SI-Card. In this
case, no feedback signal will be given. However, the failed punch will still be stored in the backup
memory of the station (with an error flag).
SPORTident Organiser Guide, Revision 1, February 2018
SPORTident GmbH • www.sportident.com • [email protected] • Arnstadt • Germany 6/61

Organiser and athletes need to ensure that the SI-Card’s storage is big enough
for the number of controls set on the course.
It is the competitor’s responsibility to ensure that the SI-Card is fully inserted into the station and
to check the station’s feedback signal for confirmation of a correct punch.
Some newer SI-Cards will also provide a feedback. The SI-Card 11 flashes
during a couple of seconds and the SIAC provides an audio feedback signal on
top of that.
At the finish
The runner punches the FINISH station. The finish time is written to an allocated field on the SI-
Card.
SI-Cards are downloaded onto a readout station after the finish to verify the punch sequence and
provide time data which may be either printed directly or passed to a timing software on a
computer.
Featured SI-Stations
SPORTident offers different types of SI-Stations. You will find detailed information in the
datasheets (available on our website).
BSF8-DB
Base Station Field 8 (display bottom), CLEAR, CHECK, START, FINISH or
CONTROL.
BSF8-DT
Base Station Field 8 (display top), CLEAR, CHECK, START, FINISH or
CONTROL.
BSF8-DT SI-Master
Base Station Field 8 (display top), SI-Master in combination with CLEAR,
CHECK, START, FINISH or CONTROL
SPORTident Organiser Guide, Revision 1, February 2018
SPORTident GmbH • www.sportident.com • [email protected] • Arnstadt • Germany 7/61
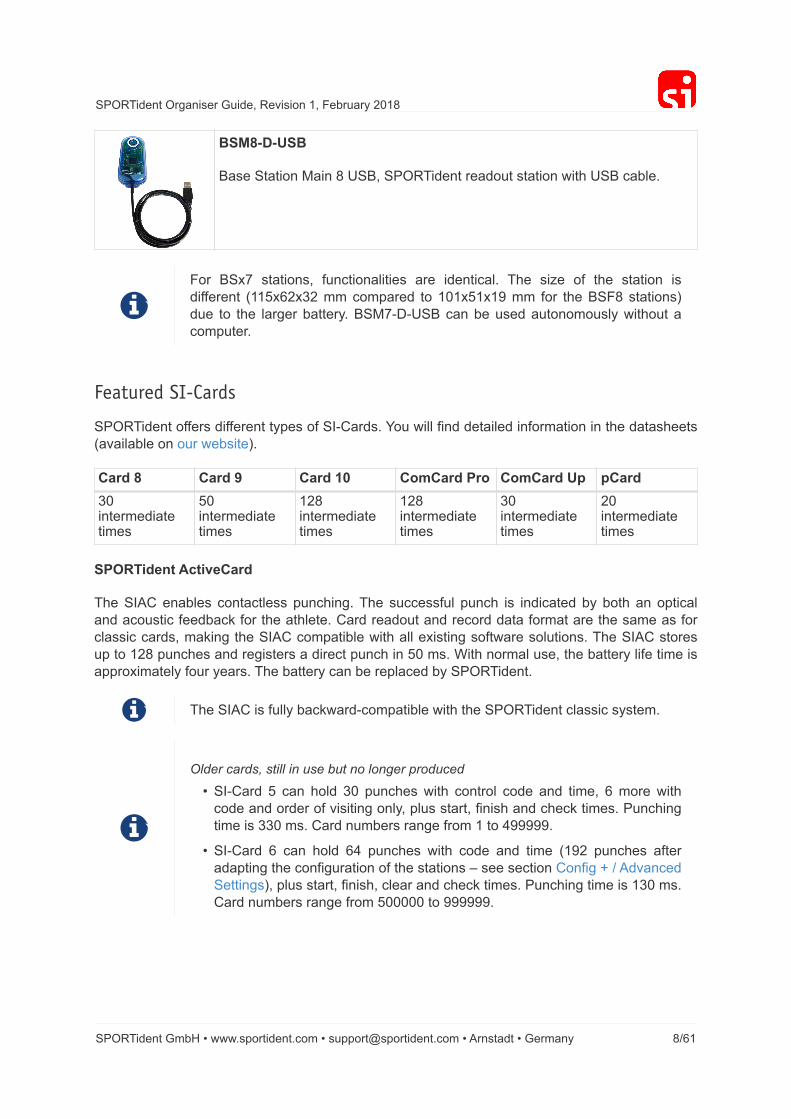
BSM8-D-USB
Base Station Main 8 USB, SPORTident readout station with USB cable.
For BSx7 stations, functionalities are identical. The size of the station is
different (115x62x32 mm compared to 101x51x19 mm for the BSF8 stations)
due to the larger battery. BSM7-D-USB can be used autonomously without a
computer.
Featured SI-Cards
SPORTident offers different types of SI-Cards. You will find detailed information in the datasheets
(available on our website).
Card 8 Card 9 Card 10 ComCard Pro ComCard Up pCard
30intermediatetimes
50intermediatetimes
128intermediatetimes
128intermediatetimes
30intermediatetimes
20intermediatetimes
SPORTident ActiveCard
The SIAC enables contactless punching. The successful punch is indicated by both an optical
and acoustic feedback for the athlete. Card readout and record data format are the same as for
classic cards, making the SIAC compatible with all existing software solutions. The SIAC stores
up to 128 punches and registers a direct punch in 50 ms. With normal use, the battery life time is
approximately four years. The battery can be replaced by SPORTident.
The SIAC is fully backward-compatible with the SPORTident classic system.
Older cards, still in use but no longer produced
• SI-Card 5 can hold 30 punches with control code and time, 6 more with
code and order of visiting only, plus start, finish and check times. Punching
time is 330 ms. Card numbers range from 1 to 499999.
• SI-Card 6 can hold 64 punches with code and time (192 punches after
adapting the configuration of the stations – see section Config + / Advanced
Settings), plus start, finish, clear and check times. Punching time is 130 ms.
Card numbers range from 500000 to 999999.
SPORTident Organiser Guide, Revision 1, February 2018
SPORTident GmbH • www.sportident.com • [email protected] • Arnstadt • Germany 8/61

Basic accessories
Instruction card SERVICE/OFF
Special SI-Card to put the stations in standby or in service mode.
Instruction card CLEAR BACKUP
Special SI-Card to clear the backup memory of the SI-Stations
Coupling stick (not in the picture)
Special graphite stick, to be put in the SI-Master station or USB-Station to make the
communication with other stations possible.
SPORTident Organiser Guide, Revision 1, February 2018
SPORTident GmbH • www.sportident.com • [email protected] • Arnstadt • Germany 9/61

Contactless punching system AIR+
Description
To enable contactless punching (i.e. punching at a distance from the control), SPORTident offers
the extension AIR+ to the existing (classic) stations. The stations operate in beacon mode and
the runners need to use a SIAC within a punching range of about 50 cm with common stations.
This SIAC (AC stands for ActiveCard) can hold 128 punches with code and time plus start,
finish, check and clear times.
The tip of the SIAC flashes when a punch has been recorded and the SIAC emits an audible
beep. The flashing continues while the SIAC is in the field of the control. The SIAC records a
second punch if it has been outside of the beacon station’s active field for at least 8 seconds and
then is moved back in. The SIAC is compatible with the classic system as it can also be used for
direct punching.
SI-Stations in beacon mode will NOT give a feedback signal when a SIAC registers a contactless
punch. In contactless punching mode, the SIAC’s optical and acoustic feedback signals confirm
to the athlete that the control code and timestamp have been successfully written to the card. A
contactless punch is only recorded onto the SIAC and is not recorded in the backup memory of
the station.
As an active device, the SIAC contains a battery. It is important to check the SIAC’s battery
performance before the event. The expected life time of the battery is about 4 years. The SIAC’s
AIR+ feature is not always active so that power consumption can be reduced, and the battery can
last longer. The AIR+ functionality becomes active if the athlete punches the CHECK station
(after clearing the card) or the SIAC ON station. The SIACs AIR+ feature is switched off by
punching a FINISH station. This is why it is important to avoid that runners pass the finish area
accidentally while they are racing. SIACs also can be switched off by using a field station
configured as SIAC OFF.
SPORTident AIR+ is fully backward-compatible with the classic system. Stations used in AIR+
mode implement the AIR+ functionality in addition to the classic direct punching. This means that
passive cards (series 5/6/8/9/10/11) can be used for classic direct punching and SIAC can be
used for contactless punching in the same event.
A direct punch with a SIAC is a fall-back option to register at controls if for any reason a station
would not be in beacon mode. The SIAC will always work in direct punching mode, even if its
battery is empty.
A SI-Station used in AIR+ mode uses about ten times more power than a similar station used only
for direct punching. A BSF8 with a brand-new battery will operate for about 1500 hours (120
events) before the battery needs to be changed, a BSF7 about double that time. To reduce power
consumption, it is strongly recommended to turn the stations into standby mode by using the
instruction card SERVICE/OFF immediately after the event.
In Foot-O, the use of AIR+ is beneficial in particular in urban sprint and sprint relays where a
whole group of competitors may arrive at a control at the same time with little space to place
multiple punching units. The AIR+ system allows several runners to punch a single control at the
SPORTident Organiser Guide, Revision 1, February 2018
SPORTident GmbH • www.sportident.com • [email protected] • Arnstadt • Germany 10/61

same time.
In Ski-O and MTBO, it is a little awkward for competitors to use traditional punching and it is
easier for them to use contactless punching. The special BS11 stations are the ideal solution. Of
course, for other sports with check points that are not easily accessible or with many participants,
AIR+ offers many advantages.
SIAC activation / deactivation
With a CLEAR station, the SIAC’s memory is cleared. With a CHECK station, this process is
verified and the SIAC is switched on. The SIAC remains active for about 20 hours if it is not
switched off. This timer is reset with each direct or proximity punch. The SIAC indicates an active
state with a slowly blinking green LED. The SIAC is deactivated by a FINISH punch (with a
classic punch or in the contactless way in beacon mode). The SIAC can also be turned off by a
SIAC OFF station.
If a SIAC is not activated before the start of the race, it will not be possible to
get any time records from a distance. In this case only direct punching will
work.
There are two ways to activate the AIR+ functionality. For orienteering we
recommend using a CHECK station as part of the starting procedure.
Organisers need to make sure that there is a CLEAR station before the
CHECK station. If a SIAC is not cleared, it will not be possible to switch it on
with a CHECK station. For other sports we recommend using a field station
configured as SIAC ON. In this case SIAC can be switched on without clearing
the card in advance.
It is recommended to programme the CLEAR station with code 1. This will
suppress the SIAC’s feedback beeps and flashes when clearing. This way, the
SIAC can punch the CHECK station without delay to activate contactless
punching. If an alternative code is used for the CLEAR station, there is the
possibility that the athlete will punch the CHECK station while the SIAC is still
beeping and flashing. In this case the CHECK punch will not register, and
contactless punching will not be activated for the SIAC.
SIAC mounting
For orienteers
There is no recommended best practice to attach and carry a SIAC. However, it is important that
the athlete should be able to observe the SIACs feedback signals. For foot orienteering, the SIAC
is generally carried as a finger stick. For orienteers who know the classic punch system, there is
no need to change the common way of carrying the card.
SPORTident Organiser Guide, Revision 1, February 2018
SPORTident GmbH • www.sportident.com • [email protected] • Arnstadt • Germany 11/61

For trail runners
For trail running and other sports, we recommend that athletes carry the SIAC on their wrists. If
there is no need for the athletes to punch the SIAC in the classic way and the card is activated
before the race start, the wrist is the optimal position.
For mountain bikers
For MTB applications we recommend carrying the SIAC on the wrist or using the SPORTident
Mounting holder "Bike" to affix the card on the frame or handlebar of the athlete’s bike. Please
ensure that the SIAC is mounted at the height of the field stations used for the event.
How not to mount the SIAC
GPS could influence SIAC signal
The AIR+ mode can be compromised by disturbances caused by third party equipment. The
active antenna of some GPS watches can significantly reduce the SIAC’s sensitivity. As a rule, a
GPS watch and SIAC shall not be carried on the same arm.
SPORTident Organiser Guide, Revision 1, February 2018
SPORTident GmbH • www.sportident.com • [email protected] • Arnstadt • Germany 12/61

Battery packs could influence SIAC signal
Advanced LED lamps use a switching circuitry to modulate the lamp’s brightness. Some lamp
models are not properly protected against emission of these signals. Even the battery leads of
these lamps can act as an antenna. Therefore, the LED lamp shall not be mounted next to the
SIAC and battery leads should not be positioned near the SIAC.
BSF7/8 for AIR+
The BSF7/8 stations can be used for contactless punching. The operating mode of the stations
has to be changed with Config+ in the same way as for the classic system (see section Config+ /
Basic configuration). The stations must be programmed in beacon mode. Possible operating
modes are: Start (BC STA), Finish (BC FIN) and Control (BC CN).
Configuration of BSF7/8
1. Read the station in remote mode by clicking on Settings. For more information on how to do
that, please refer to secion Config+ / Device connection.
2. Click on the field of the operating mode. The different options are shown. Choose the desired
function.
SPORTident Organiser Guide, Revision 1, February 2018
SPORTident GmbH • www.sportident.com • [email protected] • Arnstadt • Germany 13/61

3. Ton confirm, simply click the Apply button in the main toolbar.
4. A progress bar will pop up and confirm the configuration.
Operating mode Functionality
BC STA - Beacon Start Start time will be written on the SIAC in thecontactless way. Subsequent start punches willoverwrite the start time slot in the SI-Cardmemory, but the first start time will remainavailable in the start reserve slot.
BC CN - Beacon Control Works like a normal control station, but also inthe contactless way. The SIAC can store up to128 controls.
BC FIN - Beacon Finish Finish time will be written on the SI-Card in thecontactless way. Subsequent finish puncheswill overwrite the finish time slot in the SI-Cardmemory, but the first finish time will remainavailable in the finish reserve slot. The SIACautomatically turns off after receiving BC FIN.
Stations operating in beacon mode must be activated using a direct punch. It is
very important that for competitive events ‘real’ competitors do not find the
controls in standby mode because beacon mode is not active in standby mode
and consequently contactless punching is not possible. Pre-runners must
punch all the controls in the morning, first with a direct punch and then with a
contactless punch by using an activated SIAC to ensure that they are indeed
functioning correctly. Both punches can be registered with the same SIAC.
The operating time must be set so that the controls are still active when the first
and the last real competitor visits the controls. Furthermore, it should be noted
that contactless punching does not reset the operating time and thus needs to
be set to last for the duration of the whole event. The default value for stations
in beacon mode is 12 hours.
The stations will deactivate automatically at the end of the operating time, but to reduce power
consumption it is strongly recommended to turn the SI-Stations into standby mode manually by
using the instruction card SERVICE/OFF immediately after the stations are collected. A BSF7/8
station used in AIR+ mode uses more power than a similar station being used only for direct
punching. After using the stations, they should be set back into normal mode if the beacon mode
is NOT required for the next event. To handle this efficiently, it is helpful to use the software
Config+ and the command Apply default.
Important notice: The SERVICE/OFF instruction card does NOT enable the
beacon field of the station but switches to service mode/standby only.
SPORTident Organiser Guide, Revision 1, February 2018
SPORTident GmbH • www.sportident.com • [email protected] • Arnstadt • Germany 14/61

Special operating modes
Stations can also be configured to fulfil a special function, linked to the SIAC. These stations do
not perform any other action/mode (like CONTROL, START, …). The procedure is identical as
described above and the possibilities are shown below. SIAC special operating modes can be
configured in BSF7, BSF8, BSM7-USB (or RS232) and BSM8-USB.
SIAC Battery test
The battery voltage of the punched SIAC is measured and shown on the station’s service display.
An acoustic signal ‘normal beep’ indicates that the battery is OK. For voltages below 2.72 Volts,
the station will show WARN (warning) and emit a warning signal – several beeps at higher
frequency. In this case the battery is close to the end of life, but should easily last for the current
event, unless a lot of data is being collected from the chip for live timing. In case of FAIL (failure)
for voltages below 2.44 Volts, there is no feedback signal. In this case, the battery voltage is
below the critical level and the SIAC cannot be used for contactless punching. Battery service is
needed.
It is recommended to conduct the test before every event. SIAC Battery test stations should
therefore be placed in the event centre, so that athletes can use them early before the start. The
station’s battery voltage evaluation software considers the temperature dependency of the battery
voltage. Voltages measured are stored in the station’s backup memory. Information consisting of
SIAC ID and the battery voltage can be read out by using Config+ (see section Config+ / Read
backup).
SPORTident Organiser Guide, Revision 1, February 2018
SPORTident GmbH • www.sportident.com • [email protected] • Arnstadt • Germany 15/61

SIAC ON and SIAC OFF
Stations with SIAC ON / SIAC OFF operating modes activate and terminate the SIAC’s AIR+
functionality.
In the context of an event usage cycle, the AIR+ functionality in orienteering is typically activated
by the CHECK station and switched off by the FINISH station. With the typical procedure, the time
of check and finish are written on the SIAC.
Using SIAC ON / SIAC OFF is an alternative way. The difference is that no record is written into
the SIAC and that the SIAC is activated with SIAC ON even when the SIAC has not been cleared
before. By means of these operating modes several training sessions with breaks in between are
supported during one day. Data are collected over the day and a final evaluation can be done
afterwards.
SIAC ON does not clear the card. It has to be ensured that this is done before
the race or training.
SIAC Radio readout
A station programmed in this working mode and punched directly by a SIAC triggers the SIAC
(even when it is turned off) to send out all data records stored by its internal radio. This punch
does not modify the card memory (i.e. data records on the SIAC are not deleted). To receive the
data, a SI-SRR dongle or SIGSM-DN is needed (see chapter Short range radio). The radio
dongle (SI-SRR USB Dongle) receives these records and supplies them to the computer for
further evaluation. The GSM modem SIGSM-DN can be used to upload live data to SPORTident
web services.
Radio readout is recommended when evaluations between single sections are required. For
example, the procedure is very useful for evaluating promptly single split times during a training
day.
Data read out are not stored in the Radio readout station’s backup memory.
SIAC test
Despite all precautions taken by the organiser, it might occur that a runner enters the start box
without having activated his/her SIAC. This can easily be verified with the SIAC TEST station.
When coming in range of the station (50 cm), the SIAC should react as for a normal punch. The
SIAC TEST station will not write any data on the SIAC. The card remains empty and is thus still
able to register the start time (the START will not work when a SI-Card is not empty). The same
test is also useful for allocated start times.
BS11 for AIR+
Identification at check points in outdoor sport disciplines like trail, biking and skiing is slightly
different than in orienteering. In general, passing speed is higher. The BS11 stations are specially
SPORTident Organiser Guide, Revision 1, February 2018
SPORTident GmbH • www.sportident.com • [email protected] • Arnstadt • Germany 16/61
adapted for these applications by enabling identification over the air over a larger distance. With
the BS11-BL station, the SIAC can register the intermediate and start/finish times in a range of up
to 3 metres.
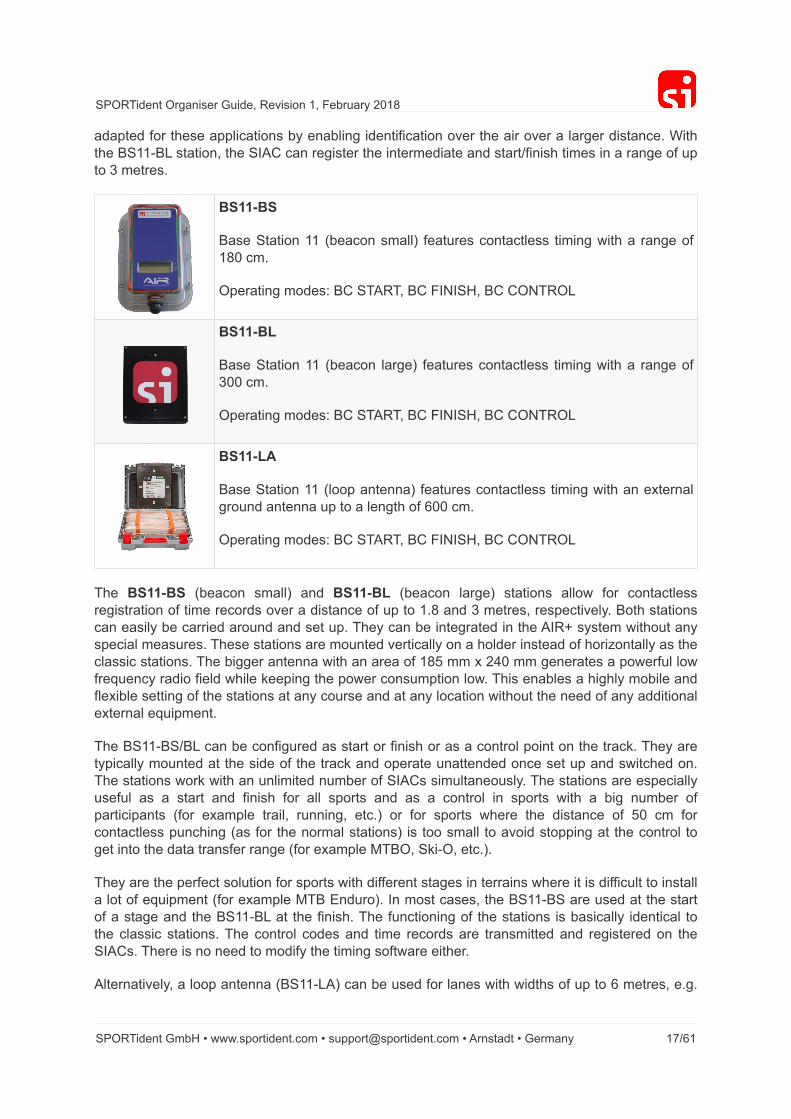
BS11-BS
Base Station 11 (beacon small) features contactless timing with a range of
180 cm.
Operating modes: BC START, BC FINISH, BC CONTROL
BS11-BL
Base Station 11 (beacon large) features contactless timing with a range of
300 cm.
Operating modes: BC START, BC FINISH, BC CONTROL
BS11-LA
Base Station 11 (loop antenna) features contactless timing with an external
ground antenna up to a length of 600 cm.
Operating modes: BC START, BC FINISH, BC CONTROL
The BS11-BS (beacon small) and BS11-BL (beacon large) stations allow for contactless
registration of time records over a distance of up to 1.8 and 3 metres, respectively. Both stations
can easily be carried around and set up. They can be integrated in the AIR+ system without any
special measures. These stations are mounted vertically on a holder instead of horizontally as the
classic stations. The bigger antenna with an area of 185 mm x 240 mm generates a powerful low
frequency radio field while keeping the power consumption low. This enables a highly mobile and
flexible setting of the stations at any course and at any location without the need of any additional
external equipment.
The BS11-BS/BL can be configured as start or finish or as a control point on the track. They are
typically mounted at the side of the track and operate unattended once set up and switched on.
The stations work with an unlimited number of SIACs simultaneously. The stations are especially
useful as a start and finish for all sports and as a control in sports with a big number of
participants (for example trail, running, etc.) or for sports where the distance of 50 cm for
contactless punching (as for the normal stations) is too small to avoid stopping at the control to
get into the data transfer range (for example MTBO, Ski-O, etc.).
They are the perfect solution for sports with different stages in terrains where it is difficult to install
a lot of equipment (for example MTB Enduro). In most cases, the BS11-BS are used at the start
of a stage and the BS11-BL at the finish. The functioning of the stations is basically identical to
the classic stations. The control codes and time records are transmitted and registered on the
SIACs. There is no need to modify the timing software either.
Alternatively, a loop antenna (BS11-LA) can be used for lanes with widths of up to 6 metres, e.g.
SPORTident Organiser Guide, Revision 1, February 2018
SPORTident GmbH • www.sportident.com • [email protected] • Arnstadt • Germany 17/61

in ski orienteering. The loop antenna is put directly at the finish line and buried in the snow or
covered with a thin carpet (no metal objects can be used as they would disturb the magnetic
field).
Charging
BS11 stations have a rechargeable battery and need to be charged before application. The
stations are equipped with a standard mini USB connector. The stations need to be connected
directly to a USB port of the computer or with an adapter to the socket. To assure waterproofness
of the stations, the mini USB connectors are protected.
The mini USB connector is located at the short side for the BS11-BS under the
rubber cap.
The mini USB connector is located at the backside of the BS11-BL under the
blue cap.
The charging progress is indicated by LED in the display:
• Yellow – Indicates (5 seconds only) that the station is successfully connected to a USB
interface.
• Red – Indicates that the station is charging.
• Green – Indicates that the charging is completed.
A fully charged station BS11-BS will work for about 75 hours and a fully
charged station BS11-BL for about 90 hours.
We recommend charging the BS11 units before every race.
Configuration of BS11
After connecting a BS11 station with the USB cable to the computer, it can be configured with
Config+. The station is read by double clicking on the device in the start-up screen (Direct and
Remote are not active).
SPORTident Organiser Guide, Revision 1, February 2018
SPORTident GmbH • www.sportident.com • [email protected] • Arnstadt • Germany 18/61
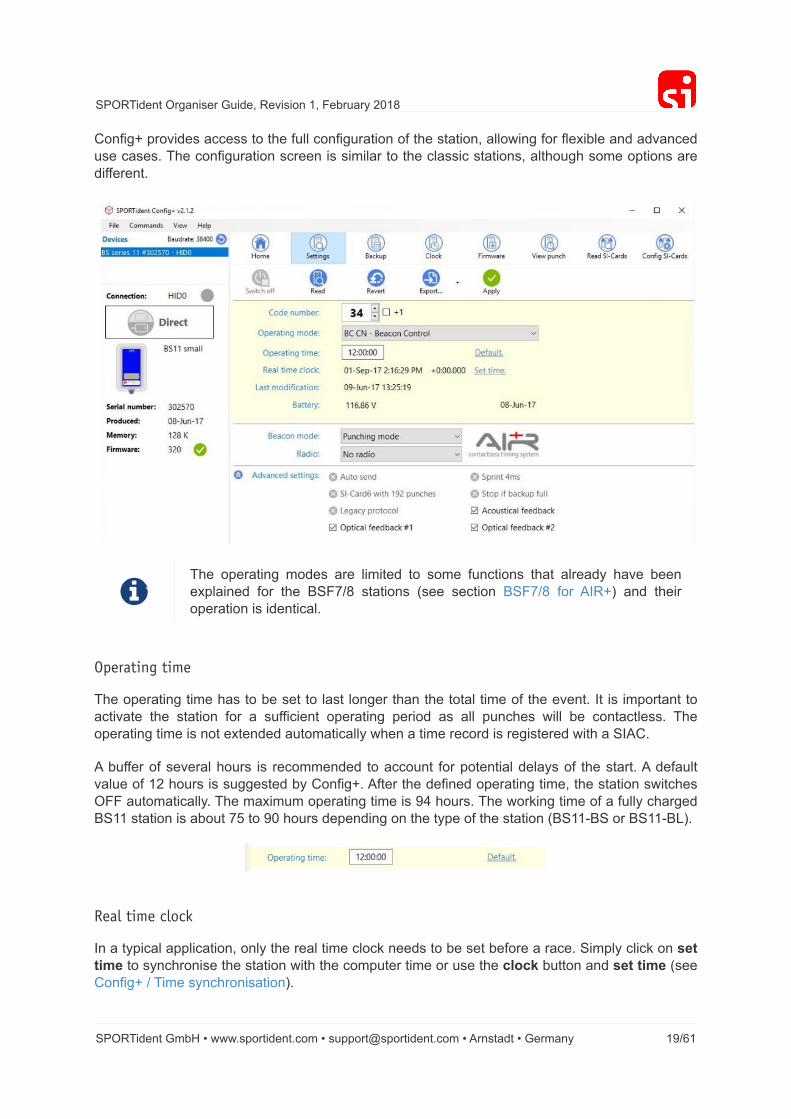
Config+ provides access to the full configuration of the station, allowing for flexible and advanced
use cases. The configuration screen is similar to the classic stations, although some options are
different.
The operating modes are limited to some functions that already have been
explained for the BSF7/8 stations (see section BSF7/8 for AIR+) and their
operation is identical.
Operating time
The operating time has to be set to last longer than the total time of the event. It is important to
activate the station for a sufficient operating period as all punches will be contactless. The
operating time is not extended automatically when a time record is registered with a SIAC.
A buffer of several hours is recommended to account for potential delays of the start. A default
value of 12 hours is suggested by Config+. After the defined operating time, the station switches
OFF automatically. The maximum operating time is 94 hours. The working time of a fully charged
BS11 station is about 75 to 90 hours depending on the type of the station (BS11-BS or BS11-BL).
Real time clock
In a typical application, only the real time clock needs to be set before a race. Simply click on set
time to synchronise the station with the computer time or use the clock button and set time (see
Config+ / Time synchronisation).
SPORTident Organiser Guide, Revision 1, February 2018
SPORTident GmbH • www.sportident.com • [email protected] • Arnstadt • Germany 19/61

You also can synchronise the time by clicking Clock on the main navigation
bar.
Beacon mode
The BS11 stations can be programmed in Punching or Timing Mode.
Punching mode
In orienteering, Punching mode is recommended for all controls. The SIAC registers the time
and station’s code number when it enters the station’s active field. The SIAC’s feedback signals
stay active while the SIAC stays in the station’s active area.
Timing mode
SPORTident Organiser Guide, Revision 1, February 2018
SPORTident GmbH • www.sportident.com • [email protected] • Arnstadt • Germany 20/61
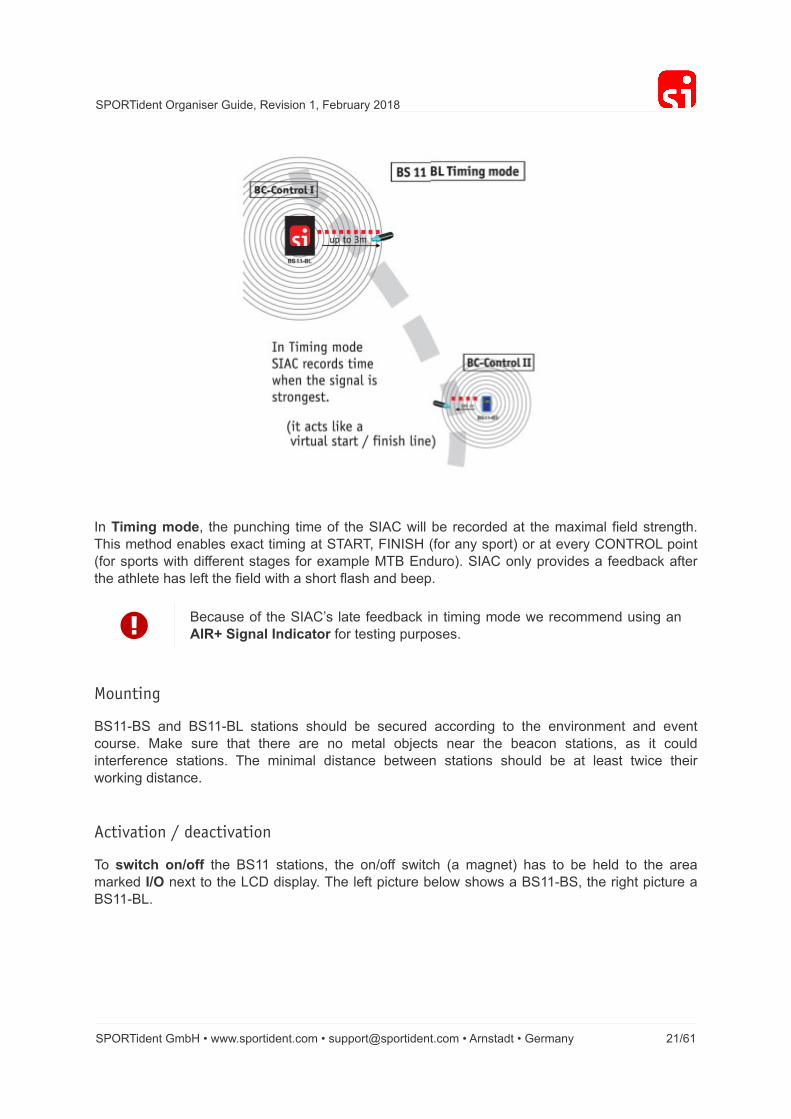
In Timing mode, the punching time of the SIAC will be recorded at the maximal field strength.
This method enables exact timing at START, FINISH (for any sport) or at every CONTROL point
(for sports with different stages for example MTB Enduro). SIAC only provides a feedback after
the athlete has left the field with a short flash and beep.
Because of the SIAC’s late feedback in timing mode we recommend using an
AIR+ Signal Indicator for testing purposes.
Mounting
BS11-BS and BS11-BL stations should be secured according to the environment and event
course. Make sure that there are no metal objects near the beacon stations, as it could
interference stations. The minimal distance between stations should be at least twice their
working distance.
Activation / deactivation
To switch on/off the BS11 stations, the on/off switch (a magnet) has to be held to the area
marked I/O next to the LCD display. The left picture below shows a BS11-BS, the right picture a
BS11-BL.
SPORTident Organiser Guide, Revision 1, February 2018
SPORTident GmbH • www.sportident.com • [email protected] • Arnstadt • Germany 21/61

The stations initialise with an acoustic and optical signal. The display is active. Additionally, there
are repeating short optical feedback signals while the station is active.
To deactivate the BS11 units, hold the Switch On/off at the I/O marked area,
until a red LED light is blinking three times and the display is switched off.
The activation of the stations should be done on the course. Do not activate a
station if another station is in range. If ERROR is shown on the display,
deactivate and activate the unit once again.
Gate mode
When two BS11-BL stations are put in front of each other, they automatically create a gate (i.e. a
virtual line). This is the ideal solution for a finish. Time is only recorded when crossing the finish
line. SIACs passing outside of this gate are not affected or accidentally deactivated. A safety zone
of 2 m is still recommended.
To create a gate as a finish:
1. Prepare the BS11-BL stations in Config+. Choose the following options
a. Operating mode: Beacon Finish
b. Beacon mode: Timing mode
c. Do not forget to set time for the clock of the station.
2. Once mounted, switch on the first station. This station will automatically be the master
station.
3. Switch on the second station within the range of the first station. This station will start up as
slave station. You can verify gate mode by checking if one display shows "Gate M" and the
other "Gate S".
SPORTident Organiser Guide, Revision 1, February 2018
SPORTident GmbH • www.sportident.com • [email protected] • Arnstadt • Germany 22/61

4. The finish gate is now operational.
The gate mode is working for all operating modes of the BS11-BL stations.
The master station will define operating mode, beacon mode and time. It is
good practice to configure both stations with the same settings to avoid
mistakes.
SPORTident Organiser Guide, Revision 1, February 2018
SPORTident GmbH • www.sportident.com • [email protected] • Arnstadt • Germany 23/61

Config+
The SPORTident Config+ software enables you to read out and configure your SPORTident
equipment. The SPORTident USB driver is necessary to communicate with a readout station
connected via USB to your computer. Config+ provides functionality to read and modify the
station, as well as any station put on top of this station and SI-Cards inserted into the station.
In 90% of the cases, stations arrive pre-configured and labelled. For many
sports or activities, no modification is needed. This guide is explaining possible
modifications of the configuration that might provide you with extra possibilities
for your sport.
Please download and install Config+ and the USB driver from the SPORTident website. When
installing Config+, installation of the USB driver is proposed as an option. The easiest solution is
to check the checkbox for the USB driver and install it right away. Follow the instructions on the
screen.
Config+ can be run in portable mode. This will not leave any traces on the
machine it is running on. You can extract all files of the application into a folder
on your thumb drive or memory card.
Device connection
Direct mode
1. Connect the readout station (e.g. BSM8-USB or BSM7-USB) to the PC.
2. Start the Config+ software (the shortcut is usually on the desktop).
SPORTident Organiser Guide, Revision 1, February 2018
SPORTident GmbH • www.sportident.com • [email protected] • Arnstadt • Germany 24/61

3. If not selected already, click on the device you want to read.
4. The button below connection needs to be on the position Direct.
5. Then click on ‘settings’. The data of the station will be read and displayed.
Settings overview
1. The available device(s) and connection(s)
2. The menu bar
3. Information about the station and the installed firmware
4. The language selector. By clicking it, another language can be selected
5. The main toolbar
6. Station’s basic settings area
7. Station’s AIR+ settings area
8. Station’s advanced settings area (can be shown/hidden by clicking the arrow left from
‘Advanced settings’)
Remote mode
1. Connect the main station (e.g. BSM8-USB or BSM7-USB) to the computer.
2. Put the SI-Station you want to read out and/or configure in service mode. Place the
SERVICE/OFF instruction card ONCE in the station. On the LCD display SERVMO is visible
(afterwards the other data of the station are shown).
3. Start Config+.
SPORTident Organiser Guide, Revision 1, February 2018
SPORTident GmbH • www.sportident.com • [email protected] • Arnstadt • Germany 25/61

Put the coupling stick (ferrite for faster transmission) into the USB station and place the station (in
service mode) on top of it (this station becomes the slave station).
The Direct button needs to be toggled to Remote. If the button show ‘Direct’ click on it to toggle
it. Click on Settings in the main toolbar. The data of the station will be read and displayed.
The layout of the screen is identical to the one in direct mode, although some
action buttons are not active (inactive buttons are grey instead of blue).
In direct mode, the settings of the station connected to the computer can be
read/modified. In remote mode, the settings of the station put on top of the
main station can be read/modified.
Basic configuration
Most SPORTident stations are technically identical and can be assigned any of the available
functions. For the basic setup, these functions are CLEAR, CHECK, START, CONTROL and
FINISH. The other possibilities will be explained with the AIR+ system.
SPORTident Organiser Guide, Revision 1, February 2018
SPORTident GmbH • www.sportident.com • [email protected] • Arnstadt • Germany 26/61

An SI-Card has allocated fields for the time of punching the stations CLEAR, CHECK, START and
FINISH and a number of fields for the controls and the punching time.
Operating mode Functionality
CLR - CLEAR Removes all data from the SI-Card andprovides a feedback signal upon completion.
CHK - CHECK Verifies that the SI-Card is empty and providesa feedback signal only if this is the case.
STA - START Verifies that the SI-Card is empty and writes thestart time on the SI-Card if this is the case.Provides a feedback signal if the start time hasbeen written successfully. If the SI-Card is notempty, the old start time is not overwritten. Ifthere are no controls punched yet, the starttime is overwritten.
CN - CONTROL Reads the competitor’s SI-Card and writes thecontrol code and time on the SI-Card. The SI-Station then reads the SI-Card again to verifythat it has been written correctly and thenbeeps and flashes and writes the SI-Cardnumber and time into the station’s backupmemory. If there are no data fields availableanymore, the station will not write anything onthe SI-Card (only in its backup memory) andwill provide no feedback.
FIN - FINISH Writes the finish time on the SI-Card (andoverwrites a potential previous finish time, forexample if somebody realized he/she hadforgotten a control and went back) and confirmswith a feedback signal.
The SIAC has two allocated fields for clear, start and finish (a normal and a
reserve field). The reserve field is never overwritten and always stores the first
time when start or finish were punched.
The function of a station is defined by the choice of operation mode in Config+.
The label on top of the station should match this setting or otherwise be
modified to match the setting! The numbers used to label the SI-Stations are
available separately.
Configuration procedure
1. Read the station in remote mode by clicking on Settings
SPORTident Organiser Guide, Revision 1, February 2018
SPORTident GmbH • www.sportident.com • [email protected] • Arnstadt • Germany 27/61

2. Click on the field of the operating mode (below the control number). The different options are
shown. Choose the desired function.
3. To modify the control number, just change the code by clicking on the arrows (up or down) or
type in the desired number. Control numbers 1 to 511 are allowed, but typically the control
numbers start at 31 (see remark below). Important: Most of the PC software for orienteering and
the SI-Card 5 can only process numbers between 31 and 255.
The code numbers 1 to 30 are available but are most of the time only used for
the special stations CLEAR, CHECK, START, FINISH and READOUT.
Typically, these are numbered from 1 to 5 as this is the logical sequence for the
use of the stations.
4. To confirm, simply click the Apply button in the main toolbar. A window with a progress bar will
pop up and show the activity.
SPORTident Organiser Guide, Revision 1, February 2018
SPORTident GmbH • www.sportident.com • [email protected] • Arnstadt • Germany 28/61

Switch off feature
If the Switch off button in the main toolbar is activated, the station will automatically go in
standby mode when the Apply button is used.
Operating time
The SI-Station is always on and works in a low power standby mode. There is no need to switch
on the SI-Station or to make any special preparation before the unit can be used. In standby
mode the SI-Station is fully qualified to receive SI-Cards. The wake-up time is at most 1 second.
In standby mode, the SI-Station is scanning for SI-Cards every second, in active mode the
interval is 40 ms. The wake-up time is variable and depends on where in the 1 second cycle the
SI-Card is inserted. Once the SI-Station is in active mode, the reaction time to the insertion of
subsequent SI-Cards is very quick. The SI-Station then operates in active mode until the set
operating time is reached. Any further punches reset that countdown. For example, the unit only
switches back to standby mode 4 hours after the last punch if the 4 hours default setting for the
operating time is used.
Change operating time
To modify the operating time in Config+:
1. Read the station in remote mode by clicking on ‘Settings’.
2. To modify the operating time, change the HH:MM:SS time or click on ‘Default’. For the classic
system, the default operating time of the stations is 4 hours. The minimum operating time is 2
minutes, the maximum operating time is 95 hours.
3. To confirm the changes simply click the Apply button in the main toolbar.
Clicking the Apply button always overwrite all information of the station. Any
kind of backup data will be deleted.
Time synchronisation
All stations have an internal clock and their ‘real time’ has to be monitored. The station’s real time
clock system is calibrated and temperature compensated. This offers a high accuracy also at very
high and very low temperatures. The internal time resolution is approximately 4 ms and the
SPORTident Organiser Guide, Revision 1, February 2018
SPORTident GmbH • www.sportident.com • [email protected] • Arnstadt • Germany 29/61
deviation about 4 seconds per week.
It is vital that all stations and especially the start and finish stations are time synchronised before
a race. That can be achieved by Config+ or by using the SI-Master station. If you use a SI-Master
station for time synchronisation you do not need a computer, except to synchronise the SI-Master
itself to computer time. The SI-Master station can transmit the time directly to the other stations.
Time synchronisation with the main computer used for evaluating the
competition is strictly recommended before the race start.
If you use multiple computers during an event, make sure that all computers
run on the same local time.
The time of a SPORTident station will automatically set when:
1. … you are booting the firmware of a SI-Station
2. … you are changing the configuration of a SI-Station
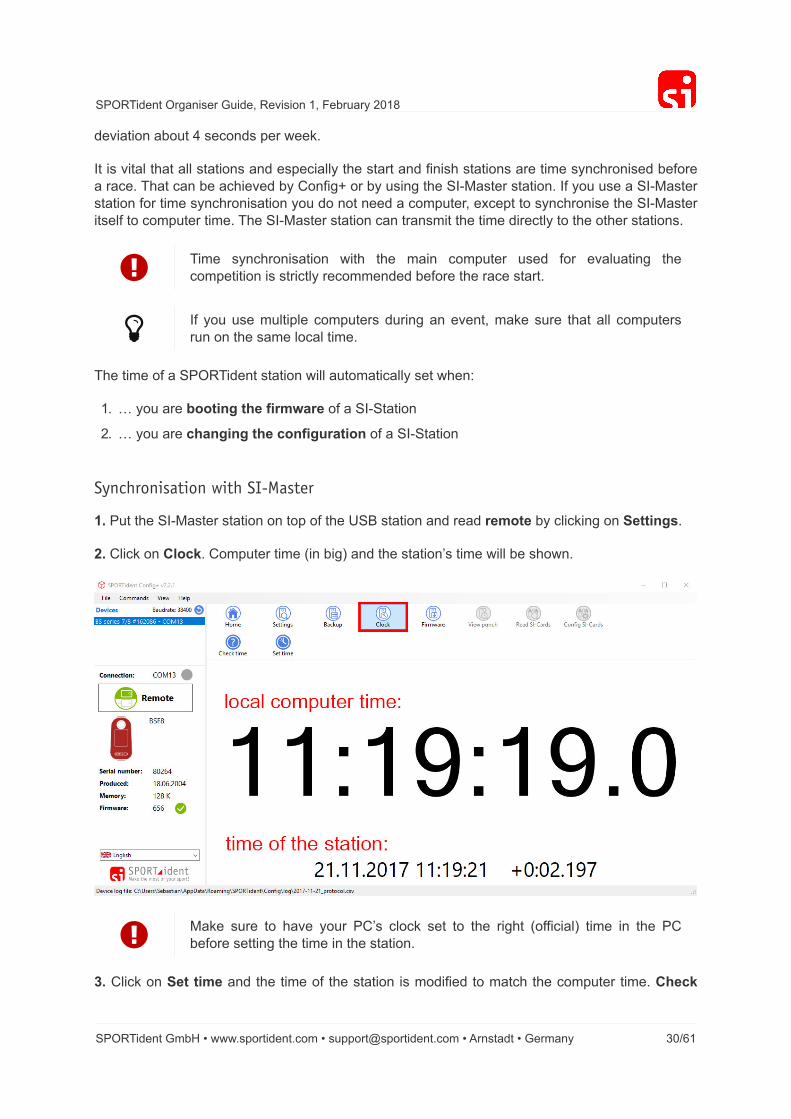
Synchronisation with SI-Master
1. Put the SI-Master station on top of the USB station and read remote by clicking on Settings.
2. Click on Clock. Computer time (in big) and the station’s time will be shown.
Make sure to have your PC’s clock set to the right (official) time in the PC
before setting the time in the station.
3. Click on Set time and the time of the station is modified to match the computer time. Check
SPORTident Organiser Guide, Revision 1, February 2018
SPORTident GmbH • www.sportident.com • [email protected] • Arnstadt • Germany 30/61

time allows you to verify this afterwards.
Alternatively, it is possible to click on Set time in the settings area of the
station. The clock will also be synchronised.
The station will remember the date of the last modification of the station
settings but not of setting the time of the clock. In other words, the last
modification is NOT the date of the last time synchronisation of the station.
If the settings of a station are modified and applied by clicking the Apply
button, the time of the clock is automatically synchronised.
4. Remove the SI-Master from the main station.
5. Put the SERVICE/OFF instruction card twice (with a very short time interval) in the SI-Master.
On the front side of the SI-Master there is a small LCD display. On this screen TIMEMA must be
shown. When you see this the station is ready.
6. Put the coupling stick in the SI-Master.
7. Place the SERVICE/OFF instruction card ONCE in the station you want to synchronise. On the
LCD display SERVMO is visible (afterwards the other data of the station are shown).
8. Place the station on the coupling stick and the SI-Master. After some seconds there is a ‘beep’.
The time of the station is now adjusted.
9. Place the ‘SERVICE/OFF’ instruction card into the station until the LCD display is empty. The
SPORTident Organiser Guide, Revision 1, February 2018
SPORTident GmbH • www.sportident.com • [email protected] • Arnstadt • Germany 31/61

station is now back in standby mode (it would automatically switch into standby mode after 5
minutes).
If the event is on the Sunday of the weekend when the clocks are adjusted for
daylight saving time, special care must be taken. The SI-Stations will not be
aware of the change!
In ExtendedMaster mode the SI-Master transmits its clock time to any other
SPORTident station. Additionally, the SI-Master clears the backup memory of
the coupled station and transmits its own active time to the coupled station. You
can activate the ExtendedMaster by punching the SERVICE OFF three times
in the SI-Master. The display will show EXTMA.
SI-Master additional features
The SI-Master station works both as a ‘Time Master’ and as a normal SI-Station, for example as a
clear station. This means that there are two functions in one unit. The SI-Master is an extended
control station. It works and can be configured the same way as any other SI-Station. Each action
by an ordinary SI-Card immediately activates the station’s base mode. All functionalities of the
regular SI-Stations are available. However, as this station is about 50% more expensive, it is
recommended not to use it as a regular SI-Station. When punching a SI-Master station in standby
mode with the SERVICE/OFF instruction card, it will cycle between the following modes:
Service mode (SERVMO):
Displays the most important settings, switches back to standby mode after 5 minutes.
Time master (TIMEMA):
The station will synchronise and set the time of every coupled SI-Station (see section
Synchronisation with SI-Master).
Extended master (EXT MA):
The station will not only synchronise and set the time of every coupled SI-Station but also change
the operating time to the one of SI-Master station (see section Operating time) and clear the
backup memory of the coupled station (see section Read backup). With these 3 actions executed
at the same time, an organiser can save significant time when preparing the stations for a race.
Standard master (STD MA):
The station will synchronise and set the time of every coupled SI-Station and restore the default
standard configuration for the station that has been set up in advance using Config+ and clear the
backup memory of the coupled station. This is an ideal solution for stations frequently used by
different persons.
Start clock (STACLK):
This mode is only available if the device is programmed in start operating mode.
SPORTident Organiser Guide, Revision 1, February 2018
SPORTident GmbH • www.sportident.com • [email protected] • Arnstadt • Germany 32/61
In extended master mode, the operating time of a station is set to a value of 12
hours if the coupled station is programmed in one of the beacon operating
modes and the program value in Config+ is less than 12 hours. Higher values
are disregarded (see chapter Contactless punching system AIR+).
Battery status
A lithium battery is soldered to the printed circuit board and can be replaced (size 1/2 AA in the
BSF8 station, AA in the BSF7 station). The double size of the battery of the BSF7 stations
provides an extended life time to the stations before battery replacement is required (4 to 7 years
for the BSF7 stations against 3 to 5 years for the BSF8 stations). The listed life time is of course
an average, and depends basically on the frequency of use of the stations, the number of
participants and the use of AIR+.
The voltage of all stations should be checked (at least twice a year) to make sure that the
batteries are OK. There are different possibilities to check the battery:
• If the battery is almost empty, the station will beep 6 times with short intervals while punched.
• Read the voltage directly on the station (see chapter LCD display information). The voltage
should be in the range of 3.20 V and 3.50 V.
• Check the voltage with Config+. This is the most reliable way.
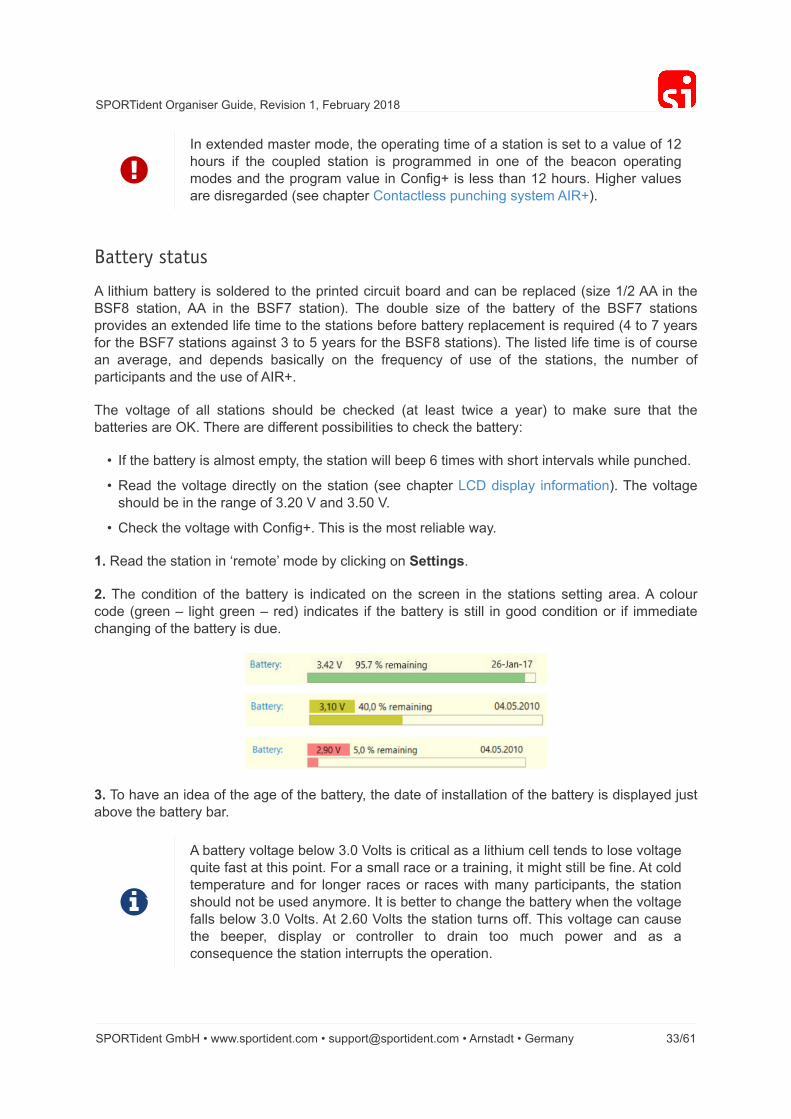
1. Read the station in ‘remote’ mode by clicking on Settings.
2. The condition of the battery is indicated on the screen in the stations setting area. A colour
code (green – light green – red) indicates if the battery is still in good condition or if immediate
changing of the battery is due.
3. To have an idea of the age of the battery, the date of installation of the battery is displayed just
above the battery bar.
A battery voltage below 3.0 Volts is critical as a lithium cell tends to lose voltage
quite fast at this point. For a small race or a training, it might still be fine. At cold
temperature and for longer races or races with many participants, the station
should not be used anymore. It is better to change the battery when the voltage
falls below 3.0 Volts. At 2.60 Volts the station turns off. This voltage can cause
the beeper, display or controller to drain too much power and as a
consequence the station interrupts the operation.
SPORTident Organiser Guide, Revision 1, February 2018
SPORTident GmbH • www.sportident.com • [email protected] • Arnstadt • Germany 33/61
Changing the battery is possible and needs to be done by SPORTident or one
of its retailers.
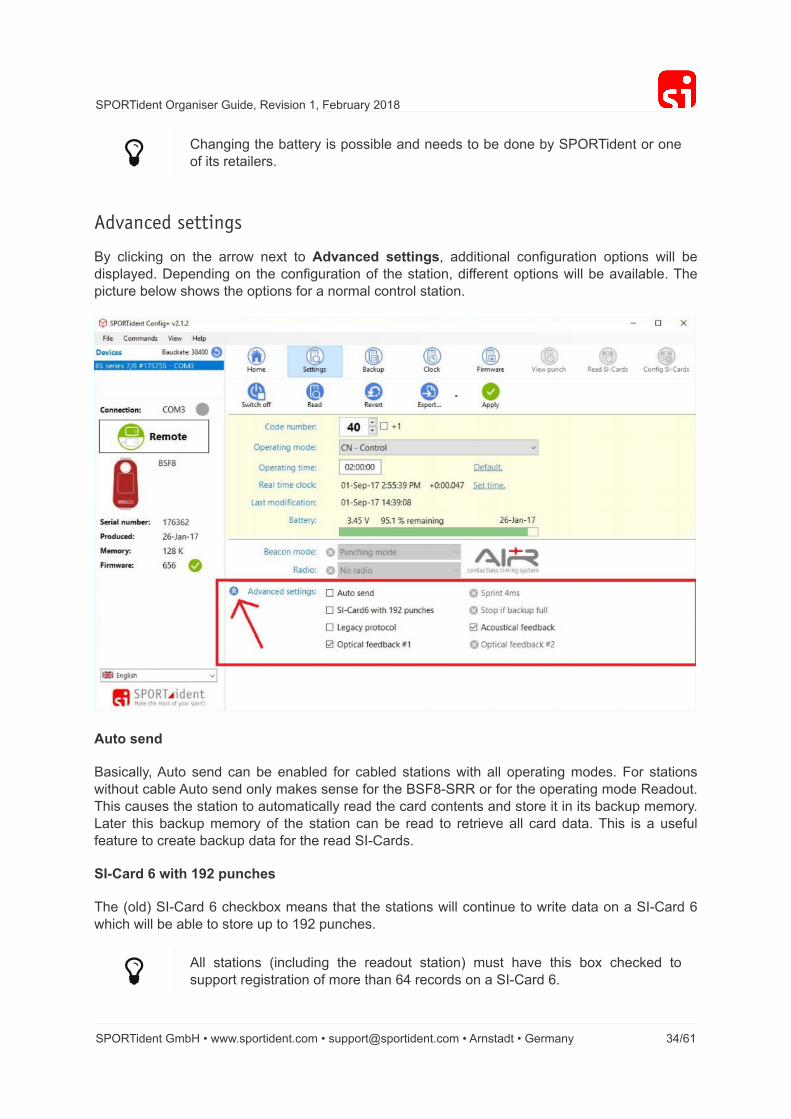
Advanced settings
By clicking on the arrow next to Advanced settings, additional configuration options will be
displayed. Depending on the configuration of the station, different options will be available. The
picture below shows the options for a normal control station.
Auto send
Basically, Auto send can be enabled for cabled stations with all operating modes. For stations
without cable Auto send only makes sense for the BSF8-SRR or for the operating mode Readout.
This causes the station to automatically read the card contents and store it in its backup memory.
Later this backup memory of the station can be read to retrieve all card data. This is a useful
feature to create backup data for the read SI-Cards.
SI-Card 6 with 192 punches
The (old) SI-Card 6 checkbox means that the stations will continue to write data on a SI-Card 6
which will be able to store up to 192 punches.
All stations (including the readout station) must have this box checked to
support registration of more than 64 records on a SI-Card 6.
SPORTident Organiser Guide, Revision 1, February 2018
SPORTident GmbH • www.sportident.com • [email protected] • Arnstadt • Germany 34/61

Legacy protocol
It is recommended not to activate this setting except for the use with old event software that does
not support the new protocol.
Optical feedback # 1
With this option enabled the LED of a station will blink when punched. Checked is the default
setting.
Acoustical feedback
With this option checked, the station will emit a beep when punched. It can be useful to uncheck
this box for night orienteering or special adventure races or raids. Checked is the default setting.
Sprint 4ms
This option is only available with the start and finish stations. If this option is enabled, the SI-
Station will write the time with 4 ms resolution instead of seconds resolution. Please note that the
event software must support this feature, otherwise it makes no sense to check this box. This
feature is especially useful in competitions where a race time is needed with a precision of 0.1
sec.
If Sprint 4ms is checked, the code number in the card memory will be
exchanged with the sub second value. Therefore, the code number will not be
available for evaluation.
Stop if backup is full
This option is only available for the readout station. If this option is enabled, the station in
operating mode Readout SI-Cards with ‘auto send’ enabled will turn off when the backup
memory is full. This ensures that old backup memory will not be overwritten (as is the default
case). This is useful if you are required to have a full backup set of read SI-Cards and old records
should not be overwritten. The station will stop reading to prevent data loss. This will enable the
operator to switch stations.
Optical feedback # 2
This option is only available for the BS11 stations. It activates/deactivates the second LED light.
Read backup
Every direct punch of a SI-Card is stored in the SI-Station’s backup memory. Config+ can be used
to read the backup memory. The data can then be inspected to check if a runner punched and if it
was correctly done. The backup memory can hold up to 21802 punches or 1022 SI-Card data
records. When full, the oldest data is overwritten. The operating mode of the station defines the
backup memory format.
SPORTident Organiser Guide, Revision 1, February 2018
SPORTident GmbH • www.sportident.com • [email protected] • Arnstadt • Germany 35/61

It is the competitor’s responsibility to ensure that the electronic punch is
recorded on the SI-Card by not removing the SI-Card until the feedback signal
has been received.
The SI-Station reads the competitor’s SI-Card and writes the control code and
time on the competitor’s SI-Card. The station then reads the competitor’s SI-
Card again to verify that it has been written correctly. It then beeps and flashes
and writes the SI-Card number and time into the station’s backup memory.
It should be noted that even if a control is not recorded on the SI-Card, the SI-Card is most
probably registered in the backup memory of the control station with an error code. It is almost
impossible to insert an SI-Card into a station without the SI-Station having the time to read and
record the number of the SI-Card. Error codes are given as ErrA to ErrF, depending on the
moment of the interruption of the writing process.
The handling of complaints in orienteering about missing controls (see § 20 and appendix 4 of the
IOF competition rules). If the competitor did not wait for the feedback signal when punching, there
will be no punch record on the SI-Card. However, the punch will be stored in the station’s backup
memory with an error code. Usually the competitor will complain and assert that he had waited for
the signal and thus should have this punch.
It is possible to download the stations from that control and search for this punch using the SI-
Card number. Two cases are possible:
• There is a punch record with an error code. An error code proves that the runner did not wait
for the signal. This means that he does not have a valid punch from that control.
• There is no punch record found. Then the runner did not punch at all at this control.
However, the IOF orienteering rules and almost all national competition rules strictly stick to what
data is found on the chip and they do not allow for any evaluation by downloading punches from
controls unless it can be established with certainty that the missing or unidentifiable punch is not
due to the competitor’s fault. In this exceptional circumstance, other evidence may be used to
prove that the competitor visited the control, such as evidence from the read-out from the control
unit.
We recommend clearing the backup memory of all stations before every race.
Remember that every reconfiguration of a station, automatically clears the
backup memory.
Reading a station’s backup memory works in remote and direct device
connection.
Read backup procedure
1. In remote or direct mode, click the Backup button in the main toolbar.
2. A progress bar will show the activity.
3. A list of punches with SI-Card number and date/time will be available when there is some
SPORTident Organiser Guide, Revision 1, February 2018
SPORTident GmbH • www.sportident.com • [email protected] • Arnstadt • Germany 36/61

data in the backup memory. Otherwise the list will be empty.
It is possible to search for a specific SI-Card by scrolling the list, to export the file (raw format or
CSV format) or to print the list. If an error occurred during the punching process, the time will be
replaced by the error code. It is easy to identify these errors on the screen as they are highlighted
in red.
The buttons Re-read, Clear backup, Export and Print are available for further
action if necessary.
Firmware update
SPORTident frequently updates the firmware of its devices. Firmware updates include new
features and fix issues. New firmware is available through the firmware update features of
SPORTident Config+. This software will frequently check for new firmware versions. You can also
manually check for updates (Menu “Help”). If a new firmware version has been found and is ready
to be installed, an information dialog will be shown:
SPORTident Organiser Guide, Revision 1, February 2018
SPORTident GmbH • www.sportident.com • [email protected] • Arnstadt • Germany 37/61

To check if you need to update your station to the new firmware, read the target device with
Config+. The left view will indicate the firmware version. The yellow icon will tell you that your
firmware is not up to date. A green icon will indicate that the firmware is up to date.
How to perform the upgrade
1. In Config+, read the settings of the device you want to update. Read Remote if you want to
update a slaved station or Direct if you want to update a main station.
SPORTident Organiser Guide, Revision 1, February 2018
SPORTident GmbH • www.sportident.com • [email protected] • Arnstadt • Germany 38/61

2. Open the firmware update view by clicking the Firmware button in the main toolbar.
3. The firmware update view will show which firmware is available for your device:
Click "Start update" to start the firmware update process. The device settings will be verified and
Config+ will ask you to confirm the firmware update. Click Yes in the upcoming dialog.
Be aware that the device backup memory will be cleared during the update.
If you update a slaved station, keep it steady on the main station.
Wait for the process to complete. The coloured indicator shows the transmission quality of the
firmware image. You can improve it by using a coupling stick if it turns yellow or even red.
SPORTident Organiser Guide, Revision 1, February 2018
SPORTident GmbH • www.sportident.com • [email protected] • Arnstadt • Germany 39/61

When the update process has completed, you will see a message telling you that the update was
successful.
Please check the device settings and time after the firmware update. Finally, if you have used a
RS232 master station or Printout station, the data transfer speed might have been changed from
slow (4800 baud) to fast (38400 baud) to speed up the firmware upgrade. Usually this speed will
be reset after the upgrade process. However, to make sure your station is working at the desired
speed, check with Config+ and correct if necessary.
Read SI-Cards
With Config+ it is possible to show the raw data of a transponder and export it in different ways.
In direct mode, click on Read SI-Cards. The card will be read automatically when inserted in the
main station. A progress bar will pop up.
All data on the card will be shown: on top the time of clear, check, start and finish, followed by the
different punches and at the bottom the personal data of the runner.
SPORTident Organiser Guide, Revision 1, February 2018
SPORTident GmbH • www.sportident.com • [email protected] • Arnstadt • Germany 40/61

1. Clicking on the "Detail panel" button will hide the data on the card.
2. By clicking the header with the right mouse button, you can select the columns you like to
display in the table. You can load and safe your selection by clicking the right mouse button in the
readout table.
Read SI-Cards navigation bar
By activating the Duplicates button, a SI-Card can be read more than once in the list. If this
SPORTident Organiser Guide, Revision 1, February 2018
SPORTident GmbH • www.sportident.com • [email protected] • Arnstadt • Germany 41/61

option is not checked, the card will not be read again if it is already listed.
By activating the SIAC subseconds button, SIACs punching sub seconds are read from the
SIAC’s memory. Every contactless punch with a SIAC at a station in beacon mode will be
registered with sub seconds. However, not every timing software can process this data.
Clear list will delete all readouts of the last session. If the cards are not cleared, all data is still
stored in the cards. By right clicking a row in the table of a card readout, single cards can be
deleted.
By clicking the Export button in the main bar, a sub navigation will open. Here you could export
the current view of your readout list or a file with all card information (full detail view). By right
clicking a row in the table of a card readout, single cards can be exported.
By clicking the Print button in the main bar a sub navigation will open. Here you can print single
card details or the complete list. To print just one card, a row in the table needs to be selected.
This feature allows you to read all relevant data on the SI-Card, which is useful
if there is a complaint by an athlete to be investigated. Specifically, the
allocated fields clear and check are not read by every timing software.
Config SI-Cards
1. In direct mode, click on Config SI-Cards. Insert the SI-Card in the main station. The SI-Card
will be read automatically if the Auto Read checkbox is on. Otherwise, click on the Read button
and the SI-Card will be read.
SPORTident Organiser Guide, Revision 1, February 2018
SPORTident GmbH • www.sportident.com • [email protected] • Arnstadt • Germany 42/61

2. Click in the checkbox next to Edit card personal data and the fields where information can be
written become active. The number of fields varies with the type of SI-Card from none (SI-Card
5), first name and last name (SI-Card 8 and 9) to everything (SI-Card 6, 10, 11, pCard and SIAC).
3. When finished, click on Apply. This button is only available if the SI-Card is in the main station.
4. For the SI-Card 11 and the SIAC, the feedback signal can be configured. During the time that
the SI-Card is flashing (and beeping), a subsequent punch cannot be recorded. This means that
with long feedback periods, these SI-Cards are not suitable for some activities such as rapidly
punching all the boxes on a table to check if they are working.
SPORTident Organiser Guide, Revision 1, February 2018
SPORTident GmbH • www.sportident.com • [email protected] • Arnstadt • Germany 43/61

Check the checkbox Edit Feedback signal and click in the field that becomes active. The default
feedback is about 3 seconds to best meet the requirements of typical orienteering events. In
general, it is recommended to use a longer feedback cycle for applications in Ski-O and MTBO
and a shorter feedback cycle for FootMicro-O. The option Blink only is available for the SIAC (as
the SI-Card 11 is not emitting a sound signal as feedback).
The option ‘Auto read’ checked will read and overwrite the personal data. This
is useful if there are no common fields between different SI-Cards. Otherwise it
is easier to use the Read button.
The option Auto apply checked is useful to edit the card data first and then put
the SI-Card in the main station to write the data to the SI-Card immediately.
SPORTident Organiser Guide, Revision 1, February 2018
SPORTident GmbH • www.sportident.com • [email protected] • Arnstadt • Germany 44/61

Short range radio
Live data is essential in competitions for delivering information to organisers or speakers. It
enhances the overall experience for spectators and competitors. For spectators, it is far less
spectacular to watch an event like orienteering, MTB Enduro, trail, and so on, by having only the
final results. The competitors in the forest or on the track might at some stage pass by the
competition arena, but most of the time they are invisible for the spectators. With the use of
additional SPORTident equipment (SI radios and receivers), live data can be produced to provide
more information for the speaker and the public, like the position in the race of the participants,
allowing them to make race predictions and to analyse the respective split times.
The following SPORTident products are specifically designed for SRR (short range radio):
Data radios Data receivers
BSF8-SRR SRR radio dongle (connects to a PC)
SIAC SIGSM-DN (GSM modem)
The collected data can be processed by a web service or used directly by evaluation software
(see chapter Live data).
Sender device: BSF8-SRR
BSF8-SRR station
The special SI-Station BSF8-DB is additionally equipped with SRR modules.
It enables wireless transmission of SPORTident data records over distances
of up to 8 metres. The radio is working in the licence free 2.4 GHz radio
band and can be used worldwide.
The data from a direct punch with a SI-Card is transmitted to a receiver. The BSF8-SRR can be
configured as a normal station in the operating modes CLEAR, CHECK, START, CONTROL and
FINISH.
A typical application for SI-SRR is the so called online controls in orienteering sport. Because
the control point in orienteering can be placed at nearly any position in any terrain, a wired data
transmission from the control station can be inconvenient or even impossible. SI-SRR creates a
wireless data bridge to a receiver or repeater mounted some metres away. The receiver (SRR
dongle) can be connected directly to a computer and a repeater (SIGSM-DN) can be used to
send the data to a web service.
SI-SRR uses two radio channels (named ‘red’ and ‘blue’) to achieve a robust data transmission
with a low error rate. While the SRR stations uses the two channels simultaneously, the data
receivers (SRR dongles) always work on one and the same channel.
BSF8-SRR configuration by using Config+:
SPORTident Organiser Guide, Revision 1, February 2018
SPORTident GmbH • www.sportident.com • [email protected] • Arnstadt • Germany 45/61

1. Read the station in remote mode by clicking on Settings.
2. The following advanced settings have to be set:
• Enable Auto send
• Disable Legacy protocol
To avoid unnecessary energy consumption, the setting Auto send should only
be activated when a radio receiver is present.
Sender device: SIAC radio
The SIAC features an inbuilt radio to deliver timing data to a receiver and for online transmission.
The SIAC’s radio is disabled by default. The radio is activated by a special signal sent from the
BSF7/8 respectively BS11 station.
When punching a control, the information is always stored in the memory of the SIAC. The
BSF7/8 and BS11 stations can optionally be configured such that their signals tell the SIACs in
range to transmit the punch details along with the SI card number. For using this feature, the
BSF7/8 stations must be configured in beacon mode (the BS11 stations are always in beacon
mode) to enable the radio options in the AIR+ settings area. Essentially, during each contactless
punching the station tells the SIAC which data to send via its radio (the default setting is no
radio).
The receiver is ideally placed very close to the control. The transmission distance from the SIAC
to a receiver should be kept in a range of no more than 8 metres. .
If a BSF8-SRR station is configured as a beacon control and is punched with a
SIAC in the contactless way, the data stored in the SIAC (depending on the
configured settings) will be sent to the receiver by the SIAC. The radio of the
SRR station has no function at that moment.
The SIAC’s power consumption is significantly increased when using its radio.
Therefore, the SIAC’s radio should only be activated by a control station if a
receiver for radio data is mounted nearby.
SPORTident Organiser Guide, Revision 1, February 2018
SPORTident GmbH • www.sportident.com • [email protected] • Arnstadt • Germany 46/61

Programming the radio options in Config+:
1. Read the station by clicking on Settings.
2. Click on the field of the operating mode (below the control number). The different options are
shown. Choose the desired beacon function.
3. Four different SIAC radio options can be chosen in the AIR+ settings area:
• No radio: This is the default setting. It should only be changed if radios will be used during
the event to avoid unnecessary consumption of battery power of the SIAC.
• Send last record: Transmits the most recently received record. This is normally, the
‘punching’ of the control where the radio is mounted.
• Send all unsent records: Transmits all the records not yet successfully transmitted.
• Send all card contents: Transmit all the records stored in the SIAC’s memory.
In cases where a SIGSM-DN receiver (repeater) is used, it is possible that the
data is transmitted with a certain delay, depending on the coverage of the GSM
network. If for any reason the information cannot be sent because of a
momentary poor coverage, the information is not transmitted to the monitoring
software and thus not available for further use. The SIAC is of course not
aware of this delay. When using ‘Send all unsent records’ at the next
transmission point, the SIAC will only send the new records recorded after the
previous transmission point.
Receiver device: SRR USB Dongle
SPORTident Organiser Guide, Revision 1, February 2018
SPORTident GmbH • www.sportident.com • [email protected] • Arnstadt • Germany 47/61
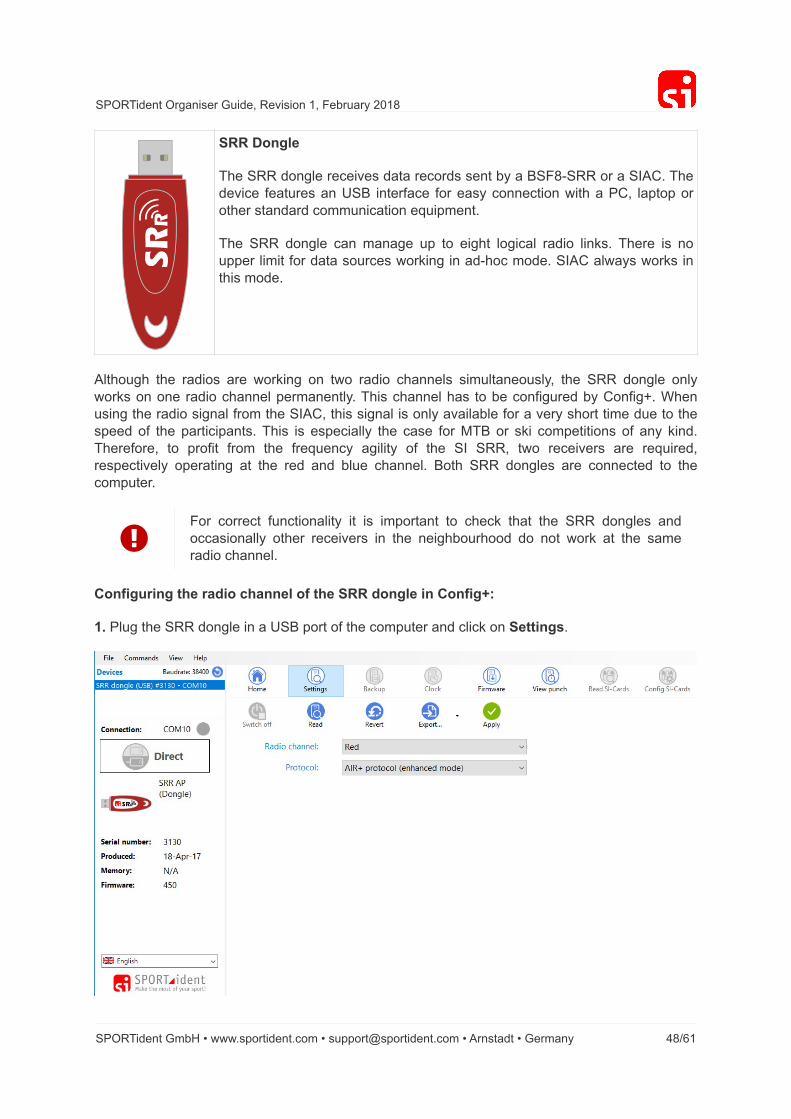
SRR Dongle
The SRR dongle receives data records sent by a BSF8-SRR or a SIAC. The
device features an USB interface for easy connection with a PC, laptop or
other standard communication equipment.
The SRR dongle can manage up to eight logical radio links. There is no
upper limit for data sources working in ad-hoc mode. SIAC always works in
this mode.
Although the radios are working on two radio channels simultaneously, the SRR dongle only
works on one radio channel permanently. This channel has to be configured by Config+. When
using the radio signal from the SIAC, this signal is only available for a very short time due to the
speed of the participants. This is especially the case for MTB or ski competitions of any kind.
Therefore, to profit from the frequency agility of the SI SRR, two receivers are required,
respectively operating at the red and blue channel. Both SRR dongles are connected to the
computer.
For correct functionality it is important to check that the SRR dongles and
occasionally other receivers in the neighbourhood do not work at the same
radio channel.
Configuring the radio channel of the SRR dongle in Config+:
1. Plug the SRR dongle in a USB port of the computer and click on Settings.
SPORTident Organiser Guide, Revision 1, February 2018
SPORTident GmbH • www.sportident.com • [email protected] • Arnstadt • Germany 48/61
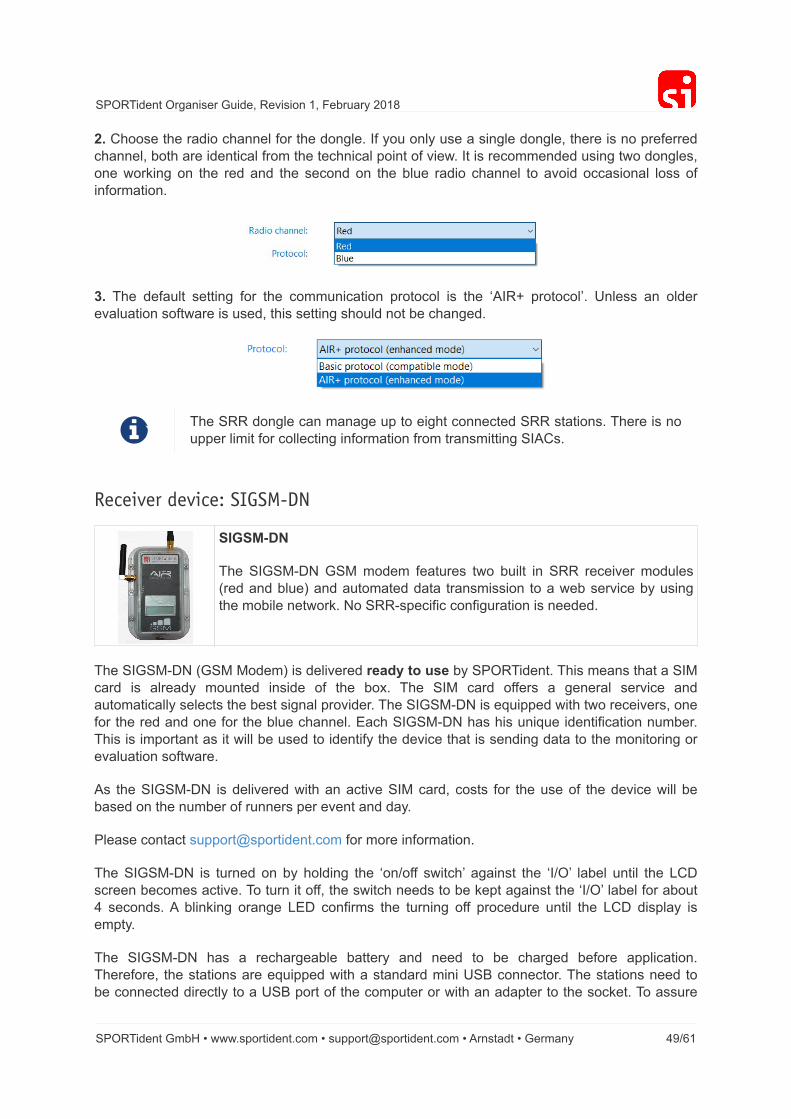
2. Choose the radio channel for the dongle. If you only use a single dongle, there is no preferred
channel, both are identical from the technical point of view. It is recommended using two dongles,
one working on the red and the second on the blue radio channel to avoid occasional loss of
information.
3. The default setting for the communication protocol is the ‘AIR+ protocol’. Unless an older
evaluation software is used, this setting should not be changed.
The SRR dongle can manage up to eight connected SRR stations. There is no
upper limit for collecting information from transmitting SIACs.
Receiver device: SIGSM-DN
SIGSM-DN
The SIGSM-DN GSM modem features two built in SRR receiver modules
(red and blue) and automated data transmission to a web service by using
the mobile network. No SRR-specific configuration is needed.
The SIGSM-DN (GSM Modem) is delivered ready to use by SPORTident. This means that a SIM
card is already mounted inside of the box. The SIM card offers a general service and
automatically selects the best signal provider. The SIGSM-DN is equipped with two receivers, one
for the red and one for the blue channel. Each SIGSM-DN has his unique identification number.
This is important as it will be used to identify the device that is sending data to the monitoring or
evaluation software.
As the SIGSM-DN is delivered with an active SIM card, costs for the use of the device will be
based on the number of runners per event and day.
Please contact [email protected] for more information.
The SIGSM-DN is turned on by holding the ‘on/off switch’ against the ‘I/O’ label until the LCD
screen becomes active. To turn it off, the switch needs to be kept against the ‘I/O’ label for about
4 seconds. A blinking orange LED confirms the turning off procedure until the LCD display is
empty.
The SIGSM-DN has a rechargeable battery and need to be charged before application.
Therefore, the stations are equipped with a standard mini USB connector. The stations need to
be connected directly to a USB port of the computer or with an adapter to the socket. To assure
SPORTident Organiser Guide, Revision 1, February 2018
SPORTident GmbH • www.sportident.com • [email protected] • Arnstadt • Germany 49/61

the waterproofness of the stations, the mini USB connectors are protected.
When switching the SIGSM-DN on, information becomes available on the LCD display. A green
LED is blinking, confirming that the GSM is on.
The upper part of the display shows:
For information: xx/xxx/xxx: the number of pings sent to the server / the number of data records in
the memory to be sent / the number of data records sent
For information: xxx/xxx: an internal working code / the time before the next ping will be sent
More importantly, in the right bottom: the coverage by the selected provider (as with a normal
GSM device) at the current location.
The bottom part of the displayed shows:
Cyclically: The time the device is already on (xx:xx:xx) and the remaining operating time in
minutes. The default operating time is 96 hours (5760 minutes) and cannot be modified.
A pictogram of the remaining capacity of the battery.
The bottom line will give some information during the starting up procedure (from initialising the
device, searching the provider and testing the connection with the monitoring server). If all steps
are concluded positively, WAIT_DATA appears, confirming that the SIGSM-DN is ready for use.
If NO_SERVICE appears, there is no connection to the provider and another location should be
found to set up the SIGSM-DN.
When using the SIGSM-DN, testing of the availability of a decent GSM network
at the desired location might be necessary prior to the competition. This can
easily be done by punching a classic SI-Card in a BSF8-SRR station or with a
(switched on) SIAC and a station in beacon mode.
Reading the SIGSM-DN in Config+:
SPORTident Organiser Guide, Revision 1, February 2018
SPORTident GmbH • www.sportident.com • [email protected] • Arnstadt • Germany 50/61

The settings of the SIGSM-DN can be read in Config+ by selecting the device and clicking on
Settings. The settings are visible but cannot be modified. The SIGSM-DN is delivered
preconfigured and any changes would only disturb the correct operation of the device. The
default operating time is 96 hours, which is identical to the capacity of the battery. In a normal use
case the device should be manually switched off. The buttons Backup and View punch will
provide the needed information in the same way as any other SI device.
Show received data in Config+
Config+ features a simple monitor function to visualize the SRR functionality. Select a SRR
dongle or a SIGSM-DN (it has to be ‘on’) as target device and choose the feature View punch in
the main toolbar. The devices will immediately show the data received from a BSF8-SRR station
or a SIAC (instructed to send its data). The available information is slightly different between a
classic and an AIR+ punch.
SPORTident Organiser Guide, Revision 1, February 2018
SPORTident GmbH • www.sportident.com • [email protected] • Arnstadt • Germany 51/61

The first row shows the information for a classic punch, the second one for a SIAC. Here,
information is given about the configuration of the station that gave instructions to the SIAC (in
this example Beacon Control 44 – radio Send last record – punching mode – No gate). It also
displays information about the used SIAC (for example Battery OK).
This feature in Config+ allows you to test the equipment that will be used before
the competition.
SPORTident Organiser Guide, Revision 1, February 2018
SPORTident GmbH • www.sportident.com • [email protected] • Arnstadt • Germany 52/61

Live data
Introduction
The use of live data has to be considered as a complete system, from collecting and uploading
the data of the competitor to a server (or directly to a PC with a SRR dongle), to the downloading
and processing of the data by an evaluation software. The SPORTident components and the
settings described in the previous sections are necessary to ensure their correct functioning as
part of the system, and their setup can differ from one race to another and from one sport to
another. SIAC, BSF8-SRR station, SRR dongle, SIGSM-DN, SI-Reader software and the
SPORTident web service provide a complete distributed online data system to meet the growing
need for live information during the race.
The basic setup of the system is given in the scheme below.
Of course, having access to the internet is essential.
Software and web services
To be able to upload/download data during a race and to handle an event, from the setup of the
race, entries registration, until the publication of the (intermediate) results, a series of software
and web services are available. Together, they offer the complete package for handling an event
and to make it attractive for the organiser, athletes and spectators.
SI-Reader
SPORTident Organiser Guide, Revision 1, February 2018
SPORTident GmbH • www.sportident.com • [email protected] • Arnstadt • Germany 53/61
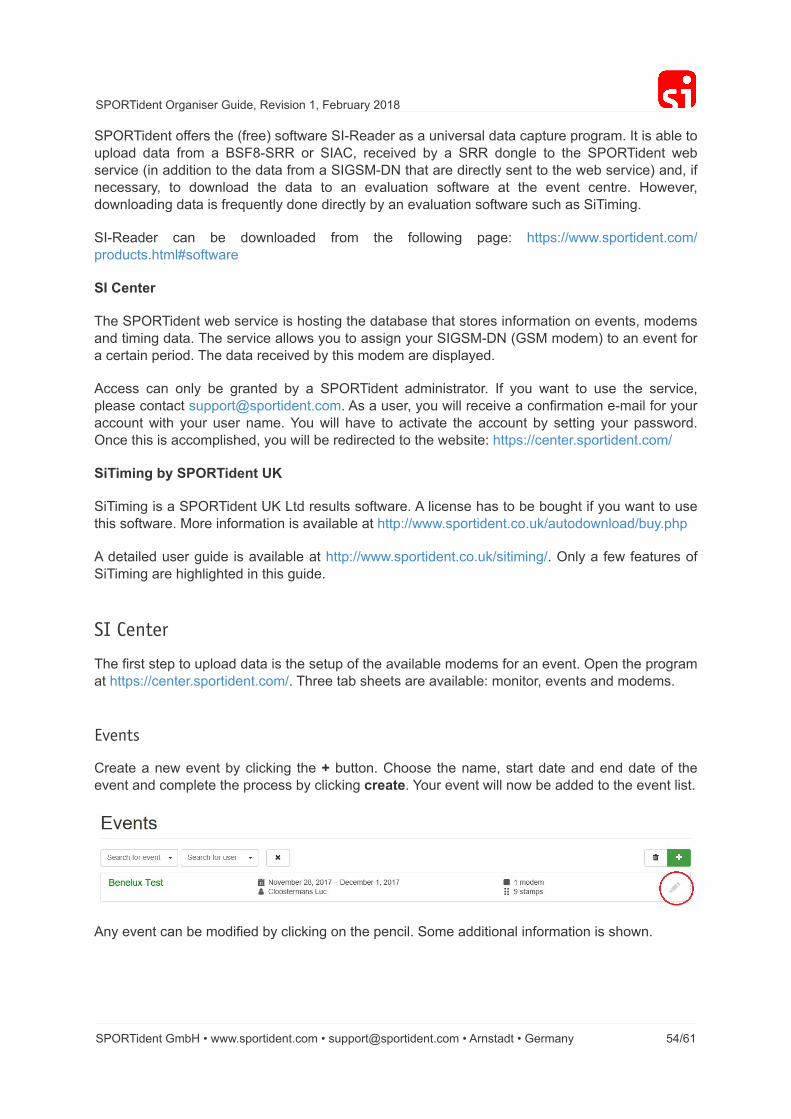
SPORTident offers the (free) software SI-Reader as a universal data capture program. It is able to
upload data from a BSF8-SRR or SIAC, received by a SRR dongle to the SPORTident web
service (in addition to the data from a SIGSM-DN that are directly sent to the web service) and, if
necessary, to download the data to an evaluation software at the event centre. However,
downloading data is frequently done directly by an evaluation software such as SiTiming.
SI-Reader can be downloaded from the following page: https://www.sportident.com/
products.html#software
SI Center
The SPORTident web service is hosting the database that stores information on events, modems
and timing data. The service allows you to assign your SIGSM-DN (GSM modem) to an event for
a certain period. The data received by this modem are displayed.
Access can only be granted by a SPORTident administrator. If you want to use the service,
please contact [email protected]. As a user, you will receive a confirmation e-mail for your
account with your user name. You will have to activate the account by setting your password.
Once this is accomplished, you will be redirected to the website: https://center.sportident.com/
SiTiming by SPORTident UK
SiTiming is a SPORTident UK Ltd results software. A license has to be bought if you want to use
this software. More information is available at http://www.sportident.co.uk/autodownload/buy.php
A detailed user guide is available at http://www.sportident.co.uk/sitiming/. Only a few features of
SiTiming are highlighted in this guide.
SI Center
The first step to upload data is the setup of the available modems for an event. Open the program
at https://center.sportident.com/. Three tab sheets are available: monitor, events and modems.
Events
Create a new event by clicking the + button. Choose the name, start date and end date of the
event and complete the process by clicking create. Your event will now be added to the event list.
Any event can be modified by clicking on the pencil. Some additional information is shown.
SPORTident Organiser Guide, Revision 1, February 2018
SPORTident GmbH • www.sportident.com • [email protected] • Arnstadt • Germany 54/61

The Event ID and the SOAP API Key are necessary for the SI-Reader program
to be able to upload data. Event GUID is only used internally so far.
Modems
The list displays the available modems assigned to the user. The modems are assigned by
SPORTident to a user. There is no possibility to add a modem by yourself. In case of questions,
please contact [email protected].
image::images/live_monitoring_modems1.jpgpdfwidth='100%',align='center']
An icon indicates the state of the modem (grey if offline, green if online) and its battery level. This
is useful information for testing the modem on site before the event (or even to monitor the
modem during an event).
A modem can only be assigned to a single event at the same time. To assign a modem to an
event, click on the runner icon at the top right of the screen.
Some extra fields are shown. Select one of your events from the list and confirm it. The modem is
now assigned to that event.
Monitor
The monitor provides an overview of the data received for a selected event, for a specified
SIGSM-DN modem, for any card (enter the card number) or for any control number (enter the
SPORTident Organiser Guide, Revision 1, February 2018
SPORTident GmbH • www.sportident.com • [email protected] • Arnstadt • Germany 55/61
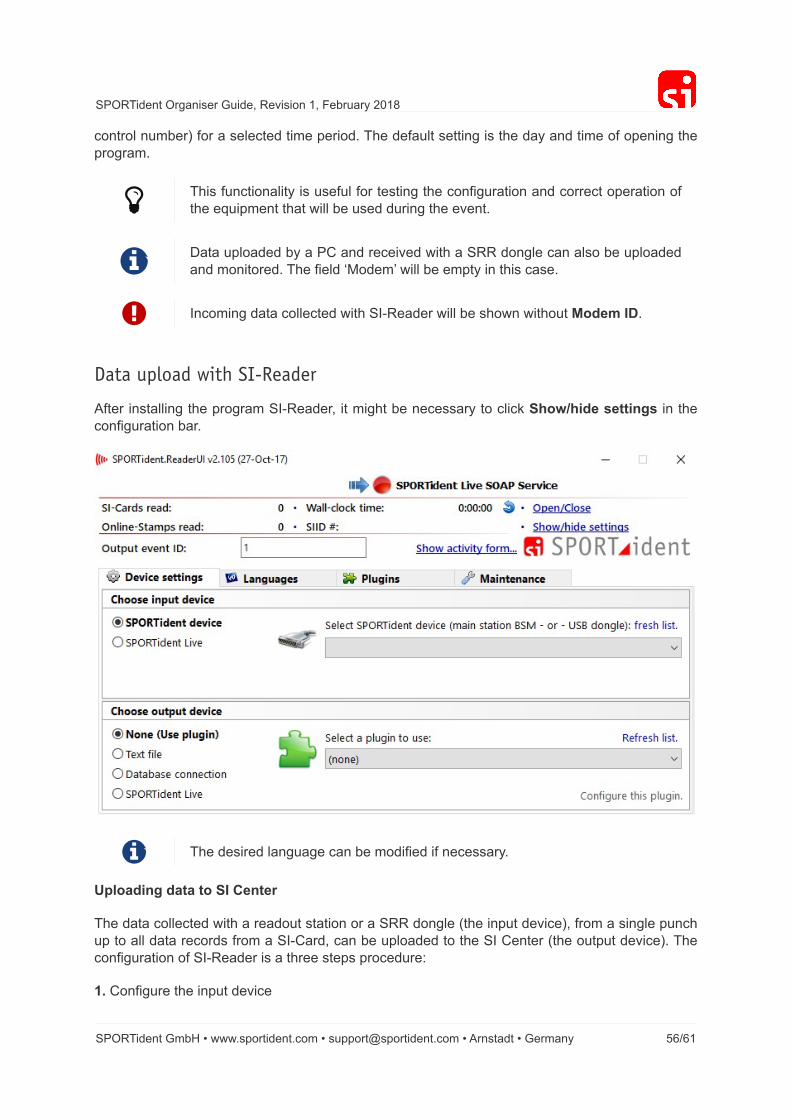
control number) for a selected time period. The default setting is the day and time of opening the
program.
This functionality is useful for testing the configuration and correct operation of
the equipment that will be used during the event.
Data uploaded by a PC and received with a SRR dongle can also be uploaded
and monitored. The field ‘Modem’ will be empty in this case.
Incoming data collected with SI-Reader will be shown without Modem ID.
Data upload with SI-Reader
After installing the program SI-Reader, it might be necessary to click Show/hide settings in the
configuration bar.
The desired language can be modified if necessary.
Uploading data to SI Center
The data collected with a readout station or a SRR dongle (the input device), from a single punch
up to all data records from a SI-Card, can be uploaded to the SI Center (the output device). The
configuration of SI-Reader is a three steps procedure:
1. Configure the input device
SPORTident Organiser Guide, Revision 1, February 2018
SPORTident GmbH • www.sportident.com • [email protected] • Arnstadt • Germany 56/61

Connect a readout station or a dongle to the computer and click on fresh list.
If you want to use two dongles (as recommended for sports were competitors
pass at high speed), or a dongle and a readout station, you need to open SI-
Reader twice. Only a single input device can be selected per SI-Reader
window. Choose a different device in each window. Now data from both
sources will be uploaded.
2. Configure the output device
There are many options, but these are mainly for developers of evaluation software. As a user,
only the last button is necessary.
The API key and event ID of the target event have to be copied from SI Center into the specified
fields.
3. Activate the connections
SPORTident Organiser Guide, Revision 1, February 2018
SPORTident GmbH • www.sportident.com • [email protected] • Arnstadt • Germany 57/61

The summary of the configuration is given at the top of the screen, in this example from a readout
station (the input device) to the SPORTident Center (the output device). The connections are not
active yet and this is visualised by the two red dots.
Click Open/Close to open (or to close) the connections. Two green dots will confirm that the
communication lines are open. SI-Reader is now ready to receive and to upload data.
In case of a red dot, the connections should be checked. It might be that the
internet connection is not available.
Next to the monitoring page in SI Center activity can also be monitored in SI-Reader by clicking
on Show activity form.
SPORTident Organiser Guide, Revision 1, February 2018
SPORTident GmbH • www.sportident.com • [email protected] • Arnstadt • Germany 58/61

LCD display information
SI-Stations BSx7/8
The onboard LCD display can provide a quick overview of the stations’ settings and properties.
The stations spend most of their life in standby mode. This is a low activity mode, which
consumes very little power. In this mode, the LCD display is off. Switching from standby mode to
active mode takes place when a SI-Card is inserted in the station. The maximum reaction time is
1 second. In active mode, the LCD display cyclically shows the function (including the control
code) and the time. It will also display the SI-Card number during 3 seconds after it has been
punched. This can be useful at the start to verify the number of the SI-Card of a runner.
From standby mode, the station can also be switched to service mode. This is done by
switching on the station with the SERVICE/OFF instruction card. In service mode the station’s
LCD display offers additional information. SERVMO indicates that the service mode is active.
Service mode is automatically terminated after 5 minutes or earlier if the SERVICE/OFF Card is
used.
Operating mode
CLR (clear), CHK (check), STA (start), FIN (finish), RDO (readout), CN
(control),
BST (beacon start), BFN (beacon finish), BCN (beacon control),
AC BT (SIAC battery test), AC ON (SIAC on), AC OFF (SIAC off), AC
RDO (SIAC radio readout).
Time of day
24h format.
OFF time
The number of minutes the station will be idling awake before
automatically switching to standby mode. In this example, the unit will
go to sleep 2 hours (120 minutes) after the last user punched the
control. If the time is above 999, only the last 3 digits are displayed.
Firmware
The version of the software (firmware) installed on the station, in this
case version 656. See section Config+ / Firmware update for the latest
version.
SPORTident Organiser Guide, Revision 1, February 2018
SPORTident GmbH • www.sportident.com • [email protected] • Arnstadt • Germany 59/61

Station backup
The number of punches that are currently stored in the backup memory
of the station.
Battery voltage
The last measured battery voltage or BAT if no battery voltage has
been measured. When it drops below 3.0V (BAT300), time is nearing
for a battery replacement.
Battery capacity
Used capacity of the battery. A new battery will indicate 0. The example
shows that the battery has consumed approximately 5% of its power.
This value is a computed approximation, not the actual level. Accurate
battery check is done with Config+.
SI-Stations BS11
CN xyz
Control number of the SI-Station.
Time of day
24h format.
Operating mode
BST (beacon start), BFN (beacon finish) or BCN (beacon control).
Beacon mode
PMODE (Punching mode) or TMODE (Timing mode).
Gate mode
NOGATE means no gate. In this case, gate mode is not active. Other
possibilities are: GATE M for master station in gate mode and GATE S
for slaved station.
SPORTident Organiser Guide, Revision 1, February 2018
SPORTident GmbH • www.sportident.com • [email protected] • Arnstadt • Germany 60/61

Operating time
Remaining operating time in minutes before the station will shut down.
The following information is only visible in the first minute after activation:
Date
Format (YYMMDD).
Temperature
Device temperature in degrees Celsius.
Battery capacity
Not measured in the current firmware.
Battery voltage
Should be between 3.5 V (low) and 4.5 V (full).
Radio options
Radio options for the SIAC (see section Short range radio / Sender
device: SIAC radio). No radio (RAD NO), Send last record (RAD LA),
Send all unsent records (RAD AN), Send all card content (RAD AL).
Serial number
Unique serial number of the SI-Station.
SPORTident Organiser Guide, Revision 1, February 2018
SPORTident GmbH • www.sportident.com • [email protected] • Arnstadt • Germany 61/61