textflo organiser
DESCRIPTION
User guide for the Textflo document organiser.TRANSCRIPT

7/18/2019 Textflo Organiser
http://slidepdf.com/reader/full/textflo-organiser 1/32
Textflo Organiser User Guide June 12, 2017
1
Textflo OrganiserVersion 1.25.1
[User Guide]
Kieran Greer,
Email: [email protected].
http://distributedcomputingsystems.co.uk/textfilter.html

7/18/2019 Textflo Organiser
http://slidepdf.com/reader/full/textflo-organiser 2/32
Textflo Organiser User Guide 1.25
2
Table of Contents
1
Introduction ........................................................................................................................ 4
1.1
Installing the Application ............................................................................................ 4
1.2
Demo Version ............................................................................................................. 4
1.3
Professional Version ................................................................................................... 4
2
Application GUI................................................................................................................. 5
2.1 File Types .................................................................................................................... 6
2.2
Toolbar ........................................................................................................................ 6
2.3
Backup of Organiser Books ........................................................................................ 7
2.4 Organiser Books .......................................................................................................... 7
2.5
Organiser Categories ................................................................................................... 7
2.6
Categories Browser ..................................................................................................... 8
2.7
View Buttons ............................................................................................................... 8
2.7.1
Tagged Groups Traversal..................................................................................... 9
2.8 Semantic Descriptions ................................................................................................. 9
2.8.1 Free Text Description........................................................................................... 9
2.8.2
Keywords List ...................................................................................................... 9
2.9
References List .......................................................................................................... 10
2.9.1
Reference Notes ................................................................................................. 10
2.9.2
Alternative Reference Name .............................................................................. 10
2.9.3
Reference Deadline ............................................................................................ 10
2.9.4
Reference Priority .............................................................................................. 11
2.10
Reference Store...................................................................................................... 11
2.10.1
Reference Types................................................................................................. 11
2.11
Find Groups from Category or Reference Terms .................................................. 11
3
Search Organiser Content ................................................................................................ 13
3.1.1 References List................................................................................................... 14
3.2
Search Types ............................................................................................................. 14
3.2.1
Searching over References Content ................................................................... 15
3.2.2
Searching over Deadlines................................................................................... 16
3.3
Search terms - Keywords Section ............................................................................. 16
3.4
Organiser Search Process .......................................................................................... 16
3.5 Word Stemming ........................................................................................................ 17
3.6
File Links Section...................................................................................................... 17
4
Organiser Buttons ............................................................................................................ 18
4.1
Copy and Paste Groups ............................................................................................. 18
4.2
The Top Forward / Backward Buttons ...................................................................... 18
4.3
Folder and Path Refactoring...................................................................................... 19
4.4
Group Refactoring (Prof version only) ..................................................................... 20
4.4.1
Move Groups to New Categories....................................................................... 21
4.4.2
Refactor or Combine Groups ............................................................................. 23
4.5
Reminders and Deadlines .......................................................................................... 26

7/18/2019 Textflo Organiser
http://slidepdf.com/reader/full/textflo-organiser 3/32
Textflo Organiser User Guide 1.25
3
4.5.1 Setting a Reminder............................................................................................. 26
4.5.2
Viewing Reminders............................................................................................ 27
4.5.3
Viewing Deadlines ............................................................................................. 30
4.5.4
Viewing Priority Lists ........................................................................................ 31
4.6
Popup Menu .............................................................................................................. 31
5
Temporary or Recent F ile References ............................................................................. 32

7/18/2019 Textflo Organiser
http://slidepdf.com/reader/full/textflo-organiser 4/32
Textflo Organiser User Guide 1.25
4
1 Introduction
This document describes the Textflo Organiser application, which can be used to organise
and categorise local file links or online hyperlinks. Reference lists can be grouped together,
based on a category classification, a free text description and a list of keywords. The
document file references can be listed under these values, allowing you to search for and find
each document, based on what it relates to. The application also includes a scheduler or
reminder list that will inform you of your daily tasks. It can be used as part of the main
program, but mostly, separately from it, where the main features are described here.
1.1
Installing the ApplicationThe organiser application installs when the main text file filter and formatter program installs.
You can then open it through the main GUI or a separate startup option.
1.2 Demo Version
The demo version has full functionality apart from some additional features that have been
disabled.
1.3
Professional Version
The professional version is the same as the demo version, apart from the following additions.
• Group Refactoring: The automatic options to combine, move, or refactor existing
groups through the refactor form (section 4.4).
• Next link: An option to sequence references, by adding a ‘next link’ to the current one
(section 4.6).
7/18/2019 Textflo Organiser
http://slidepdf.com/reader/full/textflo-organiser 5/32
Textflo Organiser User Guide 1.25
5
2 Application GUI
The Organiser has its own GUI interface that can be opened through the main GUI, or by
itself, through the startup menu. The Organiser can be used to create document groups,
represented by a list of categories, a free text description and a list of keywords. The
document file paths, or references, can then be listed under a set of these values, allowing you
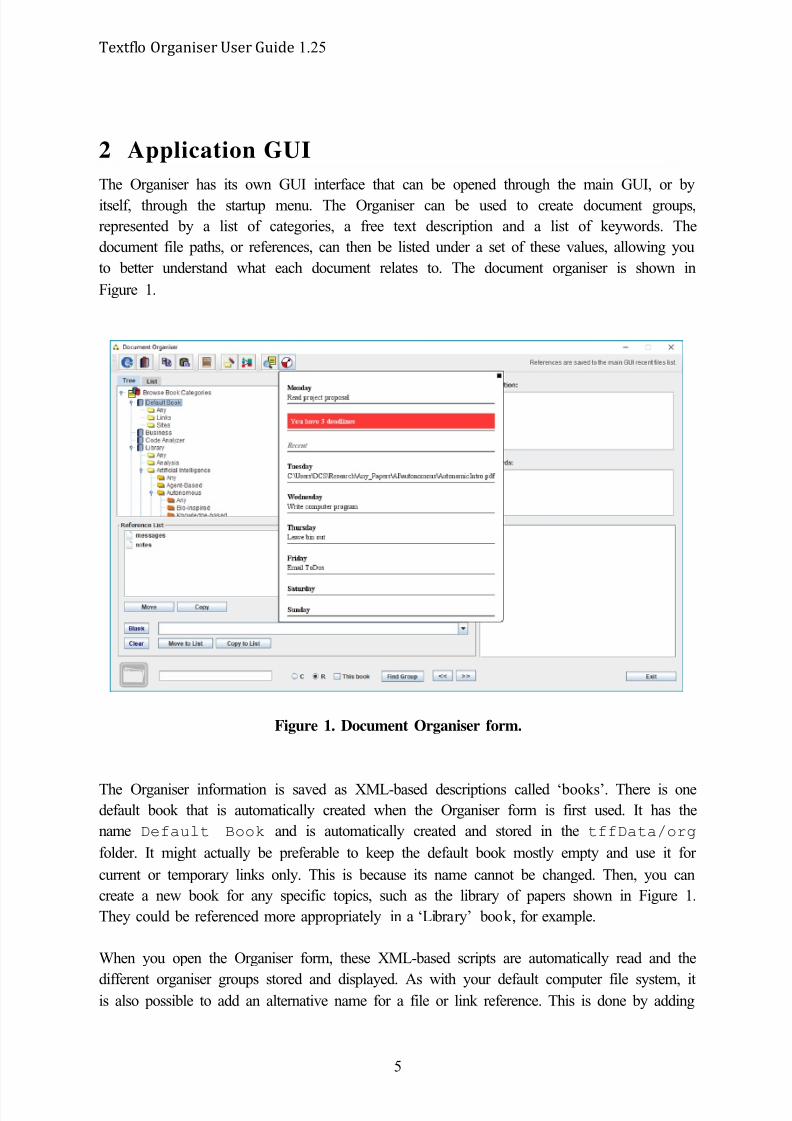
to better understand what each document relates to. The document organiser is shown in
Figure 1.
Figure 1. Document Organiser form.
The Organiser information is saved as XML-based descriptions called ‘ books’. There is onedefault book that is automatically created when the Organiser form is first used. It has the
name Default Book and is automatically created and stored in the tffData/org
folder. It might actually be preferable to keep the default book mostly empty and use it for
current or temporary links only. This is because its name cannot be changed. Then, you can
create a new book for any specific topics, such as the library of papers shown in Figure 1.
They could be referenced more appropriately in a ‘Library’ book , for example.
When you open the Organiser form, these XML-based scripts are automatically read and the
different organiser groups stored and displayed. As with your default computer file system, itis also possible to add an alternative name for a file or link reference. This is done by adding
7/18/2019 Textflo Organiser
http://slidepdf.com/reader/full/textflo-organiser 6/32
Textflo Organiser User Guide 1.25
6
it in the Alt text box and then saving the reference again. The alternative or shortened name
will then be displayed by default, but the link it relates to will automatically be retrieved
when trying to load in the file. There is a combo box (Names/Links/Dates) that allows
the reference paths to be ordered and displayed based on these different views.
2.1 File Types
It should be possible to create references or links to most of the recognised file types. Your
computer’s default file browser should then be able to open any of these files upon request.
The file types are the same as for the main GUI – Text, PDF, Microsoft files, etc.
2.2
Toolbar
The application comes with a toolbar for quick access to certain formatting options. A
summary of these with their related button are shown here.
This button allows you to switch between the main GUI form and this one. This
button brings the main GUI form to the front and it has a button to do the same for the
Organiser.
This button provides quick access to the bookmarks form.
This button copies the details of the currently selected group, to allow it to be pasted
into a different set of categories.
This button pastes the copied group details into the group defined by the new set of
categories.
This button adds a new book to the Organiser.
This button allows the contents of a folder and its sub-folders to automatically createa new organiser book, with related category sets and references.
This button performs a limited amount of analysis over selected category groups, to
indicate similarity and allow for merging of the contents. Also for more complex
group copying and moving procedures.
This button allows search operations over key terms, to retrieve groups that contain
any of the specified terms.
7/18/2019 Textflo Organiser
http://slidepdf.com/reader/full/textflo-organiser 7/32
Textflo Organiser User Guide 1.25
7
This button displays the reminder and deadlines lists, for references in any book.
The analysis or refactoring button is available on the professional version only and so is
hidden in the demo version. As it can also change the book contents permanently and so care
needs to be taken when using it.
2.3 Backup of Organiser Books
As a safeguard, whenever a save operation is executed, the previous version of the same book
is saved to a backup file. If the new operation goes wrong, you can then recover the previous
version to use instead. You can recover a book by clicking the Recover button. The backup
file should only be changed by a save operation that is performed through clicking the Save
button. If you load in a different book, you will again be asked if you want to backup the
current version. There is no automatic backup when you close the form, so you should save
first if you want to. If you recover a backed-up version, the original file will be permanently
overwritten.
2.4
Organiser Books
Document references are organised into books. In Figure 1, the top middle combo box, lists
the books that have been created, where each book represents a different set of organised
references. The first time that the Organiser is used, a default book is created called ‘Default
Book’. This maps to a file called ‘organiser.xml’ in the tffData/org folder and cannot be
deleted. You can also add other new books by clicking the New Book button on the toolbar
and entering the new book name. If the book is added, it is saved as a new file in the ‘org’
folder , with an extension of ‘#organiser.xml’ to the name that you enter. You do not need to
worry about the files themselves as they are supposed to be read by the computer and not a
human. Note that a new book does not obtain details from any other books, so you need to re-
enter duplicate information. As the number of links grows, they will still becomeunmanageable if they are all stored in a single book and so it is important to organise this
properly. To delete a book, you can click the Delete button beside the books list. This is a
permanent deletion that also removes the book files.
2.5 Organiser Categories
For each book, you can group file references under three levels of category. This is the main
classification for your file references and so it should be as accurate as possible. Thisrepresents a main category and two sub-categories. If one of the categories is missing, it

7/18/2019 Textflo Organiser
http://slidepdf.com/reader/full/textflo-organiser 8/32
Textflo Organiser User Guide 1.25
8
should default to the value Any. There are two browser views. The tree view allows you to
navigate to category groups only. The list view also allows you to add and delete new books
and categories. In the list view, the three category groups are displayed below the books
entry. You can add a new category at any level by typing in the name and clicking the related
New button. Any time a new category is added all of the other form fields are cleared, as itrepresents a new and separate group. A good practice is then to immediately save the book to
update everything and then navigate to the group again. Deleting a book is also performed
from this list, with the Delete button just above the books list. If you have accidentally
entered incorrect information, then you can also recover the last saved version using the
Recover button from the list.
2.6 Categories Browser
On the left-hand-side there is a tabbed pane with a choice of views. A Tree structure is the
default browser and allows you to manually navigate to any particular category group. If you
select an entry there, it should partially update the book and category combo boxes. If you
prefer, you can navigate using combo box lists instead. This is on the second List tabbed
pane. That pane also allows you to delete a book, recover a book, or add new categories.
Adding a new book is performed using the toolbar button. As a test, save your current book,
change an entry and then recover the book. It should revert back to the saved version.
2.7 View Buttons
Beside the browser views, there are some category group and reference buttons. One set is in
a Category Group boxed area and one set is for Other Info. The category group
buttons are for marking current search positions or for making group update or delete
changes. Every time you make a change to a group or reference’s details and wish to make it
permanent, you should click the Save button. Note that you also need to select or highlight
reference, before any text updates can be registered for it. Just below these, there are two
other buttons related to a single group, which also make permanent changes. These allow you
to completely delete the group, or to write it to a file. This list of buttons therefore works as
follows:
• The Save button saves the current details set, including reference-related.
• The Remove Group button will remove the whole group, including description and
reference links. If a group has sub-groups, you are warned to remove them first.
• The Write Group button allows you to write the details of just the group that is being
displayed, to a file. You can then transfer or use it somewhere else, for example.
7/18/2019 Textflo Organiser
http://slidepdf.com/reader/full/textflo-organiser 9/32
Textflo Organiser User Guide 1.25
9
• The Note Group will note that the group has been visited. As part of the browsing or
search, you may want to note a particular group for later retrieval and so you can
manually tag it using this button. You can then traverse back to it, as in section 2.7.1.
2.7.1 Tagged Groups Traversal
Below the Note Group button, there are two traversal buttons. Not all, but some of the
groups that you browse, search or view, will get marked or noted, when you can then traverse
back to them automatically. You use these buttons to traverse through that group list. It
means that if you were at a particular group, looked for something else, it might help you to
return to the original place. For normal browsing, you would need to click the Note Group
button to add a group to the list. If you perform a global search from the bottom of the form,
the first shown group is also automatically added and if you traverse backwards from some
group it again gets added, so that you can return to it. So tagged groups are different to the
global search traversal buttons at the bottom of the form, described in section 2.11.
2.8
Semantic Descriptions
As well as categories, groups of references can be described by a free text description and a
list of keywords. The keywords can also be entered manually, or retrieved from the analysis
panel of the main GUI. You can therefore analyse your document to find the common words
or word sequences and use this to categorise the document.
2.8.1 Free Text Des cription
The free text description is displayed in the Description text area. The text area is
editable and so you need to fill this in yourself. You can make this as specific or general as
you like.
2.8.2 Keywords List
Below the free text description, a list of keywords can also be entered. If you right-click in
the component, you get a popup menu. You can add a keyword by selecting the Add option.
You can then remove a keyword by selecting it and choosing the Remove option. These
keyword changes are only made permanent if you then Save the group. The Keywords list
can also be populated from the search form however. If the keywords option is selected in
that form (see section 3.3) and some of the keywords highlighted, then the Select button
will add them to the currently displayed group in the Organiser GUI.
7/18/2019 Textflo Organiser
http://slidepdf.com/reader/full/textflo-organiser 10/32
Textflo Organiser User Guide 1.25
10
2.9
References List
In the Organiser form, the set or list of file references that relate to any category is displayed
in the Reference List area of Figure 1. References are typically added by pasting them
into the lower combo box and then adding from there. If you have loaded a file into the main
GUI, then it is added to the lower combo box. The Move to List button in that area will
then move the reference to the group list. The Copy to List button will again add the
reference to the group list but also keep a copy in the store, so that it can also be added to a
different group. The Move and Copy buttons related to the reference list do the same thing,
but in the reverse direction. The list is also editable, so you can type a reference path into the
reference store box. It is also possible to drag a file onto the Drop area in the Organiser
form, when the file path will be added to the reference store.
2.9.1
Reference NotesBeside the references list there is a text area for entering a note related to the selected
reference only. You therefore have a text description for the group as a whole at the top and
also one for each reference. If you then select a reference, if it has a note, then it should be
displayed. Multiple selections should not display a note. After you enter the note details into
this text area, you should save the group details again. If a number of references are selected,
you will be asked if you want to save the current note for each one. If you want to delete an
existing note then you should remove it and again re-save the organiser, to re-write the note
as an empty one.
2.9.2 Alternative Reference Name
It is usual, especially when saving hyperlinks, for the display name not to be the actual link
path. The link path might not be very meaningful. In the middle of the form are some
additional info fields. One field is an Alternative Name text box that allows you to
enter an alternative name for a reference, but you then need to save the group again to make it
permanent. Each alternative name in each group must also be unique. If a reference does not
have an alternative name, then the path is displayed instead.
2.9.3 Reference Deadline
Below the alternative name entry is a date or priority option. There is a set of 2 radio buttons
that allows you to select one. You can save either a date or a priority for a reference, but not
both. If you click on Date, then a calendar date picker is made visible, to allow you to enter
a deadline time for a reference, again only stored after a subsequent save operation. You can
mark a reference with a deadline reminder and then search over the dates to find deadlines
that are about to end. You can also order the references based on these deadlines. If you click
on a reference with a deadline, a coloured box is displayed beside it, to indicate the level of
haste.

7/18/2019 Textflo Organiser
http://slidepdf.com/reader/full/textflo-organiser 11/32
Textflo Organiser User Guide 1.25
11
2.9.4 Reference Priority
If instead, you click on Priority, then a priority combo box is made visible. This allows
for a very basic form of scheduling, where a level of relative importance can be assigned.
There are 5 levels again. Saving a priority for a reference will remove the date and vice versa.
You can then order the references list based on the priority as well.
2.10 Reference Store
The reference store is the group of boxes just below the references list. Any reference that
you add is added here first. There is also a Drop area at the bottom left of the form, where
you can drag a file from an external source. The file path will then be added to the store list,
or you can paste one in manually. Beside the store list are two clear buttons. One is called
Blank and this it adds a blank or empty entry to the top of the store list. This can be useful if
you are adding manually, because long reference descriptions can be awkward to write over
quickly, whereas this button does it in one click. Directly below that is a Clear button that
removes all of the store entries.
2.10.1 Reference Types
A reference is typically a link to a local or remote (online) file source. Just as common might
be simply a text statement or entry. You can type some text into the store list and then add it,
without it being a link to anything. This is useful for adding schedule tasks or reminders. Youcan add comments, or times to it, as for any other reference entry.
2.11
Find Groups from Category or Reference Terms
While there is a search form with quite sophisticated options, you can also find groups
quickly that contain particular reference details, by matching to some free text. At the very
bottom of the form, you can type a term into the text area and click the Find Group button
to perform a search over all existing groups in all books. This includes reference paths andalternative names, and the result is a list of groups that match the search query. You can also
type in the search term and press the Enter key on your keyboard to start the search. These
groups can then be traversed through, using the left and right arrow buttons beside the Find
Group button. By default, all books are search over. If you select the This book check
box, then the search is performed over the currently selected book only. There are also two
radio buttons, to let you choose between matching to file references or category names. So,
you can also look for groups that have a particular category name associated with them.
Depending on the settings, the search text can match with any part of the reference’s
alternative name, if there is one, or link description (file path or URL, for example), or a
7/18/2019 Textflo Organiser
http://slidepdf.com/reader/full/textflo-organiser 12/32
Textflo Organiser User Guide 1.25
12
category name. This is a much more general search than previously, but also easier to use and
easier to find a related reference link with.

7/18/2019 Textflo Organiser
http://slidepdf.com/reader/full/textflo-organiser 13/32
Textflo Organiser User Guide 1.25
13
3 Search Organiser Content
As the Organiser book becomes larger, it will become more difficult to find the appropriate
group entries. The Search Organiser Content form can be used to perform another
type of search over the group details, again to give another view over the stored content. This
form can be opened by itself, or after an analysis in the main GUI has been performed. The
form is shown in Figure 2. The right-hand side ‘Select’ boxes allow you to select the ‘type’ of
information to look for, the ‘book’ to search over and some ‘query-specific’ terms. The
Search over and Select from lists therefore give alternative options for specific
types of search. Search terms are retrieved from the currently selected Organiser book only,
to make them slightly more focused. You can then choose which library to search over using
them, however. If any list is from an analysis, then this is also indicated. You can also add
your own terms to the list through the text box below that. There is also a short text
description that gets displayed, to describe the current choices. Any retrieved references get
displayed in the File Links list and the other search options are described in the
following sections.
Figure 2. Search Organiser Form for keyword matching.
In the figure, the ‘Text Filtering’ book is currently opened and the search is looking forcategories in the ‘Library’ book that match the selected clustering category.

7/18/2019 Textflo Organiser
http://slidepdf.com/reader/full/textflo-organiser 14/32
Textflo Organiser User Guide 1.25
14
Some other points are as follows:
• In the RHS Search over boxes, the first list specifies the search type – categories,
keywords, reference information, etc. The second list allows you to specify what book or
books to search over. The first book option of All will search over all books.• If the RHS Select from boxes; if you perform an analysis through the main GUI’s
Analysis tab (see main application’s user guide), then when you open this form, the
results of the analysis can be retrieved for certain types of search. When available, they
appear in the first and second choice lists, as a ‘Popular Words’ list, for example.
Otherwise, these boxes can display things like lists of categories to choose from. The best
option is to choose the search type and simply browse through the combo boxes, until the
Keywords list displays something that you want to use.
• In the LHS Keywords list, there is a new permanent entry for most categories. It is
called Has Entry. If you select this option, the search will simply check if a particularreference has any value entered for the specified search type. For notes in particular, it is
useful to retrieve only references that you have added notes to. This will then list all of
the reference paths in the File Links box.
3.1.1 References List
Any search that returns a value now also returns a list of all related references. These are
displayed in the File Links list. There is a Find Group option that is the same as for
the main Organiser form. If you select a reference in the list and click ‘Find Group’, all of thecategory groups that contain it can be retrieved and traversed to. If you then use the search
arrows buttons, you can traverse to each specific group and related reference list.
3.2
Search Types
The search form provides all already available keywords or terms and you can also enter your
own arbitrary terms. The right-hand side lists allow you to select what type of search to
perform. The actual search type is the very top list and is shown in Figure 3. The box
immediately below specifies if the search is for a particular book or all books. The Select
from lists then retrieve and display the keyword terms already used by the organiser groups.
This can be different for different options, but it is easy to simply browse through the options
and see what gets listed. The default selection is Clear, where no keywords are displayed in
the Keywords list. There is also an All choice, where all of the categorised words are
displayed. This allows you to select from different pre-defined lists of words. You then need
to select keywords by highlighting them and perform a search to find matching groups or
references. The search types are:

7/18/2019 Textflo Organiser
http://slidepdf.com/reader/full/textflo-organiser 15/32
Textflo Organiser User Guide 1.25
15
1. Category, Keyword or Description: these relate to whole groups and will return a
list of those groups that contain the selected terms. If the book contains existing terms,
then these are returned and displayed. See section 3.3 for more information on this.
2. Reference Name or Reference Note: these relate to individual file references. A
list of all categories in the currently displayed book is returned to select from. The searchwill then return any reference links that are in the matching categories and add them to
the reference list, or File Links area.
3. Reference Content: this choice relates to lists of category groups, where the actual
file or related links content is parsed and compared to the list of selected keywords. The
matching links are again displayed in the reference list, or File Links area. See also
section 3.2.1.
4. Deadline: this choice relates to deadline times, either in the selected book or over all
books. It will return links that are exactly inside of the selected deadline set. Matching
reference links are again displayed in the reference list, or File Links area. See alsosection 3.2.2.
Figure 3. List of the Type of Search
3.2.1 Searching over References Co ntent
This search is slightly different and is essentially the same as the Query form’s, ‘search over
folders’ option. To search over folders, the user browses to the root folder and also enters
keywords to match to. All of the files in the folder, or sub-folders, are parsed and if anycontain the selected keywords, they are returned. The Search Organiser Content
form will display the 3 different category levels for this search type in the Select from
lists. You can select a specific category set, manually enter keywords into the keywords list
and then search over the book groups’ reference lists that are contained in the selected
category set. This is slightly different to the main GUI folder search, as the references can be
stored in different and distributed folders, whereas a folder search is over the specified
folder(s) only. The restriction of only reading text-based or PDF files still remains, however 1.
Note that if you choose the Any category for some level, you will be asked if that means only
1 The profess ional version might allow other file types to be read.
7/18/2019 Textflo Organiser
http://slidepdf.com/reader/full/textflo-organiser 16/32
Textflo Organiser User Guide 1.25
16
the ‘Any’ category, or if it means ‘all’ categories at that (and all sub) level(s). This allows
you to choose any specific category set, or to choose a general search over more than one set
of categories.
3.2.2
Searching over Deadlines
This search is slightly different and makes a numerical comparison. The list of options is now
automatically displayed. These options cannot be changed, but you can choose which
timeframes to search over. Any references with a deadline added that lie exactly inside of any
of the timeframes are then returned and listed. You can select to search over a specific book
or to search over all books, from the second select type box.
3.3
Search terms - Keywords SectionThe top left group box retrieves keyword lists, either from the currently selected Organiser
book, or from a text analysis carried out by the main GUI’s ‘Analysis’ tab. If it is from the
book groups, a single list of all entries is returned and displayed. If it is from an analysis, the
contents will depend on what analysis was carried out and what Select from options
have been selected. There is also a text field and an Add button, for adding a new keyword
manually. The related should indicate where the keywords list has come from.
3.4 Organiser Search Process
To finally perform the search, you highlight a list of keywords and then click the Search
button in the middle of the form. This will try to match the selected keywords with all of the
selected groups. There is a text box to specify the maximum number of matches to return,
where a valid number should be entered with the following conditions:
• The Return all matches check box is selected as default. This means that all
matching groups will be returned.
•
If all matches is not selected, the maximum number of matches defaults to the value 5.
This means that only the top 5 matching groups will be returned. That is – any group with
any keyword in its list that matches with any of the specified keywords. If one group has
3 matches and another 2 matches, then the first group is preferred. If scores are equal
however, then only the first 5 that were found will be returned.
• You can therefore change this number to any other value to return a different number of
matching groups.
• A message box will display the number of matching groups that were found. The left and
right ‘arrow’ buttons will change the display in the Organiser form to show the next or
previously matched group.
• If a list of references is returned instead, then these are displayed in the ‘File Links’ list.
7/18/2019 Textflo Organiser
http://slidepdf.com/reader/full/textflo-organiser 17/32
Textflo Organiser User Guide 1.25
17
3.5
Word Stemming
The search process can perform a certain level of word stemming, where common word
endings are removed. The stemming only applies to English language text however and so
there is a check box beside the other search buttons that allows you to select this option:
• If stemming is included, then for example, the words ‘system’ and ‘systems’ would be
considered to be the same. The words ‘parser’, ‘parsers’ and ‘parsing’, would also be
considered to be the same and would be stemmed to the same word ‘pars’ before
comparing them.
• If stemming is included and the keywords are word sequences, then only the final word in
the sequence would be stemmed.
• Matching is based on the selected term being contained inside any word in the text, where
case is not considered.
Stemming means that if you enter slightly different versions of the keyword in different
groups, the search will still be able to compare the keyword lists and make a match. It also
means however that you might get matches that are not correct, but you can filter through all
returned matched groups before deciding on which one to add the reference to.
3.6
File Links Section
If you perform a search over any of the allowed categories, then a list of references can bereturned. These links are then added to the File Links reference list, when a popup menu
will allow you to open any of the links using the system’s default program. Alt ernatively, you
can copy the reference to the main Organiser form using the Add to Store button. The
file reference from the main GUI form is automatically included when this form is opened,
but it is removed again if it is not part of the search result. It is also possible to drag a file into
the Drop area, when the file path will be added to the reference list.
7/18/2019 Textflo Organiser
http://slidepdf.com/reader/full/textflo-organiser 18/32
Textflo Organiser User Guide 1.25
18
4 Organiser Buttons
The Organiser has a number of features that are activated by the toolbar buttons at the top of
the form. These include some features only available on the professional version. These
buttons can be used to perform more complex operations that involve moving or changing
whole category groups. Care must therefore be taken when using one of these options. The
features are described next.
4.1
Copy and Paste Groups
The top right corner of Figure 1 shows a Copy and a Paste button. You can use these to
copy the currently selected organiser group details and then paste them into a different set of
categories. This would be useful if you wanted to re-classify a group.
• Copy: If you click this, the currently showing category group is copied and stored. Note
that the original copied group still exists until you delete it using the Remove Group
button.
• Paste: You can then paste into an existing group and overwrite the group’s details, or you
have the option of combining the stored details with an existing group’s details . You are
prompted to confirm that you want to overwrite, as the change is then permanent.
NOTE: these options only select and copy the current group. They do not copy sub-groups of
the group.
4.2
The Top Forward / Backward Buttons
Just below the large View Group button are two Forward or Backward traversal
buttons. Special attention of these is required. You use them to traverse forwards or
backwards over previously viewed groups. These are either groups that the book opens with
or ones opened using the ‘View Group’ button. The form stores about 10 traversals, but thesecan include blank groups that you traverse through. They are especially useful if you perform
a search for something but then wish to discard the results. In that case, you might want to
traverse from the search result, back to the last manually opened group. This means that when
you click the previous ‘<<’ group button, it actually ‘repeats’ the last group first. So you need
to click it twice to move back one. Repeating the last stored manual group allows you to
retrieve that when things change from a search process, but if you are simply traversing and
viewing manually, then you might need to click some buttons twice. This is the only problem
to be aware of.
7/18/2019 Textflo Organiser
http://slidepdf.com/reader/full/textflo-organiser 19/32
Textflo Organiser User Guide 1.25
19
4.3
Folder and Path Refactoring
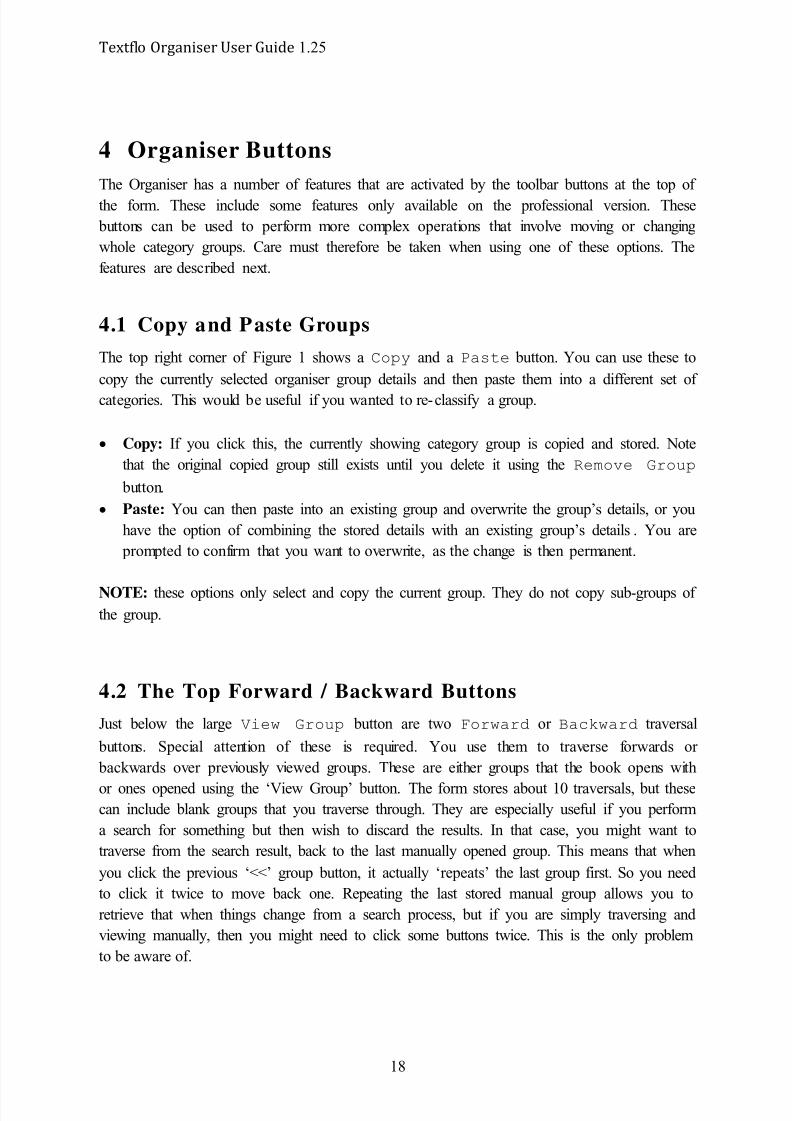
Next to the copy/paste buttons, there is a toolbar button to create a category model from a
folder. This is a quick way to convert the entire contents of a folder and its sub-folders into a
category model. The button opens a form, shown in Figure 4 that allows you to automatically
create sets of categories for a selected book. This form is also tabbed, where the second tab
allows you to make global reference path changes, as described later.
The form allows you to browse to a folder on your computer that is displayed when selected.
Below this, the list of existing books is provided and the folder name is then added as an
alternative book name. You can also manually enter a completely different name and click
the Enter button to register it. If the Remove folder category check box is selected,
the root folder is not included as a category itself. It might be the book name instead, for
example. Any file references in that folder are then added to the ‘Any’ category and the new
set of categories start with its sub-folders.
Then click the Create Model button to create a new category lists and references. The
folder and sub-folder names are read and they create the category lists, while the file names
complete the reference paths in each related category set. The maximum category depth is 3,
so after that, all sub-folder contents are added to the deepest related category list. The file
links can then be opened in the Organiser form as usual and you can add additional
descriptions or keywords to describe what the folder or file contents are about. As hyperlinks
and shortcuts can also be opened, you might want to describe your Browser hyperlinks better,
by creating an Organiser book for them.
Figure 4. Folder to Category Model form.
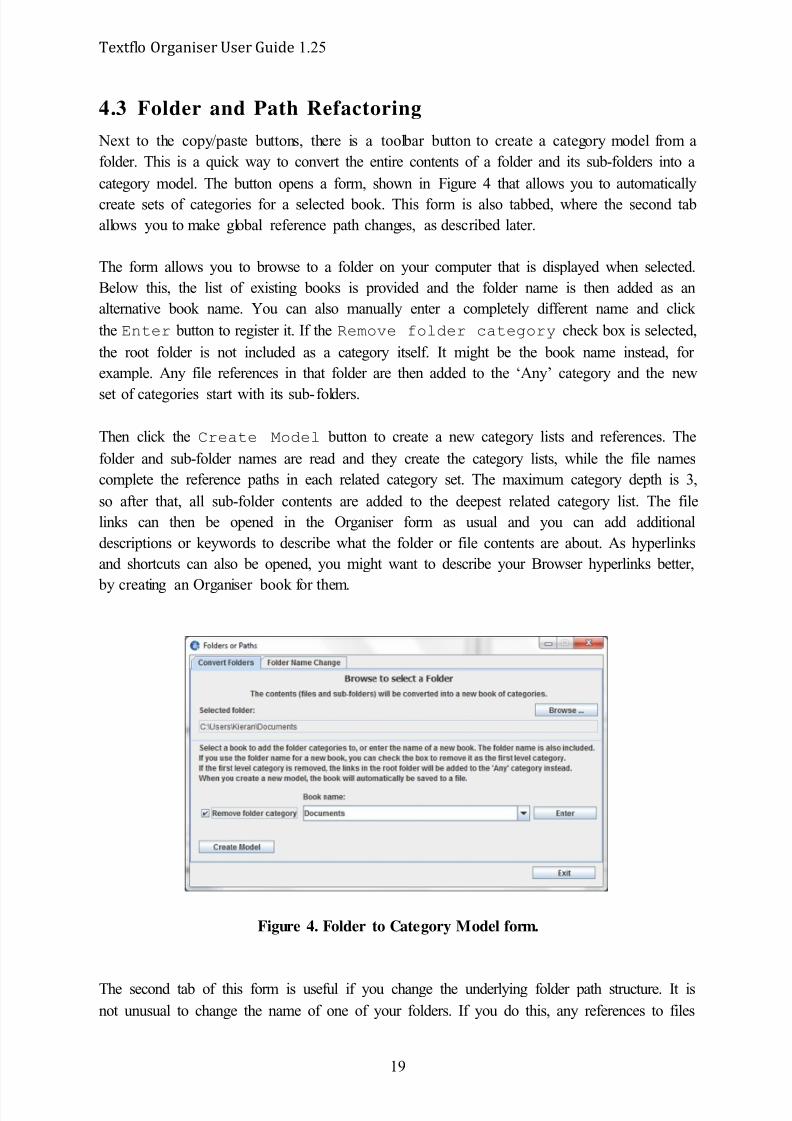
The second tab of this form is useful if you change the underlying folder path structure. It is
not unusual to change the name of one of your folders. If you do this, any references to files
7/18/2019 Textflo Organiser
http://slidepdf.com/reader/full/textflo-organiser 20/32
Textflo Organiser User Guide 1.25
20
in that folder will become out of date and so you would also need to change them. Figure 5
shows this tab with some folder path names.
Figure 5. Global folder path name change.
You need to enter the text manually and you should probably enter the full path description
from the base up to where it gets changed. The top text field is for the existing path in the file
references and the second text field is what you want to change it to. If you then click the
Change button, it will change the path in every file reference accordingly. Only the first
instance of the text string gets changed. You might want to do a backup first, just in case a
mistake is made. You could even backup the whole org folder, as every book can be updated
with all files saved again.
4.4
Group Refactoring (Prof version only)
Next to the ‘Categories from Folder’ button, there is a button to move, refactor or combine
existing groups. This is only available in the professional version, but it is a useful tool to re-
structure existing categories and can also include sub-categories or groups as part of the
process. This opens a form, shown in Figure 6 and Figure 8. This form now allows two types
of refactoring:
• One is a more sophisticated version of the copy/paste option, where you can also select
sub-folders to move, all in one operation.
• The other refactoring allows category groups and their related links to be combined.
7/18/2019 Textflo Organiser
http://slidepdf.com/reader/full/textflo-organiser 21/32
Textflo Organiser User Guide 1.25
21
4.4.1 Move Groups to New Categories
When adding new category models and lists, groups can build up that you then might want to
change later. In that case, you might want to move existing groups to a new location. The
Cut and Paste button options allow you to move single groups, but the refactoring form
allows for a batch process to move whole sections in one go. The Move Group frame of the
refactoring form, shown in Figure 6, allows you to specify a more sophisticated set of
conditions, including sub-groups and deleting or keeping the original group set. You can also
copy or move between different books.
Figure 6. Move Groups Refactor form.
The process works as follows:
1. You firstly browse the books and category lists, and Add sets of categories to be
analysed. The selected categories appear in the top All Selected Categories list.
If you select the sub-categories check box, then all sub-categories will be added for an
‘Any’ category.
7/18/2019 Textflo Organiser
http://slidepdf.com/reader/full/textflo-organiser 22/32
Textflo Organiser User Guide 1.25
22
2. This produces a single list with all of the different category options. You then need to
select explicitly, from this list, all of the category groups that you want to move. This
gives some flexibility, also allowing you to not select certain groups.
3. You then need to select the book and category group to move these groups to. This is the
second set of categories, below the select list, in the ‘move to’ section.
You then have a number of move options, as specified in the bottom panel. These work as
follows:
1.
The first set of radio buttons allows you to select one of the following options:
1.1. Move the groups by copying them and also keep the groups in their original location.
1.2. Move the groups and delete them from their original location.
1.3. Just delete the groups from their original location.
2. The second set of radio buttons allows you to select one of the following options:
2.1. Remove extra categories from the top of the groups that are moved.
2.2.
Remove extra categories from the bottom of the groups that are moved.
2.3. Remove specifically the first or top-most category. This is useful for the example,
where the ‘Writing’ category has been made into a new ‘Book’ and the other sub -
categories should all be moved up one level.
2.4.
In the example:
2.4.1. All of the ‘Writing’ categories have been added and some have been selected.
The categories to move, starting with Writing : Journals :
Something Else; and they will be moved to new groups in a new ‘Writing
Book’.
2.4.2.
The top level of ‘Writing’ category is now not required, because it is the nameof the book.
3. There is also a Keep Any as Any check box that allows the use of the ‘Any’ category
without any replacement. This is also important, as it will allow you to move to an ‘Any’
category specifically and not have to replace it with existing ones. For example:
3.1.1. You have categories to move, starting with Artificial Intelligence
: Autonomous : Something Else ; and you want to move to a group
called Networks : Any : Any.
3.1.2. The ‘Keep Any as Any’ box is checked, meaning that you want to move and
combine the selected groups into the Any category exactly. This will result inonly one new group that is Networks : Any : Any and it will contain all
of the ‘Autonomous : Something Else’ category info and links in it.
Whenever the options have been selected, click the Refactor button to start the process. A
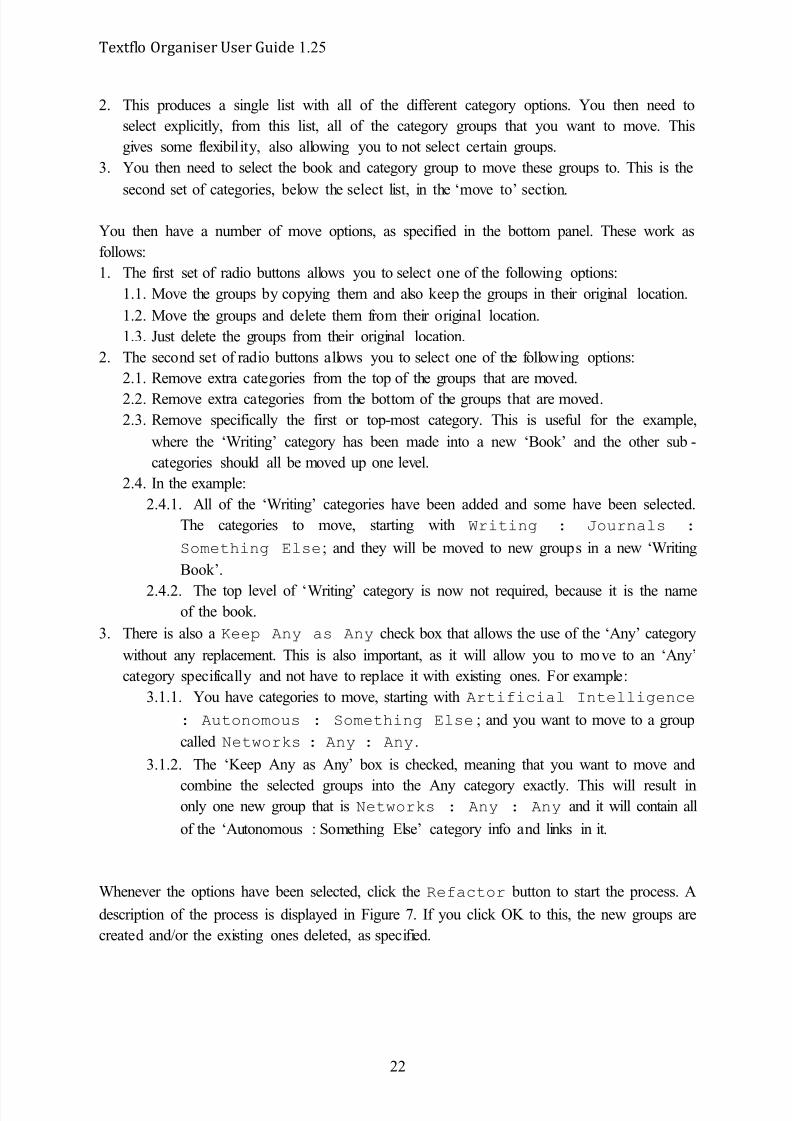
description of the process is displayed in Figure 7. If you click OK to this, the new groups are
created and/or the existing ones deleted, as specified.
7/18/2019 Textflo Organiser
http://slidepdf.com/reader/full/textflo-organiser 23/32
Textflo Organiser User Guide 1.25
23
Note: If you are unsure, you can choose to move and not delete. You can then check that the
new groups have been added as desired. You can then use the form again to simply delete the
original set. A save will update it and remove any blank category groups.
Note: You then need to save the updated book in the Organiser form for the ‘moved to’ book.If however, you have chosen to also delete from a different book, the group deletion will
already have been done. So if the new set of groups does not look correct, you need to open
up the book to correct, do not perform any new saves, and then Recover the last backup
version to retrieve the deleted category groups again. If you are careful, this process should
work safely and easily enough.
Figure 7. Example of a Move Group description.
4.4.2 Refactor or Combine Groups
This option allows you to combine or merge existing groups from the same book. When
adding new category models and lists, it is possible to add similar groups at different
locations, because they originated from different sources. You might, for example, use the
same category keywords in one or two of the slots, or use a similar set of keywords for
different category groups. The Refactor group frame shown in Figure 8 allows you to
select sets of category groups that are then analysed for this type of similarity. It will then

7/18/2019 Textflo Organiser
http://slidepdf.com/reader/full/textflo-organiser 24/32
Textflo Organiser User Guide 1.25
24
suggest if two or more groups could be combined, if they appear to be similar. You will then
have to option of combining the groups to produce a more consistent category set.
Figure 8. Combine Groups Refactor form.
Before deciding to refactor any groups, you can click on the Organiser form to bring it to the
front and look more closely at the group details. If you decide to refactor, clicking on the
refactor button will bring the existing Refactor form back, in its current state. The process
works as follows:
1. You firstly browse the category lists and Add sets of categories to be analysed. The
selected categories appear in the top Selected Categories list.
2. You then need to specify what you want to analyse. You can select either: Categories,
Keywords, References, or any combination. These are selected through the check
boxes in the Refactor options section. You can also choose Word stemming
(English only) to make the terms more general.
3.
Because this is a re-organisation process, it might be more useful to look at groups from
different category pools. For example, all of the ‘Artificial Intelligence’ groups might berelatively well sorted with each other, but a ‘Network’ group might have developed

7/18/2019 Textflo Organiser
http://slidepdf.com/reader/full/textflo-organiser 25/32
Textflo Organiser User Guide 1.25
25
separately and be related in some way. There are 2 check boxes to help with this. If you
click the Diff Category 1 check box, the groups placed in the refactor list are not
allowed to have the same first category as the selected one. If you click the Diff
Categories 1 and 2 check box, the groups placed in the refactor list are not
allowed to have the same first two categories as the selected one.4. Click the Analyse button in the bottom panel to perform an analysis. This performs a
similarity count of each of the selected groups with every other one. The Low/Hi buttons
in the middle panel will change the minimum allowed count value. Any group sets that
match the count value are displayed in the Matching groups list.
Figure 9. Example of a Refactor description.
Only 2 groups at a time can be merged, or refactored. To complete the process, you then need
to perform the following:
1. If you click on any group in the Matching groups list, it is transferred to the To
Refactor list, along with all of the groups that it matches with.
2. From the To Refactor list, select two of the category groups and click the
Refactor button. You are then asked a set of questions to configure the refactoring
process. These are:
2.1. You can either refactor to an existing list of categories, or to a new list of categories.
2.1.1.
You are shown the two selected category sets and you can select either one ofthose, or cancel this to enter your own new category set.

7/18/2019 Textflo Organiser
http://slidepdf.com/reader/full/textflo-organiser 26/32
Textflo Organiser User Guide 1.25
26
2.1.2. If you ‘Cancel’, you are allowed to edit the existing category sets to create a
new one. This is relatively easy and you only need to make sure not to remove
the separator marker when editing.
2.2. You then need to define what the primary group is from your final selection. The
values of the primary group are then taken to be the default category value set for thenew group.
2.3.
You then have the option to merge the lists of keywords, the whole group
descriptions, or each reference info description. For each of these, you can select
either to merge, or to use only the primary group set of values.
2.4. You also have the option to delete the original groups or to keep them.
3. When you have made these selections, a form will display the refactoring criteria, as
shown in Figure 9, for example. If this looks appropriate, you then click the OK button to
perform the refactoring operation. Note that if it goes wrong, you can still recover the
original book through the Recover button in the main Organiser form.
4.5
Reminders and Deadlines
This section describes options for setting reminders and deadlines. It has been extended to
include more Calendar features, but should not replace a full timetabling app. A reminder
relates to a particular event or reference link and can be repeating. A deadline relates to a
single critical time event. Reminders can be flagged a number of days before the event and
can continue to flag until it is reset. So it does not have to relate to anything critical. You may
have folders of files that were written with the intention of looking at again, for example. As
other tasks became important, these files or topics may have been forgotten about. A
reminder can simply be a message to look at a file again.
If you right-click on the reminder toolbar button, it will give you a view of your Weekly
Reminders, as in Figure 1. This displays the days remaining in the week and any reminders
for those days. It closes after about 30 seconds, or you can close it manually. If a day has
passed in the week then it is not displayed, except for the previous day, as a list of Recent
reminders. Late reminders that have not closed are also added to the current day and a count
of Deadlines is also shown. For more details, you can then open the reminder viewer, as
described in the following sections.
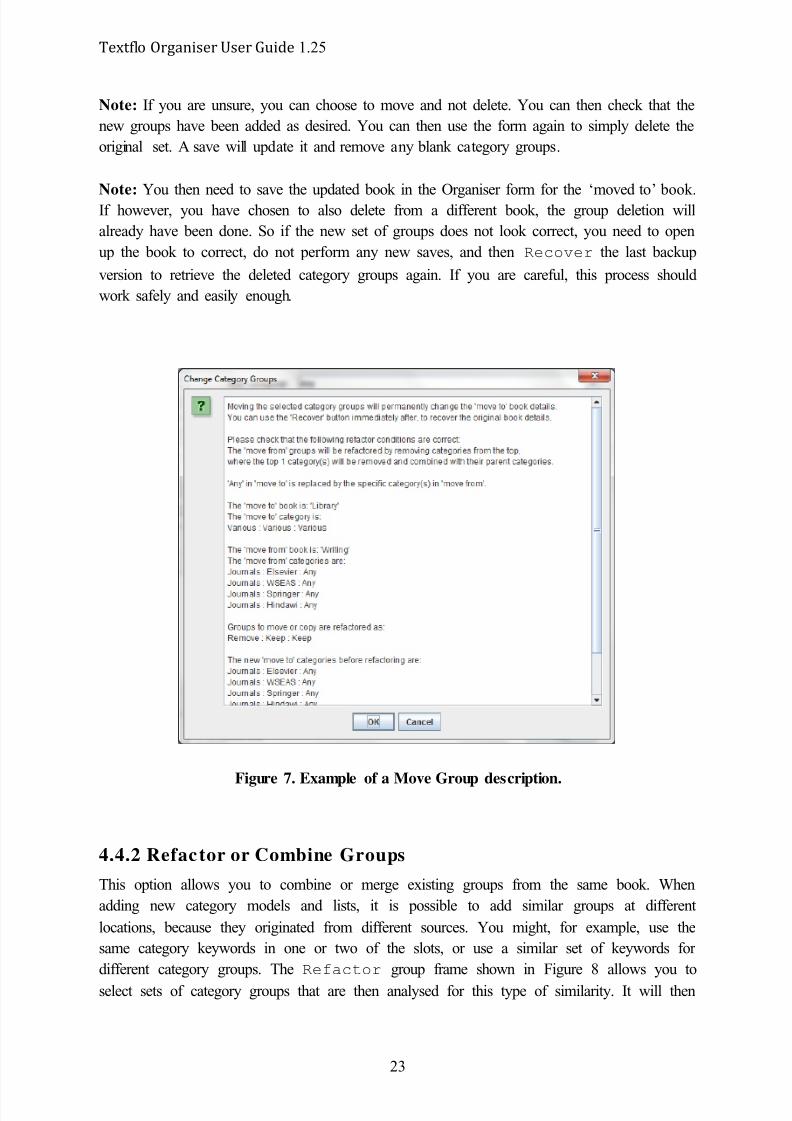
4.5.1 Setting a Reminder
Reminders are set using one form, although they can then be updated in the view form. If you
right-click a reference link in the main Organiser form, you get a popup menu, where one
option - Set Reminder - is to add a reminder for the link. The reminder is then removed
using the view form, where the set form is shown in Figure 10. The reminder now
incorporates some calendar features and can be set even years into the future.
7/18/2019 Textflo Organiser
http://slidepdf.com/reader/full/textflo-organiser 27/32
Textflo Organiser User Guide 1.25
27
Figure 10. Set reminder form.
The starting date for a reminder is selected through a date-time picker. If you do nothing, it is
automatically set to the current date. You should now in fact set the reminder to the exact
date of the event. You then also set a notify time period in days, where the reminder is
flagged that number of days before the event. You must also set the repeating time duration
for the reminder, which indicates when the reminder will be activated again. Another option
allows the reminder to either reset itself automatically or wait for a manual reset. Automatic
is the default and means that when the even date has passed, the reminder rests itself to the
event date plus the repeat time. If on manual, then the reminder does not reset and will
continue to flag until the user resets it. A check of the settings is displayed in a dialog box, to
allow you to cancel if it is incorrect. Alternatively, if you click the Group reminder
check box, the reminder will relate to a category group as a whole and not the selected
reference. The time period between reminder alerts is converted into days. The program does
not read calendar dates completely and will interpret a month as 31 days. If you then click the
Add button, the reminder is added to a file that stores all reminders from all books together.
4.5.2 Viewing Reminders
When you open the Organiser form, it will check for reminders that are now due. You can get
a weekly view by right-clicking on the reminder toolbar button. For full details, you can then
click the reminder and deadlines button to open the viewer that shows all of the saved
reminders. This is shown in Figure 11. The book and category group is displayed at the top.
Below this, the file reference and a description of the reminder dates are displayed. The form
now allows you to view your reminders, deadlines or priority lists, where the reminders view
is described here.

7/18/2019 Textflo Organiser
http://slidepdf.com/reader/full/textflo-organiser 28/32
Textflo Organiser User Guide 1.25
28
Figure 11. Reminders view.
There are 3 options for retrieving reminders based on their date as follows:
• Current: if this option is selected then the reminders that are currently due are retrieved.
• Date: this option, along with the date picker, allows you to select a future date and
retrieve reminders up to that date.
•
All: this option shows all reminders no matter what their date is.
As well as selecting the time period, the viewer gives the following options:
• If the reminder relates to a group as a whole, its reference is set to the keyword
Any and it cannot be Opened. You can still go to the group in the Organiser form,
however.
• A count of the total number of reminders is also displayed, which is useful if they start
to build up.
• There is also a filter box.
o The filter text can filter the reminder list and match to the reference path text.
o The check boxes beside the book and category names allow the filter to
include that content as well.
The reminders are browsed and updated using the buttons at the bottom of the form. These
work as follows:
• Open: This will open the link using the system default application.
• Go To: This will go to the category group in the Organiser form itself, but it will not
open the reference link.

7/18/2019 Textflo Organiser
http://slidepdf.com/reader/full/textflo-organiser 29/32
Textflo Organiser User Guide 1.25
29
• >> : This will browse to the next reminder and display its details.
• << : This will browse to the previous reminder and display its details.
• Show All: If selected, all of the reminders can be browsed through. If it is not selected,
only the reminders that are due are displayed.
•
Reminder or Current: If the Reminder radio button is selected, then a reminderReset is performed from the last reminder due date. If the Current radio button is
selected, then a reminder is reset from the current day instead. This just means that you do
not always have to reset on the exact day of the reminder, to keep some sort of
consistency between alerts. For example, if the reminder was first flagged on Monday and
you view it again on Tuesday:
o Reminder radio button: this option will reset the reminder to Monday’s date plus
the reminder time period.
o
Current radio button: this option will reset the reminder to Tuesday’s date plus the
reminder time period• Reset: This forces a reset of the reminder, even if on an automatic setting. The reset is
always to the last reminder date plus the repeat time period now.
• Automatic or Manual: This allows you to change the reminder between an automatic
reset or a manual one. If on manual, the reminder will not be reset unless you reset it, so it
will continue to flag. If on automatic, it should reset after the repeat time period has
passed.
• Remove: Remove or delete the currently selected reminder.
• Remove All: Remove or delete all of the selected reminders set.
• First +
: Use this to move the reminder date forwards by 1 whole day. This is easierthan removing the reminder completely and then adding it again. If the reminder date is
moved, it might change its status as well, so the ‘Show all’ check box is automatically set
so that all reminders (due or not due) can be displayed.
• First -: Use this to move the reminder date backwards by 1 whole day. This is easier
than removing the reminder completely and then adding it again.
• Second +: This moves the notification number of days forwards by 1 whole day. A
larger number of days means that the reminder notification happens sooner.
• Second -: This moves the notification number of days backwards by 1 whole day.
•
Third +: This also moves the reminder date forwards by 1 whole day, but it doesit by also adding 1 day to the repeat time duration. So it extends the time
duration by 1 day, meaning that the date due is also extended. If the reminder date is
moved, it might change its status as well, so the ‘Show all’ check box is automatically set
so that all reminders (due or not due) can be displayed.
• Third -: This also moves the reminder date backwards by 1 whole day, but it does it
by reducing the time duration by 1 day. If the time duration is reduced by 1 day, then the
date due is also reduced by 1 day.
• Exit: Exits the form.
7/18/2019 Textflo Organiser
http://slidepdf.com/reader/full/textflo-organiser 30/32
Textflo Organiser User Guide 1.25
30
So while reminders are not the same as a calendar or timetabling app, they do incorporate
some useful features that way and could be sufficient for most needs. The time buttons are
useful for small changes. For large changes, it would be better to delete the reminder and
create a new one.
4.5.3 Viewing De adlines
When you first open the Organiser form, it will also check for deadlines that are up to a
specified time period. You can then click the reminder and deadlines button on the toolbar to
open the form and select the Deadlines tab. This is displayed in Figure 12. The deadlines
are shown simply as a list of the ones that are inside of the specified time period. If the list is
empty, then you need to select a time period and click the Set Time Period button to
save it. You need to do this at least once at the beginning. You can also select to search over
all books, or select a single book to look at.
Figure 12. Deadlines view.
Deadlines are displayed up to the time period. So for example, if you specify to show
deadlines for up to 1 month; then deadlines for 1 month, 1 week, 1 day and late are all shown,
across every book. This is slightly different to the search form that returns results for the
selected time period only. They are also ordered from most late to most recent and if you
select a deadline in the list, its exact date should be displayed.
You can then select a deadline by clicking on it. This will show the exact time period for thatreference, as it gets shown in the main Organiser GUI. The Open button will then try to open
7/18/2019 Textflo Organiser
http://slidepdf.com/reader/full/textflo-organiser 31/32
Textflo Organiser User Guide 1.25
31
it, if it is a link, or the Go To button will go to its group in the main Organiser form. The
arrow buttons will move to each instance of the reference in the books.
4.5.4 Viewing Priority Lists
The third tab allows you to view priority lists in the same way as the deadlines. Simply select
the minimum priority and all saved reference from that to the maximum value get displayed.
4.6 Popup Menu
There is also a popup menu for the file references list that allows you to open them directly
from the list. Select/highlight a file reference and then right click the mouse to open the
popup menu. There is now one Prof option here that is not shown in the demo version. Theoptions are as follows:
1. Open (URL, Multiple, or ‘???’): This allows you to open any of the selected file
references using the system default application. Your system should know what this is
and it will try to open a direct file reference, hyperlink or shortcut, as defined by your
system. If you select more than one file then they should all be opened together. A list
item needs to be highlighted for it to be selected. If no items are highlighted, then the
reference will be written as ‘???’ and no file will be opened. You can also simply
double-click a reference in the list, to automatically try to open the link.
2.
Next Link: This is available in the Professional version only and provides some more
scheduling help. The idea is to allow you to sequence references, but only one after any
other one. There are two options here:
a. Add next link: You select this to start the process. Upon confirmation, you
can then browse to any other reference and select it. You can then add it as a
next link to the starting reference.
b. Remove next link: You select this to remove any ‘next link’ that is saved.
3. Set Reminder: This opens the Set Reminder form, described in section 4.5, to allow
you to set a reminder for a reference link.
4.
Add to Bookmarks: This will add the reference details to the bookmarks list that can beopened through the main menu or GUI.
5. Email To: This will attempt to open your default email application, set a title and add the
selected file reference to the email text content. You can then add or change fields as
required.
6. Load into GUI: This allows you to read the contents of the file that the reference points
to, and re-load it back into the main GUI form again.
7/18/2019 Textflo Organiser
http://slidepdf.com/reader/full/textflo-organiser 32/32
Textflo Organiser User Guide 1.25
5 Temporary or Recent File References
This is a new feature that is still being tested. If you open the Organiser from the main GUI,
then some of the file select options will add the file or reference path to the new temporary
files list that is saved in the main GUI. This can be accessed from the Temporary File
Analysis form in the main GUI. It might be useful to see what files you have been looking
at randomly and not all files are saved to the list.