source code management using ibm rational team concert · source code management using ibm rational...
TRANSCRIPT

Source Code Management using
IBM Rational Team Concert
Work Items, Software Configuration Management, and Team
Collaboration Platform for COBOL, Java, PL/I, C/C++, and
Assembler Development
Student Exercises
Liam Doherty ([email protected]) Rosalind Radcliffe ([email protected])
Visit Jazz.net at: http://jazz.net/

Second Edition (February 2015)
The information contained in this document has not been submitted to any formal IBM test and is distributed on an “ as is" basis without any warranty either express or implied. The use of this information or the implementation of any of these techniques is a customer responsibility and depends on the customer's ability to evaluate and integrate them into the customer's operational environment. While each item may have been reviewed by IBM for accuracy in a specific situation, there is no guarantee that the same or similar results will result elsewhere. Customers attempting to adapt these techniques to their own environments do so at their own risk.
Copyright International Business Machines Corporation 2009.2015 All rights reserved.
This material may not be reproduced in whole or in part without the prior written permission of IBM.
Note to U.S. Government Users - Documentation related to restricted rights - Use, duplication or disclosure is subject to restrictions set forth in
GSA ADP Schedule Contract with IBM Corp.

Table of Contents OVERVIEW 4
Module 1 Source Code Management (SCM) using Eclipse 5 1.1. SOURCE CODE MANAGEMENT WITH RTC 5 1.2. CONNECTING TO AN RTC REPOSITORY 7 1.3. WORKING WITH WORK ITEMS 10 1.4. GETTING A LOCAL COPY OF THE SOURCE CODE TO WORK WITH 15 1.5. MAKING THE CODE CHANGES 22 1.6. OPTIONAL: ENABLING AUTOMATIC CHECK-INS 27 1.7. BUILDING THE CODE 27
Module 2 Source code management with the ISPF Client 33 2.1. LOGGING INTO THE SHARE LPAR 33 2.2. STARTING AND LOGGING INTO THE ISPF CLIENT 33 2.3. WORKING WITH YOUR REPOSITORY WORKSPACES 36 2.4. MAKING CHANGES TO PROGRAMS 39 2.5. PERFORMING BUILDS 45 2.6. DELIVERING YOUR CHANGES TO THE STREAM 48

Overview
This lab is for use with Rational Developer for z (RDz) integrated with Rational Team Concert (RTC). RDz is an integrated development environment (IDE) that consists of a workbench and a common set of tools to help you develop and maintain Assembler, COBOL, C/C++, and PL/I. RTC provides project tracking, planning, build, collaboration and source code management. RDz and RTC can be installed separately or together in an integrated environment where both RDz and RTC share the same eclipse client. The lab will demonstrate how to use RTC to track progress using Work Items and Iteration Plans. It will show how to manage source code with the Jazz Source Code repository.

Page 5 of 53
Module 1 Source Code Management (SCM) using Eclipse
1.1. Source Code Management with RTC
Some background on source control management in RTC and an explanation of some commonly used terms.
Some Jazz Terms Defined:
Project Area
The project area is the system's representation of a software project. The
project area provides definition for the project deliverables, team
structure, process, and schedule.
Team Area
The structure of the project teams is defined by one or more team areas. A
team area serves these functions:
1. Defines the users (team members) on the team and specify their roles.
2. Defines the development line in which the team is participating.
3. Customizes the project process for the team.
Streams and Components
A stream is a repository object that includes one or more components. A
component is a collection of related artifacts, such as an Application, an
Eclipse plug-In, or a group of documents that comprise Web site content.
Change Set
A change set is a repository object that collects a related group of changes
so that they can be applied to a flow target (workspace or stream) in a
single operation.
The change set is the fundamental unit of change in Jazz source control.
The contents of any workspace, component, or stream can be expressed as
a collection of change sets, beginning with the one created when the initial
set of projects was checked in. A change set can include changes to the
contents of individual files and changes to a component namespace (such
as delete, rename, and move operations).
The source control component handles the storing, retrieving and sharing of source code and other artifacts in your project. It is important to understand the terminology and relationships involved in any model so we will give some background information on managing source code with RTC including terminology.
In Rational Team Concert, we want users to benefit from SCM's ability to track and version your changes, whether or not you are ready to share those changes with your team. Accordingly, as a user you have your own private repository workspace which stores the changes you've made, regardless of when you decide to make them available to your team. Sometimes it will be only a

Page 6 of 53
couple of hours before you decide to share your changes; sometimes it will be longer. You decide when to make the changes available to your team. When you load your repository workspace, the files and folders in it are transferred to your Eclipse workspace on your computer. To push a change from your Eclipse workspace to the repository workspace you check-in the change.
A stream is used to store the team's work. When you want to make your changes available to your team, you deliver them from a repository workspace to a stream. When you wish to incorporate other team members' changes, you accept them from the stream (Note that you can also accept changes directly from another repository workspace, allowing for fine-grained sharing of changes between team members). For example, two team members might collaborate on a small bug fix; or, if someone starts a change and has to go on vacation, another team member could continue the work and then deliver it later. All changes you make in your repository workspace are tracked within change sets. Each change set is composed of a collection of explicit, primitive changes to one or more files or folders. The following picture shows the source control process.

Page 7 of 53
The scenario presented in this first lab is that you are a new member in the team so you will need to connect to the teams RTC repository, get a list of the work assigned to you. Create a child task associated with work you are going to do and make the necessary code changes. Then run a build to compile your changes, and check the output. Finally complete the work item.
1.2. Connecting to an RTC repository
a) You should find the icon for Rational Team Concert on your desktop (IBM Rational Team Concert), double click to start the client. (The client has the Rational Developer for z client also installed for use during this lab).
You will be prompted with the Workspace Launcher where you can select your Eclipse workspace. This is a directory where all your settings are managed and where all your source code is stored. The workspace, RTClab, should be listed by default but if it is not just click the downward pointing arrow in the box and select C:\Users\csolab\RTCLab. Click OK. Use the RTCLab workspace for this lab, as it is preconfigured for you.
Note : If you have already gone past the workspace launcher selection box, you can still get to the required workspace by switching workspaces. Go to File → Switch Workspace and then either choose the workspace name or choose Other and type the workspace name in the field, or use the downward pointing arrow, or Browse to the workspace.
a) First we need to log into RTC. This may be the first time you have logged in, so for the first time we may need to create a repository connection. This is to tell our Eclipse client which server repository we are talking to. The screen should look like this:

Page 8 of 53
b) Click on the Create Repository Connection and enter the following information as shown the next screen:
Instead of using shara08 as your userid, use the userid that has been provided for you, for example shara01, shara02, shara03, etc. The password you should enter is firstpw. Click Finish to continue.
c) If you get any certificate problems when connecting, just accept the certificate permanently:
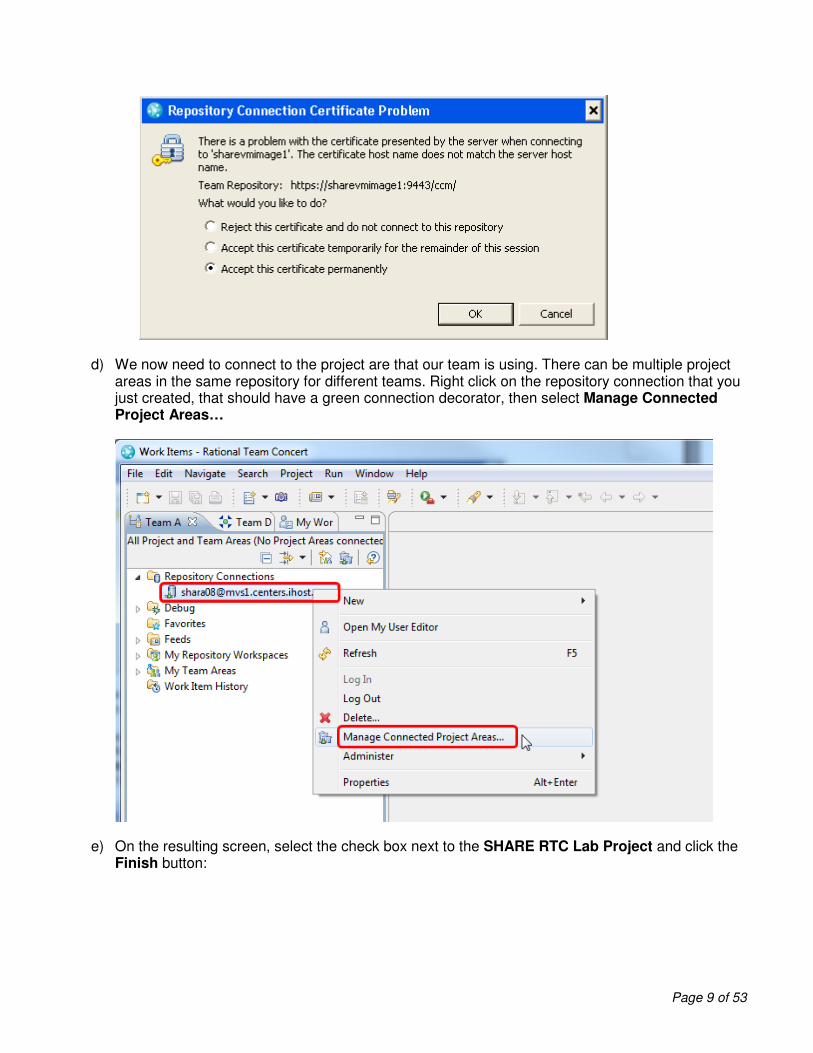
Page 9 of 53
d) We now need to connect to the project are that our team is using. There can be multiple project areas in the same repository for different teams. Right click on the repository connection that you just created, that should have a green connection decorator, then select Manage Connected Project Areas…
e) On the resulting screen, select the check box next to the SHARE RTC Lab Project and click the Finish button:

Page 10 of 53
f) The SHARE RTC Lab Project node should now have appeared in the tree view, such that if you click the arrow next to it, the RTC project nodes will be displayed. We will explore some of these throughout the course of the labs.
1.3. Working with work items
a) You are currently in the Team Artifacts view. So to get started on some work click the My Work view tab. This will display workitems that have been assigned to you.

Page 11 of 53
In your inbox you will see a work item that has been assigned to you: “New features to the mortgage application”.
b) Let’s go ahead an open that work item by double clicking it, or by right clicking and selecting Open.

Page 12 of 53
We can see this is a “Story” type of workitem, so this is a high level type work item that gives an overall view of a change. What we can do is create sub tasks as children under this Story. You can also allocate Story Points, which are a measure of the complexity of change. So we are going to go ahead and make a couple of changes to this work item, and also add a couple of task work items.
First of all click the drop down box next to Planned For and select Sprint 1, which is the current sprint as it is denoted with a -> next to the iteration. Next click on the work item status in the top
right corner, currently set to new, and change it to Start Working. You now have to save your changes by clicking the Save button in the top right corner.
c) We are now going to create a couple of new work items to split our work into smaller more manageable pieces. As these are going to be children of the parent story we will create the work items from within the Story work item. Click on the links tab at the bottom of the Story work item.
In the links section of the displayed screen, click the Add button, and then click the Add Children… option in the context menu.
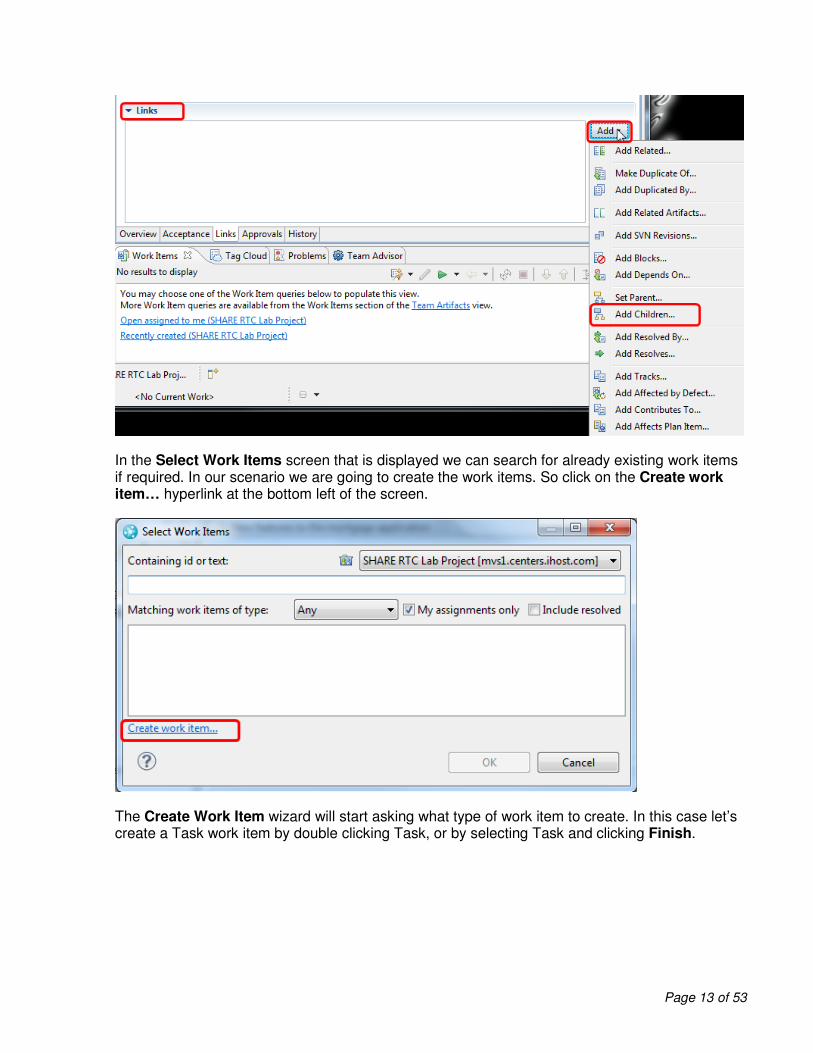
Page 13 of 53
In the Select Work Items screen that is displayed we can search for already existing work items if required. In our scenario we are going to create the work items. So click on the Create work item… hyperlink at the bottom left of the screen.
The Create Work Item wizard will start asking what type of work item to create. In this case let’s create a Task work item by double clicking Task, or by selecting Task and clicking Finish.

Page 14 of 53
A new work item window will be display ready for us to enter some information, so go ahead and add the following:
Summary Enter “Make changes to the EPSMLIST program”
Description Enter a description if you wish
Filed Against In the drop down select Share RTC Lab Project
Owned By In the drop down select your userid, for example shara08
Priority In the drop down set the priority to what ever you like
Planned For In the drop down select the current iteration, Sprint 1.
Click on Save and the work item will be created. If you click on the links tab you will see that this new work item has a parent of the Story work item. Similarly if you look at the links tab of the Story work item you will see that it now has a child relationship to this new work item. This is how work items in RTC are related to each other.
Finally, in the new work item you just created click on the work item status in the top right corner, currently set to new, and change it to Start Working. You now have to save your changes by clicking the Save button in the top right corner.
d) You will see that while you were doing all this, the My Work view was changing to reflect the addition of the new work item. If this view says to accept all work:

Page 15 of 53
Then click on the hyperlink and both work items will now appear in your current Work list.
1.4. Getting a local copy of the source code to work with
Now that we have a work item created we can start making our code changes. Currently the code is stored in the repository in a stream. In order to work on the code we need to create our own area in the repository to store our changes and in addition take a local copy in our Eclipse workspace to actually do the changes. The next part of the lab will direct you through that.
a) First, we are going to create a local repository workspace, to work with files in the repository. To do this, first locate your team stream for the project area RTC Lab Project. From the Team Artifacts View, expand SHARE RTC Lab Project project area and then expand the Source Control node. You should see a team stream named SHARE RTC Lab Project Stream.

Page 16 of 53
b) Right-click on the SHARE RTC Lab Project Stream and select New → Repository Workspace.
c) Give the repository workspace a name such as shara## Repository Workspace where ## is your user number, such as shara01 and click Next.

Page 17 of 53
d) Select the current repository for the workspace
e) Next select the read access permissions, for this lab, make the workspace public, then click Next.

Page 18 of 53
f) Make sure all components are selected and load the repository workspace after creation is checked, click Finish.

Page 19 of 53
Some Jazz terms reviewed
You use a personal Repository Workspace to work on
project files under Source Control. You Load the
repository workspace to copy the files and folders into your
local workspace (Eclipse) on your computer. Jazz tracks all
changes made to source-controlled files with Change-Sets.
Each change-set itemizes the changes to one or more
individual files or folders, carries a comment, and
references the relevant work item motivating the changes.
You Check-in your change-sets to upload copies of the
modified files from your local workspace to the repository
workspace.
g) You should now get a prompt for loading projects into your repository workspace. Make sure Find and Load Eclipse Projects is selected, and then click Next.
h) You will get a Load Eclipse Projects panel where you can select individual projects to load. Let go ahead and take the default, which is to load all projects. Click Finish.

Page 20 of 53
i) If you get a request to overwrite then select all the projects and press Finish.

Page 21 of 53
j) A loaded repository workspace will appear in the Pending Changes View. Loaded repository workspaces are special in that whenever you change a loaded file or folder in your Eclipse workspace, the changes are tracked and shown in the Pending Changes view. Here, you can manage your changes and perform common tasks such as
• Check-in changes to your repository workspace.
• Organize changes into change sets.
• Undo changes you've made.
• Associate change sets with work items.
If this view is not visible, go to Window → Show View → Other → Jazz Source Control → Pending Changes.
Note: Loaded means that the code in the repository has been copied down to your PC into a
folder so that you can work on it. A loaded component is identified by the decorator. If you have a component in your Repository workspace that is not loaded then it is not filled out in blue,
thus: .
Other change-set operations:
Suspending a change set ( )
There might be times when you need to begin working on a new change set for a given set of
items before you are finished with one that is in progress in your workspace. When in this
situation, you can suspend the current change set, which removes it from your workspace
but preserves it in the repository. The files in a suspended change set revert to the state they
were in before the change set started, and the change set itself is moved to a special
Suspended folder so that you can resume the work when you are ready.
Discarding a change set ( )
There are two basic scenarios for discarding a change set:
Appendix A. If you have accepted an incoming change set but decide later that you don't
want it in your workspace, you can discard it to undo the accept and return the change set
to the component's Incoming folder.
Appendix B. You can also discard a change set that you created but have not yet
delivered. Discarded change sets of this type remain in the repository but are not placed in
any special folder. To make it easier to retrieve a discarded change set that does not exist in
any other stream or workspace, you can associate it with a work item before you discard it
and then accept it from the work item later.
Reversing a change set ( )
If you want to undo the delivery of a change set, you can create a new change set that reverses all the changes in it and then deliver the reversed change set.

Page 22 of 53
1.5. Making the code changes
In this section we are going to walk through modifying a COBOL part. We have already loaded a local copy into some folders on our PC. We will use Eclipse to make some changes to these files. These folders have a certain “nature” and for z/OS artifacts in RTC these are called zComponent projects.
a) So let’s drill into the zComponent Projects. A zComponent project is a special type of Eclipse project that has a z/OS nature. This means that there will be special processing involved for this type of project, such as translation to EBCDIC when files are sent to z/OS for compiling.
To make changes to the files in these folders we need to be able to see the zComponent folders. For this we can use the Navigator View or the Project Explorer view. Add the Project explorer view to your workspace by selecting Window ���� Show View ���� Other…, in the filter box start typing Project Explorer until you see the node appear, then select it and click OK. In the Project Explorer open the MortgageApplication-EPSMLIST project by expanding the node. Open the zOSsrc folder and then the COBOL folder and look at the files.
Open the properties for the COBOL folder by right clicking on the COBOL folder and selecting Properties. If you click on the Enterprise Extensions you will notice the specification of the associated data set definition. A data set definition is a system definition that defines how a z/OS data set will be allocated, when required, on the mainframe. For example, during build when files are sent to z/OS to be built. Click OK or Cancel to close the properties window.

Page 23 of 53
Similarly right click on the EPSMLIST file and select Properties, again if you click on the Enterprise Extensions you will see the language definition associated with the file. A language definition is a system definition that tells RTC how to build a program, in a similar way that JCL describes how to build/compile a program. Click OK or Cancel to close the properties window.
b) Now that we have an basic understanding of the definition for the zComponent project, let’s make a source code change.
c) Double click on the EPSMLIST COBOL file with the .cbl extension. You will see it has been opened in the RDz editor. In RDz you can change the way the editor looks to suit your preference. Go to Window ���� Preferences ���� LPEX Editor then select the editor of your choice, with the obvious choice being ISPF!

Page 24 of 53
d) Make some change in the comments, and save. To save a file, either right click inside the file and select Save, Just close the file and confirm you wish to save it when asked, select file ���� Save from the main menu bar, or click the icon of the floppy disk on the toolbar.
e) Look at the pending changes view, it should be displayed below the source code. If not, open the view with Window ���� Show View ���� Pending Changes. You will now see that the Mortgage Application has a set of unresolved changes.
If you expand to see the file that changed, and double click on the file, the Text compare window will be displayed so that you can see what was added.

Page 25 of 53
f) Go back to the Pending Changes View and right click on the Unresolved line, you will get the option to Check-in or Check-in and Deliver… The later allows you to save the changes to your repository workspace, as well as to deliver them to the stream. Go ahead and select Check-in ���� New Change set at this time. This will copy the change into your own repository workspace, but not deliver it to the stream, so your team mates won’t be affected by your change.
g) Now we want to associate our work item with the change. You will notice that the Unresolved tree node has now gone and has been replaced by a line that says <Enter a Comment>. If you right click on this line, Then select Related Artifacts ���� Associate Work Item you will be able to add your work item to this changeset.
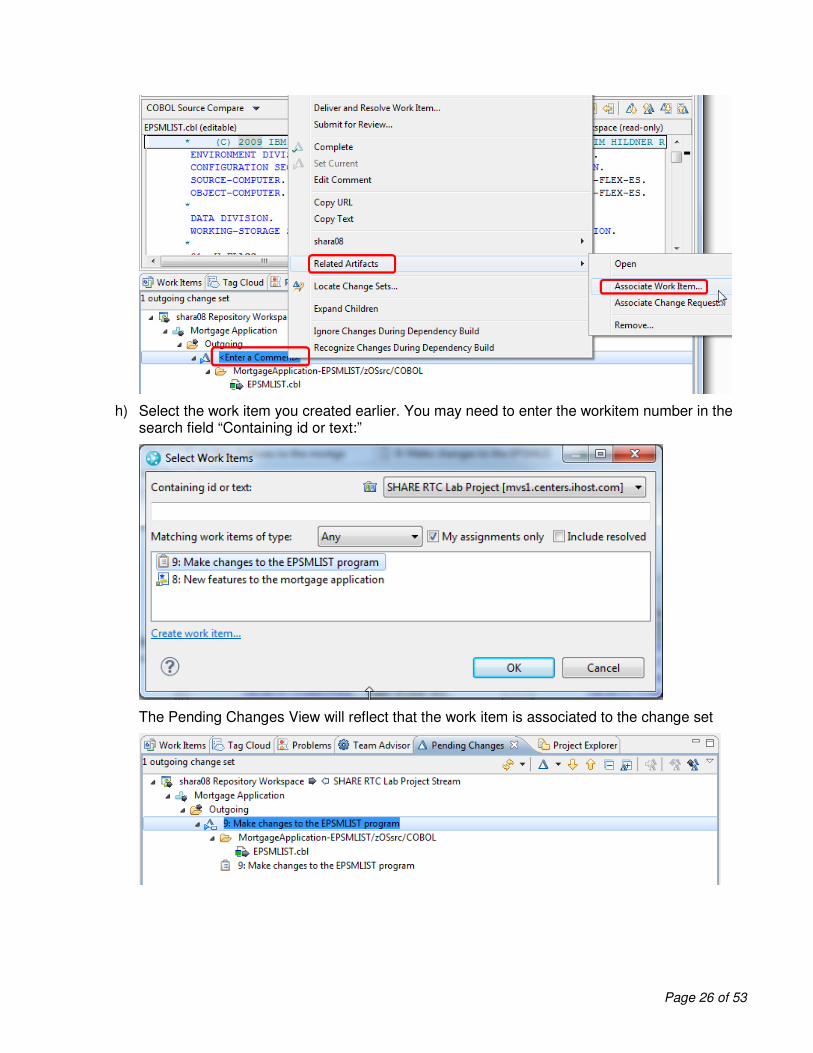
Page 26 of 53
h) Select the work item you created earlier. You may need to enter the workitem number in the search field “Containing id or text:”
The Pending Changes View will reflect that the work item is associated to the change set

Page 27 of 53
1.6. Optional: Enabling Automatic Check-Ins
Once a change is made to a versioned file (a file already being tracked by the Jazz Source Code repository), its corresponding change-set must be checked in to commit the change to your repository workspace. By default, check-ins must be initiated by the user. However, Rational Team Concert provides the option for making check-ins occur automatically.
a) Select Window ���� Preferences to open the Preferences settings.
b) Expand Team ���� Jazz Source Control and select Check-in Policies
c) Check Auto check-in local changes and press OK.
1.7. Building the code
Now that you have changed the code you will need to build it and test it. So far everything you have done has been in the Eclipse environment. This is no different for the build. However, in order for the compiles to work, the code needs to be sent to a z/OS system to be built. So regular source data sets will be populated with the code, a compile will run, and regular OBJ an LOAD data sets will contain the built files.
You can then use those built outputs to test your changes. (Don’t worry, we won’t be doing any testing in this lab).
The build definitions are normally set up by an administrator, but you can still build to your own data sets by using what is called a personal build. This is how we will invoke the build in this lab.

Page 28 of 53
a) In the Team Artifacts view you will see a Builds node in the project tree. Open that and you will see a build listed called SHARE RTC Lab Project Build.
b) Right click on the build and select Request Build …
c) The Request Build wizard will open where you can make some changes. Remember we have only checked the changes into our repository workspace. They have not been delivered to the stream as yet. The SHARE RTC Lab Project Build as it stands will build from a build workspace that is connected to the stream. So we need to tell it to build our code specifically.

Page 29 of 53
d) In the Request Build dialog open the Dependency Build Options section by clicking it. You will see a number of radio buttons, check boxes and entry fields. Make the Following changes:
i. Select the Personal Build option, so that it is ticked.
ii. Click the Browse button next to Repository Workspace and search for your own repository workspace that you created previously. It should be in the list, but if it is not you may need to enter the name (or part of it) of the workspace you created earlier in this lab.
iii. In the Load directory you need to enter a USS directory that will be used during the build. Enter /sharelab/shara##/RTCLabBuild where ## is the number of your userid.
iv. In the Resource prefix enter a high level qualifier of the location where the data sets will be loaded and built to. Enter SHARA##.RTCBUILD, where ## is the number of your userid.
e) Your Request build panel should look something like this:

Page 30 of 53
f) Click Submit to start the build. Once started the Builds tab will be displayed to show the progress of the build:
g) Once the build finishes, when the progress goes to completed, you can check the results. Double click on build result and the build result will open in the editor window:

Page 31 of 53
h) You can see from the result that there are a number of logs. These are the outputs from the compiles/links. Either click the Logs tab, or the Logs hyperlink and you will be presented with the log list screen:
i) You can see the output from the COBOL compile, and from the link-edit. If you want, double click the COBOL compile output to look at the compile output. Of course these outputs can be suppressed if required such that they are only produced if a compile error occurs.
At this point, after testing your code, you might deliver your code to the stream so that it can be integrated and shared with the rest of you team mates. For this lab however we will stop prior to delivering, so as not to confuse other lab participants with your code changes.
You can also go back to your workitems, both the Task and the Story, and change the status to a completed state. This will be reflected in your My Work view as well.

Page 32 of 53
Conclusion
This concludes Module 1. You now should have a basic understanding of source code management using the
Eclipse Client, along with the integration with the work items, and build.

Page 33 of 53
Module 2 Source code management with the ISPF Client
RTC has a number of different clients, so you can work in the environment that best suits your needs. For source control the Eclipse Client has the richest function. You can however work in a Web client, a Visual Studio client or, if you are used to a z/OS development environment, an ISPF Client.
Many z/OS shops wanted to continue using the tools they were used to to work on mainframe programs, in particular ISPF edit. So RTC provided an ISPF Client that allowed the SCM operations of RTC to be performed through ISPF. Other operations around work items, plans and admin would still be handled either from the Web UI or the Eclipse GUI.
In this module, you will see how to start the RTC ISPF Client and use it to edit, check-in, deliver and build z/OS programs.
Lab Scenario
You will create a defect work item through the RTC Web
Client and assign it to yourself. You will then use that work
item to make a change to a COBOL program, compile the
code, test it and then deliver it the stream for you
colleagues to pick up.
2.1. Logging into the SHARE LPAR
First of all you will need to logon to the SHARE LPAR by following these steps:
• Double click on the “mainframe” or “TSO” icon on your desktop.
• At the application prompt, type TSO and press Enter.
• At the prompt, enter your userid (SHARAxx – you will be allocated a number).
• On the TSO/E Logon Panel, enter your password which is FIRSTPW.
• You should be presented with the SHARE ISPF Primary Option menu
2.2. Starting and logging into the ISPF Client
The ISPF Daemon is a started task that runs to handle all requests to the various RTC servers. The Daemon should already be running. If you are interested in looking at the daemon, go to SDSF with a prefix of ISPFDMN, and you will see the started task. Have a look through the job if you wish.
a) To start the ISPF Client enter RTC on the command line in the ISPF Primary options menu and press Enter, you will see the RTC primary screen :

Page 34 of 53
b) First thing we will check are your settings by selecting option 0. This will tell the RTC Client on which port the daemon is running and additionally what the daemon registry directory is. These have to match what is set in the daemon you are pointing to. For this LPAR the daemon port is 8421 and daemon registry is /shareuser/lxd1/jazz502/ccm.
c) Press Enter to go back to the primary menu. We are now going to connect to our RTC Repository through the daemon. Select option 1 – Connections and press Enter; you will be presented with an empty repository connection screen. First step is to add your userid and repository address into the fields provided. For the user ID enter shara##, where ## is the userid number assigned to you. For the repository address enter the address https://mvs1.centers.ihost.com:8403/ccm/
d) .

Page 35 of 53
e) Press enter and the connection will be added to the list. If you have multiple servers you can connect to you can add them all to the list to use for connection. Now you can enter an L next to the connection to login, or alternatively enter a “/” to see all available options:
You will be presented with a list of options, so just select 1 to login:
f) You will be presented now with a password screen where you can enter your jazz repository password, which will be firstpw. The password is a protected field so you will not see it as your type.
g) If you have never logged in before you will be presented with a screen to select a project area. Your RTC repository may have multiple project areas you can select from. The connection panel is also the place you can switch between project areas. For this lab there is a single project area, so select it with a “/”:

Page 36 of 53
h) You should now be logged in and presented with the primary options panel to inform you of that:
Note: Many of the fields in RTC are what are known as scrollable fields in ISPF. So for fields where the information is too long for the available width you can still get the rest of the information. Position the cursor somewhere in a field, for example under the actual project name “SHARE RTC Lab”, and then press PF4. A panel is displayed with the information. Some scrollable fields are updatable, so you can press PF4 to enter additional data. Alternatively, with the cursor in a scrollable field just press PF10/PF11 to scroll the available data left and right.
2.3. Working with your repository workspaces
The first thing we need to do is load some PDSs with source code data from the RTC repository. On z/OS the source needs to be in normal PDSs so that ISPF can edit the code and compilers can compile it. The actions of the Eclipse GUI such as LOAD and SHARE have been propagated to the ISPF Client, so regardless of which interface you use the processes are basically the same. So let’s get started…
a) From the primary option menu select option 2, to work with your repository workspaces. You will see in the list provided the repository workspace that you created in the previous lab. It is not a good idea to use the same repository workspace in different clients, as the contents get out of sync. RTC will get confused as it tries to manage local changes with the repository workspace. So let’s create a new repository workspace for the ISPF Client scenario. Enter a repository workspace name, whatever you like, for example sharaxx ISPF Client RWS, where xx is the last 2 digits in your userid, and press enter:
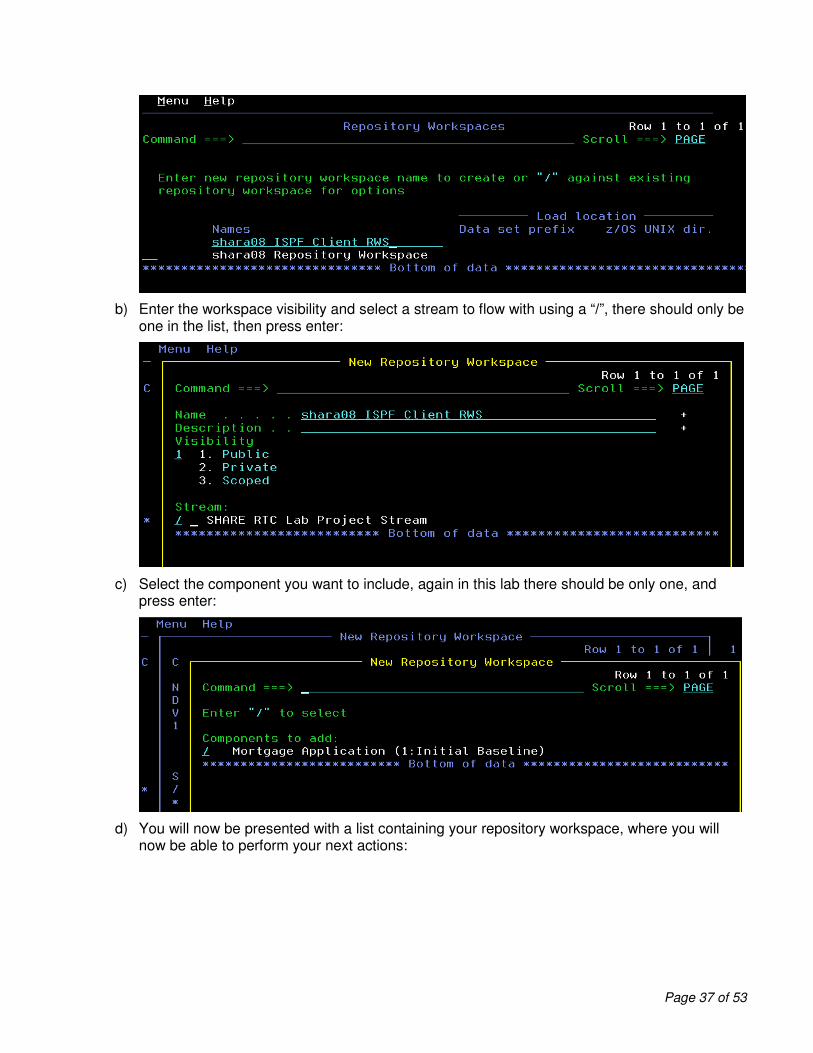
Page 37 of 53
b) Enter the workspace visibility and select a stream to flow with using a “/”, there should only be one in the list, then press enter:
c) Select the component you want to include, again in this lab there should be only one, and press enter:
d) You will now be presented with a list containing your repository workspace, where you will now be able to perform your next actions:

Page 38 of 53
e) If you enter a “/” next to the repository workspace you will see a list of actions that can be performed.
The main ones will be Load, Jump, Incoming Change Sets and Outgoing Change Sets. So we will concentrate on these for now.
f) The first thing we need to do is load a set of PDSs with the source code held in the repository so that we can begin working on it. Either from the list shown above select option 5 to perform a Load, or if you are still on the repository workspace list screen, enter an L to load. You will be presented with a screen where you have to enter your data set prefix. This is a high level qualifier, and most likely a middle level qualifier to identify where RTC is going to load the source data. Your high level qualifier for this lab will need to be you SHARE LPAR userid, SHARA##, that was assigned to you. For the middle level qualifier use something like RTCLAB. In the example shown the HLQ is SHARA08. You can ignore the z/OS UNIX directory location for this Lab.

Page 39 of 53
Enter an L next to the component to load and press Enter. You will be presented with a confirmation screen where you can just press Enter again. The load may take some time as it transfers all of the source code data from the RTC repository to the PDS data sets it will create for you. RTC uses the data set definitions to know what attributes to allocate a data set with. Once the load has finished you will be presented with the repository workspace screen, except the load location will now be filled in:
g) From here we can now easily jump to a data set list with our loaded data sets so we can begin making code changes. Enter a JD next to the repository workspace, and you will be taken to the data set list (similar to ISPF option 3.4) except for the data set pattern specified in the load location.
The next section will talk you though making program changes and checking programs in.
2.4. Making changes to programs
There are two ways to start editing members. The first is to use the Jump option from the repository workspace panel, to jump directly to the source code data panels, which we used in the previous section. You can use the J command to jump to the main option 3 panel, or the JD to jump directly to the data set list, or the JU to jump directly to the z/OS Unix directory list.

Page 40 of 53
Alternatively, and this is for information only as we already used the JD command, you can start with option 3 on the RTC primary menu:
In this case you will be given a panel where you can enter your data set pattern, which works the same as ISPF option 3.4 or ISPF option 3.17 for z/OS UNIX directories. In this case enter your data set pattern, which will be SHARAxx.RTCLAB, or whatever you used when you did your load.
Entering a “/” next to the Data Set Pattern and pressing enter will show data sets that match this pattern, which is the same panel you would be presented with if you had used the Jump option from the repository workspace panel:
So we now have a list of data sets we can start working with to make some code changes. So let’s get started on that…

Page 41 of 53
a) Enter an E next to the SHARAxx.RTCLAB.COBOL data set. Press enter and you will be presented with the member list for this dataset.
b) Enter an E next to the EPSCMORT member and press enter. You may be presented with the Edit Entry Panel where you can enter other Edit parameters, such as macros, etc. Just press Enter if you are. You are now in the normal ISPF editor for this member. We are going to make a simple change. Just add an extra comment line with a comment of your choice, using the previous comment lines as an example:
Note: In COBOL an asterix in column 7 denotes a comment line.
c) Press PF3 to save and exit the member, and you will see that the member list display has been updated to show that you have edited the member. The * in the SCM column shows that you have an unchecked in change.

Page 42 of 53
d) In order to check the member in, you are going to need to associate it with a work item. Next to the member you changed, enter a C to check the change in, and press enter:
e) You will be presented with a panel where you can now associate your changeset with an existing work item and add an optional comment or create a new work item. If you wish to enter it with an existing work item (less typing ☺) enter a * in the work item field and if you wish, a comment in the comment line. Or if you know a work item number you can, rather than entering an * to get a list, just enter the work item number directly.
However for this lab we will create a new work item. Enter a “/” in next to the Create work item field on the screen.

Page 43 of 53
f) Once you press enter you will be presented with the Create Work Item screen. Enter a summary and description if you wish. These fields are scrollable, so pressing PF4 while the cursor is in the field will enable you to enter extra data.
g) To set the Type, Filed Against, Severity, Found in and Planned for values position your cursor on those fields (either the name or the value) and press enter. You will be presented with a selection panel that presents you with valid values retrieved from the server. You can select the value you wish with a “/”.

Page 44 of 53
h) Once you have entered all the required fields, for this lab Type, Filed Against and Planned for, on the Create Work Item screen press PF3 to create the work item.
i) You will be returned to the New Change Set screen where, now that you have a work item number assigned you can press enter again to associate the work item to the change.
j) You will see that now you have pressed enter, the * in the SCM column has disappeared, showing that you have checked the code in. The next stage we need to perform is to build the program to make sure our change compiles.

Page 45 of 53
2.5. Performing Builds
Before you can deliver your changes and make them available to the rest of the team you might want to compile and test your program. So let’s explore the build options available from the ISPF Client.
a) To get to the build options we could PF3 out until we went back to the RTC Primary option menu. But instead we are going to use the Action Bar choices on the RTC menus. Position your cursor on the Menu bar and press enter and the action bar menu should be displayed.
From here we are going to select option 5 for Build and press enter.
b) The Builds panel should be displayed with a list of the different build definitions. You may need to enter an * in the filter and then press enter. There should only be one build definition for this Lab and it should show that last status of the build. In the example below, it shows it is completed.
c) To view previous builds enter a V, or if you want to request a new build enter an R, or enter a “/” to see available options. For this lab we will enter an R to request a build. If you want, enter a V to view any previous builds. This will show us, much like the Eclipse GUI, a list of all the previous builds and their current status. If you chose to view the builds PF3 back to the above screen to enter an R to request a build.
d) We now want to start a personal build to build the code changes we have made in our own personal repository workspace. The Submit Build Request panel should be displayed, which shows the build properties we will be using. However we want to submit a personal build so that it uses our own repository workspace and build data sets. So select the Personal Build option with a “/” and enter an S on the command line to submit the build.

Page 46 of 53
e) On the personal build options screen you need to select the repository workspace to use with a “/”. You also need to enter your data set prefix and load directory. For the data set prefix you can use the same settings as you did for the load, so SHARAxx.RTCLAB. For the load directory we need to specify a work location that RTC will use for the build xml files. Use /sharelab/shara##/RTCLabwhere shara## is your SHARE LPAR userid.
Press Enter and you will be presented with the Dependency Build options screen. In this case make sure Build changed items only is set with a “/”.

Page 47 of 53
Press Enter and you will be returned to the Build results screen, where you will see the build is pending. If you press Enter you will see the status change to In Progress. The build may take some time, but should only build your 1 changed program.
f) Once completed we should check the output from the build. Next to your completed build result enter an L to view the logs. Alternatively enter a / and then select the option to view the build logs. You will be presented with a list of the logs:

Page 48 of 53
g) Enter a V next to the compiler output logs to view the output. Alternatively enter a / to view the options. You can see that if the log is very large you are able to view just the top or the bottom of the log, and a percentage:
2.6. Delivering your changes to the stream
Now that you have successfully made a change to your programs, you are ready to deliver those changes to the projects stream so that you can share them with the rest of your team. This is a simple process.
a) Either from the RTC main menu, select option 2 – Workspaces or select the Menu action bar choice, press enter and 3 – Repository Workspaces. The repository workspaces panel will be displayed, and you will notice in the prefix area a > symbol. This shows we have outgoing changes that we can deliver. If the was a < symbol, then this would signify we had incoming changes to accept.

Page 49 of 53
b) You can use the “/” to bring up a list of available options, or in this case just enter an O to bring up the outgoing changes panel.
c) You will see the changeset, and the work item you attached to it listed. If you wish to see what files are being delivered you can enter a V to list the files.
From here you can then enter a “/” for available options such as browsing the local or remote files, or comparing your local file with what is on the server.
d) Press PF3 to go back to the Outgoing Change Sets panel. Now enter a D to deliver the change to the stream. Once complete you will get a confirmation message.

Page 50 of 53
e) Your changes have now been delivered to the project stream, so any team mates who have this component in their repository workspaces will now be able to accept your changes and merge them with their own.
Conclusion
This concludes Module 2. You now should be familiar with source code management using the RTC ISPF Client.
Lab Conclusion
This lab has demonstrated the basic functionality of Source Code Management with Rational Team Concert.
Download your own copy from jazz.net and play all you want to learn more.
To use the sample code used in this lab go to:
https://jazz.net/wiki/bin/view/Main/DependencyBuildScenarioV4
or for the V3.0.1 version
https://jazz.net/wiki/bin/view/Main/DependencyBuildScenario
and for information on setting the build up go to :
https://jazz.net/wiki/bin/view/Main/DependencyBuildScenarioBuildEnvironmentSetup

Page 51 of 53
Notices
© Copyright IBM Corporation 1992, 2014. All rights reserved.
U.S. Government Users Restricted Rights - Use, duplication or disclosure restricted by GSA ADP Schedule Contract with IBM Corp.
This information was developed for products and services offered in the U.S.A. IBM may not offer the products, services, or features discussed in this documentation in other countries. Consult your local IBM representative for information on the products and services currently available in your area. Any reference to an IBM product, program, or service is not intended to state or imply that only that IBM product, program, or service may be used. Any functionally equivalent product, program, or service that does not infringe any IBM intellectual property right may be used instead. However, it is the user’s responsibility to evaluate and verify the operation of any non-IBM product, program, or service.
IBM may have patents or pending patent applications covering subject matter described in this documentation. The furnishing of this documentation does not give you any license to these patents. You can send license inquiries, in writing, to:
IBM Director of Licensing IBM Corporation
North Castle Drive
Armonk, NY 10504-1785 U.S.A.
For license inquiries regarding double-byte (DBCS) information, contact the IBM Intellectual Property Department in your country or send inquiries, in writing, to:
IBM World Trade Asia Corporation Licensing
2-31 Roppongi 3-chome, Minato-ku Tokyo 106, Japan
Page 52 of 53
The following paragraph does not apply to the United Kingdom or any other country where such provisions are inconsistent with local law: INTERNATIONAL BUSINESS MACHINES CORPORATION PROVIDES THIS PUBLICATION ″AS IS″ WITHOUT WARRANTY OF ANY KIND, EITHER EXPRESS OR IMPLIED, INCLUDING, BUT NOT LIMITED TO, THE IMPLIED WARRANTIES OR CONDITIONS OF NON-INFRINGEMENT, MERCHANTABILITY OR FITNESS FOR A PARTICULAR PURPOSE. Some states do not allow disclaimer of express or implied warranties in certain transactions, therefore, this statement may not apply to you.
This information could include technical inaccuracies or typographical errors. Changes are periodically made to the information herein; these changes will be incorporated in new editions of the publication. IBM may make improvements and/or changes in the product(s) and/or the program(s) described in this publication at any time without notice.
Any references in this information to non-IBM Web sites are provided for convenience only and do not in any manner serve as an endorsement of those Web sites. The materials at those Web sites are not part of the materials for this IBM product and use of those Web sites is at your own risk.
Licensees of this program who wish to have information about it for the purpose of enabling: (i) the exchange of information between independently created programs and other programs (including this one) and (ii) the mutual use of the information which has been exchanged, should contact:
Intellectual Property Dept. for WebSphere Software IBM Corporation
3600 Steeles Ave. East
Markham, Ontario
Canada L3R 9Z7
Such information may be available, subject to appropriate terms and conditions, including in some cases, payment of a fee.
The licensed program described in this documentation and all licensed material available for it are provided by IBM under terms of the IBM Customer Agreement, IBM International Program License Agreement or any equivalent agreement between us.
Any performance data contained herein was determined in a controlled environment. Therefore, the results obtained in other operating environments may vary significantly. Some measurements may have been made on development-level systems and there is no guarantee that these measurements will be the same on generally available systems. Furthermore, some measurements may have been estimated through extrapolation. Actual results may vary. Users of this document should verify the applicable data for their specific environment.
Information concerning non-IBM products was obtained from the suppliers of those products, their published announcements or other publicly available sources. IBM has not tested those products and cannot confirm the accuracy of performance, compatibility or any other claims related to non-IBM products. Questions on the capabilities of non-IBM products should be addressed to the suppliers of those products.
All statements regarding IBM’s future direction or intent are subject to change or withdrawal without notice, and represent goals and objectives only.
Copyright license
This information contains sample application programs in source language, which illustrates programming techniques on various operating platforms. You may copy, modify, and distribute these sample programs in any form without payment to IBM, for the purposes of developing, using, marketing or distributing application
programs conforming to the application programming interface for the operating platform for which the sample

Page 53 of 53
programs are written. These examples have not been thoroughly tested under all conditions. IBM, therefore, cannot guarantee or imply reliability, serviceability, or function of these programs.
Each copy or any portion of these sample programs or any derivative work, must include a copyright notice as follows:
© (your company name) (year). Portions of this code are derived from IBM Corp. Sample Programs. © Copyright IBM Corp. 1992, 2007. All rights reserved
Trademarks and service marks
The following terms are trademarks or registered trademarks of International
Business Machines Corporation in the United States, other countries, or both.
1. IBM
2. z/OS
3. System z
4. Rational
Intel® and Pentium® are trademarks of Intel Corporation in the United States, other countries, or both.
Microsoft, Windows, Windows NT® and the Windows logo are trademarks of Microsoft Corporation in the United States, other countries, or both.
Java and all Java-based trademarks are trademarks of Sun Microsystems, Inc. in the United States, other countries, or both.
UNIX is a registered trademark of The Open Group in the United States and other countries.
Linux is a registered trademark of Linus Torvalds in the United States, other countries, or both.
Other company, product or service names may be trademarks or service marks of others.