skill set 1 getting started - cia training
TRANSCRIPT
ITQ Level 2 The Internet and Intranets
IE6 © CiA Training Ltd 2006 9
Skill Set 1
Getting Started
By the end of this section you should be able to:
Understand the Internet
Use Internet Explorer
Connect and Reconnect to the Internet
Use Online Help
Display and Remove Images
Be Familiar with the Screens and Views
The Internet and Intranets ITQ Level 2
10 © CiA Training Ltd 2006 IE6
Exercise 1 - Internet Theory
The Internet is a vast computer network, which allows users all over the world to communicate with each other. The World Wide Web (www) is not the same thing as the Internet; it is the collection of information that can be accessed via the Internet. This information is stored on the web in web sites (web pages) each of which has a unique address. Multi-page sites usually contain a Home Page, consisting of an introduction to the site and often containing links to other pages on that site. Many sites also contain links to different related sites. It is because any site can be linked to many other related sites, each one of which in turn will be linked to many more, that led to the idea of a huge web of information (the world wide web).
The Internet can be used to find information on almost any subject. The interconnected mass of information can be browsed relatively simply, by choosing a trail of links from one site to another. More and more, as an alternative to conventional shopping, the Internet is being used to purchase goods. Services such as online banking, health insurance and even education can be accessed in this way. As the Internet has no international boundaries, users can interact with sites throughout the world, from local councils and medical centres, to multinational companies and organisations. Users can now participate and make their voices heard in a range of areas; this would have been impossible only a few years ago.
Once connected to the Internet, it is possible to publish an individual web site. This is not a difficult process, as there are now software applications available which make it possible to create a web site without the need to know the Internet programming language, HTML (Hypertext Markup Language).
E-mail is a way of sending a message to another computer user, anywhere in the world. The message will reach its destination almost immediately. Internet users send and receive e-mail messages by using e-mail addresses which, like web site addresses, are unique. Outlook Express is a complete system for sending and receiving e-mail messages. Messages from newsgroups (see below) are also handled by Outlook Express. This messaging software comes as part of Windows ; it is not covered in this guide. See the corresponding E-mail unit.
Another aspect of using the Internet is the facility to chat to other users on-line, in real time, using a software application such as Windows Live Messenger. You can take part in current debates or discussions by joining a newsgroup using your e-mail software. Newsgroups allow you to post material to the Internet. However, there are many web sites that allow you to post material directly to the site, by completing online forms.
ITQ Level 2 The Internet and Intranets
IE6 © CiA Training Ltd 2006 11
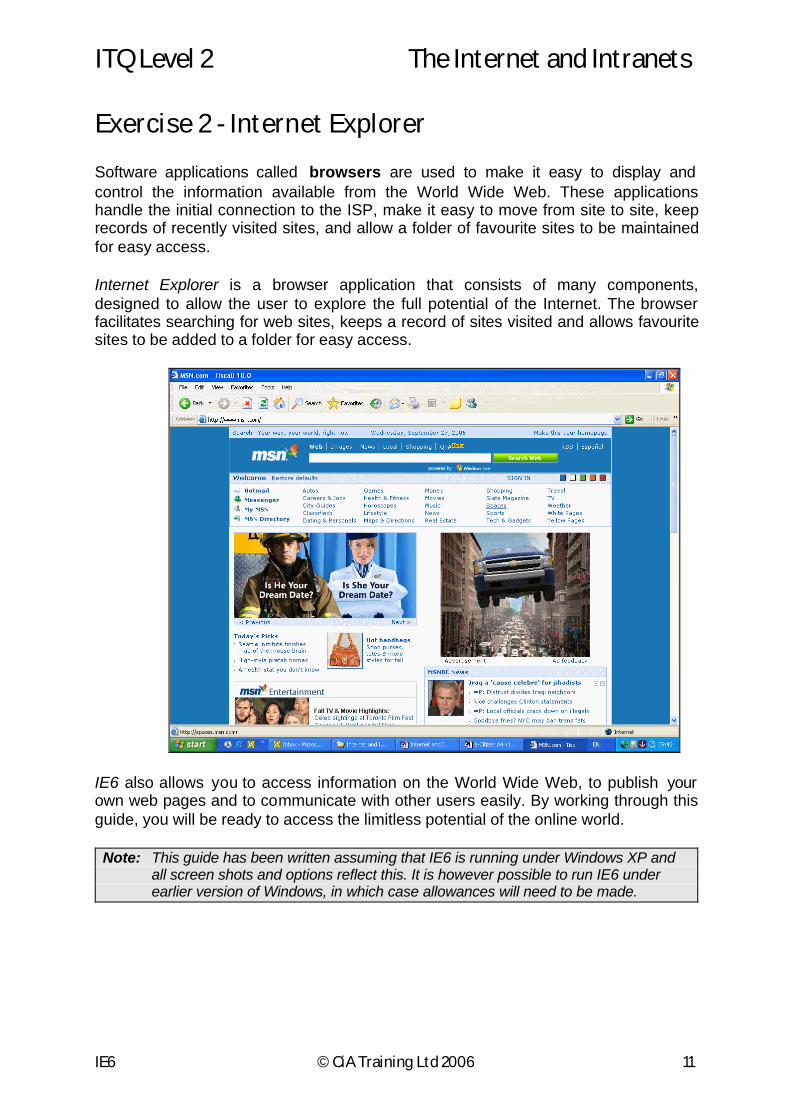
Exercise 2 - Internet Explorer
Software applications called browsers are used to make it easy to display and control the information available from the World Wide Web. These applications handle the initial connection to the ISP, make it easy to move from site to site, keep records of recently visited sites, and allow a folder of favourite sites to be maintained for easy access.
Internet Explorer is a browser application that consists of many components, designed to allow the user to explore the full potential of the Internet. The browser facilitates searching for web sites, keeps a record of sites visited and allows favourite sites to be added to a folder for easy access.
IE6 also allows you to access information on the World Wide Web, to publish your own web pages and to communicate with other users easily. By working through this guide, you will be ready to access the limitless potential of the online world.
Note: This guide has been written assuming that IE6 is running under Windows XP and all screen shots and options reflect this. It is however possible to run IE6 under earlier version of Windows, in which case allowances will need to be made.
The Internet and Intranets ITQ Level 2
12 © CiA Training Ltd 2006 IE6
Exercise 3 - Connecting to the Internet
Connections to the Internet are made via an Internet Service Provider (ISP). These are organisations that provide a powerful computer with the necessary technology to connect efficiently to the Internet. Users then connect to the ISP computer via some kind of telephone connection (dial up or broadband) and the ISP computer handles the flow of data between individual users and the Internet.
Your own computer must have a suitable connection and a modem (converts digital and analogue signals so the computer can connect to the telephone/cable line) before the Internet can be accessed. To summarise then, the requirements for Internet access are: a personal computer, a modem, a connection to the telephone network, and an account with an ISP. Once connected, a browser is normally used to provide the interface between the user and the World Wide Web.
Activity:
1. Select from the Windows Desktop and select All Programs | Internet Explorer (then possibly Internet Explorer again, depending on the computer’s setup).
2. If you have a broadband connection, move to Exercise 5.
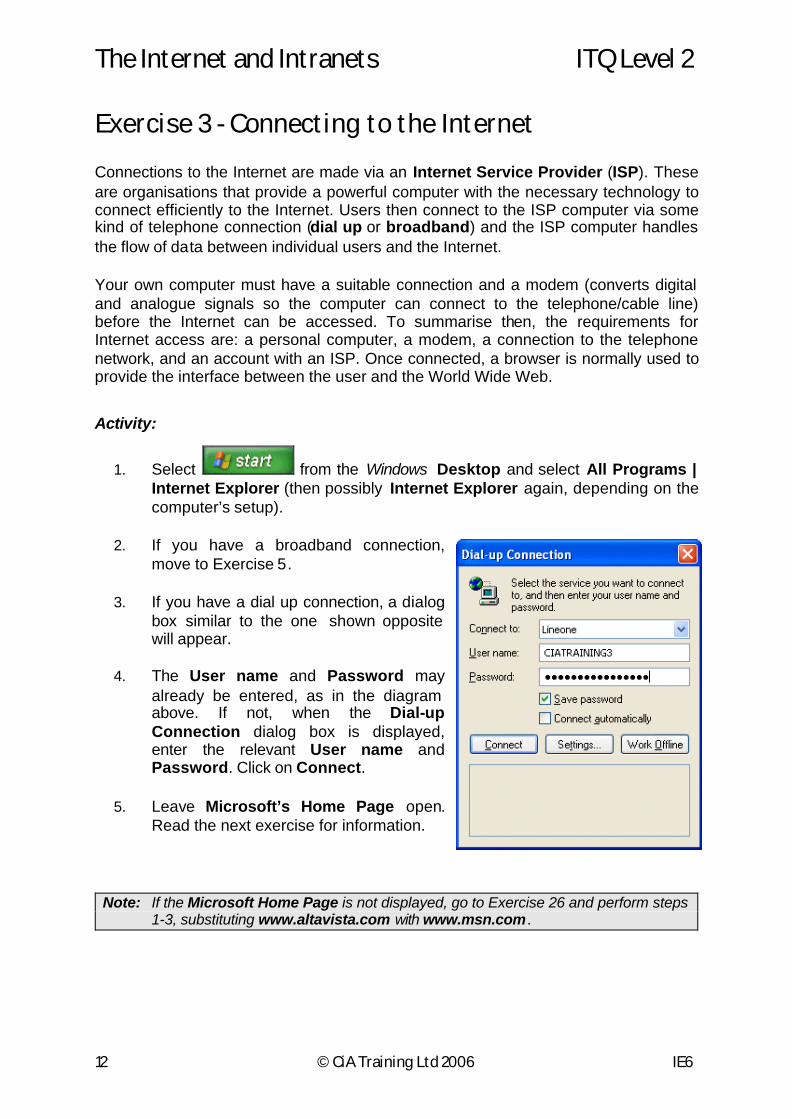
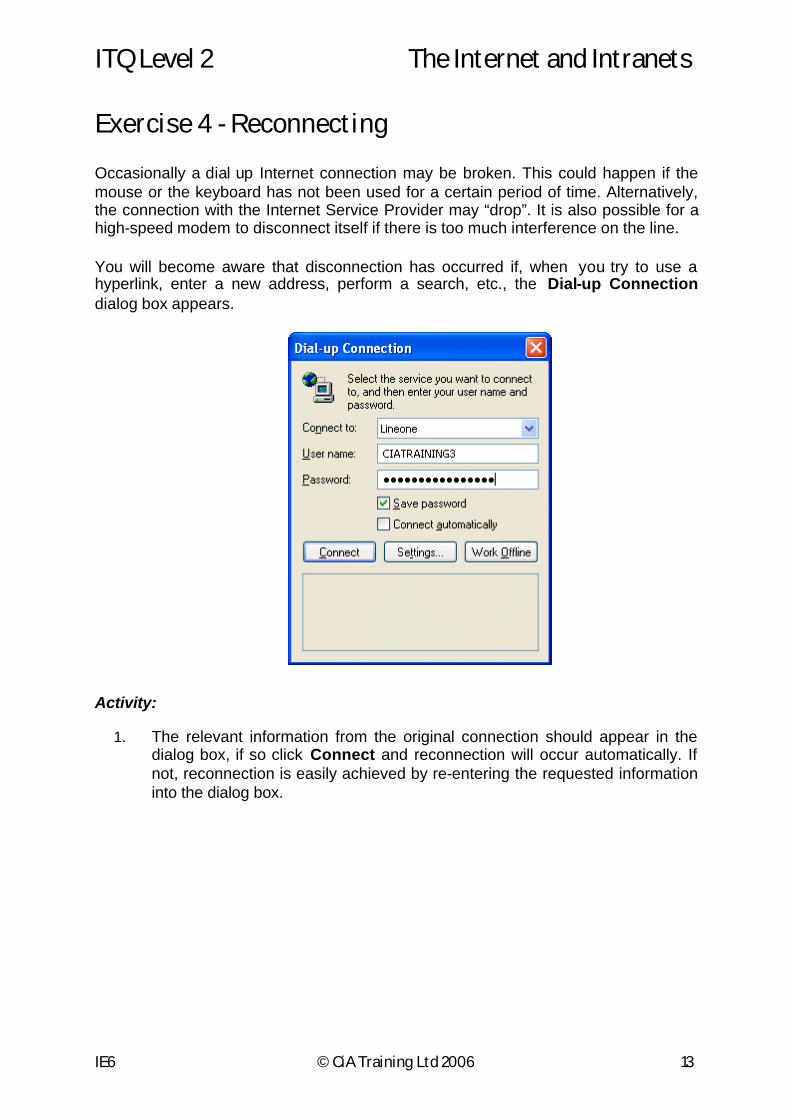
3. If you have a dial up connection, a dialog box similar to the one shown opposite will appear.
4. The User name and Password may already be entered, as in the diagram above. If not, when the Dial-up Connection dialog box is displayed, enter the relevant User name and Password. Click on Connect.
5. Leave Microsoft’s Home Page open. Read the next exercise for information.
Note: If the Microsoft Home Page is not displayed, go to Exercise 26 and perform steps 1-3, substituting www.altavista.com with www.msn.com .
ITQ Level 2 The Internet and Intranets
IE6 © CiA Training Ltd 2006 13
Exercise 4 - Reconnecting
Occasionally a dial up Internet connection may be broken. This could happen if the mouse or the keyboard has not been used for a certain period of time. Alternatively, the connection with the Internet Service Provider may “drop”. It is also possible for a high-speed modem to disconnect itself if there is too much interference on the line.
You will become aware that disconnection has occurred if, when you try to use a hyperlink, enter a new address, perform a search, etc., the Dial-up Connection dialog box appears.
Activity:
1. The relevant information from the original connection should appear in the dialog box, if so click Connect and reconnection will occur automatically. If not, reconnection is easily achieved by re-entering the requested information into the dialog box.
The Internet and Intranets ITQ Level 2
14 © CiA Training Ltd 2006 IE6
Exercise 5 - Changing Browser Appearance
It is possible to change the appearance of the Internet Explorer screens using commands within the View menu. This means that screens may not always match those shown in this guide. Two areas in particular which could cause confusion are the position of toolbars and the appearance of toolbar icons.
Note: This guide assumes that the original default settings are in effect.
Activity:
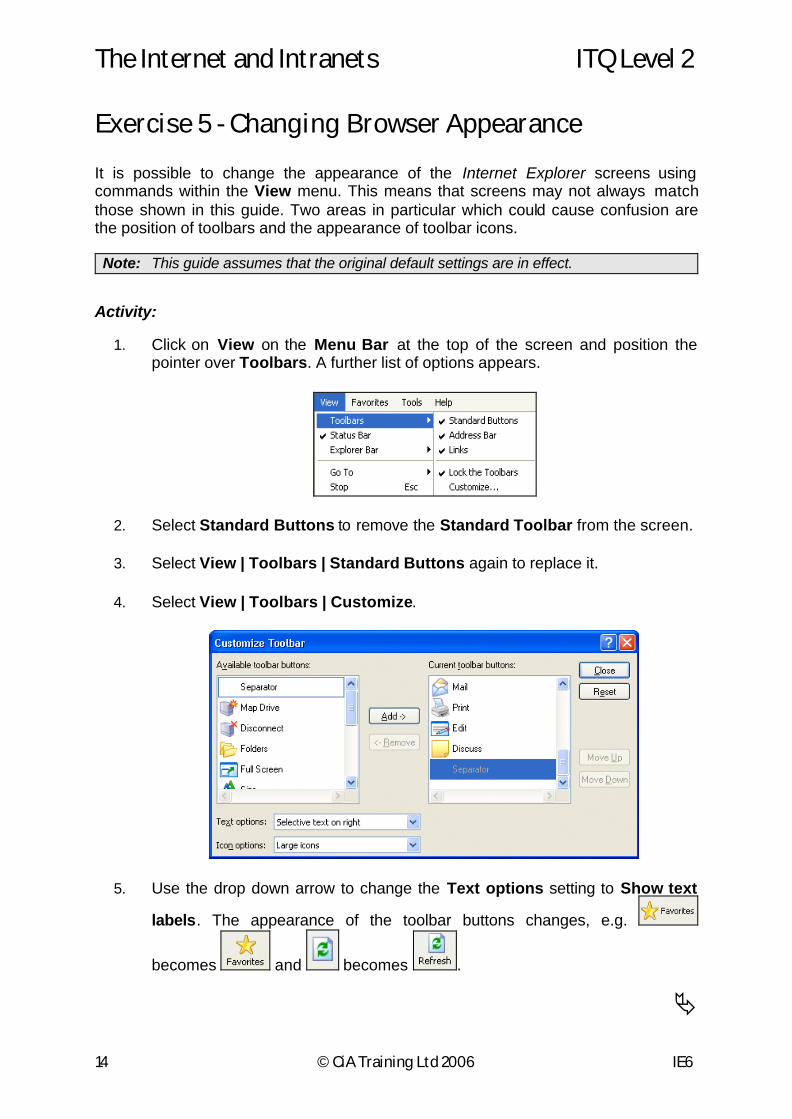
1. Click on View on the Menu Bar at the top of the screen and position the pointer over Toolbars. A further list of options appears.
2. Select Standard Buttons to remove the Standard Toolbar from the screen.
3. Select View | Toolbars | Standard Buttons again to replace it.
4. Select View | Toolbars | Customize.
5. Use the drop down arrow to change the Text options setting to Show text
labels. The appearance of the toolbar buttons changes, e.g.
becomes and becomes .
Ä
ITQ Level 2 The Internet and Intranets
IE6 © CiA Training Ltd 2006 15
6. Notice that the size of the icons and the actual buttons appearing on the toolbar can also be changed.
7. Change the Text options setting back to Selective text on right and Close the dialog box.
8. The default setting for Internet Explorer toolbars is that they are locked and cannot be repositioned. Select View | Toolbars | Lock the Toolbars. This removes the check and displays a faint vertical bar at the left of every toolbar.
9. Every toolbar (including the Menu Bar and Address Bar) can now be moved. Note the current position of the Links Bar.
10. Click the vertical bar to the left of the Links Bar (the pointer changes to a
double headed arrow, ) and drag it slowly down until the Links Bar becomes a full width bar underneath the Address Bar with all the link pages shown as icons.
11. Click the vertical bar to the left of the Links Bar again (now it is on the far left of the screen) and drag it back to its original position to the right of the Go button on the Address Bar.
12. Select View | Toolbars | Lock the Toolbars again to lock them in their current position and prevent accidental movement.
The Internet and Intranets ITQ Level 2
16 © CiA Training Ltd 2006 IE6
Exercise 6 - Online Help
Internet Explorer contains an online Help facility that may assist when certain problems are experienced.
Activity:
1. The Microsoft Home Page is shown on the screen. This will be explained in the next few exercises.
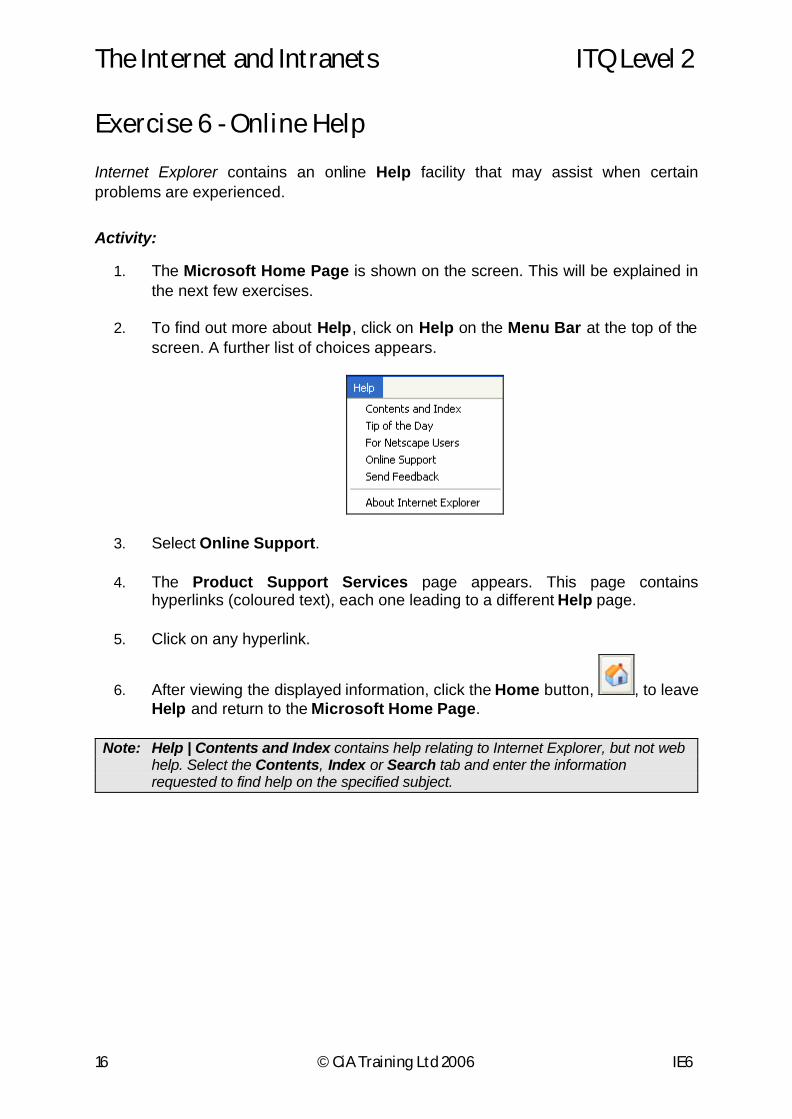
2. To find out more about Help, click on Help on the Menu Bar at the top of the screen. A further list of choices appears.
3. Select Online Support.
4. The Product Support Services page appears. This page contains hyperlinks (coloured text), each one leading to a different Help page.
5. Click on any hyperlink.
6. After viewing the displayed information, click the Home button, , to leave Help and return to the Microsoft Home Page.
Note: Help | Contents and Index contains help relating to Internet Explorer, but not web help. Select the Contents, Index or Search tab and enter the information requested to find help on the specified subject.
ITQ Level 2 The Internet and Intranets
IE6 © CiA Training Ltd 2006 17
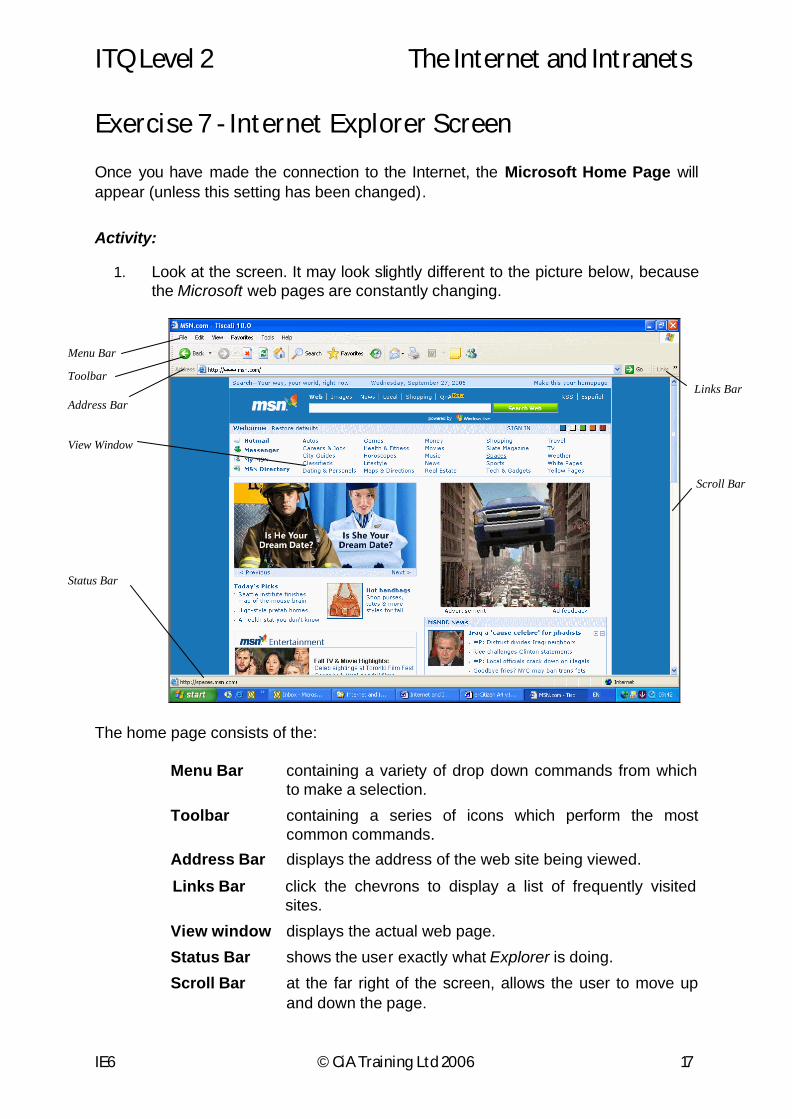
Exercise 7 - Internet Explorer Screen
Once you have made the connection to the Internet, the Microsoft Home Page will appear (unless this setting has been changed).
Activity:
1. Look at the screen. It may look slightly different to the picture below, because the Microsoft web pages are constantly changing.
The home page consists of the:
Menu Bar containing a variety of drop down commands from which to make a selection.
Toolbar containing a series of icons which perform the most common commands.
Address Bar displays the address of the web site being viewed.
Links Bar click the chevrons to display a list of frequently visited sites.
View window displays the actual web page.
Status Bar shows the user exactly what Explorer is doing.
Scroll Bar at the far right of the screen, allows the user to move up and down the page.
Menu Bar
Toolbar
Address Bar
View Window
Links Bar
Scroll Bar
Status Bar
The Internet and Intranets ITQ Level 2
18 © CiA Training Ltd 2006 IE6
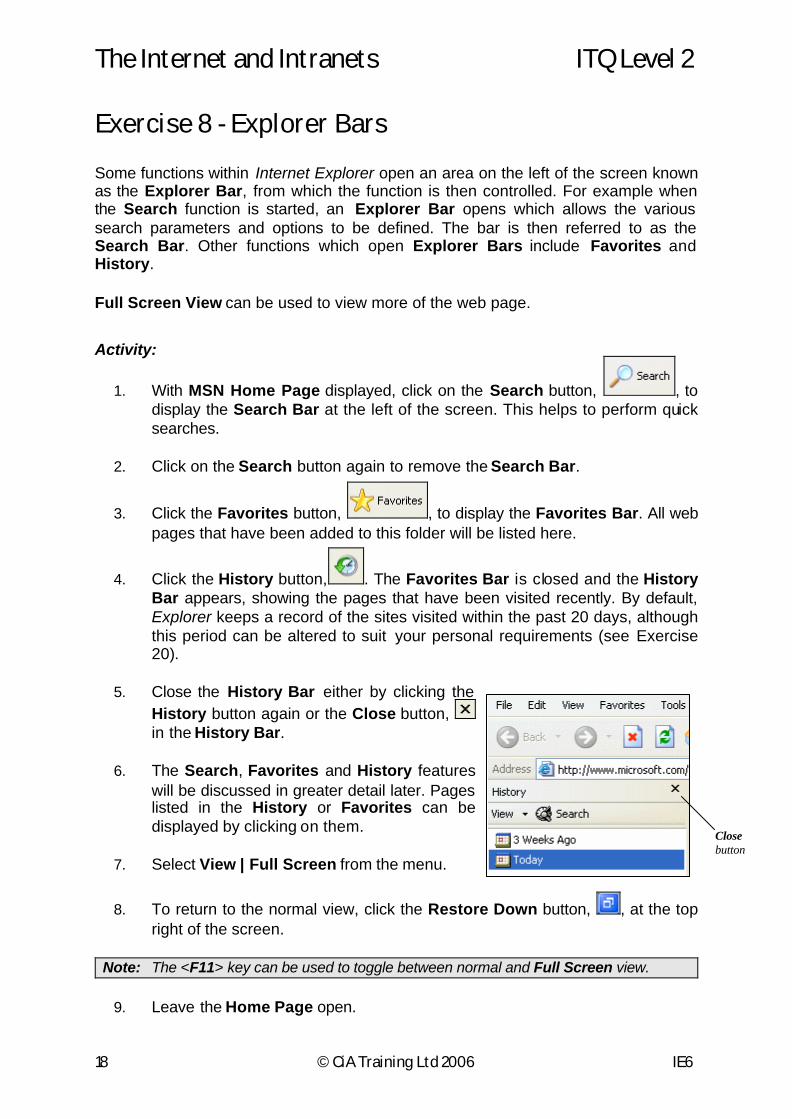
Exercise 8 - Explorer Bars
Some functions within Internet Explorer open an area on the left of the screen known as the Explorer Bar, from which the function is then controlled. For example when the Search function is started, an Explorer Bar opens which allows the various search parameters and options to be defined. The bar is then referred to as the Search Bar. Other functions which open Explorer Bars include Favorites and History.
Full Screen View can be used to view more of the web page.
Activity:
1. With MSN Home Page displayed, click on the Search button, , to display the Search Bar at the left of the screen. This helps to perform quick searches.
2. Click on the Search button again to remove the Search Bar.
3. Click the Favorites button, , to display the Favorites Bar. All web pages that have been added to this folder will be listed here.
4. Click the History button, . The Favorites Bar is closed and the History Bar appears, showing the pages that have been visited recently. By default, Explorer keeps a record of the sites visited within the past 20 days, although this period can be altered to suit your personal requirements (see Exercise 20).
5. Close the History Bar either by clicking the History button again or the Close button, in the History Bar.
6. The Search, Favorites and History features will be discussed in greater detail later. Pages listed in the History or Favorites can be displayed by clicking on them.
7. Select View | Full Screen from the menu.
8. To return to the normal view, click the Restore Down button, , at the top right of the screen.
Note: The <F11> key can be used to toggle between normal and Full Screen view.
9. Leave the Home Page open.
Close button
ITQ Level 2 The Internet and Intranets
IE6 © CiA Training Ltd 2006 19
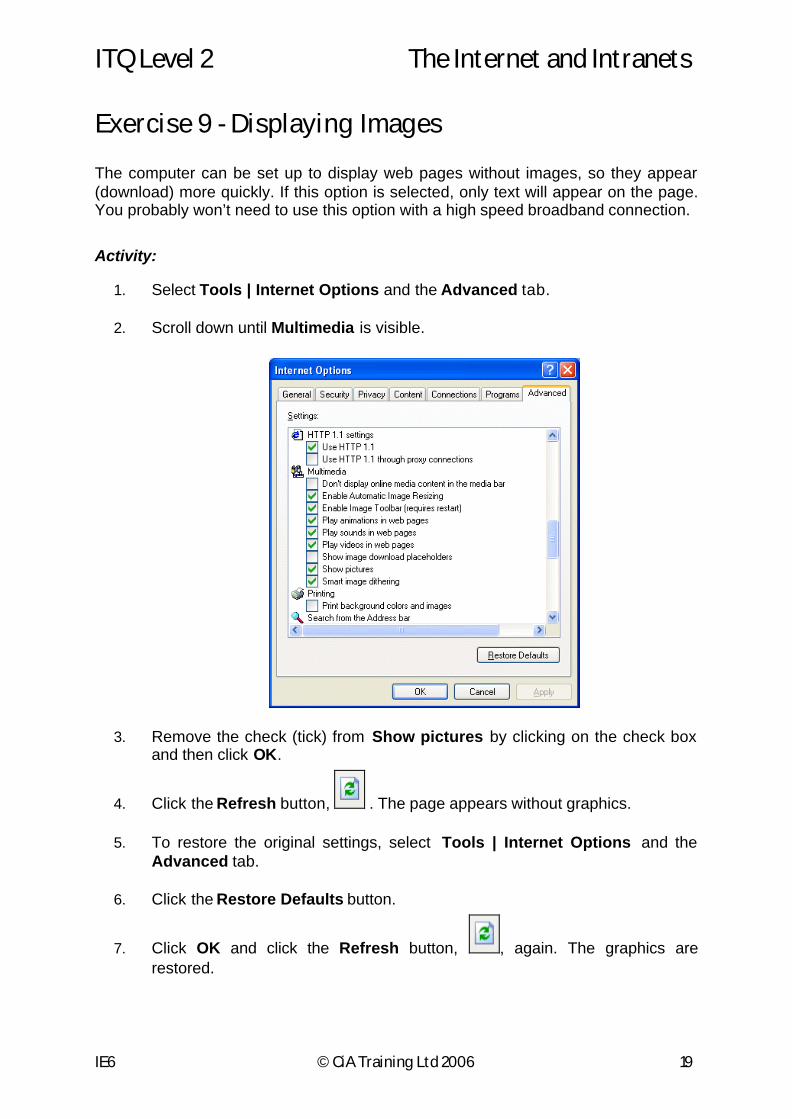
Exercise 9 - Displaying Images
The computer can be set up to display web pages without images, so they appear (download) more quickly. If this option is selected, only text will appear on the page. You probably won’t need to use this option with a high speed broadband connection.
Activity:
1. Select Tools | Internet Options and the Advanced tab.
2. Scroll down until Multimedia is visible.
3. Remove the check (tick) from Show pictures by clicking on the check box and then click OK.
4. Click the Refresh button, . The page appears without graphics.
5. To restore the original settings, select Tools | Internet Options and the Advanced tab.
6. Click the Restore Defaults button.
7. Click OK and click the Refresh button, , again. The graphics are restored.

The Internet and Intranets ITQ Level 2
20 © CiA Training Ltd 2006 IE6
Exercise 10 - Framed Web Pages
Some web sites have framed pages, consisting of a Navigation panel and a View panel. These pages work in a similar way to Windows Explorer, that is, selecting an option in the Navigation panel will display its contents in the View panel. The framed page often has scroll bars as navigation aids.
The advantage of framed web pages is that you can see the contents of a web site at a glance. However, the downside is that these sites can sometimes be difficult, or at least tiresome, when it comes to exiting, because clicking the Back button (see Exercise 14) will not always take you out of the site.
Activity:
1. Click in the Address Bar and type www.ciatraining.co.uk/ie to replace www.msn.com/, then press <Enter>. This is a framed page; a list of navigation hyperlinks is at the left of the screen. When one of these links is clicked on, a new page will be shown at the right of the screen.
Note: Web addresses will be covered in more detail in Exercise 16.
2. Click on the Images hyperlink. Notice how the information at the right of the screen changes.
3. Read the information.
4. There is a further hyperlink underneath the images. Click on the word here at the bottom right of the screen. Another new page is displayed.
5. Notice how the hyperlinks are always visible at the left of the screen.
6. Click on the Home Page hyperlink.
Note: The Back button, , can be used to move back through the pages (see Exercise 14).
Note: The Home button, , can be used to exit a complex framed web site.
7. Click the button to display the Microsoft Home Page.
ITQ Level 2 The Internet and Intranets
IE6 © CiA Training Ltd 2006 21
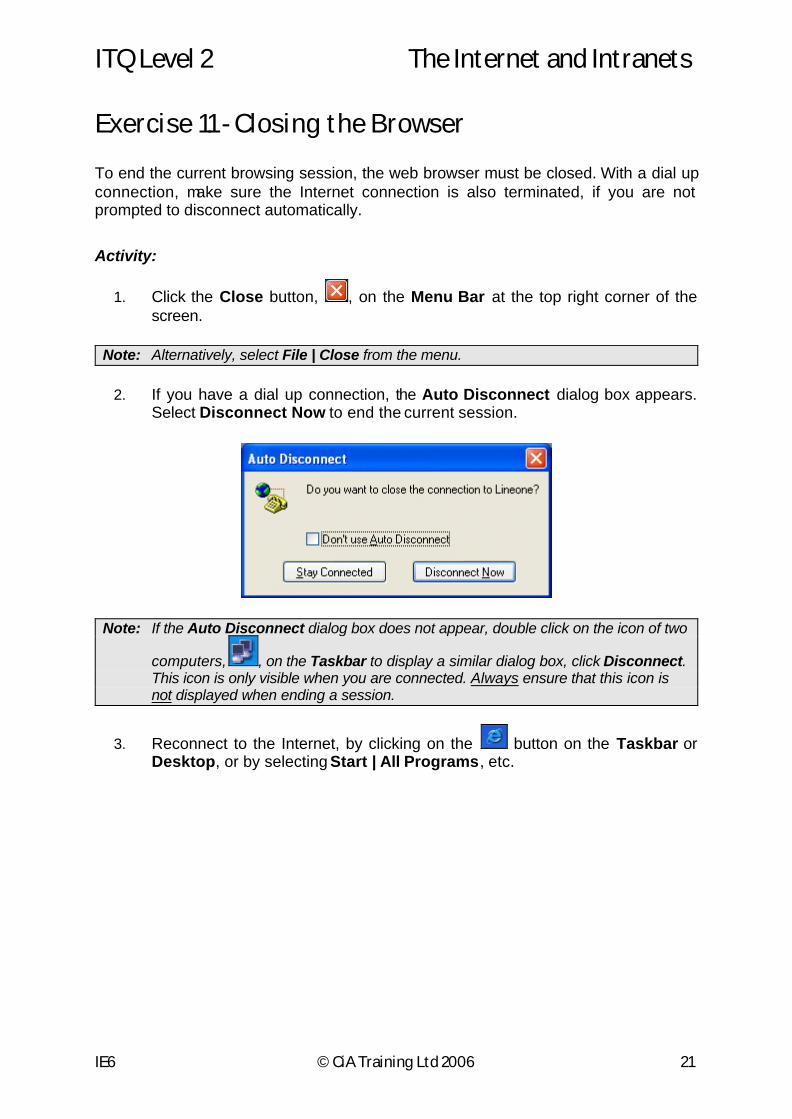
Exercise 11 - Closing the Browser
To end the current browsing session, the web browser must be closed. With a dial up connection, make sure the Internet connection is also terminated, if you are not prompted to disconnect automatically.
Activity:
1. Click the Close button, , on the Menu Bar at the top right corner of the screen.
Note: Alternatively, select File | Close from the menu.
2. If you have a dial up connection, the Auto Disconnect dialog box appears. Select Disconnect Now to end the current session.
Note: If the Auto Disconnect dialog box does not appear, double click on the icon of two
computers, , on the Taskbar to display a similar dialog box, click Disconnect. This icon is only visible when you are connected. Always ensure that this icon is not displayed when ending a session.
3. Reconnect to the Internet, by clicking on the button on the Taskbar or Desktop, or by selecting Start | All Programs, etc.
The Internet and Intranets ITQ Level 2
22 © CiA Training Ltd 2006 IE6
Exercise 12 - Develop Your Skills
You will find a Develop Your Skills exercise at the end of each Skill Set. Work through it to ensure you’ve understood the previous exercises.
1. What does www stand for?
2. What is the programming language used on the Internet?
3. What must you have before attempting to connect to the Internet?
4. Use online help to see the Tip of the Day.
5. Close the tip.
6. Which buttons will cause an Explorer Bar to be displayed?
7. Which menu command allows a page to be viewed without graphics?
8. Why are framed web pages used?
9. Disconnect from the Internet.
Note: Answers are listed in the Answers Section at the end of the guide.

ITQ Level 2 The Internet and Intranets
IE6 © CiA Training Ltd 2006 23
Summary: Getting Started
Your ITQ evidence must demonstrate the following skills:
Knowledge and understanding
You need to know about and understand the following:
• What your Internet connection will and will not do
• That settings in your browser can be changed
• That some browsers and servers will allow you to send and receive e-mail
• That it is possible to post or publish material to web sites
• That it is possible to create a web site yourself
Customising settings
You need to be able to:
• Customise browser settings to improve the performance of software
Look again at the exercises you’ve been working through in this Skill Set to give you some ideas of how you could demonstrate these skills.
Producing Evidence
To achieve an ITQ you must prove that you have all of the skills mentioned in these summary pages. You can provide evidence of your competence in several ways:
• A document can be saved and submitted. You can create a screen dump, which shows exactly what you see on the computer screen, pasted into a document and submitted. This is referred to as Examination of product (EP)
• A process can be seen by an expert witness and a signed document produced. Examination of witness testimony (EWT)
• Observation of candidate (O)
• Examination of case history (ECH)
• Examination of personal statement (EPS)
• Examination of written answers to questions (EWA)
• Questioning of candidate (QC)
• Questioning of witness (QW)
• Professional discussion (PD)
• Vocationally related Qualification unit (VRQ)
Before submitting your work for assessment, make sure you have gathered sufficient evidence for each item on the Level 2 Evidence Checklist. A copy of the checklist is at the back of this guide.