singer overlock 3 2 thread overedge.pub (read-only) · this stitch is used as a lightweight seam...
TRANSCRIPT

Two-Thread Overedge (Narrow and Wide)

Two-Thread Overedge (Narrow) This stitch is used as a lightweight seam finish or a lightweight seam. When creating a seam finish, less thread is used and the thread does not imprint on the right side of the fabric when pressed. The stitch can also used for seaming. The stitch creates less bulky seams, which is ideal for sheer or lace fabrics. The Two-Thread Overlock stitch requires the lower looper thread and one overlock needle thread. There are 2 different ways to set up for a Two-Thread Overlock stitch. For a more narrow stitch (4.0) select the right overedge needle and for a wider stitch (6.0) the left overedge needle is used.
Right Overedge Needle Thread
Lower Looper Thread
Two-Thread Overedge (narrow) page 1
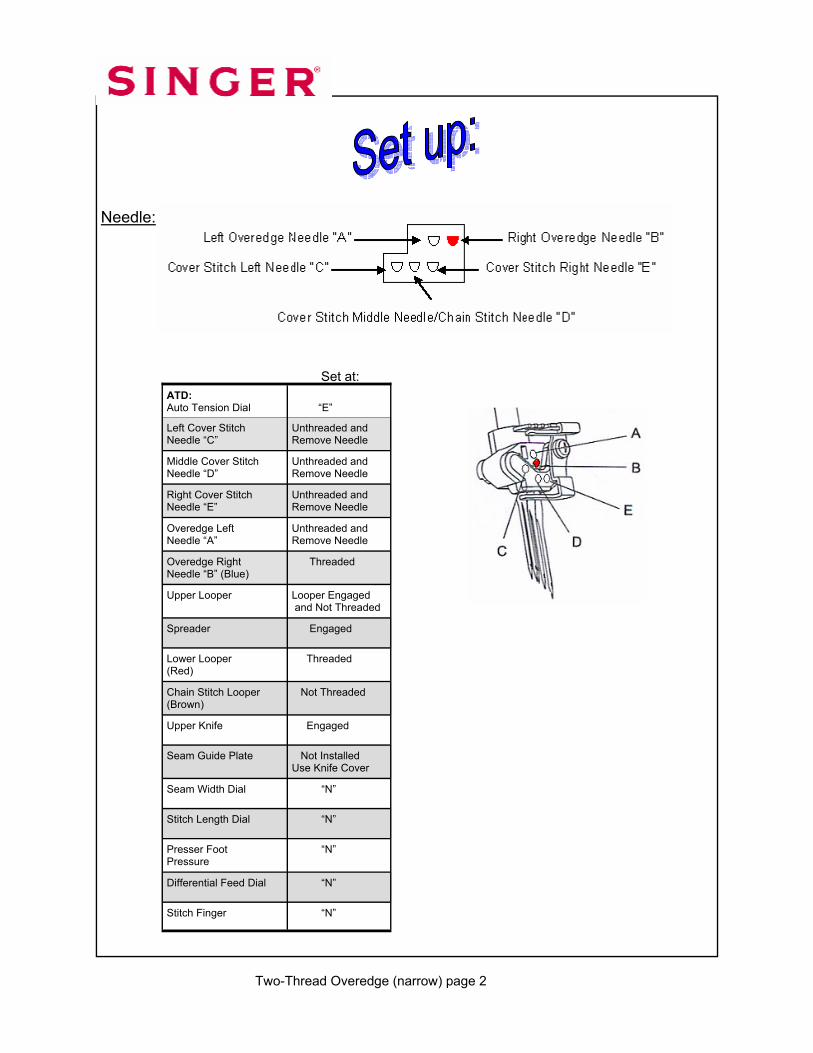
Needle:
ATD: Auto Tension Dial
“E”
Left Cover Stitch Needle “C”
Unthreaded and Remove Needle
Middle Cover Stitch Needle “D”
Unthreaded and Remove Needle
Right Cover Stitch Needle “E”
Unthreaded and Remove Needle
Overedge Left Needle “A”
Unthreaded and Remove Needle
Overedge Right Needle “B” (Blue)
Threaded
Upper Looper
Looper Engaged and Not Threaded
Lower Looper (Red)
Threaded
Chain Stitch Looper (Brown)
Not Threaded
Upper Knife Engaged
Seam Guide Plate Not Installed Use Knife Cover
Seam Width Dial “N”
Stitch Length Dial “N”
Presser Foot Pressure
“N”
Differential Feed Dial “N”
Stitch Finger “N”
Spreader Engaged
Two-Thread Overedge (narrow) page 2
Set at:

Two-Thread Overedge (narrow) page 3
Turn Auto Tension Dial to “E”.
Turn Stitch Length Dial to “2”.
Engage Upper Knife. The knife will not trim the fabric when it is disengaged. 1. Open Looper Cover. 2. Pull the movable knife holder (silver screw) to the right as far as it will go. 3. Turn the holder clockwise until the knife clicks into a lock position.
Upper Knife Engaged Upper Knife Disengaged

Turn Presser Foot Pressure Dial to “N”.
Turn Differential Feed Dial to “N”.
Turn Seam Width Dial to “N”. Set Stitch Finger to “N”.
Two-Thread Overedge (narrow) page 4

Install the Knife Cover.
Engage Upper Looper. Engaging the Upper Looper causes the looper to move when sewing. Even though the Upper Looper is not threaded, it needs to be engaged. 1. Push the clutch button to the left and down to engage. 2. Turn handwheel.
Upper Looper Disengaged
Upper Looper Engaged
Two-Thread Overedge (narrow) page 5

Two-Thread Overedge (narrow) page 6
Engage Spreader. The Upper Looper has a hole for the thread on the top of the
looper. If the stitch requires that the looper be engaged but not threaded, then the Spreader is used. The Spreader simply plugs-in (or closes) the looper’s hole. The Spreader is disengaged when the Upper Looper is engaged/operative and threaded. The Spreader is used with a stitch that requires only one looper thread. With the help of the Spreader, the single looper thread wraps around the fabric’s edge. 1. Raise the white handle on the spreader to insert the tip into the eye of the Upper Looper.
Thread Lower Looper with regular overlock thread. 1. Raise the Presser Foot to release the tension disks. Thread the Lower Looper as illustrated 1-10. 2. Pass thread from back to the front through the thread guide .
Spreader Disengaged Spreader Engaged
Eye of Looper
Two-Thread Overedge (narrow) page 7
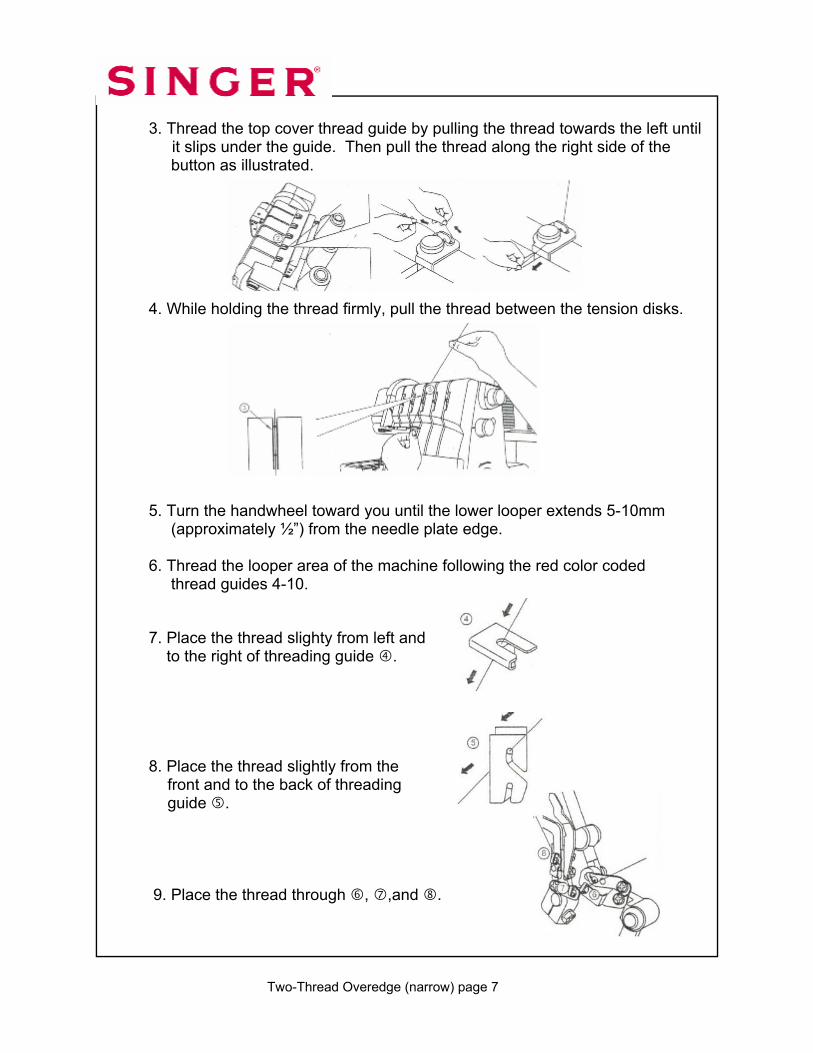
3. Thread the top cover thread guide by pulling the thread towards the left until it slips under the guide. Then pull the thread along the right side of the button as illustrated. 4. While holding the thread firmly, pull the thread between the tension disks. 5. Turn the handwheel toward you until the lower looper extends 5-10mm (approximately ½”) from the needle plate edge. 6. Thread the looper area of the machine following the red color coded thread guides 4-10. 7. Place the thread slighty from left and to the right of threading guide . 8. Place the thread slightly from the front and to the back of threading guide . 9. Place the thread through , ,and .

Two-Thread Overedge (narrow) page 8
10. Thread the looper eye (A) from front to back. Pull about 4 inches of thread. Position thread into V cutout (B) on threader. Firmly hold thread tail with left hand and pull Threader Lever (C) up into place (D).
Thread Right Overedge needle with regular thread. 1. Raise the Presser Foot to release the tension disks. Thread the right needle as indicated 1-9. 2. Pass thread from back to the front through the thread guide .
Threader Lever
“V” cutout
Two-Thread Overedge (narrow) page 9
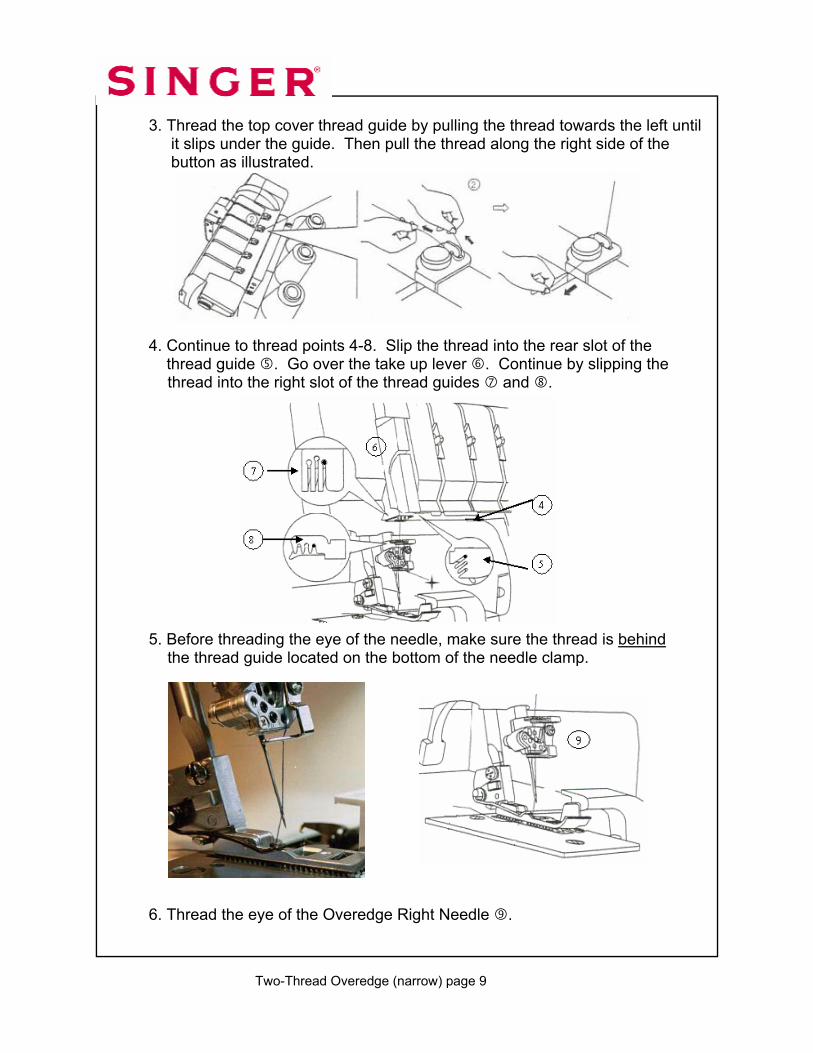
3. Thread the top cover thread guide by pulling the thread towards the left until it slips under the guide. Then pull the thread along the right side of the button as illustrated. 4. Continue to thread points 4-8. Slip the thread into the rear slot of the thread guide . Go over the take up lever . Continue by slipping the thread into the right slot of the thread guides and . 5. Before threading the eye of the needle, make sure the thread is behind the thread guide located on the bottom of the needle clamp. 6. Thread the eye of the Overedge Right Needle .
6
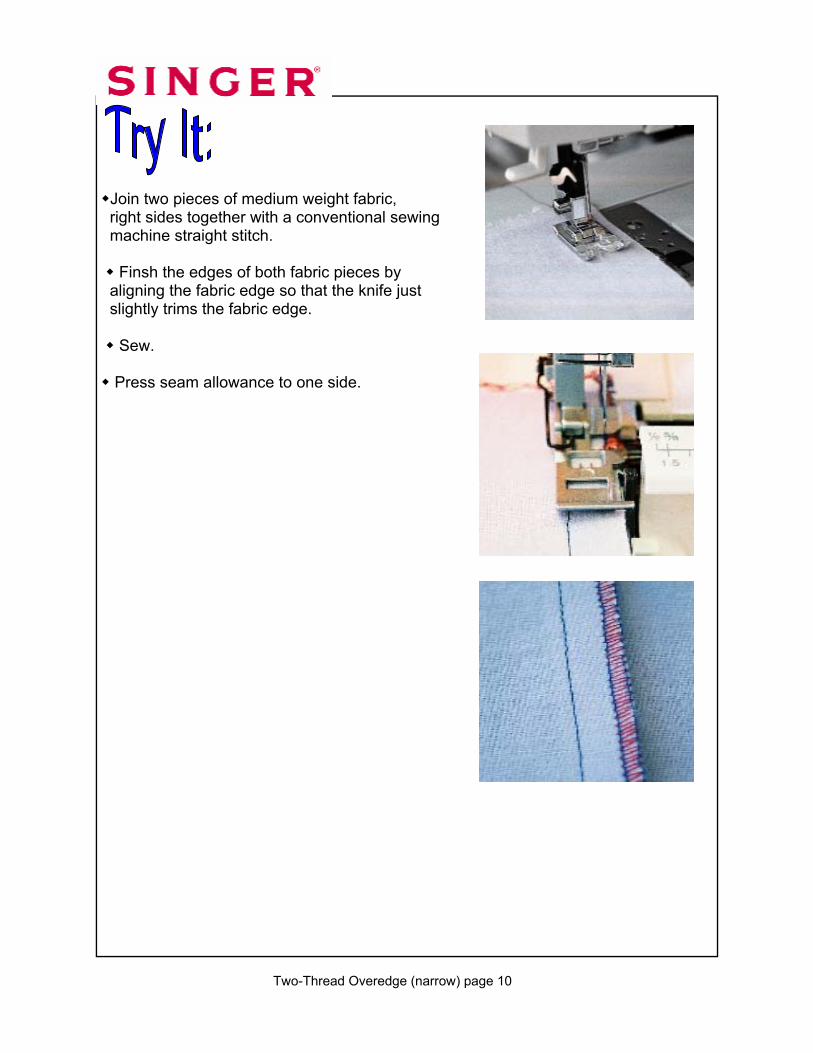
Join two pieces of medium weight fabric, right sides together with a conventional sewing machine straight stitch. Finsh the edges of both fabric pieces by aligning the fabric edge so that the knife just slightly trims the fabric edge. Sew.
Press seam allowance to one side.
Two-Thread Overedge (narrow) page 10
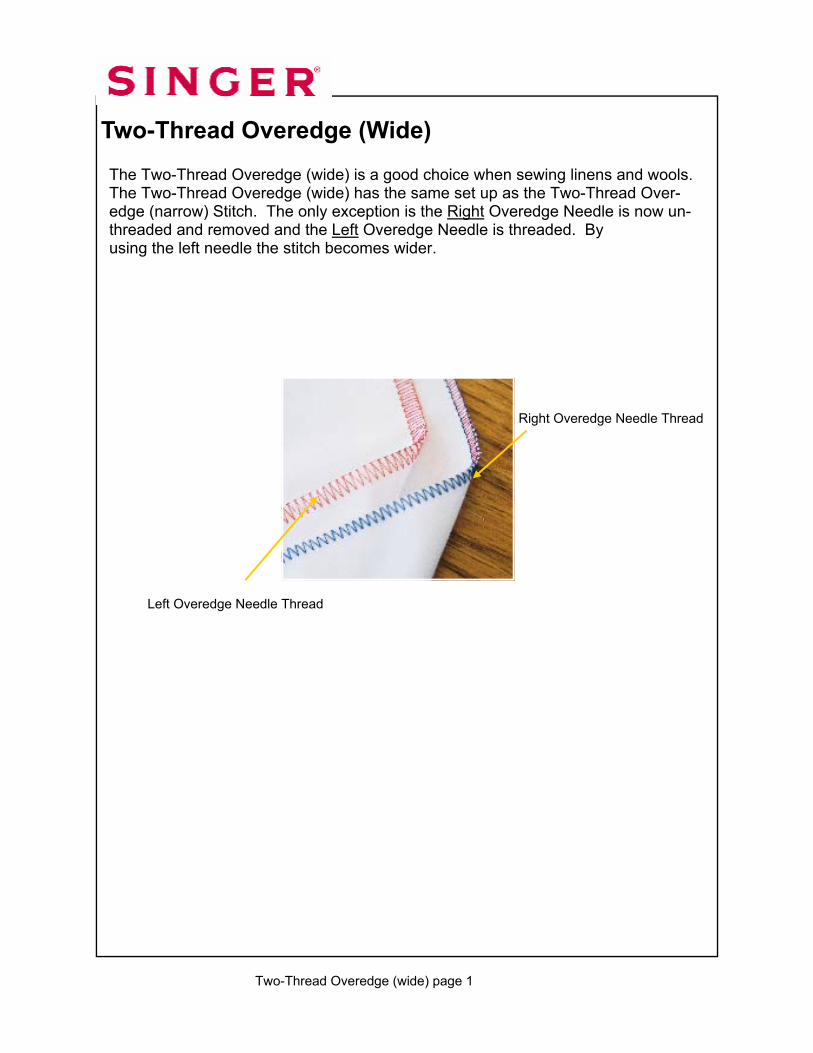
Two-Thread Overedge (Wide)
The Two-Thread Overedge (wide) is a good choice when sewing linens and wools. The Two-Thread Overedge (wide) has the same set up as the Two-Thread Over-edge (narrow) Stitch. The only exception is the Right Overedge Needle is now un-threaded and removed and the Left Overedge Needle is threaded. By using the left needle the stitch becomes wider.
Two-Thread Overedge (wide) page 1
Right Overedge Needle Thread
Left Overedge Needle Thread

ATD: Auto Tension Dial
“E”
Left Cover Stitch Needle “C” (Orange)
Unthreaded and Remove Needle
Middle Cover Stitch Needle “D” (Blue)
Unthreaded and Remove Needle
Right Cover Stitch Needle “E” (Green)
Unthreaded and Remove Needle
Overedge Left Needle “A” (Orange)
Threaded
Overedge Right Needle “B” (Blue)
Unthreaded and Remove Needle
Upper Looper (Green)
Engage Looper and Not Threaded
Lower Looper (Red)
Threaded
Chain Stitch Looper (Brown)
Not Threaded
Upper Knife Engaged
Seam Guide Plate Not Installed
Seam Width Dial “N”
Stitch Length Dial “2”
Presser Foot Pressure
“N”
Differential Feed Dial “N”
Stitch Finger “N”
Spreader Engaged
Set at:
Needle:
Two-Thread Overedge (wide) page 2

Thread Left Overedge needle with regular thread.
1. Raise the Presser Foot to release the tension disks. Thread the left needle as illustrated 1-9. 2. Pass thread from back to the front through the thread guide . 3. Thread the top cover thread guide by pulling the thread towards the left until it slips under the guide. Then pull the thread along the right side of the button as illustrated. 4. While holding the thread firmly, pull the thread between the tension disks.
Two-Thread Overedge (wide) page 3

5. Continue to thread points 4-8. Slip the thread into the middle slot of the thread guide . Go over the take up lever . Continue by slipping the thread into the middle slot of the thread guides and . 6. Before threading the eye of the needle, make sure the thread is behind the thread guide located on the bottom of the needle clamp. 7. Thread the eye of the Left Overedge Needle . 8. Draw about 4 inches of the thread through the needle eye towards the back of the machine. 9. Place the thread to the back, under the Presser Foot. Lower foot and sew.
Two-Thread Overedge (wide) page 4

Align one piece of medium weight fabric so that the knife just slightly trims the fabric edge. Sew. Align a second piece of medium wieght fabric so that the knife just slightly trims the fabric edge.
Sew. Place the two fabrics, right sides together. Using a conventional sewing machine, sew a straight stitch with a ⅝ inch seam. Press the seam open.
Two-Thread Overedge (wide) page 5