sharescript user guide 4 edition - downloads - sharescope
TRANSCRIPT

ShareScript User Guide
4th Edition

ShareScript User Guide 2
How to use this guide
This guide to ShareScript comprises the following sections:
Section 1 What is ShareScript?
Section 2 Using ShareScript
- Adding a ShareScript Column
- Adding a ShareScript Data Mining Criterion
- Adding a ShareScript Item to Details
- Adding a ShareScript Alarm
- Adding a ShareScript Indicator
- Adding a ShareScript Chart Study
- Working with Chart Studies
- Using a ShareScript Tool
- Using the ShareScript Console
- ShareScript Options
Section 3 Columns – The Basics
Section 4 Columns & Intraday Data
Section 5 Advanced Column Techniques
Section 6 Column and Alarms
Section 7 Indicators – The Basics
Section 8 Advanced Indicator Techniques
Section 9 Chart Studies – The Basics
Section 10 Chart Studies – Structuring Your Script
Section 11 Advanced Chart Study Techniques
• If you are an experienced programmer, we recommend you read this guide from
beginning to end. You will also need the ShareScript Language Reference, which
describes the available ShareScript objects and functions in full.
• If you have some programming or scripting experience, we recommend that you
take a quick look at the tutorials in Sections 3 to 11 first to see if you have the necessary
understanding to modify existing scripts or create new ones. If so, read the whole guide;
if not, we refer you to the Further Reading section below.
• If you have no programming experience, it is beyond the scope of this guide to teach
you. However, you may use the ShareScript columns/DM criteria, alarms, indicators,
studies and tools created by other users. You may have friends capable of creating them
or you could ask other members, via the Discussion Forum on the ShareScript website
(www.ShareScript.co.uk), if they have already created what you are looking for.
To learn how to import and add these scripts to your copy of ShareScope, please read
the “Using ShareScript” section at the beginning of this guide.
Further Reading
ShareScript is based on the JavaScript programming language. The ShareScript Language
Reference is a comprehensive description of all the ShareScript extensions to JavaScript, and is
available on the ShareScript website, along with this user guide.
The JavaScript language itself is not large, but full coverage is beyond the scope of this
introduction. “JavaScript, The Definitive Guide” by David Flanagan from O’Reilly Press is in
its 5th Edition and provides a complete introduction and reference.

ShareScript User Guide 3
Part I of “JavaScript, The Definitive Guide” provides an introduction to the core language and
Part III is a reference to the built in functions and objects (such as Date and Maths functions).
These parts of the book are essential documentation for anyone wanting to get the most out of
the language. Parts II and IV are an introduction and reference for JavaScript as embedded
within web-browsers, and are not relevant to ShareScript. This document and the ShareScript
Language Reference should be considered replacements for these parts of the book.
Finally, note that ShareScript is based on version 1.6 of the JavaScript language. A small
number of functions (which are often useful when working with arrays) were added in 1.6, and
are not described in “JavaScript, The Definitive Guide” (which covers version 1.5). Information
about these additional functions can be found at:
http://developer.mozilla.org/en/New_in_JavaScript_1.6
© Ionic Information Ltd. 1997-2011 All rights reserved. This guide and the program are copyright works of Ionic Information Limited, London, England and are licensed in terms of our standard contract. The data referred to herein is the copyright of the London Stock Exchange, Hemscott PLC, FTSE and others. Reproduction in whole or in part without the express written permission of Ionic Information Ltd is prohibited. Reverse engineering is also prohibited. ShareScope is the trademark of Ionic Information Ltd.

1 More correctly, ShareScript is an extension of ECMAScript for use within ShareScope. Similarly,
JavaScript is an extension of ECMAScript for use within web-browsers. However, ECMAScript is not the
nicest of names and most authors refer to the core language as JavaScript. We will follow this convention
here.
ShareScript User Guide 4
Section 1 What is ShareScript?
ShareScript is the programming language built into ShareScope. Using ShareScript will allow
you to do analysis on ShareScope’s data beyond that already available in ShareScope.
ShareScript enables you to:
• Create new columns
• Use scripts as data mining criteria, alarms and on the details screen
• Create new graph indicators
• Chart studies give you incredible flexibility to customise charts – you can create custom
bar colouring schemes, draw lines, text and symbols on the chart, or even write scripts
that react to the user clicking or zooming in on the chart
• Perform one-off operations using ShareScript tools (e.g. export data in a custom format)
• Try out ideas in a ShareScript console
However, ShareScript is not just a facility for those able to program. We hope and expect users
to share the scripts they create. You can very simply send or receive ShareScripts by email and
use them in ShareScope.
You can access documentation, free scripts and a users discussion forum on the ShareScript
website (www.ShareScript.co.uk).
ShareScript is based on the JavaScript1 scripting language, version 1.6. JavaScript is an
interpreted programming language, with similarities to C/C++, Java and Perl.

ShareScript User Guide 5
Section 2 Using ShareScript
Before you start scripting, you need to understand how to access ShareScript within
ShareScope. In this section, you’ll load and modify sample scripts just to become familiar with
the interface. This section is divided into sub-sections for columns and data-mining criteria,
indicators, studies and tools. We recommend you work through each one.
Adding a ShareScript Column
Start up ShareScope and make a List screen the active window. You add a ShareScript column
to a list table in the same way you would add any other type of column – by right-clicking on
the column headings at the top of the list to bring up the menu of available column types. Select
the menu item Add ShareScript Column…
You should now see the Add ShareScript Column dialog box. This dialog shows you all the
available ShareScript columns that can be added to the List screen, and allows you to edit them
or create new column scripts. You can see that we have included some examples and you can
download more examples from the ShareScript website using the link within this dialog box.
A ShareScript file is simply a text file with a .ss extension on the file name. ShareScope lists all the ShareScript column files in your ShareScripts Column folder (by default, this will be c:\ShareScope\ShareScript\Columns). Add any column scripts downloaded from the ShareScript Library, or received by email, to this folder.
You can create subdirectories inside this folder to organise your scripts. These will appear as folders in the Add ShareScript Column dialog box.
We will now create a new column script by clicking the New Script button. ShareScope will
ask you for a file name for the new column. Type “Tutorial” as the name of the file. ShareScope
will automatically add the “.ss” extension to the file name if you don’t type this yourself.
When you specify the name of the new file, you can also choose to include or exclude the
comments in the template script file. Leave this option ticked for now.
When you hit the OK button you will notice that ShareScope has created and opened this file
for you, and that there is already a lot of text inside the file (shown below). When you create a
new script, ShareScope automatically creates a fully functioning script, which simply displays

ShareScript User Guide 6
the latest closing price in the column. It also generates a lot of comments in the script, to help
you get started.
//@Name:Example
//@Description:Example column
//@Returns:Number
//@Width:60
/* The name of the column will be the filename of the file (the default)
or a name specified if there is a @Name directive in a comment at the
top of the file.
You can also put a @Description directive to provide a description of
What your ShareScript column does. This is shown to the user when
they add the column.
Finally, you can put a @Width directive to tell ShareScope how wide
the column should be (in pixels).
However, all these directives are optional.
*/
/* The init() function is called once.
It's a place where you can do any preparation required
*/
function init()
{
}
/* The getVal() function is called to get the value of the column for a
share. The share is passed to the function as its only parameter.
Whatever the function returns will be the value of the column.
This can be either a number (the default), or text.
To tell ShareScope what the return type is, put a @Returns directive
in a comment at the top of the file.
*/
function getVal(share)
{
return share.getClose();
}
At the top of the text file are four directive fields that enable you to specify the name of the
column, a description of the column, the column type (text or number), and the width of the
column in pixels. These fields are not mandatory but notice that ShareScope uses the column
name and description, along with the filename, in the Add ShareScript Column dialog. If
unassigned, the column type will default to “number”.
The rest of the file includes two functions – init() and getVal() – plus comments for your
guidance. The comment lines begin with /* and end with */.
The getVal() function is always required because ShareScope will call this function when it
needs to get a value for the column for a given share. The init() function is optional – called
only once (and before any calls to getVal), it is useful for performing any preparatory
operations.
For now, let’s just use the basic script that ShareScope has created for us. It simply displays the
latest close price for each instrument in the list. Edit the title of the column by changing the
Name directive (in the first line of the file) from “Example” to “Close Price”. The line should
now look like this:
//@Name:Close Price

ShareScript User Guide 7
To add this new column, save the file in your text editor and return to the Add ShareScript
Column dialog. Click on the Refresh button and details of your new script will be added to the
list in the dialog.
Double-click on the file or click on OK to close the dialog and display the new column.
In the event that your script returns the wrong value or fails, the ShareScript Console will be
displayed with details of the error. The error message may tell you in which line of code the
error occurs. The column heading will also display a red cross.
An incorrect or invalid script will need editing. Let’s see how to do this.
If you have closed your text editor, you can open the script again by right-clicking in the
column heading and selecting Edit column to display the Edit ShareScript Column dialog.
Click on the Edit Script button to open the file in your text editor. Change the return statement
to:
return share.getVolume();
and change the Name directive from “Close Price” to “Volume”. This will return the volume of
shares traded for each instrument.
Now save the file again and return to the Edit ShareScript Column dialog. Click on the
Refresh button to display the changes. Click on OK to re-test the script.
The Organise button in the dialog gives you access to the ShareScript directory where your
scripts are stored enabling you to create folders, move, copy and delete scripts.
Click on the blue hyperlink provided in the dialog to open the ShareScript website and access
documentation, free scripts and a dedicated user forum. You can exchange scripts with other
ShareScope users by email or download them from the ShareScript website. Simply save new
scripts to your ShareScript columns folder (note that you can easily open this folder by clicking
on the Organise button in the Add/Edit ShareScript Column dialog).
Any ShareScript column that returns a numeric value can also be used as a Data Mining
criterion. We’ll look at how to do this later on in this section.
You can speed up the development process by leaving your text editor open so you can easily
make changes to the script. When you want to test your changes, simply save the file in your
editor, right-click on the column heading and select Refresh Script. This will cause ShareScope
to reload your edited script avoiding the need to return to the Add/Edit ShareScript Column
dialog each time you want to test a change to your script.
We’ve now seen how to use the Add/Edit ShareScript Column dialog to create and make very
simple modifications to ShareScript columns. If you only plan to use ShareScript columns
created by other people, you should now know enough to do this effectively. However, if you
want to create your own columns that make full use of ShareScript, you should go on to read
Sections 3 – 5, which provide a full ShareScript column tutorial.

ShareScript User Guide 8
Adding a ShareScript Data Mining Criterion
Any ShareScript column that returns a numeric value can be used as a Data Mining criterion.
In the Data Mining screen, click on the Add Criterion button to display the Data Mining
wizard. Select ShareScript from the list and then on the next page click on Select ShareScript
file.
If you are not using the Data Mining Wizard, select ShareScript from the drop-down menu on
the Add Criterion dialog.
The ShareScript Criterion dialog will be displayed which will list any existing scripts that
may be used as criteria. Remember that Data Mining can only use scripts that return a numeric
value, therefore any scripts that return a string will not be displayed.
To use an existing ShareScript, select the file and then click OK. You will be returned to the
Data Mining Wizard.
To edit an existing script, select the file and then click on Edit Script. The file will be opened in
your default text editor. Make your changes, save the file and then click OK on the Add
ShareScript Criterion dialog. You will be returned to the Data Mining Wizard.
To create a new criterion, click on New Script. You will be asked to enter a filename before the
template is opened in your default text editor.
When you specify the name of the new file, you can also choose to include or exclude the
comments in the template script file. Leave this option ticked for now.
Create the new script and save the file. Return to the dialog and click on Refresh. This will
display your new criterion in the list. Select it and click OK to return to the Data Mining
Wizard.
Once you have added the new criterion to your Data Mining filter, you can edit the criterion by
right-clicking on it and selecting Edit this criterion.
Adding a ShareScript Item to Details
Any ShareScript column can also be used on the details screen.
On a Details screen, right click on a list box and select Add List Box item > Add ShareScript
Item… You can then select any of your ShareScript columns to be displayed in as an item on
the details screen.

ShareScript User Guide 9
You can also edit the item or choose a different script by double clicking on the ShareScript
item in the list box.
Adding a ShareScript Alarm
ShareScript columns can also be used as alarms. To add a ShareScript column as an alarm,
choose either Set an end-of-day alarm or Set an intraday alarm from the ShareScope’s Edit
menu, then select ShareScript as the type of alarm in the alarm wizard.
It doesn’t matter whether you choose to add an end-of-day or intraday alarm – ShareScope will correctly determine the actual type of alarm from the script itself.
Depending on the script, ShareScope may ask you to set triggering thresholds for the alarm, as
illustrated below. The alarm will trigger if the numeric result of the script for a particular share
crosses these thresholds.
If a script returns text, rather than a number then you will not be asked to supply thresholds.
ShareScope will generate an alert if the script returns any non-empty string, and the string will
be displayed on the alert.
Alarms may be re-checked after an end of day database update, periodically, or whenever new
intraday data arrives for a share. The illustration above shows a script with a checking frequency
of every 15 seconds. A directive in the script specifies how often the alarm should be re-
checked.
If an alarm script takes a long time to calculate, or an alarm is being checked for a large number of shares, ShareScope may not be able to test it as frequently as the script author has requested. In this case, the actual frequency of checking may be lower than that shown on the Alarm wizard.
Section 6 of this guide provides an in-depth introduction to programming ShareScript Alarms.

ShareScript User Guide 10
Adding a ShareScript Indicator
You can overlay ShareScript indicators on the main graph, as you would a moving average, or
add them beneath the main graph, as you would a MACD indicator for example. You can create
custom indicators using both historical OHLC data and intraday data (the principals are the
same in both cases).
To overlay a ShareScript indicator on the main graph, select ShareScript Indicators… from
the Other Main Graph Features sub-menu on the Graph context menu.
To display a ShareScript indicator beneath the graph, select the ShareScript Indicator…
option from the Add Indicator sub-menu menu on the Graph context menu.
For now, select ShareScript indicator from the Add indicator sub-menu, and you should see
the following dialog:
From this dialog you can add or edit an existing ShareScript indicator or you can create a new
indicator. You can see that we have included some examples and you can download more
examples from the ShareScript website using the link within this dialog box.
A ShareScript file is simply a text file with a .ss extension on the file name. ShareScope lists all the ShareScript indicator files in your ShareScript Indicators folder (by default, this will be c:\ShareScope\ShareScript\Indicators). Add any indicator scripts downloaded from the ShareScript Library, or received by email, to this folder.
You can create subdirectories inside this folder to organise your scripts. These will appear as folders in the ShareScript Indicator dialog box.
To create a new indicator, click on the New Script button. You will be asked to enter a filename
before a template is opened using your default text editor. Type “Tutorial” as the name of the
file. ShareScope will automatically add the “.ss” extension to the file name if you don’t type this
yourself.
When you specify the name of the new file, you can also choose to include or exclude the
comments in the template script file. Leave this option ticked for now.
When you hit the OK button you will notice that ShareScope has created and opened a template
ShareScript file, shown below, inside your text editor. ShareScope automatically creates a fully
functioning indicator script, ready for you to start modifying. If you don’t make any changes,
the indicator will always have a value of 0.

ShareScript User Guide 11
//@Name:Example
//@Description:Example
/* The title of the indicator will be "ShareScript Indicator" (the
default) or the name specified if there is a @Name directive in a
comment at the top of the file.
You can also use the setTitle() function to change the indicator's
title dynamically from the code.
You can also put a @Description directive to provide a description
of what your ShareScript indicator does. This is shown to the user
when they add the indicator.
*/
/* The init() function is called once.
It's a place where you can do any preparation required
*/
function init()
{
}
/* The getGraph() function is called each time the indicator needs to
be calculated. The current share is passed as the first parameter.
The second parameter is an array of PriceData records (OHLCV &
Date), corresponding to the bars on the main chart.
The getGraph() function should either return -
(i) A single array of values, with the same length as the array of
PriceData records.
(ii) An array of arrays as in (i) when you wish to return more than
one data series to be plotted on the indicator.
*/
function getGraph(share, data)
{
var output = new Array();
for (var i=0; i<data.length; i++)
{
output[i] = 0;
}
return output;
}
At the top of the text file are two directive fields that enable you to specify the name of the
indicator and a description. These fields are not mandatory but notice that ShareScope uses
them, along with the filename, in the ShareScript Indicator dialog.
The rest of the file includes two functions – init() and getGraph() – plus comments for your
guidance. The comment lines begin with /* and end with */.
The getGraph() function is required for all indicators because ShareScope will call this function
when it needs the indicator values for a share. It returns an array of data, one value for each bar
on the graph. The init() function is optional – called only once, it is useful for performing any
preparatory operations.
For now, let’s just rename this example script by changing the Name directive (line 1) from
“Example” to “Tutorial”. Now save and close the file to return to the ShareScript Indicator
dialog. Click on Refresh to display your new script.

ShareScript User Guide 12
To add your new indicator to the graph, double click on the file or click on OK to close the
dialog and display the new indicator. You should see a new indicator below the price graph,
which is simply a flat line.
Let’s see how to modify this basic script to make it do something more interesting.
First, right-click on your new indicator and select Edit Indicator from the menu. On the sub-
menu you should see “Tutorial”, which is the indicator we just added. Click this to get back to
the ShareScript Indicator dialog. Our tutorial indicator will already be selected.
Click on the Edit Script button to open the file in your text editor, so we can make a change to
the script. Change the line where it says output[i] = 0; to:
output[i] = data[i].close;
Save the modified file, then click on OK to make ShareScope reload the script. You should now
see an indicator that displays a closing price history for the share – a bit more interesting than a
flat line, but still not very useful! We’ll see some real examples of what you can do with
ShareScript later in this document.
It may be that your script returns the wrong values or fails, generating an error that will be
displayed in the ShareScript Console. The error message may tell you in which line of code the
error occurs.
To speed up your development, it is often easier to leave your text editor open. When you want
to try out your changes, you should save the file, then select the Refresh Script command,
which is available at the bottom of the short context menu obtained by right-clicking on the
indicator name (at the top left of the indicator box).
You can also more directly access the ShareScript Indicator dialog by selecting Edit from this
short context menu, or even more quickly, by simply double-clicking on the indicator name.
Before we move on, lets look at some of the other options on the ShareScript Indicator dialog
(right click on the indicator and select Edit again from the menu to get back to the dialog).
If you are adding an indicator beneath the graph, you will see a number of options at the bottom
of the dialog. You can create a new window for the indicator beneath the graph; you can replace
an existing window; or you can add it to any of the four indicator windows that may already
have been added to the graph. By default, ShareScope will create a new window when you
create a new script, and replace the window when you edit.
Use the Data source button to select the period length for your indicator – daily, weekly or
graph time period (which means it will use whatever time period is being used by the main
graph). This option is not available for intraday indicators – these always use the graph bar
period length (e.g. 5 min bars).
The Organise button in the dialog gives you access to the ShareScript directory where your
scripts are stored enabling you to create folders, move, copy and delete scripts.
Click on the blue hyperlink provided in the dialog to go to the ShareScript website and access
documentation, free scripts and a dedicated user forum. You can exchange scripts with other
ShareScope users by email or download them from the ShareScript website. Simply save new
scripts to your ShareScript Indicators folder (note that you can easily open this folder by
clicking on the Organise button in the ShareScript Indicator dialog).
If you want to create your own indicators that make full use of ShareScript, you should go on to
read Sections 7 & 8, which provide a full ShareScript indicator tutorial.

ShareScript User Guide 13
Adding a ShareScript Chart Study
ShareScript chart studies are the most powerful and flexible members of the ShareScript family.
To see why, lets review the roles of the ShareScript add-ons we have already seen:
• ShareScript columns return a single value for each share. This value may be text, or it
may be a number, in which case the script can also be used as a Data Mining criterion.
• ShareScript indicators return one or more data-series for each share. Each data series
will be displayed along-side or (more normally) in an analytic window beneath the price
chart. The plot-style of each data series can be separately controlled (e.g. a series can be
shown as a line or histogram).
In contrast, chart studies allow you to add new features to a chart, almost without limit. You can
draw lines, shapes and text anywhere on the chart. Your script can also react when a user clicks
on the chart (e.g. on a specific bar), or zooms in. You can also add buttons to the chart, and your
script can react when a user clicks on the buttons.
Studies can be used on both historical and intraday charts, and the basics are the same in both
cases. Let’s now look at how we go about using a ShareScript study.
To add a ShareScript study to a chart, select ShareScript Studies… from the Other Main
Graph Features sub-menu on the Graph context menu.
When you do this, you will see the ShareScript Study Manager dialog box (left-hand side
image below). This dialog shows you any existing studies that have been applied to the chart
setting, and allows you to edit or remove them. To add a new study, click on the Add button,
and you should see the now familiar script selector dialog box (right-hand side image below).
�
To use an existing study, simply select the one you want from the list and click the OK button
(or just double-click on it from the list).
ShareScope lists all the ShareScript study files in your ShareScript Studies folder (by default, this will be c:\ShareScope\ShareScript\Studies). Add any study scripts downloaded from the ShareScript Library, or received by email, to this folder.
You can create subdirectories inside this folder to organise your scripts. These will appear as folders in the ShareScript Study dialog box.

ShareScript User Guide 14
As we did with columns and indicators, we’ll now quickly show you how to create a new
ShareScript study, then we’ll take a look at the options available once a study has been added to
a chart. If your main interest is using other people’s studies, you may wish to skip ahead to
“Working with chart studies”.
To create a new chart study, click on the New Script button. You will be asked to enter a
filename before a template is opened using your default text editor. Type “Tutorial” as the name
of the file. Leave the option to include comments ticked, and click OK.
Your new script should now be created and opened in your text editor – you’ll notice that the
template script is a lot longer than ones supplied for columns and indicators. Don’t be scared –
we’re only going to make a small change at the moment, and there is a full tutorial to introduce
you to writing your own studies in section 9.
The template script is shown below, with (as usual) the comment lines on a darker background.
//@Name:Example
//@Description:Example
/* The name of the study will be the filename of the file (the default)
or a name specified if there is a @Name directive in a comment at the
top of the file.
You can also put a @Description directive to provide a description of
what your ShareScript study does. This is shown to the user when
they add the study.
*/
/* The init() function is called once.
It's a place where you can do any preparation required
*/
function init()
{
}
/* The onNewChart() function is called whenever a new chart is drawn.
The bars[] property gives access to the array of chart bars.
*/
function onNewChart()
{
}
/* The onBarClose() function is called for each complete bar added to the
chart. It is called in time order, from oldest to newest bar.
The bar & barIndex properties allow you to reference the bar.
*/
function onBarClose()
{
}
/* The onNewBarUpdate() function is called to tell you about changes to
the newest (incomplete) bar at the right hand side of the chart.
It is called when a new bar is created or when that bar changes.
It will be followed by onBarClose() when the bar completes.
The bar & barIndex properties allow you to reference the bar.
*/
function onNewBarUpdate()
{
}
/* If the study has input focus, then onMouseClick() will be called in
the event of a mouse click in a frame. The frame and point clicked
are passed as parameters. If the user clicked on bar, then the
bar & barIndex properties allow you to reference the bar.
Return true if you process the click - then ShareScope will ignore it.
Return false if you didn't - ShareScope will process it as normal.

ShareScript User Guide 15
*/
function onMouseClick(frame, date, value)
{
}
/* The onZoom() function is called when the user zooms the chart, changing
the data displayed. You can call getMin/MaxVisibleBarIndex() to get
the bounds of the visibile bars.
*/
function onZoom()
{
}
Unlike columns and indicators, where you only have 2 functions to put your code in, studies
have several. But for now, we’ll just make a small addition to one of them – onBarClose()
which is called once for every bar on the chart.
First, let’s rename this example script by changing the Name directive (line 1) from “Example”
to “Tutorial”.
//@Name:Tutorial
Next, add a single line of code to the onBarClose() function, so it looks like this:
function onBarClose()
{
bar.colour = Colour.Green;
}
Now save the file (but leave the text editor open for now). Return to ShareScope, and click on
Refresh in the Add ShareScript Study dialog to update the list to display the new name for
your script. Now click on OK to close the dialog and add your study to the chart.
You should now see the price line (or bars) of your chart turn green, and a small box labelled
“Tutorial” will appear at the top left of your chart.
These boxes show the names of any studies added to a chart, and also provide you with a means
to interact with the study – we’ll learn more about this below. You can also right-click on the
box to bring up a context menu.
Lets make a small change to the script, and use the context menu to see our changes. Switch
back to your text editor, and change the line we added so the bars are shown in a different
colour (e.g. try Colour.Red or Colour.Blue). When you’ve made the change, save the file, then
bring up the study context menu and select “Refresh Study”.
You should now see the price line on your chart change to the new colour.
If you forgot to leave the script open in your text editor, it’s easy to get to the script for a study
using the context menu. Just select “Edit Study”, and you will see the ShareScript Study
dialog box with the file already selected. Click the Edit Script button to open the script in your
editor.
Working With Chart Studies
Indicators are fairly passive. Once you’ve added them to a chart (perhaps specifying some
parameters when you did so), they simply calculate and display their data for the current share.
Studies can behave this way too – but they can also do a lot more, updating or changing the

ShareScript User Guide 16
display when you click on the chart, or click on buttons. In this section, we’ll see how to use
studies that do more than passively display data.
First, lets add a couple of the supplied example scripts to a historical chart. Bring up the chart
context menu, and select Other main graph features > ShareScript Studies…
Click Add, then select “My Bar Colours”. Then repeat this procedure, this time adding
“Fibonacci Retracement”.
You should now have two boxes (or “panels”) at the top left of your chart. You will notice that
the Fibonacci panel has a little [+] icon. Click this to open up the panel so it looks like the
screen below:
Study panels provide some basic commands for all studies, available through a context menu. If
you right-click on a panel, you can easily Edit or Delete an existing study. If you are
developing a study, you can also quickly reload the script after you have made changes, using
the Refresh command. You can also Edit by double clicking on a study.
Study panels also provide a convenient place for scripts to place any controls that allow the user
to interact with the study. Notice that the Fibonacci study has added two buttons to the panel.
You can easily hide these controls by clicking on the [-] button.
Click on the “Create New” button on the Fibonacci panel, and you will see that it updates the
panel to give you some information – in this case, asking you to click on a starting bar. Click on
a chart bar, and you should see a green triangle highlighting the bar. The info text also changes
to ask you to click on an end bar. Try this now – when you’ve selected the 2 bars, the study will
draw the Fibonacci retracement lines on the chart using these price levels.
Note that mouse clicks on the chart are only sent to the study with input “focus”. You can give a
study focus simply by clicking on its panel. Notice how the border of the panel changes to
indicate the study with input focus. You can remove focus from a study by pressing the “ESC”
key on the keyboard.
Finally, to remove the studies from your chart, simply right click on them and select Delete
Study.
You now know the basics of working with studies on your charts.

ShareScript User Guide 17
Using a ShareScript Tool
ShareScript “Tools” are stand-alone scripts that perform one-off actions. You might use them
for example to export data in a custom format for use by another program, or to show a dialog
box listing all your portfolios, allowing one to be selected and analysed.
To use or create a ShareScript tool select Use ShareScript Tools… from ShareScope’s Tool
menu.
You will then see the standard script selector dialog you have seen earlier. From this dialog you
can use or edit an existing ShareScript tool or you can create a new tool.
ShareScope lists all the ShareScript tool files in your ShareScript Tools folder (by default, this will be c:\ShareScope\ShareScript\Tools). Add any tool scripts downloaded from the ShareScript Library, or received by email, to this folder.
You can create subdirectories inside this folder to organise your scripts. These will appear as folders in the ShareScript Tool dialog box.
To use an existing tool, simply select the one you want from the list and click OK (or just
double-click it in the list).
To create a new tool, click on the New Script button. You will be asked to enter a filename
before a template is opened using your default text editor. Type “Tutorial” as the name of the
file. ShareScope will automatically add the “.ss” extension to the file name if you don’t type this
yourself.
//@Name:Example
//@Description:Example tool
/* The @Name and @Description directives provide a description of what
your tool does. They are shown to the user when they select a tool
to use.
*/
/* The main() function is called when the user selects the tool.
*/
function main()
{
}
In comparison to columns, indicators and studies, tools are very simple. ShareScope simply
calls the main() function when a user selects the tool. For now we can try something very
simple, and simply make the tutorial tool print the current date and time to the console window.
Modify your main() function by adding a single line to the script in your text editor, so it looks
like the following:
function main()
{
print(Date());
}
Save the file, then click OK to try it out – you should see the current date and time printed to the
ShareScript console window.

ShareScript User Guide 18
Using the ShareScript Console
The ShareScript Console is a window that enables you to test expressions and scripts or perform
one-off analyses. To display the console, click on the View menu and select ShareScript
Console.
To enter expressions, type them into the text input box at the bottom of the window. Press
Enter (or the Return key on your keyboard) to execute. Your input and any result will be
displayed in the top part of the window.
If you want to repeat or modify an expression already entered, press the up arrow (cursor) key in
the text input field to display the last expression entered (this allows you to correct mistakes
without retyping the whole line). You can use both the up and down cursor keys to review your
entire command history. This history is retained even if you close the window (but not when
ShareScope is closed).
You can paste single or multi-line scripts (e.g. a complete function) into the text input field and
you can even run a ShareScript file by typing the command: load("filename") where
filename is the actual name (including full directory) of the file to be processed.
If your input is not a complete ShareScript expression (e.g. if you type 1+ rather than 1+2), the
input field changes colour to yellow, prompting you to enter a complete expression.
You can also copy from the output area at the top of the window to keep a record of your work.
Select lines of text using the mouse, or press Ctrl-A to select data currently in the buffer. To
copy the selected data to the clipboard, press Ctrl-C. To paste one or more ShareScript functions
into the console, select Ctrl-V.
We’ll return to, and use, the console in the next section.
ShareScript Options
The ShareScript tab of the ShareScope Options dialog (select Options from the Tools menu)
contains various ShareScript options.
The option Prompt me if scripts run for a long time without terminating allows you to
prevent ShareScope bringing up a warning dialog if your ShareScript code runs for a long time
without terminating. If you know that the analysis you are performing will take a long time, you
may wish to disable this option so that ShareScope will not interrupt the analysis.
Whether or not this option is enabled, you can always press the Break key on the keyboard (usually found on the top right of the keyboard) to interrupt a script. If the script is a column or an indicator, then it will remain disabled until you edit or refresh it.

ShareScript User Guide 19
Most users, however, will wish to leave this option enabled. Doing so means that ShareScope
will monitor all the scripts you run and prompt you after a few seconds if it thinks a script has
been running for too long.
You can use the Text Editor option to change the text editor program that ShareScope will use
when you create or edit a ShareScript file. By default, ShareScope uses the Windows Notepad
program, which is adequate, but less than ideal. If you have a favourite text editor, select it here.
The Native code libraries (DLLs) section allows you to see which scripts are currently allowed
to access external native code. The listed scripts can make calls to functions in system or user
code libraries (DLL files) – this greatly extends the power of ShareScript, but is also potentially
dangerous, since a badly written or malicious script might delete or modify files on your
computer.
By default, scripts are not allowed to access DLLs. If a script wants to access code in a DLL,
then you will be prompted for permission the first time you use the script. If you give your
permission then the script will be added to the list above, and it will not need to ask permission
from you again.
Only allow scripts to access native code libraries (DLLs) if they come from an author or a source that you trust.
For more information, see the “NativeLibrary” entry in the ShareScript Language Reference.

ShareScript User Guide 20
Section 3 Columns – The Basics
This tutorial will show you how to develop your own yield column. A company’s yield is
defined as the total dividend paid over the year, divided by the price of the share (then
multiplied by 100 to make a percentage).
ShareScope already has a number of yield columns built in (under the Add General Column
sub-menu), but if we create our own using ShareScript you will learn how to use the
language, and it will also allow us to calculate yield exactly how we want to.
Experimenting at the Console
Although we are going to add a column, it will be useful to first do some experiments at the
ShareScript console, since the console allows you to type ShareScript commands and get
immediate feedback.
So, let’s get started. First, open the ShareScript console by selecting ShareScript Console
from the View menu.
Note that the console window always stays on top of the other ShareScope windows, so you
can use the rest of ShareScope, while leaving the console window in view. If you have
multiple monitors, you may wish to drag it to another monitor. You can also resize the
window by dragging the bottom right corner. For now, just make sure it is about a quarter of
the size of the ShareScope window, so we have plenty of room.
The console window has an input box at the bottom where you type ShareScript commands,
and an output box (the larger, black area) at the top, where you can see the results of the
commands you type.
Let’s try this out now, so you can get a feel for how the console works. Click on the input box
with your mouse so you can see the text cursor flashing. Now type:
1+2
and either click the enter button, or hit the Enter key on your keyboard. You should now see:
>1+2
3
Notice how the output window shows you a copy of what you typed (with a > symbol in front
of it), followed by the result after ShareScript has evaluated what you typed.
Working with Share Data
Now back to the yield calculation. We know that we need two pieces of information to
calculate the yield – the price of the share, and the total dividend for the year. A glance
through the ShareScript Language Reference shows that there are a number of functions that
will give us a price for a share e.g. getClose(), and that dividend figures can be obtained using
the getResult() function.
Both of these functions are methods of a Share object. What is a Share object, and how do we
make one at the console?
A Share object is the way we represent a ShareScope instrument in ShareScript. If we want to
access any of the data from ShareScope’s database for a particular share (company), we need
a Share object corresponding to that share. We can get a Share object by using the getShare()
function.
Type the following into the console:
var x = getShare("LSE:LLOY");

ShareScript User Guide 21
The getShare() function asks ShareScript to make a Share object corresponding to the
ShareScope instrument with EPIC code LLOY on the LSE exchange. This is the primary
share for the bank “Lloyds TSB Plc”. It then puts that Share object in a variable called “x”.
Try typing x into the console, and we can see what ShareScript says it is – we should see:
>x
[object Share]
Now that we have the Share object, we can call one of its methods to extract information
about it from the database. Let’s use getClose() to get the latest closing price:
x.getClose()
You should see the latest price ShareScope has for Lloyds (in pence). Lets do that again, but
store the result in a variable (try pressing the cursor up key, then editing the line):
var price = x.getClose();
Type price to check that you get the same value.
Now let’s get the dividend for the year. The getResult() method needs two parameters: The
first specifies the year, with 0 meaning the most recent year for which year end results are
available. The second parameter tells ShareScript what type of result you want. Have a look
in the ShareScript Language Reference under “Result” to see the range you have available to
you. We can now type the following:
var div = x.getResult(0, Result.Dividend);
And we should have the total dividend for Lloyds TSB’s last financial year (type div into the
console to see its value).
Now that we have both the price and dividend figures we need, lets calculate the yield:
div/price * 100
You should now see a figure giving the historical yield for Lloyds TSB Plc. At the time of
writing, this is around 6%. Check the figure we have calculated against the figure
ShareScope’s built-in column provides: the column for comparison is “Yield - Historical”.
You should find that the figure for Lloyds matches the value we’ve just calculated ourselves.
Now that we’ve seen the basic procedure for calculating yield using ShareScript, let’s put this
in a column, as originally planned.
Creating a Column
Right-click in a column heading and select Add ShareScript Column. Click on New Script
in the dialog. Give the file a name (e.g. “yield tutorial”) and change the Name directive as
well. Replace the body of the getVal() function with the following ShareScript:
function getVal(share)
{
var price = share.getClose();
var div = share.getResult(0, Result.Dividend);
return div / price * 100;
}
Notice that this time, we didn’t need to use the getShare() function – ShareScope
automatically passes a Share object to the getVal() function when it needs to get the column
value for a particular instrument. This Share object is stored in the variable named after the
function name (in this case “share”).
Also notice that there is a “return” statement in front of the yield calculation – this tells
ShareScript that we wish the calculated yield to be the value shown by the column.
Save the file (but leave the editor open), return to ShareScope, and click Ok to add the
column.

ShareScript User Guide 22
Hopefully, you should now have a ShareScript column which is showing the historical yield
for the shares in your list. But rather than using ShareScope’s built-in column, we’ve created
this ourselves.
You may wish to edit the name and description directives at the top of the ShareScript file, to
say what your new script does (so it doesn’t just say “Example”). When you make changes to
the script, you can easily get ShareScope to reload the changes by right-clicking on the
column and selecting Refresh Script.
Note: you can control the number of decimal places displayed by right-clicking in the column
heading and selecting Numeric display from the context menu.
Undefined Values
What happens when ShareScope doesn’t have a dividend figure for a share? We haven’t
explicitly dealt with this case in the script we have written.
In this case, our call to the share’s getResult() method (shown below) will return the special
JavaScript value of undefined.
var div = share.getResult(0, Result.Dividend);
The undefined value means ShareScope does not have the value in its database. It is
distinct from a zero value, which means that the database contains the value, and the value is
zero.
If the value of the variable div is undefined, what happens when we try to calculate the yield
and return it to ShareScope?
return div / price * 100;
To see what happens, you can try this out at the console, by using undefined in an
expression:
>undefined / 2
NaN
We now get another strange value, this time NaN, which stands for “Not a Number”.
JavaScript produces this value when an expression cannot be calculated.
Fortunately, when a ShareScript column returns either NaN (or undefined), this is
interpreted as meaning the column has no value, and ShareScope will simply show a blank
entry for the share in question.
So even though we have not explicitly handled this case, ShareScope behaves appropriately,
showing us yield values when they can be calculated, and empty cells when they cannot.
Invalid values are also distinct from 0 values when the column is sorted.
Often we will want to explicitly tell ShareScope that we can’t calculate a column for a
particular share, and we can do that by using:
return undefined;
Or even simply:
return;
You can test whether a variable is undefined by using:
if (div == undefined)
return;
It is good practice to explicitly deal with error conditions like the above, even though we have
seen it is not necessary in this particular case. Improving the yield script to include checks
that we have a valid closing price and dividend figure is left as an exercise for the reader.

ShareScript User Guide 23
Column Objects and the init() Function
So far, we’ve just added code to the getVal() function, which returns a value of the column
for each share when requested. What about the init() function that is also created when you
make a new ShareScript column?
The init() function is called only once, before ShareScope requests any values through
getVal(). Its purpose is to allow you to do any preparation you need to do, before calculating
column values. An example might be extracting some data from the database, processing it in
some way, then storing it in a variable that you can access later in the getVal() function.
init() is not called after a database update. This might be annoying in some cases, if your
preparation uses the latest prices in the database. We’ll see how to remedy this now.
The following example shows you how to use the init() function, how to store data in
variables that you later access in getVal(), and how to get init() to be called after a database
update. Let’s look at the code first, then we’ll see how it works:
//@Name:Update example
//@Description:Reports to the console when the database changes.
var ftse100, lastDate;
function init()
{
ftse100 = getShare("UKI:UKX");
lastDate = ftse100.getPrice().dateNum;
}
function getVal(share)
{
if (ftse100.getPrice().dateNum != lastDate)
{
print("database changed");
init();
}
return;
}
Notice first we’ve declared two variables (“ftse100” and “lastDate”) outside of any function.
When you declare variables inside a function, they exist only during the lifetime of the
function call. By declaring them outside, we make them accessible by any function in the
script. They will exist and have values as long as your column exists.
Any variables and functions you declare actually become properties of a Column object. The Column object is created when you add the column, and destroyed when the column is removed. The Column object is used as the environment for running a script. The init() and getVal() functions you write become methods of this Column object. ShareScope calls these special methods when it uses your column.
Our init() function uses getShare() to get the Share object that represents the FTSE 100 index.
We store this in a variable (or property) we have called “ftse100”. It then calls the getPrice()
method of the Share object to get a PriceData object corresponding to the latest price in the
database.
PriceData objects have several properties that give a complete record of the day’s trading,
including the opening, high, low and closing prices on the day, the volume, and the date. In
the example above, we record the date of the latest price in the “lastDate” variable.
In the getVal() function, we call getPrice() again, and check to see whether the date matches
the one we stored in the init() function. If the date doesn’t match, we know that the database
has been updated, and we print a message to the console, then call init() again.

ShareScript User Guide 24
Try adding this column. Don’t worry that the values in the column are all blank – we don’t
actually return anything in the example above. Now update your database (you may need to
wait until after 6pm to get new prices). Notice how the message is printed to the console
when the database changes.
What Next?
Hopefully this tutorial has taught you enough so you can start learning by yourself. Try
looking up the methods and objects we’ve used in the ShareScript Language Reference. Attempting the exercises below should also help you gain confidence. If you get stuck, you
should be able to find people willing to help on the ShareScript forum.
The next sections look at some of the more advanced ShareScript features you can use with
columns. Section 4 looks at intraday data, and section 5 focuses on the use of dialog boxes for
user-specified parameters to your scripts.
Further Exercises
1. We can easily change this calculation to get the projected yield (for the next year) by
changing the year in getResult from 0 to 1. Try this out and compare the results to
ShareScope’s built-in projected yield column.
2. Instead of using the latest closing price, you can get the price on the same date as the
company’s year-end. This is a bit harder! Hint – you’ll need to use the
getCloseOnDate function, and call getResult twice, once to get the dividend value,
and again to get the year-end date.

ShareScript User Guide 25
Section 4 Columns & Intraday Data
In the previous sections, we’ve been working with data from ShareScope’s historical price
and fundamentals database. In this section, we’ll see how to access intraday data using
ShareScript.
Share objects provide a range of methods for accessing their intraday data, and you can easily
find them in the ShareScript Language Reference since they all have a “I” (for Intraday) after
the get part of the method name. For example, you can get the latest mid price for a share
using share.getIMid().
Lets try out an example that simply prints the current mid price for a share in the column:
//@Name:Intraday example
//@Description:Show current mid price
function getVal(share)
{
return share.getIMid();
}
However, if you try this example, you’ll notice that while ShareScope initially displays the
correct mid price for each share, the values are frozen in time, and don’t update when we are
connected to the live data feed. Before we see how to see how to fix that, we need to first
discuss how and when ShareScope re-evaluates a column.
Column Evaluation
By default, when ShareScope has calculated the value of a ShareScript column for a share (by
calling your getVal() function), it normally caches the result, and will use the cached result
the next time it needs to know the value of the column. The cached result is invalidated if the
historical database changes (e.g. when you do an end of day update), which forces
ShareScope to re-evaluate the column.
This behaviour is ideal when our ShareScript columns are based only on data in the historical
database, but not so useful when we want to use intraday data. Fortunately, ShareScope
provides two further update modes that determine when our columns get re-evaluated.
Intraday update mode can be used by adding a new directive to our script:
//@Update:Intraday
This tells ShareScope to invalidate the cached result for a share whenever new data is
received for that share on the intraday feed. This could be a new price or a new trade.
Try adding this now to the script above. When you add the column you will see that the
column values change instantaneously whenever the share’s intraday price changes.
Alternatively, you can also tell ShareScope to re-evaluate columns periodically, for example
every 30 seconds:
//@Update:Periodic,30
By default, periodic updates will take place every minute, unless you specify a value at the
end of the directive. It is worth noting that periodic updates cannot be more frequent than
every 15 seconds, and that you cannot combine the intraday and periodic updates.
Extending the Example
At present, our example is pretty basic. Let’s extend it a bit to show the % change from the
previous close in the historical database. Edit your script to look like the example below:
//@Name:Intraday example
//@Description:Show Mid% from close
//@Update:Intraday

ShareScript User Guide 26
function getVal(share)
{
var prev = share.getClose();
var latest = share.getIClose();
if (!latest)
latest = share.getIMid();
return (latest-prev)/prev*100;
}
Notice how we first check to see if we have received a closing price for the share through the
intraday feed using getIClose(). This method returns undefined if a close price is not (yet)
available, in which case we use the latest mid price.
More Intraday Data
You will often want to access more than simply the latest intraday price. Let’s look briefly at
the methods we can use to access the complete intraday history for a share.
If we want to access all of the price data for a day, we can use
share.getIBidOfferArray() which will return an array of BidOfferData records,
detailing the complete intraday price history for a share. Each BidOfferData record has bid,
offer and mid prices, as well as the date/time of the price change.
Similarly, for trades, we can use share.getITradeArray() to return the complete
intraday trade history for a share. This method returns an array of TradeData records, which
detail the price, volume, date/time and type of the trade.
If you want OHLCV bars (e.g. to pass to one of ShareScript’s analytic classes), you can use
share.getIBarArray() to return a set of bars with a specified period length. We’ll look at
this method shortly.
Let’s see an example that uses getITradeArray() to calculate and display the total
intraday volume in a column:
//@Name:Intraday Volume
//@Description:Total volume
//@Update:Intraday
function getVal(share)
{
var trades = share.getITradeArray();
var total = 0;
for (var i=0; i<trades.length; i++)
total += trades[i].volume;
return total;
}
There’s a small problem with this script, which we’ll need to fix. All intraday methods will
return undefined if there is no intraday data available for the share, and you should always
check for this condition before starting to process the data.
Let’s fix the problem mentioned above, and also modify the script to display only the total
automatic trade volume, by checking the type field of each trade record before we add it to
the total (for details about the different trade type codes, see the TradeType entry in the
ShareScope Language Reference). Our new script looks like this:
//@Name:Intraday Volume
//@Description:Total AT trade volume
//@Update:Intraday
function getVal(share)
{
var trades = share.getITradeArray();
if (!trades) return;
var total = 0;
for (var i=0; i<trades.length; i++)

ShareScript User Guide 27
if (trades[i].type == TradeType.AT)
total += trades[i].volume;
return total;
}
Intraday Bars
You will often want to access intraday OHLCV bars, rather than the raw bid/offers values or
trades. As mentioned above, ShareScript provides a share.getIBarArray() method that
returns intraday bars as an array of PriceData objects. We look at PriceData objects in detail
in Section 7, so you may wish to read that section before continuing.
In the example below, we’ll use the share.getIBarArray() method to get intraday 5
minute bars for the current day. We’ll also use the RSI analytic class to produce a column that
gives us an intraday RSI value, based on these 5 minute bars:
//@Name:Intraday RSI
//@Description:Intraday RSI (5 minute bars)
//@Width:60
//@Update:Intraday
function getVal(share)
{
var bars = share.getIBarArray(0, 5*60);
if (!bars) return;
var rsi = new RSI(20, RSI.Wilder);
for (var i=0; i<bars.length; i++)
rsi.getNext(bars[i].close);
return rsi.getValue();
}
First, look at the method to get the bars. We pass 0 as the first parameter, since we want the
latest data (today). The second parameter is the bar length in seconds, and we multiply 5 by
60 to get 5 minute bars. As normal (with intraday methods), we need to check for the return
value of the method call to make sure intraday data was available for the requested day and
share.
We then create an RSI analytic (20 period, Wilder), and pass the closing price of each bar into
the RSI. Finally, we return the latest value of the RSI.
If you add this column to your list, then add an RSI indicator to an intraday chart, you should
be able to compare the two RSI values. If there is a difference, it may be because your
intraday chart bars are set up differently – make sure the chart period length (on the time tab
of graph design) is set to 5 minutes bars, and that bars start with a full period. Bars should be
derived from mid-prices (source, on the price tab of graph design).
Further Exercises
1. The Mid % from close column could be improved further: after you update your
historical database at 6pm, the column will show a 0% change, since
share.getClose() and share.getIClose() will both return today’s close.
Modify the script to use yesterday’s close as the previous value in this case. Hint –
you can use share.getPrice() and share.getIDateNum() to find out the dates
of the latest historical and intraday data for the share.
2. The Intraday RSI column will not be accurate early in the day, since there will be too
few bars to properly initialise the analytic. Try modifying the column to use
yesterdays intraday data too. Hint – the array concat method will join two arrays.

ShareScript User Guide 28
Section 5 Advanced Column Techniques
This tutorial is aimed at users already quite comfortable with the language. It follows on from
the previous sections and will show you how to use dialogs, persistent storage and directives
to create ShareScript columns that behave just like the built-in ShareScope columns.
Let’s start by looking at one of ShareScope’s built-in columns to get a feel for what we are
trying to achieve: On a list screen, add a Price > Average Volume… column.
Notice how this column prompts the user for the length of the period, then adds a column
with the desired setting (with an appropriate column heading). If you now right-click on the
column, and select Edit column…, notice how the user is prompted for a new value for the
length (with the dialog already initialised to the old value).
We’ll use this column as a model for this tutorial, but rather than just recreate the volume
column, we’ll add a new feature to ShareScope – a column that displays the average closing
price of a share over a user-specified period.
We’ll start with a simple script that doesn’t use dialog-boxes, and simply lays out the logic for
the calculation. Add a new ShareScript column, give it a name (e.g. “Average Price”), and
edit the template so you have something like this:
//@Name:Average Price
//@Description:Shows the average price over the last n trading days
//@Returns:Number
//@Width:60
var period = 10;
function init()
{
}
function getVal(share)
{
var prices = share.getCloseArray(period);
return MA(period, MA.Simple, prices);
}
This gives us a 10-day simple average of the closing price, but if you ever need a different
average length, you’d need to modify the line:
var period = 10;
Dialog Boxes
Let’s see how we’d use ShareScript dialogs to prompt the user for the number of days to
average over. We do this using the init() function, which you’ll remember is guaranteed to be
called only once, before any call to getVal(). Edit the init() function so it looks like the one
below:
function init()
{
var dlg = new Dialog("Price Average Column", 200, 50);
dlg.addGroupBox(5, 2, 120, 35, "Length of price average");
dlg.addIntEdit("period",-1,-1,-1,-1,"Last","trading days",period,2,1000);
dlg.addOkButton();
dlg.addCancelButton();
if (dlg.show()==Dialog.Cancel)
return false;
period = dlg.getValue("period");
setTitle(period + " day average Close");
}

ShareScript User Guide 29
This code creates a dialog box, adds some buttons and other controls to it, then displays it to
the user. If the user doesn’t click cancel, it then sets the period variable and the column title
based on the user input (for a complete guide to using the Dialog class, see the ShareScript
Language Reference).
For now, notice that when you add the column, you see the dialog prompting you to specify
an average length. Try entering a value, then click Ok. ShareScope adds a column with the
value you specify, and sets the column title accordingly.
Now try removing the column and adding it again, but this time try clicking cancel when your
dialog appears. Notice how ShareScope doesn’t add the column. If you look at the script,
you’ll notice the following two lines:
if (dlg.show()==Dialog.Cancel)
return false;
This illustrates a new behaviour of the init() function added in ShareScript v1.1 –
If the user adds a column and your script’s init() function returns false, ShareScope will cancel the add column operation.
However, although we are now closer to having something that works like a real ShareScope
column, we’re not quite there yet. To see why, try quitting ShareScope (with your column
present in the list), then starting it up again.
You should see an exception message in the console, saying something like:
Dialog.show() blocked at line 15 in [the name of your file]
Why has this happened? When ShareScope started up, it loaded the column, then called the
init() function which then tried to show the dialog. However, ShareScope does not allow
ShareScript to display dialog boxes when the user does not expect it – a column can
display a dialog when the user adds the column, or when the user edits it, but not when
ShareScope has just started up.
We need to identify these different situations somehow in our init() function, and respond
appropriately. Fortunately, this is straightforward. ShareScope passes the init() function a
parameter which allows the script to identify how it is being initialised. Add the following
lines to the init() function to see this in action:
function init(status)
{
if (status == Adding)
{
var dlg = new Dialog("Price Average Column", 200, 50);
dlg.addGroupBox(5, 2, 120, 35, "Length of price average");
dlg.addIntEdit("period",-1,-1,-1,-1,"Last","trading days",period,2,1000);
dlg.addOkButton();
dlg.addCancelButton();
if (dlg.show()==Dialog.Cancel)
return false;
period = dlg.getValue("period");
}
setTitle(period + " day average Close");
}
We now check the parameter that is passed to the init() function to find out how ShareScope
is initialising our column. The possible values are:
Parameter passed to init() When does this occur? Adding When the user has just added the ShareScript column to
their list table (or DM filter). Also when you use the Refresh
Script command from the context menu.
Loading When ShareScope has just loaded (i.e. started up).
Editing When the user has selected Edit column… from the context
menu, then selected the same ShareScript file.

ShareScript User Guide 30
If you now add your ShareScript column, you will be shown the dialog (try entering 5 for
now, and click Ok). If you now quit ShareScope, then start it up again, we don’t see the error
message about dialog boxes being blocked anymore, because we now do not try to display the
dialog.
If you look closely however (at the column title), you’ll notice that the period length being
used is no longer 5. It has reverted back to its old value of 10. Why?
The answer is that when you quit ShareScope all your variables (and the column object that
contained them) were destroyed. When ShareScope starts up again it creates a new (empty)
column object and runs your script in this environment. At this point, the period variable is
initialised back to 10. We need some way of getting ShareScope to keep our important
variables…
Persistent Storage
Column objects provide a storage area where we can keep column settings so they will persist
even when we close down ShareScope. The storage area is accessed through the appropriately
named Storage object, which is a property (named storage) of every ShareScript column.
Make the following changes to your init() function to start using this storage object:
function init(status)
{
if (status == Loading)
period = storage.getAt(0);
if (status == Adding)
{
var dlg = new Dialog("Price Average Column", 200, 50);
dlg.addGroupBox(5, 2, 120, 35, "Length of price average");
dlg.addIntEdit("period",-1,-1,-1,-1,"Last","trading days",period,2,1000);
dlg.addOkButton();
dlg.addCancelButton();
if (dlg.show()==Dialog.Cancel)
return false;
period = dlg.getValue("period");
storage.setAt(0, period);
}
setTitle(period + " day average Close");
}
Now when we add the column for the first time, we store the period length (specified by the
user) in the first slot (0) of the storage area. This will be saved in ShareScope’s configuration
files, along with all the other column settings for your list tables. When ShareScope is loaded
the next time, init() will be called with a status of Loading, which retrieves the period from
the first slot of the storage area.
Try this out, and notice how we can now add multiple instances of this column, all with
different settings, quit ShareScope, load again, and have them all maintain their individual
settings. We’re almost there – the only thing left is, how do we make the Edit column…
command work?
Editable Columns
The Edit column… command, when used on a ShareScript column, displays the Edit
ShareScript Column dialog with the current script selected. The user can then either select a
new script, or simply click OK with the same script selected.
If the user selects a new script, the old column is simply discarded, and another is created for
the new script (the init() function is called with status of Adding in the new column).
However, when the user selects the same script, ShareScope behaves differently: it first
creates a fresh column object, and creates all the variables and functions declared in the script.
It also copies the storage area from the original column to the new column, then calls init()

ShareScript User Guide 31
with a status of Editing. This allows you to display a dialog and allows the user to edit the
current values of the parameters used by your column.
Note that if the init() function returns false, the fresh column object is discarded, and the
user’s list table is left unchanged. This makes it easy to produce the normal behaviour
expected by clicking Cancel to an edit command, as we shall see below.
function init(status)
{
if (status == Loading || status == Editing)
period = storage.getAt(0);
if (status == Adding || status == Editing)
{
var dlg = new Dialog("Price Average Column", 200, 50);
dlg.addGroupBox(5, 2, 120, 35, "Length of price average");
dlg.addIntEdit("period",-1,-1,-1,-1,"Last","trading days",period,2,1000);
dlg.addOkButton();
dlg.addCancelButton();
if (dlg.show()==Dialog.Cancel)
return false;
period = dlg.getValue("period");
storage.setAt(0, period);
}
setTitle(period + " day average Close");
}
Notice that we have only had to modify two lines of the script to support the edit command.
We now load the current period from the storage area when the column is edited, and we also
display the dialog box to the user when the column is edited (the period length will now be
initialised to its current setting).
If the user edits the column, then changes their mind and hits the Cancel button, we return
false from the init() function. This causes ShareScope to discard the new column object, and
keep the old one (which was left unchanged).
Finishing Off
Now that we’ve produced a column script that displays a user-interface to accept parameters
from the user whenever the column is added or edited, it would be nice if we could make the
Edit column… command work a bit more directly, rather than needing the user to go via the
Edit ShareScript Column dialog each time.
We can do this by adding a new directive to our script:
//@Env:Production
This tells ShareScope that you are finished developing the script, and want it to behave more
like ShareScope’s built-in columns. This means the Refresh script item will be removed
from the context menu, and the Edit column… item will invoke the edit command directly.
Try this out (you will need to remove and then add the column again for the new directive to
be enabled), and notice the difference to the environment ShareScope provides to the user for
the column. Edit column… now directly invokes your dialog box, with no intermediate step.
You can also tell ShareScope that script is finished, but doesn’t support editing. You do this
by using the above directive in combination with a second one:
//@Env:Production //@Editable:No
See the ShareScript Language Reference for more information about both these directives.

ShareScript User Guide 32
Section 6 Columns and Alarms
ShareScope’s alarm system uses ShareScript columns as the basis for custom alarms.
ShareScope will calculate the column’s value for each share and will generate an alert when
an instrument’s column value meets certain criteria (such as being above or below threshold
values).
Any ShareScript column can also be used as an alarm, so if you haven’t already done so, you
should read the earlier sections of this guide that relate to programming columns. You can use
all the techniques described earlier, irrespective of whether your column is to be used as a
normal column or as an alarm.
Having said that, not every column script will necessarily be useful as a source of alarms, and
it can often be worth modifying the behaviour of column scripts so they work better when
used as alarms. We’ll learn more about this in this tutorial.
The Different Types of Alarm
In an earlier section, we saw how we could use the //@Update: directive to tell
ShareScope how often the values of a ShareScript column should be re-evaluated. By default,
ShareScope assumes that your column uses only the historical price database, and will only
re-evaluate the column when you do an end-of-day database update. If you need a column to
be re-evaluated more often, we saw how you could use the intraday or periodic update
directives to achieve this.
This behaviour carries over into ShareScript alarms just as you might expect. By default,
column scripts will be considered to be end-of-day alarms, and are tested only after an end-of-
day database update. However, scripts containing an //@Update:Intraday or
//@Update:Periodic directive will be considered to be intraday alarms, and re-checked
at the requested interval.
Note that the //@Update directive only determines when ShareScope will re-check the
alarm – there is nothing to stop you using historical price data in an intraday alarm script, or
vice-versa.
With that brief introduction, let’s develop a working alarm from scratch.
Developing a ShareScript Alarm
Over the next few pages, we’ll work through the development of a MACD cross alarm which
adds to ShareScope’s built-in MACD alarm functionality.
With the built-in MACD alarms, you have two options. The end-of-day MACD alarms can
alert you when the historical data (i.e. closing price history) contains a new MACD cross.
This alert will trigger when you do a database update after the market closes.
Alternatively, you can use intraday MACD alarms to alert you as soon as the intraday data
(e.g. 5 minute bars) generates an MACD cross.
In this tutorial, we’ll create a MACD alarm which uses the historical close prices (i.e. a daily
MACD), but also uses the latest intraday mid-price as the final data point, and thus will act as
an ‘early warning’ alarm that a cross is likely to have occurred when the share closes.
We’ll start by making a column that simply calculates the MACD using the historical
database, and returns 1 if the main line has just crossed above the signal line (regarded as a
bullish signal):
//@Name:MACD Alarm
//@Description:Return 1 if MACD crossed above signal
//@Returns:Number

ShareScript User Guide 33
function init()
{
}
function getVal(share)
{
var macd = new MACD(13, 26, 9);
var data = share.getCloseArray();
if (data.length < 2)
return 0;
// process all but the last close
for (var i=0; i<data.length-1; i++)
macd.next(data[i]);
var isAbove1 = macd.getMain() > macd.getSignal();
// now process the last close
macd.next(data[data.length-1]);
var isAbove2 = macd.getMain() > macd.getSignal();
if (!isAbove1 && isAbove2)
return 1;
else
return 0;
}
Notice that we haven’t specifically added an Update directive, so we will get the default
behaviour of a column, which is to only recalculate the values when the historical database is
updated (an “end-of-day” alarm). This is fine, since we’re only using the historical data in our
calculations at the moment.
You can try out the above script by either adding it to a list table like a normal ShareScript
column (this is often the easiest way to test alarm scripts when you develop them) or you can
add it as a ShareScript alarm.
For the purposes of this tutorial, try adding the script as an end-of-day alarm to the FTSE 100
list. After you’ve chosen the script, you will be prompted to specify threshold values (as in
the illustration below). If the value returned by the getVal() function for a share is above
or below these thresholds then the alarm is considered to have triggered for that share.
To use the script as an alarm, set the high threshold to 1 and leave the low threshold unticked.
Now when the script outputs 1 (indicating a cross) an alert will be generated.
Be aware that ShareScope will only re-check the end-of-day alarms when the update data
command actually downloads some updates to your database. So if you’ve already got the
latest database updates, clicking the Update Data button (F9) will not run your alarm script.
Fortunately, it’s possible to run any new end-of-day alarms manually by selecting the Run
end-of-day alarms now command from the Edit menu.
Press F9, or run the alarm manually now. Assuming some shares have a recent MACD cross,
you should see a list of alerts.
Note that the script above doesn’t implement any form of ‘checking back’. ShareScope’s built-in alarms can automatically ‘check back’ to find crosses that have occurred at any date since you last updated your database. If we wanted this functionality in the above script, we might implement it by storing the last FTSE100 date in the storage area, then checking it the next time the script is run and looking for any cross in the time period since the previous update.

ShareScript User Guide 34
Setting the Default Thresholds
We can make life easier for the user of a script by supplying default threshold values as
directives in the script. Add the following directive to set a default high threshold value:
//@DefaultRangeMax:1
And if you need it, you can also set a default low threshold value with:
//@DefaultRangeMin:-1
Try adding these directives to the script above and notice how the values are automatically set
when you use the script as an alarm (they have no effect when you use the script as a normal
column).
For many alarms, including the one we are developing here, the output is simply 1 or 0, and
it’s not useful to allow the user to specify thresholds. We can tell ShareScope we are going to
use this standard form of alarm output and the user will not be asked to supply thresholds:
//@StandardAlarmOutput:Yes
When this directive is used, note that the alarm will actually trigger for any return value that
is not zero (and not null).
Columns that return text output (//@Returns:Text) also do not prompt the user for
thresholds. In this case, the alarm will trigger if you return a non-empty string. We’ll talk a bit
more about how this type can be useful near the end of this section.
Making the MACD Alarm Include Intraday Data
Now that we’ve looked at the new directives available for ShareScript columns when being
used as alarms, let’s return to our MACD script and make it include the latest intraday mid
price in the calculation. Delete your old end-of-day alarm, and then modify your script so it
matches the one below (the lines that have been changed are marked with different shading):
//@Name:Intraday MACD Alarm
//@Description:Return 1 if MACD crossed above signal
//@Returns:Number
//@StandardAlarmOutput:Yes
//@Update:Periodic,60
function init(status)
{
}
function getVal(share)
{
var macd = new MACD(13, 26, 9);
var data = share.getCloseArray();
var mid = share.getIMid();
if (data.length < 1 || !mid)
return 0;
// process all the historical data
for (var i=0; i<data.length; i++)
macd.next(data[i]);
var isAbove1 = macd.getMain() > macd.getSignal();
// now process the mid price
macd.next(mid);
var isAbove2 = macd.getMain() > macd.getSignal();
if (!isAbove1 && isAbove2)
return 1;
else
return 0;
}

ShareScript User Guide 35
First, notice that we’ve specified an update directive so that ShareScope will recalculate the
column (i.e. test the alarm) every 60 seconds. We’ve also specified that the script produces
the standard alarm output of zero or non-zero so the user doesn’t need to supply thresholds
when they use the script as an alarm.
The body of the script is pretty similar, except we now process all the historical data through
the MACD, then add in the latest mid price and see if a cross has occurred.
Add this new alarm to the FTSE100 list (ShareScope will automatically detect that it is an
intraday alarm, when it reads the //@Update directive in the script). Notice how the user
isn’t prompted for any thresholds now that we have added the
//@StandardAlarmOutput directive.
Assuming you are connected to the intraday data feed (and have backfilled), ShareScope will
now start checking your script by calling getVal() for each share every minute. Hopefully
you’ll see some alerts!
Triggering and Re-triggering
If a share causes the alarm to trigger, you should see a popup alert like the one shown below
on the right. The alert will also be shown in ShareScope’s alerts view (below left).
Once an alarm has triggered for a share, ShareScope will not re-test or re-trigger the alarm
(for that share) until you acknowledge the alert. You can acknowledge the alert by clicking
OK on the alert popup, or from the context menu of the alerts view. Once the alert is
acknowledged then ShareScope will start re-checking the alarm, and it will trigger again if the
alarm condition remains met.
There are two ways to prevent intraday alarms re-triggering. The easiest is simply to leave the
alerts unacknowledged (click Cancel on the alert popup).
Alternatively, we can add logic to the script to ensure that the getVal() function will return
1 only a single time when the alarm condition is met, perhaps with some additional logic to
allow it to ‘reset’ and re-trigger again at some point in the future. This will require us to add a
per-share ‘memory’ to the column, which is a useful technique to introduce.
Once we’ve added this capability to the script, a number of possibilities are open to us. For
example, we can have the alert trigger a single time after a cross, but allow it to re-trigger
again should the MACD cross back, and then re-cross. Alternatively, we could ‘reset’ the
alarm when a new day begins, so the script will only alert once for each share every day.
The basic technique here is for the script to remember (on a per-share basis) if the alarm has
triggered (i.e. we’ve returned 1 from the getVal() function), and then to not trigger again
any subsequent time getVal() is called for that share, at least until some other condition is
met.
We can do this by using the column object methods: setValueForShare() and
getValueForShare(). These methods allow the column to store a value against any
share for subsequent retrieval later (see the ShareScript Language Reference for more
information about these column object methods).

ShareScript User Guide 36
//@Name:Inraday MACD Alarm
//@Description:Return 1 if MACD crossed above signal
//@Returns:Number
//@StandardAlarmOutput:Yes
//@Update:Periodic,60
function init(status)
{
}
function getVal(share)
{
var macd = new MACD(13, 26, 9);
var data = share.getCloseArray();
var mid = share.getIMid();
if (data.length < 1 || !mid)
return 0;
// process all the historical data
for (var i=0; i<data.length; i++)
macd.next(data[i]);
var isAbove1 = macd.getMain() > macd.getSignal();
// now process the mid price
macd.next(mid);
var isAbove2 = macd.getMain() > macd.getSignal();
var shouldAlert = !isAbove1 && isAbove2;
// check to see if we already triggered
var alreadyAlerted = getValueForShare(share);
if (shouldAlert && !alreadyAlerted)
{
setValueForShare(share, true);
return 1;
}
if (!shouldAlert && alreadyAlerted) // 'reset' the alarm
setValueForShare(share, false);
return 0;
}
Our script will now cause the alarm to trigger when the MACD crosses above the signal line,
and it will only trigger again for the same share if the MACD crosses back below, then back
above the signal line again.
When we call getValueForShare(), the possible return values are (i) undefined – if a
cross has never been found for that share (ii) true – if we have found a cross, or (iii) false – if
we have found a cross previously, but then it crossed back below. Usefully, we can rely on
the fact that the expression “!alreadyAlerted” will evaluate to true in the case where
alreadyAlerted is either undefined or false.
The technique we’ve introduced here allows you to code the re-triggering behaviour of your
scripts in a way that is appropriate to the type of alarm you are creating.
As an exercise, you may wish to try coding a %change intraday alarm that alerts if a share
goes up 5% from the previous close. You could then try modifying the script so it will re-
trigger only if the share goes up another 5% from the point where it previously triggered.
Instead of storing a boolean value against a share, you would instead store a number,
representing the price of the last alert.
Detecting When A Script Is Used As An Alarm
By restricting the conditions when getVal() will return 1 in the above example, we’ve
made the script more useful as an alarm. However, we’ve also made the script less useful as a
general column you might add to a list table, since it will only output 1 a single time at the
moment the cross occurs, then will revert to returning 0. If you look away, you might miss it!
Fortunately, it’s possible to make a single script behave usefully in both contexts. The column
property “isAlarmContext” will be set to true only if the column object was created by

ShareScript User Guide 37
ShareScope for use as an alarm, and false otherwise (i.e. when used in a list, details or data-
mining).
We can use this property as follows:
function getVal(share)
{
// [calculations go here]
if (isAlarmContext)
// return something
else
// return something else
}
Multiple Outcomes
ShareScope will simply tell you an alarm has triggered when you are using the standard alarm
output directive.
If you don’t use this directive, ShareScope will tell you the column value, and additionally
whether it has breached the high or the low threshold set for the alarm. This is useful for
scripts that are looking for deviations from a norm in either direction, since you can
immediately see from the alert which threshold was breached.
If you want to report more than two types of outcome, or a numeric return value does not
relate well to the type of thing you are trying to detect (e.g. a script looking for different types
of candlestick pattern), then you can use a text return value.
When a script returns a text value, the alarm will be triggered if getVal() returns any non-
empty string. Furthermore, the returned string will be displayed to the user as the alert. The
(incomplete) example below illustrates this type of design:
//@Name:Another alarm example
//@Returns:Text
function getVal(share)
{
// [calculations go here]
if (conditionA)
return ">Detected condition A"; // show alert using price up colour
if (conditionB)
return "Detected condition B"; // show alert using normal colour
return;
}
You can also indicate to ShareScope whether to use the price up (green) or price down (red)
colour for the alert, by starting a returned string with either a “>” or “<” character. This
character will not be displayed in the alert message itself – it is simply used to indicate the
alert colour (“>” = up, “<” = down). If the returned string doesn’t start with either of these
characters, ShareScope will use the colour specified by the user when the alarm was added.
Exercises
• If you haven’t already done so, try coding the %change alarm described above.
• Then add a dialog so the 5% threshold can be easily changed, using the storage area to
retain the value.
• Finally, once you’ve got the above examples working, use the “isAlarmContext” property
so that, when used as a normal column, no dialog is displayed and the column will simply
show the actual %change values.

ShareScript User Guide 38
Section 7 Indicators – The Basics
Creating an indicator is similar to creating a column. If you haven’t already read through
section 3 (Columns – The Basics) it would be good to do that now, since we will be building
on the principles we have already learned.
In this example, we will attempt to build a trend indicator, which should have the following
behaviour:
The trend will be up if the current close is greater than the average of the previous five
closes.
To get started, switch to a historical graph. We’ll add our indicator in a box of its own under
the main graph for now, so select the Add Indicator sub-menu and select ShareScript
Indicator.
In the ShareScript Indicator dialog box, click on the New Script button. Give the file a
name (e.g. “my trend”). ShareScope will create the new file, and create a basic indicator script
for you (as we saw in an earlier section).
Go to the top of the file, and change the name directive to match the line below and save the
file, but leave your editor window open for now.
//@Name:My Trend Indicator
Before we get started on our trend indicator, lets have a look at the ShareScript code that has
been created for us, and discuss some of the concepts involved in creating an indicator:
function getGraph(share, data)
{
var output = new Array();
for (var i=0; i<data.length; i++)
{
output[i] = 0;
}
return output;
}
The getGraph() function is where you calculate the indicator values, and return the data to
ShareScope (similar to the getVal() function in a ShareScript column). ShareScope passes two
parameters to the getGraph() function. These are stored in the variables named between the
brackets after the function name (in this case “share” & “data”).
• the first parameter is the Share object that ShareScope needs the indicator calculated for.
In the code above, the Share object is placed in a variable named “share”.
• The second parameter is an array of PriceData objects that correspond to the bars on an
OHLC graph. In the code above, this array is placed in a variable named “data”.
The PriceData Array
Understanding the array of PriceData objects that is passed to the getGraph() function is key
to understanding ShareScript indicators.
A PriceData object represents a single price bar. It has properties that give the opening price
of the bar, the high and low prices, and the closing price of the bar. Other properties give the
volume of shares traded, and the date of the bar.
Let’s explore PriceData objects using the console. Close your text editor window for now
(make sure you save your script if you didn’t earlier), and cancel the ShareScript Indicator
dialog. Open the console window and type the following:
var x = getShare("LSE:LLOY");
var p = x.getPrice();

ShareScript User Guide 39
Now type “p” to see what kind of thing we’ve made:
>p
[object PriceData]
The getPrice method returns a PriceData object for the most recent day in the database. How
can we see what properties this object has? One way is to look up PriceData objects in the
reference guide. You could also try typing the following:
for (var i in p) print(i);
You should now see the following properties listed:
open
high
low
close
volume
adjustment
date
dateNum
timeNum
isOHLCV
So how do we access the values of these properties? It’s very easy - let’s look at the closing
price by typing:
p.close
and you should see the value printed to the console. Try looking at the values of some of the
other properties.
Now, let’s make an array of PriceData objects, like the one that is passed to our indicator.
Type:
p = x.getPriceArray()
Now p is an array of PriceData objects, one for each day in the instruments history. We can
find out how many records we have by using the built-in length property of an array:
>p.length
2988
So, in the example here, our array contains almost 3000 PriceData records, each individually
recording the price and volume data for that day. We can index into the array and pick out the
earliest and latest records like this:
>p[0]
[object PriceData]
>p[2987]
[object PriceData]
Notice how the latest record is indexed as length-1. This is because array numbering starts at
zero. Finally, lets see how to combine the array indexing with the PriceData property names
and pick out volume and date values from the middle of the array:
>p[2123].volume;
38780000
>p[2123].date;
Wed May 26 2004 00:00:00 GMT+0100 (GMT Daylight Time)
Back to our Indicator
Let’s close the console now, and return to our indicator. Go back to the ShareScript
Indicator dialog.
The contents of the PriceData array passed to an indicator depends on the indicator Data
Source that is selected on the ShareScript Indicator dialog when you add an indicator:

ShareScript User Guide 40
• If you select Daily, the array will contain a PriceData object for every day. i.e. the bar
length is one day.
• If you select Weekly, you will receive a much shorter array, since each PriceData object
will represent a whole week. i.e. the bar length is one week.
• If you select Graph Time Period, the bar length will be whatever is selected on the main
chart.
For now, just make sure the Data source is set to Daily. Select the script you created and then
click the Edit Script button so you can see your script again. Look at the getGraph() code:
function getGraph(share, data)
{
var output = new Array();
for (var i=0; i<data.length; i++)
{
output[i] = 0;
}
return output;
}
Recall that the second parameter passed to the getGraph() function is our array of PriceData
objects, which is stored here in a variable called “data”.
If you study the code above, you can see that it doesn’t yet make any use of the PriceData
array, other than measuring its length, and using this to create an output array of the same
length.
Indicator Output
We’ve looked at the input data to the indicator, now let’s see how we pass data back to
ShareScope. The key concept is this:
For every bar in the input data, we need to return a corresponding indicator value.
We do this by returning an array of values, which must have the same length as the PriceData
array passed to the getGraph() function. Each value in the array we return will be plotted as
the indicator value on that day.
In the code above, we do this by creating an output array, then indexing over each element of
the output array and setting it to zero. We stop when the output array is the same length as the
input data. This output array is then returned to ShareScope.
Add the indicator now if you like, and notice how we get an indicator box below the main
graph, and that the indicator is a flat line at 0. The (Daily) in the title tells us that the data
source is correctly set to daily bars.
Doing Something Useful
This is pretty unexciting. Lets start using the PriceData array to make our indicator do
something a bit more useful. Right click on the indicator, and select Edit Indicator, then My
Trend Indicator (or, as a shortcut, double-click on the indicator title at the top-left of the
indicator box seen above). Click on Edit Script to bring the code back up (if you closed your
editor).
Remember that we are creating a script that will make an indicator that behaves as follows:

ShareScript User Guide 41
The trend will be up if the current close is greater than the average of the previous 5
closes.
Let’s make the changes required to do this, then we’ll discuss how it works. Edit your
getGraph() function, so it looks like the one below. The lines you need to change or add are
marked in darker grey this time.
function getGraph(share, data)
{
var days = 5;
var output = new Array();
for (var i = days; i < data.length; i++)
{
var total = 0;
for (var x = i-days; x < i; x++)
total += data[x].close;
if (data[i].close > total/days)
output[i] = 1;
else
output[i] = 0;
}
return output;
}
Let’s look at how this works.
• We’ve created a variable called “days”. This is the number of previous days that we
calculate the average price over. We set this to five.
• Our loop variable “i” starts at the value of “days”, rather than 0 since we can’t calculate
the indicator on days 0, 1, 2, 3 or 4 because there would not be enough previous closing
prices. If we don’t initialise an element of the output array, its value will be undefined.
This is okay, since ShareScope simply will not plot these values.
• For each indicator value, we set the “total” variable to 0. This is used to accumulate the
closing prices of the previous 5 days. Variable “x” is used to index over these previous
prices. We then divide “total” by “days” to get the average closing price of the previous 5
days.
• For each indicator value, this average is compared to the closing price of the bar in
question, and the output value set to 1 or 0 as appropriate.
Let’s see how this looks. Once you’ve made the changes above, save the file (but leave it
open) and click OK to replace the indicator with the new version. If you zoom in using the
mouse so you can only see about 6 months of history, you should see something like this:

ShareScript User Guide 42
As an indicator, it’s probably less than perfect, but you can see that the indicator value is
broadly 1 when the share is in an up-trend, and 0 otherwise.
If you get an error message on the console, try to find the mistake in your code by comparing
it to the code on the previous page. The line number reported on the console should help you
find the offending line.
Assuming you’ve got that working, let’s see how we can improve the appearance of the
indicator.
Changing the Appearance
ShareScript allows you to change the way data is plotted. At the moment, the style of the plot
is more suited to an indicator that changes value slowly, rather than one that is either up or
down.
Modify the init() function as follows:
function init()
{
setSeriesColour(0, Colour.LightBlue);
setSeriesChartType(0, ChartType.Block);
}
Then save the file, and replace the indicator (a quick way to do this is by right-clicking on the
indicator title, and selecting Refresh Script from the short context menu). You should now
see an indicator that looks something like the following (if you zoom in a bit).
This is a much more appropriate appearance for this type of indicator. Finally, let’s see how
to place this on the main graph, so the up-trend periods can easily be compared with the price
graph.
Remove the indicator from below the graph (either by right-clicking and selecting Delete
Indicator) or by clicking the little cross in the top right corner.
Now right-click on the graph and select Other main graph features, then Add ShareScript
Indicator… Select My Trend Indicator, then click OK. You should now see something like
the following:

ShareScript User Guide 43
What Next?
Hopefully this tutorial has given you enough information to get started writing ShareScript
indicators yourself. The ShareScript Language Reference contains full information about the
various methods and objects we have used. A good place to start would be to read the section
on Indicator objects.
In the next section we’ll look at how to add a dialog box to our indicator, to allow the user to
specify how many days to average over for the trend calculation. This is more advanced, and
beginner programmers may wish to develop some experience before moving on to this
section.
You might try looking at the code for some of the examples supplied with ShareScope. These
vary in complexity, with some being easier to follow than others.
Finally, the ShareScript forum is intended to get ShareScript users exchanging ideas and
helping each other. Don’t be afraid to ask questions, even if you get stuck on the basics.
Further Exercises
• Try changing the “days” variable to a value longer than 5. See what effect it has on the
behaviour of the indicator.
• Look up setSeriesChartType() in the ShareScript Language Reference (it’s in the
Indicator section) and see what other chart types are available. Try them out to see how
they change the appearance of your indicator.
• In the getGraph() function, try setting the Indicator name (see Indicator.setTitle() in the
ShareScript Language Reference) to show the value of data.length. Observe how it
changes when you change share, and what happens when you change the indicator Data
Source from Daily to Weekly or Graph Time period.

ShareScript User Guide 44
Section 8 Advanced Indicator Techniques
This tutorial is aimed at users already quite comfortable with the language. It follows on from
the previous tutorial where we developed a custom trend indicator. This tutorial will show
you how to use dialog boxes so the user can input parameters for an indicator. Before you
start, you should be familiar with the material in all the previous sections, especially Section 5
(Advanced Column Techniques) since most of the objects we will be using in this tutorial
were introduced there.
In the last section, we developed a custom trend indicator which marked the trend as up if the
price was above the average of the previous 5 days closing prices, and down otherwise. We’ll
see in this section how we can add a dialog box to our trend indicator which will allow the
user to specify how many days to average over, rather than always using 5.
Let’s start by reviewing the script as it stood at the end of the last tutorial:
//@Name:My Trend Indicator
//@Description:Custom trend indicator
function init()
{
setSeriesColour(0, Colour.LightBlue);
setSeriesChartType(0, ChartType.Block);
}
function getGraph(share, data)
{
var days = 5;
var output = new Array();
for (var i = days; i < data.length; i++)
{
var total = 0;
for (var x = i-days; x < i; x++)
total += data[x].close;
if (data[i].close > total/days)
output[i] = 1;
else
output[i] = 0;
}
return output;
}
If you still have the indicator added to your main graph (from the last tutorial), remove it for
now, then add it again in an indicator window below the main graph. Leave the source code
open, ready for editing (when you’re developing an indicator, it is easier to have it added in
an indicator window, rather than on the main graph, since the Refresh Script command is
available from the context menu obtained by right-clicking on the indicator title at the top-left
of the window).
The procedure for adding a dialog box to a ShareScript indicator is essentially the same as
when we added one to a column. The init() function is passed a status value by ShareScope
that tells you the circumstances under which your indicator is being initialised –
(i) If the user is adding the indicator to a chart, we want to display a dialog with the
default parameter values, then store them in the indicator storage area so they will
be preserved even when the user quits ShareScope.
(ii) If the user is editing the indicator (this behaviour is triggered by editing a
ShareScript indicator, then by selecting the same script), we want to retrieve any
stored values and initialise the dialog appropriately, storing the new values
afterwards.

ShareScript User Guide 45
(iii) If the indicator is loading, we simply retrieve any stored values (and don’t
display a dialog box).
In order to make your script behave in this way, make the following changes (note that we’ve
also moved the declaration of the days variable so it becomes a property of the indicator,
rather than a local variable in the getGraph function):
//@Name:My Trend Indicator
//@Description:Custom trend indicator
var days = 5;
function init(status)
{
if (status == Loading || status == Editing)
days = storage.getAt(0);
if (status == Adding || status == Editing)
{
var dlg = new Dialog("Custom Trend Indicator", 200, 45);
dlg.addOkButton();
dlg.addCancelButton();
dlg.addIntEdit("days",-1,-1,-1,-1,"Length","days",days,2,1000);
if (dlg.show() == Dialog.Cancel)
return false;
days = dlg.getValue("days");
storage.setAt(0, days);
}
setSeriesColour(0, Colour.LightBlue);
setSeriesChartType(0, ChartType.Block);
setTitle("Custom Trend "+days);
}
function getGraph(share, data)
{
var output = new Array();
for (var i = days; i < data.length; i++)
{
var total = 0;
for (var x = i-days; x < i; x++)
total += data[x].close;
if (data[i].close > total/days)
output[i] = 1;
else
output[i] = 0;
}
return output;
}
Once you have modified the script, right click on the indicator title and select Refresh Script
from the context menu. If there are any errors, correct them, then select Refresh Script again.
Note that the Refresh Script command is equivalent to removing and then adding the
indicator. The status passed to the init() function will therefore be Adding, and the storage
area is empty.
When it is working properly, you should see a dialog asking for a length in days. Enter a
value (e.g. 6), and the appropriate indicator should be displayed.
Try editing the indicator (either double-click the title, or right-click on the title and select Edit
from the context menu). Leave the script unchanged in the ShareScript indicator dialog, hit
OK, and you should see the dialog we’ve created, already initialised to the correct value.
Finally, try quitting ShareScope and reloading it. Notice how the indicator is initialised with
the correct length.
There’s a lot more we could do to improve this indicator, see the exercises for some
suggestions.

ShareScript User Guide 46
Historical and Intraday Chart Indicators
ShareScope allows you to add any ShareScript indicator to either Historical or Intraday
charts. Most indicators you write will work equally well on either type of chart.
However, a few indicators you write may be specifically designed to run on a specific chart
type. e.g. you might write a Historical chart indicator that incorporates company results (say
profits) across a long time period, and want to prevent the user from adding this indicator to
an Intraday chart (since these typically only display a few days at a time).
One way we can do this using the isIntraday property of the indicator object, and returning
false from the init() function to prevent the indicator being added:
function init(status)
{
if (status==Adding && isIntraday)
{
// display a dialog with just a cancel button
return false;
}
}
Alternatively, you can use the following directive to tell ShareScope that your chart is only
designed for use on historical charts:
//@Type:Historical
or only designed for use only on intraday charts:
//@Type:Intraday
Using either of these directives will prevent your indicator from being shown or selected in
the Add ShareScript Indicator dialog.
Further Exercises
• We have made the assumption that the data array passed to our indicator represents daily
bars. However, the period length may be different if the user changes the data source
(from the ShareScript Indicator dialog), or adds this indicator to an Intraday chart. We
should fix this – change the name of the “days” variable to “periods”, and change the
dialog box so it shows “periods” instead of “days”.
• Try adding a colour picker to the dialog, and using the value to set the colour for the data
series. Store the colour in the next available slot of the storage area.

ShareScript User Guide 47
Section 9 Chart Studies – The Basics
This tutorial will introduce you to programming your own ShareScript chart studies. Many of
the concepts are similar to those we’ve introduced in the previous tutorials so it is worth
reading through these earlier sections if you haven’t already done so.
We’ll start by looking at a working example of a ShareScript study which will simply change
the colour of the bars on the chart depending on the relationship between the open and closing
price of each bar.
Getting Started
Studies can be applied to both historical and intraday charts, but we’ll work through this
tutorial using a historical chart. First change to a historical graph setting you’re not using,
and, from the context menu, select Graph Design (we’re going to change the chart style to
make it easy to see what the study is doing). In the Price tab, select a Candlestick display
and set the Price colour to be a Single colour (e.g. black). In the Time tab, choose 1 month
bars. You should now have a chart showing a set of black candlesticks with one bar per
month.
Now we’ll add a ShareScript study. Select Other Main Graph Features > ShareScript
Studies… from the context menu, then click Add on the dialog that follows. Click the New
Script… button, and give the file a name (e.g. “Tutorial1”).
We’re going to modify the template file ShareScope provides. First, change the name
directive at the top of the file to match the one shown below.
You can delete all of the functions and comments except for onBarClose(). We’ll learn about
the other functions later. Finally, modify the function that remains so that your file looks like
the script below:
//@Name:Tutorial1
//@Description:Example
function onBarClose()
{
if (bar.close > bar.open)
bar.colour = Colour.Green;
else
bar.colour = Colour.Red;
}
Save Tutorial1.ss, but leave the file open so you can refer to the code easily as we discuss it.
Then return to ShareScope and click the OK button on the Add ShareScript Study dialog to
add the new study to your chart.
You should now see the bar colours change to red and green, with bars marked in green
where they close higher than their open (rising candles), and in red where they close below
their open (falling candles).
If there is an error in your code, you will see “(failed)” in the study’s panel at the top left of the chart. If that happens, refer to the console to find the line number of the error. When you have fixed the error in your script and saved the file, you can then select Refresh Study from the panel context menu to quickly re-load the script.
Examining the Code
Our study consists of a single function, onBarClose(). ShareScope calls a study’s
onBarClose() function once for each complete bar on the chart, starting with the oldest bar
and ending with the newest bar. So, for a typical chart, the function will be called many tens
or hundreds of times before the chart is drawn.
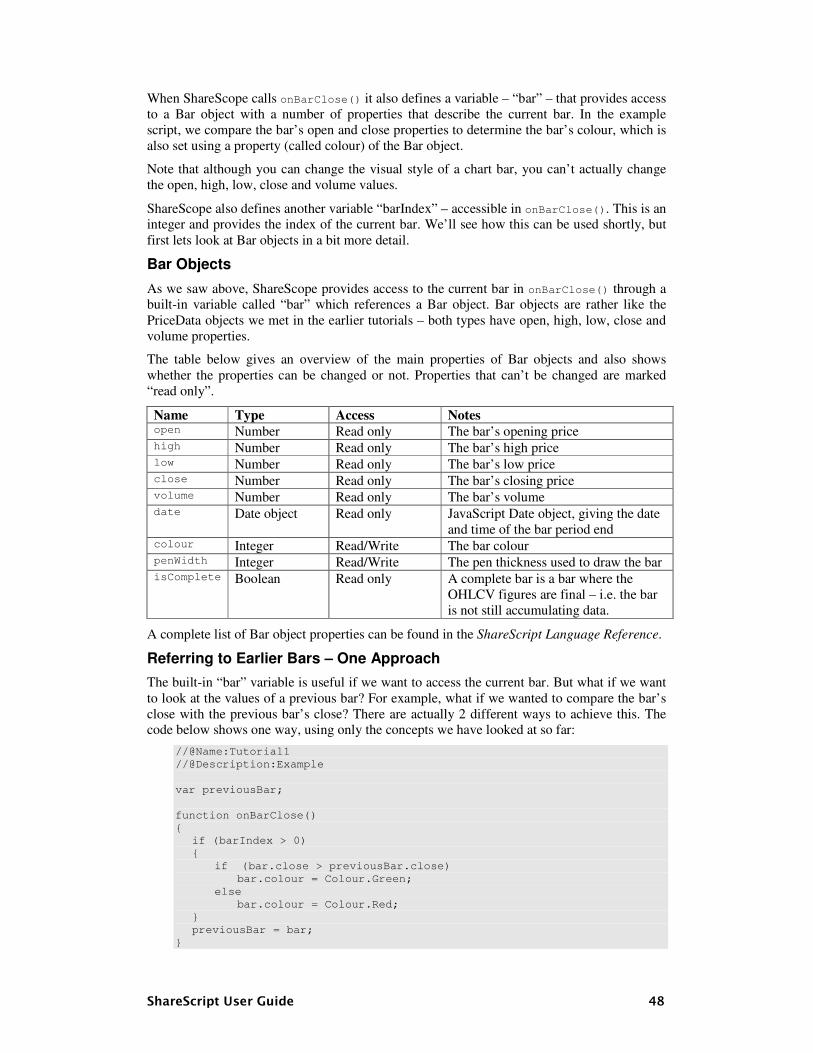
ShareScript User Guide 48
When ShareScope calls onBarClose() it also defines a variable – “bar” – that provides access
to a Bar object with a number of properties that describe the current bar. In the example
script, we compare the bar’s open and close properties to determine the bar’s colour, which is
also set using a property (called colour) of the Bar object.
Note that although you can change the visual style of a chart bar, you can’t actually change
the open, high, low, close and volume values.
ShareScope also defines another variable “barIndex” – accessible in onBarClose(). This is an
integer and provides the index of the current bar. We’ll see how this can be used shortly, but
first lets look at Bar objects in a bit more detail.
Bar Objects
As we saw above, ShareScope provides access to the current bar in onBarClose() through a
built-in variable called “bar” which references a Bar object. Bar objects are rather like the
PriceData objects we met in the earlier tutorials – both types have open, high, low, close and
volume properties.
The table below gives an overview of the main properties of Bar objects and also shows
whether the properties can be changed or not. Properties that can’t be changed are marked
“read only”.
Name Type Access Notes open Number Read only The bar’s opening price high Number Read only The bar’s high price low Number Read only The bar’s low price close Number Read only The bar’s closing price volume Number Read only The bar’s volume date Date object Read only JavaScript Date object, giving the date
and time of the bar period end colour Integer Read/Write The bar colour penWidth Integer Read/Write The pen thickness used to draw the bar isComplete Boolean Read only A complete bar is a bar where the
OHLCV figures are final – i.e. the bar
is not still accumulating data.
A complete list of Bar object properties can be found in the ShareScript Language Reference.
Referring to Earlier Bars – One Approach
The built-in “bar” variable is useful if we want to access the current bar. But what if we want
to look at the values of a previous bar? For example, what if we wanted to compare the bar’s
close with the previous bar’s close? There are actually 2 different ways to achieve this. The
code below shows one way, using only the concepts we have looked at so far:
//@Name:Tutorial1
//@Description:Example
var previousBar;
function onBarClose()
{
if (barIndex > 0)
{
if (bar.close > previousBar.close)
bar.colour = Colour.Green;
else
bar.colour = Colour.Red;
}
previousBar = bar;
}

ShareScript User Guide 49
We have declared a variable “previousBar” outside of any function. This makes it a property
of the study with a lifetime beyond that of any individual function call.
The first time onBarClose() is called, barIndex will be 0 which means the first bar’s colour
will not be changed. Before onBarClose() ends, we make “previousBar” equal to the current
bar allowing us to refer to the previous bar in a subsequent call to onBarClose().
As an aside, you might expect we could use the following test to avoid referencing an
undefined “previousBar.close” for the first bar:
if (previousBar != undefined)
Rather than the one we actually used:
if (barIndex > 0)
Although checking to see whether previousBar is defined will work fine the first time a chart
is drawn, it will fail with an error when you change the charted instrument (try it) – this is
because the study object that “previousBar” belongs to has a lifetime beyond that of an
individual chart. Therefore, when you change the current share, the “previousBar” variable
still refers to the last bar of the previous chart – which is no longer accessible (there’s a very
easy way to solve this problem – we’ll deal with this at the start of the next chapter).
Built-in Variables - bar, bars[] & barIndex
Lets now look at an alternative approach which uses some of the other built-in variables
available in studies.
We’ve already seen the “bar” and “barIndex” variables available in onBarClose().
You can also access the complete set of bars that make up the chart using the “bars” array.
Each element of this array is a Bar object representing a single bar on the chart. The first bar
is bars[0] and the last bar is bars[bars.length-1].
In onBarClose(), the “barIndex” variable gives the index of the current bar in the “bars” array. Thus the bars and barIndex variables are closely related. In fact,
“bar” is just a shorthand way of saying bars[barIndex].
Having seen this, we can now write our previous bar example in a different way, using the
new variables we’ve just learnt about:
//@Name:Tutorial1
//@Description:Example
function onBarClose()
{
if (barIndex == 0) return; // do nothing to the first bar
if (bar.close > bars[barIndex-1].close)
bar.colour = Colour.Green;
else
bar.colour = Colour.Red;
}
Notice how we just return immediately for the first bar (index 0) – we can’t compare its close
to a previous bar’s close – there is no previous bar! If this test wasn’t present, the script would
try to access bars[–1].close, which would generate an error since –1 is not a valid array index.
More About the onBarClose() Function
onBarClose() is called for each complete bar on the chart. A complete bar is one where the
OHLCV values are fixed i.e. bar is not still accumulating data.
Normally, with historical charts, every bar is complete. The only exception is when you have
chosen to Include latest intraday price (the option is in Graph Design, Price tab). If you

ShareScript User Guide 50
switch on this option now (during market hours) you may notice the last bar on your chart is
not coloured. Why?
When this option is enabled, the last bar on the chart includes today’s current intraday
OHLCV values. This last bar is still accumulating values and is a partial bar rather than a
complete bar. It will become complete when the final closing price is announced over the
intraday feed (around 4.35pm for LSE stocks). Only at the point will ShareScope call
onBarClose() for that bar.
Intraday charts work in a similar manner. When first drawing the chart, ShareScope will call
onBarClose() for all the complete bars that already exist in your intraday database. It will not
call onBarClose() for the right-most bar that is still accumulating data (during market hours).
As new bars complete every minute or so (depending on the chart period length selected) it
will call onBarClose() again, for each new complete bar.
You may be wondering if you can access the data in an incomplete (or partial) bar. The
answer is yes. The last bar is present in the bars array whether it is complete or not. You can
also check whether it is complete using the expression:
bars[bars.length-1].isComplete // true if complete, false if partial
We’ll return to the issue of partial bars and intraday updates to the bar data later in the next
section of this tutorial.
Further Exercises
• Try changing the bar colours such that bars are blue if they are above a moving
average, and red if they are below. Add a MA to the chart to see if your bar colouring
works. Hint – you will need to declare a variable outside of any function for the
moving average object. You will also need to create a new MA object in
onBarClose() whenever barIndex == 0.

ShareScript User Guide 51
Section 10 Chart Studies – Structuring Your Script
If you attempted the exercise at the end of the last section (colouring bars based on whether
they close above or below a moving average), you hopefully ended with a script something
like this:
//@Name:Tutorial2
//@Description:Example
var ma;
function onBarClose()
{
if (barIndex == 0)
ma = new MA(20, MA.Simple);
var maVal = ma.getNext(bar.close);
if (bar.close > maVal)
bar.colour = Colour.Blue;
else
bar.colour = Colour.Red;
}
If you didn’t do the exercise, then try out this script now, naming the file “Tutorial2”.
The key thing to note about the code is that we have to reset the MA object in the first bar of
every chart (when barIndex is 0). This is because the lifetime of the study (and therefore the
ma variable that belongs to it) is greater than a single chart.
Rather than having to put this logic in onBarClose(), wouldn’t it be useful if there was a
function that was called whenever a new chart was about to be displayed? There is such a
function – onNewChart().
The onNewChart() Function
The onNewChart() function is called whenever ShareScope is about to draw a new chart. It is
called before any of the calls to onBarClose().
Let’s now rewrite the above example to make use of this function. Open “Tutorial2” in your
editor, add the onNewChart() function shown below, and modify the onBarClose() function,
removing the lines that are no longer necessary:
//@Name:Tutorial2
//@Description:Example
var ma;
function onNewChart()
{
ma = new MA(20, MA.Simple);
}
function onBarClose()
{
var maVal = ma.getNext(bar.close);
if (bar.close > maVal)
bar.colour = Colour.Blue;
else
bar.colour = Colour.Red;
}
ShareScope guarantees to call the onBarClose() function, in time order and without gaps, for every complete bar on the chart. This means we can safely process the bars using objects designed to work on sequential data (such as MA or Analytic objects) without worrying about input data being out of order.

ShareScript User Guide 52
Drawing the MA
It would be nice if we could see the MA line itself on the chart. We could add it to the chart
using ShareScope’s built-in moving average drawing. However studies offer a powerful set of
commands that allow us to do our own drawing on charts, so let’s try this instead.
Modify your script to include the new lines below (which are highlighted in a different
colour):
//@Name:Tutorial2
//@Description:Example
var ma;
function init()
{
setPenColour(Colour.Blue);
}
function onNewChart()
{
ma = new MA(20, MA.Simple);
}
function onBarClose()
{
var maVal = ma.getNext(bar.close);
if (bar.close > maVal)
bar.colour = Colour.Blue;
else
bar.colour = Colour.Red;
// plot the MA line
if (barIndex == 0)
moveTo(barIndex, maVal);
else
lineTo(barIndex, maVal);
}
Make the changes and refresh the study on your chart. You should see a blue MA line appear
on the chart, which should correspond with the changes in bar colouring.
Notice that we’ve added an init() function to our script. Like column and indicators scripts,
the init() function is only ever called once per study, when the study object is first created.
Here, we use it to set the pen colour for drawing. Now lets look at how drawing works.
Drawing and the Display List
ShareScript studies maintain a persistent list of graphic elements that have been added to the
chart (the “display list”). This list is cleared before onNewChart() is called – but otherwise
everything drawn on the chart will remain on the chart, unless explicitly removed by your
script.
Alongside the display list, a study also maintains a cursor position. The moveTo() command
moves the cursor to a specified point. The lineTo() command draws a line from the current
cursor to a specified point, moving the cursor to the new point afterwards. Both these
commands are used in the script above.
When onBarClose() is called for the first bar on the chart (index 0) we simply move the
cursor to the first computed MA value (variable “maVal”). For all subsequent bars, we draw a
line from the cursor to the next MA value.
Note that when onNewChart() is called (and the display list is cleared) the cursor position becomes undefined. You should always make sure your scripts explicitly set its position using moveTo() before relying on its location.

ShareScript User Guide 53
Specifying a Point on the Chart
A point on the chart is specified using an x-coordinate (date/time) and a y-coordinate (value).
There are actually 3 ways to specify the x-coordinate:
• A Date object e.g. moveTo(bar.date, bar.close)
• An array of 2 elements, with the dateNum and timeNum e.g. moveTo([bar.dateNum, bar.timeNum], bar.close).
• A bar index – where 0 is the centre of the left-most bar, 1 is the centre of the next bar,
etc. e.g. moveTo(barIndex, bar.close)
In the example above, we’ve used the last method. It’s the fastest and easiest way to specify
an x-coordinate and the positions are conveniently aligned with the bar centres.
Note that you can actually use a non-integer value for bar index when specifying an x-position. e.g. 0.5 is the position midway between the centres of bar index 0 and bar index 1.
The method you chose to specify a position will depend on what you are trying to do in your
script. It is often natural to use a bar index to specify the x-position. On the other hand, if you
are trying to plot financial results on the chart, and for each year you have a year-end date as a
Date object, then the Date object method is likely to be the most convenient.
You should be aware, however, that Date object based plotting is comparatively slow, and
you should avoid this method where possible when drawing hundreds of graphics elements.
Drawing in onNewChart()
So far, we’ve done all our drawing in the onBarClose() function. However you can actually
do drawing in any study function (except init() which is called when the study is first
created and before it is associated with any particular instrument’s chart).
The example below shows how we could rewrite our study by doing the drawing in
onNewChart():
//@Name:Tutorial2
//@Description:Example
function init()
{
setPenColour(Colour.Blue);
}
function onNewChart()
{
var ma = new MA(20, MA.Simple);
beginPath();
for (var i=0; i<bars.length; i++)
{
var maVal = ma.getNext(bars[i].close);
if (bars[i].close > maVal)
bars[i].colour = Colour.Blue;
else
bars[i].colour = Colour.Red;
if (i == 0)
moveTo(i, maVal);
else
lineTo(i, maVal);
}
endPath();
drawPath();
}

ShareScript User Guide 54
The “bar” and “barIndex” variables we used in onBarClose() are not available in
onNewChart(). However the “bars” array is, and we can use it to examine all the bars on the
chart.
We explicitly loop through all the bars in onNewChart() using “i” as the index of the current
bar– when we used onBarClose() this was effectively done for us behind the scenes, with
barIndex acting as the loop index.
We are also using three new drawing functions: beginPath(), endPath() and drawPath() –
these group a set of lineTo() commands together into a single graphical object. This allows
ShareScope to draw the MA line on the chart much more quickly.
Keeping Intraday Charts Up to Date
Soon, we’ll discuss why you might want to structure a study script in this way. But first we
need to fix a small problem. Recall that onNewChart() is called once before a chart is about
to be drawn for the first time. It is not called when new bars are added to the chart, unlike the
onBarClose() function.
This should be quite apparent if you try adding the script to an intraday chart (set the display
to be Candlestick in Graph Design, with a period of 1 or 2 minutes). Although the study is
initially drawn correctly, if you are connected to the intraday feed you will see that new bars
are not coloured correctly and the MA line does not update.
The easiest way to fix this is to restructure the code slightly, moving the drawing code to its
own function, then calling this function from both from onNewChart() and onBarClose():
//@Name:Tutorial2
//@Description:Example
function init()
{
setPenColour(Colour.Blue);
}
function onNewChart()
{
draw();
}
function onBarClose(preExisting)
{
if (!preExisting)
draw();
}
function draw()
{
clearDisplay();
var ma = new MA(20, MA.Simple);
beginPath();
for (var i=0; i<bars.length; i++)
{
var maVal = ma.getNext(bars[i].close);
if (bars[i].close > maVal)
bars[i].colour = Colour.Blue;
else
bars[i].colour = Colour.Red;
if (i == 0)
moveTo(i, maVal);
else
lineTo(i, maVal);
}
endPath();
drawPath();
}

ShareScript User Guide 55
We now have created a function of our own, draw(), that is called from both onNewChart()
and onBarClose(). However, drawing from onBarClose() only takes place under a certain
condition – when preExisting is false. This is explained below.
Pre-existing Bars
When ShareScope calls onNewChart(), all the completed bars that already exist in your
database are made available through the “bars” array. When onNewChart() completes,
ShareScope then calls onBarClose() for all these pre-existing bars.
In the above study, we don’t want to do any drawing in these calls to onBarClose() – since
we’ve already calculated the MA and drawn the study in onNewChart(). The calls to
onBarClose() aren’t telling us about new bars.
However, if you are connected to the intraday feed, you will also get calls to onBarClose()
for any new complete bars added to the chart. These new bars were not in your database when
onNewChart() was called.
A Boolean parameter is passed to onBarClose() that allows you to differentiate between bars
that existed when onNewChart() was called, and those that are newly added.
You can call this parameter anything you like, but we’ve called it “preExisting” in the above
example to make the code and the explanation clearer.
What would happen if we didn’t test this parameter? The script would still work, but it would
recalculate and redraw the study many tens (or even hundreds) of times whenever it drew a
chart for the first time – this would make it very sluggish when you changed the charted
share.
Choosing the Correct Design Pattern For Your Study
We’ve seen that you can structure a study in two different ways – you can do your analysis
and drawing on a per-bar basis on onBarClose(), or you can loop over the bars array in a
single function (and, if necessary, redo the analysis whenever a new bar is added to the chart).
Which way is best? The answer depends on the kind of study you are developing.
If your study needs to analyse the data as it happens, perhaps looking for entry and exit
conditions on a bar by bar basis, it is probably best to use the onBarClose() approach we
looked at first. This often leads to simpler, clearer scripts.
However, if your study is more complex and needs to look across the data as a whole, then it
is probably best to use the second approach.
Furthermore, if you want to use a path to speed the drawing of a data-series across the bars (as
we did in the above example with the MA) then this is only possible using the second
approach.
Further Exercises
• Try printing a message to the console every time the draw() function in the last
example is called. Confirm that it is only called once initially when the chart is
drawn, then again when a new bar is formed by the intraday feed.
• The bars array may include a partial bar at the last index. At present our last example
study does not exclude this partial bar from the analysis – try using the isComplete
bar property to make sure only complete bars are processed by the study. You can
zoom into the right hand side of the chart to make sure your change has worked.

ShareScript User Guide 56
Section 11 Advanced Chart Study Techniques
This section will first take a look at how to add dialog boxes to your studies, which allow the
user to easily customise a study.
Then we’ll see how you can use a study’s panel to offer the user more ways to interact with
your study.
Finally, we’ll take a quick tour through some of the other study functions that get called by
ShareScope in response to certain events. These events can include the user zooming the chart
or clicking the mouse on a bar.
Dialog Boxes
Using a dialog box to display a settings dialog for a chart study is an almost identical process
to that for a ShareScript column. Since we already covered columns dialogs in some detail in
the tutorial in section 5, we’ll jump straight into looking at a complete example. The script
below revisits our bar colouring example from the previous section, but we now ask the user
to provide the MA length when the study is first added:
//@Name:Tutorial3
//@Description:Example
var ma;
var period = 20;
function init(status)
{
if (status == Loading || status == Editing)
period = storage.getAt(0);
if (status == Adding || status == Editing)
{
var dlg = new Dialog("Tutorial3", 200, 50);
dlg.addIntEdit("period",-1,-1,-1,-1,"MA Period","bars",period,2,1000);
dlg.addOkButton();
dlg.addCancelButton();
if (dlg.show() == Dialog.Cancel)
return false;
period = dlg.getValue("period");
storage.setAt(0, period);
}
setPenColour(Colour.Blue);
setTitle("Tutorial3: " + period);
}
function onNewChart()
{
ma = new MA(period, MA.Simple);
}
function onBarClose()
{
var maVal = ma.getNext(bar.close);
if (bar.close > maVal)
bar.colour = Colour.Blue;
else
bar.colour = Colour.Red;
}
The overall structure of this script should be fairly familiar to you (if is isn’t, please revisit the
tutorial in section 5).
Note, that like columns, we can add a production environment directive to the script:
//@Env:Production
This directive means a user will move straight to the study’s dialog when they select Edit
Study from the panel context menu, or double click on the panel. It also removes the Refresh
Study command, so only do this when you’ve finished creating and debugging the script.

ShareScript User Guide 57
Studies, Settings and Windows
You should be familiar with the concept of settings in ShareScope. That is, the look of a
window is determined by which of the 12 available settings has been applied to it. When you
add something to a ShareScope chart (e.g. an indicator or a moving average), it is added on a
per-setting basis. That is, if the chart uses Setting #1 then the indicator will be applied to not
just the current chart window but any other chart window using Setting #1.
The same rule applies to chart studies but there are some technical details you should be
aware of when you are developing study scripts:
• Study scripts are added to the Chart (Graph) Setting.
• Individual Study objects, however, exist on a per-chart window basis.
• The storage area is shared between all the study objects for a given study script i.e. it
is per-setting not per-chart window.
You shouldn’t really need to understand how ShareScope implements this behaviour – from a
script author’s point of view it should usually just work in a natural way. However, if you do
want to understand what’s happening behind the scenes, or if your script behaves in a way
that you don’t understand, read on (if not, please feel free to skip the next bit).
With that caveat, let’s take a look behind the scenes when you add a study to a chart. Imagine
the user has added the script on the previous page (which uses a dialog and the storage area to
allow the user to customise the study) to Setting #1.
• First, ShareScope creates a study object, and calls its init() function with a status of
“Adding”. An un-initialised storage area is allocated for the script in Setting #1, and
made available to the study.
• This study object (which you can think of as a temporary per-setting study object)
shows the user a dialog box, and waits for them to click OK. The study then stores the
entered parameters in the setting-based storage area, and its init() function returns
with true. ShareScope then destroys this temporary study object.
• ShareScope creates a new study object for each chart window that is using Setting #1.
Each of these study objects is passed the script’s storage area (stored in the setting),
and each study’s init() function is called with a status of “Loading”.
• These per-chart window study objects have a normal lifetime, with their
onNewChart() and onBarClose() functions being called as previously discussed.
In this way the user can be presented with a dialog only once, but the parameters entered can
be shared across multiple study objects each responsible for a different chart window.
The Study Panel
The study panel offers a convenient way for the user to interact with a study. As we’ve seen
the user can right-click on the panel to see a context menu, and also double click on the panel
to edit a study’s settings.
You can use the setTitle() command to change the chart study’s title on the panel. We used
this in the example above to append the MA period to the study name. You can also use
setInfoText() to show additional text on the panel. e.g. the example below shows the
contents of a share’s first notes column on the graph:
//@Name:Share's Note
//@Description:Shows notes column 1 on the chart
function onNewChart()
{
var notes = getCurrentShare().getNotes();
setInfoText(notes[0]);
}

ShareScript User Guide 58
You can also put buttons on the panel and your script can react when the user clicks them. For
example, we could add a next and previous button to the above example to allow the user to
click through all 10 possible notes columns for a share. This is left as an exercise for the
reader (see further exercises at the end of this section for some hints).
Other Study Events – onNewBarUpdate(), onMouseClick(), onZoom()
We’ll now take a quick look at some of the other study functions that ShareScope will call
when certain events happen.
onNewBarUpdate()
The onNewBarUpdate() function is called whenever a new partial bar is added to the chart, or
if the current partial bar’s OHLCV figures change. The “bar” and “barIndex” variables are set
when this function is called, and can be used in the same way as in onBarClose().
By adding some code to this function, you allow your study to react to changes to the latest
intraday partial bar, rather than reacting only to newly completed bars. For example, if we add
the following function to the last example in Section 10 (“Keeping intraday charts up to
date”), then any changes to the newest partial bar will cause the study to be updated:
function onNewBarUpdate(preExisting)
{
if (!preExisting)
draw();
}
You will normally receive multiple calls to onNewBarUpdate() for the latest partial bar,
followed by a call to onBarClose() for the same barIndex when the bar completes. You will
then receive an onNewBarUpdate() as a new partial bar is created, and so on until the market
closes, when a final onBarClose() will be received.
Notice that, as with onBarClose(), a boolean parameter is passed to onNewBarUpdate()
indicating whether the bar existed (with the same OHLCV) during the call to onNewChart().
onMouseClick()
ShareScope calls a study’s onMouseClick() function when the study has input focus (which
the user can do by clicking on the panel).
A number of parameters are passed to this function:
• The frame that was clicked in (i.e. whether in the main chart, or the volume area of
the chart)
• the x co-ordinate (as a JavaScript date object)
• the y co-ordinate (a number, either the price or volume)
If the user clicked on a bar, the “bar” and “barIndex” variables will additionally be defined,.
This makes it easy to detect a click on a bar, as this simple example illustrates:
//@Name:Bar Highlight
function onMouseClick(frame, date, value)
{
if (bar) // defined only if the user clicked on a bar
{
if (bar.oldColour == undefined)
{
bar.oldColour = bar.colour;
bar.colour = Colour.Yellow;
}
else
{
bar.colour = bar.oldColour;
bar.oldColour = undefined;
}
return true;

ShareScript User Guide 59
}
}
This study allows you to highlight any bar by clicking on it. Click a bar again to toggle it back
to its original colour.
The onMouseClick() function should return true if your script reacts to the click. In the above
example, we return true only if a bar has been clicked on (and we toggled the bar colour).
Returning true will prevent ShareScope from also handling the mouse click. If you don’t
return true – ShareScope will process the click as normal.
This example also illustrates another useful thing you can do with Bar objects – adding new
properties. Here we add a new property “oldColour” to store the original colour of the bar so
we can restore it when the bar is clicked on again.
Any properties you add to the chart’s Bar objects will persist even as new bars are added to
the chart. The set of Bar objects is destroyed only when a completely new chart is displayed
(and onNewChart() is called).
onZoom()
ShareScope calls a study’s onZoom() function whenever the visible range of bars on the chart
changes. This happens when the user zooms in or out of the chart, changing the displayed
data.
Note that the actual bar data remains unchanged during a zoom, only the visible data changes.
You can use this function in conjunction with getMinVisibleBarIndex() and
getMaxVisibleBarIndex() to find out the indices of the left and rightmost visible bars.
The following example shows the maximum visible price in the study’s panel:
//@Name:Max Visible Price
function getMaxPrice()
{
var min = getMinVisibleBarIndex();
var max = getMaxVisibleBarIndex();
var maxPrice = 0;
for (var i = min; i <= max; i++)
{
if (bars[i].high > maxPrice)
maxPrice = bars[i].high;
}
setInfoText("Max = "+maxPrice.toFixed(3));
}
function onNewChart()
{
getMaxPrice();
}
function onZoom()
{
getMaxPrice();
}
This concludes our look at chart studies. There’s still more to learn, but you should now
understand enough of the fundamentals to make good use of the documentation in the
ShareScript Language Reference.
Further Exercises
• Modify the earlier notes example to add “next” and “previous” buttons to the panel.
Initially the panel should show notes column 1. When you click “next” it should show
notes column 2, etc. Hint – lookup createButton() in the ChartStudy object section
of the ShareScript Language Reference to get started.