share point handbook
TRANSCRIPT

8/3/2019 Share Point Handbook
http://slidepdf.com/reader/full/share-point-handbook 1/28
1
SharePoint Handbook
Prepared by Kamil Salus 4/7/2009
Instructional & Informational Technology
Evanston Township High School, District 202
8/3/2019 Share Point Handbook
http://slidepdf.com/reader/full/share-point-handbook 2/28
2
ContentsAccessing SharePoint................................................................................................................................................................................. 3
Getting to Know SharePoint’s Layout ....................................................................................................................................................... 3
Signing in ................................................................................................................................................................................................... 4
Making Changes to the Site from the FireFox browser or a Mac. ............................................................................................................. 4
Getting around in the calendar ................................................................................................................................................................... 5
Entering a calendar item ............................................................................................................................................................................ 5
Editing or deleting a calendar item ............................................................................................................................................................ 6
Sending a calendar link to others ............................................................................................................................................................... 6
Making the SharePoint calendar visible in Outlook .......... ........... .......... ........... .......... ........... .......... .......... ........... .......... ........... .......... ...... 6
Entering a calendar item from Outlook ...................................................................................................................................................... 7
Synchronizing your calendar entries .......................................................................................................................................................... 8
Creating a Class Blog Site ......................................................................................................................................................................... 9
Blog Site Settings ....................................................................................................................................................................................... 9
Creating a Class Wiki Site ....................................................................................................................................................................... 11
Creating a Personal Wiki Site .................................................................................................................................................................. 11
Creating a New Discussion ...................................................................................................................................................................... 13
Viewing documents in a document library .............................................................................................................................................. 15
Editing a document in a document library ............................................................................................................................................... 15
Deleting a document from a document library......................................................................................................................................... 15
Creating a folder in a document library ................................................................................................................................................... 15
Uploading a document to the Document Library ..................................................................................................................................... 16
Uploading multiple documents to the Document Library ........................................................................................................................ 16
Saving to a library using Microsoft Office Word, Excel, or PowerPoint 2007 ......... ........... .......... ........... .......... ........... .......... .......... ...... 17
Editing a file for use in Word, Excel, or PowerPoint 2007 .......... .......... ........... .......... .......... ........... .......... ........... .......... ........... .......... .... 17
Using Windows Explorer to move files, and more .................................................................................................................................. 18Adding Outside links to your top link bar .......... .......... ........... .......... .......... ........... .......... ........... .......... ........... .......... ........... .......... ......... 19
Renaming Links on your Top Link Bar ................................................................................................................................................... 19
Changing a Name on the Quick Launch .................................................................................................................................................. 19
Customizing the site's theme .................................................................................................................................................................... 19
Changing the logo on your home page .................................................................................................................................................... 20
Changing Permission Levels .................................................................................................................................................................... 21
Adding People to Permissions Groups ......... ........... .......... ........... .......... ........... .......... .......... ........... .......... ........... .......... ........... .......... .... 21
Removing People from Permissions Groups ........................................................................................................................................... 22
Creating New Permission Groups ............................................................................................................................................................ 22
Breaking Permission Inheritance ............................................................................................................................................................. 22
Adding and Editing Permissions .............................................................................................................................................................. 23
Creating a SubSite ................................................................................................................................................................................... 24
Adding Web Parts .................................................................................................................................................................................... 26
Modifying a Content Editor Web Part ..................................................................................................................................................... 26
8/3/2019 Share Point Handbook
http://slidepdf.com/reader/full/share-point-handbook 3/28
3
Getting Started
Accessing SharePoint
You can access your site from work or home easily on any browser and any computer without specialized
software. To access your SharePoint go to http://sp.eths.k12.il.us/ your_sitename
.Your_sitename
is usuallyyour last name followed by first initial such as smithj, for example: http://sp.eths.k12.il.us/ smithj. If this is adepartment, committee, special program or other none teacher site your site will have a specialized name for
example the Saftey Department’s SharePoint site is http: //sp.eths.k12.il.us/ safety.
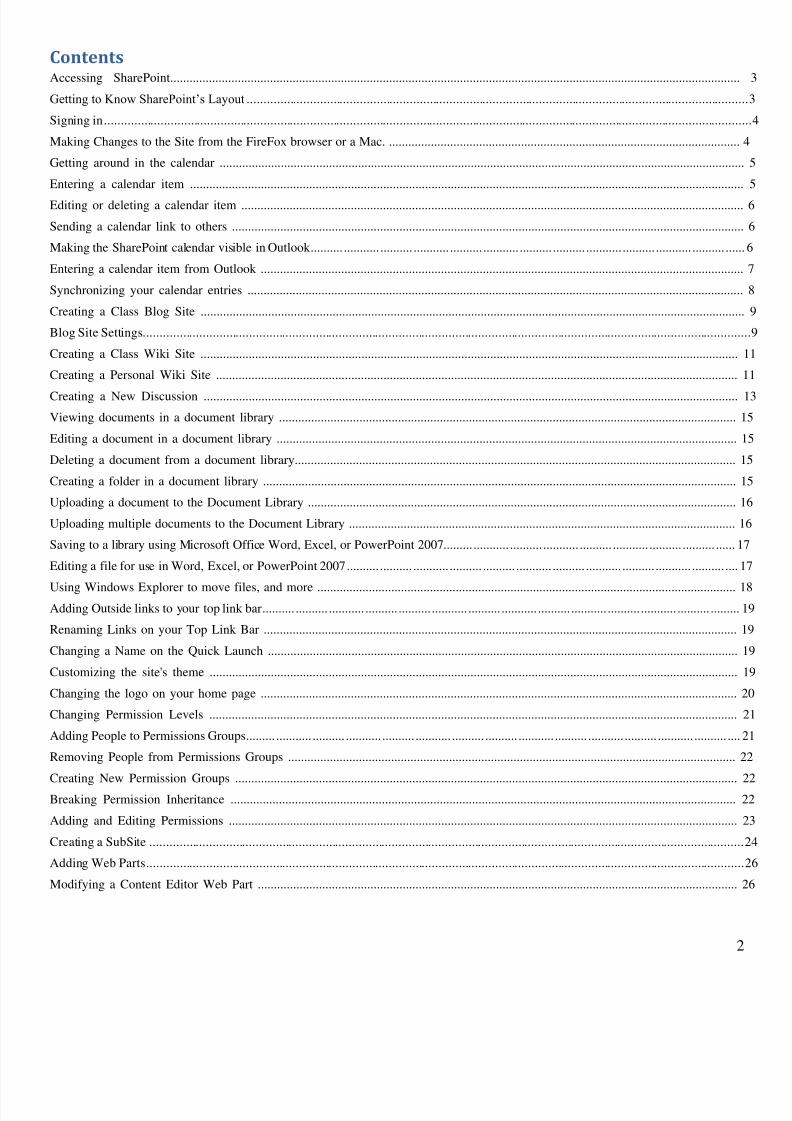
Getting to Know SharePoint’s Layout
Top Link Bar Navigation (Tabs) – Consistent throughout your site, never changes, can display links to sub-
sites (i.e. different classes or inner-departmental offices. Tabs across the top of the main window can be used
for navigation. A Home tab always appears regardless of what type of customizations have been done.
Quick Launch Navigation (Left Navigation Menu) – The left navigation menu is customizable, so its
appearance may vary from site to site. The pages that are available on the site will be listed in the left navigationmenu.
Bread Crumb Navigation Sign In Link Site Title
Quick Launch Navigation
Web Parts
Top Link Bar Navigation
8/3/2019 Share Point Handbook
http://slidepdf.com/reader/full/share-point-handbook 4/28
4
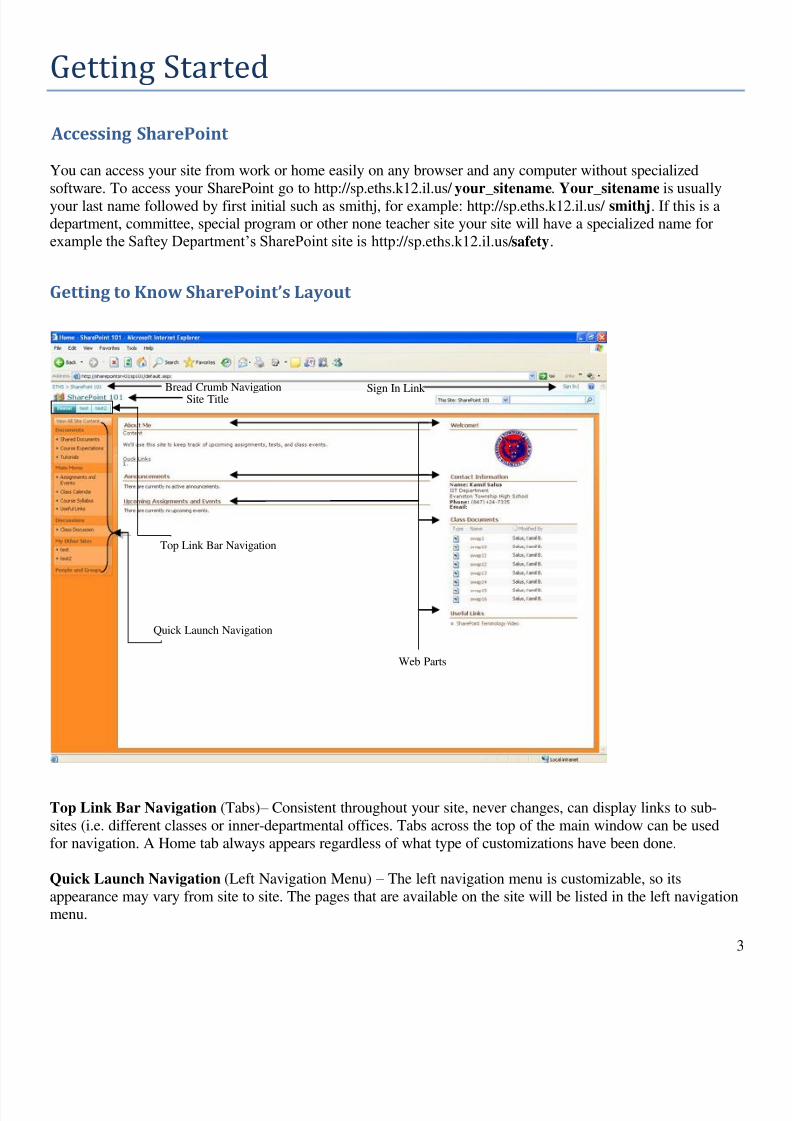
Bread Crumb Navigation – Shows user where they are relative to the main ETHS SharePoint site.
My Links – You can use the My Links feature to
bookmark all the SharePoint sites that you commonly use.The My Links button will be available at the top right of
your screen while accessing any SharePoint site that you
are logged into.
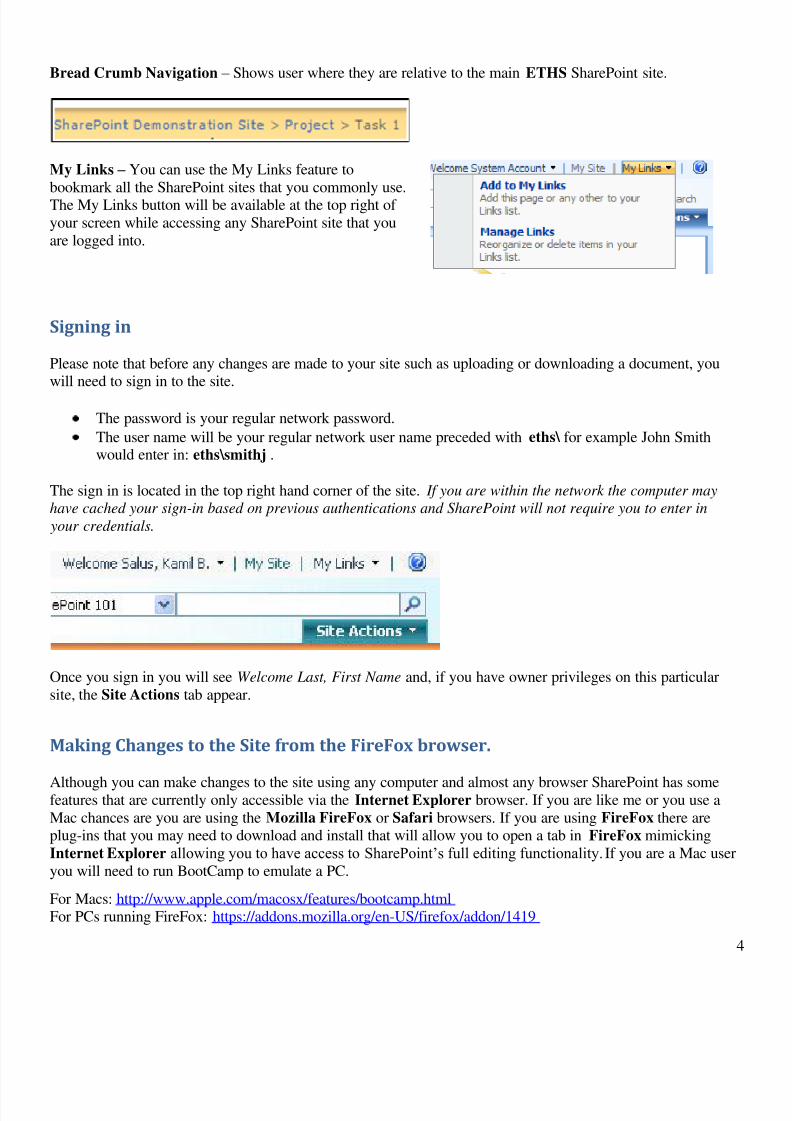
Signing in
Please note that before any changes are made to your site such as uploading or downloading a document, youwill need to sign in to the site.
The password is your regular network password.
The user name will be your regular network user name preceded with eths\ for example John Smithwould enter in: eths\smithj .
The sign in is located in the top right hand corner of the site. If you are within the network the computer may
have cached your sign-in based on previous authentications and SharePoint will not require you to enter in
your credentials.
Once you sign in you will see Welcome Last, First Name and, if you have owner privileges on this particular
site, the Site Actions tab appear.
Making Changes to the Site from the FireFox browser.
Although you can make changes to the site using any computer and almost any browser SharePoint has somefeatures that are currently only accessible via the Internet Explorer browser. If you are like me or you use a
Mac chances are you are using the Mozilla FireFox or Safari browsers. If you are using FireFox there areplug-ins that you may need to download and install that will allow you to open a tab in FireFox mimicking
Internet Explorer allowing you to have access to SharePoint’s full editing functionality. If you are a Mac user
you will need to run BootCamp to emulate a PC.
For Macs: http://www.apple.com/macosx/features/bootcamp.html For PCs running FireFox: https://addons.mozilla.org/en-US/firefox/addon/1419
8/3/2019 Share Point Handbook
http://slidepdf.com/reader/full/share-point-handbook 5/28
5
Calendar
Finding the built-in calendar
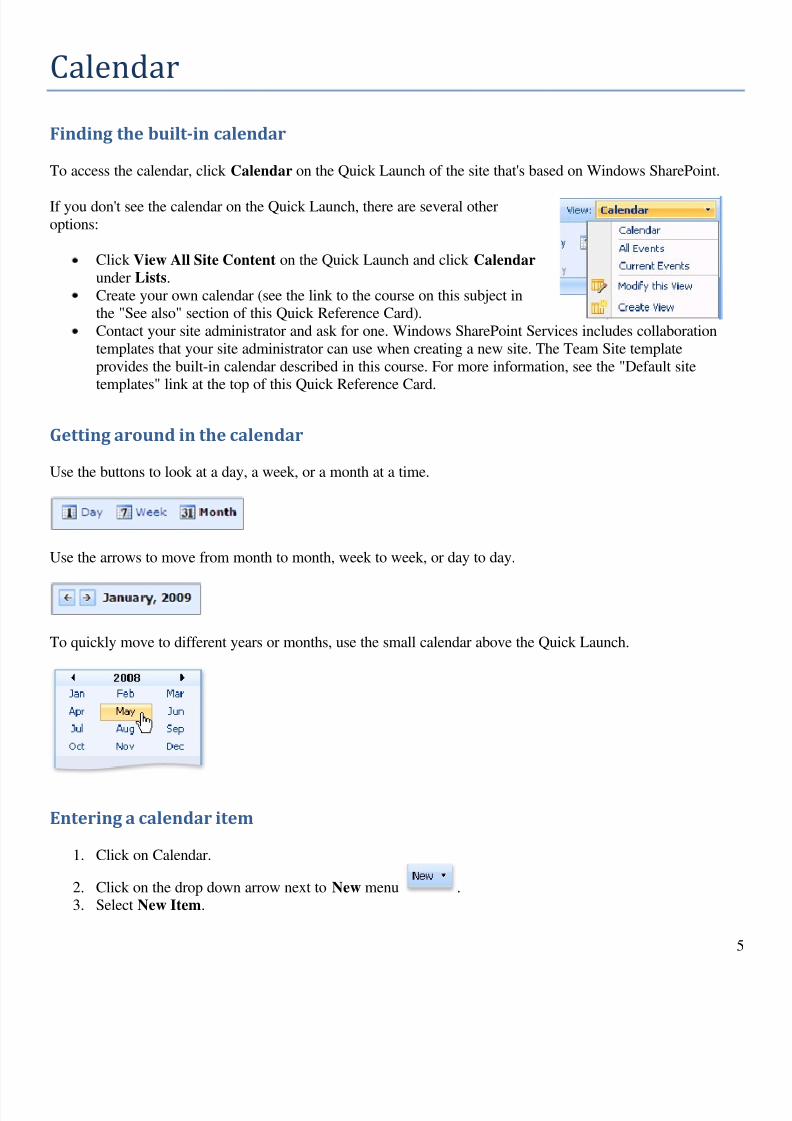
To access the calendar, click Calendar on the Quick Launch of the site that's based on Windows SharePoint.
If you don't see the calendar on the Quick Launch, there are several other
options:
Click View All Site Content on the Quick Launch and click Calendar
under Lists.
Create your own calendar (see the link to the course on this subject inthe "See also" section of this Quick Reference Card).
Contact your site administrator and ask for one. Windows SharePoint Services includes collaboration
templates that your site administrator can use when creating a new site. The Team Site template
provides the built-in calendar described in this course. For more information, see the "Default sitetemplates" link at the top of this Quick Reference Card.
Getting around in the calendar
Use the buttons to look at a day, a week, or a month at a time.
Use the arrows to move from month to month, week to week, or day to day.
To quickly move to different years or months, use the small calendar above the Quick Launch.
Entering a calendar item
1. Click on Calendar.
2. Click on the drop down arrow next to New menu .3. Select New Item.
8/3/2019 Share Point Handbook
http://slidepdf.com/reader/full/share-point-handbook 6/28
6
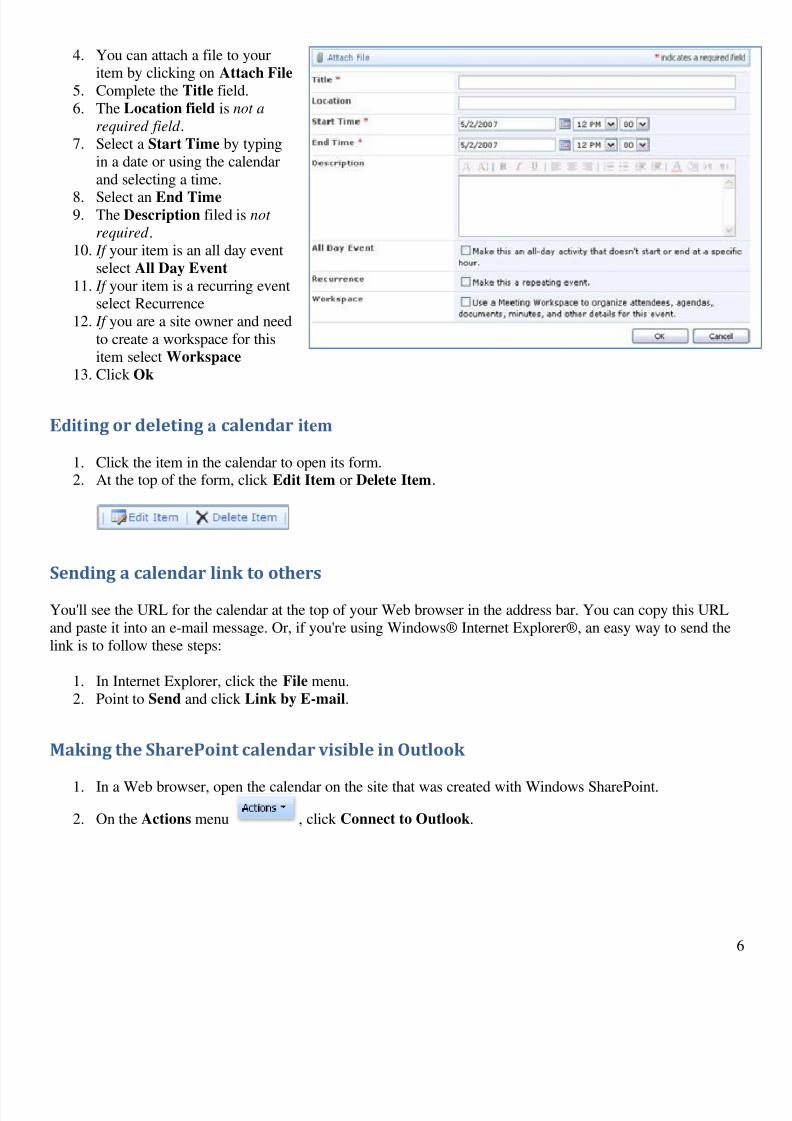
4. You can attach a file to youritem by clicking on Attach File
5. Complete the Title field.
6. The Location field is not a
required field .
7. Select a Start Time by typing
in a date or using the calendar
and selecting a time.
8. Select an End Time 9. The Description filed is not
required .10. If your item is an all day event
select All Day Event
11. If your item is a recurring eventselect Recurrence
12. If you are a site owner and need
to create a workspace for this
item select Workspace 13. Click Ok
Editing or deleting a calendar item
1. Click the item in the calendar to open its form.2. At the top of the form, click Edit Item or Delete Item.
Sending a calendar link to others
You'll see the URL for the calendar at the top of your Web browser in the address bar. You can copy this URL
and paste it into an e-mail message. Or, if you're using Windows® Internet Explorer®, an easy way to send the
link is to follow these steps:
1. In Internet Explorer, click the File menu.
2. Point to Send and click Link by E-mail.
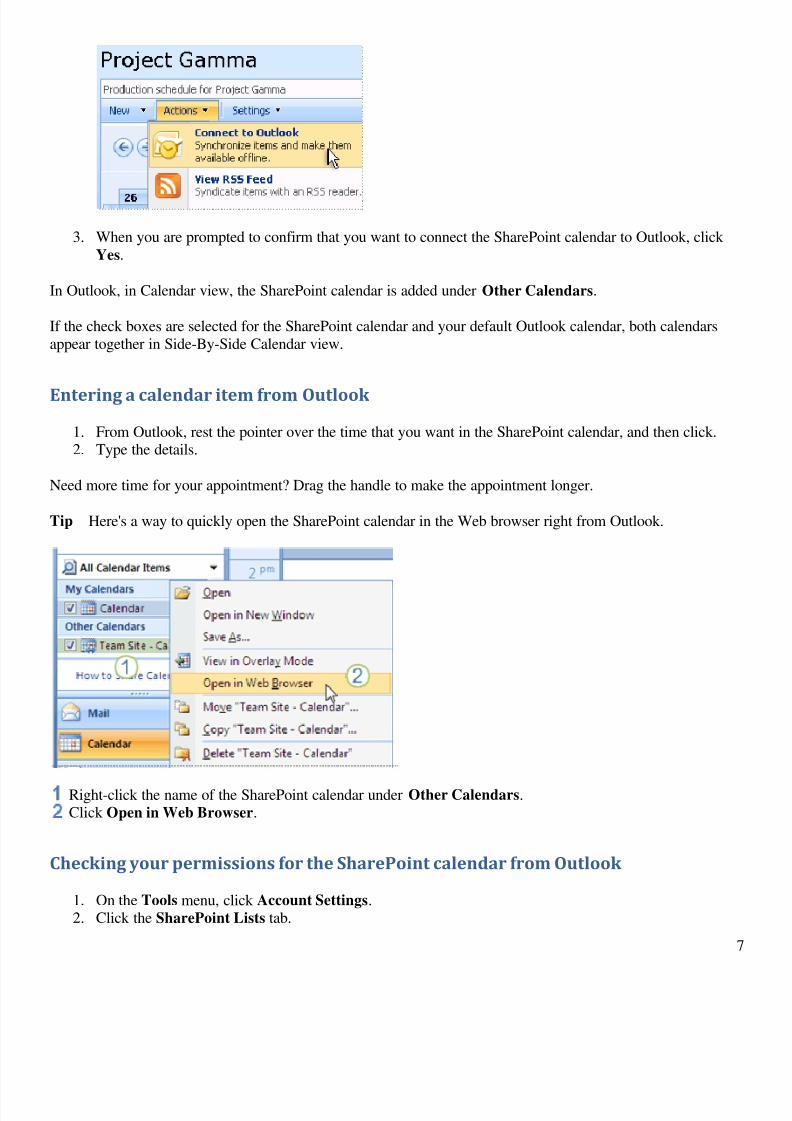
Making the SharePoint calendar visible in Outlook
1. In a Web browser, open the calendar on the site that was created with Windows SharePoint.
2. On the Actions menu , click Connect to Outlook.
8/3/2019 Share Point Handbook
http://slidepdf.com/reader/full/share-point-handbook 7/28
7
3. When you are prompted to confirm that you want to connect the SharePoint calendar to Outlook, click
Yes.
In Outlook, in Calendar view, the SharePoint calendar is added under Other Calendars.
If the check boxes are selected for the SharePoint calendar and your default Outlook calendar, both calendars
appear together in Side-By-Side Calendar view.
Entering a calendar item from Outlook
1. From Outlook, rest the pointer over the time that you want in the SharePoint calendar, and then click.2. Type the details.
Need more time for your appointment? Drag the handle to make the appointment longer.
Tip Here's a way to quickly open the SharePoint calendar in the Web browser right from Outlook.
Right-click the name of the SharePoint calendar under Other Calendars.Click Open in Web Browser.
Checking your permissions for the SharePoint calendar from Outlook
1. On the Tools menu, click Account Settings.2. Click the SharePoint Lists tab.

8/3/2019 Share Point Handbook
http://slidepdf.com/reader/full/share-point-handbook 8/28
8
3. In the table, look at the entry in the Permissions column for the calendar that you've connected toOutlook.
Note You'll need Write permissions in order to be able to create, modify, or delete items. To get the correctpermissions, contact the person who set up the SharePoint calendar.
Copying calendar entries from private to public
Follow these steps to copy an item from your own calendar to the SharePoint calendar:
1. Select the item.2. Click Copy to Folder on the Edit menu.
3. In the Copy Items dialog box, select the shared calendar in the SharePoint Lists folder as the
destination.4. Click OK.
5. When you receive the message about incompatible content, click Yes.
Go the other way: Copy entries from public to private
Follow these steps to copy an item from the SharePoint calendar to your own calendar:
1. In Outlook, select the item from the SharePoint calendar.
2. Click Copy to Folder on the Edit menu.3. In the Copy Items dialog box, select the Calendar folder under Mailbox as the destination.
4. Click OK.
Synchronizing your calendar entries
To synchronize the SharePoint calendar entries between the Outlook version and the Web site version, followthese steps:
1. From Outlook, click to select the SharePoint calendar folder under Other Calendars.
2. Click Send/Receive on the Tools menu, and then click This Folder.
Disconnecting the calendar from Outlook
Right-click the entry for the calendar under Other Calendars and click Delete "SharePoint Calendar Name"
(where SharePoint Calendar Name is the name of the shared calendar).
This will remove the copy of the calendar from Outlook and from your own computer. It will not affect the
calendar on the SharePoint site. If you change your mind and want to reconnect, you can always do that by
starting from the SharePoint site again.
Tip If your aim is to temporarily hide the SharePoint calendar from view, simply clear the check box for the
SharePoint calendar (in the Navigation Pane under Other Calendars).
8/3/2019 Share Point Handbook
http://slidepdf.com/reader/full/share-point-handbook 9/28
9
Class Blogs
Creating a Class Blog Site
1. Click on Site Actions, Create
2. UnderWeb Pages
, selectSites and Workspaces
3. Give your site a Title (i.e. Reflections or Journals, etc.)4. Type the URL address for your site. It should be short and have no spaces (i.e. MyJournal)
5. Under Select a Template, select Blog.
6. Leave everything else at the default settingsa. Use same permissions as the parent site.
b. Display this site on the Quick Launch…? YES
c. Display this site on the Top Link Bar…? YES
d. Use the Top Link Bar from the parent site? YES
7. Click CREATE.
Once the site is created, there are some settings you need to change.
Blog Site Settings
1. Click on Site Actions, Site Settings
2. Select Advanced Permissions
3. Select Actions, Edit Permissions 4. Click on the check box in front of the group for which you wish to edit permissions
5. Click on Actions, Edit User Permissions
6. Change the check mark from Read to Contribute. This will allow your students to add posts to this
blog site.
7. Click OK
Managing Blog Posts Settings1. Click on Manage Posts (on the right side of the site)
2. Click on Settings, List Settings
3. Click on Advanced Settings 4. Under Item Level Permissions
a. Read Access · All Items – if you plan on them sharing their posts with the class (public Blog)· Only My Own – if you only want them to be able to read their own posts (private Journal)
b. Edit Access · All Items – if you want them to be able to edit each other’s posts
· Only My Own – if you only want them to be able to edit their own posts· None – if you select this setting, they will be denied access to creating a post!
5. Click OK
8/3/2019 Share Point Handbook
http://slidepdf.com/reader/full/share-point-handbook 10/28
10
Managing Blog Comments Settings
1. Click on Manage Comments
2. Select Settings, List Settings 3. Click on Advanced Settings
4. Under Item Level Permissions, make the following choices
a. Read Access · All Items – if you plan on them sharing them· Only My Own – if you only want them to be able to read their own
b. Edit Access
· All Items – if you want them to be able to edit each other’s comments · Only My Own – if you only want them to be able to edit their own comments.

8/3/2019 Share Point Handbook
http://slidepdf.com/reader/full/share-point-handbook 11/28
11
Class Wiki
Creating a Class Wiki Site
1. Click on Site Actions, Create
2. Under Web Pages, select Sites and Workspaces 3. Give your site a Title (i.e. Civil War, Matter, etc.)
4. Type the URL address for your site. It should be short and have no spaces (i.e. CivilWar or Matter)
5. Under Select a Template, select Wiki Site 6. Leave everything else at the default settings
a. Use same permissions as the parent site.
b. Display this site on the Quick Launch…? YES c. Display this site on the Top Link Bar…? YES
d. Use the Top Link Bar from the parent site? YES
7. Click CREATE.
Once the site is created, there are some settings you need to change.
Changing permissions to allow your students to edit the wiki
1. Click on Site Actions, Site Settings
2. Select Advanced Permissions 3. Select Actions, Edit Permissions
4. Click on the check box in front of the group for which you wish to edit permissions (for most Class
Sites, the students sit in the Visitors group)5. Click on Actions, Edit User Permissions
6. Change the check mark from Read to Contribute. This will allow your students to add posts to this
blog site.
7. Click OK
Creating a Personal Wiki Site
1. Go to your Home Page (or on the subsite you want it to link from)2. Click on Site Actions/Create 3. Click on Sites and Workspaces
4. Title and Description- Name the title of the new site with the student name
5. Give it a URL with NO SPACES (maybe just the last name)
6. Choose the template 'Wiki Site' 7. User Permissions- change to unique permissions
8. Navigation- change 'Display this site on the top bar of the parent site?' to NO
9. Leave everything else the same and click 'Create'
10. In the new screen 'Set Up Groups for this Site'11. In the 'Visitors to this Site' area, switch 'Visitors' to 'Owners'
12. Add the student's username to Members of this site area
8/3/2019 Share Point Handbook
http://slidepdf.com/reader/full/share-point-handbook 12/28
12
13. On The Owners of this site, click on 'Use an existing Group' and choose 'Owners'14. Click 'OK'
Checking Out a Wiki Page for editing
Only one person can edit a Wiki page at a time. To notify others that you are working on a page, you will need
to check it out.
1. Click on history
2. Click on check out
3. Click on edit item
4. make your changes5. Click OK
6. Mouse over the checked out page
7. Click on the drop down arrow
8. Click Check in 9. Click OK

8/3/2019 Share Point Handbook
http://slidepdf.com/reader/full/share-point-handbook 13/28
13
Discussion Boards
Discussion Boards can be created in order to organize messages around similar topics. New messages can becreated as well as replies to existing messages.
Creating a New Discussion
1. Click into the discussion board, andchoose new. (Please do not repeat
previous discussions or the board can
get big)2. In the Subject area give your discussion
a topic.
3. Type any description or information in
the Body
4.
Click Attach File if you wish to attach afile.
5. Click "OK" when you are finished.
Viewing a Discussion
1. Click into the discussion board, then select the topic of the discussion.2. You may now read the discussion.
3. Simply use the back button to navigate back to the discussion board.
You can view the discussions in the order in which they are posted or you can view
them as a Threaded Discussion. The threaded view allows you to see more clearlywho has responded to what post.
1. Click on a Post.
2. Click on the drop down arrow for View
3. Select Threaded
Replying to a Discussion
1. Click into the discussion board,
8/3/2019 Share Point Handbook
http://slidepdf.com/reader/full/share-point-handbook 14/28
14
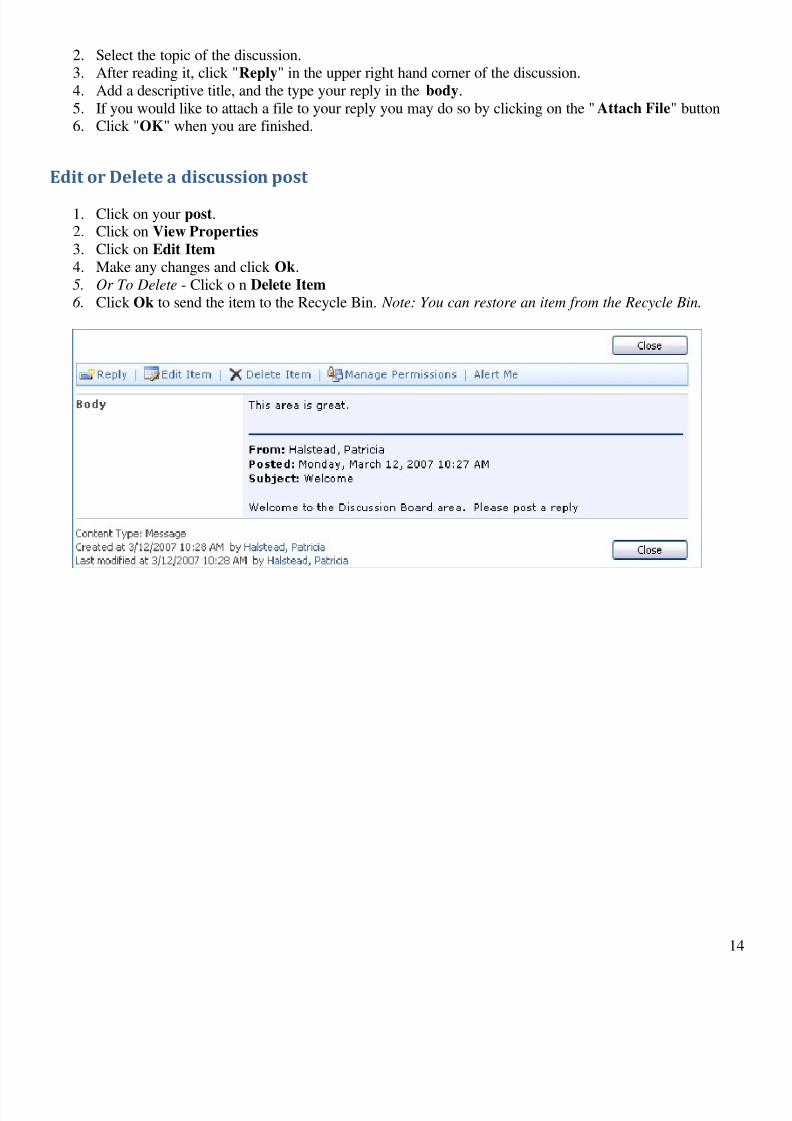
2. Select the topic of the discussion.3. After reading it, click "Reply" in the upper right hand corner of the discussion.
4. Add a descriptive title, and the type your reply in the body.
5. If you would like to attach a file to your reply you may do so by clicking on the "Attach File" button6. Click "OK" when you are finished.
Edit or Delete a discussion post
1. Click on your post.2. Click on View Properties
3. Click on Edit Item
4. Make any changes and click Ok.
5. Or To Delete - Click o n Delete Item 6. Click Ok to send the item to the Recycle Bin. Note: You can restore an item from the Recycle Bin.
8/3/2019 Share Point Handbook
http://slidepdf.com/reader/full/share-point-handbook 15/28
15
Document Libraries
A document library is a place to store documents that you would like to access from school or from home.
Documents can be downloaded from a Sharepoint site and uploaded to a Sharepoint site quickly and easily.Before uploading or downloading a document, you will need to log in to the site. The login is always your
complete email address – [email protected]. The password is your regular network password.
Viewing documents in a document library
1. Click in the folder and then/or select the document you would like to view by double clicking on it.
2. Once you are finished viewing the document, simply close out of it.
Changing a document (for yourself only)
1. Select the document from the document library and open it by double clicking on it.2. After it opens up, do a "Save As" and save it on your computer.
3. You now may change any information on the document and not affect the document on SharePoint.
Editing a document in a document library(for everyone, you must have contribute permissions)
1. Hover your mouse over the document, and click on the drop down arrow on the right side of the
document name.2. Choose "Edit in... "(the program type)
3. The document will open, you may now make any changes necessary.
4. When you are finished, click "Save" and your document will be automatically uploaded to the documentlibrary.
Deleting a document from a document library(you must have contribute permissions)
1. Hover your mouse over the document, and click on the drop down arrow on the right side of thedocument name.
2. Scroll down and select Delete 3. Click OK
4. The document has been moved from the document library to the recycle bin where you can restore it at alater date or delete it completely.
Creating a folder in a document library
1. Click on "Shared Documents".
2. Hover your mouse over "New" and select the arrow on the right side and choose folder
8/3/2019 Share Point Handbook
http://slidepdf.com/reader/full/share-point-handbook 16/28
16
3. Type the name of the folder and select ok.
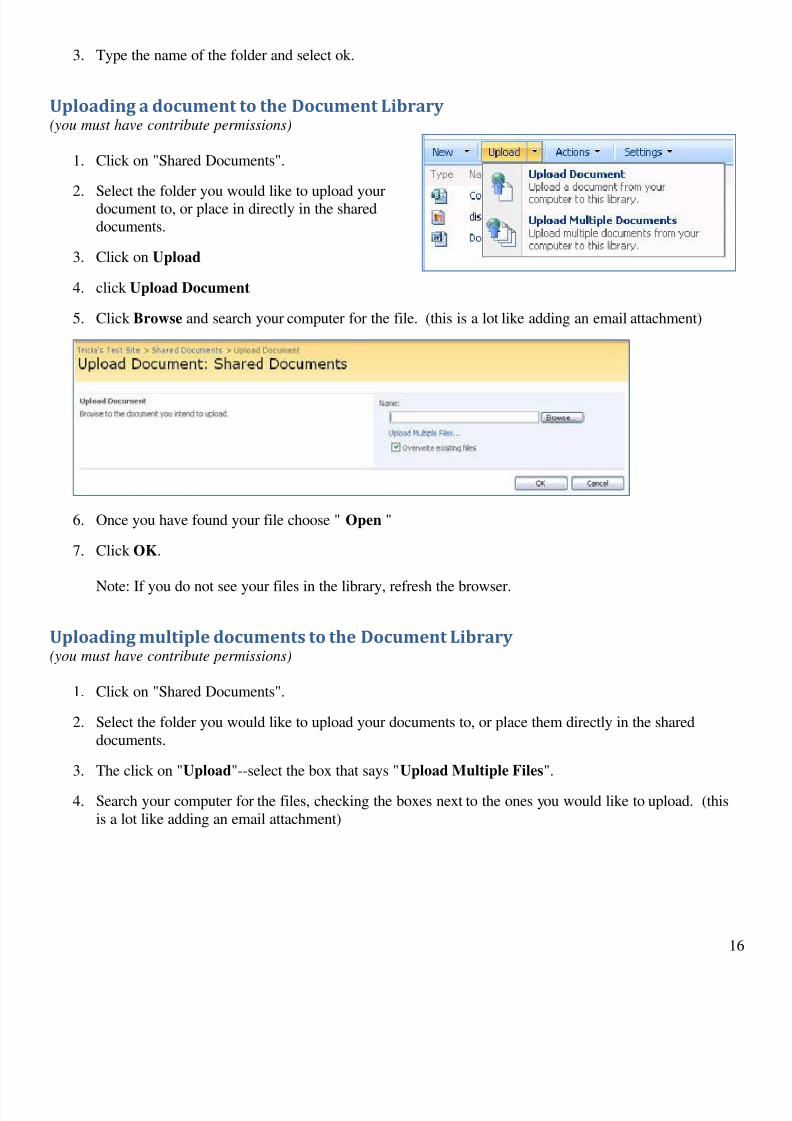
Uploading a document to the Document Library(you must have contribute permissions)
1. Click on "Shared Documents".
2.
Select the folder you would like to upload yourdocument to, or place in directly in the shared
documents.
3. Click on Upload
4. click Upload Document
5. Click Browse and search your computer for the file. (this is a lot like adding an email attachment)
6. Once you have found your file choose " Open "
7. Click OK.
Note: If you do not see your files in the library, refresh the browser.
Uploading multiple documents to the Document Library(you must have contribute permissions)
1. Click on "Shared Documents".
2. Select the folder you would like to upload your documents to, or place them directly in the shared
documents.
3. The click on "Upload"--select the box that says "Upload Multiple Files".
4. Search your computer for the files, checking the boxes next to the ones you would like to upload. (this
is a lot like adding an email attachment)
8/3/2019 Share Point Handbook
http://slidepdf.com/reader/full/share-point-handbook 17/28
17
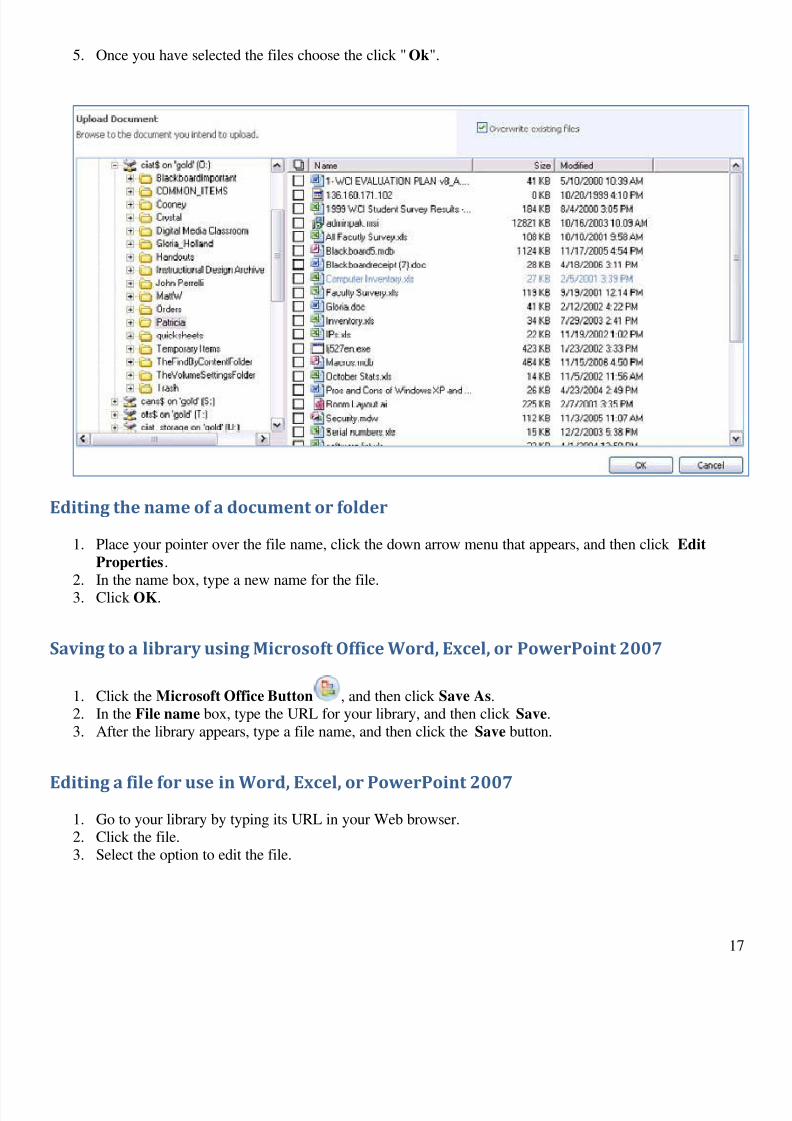
5. Once you have selected the files choose the click "Ok".
Editing the name of a document or folder
1. Place your pointer over the file name, click the down arrow menu that appears, and then click Edit
Properties.
2. In the name box, type a new name for the file.3. Click OK.
Saving to a library using Microsoft Office Word, Excel, or PowerPoint 2007
1. Click the Microsoft Office Button , and then click Save As.2. In the File name box, type the URL for your library, and then click Save.
3. After the library appears, type a file name, and then click the Save button.
Editing a file for use in Word, Excel, or PowerPoint 2007
1. Go to your library by typing its URL in your Web browser.2. Click the file.
3. Select the option to edit the file.
8/3/2019 Share Point Handbook
http://slidepdf.com/reader/full/share-point-handbook 18/28
18
Checking out a file
Point to the file name to display a down arrow.Click the down arrow, and in the menu that appears, click Check Out.
Signing up for e-mail alerts for a document
1. Go to the page that displays the list or library with the list item or file for which you want to add an alert.2. Place your pointer over the file, click the down arrow, and then click Alert Me.
3. In the Send Alerts To section, confirm that the destination e-mail address is correct.4. In the Send Alerts for These Changes section, specify whether you want to be notified when the item
or file has been changed or deleted, or click All Changes to be notified whenever any type of change
occurs.5. In the When to Send Alerts section, click a choice that reflects how often you want to be notified of
changes.
6. Click OK.
Sending someone a link to a library file
1. Place your pointer over the file name, click the down arrow, and then click Send To.2. Click E-mail a Link.
Your e-mail program will start, and a message will appear with the link to the file.
Using Windows Explorer to move files, and more
1. On the Actions menu, click Open with Windows Explorer.
2. Here you can move files from one folder to another. You can also copy, paste, rename, and drag anddrop files using this window.
Note You may have to refresh the library to see recently moved or renamed files.
8/3/2019 Share Point Handbook
http://slidepdf.com/reader/full/share-point-handbook 19/28
19
Look and Feel
Adding Outside links to your top link bar
1. Click on Site Actions, Site Settings.
2. Click on Top Link Bar under Look and Feel
3. Click on New Link. Add the URL and a common name for the web address.4. Click OK.
The common name should appear as a tab on the Top Link bar
Renaming Links on your Top Link Bar
Here are directions on how to change the name (description) of a link on the Top Link Bar. This is also where
you can change the order of the links on the Top Link Bar or add a new link.
1. Click on Home to be at the top-level site.
2. Select Site Actions and then Site Settings (top right corner).3. Click on Top link bar under Look and Feel.
4. Click on the Edit button next to the link. Change the description (name).
Changing a Name on the Quick Launch
Here are directions on how to change the name of a link on the Quick Launch. This is also where you can
change the order of the links on the Quick Launch or add a new link.
1. Click on Home to be at the top-level site.
2. Select Site Actions and then Site Settings (top right corner).
3. Click on Quick Launch under Look and Feel.4. Click on the Edit button next to the link. Change the description (name) of the URL.5. You can also choose to change which heading the link falls under.
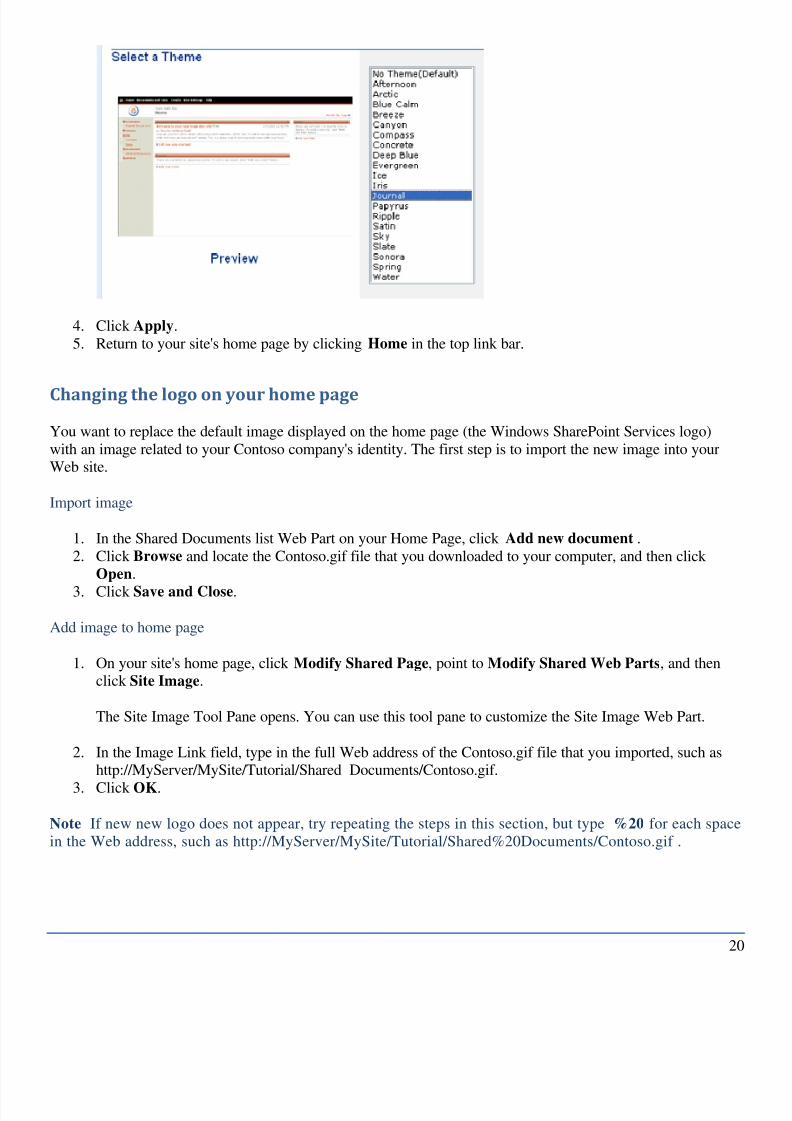
Customizing the site's theme
A theme is a unified set of design elements that influence the fonts and color scheme of your SharePoint site.Changing your site's theme is an easy way to customize your site to fit your team's personality.
1. On the top link bar, click Site Settings.
2. On the Site Settings page, in the Customization section, click Apply theme to site.
3. On the Apply Theme to Web Site page, select the Journal theme.
A preview of the theme appears.
8/3/2019 Share Point Handbook
http://slidepdf.com/reader/full/share-point-handbook 20/28
20
4. Click Apply.
5. Return to your site's home page by clicking Home in the top link bar.
Changing the logo on your home page
You want to replace the default image displayed on the home page (the Windows SharePoint Services logo)
with an image related to your Contoso company's identity. The first step is to import the new image into yourWeb site.
Import image
1. In the Shared Documents list Web Part on your Home Page, click Add new document .
2. Click Browse and locate the Contoso.gif file that you downloaded to your computer, and then click
Open.
3. Click Save and Close.
Add image to home page
1. On your site's home page, click Modify Shared Page, point to Modify Shared Web Parts, and thenclick Site Image.
The Site Image Tool Pane opens. You can use this tool pane to customize the Site Image Web Part.
2. In the Image Link field, type in the full Web address of the Contoso.gif file that you imported, such ashttp://MyServer/MySite/Tutorial/Shared Documents/Contoso.gif.
3. Click OK.
Note If new new logo does not appear, try repeating the steps in this section, but type %20 for each space
in the Web address, such as http://MyServer/MySite/Tutorial/Shared%20Documents/Contoso.gif .
8/3/2019 Share Point Handbook
http://slidepdf.com/reader/full/share-point-handbook 21/28
21
Permissions
Those designated as “Site Owners” (or those with Full Control permissions on a site) are able to set sitepermissions for others. By default, there are three permissions groups automatically created
for a SharePoint site:
• Site Owners: individuals with full control over the site (the ability to make changes to lists/libraries, changesite permissions, add new lists/libraries, and alter the look of the site’s home page)
• Site Members: individuals with “contribute” (read/write) access to site content, such as items in lists andlibraries
• Site Visitors: individuals with read-only access to the site The simplest way to set permissions for a site is toadd people to the above groups.
Changing Permission Levels
1. Click on the area you would like to change permission levels (discussion board, document library,
folder...)2. Click on Settings and permissions for this ...(discussion board, document library, folder...)
3. Click on the group you would like to change
4. Uncheck current permission level
5. Check the desired level 6. Click OK
Adding People to Permissions Groups
1. Click Site Actions menu, and choose Site Settings
2. Click the “People and groups” link
3. There are three permissions groups for the site, by default, listed on the left. (If you don't see them all, click
the "More..." link to see all groups.)4. Click on one of the groups to see its current membership list
5. To add a user or Active Directory group to a SharePoint permissions group, click the New menu and choose
Add Users 6. On the new screen, enter the e-mail addresses or usernames of the users (or groups) you wish to add. Clicking
the check mark will allow you to resolve names (like in Outlook); if names don’t resolve, just click on the name
(which is italicized) and choose an option from the drop down menu. You can also click the address book iconto pick people from the directory. You can also click the "Add All Authenticated Users" link on the left to add
all users (in the domain) to the group.
7. Make sure the correct group is listed in the “Add users to a SharePoint group” drop down menu.
8. You may wish to uncheck the “Send welcome e-mail to the new users” button, as this option would cause ane-mail to be sent to the users you’re adding.
9. Click OK when ready. You can then view the SharePoint permission group’s membership list to make
certain the individual(s) were added.
Permissions changes take effect immediately.
8/3/2019 Share Point Handbook
http://slidepdf.com/reader/full/share-point-handbook 22/28
22
Removing People from Permissions Groups
1. Click Site Actions menu, and choose Site Settings
2. Click the “People and groups” link
3. There are three permissions groups for the site, by default, listed on the left. (If you don't see
them all, click the "More..." link to see all groups.)4. Click the groups whose current membership list you wish to modify
5. Check (click to enable the checkbox) the names of the individuals or groups that need to be removed
6. Click the Actions menu, and choose Remove Users from Group
Permissions changes take effect immediately.
Creating New Permission Groups
1. Click Site Actions menu and choose Site Settings
2. Click the Advanced Permissions link 3. Click on the down arrow next to New and choose New Group
4. Enter a name and description for the group
5. If the Group Owner is different than the default, enter the owner’s account name and click the Check Names icon or click on the Browse icon to look up the user
6. Under Give Group Permission to this Site, choose the level of permissions that the group
will have to the entire site.7. Click Create
Breaking Permission Inheritance
If a list, library, or sub site needs to have permissions that are different than those of the main site, you can
break permission inheritance for that resource.
1. To navigate to the permissions of the list/library/site:• For a list or library:
1. Navigate to the list or library for which you need to set permissions2. Click on the Settings menu and choose Library Settings or List Settings.
3. Click Permissions for this (list or library)
4. Click on the Actions menu and choose Edit Permissions
You will receive a message that “You are about to create unique permissions for this list/
library.” Click Ok.
• For a sub site:
1. Navigate to the list or library for which you need to set permissions2. Click the Site Actions menu and choose Site Settings
3. Click Advanced Permissions• For a document or list item:
1. Navigate to the item for which you need to set permissions2. Hover over the item and then click on the down arrow that appears to display the Edit menu, then
choose Manage Permissions
2. For a site, click on the Actions menu and choose Edit Permissions
You will receive a message that “You are about to create unique permissions for this web site.”
Click Ok.
8/3/2019 Share Point Handbook
http://slidepdf.com/reader/full/share-point-handbook 23/28
23
Adding and Editing Permissions
Once you have broken permissions inheritance on a list/library/sub site, you can add and edit permissions
on that resource.
Navigate to the permissions of the list/library/site as noted above.
To add users or groups to the permissions:1. Click New
2. Enter the name of the user or group that you would like to add to the permissions
3. You can choose to add the users/groups to an existing SharePoint group which has permissions to theresource or you can directly specify the permissions that the users/groups should have. Note: You cannot
add a SharePoint group as a member of another SharePoint group .
4. You can choose to send the new users a message indicating that they’ve been given access to the resource.
To edit permissions:
1. Select the checkbox next to the user or group that you would like to modify
2. Click the Actions menu and choose Edit User Permissions 3. Select the appropriate permission level and click Ok
To remove permissions:1. Select the checkbox next to the user or group that you would like to modify
2. Click the Actions menu and choose Remove User Permissions
You will receive a message that “You are about to remove all permissions for the following user
or group” to this resource. Click Ok.
It is important to remember not to remove or change the permissions on the Site Owners group.
This could result in locking out the Site Owners from the resource.
Re-enabling Permission InheritanceIf you wish to remove the custom permissions you have created for a list/library/sub site, you can re-enable
permission inheritance for that resource.
1. Navigate to the permissions of the list/library/site as noted above.2. Click the Actions menu and choose Inherit Permissions
You will receive a message that “You are about to inherit permissions from the parent web site.”
Click Ok.
8/3/2019 Share Point Handbook
http://slidepdf.com/reader/full/share-point-handbook 24/28
24
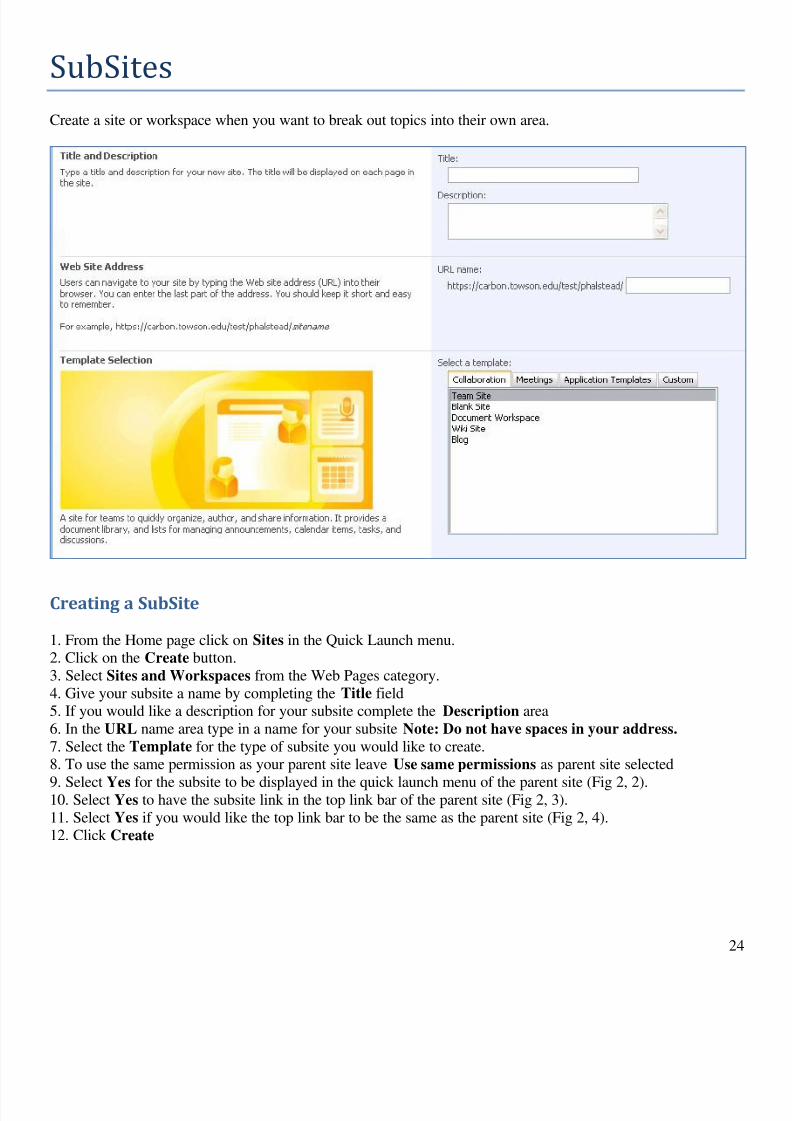
SubSites
Create a site or workspace when you want to break out topics into their own area.
Creating a SubSite
1. From the Home page click on Sites in the Quick Launch menu.2. Click on the Create button.
3. Select Sites and Workspaces from the Web Pages category.
4. Give your subsite a name by completing the Title field5. If you would like a description for your subsite complete the Description area
6. In the URL name area type in a name for your subsite Note: Do not have spaces in your address.
7. Select the Template for the type of subsite you would like to create.8. To use the same permission as your parent site leave Use same permissions as parent site selected
9. Select Yes for the subsite to be displayed in the quick launch menu of the parent site (Fig 2, 2).10. Select Yes to have the subsite link in the top link bar of the parent site (Fig 2, 3).
11. Select Yes if you would like the top link bar to be the same as the parent site (Fig 2, 4).12. Click Create

8/3/2019 Share Point Handbook
http://slidepdf.com/reader/full/share-point-handbook 25/28
25
8/3/2019 Share Point Handbook
http://slidepdf.com/reader/full/share-point-handbook 26/28
26
Web Parts
A SharePoint Web Part is a customizable web page element that is typically used to display data from lists and
libraries on a web parts page. A Web Parts Page, such as a site’s homepage, can host one or more web parts.
Site owners can add, remove, edit, and arrange the web parts for the page’s default view.
Opening Web Parts
1. Click on Site Actions, Site Settings 2. Under Galleries, select Web Parts
3. Click New. Scroll down the list and select the check box in front of the Web Part you wish to add. (The
titles of these web parts are not easy to read. I look at the middle column when trying to figure out thenames of the web parts.)
4. Scroll back to the top of the page and select Populate Gallery.
You will now be able to add these web parts by clicking on Site Actions, Edit Page and then selecting Add a
new Web Part from either the Right or Left Zone.
Some of the popular web parts that many people add to their site include:
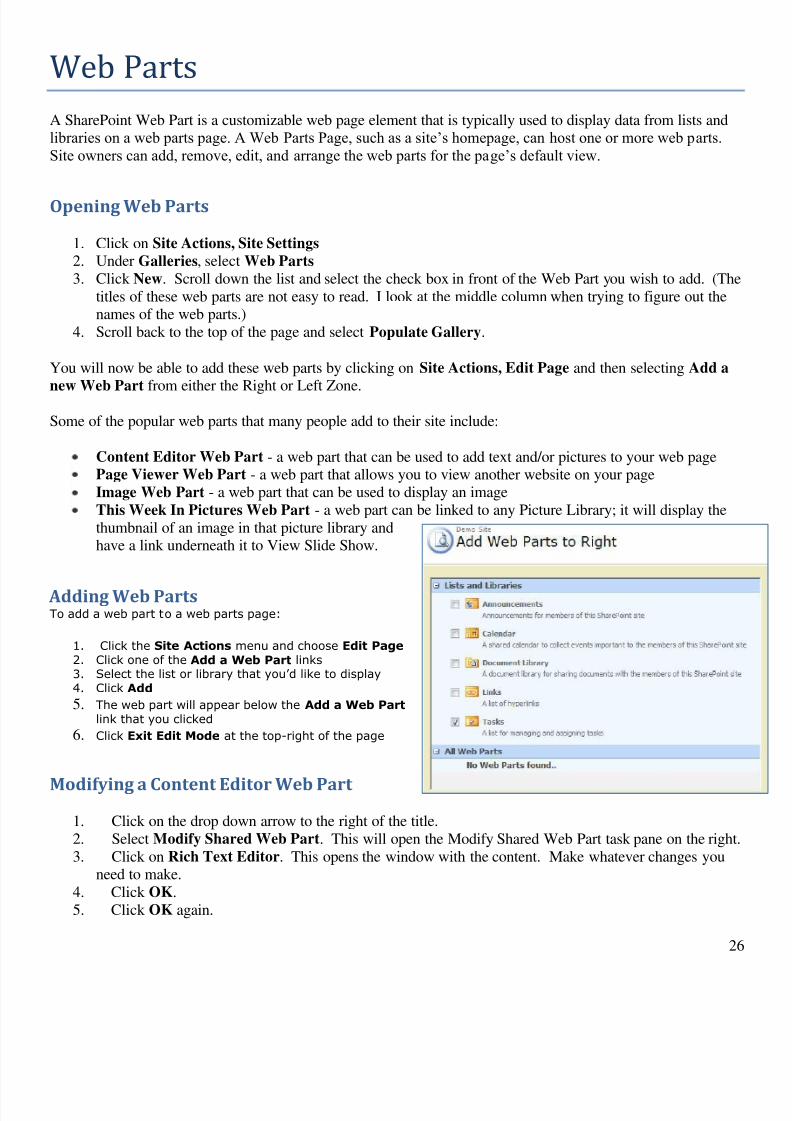
Content Editor Web Part - a web part that can be used to add text and/or pictures to your web pagePage Viewer Web Part - a web part that allows you to view another website on your page
Image Web Part - a web part that can be used to display an image
This Week In Pictures Web Part - a web part can be linked to any Picture Library; it will display the
thumbnail of an image in that picture library andhave a link underneath it to View Slide Show.
Adding Web PartsTo add a web part to a web parts page:
1. Click the Site Actions menu and choose Edit Page 2. Click one of the Add a Web Part links3. Select the list or library that you’d like to display 4. Click Add
5. The web part will appear below the Add a Web Part link that you clicked
6. Click Exit Edit Mode at the top-right of the page
Modifying a Content Editor Web Part
1. Click on the drop down arrow to the right of the title.
2. Select Modify Shared Web Part. This will open the Modify Shared Web Part task pane on the right.
3. Click on Rich Text Editor. This opens the window with the content. Make whatever changes youneed to make.
4. Click OK.
5. Click OK again.
8/3/2019 Share Point Handbook
http://slidepdf.com/reader/full/share-point-handbook 27/28
27
SharePoint Terminology
Alerts These notify users of changes to existing information or new information, add an alert to track changes to
content in an area, or a new site added to the Site Directory
Anonymous AccessAllows anyone to view the sites contents with no authentication
Areas means to organize portal for navigational simplification
Audiences Groups of users, who meet certain criteria, created for targeted distribution of information.
Discussions
SharePoint supports two types of discussions: discussion boards and Web discussions. Discussion boards aresimilar to any newsgroup forum. Web discussions, on the other hand, are a new way to comment on documents
and share those comments with others. When a new site is created, a discussion board is automatically created.
Libraries In order to share files, SharePoint makes use of libraries. The three types of libraries available in SharePoint are
document libraries, form libraries and picture libraries.
Lists Along with document libraries, lists form the foundation of content within SharePoint. A list is a collection of
information items displayed in an area or on a site. List types include: Announcements, Links, Contacts, Events,
Tasks and Issues.
Private Web Part A Web Part added to a Web Part Page by a user who is working on the page in personal view. Private WebParts are available only to the user who added or imported the Web Part.
Shared Web Part A Web Part added to a Web Part Page by a user who is working on the page in shared view. Shared Web Parts
are available to all users of a Web Part Page who have the appropriate permissions.
Site Groups Site groups are custom security groups that apply to a specific Web site. Users are assigned to site groups to
grant them permissions on a SharePoint site.
Site Templates Whenever you create a new site, SharePoint use predefined templates to simplify the creation of the new
elements for the site. These templates allow you to create everything from a specialized team site to a blank site
you can use to create content from scratch.
8/3/2019 Share Point Handbook
http://slidepdf.com/reader/full/share-point-handbook 28/28
Site Member A user who has permissions to contribute to existing lists and libraries.
Site Owner A user who can create lists and libraries, contribute to lists and libraries, and assign user permissions.
Site Visitor A user who can only read content in existing lists and libraries.
SubSite
A named subdirectory of the top-level Web site that is a complete Web site. Each sub-site can have independentadministration, authoring, and browsing permissions from the top-level Web sites and other sub-sites.
Survey A Web site component that enables users to respond to a set of questions specified by the creator of the survey.
Results are tallied in a graphical summary. Surveys provide a way to poll portal users for input on a subject.
Surveys support a wide variety of response types from simple Yes/No answers to free-form text.
Web Part
Customizable Web page element that can be added to SharePoint pages.
Web Parts Page - A Web page that can host one or more Web parts. A site owner can arrange the web parts forthe default view of the page. A site’s homepage is an example of a web parts page.
Web Part Zone A container with a set of properties that can be configured to control the organization and format of Web Parts
on a Web Part Page. Web Part zones can also be used to provide protection against changes to Web Parts.