section ii horse farm management (hfm) quick start guide
TRANSCRIPT

Section II Horse Farm Management (HFM)
Quick Start Guide
Version 4.0.x
July 1, 2006
Copyright © 2006 The Jockey Club Information Systems, Inc.

Page 2 of 36 The Jockey Club Information Systems, Inc. Date: 7/1/2006
BEFORE YOU START.................................................................................................................. 3 QUICK START GUIDE................................................................................................................. 4
Starting the Program for the First Time.................................................................................. 4 Using the Software.................................................................................................................. 5 Set up your Farm..................................................................................................................... 5 Set up your Company.............................................................................................................. 7 Set up your Company Preferences.......................................................................................... 9 Horse Type Entry/Edit Form ................................................................................................ 11 Boarding Type Entry/Edit Form ........................................................................................... 12 Client Entry/Edit form .......................................................................................................... 14 Horse Entry/Edit ................................................................................................................... 16 Procedure Category Entry/Edit Form ................................................................................... 20 Procedure Master Entry/Edit Form....................................................................................... 22 Initial A/R Client Balances Form ......................................................................................... 24 Health Record Entries ........................................................................................................... 25 Adding Procedures that have been Performed on Horses..................................................... 25 Recording your Breeding Season.......................................................................................... 28 Billing ................................................................................................................................... 30 Generate Board Charges ....................................................................................................... 30 Billing Reports ...................................................................................................................... 31 Billing Reports ...................................................................................................................... 31 Finalize Billing...................................................................................................................... 32 Maintaining Client Balances................................................................................................. 33 Adding Adjustments ............................................................................................................. 33 Adding Payments .................................................................................................................. 35
Date: 7/1/2006 The Jockey Club Information Systems, Inc. Page 3 of 36
BEFORE YOU START Welcome
Thank you for your interest in The Jockey Club Information Systems’ Horse Farm Management System! The Horse Farm Management Software is constantly being refined and improved with horse farms in mind. With an easy-to-use “point-and-click” format, the farms are able to keep detailed records from breeding and foaling to billing and health records. The many convenient features allow streamlining and simplification of day-to-day operations of a fast-paced business.
The basic steps:
This manual covers the basic steps on using the software.The companion document to this is the HFM Installation Guide.That document will cover, step by step, how to install the software on your PC. When first installed, you will be allowed to use the software in an evaluation mode. The program will be fully functional with a few exceptions. First is that it will only be active for 60 days after you first start to use it. Also, there is a limit as to the number of horses and clients that can be added. If you’d like, you can add some of you own information (as this guide suggests) before you start to review the software, or you can just browse around and see how the program works. When you are ready to purchase the software, we will give you a key that will unlock the use restrictions and will provide you with an empty database to start to add all of your farm’s information. Any information added in the evaluation version will be discarded.
For more information:
See the Install CD menu option “Help Guides.”Please review this section for the most up-to-date information.
Contact us with any questions:
The Jockey Club Information Systems, Inc. Phone: 1-800-333-1778 821 Corporate Drive (859) 224-2800 Lexington, KY.40503 Fax: (859) 224-2810 E-Mail: [email protected] We are available to answer questions during our regular business hours: 8:00 am – 5:00 pm (Eastern Time) Monday – Friday We can be found on the web at http://www.tjcis.com.

Page 4 of 36 The Jockey Club Information Systems, Inc. Date: 7/1/2006
QUICK START GUIDE
Starting the Program for the First Time Once installed, the program will have installed a desktop icon labeled “Launch Horse Farm Management” Clicking this button will bring you to the following screen.
You will only need to click Evaluate once and your 60-day trial will begin.You do not need a registration key to try our HFM software. If you have purchased the software, you will need to contact us for your registration key before you will be able to use the software. Click on the Register button. You will be presented with the following dialog box.
Contact us at the (800) 333-1778 from 8 AM to 5 PM Eastern Time, Monday through Friday. Have the Installation ID ready. We in turn will provide you with the key that will enable you to use the software in an unrestricted manner. If you accidentally press the Register Key while you are evaluating the software, just click Cancel and you will be returned to the main menu.

Date: 7/1/2006 The Jockey Club Information Systems, Inc. Page 5 of 36
Using the Software The following section outlines the step-by-step process of setting up your farm’s information and entering your horses’ daily activity into the Horse Farm Management program.
Set up your Farm o From the main menu, select Master Files, Farms o A list of the farms (both your own, and those that you do business with) will be
displayed. o If your farm is not yet on the list, click the Add button. o At any time after you have added a farm to the system, you may edit that farm’s
information by clicking on the Edit button. o Also on this form is a Delete button. If you wish, you will be able to delete the farm
record as long as you have not associated that farm with any other records in the system.

Page 6 of 36 The Jockey Club Information Systems, Inc. Date: 7/1/2006
o Enter as much information as you can on each farm, including phone and fax numbers, the persons to contact, and any breeding requirements.
o Add any other farms that you will be interacting with during the breeding season. o Also on this form is a check box for “Active.” You will need to select this box for any
farm that you want to appear when searching for farms. o Once done, close the form and return to the Farm Search Menu.If done, click the
Close button to return to the main menu.

Date: 7/1/2006 The Jockey Club Information Systems, Inc. Page 7 of 36
Set up your company Staring with this version of the software, you can now maintain information from different companies from within the farm program.Each company has its own unique set of Clients, Owners, Farms and Horses. If you are using the evaluation version of software, you are limited to only one company.
o From the Main Menu,SelectSetup, Company o If this is a new company, select Add from this form, or if you making a change, select
the company and select Edit

Page 8 of 36 The Jockey Club Information Systems, Inc. Date: 7/1/2006
o Once you have selected your company, enter as much information as you can. o A new feature with this version is the option to make a company as being “Active.” If
checked, the company will appear in the various drop-down menus that feature Company as a selection.If you only have one company, select the Active option.
o The GL account number entry is optional. o A farm logo may be added on this form. If added, the logo will print on your
invoices.The logo file can be either is of a type of BMP or GIF. You’ll need to limit the size of the logo to no more than 120 x 80 pixels.
Date: 7/1/2006 The Jockey Club Information Systems, Inc. Page 9 of 36
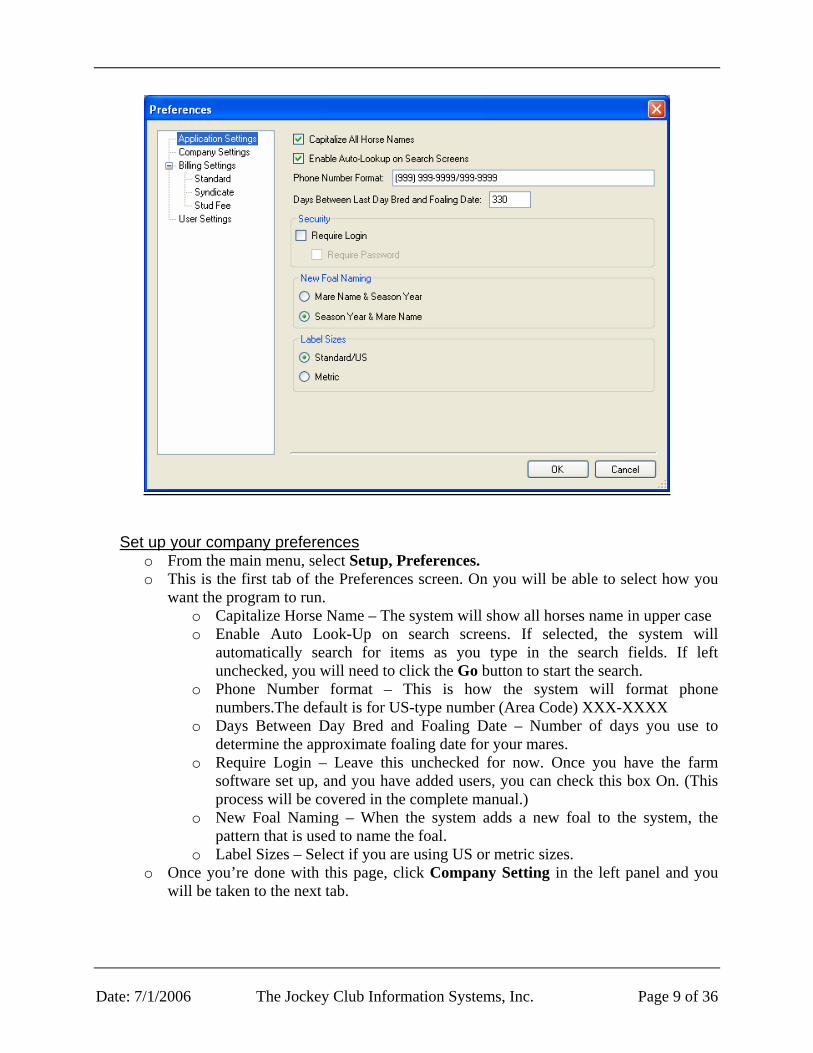
Set up your company preferences
o From the main menu, select Setup, Preferences. o This is the first tab of the Preferences screen. On you will be able to select how you
want the program to run. o Capitalize Horse Name – The system will show all horses name in upper case o Enable Auto Look-Up on search screens. If selected, the system will
automatically search for items as you type in the search fields. If left unchecked, you will need to click the Go button to start the search.
o Phone Number format – This is how the system will format phone numbers.The default is for US-type number (Area Code) XXX-XXXX
o Days Between Day Bred and Foaling Date – Number of days you use to determine the approximate foaling date for your mares.
o Require Login – Leave this unchecked for now. Once you have the farm software set up, and you have added users, you can check this box On. (This process will be covered in the complete manual.)
o New Foal Naming – When the system adds a new foal to the system, the pattern that is used to name the foal.
o Label Sizes – Select if you are using US or metric sizes. o Once you’re done with this page, click Company Setting in the left panel and you
will be taken to the next tab.
Page 10 of 36 The Jockey Club Information Systems, Inc. Date: 7/1/2006
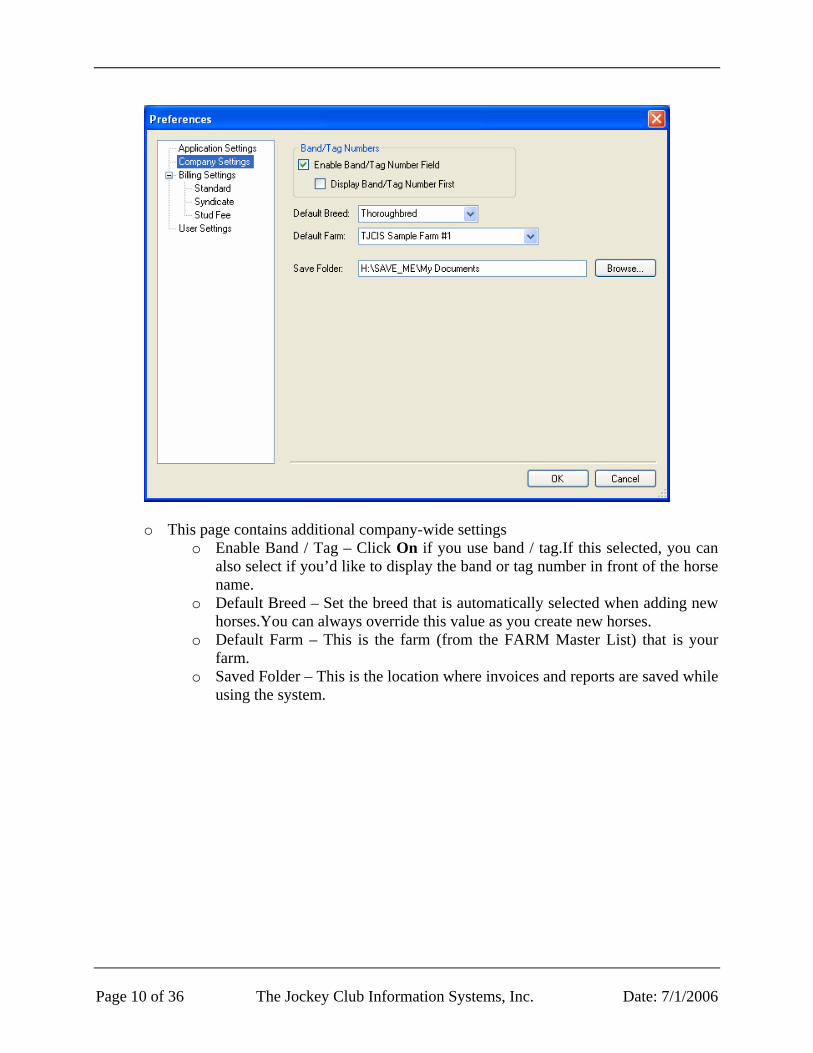
o This page contains additional company-wide settings o Enable Band / Tag – Click On if you use band / tag.If this selected, you can
also select if you’d like to display the band or tag number in front of the horse name.
o Default Breed – Set the breed that is automatically selected when adding new horses.You can always override this value as you create new horses.
o Default Farm – This is the farm (from the FARM Master List) that is your farm.
o Saved Folder – This is the location where invoices and reports are saved while using the system.

Date: 7/1/2006 The Jockey Club Information Systems, Inc. Page 11 of 36
Horse Type Entry /Edit Form The system requires a defined horse type when adding any horse to the system. Each horse will also have a Boarding Type that will be associated with a daily board rate.
o From the main menu, select Master Files, Horse Types o The system has a number of default horse types that are already present. If you need
additional, click on the New button.A blank record will be created on the bottom of this list.You can now type in the text for your new horse type.
o If you wish to remove a horse type, select that type and click the Remove button

Page 12 of 36 The Jockey Club Information Systems, Inc. Date: 7/1/2006
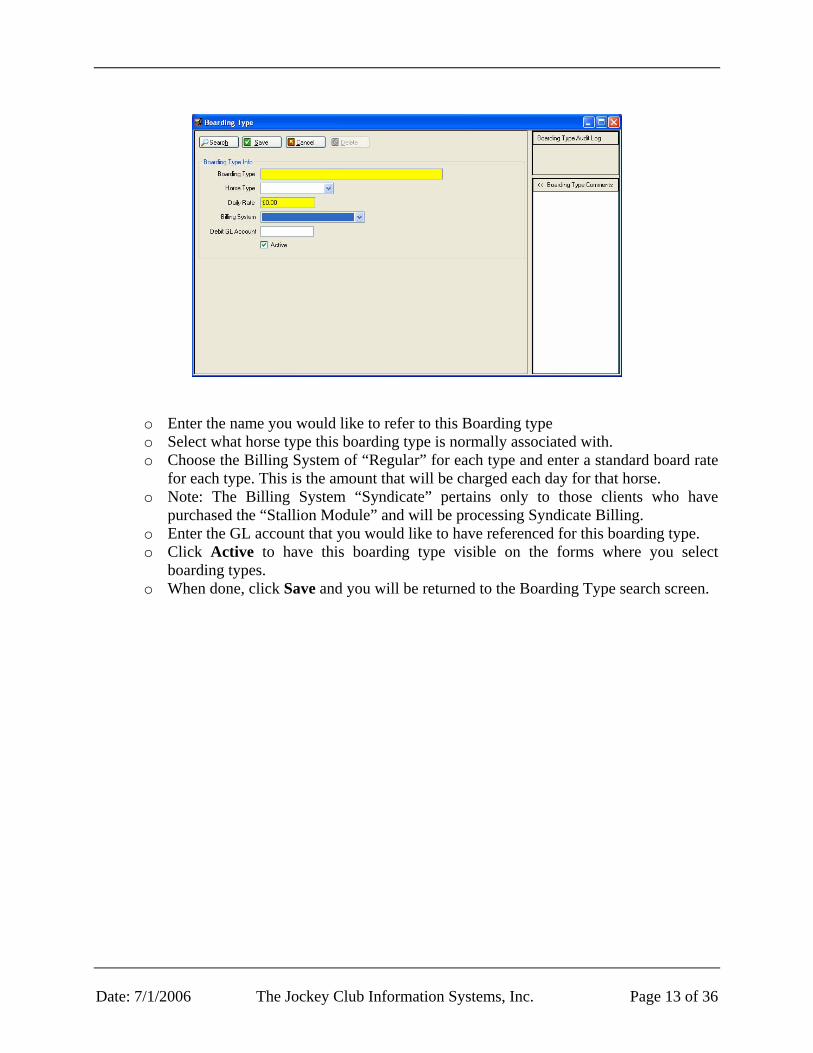
Boarding Type Entry /Edit Form
o From the main menu, select Master Files, Boarding Types o The system has a number of default boarding types already present. If you need
additional, click on the New button.If you wish to change a defined boarding type, click Edit.
Date: 7/1/2006 The Jockey Club Information Systems, Inc. Page 13 of 36
o Enter the name you would like to refer to this Boarding type o Select what horse type this boarding type is normally associated with. o Choose the Billing System of “Regular” for each type and enter a standard board rate
for each type. This is the amount that will be charged each day for that horse. o Note: The Billing System “Syndicate” pertains only to those clients who have
purchased the “Stallion Module” and will be processing Syndicate Billing. o Enter the GL account that you would like to have referenced for this boarding type. o Click Active to have this boarding type visible on the forms where you select
boarding types. o When done, click Save and you will be returned to the Boarding Type search screen.

Page 14 of 36 The Jockey Club Information Systems, Inc. Date: 7/1/2006
Client Entry/Edit form
o From the main menu, select Master Files, Clients o When first selected you will be shown the Client Search screen. o Select the Add button to add each horse owner, client, billing entity, etc., to the
system.

Date: 7/1/2006 The Jockey Club Information Systems, Inc. Page 15 of 36
o First add yourself as a client. o Next, enter all of your clients. You can enter just the last name and first name and
leave the farm/company name blank or you can enter just the farm name or you can enter both the last name, first name and the farm name. Enter as much information on each client as possible.
o Close the form and return to the Main Menu. Note: Later, when assigning ownership for horses you will be selecting clients from this Client Table.
Additional Notes:
Use Farm/Show Company Only. If the farm is the billing entity and not the client name, then check the “Use Farm/Company Name Only” checkbox and only the farm/company name will appear on the invoices and reports.(A) TIP: You can enter a client’s street or P.O. Box, skip the city and state, enter the zip code
and the system will automatically enter the city and state for you. TIP: When entering phone numbers, type in the number without spaces or dashes and the
system will automatically format it for you. For example, 8592242800 = (859) 224-2800.
A

Page 16 of 36 The Jockey Club Information Systems, Inc. Date: 7/1/2006
Horse Entry/Edit o From the main menu, select Master Files, Horses o When first selected you will be shown the Horse Search screen.

Date: 7/1/2006 The Jockey Club Information Systems, Inc. Page 17 of 36
o Enter horse’s name. o The default farm (yours) will be added automatically. o Enter the horse type. o Enter all of the basic information about this horse. o Next, you must assign an owner to this horse.When you have finished filling out the
fields on this tab, you must assign ownership.Click on the ownership tab. (A)
A

Page 18 of 36 The Jockey Club Information Systems, Inc. Date: 7/1/2006
When adding a horse to the system, you are required to identify the owner of the horse for billing purposes.
o Click on the New Date button. A box will pop up for you to enter the “Effective
Date of the Ownership.” This is usually the day that the horse arrived on your farm.
o The Client Search screen will open after you have entered an effective date. Select the current owner of the horse from the list.
o If more than one person owns the horse, click the New button and select the next owner. Each owner is entered on a separate line, so be sure to indicate the correct ownership percentages.
o All board and procedure charges will be billed to owners of horses based on the percent of ownership. Once ownership information has been entered (and ownership percentage totals 100%), close the form and return to the Horse Entry/Edit screen.
Note:Total Percent must always equal 100%
TIP: Effective Dates:The system will store all history ownership changes and will
process billing based on any combination of ownership percentages. When ownership changes, click on the Add New button. Enter the new Effective Date and select the new owner(s).Do not delete prior ownership dates/clients.
Date: 7/1/2006 The Jockey Club Information Systems, Inc. Page 19 of 36
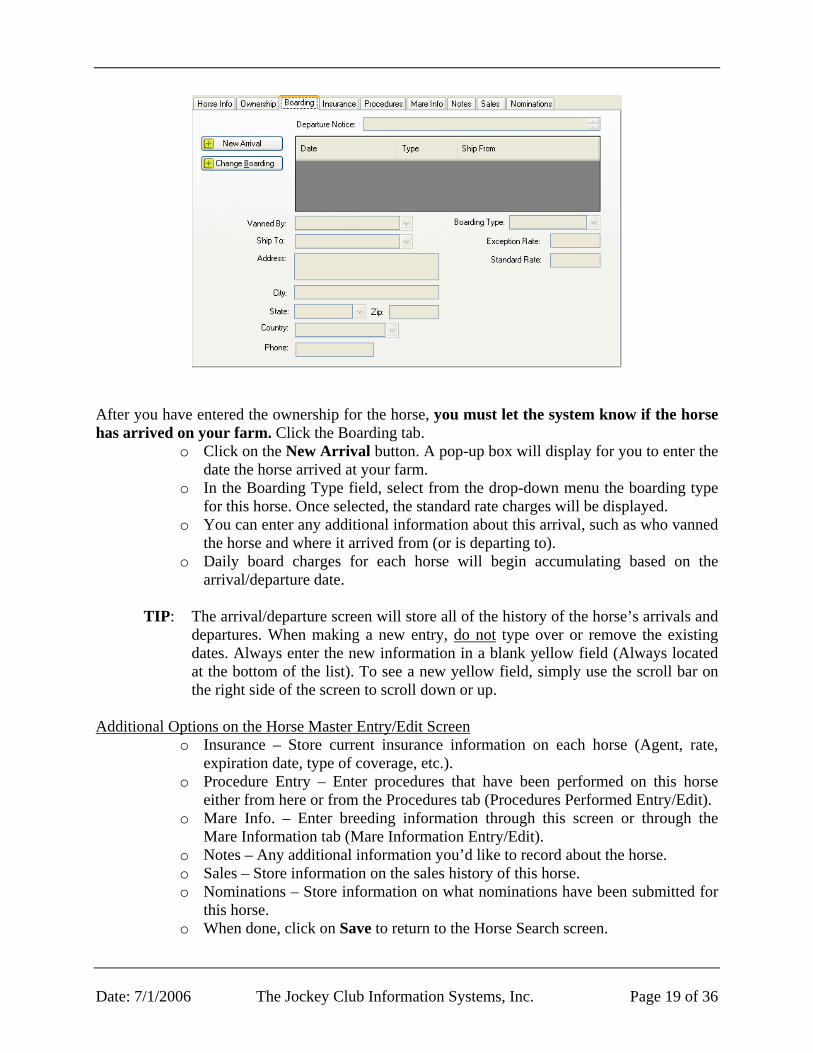
After you have entered the ownership for the horse, you must let the system know if the horse has arrived on your farm. Click the Boarding tab.
o Click on the New Arrival button. A pop-up box will display for you to enter the date the horse arrived at your farm.
o In the Boarding Type field, select from the drop-down menu the boarding type for this horse. Once selected, the standard rate charges will be displayed.
o You can enter any additional information about this arrival, such as who vanned the horse and where it arrived from (or is departing to).
o Daily board charges for each horse will begin accumulating based on the arrival/departure date.
TIP: The arrival/departure screen will store all of the history of the horse’s arrivals and
departures. When making a new entry, do not type over or remove the existing dates. Always enter the new information in a blank yellow field (Always located at the bottom of the list). To see a new yellow field, simply use the scroll bar on the right side of the screen to scroll down or up.
Additional Options on the Horse Master Entry/Edit Screen
o Insurance – Store current insurance information on each horse (Agent, rate, expiration date, type of coverage, etc.).
o Procedure Entry – Enter procedures that have been performed on this horse either from here or from the Procedures tab (Procedures Performed Entry/Edit).
o Mare Info. – Enter breeding information through this screen or through the Mare Information tab (Mare Information Entry/Edit).
o Notes – Any additional information you’d like to record about the horse. o Sales – Store information on the sales history of this horse. o Nominations – Store information on what nominations have been submitted for
this horse. o When done, click on Save to return to the Horse Search screen.

Page 20 of 36 The Jockey Club Information Systems, Inc. Date: 7/1/2006
Procedure Category Entry/Edit form
o From the main menu, select Master Files, Procedure Categories. o When first selected, you will be shown the Category search screen.
Each specific procedure is performed on a horse falls into a general “Procedure Category.” This allows procedure category totals to appear on your clients’ invoices (i.e. Total Vaccination Charges, Total Blacksmith Charges, etc.)

Date: 7/1/2006 The Jockey Club Information Systems, Inc. Page 21 of 36
o Select Add New to add each Category. o Enter a category name.It should be descriptive, such as De-worming, Vaccinations,
Blacksmith, Medical, Nominations/Registration, etc. o Select whether or not you want items in this category to print on your departure form
(No, Yes, Last). If you select “No,” the procedures that have been performed in this category will not print on the departure form. If you select “Yes,” the procedures that have been performed in this category will print on the departure form.If you select “Last,” only the last occurrence of the procedures that have been performed in this category will print on the departure form.
o [Optional] Select an appropriate billing category. o Enter the GL Account Code that you would like to have the procedure reference. o When done, click on the Save button to return to the Procedure Category list screen.

Page 22 of 36 The Jockey Club Information Systems, Inc. Date: 7/1/2006
Procedure Master Entry/Edit form
o From the main menu, select Master Files, Procedure Masters o When first selected, you will be shown the Procedure Master Search screen.

Date: 7/1/2006 The Jockey Club Information Systems, Inc. Page 23 of 36
o Procedure Master Name – Enter the name of each specific procedure that may be performed on a horse on a regular basis (Rabies Vaccination, X-Ray, Deworm – Strongid, Palpation, Ultrasound, Trim 4, Jockey Club Registration, etc.).
o Default Charge – Enter the charge for each procedure if there is one. o Procedure Category – Select the corresponding Procedure Category for that procedure
from the pull-down menu. o Default Preformed By – If this procedure is typically done by the vet or some other
person, you can enter that name here.It will be the name listed when you perform this procedure. You always have the option of changing the name at that time also.
o Select whether or not you want items in this item to print on your departure form (No, Yes, Last). If you select “No,” the procedures that have been performed in this category will not print on the departure form. If you select “Yes,” the procedures that have been performed in this category will print on the departure form. If you select “Last,” only the last occurrence of the procedures that have been performed in this category will print on the departure form.
o Active – Click this on if you wish to have this procedure listed in the drop-down selection lists.
o Default to Appear on Invoice – Click on if you want this procedure to appear on invoices. You have the option to change this as you perform each procedure.
o [Optional] Checkboxes help identify special procedure: Breeding, Health, Foaling, or an arrival/departure.
o Click Box – Recurring. If selected, this procedure will be of the type that happens between two dates.Once you actually perform this procedure; you will be shown an additional field (Ending Date) on the Procedure Perform form.
o Once you have finished filling in the form, click on the Save button
Note:After you have finished setting up the program, you will be entering all of the daily procedures that have actually been performed on your horses. At that time, you will be selecting one of these procedures from a master listing in the Procedures Performed Entry/Edit screen.

Page 24 of 36 The Jockey Club Information Systems, Inc. Date: 7/1/2006
Initial A/R Client Balances Form o From the main menu, select Setup, Billing Setup, AR Maintenance o Add the ending balances for each client from your previous billing.(You can put the
full amount in the Current column, or you may want to break down the amount owed into Current, Over 30, Over 60, Over 90 and Accumulated Service Charges in order for the Aged A/R Balance Reports to be correct.)
o Enter the Due Date for these balances.This would be the date that you ended billing in your previous accounting system.
o When done, click on Save button Note:The amounts entered in this table will be reflected as the beginning balance on the first billing run performed.

Date: 7/1/2006 The Jockey Club Information Systems, Inc. Page 25 of 36
Health Record Entries
Adding Procedures That Have Been Performed on Horses
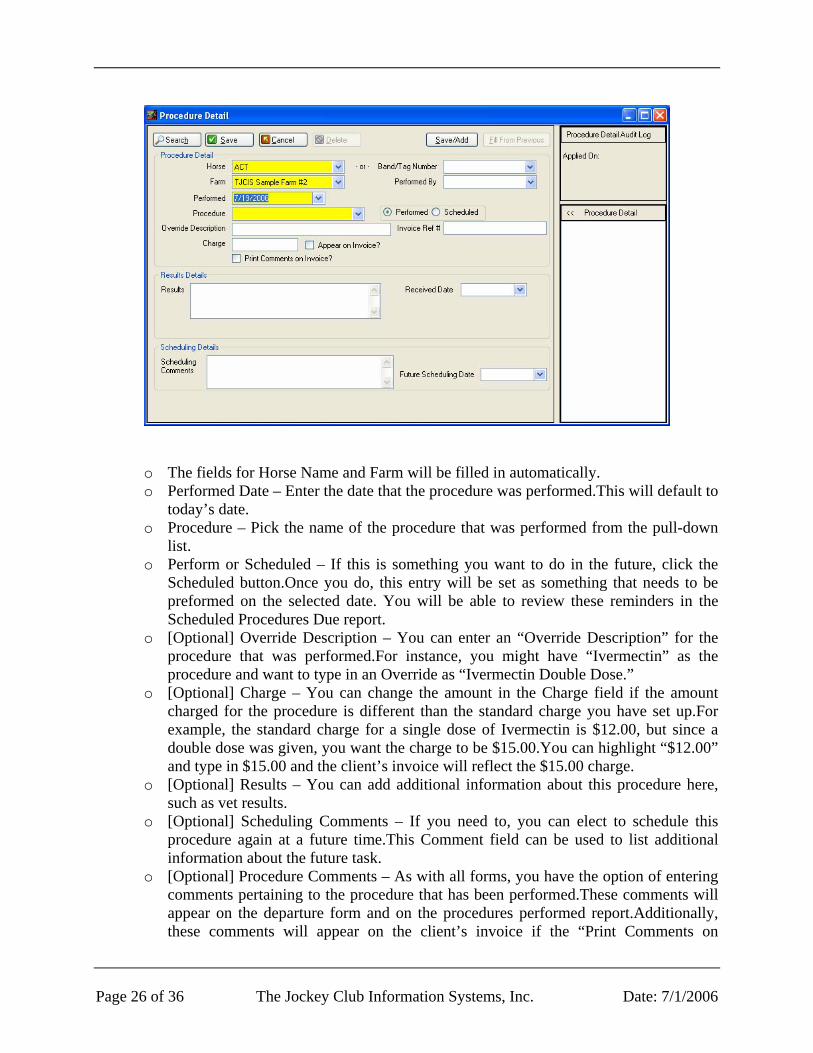
o From the main menu, select Procedure, Procedure Performed. o The Horse Selection screen will be displayed. o Select a horse name from the list. The procedures done on that horse will now be
displayed. o You may either edit an existing procedure or click Add to create a new record.
Page 26 of 36 The Jockey Club Information Systems, Inc. Date: 7/1/2006
o The fields for Horse Name and Farm will be filled in automatically. o Performed Date – Enter the date that the procedure was performed.This will default to
today’s date. o Procedure – Pick the name of the procedure that was performed from the pull-down
list. o Perform or Scheduled – If this is something you want to do in the future, click the
Scheduled button.Once you do, this entry will be set as something that needs to be preformed on the selected date. You will be able to review these reminders in the Scheduled Procedures Due report.
o [Optional] Override Description – You can enter an “Override Description” for the procedure that was performed.For instance, you might have “Ivermectin” as the procedure and want to type in an Override as “Ivermectin Double Dose.”
o [Optional] Charge – You can change the amount in the Charge field if the amount charged for the procedure is different than the standard charge you have set up.For example, the standard charge for a single dose of Ivermectin is $12.00, but since a double dose was given, you want the charge to be $15.00.You can highlight “$12.00” and type in $15.00 and the client’s invoice will reflect the $15.00 charge.
o [Optional] Results – You can add additional information about this procedure here, such as vet results.
o [Optional] Scheduling Comments – If you need to, you can elect to schedule this procedure again at a future time.This Comment field can be used to list additional information about the future task.
o [Optional] Procedure Comments – As with all forms, you have the option of entering comments pertaining to the procedure that has been performed.These comments will appear on the departure form and on the procedures performed report.Additionally, these comments will appear on the client’s invoice if the “Print Comments on

Date: 7/1/2006 The Jockey Club Information Systems, Inc. Page 27 of 36
Invoice” box has been checked. o SAVE/ADD – if you are doing the same procedure on a number of horses, you can
click the SAVE/ADD button.Doing so will save the current record and enable the FILL FROM PREVIOUS button.Clicking this button (after SAVE/ADD) will recall all of the information you had just entered.You can now select a new horse from the horse drop-down list and add the procedure to this new horse.
o Clicking the Save button will save the record and return you this list of procedures for the selected horse.

Page 28 of 36 The Jockey Club Information Systems, Inc. Date: 7/1/2006
Recording your breeding season A.Creating a Mare’s Breeding “Season” Record
o From the main menu, select Mare Info, Mares.The Mare Search page will display the list of horses you have setup with a horse type of Mare.(You can also get to this screen by clicking the “Mare Info” button in the “Horse Entry/Edit” form.)
o Select a horse name from the dropdown box and press Edit. o Season Year – Next to the season year drop-down is a New button. Click on this
button and a pop-up box will appear.You will be able to enter the Season year, 2006 for example.Click OK to confirm your entry. The year you have entered will be the selected year.
o Starting Status – Enter the mare’s Starting Status (Maiden, In Foal, etc.). o Booked To – Enter the name of the stallion that the mare is scheduled to be bred to
for that breeding season (“Booked To” field).You can either type in the name of the stallion, or if you have entered the stallion in your master horse list, click on the magnifying glass icon and select the stallion from your master list of horses.

Date: 7/1/2006 The Jockey Club Information Systems, Inc. Page 29 of 36
B.Booking the Mare for Breeding o Open the Mare Info Entry/Edit form for the mare and select the season that you
would like to work with. o Click on the Breeding Dates tab to open the Breeding Dates Entry/Edit Screen. o To add a new breeding record, click the New button. o Enter the date the breeding is scheduled (Booked Date). o Enter what time the mare is booked (Booked Time). o The system will default the status to Scheduled and place the name of the stallion in
the Bred To column. o Close the form to return to the Mare Info Entry/Edit form.
C.Recording the Breeding Dates
When you have confirmation that the mare has been bred: o Open the Mare Information Entry/Edit form for the mare and select the season that
you are working with. o Click on the Breeding Dates tab to open the Breeding Dates Entry/Edit screen o From the drop-down under Status, select Bred. o Save the record by clicking the Savebutton, or by selecting a different tab on the
Mare form

Page 30 of 36 The Jockey Club Information Systems, Inc. Date: 7/1/2006
Billing
Generate Board Charges To start the billing process, the system needs to calculate board and procedure charges for each horse, and allocate all charges to the appropriate owner(s) based upon arrival and departure dates; percentages of ownership, and dates the charges were incurred.All of this is done in a single process.
o From the main menu, select Billing, Standard, Generate Billing. o Select Generate Board Charges. o Select the billing range by entering the Starting Date and the Ending Date for the
billing you are gong to process. o You can also generate billing for a single client and or a single horse.By leaving this
drop-down as ALL, clients who have had actively within the selected date range will have invoices created.
o Click Generate to begin processing. Processing takes only a few minutes, depending on the size of the farm
Note:The Board Charge Generation process may be done as many times as necessary. If you generate, review the pre-billing and then find something that needs to be corrected and/or changed (adding procedures, payments, receipts; changing ownership, board rates, board types, etc), simply make the necessary changes and generate again. This generation process simply allows the system to sort through all of the records to see what should be included in the billing date range you have selected, as well as to pick up any changes you have just made.Once you are satisfied that the Pre-billing is correct, continue the billing process by printing or viewing the billing reports. These reports will be used to verify the billing charges and may be run as many times as necessary. In order for these reports to print accurate, up-to-date information, remember that if you have made any changes, you must first “Generate Board Charges” before running the reports.

Date: 7/1/2006 The Jockey Club Information Systems, Inc. Page 31 of 36
Billing Reports After you have generated, you will be able to see the preliminary charges by reviewing the Preliminary Reports.These reports include the Pre-billing Report, Edit Invoices, etc.These reports allow you to review your billing work before you finalize the billing. Your billing is not complete until you finalize billing.
Billing Reports
o Pre-billing is a summary of what the billing will consist of. o Adjustments Report will show any positive or negative adjustments that have been
applied to the billing. o Payments Report is a report that shows a complete listing of all of the cash receipts
you have entered for this billing cycle.This list should always reconcile to your bank deposits.
o Boarding Report is a report that lists only boarding charges for each horse.It will show the horse’s type, boarding dates, rate, total amount charged and a grand total of horse days for the billing cycle.
o Invoices – These are trial invoices. You will be able to see what the invoice contents and balances will look like.THESE ARE NOT INTENDED TO BE SENT TO THE CLIENT.The final invoices are printed after you finalized your billing

Page 32 of 36 The Jockey Club Information Systems, Inc. Date: 7/1/2006
o Preliminary Aged A/R Report shows what your client balances will look like after this billing cycle is closed.
o Service Charge Report lists late fees that are going to be applied to individual clients for this billing cycle.
o Print Invoices – Select this option when you are ready to print your invoices. o Closing Summary is a one-page report summarizing your clients’ Beginning
Balances, Cash Receipts, Direct Charges/Credits, Procedure Totals, etc.
NOTE:During a typical billing cycle you would generate board and procedure charges, and then you would use the monthly billing reports to verify all information. After you have made all necessary changes, it is a good idea to generate again, verify that all of the information will be invoiced correctly, and then print your invoices.
Finalize Billing
To make the billing process final, the system must update tables to reflect the current billing balances, record aging balances, flag procedures as having been invoiced, etc.This process is accomplished when you select “Finalize Billing”
o Click Finalize to begin the processing. NOTE:The “Finalize” option should not be selected until you have reviewed the invoices and are satisfied that they are correct.

Date: 7/1/2006 The Jockey Club Information Systems, Inc. Page 33 of 36
Maintaining Client Balances
Adding Adjustments
o From the main menu, selectA/R Transactions, Adjustments.You will be shown the list
of clients you have in you system. o Select the client’s name from the list. o Click Add if you are entering a new Direct Credit/Charge for that client or click Edit
if you want to change or review an existing entry for that client

Page 34 of 36 The Jockey Club Information Systems, Inc. Date: 7/1/2006
o To add a Direct Credit/Charge, enter the date that the adjustment is to occur on. o Enter the amount of the adjustment (the system will automatically fill in the G/L
Account Number, the G/L Amount and the Total). o You can either enter the amount as a pure credit against the account, or you can apply
the amount against a specific invoice.
Note: A positive number such as $25.00 will add a charge to the client’s next invoice and a negative number such as -$25.00 or ($25.00) will deduct the amount from the next invoice. Add the optional Invoice Comment which will show the explanation for the adjustment on the client’s invoice.

Date: 7/1/2006 The Jockey Club Information Systems, Inc. Page 35 of 36
Adding Payments
o From the main menu, select A/R Transactions, Payments. You will be shown the list of clients you have in you system.
o Select the name of the client that has made a payment. o Click Add to enter a new payment (or Edit to change an existing entry).

Page 36 of 36 The Jockey Club Information Systems, Inc. Date: 7/1/2006
o Enter the date that the payment was made on. o Select Board Payment in the Applied To field. o Enter the amount of the payment. o You can now apply the payment to any open invoices that the client may have. You
may also elect to leave the payment amount as unapplied.You may do this if the client gives you a down payment against future charges.
o To apply the payment, click the Apply box next to the invoice.If enough money (payment) is available, the system will fill in the amount to be applied. If you wish you can adjust this amount. For example, the invoice total is $525, but the customer is disputing a $75 charge. You could enter $450 in the Amount To Apply column.This would leave the reminder of the payment to be applied to other outstanding invoices or remain unapplied.
o Once done, click the Save button.You’ll be returned to the payment listing for that customer.