scripting reference manual - weiss robotics · - 4 - 1 introduction the wsg family of grippers...
TRANSCRIPT

WSG Series of Intelligent Servo-Electric Grippers
Scripting Reference Manual
Firmware Version 4.0.0
July 2015
- 1 -
Contents
1 Introduction ................................................................................................ 4
1.1 The Lua scripting language .................................................................................... 4
1.2 The scripting environment .................................................................................... 4
1.2.1 Using the interactive scripting editor ............................................................................ 4
1.2.2 Uploading and downloading scripts .............................................................................. 5
1.2.3 Automatically run a script on startup ............................................................................ 6
1.2.4 Accessing files from within a script ............................................................................... 7
1.2.5 Restrictions .................................................................................................................... 8
2 WSG-specific Lua extensions ........................................................................ 9
2.1 Generic extensions ................................................................................................ 9
2.1.1 Error codes .................................................................................................................... 9
2.1.2 Print a formatted string - printf() .................................................................................. 9
2.1.3 Wait some time - sleep() ............................................................................................. 10
2.1.4 Convert bytes into a Lua number - bton() ................................................................... 10
2.1.5 Convert Lua number into bytes - ntob() ...................................................................... 11
2.1.6 Convert an error code into a string – etos() ................................................................ 11
2.1.7 Convert an error code into bytes – etob() ................................................................... 12
2.1.8 Replace characters inside a string – replace() ............................................................. 12
2.2 System ............................................................................................................... 13
2.2.1 Get system information - system.info() ...................................................................... 13
2.2.2 Device tag - system.tag() ............................................................................................. 13
2.2.3 Get the service tag - system.servicetag() .................................................................... 14
2.2.4 Get temperature - system.temperature() ................................................................... 14
2.3 Gripper state and device information .................................................................. 15
2.3.1 Read system state flags - gripper.state() ..................................................................... 15
2.3.2 Get the system state as table - gripper.flags() ............................................................ 15
2.3.3 Get gripper limits - gripper.limits() .............................................................................. 16
2.4 General purpose I/O (GPIO) ................................................................................ 17
2.4.1 Access a single pin - gpio.pin() ..................................................................................... 17
2.4.2 Set an output pin to high - gpio.set() .......................................................................... 17
2.4.3 Set output Pin to low - gpio.clear().............................................................................. 18
2.4.4 Access I/O pins directly - gpio.pins() ........................................................................... 18
2.5 Gripping ............................................................................................................. 19
2.5.1 Move fingers - grasping.move()................................................................................... 19
2.5.2 Grip a part - grasping.grasp() ....................................................................................... 20
2.5.3 Release a part - grasping.release() .............................................................................. 21
2.5.4 Manually clamp a part - grasping.clamp() ................................................................... 22
- 2 -
2.5.5 Manually stop clamping a part - grasping.stop_clamping() ........................................ 23
2.5.6 Get gripper state - grasping.state() ............................................................................. 24
2.5.7 Get gripper state as string – grasping.statestring() ..................................................... 25
2.5.8 Get gripper statistics - grasping.stats() ........................................................................ 26
2.5.9 Reset gripper statistics - grasping.resetstats() ............................................................ 26
2.6 Motion Control ................................................................................................... 27
2.6.1 Speed controller gain - mc.pid() .................................................................................. 27
2.6.2 Position controller gain - mc.kv() ................................................................................ 28
2.6.3 Finger speed - mc.speed() ........................................................................................... 28
2.6.4 Finger opening width - mc.position() .......................................................................... 29
2.6.5 Get block - mc.blocked() .............................................................................................. 30
2.6.6 Current gripping force and force limit - mc.force() ..................................................... 30
2.6.7 Get approximated gripping force - mc.aforce()........................................................... 31
2.6.8 Tare force sensors - mc.tare() ..................................................................................... 31
2.6.9 Overdrive Mode - mc.overdrive() ................................................................................ 32
2.6.10 Finger acceleration limit - mc.acceleration() ............................................................... 33
2.6.11 Set soft limits - mc.softlimits() ..................................................................................... 33
2.6.12 Enable soft limits - mc.softlimits_en() ......................................................................... 35
2.6.13 Soft limits reached - mc.softlimits_reached() ............................................................. 35
2.6.14 Stop current movement - mc.stop() ............................................................................ 36
2.6.15 Are the fingers moving? - mc.busy()............................................................................ 36
2.6.16 Advanced finger positioning - mc.move() ................................................................... 37
2.6.17 Move fingers using a ramp profile – mc.move_ramp() ............................................... 38
2.6.18 Move fingers using a rectangular profile – mc.move_rect() ....................................... 39
2.6.19 Stop in case of an error - mc.faststop() ....................................................................... 39
2.6.20 Execute custom trajectory - mc.trajectory() ............................................................... 40
2.6.21 Execute homing sequence - mc.homing() ................................................................... 41
2.7 Command Interface ............................................................................................ 42
2.7.1 Interface – cmd.interface() .......................................................................................... 42
2.7.2 Get command statistics – cmd.stats() ......................................................................... 42
2.7.3 Host connected? – cmd.online() ................................................................................. 43
2.7.4 Register a packet ID – cmd.register() .......................................................................... 44
2.7.5 Unregister a packet ID – cmd.unregister() .................................................................. 44
2.7.6 Send a data packet – cmd.send() ................................................................................ 45
2.7.7 Get number of available packets – cmd.available() .................................................... 46
2.7.8 Read a received data packet – cmd.read() .................................................................. 47
2.8 Finger control ..................................................................................................... 48
2.8.1 Get number of fingers – finger.count() ....................................................................... 48
2.8.2 Get finger type – finger.type() ..................................................................................... 48
2.8.3 Get or set a finger parameter – finger.param()........................................................... 49
2.8.4 Get the current finger data – finger.data().................................................................. 50
2.8.5 Digital sensor interface – finger.interface()................................................................. 51

- 3 -
2.8.6 Get finger state – finger.state() ................................................................................... 54
2.8.7 Get the finger state as table - finger.flags()................................................................. 55
2.8.8 Control finger power – finger.power() ........................................................................ 56
2.8.9 Get analog voltage – finger.analog() ........................................................................... 56
2.8.10 Digital I/O pin – finger.iopin() ...................................................................................... 57
2.8.11 Set direction of digital I/O pin – finger.iodir() ............................................................. 58
2.8.12 Write data to finger – finger.write() ............................................................................ 58
2.8.13 Bytes available – finger.bytes_available() ................................................................... 59
2.8.14 Read data from finger – finger.read() ......................................................................... 60
2.8.15 Synchronous data transfer via SPI – finger.spi() .......................................................... 61
2.8.16 Finger configuration memory – finger.config() ........................................................... 62
2.9 Fieldbus interface ............................................................................................... 63
2.9.1 Get connection state – fieldbus.online() ..................................................................... 64
2.9.2 Get bitrate – fieldbus.bitrate() .................................................................................... 64
2.9.3 Access an I/O flag – fieldbus.flag() .............................................................................. 65
2.9.4 Write/read user flags – fieldbus.flags() ....................................................................... 66
2.9.5 Set one or more output flags – fieldbus.fset() ............................................................ 66
2.9.6 Clear one or more output Flags – fieldbus.fclear()...................................................... 67
2.9.7 Wait for activity – fieldbus.waitact() ........................................................................... 68
Appendix A. Status codes .............................................................................................. 69
Appendix B. System state flags ...................................................................................... 71
Appendix C. Finger state flags ....................................................................................... 74
Appendix D. Syntax notation ......................................................................................... 75

- 4 -
1 Introduction
The WSG family of grippers includes a powerful scripting engine based on the LUA language that
enables you to implement application specific behavior of your gripper. The WSG gripping modules
are using LUA interpreter version 5.1.4.
1.1 The Lua scripting language
Lua is a lightweight and extensible configuration language and was developed by a research group
around Roberto Ierusalimschy at Pontifical Catholic University of Rio de Janeiro, Brazil in 1993. This
manual will not give you a complete introduction in how to program Lua, but will focus on the
gripper-specific extensions of the programming language. A good source for learning Lua and for
programming examples is the official Lua Website at http://lua.org and the Lua user’s website at
http://lua-users.org.
In addition, the following books will give you an introduction in the Lua programming language:
For beginners in programming, we recommend this book:
K. Jung, A. Brown: Beginning Lua Programming, 2007, ISBN 0-470-06917-1
If you are already familiar with programming, you may read instead:
R. Ierusalimschy: Lua 5.1 Reference Manual, August 2006, ISBN 85-903798-3-3
R. Ierusalimschy: Programming in Lua, March 2006, ISBN 85-903798-2-5
There is also a German edition of the latter one:
R. Ierusalimschy: Programmieren mit Lua, September 2006, ISBN 3-937514-22-8
1.2 The scripting environment
1.2.1 Using the interactive scripting editor
For developing and testing scripts, the WSG gripping modules contain an interactive script editor (see
Figure 1) that is accessible over its web interface. It consists of an editor with syntax highlighting and
a console window to display log messages from your script. To open the interactive script editor, go
to the gripper’s website by entering its IP address in your browser’s address line. Alternatively, you
can use the symbolic name http://wsg50-00000000.local of your gripper, replacing the “00000000”
by the serial number of your Gripper (this requires mDNS to be enabled on the gripper and an mDNS
service like “Bonjour” running on your PC). This 8 digit number can be found on the type label
located above the connectors. When accessing the WSG’s web interface, you may have to log in first,
depending on the security settings of the gripper.
You will need administrator rights to use the interactive script editor
- 5 -
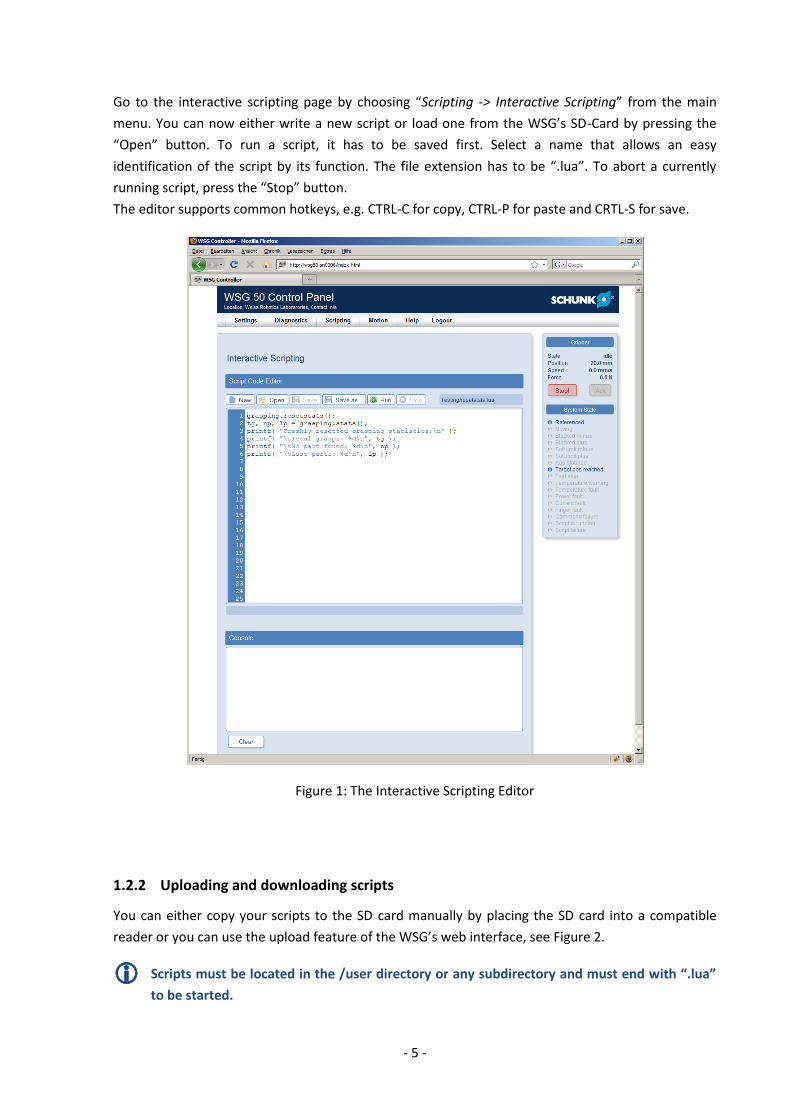
Go to the interactive scripting page by choosing “Scripting -> Interactive Scripting” from the main
menu. You can now either write a new script or load one from the WSG’s SD-Card by pressing the
“Open” button. To run a script, it has to be saved first. Select a name that allows an easy
identification of the script by its function. The file extension has to be “.lua”. To abort a currently
running script, press the “Stop” button.
The editor supports common hotkeys, e.g. CTRL-C for copy, CTRL-P for paste and CRTL-S for save.
1.2.2 Uploading and downloading scripts
You can either copy your scripts to the SD card manually by placing the SD card into a compatible
reader or you can use the upload feature of the WSG’s web interface, see Figure 2.
Scripts must be located in the /user directory or any subdirectory and must end with “.lua”
to be started.
Figure 1: The Interactive Scripting Editor

- 6 -
You need administrator rights to upload or download scripts
1.2.3 Automatically run a script on startup
Via the web interface of the WSG Gripper (go to the system settings page via “Settings -> System”),
you may specify any script from the /user directory to be automatically executed when the gripper
starts up (see Figure 3). Care should be taken that the script runs error-free. It is easy to imagine that
you can seriously disturb the normal operation of the gripper with an erroneous script. We
recommend testing the script extensively using the interactive scripting editor before using it as an
autorun script.
In autorun mode, all console outputs are discarded, unless you open the web interface and go to the
interactive scripting editor page. There, you can see the currently running script.
In case of a script error, a FAST STOP is raised and the error is written to the system log.
Scripts must be located in the /user directory to be selectable as autostart script.
You need administrator rights to configure the autostart feature
Figure 2: Up-/Download Page
- 7 -
1.2.4 Accessing files from within a script
You can create and access files on the WSG Gripper’s integrated SD card. This may be useful e.g. to
store gripping information on different parts that have to be gripped in the same process. The
default directory when starting a script is /user. To read the content of a file, you can use the
example code below. It accesses the file test.txt which is assumed to be located in the user directory
on the SD card. For a complete “How To” on accessing files from within LUA, please see the LUA
Manual at http://lua.org.
Example
f = assert( io.open("test.txt", "r" ))
text = f:read( "*all" )
f:close()
print( text )
Care should be taken if accessing a file using an absolute path, as manipulation of system-
related files (outside the /user directory) may endanger the correct operation of the gripper!
Figure 3: Configuring an autostart script

- 8 -
1.2.5 Restrictions
Even if the WSG Grippers support the complete functional range and syntax of the LUA programming
language, the following restrictions apply when running a script on the gripper hardware:
Arithmetic calculations are done using single precision floating point functions.
Environment variables are not available.
Console buffer does not block if full. Prints to the console (either via “print” or “printf”) are
internally buffered with a buffer of a constant length. If the script constantly prints messages
but they are not polled by a client (i.e. the web interface’s console window is not active), the
message buffer may discard new messages if it is already full.
The script cannot read characters from the standard input (e.g. keyboard input).
If the script was started automatically on startup, a script error will raise a FAST STOP
condition and an entry describing the error is created in the system log.

- 9 -
2 WSG-specific Lua extensions
2.1 Generic extensions
2.1.1 Error codes
The WSG firmware provides the available error codes as global variables that can be used from
within your script. They can be used as a standard variable inside your code, e.g. to print the error
number for success to the console, you can simply write printf( "E_SUCCESS = %d\n", E_SUCCESS ).
Since LUA does not support constants by default, the provided variables can be changed (however
this is not a good idea!).
For a list of the available error codes see Appendix A (chapter 2.9).
2.1.2 Print a formatted string - printf()
Print a formatted string to the console. The format string follows the same rules as the ANSI C printf()
command. The following options/modifiers are not supported: *, l, L, n, p, h. For further details on
formatting strings, see the description of string.format in the LUA Reference Manual.
The console uses line buffering for printf() outputs. To force a line to be printed immediately,
terminate it using a carriage return ('\n') character.
The internal buffer of the console output will hold a limited number of characters. If no
console window is open or your script prints too much text, this buffer may become full and
additional text may be lost!
Syntax
printf( fmt, […] )
Parameters
fmt
Format string
… (optional)
Optional list of parameters that are output using the format described in fmt.
Return Value
none
Example
printf( “Hello World!\n” ) -- outputs “Hello World” at the console
- 10 -
printf( “This is a %s: %d\n”, “ten”, 10 ) -- outputs “This is a ten: 10” at the console
2.1.3 Wait some time - sleep()
Pauses the script execution for a given time.
Syntax
sleep( ms )
Parameters
ms (integer)
Time to wait in milliseconds. Negative values are treated as 0.
Return Value
none
Example
sleep( 1000 ) -- waits for 1 second
2.1.4 Convert bytes into a Lua number - bton()
Converts a table with 4 bytes representing an IEEE 754 single precision floating point number into a
LUA number.
Syntax
<number> = bton( bytes )
Parameters
bytes <table>
Table containing four integers in the range of [0..255]. Byte addressing is little endian.
Return Value
floating point number
Example
number = bton( {164, 112, 157, 63} )
printf( “Number is %g\n”, number ) -- outputs “Number is 1.23” at the console
- 11 -
2.1.5 Convert Lua number into bytes - ntob()
Interprets a LUA number as an IEEE 754 single precision floating point number and converts it into its
byte representation.
Syntax
<number> = ntob( number )
Parameters
number <number>
LUA Floating point number.
Return Value
Returns a table with four integers in the range of [0..255] that holds the binary representation of the
passed LUA number.
Example
bytes = {}
bytes = ntob( 1.23 )
print( bytes ) -- outputs “164 112 157 63” at the console
2.1.6 Convert an error code into a string – etos()
Some functions may return a gripper-specific error code as a return value. This function converts the
error code into given as parameter into a human readable string. For a list of error codes, see the
Appendix A.
Syntax
<string> = etos( errorcode )
Parameters
errorcode (integer)
Error code.
Return Value
returns a human readable string describing the error.
Example
s = etos( E_CMD_FAILED )
printf( "Error text: %s\n", s ) -- Will output: "Error text: Command failed"
- 12 -
2.1.7 Convert an error code into bytes – etob()
Convert the given error code into its two-byte representation as it is used e.g. as a return code for
custom commands. The function does not check for the validity of the given error code. For a list of
error codes, see the Appendix A.
Syntax
<table> = etob( errorcode )
Parameters
errorcode (integer)
Error code. See Appendix A for a list of error codes.
Return Value
Returns a table containing the two byte values as integer values (range 0..255).
Example
-- This will output "Error code bytes: 18, 0" at the console:
printf( "Error code bytes: %d, %d\n", etob( E_CMD_FAILED ))
2.1.8 Replace characters inside a string – replace()
Replace all occurrences of the old character inside a string by a new character.
Syntax
<string> = replace( str, oldch, newch )
Parameters
str (string)
String where the characters should be replaced.
oldch (string)
Character to be replaced. This string must only contain one character.
newch (string)
Replacement character. This string must only contain one character.
Return Value
Returns a copy of the given string where the characters have been replaced.
Example
-- Replace all points by commas:
s = "These are numbers: 1.234 and 3.45"
print( replace( s, ".", "," )) -- -> produces "These are numbers: 1,234 and 3,45"
- 13 -
2.2 System
2.2.1 Get system information - system.info()
Returns a table containing the system information and the gripper-specific physical limits.
Syntax
<table> = system.info()
Parameters
none
Return Value
Table containing the system information:
<table>.serial_number = <int> Serial Number
<table>.hw_revision = <int> Hardware revision
<table>.sw_revision = <string> Software revision
<table>.bl_version = <string> Bootloader version
<table>.type = <string> System type, e.g. "WSG 50"
<table>.macaddr = <string> The sensor’s MAC address
Example
info = {}
info = system.info()
printf( "type: %s mm\n", info.type ) -- outputs: “type: WSG 50”
2.2.2 Device tag - system.tag()
Sets and/or returns the system tag. The system tag is a string that can be set to any value. You can
write e.g. application specific data or the gripper location to it. The system tag can be accessed via
the command interface, too.
Syntax
<string> = system.tag( [value] )
Parameters
value (string), optional
If this parameter is passed, it defines the new value for the tag.
Return Value
Current tag value.
- 14 -
Example
system.tag( "Example" ) -- Set the system tag to "Example"
printf( "System tag is %s\n", system.tag()) -- outputs: "System tag is Example"
2.2.3 Get the service tag - system.servicetag()
Return the service tag of the device. The service tag is an alphanumeric string that is used to identify
the device for service purposes.
Syntax
<string> = system.servicetag()
Parameters
none
Return Value
String containing the service tag of the device
Example
tag = system.servicetag()
printf("The system service tag is %s\n", tag )
2.2.4 Get temperature - system.temperature()
Return the temperature of the device.
Syntax
<number> = system.temperature()
Parameters
none
Return Value
Temperature in degrees celsius
Example
t = system.temperature()
printf("The current system temperature is %f degC\n", t )

- 15 -
2.3 Gripper state and device information
2.3.1 Read system state flags - gripper.state()
Get the currently set system state flags. A mask can be applied to filter out specific flags. See chapter
0 for the system flags definition.
If you want to read the system state flags as a table, use gripper.flags() instead (see chapter
2.3.2)
Syntax
<int> = gripper.state( [mask] )
Parameters
mask (integer), optional
If passed, only the system flags that are masked (i.e. set to HIGH) will be returned.
Return Value
Returns the currently set system state flags.
Example 1
flags = gripper.state() -- returns the current system state flags.
Example 2
if gripper.state( 0x0018 ) then -- Test for the AXIS BLOCKED flags
printf(" Axis blocked!\n" )
end
2.3.2 Get the system state as table - gripper.flags()
Get the currently set system state flags as an associative table. The flags can be easily accessed by
using their symbolic name, see the example below. Chapter 0 lists the symbolic names of the system
flags.
If you want to read the system state flags as an integer value, use gripper.state() instead (see
Chapter 2.3.1)
Syntax
<table> = gripper.flags()
Parameters
none
- 16 -
Return Value
Current system state flags as an associative table.
Example
flags = gripper.flags() -- returns the current system state flags.
if flags.SF_AXIS_BLOCKED == true then
print(" Axis is blocked!" )
else
print(" Axis is not blocked!" )
end
2.3.3 Get gripper limits - gripper.limits()
Returns a table containing the gripper-specific physical limits.
Syntax
<table> = gripper.limits()
Parameters
none
Return Value
Table containing the system information:
<table>.stroke = <number> Stroke in mm
<table>.min_speed = <number> Minimum speed of the gripper in mm/s
<table>.max_speed = <number> Maximum speed of the grippe in mm/s
<table>.min_acc = <number> Minimum acceleration in mm/s²
<table>.max_acc = <number> Maximum acceleration in mm/s²
<table>.min_force = <number> Minimum gripping force in N
<table>.nominal_force = <number> Nominal gripping force in N (duty cycle 100%)
<table>.overdrive_force = <number> Overdrive gripping force in N (if available)
Overdrive mode is not supported by all WSG grippers. Please refer to the User’s Manual for
further information.
Example
info = {}
info = gripper.limits()
printf( "stroke: %d mm\n", info.stroke ) -- outputs: “stroke: 110 mm”

- 17 -
2.4 General purpose I/O (GPIO)
Control the GPIO interface of the gripper. The WSG 50 has two channels with one IN and one OUT
pin each.
The GPIO scripting extension is only supported by devices that have a built-in GPIO interface.
Please refer to the User’s Manual for further information.
2.4.1 Access a single pin - gpio.pin()
Access a discrete GPIO channel. Used to change the value of a discrete GPIO pin and/or to read the
value of the corresponding input pin.
Syntax
gpio.pin( index, [state] )
Parameters
index (integer)
Index of the channel to be accessed (0..1)
state (boolean), optional
Logic level to be set for the selected OUT pin. If this parameter is not given, the logic level of the OUT
pin is not changed. Can be either an integer (0..1) or a boolean value.
Return Value
The function returns the logic level of the channel’s IN pin (0 or 1).
Example
level = gpio.pin(1) -- Get the logic level of IN1
gpio.pin(0, 1) -- Set the logic level of OUT0 to logic HIGH
2.4.2 Set an output pin to high - gpio.set()
Produce a HIGH level on the OUT pins. Passing a ‘1’ results in a HIGH level of the resp. OUT pin.
Passing ‘0’ has no effect.
Syntax
gpio.set( bitvector )
Parameters
bitvector (integer)
Integer value, where every bit selects one GPIO channel. state.0 -> OUT0, state.1 -> OUT1, …
- 18 -
Return Value
none
Example
gpio.set(2) -- Sets OUT1 to logic HIGH. The logic level of OUT0 remains unchanged.
gpio.set(3) -- Sets both OUT0 and OUT1 to logic HIGH
2.4.3 Set output Pin to low - gpio.clear()
Produce a LOW level on the OUT pins. Passing a ‘1’ results in a LOW level of the resp. OUT pin while
passing ‘0’ has no effect.
Syntax
gpio.clear( bitvector )
Parameters
bitvector (integer)
Integer value where every bit selects one GPIO channel. state.0 -> OUT0, state.1 -> OUT1, …
Return Value
none
Example
gpio.clear(1) -- Clear OUT0 and leave OUT1 untouched
gpio.clear(3) -- Clears both OUT0 and OUT1
2.4.4 Access I/O pins directly - gpio.pins()
Accesses the GPIO pins directly. This function can be used to write to all OUT pins simultaneously
and/or to read from all IN pins.
Syntax
<int> = gpio.pins( [bitvector] )
Parameters
bitvector (integer), optional
If passed, the OUT pins will be set according to this bit vector. Output is treated as bit vector, where
bit 0 corresponds to OUT0 pin, bit 1 to OUT1, etc.
Return Value
Returns the current logic level of the IN pins as a bit vector, where bit 0 represents the logic level of
IN0, bit 1 that of IN1, etc.

- 19 -
Example
levels = gpio.pins() -- returns 2, if IN1 is HIGH and IN0 is LOW.
gpio.pins(2) -- sets OUT0 to LOW and OUT1 to HIGH
2.5 Gripping
2.5.1 Move fingers - grasping.move()
Initiate a pre-positioning movement of the fingers. The function waits until the motion has finished.
In addition, the function returns an error code as a result of the movement. The force limit set by
mc.force() is used for the movement.
grasping.move() uses an acceleration- and jerk-limited speed profile for motion (sin²x profile) as
shown below.
time
speed
time
position
grasping.move() raises a runtime error, if at least one of the following conditions is met:
The given position violates the soft limits.
Gripper is in FAST STOP state.
Gripper is not referenced.
To grip a part, please use the grasping.grasp() command instead since grasping.move() will
fail if the fingers are blocked.
Even with installed force measurement finger (WSG-FMF), pre-positioning is always done by
approximating the force from the measured motor current, which is not as accurate as the
measurement by the force measurement finger.
Syntax
<integer> = grasping.move( opening_width, [speed] )
Parameters
opening_width (number)
Target opening width of the fingers in mm
speed (number), optional
- 20 -
Positioning speed in mm/s. If not set, the speed from the last move command is taken.
Return Value
The function returns an error code describing the motion result. It can be of one of the following
values:
E_AXIS_BLOCKED: A block condition occurred while moving
E_TIMEOUT: The target position was not reached in the pre-calculated time.
For further error codes and its meanings, see Appendix A.
Example
grasping.move( 10, 50 ) -- Move to 10mm, speed=50mm/s, wait until finished
grasping.move( 50 ) -- Move to 50mm, speed is still 50mm/s, wait until finished
printf( "Done, opening width: %.2f mm\n", mc.position() )
2.5.2 Grip a part - grasping.grasp()
Grip a part with a given nominal width. As optional parameters, you can pass the finger opening
width, traveling speed and the maximum clamping travel.
The function raises a runtime error, if at least one of the following conditions is met:
Gripper is in FAST STOP state.
Gripper is not referenced.
Another movement is currently in progress.
If a force measurement finger (WSG-FMF) is installed on the gripper, the part is gripped using
true force control. If no force measurement finger is found, the gripping force is
approximated by measuring the motor current. Please note, that this is not as accurate as a
direct force measurement.
Syntax
<boolean> = grasping.grasp( [width], [speed], [clampingtravel] )
Parameters
width (number), optional
Nominal width of the part to be gripped in mm. If not given, the width set by the last call to grasp() is
used. Default value on startup is 10 mm.
speed (number), optional
Gripping speed in mm/s. If not given, the speed set by the last call to grasp() is used.
Default value on startup is 50 mm/s.
clampingtravel (number), optional

- 21 -
Clamping travel in mm. After touching a part, the gripper tries to establish the gripping force by
moving the finger further to the part. This value defines a travel limit for this. If the parameter is not
given, the clamping travel set by the last call to grasp() is used.
The default value can be set up using the Web Interface (Settings|Motion Configuration -> Default
Clamping Travel).
Return Value
Returns true, if a part was gripped (i.e. the gripper state is "holding"). If no part was found or an error
occurred, the function returns false.
Example
-- Set a gripping force of 10N:
mc.force( 10 )
-- Grip a part with a nominal width of 10mm, a speed of 50mm and with a
-- max. clamping travel is 5mm:
if grasping.grasp( 10, 50, 5 ) then
printf( "Part successfully gripped\n" )
else
printf( "No part gripped\n" )
end
2.5.3 Release a part - grasping.release()
Release a part by opening the fingers. By an optional parameter, you can specify the opening speed.
The function raises a runtime error, if at least one of the following conditions is met:
Gripper is in FAST STOP state.
Gripper is not referenced.
Syntax
grasping.release( [width], [speed] )
Parameters
width (number), optional
Opening width in mm to release the part. If not given, the width set by the last call to release() is
used. Default value on startup is the gripper’s stroke – 5mm.
speed (number), optional
Opening speed in mm/s. If not given, the speed set by the last call to release() is used.
Default value on startup is 50 mm/s.

- 22 -
Return Value
none
Example
mc.force( 10 ) -- Set Gripping Force to 10N
-- Grip a part with a nominal width of 10mm and a speed of 50mm. Max. Clamping travel is 5mm:
while not grasping.grasp( 10, 50, 5 ) do
printf( "No part gripped – trying again...\n" )
sleep( 500 )
grasping.release( 30, 100 )
sleep( 2000 )
end
printf( "Part successfully gripped\n" )
2.5.4 Manually clamp a part - grasping.clamp()
This command can be used to manually clamp a part with a defined gripping force and a defined
clamping travel. Since the speed cannot be set with this command, the gripper’s fingers should
already touch the part. Finger prepositioning can be realized e.g. using a mc.move() command (see
chapter 2.6.16). The clamping travel is the way, the fingers will move towards the part to establish
the specified clamping force. If the fingers can move further than given the clamping travel, the
gripper stops and the gripper state is set to “PART LOST”.
Note that the axis must already be blocked by the part to be gripped. Else, the command will fail.
Once initiated the clamping of a part manually, you need to stop clamping using the
grasping.release() or grasping.stop_clamping() command (see chapters 2.5.3 and 2.5.5) prior
the issueing of another movement command.
Syntax
grasping.clamp( travel, force )
Parameters
travel (number)
Clamping travel width in mm. Measured between the two fingers (i.e. every finger will move at most
half this value). Must be a positive value. The clamping direction will be detected automatically from
the block direction.
force (number)
Clamping force in N.
Return Value
none
- 23 -
Example
force_threshold = 2.0 -- Force threshold in N to detect a part
-- Make sure a WSG-FMF force measurement finger is installed
if finger.type(0) ~= FT_FMF then
printf( "Finger 0 is not a force measurement finger\n" )
return
end
mc.homing() -- Home the gripper
mc.force( 30 ) -- Set force limit (high enough to allow a smooth movement)
mc.move( 10, 50, 0 ) -- Move towards the center to grip a part
-- Wait, until we touched something:
while ( mc.busy() and ( finger.data(0) < force_threshold )) do
sleep( 1 )
end
-- Clamp the touched part:
grasping.clamp( -5, 5 ) -- for the WSG 50, the minimum gripping force is 5N!
printf( "Holding\n" )
while ( mc.busy() ) do
sleep( 100 )
end
printf( "bye!\n" )
-- Stop clamping:
grasping.stop_clamping()
2.5.5 Manually stop clamping a part - grasping.stop_clamping()
Stop clamping a part after issuing a grasping.grasp() or grasping.clamp() command. This command
simply stops the force control without opening the fingers. This function will set the gripper state to
IDLE.
Syntax
grasping.stop_clamping()
Parameters
none
Return Value
none
Example
mc.force( 10 ) -- Set Gripping Force to 10N
if grasping.grasp( 10, 50, 15 ) then -- Grasp a part with 10 mm width and a force of 15 N

- 24 -
printf( "Part successfully gripped\n" )
sleep( 3000 )
-- Stop clamping:
grasping.stop_clamping()
end
2.5.6 Get gripper state - grasping.state()
Returns the current gripper state.
Syntax
<integer> = grasping.state()
Parameters
none
Return Value
Integer value holding the current gripper state. The grasping state can have one of the following
values:
Value Symbol Description
0 GS_IDLE Gripper is in idle state, i.e. it is not holding a part.
1 GS_GRIPPING The fingers are currently closing to grip a part. The part has not been gripped, yet
2 GS_NO_PART The fingers have been closed, but no part was found at the specified nominal width. This state will be active until the next grip or release command is issued.
3 GS_PART_LOST A part was gripped but then lost before the fingers have been opened again. This state will be active until the next grip or release command is issued.
4 GS_HOLDING A part was gripped successfully and is now being hold with the gripping force.
5 GS_RELEASING The fingers are currently opening towards the opening width to release a part.
6 GS_POSITIONING The fingers are currently pre-positioned using a “move” command.
7 GS_ERROR An error occurred.
Example
state = grasping.state()
if state == 4 then

- 25 -
printf( “Holding a part\n” )
else
printf( “No part!\n” )
end
2.5.7 Get gripper state as string – grasping.statestring()
Returns the current gripper state as a human-readable string.
Syntax
<string> = grasping.statestring()
Parameters
none
Return Value
String describing the current gripper state:
State Return value Description
GS_IDLE “idle” Gripper is in idle state, i.e. it is not holding a part.
GS_GRIPPING “gripping” The fingers are currently closing to grip a part. The part has not been gripped, yet
GS_NO_PART “no part” The fingers have been closed, but no part was found at the specified nominal width. This state will be active until the next grip or release command is issued.
GS_PART_LOST “part lost” A part was gripped but then lost before the fingers have been opened again. This state will be active until the next grip or release command is issued.
GS_HOLDING “holding” A part was gripped successfully and is now being hold with the gripping force.
GS_RELEASING “releasing” The fingers are currently opening towards the opening width to release a part.
GS_POSITIONING “positioning” The fingers are currently pre-positioned using a “move” command.
GS_ERROR “error” An error occurred.
Example
grasping.grasp( 10 )
printf( "Current gripper state is '%s'\n", grasping.statestring() )
- 26 -
2.5.8 Get gripper statistics - grasping.stats()
Get the current gripper statistics.
Syntax
<integer>, <integer>, <integer> = grasping.stats()
Parameters
none
Return Value
The function returns three parameters:
1. Number of total grips.
This counter is incremented whenever a grip command is executed and returned with an
error code of E_SUCCESS or E_CMD_FAILED
2. Number of grips where no part was found.
This counter is incremented whenever a grip commands doesn’t find a part at the given
nominal width, i.e. returns with E_CMD_FAILED.
3. Number of lost parts.
This counter is incremented, if a part was successfully gripped, but removed from in between
of the fingers before a release command was given.
Example
-- do some gripping...
for i=1,10 do
grasping.grasp()
sleep( 500 )
grasping.release( 20 )
end
-- get gripper statistics:
tg, np, lp = grasping.stats()
printf( "Current gripper statistics:\n" )
printf( "\tTotal grips: %d\n", tg )
printf( "\tNo part found: %d\n", np )
printf( "\tLost parts: %d\n", lp )
2.5.9 Reset gripper statistics - grasping.resetstats()
Reset the gripper statistics. All counters are set to 0.
Syntax
grasping.resetstats()
Parameters
none

- 27 -
Return Value
none
Example
grasping.resetstats()
tg, np, lp = grasping.stats()
printf( "Freshly resetted gripper statistics:\n" )
printf( "\tTotal grips: %d\n", tg )
printf( "\tNo part found: %d\n", np )
printf( "\tLost parts: %d\n", lp )
2.6 Motion Control
2.6.1 Speed controller gain - mc.pid()
Set and get the PID parameters for the speed controller.
Incorrect settings of the controller gains may result in swinging of the fingers which can
damage the mechanics. Please use this command with care!
Syntax
<number>, <number>, <number> = mc.pid( [new_p, new_i, new_d] )
Parameters
new_p (number), optional
New proportional gain for the speed controller. Must be a positive value.
new_i (number), optional
New integral gain for the speed controller. Must be >= 0.
new_d (number), optional
New differential gain for the speed controller. Must be >= 0.
Return Value
The function returns three parameters:
1. currently set proportional gain
2. currently set integral gain
3. currently set differential gain
If new gain values are passed, the function returns these values.
Example
p, i, d = mc.pid() -- stores the current gain values in the variables p, i and d.

- 28 -
mc.pid( 3.2, 60, 0 ) -- sets the proportional gain to 3.2, integral to 60 and differential to
0
2.6.2 Position controller gain - mc.kv()
Set and get the position controller’s proportional gain.
Incorrect settings of the controller gains may result in swinging of the fingers which can
damage the mechanics. Please use this command with care!
Syntax
<number> = mc.kv( [kv] )
Parameters
kv (number), optional
New proportional gain for the position controller. Must be a positive value.
Return Value
The function returns the currently set kv value.
Example
printf( "Kv is %.2f\n", mc.kv() )
-- Set kv:
mc.kv( 13.2 ) -- sets the proportional gain of the position controller to 13.2
2.6.3 Finger speed - mc.speed()
Set and/or read back the current speed of the fingers. The speed is measured between the fingers,
i.e. a value of 100 mm/s means that every finger moves with 50 mm/s. If a speed value outside the
gripper’s limits is set, the value is clamped to the limiting value.
The function raises a runtime error, if at least one of the following conditions is met:
Gripper is in FAST STOP state.
Gripper is not referenced.
Syntax
<number> = mc.speed( [new_speed] )
Parameters
new_speed (number), optional
New speed value in mm/s.

- 29 -
Return Value
Returns the current speed of the fingers in mm/s.
Example
speed = mc.speed() -- stores the current finger speed in variable "speed".
mc.speed( 50 ) -- set the finger speed to 50 mm/s
2.6.4 Finger opening width - mc.position()
Set and/or read back the current opening width of the fingers. The position value is treated as the
opening width of the fingers, i.e. it is measured as the distance between the fingers. If a position
outside the gripper’s limits is set, the Fingers will move against the resp. mechanical end stop. When
setting a new position, the function will block, until movement was finished. The function accepts an
optional speed parameter. If not set, the speed value from the last move/position command is used.
The function raises a runtime error, if at least one of the following conditions is met:
Movement timed out, i.e. the target position was not reached in the calculated time.
The given position violates the soft limits.
Gripper is in FAST STOP state.
Gripper is not referenced.
The force limit for prepositioning mode can be set by the mc.force() command (see page 30
for details)
Syntax
<number> = mc.position( [targetpos], [speed] )
Parameters
targetpos (number), optional
New finger opening width in mm.
speed (number), optional
Finger opening speed in mm/s.
Return Value
Returns the current opening width of the fingers in mm.
Example
width = mc.position() -- stores the current opening width of the fingers in variable
"width".
mc.position( 50 ) -- set the finger opening width to 50 mm.

- 30 -
2.6.5 Get block - mc.blocked()
Get the current blocking state of the fingers.
The block direction can be obtained from the System Flags.
Syntax
<boolean> = mc.blocked()
Parameters
none
Return Value
The function returns true, if the fingers are blocked.
Example
print( mc.blocked() ) -- print the current blocking state
2.6.6 Current gripping force and force limit - mc.force()
The function returns the current gripping force as well as the currently set force limit. If an additional
parameter is given, it will set a new force limit for future pre-positioning movements and gripping
commands.
The value set as force limit is lost power-down.
In prepositioning mode (using mc.position() and mc.move() commands), force always
estimated by measuring the motor current. If you want to have true force control using an
installed WSG-FMF measurement finger, please use the grasping.grasp() command instead.
Syntax
<number>, <number> = mc.force( [forcelimit] )
Parameters
forcelimit (number), optional
New force limit in Newton. If you set a value that is outside the gripper’s capabilities, it is clamped to
the nearest possible value.
Return Value
The function returns two parameters:
1. Current gripping force
2. Force limit value

- 31 -
Example
mc.force( 50 ) -- Set the force limit to 50 N
print( mc.force() ) -- print the current gripping force and the force limit
2.6.7 Get approximated gripping force - mc.aforce()
The function returns the approximated gripping force computed from the motor current. Especially
with force measurement fingers installed, this command is useful to determine any loads that are
applied outside the force-sensitive area of the finger.
Without force measurement fingers installed, this is same as the gripping force returned by
mc.force() (see chapter 2.6.6).
Syntax
<number> = mc.aforce()
Parameters
none
Return Value
The function returns the actual approximated force in Newton.
Example
f = mc.aforce()
print( "Approximated Force is %.1f N\n", f ) -- print the approximated force
2.6.8 Tare force sensors - mc.tare()
Adjusts the force sensor output to zero, hiding any static offset error or initial load condition.
Depending on the system settings, the force sensors are automatically zeroed with every
homing sequence, too.
This command is only allowed, if the gripper is not in force control mode (i.e. the gripper
state must not be HOLDING when issuing this command).
Syntax
<integer> = mc.tare()
Parameters
none
Return Value
The function returns a standard error code as listed in Appendix A:

- 32 -
Example
err = mc.tare() -- Tares the connected force sensing fingers
printf( "Taring done: %s\n", etos( err ))
2.6.9 Overdrive Mode - mc.overdrive()
Enables or disables force overdrive mode and returns the current overdrive setting. By default, the
gripper only allows to set a gripping force that is not higher than the nominal value, which can be
applied with a duty cycle of 100%. By enabling overdrive mode, the gripping force can be increased
up to the overdrive limit (see the system.info() command in chapter 2.2.1).
Use the overdrive feature with care! If overdrive mode is enabled and a force higher than
the nominal force value is set, the gripper’s power dissipation will be increased. Depending
on the duty cycle used, this may result in an excessive overheat and force the gripper to turn
off its power electronics. In some cases, excessive overload may also damage the device.
Overdrive mode is not supported by all WSG grippers. Please refer to the User’s Manual for
further information.
If overdrive mode is disabled and the current gripping force limit is beyond the gripper’s
nominal force limit, it is automatically reduced to the nominal force.
Overdrive mode will be disabled upon termination of the script.
When entering or leaving overdrive mode, a resp. entry is created in the system log.
Syntax
<Boolean> = mc.overdrive( [enable] )
Parameters
enable (Boolean), optional
If true, overdrive mode is enabled, if false, it is disabled.
Return Value
The function returns true, if the overdrive mode is currently enabled.
Example
if mc.overdrive() then
printf( "Overdrive mode is enabled\n" )
else
printf( "Overdrive mode is disabled and will be enabled, now.\n" )
mc.overdrive( true ); -- enable overdrive mode
end
force, limit = mc.force( 100 ) -- Set the force limit to 100 N
printf( "Current force limit is set to %.2f N\n", limit )

- 33 -
2.6.10 Finger acceleration limit - mc.acceleration()
The function returns the finger acceleration limit. If a parameter is given, it will set a new
acceleration limit for future movements, too. The acceleration limit is the maximum allowed
acceleration for the finger movement and is used for all movement-related commands, except STOP
and FAST STOP, which stop the axis immediately.
The value set as acceleration limit is lost power-down.
Syntax
<number> = mc.acceleration( [acceleration] )
Parameters
acceleration (number), optional
New finger acceleration limit in mm/s². If this value is outside the gripper’s capabilities, it is clamped
to the nearest possible value.
Return Value
The function returns the currently set acceleration limit.
Example
mc.acceleration( 1000 ) -- Set the acceleration to 1000 mm/s²
printf( "Current acceleration limit is %g mm/s²", mc.acceleration() )
2.6.11 Set soft limits - mc.softlimits()
The function returns the currently set soft limits. If two parameters are passed, they will be set as
new soft limit values and soft limits checking will be enabled automatically. You can only set soft
limits in both movement directions. To effectively disable checking in one direction, set its limit to a
value that is outside the gripper movement range.
- 34 -
Operating AreaRestricted AreaOperating Area
PLUS SOFT LIMIT
MINUS SOFT LIMIT
To see if soft limit checking is currently enabled or to enable/disable checking, you may use the
Enable Soft Limits command, see chapter 2.6.12.
Any value set by this command is lost at power-down.
Syntax
<number>, <number> = mc.softlimits( [minus, plus] )
Parameters
minus (number), optional
New soft limit in mm, negative movement direction.
plus (number), optional
New soft limit in mm, positive movement direction.
Return Value
The function returns two parameters (even if soft limit checking is disabled):
1. Currently set limit in mm, negative direction.
2. Currently set limit in mm, positive direction.
Example
-- Set new limits:
printf( "Setting negative limit: %.1f mm, positive limit: %.1f mm\n", mc.softlimits( 10, 90 ))
-- Soft limit checking is enabled, now!
end
Figure 4: Soft Limits definition
- 35 -
2.6.12 Enable soft limits - mc.softlimits_en()
The function returns true, if the soft limits are enabled. It can also be used to enable or disable soft
limits checking by passing true or false as a parameter to this function. The soft limits have to be set
separately using the Set Soft Limits command, see chapter 2.6.11.
Any value set by this command is lost at power-down.
Syntax
<number> = mc.softlimits_en( [enable] )
Parameters
enable (boolean), optional
If set to true, soft limits checking is enabled. On false, it is disabled.
Return Value
The function returns the currently set acceleration limit.
Example
if not mc.softlimits_en() then
-- Currently no soft limits set, so we do it, now:
printf( "Setting negative limit: %.1f mm, positive limit: %.1f mm\n", mc.softlimits( 10,
90 ))
end
-- Disable soft limits checking again:
mc.softlimits_en( false )
2.6.13 Soft limits reached - mc.softlimits_reached()
The function returns true, if one of the soft limits is violated. If soft limit checking is disabled, the
function always returns false.
Syntax
<boolean> = mc.softlimits_reached()
Parameters
none
Return Value
True, if soft limits are violated.
Example
if not mc.softlimits_reached() then
-- Soft limits not reached:
- 36 -
printf( "Soft limits are not reached\n" )
end
2.6.14 Stop current movement - mc.stop()
Abort the current movement immediately and disable the position controller. The command sets the
E_AXIS_STOPPED system flag. After issuing a stop command, the position controller is disabled, i.e.
the fingers can be moved by an externally applied force that is larger than the currently set gripping
force limit.
The position controller will be enabled again by the next positioning command.
Syntax
mc.stop()
Parameters
none
Return Value
none
Example
mc.move( 10, 100 ) -- Move to 10mm, speed=100mm/s, wait, until target position was reached.
mc.move( 100, 10, 0 ) -- Move to 100mm, speed=10mm/s, 0=return immediately
sleep( 2000 )
mc.stop() -- Stop axis
mc.force( 0 ) -- Set force limit to minimum value, thus enabling a manual movement of the
fingers
2.6.15 Are the fingers moving? - mc.busy()
mc.busy() returns true, if the fingers are currently moving. This function is helpful when waiting for
the completion of a movement.
Syntax
<boolean> = mc.busy()
Parameters
none
Return Value
true, if fingers are currently moving or false, if the previously given movement command is already
completed.

- 37 -
Example
mc.move( 10, 100 )
mc.move( 100, 10, 0 ) -- Move to 100mm, speed=10mm/s, 0=return immediately
while mc.busy() do
printf( "Current opening width: %.2f mm\n", mc. position() )
sleep( 300 )
end
printf( "Done, opening width: %.2f mm\n", mc.position() )
2.6.16 Advanced finger positioning - mc.move()
Initiate an advanced pre-positioning movement of the fingers. The function is similar to
mc.position(), but accepts certain flags to control the motion. In addition, the function returns an
error code as a result of the movement. The force limit set by mc.force() is used for the movement.
mc.move() uses an acceleration- and jerk-limited speed profile for motion (sin²x profile) as shown
below.
time
speed
time
position
mc.move() raises a runtime error, if at least one of the following conditions is met:
The given position violates the soft limits.
Gripper is in FAST STOP state.
Gripper is not referenced.
mc.move() is intended for advanced finger positioning with special flags being used (see
table below). If you simply want to move the fingers, use grasping.move() instead. To grip a
part, use the grasping.grasp() command since it offers additional features like part detection
and monitoring.
Even with installed force measurement finger (WSG-FMF), prepositioning is always done by
approximating the force from the measured motor current, which is not as accurate as the
measurement by the force measurement finger.
Syntax
<integer> = mc.move( openingwidth, [speed], [flags] )
Parameters
openingwidth (number)
- 38 -
Target opening width of the fingers in mm
speed (number), optional
Positioning speed in mm/s. If not set, the speed from the last move command is taken.
flags (integer), optional
Additional flags to control the movement. If this parameter is not given, flags are treated as
PC_WAIT.
Bit No. Symbol Description
D31..D3 unused It is a good practice to set unused flags to 0, since they may be used in future versions.
D2 PC_STOP_ON_BLOCK If set, a STOP command is issued, if a mechanical block of the fingers was detected.
D1 PC_IGNORE_BLOCK If set, any mechanical block condition is ignored. In this case, the function returns with a timeout error, if the target position was not reached in a pre-calculated time.
D0 PC_WAIT If set, the function waits, until the target position was reached or a mechanical block was detected.
Return Value
The function returns an error code describing the movement result. It can be of one of the following
values:
E_AXIS_BLOCKED: A block condition occurred while moving (i.e. a part was gripped)
E_TIMEOUT: The target position was not reached in the pre-calculated time.
For further error codes and its meanings, see Appendix A.
Example
mc.move( 10, 50 ) -- Move to 10mm, speed=50mm/s, don’t wait until finished
mc.move( 50 ) -- Move to 50mm, speed is still 50mm/s, don’t wait until finished
mc.move( 100, 10, 0 ) -- Move to 100mm, speed=10mm/s, Flags: not set
while mc.busy() do
printf( "Current opening width: %.2f mm\n", mc.position() )
sleep( 300 )
end
printf( "Done, opening width: %.2f mm\n", mc.position() )
2.6.17 Move fingers using a ramp profile – mc.move_ramp()
Same as mc.move(), but uses a ramp instead of the sin²x profile. This is an acceleration limited speed
profile, where a constant acceleration is used to increase and decrease the finger speed. This profile
is similar to the sin²x-profile, but is not jerk-limited.
- 39 -
time
speed
time
position
2.6.18 Move fingers using a rectangular profile – mc.move_rect()
Same as mc.move(), but uses a rectangular motion profile. This function is intended e.g. for clamping
actions, where the fingers don’t have to move but have to apply a preload.
This speed profile is not acceleration-and not jerk-limited and should be used with care,
since it may degrade the mechanical properties of the gripper when used with high speeds
and finger loads.
time
speed
time
position
2.6.19 Stop in case of an error - mc.faststop()
Abort the current movement immediately and disable the position controller. A FAST STOP command
inhibits any further movement, until the user did acknowledge it. You should only use it to react on a
(severe) error condition. Every FAST STOP produces an entry in the system log file. The function can
accept a string parameter that is written into the log file, too, to identify the reason of the FAST
STOP.
Syntax
mc.faststop( [reason] )
Parameters
reason (string)
Text string, describing the reason of the FAST STOP.
- 40 -
Return Value
none
Example
mc.faststop( "This is a test" )
2.6.20 Execute custom trajectory - mc.trajectory()
Execute a trajectory. The trajectory is a sequence of position points that are directly sent to the
gripper’s interpolation engine. Every interpolation cycle (i.e. every 10 ms), a point is taken from the
sequence and used as new target opening width for the fingers. Therefore, the distance between the
points determines the moving speed of the fingers. You have to ensure, that the resulting speed
becomes not higher than the gripper’s maximum speed. The force limit set by mc.force() is applied.
The function will return immediately. Use mc.busy() to wait, until the trajectory execution is finished.
The gripper does not test for maximum acceleration when executing a custom trajectory.
Your application has to ensure, that speed and acceleration limits of the hardware are not
violated.
The function raises a runtime error, if at least one of the following conditions is met:
The given position violates the soft limits.
Gripper is in FAST STOP state.
Gripper is not referenced.
The moving speed exceeds the system limits.
Syntax
<integer>, <integer> = mc.trajectory( trajectory )
Parameters
trajectory (table)
Table containing the position points in mm. The table must only contain numeric values.
Return Value
The function returns two parameters:
1. Error Code. For a list of error codes and their meaning, see Appendix A.
2. Number of processed points
Example
t = {}
len = 200 -- Length of the trajectory is 200 points
-- Move to start position:
- 41 -
mc.move( 10, 50 )
-- Calculate trajectory points:
pos = mc.position()
for i=1,len do
t[i] = pos + ( math.sin(( i - 1 ) * math.pi / len )^2 * 80 )
end
-- Execute trajectory:
error_code, cnt = mc.trajectory( t )
if error_code ~= 0 then
-- An error occurred:
printf( "Error while executing: %s. %d points processed.\n", error2str( error_code ), cnt )
else
-- No error, wait until movement finished:
while mc.busy() do
sleep( 50 )
end
printf( "Trajectory executed successfully\n" )
end
2.6.21 Execute homing sequence - mc.homing()
Execute a homing sequence to reference the gripper. During homing, the fingers are moved to one of
the mechanical end stops. An optional parameter determines, which end stop is used. The function
raises a runtime error, if the gripper is currently in FAST STOP state.
The best positioning performance will be achieved if homing is done into the direction you
require the better positioning accuracy.
Depending on the system settings, the force sensors are automatically zeroed during the
homing sequence, too.
During homing, soft limits are disabled!
Obstacles in the movement range of the fingers and collision with these during homing may
result in a wrong reference point for the finger position!
Syntax
mc.homing( [direction] )
Parameters
direction (boolean), optional
If true, the end stop in positive direction will be used. If set to false, the end stop in negative moving
direction will be used. If the parameter is not given, the default end stop is used. You can use the
web interface to setup the default value.
Return Value
none

- 42 -
Example
mc.homing() -- homes in the default direction
sleep( 500 )
mc.homing( true ) -- homes towards the positive end stop
sleep( 500 )
mc.homing( false ) -- homes towards the negative end stop
2.7 Command Interface
2.7.1 Interface – cmd.interface()
Get the currently used command interface or to change it. When changing to a connection-based
interface, you may want to ensure that the connection is established by using the cmd.connected()
command.
Syntax
<string> = cmd.interface( [name] )
Parameters
name (string), optional
Name of the interface to be used for commands. Possible string values are: “none”, “RS232”, “CAN”,
“TCP”, “Profibus”. The name evaluation is not case sensitive.
Depending on the hardware platform you are using, not all of these interfaces might be
available.
Return Value
String descriptor for the currently used interface (e.g. “CAN”)
Example
printf( "Current Interface is %s\n", cmd.interface() )
iface = cmd.interface( "can" ) -- changing interface to CAN-Bus
printf( "Interface changed to %s\n", iface )
2.7.2 Get command statistics – cmd.stats()
Read the command interface statistics. They give you detailed information on the health of your high
level communication with the gripper.
Syntax
<table> = cmd.stats()
- 43 -
Parameters
none
Return Value
The function returns a table with the following predefined fields:
rx_count
Number of successfully received data packets.
checksum_errs
Counts the checksum errors in received data packets
length_errs
Counts the number of data packets that are too long to be accepted (the gripper accepts
payloads with a length of up to 1024 bytes)
timeout_errs
Number of timeout errors. A timeout error occurs, if the time between two received bytes of
a packet is larger than 300ms.
unknown_id_errs
Number of received command packets with an unknown ID.
tx_count
Number of successfully transmitted packets.
Example
stats = cmd.stats()
printf( "Command statistics:\n" )
printf( "\tReceived Packets: %d\n", stats.rx_count )
printf( "\tRx checksum errors: %d\n", stats.checksum_errs )
printf( "\tRx length errors: %d\n", stats.length_errs )
printf( "\tRx timeout errors: %d\n", stats.timeout_errs )
printf( "\tRx unknown IDs: %d\n", stats.unknown_id_errs )
printf( "\tSent packets: %d\n", stats.tx_count )
2.7.3 Host connected? – cmd.online()
Returns true, if a host is connected via the specified command interface. This command will only be
useful on TCP and Profibus connections. On communication via CAN-Bus and RS232, the host is
assumed to be always connected.
Syntax
<Boolean> = cmd.online()
Parameters
none

- 44 -
Return Value
The function returns true, if a host is connected or false, if not. For RS232 and CAN-Bus, the function
returns always true.
Example
if cmd.online() then
printf( "Currently online!\n" )
-- Send a message:
cmd.register( 0xBB )
cmd.send( 0xBB, "This is a test!" )
else
printf( "offline\n" )
end
2.7.4 Register a packet ID – cmd.register()
Register a custom packet ID to send and receive data packets via the command interface. The
function raises a runtime error, if you try to register an ID that is already used, e.g. by the built-in
command set.
Syntax
cmd.register( id )
Parameters
id (integer)
Packet ID to be registered. Valid ID values are from 0 to 255.
Return Value
none
Example
id = 0xBB
cmd.register( id ) -- Register ID BBh
cmd.send( id, "This is a test!" ) -- Send a message to the connected host via this Id
2.7.5 Unregister a packet ID – cmd.unregister()
Unregister a previously registered custom packet ID.
You cannot unregister an ID of a built-in command.
Syntax
cmd.unregister( id )
- 45 -
Parameters
id (integer)
Packet ID to be unregistered. Valid ID values are from 0 to 255.
Return Value
none
Example
id = 0xBB
cmd.register( id ) -- Register ID BBh
cmd.send( id, "This is a test!" ) -- Send a message to the connected host via this Id
cmd.unregister( id ) -- Un-register ID BBh
cmd.send( id, "I will produce an error!" ) -- This line will raise a runtime error!
2.7.6 Send a data packet – cmd.send()
Send a data packet using a custom ID. The ID that is used for sending the packet has to be registered
before using cmd.register() (see chapter 2.7.4). The payload of the data packet is passed as a variable
argument list that can contain integer types, Boolean types and string types and well as tables
containing these types.
The following conversion rules will be applied:
Integer and Number types are treated as single bytes, i.e. have a valid range of 0 to 255. If
this range is exceeded, the function raises a runtime error. To send a number value, use the
ntob() conversion function (see chapter 2.1.5).
Boolean values are converted into a single byte set to 0 and 1, respectively.
String values are converted into a sequence of bytes (without a trailing zero).
Tables can contain the above types and can be nested at a total of up to 5 levels.
The maximum length for a custom command is 65536 bytes.
Trying to send a packet while the connection is offline will produce a runtime error.
Syntax
cmd.send( id, [...] )
Parameters
id (integer)
Packet ID. Valid ID values are from 0 to 255.
..., optional
Variable argument list with one or more integer parameters (range: 0 to 255) forming the payload of
the data packet. See the description above.
- 46 -
Return Value
none
Example
id = 0xBB
cmd.register( id ) -- Register ID BBh
if cmd.online() then
-- String payload:
cmd.send( id, "This is a test!" )
-- Number as payload:
cmd.send( id, ntob( 1.234 ))
-- Payload combining various types:
cmd.send( id, 0x54, 0x68, "is is a test!", {1, 2, 3}, {4, 5, ntob(6.7), { "Nested Table" }}
)
-- Payload with nested tables:
cmd.send( id, {1, 2, { 3, 4, { 5, 6, { 7, 8, { 9, 10 }}}}} )
else
printf( "Sorry, currently offline!\n" )
end
2.7.7 Get number of available packets – cmd.available()
Returns the number of received data packets waiting in the input buffer for being read.
If the connection is currently offline, cmd.available() returns always 0.
Syntax
<integer> = cmd.available()
Parameters
none
Return Value
The function returns the number of data packets waiting in the reception buffer.
Example
cmd.register( 0xBB ) -- Register ID BBh
cmd.register( 0xBC ) -- Register ID BCh
cmd.register( 0xBD ) -- Register ID BDh
while cmd.online() do
if cmd.available() > 0 then
id, payload = cmd.read()
printf( "Data packet received: ID=%d, payload length=%d\n", id, #payload )
end
end
- 47 -
2.7.8 Read a received data packet – cmd.read()
To receive data packets with a certain ID, you have first to register this ID by calling cmd.register(),
see chapter 2.7.4. You can only receive data packets which IDs are not used by the integrated
command set.
cmd.read() blocks, until a data packet was received. You can poll the state of the receive buffer by
using cmd.available(), see chapter 2.7.7.
The payload length for received messages is limited to 1024.
Syntax
<integer>, <table> = cmd.read()
Parameters
none
Return Value
The function returns two parameters:
1. ID of the received data packet (range: 0 to 255)
2. Table containing the payload as consecutive bytes. If the received packet has no payload, the
function returns an empty table.
Example
-- This example implements a custom command (ID=0xBB) to set the GPIO’s output pins
cmd.register( 0xBB ) -- Register ID BBh
while true do
if cmd.online() then
id, payload = cmd.read()
if #payload == 1 then
-- Payload length is okay:
printf( "Setting outputs to %d\n", payload[1] )
gpio.pins( payload[1] )
cmd.send( id, etob( E_SUCCESS )) -- Send E_SUCCESS as return value
else
-- Error: Payload length mismatch:
printf( "Payload length mismatch (%d)\n", #payload )
cmd.send( id, 15, etob( E_CMD_FORMAT_ERROR )) -- Send E_CMD_FORMAT_ERROR as return
value
end
else
-- Interface is offline...
sleep( 50 )
end
end

- 48 -
2.8 Finger control
The Finger Module is used to control and communicate with active fingers connected to the sensor
port of the WSG Gripper’s base jaws. In contrast to the Lua standard, finger numbering starts at 0,
i.e. WSG Grippers with two fingers uses the indices 0 and 1.
The finger scripting extension is only supported by devices that have a built-in sensor port
interface. Please refer to the User’s Manual for further information.
2.8.1 Get number of fingers – finger.count()
Get the number of available fingers. For the WSG, this is always 2.
Syntax
<integer> = finger.count()
Parameters
none
Return Value
Number of fingers.
Example
printf( "This gripper has %d fingers\n", finger.count() )
2.8.2 Get finger type – finger.type()
Get the type of the finger with the given index. There are three finger types supported:
“generic”
This finger type has no predefined function and can be fully controlled by the script.
“fmf”
Force Measurement Finger. Used by the gripper to control the gripping force. Accessing the
finger via finger.param() and finger.data().
“dsa”
Tactile Sensing Finger. Accessing the finger via finger.param() and finger.data().
The finger types are registered as global variables on startup and can be directly used from
inside your script, please see the example below.
Syntax
<string> = finger.type( index )

- 49 -
Parameters
index (integer)
Finger index. Range is 0..finger.count()-1.
Return Value
Returns the finger type as string.
Example
for i=0,finger.count()-1 do
t = finger.type(i)
printf( "Finger %d is a %s finger\n", i, t )
end
2.8.3 Get or set a finger parameter – finger.param()
Predefined finger types may have one or more finger-specific parameters that can be set or read
using this command.
For the finger-specific parameters please refer to the finger’s User Manual.
Syntax
<var> = finger.param( index, descr, [value] )
Parameters
index (integer)
Finger index. Range is 0..finger.count()-1.
descr (string)
Descriptor for the parameter. See the list of available parameters in the finger’s User Manual.
value (type depending on the parameter), optional
If given, the parameter is changed to this value. The variable type depends on the parameter and is
listed in the finger’s User Manual.
Return Value
Returns the current value of the parameter. The type depends on the parameter and is listed in the
finger’s User Manual.
Example
-- This example prints some information about the connected
-- Tactile Sensing finger(s)
for i=0,finger.count()-1 do
- 50 -
if finger.type( i ) == "dsa" then
-- This is a tactile sensing finger
controllerType = finger.param( i, "dsatype" )
version = finger.param( i, "version" )
cellsX = finger.param( i, "cells_x" )
cellsY = finger.param( i, "cells_y" )
width = finger.param( i, "width" )
height = finger.param( i, "height" )
printf( "Transducer type: %s (software V%s)\n", controllerType, version )
printf( "Matrix has %d x %d sensor cells ", cellsX, cellsY )
printf( "and has an active area of %.1f x %.1f mm\n", width, height )
end
end
2.8.4 Get the current finger data – finger.data()
Read the current data from a predefined finger. It returns a single value whose format depends on
the finger type. This command is only available for fingers of predefined type.
The command will raise a runtime error, if
you try to access a generic finger
you try to access an unpowered finger or a finger with a communication error indicated in
the finger flags.
For the finger-specific parameters please refer to the finger’s User Manual.
Syntax
<var> = finger.data( index )
Parameters
index (integer)
Finger index. Range is 0..finger.count()-1.
Return Value
Returns the current data from the selected finger. Only one value is returned, but its type depends
on the finger type. The returned data is described in the finger’s User Manual.
Example
-- This example tries to read the finger data
-- and print it to the console output
-- Determines the data type and print it:
function printData( m )
local x, y
if type( m ) == "table" then

- 51 -
-- This is a WSG-DSA frame:
printf( "Timestamp: %d\n", m.timestamp )
-- data is a matrix:
for y=1,#m.frame[1] do
for x=1,#m.frame do
printf( "%4d ", m.frame[x][y] )
end
printf( "\n" )
end
else
-- data is a scalar value (e.g. WSG-FMF):
printf( "%.1f\n", m )
end
end
-- Read data from all fingers that support it:
for i=0,1 do
printf( "Finger %d (%s)\n", i, finger.type(i) )
res, data = pcall( finger.data, i )
if res == true then
printData( data )
printf( "\n" )
else
printf( "Finger doesn't provide any data\n" )
end
end
2.8.5 Digital sensor interface – finger.interface()
Get or configure the digital sensor interface inside the gripper’s base jaw that is used to
communicate with a custom finger electronics. This command allows to set up the communication
type (SPI or UART), as well as other interface settings like bit rate, frame size, clocking polarity and
phasing (SPI).
The current interface settings can be obtained by using this function without any of the optional
parameters (e.g. finger.interface(0) for finger 0).
Setting the interface configuration is only possible for generic fingers.
Syntax
<string> = finger.interface( index, [ifacetype], [bitrate], [framesize], [CPOL], [CPHA] )
Parameters
index (integer)
Finger index. Range is 0..finger.count()-1.
ifacetype (string), optional*

- 52 -
String describing the new interface to be used. Valid descriptors are
• “spi” for SPI interface
• “uart” for UART interface
• “none” to disable the interface.
bitrate (integer), optional*
Bit rate of the interface in Bits per second.
For SPI connections: available bitrates can be determined using the following formula
(n=0..255):
If a bit rate is set that does not satisfy the formula above, the device uses the nearest
possible bit rate. To determine the actual bit rate, you may evaluate the return value of the
function.
For UART connections: only the following bitrates are allowed:
• 1.200 bit/s
• 2.400 bit/s
• 4.800 bit/s
• 9.600 bit/s
• 19.200 bit/s
• 38.400 bit/s
• 57.600 bit/s
• 115.200 bit/s
• 230.400 bit/s
• 460.800 bit/s
Setting other bit rates as those listed above will produce a runtime error.
framesize (integer), optional*
Only for SPI communication: Size of the data frame, can be 4 to 16 bits long, see
Figure 5.

- 53 -
cpol (boolean), optional*
Only for SPI communication: Clock polarity, see Figure 6 for explanation.
cpha (boolean), optional*
Only for SPI communication: Clock phase, see Figure 6 for explanation.
cpol = 0, cpha = 0 cpol = 1, cpha = 0
cpol = 0, cpha = 1 cpol = 1, cpha = 1
*) To configure the sensor interface properly, the following parameters are required, depending on
the selected interface type:
Interface Type: SPI UART none
Figure 5: SPI Frame length
Figure 6: SPI Frame with available clock and phase settings

- 54 -
index required required required
ifacetype required required required
bitrate required required -
framesize required - -
cpol required - -
cpha required - -
Return Value
The function returns two parameters:
1. Interface used for communication. Can be of either
• “none” - No interface is used.
• “uart” - The UART interface is used.
• “spi” - The SPI interface is used.
2. Effective bitrate in bits per second (for interface “none”, 0 is returned).
Example
for i=0,finger.count()-1 do
iface, speed = finger.interface( i )
printf( "Finger %d interface: %s, speed: %d bps\n", i, iface, speed )
end
-- Setting the interface of Finger 0 to UART mode with 115200 baud:
if ( finger.type( 0 ) == "generic" ) then
finger.interface( 0, "uart", 115200 )
end
-- Setting the interface of Finger 1 to SPI mode with 8 MBit/s, 8 bits per frame and
CPOL=CPHA=0:
if ( finger.type( 1 ) == "generic" ) then
finger.interface( 1, "spi", 8000000, 8, 0, 0 )
end
2.8.6 Get finger state – finger.state()
Get the state of the finger with the given index. For a description of the Finger State Flags, see
Appendix C (chapter 0).
If you want to read the finger state flags as a table, use finger.flags() instead (see Chapter
2.8.7)
Syntax
<integer> = finger.state( index [, mask] )
Parameters
index (integer)

- 55 -
Finger index. Range is 0..finger.count()-1.
mask (integer), optional
If passed, only the finger state flags that are masked (i.e. set to HIGH) will be returned.
Return Value
Returns the currently set finger state flags.
Example
for i=0,finger.count()-1 do
if finger.state( i, 0x0001 ) then -- Test for the FINGER ENABLED flag
printf( "Finger %d is enabled! (state: %.4xh)\n", i, finger.state( i ))
else
printf( "Finger %d is disabled!\n", i )
end
end
2.8.7 Get the finger state as table - finger.flags()
Get the currently set Finger State Flags as an associative table. The flags can be easily accessed by
using their symbolic name, see the example below. Chapter 0 lists the symbolic names of the system
flags.
If you want to read the system state flags as an integer value, use finger.state() instead (see
Chapter Get finger state – finger.state()2.8.6)
Syntax
<table> = finger.flags( index )
Parameters
index (integer)
Finger index. Range is 0..finger.count()-1.
Return Value
Current finger state flags as an associative table.
Example
flags = finger.flags(0) -- returns the state flags of finger 0.
if flags.FF_POWER_ON == true then
print(" Finger 0 is switched on!" )
else
print(" Finger 0 is switched off!" )
end

- 56 -
2.8.8 Control finger power – finger.power()
Enable or disable the power supply of the given finger. You can only control the power of generic
fingers (see chapter 2.8.2), power control for predefined finger types is not possible.
This command will raise a runtime error, if
you try to change the power of a finger whose type is different from “generic”
you try to enable power of a short-circuited finger
You may check the current power state of the finger by evaluating its state flags via
finger.state(), see chapter 2.8.2.
Syntax
finger.power( index, enabled )
Parameters
index (integer)
Finger index. Range is 0..finger.count()-1.
enabled (integer)
Set to true to enable power for the resp. finger or to false to disable power.
Return Value
none
Example
if finger.type(0) == "generic" then
printf( "Toggle power of finger 0...\n" )
for i=1,5 do
printf( "Step %d of 5\n", i )
finger.power( 0, true ) -- enable power of finger 0
sleep( 2000 )
finger.power( 0, false ) -- disable power of finger 0
sleep( 2000 )
end
printf( "done!\n" )
else
printf( "Not a generic finger, cannot change its power state.\n" )
end
2.8.9 Get analog voltage – finger.analog()
Get the analog voltage from the finger interface with the given index. The voltage signal is between 0
and 2.5 V. This command is only available for generic fingers.
- 57 -
This command is only supported by devices that have a built-in analog input on the sensor
interface. Please refer to the User’s Manual for further information.
Syntax
<number> = finger.analog( index )
Parameters
index (integer)
Finger index. Range is 0..finger.count()-1.
Return Value
Returns the voltage at the analog input pin of the selected finger interface in Volts.
Example
while true do
printf( "Analog input: %.2fV\n", finger.analog( 0 )) -- Get the analog input voltage of
finger 0
sleep( 500 )
end
2.8.10 Digital I/O pin – finger.iopin()
Get or set the state of the digital I/O pin on the finger interface.
This command is only supported by devices that have a built-in digital I/O pin on the sensor
interface. Please refer to the User’s Manual for further information.
Syntax
<state> = finger.iopin( index [, state] )
Parameters
index (integer)
Finger index. Range is 0..finger.count()-1.
state (integer), optional
I/O pin state. Set to 0 or 1.
Return Value
Returns the current state of the digital I/O pin.
Example
state = finger.iopin( 0 ) -- Get I/O pin state of finger 0
if ( state == 0 ) then
- 58 -
finger.iopin( 1, 1 ) -- Set I/O pin state of finger 1 to “high”
end
2.8.11 Set direction of digital I/O pin – finger.iodir()
Set direction of digital I/O pin to input or output.
This command is only supported by devices that have a built-in digital I/O pin on the sensor
interface. Please refer to the User’s Manual for further information.
Syntax
<dir> = finger.iodir( index [, direction] )
Parameters
index (integer)
Finger index. Range is 0..finger.count()-1.
direction (integer), optional
I/O pin direction. Set to 0 for input or 1 for output.
Return Value
Returns the voltage current direction of the digital I/O pin.
Example
finger.iodir( 0, 1 ) -- Set finger 0 I/O pin to output
2.8.12 Write data to finger – finger.write()
Write the given data to the indexed finger. Direct communication with the finger is only possible for
generic fingers.
The data to be written is passed as a variable argument list that can contain integer types, Boolean
types and string types as well as tables containing these types.
The following conversion rules will be applied:
Integer and Number types are treated as single bytes, i.e. have a valid range of 0 to 255. If
this range is exceeded, the function raises a runtime error. To send a number value, use the
ntob() conversion function (see chapter 2.1.5).
Boolean values are converted into a single byte set to 0 and 1, respectively.
String values are converted into a sequence of bytes (without a trailing zero).
Tables can contain the above types and can be nested at a total of up to 5 levels.
This command will raise a runtime error, if
you try to write to a finger with predefined finger type
you try to write to an unpowered finger

- 59 -
the finger is not properly configured or configuration cannot be read
If SPI is used for communication with the finger, finger.write() uses 16-bit frames for data
exchange, even if the frame size is configured to 8 or less bits. This means that two
consecutive bytes are used for each frame, e.g. to write 4 frames (0x0001, 0x0002, 0x0003,
0xF004) from finger 0 via SPI, use finger.write(0,{1,0,2,0,3,0,4,0xF0}).
If SPI is used for communication, the received data that was clocked in while transmitting is
discarded. Use the finger.spi() command, if you require to receive and transmit
simultaneously.
Syntax
finger.write( index, ... )
Parameters
index (integer)
Finger index. Range is 0..finger.count()-1.
...
Variable arguments list containing the data to be sent. See description above.
Return Value
none
Example
if finger.type( 0 ) == "generic" then
for i=1,10 do
finger.write( 0, "Hello Finger, this is a test: "..tostring(i).."\n" )
end
else
printf( "Cannot send data to a non-generic finger.\n" )
end
2.8.13 Bytes available – finger.bytes_available()
Returns the number of bytes waiting in the input buffer of the given finger. For SPI communication,
the function always returns 2, since SPI transfers aren’t internally buffered.
The function returns 0 for non-generic fingers or if the finger is unpowered or not properly
configured.
Syntax
<integer> = finger.bytes_available( index )
Parameters
index (integer)

- 60 -
Finger index. Range is 0..finger.count()-1.
Return Value
Number of bytes waiting in the input buffer.
Example
if finger.type( 0 ) == "generic" then
printf( "%d bytes available\n", finger.bytes_available( 0 ))
end
2.8.14 Read data from finger – finger.read()
Read data from the finger with the given index. Direct communication is only possible for generic
fingers.
finger.read() returns the data in form of a table containing the received bytes. You can optionally
specify the number of bytes to be read. The function blocks in case there is not enough data inside
the receive buffer. If you don’t specify the number of bytes to be read, the function returns all
available data or an empty table, if there is currently no data available.
This command will raise a runtime error, if
you try to read from a finger whose type is different from “generic”
you try to read from an unpowered finger
the finger is not properly configured or configuration cannot be read
If SPI is used for communication with the finger, finger.read() uses 16-bit frames for data
exchange, even if the frame size is configured to 8 or less bits. This means that each frame is
returned as two consecutive bytes, e.g. to read 4 frames from finger 0 via SPI, use rxdata =
finger.read(0, 8). The result will be a table containing 8 bytes that represent the 4 frames.
If SPI is used for communication, the gripper clocks out zeros to read the data. Use the
finger.spi() command, if you require to receive and transmit simultaneously.
Syntax
<table> = finger.read( index, [count] )
Parameters
index (integer)
Finger index. Range is 0..finger.count()-1.
count (integer), optional
Number of bytes to be read. If you try to read more bytes than currently available, the function will
not return, until the given number of bytes is available.

- 61 -
Return Value
Table containing the received data.
Example
if finger.type( 0 ) == "generic" then
while true do
data = finger.read( 0 ) -- read data from finger 0
if #data > 0 then
for i=1,#data do -- print out all data, assuming it is ASCII coded.
printf( "%c", data[i] )
end
end
end
else
printf( "Cannot read data from a non-generic finger.\n" )
end
2.8.15 Synchronous data transfer via SPI – finger.spi()
Exchange data with the finger with the given index. Direct communication is only possible with
generic fingers.
This command can only be used, if the finger is configured to use the SPI interface and is
intended as an alternative to finger.read() and finger.write() supporting true bidirectional
data transfers.
The data to be written is passed as a variable argument list that can contain integer types, Boolean
types and string types as well as tables containing these types. The length of the given table defines
the number of frame transfers to be made.
The following conversion rules will be applied:
Integer and Number types are treated as single frame, i.e. have a valid range of 0 to 65535
for a frame width of 16 bits. If this range is exceeded, the function raises a runtime error.
Boolean values are converted into a single frame whose content is set to 0 or 1, respectively.
String values are converted into a sequence of frames (without a trailing zero), one frame
each character.
Tables can contain the above types and can be nested at a total of up to 5 levels.
The simultaneously read data is returned as a table containing the single frames. Received data is
assumed to be unsigned, so each value is in the range of 0 to 65535.
This command will raise a runtime error, if
you try to communicate with a non-generic finger
you try to communicate with an unpowered finger
the finger is not properly configured or configuration cannot be read
- 62 -
Syntax
<table> = finger.spi( index, data )
Parameters
index (integer)
Finger index. Range is 0..finger.count()-1.
data (table)
Frame data to be sent. See conversion rules above.
Return Value
Table containing the received frame data. It will be of the same length as the given transmit data
table.
Example
if finger.type( 1 ) == "generic" then
while true do
sleep( 1000 )
rxdata = finger.spi( 1, 0x1234 ) -- SPI transfer with finger 0
for i=1,#rxdata do -- print out the received data
printf( "%.4Xh ", rxdata[i] )
end
printf( "\n" )
end
else
printf( "Cannot read data from a non-generic finger.\n" )
end
2.8.16 Finger configuration memory – finger.config()
If the finger has a built-in configuration memory, this function allows you to read or write its content.
Accessing the finger configuration is only possible for generic fingers.
The finger configuration can be stored as value pairs in the form of “descriptor” = “value”.
finger.config(index) will always return an associative table containing the configuration value pairs. If
you want to store an updated configuration set to the finger’s memory persistently, you may pass an
optional table to the function containing the value pairs.
Neither values nor descriptors must contain Line Feeds (0Ah) or “=” characters, as these are
used as internal storage formatters.
You should never set the descriptor key “type” manually to something different than
FT_GERERIC, since this may render the Finger unusable !!!

- 63 -
Syntax
<table> = finger.config( index, data )
Parameters
index (integer)
Finger index. Range is 0..finger.count()-1.
data (table)
New configuration data to be stored. You should pass an associative table using string descriptor keys
(see the example below).
Return Value
Table containing the current finger configuration.
Example
if finger.type( 1 ) == "generic" then
-- read the configuration of Finger 1:
cfg = finger.config( 1 )
-- Print the current finger configuration:
for key in pairs( cfg ) do
print( key, cfg[key] )
end
-- Add a custom value pair to the configuration:
cfg["key"] = 1.05
-- Store the updated configuration to the finger’s nonvolatile memory:
finger.config( 1, cfg )
else
printf( "Cannot read the configuration data from a non-generic finger.\n" )
end
2.9 Fieldbus interface
This module extends the scripting environment with fieldbus functionality and virtual I/O terminals
that can be used to interact with the connected PLC.
The Fieldbus scripting extension is only supported by devices that have at least one built-
in/licensed fieldbus interface. Please refer to the WSG Fieldbus Manual for further
information.

- 64 -
Virtual I/O over Fieldbus
In addition to the gripping command interface, the WSG Grippers have 8 user input flags (IF1 to IF8)
and eight user output flags (OF1 to OF8) that can be independently controlled. From the PLC side,
they can be accessed as a normal input or output respectively, thus enabling an effective data
exchange between a PLC program on the one side and the user script running on the WSG Gripper on
the other.
For further details about the WSG’s fieldbus Interface, please see the “WSG Fieldbus
Interface Manual”
2.9.1 Get connection state – fieldbus.online()
Return the state of the fieldbus connection.
Syntax
<online> = fieldbus.online()
Parameters
no parameters expected
Return Value
true, if the device is online.
Example
while fieldbus.online() do
-- Do something here...
end
2.9.2 Get bitrate – fieldbus.bitrate()
Return the currently used fieldbus communication bit rate.
Syntax
<bitrate> = fieldbus.bitrate()
Parameters
no parameters expected
Return Value
Bitrate in bits/s. If the connected fieldbus does not support a specific bitrate (e.g. Modbus/TCP,
Profinet), 0 is returned.
Example
if fieldbus.online() then

- 65 -
br = fieldbus.bitrate()
printf( "Bitrate: %d bit/s\n", br )
else
printf( "Fieldbus interface is offline\n" )
end
2.9.3 Access an I/O flag – fieldbus.flag()
Read the state of the user input flag (IF) with the given index and optionally change the value of the
corresponding user output flag (OF). This command can be used in conjunction with the PLC program
to implement custom behavior on the device using scripts.
Syntax
<value> = fieldbus.flag( index, [setvalue] )
Parameters
index (integer)
User Flag index. Range is 1..8.
setvalue (bool), optional
New value for the indexed output user flag (OF).
Return Value
Current value of the input user flag (IF) as integer (i.e. ‘0’ or ‘1’).
Example
-- Movement speed is determined by the state of Input Flag 1
-- State of Output Flags 1 and 2 are toggled according to the position reached
POS_A = 10
POS_B = 60
position = POS_A
fieldbus.fclear( 0xFF ) -- reset Output User Flags
while fieldbus.online() do
-- Determine speed from the state of Input User Flag 1:
if fieldbus.flag( 1 ) == 0 then
speed = 50.0
else
speed = 10.0
end
-- move and wait while busy:
mc.move( position, speed, 1 )
-- Toggle target position:
if position == POS_A then
- 66 -
fieldbus.flag( 1, 0 )
fieldbus.flag( 2, 1 ) -- set Output User Flag 2 as ack to the PLC
position = POS_B
else
fieldbus.flag( 1, 1 ) -- set Output User Flag 1 as ack to the PLC
fieldbus.flag( 2, 0 )
position = POS_A
end
end
2.9.4 Write/read user flags – fieldbus.flags()
Read the state of all user input flags (IF) and optionally change the value of all user output flag (OF).
This command can be used in conjunction with the PLC program to implement custom behavior on
the device using scripts.
if you want to read the state of a single flag or manipulate it, you can use the fieldbus.flag()
command instead.
Syntax
<value> = fieldbus.flags( [setvalue] )
Parameters
setvalue (integer), optional
New value for the output user flags (OF) as a bit field value, i.e. bit 0 of setvalue corresponds to OF1,
bit 1 to OF2, …
Return Value
Current value of the input user flags (IF) as a bit field value (i.e. bit 0 has state of IF1, bit 1 of IF2, …).
Example
-- Simple counter example. The counting value is written to the Profibus Output Flags (OF)
count = 0
while fieldbus.online() do
count = count + 1
if count == 256 then
count = 1
end
fieldbus.flags( count ) -- write counting value to the Profibus Output Flags
sleep( 500 )
end
2.9.5 Set one or more output flags – fieldbus.fset()
Set the state of one or more user output flags (OF) to ‘1’.

- 67 -
Syntax
fieldbus.fset( mask )
Parameters
mask (integer)
A bit field value for the output user flags (OF) where bit 0 corresponds to OF1, bit 1 to OF2, and so
on.
A ‘1’ in the bit field will set the corresponding OF while a ‘0’ has no effect.
Return Value
no return value.
Example
-- Set OF1, OF5 and OF7 (mask is 01010001b or 0x51)
if fieldbus.online() then
fieldbus.fset( 0x51 )
end
2.9.6 Clear one or more output Flags – fieldbus.fclear()
Set the state of one or more user output flags (OF) to ‘0’.
Syntax
fieldbus.fclear( mask )
Parameters
mask (integer)
A bit field value for the output user flags (OF) where bit 0 corresponds to OF1, bit 1 to OF2, and so
on.
A ‘1’ in the bit field will clear the corresponding OF while a ‘0’ has no effect.
Return Value
no return value.
Example
-- Clear OF1, OF5 and OF7 (mask is 01010001b or 0x51)
if fieldbus.online() then
fieldbus.fclear( 0x51 )
end
- 68 -
2.9.7 Wait for activity – fieldbus.waitact()
Wait for a state transition on one or more user input flags (IF). An optional timeout can be used. Use
this function, if you have to wait on a change of certain input flags.
Syntax
<integer>, <integer> = fieldbus.waitact( mask, [timeout] )
Parameters
mask (integer)
A bit field value for the input user flags (IF) that shall be monitored, where bit 0 corresponds to OF1,
bit 1 to OF2, and so on. Write a ‘0’ in the bit field at the flag position that has not to be monitored.
timeout (integer), optional
An optional timeout in milliseconds. If no activity on the selected user flags occurs after this time, the
function returns with activity = 0.
Return Value
Two parameters are returned:
1. Parameter: “activity” (integer) is a bit field with ‘1’s at the position of the changed input
flags.
2. Parameter: “state” (integer) is the input flag state after the change. This can be used e.g. to
detect the transition direction, i.e. raising or falling edge.
Example
-- Wait for Activity on IF1:
activity, state = fieldbus.waitact( 0x01 )
if activity ~= 0 then
printf( "Activity detected!\n" )
if state > 0 then
printf( "Raising edge\n" )
else printf( "Falling edge\n" )
end

- 69 -
Appendix A. Status codes
Status code Symbol name Description
0 E_SUCCESS No error occurred, operation was successful
1 E_NOT_AVAILABLE Function or data is not available
2 E_NO_SENSOR No measurement converter is connected
3 E_NOT_INITIALIZED Device was not initialized
4 E_ALREADY_RUNNING The data acquisition is already running
5 E_FEATURE_NOT_SUPPORTED The requested feature is currently not available
6 E_INCONSISTENT_DATA One or more parameters are inconsistent
7 E_TIMEOUT Timeout error
8 E_READ_ERROR Error while reading data
9 E_WRITE_ERROR Error while writing data
10 E_INSUFFICIENT_RESOURCES No more memory available
11 E_CHECKSUM_ERROR Checksum error
12 E_NO_PARAM_EXPECTED A Parameter was given, but none expected
13 E_NOT_ENOUGH_PARAMS Not enough parameters for executing the command
14 E_CMD_UNKNOWN Unknown command
15 E_CMD_FORMAT_ERROR Command format error
16 E_ACCESS_DENIED Access denied
17 E_ALREADY_OPEN Interface is already open
18 E_CMD_FAILED Error while executing a command
19 E_CMD_ABORTED Command execution was aborted by the user
20 E_INVALID_HANDLE Invalid handle
21 E_ NOT_FOUND Device or file not found
22 E_ NOT_OPEN Device or file not open
23 E_IO_ERROR Input/Output Error
24 E_INVALID_PARAMETER Wrong parameter
25 E_INDEX_OUT_OF_BOUNDS Index out of bounds

- 70 -
26 E_CMD_PENDING No error, but the command was not completed, yet. Another return message will follow including an error code, if the function was completed.
27 E_OVERRUN Data overrun
28 RANGE_ERROR Range error
29 E_AXIS_BLOCKED Axis blocked
30 E_FILE_EXISTS File already exists
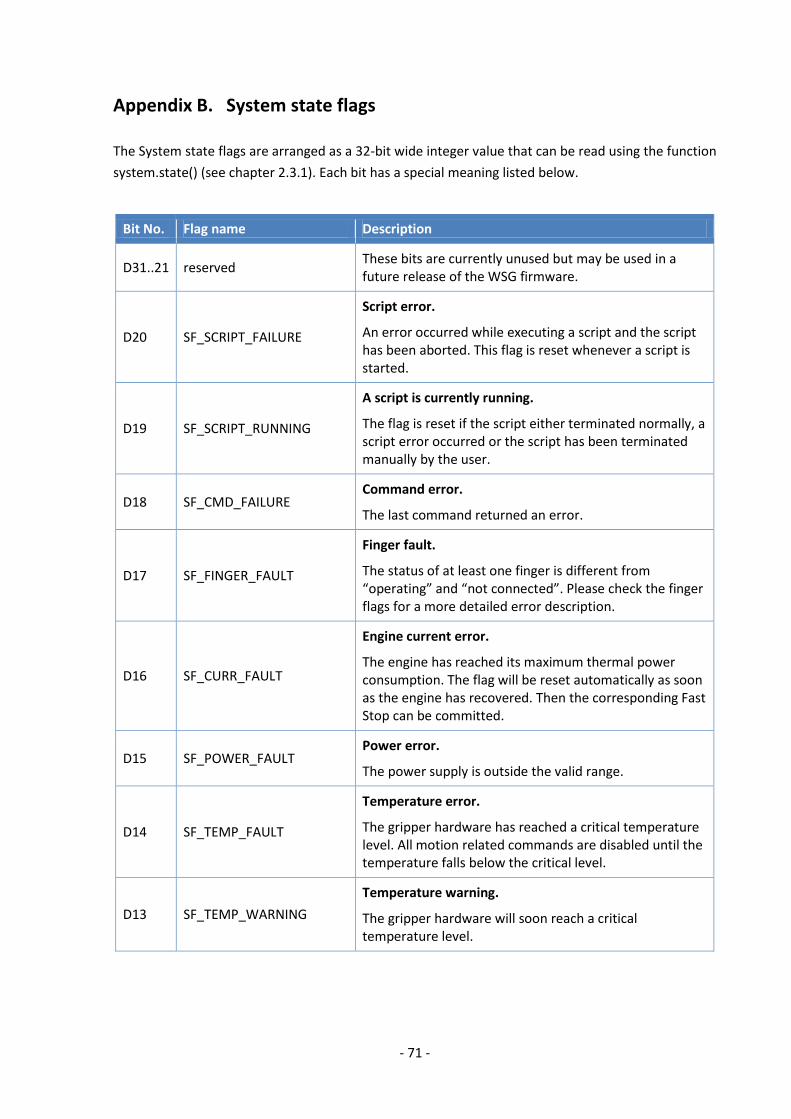
- 71 -
Appendix B. System state flags
The System state flags are arranged as a 32-bit wide integer value that can be read using the function
system.state() (see chapter 2.3.1). Each bit has a special meaning listed below.
Bit No. Flag name Description
D31..21 reserved These bits are currently unused but may be used in a future release of the WSG firmware.
D20 SF_SCRIPT_FAILURE
Script error.
An error occurred while executing a script and the script has been aborted. This flag is reset whenever a script is started.
D19 SF_SCRIPT_RUNNING
A script is currently running.
The flag is reset if the script either terminated normally, a script error occurred or the script has been terminated manually by the user.
D18 SF_CMD_FAILURE Command error.
The last command returned an error.
D17 SF_FINGER_FAULT
Finger fault.
The status of at least one finger is different from “operating” and “not connected”. Please check the finger flags for a more detailed error description.
D16 SF_CURR_FAULT
Engine current error.
The engine has reached its maximum thermal power consumption. The flag will be reset automatically as soon as the engine has recovered. Then the corresponding Fast Stop can be committed.
D15 SF_POWER_FAULT Power error.
The power supply is outside the valid range.
D14 SF_TEMP_FAULT
Temperature error.
The gripper hardware has reached a critical temperature level. All motion related commands are disabled until the temperature falls below the critical level.
D13 SF_TEMP_WARNING
Temperature warning.
The gripper hardware will soon reach a critical temperature level.
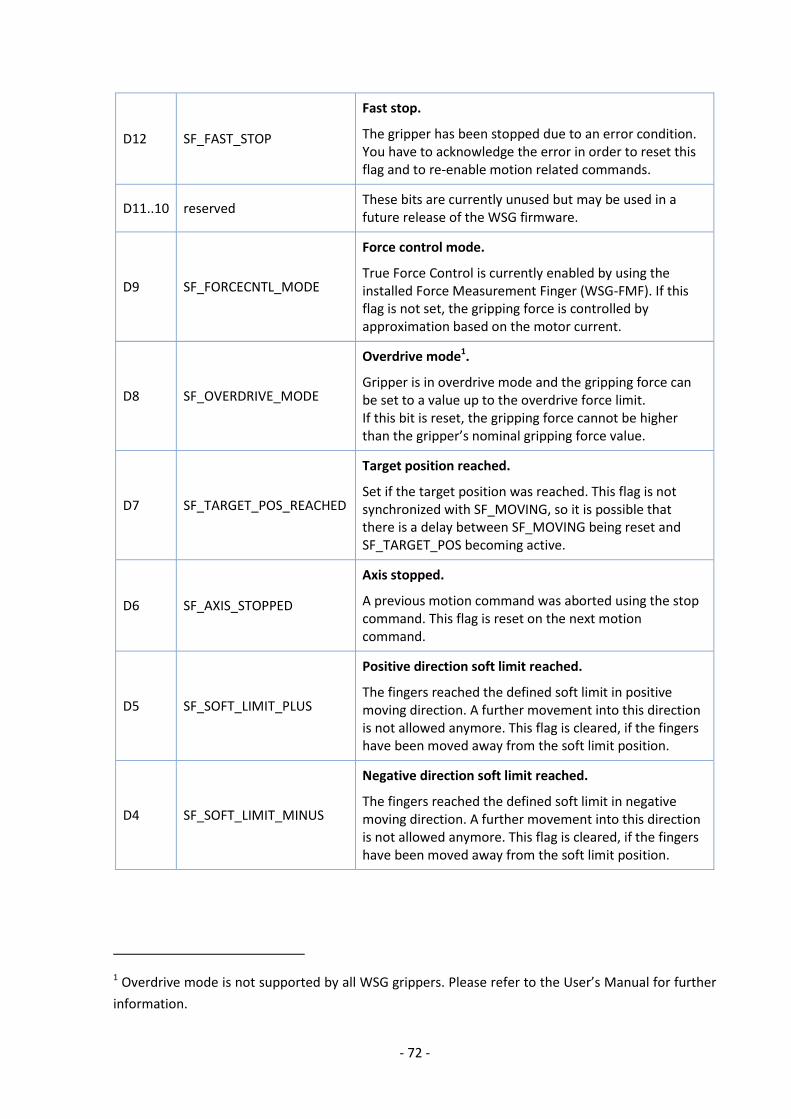
- 72 -
D12 SF_FAST_STOP
Fast stop.
The gripper has been stopped due to an error condition. You have to acknowledge the error in order to reset this flag and to re-enable motion related commands.
D11..10 reserved These bits are currently unused but may be used in a future release of the WSG firmware.
D9 SF_FORCECNTL_MODE
Force control mode.
True Force Control is currently enabled by using the installed Force Measurement Finger (WSG-FMF). If this flag is not set, the gripping force is controlled by approximation based on the motor current.
D8 SF_OVERDRIVE_MODE
Overdrive mode1.
Gripper is in overdrive mode and the gripping force can be set to a value up to the overdrive force limit. If this bit is reset, the gripping force cannot be higher than the gripper’s nominal gripping force value.
D7 SF_TARGET_POS_REACHED
Target position reached.
Set if the target position was reached. This flag is not synchronized with SF_MOVING, so it is possible that there is a delay between SF_MOVING being reset and SF_TARGET_POS becoming active.
D6 SF_AXIS_STOPPED
Axis stopped.
A previous motion command was aborted using the stop command. This flag is reset on the next motion command.
D5 SF_SOFT_LIMIT_PLUS
Positive direction soft limit reached.
The fingers reached the defined soft limit in positive moving direction. A further movement into this direction is not allowed anymore. This flag is cleared, if the fingers have been moved away from the soft limit position.
D4 SF_SOFT_LIMIT_MINUS
Negative direction soft limit reached.
The fingers reached the defined soft limit in negative moving direction. A further movement into this direction is not allowed anymore. This flag is cleared, if the fingers have been moved away from the soft limit position.
1 Overdrive mode is not supported by all WSG grippers. Please refer to the User’s Manual for further
information.

- 73 -
D3 SF_BLOCKED_PLUS
Axis is blocked in positive moving direction.
Set if the axis is blocked in positive moving direction. The flag is reset if either the blocking condition has been resolved or a stop command has been issued.
D2 SF_BLOCKED_MINUS
Axis is blocked in negative moving direction.
Set if the axis is blocked in negative moving direction. The flag is reset if either the blocking condition has been resolved or a stop command has been issued.
D1 SF_MOVING
The fingers are currently moving.
This flag is set whenever a movement is started (e.g. MOVE command) and reset automatically if the movement stops.
D0 SF_REFERENCED
Fingers referenced.
If set, the gripper is referenced and accepts movement commands.

- 74 -
Appendix C. Finger state flags
The finger state flags are arranged as a 16-bit wide integer value that can be read using the function
finger.state() (see chapter 2.8.1). Each bit has a special meaning listed below.
Bit No. Flag Name Description
D15..10 reserved These bits are currently unused but may be used in a future release of the WSG firmware.
D9 FF_COMM_FAULT Communication fault.
A communication error occurred during runtime.
D8 FF_POWER_FAULT
Power fault.
An over-current condition was detected at the resp. finger.
D7..2 reserved These bits are currently unused but may be used in a future release of the WSG firmware.
D1 FF_CONFIG_AVAIL
Configuration available.
If the connected finger provides a configuration memory and its content is valid, this bit is set.
D0 FF_POWER_ON Power enabled.
If true, the finger is powered up.
- 75 -
Appendix D. Syntax notation
The following command syntax notation is used throughout this document:
Parameters
a Denotes a mandatory parameter
[a] Denotes an optional parameter
{a, b, c} Denotes a selection of mandatory parameters (exactly one must be present)
[{a, b, c}] Selection of optional parameters (either exactly one or none must be present)
Values
<integer> An integer value
<number> A floating point value
<string> A string literal
<table> A table
<var> variable type

© Weiss Robotics GmbH & Co. KG. All rights reserved. The technical data mentioned in this document can be changed to improve our products without prior notice. Used trademarks are the property of their respective trademark owners. Our products are not intended for use in life support systems or systems whose failure can lead to personal injury.