scripting for begginers
TRANSCRIPT

Scripting for Beginners By Seth Thomas (Falloutperson416)

This tutorial assumes that you have prior G.E.C.K. knowledge. If you don’t, then I suggest you come back when you have familiarized yourself with G.E.C.K. functions.
Table of Contents

Section 1: Understanding Scripts…...……………………………………………4
Part 1 - The Basics of Scripting................................................................5
Section 2: Writing Scripts…………………………………………………………….6
Part 1 - Writing Our First Script……………………………………………………………7
Part 2 - More and More Functions……………………………………………………..13
Section 3: Different Kinds of Scripts……………………………………………15
Part 1 - Result Scripts…………………………………………………………………………16
Part 2 - Frequently Used Scripts and There Functions………………………..18
Section 4: Information…………………………………………………………………….…42
Part 1 - Credits and Information………………………………………………………..43
Understanding Scripts

In Section 1 of this Beginners Guide, you will learn the basics of the Fallout scripting language. At first, scripting can be complicated and frustrating. But, with enough practice, you will get the hang of scripting and use the ability in your mods.
The Basics of Scripting

Scripts can be used to create many different effects within the game. Without scripts, you couldn’t ask a trader to repair your gear and have a menu appear, or turn off the lights when you press a button. Effects such as these can be used in the game because of scripts. Let’s get started.
The scripting language used in Fallout 3 and New Vegas is not case -sensitive. While this means that you can have a perfectly good script with inconsistent capitalization, proper grammar within the script can make it much easier to understand, read, and write.
Ex) This is a 1 line script that performs a single function:
showbartermenu
Now, you can also write it like this:
ShOwBaRtErMeNu
The two scripts above perform the very same function, even though they look a lot different. Capitalization has no effect, but proper grammar is much easier to read in scripts. Another thing to know is that every script (Except for Result Scripts) has to start with SCN. SCN has the same meaning as ScriptName; it is the EditorID of the script. When you are giving the script its name, you can write either SCN or ScriptName. Either one works, it is up to you to choose which one to use.
Writing Scripts

Now that you know a few things about scripting, let’s write our very first script and go over what it does.
Writing Our First Script
Open the G.E.C.K., and click the Pencil icon.

Now, click Script, and in the drop down box that appears, click New.

Now, let’s begin to write our script. As we learned on pages 3 and 4, our script needs an EditorID.
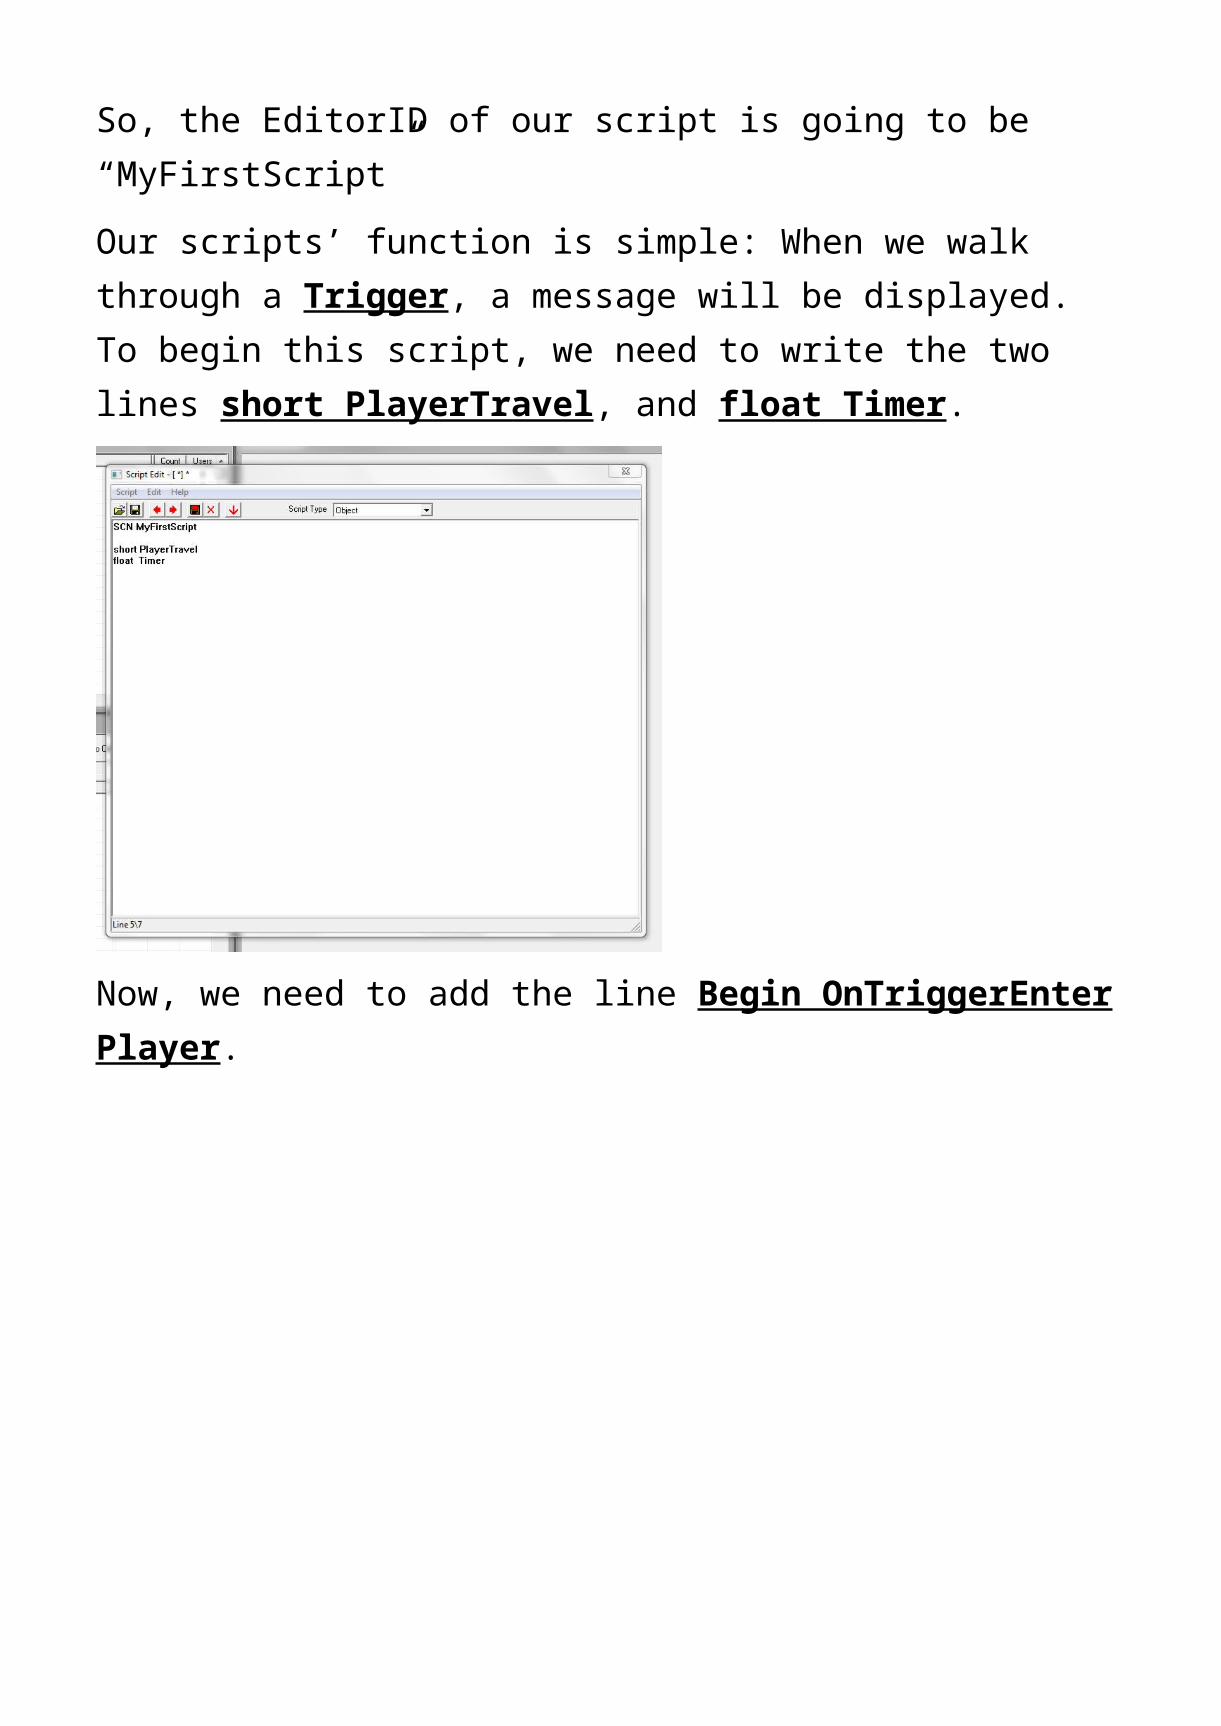
So, the EditorID of our script is going to be “MyFirstScript”

Our scripts’ function is simple: When we walk through a Trigger, a message will be displayed. To begin this script, we need to write the two lines short PlayerTravel, and float Timer.
Now, we need to add the line Begin OnTriggerEnter Player.

Now, what does this line mean and what does it do? Let’s break it down piece by piece. “Begin OnTriggerEnter” means that the script will begin when the trigger is entered by the Player or an NPC. In this case, we only want the Player to activate the script, so we add in the word “Player”. This ensures that the script will run its function on the Player only. After this line comes If ( IsActionRef Player == 1).
This lines’ function is simple; it checks to see if the Player has entered the trigger. IsActionRef Player means that the Player has taken an action. The “== 1” is simply checking off that the Player has taken action by entering the trigger. This is why you don’t get messages added to your inventory if you’re not standing in a trigger. If the Player has not, the game would recognize the Players action as “== 0”, because the player hasn’t entered the trigger. So, if everything checks off, the Players action has been marked as “== 1”, then the script continues its function. The next line is ShowMessage MyMessage.
This line is the simplest one in the entire script. It displays the message “MyMessage”. Of course, you would need to create a message to be displayed. “MyMessage” is the EditorID of the message we want to be displayed.

Now we finish off the script with the lines Endif and End.
These lines finish the script. At this point, the Player has entered the trigger, the Players action has been checked, MyMessage has been displayed, and the script has finished. Congratulations! You have written your very first script, you know how it works and what it does!

More and More Functions
Now that you have written a script that performs one main function, it’s time to write a script that has two main functions. To start, you can either add on to the script we just wrote, or write the first function again with the new function. I am going to be adding onto the script we just wrote. Before we start writing, let’s cover what the second function is going to do. After MyMessage has been displayed, we want a note to be added to the Players inventory. So, instead of writing two different scripts and placing down two different triggers, we can make it easier with one trigger and one script with two functions. The first thing we need to do is remove the last line of our script, the one that has the word End. Then, add in the line Player.additem 01003592 1.

Now, you may be wondering why we removed End and what do all of those numbers mean. We removed End because it is no longer the end of the script. There is more to go, it is not the end. The line Player.additem tells the script to add a certain item to the Players inventory. The numbers 01003592 simply represent the object that we want to be added to the player inventory (Keep in mind that 01003592 is NOT the EditorID of the object). In this case, it is a note. The number 1 at the end of the line tells the script how many copies of the object to give the Player. Right now, only 1 copy of the note will be added to the Players inventory. If we were to replace the 1 with a 1000, then 1000 copies of the note would be added to the Players inventory when the Player enters the trigger. Now, to finish the script, we add the End.
Now our script performs two functions: Displays MyMessage and adds 1 copy of the note 01003592.

Different Kinds of Scripts
We’ve learned an awful lot already, but now it’s time to expand even more and learn about different types of scripts.

Result Scripts
Result scripts are simple, one line commands that don’t have an EditorID. They are generally used in quests, dialog, and even in - game. Back on page 4, there was the line ShowBarterMenu. This is a result script. It doesn’t have an EditorID and it is mainly used in Dialog. Its function is to show the Player what an NPC has for sale.
Other Result Scripts:
ShowRepairMenu ; Shows an NPC’s repair menu
Player.Additem ; Adds an item to the Players inventory
ShowRaceMenu ; Allows you to edit your facial features
ShowNameMenu ; Allows you to edit your name
Those are just some of many Result Scripts. Here are some Result Scripts that can be used in - game, via the console. These are more commonly known as Console Commands.
In - Game Result Scripts:
tgm
tcl
tlc
Player.Additem
Tgm
Tmg
ShowRaceMenu
ShowNameMenu

These are also just some of many Result Scripts that can be used in game.

Frequently Used Scripts and There Functions
Now, let’s walk through some various, commonly used scripts that you can use in future mods.
NPC Force – Greet Script:
Giving an NPC this script will force them to greet the Player. This script requires AI Packages and dialog.
As always, we need to give our script its EditorID
.

Next, we need to add in the lines Short Task and Short PlayerSpotted.
Short Task works like this: 0= Player out of site, 1= Player spotted. Short PlayerSpotted is used to determine if the NPC sees the Player.

Now add in the line Begin GameMode
Begin GameMode simply means that the script will be active when you start the game.

Next up is the line If (Task == 0).
The script only uses this line when the Task = 0, meaning the NPC does not see the Player and has not spoken to the Player already.

Now add the line Set PlayerSpotted to (GetLos Player).
If the Player has been spotted, this line determines the AI Package requirements. If the requirements have not been met, the NPC won’t approach the Player.
Next, add the line If PlayerSpotted.

If the Player has been spotted, the script continues its function.
Now, add the line Set Task to 1.

Set Task to 1 makes sure the AI Package requirements have been met and allows the AI Package to run its course (Starting a conversation with the Player.)
Next, add evp.

Evp starts the AI Package. At this point, the NPC will be walking towards the Player or will have already started the conversation.
Now it’s time to finish the script. Add Endif, Endif, and End.

There you go. The script has been finished. The NPC has had its AI Package conditions met, the AI Package has been activated, and the NPC has begun a conversation with the Player.
Item Adding Script:

This script adds an item to the Players inventory upon entering a trigger.
To start, give your script an EditorID.

Now for the second line, add Player.Additem 01003592 1. The numbers are the same as the numbers we used to write our first script. If you need a reminder as to what the numbers mean or do, refer back to page 13.

And for the last line, add End.
This is a very useful small script.

Object Activation Script:
This script is used to activate and deactivate objects like blinds in a window. This script requires a switch of some kind that is linked to an object with a reference.
As always, give your script its EditorID.

Next, add REF LRef.
REF LRef sets the reference that the script will be referring to. The reference could be anything from a rock, to a lighting effect.

Next, add Begin OnActivate.
As you know from previous scripts, Begin OnActivate enables the script when you start the game.

Now add Set LRef to GetLinkedRef
This is changing “LRef” (Which isn’t an object) to the actual reference you want to have activated or deactivated.

Next up is If LRef.GetDisabled.
This line checks to see if the object is already disabled.

Now add LRef.Enable.
This line activates or “enables” the object.

Next, add SetOpenState 1.
SetOpenState 1 is changing the objects state from 0 to 1, so the script won’t activate the object if it is already activated.

Next is else.
When the open state is determined (0= deactivated, 1= activated), this line tells the script to either stop or continue on to the next line.

Now add LRef.Disable.
This line deactivates the reference.
Next is SetOpenState 0.

Like SetOpenState 1, this line is setting the references current state (Activated or deactivated.)
Now add the last two lines, Endif and End.

So, now you can activate or deactivate objects with the touch of a button.


Information
Thank you all for using my Scripting for Beginners Guide! I hope it helped you as much as I enjoyed making it.
Dialog for Beginners Guide coming soon!

Scripting for Beginners By Seth Thomas (Falloutperson416)