sambapos staff training manual · sambapos will use your computer's date for work periods....
TRANSCRIPT
SambaPOS Staff Training Manual
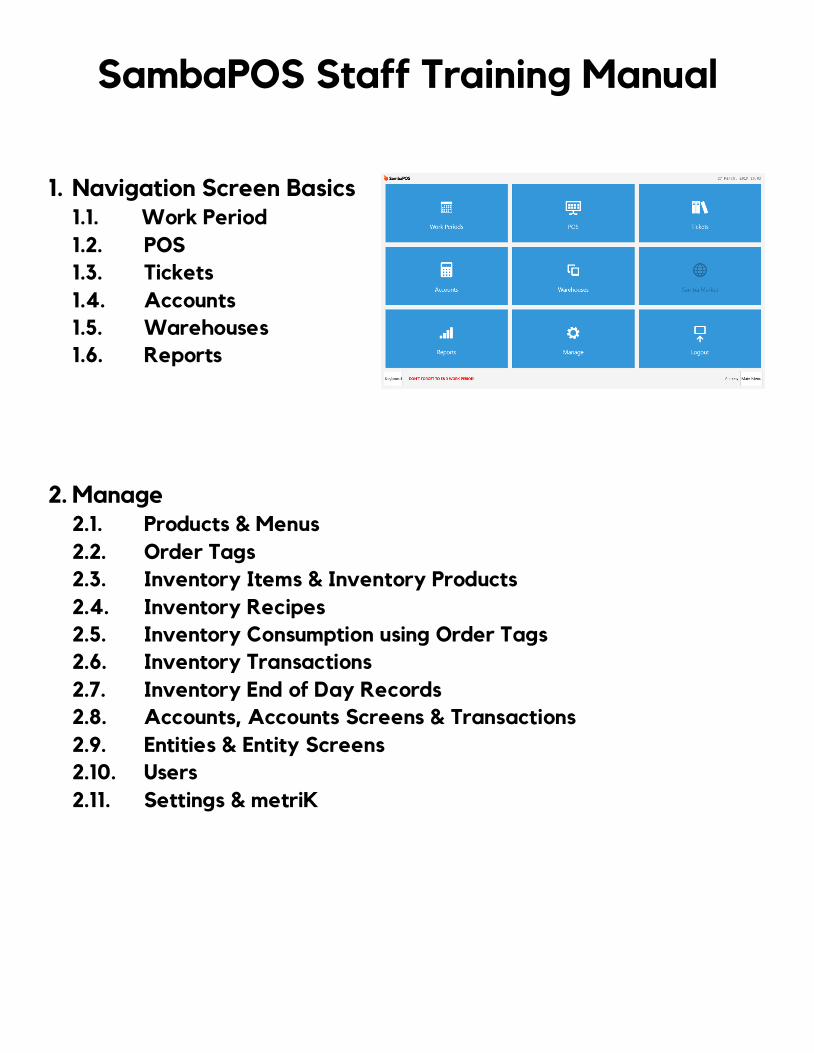
1. Navigation Screen Basics
1.1. Work Period
1.2. POS
1.3. Tickets
1.4. Accounts
1.5. Warehouses
1.6. Reports
2. Manage 2.1. Products & Menus
2.2. Order Tags
2.3. Inventory Items & Inventory Products
2.4. Inventory Recipes
2.5. Inventory Consumption using Order Tags
2.6. Inventory Transactions
2.7. Inventory End of Day Records
2.8. Accounts, Accounts Screens & Transactions
2.9. Entities & Entity Screens
2.10. Users
2.11. Settings & metriK

1.1 Work Period
Work Periods identify your working hours. It simplifies reporting and also useful for tracking periodic inventory changes.
On the left side of the screen we can see past and current work periods. On the right side of the screen we have Start Work Period and End Work Period buttons which are useful for starting or ending your day/shift. You can also see when it was started and how long was your business open. POS Screen depends on Work Periods and can only be accessed after you Start Work Period. Work Periods separate your daily reports, create End of Day Records and create database backups. Its important to End Work Period at the end of every day/shift. You can only End Work Period after all your unpaid tickets have been paid or settled on a customer account.

1.2. POS
You can manage sales, orders, entities (tables, customers etc.) and payment processing from this screen.
The POS screen will open your entity screens (table layouts, customers, staff etc). After selecting your Entity, you will access your Menu Categories, Products within those categories and Ticket screen In SambaPOS you can keep on top of your tickets that are registered through states.
Orange indicates the order was submitted and the table is currently occupied.
Dark Red indicates that Bill was printed but the ticket hasn’t been settled or fully paid yet.
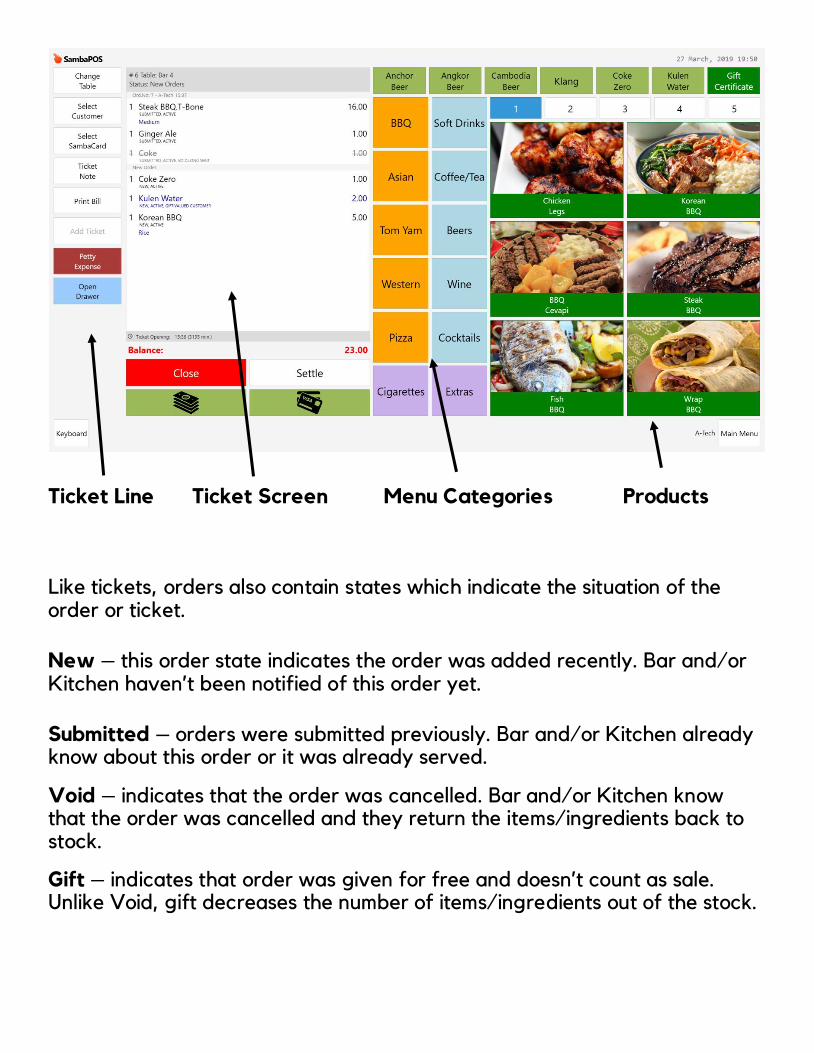
Ticket Line Ticket Screen Menu Categories Products
Like tickets, orders also contain states which indicate the situation of the order or ticket.
New – this order state indicates the order was added recently. Bar and/or Kitchen haven’t been notified of this order yet.
Submitted – orders were submitted previously. Bar and/or Kitchen already know about this order or it was already served.
Void – indicates that the order was cancelled. Bar and/or Kitchen know that the order was cancelled and they return the items/ingredients back to stock.
Gift – indicates that order was given for free and doesn’t count as sale. Unlike Void, gift decreases the number of items/ingredients out of the stock.

In Ticket screen section you can see certain details of your ticket.
In this example you can see:
Ticket number – # 6 selected entity – Table: Bar 4 current status – Status: New Orders Ticket screen also allows you to see Order number and who made the last order. Ticket screen also shows total of the ticket, discounts and other calculations.
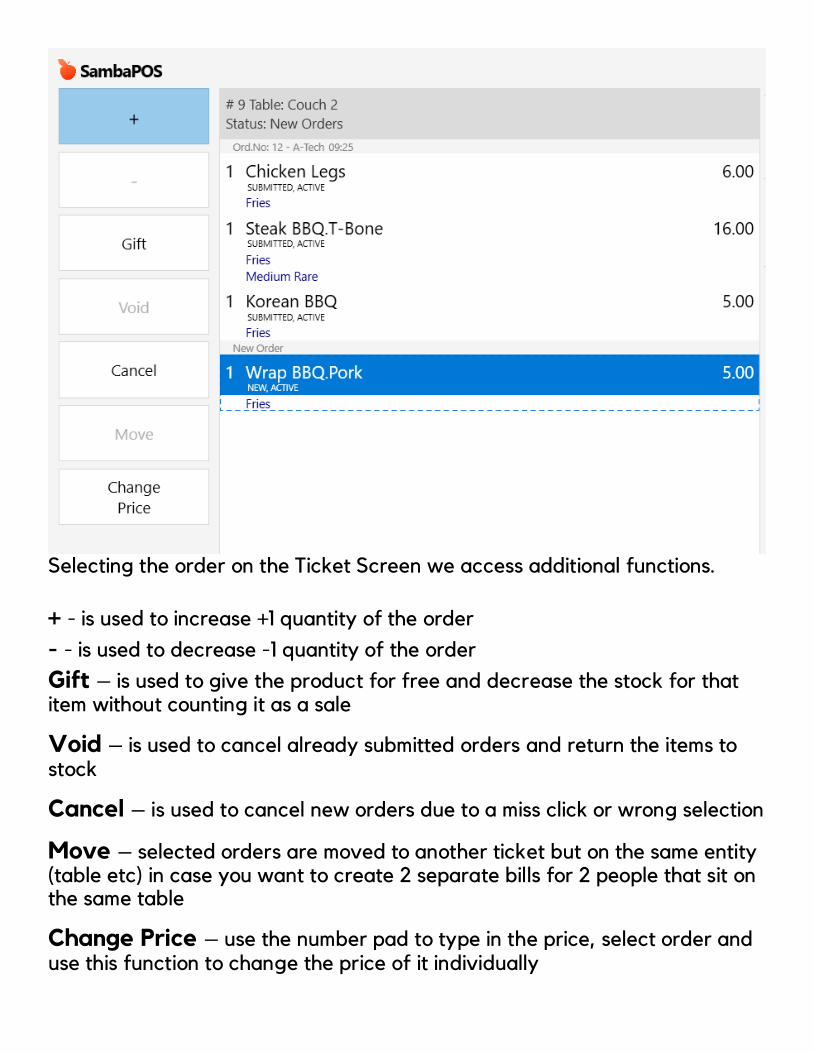
Selecting the order on the Ticket Screen we access additional functions.
+ - is used to increase +1 quantity of the order
- - is used to decrease -1 quantity of the order
Gift – is used to give the product for free and decrease the stock for that item without counting it as a sale
Void – is used to cancel already submitted orders and return the items to stock
Cancel – is used to cancel new orders due to a miss click or wrong selection
Move – selected orders are moved to another ticket but on the same entity (table etc) in case you want to create 2 separate bills for 2 people that sit on the same table
Change Price – use the number pad to type in the price, select order and use this function to change the price of it individually
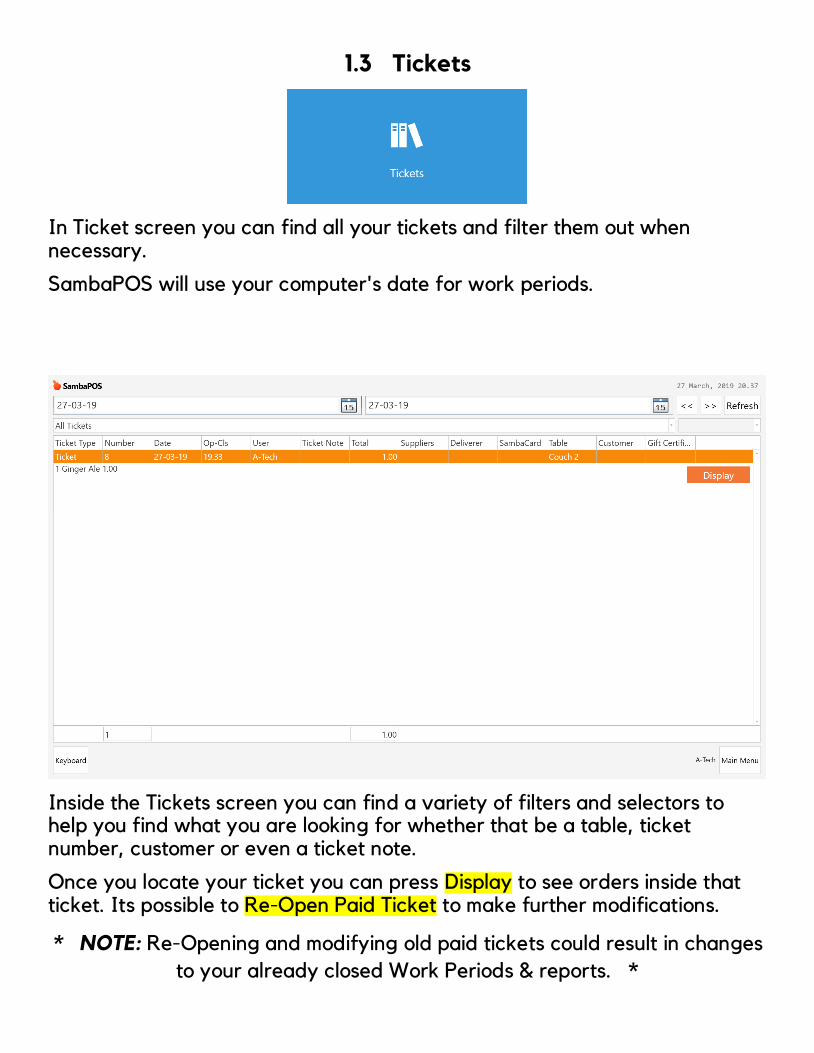
1.3 Tickets
In Ticket screen you can find all your tickets and filter them out when necessary.
SambaPOS will use your computer's date for work periods.
Inside the Tickets screen you can find a variety of filters and selectors to help you find what you are looking for whether that be a table, ticket number, customer or even a ticket note.
Once you locate your ticket you can press Display to see orders inside that ticket. Its possible to Re-Open Paid Ticket to make further modifications.
* NOTE: Re-Opening and modifying old paid tickets could result in changes
to your already closed Work Periods & reports. *
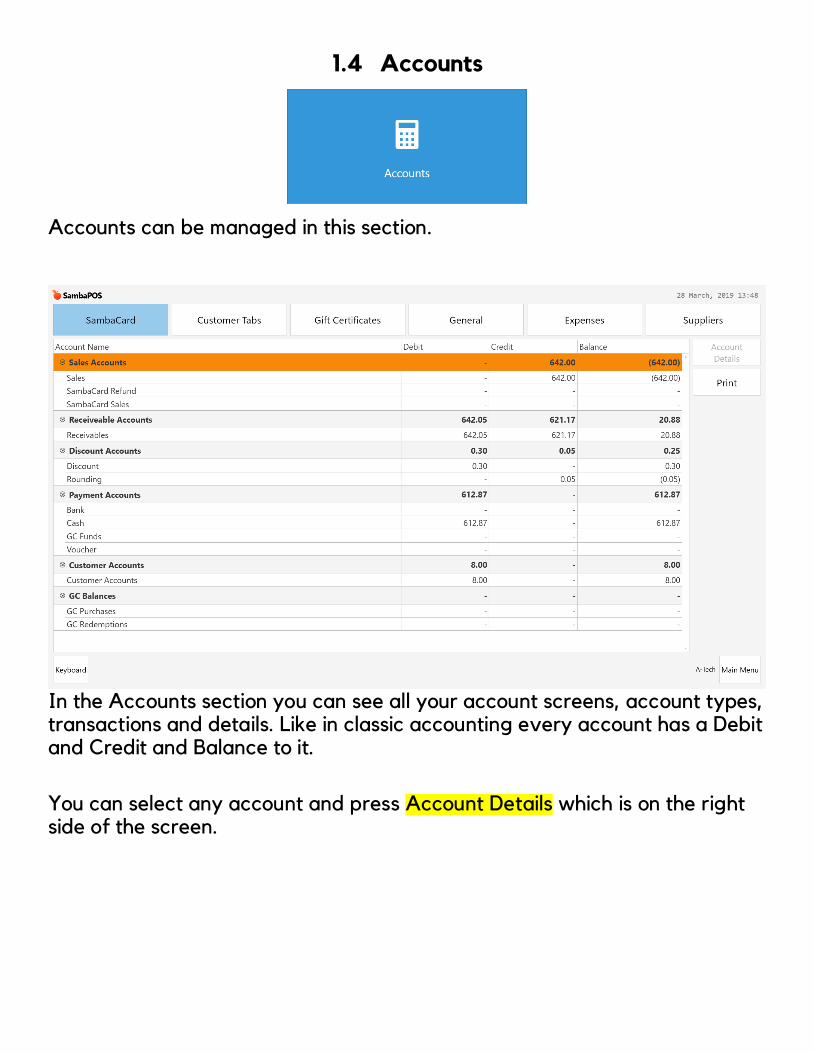
1.4 Accounts
Accounts can be managed in this section.
In the Accounts section you can see all your account screens, account types, transactions and details. Like in classic accounting every account has a Debit and Credit and Balance to it.
You can select any account and press Account Details which is on the right side of the screen.
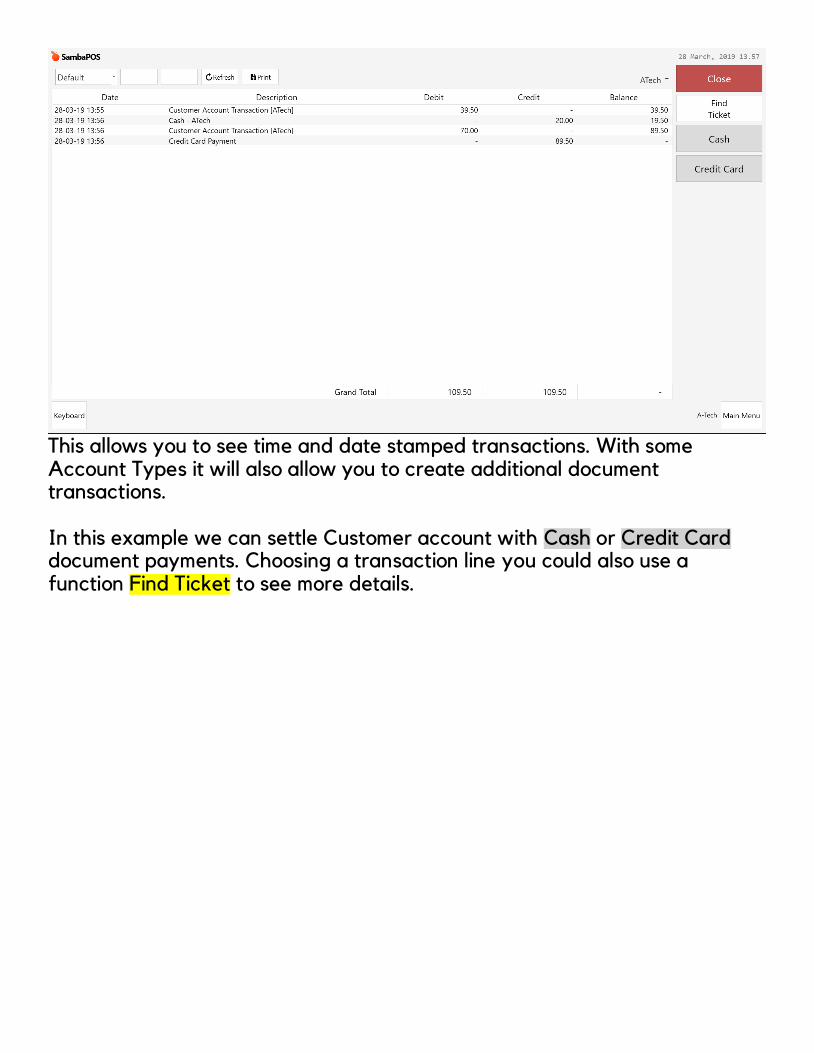
This allows you to see time and date stamped transactions. With some Account Types it will also allow you to create additional document transactions. In this example we can settle Customer account with Cash or Credit Card document payments. Choosing a transaction line you could also use a function Find Ticket to see more details.
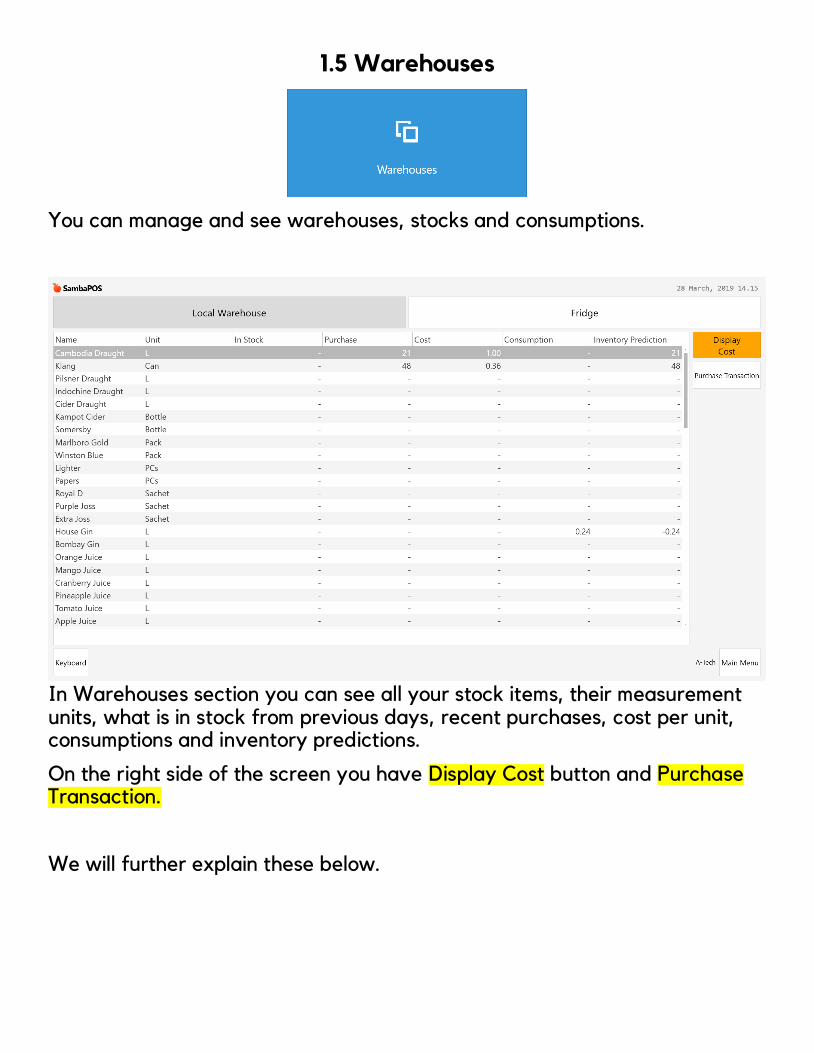
1.5 Warehouses
You can manage and see warehouses, stocks and consumptions.
In Warehouses section you can see all your stock items, their measurement units, what is in stock from previous days, recent purchases, cost per unit, consumptions and inventory predictions.
On the right side of the screen you have Display Cost button and Purchase Transaction.
We will further explain these below.

Purchase Transaction opens a screen in which we can create stock purchases. In this screen you can have your document number, supplier, currency and description of the purchase. This screen also has 5 columns by default. Name of the item, quantity you are purchasing, measurement unit (liters, cans, bottles, packages etc.), Price per unit and total price. On the right side we have 4 buttons.
Close – Closes the screen and brings you back to your Warehouse screen. Add – Adds a new line for selecting the item you bought from your suppliers, quantity and price. Delete – deletes the selected line. Save – saves the transaction and puts your input in stock.

1.6 Reports
In this section you can see and filter all your reports.
On the left side you can see all your reports. Each one of them provides you with different details or summary.

Above the visual part of the report we have two kind of filters. This is where you can find your drop down menu for different timelines such as Today, Yesterday, Past Week, This Month etc. On the right side you have a custom filter in which you can put in your own Start and End date.
Refresh – after updating your date filter you can press Refresh and reports will fetch all the information within that date range
Print – will print the selected report and date range (ask your reseller if you want to print them in A4 format; you will need a A4 printer)
Save – will save a report in an .xps (Windows version of PDF) format
2. Manage
This section allows management to change or modify almost every aspect of the POS.
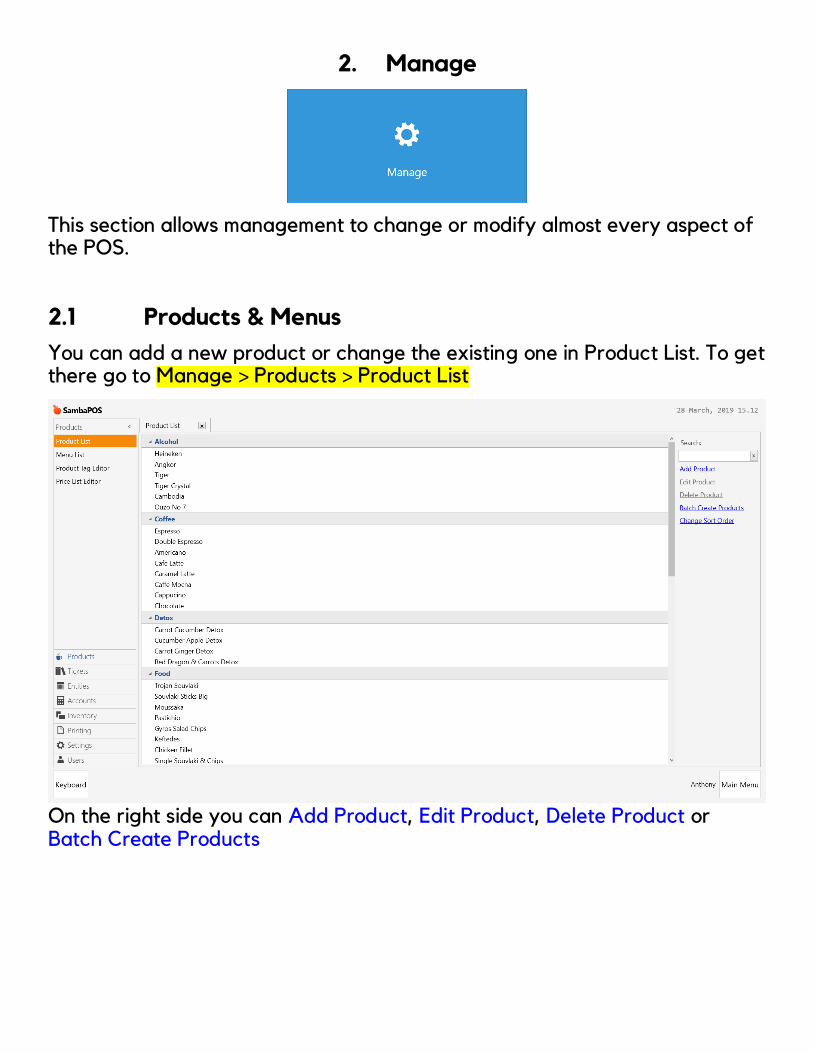
2.1 Products & Menus
You can add a new product or change the existing one in Product List. To get there go to Manage > Products > Product List
On the right side you can Add Product, Edit Product, Delete Product or Batch Create Products
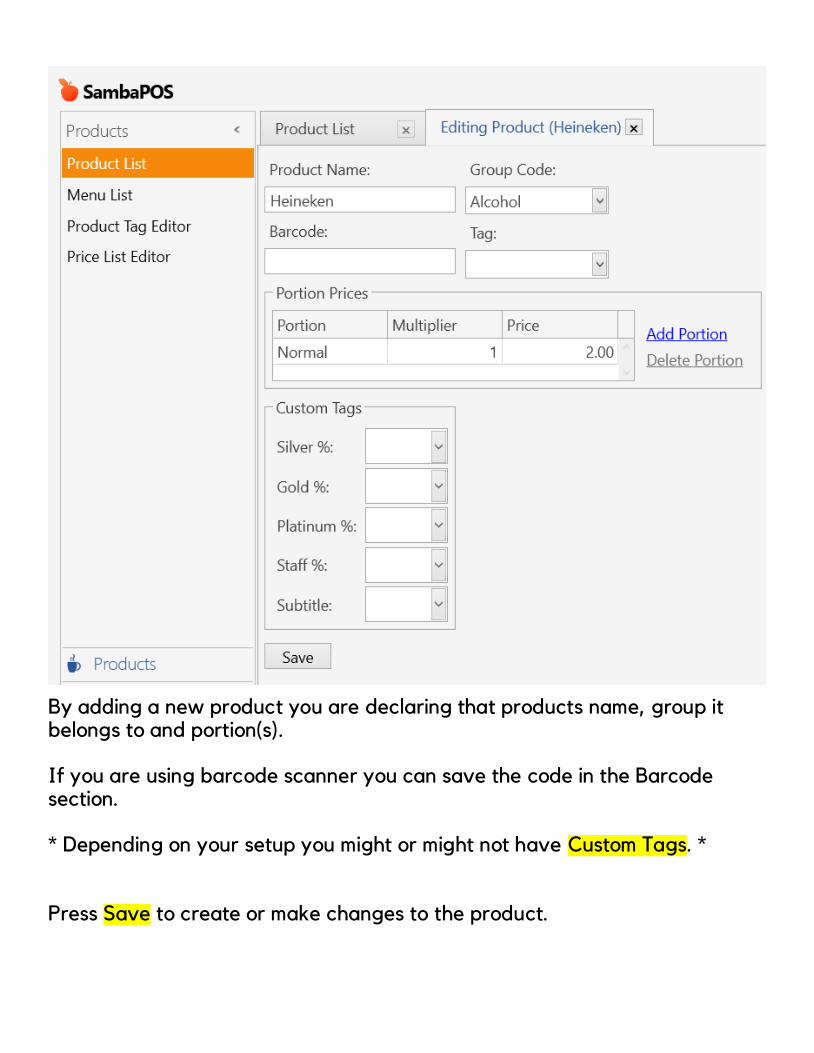
By adding a new product you are declaring that products name, group it belongs to and portion(s). If you are using barcode scanner you can save the code in the Barcode section. * Depending on your setup you might or might not have Custom Tags. * Press Save to create or make changes to the product.
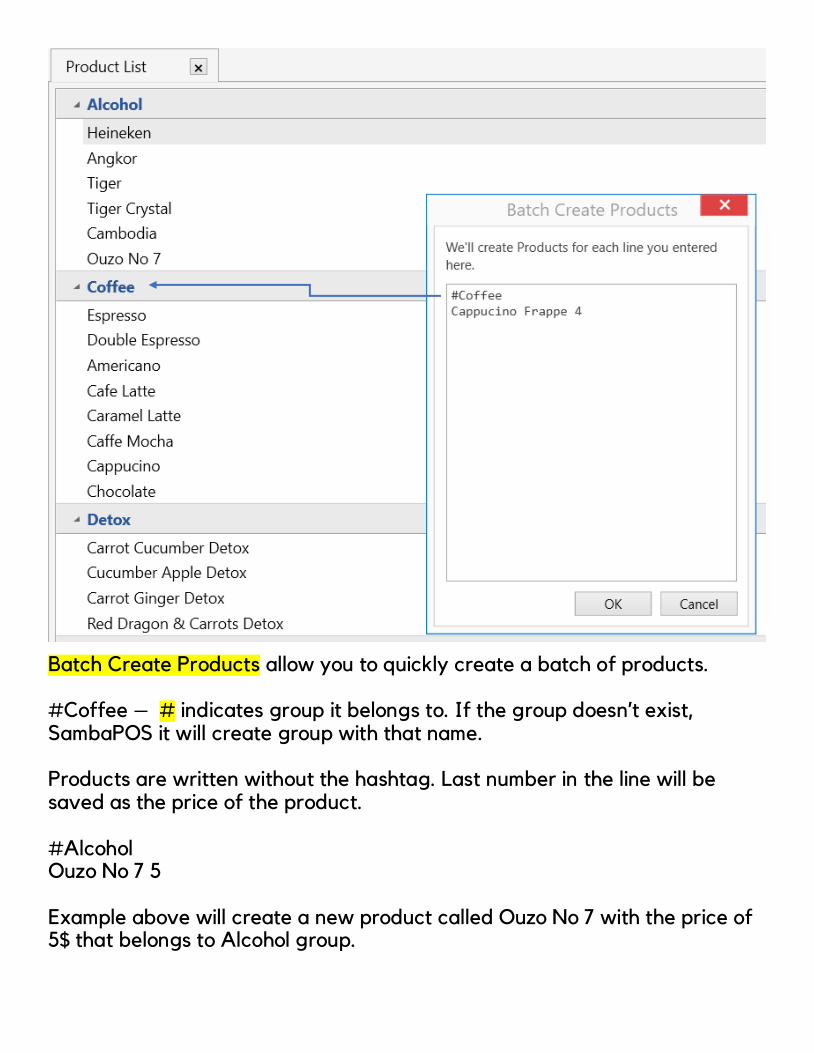
Batch Create Products allow you to quickly create a batch of products. #Coffee – # indicates group it belongs to. If the group doesn’t exist, SambaPOS it will create group with that name. Products are written without the hashtag. Last number in the line will be saved as the price of the product. #Alcohol Ouzo No 7 5 Example above will create a new product called Ouzo No 7 with the price of 5$ that belongs to Alcohol group.

In the Menu section you manipulate Menu Categories and Products you see on your POS screen.
You can edit your menu by going Manage > Products > Menu List selecting your menu and Edit Menu
By selecting a category on your menu and selecting Edit Category Products you can add products to your POS screen by moving them from left to right. You can also remove those products by moving them from right to left.
You can also change formatting of the categories and products such as size, colors, pictures and so on.
You can do that by clicking on Edit Product Properties

Here you can add pictures to your products, change color and use Auto
Select ☑. When a product has Auto Select it means when product is selected in the POS screen it will automatically open your listing of portions, order tags and other modifiers. Otherwise you will have to select that product manually to change modifiers.
We will talk more about Order Tags below.

2.2 Order Tags
Order tags are modifiers for your orders which provide additional information for the staff in the kitchen, bar or your customer if those modifiers come with extra price.
In this example after choosing a product, additional screen pops up where you can select your modifiers.
SambaPOS also allows Free Tag which gives you the flexibility to write a custom modifier that’s not usually requested or doesn’t exist on your menu. You can also add a custom surcharge to that modifier.

New Order Tags can be created in Manage > Tickets > Order Tags
On the right side you can Add Order Tag Group, Edit Order Tag Group, Delete Order Tag Group and Sort Order Tag Group.
Selecting Add Order Tag Group you can create the name of that Order Tag. Depending on your product you can choose what is the minimum amount or maximum number of Order tags you can select while adding the order to the ticket.
Here you can select different properties such as whether the modifier adds price to the product or is shown separately and whether it is or isn’t Tax Free. Display Settings, Order Tag List, Prefix List and Mappings are explained below.

Display Settings allows you to change formatting of the Order Tag such as: Default Order Tag button colors Number of columns per Order Tag Group Size of the buttons in pixels. Font size Custom formatting of the order tag.
Order Tag List is a list of modifiers that will appear on the order screen. You can Add Order Tag, Delete Order Tag and Sort Order Tags them with buttons on the right side.
Tag – name of the button
Max Quantity – number of times you can select the same modifier
Product – indicates which product will be decreased from stock (explained in inventory section)
Price – surcharge for that order tag
Color – used for changing the color of the button
Header – used to change the visible name or formatting of the button
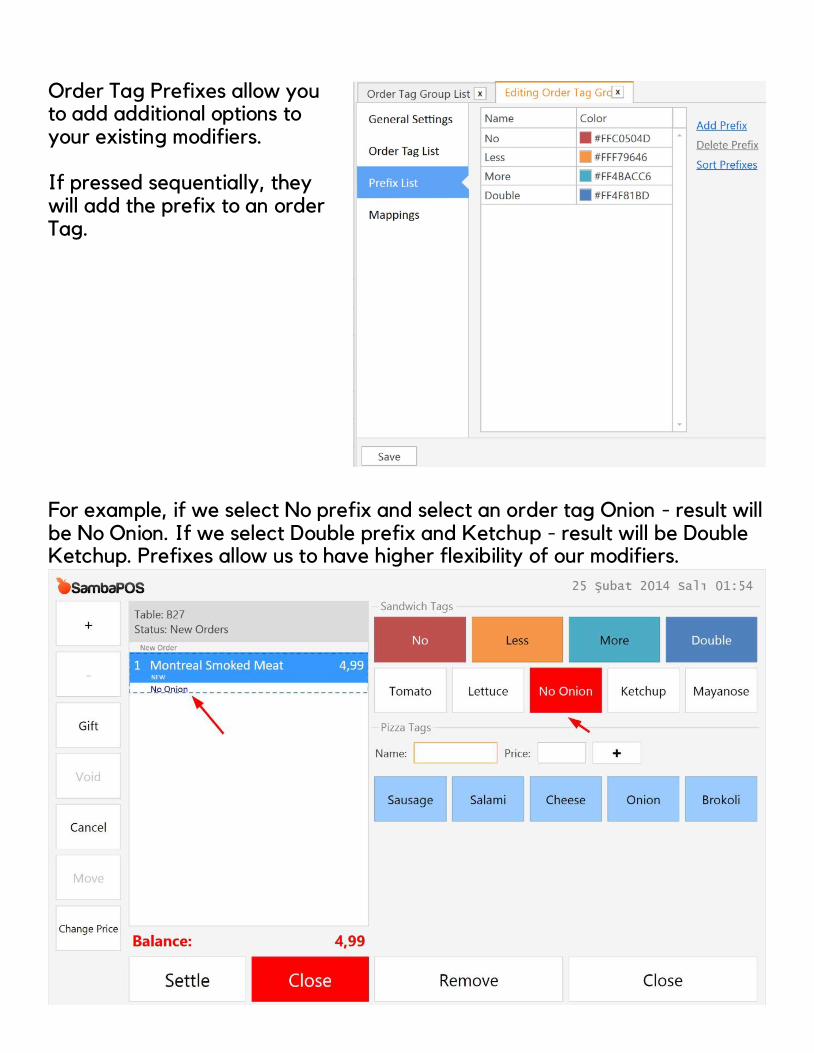
Order Tag Prefixes allow you to add additional options to your existing modifiers. If pressed sequentially, they will add the prefix to an order Tag.
For example, if we select No prefix and select an order tag Onion - result will be No Onion. If we select Double prefix and Ketchup - result will be Double Ketchup. Prefixes allow us to have higher flexibility of our modifiers.
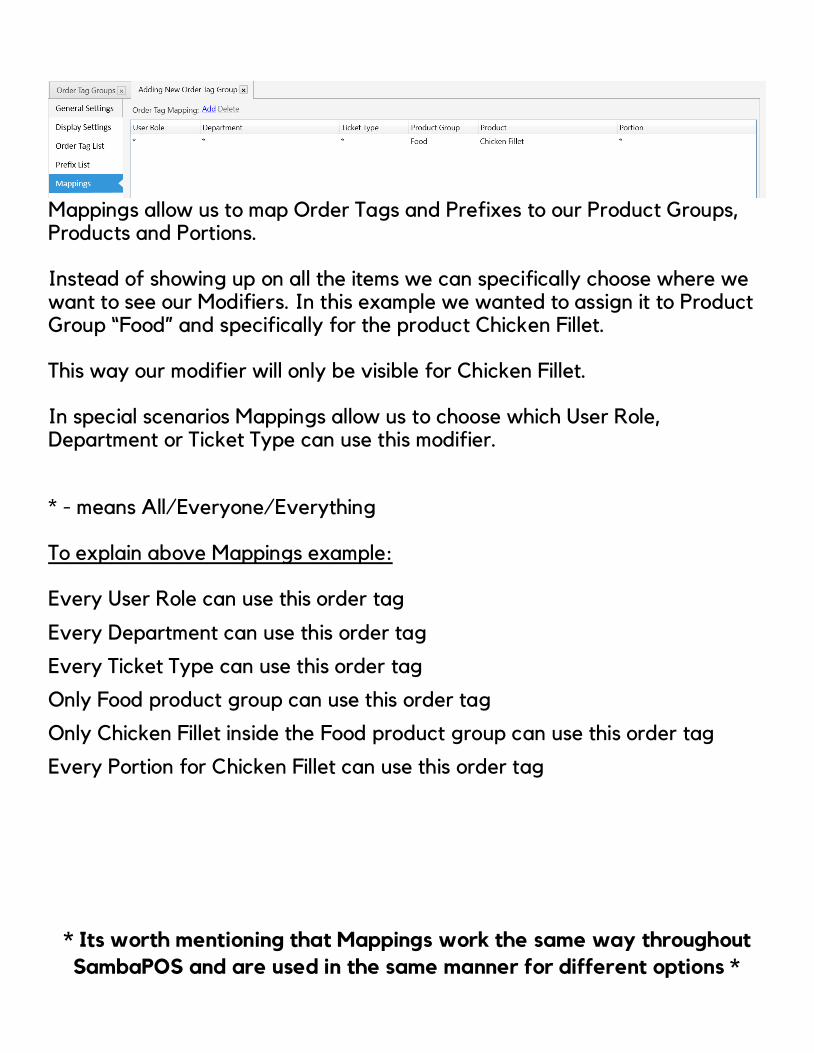
Mappings allow us to map Order Tags and Prefixes to our Product Groups, Products and Portions. Instead of showing up on all the items we can specifically choose where we want to see our Modifiers. In this example we wanted to assign it to Product Group “Food” and specifically for the product Chicken Fillet. This way our modifier will only be visible for Chicken Fillet. In special scenarios Mappings allow us to choose which User Role, Department or Ticket Type can use this modifier.
* - means All/Everyone/Everything To explain above Mappings example: Every User Role can use this order tag
Every Department can use this order tag
Every Ticket Type can use this order tag
Only Food product group can use this order tag
Only Chicken Fillet inside the Food product group can use this order tag
Every Portion for Chicken Fillet can use this order tag
* Its worth mentioning that Mappings work the same way throughout
SambaPOS and are used in the same manner for different options *
2.3 Inventory Items & Inventory Products
Inventory Items & Products are used for calculating stock consumption. We use these to define what our Menu Products are made of. They are defined in Manage > Inventory > Inventory Items or Inventory Products.
We need to understand the difference between Menu Products and Inventory Products.
Menu Products are things that we Sell from our Menu. They are defined in Manage > Products > Product List.
Inventory Products are products you can “build” (meatballs etc). Think of them as semi-products that are made of Inventory Items and/or Inventory Products as defined by a Recipe. They can also be used in a powerful and special way.
Let’s start with basics first.

Inventory Items are items you Purchase from suppliers like Beer bottle, Soda can, ground Beef, or Eggs.
Inventory Item Name – is the name of the item. This name will show up while making a Purchase Transaction in Warehouse (buying stock) ……
Group Code – groups your items for easier sorting ……………..…………………
Warehouse Code – works like item group code but in most cases is unnecessary and you can leave it blank …………………
Warehouse – is your in-house stock room, by default it should be Local Warehouse; some businesses have 2 or 3 stock rooms and this variable can be used to create more complex setups in which you can move your stock around
Base Unit – it is a measurement unit for your inventory item in stock (Can, Bottle,L, kg, Pack etc)
Transaction Unit – if you leave Transaction unit Empty stock will be counted by Base Unit, in this example Can; its best to leave it blank

Additional Units – are used for quick stock purchases, here you can declare how many Base Units are in this Additional Unit; in this example there are 24 Cans of Coke in 1 Case or there is 4 Cases in 1 box
Check Box ☑ – makes the purchase unit default. When making a Purchase Transaction it will be the first one to show (when Purchasing you can change between these units)
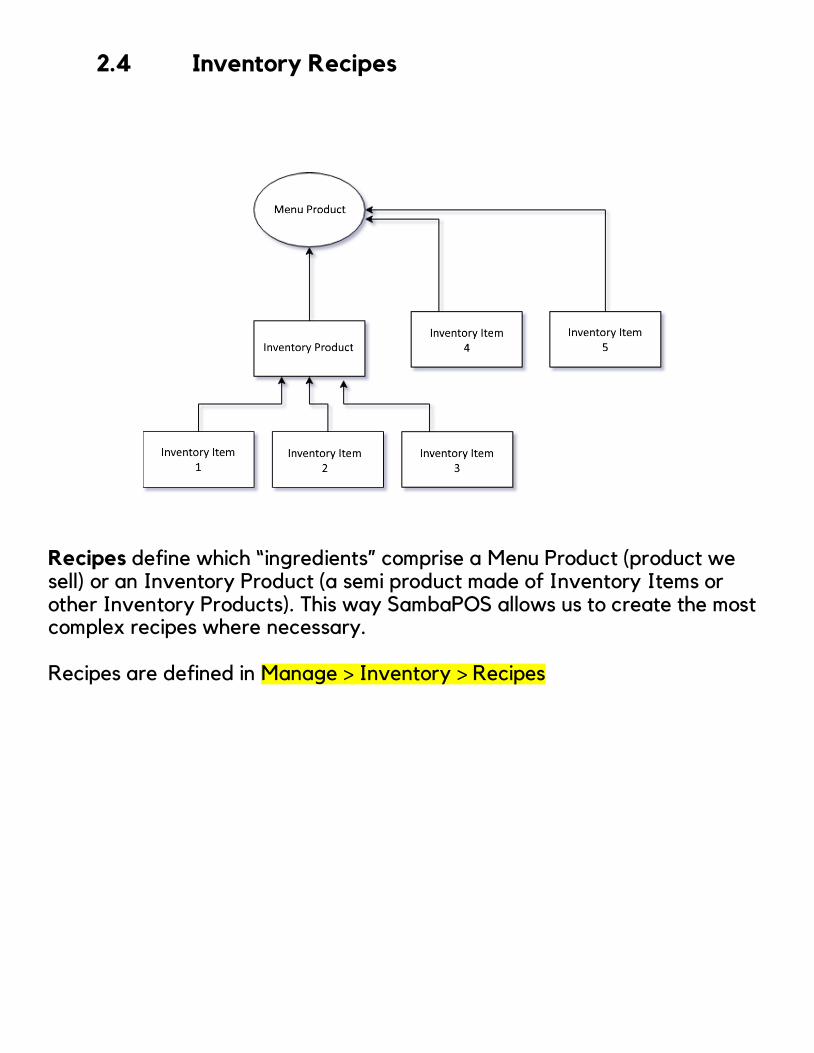
2.4 Inventory Recipes
Recipes define which “ingredients” comprise a Menu Product (product we sell) or an Inventory Product (a semi product made of Inventory Items or other Inventory Products). This way SambaPOS allows us to create the most complex recipes where necessary. Recipes are defined in Manage > Inventory > Recipes
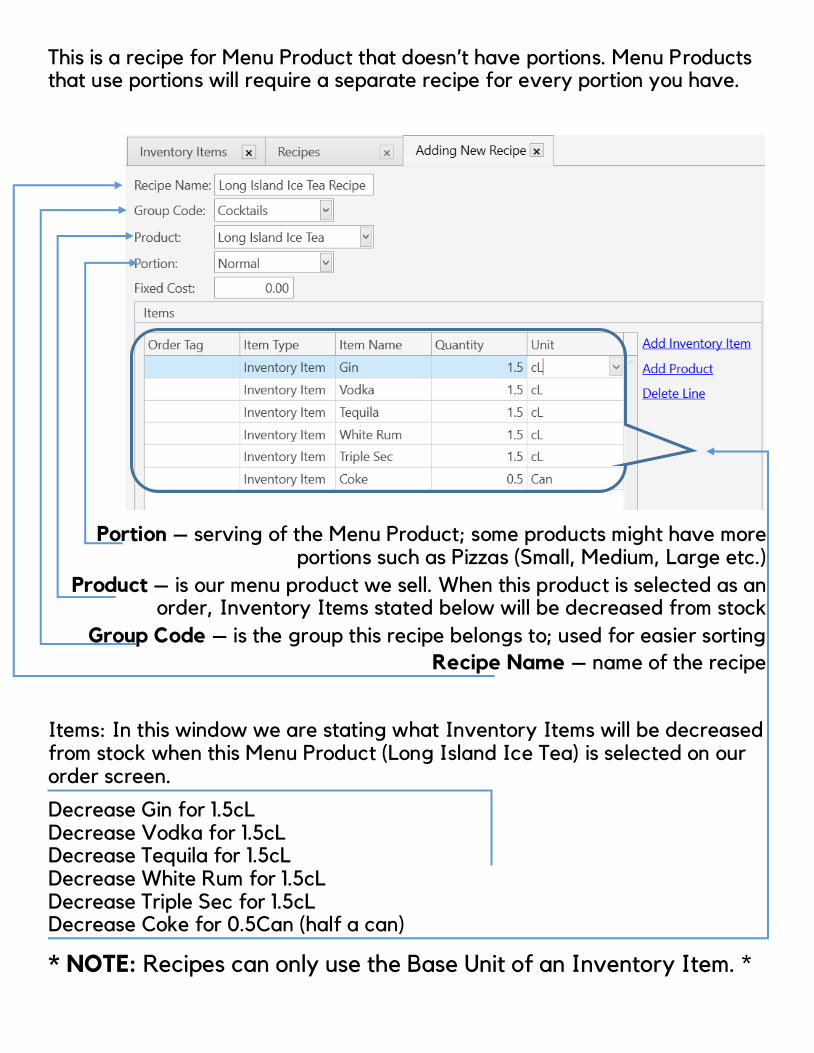
This is a recipe for Menu Product that doesn’t have portions. Menu Products that use portions will require a separate recipe for every portion you have.
Portion – serving of the Menu Product; some products might have more portions such as Pizzas (Small, Medium, Large etc.)
Product – is our menu product we sell. When this product is selected as an order, Inventory Items stated below will be decreased from stock
Group Code – is the group this recipe belongs to; used for easier sorting
Recipe Name – name of the recipe
Items: In this window we are stating what Inventory Items will be decreased from stock when this Menu Product (Long Island Ice Tea) is selected on our order screen.
Decrease Gin for 1.5cL Decrease Vodka for 1.5cL Decrease Tequila for 1.5cL Decrease White Rum for 1.5cL Decrease Triple Sec for 1.5cL Decrease Coke for 0.5Can (half a can)
* NOTE: Recipes can only use the Base Unit of an Inventory Item. *

When to use Inventory Products
You sell Sliders and Subs. A slider takes 1 Meatball, while a Sub takes 3 Meatballs.
You make your own Meatballs from scratch. You don’t buy packages or cases of pre-made frozen Meatballs from a Supplier. Instead, you buy Meatball Ingredients from a Supplier such as Ground Beef, Oatmeal, and Eggs.
When you make a Meatball, you don’t make 1 at a time. You make them in Batches. But you don’t sell Batches of Meatballs - you sell 1 Meatball, or 2, or 3, or 4, which are part of a larger Recipe for your Slider or Sub Menu Products.
How do you define the Recipe for a single Meatball? Do you take all of the ingredients in the Meatball Batch and divide each of those ingredients into minuscule measurements depending on the number of Meatballs you can make in a Batch? You could… but thankfully, we don’t need to.
Here we define Inventory Product Meatball and its Units (similar to Base Unit)
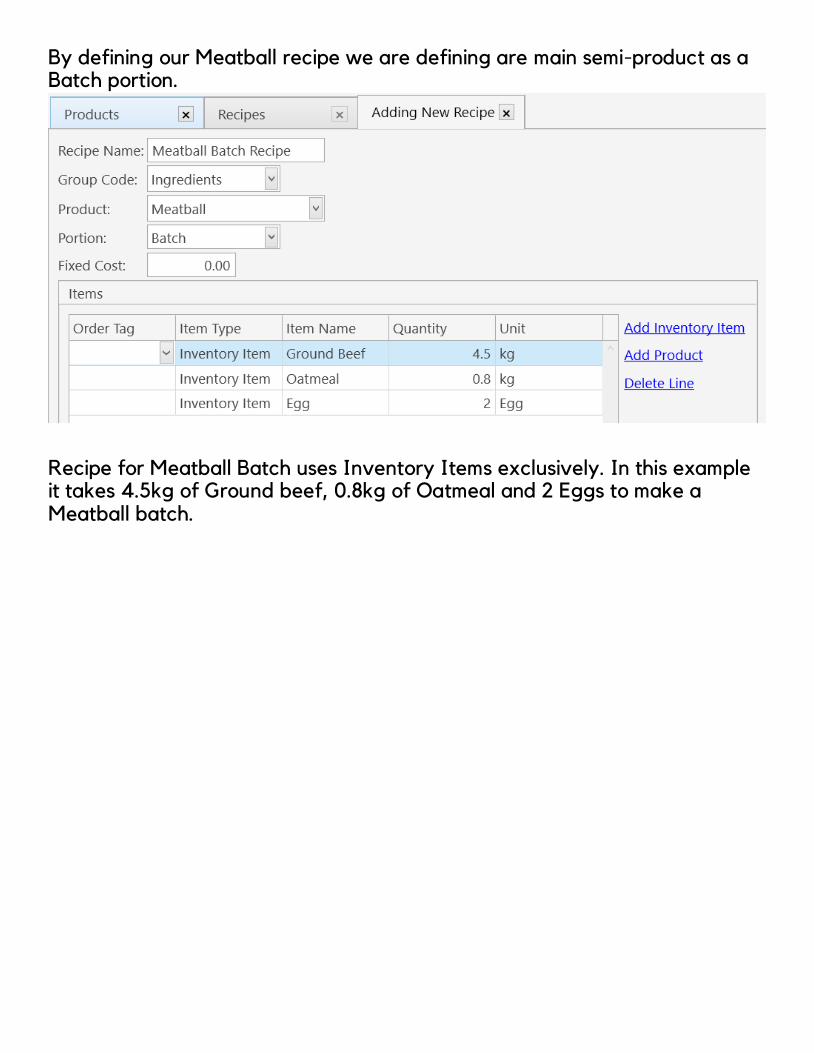
By defining our Meatball recipe we are defining are main semi-product as a Batch portion.
Recipe for Meatball Batch uses Inventory Items exclusively. In this example it takes 4.5kg of Ground beef, 0.8kg of Oatmeal and 2 Eggs to make a Meatball batch.

However, a recipe can also contain an Inventory Product.
We defined what it takes to make a Meatball batch. Now we need to define what fraction of that batch it takes to make our meatball we serve on a plate or in a sandwich. Lets say in our restaurant a single meatball is approx. 60grams and we use 4500g of meat for our batch.
So.. 1 MeatBall = 60grams/4500g = 0.0133 of a Batch
But because of other ingredients we use (that we don’t track) for our meatballs we know that our batch actually gives around 90 meatballs, so:
1 Ball / 90 Balls = 0.0111 of a Batch

2.5 Inventory Consumption using Order Tags
We already mentioned Order Tags we use as our order modifiers.
However, these orders tags can be mapped in our Inventory Consumption. This gives us an ability to have a very flexible and dynamic menu without losing track of our stock. You can create a new Menu Product in Product List.
After creating a Menu Product we can create a recipe using our Meatball Batch product we mentioned earlier.

Once you have both Menu Product and Recipe you can edit your Order Tag Group and choose which Menu Product is being used by that Order Tag.
You can use this method to create flexible custom food or drink orders using nothing but Order Tags.
* This is ideal for businesses that serve “build your own
burger”, “build your own sandwich” and “build your own
cocktail” etc. *

2.6 Inventory Transactions
Inventory Transactions are purchases or movements of our stock. We already mentioned how to put stock purchases in the Warehouse screen.
SambaPOS also allows for stock movements in case you have 2 or more stock rooms.
This is why they are called Inventory Transactions because similarly to accounts you can take stock from one warehouse and put it another warehouse.
Inventory Transactions can be found at Manage > Inventory > Transactions
This screen is used for correcting mistakes, creating transactions for management purposes or simply deleting them.
You can select a transaction and press Edit Transaction Document.
You can select and modify any of the columns as you see fit.
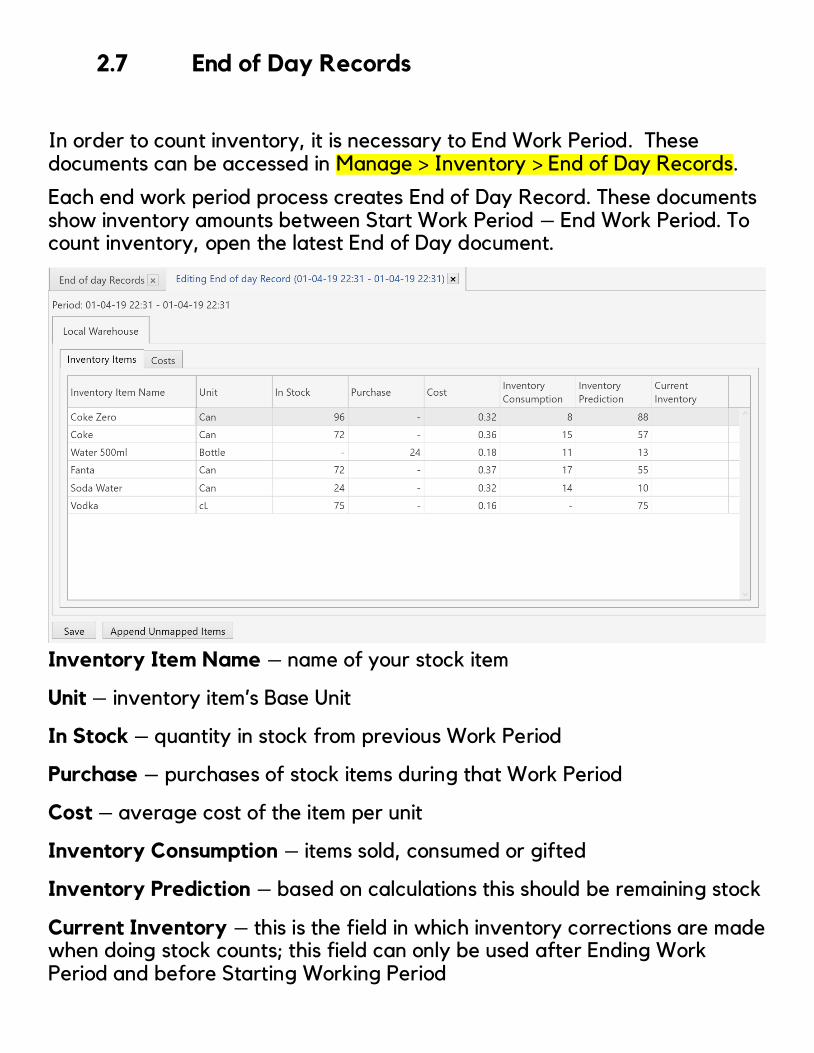
2.7 End of Day Records
In order to count inventory, it is necessary to End Work Period. These documents can be accessed in Manage > Inventory > End of Day Records.
Each end work period process creates End of Day Record. These documents show inventory amounts between Start Work Period – End Work Period. To count inventory, open the latest End of Day document.
Inventory Item Name – name of your stock item
Unit – inventory item’s Base Unit
In Stock – quantity in stock from previous Work Period
Purchase – purchases of stock items during that Work Period
Cost – average cost of the item per unit
Inventory Consumption – items sold, consumed or gifted
Inventory Prediction – based on calculations this should be remaining stock
Current Inventory – this is the field in which inventory corrections are made when doing stock counts; this field can only be used after Ending Work Period and before Starting Working Period

2.10 Users
Users section can be found at Manage > Users > User List. This section is used to create new staff users or change names and pins to the existing ones.
Pin codes have to be between 4-20 digits long. User role is to assign privilege access to your staff and their purpose within the business. Different roles will allow staff to see or use different parts of the POS.
For general purpose you can leave Password empty.

2.11 Settings & metriK
This section can be found in Manage > Settings. Settings section is mostly used for accessing metriK app or Database Backups. metriK provides instant tracking for restaurant owners using SambaPOS.
You can find more information at More about metriK How to use metriK
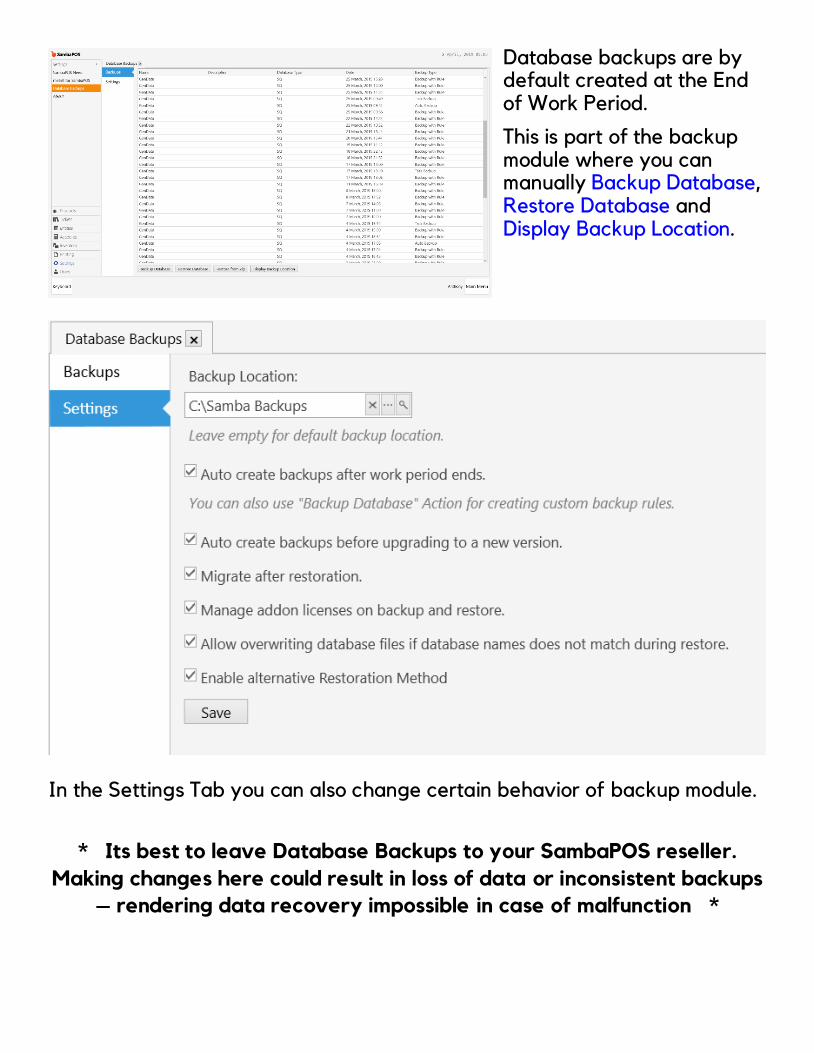
Database backups are by default created at the End of Work Period.
This is part of the backup module where you can manually Backup Database, Restore Database and Display Backup Location.
In the Settings Tab you can also change certain behavior of backup module.
* Its best to leave Database Backups to your SambaPOS reseller.
Making changes here could result in loss of data or inconsistent backups
– rendering data recovery impossible in case of malfunction *

About SambaPOS:
131209 Restaurants
23 Languages
195 Countries