red hat cloud foundations reference · pdf file · 2010-07-14red hat cloud...
TRANSCRIPT

Red Hat Cloud FoundationsReference Architecture
Edition One: Private IaaS Clouds
Version 1.0April 2010

Red Hat Cloud Foundations Reference ArchitectureEdition One: Private IaaS Clouds
1801 Varsity Drive™Raleigh NC 27606-2072 USAPhone: +1 919 754 3700Phone: 888 733 4281Fax: +1 919 754 3701PO Box 13588Research Triangle Park NC 27709 USA
Linux is a registered trademark of Linus Torvalds. Red Hat, Red Hat Enterprise Linux and the Red Hat "Shadowman" logo are registered trademarks of Red Hat, Inc. in the United States and other countries.
Microsoft and Windows are U.S. registered trademarks of Microsoft Corporation.
UNIX is a registered trademark of The Open Group.
Intel, the Intel logo, Xeon and Itanium are registered trademarks of Intel Corporation or its subsidiaries in the United States and other countries.
All other trademarks referenced herein are the property of their respective owners.
© 2010 by Red Hat, Inc. This material may be distributed only subject to the terms and conditions set forth in the Open Publication License, V1.0 or later (the latest version is presently available at http://www.opencontent.org/openpub/).
The information contained herein is subject to change without notice. Red Hat, Inc. shall not be liable for technical or editorial errors or omissions contained herein.
Distribution of modified versions of this document is prohibited without the explicit permission of Red Hat Inc.
Distribution of this work or derivative of this work in any standard (paper) book form for commercial purposes is prohibited unless prior permission is obtained from Red Hat Inc.
The GPG fingerprint of the [email protected] key is:CA 20 86 86 2B D6 9D FC 65 F6 EC C4 21 91 80 CD DB 42 A6 0E
www.redhat.com 2

Table of Contents
1 Executive Summary.........................................................................................7
2 Cloud Computing: Definitions...........................................................................9 2.1 Essential Characteristics.................................................................................................9
2.1.1 On-demand Self-Service .........................................................................................9
2.1.2 Resource Pooling.....................................................................................................9
2.1.3 Rapid Elasticity ........................................................................................................9
2.1.4 Measured Service....................................................................................................9
2.2 Service Models..............................................................................................................10
2.2.1 Cloud Infrastructure as a Service (IaaS)................................................................10
2.2.2 Cloud Platform as a Service (PaaS)......................................................................10
2.2.3 Cloud Software as a Service (SaaS)......................................................................10
2.2.4 Examples of Cloud Service Models.......................................................................11
2.3 Deployment Models.......................................................................................................12
2.3.1 Private Cloud..........................................................................................................12
2.3.2 Public Cloud...........................................................................................................13
2.3.3 Hybrid Cloud...........................................................................................................14
2.3.4 Community Cloud...................................................................................................14
3 Red Hat and Cloud Computing......................................................................15 3.1 Evolution, not Revolution – A Phased Approach to Cloud Computing.........................15
3.2 Unlocking the Value of the Cloud..................................................................................17
3.3 Redefining the Cloud.....................................................................................................18
3.3.1 Deltacloud...............................................................................................................18
4 A High Level Functional View of Cloud Computing........................................20 4.1 Cloud User / Tenant.......................................................................................................22
4.1.1 User Log-In.............................................................................................................22
4.1.2 VM Deployment & Monitoring................................................................................22
4.1.3 VM Orchestration & Discovery...............................................................................22
4.2 Cloud Provider / Administrator.......................................................................................23
4.2.1 Tenant Account Management................................................................................23
4.2.2 Virtualization Substrate Management....................................................................23
4.2.3 Software Life-Cycle Management..........................................................................24
3 www.redhat.com
4.2.4 Operations Management........................................................................................24
4.2.5 Cloud Provider Functionality - Creating/Managing an IaaS Cloud Infrastructure..24
4.3 Multi-Cloud Configurations ...........................................................................................26
5 Red Hat Cloud: Software Stack and Infrastructure Components...................27 5.1 Red Hat Enterprise Linux..............................................................................................29
5.2 Red Hat Enterprise Virtualization (RHEV) for Servers..................................................30
5.3 Red Hat Network (RHN) Satellite..................................................................................31
5.3.1 Cobbler...................................................................................................................31
5.4 JBoss Enterprise Middleware........................................................................................32
5.4.1 JBoss Enterprise Application Platform (EAP)........................................................33
5.4.2 JBoss Operations Network (JON)..........................................................................33
5.5 Red Hat Enterprise MRG Grid.......................................................................................35
6 Proof-of-Concept System Configuration.........................................................36 6.1 Hardware Configuration.................................................................................................37
6.2 Software Configuration..................................................................................................38
6.3 Storage Configuration ...................................................................................................39
6.4 Network Configuration...................................................................................................41
7 Deploying Cloud Infrastructure Services........................................................42 7.1 Network Gateway ........................................................................................................44
7.2 Install First Management Node......................................................................................46
7.3 Create Satellite System.................................................................................................48
7.3.1 Create Satellite VM................................................................................................48
7.3.2 Configure DHCP.....................................................................................................50
7.3.3 Configure DNS.......................................................................................................52
7.3.4 Install and Configure RHN Satellite Software........................................................53
7.3.5 Configure Multiple Organizations...........................................................................54
7.3.6 Configure Custom Channels for RHEL 5.5 Beta....................................................55
7.3.7 Cobbler...................................................................................................................56 7.3.7.1 Configure Cobbler.........................................................................................................................56
7.3.7.2 Configure Cobbler Management of DHCP..................................................................................57
7.3.7.3 Configure Cobbler Management of DNS.....................................................................................58
7.3.7.4 Configure Cobbler Management of PXE.....................................................................................60
7.4 Build Luci VM.................................................................................................................61
7.5 Install Second Management Node................................................................................63
7.6 Configure RHCS............................................................................................................66
www.redhat.com 4

7.7 Configure VMs as Cluster Services...............................................................................74
7.7.1 Create Cluster Service of Satellite VM...................................................................74
7.7.2 Create Cluster Service of Luci VM.........................................................................75
7.8 Configure NFS Service (for ISO Library).......................................................................76
7.9 Create RHEV Management Platform............................................................................80
7.9.1 Create VM..............................................................................................................80
7.9.2 Create Cluster Service of VM.................................................................................81
7.9.3 Install RHEV-M Software........................................................................................82
7.9.4 Configure the Data Center.....................................................................................87
8 Deploying VMs in Hypervisor Hosts...............................................................89 8.1 Deploy RHEV-H Hypervisor..........................................................................................90
8.2 Deploy RHEL Guests (PXE / ISO / Template) on RHEV-H Host..................................93
8.2.1 Deploying RHEL VMs using PXE...........................................................................93
8.2.2 Deploying RHEL VMs using ISO Library...............................................................95
8.2.3 Deploying RHEL VMs using Templates.................................................................97
8.3 Deploy Windows Guests (ISO / Template) on RHEV-H Host.......................................99
8.3.1 Deploying Window VMs using ISO Library............................................................99
8.3.2 Deploying Windows VMs using Templates..........................................................101
8.4 Deploy RHEL + KVM Hypervisor Host........................................................................103
8.5 Deploy RHEL Guests (PXE / ISO / Template) on KVM Hypervisor Host....................107
8.5.1 Deploying RHEL VMs using PXE.........................................................................107
8.5.2 Deploying RHEL VMs using ISO Library.............................................................109
8.5.3 Deploying RHEL VMs using Templates...............................................................111
8.6 Deploy Windows Guests (ISO / Template) on KVM Hypervisor Host.........................113
8.6.1 Deploying Window VMs using ISO Library..........................................................113
8.6.2 Deploying Windows VMs using Templates..........................................................115
9 Deploying Applications in RHEL VMs...........................................................117 9.1 Deploy Application in RHEL VMs................................................................................117
9.1.1 Configure Application and Deploy Using Satellite...............................................117
9.1.2 Deploy Application Using Template.....................................................................123
9.2 Scale Application.........................................................................................................125
10 Deploying JBoss Applications in RHEL VMs..............................................128 10.1 Deploy JON Server in Management Services Cluster..............................................128
10.2 Deploy JBoss EAP Application in RHEL VMs...........................................................134
10.2.1 Deploy Using Satellite........................................................................................134
5 www.redhat.com

10.2.2 Deploy Using Template......................................................................................143
10.3 Scale JBoss EAP Application....................................................................................147
11 Deploying MRG Grid Applications in RHEL VMs........................................149 11.1 Deploy MRG Manager in Management Services Cluster.........................................149
11.2 Deploy MRG Grid in RHEL VMs................................................................................161
11.3 Deploy MRG Grid Application....................................................................................166
11.4 Scale MRG Grid Application......................................................................................167
12 Cloud End-User Use-Case Scenarios........................................................168
13 References.................................................................................................169
Appendix A: Configuration Files.......................................................................170 A.1 Satellite answers.txt....................................................................................................170 A.2 Cobbler settings..........................................................................................................173 A.3 rhq-install.sh................................................................................................................180 A.4 Configuration Channels Files......................................................................................185
www.redhat.com 6

1 Executive SummaryRed Hat's suite of open source software provides a rich infrastructure for cloud providers to build public/private cloud offerings.
This Volume 1 guide for deploying the Red Hat infrastructure for a private cloud describes the foundation for building a Red Hat Private cloud:
1. Deployment of infrastructure management services, e.g., Red Hat Network (RHN) Satellite, Red Hat Enterprise Virtualization (RHEV) Manager (RHEV-M), DNS service, DHCP service, PXE server, NFS server for ISO images, JON, MRG Manager - most of them installed in virtual machines (VMs) in a Red Hat Cluster Suite (RHCS) cluster for high availability.
2. Deployment of a farm of RHEV host systems (either in the form of RHEV Hypervisors or as RHEL+KVM) to run tenants' VMs.
3. Demonstrate sample RHEL application(s), JBoss application(s) and MRG Grid application(s) respectively in the tenant VMs.
Section 2 presents some commonly used definitions of cloud computing.
Section 3 discusses the phased adoption of cloud computing by enterprises from the use of virtualization, to the deployment of internal clouds and leading to full-functional utility computing using private and public clouds.
Section 4 describes a high level functional view of cloud computing. The model is described in terms of:
• Cloud administrator/provider actions and flows - to create and maintain the cloud infrastructure
• Cloud user/tenant actions and flows - to deploy and manage applications in the cloud
Section 5 describes the software infrastructure for the Red Hat Cloud.
Section 6 describes the configuration used for the proof-of-concept.
Section 7 is a detailed step-by-step guide for deploying cloud infrastructure management services in a Red Hat Cluster Suite (RHCS) cluster for high availability.
Section 8 is a detailed step-by-step guide for deploying RHEV host systems to run tenants' VMs.
Section 9 is a detailed step-by-step guide for deploying and scaling a sample RHEL application in tenant VMs.
Section 10 is a detailed step-by-step guide for deploying and scaling a sample JBoss application in tenant VMs.
7 www.redhat.com

Section 11 is a detailed step-by-step guide for deploying and scaling a sample MRG Grid application in tenant VMs.
Section 12 describes some end-user use-cases scenarios of the cloud infrastructure outlined in Section 6 through Section 11 above.
Section 13 lists referenced documents.
Future versions of the Red Hat Cloud Reference Architecture will take these concepts further:
• Red Hat Cloud Reference Architecture: Adding self-service
• Red Hat Cloud Reference Architecture: Managing mixed private clouds
• Red Hat Cloud Reference Architecture: Adding public clouds
• Red Hat Cloud Reference Architecture: Creating large-scale clouds
www.redhat.com 8

2 Cloud Computing: DefinitionsCloud computing is a model for enabling convenient, on-demand network access to a shared pool of configurable computing resources (e.g., networks, servers, storage, applications, and services) that can be rapidly provisioned and released with minimal management effort or service provider interaction. This cloud model promotes availability and is composed of five essential characteristics, three service models, and four deployment models. The following definitions have been proposed by National Institute of Standards and Technology (NIST) in the document found at http://csrc.nist.gov/groups/SNS/cloud-computing/cloud-def-v15.doc
2.1 Essential CharacteristicsCloud computing creates an illusion of infinite computing resources available on demand, thereby eliminating the need for Cloud Computing users to plan far ahead for provisioning.
2.1.1 On-demand Self-Service A consumer can unilaterally provision computing capabilities, such as server time and network storage, as needed automatically without requiring human interaction with each service’s provider.
2.1.2 Resource PoolingThe provider’s computing resources are pooled to serve multiple consumers using a multi-tenant model, with different physical and virtual resources dynamically assigned and reassigned according to consumer demand. There is a sense of location independence in that the customer generally has no control or knowledge over the exact location of the provided resources but may be able to specify location at a higher level of abstraction (e.g., country, state, or data center). Examples of resources include storage, processing, memory, network bandwidth, and virtual machines.
2.1.3 Rapid Elasticity Capabilities can be rapidly and elastically provisioned, in some cases automatically, to quickly scale out and rapidly released to quickly scale in. To the consumer, the capabilities available for provisioning often appear to be unlimited and can be purchased in any quantity at any time.
2.1.4 Measured ServiceCloud systems automatically control and optimize resource use by leveraging a metering capability at some level of abstraction appropriate to the type of service (e.g., storage, processing, bandwidth, and active user accounts). Resource usage can be monitored, controlled, and reported providing transparency for both the provider and consumer of the utilized service.
9 www.redhat.com
2.2 Service Models
2.2.1 Cloud Infrastructure as a Service (IaaS)The capability provided to the consumer is to provision processing, storage, networks, and other fundamental computing resources where the consumer is able to deploy and invoke arbitrary software, which can include operating systems and applications. The consumer does not manage or control the underlying cloud infrastructure but has control over operating systems, storage, deployed applications, and possibly limited control of select networking components (e.g., host firewalls).
2.2.2 Cloud Platform as a Service (PaaS)The capability provided to the consumer is to deploy onto the cloud infrastructure consumer-created or acquired applications created using programming languages and tools supported by the provider. The consumer does not manage or control the underlying cloud infrastructure including network, servers, operating systems, or storage, but has control over the deployed applications and possibly application hosting environment configurations.
2.2.3 Cloud Software as a Service (SaaS)The capability provided to the consumer is to use the provider’s applications running on a cloud infrastructure. The applications are accessible from various client devices through a thin client interface such as a web browser (e.g., web-based email). The consumer does not manage or control the underlying cloud infrastructure including network, servers, operating systems, storage, or even individual application capabilities, with the possible exception of limited user-specific application configuration settings.
www.redhat.com 10
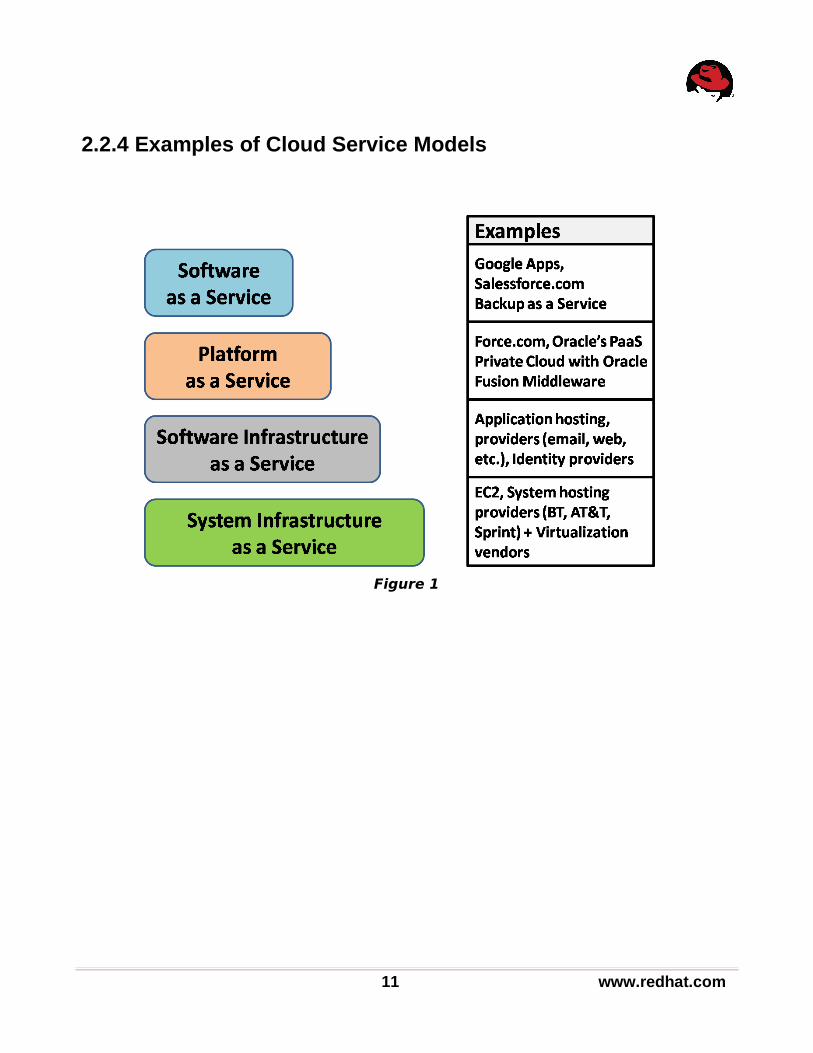
2.2.4 Examples of Cloud Service Models
11 www.redhat.com
Figure 1

2.3 Deployment Models
2.3.1 Private CloudThe cloud infrastructure is operated solely for an organization. It may be managed by the organization or a third party and may exist on premise or off premise.
www.redhat.com 12
Figure 2

2.3.2 Public CloudThe cloud infrastructure is made available to the general public or a large industry group and is owned by an organization selling cloud services.
13 www.redhat.com
Figure 3

2.3.3 Hybrid CloudThe cloud infrastructure is a composition of two or more clouds (private, community, or public) that remain unique entities but are bound together by standardized or proprietary technology that enables data and application portability (e.g., load-balancing between clouds).
2.3.4 Community CloudThe cloud infrastructure is shared by several organizations and supports a specific community that has shared concerns (e.g., mission, security requirements, policy, and compliance considerations). It may be managed by the organizations or a third party and may exist on premise or off premise.
www.redhat.com 14
Figure 4

3 Red Hat and Cloud Computing
3.1 Evolution, not Revolution – A Phased Approach to Cloud ComputingWhile cloud computing requires virtualization as an underlying and essential technology, it is inaccurate to equate cloud computing with virtualization. The figure below displays the different levels of abstraction addressed by virtualization and cloud computing respectively.
15 www.redhat.com
Figure 5: Levels of Abstraction

The following figure illustrates a phased approach to technology adoption starting with server consolidation using 'virtualization', then automating large deployments of virtualization within an enterprise using 'private clouds', and finally extending private clouds to hybrid environments leveraging public clouds as a utility.
www.redhat.com 16
Figure 6: Phases of Technology Adoption in the Enterprise

3.2 Unlocking the Value of the CloudRed Hat's approach does not lock an enterprise into one vendor's cloud stack, but instead offers a rich set of solutions for building a cloud. These can be used alone or in conjunction with components from third-party vendors to create the optimal cloud to meet unique needs.
Cloud computing is one of the most important shifts in information technology to occur in decades. It has the potential to improve the agility of organizations by allowing them to:
1. Enhance their ability to respond to opportunities, 2. Bond more tightly with customers and partners, and 3. Reduce the cost to acquire and use IT in ways never before possible.
Red Hat is proud to be a leader in delivering the infrastructure necessary for reliable, agile, and cost-effective cloud computing. Red Hat's cloud vision is unlike that of any other IT vendor. Red Hat recognizes that IT infrastructure is - and will continue to be - composed of pieces from many different hardware and software vendors. Red Hat enables the use and management of these diverse assets as one cloud. Enabling cloud to be an evolution, not a revolution.
Red Hat's vision spans the entire range of cloud models:
• Building an internal Infrastructure as a Service (IaaS) cloud, or seamlessly using a third-party's cloud
• Creating new Linux, LAMP, or Java applications online, as a Platform as a Service (PaaS)
• Providing the easiest path to migrating applications to attractive Software as a Service (SaaS) models
Red Hat's open source approach to cloud computing protects existing investment and manages diverse investments as one cloud -- whether Linux or Windows, Red Hat Enterprise Virtualization, VMware or Microsoft Hyper-V, Amazon EC2 or another vendor's IaaS, .Net or Java, JBoss or WebSphere, x86 or mainframe.
17 www.redhat.com

3.3 Redefining the CloudCloud computing is the first major market wave where open source technologies are built in from the beginning, powering the vast majority of early clouds.
Open source products that make up Red Hat's cloud infrastructure include:• Red Hat Enterprise Virtualization • Red Hat Enterprise Linux • Red Hat Network Satellite • Red Hat Enterprise MRG Grid • JBoss Enterprise Middleware
In addition Red Hat is leading work on and investing in several open source projects related to computing. As these projects mature, and after undergo rigorous testing, tuning, and hardening, the ideas from many of these projects may be incorporated into future version of the Red Hat cloud infrastructure. These projects include:
• Deltacloud - Abstracts the differences between clouds • BoxGrinder - Making it easy to grind out server configurations for a multitude of
virtualization fabrics • Cobbler - Installation server for rapid set up of network installation equipment • Condor - Batch system managing millions of machines worldwide • CoolingTower - Simple application-centric tool for deploying applications in the cloud • Hail - Umbrella cloud computing project for cloud services • Infinispan - Extremely scalable, highly available data grid platform • Libvirt - Common, generic, and scalable layer to securely manage domains on a node • Spice - Open remote computing solution or solution for interaction with virtualized
desktop devices • Thincrust - Tools to build appliances for the cloud
3.3.1 DeltacloudThe goal of Deltacloud is simple: making many clouds act as one. Deltacloud aims to bridge the differences between diverse silos of infrastructure, allowing them to be managed as one. Organizations today may have different clouds built on, for example, Red Hat Enterprise Virtualization, VMware, or Hyper-V. The Deltacloud project is designed to make them manageable as one cloud, one pool of resources. Or organizations may wish to use internal cloud capacity, as well as Amazon EC2, and perhaps capacity from other IaaS providers. The Deltacloud project is designed to make these manageable as one.
Today each IaaS cloud presents a unique API that developers and ISVs need to write to in order to consume the cloud service. The Deltacloud effort is creating a common, REST-based API, such that developers can write once and manage anywhere. Deltacloud is cloud broker, so to speak, with drivers that map the API to both public clouds like EC2 and private virtualized clouds based on VMware and Red Hat Enterprise Linux with integrated KVM virtualization technology. The API can be test driven with the self-service web console, which
www.redhat.com 18

is also a part of the Deltacloud effort. While a young project, the response has been overwhelming and the potential impact on users, developers, and IT to consume cloud services via a common set of tools is epic. To learn more about the Deltacloud project, visit http://deltacloud.org.
Red Hat's unique open source development model means that one can observe, participate in, and improve the development of our technologies with us. It is done in the open to ensure interoperability and compatibility. It yields uncompromising, stable, reliable, secure, enterprise-class infrastructure software, which powers the world's markets, businesses, governments, and defense organizations. The power of this model is being harnessed to drive the cloud forward.
19 www.redhat.com

4 A High Level Functional View of Cloud ComputingThe Red Hat infrastructure for cloud computing is described in terms of:
1. Cloud administrator/provider interfaces – to create and maintain the cloud infrastructure
2. Cloud user/tenant interfaces – to deploy and manage applications in the cloud
Note: Most cloud architecture write-ups only describe the cloud user interface. Since this reference architecture is intended to help enterprises set up private clouds using the Red Hat infrastructure, this document provides an overview of the cloud provider interfaces in addition to the cloud tenant interfaces.
www.redhat.com 20
Figure 7: Cloud Provider & Tenants

21 www.redhat.com
Figure 8: Cloud Components & Interfaces

4.1 Cloud User / TenantThe cloud user (or tenant) uses the user portal interfaces to deploy and manage their application on top of a cloud infrastructure offered by a cloud provider. Three types of user portal functionality are covered at a very high level in this section:
1. User Log-In
2. VM Deployment & Monitoring
3. VM Orchestration & Discovery
4.1.1 User Log-InUser Account Management enables cloud users to create new accounts, log into existing accounts, and gain access to their (active or dormant) VMs.
The user portal supports all these functions via a web/API interface which supports multi-tenancy, i.e., each user (or tenant) has secure access to only their VMs and is isolated from other VMs it does not own.
4.1.2 VM Deployment & MonitoringThe workhorses in a cloud are virtual machines loaded with the executable images (templates) of the application stack with access to application data/storage, network connections, and a user portal.
The user portal enables functions like import/export/backup of images in the VM, add/edit VM resources, and state control of the VM via commands such as run, shutdown and suspend.
4.1.3 VM Orchestration & DiscoveryThere are many patterns of how a cloud is used as a utility. For example, one IaaS pattern may be where the cloud provides fast provisioning of the pre-configured virtual machines. Other details of patterns of use may involve application data persisting across VM invocations (stateful) or not persisting across VM invocations (stateless), or IP connections persisting across VM invocations or not. If a user starts a group of VMs running client-server applications, the virtual machines running the clients should be able to locate virtual machines running the servers.
VM orchestration and discovery services are used to organize VMs into group of cooperating virtual machines by assigning parameters to VMs that can be used to customize the VM instance according to its role.
www.redhat.com 22

4.2 Cloud Provider / AdministratorThe cloud provider has a set of management interfaces to create, monitor and manage the cloud infrastructure. Four types of cloud administrator functionality are covered at a very high level in his section:
1. Tenant Account Management
2. Virtualization Substrate Management
3. Application / Software / Image Life-Cycle Management
4. Operations Management
4.2.1 Tenant Account ManagementUser Account Management provides the security framework for creating and maintaining cloud user (or tenant) accounts. It tracks all the (virtual) hardware and software resources assigned to a tenant and provides the necessary isolation of a tenant's resources from unauthorized access. It offers an interface to track the resource consumption and billing information on a per tenant basis.
4.2.2 Virtualization Substrate ManagementVirtualization Substrate Management is a centralized management system to administer and control all aspects of a virtualized infrastructure including datacenters, clusters, hosts and virtual machines. It offers rich functionality via both an API as well as a Web browser GUI. Functions include:
• Live Migration: Dynamically move virtual machines between hosts with no service interruption.
• High Availability: Virtual machines automatically restart on another host in the case of host failure.
• Workload Management: Balance workloads in the datacenter by dynamically live-migrating virtual machines based on resource usage and policy.
• Power Management: During off-peak hours, concentrates virtual machines on fewer physical hosts to reduce power consumption on unused hosts.
• Maintenance Manager: Perform maintenance on hosts without guest downtime. Upgrade hypervisors directly from management system.
• Image Manager: Create new virtual machines based on templates. Use snapshots to create point-in-time image of virtual machines.
• Monitoring : Real time monitoring of virtual machines, host systems and storage. Alerts and notifications.
23 www.redhat.com
• Security : Role based access control allowing fine grained access control and the creation of customized roles and responsibilities. Detailed audit trails covering GUI and API access.
• API : API for command line management and automation
• Centralized Host management : Manage all aspects of host configuration including network configuration, bonding, VLANs and storage.
4.2.3 Software Life-Cycle ManagementSoftware Life-Cycle Management is a software management solution deployed inside the customer's data center and firewall that provides software updates, configuration management, and life cycle management across both physical and virtual servers. It supports:
• Operating System software• Middleware software• Application software
It also provides powerful systems administration capabilities such as provisioning and monitoring for large deployments and ensures that security fixes and configuration files are applied consistently across the entire environment.
4.2.4 Operations ManagementSince the virtualized environment exists in a physical environment, Operations Management is a catch-all category which covers a whole host of management functions required to install, configure and manage physical servers, storage and networks.
Other functions covered by Operations Management include overall physical datacenter security, performance, high availability, disaster tolerance, SLA/QoS, energy management, software licensing, usage/billing/charge-back across divisions of a company.
4.2.5 Cloud Provider Functionality - Creating/Managing an IaaS Cloud InfrastructureCloud provider / administrator functionality includes:
1. Create and mange cloud user accounts2. Managing physical resources
• Servers• Storage• Network• Power
3. Managing virtualization substrate• Create virtual data centers and associated storage domains• Configure virtualization clusters (comprising virtual hosts) within the virtual data
www.redhat.com 24
centers• Create pre-configured VMs on virtual hosts with default resources = vCPUs,
vMem, vNetwork and vStorage• Deploy Operating System and other software in pre-configured VMs• Create templates for pre-configured VMs• Offer interfaces to manage the virtualized environment: create new templates,
shutdown/resume/snapshot/remove VMs4. Managing images, software stack / application life cycle5. Managing security – users, groups, access controls, permissions6. Offering a scheduling / dispatching function for scheduling work7. Managing and monitor SLA / QoS policy
• Performance• HA/DT• Power
8. Managing accounting / chargeback
25 www.redhat.com
4.3 Multi-Cloud Configurations Figure 9 takes the cloud functionality shown in Figure 8 and extends it to a multi-cloud configuration.
Figure 9: Multi-Cloud Configuration - Components & Interfaces
www.redhat.com 26

5 Red Hat Cloud: Software Stack and Infrastructure ComponentsFigure 10 maps Red Hat infrastructure components to the Cloud functionality shown in Figure 9.
Figure 10: Mapping Red Hat Components for Cloud Functionality
Recall that Red Hat itself does not operate a cloud but its suite of open source software provides the infrastructure with which cloud providers are able to build public/private cloud offerings. Specifically:
1. IaaS based on:• RHEV • MRG Grid
27 www.redhat.com

2. PaaS based on: • JBoss
Figure 11 depicts the software stack of Red Hat cloud infrastructure components.
Figure 11: Red Hat Software Stack
www.redhat.com 28

5.1 Red Hat Enterprise Linux
Red Hat Enterprise Linux (RHEL) is the world's leading open source application platform. On one certified platform, RHEL offers a choice of:
• Applications - Thousands of certified ISV applications• Deployment - Including standalone or virtual servers, cloud computing, or software
appliances• Hardware - Wide range of platforms from the world's leading hardware vendors
Red Hat has announced the fifth update to RHEL 5: Red Hat Enterprise Linux 5.5.
RHEL 5.5 is designed to support newer Intel Xeon® Nehalem-EX platform as well as the upcoming AMD Opteron™ 6000 Series platform (formerly code named “Magny-Cours”). We expect the new platforms to leverage Red Hat’s history in scalable performance with new levels of core counts, memory and I/O, offering users a very dense and scalable platform balanced for performance across many workload types. To increase the reliability of these systems, Red Hat supports Intel’s expanded machine check architecture, CPU fail-over and memory sparing.
Red Hat also continues to make enhancements to our virtualization platform. New to the RHEL 5.5 is support for greater guest density, meaning that more virtual machines can be supported on each physical server. Our internal testing to date has shown that this release can support significantly more virtual guests than other virtualization products. The new hardware and protocols included in the beta significantly improve networking scaling by providing direct access from the guest to the network.
RHEL 5.5 also introduces improved interoperability with Microsoft Windows 7 with an update to Samba. This extends the Active Directory integration to better map users and groups on Red Hat Enterprise Linux systems and simplifies managing filesystems across platforms.
An important feature of any RHEL update is that kernel and user application programming interfaces (APIs) remain unchanged, ensuring RHEL 5 applications do not need to be rebuilt or re-certified. The unchanged kernel and user APIs also extend to virtualized environments: with a fully integrated hypervisor, the application binary interface (ABI) consistency offered by RHEL means that applications certified to run on RHEL on physical machines are also certified when run on virtual machines. With this, the portfolio of thousands of certified applications for Red Hat Enterprise Linux applies to both environments.
29 www.redhat.com

5.2 Red Hat Enterprise Virtualization (RHEV) for ServersRed Hat Enterprise Virtualization (RHEV) for Servers is an end-to-end virtualization solution that is designed to enable pervasive data center virtualization, and unlock unprecedented capital and operational efficiency.
RHEV is the ideal platform on which to build an internal or private cloud of Red Hat Enterprise Linux or Windows virtual machines.
RHEV consists of the following two components:
• Red Hat Enterprise Virtualization Manager (RHEV-M) for servers: A feature-rich server virtualization management system that provides advanced capabilities for hosts and guests, including high availability, live migration, storage management, system scheduler, and more.
• Red Hat Enterprise Virtualization Hypervisor (RHEV-H): A modern hypervisor based on Kernel-based Virtual Machine (KVM) virtual technology which can be deployed either as a standalone bare metal hypervisor (included with Red Hat Enterprise Virtualization for Servers), or as Red Hat Enterprise Linux 5.4 and later (purchased separately) installed as a hypervisor host.
Some key characteristics of RHEV 2.1 are listed below:
Scalability: • Host: Up to 256 cores, 1 TB RAM• Guest/VM: Up to 16 vCPUs, 64 GB RAM• Clusters: Over 50 hosts per cluster• Predictable, scalable performance for enterprise workloads from SAP, Oracle,
Microsoft, Apache, etc.
Advanced features: • Memory page sharing, advanced scheduling capabilities, and more, inherited from the
Red Hat Enterprise Linux kernel
Guest operating system support:• Paravirtualized network and block drivers for highest performance• Red Hat Enterprise Linux Guests (32-bit & 64-bit): Red Hat Enterprise Linux 3, 4 and 5 • Microsoft® Windows® Guests (32-bit & 64-bit): Windows 2003 server, Windows 2008
server, Windows XP. SVVP, and WHQL certified
Hardware support: • All 64-bit x86 servers that support Intel VT or AMD-V technology and are certified for
Red Hat Enterprise Linux 5 are certified for Red Hat Enterprise Virtualization.• Red Hat Enterprise Virtualization supports NAS/NFS, Fibre Channel, and iSCSI
storage topologies.
www.redhat.com 30

5.3 Red Hat Network (RHN) SatelliteAll Red Hat network functionality is on the network, allowing much greater functionality and customization. The Satellite server connects with Red Hat over the public Internet to download new content and updates. This model also allows customers to take their Red Hat Network solution completely off-line if desired.
Features include:• An embedded database to store packages, profiles, and system information. • Instantly update systems for security fixes or to provide packages or applications
needed immediately. • API layer allows the creation of scripts to automate functions or integrate with existing
management applications. • Distribute custom or 3rd party applications and updates. • Create staged environments (development, test, production) to select, manage and
test content in a structured manner. • Create errata for custom content, or modify existing errata to provide specific
information to different groups. • Access to advanced features in the Provisioning Module, such as bare metal PXE boot
provisioning and integrated network install trees. • Access to Red Hat Network Monitoring Module for track system and application
performance.
RHN Satellite is Red Hat’s on-premises systems management solution that provides software updates, configuration management, provisioning and monitoring across both physical and virtual Red Hat Enterprise Linux servers. It offers customers opportunities to gain enhanced performance, centralized control and higher scalability for their systems, while deployed on a management server located inside the customer’s data center and firewall.
In September 2009, Red Hat released RHN Satellite 5.3, the first fully open source version of the product. This latest version offers opportunities for increased flexibility and faster provisioning setups for customers with the incorporation of open source Cobbler technology in its provisioning architecture.
5.3.1 CobblerCobbler is a Linux installation server that allows for rapid setup of network installation environments. It binds and automates many associated Linux tasks, eliminating the need for many various commands and applications when rolling out new systems and, in some cases, changing existing ones. With a simple series of commands, network installs can be configured for PXE, re-installations, media-based net-installs, and virtualized installs (supporting Xen and KVM).
Cobbler can also optionally help with managing DHCP, DNS, and yum package mirroring infrastructure. In this regard, it is a more generalized automation application, rather than just dealing specifically with installations. There is also a lightweight built-in configuration management system as well as support for integrating with other configuration management systems. Cobbler has a command line interface as well as a web interface and several API access options.
31 www.redhat.com

5.4 JBoss Enterprise MiddlewareThe following JBoss Enterprise Middleware Development Tools, Deployment Platforms and Management Environment are available via subscriptions that deliver industry leading SLA-based production and development support, patches and updates, multi-year maintenance policies and software assurance from Red Hat, the leader in open source solutions.
Development Tools:• JBoss Developer Studio - PE (Portfolio Edition): Everything needed to develop, test
and deploy rich web applications, enterprise applications and SOA services.
Enterprise Platforms:• JBoss Enterprise Application Platform: Everything needed to deploy, and host
enterprise Java applications and services. • JBoss Enterprise Web Platform: A standards-based solution for light and rich Java web
applications. • JBoss Enterprise Web Server: a single enterprise open source solution for large scale
websites and lightweight web applications. • JBoss Enterprise Portal Platform: Platform for building and deploying portals for
personalized user interaction with enterprise applications and automated business processes.
• JBoss Enterprise SOA Platform: A flexible, standards-based platform to integrate applications, SOA services, and business events as well as to automate business processes.
• JBoss Enterprise BRMS: An open source business rules management system that enables easy business policy and rules development, access, and change management.
• JBoss Enterprise Data Services Platform: Bridge the gap between diverse existing enterprise data sources and the new forms of data required by new projects, applications, and architectures.
Enterprise Frameworks:• JBoss Hibernate Framework: Industry-leading object/relational mapping and
persistence. • JBoss Seam Framework: Powerful application framework for building next generation
Web 2.0 applications. • JBoss Web Framework Kit: A combination of popular open source web frameworks for
building light and rich Java applications. • JBoss jBPM Framework: Business process automation and workflow engine.
Management:• JBoss Operations Network (JON): An advanced management platform for
inventorying, administering, monitoring, and updating JBoss Enterprise Platform deployments.
www.redhat.com 32

5.4.1 JBoss Enterprise Application Platform (EAP)JBoss Enterprise Application Platform is the market leading platform for innovative and scalable Java applications. Integrated, simplified, and delivered by the leader in enterprise open source software, it includes leading open source technologies for building, deploying, and hosting enterprise Java applications and services.
JBoss Enterprise Application Platform balances innovation with enterprise class stability by integrating the most popular clustered Java EE application server with next generation application frameworks. Built on open standards, JBoss Enterprise Application Platform integrates JBoss Application Server, with JBoss Hibernate, JBoss Seam, and other leading open source Java technologies from JBoss.org into a complete, simple enterprise solution for Java applications.
Features and Benefits:
• Complete Eclipse-based Integrated Development Environment (JBoss Developer Studio)
• Built for Standards and Interoperability: JBoss EAP supports a wide range of Java EE and Web Services standards.
• Enterprise Java Beans and Java Persistence • JBoss EAP bundles and integrates Hibernate, the de facto leader in Object/Relational
mapping and persistence. • Built-in Java naming and directory interface (JNDI) support • Built-in JTA for two-phase commit transaction support • JBoss Seam Framework and Web Application Services • Caching, Clustering, and High Availability • Security Services • Web Services and Interoperability • Integration and Messaging Services • Embeddable, Service-Oriented Architecture microkernel • Consistent Manageability
5.4.2 JBoss Operations Network (JON)JON is an integrated management platform that simplifies the development, testing, deployment and monitoring of JBoss Enterprise Middleware. From the JON console one can:
• inventory resources from the operating system to applications.• control and audit application configurations to standardize deployments.• manage, monitor and tune applications for improved visibility, performance and
availability.
One central console provides an integrated view and control of JBoss middleware infrastructure.
33 www.redhat.com

The JON management platform (server-agent) delivers centralized systems management for the JBoss middleware product suite. With it one can coordinate the many stages of application life cycle and expose a cohesive view of middleware components through complex environments, improve operational efficiency and reliability through thorough visibility into production availability and performance, and effectively manage configuration and rollout of new applications across complex environments with a single, integrated tool.
• Auto-discover application resources: Operating systems, applications and services • From one console, store, edit and set application configurations • Start. stop or schedule an action on an application resource • Remotely deploy applications • Monitor and collect metric data for a particular platform, server or service • Alert support personnel based upon application alert conditions • Assign roles for users to enable fine-grained access control to JON services
www.redhat.com 34

5.5 Red Hat Enterprise MRG GridMRG Grid provides high throughput and high performance computing. Additionally, it enables enterprises to move to a utility model of computing to help enterprises achieve both higher peak computing capacity and higher IT utilization by leveraging their existing infrastructure to build high performance grids.
Based on the Condor project, MRG Grid provides the most advanced and scalable platform for high throughput and high performance computing with capabilities like:
• scalability to run the largest grids in the world. • advanced features for handling priorities, workflows, concurrency limits, utilization, low
latency scheduling, and more. • support for a wide variety of tasks, ranging from sub-second calculations to long-
running, highly parallel (MPI) jobs. • the ability to schedule to all available computing resources, including local grids,
remote grids, virtual machines, idle desktop workstations, and dynamically provisioned cloud infrastructure.
MRG Grid also enables enterprises to move to a utility model of computing, where they can:
• schedule a variety of applications across a heterogeneous pool of available resources. • automatically handle seasonal workloads with high efficiency, utilization, and flexibility. • dynamically allocate, provision, or acquire additional computing resources for
additional applications and loads. • execute across a diverse set of environments, ranging from virtual machines to bare-
metal hardware to cloud-based infrastructure.
35 www.redhat.com

6 Proof-of-Concept System ConfigurationThis proof-of-concept for deploying the Red Hat infrastructure for a private cloud used the configuration shown in Figure 12 comprised of:
1. Infrastructure management services, e.g., Red Hat Network (RHN) Satellite, Red Hat Enterprise Virtualization Manager (RHEV-M), DNS service, DHCP service, PXE server, NFS server for ISO images, JON, MRG Manager - most of them installed in virtual machines (VMs) in a Red Hat Cluster Suite (RHCS) cluster for high availability.
2. A farm of RHEV host systems (either in the form of RHEV Hypervisors or as RHEL+KVM) to run tenants' VMs.
3. Sample RHEL application(s), JBoss application(s) and MRG Grid application(s) deployed in the tenant VMs.
www.redhat.com 36
Figure 12

6.1 Hardware Configuration
Hardware Systems Specifications
NAT System[1 x HP ProLiant DL585 G2]
Quad Socket, Dual Core, (8 cores)AMD Opteron 8222 SE @3.0 GHz , 72GB RAM
4 x 72 GB SAS 15K internal disk drives
2 x Broadcom BCM5706 Gigabit Ethernet Controller
Management Cluster Nodes[2 x HP ProLiant DL580 G5]
Quad Socket, Quad Core (16 cores)Intel® Xeon® CPU X7350 @2.93GHz, 64GB RAM
4 x 72 GB SAS 15K internal disk drives
2 x QLogic ISP2432-based 4Gb FC HBA
1 x Intel 82572EI Gigabit Ethernet Controller2 x Broadcom BCM5708 Gigabit Ethernet Controller
Hypervisor Host Systems[2 x HP ProLiant DL370 G6]
Dual Socket, Quad Core, (8 cores)Intel® Xeon® CPU W5580 @3.20GHz, 48GB RAM
6 x 146 GB SAS 15K internal disk drives
2 x QLogic ISP2532-based Dual-Port 8Gb FC HBA
4 x NetXen NX3031 1/10-Gigabit Ethernet Controller
Table 1: Hardware Configuration
37 www.redhat.com

6.2 Software Configuration
Software Version
Red Hat Enterprise Linux (RHEL)5.5 Beta
(2.6.18-191.el5 kernel)
Red Hat Enterprise Virtualization (RHEV) 2.2 Beta
Red Hat Network (RHN) Satellite 5.3
JBoss Enterprise Application Platform (EAP) 5.0
JBoss Operations Network (JON) 2.2
Red Hat Enterprise MRG Grid 1.2
Table 2: Software Configuration
www.redhat.com 38
6.3 Storage Configuration
Hardware Specifications
1 x HP StorageWorks MSA2324fcFibre Channel Storage Array +
HP StorageWorks 70 Modular Smart Array with Dual Domain IO Module[24+25 x 146GB 10K RPM SAS disks]
Storage Controller:Code Version: M100R18Loader Code Version: 19.006
Memory Controller:Code Version: F300R22
Management ControllerCode Version: W440R20Loader Code Version: 12.015
Expander Controller:Code Version: 1036
CPLD Code Version: 8
Hardware Version: 56
1 x HP StorageWorks 4/16SAN Switch
Firmware: v5.3.0
1 x HP StorageWorks 8/40SAN Switch
Firmware: v6.1.0a
Table 3: Storage Hardware
The MSA2324fc array was configured with four 11-disk RAID6 vdisks, each with spares. • create vdisk level r6 disks 1.1-11 spare 1.12 VD1 • create vdisk level r6 disks 1.13-23 spare 1.24 VD2 • create vdisk level r6 disks 2.1-11 spare 2.12 VD3 • create vdisk level r6 disks 2.13-23 spare 2.24-25 VD4
39 www.redhat.com
LUNs were created and presented as outlined in the following table.
Volume Size Presentation Purpose
sat_disk 300 GB Management Cluster Satellite Server VM OS disk
luci_disk 20 GB Management Cluster Luci server VM OS disk
q_disk 50 MB Management Cluster Management Cluster Quorum
jon_disk 40 GB Management Cluster JON VM OS Disk
mgmtvirt_disk 300 GB Management Cluster Management Virtualization Storage
rhevm_disk 30 GB Management Cluster RHEV-M OS Disk
rhev-nfs-fs 300 GB Management Cluster RHEV-M ISO Library
rhevm-storage 1 TB Hypervisor Hosts RHEV-M Storage Pool
Table 4: LUN Configuration
As an example, the following commands were used to create the 30 GB rhevm_disk LUN and present it exclusively to each HBA in the management cluster nodes.
• create volume rhevm-vm vdisk VD4 size 30GB lun 07• map volume rhevm-vm access rw ports a1,a2,b1,b2 lun 07 host
monet_host0,degas_host0,degas_host1,monet_host1 • unmap volume rhevm-storage
www.redhat.com 40

6.4 Network ConfigurationThe components of this cloud infrastructure were staged in a private subnet, allowing the environment complete control of the network (e.g., DHCP, DNS, and {XE) without having to lobby IT for changes to support a segment which they would not maintain and control. Other configurations are supported but this one was the most time efficient for this exercise.
While the infrastructure is in a private sub-net, access to and from the systems to the complete network is required. This was handled by configuring a system that has network connections to both the private subnet and the public network. This machine served as a gateway between the networks by configuring iptables to perform Network Address Translation (NAT). A system was configured to act as a NAT using the top address (172.22.131.254) as a gateway and a network domain name of ra.rh.com.
The initial estimated IP requirement was approximately 1000 address in an RFC 1918 (address allocation for private internet) address space. The decision was made to use a class B network which would be in the 172.16/12 space. This number of addresses requires a 22-bit subnet mask (e.g., 172.20.128/255.255.252.0 which yields addresses 172.20.128.0 through 172.20.131.255).
41 www.redhat.com

7 Deploying Cloud Infrastructure ServicesThis section provides a set of detail actions required to configure Red Hat products that constitute the infrastructure used for a private cloud.
The goal is to create a set of highly available cloud infrastructure management services. These cloud management services will then be used to set up the cloud hosts, the VMs within those hosts and finally load applications in those VMs.
High availability is achieved by clustering two RHEL nodes (active / passive) using the Red Hat Cluster Suite (RHCS). Each of the cluster nodes is set up to run RHEL 5.5 (with the bundled KVM hypervisor). For most management services a VM is created (using the KVM hypervisor and not RHEV-M) and configured as an RHCS service. And then the management service in installed in the VM, e.g., RHN Satellite VM, JON VM. A high level walk-through of the steps to create these highly available cloud infrastructure management services is presented below.
1. Install RHEL + KVM on a node2. Use Virt-manager to create a VM3. Install RHN Satellite in the VM (= Satellite VM)4. Synchronize Satellite with RHN & download packages from all appropriate channels /
child channels:• Base RHEL 5• Clustering (RHCS, …)• Cluster storage (GFS, …)• Virtualization (KVM, …)• RHN Tools• RHEV management agents for RHEL hosts
5. Use multi-organization support in Satellite - create a ‘Tenant’ organization and ‘Management’ organization
6. Configure cobbler• Configure cobbler’s management of DHCP• Configure cobbler’s management of DNS• Configure cobbler’s management of PXE
7. Provision MGMT-1 node from Satellite8. Migrate Satellite-VM to MGMT-19. Provision additional cloud infrastructure management services on MGMT-1 (using
Satellite where applicable = Satellite creates VM, installs OS and additional software)• RHEL VM: LUCI• Windows VM: RHEV-M• RHEL VM: JON• RHEL VM: MRG Manager• NFS service
10.Provision MGMT-2 node from Satellite11.Turn MGMT-1 and MGMT-2 into RHCS cluster
www.redhat.com 42

12.Make cloud infrastructure management services clustered services13.Balance clustered services (for better performance)14.Configure RHEV-M
• RHEV data center(s)• RHEV cluster(s) within the data center(s)
43 www.redhat.com

7.1 Network Gateway The gateway system renoir.lab.bos.redhat.com was installed with a basic configuration of Red Hat Enterprise Linux 5.4 Advanced Platform and iptables was configured to perform network address translation to allow communication between the private subnet and the public network.
The following details the procedure for this configuration.
1. Install Red Hat Enterprise Linux 5.4 Advanced Platform:
a) Use obvious naming convention for operating system volume group (e.g., <hostname>NATVG).
b) Exclude all software groups when selecting software components.
c) When prompted, configure the preferred network interface using DHCP.
d) Set SELinux to permissive mode.
e) Disable the firewall (iptables).
2. Configure Secure Shell (ssh) keys
www.redhat.com 44
Figure 13

3. To prevent /etc/resolv.conf from being overwritten by DHCP, convert eth0 (/etc/sysconfig/network-script/ifcfg-eth0) to a static IP
DEVICE=eth0BOOTPROTO=staticNETMASK=255.255.248.0IPADDR=10.16.41.102HWADDR=00:1E:0B:BB:42:70ONBOOT=yesTYPE=Ethernet
4. Configure eth1 (/etc/sysconfig/network-script/ifcfg-eth1) with gateway address for the private subnet
DEVICE=eth1BOOTPROTO=staticNETMASK=255.255.252.0IPADDR=172.20.131.254HWADDR=00:1E:0B:BB:42:72TYPE=EthernetONBOOT=yes
5. Update /etc/hosts with known addresses for NAT, DNS, etc.
6. To be able to search both public and private networks, edit /etc/resolv.conf to contain the following:
search ra.rh.com,lab.bos.redhat.comnameserver 172.20.128.35 # satellite systemnameserver 10.16.36.29nameserver 10.16.255.2nameserver 10.16.255.3
7. Edit /etc/sysclt.conf:• Set net.ipv4.ip_forward=1
8. Enable, configure and save iptables settings using the following commands:• chkconfig iptables on • service iptables on • iptables -F • iptables -t nat -F • iptables -t mangle -F • iptables -t nat -A POSTROUTING -o eth0 -j MASQUERADE • iptables -A FORWARD -i eth1 -j ACCEPT • service iptables save
45 www.redhat.com

7.2 Install First Management NodeInstall and configure the first of the nodes that will comprise the management services cluster.
1. Disable fibre channel connectivity with system (e.g., switch port disable, cable pull, HBA disable, etc.).
2. Install Red Hat Enterprise Linux 5.5 Advanced Platform:
a) Use obvious naming convention for operating system volume group (e.g., <hostname>CloudVG).
b) Include the Clustering and Virtualization software groups when selecting software components.
c) Select the Customize Now option and highlight the Virtualization entry at left. Check the box for KVM. Ensure Virtualization is unchecked.
d) When prompted, configure the preferred network interface using:• a static IP• the NAT server IP address as a default route• IP addresses for locally configured DNS
www.redhat.com 46
Figure 14

e) Set SELinux to permissive mode
f) Enable the firewall (iptables) leaving ports open for ssh, http, and https.
3. Configure Secure Shell (ssh) keys
4. Update /etc/hosts with known addresses for NAT, DNS, etc.
5. Modify /etc/resolv.conf to contain the following:search ra.rh.comnameserver 172.20.128.35 # satellite system IP
6. Configure NTP using the following commands:• service ntpd start• chkconfig ntpd on
7. Modify firewall rules to include openais, rgmanager, ricci, dlm, cssd, and vnc using the following commands:
• iptables -I RH-Firewall-1-INPUT -m state --state NEW -m multiport -p udp --dport 5404,5405 -j ACCEPT # openais
• iptables -I RH-Firewall-1-INPUT -m state --state NEW -m multiport -p tcp --dports 41966,41967,41968,41969 -j ACCEPT # rgmanager
• iptables -I RH-Firewall-1-INPUT -m state --state NEW -m multiport -p tcp --dports 11111 -j ACCEPT # ricci
• iptables -I RH-Firewall-1-INPUT -m state --state NEW -m multiport -p tcp --dports 21064 -j ACCEPT # dlm
• iptables -I RH-Firewall-1-INPUT -m state --state NEW -m multiport -p tcp --dports 50006,50008,50009 -j ACCEPT # cssd
• iptables -I RH-Firewall-1-INPUT -m state --state NEW -m multiport -p udp --dports 50007 -j ACCEPT # cssd
• iptables -I RH-Firewall-1-INPUT -m state --state NEW -p tcp --destination-port 5900 -j ACCEPT # vnc
• iptables -I RH-Firewall-1-INPUT -m state --state NEW -p tcp --destination-port 5800 -j ACCEPT # vnc
• service iptables save 8. Disable ACPID:
• chkconfig acpid off
9. Configure device-mapper a) Enable device-mapper multipathing using the following commands:
• yum install device-mapper-multipath• chkconfig multipathd on• service multipathd start
b) Edit /etc/multipath.conf accordingly to alias known devices
10. Configure cluster interconnect network
11.Enable fibre channel connectivity disabled in step 1.
12.To discover any fibre channel devices, either execute rescan-scsi-bus.sh or reboot the node.
47 www.redhat.com

7.3 Create Satellite SystemThe satellite system provides the configuration management of the Red Hat Enterprise Linux system and is the network maintainer of DHCP, DNS and PXE.
7.3.1 Create Satellite VM
1. Convert primary network of management system to bridge to allow sharing.
a) Create network bridge for virtualization:• Create bridge configuration file /etc/sysconfig/network-scripts/ifcfg-cumulus0
DEVICE=cumulus0TYPE=BridgeBOOTPROTO=staticIPADDR=172.20.128.10NETMASK=255.255.252.0GATEWAY=172.20.131.254ONBOOT=yes
b) Modify the existing public network file (e.g., ifcfg-eth#) • add BRIDGE=cumulus0
www.redhat.com 48
Figure 15
• confirm BOOTPROTO=none • remove/comment out any static IP address
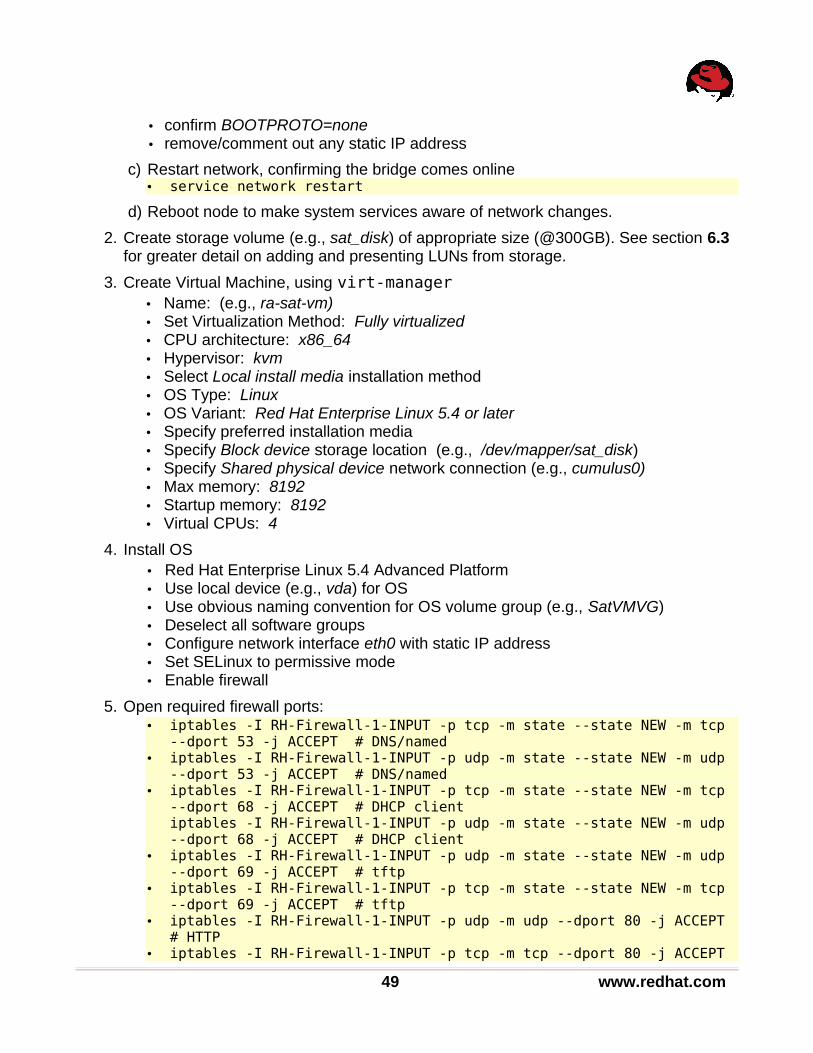
c) Restart network, confirming the bridge comes online• service network restart
d) Reboot node to make system services aware of network changes.
2. Create storage volume (e.g., sat_disk) of appropriate size (@300GB). See section 6.3 for greater detail on adding and presenting LUNs from storage.
3. Create Virtual Machine, using virt-manager• Name: (e.g., ra-sat-vm) • Set Virtualization Method: Fully virtualized • CPU architecture: x86_64 • Hypervisor: kvm • Select Local install media installation method• OS Type: Linux • OS Variant: Red Hat Enterprise Linux 5.4 or later • Specify preferred installation media • Specify Block device storage location (e.g., /dev/mapper/sat_disk)• Specify Shared physical device network connection (e.g., cumulus0)• Max memory: 8192• Startup memory: 8192• Virtual CPUs: 4
4. Install OS• Red Hat Enterprise Linux 5.4 Advanced Platform• Use local device (e.g., vda) for OS• Use obvious naming convention for OS volume group (e.g., SatVMVG) • Deselect all software groups • Configure network interface eth0 with static IP address • Set SELinux to permissive mode• Enable firewall
5. Open required firewall ports:• iptables -I RH-Firewall-1-INPUT -p tcp -m state --state NEW -m tcp
--dport 53 -j ACCEPT # DNS/named• iptables -I RH-Firewall-1-INPUT -p udp -m state --state NEW -m udp
--dport 53 -j ACCEPT # DNS/named• iptables -I RH-Firewall-1-INPUT -p tcp -m state --state NEW -m tcp
--dport 68 -j ACCEPT # DHCP clientiptables -I RH-Firewall-1-INPUT -p udp -m state --state NEW -m udp --dport 68 -j ACCEPT # DHCP client
• iptables -I RH-Firewall-1-INPUT -p udp -m state --state NEW -m udp --dport 69 -j ACCEPT # tftp
• iptables -I RH-Firewall-1-INPUT -p tcp -m state --state NEW -m tcp --dport 69 -j ACCEPT # tftp
• iptables -I RH-Firewall-1-INPUT -p udp -m udp --dport 80 -j ACCEPT # HTTP
• iptables -I RH-Firewall-1-INPUT -p tcp -m tcp --dport 80 -j ACCEPT
49 www.redhat.com

# HTTP• iptables -I RH-Firewall-1-INPUT -p udp -m udp --dport 443 -j ACCEPT
# HTTPS• iptables -I RH-Firewall-1-INPUT -p tcp -m tcp --dport 443 -j ACCEPT
# HTTPS • iptables -I RH-Firewall-1-INPUT -p tcp -m tcp --dport 4545 -j
ACCEPT # RHN Satellite Server Monitoring• iptables -I RH-Firewall-1-INPUT -p udp -m udp --dport 4545 -j
ACCEPT # RHN Satellite Server Monitoring• iptables -I RH-Firewall-1-INPUT -p tcp -m tcp --dport 5222 -j
ACCEPT # XMPP Client Connection• iptables -I RH-Firewall-1-INPUT -p udp -m udp --dport 5222 -j
ACCEPT # XMPP Client Connection• iptables -I RH-Firewall-1-INPUT -p udp -m state --state NEW -m udp
--dport 25150 -j ACCEPT # Cobbler• iptables -I RH-Firewall-1-INPUT -p tcp -m state --state NEW -m tcp
--dport 25151 -j ACCEPT # Cobbler• service iptables save
7.3.2 Configure DHCPThis initial DHCP configuration will provide immediate functionality and become the basis of the template when cobbler is configured.
1. Install the DHCP software package• yum install dhcp
2. Create /etc/dhcpd.conf a) Start by using the sample configuration
• cp /usr/share/doc/dhcp*/dhcpd.conf.sample /etc/dhcpd.conf
b) Edit the file, updating the following entries:• subnet• netmask• routers• domain name• domain name server• dynamic IP range• hosts
## DHCP Server Configuration file.# see /usr/share/doc/dhcp*/dhcpd.conf.sample #authoritive;ddns-update-style interim;ignore client-updates;
subnet 172.20.128.0 netmask 255.255.252.0 {
# --- default gateway option routers 172.20.131.254; option subnet-mask 255.255.252.0;
www.redhat.com 50

option domain-name "ra.rh.com"; option domain-name-servers 172.20.128.35;
option time-offset -18000; # Eastern Standard Time
range 172.20.128.130 172.20.131.253; default-lease-time 21600; max-lease-time 43200;
host monet { option host-name "monet.ra.rh.com"; hardware ethernet 00:1E:0B:42:7A; fixed-address 172.20.128.10; }host degas { option host-name "degas.ra.rh.com"; hardware ethernet 00:21:5A:5C:2E:46; fixed-address 172.20.128.15; }host ra-sat-vm { option host-name "ra-sat-vm.ra.rh.com"; hardware ethernet 54:52:00:6A:30:CA; fixed-address 172.20.128.35; }host ra-luci-vm { option host-name "ra-luci-vm.ra.rh.com"; hardware ethernet 54:52:00:50:80:0A; fixed-address 172.20.128.25; }host ra-rhevm-vm { option host-name "ra-rhevm-vm.ra.rh.com"; hardware ethernet 54:52:00:07:B0:85; fixed-address 172.20.128.40; }host renoir { option host-name "renoir.ra.rh.com"; hardware ethernet 00:18:71:EB:87:9D; fixed-address 172.20.131.254; } }
3. Check the syntax of the dhcpd.conf file and resolve any issues• service dhcpd configtest
4. Start the service• service dhcpd start• chkconfig dhcpd on
5. Boot a test system and verify that an appropriate entry is produced in /var/lib/dhcpd/dhcpd.leases
51 www.redhat.com

7.3.3 Configure DNS 1. Install DNS software and related configuration tool
• yum install named system-config-bind
2. Edit /etc/host.conf to include the bind keywordorder hosts,bind
3. Create a file that contains all hosts to be defined. Format should be:<IP Address> <Fully Qualified Host Name>
4. Invoke system-config-bind and perform the following to create the configuration file (/etc/named.conf) and zone files in /var/named:
• Import file of all defined hosts• Define forwarders using options settings
5. Test configuration and resolve issues• service named configtest
6. Start service• service named start• chkconfig named on
www.redhat.com 52

7.3.4 Install and Configure RHN Satellite SoftwareThis installation will use the embedded database for Satellite. For complete details, refer to the Red Hat Network Satellite 5.3.0 Installation guide at http://www.redhat.com/docs/en-US/Red_Hat_Network_Satellite/5.3/Installation_Guide/html/index.html.
1. Register ra-sat-vm with central Red Hat Network• rhn_register
2. Obtain a Satellite certificate and place in a known location. 3. Download redhat-rhn-satellite-5.3-server-x86_64-5-embedded-oracle.iso. Starting at
the RHN website, select the following links: Download Software -> expand Red Hat Enterprise Linux (v. 5 for 64-bit x86_64) -> Red Hat Network Satellite (v5.3 for Server v5 AMD64 / Intel64) -> Satellite 5.3.0 Installer for RHEL-5 - (Embedded Database)
4. Mount the CD image• mount -o loop /root/redhat-rhn-satellite-5.3-server-x86_64-5-
embedded-oracle.iso /media/cdrom 5. Create an answers.txt for the installation.
53 www.redhat.com
Figure 16

a) Copy the sample answers.txt • cp /media/cdrom/install/answers.txt /tmp/
b) Edit the copied file addressing all the following required fields and any desired optional fields, refer to Appendix A: for the example used: • admin-email• SSL data
• ssl-set-org• ssl-set-org-unit• ssl-password • ssl-set-org• ssl-set-city• ssl-set-state• ssl-set-country• ssl-password
• satellite-cert-file• ssl-config-sslvhost
6. Start installation• cd /media/cdrom; ./install.pl --answer-file=/tmp/answers.txt
7. After completion of installation, direct a Web browser to the displayed address and perform the following steps: a) Create Satellite Administrator b) General Configuration c) RHN Satellite Configuration – Monitoring d) RHN Satellite Configuration – Bootstrap e) RHN Satellite Configuration – Restart
8. Prepare channels a) List authorized channels
• satellite-sync --list-channels
b) Download base channel (could take several hours)• satellite-sync -c rhel-x86_64-server-5
c) Optionally download any desired child channels using syntax described above
7.3.5 Configure Multiple OrganizationsUsing multiple organization can make a single satellite appears as multiple discreet instances. Organizations can be configured to share software channels. This configuration created a management and a tenant organization. The elements of the management organization consisted of the cluster members, NAT server, luci VM, JON VM, etc. All RHEV VMs will be registered to the tenant organization. Separating the organization will allow the tenants to have complete functional access to a satellite for RHEV based VMs and provide security by restricting the access to the management systems via satellite.
1. Access the administrator account of the satellite. Navigate to the Admin tab and select create new organization. Fill in all the fields:
• Organization Name
www.redhat.com 54

• Desired Login• Desired Password• Confirm Password• Email• First Name• Last Name
2. After selecting Create Organization the System Entitlement page will be displayed. Input the number of entitlements for each entitlement type this organization will be allocated and select Update Organization.
3. Navigate to the Software Channel Entitlements page. Update the channel entitlement allocation for all channels.
4. Navigate to the Trusts page. Select to trust all organizations and select Modify Trusts.
7.3.6 Configure Custom Channels for RHEL 5.5 Beta
1. Create new channel for each of the following:• rhel5-5-x86_64-server [base channel]• rhel5-5-x86_64-vt• rhel5-5-x86_64-cluster• rhel5-5-x86_64-clusterstorage
a) Starting at the satellite home page, select the following links: Channels -> Manage Software Channels -> create new channel and provide the information below for each channel created:
• Channel Name• Channel Label• Parent Channel [None indicates base channel]• Parent Channel Architecture (e.g., x86_64)• Channel Summary• Organization Sharing (e.g., public)
2. Place packages into created channels – assumes distribution has been made available under /distro
• rhnpush -v -c rhel5-5-x86_64-server --server=http://localhost/APP --dir=/distro/rhel5-server-x86_64/Server -u admin -p <password>
• rhnpush -v -c rhel5-5-x86_64-vt --server=http://localhost/APP --dir=/distrorhel5-server-x86_64/VT -u admin -p <password>
• rhnpush -v -c rhel5-5-x86_64-cluster --server=http://localhost/APP --dir=/distro/rhel5-server-x86_64/Cluster -u admin -p <password>
• rhnpush -v -c rhel5-5-x86_64-clusterstorage --server=http://localhost/APP --dir=/distro/rhel5-server-x86_64/ClusterStorage -u admin -p <password>
3. Clone the RHN Tools child channel as a RHEL5-5 child channel a) Starting at Satellite Home, select the following links: Channels -> Manage Software
Channels -> clone channel◦ Clone From: Red Hat Network Tools for RHEL Server (v.5 64-bit x86_64)
55 www.redhat.com

◦ Clone: Current state of the channel (all errata)◦ Click Create Channel
• In the Details page displayed◦ Parent Channel: (e.g., rhel5-5-x86_64-server)◦ Channel Name: use provided or specify name◦ Channel Label: use provided or specify label◦ Base Channel Architecture: x86_64◦ Channel Summary: use provided or specify summary◦ Enter any optional (non asterisk) information as desired◦ Click Create Channel
• On re-displayed Details page◦ Organizational Sharing: Public◦ Click Update Channel
4. Make distribution kickstartable a) Starting at Satellite Home, select the following links: Systems -> Kickstart ->
Distributions -> create new distributions◦ Distribution Label: (e.g., rhel5-5_x86-64)◦ Tree Path: /distro/rhel5-server-x86_64◦ Base Channel: rhel5-5-x86_64-server◦ Installer Generation: Red Hat Enterprise Linux 5◦ [optional] Kernel Options and Post Kernel Options◦ Create Kickstart Distribution
7.3.7 CobblerRHN Satellite includes the Cobbler server that allows administrators to centralize their system installation and provisioning infrastructure. Cobbler is an installation server that collects the various methods of performing unattended system installations, whether it be server, workstation, or guest systems in a full or para-virtualized setup. Cobbler has several tools to assist in pre-installation guidance, kickstart file management, content channel management, and more.
7.3.7.1 Configure CobblerThe steps listed in this section perform the initial steps to configure cobbler. The sections that follow will provide the procedure for cobbler's management of additional services.
1. Configure the following settings in /etc/cobbler/settings. The complete settings file can be found in Appendix A.2
• redhat_management_server: "ra-sat-vm.ra.rh.com"• server: ra-sat-vm.ra.rh.com• register_new_installs: 1• redhat_management_type: "site"• DO NOT set scm_track_enabled: 1, unless git has been installed
2. Enable SELinux to all HTTPD web service components• setsebool -P httpd_can_network_connect true
www.redhat.com 56
3. Check the configuration, ignore warning about version of reposync• cobbler check
4. Synchronize cobbler controlled files• cobbler sync
5. Restart satellite• /usr/sbin/rhn-satellite restart
7.3.7.2 Configure Cobbler Management of DHCP 1. Configure the following settings in /etc/cobbler/settings. The complete settings file can
be found in Appendix A.2 • manage_dhcp: 1 • dhcpd_bin: /usr/sbin/dhcpd • dhcpd_conf: /etc/dhcpd.conf • restart_dhcp: 1
2. Verify [dhcp] section of /etc/cobbler/modules.conf is set as module = manage_isc
3. Create /etc/cobbler/dhcp.template based on existing /etc/dhcpd.conf created earlier with additional section of macros to add managed systems as shown in the excerpt below:
## DHCP Server Configuration file.# see /usr/share/doc/dhcp*/dhcpd.conf.sample #authoritive;ddns-update-style interim;ignore client-updates;
subnet 172.20.128.0 netmask 255.255.252.0 {
[ . . . ]
host renoir { option host-name "renoir.ra.rh.com"; hardware ethernet 00:1E:0B:BB:42:72; fixed-address 172.20.131.254; }#for dhcp_tag in $dhcp_tags.keys(): ## group could be subnet if dhcp tags align with the subnets ## or any valid dhcpd.conf construct ... if the default dhcp tag in cobbler ## is used, the group block can be deleted for a flat configuration ## group for Cobbler DHCP tag: $dhcp_tag
#for mac in $dhcp_tags[$dhcp_tag].keys(): #set iface = $dhcp_tags[$dhcp_tag][$mac] host $iface.name { hardware ethernet $mac; #if $iface.ip_address:
57 www.redhat.com

fixed-address $iface.ip_address; #end if #if $iface.hostname: option host-name "$iface.hostname"; #end if } #end for#end for
}
6. Synchronize cobbler controlled files• cobbler sync
7. Verify generated /etc/dhcpd.conf
7.3.7.3 Configure Cobbler Management of DNS 1. Configure the following settings in /etc/cobbler/settings. The complete settings file can
be found in Appendix A.2 • manage_dns: 1 • restart_dns: 1 • bind_bin: /usr/sbin/named • named_conf: /etc/named.conf • manage_forward_zones:
• - 'ra.rh.com'• manage_reverse_zones:
• - '172.20.128' • - '172.20.129' • - '172.20.130' • - '172.20.131'
2. Verify [dns] section of /etc/cobbler/modules.conf is set as module = manage_bind
3. Create /etc/cobbler/named.template based on existing /etc/named.conf created earlier. Modifications required include:
• removing zones references that will be managed as specified in /etc/cobbler/settings
• adding a section with macros for the managed zones
// Red Hat BIND Configuration Tool// // Default initial "Caching Only" name server configuration//options { forwarders { 10.16.255.2 port 53; 10.16.255.3 port 53;};forward first;directory "/var/named"; dump-file "/var/named/data/cache_dump.db";
www.redhat.com 58

statistics-file "/var/named/data/named_stats.txt";};zone "." IN { type hint; file "named.root";};zone "localdomain." IN { type master; file "localdomain.zone"; allow-update { none; };};zone "localhost." IN { type master; file "localhost.zone"; allow-update { none; };};zone "0.0.127.in-addr.arpa." IN { type master; file "named.local"; allow-update { none; };};zone "0.0.0.0.0.0.0.0.0.0.0.0.0.0.0.0.0.0.0.0.0.0.0.0.0.0.0.0.0.0.0.ip6.arpa." IN { type master; file "named.ip6.local"; allow-update { none; };};zone "255.in-addr.arpa." IN { type master; file "named.broadcast"; allow-update { none; };};zone "0.in-addr.arpa." IN { type master; file "named.zero"; allow-update { none; };};#for $zone in $forward_zoneszone "${zone}." { type master; file "$zone";};#end for#for $zone, $arpa in $reverse_zoneszone "${arpa}." { type master; file "$zone";};#end forinclude “/etc/rnds.key”;
59 www.redhat.com
4. Note: Zone files will be named as specified in /etc/cobbler/settings, changed from the original name specified in /etc/named.conf
5. Create zone templates a) Create /etc/cobbler/zone_templates
• mkdir /etc/cobbler/zone_templates
b) Copy zone files for the managed zones from /var/named to /etc/cobbler/zone_templates changing to specified name and appending $host_record to the end of the contents of each file.
6. Synchronize cobbler controlled files• cobbler sync
7. Verify generated /etc/named.conf
7.3.7.4 Configure Cobbler Management of PXE 1. Configure the following settings in /etc/cobbler/settings. The complete settings file can
be found in Appendix A.2
2. Verify the following setting in /etc/cobbler/settings• next_server: ra-sat-vm.ra.rh.com
3. Edit /etc/xinetd.d/tftp to verify the following entry ... disable=no
4. Add/Verify that /etc/cobbler/dhcp.template has the following entries:• filename "pxelinux.0"; • range dynamic-bootp 172.20.128.130 172.20.131.253; • next-server 172.20.128.35; # satellite address
5. Synchronize cobbler controlled files• cobbler sync
6. Verify a system can PXE boot
www.redhat.com 60

7.4 Build Luci VMCreate and configure the virtual machine on which luci will run for cluster management.
1. On a management cluster node, create network bridge for cluster interconnect
• Create bridge configuration file /etc/sysconfig/network-scripts/ifcfg-ic0 DEVICE=ic0BOOTPROTO=noneONBOOT=yesTYPE=BridgeIPADDR=<IP address>NETMASK=<IP mask>
• Modify existing interconnect network ifcfg-eth# file as follows: • add BRIDGE=ic0 • confirm BOOTPROTO=none • remove/comment out any static IP address
• Verify bridge configuration with a network restart: • service network restart
61 www.redhat.com
Figure 17

• Reboot node to make system services aware of network changes
2. Create storage volume (e.g., luci_disk) of appropriate size (@20GB). See section 6.3 for greater detail on adding and presenting LUNs from storage.
3. Using virt-manager, create the luci VM using the following input:• Name: ra-luci-vm • Set Virtualization Method: Fully virtualized • CPU architecture: x86_64 • Hypervisor: kvm • Select Local install media installation method• OS Type: Linux • OS Variant: Red Hat Enterprise Linux 5.4 or later • Specify preferred installation media • Specify Block device storage location (e.g., /dev/mapper/luci_disk)• Specify Shared physical device network connection (e.g., cumulus0)• Max memory: 2048• Startup memory: 2048• Virtual CPUs: 2
4. Install OS:• Red Hat Enterprise Linux 5.5 Advanced Platform• Use local device (e.g., vda) for OS• Use obvious naming convention for OS volume group (e.g., LuciVMVG) • Deselect all software groups • Configure network interface eth0 with static IP address • Set SELinux to permissive mode• Enable firewall
5. Open firewall ports 80, 443, and 8084:• iptables -I RH-Firewall-1-INPUT -p udp -m udp --dport 80 -j ACCEPT• iptables -I RH-Firewall-1-INPUT -p tcp -m tcp --dport 80 -j ACCEPT• iptables -I RH-Firewall-1-INPUT -p udp -m udp --dport 443 -j ACCEPT• iptables -I RH-Firewall-1-INPUT -p tcp -m tcp --dport 443 -j ACCEPT• iptables -I RH-Firewall-1-INPUT -p tcp -m tcp --dport 8084 -j
ACCEPT # luci• iptables -I RH-Firewall-1-INPUT -p udp -m udp --dport 8084 -j
ACCEPT # luci• service iptables save
www.redhat.com 62

7.5 Install Second Management NodeInstall and configure the next of the nodes that will comprise the management services cluster.
1. Disable fibre channel connectivity with system (e.g., switch port disable, cable pull, HBA disable, etc.).
2. Install Red Hat Enterprise Linux 5.5 Advanced Platform:
a) Use obvious naming convention for operating system volume group (e.g., <hostname>CloudVG).
b) Include the Clustering and Virtualization software groups when selecting software components.
c) Select the Customize Now option and highlight the Virtualization entry at left. Check the box for KVM. Ensure Virtualization is unchecked.
63 www.redhat.com
Figure 18
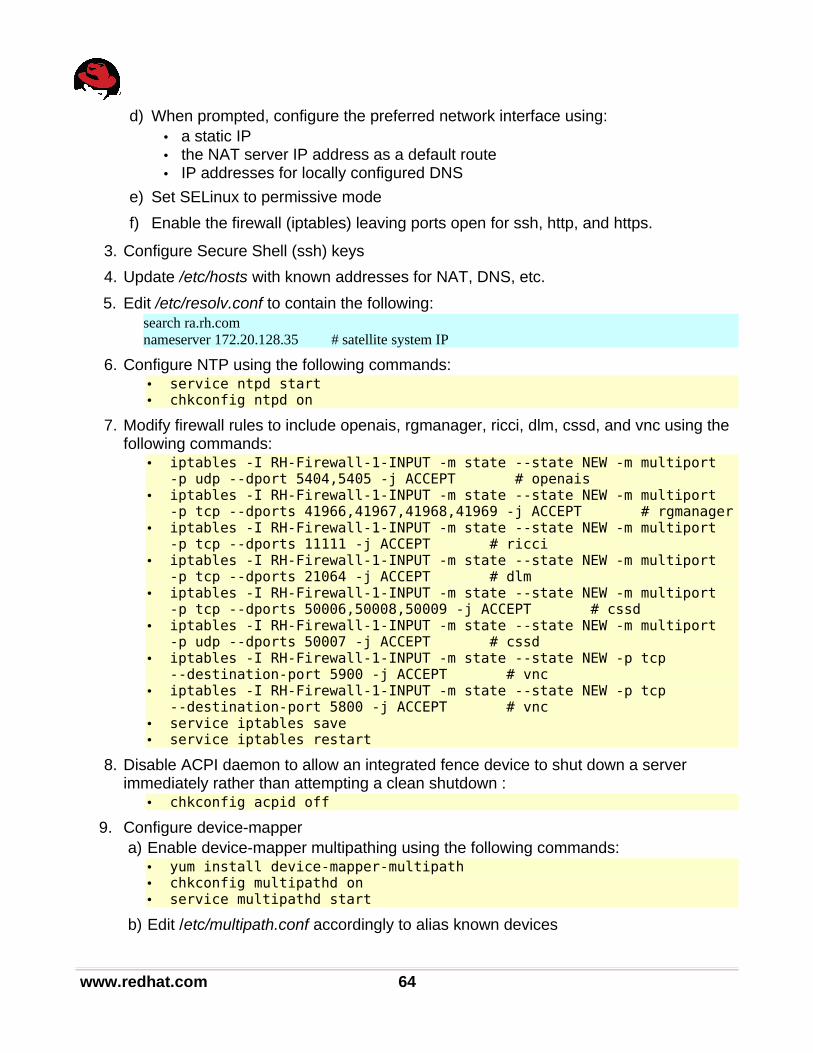
d) When prompted, configure the preferred network interface using:• a static IP• the NAT server IP address as a default route• IP addresses for locally configured DNS
e) Set SELinux to permissive mode
f) Enable the firewall (iptables) leaving ports open for ssh, http, and https.
3. Configure Secure Shell (ssh) keys
4. Update /etc/hosts with known addresses for NAT, DNS, etc.
5. Edit /etc/resolv.conf to contain the following:search ra.rh.comnameserver 172.20.128.35 # satellite system IP
6. Configure NTP using the following commands:• service ntpd start• chkconfig ntpd on
7. Modify firewall rules to include openais, rgmanager, ricci, dlm, cssd, and vnc using the following commands:
• iptables -I RH-Firewall-1-INPUT -m state --state NEW -m multiport -p udp --dport 5404,5405 -j ACCEPT # openais
• iptables -I RH-Firewall-1-INPUT -m state --state NEW -m multiport -p tcp --dports 41966,41967,41968,41969 -j ACCEPT # rgmanager
• iptables -I RH-Firewall-1-INPUT -m state --state NEW -m multiport -p tcp --dports 11111 -j ACCEPT # ricci
• iptables -I RH-Firewall-1-INPUT -m state --state NEW -m multiport -p tcp --dports 21064 -j ACCEPT # dlm
• iptables -I RH-Firewall-1-INPUT -m state --state NEW -m multiport -p tcp --dports 50006,50008,50009 -j ACCEPT # cssd
• iptables -I RH-Firewall-1-INPUT -m state --state NEW -m multiport -p udp --dports 50007 -j ACCEPT # cssd
• iptables -I RH-Firewall-1-INPUT -m state --state NEW -p tcp --destination-port 5900 -j ACCEPT # vnc
• iptables -I RH-Firewall-1-INPUT -m state --state NEW -p tcp --destination-port 5800 -j ACCEPT # vnc
• service iptables save• service iptables restart
8. Disable ACPI daemon to allow an integrated fence device to shut down a server immediately rather than attempting a clean shutdown :
• chkconfig acpid off
9. Configure device-mapper a) Enable device-mapper multipathing using the following commands:
• yum install device-mapper-multipath• chkconfig multipathd on• service multipathd start
b) Edit /etc/multipath.conf accordingly to alias known devices
www.redhat.com 64

10. Create cluster interconnect bridged network.• Create bridge configuration file /etc/sysconfig/network-scripts/ifcfg-ic0
DEVICE=ic0BOOTPROTO=noneONBOOT=yesTYPE=BridgeIPADDR=<IP address>NETMASK=<IP mask>
• Modify existing interconnect network file (e.g., ifcfg-eth#) as follows: • add BRIDGE=ic0 • confirm BOOTPROTO=none • confirm ONBOOT=yes • remove/comment out any static IP address
• Verify bridge configuration with a network restart: • service network restart
11. Convert primary network of management system to bridge to allow sharing.
a) Create network bridge for virtualization:• Create bridge configuration file /etc/sysconfig/network-scripts/ifcfg-cumulus0
DEVICE=cumulus0TYPE=BridgeBOOTPROTO=staticIPADDR=172.20.128.20NETMASK=255.255.252.0GATEWAY=172.20.131.254ONBOOT=yes
b) Modify the existing public network file (e.g., ifcfg-eth#) • add BRIDGE=cumulus0 • confirm BOOTPROTO=none • remove/comment out any static IP address
c) Restart network, confirming the bridge comes online• service network restart
12. Enable fibre channel connectivity disabled in step 1.
13. Reboot to discover fibre channel devices and make system services aware of network changes.
65 www.redhat.com
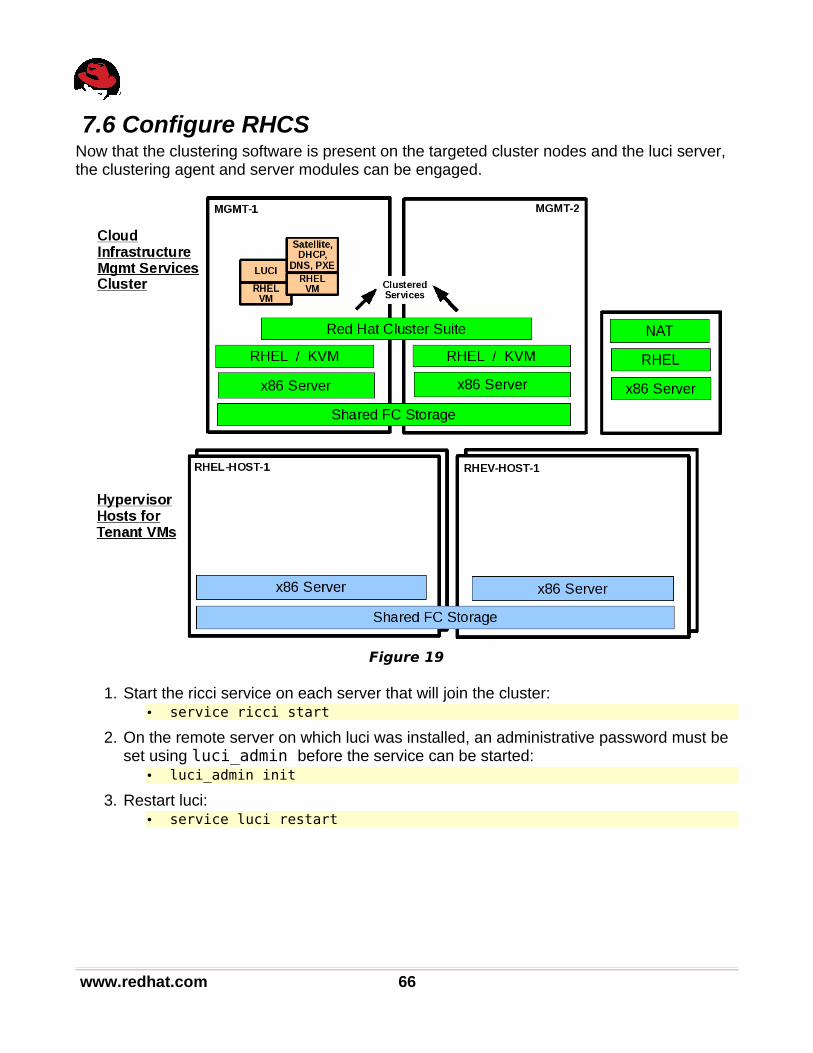
7.6 Configure RHCSNow that the clustering software is present on the targeted cluster nodes and the luci server, the clustering agent and server modules can be engaged.
1. Start the ricci service on each server that will join the cluster:• service ricci start
2. On the remote server on which luci was installed, an administrative password must be set using luci_admin before the service can be started:
• luci_admin init
3. Restart luci:• service luci restart
www.redhat.com 66
Figure 19

4. The first time luci is accessed via a web browser at https://<luci_servername>:8084, the user will need to accept two SSL certificates before being directed to the login page.
5. Enter the login name and chosen password to view the luci home page.
6. In the Luci Home page, click on the cluster tab at the top of the page and then on Create a New Cluster from the menubar on left. In the cluster creation window, enter the preferred name for the cluster (15 char max), the host names assigned to the local interconnect of each server and their root passwords. This window also provides options to:
• use the clustering software already present on the system or download the required packages
• enable shared storage support• reboot the systems prior to joining the new cluster• check to verify that system passwords are identical• view the SSL certification fingerprints of each server
7. Note that it is possible to use the external hostnames of the servers to build a cluster. This means that the cluster will be using the public LAN for its inter-node communications and heartbeats. It also means that the server running luci will need to be able to access the clustered systems on the same public LAN. A safer and more highly recommended configuration is to use the interconnect names (or their IP addresses) when building the cluster. This will require that the luci server also have a
67 www.redhat.com

connection to the private LAN and will remove any possibilities of public IO traffic interfering with the cluster activities.
8. Click the Submit button to download (if selected) and install the cluster software packages onto each node, create the cluster configuration file, propagate the file to each cluster member, and start the cluster. This will then display the main configuration window for the newly created cluster. The General tab (shown below) displays cluster name and provides a method for modifying the configuration version and advanced cluster properties.
9. The Fence tab will display the fence and XVM daemon properties window. While the default value of Post-Join Delay is 3, a more practical setting is between 20 and 30 seconds, but can vary to user preference. For this effort, the default Post-Join Delay was set to 30 seconds while default values were used for the other parameters. Set the Post-Join Delay value as preferred and click Apply.
10.The Multicast tab displays the multicast configuration window. The default option to Let cluster choose the multicast address is selected because Red Hat Cluster software chooses the multicast address for management communication across clustered nodes. If the user must use a specific multicast address, click Specify the multicast
www.redhat.com 68

address manually, enter the address and click Apply for changes to take effect. Otherwise, leave the default selections alone.
11.The Quorum Partition tab displays the quorum partition configuration window. Reference the Considerations for Using Quorum Disk and Global Cluster Properties sections of Configuring and Managing a Red Hat Cluster for further considerations regarding the use of a cluster quorum device. To understand the use of quorum disk parameters and heuristics, refer to the qdisk(5) man page.
Create storage volume (e.g., qdisk) of appropriate size (@50MB). See section 6.3 for greater detail on adding and presenting LUNs from storage.
The mkqdisk command will create the quorum partition. Specify the device and a unique identifying label:
• mkqdisk -c /dev/mapper/qdisk -l q_disk
Now that appropriate label has been assigned to the quorum partition or disk, configure the newly labeled q_disk as the cluster quorum device.
Once the preferred quorum attributes has been entered and any desired heuristic(s),
69 www.redhat.com

and their respective scores, have been defined, click Apply to create the quorum device. If further information regarding quorum partition details and heuristics is required, please reference:
• the Considerations for Using Quorum Disk and Global Cluster Properties sections of Configuring and Managing a Red Hat Cluster
• the Cluster Project FAQ• Red Hat Knowledgebase Article ID 13315 • the qdisk(5) man page
12. Once the initial cluster creation has completed, configure each of the clustered nodes.
www.redhat.com 70

13. A failover domain is a chosen subset of cluster members that are eligible to run a cluster service in the event of a node failure. From the cluster details window, click Failover Domains and then Add a Failover Domain.
71 www.redhat.com

14. Click on the Fence tab to configure a Fence Daemon.
www.redhat.com 72

15. Click on the Add a fence device for this level link at the bottom of the system details page to reveal the Fence Device form. Enter the information for the fence device being used. Click on Update main fence properties to proceed.
73 www.redhat.com

7.7 Configure VMs as Cluster Services
7.7.1 Create Cluster Service of Satellite VM 1. If running, shut down the satellite VM prior to configuring it as a cluster service. This is
due to the fact that when the Check the box to Automatically Start this Service option is enabled for a cluster service, it will automatically start the service as soon as it is created which will conflict with any currently running satellite VM.
• virsh shutdown ra-sat-vm
2. In the luci cluster configuration window, select the following links: Services -> Add a Virtual Machine Service and enter the information necessary to create the service:
• VM name: ra-sat-vm• Path to VM Configuration Files: /etc/libvirt/qemu• Leave VM Migration Mapping empty • Migration Type: live• Hypervisor: KVM• Check the box to Automatically Start this Service• Leave the NFS Lock Workaround and Run Exclusive boxes unchecked• FO Domain: ciab_fod• Recovery Policy: Restart• Max restarts: 2• Length of restart: 60• Select Update Virtual Machine Service
www.redhat.com 74

7.7.2 Create Cluster Service of Luci VMWhen creating a service of the Luci VM, the VM can not be shut down prior to configuring the service because Luci is required to create the service itself. Given this, the service can be created but not configured to auto start. Once the service exists without the auto start option, it can be modified afterward to set the option accordingly.
1. In the luci cluster configuration window, select the following links: Services -> Add a Virtual Machine Service and enter the information necessary to create the service:
• VM name: ra-luci-vm• Path to VM Configuration Files: /etc/libvirt/qemu• Leave VM Migration Mapping empty • Migration Type: live• Hypervisor: KVM• Leave the Automatically Start this Service, NFS Lock Workaround, and Run
Exclusive boxes unchecked• FO Domain: ciab_fod• Recovery Policy: Restart• Max restarts: 2• Length of restart: 60• Select Update Virtual Machine Service
2. In the luci cluster configuration window, select the following links: Services -> Configure a Service -> ra-luci-vm:
• Check the box to Automatically Start this Service• Select Update Virtual Machine Service
3. Start the luci service on a management cluster node:• clusvcadm -e vm:ra-luci-vm
75 www.redhat.com

7.8 Configure NFS Service (for ISO Library)Create and configure an NFS cluster service to provide storage for the RHEV-M ISO image library.
1. Modify firewall rules on all nodes in management cluster:• iptables -I RH-Firewall-1-INPUT -p udp -m udp --dport 2020 -j
ACCEPT• iptables -I RH-Firewall-1-INPUT -p tcp -m tcp --dport 2020 -j
ACCEPT• iptables -I RH-Firewall-1-INPUT -p udp -m udp --dport 2049 -j
ACCEPT• iptables -I RH-Firewall-1-INPUT -p tcp -m tcp --dport 2049 -j
ACCEPT• iptables -I RH-Firewall-1-INPUT -p tcp -m tcp --dport 111 -j ACCEPT• iptables -I RH-Firewall-1-INPUT -p udp -m udp --dport 111 -j ACCEPT• iptables -I RH-Firewall-1-INPUT -p udp -m udp --dport 662 -j ACCEPT• iptables -I RH-Firewall-1-INPUT -p tcp -m tcp --dport 662 -j ACCEPT• iptables -I RH-Firewall-1-INPUT -p udp -m udp --dport 32803 -j
ACCEPT
www.redhat.com 76
Figure 20

• iptables -I RH-Firewall-1-INPUT -p tcp -m tcp --dport 32803 -j ACCEPT
• iptables -I RH-Firewall-1-INPUT -p udp -m udp --dport 32769 -j ACCEPT
• iptables -I RH-Firewall-1-INPUT -p tcp -m tcp --dport 32769 -j ACCEPT
• iptables -I RH-Firewall-1-INPUT -p udp -m udp --dport 892 -j ACCEPT• iptables -I RH-Firewall-1-INPUT -p tcp -m tcp --dport 892 -j ACCEPT• iptables -I RH-Firewall-1-INPUT -p udp -m udp --dport 875 -j ACCEPT• iptables -I RH-Firewall-1-INPUT -p tcp -m tcp --dport 875 -j ACCEPT
2. Edit /etc/sysconfig/nfs on each node in the management cluster to verify the following lines are uncommented as shown in the file excerpt below:RQUOTAD_PORT=875LOCKD_TCPPORT=32803 LOCKD_UDPPORT=32769MOUNTD_PORT=892 STATD_PORT=662 STATD_OUTGOING_PORT=2020
3. Enable NFS service:• chkconfig nfs on
4. Create a storage volume (e.g., rhev-nfs-fs) of appropriate size (@300GB). See section 6.3 for greater detail on adding and presenting LUNs from storage.
5. Create and check the file system on the target volume: • mkfs -t ext3 /dev/mapper/rhev-nfs-fs• fsck -y /dev/mapper/rhev-nfs-fs
6. In the luci cluster configuration window:a) Select the following links: Resources -> Add a Resource
Select type: IP Address• Enter reserved IP address• Click Submit
b) Select the following links: Resources -> Add a ResourceSelect type: File System
• Enter name• Select ext3• Enter mountpoint: /rhev • Path to mapper dev [e.g., /dev/mapper/rhev-nfs]• Options: rw• Click Submit
c) Select the following links: Resources -> Add a ResourceSelect type: NFS Export
• Enter export name• Click Submit
d) Select the following links: Resources -> Add a Resource
77 www.redhat.com
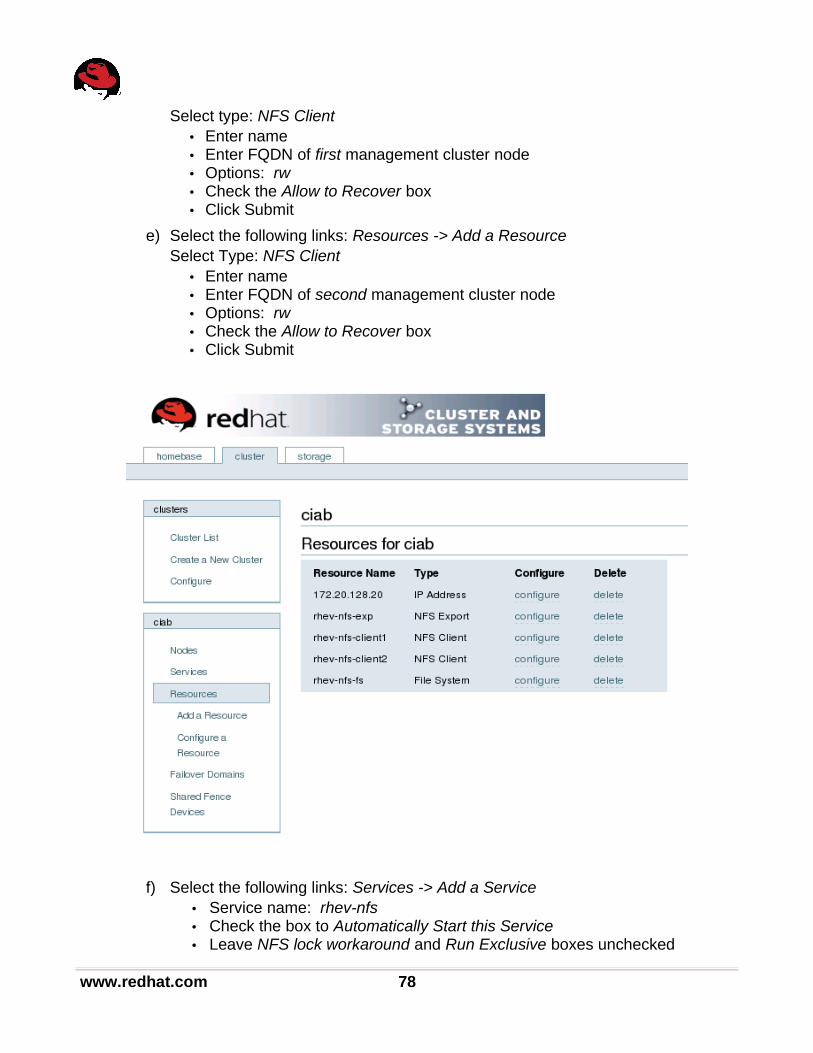
Select type: NFS Client• Enter name• Enter FQDN of first management cluster node• Options: rw• Check the Allow to Recover box• Click Submit
e) Select the following links: Resources -> Add a ResourceSelect Type: NFS Client
• Enter name• Enter FQDN of second management cluster node• Options: rw• Check the Allow to Recover box• Click Submit
f) Select the following links: Services -> Add a Service• Service name: rhev-nfs• Check the box to Automatically Start this Service• Leave NFS lock workaround and Run Exclusive boxes unchecked
www.redhat.com 78

• FO Domain: ciab_fod • Recovery Policy: Restart • Max restarts: 2 • Length of restart: 60 • Select Update Virtual Machine Service
NOTE: When configuring the NFS export resource for an NFS service, it must be configured as a child of the File System resource. Additionally, each NFS client resource for an NFS service must be configured as a child of the NFS export resource.
g) Following the child configuration rule as described in the previous step, add each of the above resources created in steps 'a' through 'e' (IP, NFS Export, both NFS Clients) to the rhev-nfs service using the "Add a resource to this service" button.
79 www.redhat.com

7.9 Create RHEV Management Platform
7.9.1 Create VMCreate the virtual machine where the RHEV-M software will reside.
1. Create a storage volume (e.g., rhevm_disk) of appropriate size (@30GB). See section 6.3 for greater detail on adding and presenting LUNs from storage.
2. Use virt-manager to create the RHEV-M VM• Name: rhevm-vm • Set Virtualization Method: Fully virtualized • CPU architecture: x86_64 • Hypervisor: kvm • Select Local install media installation method• OS Type: Windows • OS Variant: Microsoft Windows 2008 • Specify preferred installation media • Specify Block device storage location (e.g., /dev/mapper/rhevm_disk)• Specify Shared physical device network connection (e.g., cumulus0)
www.redhat.com 80
Figure 21

• Max memory: 2048• Startup memory: 2048• Virtual CPUs: 2
3. Install Windows Server 2008 R2 Enterprise: a) Reference Section 15 [Installing with a virtualized floppy disk] of the Red Hat
Virtualization Guide for instruction on installing the para-virtualized drivers during a Windows installation. Proceed with installation.
b) Select language preference
c) Select OS: Windows Server 2008 R2 Enterprise (Full Installation)
d) Accept license terms
e) Select Custom (Advanced) to install a new copy of Windows
f) Load the PV driver if installer fails to identify any devices on which to install
g) After system reboots (twice) and prepares for first use, set password when prompted
h) The Initial Configuration Tasks window will provide the opportunity to: • activate Windows • set time zone • enable automatic updates • install available updates
i) Disable Windows firewall
7.9.2 Create Cluster Service of VM
1. In the luci cluster configuration window, select the following links: Services -> Add a Virtual Machine Service and enter the following:
• VM Name: rhevm-vm• Path to VM Configuration Files: /etc/libvirt/qemu• VM Migration Mapping: • Migration Type: live• Hypervisor: KVM• Check the box to Automatically Start this Service• Leave the NFS Lock Workaround and Run Exclusive boxes unchecked• Failover Domain: ciab_fod• Recovery Policy: Restart• Max Restarts: 2• Length of Restart: 60• Select Update Virtual Machine Service
81 www.redhat.com

7.9.3 Install RHEV-M SoftwareThis release of the Red Hat Enterprise Virtualization Manager was hosted on Microsoft Windows Server 2008 R2 Enterprise.
1. Open TCP port 54321 on each management cluster node:• iptables -I RH-Firewall-1-INPUT -p tcp --dport 54321 -m state
--state NEW -j ACCEPT
2. Install Windows Server 2008 R2 Enterprise and any applicable updates.
3. RHEV Manager utilizes .NET Framework. Verify that .NET Framework 3.5 is present on the system. In Windows Server 2008 R2, .NET Framework can be enabled in the Server Manager (Start -> All Programs -> Administrative Tools -> Server Manager, if it does not auto start at login). Once started, click Features to expand the category. .NET Framework is the first feature in the list of features to enable. If there are features already enabled and .Net Framework is not listed among them, click Add Features to see the list of features remaining to add to install it.
4. Red Hat requires that Windows PowerShell 2.0 be installed. This is included in the Windows 2008 R2 installation but if it should not present on the system, the appropriate version for the OS can be obtained by searching the Microsoft web site. If PowerShell has been installed on the system, it will have its own icon in the Windows taskbar or a command window appears by typing 'powershell' in the Run... dialog box of the Start menu.
5. System and user authentication can be local or through the use of an Active Directory Domain. If there is an existing domain, an administrator can join using the Computer Name tab of the System Properties window. Another option would be to configure the system which runs the RHEV Manager software as a domain controller.
www.redhat.com 82
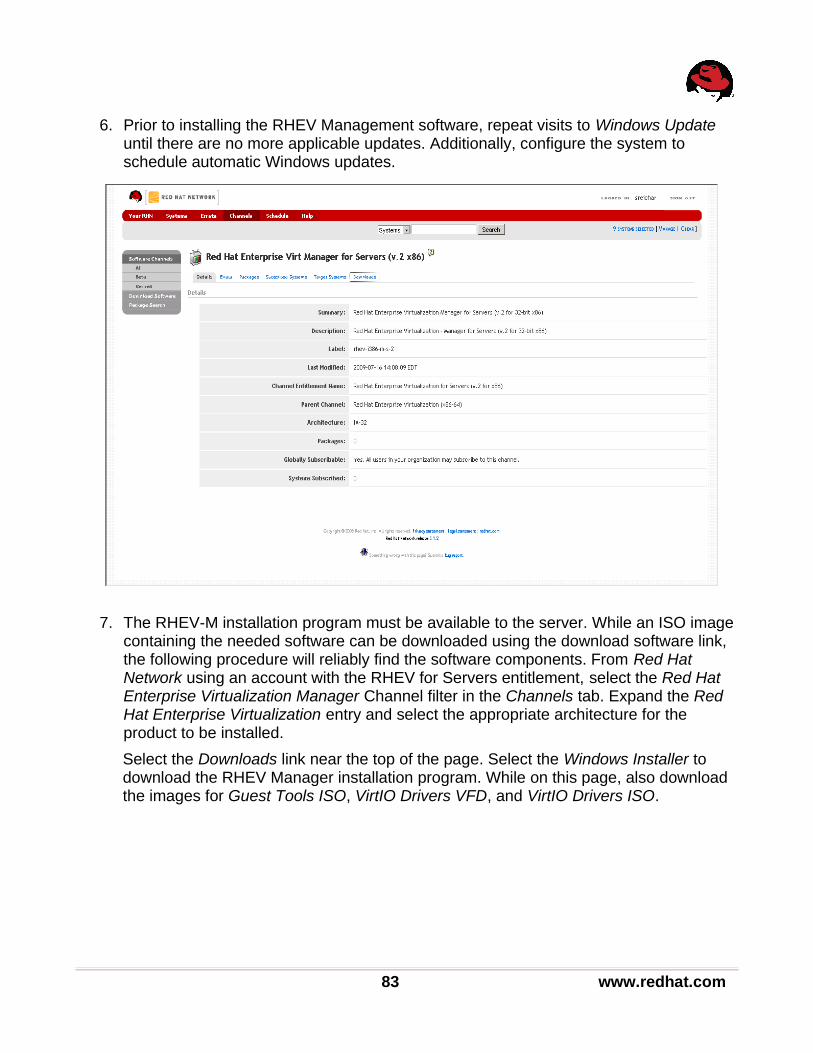
6. Prior to installing the RHEV Management software, repeat visits to Windows Update until there are no more applicable updates. Additionally, configure the system to schedule automatic Windows updates.
7. The RHEV-M installation program must be available to the server. While an ISO image containing the needed software can be downloaded using the download software link, the following procedure will reliably find the software components. From Red Hat Network using an account with the RHEV for Servers entitlement, select the Red Hat Enterprise Virtualization Manager Channel filter in the Channels tab. Expand the Red Hat Enterprise Virtualization entry and select the appropriate architecture for the product to be installed.
Select the Downloads link near the top of the page. Select the Windows Installer to download the RHEV Manager installation program. While on this page, also download the images for Guest Tools ISO, VirtIO Drivers VFD, and VirtIO Drivers ISO.
83 www.redhat.com

www.redhat.com 84

8. Execute the installation program (e.g., rhevm-2.1-37677.exe). After the initial screen, accept the End User License Agreement. When the feature checklist screen is displayed, verify that all features have been selected.
9. Choose to either use an existing SQL Server DB or install the express version locally. After selecting to install SQLEXPRESS, a strong password must be entered for the 'sa' user. The destination folder for the install may be changed. The destination web site for the portal can be chosen next or the defaults are used.
10.On the next screen, specify whether to use Domain or local authentication. If local is used, provide the user name and password for an account belonging to the Administrators group.
11. In the next window, enter the organization and computer names for use in certificate generation. The option to change the net console port is provided. Proceeding past the Review screen, the installation begins. The installation process prompts the administrator to install OpenSSL, which provides secure connectivity to Red Hat Enterprise Virtualization Hypervisor and Enterprise Linux as well as other systems. pywin32 is installed on the server. If selected, as in this case, SQLEXPRESS is installed. The RHEV Manager is installed with no further interaction other than when
85 www.redhat.com

the install has completed.
12.Click the Finish button to complete the installation.
13.Verify the install by starting RHEV Manager. From the Start menu, select All Programs -> Red Hat -> RHEV Manager -> RHEVManager. The certificate is installed during the first portal access. At the Login screen enter the User Name and Password for the RHEV administrator, specified during installation, to present the following screen.
www.redhat.com 86

7.9.4 Configure the Data CenterCreate and configure a data center with a storage pool and a populated ISO image library for VM installations.
1. Create a new data center. In RHEV-M in the Data Centers tab, click the New button: • Name: (e.g., Cloud_DC1)• Description: [optional]• Type: FCP • Compatibility Version: 2.2
2. Create a new cluster within the data center. In the Clusters tab, click the New button: • Name: (e.g., dc1-clus1)• Description: [optional] • Data Center: Cloud_DC1 • Memory Over Commit: Server Load • CPU Name: (e.g., Intel Xeon)• Compatibility Version: 2.2
3. Add a host. Reference Sections 8.1 and 8.4 for the instructions to add a host.4. Create the storage pool. Assuming a LUN for use as the storage pool exists and has
been presented to all target hosts of this data center, select the Storage tab in RHEV Manager and click New Domain:
87 www.redhat.com
Figure 22

• Name: (e.g., fc1_1tb)• Domain Function: Data • Storage Type: FCP • Leave Build New Domain selected • Ensure the correct host name is selected in the 'Use host' list • Select the desired LUN from the list of Discovered LUNs and click Add to move it
to the Selected LUNs window • Click OK
5. Create the ISO Library. Select the Storage tab in RHEV Manager and click New Domain:
• Name: (e.g., ISO Library)• Domain Function: ISO • Storage Type: NFS • Export Path: enter <server>:<path> to the exported mount point
(e.g., rhev-nfs.ra.rh.com:/rhev/ISO_Library)• Click OK
6. Attach the ISO library and storage pool to the data center. In the Data Centers tab, select/highlight the newly created data center:
• Click the Storage tab in the lower half of the window • Click the Attach Domain button • Select the check box corresponding to the newly created storage pool and click
OK • Click the Attach ISO button • Select the check box corresponding to the newly created ISO image library• Click OK
7. Populate the ISO library. The Guest Tools and VirtIO driver images that were downloaded when the RHEV Manager installer was downloaded are recommended software for availability in the ISO Library as well as any OS images desired for VM OS installs. NOTE: User must be Administrator to run RHEV Apps until BZ 565624 is resolved.
• On the RHEV Manager system, select Start -> All Programs -> Red Hat -> RHEV Manager -> ISO Uploader
• In the Red Hat Virtualization ISO Uploader window, press the Add button to select any or all of the images (.iso, .vfd) previously downloaded
• Select the correct Data Center from the pull down list• Click the Upload button
www.redhat.com 88

8 Deploying VMs in Hypervisor HostsAfter creating the cloud infrastructure management services, the next steps involve creating RHEV-H and RHEL hypervisor hosts. Once done, create VMs within those hosts for each possible use-case.
For RHEV-H host:1. Use Satellite to provision RHEV-HOST-12. Provision VMs on RHEV-HOST-1
• Deploy RHEL VMs using:◦ Use Case 1: ISO libraries via NFS service◦ Use Case 2: Template via RHEV-M◦ Use Case 3: PXE via Satellite
• Deploy Windows VMs using:◦ Use Case 1: ISO libraries via NFS service ◦ Use Case 2: Template via RHEV-M
For RHEL host:1. Shut down VMs and put RHEV-H hosts in maintenance mode2. Use Satellite to provision RHEL-HOST-13. Use RHEV-M to incorporate RHEL-HOST-1 as a RHEV host4. Provision VMs on RHEL-HOST-1
• Deploy RHEL VMs using:◦ Use Case 1: ISO libraries via NFS service ◦ Use Case 2: Template via RHEV-M◦ Use Case 3: PXE via Satellite
• Deploy Windows VMs using:◦ Use Case 1: ISO libraries via NFS service ◦ Use Case 2: Template via RHEV-M
89 www.redhat.com

8.1 Deploy RHEV-H HypervisorThe RHEV Hypervisor is a live image and is delivered as a bootable ISO that will install the live image onto the local machine. Because Red Hat Enterprise Linux is primarily delivered as a collection of packages, RHN Satellite is used to manage these packages. Since the RHEV hypervisor is delivered as a live image, it can not currently be managed in a satellite channel, however, it can be configured as a PXE bootable image using cobbler.
Figure 23
1. Enable PXE of RHEV-H live image by performing the following procedures on the Satellite VM:
a) Download RHEV Hypervisor Beta RPM (e.g., rhev-hypervisor-5.5-2.2.0.8.el5rhev.noarch.rpm)• Login to RHN Web Site• Locate the Search field near the top of the page
• Select Packages search• Enter 'rhev-hypervisor' in search box• Select rhev-hypervisor
• Select Beta (e.g., rhev-hypervisor-5.5-2.2.0.8.el5rhev.noarch)
www.redhat.com 90
• Near the bottom of this page, select the Download Package link• Install the package
• rpm -ivh rhev-hypervisor-5.5-2.2.0.8.el5rhev.noarch.rpm
b) Since later versions may be installed (e.g., Beta 2 or GA) rename the file to be identifiable:• cd /usr/share/rhev-hypervisor• mv rhev-hypervisor.iso rhev-hypervisor-2.2beta1.iso
c) Using the livecd tools which were installed with the hypervisor package, generate the files needed for PXE• livecd-iso-to-pxeboot rhev-hypervisor-2.2beta1.iso
d) Also rename the generated tftpboot subdirectory to be more specific• mv tftpboot tftpboot2.2beta1
e) Create cobbler distro from tftptboot file, ignore warnings related to exceeding kernel options length• cobbler distro add --name="rhevh_2.2beta1"
--kernel=/usr/share/rhev-hypervisor/tftpboot2.2beta1/vmlinuz0 --initrd=/usr/share/rhev-hypervisor/tftpboot2.2beta1/initrd0.img --kopts="rootflags=loop root=/rhev-hypervisor-2.2beta1.iso rootfstype=auto liveimg"
f) Create cobbler profile which uses the recently created distro, this will used for interactive installations of the hypervisor. • cobbler profile add --name=rhevh_2.2beta1 --distro=rhevh_2.2beta1
a) Create an additional cobbler profile supplying additional kernel options which will automate the hypervisor configuration and installation. • cobbler profile add --name=rhevh_2.2beta1Auto
--distro=rhevh_2.2beta1 --kopts="storage_init=/dev/cciss/c0d0 storage_vol=::::: BOOTIF=eth0 management_server=ra-rhevm-vm.ra.rh.com netconsole=ra-rhevm-vm.ra.rh.com"
g) Synchronize cobblers configuration with the system filesystems• cobbler sync
2. Prepare cobbler to PXE boot system
a) If system does not have a cobbler system record, create one• cobbler add system --name=vader.ra.rh.com -- profile=rhevh_2.2beta1Auto –mac=00:25:B3:A8:6F:19 --ip=172.20.128.90 --hostname=vader.ra.rh.com --dns-name=vader.ra.rh.com
b) If system does have a cobbler system record, modify to use automated profile• cobbler system edit --name=vader.ra.rh.com --profile=
rhevh_2.2beta1Auto• cobbler sync
91 www.redhat.com

3. PXE boot system
a) Disable fibre channel connectivity with system (e.g., switch port disable, cable pull, HBA disable, etc.).
b) Interact with BIOS to start PXE boot. System will install.
c) Enable fibre channel connectivity disabled in step a)
4. At RHEV Manager Host tab, approve system
www.redhat.com 92

8.2 Deploy RHEL Guests (PXE / ISO / Template) on RHEV-H Host
8.2.1 Deploying RHEL VMs using PXE 1. Configure Activation Key
a) Starting at the satellite home page for the tenant user page, select the following links: Systems -> Activation Keys -> create new key and provide the information below: • Description: (e.g., RHEL55key) • Base Channel: rhel5-5-x86_64-server• Add On Entitlements: Monitoring, Provisioning• Create Activation Key
b) Select Child Channel tab• add RHN Tools, select Update Key
93 www.redhat.com
Figure 24

2. Configure Kickstart a) Starting at the satellite home page for the tenant user page, select the following
links: Systems -> Kickstart -> Profiles -> create new kickstart profile and provide the information below: • Label: (e.g., RHEL55guest)• Base Channel: rhel5-5-x86-server• Kickstartable Tree: rhel55_x86-64• Virtualization Type: None• Select Next to accept input and proceed to next page• Select Default Download Location• Select Next to accept input and proceed to next page• Specify New Root Password and Verify • Click Finish
b) In the Kickstart Details -> Details tab• Log custom post scripts• Click Update Kickstart
c) In the Kickstart Details -> Operating System tab• Select Child Channels (e.g., RHN Tools)• Since this is a base only install, verify no Repositories checkboxes are selected • Click Update Kickstart
d) In the Kickstart Details -> Advanced Options tab• Verify reboot is selected• Change firewall to – enabled
e) In the System Details -> Details tab• Enable Configuration Management and Remote Commands• Click Update System Details
f) In the Activation Keys tab• Select RHEL55key• Click Update Activation Keys
3. Confirm all active hosts are RHEV-H hosts, place any RHEL Hosts into maintenance mode.
4. Create RHEV VM
a) At the RHEV Manager Virtual Machines tab, select New Server
www.redhat.com 94
b) In the New Server Virtual Machine dialog, General tab provide the following data
• Name: (e.g., rhel55guest1)• Description: [optional]• Host Cluster: (e.g., dc1-clus1)• Template: [blank]• Memory Size : (e.g., 2048)• CPU Sockets: (e.g., 1)• CPUs Per Socket: (e.g., 2)• Operating System: Red Hat Enterprise Linux 5.x x64
c) In the Boot Sequence tab, provide the following”
• Second Device: Network (PXE)
d) Select the Configure Network Interfaces button in the Guide Me dialog and provide the following in the New Network Interface:
• Type: Red Hat VirtIO
e) Select the Configure Virtual Disks button in the Guide Me dialog and provide the following in the New Virtual Disk dialog:
• Size (GB): (e.g., 8)• the defaults for the remaining entries are adequate
5. Boot VM
a) In the RHEV Manager Virtual Machines tab select the newly create VM b) Either select the Run button or the equivalent right mouse button menu option c) Start console by selecting the Console button when active or the equivalent right
mouse button menu option d) After initial PXE booting the Cobbler PXE boot menu will display, select the
kickstart that was previously created, (e.g., RHEL55guest:22:tenants) e) The VM will reboot when the installation is complete
8.2.2 Deploying RHEL VMs using ISO Library
1. If not already in place, populate the ISO library with the RHEL 5.5 ISO image, which can be downloaded via the RHN web site.NOTE: User must be Administrator to run RHEV Apps until BZ 565624 is resolved. a) On the RHEV Manager system, select Start -> All Programs -> Red Hat -> RHEV
Manager -> ISO Uploader b) In the Red Hat Virtualization ISO Uploader window, press the Add button to select
any or all of the images (.iso, .vfd) previously downloaded c) Select the correct Data Center from the pull down list d) Click the Upload button Place ISO image into ISO Library
95 www.redhat.com

2. Confirm all active hosts are RHEVH hosts, place any RHEL Hosts into maintenance
3. Create RHEV VM
a) At the RHEV Manager Virtual Machines tab, select New Server
b) In the New Server Virtual Machine dialog, General tab provide the following data
• Name: (e.g.,. rhel55guest2)
• Description: [optional]
• Host Cluster: (e.g., dc1-clus1)
• Template: Blank
• Memory Size : (e.g., 2048)
• CPU Sockets: (e.g., 1)
• CPUs Per Socket: (e.g., 2)
• Operating System: Red Hat Enterprise Linux 5.x x64
c) In the Boot Sequence tab, provide the following:
• Second Device: CD-ROM
• Select Attach CD checkbox
• Specify CD/DVD to mount (e.g., rhel-server-5.5-x86_64-dvd.iso)
d) Select the Configure Network Interfaces button in the Guide Me dialog and provide the following in the New Network Interface:
• Type: Red Hat VirtIO
• the defaults for the remaining entries are adequate
e) Select the Configure Virtual Disks button in the Guide Me dialog and provide the following in the New Virtual Disk dialog:
• Size (GB): (e.g., 8)
• the defaults for the remaining entries are adequate
4. Boot VM
a) At the RHEV Manager Virtual Machines tab select the newly create VM
b) Either select the Run button or the equivalent right mouse button menu option
c) Start console by selecting the Console button when active or the equivalent right mouse button menu option
d) The VM will boot the DVD, the remaining installation will need to be performed through the console.
e) After the software is installed, the VM will prompt to reboot. After the reboot, answer the First Boot interrogation. Since the Satellite's specific certificate is not local to the VM at this time, skip registering with RHN.
f) After system Login Screen displays, login and register with Satellite.
• Install Satellite certificate
www.redhat.com 96

• rpm -ivh http://ra-sat-vm.ra.rh.com/pub/rhn-org-trusted-ssl-cert-1.0-1.noarch.rpm
• Start the rhn_register program and provide the following information
• Select to receive updates from Red Hat Network Satellite
• Specify Red Hat Network Location: (e.g., https://ra-sat-vm.ra.rh.com)
• Select and specify the SSL certificate : /usr/share/rhn/RHN-ORG-TRUSTED-SSL-CERT
• Provide tenant user credentials
• Verify System Name and send Profile Data
8.2.3 Deploying RHEL VMs using Templates
1. Confirm all active hosts are RHEVH hosts, place any RHEL hosts into maintenance mode.
2. Create Template a) Prepare the template system to register with the satellite upon booting
• Identify the activation key to use to register the system.
• The Activation Keys page (in Systems tab) of the satellite will list existing keys for each organization.
• Alternatively, if the system was PXE installed using satellite, the register command can be found in /root/cobbler.ks which includes the key used• grep rhnreg cobbler.ks
• The following commands will place commands in the proper script to execute on the next boot• cp /etc/rc.d/rc.local /etc/rc.d/rc.localpretemplate• echo “rhnreg_ks --force --serverUrl=https://ra-sat-
vm.ra.rh.com/XMLRPC --sslCACert=/usr/share/rhn/RHN-ORG-TRUSTED-SSL-CERT –activationkey=22-f0b9a335f83c50ef9e5af6a520430aa1” >> /etc/rc.d/rc.local
• echo “mv /etc/rc.d/rc.local.pretemplate /etc/rc.d/rc.local” >> /etc/rc.d/rc.local
b) Before shutting down the system which will be used to create a template, some level of clearing the configuration settings should be performed.
• At a minimum the hostname should not be hard-coded as this can lead to confusion when the hostname does not match the IP currently assigned. The following commands will remove the name that was set when installed, and DHCP will set the name upon boot• cp /etc/sysconfig/network /tmp• grep -v “HOSTNAME=” /tmp/network > /etc/sysconfig/network
• Alternatively, a more extensive method of clearing configuration setting is to use the sys-unconfig command. sys-unconfig will cause the system to reconfigure network, authentication and several other subsystems on next boot.
97 www.redhat.com

c) If already not shutdown, shutdown the VM
d) At the RHEV Manager Virtual Machines tab, select the appropriate VM and either the Make Template button or right mouse button menu option
• Name: (e.g., RHEL55_temp)• Description: [optional]
While creating the template the image is locked. Confirm the template exists in the Templates tab after the creation is complete
3. Create New VM using template a) At the RHEV Manager Virtual Machines tab, select New Server
b) In the New Server Virtual Machine dialog, General tab provide the following data
• Name: (e.g., rhel55guest3)
• Description: [optional]
• Template: (e.g., RHEL55_temp)
• Confirm or override the remaining entries
c) If the Data Center and Cluster are set to v2.2 compatibility, the provisioning can be changed from thin to preallocated. in the Allocation tab, provide the following:
• Provisioning: Clone
• Provisioning: Preallocated
4. The newly created VM will have a Locked Image while being instantiated. When the process is complete the VM is ready to boot. a) At the RHEV Manager Virtual Machines tab select the newly create VM
b) Either select the Run button or the equivalent right mouse button menu option
c) Start console by selecting the Console button when active or the equivalent right mouse button menu option
d) This system will be known to satellite with its progenitor's ID, therefore it must register with Satellite.
• Start the rhn_register program and provide the following information:
• Select to Yes, Continue when presented with the old systems registration
• Confirm to receive updates from Red Hat Network Satellite and the Red Hat Network Location: (e.g., https://ra-sat-vm.ra.rh.com)
• Provide tenant user credentials
• Verify System Name and send Profile Data
www.redhat.com 98

8.3 Deploy Windows Guests (ISO / Template) on RHEV-H Host
8.3.1 Deploying Window VMs using ISO Library
1. If not already in place, populate the ISO library with the ISO image or images needed for the Windows installation. The RHEV Tools CD and VirtIO driver virtual floppy drive should also be in the ISO Library.
NOTE: User must be Administrator to run RHEV Apps until BZ 565624 is resolved.
a) On the RHEV Manager system, select Start -> All Programs -> Red Hat -> RHEV Manager -> ISO Uploader
b) In the Red Hat Virtualization ISO Uploader window, press the Add button to select any or all of the images (.iso, .vfd) previously downloaded
99 www.redhat.com
Figure 25

c) Select the correct Data Center from the pull down list d) Click the Upload button Place ISO image into ISO Library
2. Confirm all active hosts are RHEVH hosts, place any RHEL Hosts into maintenance
3. Create Windows VM
a) At the RHEV Manager Virtual Machines tab, select New Server
b) In the New Server Virtual Machine dialog, General tab provide the following data
• Name: (e.g., w2k3guest1)
• Description: [optional]
• Host Cluster: (e.g., dc1-clus1)
• Template: Blank
• Memory Size : (e.g., 2048)
• CPU Sockets: (e.g., 1)
• CPUs Per Socket: (e.g., 2)
• Operating System: (e.g., Windows 2003)
c) In the First Run tab
• Provide a Domain if used
• Verify Time Zone is correct
d) Select the Configure Network Interfaces button in the Guide Me dialog and provide the following in the New Network Interface:
• Type: Red Hat VirtIO
• the defaults for the remaining entries are adequate
e) Select the Configure Virtual Disks button in the Guide Me dialog and provide the following in the New Virtual Disk dialog:
• Size (GB): (e.g., 12)
• the defaults for the remaining entries are adequate
4. Boot VM
a) At the RHEV Manager Virtual Machines tab select the newly create VM
b) Either select the Run Once option of the Run button, or the Run Once option in the right mouse button menu, and provide the following entries:
• Attach Floppy checkbox
• Indicate the virtio-drivers-1.0.0.vfd should be mounted
• Attach CD checkbox
• Indicate which CD/DVD should be mounted (e.g., Win2003R2-disk1.iso)
• Verify that Network is last in the Boot Sequence
www.redhat.com 100

c) Start console by selecting the Console button when active or the equivalent right mouse button menu option
d) The VM will boot the DVD, the remaining installation will need to be performed through the console.
e) Perform all the actions to install the Operating system. Some versions of windows will recognize the mount floppy and automatically use the VirtIO disk driver, other may require the operator to select the drivers to load. If a second CD/DVD is requires, activate the right mouse button menu on the VM and use the Change CD option locate near the bottom of the options.
f) The CD should be changed to the RHEV tools using he right mouse button menu on the VM and use the Change CD option locate near the bottom of the options. Once the Disk is mounted, the RHEV Tools found on this disk should be installed. This will include VirtIO drivers not previously loaded (e.g., network)
g) Red Hat recommends all applicable Window Updates be applied and to activate the Window installation.
8.3.2 Deploying Windows VMs using Templates
1. Confirm all active hosts are RHEVH hosts, place any RHEL Hosts into maintenance
2. Create Template a) Window systems should be 'sysprep'ed prior to be used as the source of a
template. There are differences for various versions of Windows, therefore it is best to consult the Microsoft documentation for the exact procedure. The highlights of the process for Windows 2003 is highlighted below:• create c:/sysprep folder• Mount Installation ISO (disk1) [assume disk D:]• Extract the content of Deploy.cab from the D:\Support\Tools into sysprep folder• Create sysprep.ini file by executing C:/sysprep/setupmgr.exe
• Select Create New• Select Sysprep Setup• Select the appropriate software version (e.g., Window 2003 Server Standard
Edition)• Select to Fully Automate• Provide a Name and Organization• Specify the appropriate Time Zone• Provide the Product Key• Specify the computer Name should be automatically generated• Provide the desired Administrator password in encrypted format• Finish
• Since this sysprep.ini file may be used on other instance, the user may want to copy to a known shared location
101 www.redhat.com
• Execute sysprep.exe• Do not reset the grace period for activation• Shutdown Mode should be set to Shut down• Reseal
• The sysprep process will shutdown the VM
b) At the RHEV Manager Virtual Machines tab, select the appropriate VM and either the Make Template button or right mouse button menu option• Name: (e.g., w2k3_temp)• Description: [optional]
c) While creating the template the image is locked. Confirm the template exists in the Templates tab after the creation is complete.
3. Create New VM using template a) At the RHEV Manager Virtual Machines tab, select New Server
b) In the New Server Virtual Machine dialog, General tab provide the following data
• Name: (e.g., w2k3guest2)
• Description: [optional]
• Template: (e.g., w2k3_temp)
• Confirm or override the remaining entries
c) If the Data Center and Cluster are set to v2.2 compatibility, the provisioning can be changed from thin to preallocated. in the Allocation tab, provide the following:
• Provisioning: Clone• Disk 1: Preallocated
4. The newly created VM will have a Locked Image while being instantiated. When the process is complete the VM is ready to Boot. a) At the RHEV Manager Virtual Machines tab select the newly create VM
b) Either select the Run button or the equivalent right mouse button menu option
c) Start console by selecting the Console button when active or the equivalent right mouse button menu option
d) Respond to any system prompts upon booting the VM
www.redhat.com 102
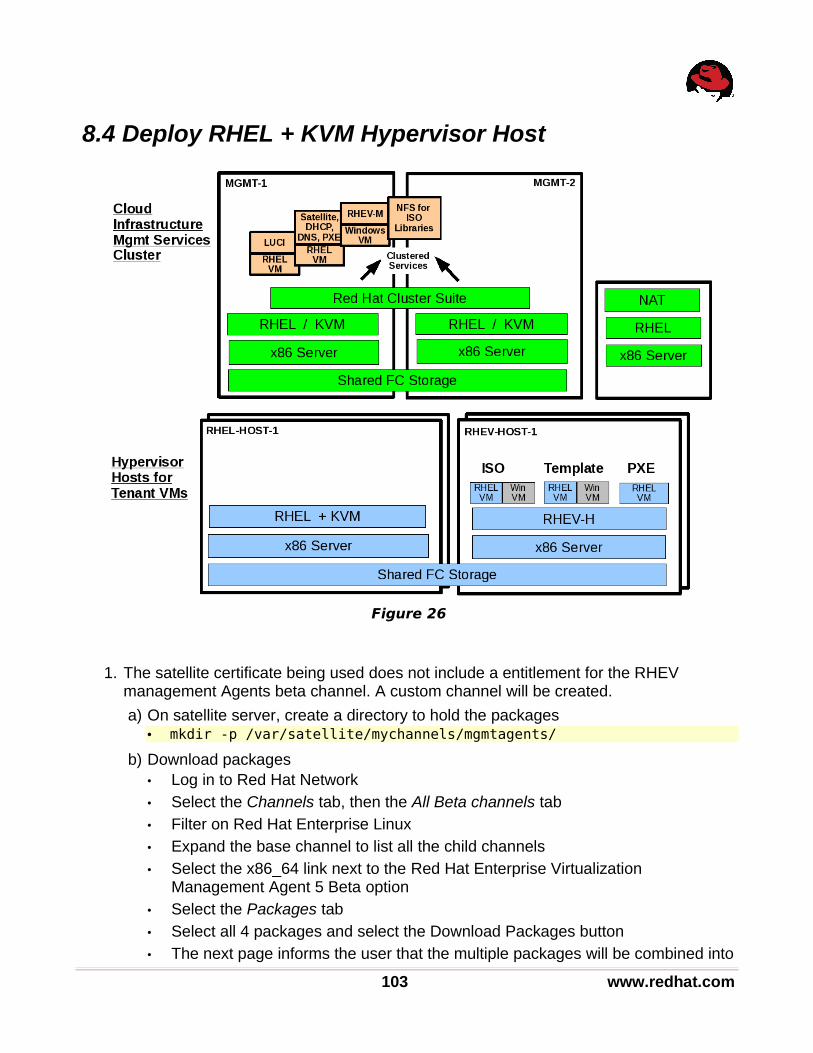
8.4 Deploy RHEL + KVM Hypervisor Host
1. The satellite certificate being used does not include a entitlement for the RHEV management Agents beta channel. A custom channel will be created.
a) On satellite server, create a directory to hold the packages• mkdir -p /var/satellite/mychannels/mgmtagents/
b) Download packages• Log in to Red Hat Network• Select the Channels tab, then the All Beta channels tab• Filter on Red Hat Enterprise Linux• Expand the base channel to list all the child channels• Select the x86_64 link next to the Red Hat Enterprise Virtualization
Management Agent 5 Beta option• Select the Packages tab• Select all 4 packages and select the Download Packages button• The next page informs the user that the multiple packages will be combined into
103 www.redhat.com
Figure 26

a tar file. Select the Download Selected Packages Now button.• Save the tar file to the created directory
c) Extract the files in the same directory• tar xvf mgmtagentbeta1.tar --strip-components 1
d) Create Custom channel• Log into RHN Satellite as the management organization administrator• Select the Channels tab, the Manage Software Channels on the left side of the
page, then the create new channel option near the top of the page providing the information below • Channel Name• Channel Label• Parent Channel (e.g., rhel5-5-x86_64-server)• Parent Channel Architecture (e.g., x86_64)• Channel Summary• Organization Sharing (e.g., public)
e) Place previously downloaded and extracted packages into the created channel • rhnpush -v -c rhev22mgmtagentsbeta1 --server=http://localhost/APP
--dir=/var/satellite/mychannels/mgmtagents -u manage -p <password>
2. Configure Activation Key a) Starting at the satellite home page for the tenant user page, select the following
links: Systems -> Activation Keys -> create new key and provide the information below: • Description: (e.g., RHELHkey) • Base Channel: rhel5-5-x86_64-server• Add On Entitlements: Monitoring, Provisioning, Virtualization Platform • Create Activation Key
b) Select Child Channel tab select a the following• RHN Tools Channel [e.g., Red Hat Network Tools for RHEL Server (v.5 64-bit
x86_64)]• Virtualization Channel (e.g., rhel5-5-x86_64-vt)• RHEV Management Channel [e.g., Red Hat Enterprise Virt Management Agent
(v.5 for x86_64)]• Click Update Key
3. If not previously created, configure Kickstart a) Starting at the satellite home page for the tenant user page, select the following
links: Systems -> Kickstart -> Profiles -> create new kickstart profile and provide the information below: • Label: (e.g., RHELH55-x86_64)• Base Channel: rhel5-5-x86-server• Kickstartable Tree: rhel55_x86-64• Virtualization Type: None
www.redhat.com 104

• Select Next to accept input and proceed to next page• Select Default Download Location• Select Next to accept input and proceed to next page• Specify New Root Password and Verify • Click Finish
b) In the Kickstart Details -> Details tab• Log custom post scripts• Click Update Kickstart
c) In the Kickstart Details -> Operating System tab• Select Child Channels (e.g., RHN Tools, Virtualization, RHEV Mgmt Agents)• Click Update Kickstart
d) In the Kickstart Details -> Variables• Define disk=cciss/c0d0
e) In the Kickstart Details -> Advanced Options tab• Change clearpart to --linux --drives=$disk• Verify reboot is selected• Change firewall to --enabled
f) In the System Details -> Details tab• Confirm SELinux is Permissive• Enable Configuration Management and Remote Commands• Click Update System Details
g) In the System Details -> Partitioning tabpartition swap --size=10000 --maxsize=20000 --ondisk=$diskpartition /boot --fstype=ext3 --size=200 --ondisk=$diskpartition pv.01 --size=1000 --grow --ondisk=$diskvolgroup rhelh_vg pv.01logvol / --vgname=rhelh_vg --name=rootvol --size=1000 --grow
f) In the Activation Keys tab• Select RHELHkey• Click Update Activation Keys
h) A single script will is used to disable GPG check of the custom channels since all beta packages have not been signed, open the requires firewall ports, installs some RHN tools, and make sure all installed software is up to date.
echo "" >> /etc/yum/pluginconf.d/rhnplugin.confecho "[rhel5-5-x86_64-server-snap4]" >> /etc/yum/pluginconf.d/rhnplugin.confecho "gpgcheck=0" >> /etc/yum/pluginconf.d/rhnplugin.confecho "" >> /etc/yum/pluginconf.d/rhnplugin.confecho "[rhel5-5-x86_64-vt-snap4]" >> /etc/yum/pluginconf.d/rhnplugin.confecho "gpgcheck=0" >> /etc/yum/pluginconf.d/rhnplugin.confecho "" >> /etc/yum/pluginconf.d/rhnplugin.confecho "[clone-rhn-tools-rhel-x86_64-server-5]" >> /etc/yum/pluginconf.d/rhnplugin.conf
105 www.redhat.com
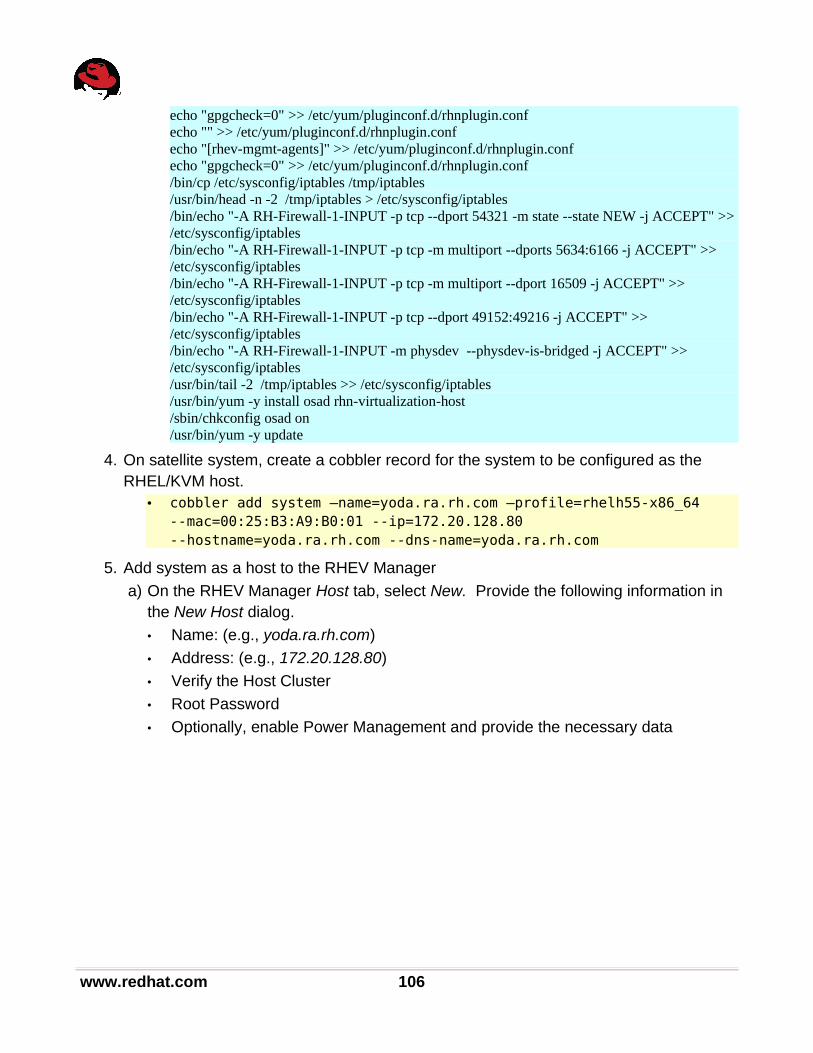
echo "gpgcheck=0" >> /etc/yum/pluginconf.d/rhnplugin.confecho "" >> /etc/yum/pluginconf.d/rhnplugin.confecho "[rhev-mgmt-agents]" >> /etc/yum/pluginconf.d/rhnplugin.confecho "gpgcheck=0" >> /etc/yum/pluginconf.d/rhnplugin.conf/bin/cp /etc/sysconfig/iptables /tmp/iptables/usr/bin/head -n -2 /tmp/iptables > /etc/sysconfig/iptables/bin/echo "-A RH-Firewall-1-INPUT -p tcp --dport 54321 -m state --state NEW -j ACCEPT" >> /etc/sysconfig/iptables/bin/echo "-A RH-Firewall-1-INPUT -p tcp -m multiport --dports 5634:6166 -j ACCEPT" >> /etc/sysconfig/iptables/bin/echo "-A RH-Firewall-1-INPUT -p tcp -m multiport --dport 16509 -j ACCEPT" >> /etc/sysconfig/iptables/bin/echo "-A RH-Firewall-1-INPUT -p tcp --dport 49152:49216 -j ACCEPT" >> /etc/sysconfig/iptables/bin/echo "-A RH-Firewall-1-INPUT -m physdev --physdev-is-bridged -j ACCEPT" >> /etc/sysconfig/iptables/usr/bin/tail -2 /tmp/iptables >> /etc/sysconfig/iptables/usr/bin/yum -y install osad rhn-virtualization-host/sbin/chkconfig osad on/usr/bin/yum -y update
4. On satellite system, create a cobbler record for the system to be configured as the RHEL/KVM host.
• cobbler add system –name=yoda.ra.rh.com –profile=rhelh55-x86_64 --mac=00:25:B3:A9:B0:01 --ip=172.20.128.80 --hostname=yoda.ra.rh.com --dns-name=yoda.ra.rh.com
5. Add system as a host to the RHEV Manager
a) On the RHEV Manager Host tab, select New. Provide the following information in the New Host dialog.
• Name: (e.g., yoda.ra.rh.com)
• Address: (e.g., 172.20.128.80)
• Verify the Host Cluster
• Root Password
• Optionally, enable Power Management and provide the necessary data
www.redhat.com 106
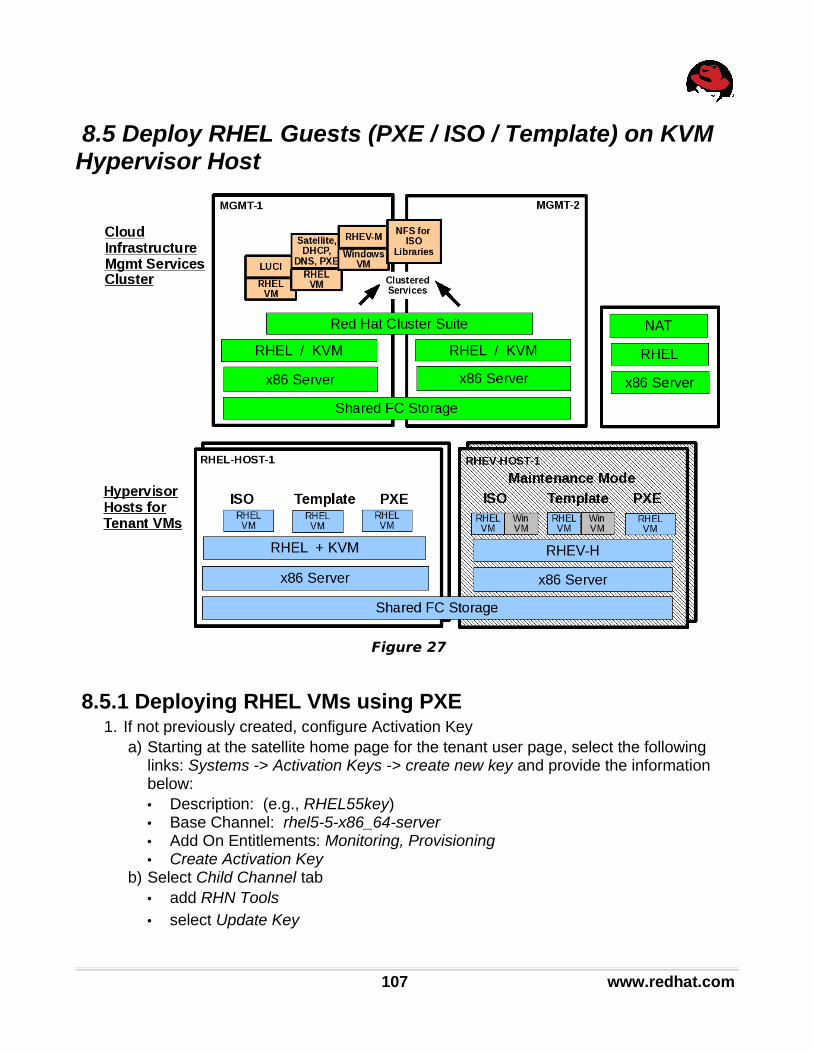
8.5 Deploy RHEL Guests (PXE / ISO / Template) on KVM Hypervisor Host
8.5.1 Deploying RHEL VMs using PXE 1. If not previously created, configure Activation Key
a) Starting at the satellite home page for the tenant user page, select the following links: Systems -> Activation Keys -> create new key and provide the information below: • Description: (e.g., RHEL55key) • Base Channel: rhel5-5-x86_64-server• Add On Entitlements: Monitoring, Provisioning• Create Activation Key
b) Select Child Channel tab• add RHN Tools• select Update Key
107 www.redhat.com
Figure 27

2. If not previously created, configure Kickstart a) Starting at the satellite home page for the tenant user page, select the following
links: Systems -> Kickstart -> Profiles -> create new kickstart profile and provide the information below: • Label: (e.g., RHEL55guest)• Base Channel: rhel5-5-x86-server• Kickstartable Tree: rhel55_x86-64• Virtualization Type: None• Select Next to accept input and proceed to next page• Select Default Download Location• Select Next to accept input and proceed to next page• Specify New Root Password and Verify • Click Finish
b) In the Kickstart Details -> Details tab• Log custom post scripts• Click Update Kickstart
c) In the Kickstart Details -> Operating System tab• Select Child Channels (e.g., RHN Tools)• Since this is a base only install, verify no Repositories checkboxes are selected • Click Update Kickstart
d) In the Kickstart Details -> Advanced Options tab• Verify reboot is selected• Change firewall to – enabled
e) In the System Details -> Details tab• Enable Configuration Management and Remote Commands• Click Update System Details
f) In the Activation Keys tab• Select RHEL55key• Click Update Activation Keys
3. Confirm all active hosts are RHEL/KVM hosts, place any RHEV Host into maintenance
4. Create RHEV VM
a) At the RHEV Manager Virtual Machines tab, select New Server
b) In the New Server Virtual Machine dialog, General tab provide the following data
• Name: (e.g., rhel55guest4)
• Description: [optional]
• Host Cluster: (e.g., dc1-clus1)
• Template: [blank]
www.redhat.com 108

• Memory Size: (e.g., 2048)
• CPU Sockets: (e.g., 1)
• CPUs Per Socket: (e.g., 2)
• Operating System: Red Hat Enterprise Linux 5.x x64
c) In the Boot Sequence tab, provide the following:
• Second Device: Network (PXE)
d) Select the Configure Network Interfaces button in the Guide Me dialog and provide the following in the New Network Interface:
• Type: Red Hat VirtIO
e) Select the Configure Virtual Disks button in the Guide Me dialog and provide the following in the New Virtual Disk dialog:
• Size (GB): (e.g., 8)
• the defaults for the remaining entries are adequate
5. Boot VM
a) In the RHEV Manager Virtual Machines tab select the newly created VM
b) Either select the Run button or the equivalent right mouse button menu option
c) Start console by selecting the Console button when active or the equivalent right mouse button menu option
d) After initial PXE booting the Cobbler PXE boot menu will display, select the kickstart that was previously created, (e.g., RHEL55guest:22:tenants)
e) The VM will reboot when the installation is complete
8.5.2 Deploying RHEL VMs using ISO Library
1. If not already in place, populate the ISO library with the RHEL 5.5 ISO image, which can be downloaded via the RHN web site.NOTE: User must be Administrator to run RHEV Apps until BZ 565624 is resolved. a) On the RHEV Manager system, select Start -> All Programs -> Red Hat -> RHEV
Manager -> ISO Uploader b) In the Red Hat Virtualization ISO Uploader window, press the Add button to select
any or all of the images (.iso, .vfd) previously downloaded c) Select the correct Data Center from the pull down list d) Click the Upload button Place ISO image into ISO Library
2. Confirm all active hosts are RHEL/KVM hosts, place any RHEV Hosts into maintenance.
3. Create RHEV VM
a) At the RHEV Manager Virtual Machines tab, select New Server
109 www.redhat.com
b) In the New Server Virtual Machine dialog, General tab provide the following data
• Name: (e.g., rhel55guest5)
• Description: [optional]
• Host Cluster: (e.g., dc1-clus1)
• Template: Blank
• Memory Size : (e.g., 2048)
• CPU Sockets: (e.g., 1)
• CPUs Per Socket: (e.g., 2)
• Operating System: Red Hat Enterprise Linux 5.x x64
c) In the Boot Sequence tab, provide the following:
• Second Device: CD-ROM
• Select Attach CD checkbox
• Specify CD/DVD to mount (e.g., rhel-server-5.5-x86_64-dvd.iso)
d) Select the Configure Network Interfaces button in the Guide Me dialog and provide the following in the New Network Interface:
• Type: Red Hat VirtIO
• the defaults for the remaining entries are adequate
e) Select the Configure Virtual Disks button in the Guide Me dialog and provide the following in the New Virtual Disk dialog:
• Size (GB): (e.g., 8)
• the defaults for the remaining entries are adequate
4. Boot VM
a) In the RHEV Manager Virtual Machines tab select the newly create VM
b) Either select the Run button or the right equivalent right mouse button menu option
c) Start console by selecting the Console button when active or the equivalent right mouse button menu option
d) The VM will boot the DVD, the remaining installation will need to be performed through the console.
e) After the software is installed, the VM will prompt to reboot. After the reboot, answer the First Boot interrogation. Since the Satellite's specific certificate is not local to the VM at this time, skip registering with RHN.
f) After system Login Screen displays, login and register with Satellite.
• Install Satellite certificate• rpm -ivh http://ra-sat-vm.ra.rh.com/pub/rhn-org-trusted-ssl-
cert-1.0-1.noarch.rpm
• Start the rhn_register program and provide the following information
www.redhat.com 110

• Select to receive updates from Red Hat Network Satellite
• Specify Red Hat Network Location: (e.g., https://ra-sat-vm.ra.rh.com)
• Select and specify the SSL certificate : /usr/share/rhn/RHN-ORG-TRUSTED-SSL-CERT
• Provide tenant user credentials
• Verify System Name and send Profile Data
8.5.3 Deploying RHEL VMs using Templates
1. Confirm all active hosts are RHEL/KVM hosts, place any RHEV Hosts into maintenance
2. Create Template
a) Prepare the template system to register with the satellite upon booting
• Identify the activation key to use to register the system.
• The Activation Keys page (in Systems tab) of the satellite will list existing keys for each organization.
• Alternatively, if the system was PXE installed using satellite, the register command can be found in /root/cobbler.ks which includes the key used• grep rhnreg cobbler.ks
• The following commands will place commands in the proper script to execute on the next boot• cp /etc/rc.d/rc.local /etc/rc.d/rc.localpretemplate• echo “rhnreg_ks --force --serverUrl=https://ra-sat-
vm.ra.rh.com/XMLRPC --sslCACert=/usr/share/rhn/RHN-ORG-TRUSTED-SSL-CERT --activationkey=22-f0b9a335f83c50ef9e5af6a520430aa1” >> /etc/rc.d/rc.local
• echo “mv /etc/rc.d/rc.local.pretemplate /etc/rc.d/rc.local” >> /etc/rc.d/rc.local
b) Before shutting down the system which will be used to create a template, some level of clearing the configuration settings should be performed.
• At a minimum the hostname should not be hard-coded as this can lead to confusion when the hostname does not match the IP currently assigned. The following commands will remove the name that was set when installed, and DHCP will set the name upon boot• cp /etc/sysconfig/network /tmp• grep -v “HOSTNAME=” /tmp/network > /etc/sysconfig/network
• Alternatively, a more extensive method of clearing configuration setting is to use the sys-unconfig command. sys-unconfig will cause the system to reconfigure network, authentication and several other subsystems on next boot.
c) If already not shutdown, shutdown the VM
111 www.redhat.com

d) At the RHEV Manager Virtual Machines tab, select the appropriate VM and either the Make Template button or right mouse button menu option
• Name: (e.g., RHEL55_temp)• Description: [optional]
While creating the template the image is locked. Confirm the template exists in the Templates tab after the creation is complete
3. Create New VM using template
a) At the RHEV Manager Virtual Machines tab, select New Server
b) In the New Server Virtual Machine dialog, General tab provide the following data
• Name: (e.g., rhel55guest6)
• Description: [optional]
• Template: (e.g., temp_RHEL55)
• Confirm or override the remaining entries
c) If the Data Center and Cluster are set to v2.2 compatibility, the provisioning can be changed from thin to preallocated. in the Allocation tab, provide the following:
• Provisioning: Clone
• Disk 1: Preallocated
4. The newly created VM will have a Locked Image while being instantiated. When the process is complete the VM is ready to Boot.
a) At the RHEV Manager Virtual Machines tab select the newly create VM
b) Either select the Run button or the right equivalent right mouse button menu option
c) Start console by selecting the Console button when active or the equivalent right mouse button menu option
d) This system will be known to satellite with its progenitor's ID, therefore it must register with Satellite.
• Start the rhn_register program and provide the following information:
• Select to Yes, Continue when presented with the old systems registration
• Confirm to receive updates from Red Hat Network Satellite and the Red Hat Network Location: (e.g., https://ra-sat-vm.ra.rh.com)
• Provide tenant user credentials
• Verify System Name and send Profile Data
www.redhat.com 112

8.6 Deploy Windows Guests (ISO / Template) on KVM Hypervisor Host
8.6.1 Deploying Window VMs using ISO Library
1. If not already in place, populate the ISO library with the ISO image or images needed for the Windows installation. The RHEV Tools CD and VirtIO driver virtual floppy drive should also be in the ISO Library.
NOTE: User must be Administrator to run RHEV Apps until BZ 565624 is resolved.
a) On the RHEV Manager system, select Start -> All Programs -> Red Hat -> RHEV Manager -> ISO Uploader
b) In the Red Hat Virtualization ISO Uploader window, press the Add button to select any or all of the images (.iso, .vfd) previously downloaded
c) Select the correct Data Center from the pull down list
113 www.redhat.com
Figure 28

d) Click the Upload button Place ISO image into ISO Library
2. Confirm all active hosts are RHEL/KVM hosts, place any RHEV Hosts into maintenance
3. Create Windows VM
a) At the RHEV Manager Virtual Machines tab, select New Server
b) In the New Server Virtual Machine dialog, General tab provide the following data
• Name: (e.g., w2k8guest1)
• Description: [optional]
• Host Cluster: (e.g., dc1-clus1)
• Template: [blank]
• Memory Size : (e.g., 4096)
• CPU Sockets: (e.g., 1)
• CPUs Per Socket: (e.g., 2)
• Operating System: (e.g., Windows 2008 R2)
c) In the First Run tab
• Provide a Domain if used
• Verify Time Zone is correct
d) Select the Configure Network Interfaces button in the Guide Me dialog and provide the following in the New Network Interface:
• Type: Red Hat VirtIO
• the defaults for the remaining entries are adequate
e) Select the Configure Virtual Disks button in the Guide Me dialog and provide the following in the New Virtual Disk dialog:
• Size (GB): (e.g., 20)
• the defaults for the remaining entries are adequate
4. Boot VM
a) At the RHEV Manager Virtual Machines tab select the newly create VM
b) Either select the Run Once option of the Run button, or the Run Once option in the right mouse button menu, and provide the following entries:
• Attach Floppy checkbox
• Indicate the virtio-drivers-1.0.0.vfd should be mounted
• Attach CD checkbox
• Indicate which CD/DVD should be mounted (e.g., en_windows_server_2008_r2_dvd.iso)
www.redhat.com 114

• Verify that Network is last in the Boot Sequence
c) Start console by selecting the Console button when active or the equivalent right mouse button menu option
d) The VM will boot the CD/DVD, the remaining installation will need to be performed through the console.
e) Perform all the actions to install the Operating system. Some versions of windows will recognize the mount floppy and automatically use the VirtIO disk driver, other may require the operator to select the drivers to load. If a second CD/DVD is requires, activate the right mouse button menu on the VM and use the Change CD option locate near the bottom of the options.
f) The CD/DVD should be changed to the RHEV tools using he right mouse button menu on the VM and use the Change CD option locate near the bottom of the options. Once the Disk is mounted, the RHEV Tools found on this disk should be installed. This will include VirtIO drivers not previously loaded (e.g., network)
g) Red Hat recommends all applicable Window Updates be applied and to activate the Window installation.
8.6.2 Deploying Windows VMs using Templates
1. Confirm all active hosts are RHEL/KVM hosts, place any RHEV Hosts into maintenance mode.
2. Create Template
a) Window systems should be 'sysprep'ed prior to be used as the source of a template. There are differences for various versions of Windows, therefore it is best to consult the Microsoft documentation for the exact procedure. The highlights of the process for Windows 2008 is highlighted below:• Create sysprep.ini file by executing C:\Windows\System 32\
sysprep\sysprep.exe• Set System Cleanup Action to Enter System Out-of-Box Experience (OOBE)• Shutdown Mode should be set to Shut down
• The sysprep process will shutdown the VM
b) At the RHEV Manager Virtual Machines tab, select the appropriate VM and either the Make Template button or right mouse button menu option• Name: (e.g., w2k8_temp)• Description: [optional]
c) While creating the template the image is locked. Confirm the template exists in the Templates tab after the creation is complete.
3. Create New VM using template a) At the RHEV Manager Virtual Machines tab, select New Server
115 www.redhat.com

b) In the New Server Virtual Machine dialog, General tab provide the following data
• Name: (e.g., w2k8guest2)
• Description: [optional]
• Template: (e.g., w2k8_temp)
• Confirm or override the remaining entries
c) If the Data Center and Cluster are set to v2.2 compatibility, the provisioning can be changed from thin to preallocated. in the Allocation tab, provide the following:
• Provisioning: Clone
• Disk 1: Preallocated
4. The newly created VM will have a Locked Image while being instantiated. When the process is complete the VM is ready to Boot. a) At the RHEV Manager Virtual Machines tab select the newly create VM
b) Either select the Run button or the equivalent right mouse button menu option
c) Start console by selecting the Console button when active or the equivalent right mouse button menu option
d) Respond to any system prompts upon booting the VM
www.redhat.com 116

9 Deploying Applications in RHEL VMs
9.1 Deploy Application in RHEL VMsThe application is based on a server side Java exerciser. The standard means of executing this application will increasingly scale the workload depending on CPU horsepower that is available.
9.1.1 Configure Application and Deploy Using Satellite 1. Prepare Application
a) Create script (javaApp) to run application in an infinite loop
b) Create control script (javaAppd) to be placed in /etc/init.d to automatically start and optionally stop the workload
117 www.redhat.com
Figure 29

c) Adjust any application settings as desired
d) Create compressed tar file which contains entire inventory which will be delivered and installed onto target system
2. Build Application RPM
a) As root, make sure rpm-build package is installed • yum -y install rpm-build
b) As a user create directory to using for RPM creation• mkdir ~/rpmbuild• cd ~/rpmbuild• mkdir BUILD RPMS SOURCES SPECS SRPMS
c) Create ~/.rpmmacros file identifying the top of the build structure• echo "%_topdir /home/juser/rpmbuild" > ~/.rpmmacros
d) Copy compressed tar file into SOURCES directory
e) Create SPECS/javaApp.spec file referencing the previously created compressed tar file by name
Summary: A tool which will start a Java based load on the systemName: javaAppVersion: 1Release: 0License: GPLGroup: OtherSource0: javaApp.tgzBuildRoot: %{_tmppath}/%{name}-%{version}-%{release}-root#URL: BuildArch: noarch#BuildRequires:
%descriptionThe javaApp install into /usr/javaApp and create a init script tostart the load on the system upon reboot.
%preprm -rf $RPM_BUILD_DIR/javaAppzcat $RPM_SOURCE_DIR/javaApp.tgz | tar -xvf -
%installrm -rf $RPM_BUILD_ROOT/usrrm -rf $RPM_BUILD_ROOT/etcinstall -d $RPM_BUILD_ROOT/usr/javaApp/xmlinstall -d $RPM_BUILD_ROOT/etc/init.dinstall -m 755 javaApp/javaAppd $RPM_BUILD_ROOT/etc/init.dinstall -m 755 javaApp/javaApp $RPM_BUILD_ROOT/usr/javaAppinstall -m 644 javaApp/check.jar javaApp/jbb.jar javaApp/SPECjbb_config.props javaApp/SPECjbb.props $RPM_BUILD_ROOT/usr/javaAppinstall -m 644 javaApp/xml/template-document.xml javaApp/xml/jbb-document.dtd $RPM_BUILD_ROOT/usr/javaApp/xml
www.redhat.com 118

%cleanrm -rf %{buildroot}
%files %defattr(-,root,root)/etc/init.d/javaAppd/usr/javaApp/javaApp/usr/javaApp/check.jar/usr/javaApp/jbb.jar/usr/javaApp/SPECjbb_config.props/usr/javaApp/SPECjbb.props/usr/javaApp/xml/jbb-document.dtd/usr/javaApp/xml/template-document.xml
%postchkconfig --add javaAppdchkconfig javaAppd onservice javaAppd start
f) Build RPM• rpmbuild -v -bb SPECS/javaApp.spec
g) Copy RPM from RPMS/noarch/ to satellite system
3. Sign RPM
a) As root on satellite system• gpg --gen-key
• select default key type · DSA and Elgamal • specify desired key length of at least 1024 • specify and confirm that key will not expire • Specify and confirm Real Name and Email address • Enter a passphrase • Key will generate
b) List keys• gpg --list-keys --fingerprint
c) The ~/.rpmmacros file should have content telling the key type and provide the key id which can be obtained from the listing above.
%_signature gpg%_gpg_name 27D514A0
d) Sign RPM • rpm --resign javaApp-1-0.noarch.rpm
Enter the passphrase used when the key was generated
e) Save the public key to a file• gpg --export -a '<Real Name>' > public_key.txt
119 www.redhat.com

f) Place a copy of the public key to a web accessible area• cp public_key.txt /var/www/html/pub/APP-RPM-GPG-KEY
4. Create Custom Channel
a) Log into RHN Satellite as the tenant organization administrator
b) Select the Channels tab, the Manage Software Channels on the left side of the page, then the create new channel option near the top of the page providing the information below • Channel Name: (e.g., ourapps)
• Channel Label: (e.g., ourapps)
• Parent Channel: (e.g., rhel5-5-x86_64-server)
• Parent Channel Architecture: x86_64
• Channel Summary: (e.g., ourapps)
• Channel Description: In-house developed Applications
• Channel Access Control: Organization Sharing: public
• Security: GPG: GPG key URL: (e.g., http://ra-sat-vm.ra.rh.com/pub/APP-RPM-GPG-KEY )
• Security: GPG: GPG key ID: (e.g., 27D514A0)
• Security: GPG: GPG key Fingerprint: (e.g., 6DC6 F770 4EA1 BCC6 A9E2 6A4A 5DA5 3D96 27D5 14A0)
• Create Channel
c) Push package to channel: • ls java*.rpm | rhnpush -v -c ourapps --server=http://localhost/APP
-u tenant -p XXX -s
5. Configure GPG key
a) As the tenant manager on the Satellite select the following links and provide the information below: Systems -> GPG and SSL Keys -> create new stored key/cert• Description: (e.g., App-Sig) • Type: GPG • Select file to upload: (e.g., /var/www/html/pub/APP-RPM-GPG-KEY) • Create Key
6. Configure Activation Key
a) Starting at the satellite home page for the tenant administrator, select the following links: Systems -> Activation Keys -> create new key and provide the information below: • Description: (e.g., r55java-key)) • Base Channel: rhel5-5-x86_64-server• Add On Entitlements: Monitoring, Provisioning• Create Activation Key
www.redhat.com 120

b) Select the Child Channels tab and select the follow channels:• RHN Tools• ourapps
7. Configure Kickstart
a) Starting at the satellite home page for the tenant administrator, select the following links and provide the information below: Systems -> Kickstart -> Profiles -> create new kickstart profile • Label: (e.g., RHEL55java)• Base Channel: rhel5-5-x86-server• Kickstartable Tree: rhel55_x86-64• Virtualization Type: None• Select Next to accept input and proceed to next page• Select Default Download Location• Select Next to accept input and proceed to next page• Specify New Root Password and Verify • Click Finish
b) In the Kickstart Details -> Details tab• Log custom post scripts• Click Update Kickstart
c) In the Kickstart Details -> Operating System tab• Select Child Channels
• RHN Tools• ourapps
• Since this is a base only install, verify no Repositories checkboxes are selected • Click Update Kickstart
d) In the Kickstart Details -> Advanced Options tab• Verify reboot is selected• Change firewall to --enabled
e) In the System Details -> Details tab• Enable Configuration Management and Remote Commands• Click Update System Details
f) In the System Details -> Partitioning tab• Change volume group name (e.g., JavaAppVM)• Click Update
g) In the System Details -> GPG & SSL tab• select App-Sig and RHN-ORG-TRUSTED-SSL-CERT keys
121 www.redhat.com

h) In the Activation Keys tab• Select r55java-key• Click Update Activation Keys
i) In the Scripts tab• A single script is used to disable GPG checking of the custom channels since all
beta packages have not been signed; install some RHN tools, java and the javaApp; and ensure all installed software is up to date
echo "" >> /etc/yum/pluginconf.d/rhnplugin.confecho "[rhel5-5-x86_64-server-snap4]" >> /etc/yum/pluginconf.d/rhnplugin.confecho "gpgcheck=0" >> /etc/yum/pluginconf.d/rhnplugin.confecho "" >> /etc/yum/pluginconf.d/rhnplugin.confecho "[clone-2-rhn-tools-rhel-x86_64-server-5]" >> /etc/yum/pluginconf.d/rhnplugin.confecho "gpgcheck=0" >> /etc/yum/pluginconf.d/rhnplugin.conf/usr/bin/yum -y install java-1.6.0-openjdk/usr/bin/yum -y install rhn-virtualization-host /usr/bin/yum -y install osad/sbin/chkconfig osad on/usr/bin/yum -y update/usr/bin/yum -y install javaApp
8. Create RHEV VM
a) At the RHEV Manager Virtual Machines tab, select New Server
b) In the New Server Virtual Machine dialog, General tab provide the following data
• Name: (e.g., javaApp1)
• Description: [optional]
• Host Cluster: (e.g., dc1-clus1)
• Template: [blank]
• Memory Size: (e.g., 4096)
• CPU Sockets: (e.g., 1)
• CPUs Per Socket: (e.g., 4)
• Operating System: Red Hat Enterprise Linux 5.x x64
c) In the Boot Sequence tab, provide the following:
• Second Device: Network (PXE)
d) Select OK
e) Select the Configure Network Interfaces button in the Guide Me dialog and provide the following in the New Network Interface:
• Type: Red Hat VirtIO
www.redhat.com 122

f) Select the Configure Virtual Disks button in the Guide Me dialog and provide the following in the New Virtual Disk dialog:
• Size (GB): (e.g., 8)
• the defaults for the remaining entries are adequate
9. Boot VM
a) In the RHEV Manager Virtual Machines tab, select the newly created VM
b) Either select the Run button or the equivalent right mouse button menu option
c) Start console by selecting the Console button when active or the equivalent right mouse button menu option
d) After initial PXE booting the Cobbler PXE boot menu will display, select the kickstart that was previously created, (e.g., RHEL55java:22:tenants)
e) The VM will reboot when the installation is complete
9.1.2 Deploy Application Using Template 1. Create Template
a) Prepare the template system to register with the satellite upon booting
• Identify the activation key to use to register the system.
• The Activation Keys page (in Systems tab) of the satellite will list existing keys for each organization.
• Alternatively, if the system was PXE installed using satellite, the register command can be found in /root/cobbler.ks which includes the key used• grep rhnreg cobbler.ks
• The following commands will place commands in the proper script to execute on the next boot• cp /etc/rc.d/rc.local /etc/rc.d/rc.localpretemplate• echo “rhnreg_ks --force --serverUrl=https://ra-sat-
vm.ra.rh.com/XMLRPC --sslCACert=/usr/share/rhn/RHN-ORG-TRUSTED-SSL-CERT --activationkey=22-f0b9a335f83c50ef9e5af6a520430aa1” >> /etc/rc.d/rc.local
• echo “mv /etc/rc.d/rc.local.pretemplate /etc/rc.d/rc.local” >> /etc/rc.d/rc.local
b) Before shutting down the system which will be used to create a template, some level of clearing the configuration settings should be performed.
• At a minimum the hostname should not be hard-coded as this can lead to confusion when the hostname does not match the IP currently assigned. The following commands will remove the name that was set when installed, and DHCP will set the name upon boot• cp /etc/sysconfig/network /tmp• grep -v “HOSTNAME=” /tmp/network > /etc/sysconfig/network
• Alternatively, a more extensive method of clearing configuration setting is to use
123 www.redhat.com

the sys-unconfig command. sys-unconfig will cause the system to reconfigure network, authentication and several other subsystems on next boot.
c) If already not shutdown, shutdown the VM
d) At the RHEV Manager Virtual Machines tab, select the appropriate VM and either the Make Template button or right mouse button menu option
• Name: (e.g., RHEL55_temp)• Description: [optional]
While creating the template the image is locked. Confirm the template exists in the Templates tab after the creation is complete
2. Create New VM using template
a) At the RHEV Manager Virtual Machines tab, select New Server
b) In the New Server Virtual Machine dialog, General tab provide the following data
• Name: (e.g., javaApp2)
• Description: [optional]
• Template: (e.g., temp_javaApp)
• Confirm or override the remaining entries
c) If the Data Center and Cluster are set to v2.2 compatibility, the provisioning can be changed from thin to preallocated. in the Allocation tab, provide the following:
• Provisioning: Clone
• Disk 1: Preallocated
3. The newly created VM will have a Locked Image while being instantiated. When the process is complete the VM is ready to Boot.
a) At the RHEV Manager Virtual Machines tab select the newly created VM
b) Either select the Run button or the equivalent right mouse button menu option
c) Start console by selecting the Console button when active or the equivalent right mouse button menu option
www.redhat.com 124
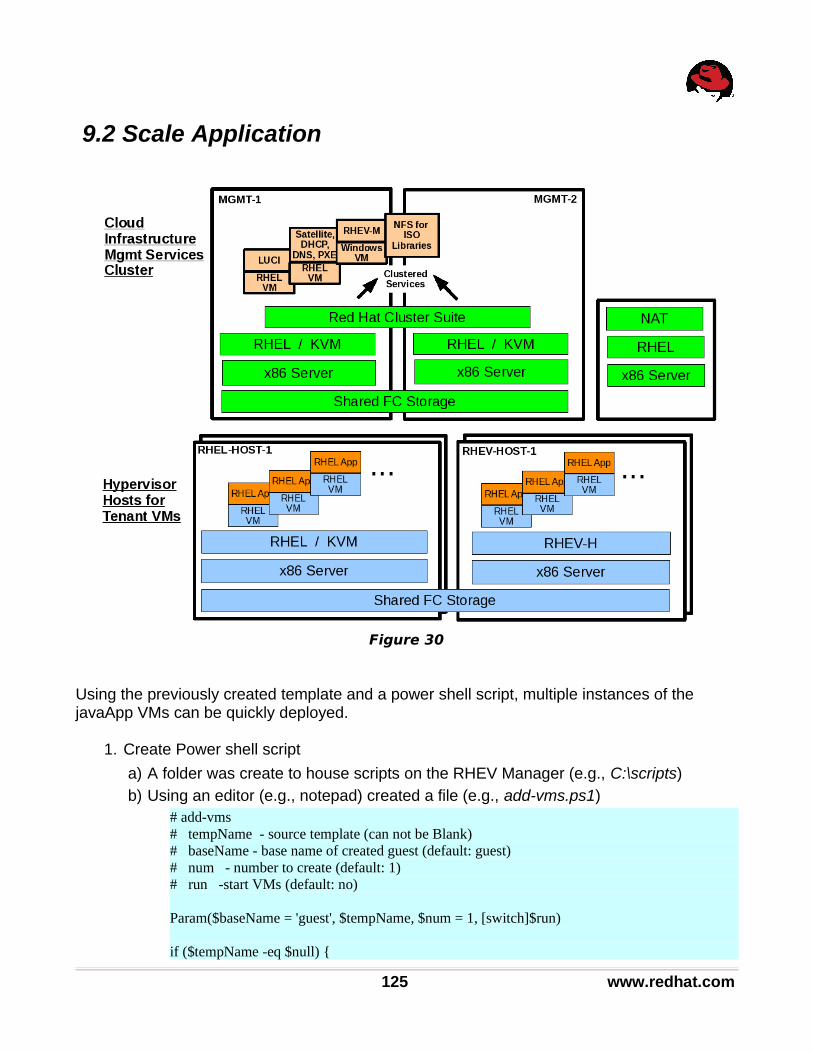
9.2 Scale Application
Using the previously created template and a power shell script, multiple instances of the javaApp VMs can be quickly deployed.
1. Create Power shell script
a) A folder was create to house scripts on the RHEV Manager (e.g., C:\scripts) b) Using an editor (e.g., notepad) created a file (e.g., add-vms.ps1)
# add-vms # tempName - source template (can not be Blank) # baseName - base name of created guest (default: guest) # num - number to create (default: 1) # run -start VMs (default: no)
Param($baseName = 'guest', $tempName, $num = 1, [switch]$run)
if ($tempName -eq $null) {
125 www.redhat.com
Figure 30

write-host "Must specify a template!" exit }
<#write-host "baseName = $baseName" write-host "tempName = $tempName" write-host " num = $num" write-host " run = $run" #>
$my_clusId = -1; $my_temp = select-template -SearchText $tempName if ($my_temp -eq $null) { Write-host "No matching templates found!" exit } elseif ($my_temp.count -gt 1) { Write-host "Too many matching templates found!" exit } elseif ($my_temp.name -eq "Blank") { Write-host "Can not use Blank template!" exit }
#search for matching basenames $matches = select-vm -searchtext "$baseName" | where {$_.name -like "$baseName*"} if ($matches -ne $null) { $measure = $matches | select-object name | foreach { $_.name.Replace("$baseName","") } | measure-object -max $start = $measure.maximum + 1 $x = $matches | select-object -first 1 $my_clusId = $x.HostClusterId } else { $start = 1 }
$id = $my_temp.HostClusterId
$clus = select-cluster | where { $_.ClusterID -eq $id } if ($clus -ne $null) { if ($clus.IsInitialized -eq $true) { $my_clusId = $id } else { write-host "Cluster of Template is not initialized!" exit } }
#loop over addsfor ($i=$start; $i -lt $start + $num; $i++) {
www.redhat.com 126

# write-host "-name $baseName$i -templateobject $my_temp -HostClusterId $my_clusId -copytemplate -Vmtype server" if ( $run -eq $true ) { $my_vm = add-vm -name $baseName$i -templateobject $my_temp -HostClusterId $my_clusId -copytemplate -Vmtype server start-vm -VmObject $my_vm } else { $my_vm = add-vm -name $baseName$i -templateobject $my_temp -HostClusterId $my_clusId -copytemplate -Vmtype server -Async } }
2. Use the script to create multiple VMs a) On the RHEV Manager select the following from the Start menu: All Programs ->
Red Hat -> RHEV Manager -> RHEV Manager Scripting Library
b) In the power shell window, log in with a superuser account• Login-User -user admin -p <password> -domain ra-rhevm-vm
c) Change to the scripts directory• cd c:/scripts
d) Call the script to asynchronously create 5 VMs named javaApp# • ./add-vms -tempName temp_javaApp -baseName javaApp -num 5
e) After the VMs finish creating, the operator can select all desired and press Run
f) Or if desired, the operator can call the script with the -run option which will start each VM as is it synchronously created• ./add-vms -tempName temp_javaApp -baseName javaApp -num 5 -run
127 www.redhat.com

10 Deploying JBoss Applications in RHEL VMs
10.1 Deploy JON Server in Management Services ClusterThe JON server will be deployed using the Satellite server to provision the Virtual Machine.
1. Create storage volume (e.g., mgmtvirt_disk) of appropriate size (@300GB). See section 6.3 for greater detail on adding and presenting LUNs from storage.
2. Create the MgmtVirtVG from the disk. a) Initialize the disk for LVM
• pvcreate /dev/mapper/mgmtvirt_disk
b) create VM• vgcreate MgmtVirtVG /dev/mapper/mgmtvirt_disk
3. Configure Activation Key
www.redhat.com 128
Figure 31

a) Log into satellite as 'manage', select the following links: Systems -> Activation Keys -> create new key• Description: (e.g., JONkey) • Base Channel: rhel5-5-x86_64-server• Add On Entitlements: Monitoring, Provisioning• Click Create Activation Key
b) Select Child Channel tab• add RHN Tools• select Update Key
4. Configure Kickstart
a) Log into satellite as 'manage', select the following links: Systems -> Kickstart -> Profiles -> create new kickstart profile• Label: RHEL55_JON_VM • Base Channel: rhel5-5-x86-server• Kickstartable Tree: rhel55_x86-64• Virtualization Type: KVM Virtualization Guest • Click Next to accept input and proceed to next page• Click Default Download Location• Click Next to accept input and proceed to next page• Specify New Root Password, Verify• Click Finish
b) Select the following links: Kickstart Details -> Details tab• Virtual Memory (in MB): 4096• Number of Virtual CPUs: 2• Virtual Disk Space (in GB): 40• Virtual Bridge: cumulus0• Log custom post scripts• Click Update Kickstart
c) Select the following links: Kickstart Details -> Operating System tab• Select RHN Tools Child Channels• Uncheck all Repositories• Click Update Kickstart
d) Select the following links: Kickstart Details -> Advanced Options tab• Verify reboot is selected• Change firewall to – enabled
e) Select the following links: System Details -> Details tab• Enable Configuration Management and Remote Commands• Click Update System Details
129 www.redhat.com

f) Select the following links: System Details -> Partitioning tab• Change myvg to JONVG• Click Update
g) Select the following link: Activation Keys tab • Select JONkey• Click Update Activation Key
h) Select Scripts tab• Script 1 installs additional software working around some unsigned packages
that exists in the Beta releaseecho "" >> /etc/yum/pluginconf.d/rhnplugin.confecho "[rhel5-5-x86_64-server-snap4]" >> /etc/yum/pluginconf.d/rhnplugin.confecho "gpgcheck=0" >> /etc/yum/pluginconf.d/rhnplugin.confyum install postgresql84 -yyum install postgresql84-server -yyum install java-1.6.0-openjdk.x86_64 -y
• Script 2 opens the firewall ports needed and updates any packages#JBoss Required Ports/bin/cp /etc/sysconfig/iptables /tmp/iptables/usr/bin/head -n -2 /tmp/iptables > /etc/sysconfig/iptables/bin/echo "-A RH-Firewall-1-INPUT -p tcp --dport 22 -m state --state NEW -j ACCEPT" >> /etc/sysconfig/iptables/bin/echo "-A RH-Firewall-1-INPUT -p tcp --dport 1098 -m state --state NEW -j ACCEPT" >> /etc/sysconfig/iptables/bin/echo "-A RH-Firewall-1-INPUT -p tcp --dport 1099 -m state --state NEW -j ACCEPT" >> /etc/sysconfig/iptables/bin/echo "-A RH-Firewall-1-INPUT -p tcp --dport 3873 -m state --state NEW -j ACCEPT" >> /etc/sysconfig/iptables/bin/echo "-A RH-Firewall-1-INPUT -p tcp --dport 4444 -m state --state NEW -j ACCEPT" >> /etc/sysconfig/iptables/bin/echo "-A RH-Firewall-1-INPUT -p tcp --dport 4445 -m state --state NEW -j ACCEPT" >> /etc/sysconfig/iptables/bin/echo "-A RH-Firewall-1-INPUT -p tcp --dport 4446 -m state --state NEW -j ACCEPT" >> /etc/sysconfig/iptables/bin/echo "-A RH-Firewall-1-INPUT -p tcp --dport 4457 -m state --state NEW -j ACCEPT" >> /etc/sysconfig/iptables/bin/echo "-A RH-Firewall-1-INPUT -p tcp --dport 8009 -m state --state NEW -j ACCEPT" >> /etc/sysconfig/iptables/bin/echo "-A RH-Firewall-1-INPUT -p tcp --dport 8080 -m state --state NEW -j ACCEPT" >> /etc/sysconfig/iptables/bin/echo "-A RH-Firewall-1-INPUT -p tcp --dport 8083 -m state --state NEW -j ACCEPT" >> /etc/sysconfig/iptables/bin/echo "-A RH-Firewall-1-INPUT -p tcp --dport 1100 -m state --state NEW -j ACCEPT" >> /etc/sysconfig/iptables/bin/echo "-A RH-Firewall-1-INPUT -p tcp --dport 1101 -m state --state NEW -j ACCEPT" >> /etc/sysconfig/iptables/bin/echo "-A RH-Firewall-1-INPUT -p tcp --dport 1102 -m state --state NEW -j ACCEPT" >> /etc/sysconfig/iptables
www.redhat.com 130

/bin/echo "-A RH-Firewall-1-INPUT -p tcp --dport 1161 -m state --state NEW -j ACCEPT" >> /etc/sysconfig/iptables/bin/echo "-A RH-Firewall-1-INPUT -p tcp --dport 1162 -m state --state NEW -j ACCEPT" >> /etc/sysconfig/iptables/bin/echo "-A RH-Firewall-1-INPUT -p tcp --dport 3528 -m state --state NEW -j ACCEPT" >> /etc/sysconfig/iptables/bin/echo "-A RH-Firewall-1-INPUT -p tcp --dport 4447 -m state --state NEW -j ACCEPT" >> /etc/sysconfig/iptables/bin/echo "-A RH-Firewall-1-INPUT -p tcp --dport 7900 -m state --state NEW -j ACCEPT" >> /etc/sysconfig/iptables/bin/echo "-A RH-Firewall-1-INPUT -p udp --dport 1102 -m state --state NEW -j ACCEPT" >> /etc/sysconfig/iptables/bin/echo "-A RH-Firewall-1-INPUT -p udp --dport 1161 -m state --state NEW -j ACCEPT" >> /etc/sysconfig/iptables/bin/echo "-A RH-Firewall-1-INPUT -p udp --dport 1162 -m state --state NEW -j ACCEPT" >> /etc/sysconfig/iptables/bin/echo "-A RH-Firewall-1-INPUT -p tcp --dport 3528 -m state --state NEW -j ACCEPT" >> /etc/sysconfig/iptables/bin/echo "-A RH-Firewall-1-INPUT -p tcp --dport 4447 -m state --state NEW -j ACCEPT" >> /etc/sysconfig/iptables/bin/echo "-A RH-Firewall-1-INPUT -p tcp --dport 7900 -m state --state NEW -j ACCEPT" >> /etc/sysconfig/iptables/bin/echo "-A RH-Firewall-1-INPUT -p udp --dport 43333 -m state --state NEW -j ACCEPT" >> /etc/sysconfig/iptables/bin/echo "-A RH-Firewall-1-INPUT -p udp --dport 45551 -m state --state NEW -j ACCEPT" >> /etc/sysconfig/iptables/bin/echo "-A RH-Firewall-1-INPUT -p udp --dport 45556 -m state --state NEW -j ACCEPT" >> /etc/sysconfig/iptables/bin/echo "-A RH-Firewall-1-INPUT -p udp --dport 45557 -m state --state NEW -j ACCEPT" >> /etc/sysconfig/iptables/bin/echo "-A RH-Firewall-1-INPUT -p udp --dport 45668 -m state --state NEW -j ACCEPT" >> /etc/sysconfig/iptables/bin/echo "-A RH-Firewall-1-INPUT -p udp --dport 45557 -m state --state NEW -j ACCEPT" >> /etc/sysconfig/iptables/bin/echo "-A RH-Firewall-1-INPUT -p udp --dport 5432 -m state --state NEW -j ACCEPT" >> /etc/sysconfig/iptables/bin/echo "-A RH-Firewall-1-INPUT -p tcp --dport 67 -m state --state NEW -j ACCEPT" >> /etc/sysconfig/iptables/bin/echo "-A RH-Firewall-1-INPUT -p tcp --dport 68 -m state --state NEW -j ACCEPT" >> /etc/sysconfig/iptables# Jon Specific Ports/bin/echo "-A RH-Firewall-1-INPUT -p tcp --dport 7443 -m state --state NEW -j ACCEPT" >> /etc/sysconfig/iptables/bin/echo "-A RH-Firewall-1-INPUT -p tcp --dport 9093 -m state --state NEW -j ACCEPT" >> /etc/sysconfig/iptables/bin/echo "-A RH-Firewall-1-INPUT -p tcp --dport 7080 -m state --state NEW -j ACCEPT" >> /etc/sysconfig/iptables/bin/echo "-A RH-Firewall-1-INPUT -p tcp --dport 2098 -m state --state NEW -j ACCEPT" >> /etc/sysconfig/iptables/bin/echo "-A RH-Firewall-1-INPUT -p tcp --dport 2099 -m state --state NEW -j ACCEPT" >>
131 www.redhat.com

/etc/sysconfig/iptables/bin/echo "-A RH-Firewall-1-INPUT -p tcp --dport 7444 -m state --state NEW -j ACCEPT" >> /etc/sysconfig/iptables/bin/echo "-A RH-Firewall-1-INPUT -p tcp --dport 7445 -m state --state NEW -j ACCEPT" >> /etc/sysconfig/iptables/bin/echo "-A RH-Firewall-1-INPUT -p tcp --dport 16163 -m state --state NEW -j ACCEPT" >> /etc/sysconfig/iptables/usr/bin/tail -2 /tmp/iptables >> /etc/sysconfig/iptables/usr/bin/yum -y update
• Script 3 downloads a script which will install and configure the JON software and then invokes the script. Refer to Appendix A.3 for contents of the rhq-install.sh script
cd /tmpwget http://ra-sat-vm.ra.rh.com/pub/kits/rhq-install.shchmod 777 ./rhq-install.sh./rhq-install.sh
5. Prepare download area a) Create /var/www/html/pub/kits on Satellite server and set permissions
• mkdir /var/www/html/pub/kits• chmod 777 /var/www/html/pub/kits
b) Create script to download needed files#Jon# In lieu of Satellite server these wgets procure the JON zips to be staged on the sat server. # Subsequent wgets in a post install script place it on new VMswget http://jon01.qa.atl2.redhat.com:8042/dist/qa/jon-server-LATEST.zipwget http://jon01.qa.atl2.redhat.com:8042/dist/release/jon/jon-license.xml
c) Execute Script• cd /var/www/html/pub/kits• ./download_jon.sh
6. Provision JON VM
a) On Satellite as 'manage', select the following links: Systems -> Monet (Mgmt Server) -> Virtualization -> Provisioning• Check button next to the RHEL55_JON_VM kickstart profile• Guest Name: ra-jon-vm• Select Advanced Configuration• Virtual Storage Path: MgmtVirtVG• Select Schedule Kickstart and Finish
b) Speed the install by logging on to monet (Mgmt Server)• Check in with Satellite and watch verbose output
• rhn_check -vv &
• If desired, watch installation• virt-viewer ra-jon-vm &
• Obtain VM MAC address (for use in cobbler system entry)
www.redhat.com 132

• grep "mac add" /etc/libvirt/qemu/ra-jon-vm.xml
c) The cobbler system entry for VM is not complete, therefore make changes on Satellite server• Determine VM's cobbler system entry (e.g., monet.ra.rh.com:2:ra-jon-vm)
• cobbler list
• Remove this entry• cobbler system remove --name=monet.ra.rh.com:2:ra-jon-vm
• Add complete entry• cobbler add system --name=ra-jon-vm.ra.rh.com
--profile=RHEL55_JON_VM:2:management --mac=00:16:3e:5e:38:1f --ip=172.20.128.45 --hostname=ra-jon-vm.ra.rh.com --dns-name=ra-jon-vm.ra.rh.com
• Synchronize cobbler and system files• cobbler sync
d) The hostname may have been set to a temporary DHCP name, change this to the new registered name by logging into VM• edit /etc/sysconfig/network, remove name after '=' in HOSTNAME entry• reboot
7. Configure VM as a cluster service a) Shutdown the VM so that when the cluster starts an instance there is only one
active• virsh shutdown ra-jon-vm
b) Copy VM definition to all cluster members• scp /etc/libvirt/qemu/ra-jon-vm.xml degas-
cl.ra.rh.com:/etc/libvirt/qemu/
c) Log into the luci home page and follow links: cluster -> ciab -> Services -> add a virtual machine service• Virtual machine name: ra-jon-vm • Path to VM configuration files: /etc/libvirt/qemu • Migration type: Live• Hypervisor: Automatic• Check Automatically start this service box• Failover Domain: ciab_fod • Recovery policy: Restart• Max restart failures: 2 • Length of time after which to forget a restart: 60
d) Test service migration• clusvcadm -M vm:ra-jon-vm -m monet-cl.ra.rh.com
e) Test access to JON console• URL: http://ra-jon-vm.ra.rh.com:7080• Login: rhqadmin / rhqadmin
133 www.redhat.com

10.2 Deploy JBoss EAP Application in RHEL VMsThe application is based on a server side Java exerciser. The standard means of executing this application will increasingly scale the workload depending on CPU horsepower that is available.
10.2.1 Deploy Using Satellite 1. Configure Activation Key
a) Starting at the satellite home page for the tenant administrator, select the following links: Systems -> Activation Keys -> create new key and provide the information below: • Description: (e.g., r55jboss-key)) • Base Channel: rhel5-5-x86_64-server• Add On Entitlements: Monitoring, Provisioning• Create Activation Key
www.redhat.com 134
Figure 32

b) Select the Child Channels tab and select the follow channels:• RHN Tools
2. Configure Kickstart
a) Starting at the satellite home page for the tenant administrator, select the following links: Systems -> Kickstart -> Profiles -> create new kickstart profile and provide the information below• Label: (e.g., RHEL55jboss)• Base Channel: rhel5-5-x86-server• Kickstartable Tree: rhel55_x86-64• Virtualization Type: None• Select Next to accept input and proceed to next page• Select Default Download Location• Select Next to accept input and proceed to next page• Specify New Root Password and Verify • Click Finish
b) In the Kickstart Details -> Details tab• Log custom post scripts• Click Update Kickstart
c) In the Kickstart Details -> Operating System tab• Select Child Channels
• RHN Tools• Since this is a base only install, verify no Repository checkboxes are selected • Click Update Kickstart
d) In the Kickstart Details -> Advanced Options tab• Verify reboot is selected• Change firewall to --enabled
e) In the System Details -> Details tab• Enable Configuration Management and Remote Commands• Click Update System Details
f) In the System Details -> Partitioning tab• Change volume group name (e.g., jbossVM)• Click Update Partitions
g) In the System Details -> GPG & SSL tab• select RHN-ORG-TRUSTED-SSL-CERT key• Update Keys
f) In the Activation Keys tab• Select r55jboss-key• Click Update Activation Keys
135 www.redhat.com
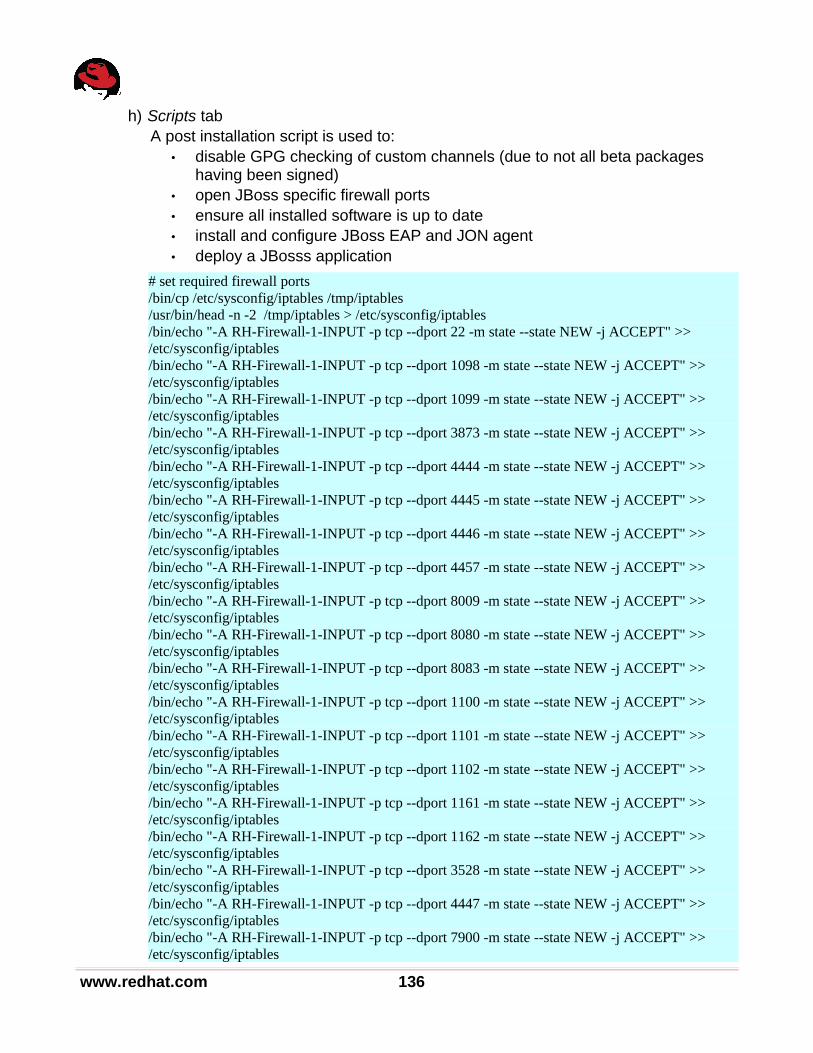
h) Scripts tabA post installation script is used to:
• disable GPG checking of custom channels (due to not all beta packages having been signed)
• open JBoss specific firewall ports• ensure all installed software is up to date• install and configure JBoss EAP and JON agent• deploy a JBosss application
# set required firewall ports/bin/cp /etc/sysconfig/iptables /tmp/iptables/usr/bin/head -n -2 /tmp/iptables > /etc/sysconfig/iptables/bin/echo "-A RH-Firewall-1-INPUT -p tcp --dport 22 -m state --state NEW -j ACCEPT" >> /etc/sysconfig/iptables/bin/echo "-A RH-Firewall-1-INPUT -p tcp --dport 1098 -m state --state NEW -j ACCEPT" >> /etc/sysconfig/iptables/bin/echo "-A RH-Firewall-1-INPUT -p tcp --dport 1099 -m state --state NEW -j ACCEPT" >> /etc/sysconfig/iptables/bin/echo "-A RH-Firewall-1-INPUT -p tcp --dport 3873 -m state --state NEW -j ACCEPT" >> /etc/sysconfig/iptables/bin/echo "-A RH-Firewall-1-INPUT -p tcp --dport 4444 -m state --state NEW -j ACCEPT" >> /etc/sysconfig/iptables/bin/echo "-A RH-Firewall-1-INPUT -p tcp --dport 4445 -m state --state NEW -j ACCEPT" >> /etc/sysconfig/iptables/bin/echo "-A RH-Firewall-1-INPUT -p tcp --dport 4446 -m state --state NEW -j ACCEPT" >> /etc/sysconfig/iptables/bin/echo "-A RH-Firewall-1-INPUT -p tcp --dport 4457 -m state --state NEW -j ACCEPT" >> /etc/sysconfig/iptables/bin/echo "-A RH-Firewall-1-INPUT -p tcp --dport 8009 -m state --state NEW -j ACCEPT" >> /etc/sysconfig/iptables/bin/echo "-A RH-Firewall-1-INPUT -p tcp --dport 8080 -m state --state NEW -j ACCEPT" >> /etc/sysconfig/iptables/bin/echo "-A RH-Firewall-1-INPUT -p tcp --dport 8083 -m state --state NEW -j ACCEPT" >> /etc/sysconfig/iptables/bin/echo "-A RH-Firewall-1-INPUT -p tcp --dport 1100 -m state --state NEW -j ACCEPT" >> /etc/sysconfig/iptables/bin/echo "-A RH-Firewall-1-INPUT -p tcp --dport 1101 -m state --state NEW -j ACCEPT" >> /etc/sysconfig/iptables/bin/echo "-A RH-Firewall-1-INPUT -p tcp --dport 1102 -m state --state NEW -j ACCEPT" >> /etc/sysconfig/iptables/bin/echo "-A RH-Firewall-1-INPUT -p tcp --dport 1161 -m state --state NEW -j ACCEPT" >> /etc/sysconfig/iptables/bin/echo "-A RH-Firewall-1-INPUT -p tcp --dport 1162 -m state --state NEW -j ACCEPT" >> /etc/sysconfig/iptables/bin/echo "-A RH-Firewall-1-INPUT -p tcp --dport 3528 -m state --state NEW -j ACCEPT" >> /etc/sysconfig/iptables/bin/echo "-A RH-Firewall-1-INPUT -p tcp --dport 4447 -m state --state NEW -j ACCEPT" >> /etc/sysconfig/iptables/bin/echo "-A RH-Firewall-1-INPUT -p tcp --dport 7900 -m state --state NEW -j ACCEPT" >> /etc/sysconfig/iptables
www.redhat.com 136

/bin/echo "-A RH-Firewall-1-INPUT -p udp --dport 1102 -m state --state NEW -j ACCEPT" >> /etc/sysconfig/iptables/bin/echo "-A RH-Firewall-1-INPUT -p udp --dport 1161 -m state --state NEW -j ACCEPT" >> /etc/sysconfig/iptables/bin/echo "-A RH-Firewall-1-INPUT -p udp --dport 1162 -m state --state NEW -j ACCEPT" >> /etc/sysconfig/iptables/bin/echo "-A RH-Firewall-1-INPUT -p tcp --dport 3528 -m state --state NEW -j ACCEPT" >> /etc/sysconfig/iptables/bin/echo "-A RH-Firewall-1-INPUT -p tcp --dport 4447 -m state --state NEW -j ACCEPT" >> /etc/sysconfig/iptables/bin/echo "-A RH-Firewall-1-INPUT -p tcp --dport 7900 -m state --state NEW -j ACCEPT" >> /etc/sysconfig/iptables/bin/echo "-A RH-Firewall-1-INPUT -p udp --dport 43333 -m state --state NEW -j ACCEPT" >> /etc/sysconfig/iptables/bin/echo "-A RH-Firewall-1-INPUT -p udp --dport 45551 -m state --state NEW -j ACCEPT" >> /etc/sysconfig/iptables/bin/echo "-A RH-Firewall-1-INPUT -p udp --dport 45556 -m state --state NEW -j ACCEPT" >> /etc/sysconfig/iptables/bin/echo "-A RH-Firewall-1-INPUT -p udp --dport 45557 -m state --state NEW -j ACCEPT" >> /etc/sysconfig/iptables/bin/echo "-A RH-Firewall-1-INPUT -p udp --dport 45668 -m state --state NEW -j ACCEPT" >> /etc/sysconfig/iptables/bin/echo "-A RH-Firewall-1-INPUT -p udp --dport 45557 -m state --state NEW -j ACCEPT" >> /etc/sysconfig/iptables/bin/echo "-A RH-Firewall-1-INPUT -p udp --dport 5432 -m state --state NEW -j ACCEPT" >> /etc/sysconfig/iptables/bin/echo "-A RH-Firewall-1-INPUT -p tcp --dport 67 -m state --state NEW -j ACCEPT" >> /etc/sysconfig/iptables/bin/echo "-A RH-Firewall-1-INPUT -p tcp --dport 68 -m state --state NEW -j ACCEPT" >> /etc/sysconfig/iptables/bin/echo "-A RH-Firewall-1-INPUT -p tcp --dport 16163 -m state --state NEW -j ACCEPT" >> /etc/sysconfig/iptables/usr/bin/tail -2 /tmp/iptables >> /etc/sysconfig/iptables
# disable GPG checking of custom channelsecho "" >> /etc/yum/pluginconf.d/rhnplugin.confecho "[rhel5-5-x86_64-server-snap4]" >> /etc/yum/pluginconf.d/rhnplugin.confecho "gpgcheck=0" >> /etc/yum/pluginconf.d/rhnplugin.confecho "" >> /etc/yum/pluginconf.d/rhnplugin.confecho "[clone-2-rhn-tools-rhel-x86_64-server-5]" >> /etc/yum/pluginconf.d/rhnplugin.confecho "gpgcheck=0" >> /etc/yum/pluginconf.d/rhnplugin.conf
# install required packages/usr/bin/yum -y install java-1.6.0-openjdk/usr/bin/yum -y install osad/sbin/chkconfig osad on/usr/bin/yum -y update
# download, install and configure JBoss EAPcd /root
137 www.redhat.com

wget http://ra-sat-vm.ra.rh.com/pub/kits/jboss-eap-default.GA.zipunzip jboss-eap-*.GA.zipcd jboss-eap*/jboss-as/server/default/conf/propscat jmx-console-users.properties | sed -e 's/# admin=admin/admin=100yard-/' > jmx-console-users.properties2mv -f jmx-console-users.properties2 jmx-console-users.properties
# download, install and configure the JON agentcd /rootwget http://ra-sat-vm.ra.rh.com/pub/kits/rhq-enterprise-agent-default.GA.jarjava -jar /root/rhq-enterprise-agent-default.GA.jar --installcd /root/rhq-agent/confline=`grep -n "key=\"rhq.agent.configuration-setup-flag" agent-configuration.xml | cut -d: -f1`before=`expr $line - 1`after=`expr $line + 1`sed -e "${after}d" -e "${before}d" agent-configuration.xml > agent-configuration.xml2\mv agent-configuration.xml2 agent-configuration.xmlsed -e '/rhq.agent.configuration-setup-flag/s/false/true/g' agent-configuration.xml > agent-configuration.xml2\mv agent-configuration.xml2 agent-configuration.xmlsed -e "/rhq.agent.server.bind-address/s/value=\".*\"/value=\"ra-jon-vm.ra.rh.com\"/g" agent-configuration.xml > agent-configuration.xml2\mv agent-configuration.xml2 agent-configuration.xmlcd /root/rhq-agent/bin\mv rhq-agent-env.sh rhq-agent-env.sh.origwget http://ra-sat-vm.ra.rh.com/pub/kits/rhq-agent-env.sh
# deploy the test appcd /root/jboss-eap*/jboss-as/server/default/deploywget http://ra-sat-vm.ra.rh.com/pub/kits/jboss-seam-booking-ds.xmlwget http://ra-sat-vm.ra.rh.com/pub/kits/jboss-seam-booking.ear
# configure JBoss and JON agent to auto startcd /etc/init.dwget http://ra-sat-vm.ra.rh.com/pub/kits/jboss-eapsed -e "s/readlink/readlink -e/g" /root/rhq-agent/bin/rhq-agent-wrapper.sh > /root/rhq-agent/bin/rhq-agent-wrapper.sh2\mv /root/rhq-agent/bin/rhq-agent-wrapper.sh2 /root/rhq-agent/bin/rhq-agent-wrapper.shln -s /root/rhq-agent/bin/rhq-agent-wrapper.sh .chmod +x jboss-eap rhq-agent-wrapper.sh/sbin/chkconfig --add jboss-eap/sbin/chkconfig --add rhq-agent-wrapper.sh/sbin/chkconfig rhq-agent-wrapper.sh on/sbin/chkconfig jboss-eap on
3. Create control script (jboss-eap) to be provisioned into /etc/init.d to automatically start and optionally stop the workload.
#!/bin/sh## jboss-eap Start jboss-eap#
www.redhat.com 138

# chkconfig: 2345 99 02# description: Starts and stops jboss-eap## Source function library.. /etc/init.d/functions
IPADDR=`ifconfig eth0 | awk -F: '/172.20/ {print $2}' |awk '{print $1}'`
start() { cd /root/jboss-eap*/jboss-as/bin nohup ./run.sh -b $IPADDR &}
stop() { cd /root/jboss-eap*/jboss-as/bin ./shutdown.sh -S -s jnp://$IPADDR:1099 -u admin -p <password>}
status_at() { cd /root/jboss-eap*/jboss-as/bin status ./run.sh}
case "$1" in start)# stop start RETVAL=$? ;; stop) stop RETVAL=$? ;; status) status_at RETVAL=$? ;; *) echo $"Usage: $0 {start|stop|status}" exit 1 ;;esac
exit $RETVAL
139 www.redhat.com

4. To run the JON agent at startup, some of the parameters in rhq-agent-env.sh will need to be enabled by removing the # symbol that appears at the start of each line. The following three parameters are mandatory, were uncommented, and set accordingly for this effort:
• RHQ_AGENT_HOME=”/root/rhq-agent” - This is the directory above the agent installation bin directory.
• RHQ_AGENT_JAVA_HOME=”/usr/lib/jvm/jre-1.6.0” - This is the directory above the bin folder for JDK.
• RHQ_AGENT_PIDFILE_DIR=/var/run - A directory writable by the user that executes the agent. It defaults to /var/run but if /var/run is not writable, use $RHQ_AGENT_HOME/bin. Note that this is only applicable for JON Agent versions 2.1.2SP1 and earlier. Modifications have been made in subsequent versions of the agent that will fall back to a writable directory.
NOTE: If #RHQ_AGENT_PIDFILE_DIR is modified and the OS is RHEL, a parallel change is required to the chkconfig "pidfile" location at the top of the rhq-agent-wrapper.sh script.
5. Copy files to the previously created /var/www/html/pub/kits directory on the Satellite server
• jboss-eap-default.GA.zip (JBoss EAP)
• jboss-eap (init.d startup file)
• rhq-enterprise-agent-default.GA.jar (JON agent)
• rhq-agent-env.sh (JON agent variable definitions)
• jboss-seam-booking-ds.xml (JBoss application)
• jboss-seam-booking.ear
6. Create RHEV VM
a) At the RHEV Manager Virtual Machines tab, select New Server
b) In the New Server Virtual Machine dialog, General tab provide the following data
• Name: (e.g., jboss1)
• Description: [optional]
• Host Cluster: (e.g., dc1-clus1)
• Template: [blank]
• Memory Size: (e.g., 2048)
• CPU Sockets: (e.g., 1)
• CPUs Per Socket: (e.g., 2)
• Operating System: Red Hat Enterprise Linux 5.x x64
c) In the Boot Sequence tab, provide the following:
• Second Device: Network (PXE)
www.redhat.com 140

d) Select OK
e) Select the Configure Network Interfaces button in the Guide Me dialog and provide the following in the New Network Interface:
• Type: Red Hat VirtIO
f) Select the Configure Virtual Disks button in the Guide Me dialog and provide the following in the New Virtual Disk dialog:
• Size (GB): (e.g., 8)
• the defaults for the remaining entries are adequate
7. Boot the JBoss VM
a) In the RHEV Manager Virtual Machines tab, select the newly created VM
b) Select either the Run button or the Run option in the right mouse button menu
c) Start console by selecting the Console button when active or the Console option in the right mouse button menu
d) After initial PXE booting the Cobbler PXE boot menu will display, select the kickstart that was previously created in Step 2 (e.g., RHEL55jboss:22:tenants).
e) The VM will reboot when the installation is complete and the JON Console Dashboard will display the VM as an Auto-Discovered resource.
141 www.redhat.com

8. For this proof of concept, the JBoss Seam hotel booking web application (a key component of the JBoss EAP) is distributed via Satellite onto each JBoss server.
www.redhat.com 142
Figure 33: JON Console Dashboard

9. The application can be tested by directing a browser to the JBoss server URL. For example,
http://172.20.130.223:8080/seam-booking/
10.2.2 Deploy Using TemplateBecause the previous section has each new JBoss VM automatically registering with JON, deployment via template will differ only in as much as the VM created to act as a model for the template will not register itself with JON so that any VMs created from this template will be able to register their own IP/port token.
143 www.redhat.com
Figure 34: JBoss Seam Framework Demo

1. Clone JBoss VM Kickstart a) Starting at the satellite home page for the tenant administrator, select the following
links: Systems -> Kickstart -> Profiles and select the profile created for the JBoss VM (e.g., jboss)
b) Select the link to clone kickstart and provide the information below• Kickstart Label: (e.g., jboss-cloner)• Click Clone Kickstart
c) Select the following links: Scripts -> Script 1 d) Modify the post install script to remove or comment out the following entries:
/sbin/chkconfig --add rhq-agent-wrapper.sh/sbin/chkconfig rhq-agent-wrapper.sh on
e) Click Update Kickstart
2. Create VM for Template
a) At the RHEV Manager Virtual Machines tab, select New Server
b) In the New Server Virtual Machine dialog, General tab provide the following data
• Name: (e.g., jbossClonerVM)
• Description: [optional]
• Host Cluster: (e.g., dc1-clus1)
• Template: [blank]
• Memory Size: (e.g., 2048)
• CPU Sockets: (e.g., 1)
• CPUs Per Socket: (e.g., 2)
• Operating System: Red Hat Enterprise Linux 5.x x64
c) In the Boot Sequence tab, provide the following:
• Second Device: Network (PXE)
d) Select OK
e) Select the Configure Network Interfaces button in the Guide Me dialog and provide the following in the New Network Interface:
• Type: Red Hat VirtIO
f) Select the Configure Virtual Disks button in the Guide Me dialog and provide the following in the New Virtual Disk dialog:
• Size (GB): (e.g., 8)
• the defaults for the remaining entries are adequate
3. Boot the JBoss VM
a) In the RHEV Manager Virtual Machines tab, select the newly created VM
b) Select either the Run button or the Run option in the right mouse button menu
www.redhat.com 144

c) Start console by selecting the Console button when active or the Console option in the right mouse button menu
d) After initial PXE booting the Cobbler PXE boot menu will display, select the kickstart that was previously created in Step 2 (e.g., jboss-cloner:22:tenants).
4. The VM will reboot when the installation is complete and the JON Console Dashboard should not display the VM as an Auto-Discovered resource.
5. Create Template a) Prepare the template system (e.g., jbossClonerVM) to register with the satellite
upon booting
• Identify the activation key to use to register the system. • The Activation Keys page (in Systems tab) of the satellite will list existing
keys for each organization
• Alternatively, if the system was PXE installed using satellite, the register command can be found in /root/cobbler.ks which includes the key used• grep rhnreg cobbler.ks
• Using the activation key acquired in the previous step, the following will place commands in the proper script to execute on the next boot:• cp /etc/rc.d/rc.local /etc/rc.d/rc.localpretemplate• echo “rhnreg_ks --force --serverUrl=https://ra-sat-
vm.ra.rh.com/XMLRPC --sslCACert=/usr/share/rhn/RHN-ORG-TRUSTED-SSL-CERT --activationkey=22-58d19ee2732c866bf9b89f39e498384e” >> /etc/rc.d/rc.local
• echo “mv /etc/rc.d/rc.local.pretemplate /etc/rc.d/rc.local” >> /etc/rc.d/rc.local
• Execute the following commands on the newly created VM:• /sbin/chkconfig --add rhq-agent-wrapper.sh• /sbin/chkconfig rhq-agent-wrapper.sh on
b) Before shutting down the system used to create a template, some level of clearing the configuration settings should be performed.
• At a minimum the hostname should not be hard-coded as this can lead to confusion when the hostname does not match the IP currently assigned. The following commands will remove the name that was set when installed, and DHCP will set the name upon boot• cp /etc/sysconfig/network /tmp• grep -v “HOSTNAME=” /tmp/network > /etc/sysconfig/network
• Alternatively, a more extensive method of clearing configuration setting is to use the sys-unconfig command. sys-unconfig will cause the system to reconfigure network, authentication and several other subsystems on next boot.
c) Shutdown the template model VM
145 www.redhat.com

d) At the RHEV Manager Virtual Machines tab, select the appropriate VM and either the Make Template button or right mouse button menu option
• Name: (e.g., jboss_template)• Description: [optional]
While creating the template the image is locked. Confirm the template exists in the Templates tab after the creation is complete
6. Create a new VM using the template
a) At the RHEV Manager Virtual Machines tab, select New Server
b) In the New Server Virtual Machine dialog, General tab provide the following data
• Name: (e.g., jboss2)
• Description: [optional]
• Template: (e.g., jboss_template)
• Confirm or override the remaining entries
c) If the Data Center and Cluster are set to v2.2 compatibility, the provisioning can be changed from thin to preallocated. in the Allocation tab, provide the following:
• Provisioning: Clone
• Disk 1: Preallocated
7. The newly created VM will have a Locked Image while being instantiated. When the process is complete the VM is ready to Boot.
8. The newly created VM will have a Locked Image while being instantiated.
9. When the process is complete the cloned VM is ready to boot.
a) At the RHEV Manager Virtual Machines tab, select the newly created VM
b) Either select the Run button or the equivalent right mouse button menu option
c) Start console by selecting the Console button when active or the equivalent right mouse button menu option
d) With the JON agent running, the JON Console Dashboard should display the newly cloned VM as an Auto-Discovered resource.
www.redhat.com 146

10.3 Scale JBoss EAP Application
Using the previously created template and a power shell script, multiple instances of the JBoss VM can be rapidly deployed.
1. Use the powershell script created in Section 9.2 to create multiple VMs:
a) On the RHEV Manager select the following from the Start menu: All Programs -> Red Hat -> RHEV Manager -> RHEV Manager Scripting Library
b) In the power shell window, log in with a superuser account• Login-User -user admin -p <password> -domain ra-rhevm-vm
c) Change to the scripts directory• cd c:/scripts
d) Call the script to asynchronously create 5 VMs named jboss# • ./add-vms -tempName jboss_template -baseName jboss -num 5
e) After the VMs finish creating, the operator can select any or all the desired VMs and
147 www.redhat.com
Figure 35

press Run
f) Or if desired, the operator can call the script with the -run option which will start each VM as is it synchronously created• ./add-vms -tempName jboss_template -baseName jboss -num 5 -run
www.redhat.com 148
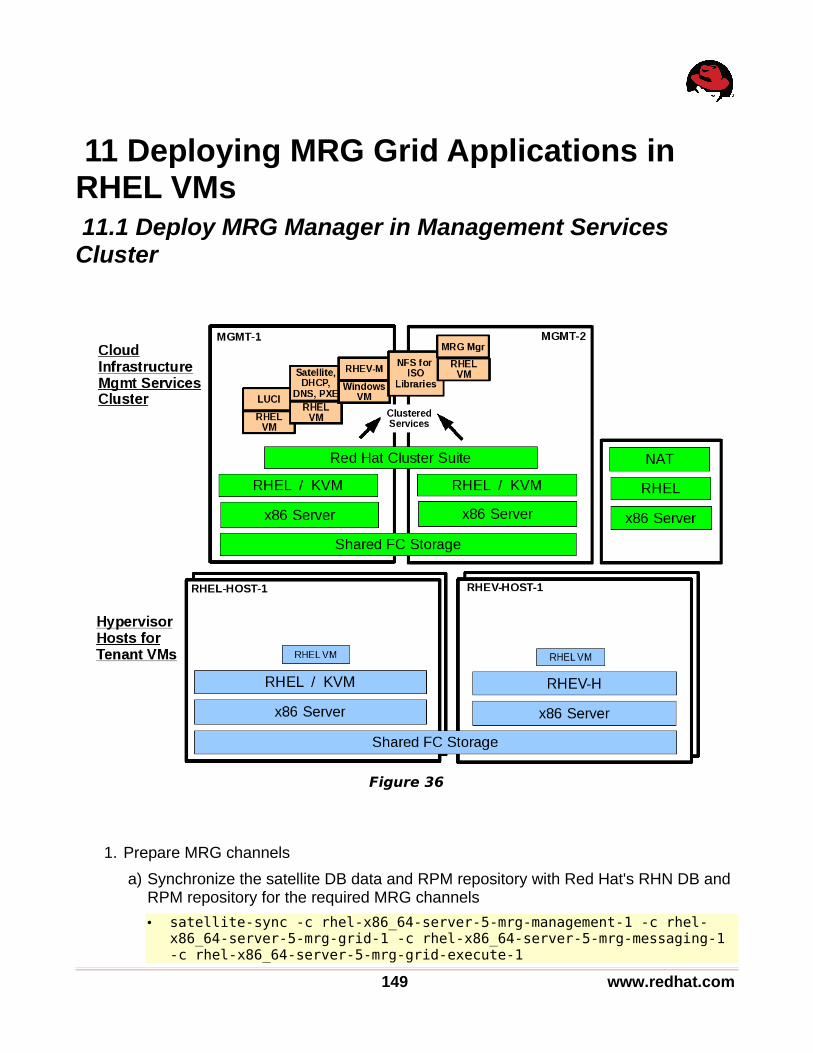
11 Deploying MRG Grid Applications in RHEL VMs 11.1 Deploy MRG Manager in Management Services Cluster
1. Prepare MRG channels
a) Synchronize the satellite DB data and RPM repository with Red Hat's RHN DB and RPM repository for the required MRG channels
• satellite-sync -c rhel-x86_64-server-5-mrg-management-1 -c rhel-x86_64-server-5-mrg-grid-1 -c rhel-x86_64-server-5-mrg-messaging-1 -c rhel-x86_64-server-5-mrg-grid-execute-1
149 www.redhat.com
Figure 36

b) Clone the above channels under the custom Red Hat Enterprise Linux 5.5 base channel. Starting at Satellite Home, select the following links for each channel above: Channels -> Manage Software Channels -> clone channel
◦ Clone From: (e.g rhel-x86_64-server-5-mrg-management-1)◦ Clone: Current state of the channel (all errata)◦ Click Create Channel
• In the displayed Details page:◦ Parent Channel: (e.g., rhel5-5-x86_64-server)◦ Channel Name: use provided or specify name◦ Channel Label: use provided or specify label◦ Base Channel Architecture: x86_64◦ Channel Summary: use provided or specify summary◦ Enter any optional (non asterisk) information as desired◦ Click Create Channel
• On re-displayed Details page:◦ Organizational Sharing: Public
2. Prepare the required Configuration Channels a) Refer to Appendix A.4 for details on each of the files for each channel. Use this
information for access to the files during the channel creation. Using the information in the Appendix, the files can be downloaded to a holding area and have any required modifications applied, readying them for upload into the configuration channels. Another option for all except the largest file which does not have its contents listed, the file could be created by copying the contents from the appendix.
b) For each channel listed, create the configuration channel by selecting the Configuration tab -> the Configuration Channels link of the left side of the page -> create new config channel. After specifying each channel's Name, Label, and Description, add the file(s) where all non-default values have been specified.
• sesame• Filename/Path: /etc/sesame/sesame.conf
• cumin• Filename/Path: /etc/cumin/cumin.conf
• postgresql• Filename/Path: /var/lib/pgsql/data/pg_hba.conf
• Ownership: User name: postgres• Ownership: Group name: postgres• File Permissions Mode: 600
• mrgdeploy• Filename/Path: /root/mrgdeploy.sh
• File Permissions Mode: 744
• condor_manager
• Filename/Path: /etc/condor/condor_config
www.redhat.com 150
• Filename/Path: /home/mrgmgr/CreateNewNode.sh• Ownership: User name: mrgmgr• Ownership: Group name: mrgmgr• File Permissions Mode: 744
• Filename/Path: /home/mrgmgr/DestroyLastNode.sh• Ownership: User name: mrgmgr• Ownership: Group name: mrgmgr• File Permissions Mode: 744
• Filename/Path: /home/mrgmgr/SatelliteRemoveLast.pl• Ownership: User name: mrgmgr• Ownership: Group name: mrgmgr• File Permissions Mode: 744
• Filename/Path: /var/lib/condor/condor_config.local
• ntp• Filename/Path: /etc/ntp.conf
3. If not previously configured, create storage area for virtual machines.
a) Create storage volume (e.g., mgmtvirt_disk) of appropriate size (@300GB). See section 6.3 for greater detail on adding and presenting LUNs from storage.
b) Create the MgmtVirtVG from the disk.• Initialize the disk for LVM
• pvcreate /dev/mapper/mgmtvirt_disk
• create VM• vgcreate MgmtVirtVG /dev/mapper/mgmtvirt_disk
4. Configure Activation Key
a) Log into satellite as 'manage', select the following links: Systems -> Activation Keys -> create new key• Description: (e.g., coe-mrg-gridmgr) • Base Channel: rhel5-5-x86_64-server• Add On Entitlements: Monitoring, Provisioning• Create Activation Key
b) In the Details tab• Select the Configuration File Deployment checkbox• Click Update Activation Key
c) Select Child Channel tab• add RHN Tools and all the cloned MRG channels• Select Update Key
151 www.redhat.com

d) Select the Packages tab and enter the following packagesqpiddsesameqmfcondorcondor-qmf-pluginscuminperl-Frontier-RPCrhncfgrhncfg-clientrhncfg-actionsntppostgresqlpostgresql-server
e) Select the Configuration and Subscribe to Channels tabs• Select all the configuration channels create in step 2 and select Continue• None of the channels had files in common so accept the presented order by
selecting Update Channel Rankings
5. Configure Kickstart
a) Log into satellite as 'manage', select the following links: Systems -> Kickstart -> Profiles -> create new kickstart profile• Label: (e.g. coe-mrg-gridmgr)• Base Channel: rhel5-5-x86-server• Kickstartable Tree: rhel55_x86-64• Virtualization Type: KVM Virtualization Guest • Click Next to accept input and proceed to next page• Click Default Download Location• Click Next to accept input and proceed to next page• Specify New Root Password, Verify, and Finish
b) Select the following links: Kickstart Details -> Details tab• Virtual Memory (in MB): 1024• Number of Virtual CPUs: 1• Virtual Disk Space (in GB): 20• Virtual Bridge: cumulus0• Log custom post scripts• Click Update Kickstart
www.redhat.com 152

c) Select the following links: Kickstart Details -> Operating System tab• Select RHN Tools and cloned MRG Child Channels• Uncheck all Repositories• Click Update Kickstart
d) Select the following links: Kickstart Details -> Advanced Options tab• Verify reboot is selected
e) Select the following links: System Details -> Details tab• Enable Configuration Management and Remote Commands• Click Update System Details
f) Select the following links: System Details -> Partitioning tab• Change myvg to MRGVG, • Click Update
g) Select the following link: Activation Keys tab • Select coe-mrg-gridmgr• Click Update Activation Keys
h) Select Scripts tab• This script performs the necessary configuration for the MRG Management
Console. #Turn on Serviceschkconfig sesame onchkconfig postgresql onchkconfig condor onchkconfig qpidd onchkconfig cumin onchkconfig ntpd on
#Postgresql funkinessrm -rf /var/lib/pgsql/datasu - postgres -c "initdb -D /var/lib/pgsql/data"service postgresql restartservice qpidd start
#Add mrgmgr useruseradd mrgmgr
6. Provision MRG Management VM a) On Satellite as 'manage', select the following links: Systems -> Monet (Mgmt
Server) -> Virtualization -> Provisioning• Check button next to the coe-mrg-gridmgr kickstart profile• Guest Name: ra-mrggrid-vm• Select Advanced Configuration• Virtual Storage Path: MgmtVirtVG• Select Schedule Kickstart and Finish
153 www.redhat.com

b) Speed the install by logging on to monet (Mgmt Server)• Check in with Satellite and watch verbose output
• rhn_check -vv &
• If desired, watch installation• virt-viewer ra-jon-vm &
• Obtain VM MAC address (for use in cobbler system entry)• grep "mac add" /etc/libvirt/qemu/ra-jon-vm.xml
c) The cobbler system entry for VM is not complete, therefore make changes on Satellite server• Discover VM's cobbler system entry (e.g., monet.ra.rh.com:2:ra-jon-vm)
• cobbler list
• Remove this entry• cobbler system remove --name=monet.ra.rh.com:2:ra-mrggrid-vm
• Add complete entry• cobbler add system --name=ra-mrggrid-vm.ra.rh.com
--profile=coe-mrg-gridmgr:2:management --mac=00:16:3e:20:75:67 --ip=172.20.128.46 --hostname=ra-mrggrid-vm.ra.rh.com --dns-name=ra-mrggrid-vm.ra.rh.com
• Synchronize cobbler and system files• cobbler sync
d) The hostname may have been set to a temporary DHCP name, change this to the new registered name by logging into VM• edit /etc/sysconfig/network, remove name after '=' in HOSTNAME entry• reboot
7. Configure VM as a cluster service a) Shutdown the VM so that when the cluster starts an instance there is only one
active• virsh shutdown ra-mrggrid-vm
b) Copy VM definition to all cluster members• scp /etc/libvirt/qemu/ra-mrggrid-vm.xml degas-
cl.ra.rh.com:/etc/libvirt/qemu/
c) Log into the luci home page and follow links: cluster -> ciab -> Services -> add a virtual machine service• Virtual machine name: ra-mrggrid-vm • Path to VM configuration files: /etc/libvirt/qemu • Migration type: Live• Hypervisor: Automatic• Check Automatically start this service box• Failover Domain: ciab_fod • Recovery policy: Restart• Max restart failures: 2 • Length of time after which to forget a restart: 60
www.redhat.com 154

d) Test service migration• clusvcadm -M vm:ra-mrggrid-vm -m monet-cl.ra.rh.com
e) Invoke the setup script on ra-mrggrid-vm• ssh root@ra-mrggrid-vm• /root/mrgdeploy.sh
f) Test access to MRG Manager Console• URL: http://ra-mrggrid-vm.ra.rh.com:45672• Login: admin / <password>
8. Install Cygwin on the RHEV Management Platform a) On the ra-rhevm-vm system, navigate to the Cygwin home page,
http://www.cygwin.com
b) Select the Install Cygwin now link locate toward the top right side of the page
c) Select Run in the download dialog
d) Select Next int the Cygwin Setup Screen
155 www.redhat.com
Figure 37: Cygwin Home Page
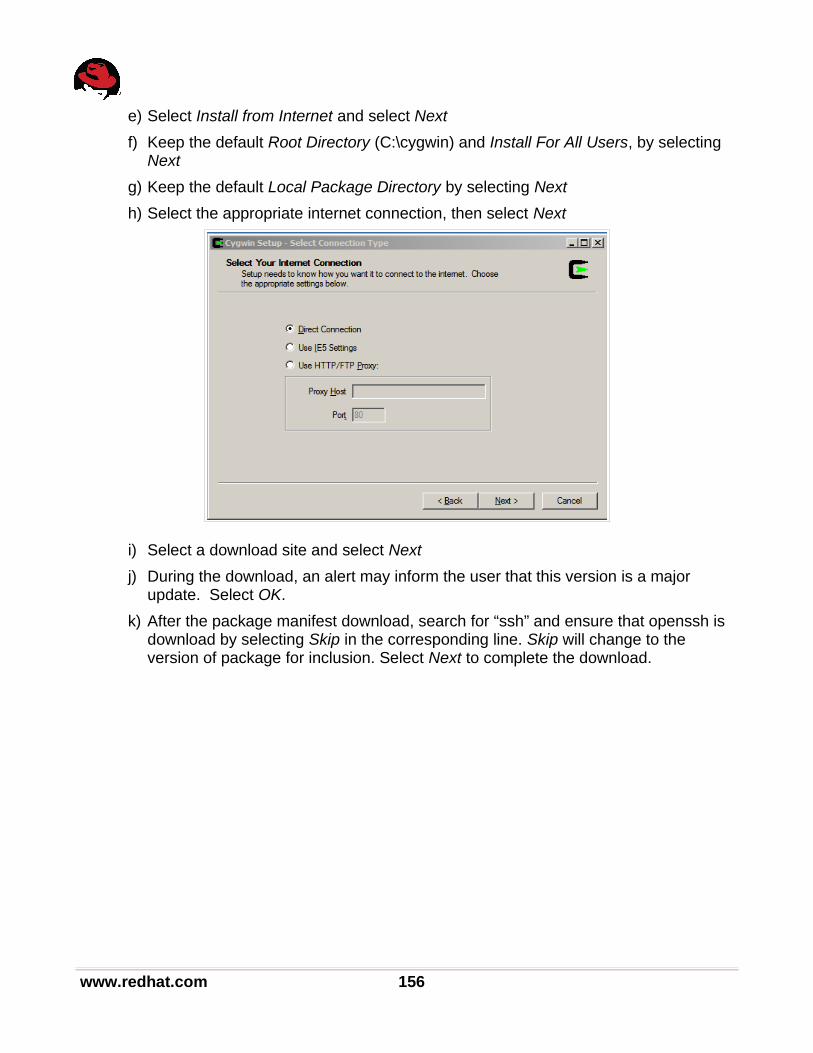
e) Select Install from Internet and select Next
f) Keep the default Root Directory (C:\cygwin) and Install For All Users, by selecting Next
g) Keep the default Local Package Directory by selecting Next
h) Select the appropriate internet connection, then select Next
i) Select a download site and select Next
j) During the download, an alert may inform the user that this version is a major update. Select OK.
k) After the package manifest download, search for “ssh” and ensure that openssh is download by selecting Skip in the corresponding line. Skip will change to the version of package for inclusion. Select Next to complete the download.
www.redhat.com 156

l) After the packages install, complete the installation by selecting Finish.
157 www.redhat.com

m)The cygwin bin directory should be added to the system PATH variable. Start the Control Panel -> System and Security -> System -> Advances system settings -> Environment Variables ... -> Path -> Edit... -> add “C:\cygwin\bin” at the end -> select OK
www.redhat.com 158

n) Launch the cygwin shell by selecting Run as administrator in the right mouse button menu from the desktop icon.
o) Invoke the following commands in the Cygwin shell, answering yes and providing desired user name and passwords• ssh-host-config• mkpasswd -cl > /etc/passwd• mkgroup –l > /etc/group
159 www.redhat.com
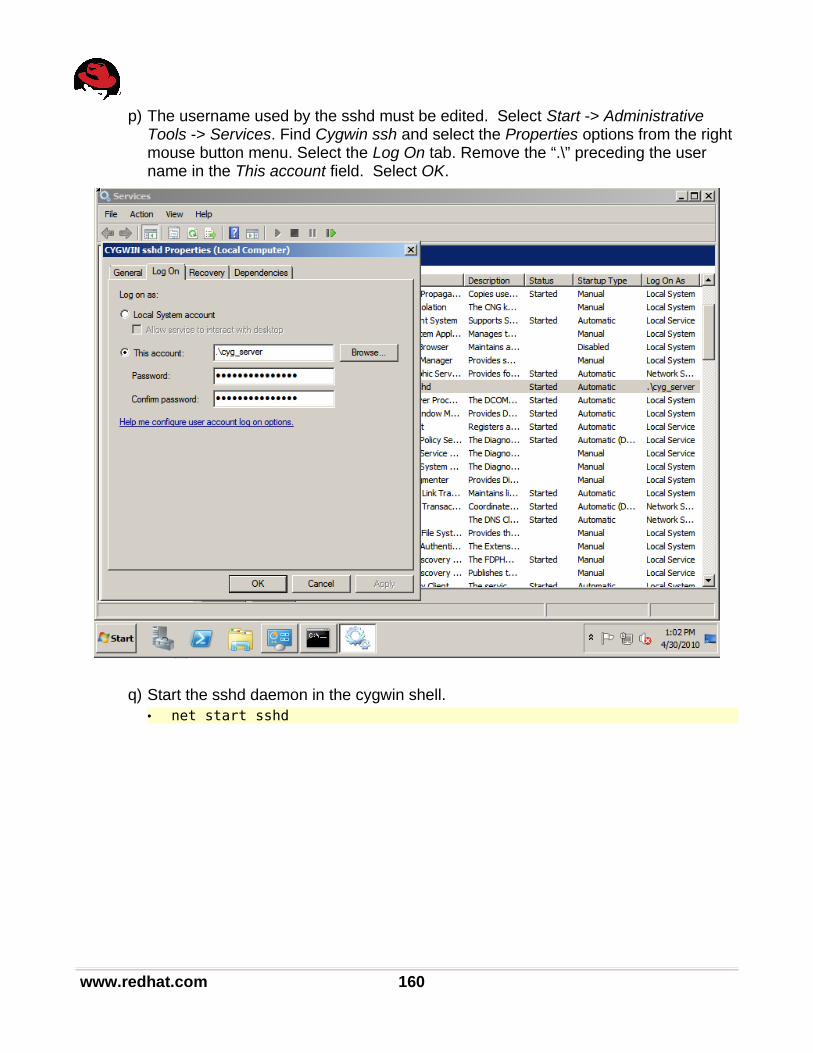
p) The username used by the sshd must be edited. Select Start -> Administrative Tools -> Services. Find Cygwin ssh and select the Properties options from the right mouse button menu. Select the Log On tab. Remove the “.\” preceding the user name in the This account field. Select OK.
q) Start the sshd daemon in the cygwin shell.• net start sshd
www.redhat.com 160

11.2 Deploy MRG Grid in RHEL VMs
1. Prepare the required Configuration Channels (condor_execute) a) Refer to Appendix A.4 for details on each of the files for each channel. Use this
information for access to the files during the channel creation. Using the information in the Appendix, the files can be downloaded to a holding area and have any required modifications applied, readying them for upload into the configuration channels. Another option for all except the largest file which does not have its contents listed, the file could be created by copying the contents from the appendix.
b) For each channel listed, create the configuration channel by selecting the Configuration tab -> the Configuration Channels link of the left side of the page -> create new config channel. After specifying each channel's Name, Label, and Description, add the file(s) where all non-default values have been specified.
• condor_execute• Filename/Path: /etc/sesame/sesame.conf
161 www.redhat.com
Figure 38
• Filename/Path: /etc/condor/condor_config
• Filename/Path: /var/lib/condor/condor_config.local
• ntp• Filename/Path: /etc/ntp.conf
2. Configure Activation Key
a) Log into satellite as 'tenant', select the following links: Systems -> Activation Keys -> create new key• Description: (e.g., coe-mrg-gridexec) • Base Channel: rhel5-5-x86_64-server• Add On Entitlements: Monitoring, Provisioning• Create Activation Key
b) In the Details tab• Select the Configuration File Deployment checkbox• Click Update Activation Key
c) Select Child Channel tab• add RHN Tools and all the cloned MRG channels• Select Update Key
d) Select the Packages tab and enter the following packagesqpiddcondorcondor-qmf-pluginsrhncfgrhncfg-clientrhncfg-actionsntp
e) Select the Configuration and Subscribe to Channels tabs• Select all the configuration channels create in step 2 and select Continue• None of the channels had files in common so accept the presented order by
selecting Update Channel Rankings
3. Configure Kickstart
a) Log into satellite as 'tenant', select the following links: Systems -> Kickstart -> Profiles -> create new kickstart profile
• Label: (e.g. coe-mrg-gridexec)• Base Channel: rhel5-5-x86-server• Kickstartable Tree: rhel55_x86-64• Virtualization Type: none• Click Next to accept input and proceed to next page• Click Default Download Location• Click Next to accept input and proceed to next page
www.redhat.com 162

• Specify New Root Password, Verify, and Finish
b) Select the following links: Kickstart Details -> Operating System tab• Select RHN Tools and cloned MRG Child Channels• Uncheck all Repositories• Click Update Kickstart
c) Select the following links: Kickstart Details -> Advanced Options tab• Verify reboot is selected
d) Select the following links: System Details -> Details tab• Enable Configuration Management and Remote Commands• Click Update System Details
e) Select the following links: System Details -> Partitioning tab• Change myvg to MRGVG, • Click Update
f) Select the following link: Activation Keys tab • Select coe-mrg-gridexec• Click Update Activation Keys
g) Select Scripts tab• This script performs the necessary configuration for the MRG Management
Console. chkconfig condor onchkconfig qpidd oncondor_status -anychkconfig sesame onchkconfig ntpd on
4. Deploy scripts on RHEV Manager and MRG Grid Manager
a) On the RHEV Manager as the admin user download http://people.redhat.com/jlabocki/GOAC/ciabRhevScripts.tar.gz
b) Extract the contents of ciabRhevScripts.tar.gz in C:\Program Files (x86)\RedHat\RHEVManager\RHEVM Scripting Library
c) Edit the contents of ciabCreateNewVm.ps1 to match your environments credentials and configuration
d) On the MRG Manager as the mrgmgr user download http://people.redhat.com/jlabocki/GOAC/ciabMRGScripts.tar.gz
e) Extract the contents of ciabMRGScripts.tar.gz in /home/mrgmgr
f) Edit the contents of CiabCreateNewVm.sh to match your environments credentials and configuration
5. Create VM to be used for template
a) At the RHEV Manager Virtual Machines tab, select New Server
163 www.redhat.com

b) In the New Server Virtual Machine dialog, General tab provide the following data
• Name: (e.g., mrgexectemplate)
• Description: [optional]
• Host Cluster: (e.g., dc1-clus1)
mrgTemplate: [blank]
• Memory Size: (e.g., 512)
• CPU Sockets: (e.g., 1)
• CPUs Per Socket: (e.g., 1)
• Operating System: Red Hat Enterprise Linux 5.x x64
c) In the Boot Sequence tab, provide the following:
• Second Device: Network (PXE)
d) Select OK
e) Select the Configure Network Interfaces button in the Guide Me dialog and provide the following in the New Network Interface:
• Type: Red Hat VirtIO
f) Select the Configure Virtual Disks button in the Guide Me dialog and provide the following in the New Virtual Disk dialog:
• Size (GB): (e.g., 10)
• the defaults for the remaining entries are adequate
6. Boot the Grid Exec VM
a) In the RHEV Manager Virtual Machines tab, select the newly created VM
b) Select either the Run button or the Run option in the right mouse button menu
c) Start console by selecting the Console button when active or the Console option in the right mouse button menu
d) After initial PXE booting the Cobbler PXE boot menu will display, select the kickstart that was previously created in Step 2 (e.g., coe-mrg-gridexec:22:tenants).
7. Prepare MRG Grid Exec Node VM for template
a) Prepare the template system (e.g. mrgexectemplate) to register with the satellite upon booting
• Identify the activation key to use to register the system. • The Activation Keys page (in Systems tab) of the satellite will list existing
keys for each organization
• Alternatively, if the system was PXE installed using satellite, the register command can be found in /root/cobbler.ks which includes the key used• grep rhnreg cobbler.ks
• Using the activation key acquired in the previous step, the following will place commands in the proper script to execute on the next boot:
www.redhat.com 164

• cp /etc/rc.d/rc.local /etc/rc.d/rc.localpretemplate• echo “rhnreg_ks --force --serverUrl=https://ra-sat-
vm.ra.rh.com/XMLRPC --sslCACert=/usr/share/rhn/RHN-ORG-TRUSTED-SSL-CERT –activationkey=22-a570cc62867470dc9df44e0335bc1e22” >> /etc/rc.d/rc.local
• echo “mv /etc/rc.d/rc.local.pretemplate /etc/rc.d/rc.local” >> /etc/rc.d/rc.local
b) Before shutting down the system used to create a template, some level of clearing the configuration settings should be performed.
• At a minimum the hostname should not be hard-coded as this can lead to confusion when the hostname does not match the IP currently assigned. The following commands will remove the name that was set when installed, and DHCP will set the name upon boot• cp /etc/sysconfig/network /tmp• grep -v “HOSTNAME=” /tmp/network > /etc/sysconfig/network
• Alternatively, a more extensive method of clearing configuration setting is to use the sys-unconfig command. sys-unconfig will cause the system to reconfigure network, authentication and several other subsystems on next boot.
c) If already not shutdown, shutdown the template model VM
d) At the RHEV Manager Virtual Machines tab, select the appropriate VM and either the Make Template button or right mouse button menu option
• Name: (e.g., mgrexectemplate)• Description: [optional]
e) While creating the template the image is locked. Confirm the template exists in the Templates tab after the creation is complete
f) Remove the network from the template
• Select the Templates tab
• Choose the created template
• Choose the Network Interfaces tab it he Details pane
• Select eth0
• Select Remove
8. Creating a MRG Grid virtual machine resource
a) Login into the MRG Grid Manager as the “mrgmgr” user
b) Execute the following: • ./CiabCreateNewVm.sh <templatename>
Which performs the following:
• Determining the name of the last MRG Grid execute node running on RHEV.
• Registering a new system hostname, mac address, and IP address with Satellite via cobbler
165 www.redhat.com

• Creating a new virtual machine in the RHEV Manager
• Installing MRG Grid on the new virtual machine
11.3 Deploy MRG Grid Application
1. Create the 'admin' user on ra-mrggrid-vm
• useradd admin2. Create a job file, /home/admin/jobfile, in the admin users home directory
#Test JobExecutable = /bin/ddUniverse = vanilla#input = test.dataoutput = loop.outerror = loop.errorLog = loop.logargs = if=/dev/zero of=/dev/null should_transfer_files = YESwhen_to_transfer_output = ON_EXIT
www.redhat.com 166
Figure 39

queue3. Submit the job as the admin user
• condor_submit /home/admin/jobfile4. Verify the job is running
• condor_q• condor_status -any
5. Log into the MRG Management Console, http://ra-mrggrid-vm.ra.rh.com:45672, and view the job statistics
11.4 Scale MRG Grid Application
To be documented.
167 www.redhat.com
Figure 40

12 Cloud End-User Use-Case ScenariosThe following are examples of the types of end-user use-cases that will be implemented to demonstrate the capabilities of the cloud infrastructure described in previous sections.
Key participants in these use cases are:• Service Provider (SP) • Service Consumers (SC1 and SC2)
Use Cases:
1. SP: Create two users (SC1, SC2) via the admin portal: Using the self-service portal, create two users to mimic two customers accessing the cloud.
2. SC1: Create instance of the Service 1: Instantiate virtual machines that make up the Service 1 including IP address and links to storage.
3. SC1: Monitor state of Service 1: Observe the state of the newly created VMs.
4. SC1: Scale-out Service 1: Add an app front-end VMs and add to load-balance pool. Test for application scalability.
5. SC2: Create instance of the Service 2: Instantiate VMs that make up the Service 2 including IP address and links to storage.
6. SC2: Monitor state of Service 2: Observe the state of the newly created VMs.
7. SC1: Terminate an app front-end VM: Remove from load-balance pool and terminate a VM and observe for results.
8. SP: Add bare-metal capacity to existing cluster: Add a new server to an existing cluster.
9. SC1, SC2: Generate utilization reports: End users requesting for resource utilization report of their usage.
10. SP: Generate utilization reports: Create reports either via a GUI or by log files.
• SP: Balance utilization for power (or other) metrics and adjust workload placement policy
11. SC1, SC2: Scale-out Service 1, Service 2: Add an app front-end VM and add to load-balance pool. Test for application scalability on both Service 1 and Service 2.
12. SP: Fail a server; Ensure that the cluster is still operational.
13. SC1, SC2: Shutdown Service 1, Service 2: End the application service and remote access to users SC1 and SC2.
14. SP: Generate utilization reports: Create resource utilization report of SC1 and SC2.
www.redhat.com 168

13 References1. The NIST Definition of Cloud Computing
Version 1507 October 2009http://csrc.nist.gov/groups/SNS/cloud-computing/cloud-def-v15.doc
2. Above the Clouds: A Berkley View of Cloud ComputingTechnical Report No. UCB/EECS-2009-28Department of Electrical Engineering and Computer ScienceUniversity of California at Berkeleyhttp://www.eecs.berkeley.edu/Pubs/TechRpts/2009/EECS-2009-28.pdf
3. Cloud Computing Use Cases White Paper(A white paper produced by the Cloud Computing Use Case Discussion Group)Version 2.030 October 2009http://groups.google.com/group/cloud-computing-use-cases
4. Configuring and Managing a Red Hat Clusterhttp://www.redhat.com/docs/en-US/Red_Hat_Enterprise_Linux/5.2/html/Cluster_Administration/index.html
5. Red Hat Enterprise Virtualization - Administration Guide http://www.redhat.com/docs/en-US/Red_Hat_Enterprise_Virtualization/Red_Hat_Enterprise_Virtualization_for_Servers/2.1/pdf/RHEV_for_Server_Administration_Guide/Administration_Guide.pdf
6. Red Hat Enterprise Virtualization - Installation Guide http://www.redhat.com/docs/en-US/Red_Hat_Enterprise_Virtualization/Red_Hat_Enterprise_Virtualization_for_Servers/2.1/pdf/RHEV_for_Servers_Installation_Guide/Installation_Guide.pdf
7. Red Hat Enterprise Virtualization - API Guide http://www.redhat.com/docs/en-US/Red_Hat_Enterprise_Virtualization/Red_Hat_Enterprise_Virtualization_for_Servers/2.1/pdf/API_Guide/API_Guide.pdf
169 www.redhat.com
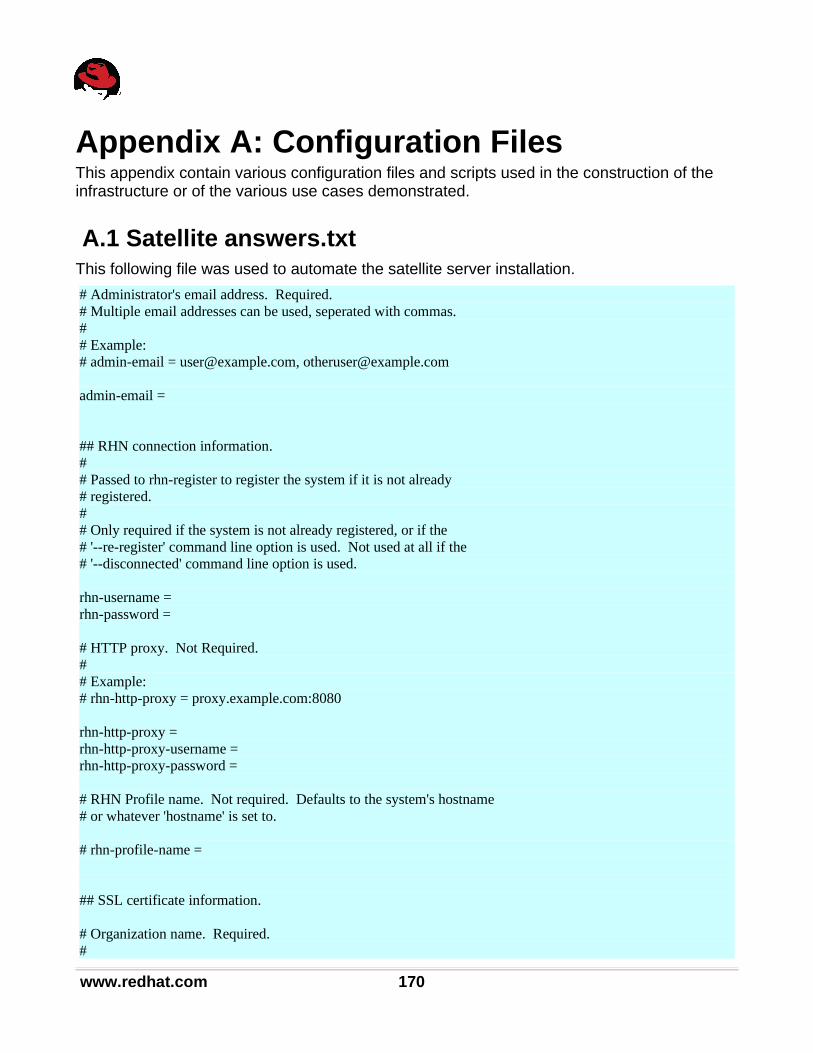
Appendix A: Configuration FilesThis appendix contain various configuration files and scripts used in the construction of the infrastructure or of the various use cases demonstrated.
A.1 Satellite answers.txtThis following file was used to automate the satellite server installation.
# Administrator's email address. Required.# Multiple email addresses can be used, seperated with commas.## Example: # admin-email = [email protected], [email protected]
admin-email =
## RHN connection information.## Passed to rhn-register to register the system if it is not already# registered.## Only required if the system is not already registered, or if the# '--re-register' command line option is used. Not used at all if the# '--disconnected' command line option is used.
rhn-username =rhn-password =
# HTTP proxy. Not Required.## Example:# rhn-http-proxy = proxy.example.com:8080
rhn-http-proxy =rhn-http-proxy-username =rhn-http-proxy-password =
# RHN Profile name. Not required. Defaults to the system's hostname# or whatever 'hostname' is set to.
# rhn-profile-name =
## SSL certificate information.
# Organization name. Required.#
www.redhat.com 170

# Example:# ssl-set-org = Riboflavin, Inc.
ssl-set-org = Red Hat
# The unit within the organization that the satellite is assigned to.# Not required.## Example:# ssl-set-org-unit = Information Systems Department
ssl-set-org-unit = Reference Architecture
# Location information for the SSL certificates. Required.## Example:# ssl-set-city = New York# ssl-set-state = NY# ssl-set-country = US
ssl-set-city = Westfordssl-set-state = MAssl-set-country = US
# Password for CA certificate. Required. Do not lose or forget this# password!## Example:# ssl-password = c5esWL7s
ssl-password = XXXXXXX
## Database connection information.## Required if the database is an external (not embedded) database.
# db-user =# db-password =# db-host =# db-sid =# db-port = 1521# db-protocol = TCP
## The location (absolute path) of the satellite certificate file.# Required.## Example:# satellite-cert-file = /tmp/satcert.cert
171 www.redhat.com

satellite-cert-file = /pub/cloud_stuff/redhat-internal-5.3.cert
## Apache conf.d/ssl.conf virtual host definition reconfiguration## A value of "Y" or "y" here will cause the installer to make a numbered# backup of the system's existing httpd/conf.d/ssl.conf file and replace# the original with one that's set up properly to work with Spacewalk.# The recommended answer is Y## ssl-config-sslvhost =ssl-config-sslvhost = Y
# *** Options below this line usually don't need to be set. ***
# The Satellite server's hostname. This must be the working FQDN of# the satellite server.## hostname =
# The mount point for the RHN package repository. Defaults to# /var/rhn/satellite## mount-point =
# Mail configuration.## mail-mx =# mdom =
# 'Common name' for the SSL certificates. Defaults to the system's# hostname, or whatever 'hostname' is set to.## ssl-set-common-name =
# The email address for the SSL certificates. Defaults to 'admin-email'.## ssl-set-email =
# The expiration (in years) for the satellite certificates. Defaults# to the number of years until 2037.## ssl-ca-cert-expiration = # ssl-server-cert-expiration =
# Set to 'yes' to automatically install needed packages from RHN, provided the# system is registered. Set to 'no' to terminate the installer if any needed# packages are missing. Default is to prompt.## run-updater =
www.redhat.com 172

# *** For troubleshooting/testing only. ***## rhn-parent =# ssl-dir =# ssl-server-rpm =
A.2 Cobbler settingsCobbler using the /etc/cobbler/settings file for it main configuration parameters. The output below shows the contents of this file when all the used components were configured.
# cobbler settings file# restart cobblerd and run "cobbler sync" after making changes# This config file is in YAML 1.0 format# see http://yaml.org# ==========================================================# if 1, cobbler will allow insertions of system records that duplicate# the hostname information of other system records. In general,# this is undesirable.allow_duplicate_hostnames: 0
# if 1, cobbler will allow insertions of system records that duplicate# the ip address information of other system records. In general,# this is undesirable.allow_duplicate_ips: 0
# if 1, cobbler will allow insertions of system records that duplicate# the mac address information of other system records. In general,# this is undesirable.allow_duplicate_macs: 0
# the path to BIND's executable for this distribution.bind_bin: /usr/sbin/named
# Email out a report when cobbler finishes installing a system.# enabled: set to 1 to turn this feature on# sender: optional# email: which addresses to email# smtp_server: used to specify another server for an MTA# subject: use the default subject unless overridden
build_reporting_enabled: 1build_reporting_sender: ""build_reporting_email: [ 'root@localhost' ]build_reporting_smtp_server: "localhost"build_reporting_subject: ""
# Cheetah-language kickstart templates can import Python modules.
173 www.redhat.com

# while this is a useful feature, it is not safe to allow them to # import anything they want. This whitelists which modules can be # imported through Cheetah. Users can expand this as needed but# should never allow modules such as subprocess or those that# allow access to the filesystem as Cheetah templates are evaluated# by cobblerd as code.cheetah_import_whitelist: - "random" - "re" - "time"
# if no kickstart is specified, use this template (FIXME)default_kickstart: /var/lib/cobbler/kickstarts/default.ks
# cobbler has various sample kickstart templates stored# in /var/lib/cobbler/kickstarts/. This controls# what install (root) password is set up for those# systems that reference this variable. The factory# default is "cobbler" and cobbler check will warn if# this is not changed.
default_password_crypted: "$1$mF86/UHD$WvxIcX2t6caBz2ohWxyac."
# configure all installed systems to use these nameservers by default# unless defined differently in the profile. default_name_servers: []
# for libvirt based installs in koan, if no virt bridge# is specified, which bridge do we try? For EL 4/5 hosts# this should be xenbr0, for all versions of Fedora, try# "virbr0". This can be overridden on a per-profile# basis or at the koan command line though this saves# typing to just set it here to the most common option.default_virt_bridge: cumulus0
# if koan is invoked without --virt-type and no virt-type# is set on the profile/system, what virtualization type# should be assumed? Values: xenpv, xenfv, qemu, vmware# (NOTE: this does not change what virt_type is chosen by import)default_virt_type: qemu
# use this as the default disk size for virt guests (GB)default_virt_file_size: 20
# use this as the default memory size for virt guests (MB)default_virt_ram: 2048
# if using the authz_ownership module (see the Wiki), objects# created without specifying an owner are assigned to this# owner and/or group. Can be a comma seperated list.default_ownership:
www.redhat.com 174

- "admin"
# controls whether cobbler will add each new profile entry to the default# PXE boot menu. This can be over-ridden on a per-profile# basis when adding/editing profiles with --enable-menu=0/1. Users# should ordinarily leave this setting enabled unless they are concerned# with accidental re-installs from users who select an entry at the PXE# boot menu. Adding a password to the boot menus templates # may also be a good solution to prevent unwanted re-installationsenable_menu: 1
# location for some important binaries and config files # that can vary based on the distribution.dhcpd_bin: /usr/sbin/dhcpddhcpd_conf: /etc/dhcpd.confdnsmasq_bin: /usr/sbin/dnsmasqdnsmasq_conf: /etc/dnsmasq.conf
# enable Func-integration? This makes sure each installed machine is set up# to use func out of the box, which is a powerful way to script and control# remote machines. # Func lives at http://fedorahosted.org/func# read more at https://fedorahosted.org/cobbler/wiki/FuncIntegration# Will need to mirror Fedora/EPEL packages for this feature, see# https://fedorahosted.org/cobbler/wiki/ManageYumRepos
func_auto_setup: 0func_master: overlord.example.org
# more important file locations...httpd_bin: /usr/sbin/httpd
# change this port if Apache is not running plaintext on port# 80. Most people can leave this alone.http_port: 80
# kernel options that should be present in every cobbler installation.# kernel options can also be applied at the distro/profile/system# level.kernel_options: ksdevice: bootif lang: ' ' text: ~
# s390 systems require additional kernel options in addition to the# above defaults
kernel_options_s390x: RUNKS: 1 ramdisk_size: 40000
175 www.redhat.com

root: /dev/ram0 ro: ~ ip: off vnc: ~
# configuration options if using the authn_ldap module. See the# the Wiki for details. This can be ignored if not using# LDAP for WebUI/XMLRPC authentication.ldap_server: "ldap.example.com"ldap_base_dn: "DC=example,DC=com"ldap_port: 389ldap_tls: 1ldap_anonymous_bind: 1ldap_search_bind_dn: ''ldap_search_passwd: ''ldap_search_prefix: 'uid='
# set to 1 to enable Cobbler's DHCP management features.# the choice of DHCP management engine is in /etc/cobbler/modules.confmanage_dhcp: 1
# set to 1 to enable Cobbler's DNS management features.# the choice of DNS mangement engine is in /etc/cobbler/modules.confmanage_dns: 1
# if using BIND (named) for DNS management in /etc/cobbler/modules.conf# and manage_dns is enabled (above), this lists which zones are managed# See the Wiki (https://fedorahosted.org/cobbler/wiki/ManageDns) for more infomanage_forward_zones: - 'ra.rh.com'manage_reverse_zones: - '172.20.128' - '172.20.129' - '172.20.130' - '172.20.131'
# cobbler has a feature that allows for integration with config management# systems such as Puppet. The following parameters work in conjunction with # --mgmt-classes and are described in further detail at:# https://fedorahosted.org/cobbler/wiki/UsingCobblerWithConfigManagementSystemmgmt_classes: []mgmt_parameters: from_cobbler: 1
# location where cobbler will write its named.conf when BIND dns management is# enablednamed_conf: /etc/named.conf
# if using cobbler with manage_dhcp, put the IP address# of the cobbler server here so that PXE booting guests can find it# if not set correctly, this will manifest in TFTP open timeouts.
www.redhat.com 176

next_server: ra-sat-vm.ra.rh.com
# if using cobbler with manage_dhcp and ISC, omapi allows realtime DHCP# updates without restarting ISC dhcpd. However, it may cause# problems with removing leases and make things less reliable. OMAPI# usage is experimental and not recommended at this time.
omapi_enabled: 0omapi_port: 647omshell_bin: /usr/bin/omshell
# settings for power management features. optional.# see https://fedorahosted.org/cobbler/wiki/PowerManagement to learn more# choices:# bullpap# wti# apc_snmp# ether-wake# ipmilan# drac# ipmitool# ilo# rsa# lpar# bladecenter# virsh
power_management_default_type: 'ilo'
# the commands used by the power management module are sourced# from what directory?power_template_dir: "/etc/cobbler/power"
# if this setting is set to 1, cobbler systems that pxe boot# will request at the end of their installation to toggle the # --netboot-enabled record in the cobbler system record. This eliminates# the potential for a PXE boot loop if the system is set to PXE# first in it's BIOS order. Enable this if PXE is first in the BIOS# boot order, otherwise leave this disabled. See the manpage# for --netboot-enabled.pxe_just_once: 0
# the templates used for PXE config generation are sourced# from what directory?pxe_template_dir: "/etc/cobbler/pxe"
# Using a Red Hat management platform in addition to Cobbler?# Cobbler can help register to it. Choose one of the following:# "off" : I'm not using Red Hat Network, Satellite, or Spacewalk# "hosted" : I'm using Red Hat Network
177 www.redhat.com

# "site" : I'm using Red Hat Satellite Server or Spacewalk# Also read: https://fedorahosted.org/cobbler/wiki/TipsForRhn
redhat_management_type: "site"
# if redhat_management_type is enabled, choose the server# "management.example.org" : For Satellite or Spacewalk# "xmlrpc.rhn.redhat.com" : For Red Hat Network# This setting is also used by the code that supports using Spacewalk/Satellite users/passwords# within Cobbler Web and Cobbler XMLRPC. Using RHN Hosted for this is not supported.# This feature can be used even if redhat_management_type is off, simply select authn_spacewalk in # modules.conf
redhat_management_server: "ra-sat-vm.ra.rh.com"
# specify the default Red Hat authorization key to use to register# system. If left blank, no registration will be attempted. Similarly# one can set the --redhat-management-key to blank on any system to # keep it from trying to register.redhat_management_key: ""
# if using authn_spacewalk in modules.conf to let cobbler authenticate # against Satellite/Spacewalk's auth system, by default it will not allow per user # access into Cobbler Web and Cobbler XMLRPC.# in order to permit this, the following setting must be enabled HOWEVER# doing so will permit all Spacewalk/Satellite users of certain types to edit all# of cobbler's configuration.# these roles are: config_admin and org_admin# users should turn this on only if they want this behavior and# do not have a cross-multi-org separation concern. If there is just# a single org in satellite, it's probably safe to turn this# on and use CobblerWeb alongside a Satellite install.redhat_management_permissive: 1
# when DHCP and DNS management are enabled, cobbler sync can automatically# restart those services to apply changes. The exception for this is# if using ISC for DHCP, then omapi eliminates the need for a restart.# omapi, however, is experimental and not recommended for most configurations.# If DHCP and DNS are going to be managed, but hosted on a box that# is not on this server, disable restarts here and write some other# script to ensure that the config files get copied/rsynced to the destination# box. This can be done by modifying the restart services trigger.# Note that if manage_dhcp and manage_dns are disabled, the respective# parameter will have no effect. Most users should not need to change# this.restart_dns: 1restart_dhcp: 1
# if set to 1, allows /usr/bin/cobbler-register (part of the koan package)# to be used to remotely add new cobbler system records to cobbler.# this effectively allows for registration of new hardware from system
www.redhat.com 178

# records.register_new_installs: 1
# install triggers are scripts in /var/lib/cobbler/triggers/install# that are triggered in kickstart pre and post sections. Any# executable script in those directories is run. They can be used# to send email or perform other actions. They are currently# run as root so if this functionality is not needed, one can# disable it, though this will also disable "cobbler status" which# uses a logging trigger to audit install progress.run_install_triggers: 1
# enables a trigger which version controls all changes to /var/lib/cobbler# when add, edit, or sync events are performed. This can be used# to revert to previous database versions, generate RSS feeds, or for# other auditing or backup purposes. git is the recommend SCM# for use with this feature.
scm_track_enabled: 0scm_track_mode: "git"
# this is the address of the cobbler server -- as it is used# by systems during the install process, it must be the address# or hostname of the system as those systems can see the server.# if a server appears differently to different subnets# (dual homed, etc), will need to read the --server-override section# of the manpage for how that works.server: ra-sat-vm.ra.rh.com
# this is a directory of files that cobbler uses to make# templating easier. See the Wiki for more information. Changing# this directory should not be required.snippetsdir: /var/lib/cobbler/snippets
# by default, installs are *not* set to send installation logs to the cobbler# server. With 'anamon_enabled', kickstart templates may use the pre_anamon# snippet to allow remote live monitoring of their installations from the# cobbler server. Installation logs will be stored under# /var/log/cobbler/anamon/. NOTE: This does allow an xmlrpc call to send logs# to this directory, without authentication, so enable only if # ok with this limitation.anamon_enabled: 1
# locations of the TFTP binary and config filetftpd_bin: /usr/sbin/in.tftpdtftpd_conf: /etc/xinetd.d/tftp
# cobbler's web directory. Don't change this setting -- see the# Wiki on "relocating a cobbler install" if the /var partition# is not large enough.
179 www.redhat.com

webdir: /var/www/cobbler
# cobbler's public XMLRPC listens on this port. Change this only# if absolutely needed because a new port option will have to be supplied # to koan if it is not the default.xmlrpc_port: 25151
# "cobbler repo add" commands set cobbler up with repository# information that can be used during kickstart and is automatically# set up in the cobbler kickstart templates. By default, these# are only available at install time. To make these repositories# usable on installed systems (since cobbler makes a very convent)# mirror, set this to 1. Most users can safely set this to 1. Users# who have a dual homed cobbler server, or are installing laptops that# will not always have access to the cobbler server may wish to leave# this as 0. In that case, the cobbler mirrored yum repos are still# accessible at http://cobbler.example.org/cblr/repo_mirror and yum# configuration can still be done manually. This is just a shortcut.yum_post_install_mirror: 1
# additional flags to yum commandsyumreposync_flags: "-l"yumdownloader_flags: "--resolve"
A.3 rhq-install.shThis script to install the JON software during provisioning.
#!/bin/bash# quick 'n dirty JON/JOPR/RHQ installation/re installation script# for zipped distributions#
#script default values:HOSTNAME=`hostname`IP=`ifconfig eth0 | grep 'inet addr' | sed 's/.*inet addr://' | sed 's/ .*//'`CURR_USER=`whoami`AUTOINSTALL_WAITTIME=300UNINSTALL_ONLY=0RECREATE_USER=0
# JON installation defaults (what user gets created, where JON lands)JON_ROOT=rhq/JON_USER=rhq
# Java defaults
JAVA_HOME=/usr/lib/jvm/jre-openjdk
www.redhat.com 180

# JON-specific defaultsDB_CONNECTION_URL="jdbc:postgresql:\/\/127.0.0.1:5432\/rhq"DB_SERVER_NAME="127.0.0.1"HA_NAME=$HOSTNAMESAT_SERVER=http://ra-sat-vm.ra.rh.comJON_URL="$SAT_SERVER/pub/kits/jon-server-LATEST.zip"JON_LICENSE_URL="$SAT_SERVER/pub/kits/jon-license.xml"
if [ $CURR_USER != "root" ]; then echo "Must be logged in as the root user to install JON." exit 1fi
function jon_uninstall { # find service script echo " * Finding JON/JOPR/RHQ service script location..." SVC_SCRIPT=`find /etc/init.d/ -iname "*rhq*"` if [ -z "$SVC_SCRIPT" ]; then SVC_SCRIPT=`find /etc/init.d/ -iname "*jon*"` fi if [ -z "$SVC_SCRIPT" ]; then echo " - No previous installations found." return fi echo " - Found JON/JOPR/RHQ service script at: $SVC_SCRIPT"
# find home directory echo " * Finding first-defined JON/JOPR/RHQ home directory..." for i in $SVC_SCRIPT; do for dir in `grep RHQ_SERVER_HOME= $i | sed 's/[-a-zA-Z0-9_]*=//'`; do if [ -a $dir ]; then JON_HOME=$dir; fi done if [ -z "$JON_HOME" ]; then echo " - JON/JOPR/RHQ home directory was not defined in the service script, uninstall failed." exit 1 else break fi done if [ -z "$JON_HOME" ]; then echo " - JON/JOPR/RHQ home directory was not defined in the service script, uninstall failed." exit 1 fi echo " - Found JON/JOPR/RHQ home directory at: $JON_HOME"
181 www.redhat.com

echo " * Stopping all services, removing service script..." $SVC_SCRIPT stop rm -f $SVC_SCRIPT
echo " * Dropping Postgres tables..." su - postgres -c "psql -c \"DROP DATABASE rhq;\"" su - postgres -c "psql -c \"DROP USER rhqadmin;\""
echo " * Deleting JON/JOPR/RHQ..." rm -rf $JON_HOME
echo " - Uninstall complete!"}
# handle CLI overridesfor i in $* do case $i in --jon-localuser=*) JON_USER="`echo $i | sed 's/[-a-zA-Z0-9]*=//'`" ;; --jon-rootdir=*) JON_ROOT="`echo $i | sed 's/[-a-zA-Z0-9]*=//'`" ;; --jon-url=*) JON_URL="`echo $i | sed 's/[-a-zA-Z0-9]*=//'`" ;; --licenseurl=*) JON_LICENSE_URL="`echo $i | sed 's/[-a-zA-Z0-9]*=//'`" ;; --db-connectionurl=*) DB_CONNECTION_URL="`echo $i | sed 's/[-a-zA-Z0-9]*=//'`" ;; --db-servername=*) DB_SERVER_NAME="`echo $i | sed 's/[-a-zA-Z0-9]*=//'`" ;; --ha-name=*) HA_NAME="`echo $i | sed 's/[-a-zA-Z0-9]*=//'`" ;; --uninstall*) UNINSTALL_ONLY=1 ;; --recreateuser*) RECREATE_USER=1 ;; *) # unknown option echo "Unrecognized option." echo "" echo "If an option is not specified, a default will be used." echo "Available options:"
www.redhat.com 182
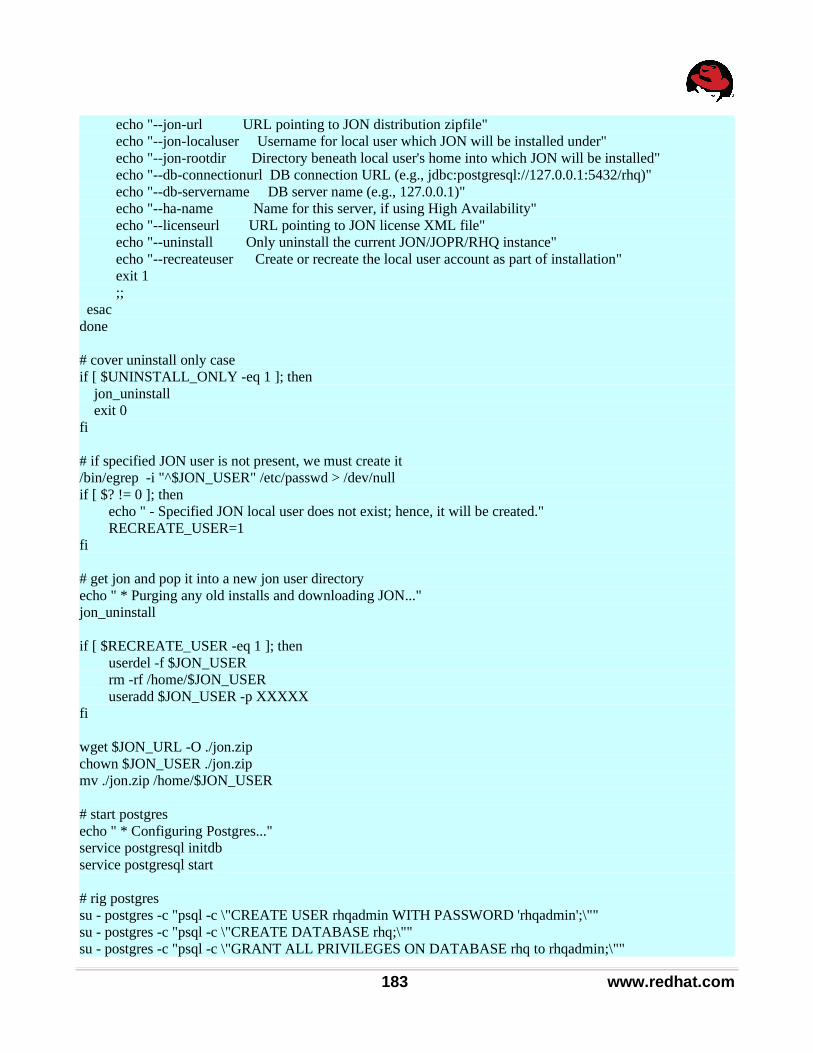
echo "--jon-url URL pointing to JON distribution zipfile" echo "--jon-localuser Username for local user which JON will be installed under" echo "--jon-rootdir Directory beneath local user's home into which JON will be installed" echo "--db-connectionurl DB connection URL (e.g., jdbc:postgresql://127.0.0.1:5432/rhq)" echo "--db-servername DB server name (e.g., 127.0.0.1)" echo "--ha-name Name for this server, if using High Availability" echo "--licenseurl URL pointing to JON license XML file" echo "--uninstall Only uninstall the current JON/JOPR/RHQ instance" echo "--recreateuser Create or recreate the local user account as part of installation" exit 1 ;; esacdone
# cover uninstall only caseif [ $UNINSTALL_ONLY -eq 1 ]; then jon_uninstall exit 0fi
# if specified JON user is not present, we must create it/bin/egrep -i "^$JON_USER" /etc/passwd > /dev/nullif [ $? != 0 ]; then echo " - Specified JON local user does not exist; hence, it will be created." RECREATE_USER=1fi
# get jon and pop it into a new jon user directoryecho " * Purging any old installs and downloading JON..."jon_uninstall
if [ $RECREATE_USER -eq 1 ]; then userdel -f $JON_USER rm -rf /home/$JON_USER useradd $JON_USER -p XXXXXfi
wget $JON_URL -O ./jon.zipchown $JON_USER ./jon.zipmv ./jon.zip /home/$JON_USER
# start postgresecho " * Configuring Postgres..."service postgresql initdbservice postgresql start
# rig postgressu - postgres -c "psql -c \"CREATE USER rhqadmin WITH PASSWORD 'rhqadmin';\""su - postgres -c "psql -c \"CREATE DATABASE rhq;\""su - postgres -c "psql -c \"GRANT ALL PRIVILEGES ON DATABASE rhq to rhqadmin;\""
183 www.redhat.com

echo " # TYPE DATABASE USER CIDR-ADDRESS METHOD
# \"local\" is for Unix domain socket connections only local all all trust # IPv4 local connections: host all all 127.0.0.1/32 trust host all all 10.0.0.1/8 md5 # IPv6 local connections: host all all ::1/128 trust" > /var/lib/pgsql/data/pg_hba.conf
chkconfig postgresql onservice postgresql restart
echo " * Unzipping and configuring JON..."# unzip jonsu - $JON_USER -c 'unzip jon.zip'su - $JON_USER -c 'rm jon.zip'su - $JON_USER -c "mv jon* $JON_ROOT"su - $JON_USER -c "mv rhq* $JON_ROOT"
# configure jon's autoinstallsed -ie "s/rhq.autoinstall.enabled=false/rhq.autoinstall.enabled=true/" /home/$JON_USER/$JON_ROOT/bin/rhq-server.propertiessed -ie "s/rhq.server.high-availability.name=/rhq.server.high-availability.name=$HA_NAME/" /home/$JON_USER/$JON_ROOT/bin/rhq-server.propertiessed -ie "s/rhq.server.database.connection-url=jdbc:postgresql:\/\/127.0.0.1:5432\/rhq/rhq.server.database.connection-url=$DB_CONNECTION_URL/" /home/$JON_USER/$JON_ROOT/bin/rhq-server.propertiessed -ie "s/rhq.server.database.server-name=127.0.0.1/rhq.server.database.server-name=$DB_SERVER_NAME/" /home/$JON_USER/$JON_ROOT/bin/rhq-server.properties
# copy rhq-server.sh to /etc/init.dcp /home/$JON_USER/$JON_ROOT/bin/rhq-server.sh /etc/init.d
# prepend chkconfig preambleecho "#!/bin/sh#chkconfig: 2345 95 20 #description: JON Server#processname: run.shRHQ_SERVER_HOME=/home/$JON_USER/$JON_ROOTRHQ_SERVER_JAVA_HOME=$JAVA_HOME" > /tmp/outcat /etc/init.d/rhq-server.sh >> /tmp/outmv /tmp/out /etc/init.d/rhq-server.shchmod 755 /etc/init.d/rhq-server.sh
# rig JON as a serviceecho " * Installing JON as a service..."chkconfig --add rhq-server.sh
www.redhat.com 184

chkconfig rhq-server.sh --listchkconfig -- level 3 rhq-server.sh on
# install JON licenseecho " * Downloading JON license..."wget $JON_LICENSE_URL -O /home/$JON_USER/$JON_ROOT/jbossas/server/default/deploy/rhq.ear.rej/license/license.xml
echo " * Starting JON for the first time..."service rhq-server.sh start
# install JON pluginsecho " * Waiting until server installs then installing the plugins that came with the JON zipfile..."sleep $AUTOINSTALL_WAITTIME #wait for autoinstall to finishls -1 /home/$JON_USER/$JON_ROOT/*.zip | xargs -i[] unzip -d /home/$JON_USER/$JON_ROOT/plugins/ []find /home/$JON_USER/$JON_ROOT/plugins/ -name "*.jar" | xargs -i[] mv [] /home/$JON_USER/$JON_ROOT/plugins/find /home/$JON_USER/$JON_ROOT/plugins/ -name "*.jar" | xargs -i[] cp [] /home/$JON_USER/$JON_ROOT/jbossas/server/default/deploy/rhq.ear/rhq-downloads/rhq-plugins/
echo " * Restarting JON..."service rhq-server.sh stopservice rhq-server.sh start
A.4 Configuration Channels FilesThere are six configuration channels that contains a total of 11 files.
Sesame Channel
This channel contains a single file that will be placed at /etc/sesame/sesame.conf and can be downloaded from http://people.redhat.com/jlabocki/GOAC/configuration/sesame.conf.
#### sesame configuration##
##===================## Broker Connection##===================
#### Set the host and port of the broker that this agent shall attempt to## connect to. The port will default to the appropriate value based on the## protocol.#### For proto=tcp, the default port is 5672## proto=ssl, 5671## proto=rdma, 5672
185 www.redhat.com

##host=localhostproto=tcpport=5672
##======================## Agent Authentication##======================
#### Set the SASL mechanism (PLAIN by default), and the username and password## to be used when authenticating to the broker. If you wish to not store## the password in this configuration file, you may use pwd-file to point## to an access-restricted file containing the password.##mech=PLAINuid=guestpwd=guest#pwd-file=/etc/sesame/password
##==============## Data Storage##==============
#### Set the path to the directory where sesame will store persistent data.###state-dir=/var/lib/sesame
##=========## Logging##=========
# log-enable=RULE## Enable logging for selected levels and components. RULE is in the form # 'LEVEL[+][:PATTERN]' Levels are one of:# trace debug info notice warning error critical## For example:# '--log-enable warning+' logs all warning, error and critical messages.
#log-enable notice+
Cumin Channel
This channel contains a single file that will be placed at /etc/cumin/cumin.conf and can be downloaded from http://people.redhat.com/jlabocki/GOAC/configuration/cumin.conf. The addr must be change to the IP of the MRG manager.
www.redhat.com 186

[main]data: postgresql://cumin@localhost/cuminaddr: 172.20.128.46ssl: yes
Postgresql ChannelThis channel contains a single file that will be placed at /var/lib/pgsql/data/pg_hba.conf and can be downloaded from http://people.redhat.com/jlabocki/GOAC/configuration/pg_hba.conf.
# PostgreSQL Client Authentication Configuration File# ===================================================## Refer to the PostgreSQL Administrator's Guide, chapter "Client# Authentication" for a complete description. A short synopsis# follows.## This file controls: which hosts are allowed to connect, how clients# are authenticated, which PostgreSQL user names they can use, which# databases they can access. Records take one of these forms:## local DATABASE USER METHOD [OPTION]# host DATABASE USER CIDR-ADDRESS METHOD [OPTION]# hostssl DATABASE USER CIDR-ADDRESS METHOD [OPTION]# hostnossl DATABASE USER CIDR-ADDRESS METHOD [OPTION]## (The uppercase items must be replaced by actual values.)## The first field is the connection type: "local" is a Unix-domain socket,# "host" is either a plain or SSL-encrypted TCP/IP socket, "hostssl" is an# SSL-encrypted TCP/IP socket, and "hostnossl" is a plain TCP/IP socket.## DATABASE can be "all", "sameuser", "samerole", a database name, or# a comma-separated list thereof.## USER can be "all", a user name, a group name prefixed with "+", or# a comma-separated list thereof. In both the DATABASE and USER fields# you can also write a file name prefixed with "@" to include names from# a separate file.## CIDR-ADDRESS specifies the set of hosts the record matches.# It is made up of an IP address and a CIDR mask that is an integer# (between 0 and 32 (IPv4) or 128 (IPv6) inclusive) that specifies# the number of significant bits in the mask. Alternatively, you can write# an IP address and netmask in separate columns to specify the set of hosts.## METHOD can be "trust", "reject", "md5", "crypt", "password",# "krb5", "ident", or "pam". Note that "password" sends passwords# in clear text; "md5" is preferred since it sends encrypted passwords.## OPTION is the ident map or the name of the PAM service, depending on METHOD.
187 www.redhat.com

## Database and user names containing spaces, commas, quotes and other special# characters must be quoted. Quoting one of the keywords "all", "sameuser" or# "samerole" makes the name lose its special character, and just match a# database or username with that name.## This file is read on server startup and when the postmaster receives# a SIGHUP signal. If you edit the file on a running system, you have# to SIGHUP the postmaster for the changes to take effect. You can use# "pg_ctl reload" to do that.
# Put your actual configuration here# ----------------------------------## If you want to allow non-local connections, you need to add more# "host" records. In that case you will also need to make PostgreSQL listen# on a non-local interface via the listen_addresses configuration parameter,# or via the -i or -h command line switches.#
# TYPE DATABASE USER CIDR-ADDRESS METHODhost cumin cumin 127.0.0.1/32 trust# "local" is for Unix domain socket connections onlylocal all all ident sameuser# IPv4 local connections:host all all 127.0.0.1/32 ident sameuser# IPv6 local connections:host all all ::1/128 ident sameuser
Mrgdeploy ChannelThis channel contains a single file that will be placed at /root/mrgdeploy.sh.
#!/bin/sh
#Initialize the databasecumin-database-init
#Add the admin usercumin-admin add-user admin
#Restart Cuminservice cumin restart
NTP ChannelThis channel contains a single file that will be placed at /etc/ntp.conf and can be downloaded from http://people.redhat.com/jlabocki/GOAC/configuration/ntp. The entries at the bottom of the file should be adjusted for the user's environment.
www.redhat.com 188

# Permit time synchronization with our time source, but do not# permit the source to query or modify the service on this system.restrict default kod nomodify notrap nopeer noquery
# Permit all access over the loopback interface. This could# be tightened as well, but to do so would effect some of# the administrative functions.restrict 127.0.0.1
# Hosts on local network are less restricted.#restrict 192.168.1.0 mask 255.255.255.0 nomodify notrap
# Use public servers from the pool.ntp.org project.# Please consider joining the pool (http://www.pool.ntp.org/join.html).
#broadcast 192.168.1.255 key 42 # broadcast server#broadcastclient # broadcast client#broadcast 224.0.1.1 key 42 # multicast server#multicastclient 224.0.1.1 # multicast client#manycastserver 239.255.254.254 # manycast server#manycastclient 239.255.254.254 key 42 # manycast client
# Undisciplined Local Clock. This is a fake driver intended for backup# and when no outside source of synchronized time is available. server 127.127.1.0fudge 127.127.1.0 stratum 10
# Drift file. Put this in a directory which the daemon can write to.# No symbolic links allowed, either, since the daemon updates the file# by creating a temporary in the same directory and then rename()'ing# it to the file.driftfile /var/lib/ntp/drift
# Key file containing the keys and key identifiers used when operating# with symmetric key cryptography. keys /etc/ntp/keys
# Specify the key identifiers which are trusted.#trustedkey 4 8 42
# Specify the key identifier to use with the ntpdc utility.#requestkey 8
# Specify the key identifier to use with the ntpq utility.#controlkey 8restrict 10.16.47.254 mask 255.255.255.255 nomodify notrap noqueryserver 10.16.47.254restrict 10.16.47.254 mask 255.255.255.255 nomodify notrap noquery
Condor_manager Channel
189 www.redhat.com

This channel contains five files. The first file will be placed at /etc/condor/condor_config and can be downloaded from http://people.redhat.com/jlabocki/GOAC/configuration/condor_config.mgr. The contents have not been listed in respect of the length of this document.
The second file will be placed at /home/mrgmgr/CreateNewNode.sh and can be downloaded from http://people.redhat.com/jlabocki/GOAC/configuration/CreateNewNode.sh. The hostname/IP and username fields will need to be customized.
#!/bin/sh
#Get the last used namelastname=`ssh -f [email protected] '/cygdrive/c/Program\ Files/RedHat/RHEVManager/RHEVM\ Scripting\ Library/GetNextNodeName.bat' |grep -i hostname |sort |awk -F" " '{print $3}' |awk -F"." '{print $1}' |tail -1 |cut -c 8-10`;
#Increment digits to get next node namenewname=mrgexec$((lastname + 1))
#Creating the next vmvmid=`ssh -f [email protected] "/cygdrive/c/Program\ Files/RedHat/RHEVManager/RHEVM\ Scripting\ Library/CreateNewVm.bat $newname" |grep VmId |awk -F" " '{print $3}'`
#Add Network Adapter to new vmhush=`ssh -f [email protected] "/cygdrive/c/Program\ Files/RedHat/RHEVManager/RHEVM\ Scripting\ Library/AddNetwork.bat $newname"`
#Add Diskescapevmid=`echo $vmid |awk '{gsub(/-/,"\\\-")}; 1'`hush=`ssh -f [email protected] "echo $escapevmid > /cygdrive/c/Program\ Files/RedHat/RHEVManager/RHEVM\ Scripting\ Library/vmidholder"`hush=`ssh -f [email protected] "/cygdrive/c/Program\ Files/RedHat/RHEVManager/RHEVM\ Scripting\ Library/AddDisk.bat"`
#Starting the vmhush=`ssh -f [email protected] "/cygdrive/c/Program\ Files/RedHat/RHEVManager/RHEVM\ Scripting\ Library/StartVm.bat"`
The third file will be placed at /home/mrgmgr/DestroyLastNode.sh and can be downloaded from http://people.redhat.com/jlabocki/GOAC/configuration/DestroyLastNode.sh. The hostname/IP and username fields will need to be customized.
#!/bin/sh
#Get the highest mrgexec node running (i.e. mrgexec119)lastname=`ssh -f [email protected] '/cygdrive/c/Program\ Files/RedHat/RHEVManager/RHEVM\ Scripting\ Library/GetLastNodeName.bat' |grep -i hostname |sort |awk -F" " '{print $3}' |awk -F"." '{print $1}' |tail -1 |cut -c 8-10`;
#Tack on prefixlastname=mrgexec${lastname}
www.redhat.com 190

#Shutdown the VMhush=`ssh -f [email protected] "/cygdrive/c/Program\ Files/RedHat/RHEVManager/RHEVM\ Scripting\ Library/ShutdownVM.bat $lastname"`
#Shutdown the VM Hard, run it twice!hush=`ssh -f [email protected] "/cygdrive/c/Program\ Files/RedHat/RHEVManager/RHEVM\ Scripting\ Library/ShutdownVM.bat $lastname"`
#Sleep for safety (make sure the vm is shutdown before we try to remove it)sleep 1
#Remove the VMhush=`ssh -f [email protected] "/cygdrive/c/Program\ Files/RedHat/RHEVManager/RHEVM\ Scripting\ Library/RemoveVM.bat $lastname"`
#Call Satellite removal script/home/mrgmgr/SatelliteRemoveLast.pl
The fourth file will be placed at /home/mrgmgr/SatelliteRemoveLast.pl and can be downloaded from http://people.redhat.com/jlabocki/GOAC/configuration/SatelliteRemoveLast.pl. The hostname, username and password fields will need to be customized.
#!/usr/bin/perl
use strict;use warnings;use Frontier::Client;
my $HOST = 'satellite.coe.iad.redhat.com';my $user = 'jlabocki';my $pass = 'password';my @newList;my @test;my @id;
my $client = new Frontier::Client(url => "http://$HOST/rpc/api");my $session = $client->call('auth.login', $user, $pass);
print "\nGet All Systems:\n";
my $systems = $client->call('system.listUserSystems', $session);foreach my $system (@$systems) { if(($system->{'name'} =~ m/mrg/) && ($system->{'name'} !~ m/mrgmgr/)) { print $system->{'name'}."\n"; my $systemName = $system->{'name'}; push(@newList,$systemName); }}
191 www.redhat.com

print "\nSort Array and Get Oldest\n";
@newList = sort(@newList);
foreach (@newList) { print $_ . "\n";}
print "\nPrint Last Element\n";print $newList[-1]."\n";
my $lastsystem = $newList[-1];
print "\nGet Id\n";my $details = $client->call('system.getId', $session, $lastsystem);foreach my $detail (@$details) { print $detail->{'id'}."\n"; my $systemId = $detail->{'id'}; push(@id,$systemId);}
print "\nPrint ID of last\n";print $id[-1]."\n";my $lastid = $id[-1];
print "\nDelete Last ID";my $delete = $client->call('system.deleteSystems', $session, $lastid);
The fifth file will be placed at /var/lib/condor/condor_config.local and can be downloaded from http://people.redhat.com/jlabocki/GOAC/configuration/condor_config.local.mgr.
# This config disables advertising to UW's world collector. Changing# this config option will have your pool show up in UW's world# collector and eventually on the world map of Condor pools.CONDOR_DEVELOPERS = NONE
CONDOR_HOST = $(FULL_HOSTNAME)COLLECTOR_NAME = Grid On a CloudSTART = TRUESUSPEND = FALSEPREEMPT = FALSEKILL = FALSEHOSTALLOW_WRITE = *DAEMON_LIST = COLLECTOR, MASTER, NEGOTIATOR, SCHEDDNEGOTIATOR_INTERVAL = 20TRUST_UID_DOMAIN = TRUE
SCHEDD.PLUGINS = $(LIB)/plugins/MgmtScheddPlugin-plugin.soCOLLECTOR.PLUGINS = $(LIB)/plugins/MgmtCollectorPlugin-plugin.so
www.redhat.com 192

NEGOTIATOR.PLUGINS = $(LIB)/plugins/MgmtNegotiatorPlugin-plugin.so
# Plugin configurationMASTER.PLUGINS = $(LIB)/plugins/MgmtMasterPlugin-plugin.soQMF_BROKER_HOST = mrgmgr.coe.iad.redhat.com
193 www.redhat.com