quilt finishes 85½ x 95½ - jinnybeyer.com · 3 pin and sew the corner triangles to the framing...
TRANSCRIPT
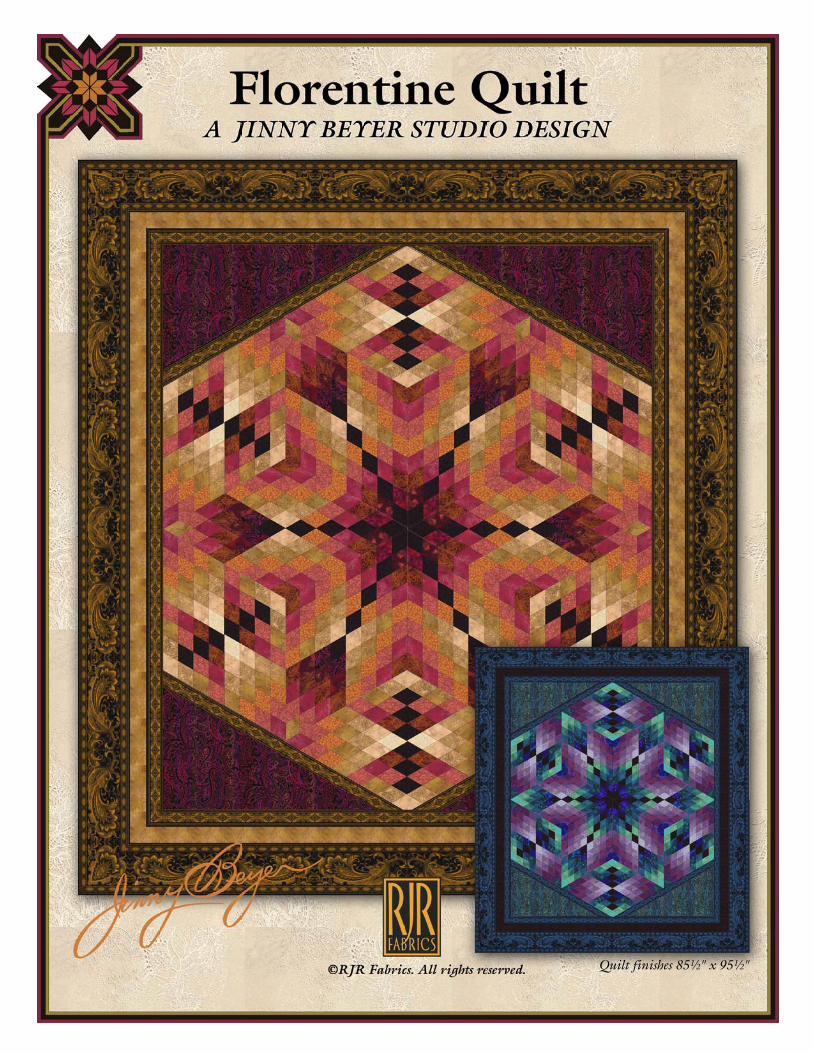
Quilt finishes 85½" x 95½"

2½"
Diagram 3. Cut strips 2½"wide, maintaining the 60°angle.
Diagram 2. Trim off the unevenedges at a 60° angle.
60° line on ruler
Diagram 1. Sew the strips for each strip-set together, offsettingthem 1" to the right.
Perfect Cut Ruler Tip: After cutting the segments, trim thesharp points on each end to make it easier to match the stripsbefore sewing them together in the next step.
1
Jinny Beyer’s Florentine quilt features fabrics from her Milan collection. The stunningly shaded diamond units are easyto construct using strip-piecing techniques. (Jinny’s Perfect Cut 60° Diamond Ruler makes the cutting and markingeven faster and more accurate.) The quilt is framed with an elegant scroll border.
All seam allowances are ¼-inch. Press seams to one side.WOF = Width of Fabric. Read the entire pattern beforebeginning. Basic quiltmaking knowledge is assumed.
Step 1: Cut FabricsReferring to the Fabric Guide on page 5 for Fabrics 1-11,cut the strips and pieces as noted. All strips are 2½" x WOFunless otherwise noted. Take care to label and set aside theFabric 7 strips for Border 2.
Border Print. Separate the wide and narrow stripes by cut-ting through the center of the dark area between them.Each strip should have ¼" of the dark fabric along the longsides for seam allowance. Please note that the border printborders for the sides must be pieced to allow matching ofthe design at the corners. For this reason, four pieces of thewide and narrow stripes will be cut for the sides. All borderpieces are cut oversized and are trimmed to fit in a later step.
For a video introduction to using border print fabrics, visitwww.jinnybeyer.com/bordertips.
Narrow Stripes: From each of two stripes, cut one piecemeasuring 71" and one measuring 43". From a third stripe,cut two pieces measuring 43". Set aside the 71" strips forthe top/bottom borders, and the four 43" strips for thesides. From the remaining stripes, cut a total of four identi-cal 40" pieces to frame the quilt center.Wide Stripes: From each of two stripes, cut one piece mea-suring 100" for the top/bottom borders. Cut the remainingtwo stripes in half for a total of four pieces measuring about60" for the sides.
Step 2: Make the Strip-SetsReferring to the Block Guide on page 4 and using the num-ber and length of strips indicated for each unit, arrange thestrips for each strip-set in the order shown.
All Units: Offseteach strip 1" to theright so that the topstrip is furthest to theright, thensew the stripstogether(Diagram 1).
Using Jinny Beyer’s Perfect Cut 60° Diamond Ruler, oraligning the 60° line of a quilter’s ruler with the bottom edgeof the strip-set, trim off the uneven left edge (Diagram 2).
Then cut strips 2½" wide (Diagram 3). Check the angleevery few cuts and adjust as necessary to maintain the 60°angle. Each WOF strip-set yields 13 segments; each 21"strip-set yields 6 segments.
For a video demonstration of sewing an inset seam, visitwww.jinnybeyer.com/videotips
2
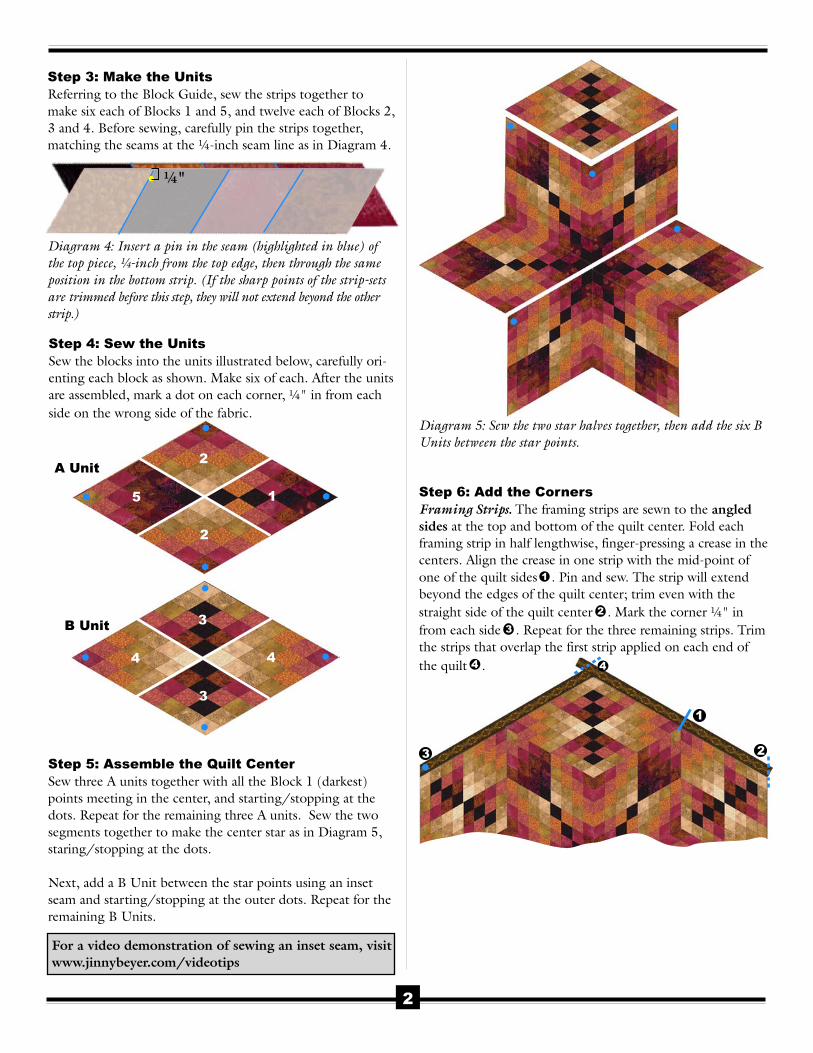
Step 4: Sew the UnitsSew the blocks into the units illustrated below, carefully ori-enting each block as shown. Make six of each. After the unitsare assembled, mark a dot on each corner, ¼" in from eachside on the wrong side of the fabric.
Step 3: Make the UnitsReferring to the Block Guide, sew the strips together tomake six each of Blocks 1 and 5, and twelve each of Blocks 2,3 and 4. Before sewing, carefully pin the strips together,matching the seams at the ¼-inch seam line as in Diagram 4.
¼"
Diagram 4: Insert a pin in the seam (highlighted in blue) ofthe top piece, ¼-inch from the top edge, then through the sameposition in the bottom strip. (If the sharp points of the strip-setsare trimmed before this step, they will not extend beyond the otherstrip.)
1
2
2
5
A Unit
4
3
3
4
B Unit
Step 5: Assemble the Quilt CenterSew three A units together with all the Block 1 (darkest)points meeting in the center, and starting/stopping at thedots. Repeat for the remaining three A units. Sew the twosegments together to make the center star as in Diagram 5,staring/stopping at the dots.
Next, add a B Unit between the star points using an insetseam and starting/stopping at the outer dots. Repeat for theremaining B Units.
Diagram 5: Sew the two star halves together, then add the six BUnits between the star points.
1
23
4
Step 6: Add the CornersFraming Strips. The framing strips are sewn to the angledsides at the top and bottom of the quilt center. Fold eachframing strip in half lengthwise, finger-pressing a crease in thecenters. Align the crease in one strip with the mid-point ofone of the quilt sides 1 . Pin and sew. The strip will extendbeyond the edges of the quilt center; trim even with thestraight side of the quilt center 2 . Mark the corner ¼" infrom each side 3 . Repeat for the three remaining strips. Trimthe strips that overlap the first strip applied on each end ofthe quilt 4 .

3
Pin and sew the corner triangles to the framingstrips on the quilt center as shown, matching thedots on the corners and strips. (The triangles areoversized and will not be the same length as theframing strips.) Press. Trim the top and bottom ofthe quilt ¼" beyond the lightest diamond point asin Diagram 6.
Step 7: Make & Add the BordersBorder 2: Prepare the borders as follows using thereserved strips. (All border strips will be oversized.)• Top/Bottom. Sew two strips together end to
end for both the top and bottom borders.• Sides. Cut one WOF strip in half. Sew a WOF
strip to each end of the half-strip for one sideborder; repeat for the other side.
Add the borders to the quilt, following the instruc-tions for a rectangular quilt and Adding MultipleBorders in Framing a Quilt the Jinny Beyer Way.
For a video demonstration of the technique,visit www.jinnybeyer.com/bordertips.
Step 8: Quilt & BindLayer the quilt as follows: backing (wrong side up),batting, quilt top (right side up). Baste layerstogether. Quilt as desired.
When quilting is completed, trim backing and bat-ting even with edges of quilt top. Make bindingstrips using reserved fabric and bind using yourfavorite binding method or by following theinstructions at www.jinnybeyer.com/promos/binding.
Diagram 6. The top and bottom of the quilt are trimmed ¼" beyond thelightest diamond.
Jinny suggests her Perfect Cut 60° Diamond Ruler forthis project. It cuts perfect angles for the diamonds,and makes it fast and easy to mark and trim pointsfor accuracy. Jinny demonstrates it atwww.jinnybeyer.com/videotips
Available at independent quilt shops and atjinnybeyer.com
Corner Triangles. Mark a dot on the two sets oflarge triangles as shown.
¼"

The quilt units are made by sewing individual strips of fabric into strip-sets, then sewing the different strip-sets together. Thestrip-sets for each unit are divided in the illustrations below with blue lines. For example, in Block 1, the first strip-set is madefrom Fabrics 1-2-3-4; the second is made from Fabrics 2-1-4-5; and so on.
1
2
3
4
2
1
4
5
3
4
4
1
16
6
5
Block 1. Make six using 21" strips.2
2
2
2
3
3
3
4
4
5
7
8
9 8
7
7
Block 2. Make twelve using WOF strips.
3
3
3
3
4
4
5
51
1
1
8
8
7
7 9Block 3. Make twelve using WOF strips.
10
9
9
8
8
8
7
7
7
7
2
2
2
3
3
4
Block 4. Make twelve using WOF strips.
1
11
11
5
5
5
5
4
4
4
3
3
7
6
6
6Block 5. Make six using 21" strips.
Florentine Block Guide(Gold Colorway)
4
2266-15 (P#25)
9410-14 (P#48)
6740-10 (P#106)
1845-02
1847-02
1842-02
1845-01
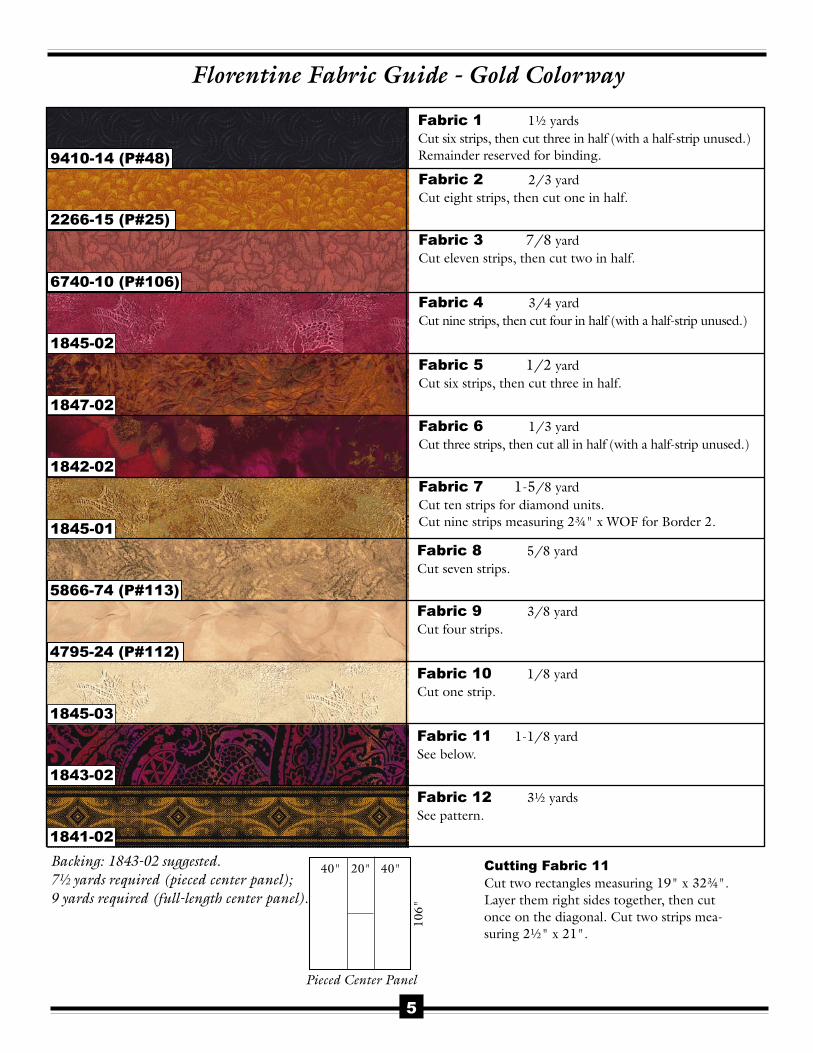
Backing: 1843-02 suggested.7½ yards required (pieced center panel);9 yards required (full-length center panel).
Fabric 1 1½ yardsCut six strips, then cut three in half (with a half-strip unused.)Remainder reserved for binding.
Fabric 2 2/3 yardCut eight strips, then cut one in half.
Fabric 3 7/8 yardCut eleven strips, then cut two in half.
Fabric 4 3/4 yardCut nine strips, then cut four in half (with a half-strip unused.)
Fabric 5 1/2 yardCut six strips, then cut three in half.
Fabric 6 1/3 yardCut three strips, then cut all in half (with a half-strip unused.)
Fabric 7 1-5/8 yardCut ten strips for diamond units.Cut nine strips measuring 2¾" x WOF for Border 2.
Fabric 8 5/8 yardCut seven strips.
Fabric 9 3/8 yardCut four strips.
Fabric 10 1/8 yardCut one strip.
Fabric 11 1-1/8 yardSee below.
Fabric 12 3½ yardsSee pattern.
5866-74 (P#113)
4795-24 (P#112)
1845-03
1843-02
1841-02
5
Florentine Fabric Guide - Gold Colorway
40" 40"20"
106"
Pieced Center Panel
Cutting Fabric 11Cut two rectangles measuring 19" x 32¾".Layer them right sides together, then cutonce on the diagonal. Cut two strips mea-suring 2½" x 21".

5
12
12
7
7
7
7
8
8
8
9
9
10
11
11
11
Block 4. Make twelve using WOF strips.
4
4
4
4
5
5
6
61
1
1
2
2
3
3 13Block 3. Make twelve using WOF strips.
13
2
2
3
3
3
4
4
4
4
5
5
5
6
6
1
Block 5. Make six using 21" strips.
Block 2. Make twelve using WOF strips.
7
7
7
7
11
11
11
12
12
5
8
9
10 9
8
8
1
2
3
4
2
1
4
5
3
4
4
1
16
6
5
Block 1. Make six using 21" strips.
Block GuideThe quilt units are made by sewing individual strips of fabric intostrip-sets, then sewing the different strip-sets together. The strip-sets for each unit are divided in the illustrations below with bluelines. For example, in Block 1, the first strip-set is made from Fab-rics 1-2-3-4; the second is made from Fabrics 2-1-4-5; and so on.
Florentine Pattern Changes & Block Guide(Jewel Colorway)
6
Pattern ChangesFor the Jewel colorway, follow the pattern, making the following changes:• Step 1: Refer to the Fabric Guide on page 7 and cut Fabrics 1-14. Set
aside the Fabric 1 strips for Border 2.• Step 2: Refer to this Block Guide, not the version on page 4.
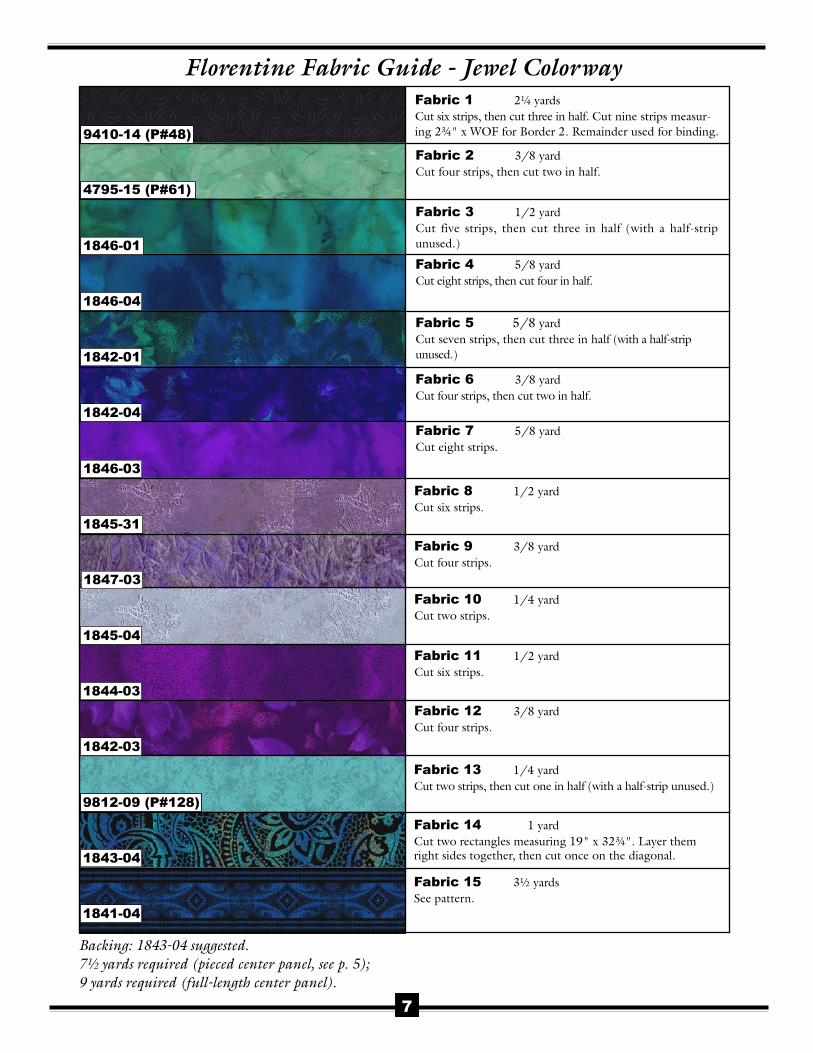
Backing: 1843-04 suggested.7½ yards required (pieced center panel, see p. 5);9 yards required (full-length center panel).
7
Florentine Fabric Guide - Jewel Colorway
4795-15 (P#61)
9410-14 (P#48)
1846-01
1846-04
1842-01
1842-04
1846-03
Fabric 1 2¼ yardsCut six strips, then cut three in half. Cut nine strips measur-ing 2¾" x WOF for Border 2. Remainder used for binding.
Fabric 2 3/8 yardCut four strips, then cut two in half.
Fabric 3 1/2 yardCut five strips, then cut three in half (with a half-stripunused.)
Fabric 4 5/8 yardCut eight strips, then cut four in half.
Fabric 5 5/8 yardCut seven strips, then cut three in half (with a half-stripunused.)
Fabric 6 3/8 yardCut four strips, then cut two in half.
Fabric 7 5/8 yardCut eight strips.
Fabric 8 1/2 yardCut six strips.
Fabric 9 3/8 yardCut four strips.
Fabric 10 1/4 yardCut two strips.
Fabric 11 1/2 yardCut six strips.
Fabric 12 3/8 yardCut four strips.
1845-31
1845-04
1844-03
1842-03
1847-03
Fabric 13 1/4 yardCut two strips, then cut one in half (with a half-strip unused.)
Fabric 14 1 yardCut two rectangles measuring 19" x 32¾". Layer themright sides together, then cut once on the diagonal.
Fabric 15 3½ yardsSee pattern.
9812-09 (P#128)
1843-04
1841-04
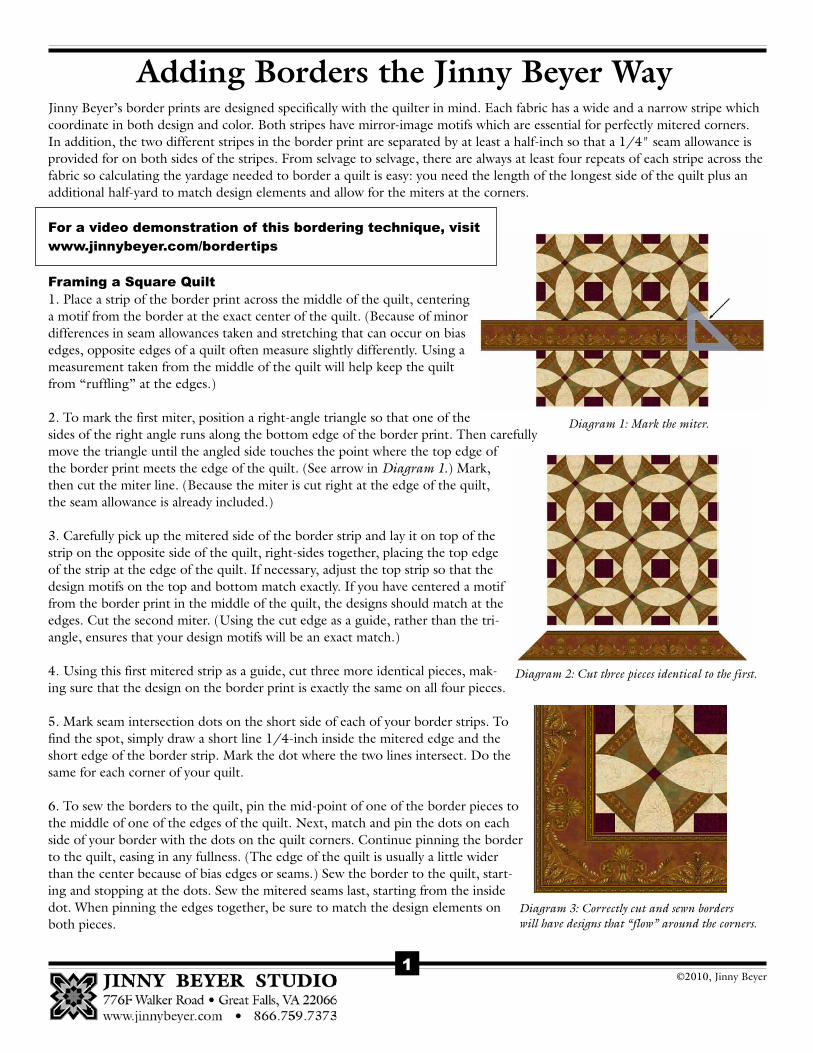
Diagram 3: Correctly cut and sewn borderswill have designs that “flow” around the corners.
Diagram 2: Cut three pieces identical to the first.
Jinny Beyer’s border prints are designed specifically with the quilter in mind. Each fabric has a wide and a narrow stripe whichcoordinate in both design and color. Both stripes have mirror-image motifs which are essential for perfectly mitered corners.In addition, the two different stripes in the border print are separated by at least a half-inch so that a 1/4" seam allowance isprovided for on both sides of the stripes. From selvage to selvage, there are always at least four repeats of each stripe across thefabric so calculating the yardage needed to border a quilt is easy: you need the length of the longest side of the quilt plus anadditional half-yard to match design elements and allow for the miters at the corners.
For a video demonstration of this bordering technique, visitwww.jinnybeyer.com/bordertips
Framing a Square Quilt1. Place a strip of the border print across the middle of the quilt, centeringa motif from the border at the exact center of the quilt. (Because of minordifferences in seam allowances taken and stretching that can occur on biasedges, opposite edges of a quilt often measure slightly differently. Using ameasurement taken from the middle of the quilt will help keep the quiltfrom “ruffling” at the edges.)
2. To mark the first miter, position a right-angle triangle so that one of thesides of the right angle runs along the bottom edge of the border print. Then carefullymove the triangle until the angled side touches the point where the top edge ofthe border print meets the edge of the quilt. (See arrow in Diagram 1.) Mark,then cut the miter line. (Because the miter is cut right at the edge of the quilt,the seam allowance is already included.)
3. Carefully pick up the mitered side of the border strip and lay it on top of thestrip on the opposite side of the quilt, right-sides together, placing the top edgeof the strip at the edge of the quilt. If necessary, adjust the top strip so that thedesign motifs on the top and bottom match exactly. If you have centered a motiffrom the border print in the middle of the quilt, the designs should match at theedges. Cut the second miter. (Using the cut edge as a guide, rather than the tri-angle, ensures that your design motifs will be an exact match.)
4. Using this first mitered strip as a guide, cut three more identical pieces, mak-ing sure that the design on the border print is exactly the same on all four pieces.
5. Mark seam intersection dots on the short side of each of your border strips. Tofind the spot, simply draw a short line 1/4-inch inside the mitered edge and theshort edge of the border strip. Mark the dot where the two lines intersect. Do thesame for each corner of your quilt.
6. To sew the borders to the quilt, pin the mid-point of one of the border pieces tothe middle of one of the edges of the quilt. Next, match and pin the dots on eachside of your border with the dots on the quilt corners. Continue pinning the borderto the quilt, easing in any fullness. (The edge of the quilt is usually a little widerthan the center because of bias edges or seams.) Sew the border to the quilt, start-ing and stopping at the dots. Sew the mitered seams last, starting from the insidedot. When pinning the edges together, be sure to match the design elements onboth pieces.
Diagram 1: Mark the miter.
©2010, Jinny Beyer
Adding Borders the Jinny Beyer Way
1
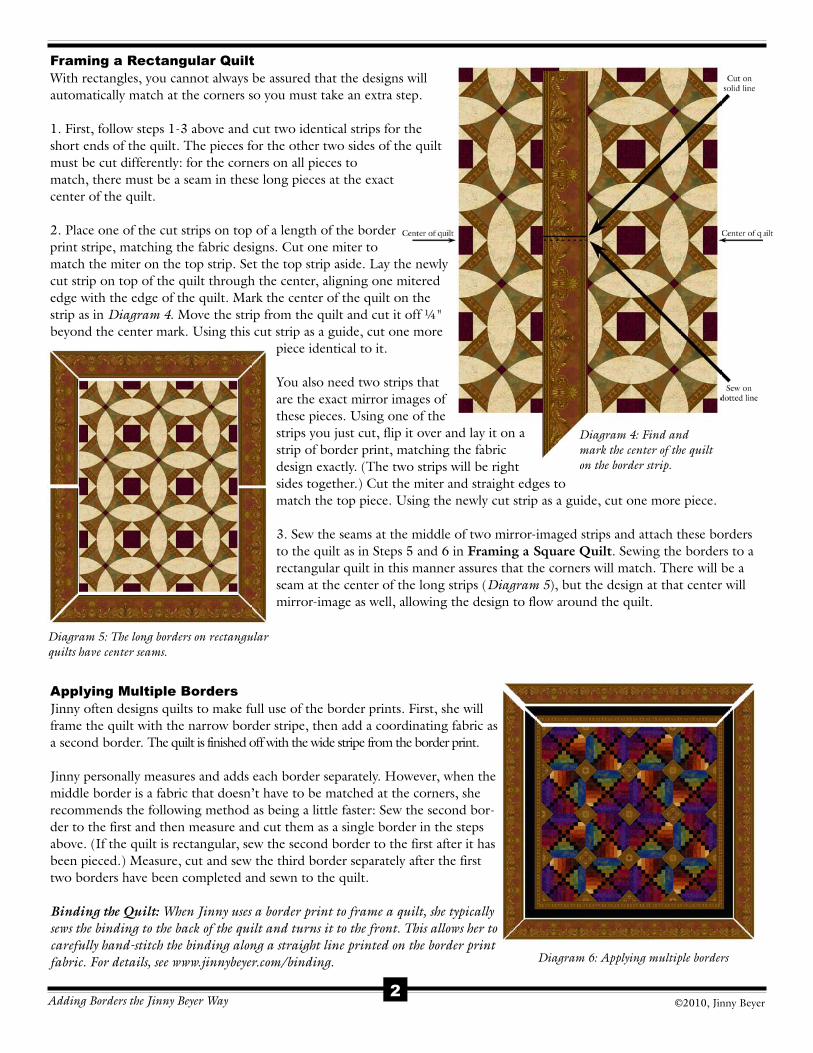
Diagram 4: Find andmark the center of the quilton the border strip.
Framing a Rectangular QuiltWith rectangles, you cannot always be assured that the designs willautomatically match at the corners so you must take an extra step.
1. First, follow steps 1-3 above and cut two identical strips for theshort ends of the quilt. The pieces for the other two sides of the quiltmust be cut differently: for the corners on all pieces tomatch, there must be a seam in these long pieces at the exactcenter of the quilt.
2. Place one of the cut strips on top of a length of the borderprint stripe, matching the fabric designs. Cut one miter tomatch the miter on the top strip. Set the top strip aside. Lay the newlycut strip on top of the quilt through the center, aligning one miterededge with the edge of the quilt. Mark the center of the quilt on thestrip as in Diagram 4. Move the strip from the quilt and cut it off ¼"beyond the center mark. Using this cut strip as a guide, cut one more
piece identical to it.
You also need two strips thatare the exact mirror images ofthese pieces. Using one of thestrips you just cut, flip it over and lay it on astrip of border print, matching the fabricdesign exactly. (The two strips will be rightsides together.) Cut the miter and straight edges tomatch the top piece. Using the newly cut strip as a guide, cut one more piece.
3. Sew the seams at the middle of two mirror-imaged strips and attach these bordersto the quilt as in Steps 5 and 6 in Framing a Square Quilt. Sewing the borders to arectangular quilt in this manner assures that the corners will match. There will be aseam at the center of the long strips (Diagram 5), but the design at that center willmirror-image as well, allowing the design to flow around the quilt.
Applying Multiple BordersJinny often designs quilts to make full use of the border prints. First, she willframe the quilt with the narrow border stripe, then add a coordinating fabric asa second border. The quilt is finished off with the wide stripe from the border print.
Jinny personally measures and adds each border separately. However, when themiddle border is a fabric that doesn’t have to be matched at the corners, sherecommends the following method as being a little faster: Sew the second bor-der to the first and then measure and cut them as a single border in the stepsabove. (If the quilt is rectangular, sew the second border to the first after it hasbeen pieced.) Measure, cut and sew the third border separately after the firsttwo borders have been completed and sewn to the quilt.
Binding the Quilt: When Jinny uses a border print to frame a quilt, she typicallysews the binding to the back of the quilt and turns it to the front. This allows her tocarefully hand-stitch the binding along a straight line printed on the border printfabric. For details, see www.jinnybeyer.com/binding.
Diagram 5: The long borders on rectangularquilts have center seams.
Diagram 6: Applying multiple borders
g
Adding Borders the Jinny Beyer Way ©2010, Jinny Beyer2