pt3e-05211 fi-8000
TRANSCRIPT

PT3E-05211
Optical Interferometric Gas Concentration Meter
FI-8000 Operating Manual
(PT3-052)
A.M.BICKFORD, INC.12318 Big Tree Road, Wales Center, New York 14169-0201, USA
Phone (716) 652-1590Fax (716) 652-2046Toll Free (800) 795-3062Web ambickford.com

- 1 -
<Contents> 1 Outline of the Product ......................................................................................................... 21-1. Preface .............................................................................................................................. 21-2. Purpose of use .................................................................................................................. 21-3. Definition of DANGER, WARNING, CAUTION and NOTE ................................................ 2
2 Important Notices on Safety................................................................................................ 32-1. Danger cases .................................................................................................................... 32-2. Warning cases .................................................................................................................. 52-3. Precautions ....................................................................................................................... 6 2-4. Safety Information ............................................................................................................. 8
3 Product Components .......................................................................................................... 93-1. Main unit and standard accessories .................................................................................. 93-2. Names and functions for each part ................................................................................... 12
4 How to Use ......................................................................................................................... 144-1. Before using the concentration meter ............................................................................... 144-2. Preparation for start-up ..................................................................................................... 144-3. Basic operating procedures............................................................................................... 184-4. How to start the concentration meter ................................................................................ 194-5. Measurement method (measuring mode) ......................................................................... 214-6. Manual Memory ................................................................................................................ 244-7. Measuring Gas/Range Detail Display ............................................................................... 254-8. Reference gas calibration ................................................................................................. 264-9. Setup mode ....................................................................................................................... 274-10. Recording measurement mode (pump suction type only) ............................................... 334-10. How to exit ...................................................................................................................... 39
5 Operations and Functions ................................................................................................... 405-1. CAUTION display .............................................................................................................. 405-2. ERROR display ................................................................................................................. 42
6 Maintenance ....................................................................................................................... 436-1. Maintenance intervals and items ....................................................................................... 436-2. Calibration ......................................................................................................................... 446-3. How to clean ..................................................................................................................... 446-4. Parts replacement ............................................................................................................. 45
7 Storage and Disposal ......................................................................................................... 467-1. Procedures to store the concentration meter or leave it for a long time ............................ 467-2. Procedures to use the concentration meter again ............................................................. 467-3. Disposal of products .......................................................................................................... 47
8 Troubleshooting .................................................................................................................. 48
9 Product Specifications ........................................................................................................ 519-1. List of specifications .......................................................................................................... 519-2. List of accessories ............................................................................................................. 53
10 Definition of Terms ............................................................................................................ 54
11 Detection Principle ............................................................................................................ 55
Measuring Gas Specifications by Type .................................................................................... 56

1 Outline of the Product 1-1. Preface
- 2 -
1
Outline of the Product
1-1. PrefaceThank you for choosing our optical interferometric gas concentration meter FI-8000. Please check that the model number of the product you purchased is included in the specifications on this manual.
This manual explains how to use the concentration meter and its specifications. It contains information required for using the concentration meter properly. Not only the first-time users but also the users who have already used the product must read and understand the operating manual to enhance the knowledge and experience before using the concentration meter.
1-2. Purpose of useThis product is a portable concentration meter designed to measure concentration or density of gases, such as halothane in oxygen and methyl bromide in the air.
The measuring gases and ranges vary by the type of FI-8000 you purchased. Check the type again before use and perform gas measurement properly in accordance with purposes (see "Measuring Gas Specifications by Type" at the end of this manual for identifying the type).
1-3. Definition of DANGER, WARNING, CAUTION andNOTE
DANGER This message indicates that improper handling may cause serious damage on life, health or assets.
WARNING This message indicates that improper handling may cause serious damage on health or assets.
CAUTION This message indicates that improper handling may cause minor damage on health or assets.
NOTE This message indicates advice on handling.

2 Important Notices on Safety 2-1. Danger cases
- 3 -
2
Important Notices on Safety
2-1. Danger cases
DANGER About explosion-proof When using this gas detector in a hazardous area, take the following countermeasures for
preventing dangers resulting from electrostatic charges.(1) Wear anti-static clothes and conductive shoes (anti-static work shoes).(2) For indoor use, use the gas detector while standing on a conductive work floor (with aleakage resistance of 10 MΩ or less).
【FI-8000】The battery units that can be connected are the BUL-8000(F)(TC21066), BUL-8000 (F1)(TC21067), or BUD-8000(F)(TC21065).
【BUL-8000(F), BUL-8000(F1), BUD-8000(F)】The main unit that can be connected isFI-8000(TC21064) only.
【BUL-8000(F), BUL-8000(F1), BUD-8000(F)】Do not attach and remove the battery unit in a hazardous location.
【BUL-8000(F), BUL-8000(F1)】Charging has to be done with the dedicated AC adaptor innon-hazardous area.
【BUL-8000(F), BUL-8000(F1)】The temperature should be between 0degree C and +40degree C. 【BUD-8000(F)】Do not attach and remove batteries in the dry battery unit in a hazardous
location. 【BUD-8000(F)】Use specified AA alkaline batteries (LR6 TOSHIBA) for the dry battery unit. The specifications of the gas detector are as follows:
Sensor circuit : Allowable voltage of 4.95 V, allowable current of 1.12 A, and allowable power of 1138 mW
Pump circuit : Allowable voltage of 4.95 V, allowable current of 0.834 A, and allowable power of 853 mW
Buzzer circuit : Allowable voltage of 4.95 V, allowable current of 0.431 A, and allowable power of 441 mW
Main circuit : Allowable voltage of 4.95 V, allowable current of 0.717 A, and allowable power of 733 mW
Backup circuit : 3.0 VDC, 10 µA Ambient temperature :-20degree C to +50degree C
2 Important Notices on Safety 2-1. Danger cases
- 4 -
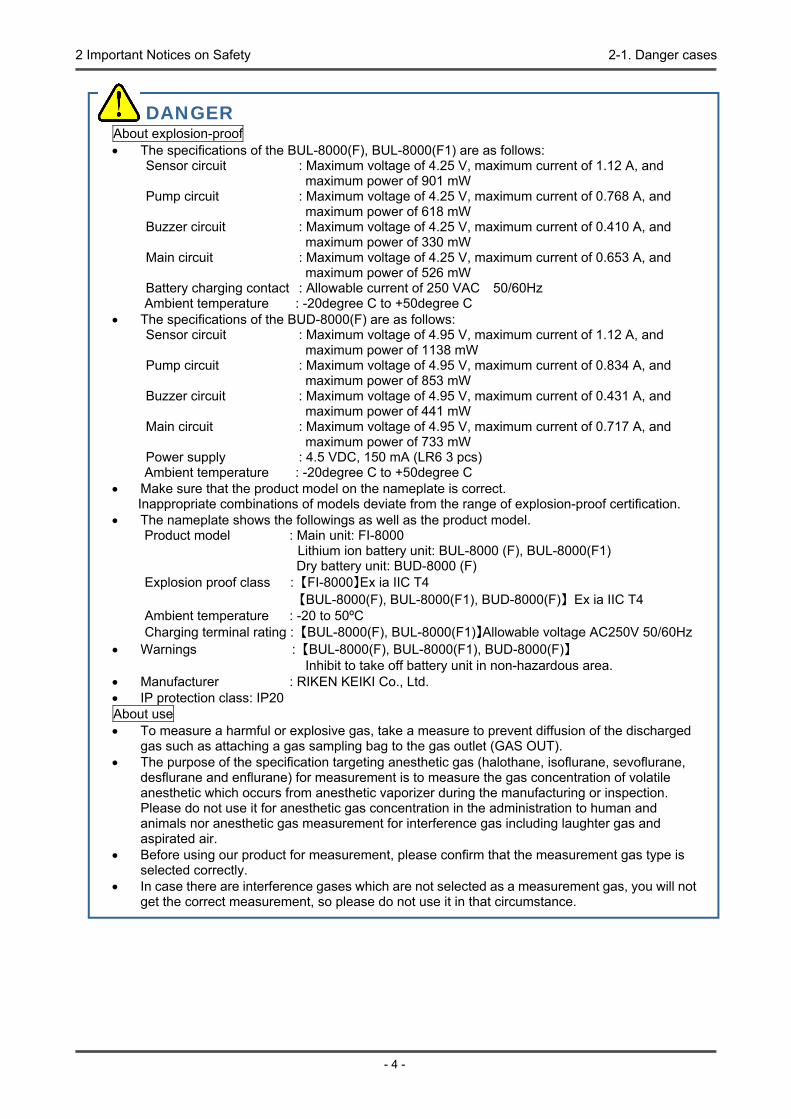
DANGER About explosion-proof The specifications of the BUL-8000(F), BUL-8000(F1) are as follows:
Sensor circuit : Maximum voltage of 4.25 V, maximum current of 1.12 A, and maximum power of 901 mW
Pump circuit : Maximum voltage of 4.25 V, maximum current of 0.768 A, and maximum power of 618 mW
Buzzer circuit : Maximum voltage of 4.25 V, maximum current of 0.410 A, and maximum power of 330 mW
Main circuit : Maximum voltage of 4.25 V, maximum current of 0.653 A, and maximum power of 526 mW
Battery charging contact : Allowable current of 250 VAC 50/60Hz Ambient temperature : -20degree C to +50degree C
The specifications of the BUD-8000(F) are as follows:Sensor circuit : Maximum voltage of 4.95 V, maximum current of 1.12 A, and
maximum power of 1138 mW Pump circuit : Maximum voltage of 4.95 V, maximum current of 0.834 A, and
maximum power of 853 mW Buzzer circuit : Maximum voltage of 4.95 V, maximum current of 0.431 A, and
maximum power of 441 mW Main circuit : Maximum voltage of 4.95 V, maximum current of 0.717 A, and
maximum power of 733 mW Power supply : 4.5 VDC, 150 mA (LR6 3 pcs) Ambient temperature : -20degree C to +50degree C
Make sure that the product model on the nameplate is correct.Inappropriate combinations of models deviate from the range of explosion-proof certification.
The nameplate shows the followings as well as the product model.Product model : Main unit: FI-8000
Lithium ion battery unit: BUL-8000 (F), BUL-8000(F1) Dry battery unit: BUD-8000 (F)
Explosion proof class : 【FI-8000】Ex ia IIC T4 【BUL-8000(F), BUL-8000(F1), BUD-8000(F)】 Ex ia IIC T4
Ambient temperature : -20 to 50ºC Charging terminal rating : 【BUL-8000(F), BUL-8000(F1)】Allowable voltage AC250V 50/60Hz
Warnings : 【BUL-8000(F), BUL-8000(F1), BUD-8000(F)】 Inhibit to take off battery unit in non-hazardous area.
Manufacturer : RIKEN KEIKI Co., Ltd. IP protection class: IP20About use To measure a harmful or explosive gas, take a measure to prevent diffusion of the discharged
gas such as attaching a gas sampling bag to the gas outlet (GAS OUT). The purpose of the specification targeting anesthetic gas (halothane, isoflurane, sevoflurane,
desflurane and enflurane) for measurement is to measure the gas concentration of volatileanesthetic which occurs from anesthetic vaporizer during the manufacturing or inspection.Please do not use it for anesthetic gas concentration in the administration to human andanimals nor anesthetic gas measurement for interference gas including laughter gas andaspirated air.
Before using our product for measurement, please confirm that the measurement gas type isselected correctly.
In case there are interference gases which are not selected as a measurement gas, you will notget the correct measurement, so please do not use it in that circumstance.

2 Important Notices on Safety 2-2. Warning cases
- 5 -
2-2. Warning cases
WARNING Sampling point pressure The concentration meter is designed to draw gases around it under the atmospheric pressure.
If excessive pressure is applied to the gas inlet (GAS IN) and outlet (GAS OUT) of theconcentration meter, measuring gases may leak out from its inside and may cause dangerousconditions. Be sure that excessive pressure is not applied to the concentration meter whileused.
Do not connect the gas sampling hose directly to a location with a pressure higher than theatmospheric pressure. The internal piping system may be damaged.
Reference gas calibration in the atmosphere When the reference gas calibration is performed in the atmosphere, check the atmosphere for
freshness before beginning the calibration. If interference gases (other than measuring andbase gases) exist, the adjustment cannot be performed properly, thus leading to dangers whenthe gas leaks.
Battery level check Before use, check that there remains sufficient battery power. When the concentration meter is
used for the first time or is not used for a long period, the batteries may be exhausted. Eitherfully charge the batteries or replace them with new ones before use.
If a battery error occurs, measurement cannot be performed. If the error message is displayedduring use, turn off the power and promptly replace or charge the batteries in a non-hazardousarea.
Others Do not draw a high-concentration gas beyond the measuring range. Accurate readings cannot
be obtained. Do not throw the concentration meter into fire. Do not block the buzzer sound opening. No buzzer sound can be heard. Do not remove the battery unit while the power is on. Use dry batteries of the specified ratings for the concentration meter.

2 Important Notices on Safety 2-3. Precautions
- 6 -
2-3. Precautions
CAUTION Do not measure gases that contain interference gases. If a measuring gas contains an interference gas (other than measuring and base gases),
accurate readings cannot be obtained.Do not measure gases that contain interference gases.
The gas inlet and outlet should be at the atmospheric pressure. Keep the gas inlet and outlet at the atmospheric pressure.
Do not use the concentration meter where it is exposed to oil, chemicals, etc. Do not submerge the concentration meter under water on purpose. Do not use in a place where the concentration meter is exposed to liquids such as oil and
chemicals. The concentration meter, being compliant to IP67, is not water-pressure-resistant. Do not use
the concentration meter where a high water pressure is applied to it (under a faucet, shower,etc.) or submerge it under water for a long time. The concentration meter is water-proof only infresh water and running water, and not in hot water, salt water, detergent, chemicals, humansweat, etc.
The gas inlet and outlet are not water-proof. Be careful not to let water such as rainwater getinto these parts. Because this may cause trouble and gas cannot be measured.
Do not place the concentration meter where water or dirt gets accumulated. The concentrationmeter placed at such a location may malfunction due to water or dirt that gets into the buzzeropening, gas inlet, etc.
Note that drawing in dirty water, dust, metallic powder, etc. will significantly deteriorate thesensor sensitivities. Be careful when the concentration meter is used in an environment wherethese elements exist.
Do not use the concentration meter in a place where the temperature drops below -20ºC or rises over 50ºC. The operating temperature of the concentration meter is -20 to 50ºC. Do not use the
concentration meter at higher temperatures, humidities and pressures or at lower temperaturesthan the operating range.
Avoid long-term use of the concentration meter in a place exposed to radiant heat (infraredrays emitted from a high-temperature object) or direct sunlight.
Do not store the concentration meter in a sun-heated car.
Observe the operating restrictions to prevent condensation inside the concentration meter or gas sampling hose. Condensation formed inside the concentration meter or gas sampling hose causes clogging or gas adsorption, which may disturb accurate gas measurement. Thus, condensation must be avoided. In addition to the operating environment, carefully monitor the temperature/humidity of the sampling point to prevent condensation inside the concentration meter or gas sampling hose. Please observe the operating restrictions.

2 Important Notices on Safety 2-3. Precautions
- 7 -
Do not use a transceiver near the concentration meter. Radio wave from a transceiver near the concentration meter may disturb readings. If a
transceiver or other radio wave transmitting device is used, it must be used in a place where itdisturbs nothing.
Do not use the concentration meter near a device that emits strong electromagnetic waves(high-frequency or high-voltage devices).
Never fail to perform a regular maintenance. Never fail to perform a regular maintenance to ensure safety. Continuing to use the concentration meter without performing maintenance will result in inaccurate gas measurement.
Others Operate the concentration meter using only the procedures described in this operating manual. Do not drop or give shock to the concentration meter. The water-proof performance and
accuracy may be deteriorated. Do not use the concentration meter while charging it.

2 Important Notices on Safety 2-4. Safety Information
- 8 -
2-4. Safety InformationThe FI-8000 is an optical interferometer which is used for measuring gas concentration or calorie of flammable gases in hazardous location. It has two different suction styles, one is manual aspirating with squeezing a rubber bulb and other is automatic suction by an internal micro pump. The battery can be selected either Li-ion battery or alkaline dry battery. Li-ion battery unit is called BUL-8000(F), BUL-8000(F1) and alkaline dry battery unit is called BUD-8000(F). The battery unit structured in a way, that even the end user is possible to replace it.
Specification for safety ・Ex ia IIC T4 Ga
・Ambient temperature range for use : -20°C to +50°C・Ambient temperature range during battery charging : 0°C to +40°C
Electrical data ・Power supply of Li-ion battery unit : BUL-8000(F), BUL-8000(F1)Two parallel connected Li-ion cells used in battery pack BP-8000 are from type MaxellINR18650PB1 or SDI INR18650-15M or SONY US18650VT3. Um=250V.・Power supply of alkaline battery unit : BUD-8000(F)Powered by three series AA size alkaline batteries, model LR6 by TOSHIBA.
Certificate numbers・IECEx Certificate number : IECEx PRE 14.0061・ATEX Certificate number :Presafe 14 ATEX 5711
List of standards ・IEC 60079-0:2011 ・EN60079-0:2012・IEC 60079-11:2011 ・EN60079-11:2012・IEC 60079-26:2006 ・EN60079-26:2007
WARNING ・DO NOT CHARGE IN HAZARDOUS LOCATION.・DO NOT CHARGE IT EXCEPT BY GENUINE CHARGER.・DO NOT REPLACE BATTERY UNIT IN HAZARDOUS LOCATION.・DO NOT REPLACE DRY BATTERIES IN HAZARDOUS LOCATION.・DO NOT ATTEMPT TO DISASSEMBLE OR ALTER THE INSTRUMENT.・USE ONLY WITH CONNECTED ALKALINE AA BATTERY, TYPE LR6MANUFACTURED BY TOSHIBA.
INST. No. 0 0 0 0 0 0 0 0 0 0 0 A B C D E
A: Manufacturing year (0-9) B: Manufacturing month (1-9,XYZ for Oct.-Dec.) C: Manufacturing lot D: Serial number E: Code of factory
・ II 1 G Ex ia IIC T4 Ga
Phone : +81-3-3966-1113 Fax : +81-3-3558-9110
E-mail : [email protected] Web site : http://www.rikenkeiki.co.jp
3 Product Components 3-1. Main unit and standard accessories
- 9 -
3
Product Components
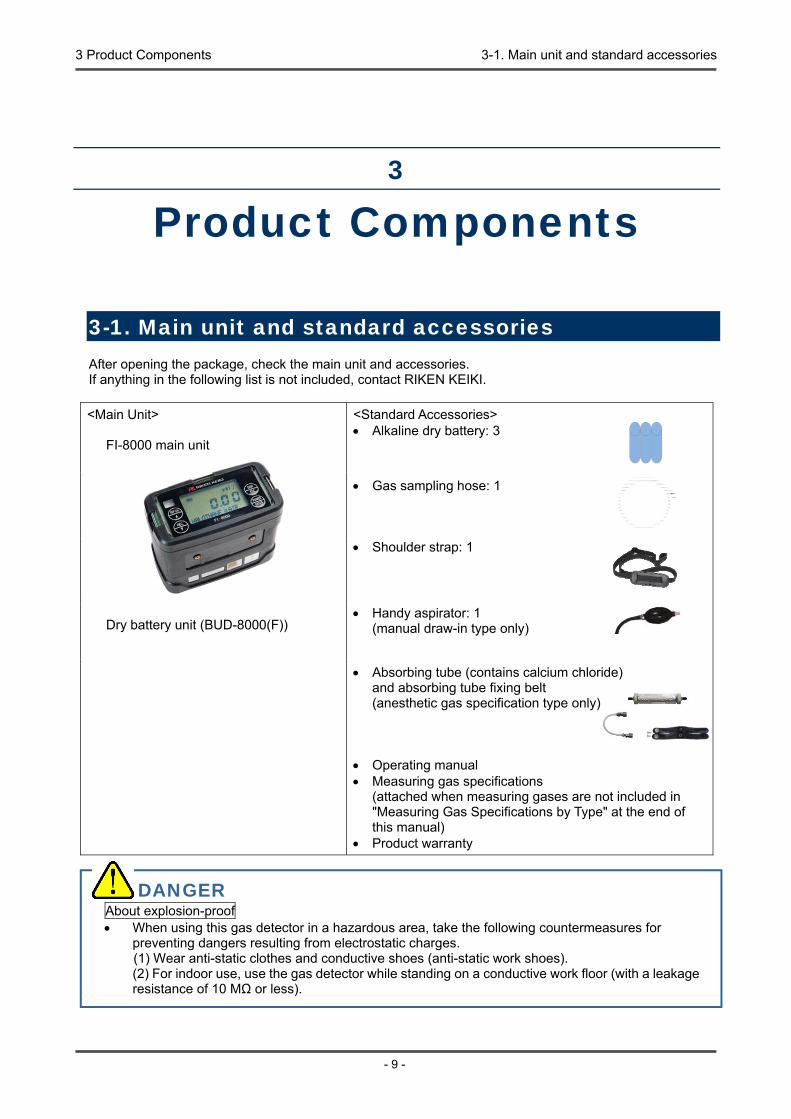
3-1. Main unit and standard accessoriesAfter opening the package, check the main unit and accessories. If anything in the following list is not included, contact RIKEN KEIKI.
<Main Unit>
FI-8000 main unit
Dry battery unit (BUD-8000(F))
<Standard Accessories> Alkaline dry battery: 3
Gas sampling hose: 1
Shoulder strap: 1
Handy aspirator: 1(manual draw-in type only)
Absorbing tube (contains calcium chloride)and absorbing tube fixing belt(anesthetic gas specification type only)
Operating manual Measuring gas specifications
(attached when measuring gases are not included in"Measuring Gas Specifications by Type" at the end ofthis manual)
Product warranty
DANGER About explosion-proof When using this gas detector in a hazardous area, take the following countermeasures for
preventing dangers resulting from electrostatic charges.(1) Wear anti-static clothes and conductive shoes (anti-static work shoes).(2) For indoor use, use the gas detector while standing on a conductive work floor (with a leakageresistance of 10 MΩ or less).

3 Product Components 3-1. Main unit and standard accessories
- 10 -
DANGER 【FI-8000】The battery units that can be connected are the BUL-8000(F)(TC21066),
BUL-8000 (F1)(TC21067) or BUD-8000(F)(TC21065). 【BUL-8000(F), BUL-8000(F1), BUD-8000(F)】The main unit that can be connected is
FI-8000(TC21064) only. 【BUL-8000(F), BUL-8000(F1), BUD-8000(F)】Do not attach and remove the battery unit in a
hazardous location. 【BUL-8000(F), BUL-8000(F1)】Charging has to be done with the dedicated AC adaptor in
non-hazardous area. 【BUL-8000(F), BUL-8000(F1)】The temperature should be between 0degree C and +40degree C. 【BUD-8000(F)】Do not attach and remove batteries in the dry battery unit in a hazardous location. 【BUD-8000(F)】Use specified AA alkaline batteries (LR6 TOSHIBA) for the dry battery unit. The specifications of the gas detector are as follows:
Sensor circuit : Allowable voltage of 4.95 V, allowable current of 1.12 A, and allowable power of 1138 mW
Pump circuit : Allowable voltage of 4.95 V, allowable current of 0.834 A, and allowable power of 853 mW
Buzzer circuit : Allowable voltage of 4.95 V, allowable current of 0.431 A, and allowable power of 441 mW
Main circuit : Allowable voltage of 4.95 V, allowable current of 0.717 A, and allowable power of 733 mW
Backup circuit : 3.0 VDC, 10 µA Ambient temperature :-20degree C to +50degree C
The specifications of the BUL-8000(F), BUL-8000(F1) are as follows:Sensor circuit : Maximum voltage of 4.25 V, maximum current of 1.12 A, and maximum
power of 901 mW Pump circuit : Maximum voltage of 4.25 V, maximum current of 0.768 A, and
maximum power of 618 mW Buzzer circuit : Maximum voltage of 4.25 V, maximum current of 0.410 A, and
maximum power of 330 mW Main circuit : Maximum voltage of 4.25 V, maximum current of 0.653 A, and
maximum power of 526 mW Battery charging contact : Allowable current of 250 VAC 50/60Hz Ambient temperature : -20degree C to +50degree C
The specifications of the BUD-8000(F) are as follows:Sensor circuit : Maximum voltage of 4.95 V, maximum current of 1.12 A, and maximum
power of 1138 mW Pump circuit : Maximum voltage of 4.95 V, maximum current of 0.834 A, and
maximum power of 853 mW Buzzer circuit : Maximum voltage of 4.95 V, maximum current of 0.431 A, and
maximum power of 441 mW Main circuit : Maximum voltage of 4.95 V, maximum current of 0.717 A, and
maximum power of 733 mW Power supply : 4.5 VDC, 150 mA (LR6 3 pcs) Ambient temperature : -20degree C to +50degree C
Make sure that the product model on the nameplate is correct.Inappropriate combinations of models deviate from the range of explosion-proof certification.
The nameplate shows the followings as well as the product model.Product model : Main unit: FI-8000
Lithium ion battery unit: BUL-8000 (F), BUL-8000(F1) Dry battery unit: BUD-8000 (F)
Explosion proof class : 【FI-8000】Ex ia IIC T4 【BUL-8000(F), BUL-8000(F1), BUD-8000(F)】 Ex ia IIC T4
Ambient temperature : -20 to 50ºC Charging terminal rating : 【BUL-8000(F), BUL-8000(F1)】Allowable voltage AC250V 50/60Hz
Warnings : 【BUL-8000(F), BUL-8000(F1), BUD-8000(F)】 Inhibit to take off battery unit in non-hazardous area.
Manufacturer : RIKEN KEIKI Co., Ltd. IP protection class: IP20

3 Product Components 3-1. Main unit and standard accessories
- 11 -
NOTE Connect either the lithium ion battery unit BUL-8000(F), BUL-8000(F1) or dry battery unit BUD-8000(F). Check the model of the battery unit with the nameplate affixed to the unit. A nameplate indicating a compatible model is affixed to the battery unit to avoid using the gas monitor in combination with a wrong unit. Check this information and use a correct combination. Nameplate
(Top view of battery unit)
(Side view of battery unit)

3 Product Components 3-2. Names and functions for each part
- 12 -
3-2. Names and functions for each part<Outline Drawing> (Main Unit)
(1) LCD display Displays a measuring gas name, concentration, error, etc. (2)
Buzzer sound opening Emits a buzzer sound at power-on/off or error occurrence. (Do not block it.)
(3) Alarm LED arrays The lamp blinks in response to error occurrence. (4) Infrared communication port Used to carry out data communications with a PC in data logger mode.(5) REF CAL switch Used to perform reference gas calibration.
[switch] [Used to enter numerical values or move a screen.] (6) REC. switch Used to save measurement results in the measuring mode.
[ switch] [Used to enter numerical values or move a screen.] (7) DISP switch Displays detailed information such as a range of measuring gas.
[ESC switch] [Used to stop processing and to do others.]

3 Product Components 3-2. Names and functions for each part
- 13 -
(8) POWER switch Turns ON/OFF the power.
[ENTER switch] [Used to make a selection in the setup and recording measurement modes.]
(9) Gas inlet Draws in a gas (do not block it). The gas sampling hose is connected. (10)
Gas outlet Discharges a gas drawn into the concentration meter (do not block it). (A handy aspirator is attached for the handy aspirator specification type.)
(11) Battery cover Opened or closed when replacing dry batteries. (12) Battery cover fixing screw Fixes the battery cover. (13) Battery unit screws Loosened to detach and replace the battery unit.
The switches and descriptions in [ ] are for the setup and recording measurement modes.
<LCD Display> (Measuring mode)
(1) Battery level icon Displays the battery level. See the information below for the meanings of battery level icons.
(2) Unit Displays a unit of gas concentration.
(3) Measuring gas concentration display
Displays the gas concentration as numeric output.
(4) Measuring gas name Displays the measuring gas name.
NOTE The meanings of battery level icons are as follows:
: Sufficient/ : Low/ : Needs replacement (charging) If the battery level further drops, the inside of the battery icon starts to blink ( ).
CAUTION Do not jab the buzzer sound opening with a sharp-pointed item. The unit may malfunction or
get damaged, allowing water or foreign matter, etc. to get inside. Do not remove the panel sheet on the surface. The water-proof and dust-proof performances
will be deteriorated. Do not affix a label or the like on the infrared communication port. Infrared communications can
no longer be conducted.
(1) Battery level icon
(2) Unit
(3) Measured gas concentration display
(4) Measured gas name

4 How to Use 4-1. Before using the concentration meter
- 14 -
4
How to Use
4-1. Before using the concentration meterNot only the first-time users but also the users who have already used the concentration meter must follow the operating precautions. Ignoring the precautions may damage the unit, resulting in inaccurate gas measurement.
4-2. Preparation for start-upBefore starting gas measurement, read and understand the following precautions. Ignoring these precautions may prevent correct gas measurement. Check that the battery level is sufficient. Check that there is no bend or hole in the gas sampling hose. Check that the filter in the gas sampling probe is free of dust or clogging. Check that the main unit and gas sampling hose are connected properly. Check that the main unit and handy aspirator are connected properly (the handy aspirator specification
type only).
<Attaching Batteries> (When the standard accessory BUD-8000(F) is used) When the concentration meter is used for the first time, or when the battery level is low, attach new AA alkaline batteries.
DANGER 【BUL-8000(F), BUL-8000(F1), BUD-8000(F)】Do not attach and remove the battery unit in a
hazardous location. 【BUL-8000(F), BUL-8000(F1)】Charging has to be done with the dedicated AC adaptor in
non-hazardous area. 【BUL-8000(F), BUL-8000(F1)】The temperature should be between 0degree C and +40degree C. 【BUD-8000(F)】Do not attach and remove batteries in the dry battery unit in a hazardous location. 【BUD-8000(F)】Use specified AA alkaline batteries (LR6 TOSHIBA) for the dry battery unit.
CAUTION <Replacement> Turn off the power of the concentration meter before replacing the batteries. Replace the batteries in a non-hazardous area. Replace all of the three batteries with new ones at one time. Pay attention to the polarities of the batteries. If the battery cover fixing screw is not completely tightened, the dry batteries may drop off or
water may get in through the clearance.Water may also get in if a minute foreign substance is caught beneath the battery unit.
<Batteries> Use AA alkaline batteries. Rechargeable batteries cannot be used. If the concentration meter is not used for a long time, store it after removing the batteries.

4 How to Use 4-2. Preparation for start-up
- 15 -
(1) Using a flathead screwdriver or coin,turn the battery cover fixing screwcounterclockwise to open the batterycover.
(2) Paying attention to the polarities ofbatteries, replace all the three batterieswith new ones.
(3) Close the battery cover and tighten thebattery cover fixing screw.
<Charging Batteries> (When the option unit BUL-8000(F), BUL-8000(F1) is used)
In addition to the alkaline battery unit (BUD-8000(F)) of standard accessory, the optional lithium ion battery unit (BUL-8000(F), BUL-8000(F1)) can be used for the concentration meter. When the concentration meter is used for the first time, or when the battery level is low, be sure to use the accessory AC powered charger to charge the batteries.
Battery cover Battery cover fixing screw
AA alkaline dry batteries
Battery polarity
DANGER Use the dedicated AC powered charger. Charge the battery unit in a non-hazardous area. Charge the battery unit at ambient temperatures between 0 to +40ºC. Do not use the concentration meter while charging it. Correct measurements cannot be
obtained.Furthermore, the batteries get deteriorated more quickly and may have shorter life.
The charger is neither water-proof nor dust-proof. Do not charge the batteries while theconcentration meter is wet.
The AC powered charger is not explosion-proof.

4 How to Use 4-2. Preparation for start-up
- 16 -
(1) Open the charging jack cover of the concentration meter.
(2) Put the plug of the AC powered charger into the charging jack of the concentration meter.(3) Connect the AC powered charger to the wall electric outlet.
When charging is started, the charging indicator lamp lights up (red).(Charging time: Three hours at the maximum until the batteries are fully charged)
(4) When charging is completed, the charging indicator lamp goes off.(5) When charging is completed, disconnect the AC powered charger from the wall electric outlet.(6) Pull out the AC powered charger plug from the charging jack of the concentration meter and reattach
the charging jack cover (rubber cap). Push the charging jack cover as far as it will go.
NOTE During charging, the battery unit may get hot, but this is not an abnormality. The temperature of the concentration meter is high immediately after charging is completed. Let it stand
for 10 minutes or more before using it. Otherwise, correct measurements may not be obtained. When fully charged batteries are recharged, the charging indicator lamp does not go on.
CAUTION Do not pull the charging jack cover too hard. It may get damaged.
Put the plug of AC powered charger into the charging jack
Charging jack
Plug
Charging jack cover(rubber cap)
Charging indicator lamp
AC powered charger
CAUTION Do not use the concentration meter with the charging jack cover detached. Dust or water may
get into the concentration meter, causing it to malfunction. If the charging jack cover is not completely closed, water may get in from the power jack. The
same thing occurs if a minute foreign substance is caught beneath the knob. Disconnect the AC powered charger plug from the charging jack while it is not in use.

4 How to Use 4-2. Preparation for start-up
- 17 -
<Releasing and Attaching the Battery Unit> (1) Loosen the two battery unit screws.
(They need not be completely detached.)(2) Detach the battery unit.(3) Attach a new battery unit.
NOTE Make sure that the battery unit is installed in correct orientation by checking the locations of the connection terminal and projection portions.
(4) Securely tighten the two battery unit screws.
<Connecting the Gas Sampling Hose> Connect the sampling hose securely to the gas inlet (GAS IN) of the concentration meter. To use an absorbing tube, connect tubes to the gas inlet (GAS IN) of the concentration meter in the
following order: relay tube, absorbing tube and then gas sampling hose. To use the handy aspirator specification type, connect the handy aspirator securely to the gas outlet
(GAS OUT) of the concentration meter.
CAUTION Turn off the power of the concentration meter before
replacing the battery unit. Detach and reattach the battery unit in a non-hazardous
area. If the battery unit screw is not completely tightened, the
battery unit may drop off or water may get in through theclearance.Also, if a minute foreign substance is caught in theclearance, water may get in.
Do not damage the rubber seal. To maintain the water-proof and dust-proof performances, it
is recommended to replace the rubber seal every two years,whether or not it has an abnormality.
Connection terminal
Battery unit screws
Bottom of concentration meter
Insert the handy aspirator all the way into the gas outlet (GAS OUT)to ensure connection.
Insert the sampling hose or relay tube to the gas inlet (GAS IN) until it clicks into place to ensure connection.
CAUTION Use only the tubes specified by RIKEN KEIKI.

4 How to Use 4-3. Basic operating procedures (measuring mode)
- 18 -
4-3. Basic operating procedures (measuring mode)
NOTE The concentration meter provides various operating modes: "Measuring mode" for measuring a specified gas continuously, "Setup mode" for changing a measuring gas, setting time, etc. and "Recording measurement mode (pump specification type only)" for measuring and recording at specified time intervals. The power-on method differs in each mode. See "4-7. Modes" for details.
<Caution Display>
<Error Display>
<Measuring Mode>
<Manual Memory>
<Measuring Gas/Range Detail Display>
<Reference Gas Calibration>
(long pressing)
(long pressing)

4 How to Use 4-4. How to start the concentration meter
- 19 -
4-4. How to start the concentration meter<Start-up Procedures> (Measuring mode)
Keep the POWER switch pressed for three seconds or more.
Self-diagnosis (UV intensity)Example: OK (no problem)
All LCDs light up. Alarm lamp lights up. Buzzer sounds once. (Beep)
Self-diagnosis (contrast) Example: OK (no problem)
Measuring mode Buzzer sounds twice. (Beep, beep)
Self-diagnosis (battery level) Example: March 10, 2014 23:47
OK (no problem)
CAUTION After start-up, make the concentration meter draw the reference gas specified in the measuring gas specifications sufficiently from the gas inlet (GAS IN) before performing gas measurement. If the concentration meter does not read the reference calibration value specified in the measuring gas specifications, perform reference gas calibration (see "4-8. Reference gas calibration").

4 How to Use 4-4. How to start the concentration meter
- 20 -
<Self-diagnosis Function at Start-up>
The concentration meter provides various operating modes: "Measuring mode" for measuring a specified gas continuously, "Setup mode" for changing a measuring gas, setting time, etc. and "Recording measurement mode (pump suction type only)" for measuring and recording at specified time intervals. The power-on method differs in each mode. See "4-7. Modes" for details. The self-diagnosis function works automatically regardless of the way to turn on the power, and the self-diagnosis screen is displayed (see P.17 Start-up Procedures). If a problem is found in the battery level, UV intensity or contrast as a result of self-diagnosis, the concentration meter displays "LOW" in the lower part of the screen and sounds the buzzer.
Display example: Low contrast
If the problem found is a minor one, the concentration meter enters the measuring mode. However, the screen provides the normal and caution displays alternately.
Display example: Caution display for low contrast
If the problem found is a major one that prevents measurement, the concentration meter does not enter any mode and displays an error.
Display example: Contrast error
Alternate display
CAUTION If a caution or error is displayed, promptly take an appropriate remedial measure to restore the normal condition. See "8. Troubleshooting" for caution and error details and remedial actions.

4 How to Use 4-5. Measurement method (measuring mode)
- 21 -
4-5. Measurement method (measuring mode)The concentration meter provides the following display in the measuring mode.
Display example <- Display example
Sevoflurane concentration: 7. 43 vol% Base gas: Air Battery level: Sufficient
<Automatic Draw-in by Built-in Pump> In the measuring mode, put the gas sampling hose close to the measurement location and take the reading.
<Manual Draw-in by Handy Aspirator> In the measuring mode, put the gas sampling hose close to the measurement location and squeeze the handy aspirator two or three times to draw a gas. The reading fluctuates widely due to change in pressure while a gas is drawn. After drawing a gas, take the reading when it is stabilized.
DANGER Oxygen-deficient air or other gases may blow out from the gas exhausting outlet. Never inhale
the air or gases. To measure a harmful or explosive gas, take a measure to prevent diffusion of the exhausted
gas such as attaching a gas sampling bag to the gas outlet (GAS OUT). The purpose of the specification targeting anesthetic gas (halothane, isoflurane, sevoflurane,
desflurane and enflurane) for measurement is to measure the gas concentration of volatileanesthetic which occurs from anesthetic vaporizer during the manufacturing or inspection.Please do not use it for anesthetic gas concentration in the administration to human andanimals nor anesthetic gas measurement for interference gas including laughter gas andaspirated air.
Before using our product for measurement, please confirm that the measurement gas type isselected correctly.
In case there are interference gases which are not selected as a measurement gas, you will notget the correct measurement, so please do not use it in that circumstance.
WARNING The concentration meter is designed to draw gases around it under the atmospheric pressure.
If excessive pressure is applied to the gas inlet and outlet (GAS IN, GAS OUT) of theconcentration meter, measuring gases may leak out from its inside and may cause dangerousconditions. Be sure that excessive pressure is not applied to the inlets while the concentrationmeter is used.
Do not connect the gas sampling hose directly to a location with a pressure higher than theatmospheric pressure. The internal piping system may be damaged.
Do not draw a gas with a pressure higher than the atmospheric pressure. Accurate readingscannot be obtained.
Before use, check that there remains sufficient battery power. When the concentration meter isused for the first time or is not used for a long period, the batteries may be exhausted. Eitherfully charge the batteries or replace them with new ones before use.
If a battery error occurs, measurement cannot be performed. If the error message is displayedduring use, turn off the power and promptly replace or charge the batteries in a non-hazardousarea.
Do not draw a high-concentration gas beyond the measuring range. Accurate readings cannotbe obtained.
Do not block the buzzer sound opening. No buzzer sound can be heard when an error isdisplayed.

4 How to Use 4-5. Measurement method (measuring mode)
- 22 -
NOTE In a low-temperature environment, the operating time is shortened due to the battery performance
property. At a low temperature, the response of the LCD display may get slow down. If a high-concentration gas is drawn, some gas may remain in the gas sampling hose due to adsorption
in the hose, etc. After drawing a high-concentration gas, clean the concentration meter to remove theadsorbed gas (draw a reference gas and check that the reading becomes the reference calibrationvalue).Note that if reference gas calibration is performed while the cleaning is incomplete, the concentrationmeter will not be adjusted properly and thus correct measurement cannot be performed. In such a case,remove the gas sampling hose before performing reference gas calibration to avoid inaccurateadjustment.
<Points of attention in fumigation gases measurement> FI-8000 might indicate different reading from true measuring concentration due to influence of carbon dioxide concentration variation. In order to reduce the influence of carbon dioxide concentration variation as much as possible, please operate the FI-8000 with below instructions.
In order to reduce the influence of carbon dioxide concentration variation as much as possible, carbon dioxide needs to be removed by pretreating prior to start measurement. Carbon dioxide removal filter (soda lime filter)*1 and Moisture removal filter (calcium chloride filter)*2 are used for this pretreatment.
*1) Carbon dioxide removal filter (soda lime filter)
It removes carbon dioxide. Moisture will be generated in a chemical reaction of carbon dioxide and soda
lime. *2) Moisture removal filter (calcium chloride filter)
It removes moisture that is generated by carbon dioxide removal filter.
At the beginning, Reference gas calibration should be done using carbon dioxide removal filter and moisture removal filter at the fumigation area that there is no fumigation gas (see “4-6. Reference gas calibration”). Once gas is introduced, start measurement that also should be done using both filters as soon as possible.
Since carbon dioxide is being generated from objects, if a time interval causes, you might not have accurate reading due to carbon dioxide concentration variation.
CAUTION If the measured gas contains an interference gas (other than measuring and base gases),
accurate readings cannot be obtained. Do not measure gases that contain interference gases. Keep the gas inlet and outlet at the atmospheric pressure. The concentration meter does not read normally unless a measuring and base gases are
selected correctly. Check that the measuring and base gas names displayed on the screenagree with ones to be measured before use.
FI-8000
Moisture removal filter
Carbon dioxide removal filter
Fumigation area gas (Environment before/after introducing fumigation gas)

4 How to Use 4-5. Measurement method (measuring mode)
- 23 -
CAUTION Filters are consumables. Please replace both filters periodically. Incorrect filter connection sequence can cause failure. The FI-8000 will suck the moisture
which is generated from carbon dioxide removal filter.
FI-8000
Moisture removal filter
Carbon dioxide removal filter
Fumigation area gas (Environment before/after introducing fumigation gas)
<Correct use>
FI-8000
Carbon dioxide removal filter
Moisture removal filter
Fumigation area gas (Environment before/after introducing fumigation gas)
<Incorrect use>

4 How to Use 4-6. Manual Memory
- 24 -
4-6. Manual Memory
Any instantaneous value during measurement can be recorded. Up to 256 points of data can be recorded.
(1) In the measuring mode, press the REC. switch (for about two seconds).
(2) The buzzer blips and the time and instantaneous value at that time are recorded. The following screensare displayed on the concentration meter.
The concentration meter returns to the normal display of the measuring mode automatically.
NOTE If the maximum data amount (256 points) is exceeded, the concentration meter displays "RECORD FULL" and rejects saving of further data. To save data newly, delete the saved data in the display/setting mode (see "4-8. Setup mode" for details).

4 How to Use 4-7. Measuring Gas/Range Detail Display
- 25 -
4-7. Measuring Gas/Range Detail DisplayThe detailed information of measuring gas/range can be checked.
(1) Press the DISP switch. The concentration meter displays the following screens in turn (the displaycontent varies by the combination of measuring and base gases).
(2) After displaying ten cycles, the normal display returns.

4 How to Use 4-8. Reference gas calibration
- 26 -
4-8. Reference gas calibration
NOTE When an occurrence of zero drift is highly likely, the caution display "CHECK REF. CAL" is displayed. In this case, draw a specified reference gas and perform reference gas calibration (see the measuring gas specifications for reference gas).
CAUTION Perform reference gas calibration under pressure and temperature/humidity conditions close to
those in the operating environment. Perform reference gas calibration after the reading is stabilized. If there is a sudden temperature change of 15ºC or more between the storage and operation
locations, turn on the power of the concentration meter, leave it for about ten minutes in asimilar environment to the operation location, and perform reference gas calibration beforeusing it.
After calibration, check that the concentration meter reads the reference calibration value(REF. CAL value) which is determined by the combination of measuring and base gases. Seethe measuring gas specifications for REF. CAL values.
Draw a specified reference gas from GAS IN. When the reading is stabilized, press the REF. CALswitch (for more than two seconds).
When the buzzer blips, releasethe REF. CAL switch Reference gas calibration is now finished.

4 How to Use 4-9. Setup mode
- 27 -
4-9. Setup modeThis mode allows changing various displays and settings. This mode can be entered by pressing the POWER switch while holding down the /REF CAL switch. Every time the switch is pressed, various menu screens are displayed in turn.
Saved data display => P30
Power ON Press the POWER switch while holding down the /REF CAL switch.
Date/time setting => P29
Measuring gas setting => P28
Start-up procedures =>P19
Saved data display Display the data recorded in the manual memory or recording measurement mode.
Date/time setting Set the date and time of the internal clock.
Setup mode
Measuring gas setting A measuring gas can be selected.
Saved data clear => P31
IrDA communication Establish an infrared communication with a personal computer to perform various settings or data management. (The communication program is available as an optional accessory.)
Saved data clear Clear saved data.

4 How to Use 4-9. Setup mode
- 28 -
<Measuring Gas Setting "1. SELECT GAS">
A measuring gas can be selected.
(1) Press the / switch and select "1. SELECT GAS" from the setup menu.
(2) When the ENTER switch is pressed, the currently set measuring gas, base gas, measuring range andother information are displayed as shown below (the displayed information varies by the selectedmeasuring gas or range).
NOTE When there is no need of changing the setting, press the ESC switch to return to the setup mode menu.
(3) When the ENTER switch is pressed again, the SPE number (a number allocated to a combination ofmeasuring and base gases, measuring range, etc.) in the upper right section of the screen blinks.Every time the or switch is pressed, the displayed SPE number changes.
(4) Press the ENTER switch to confirm it. After a value is confirmed, the concentration meter returns to thesetup mode menu automatically.
NOTE Contact RIKEN KEIKI for a change or addition of selectable gases.
Switch to measuring mode Exit the setup mode and enter the measuring mode.
Switch to measuring mode ⇒P32

4 How to Use 4-9. Setup mode
- 29 -
<Date/Time Setting "2. SET DATE/TIME">
The date and time of the internal clock can be set.
(1) Press the / switch and select "2. SET DATE/TIME" from the setup mode menu.
(2) When the ENTER switch is pressed, the set time is displayed. (Input example: January 20, 2014 23:47)
NOTE When there is no need of changing the setting, press the ESC switch to return to the setup mode menu.
(3) When the ENTER switch is pressed again, the input area blinks. Enter the year, month, day, hour, andminute in this order. Press the / switch to change the values and press the ENTER switch toconfirm each value (24-hour notation is used).
(4) When the ENTER switch is pressed to confirm a change of time (minute), the concentration meterreturns to the setup mode menu automatically.
4 How to Use 4-9. Setup mode
- 30 -
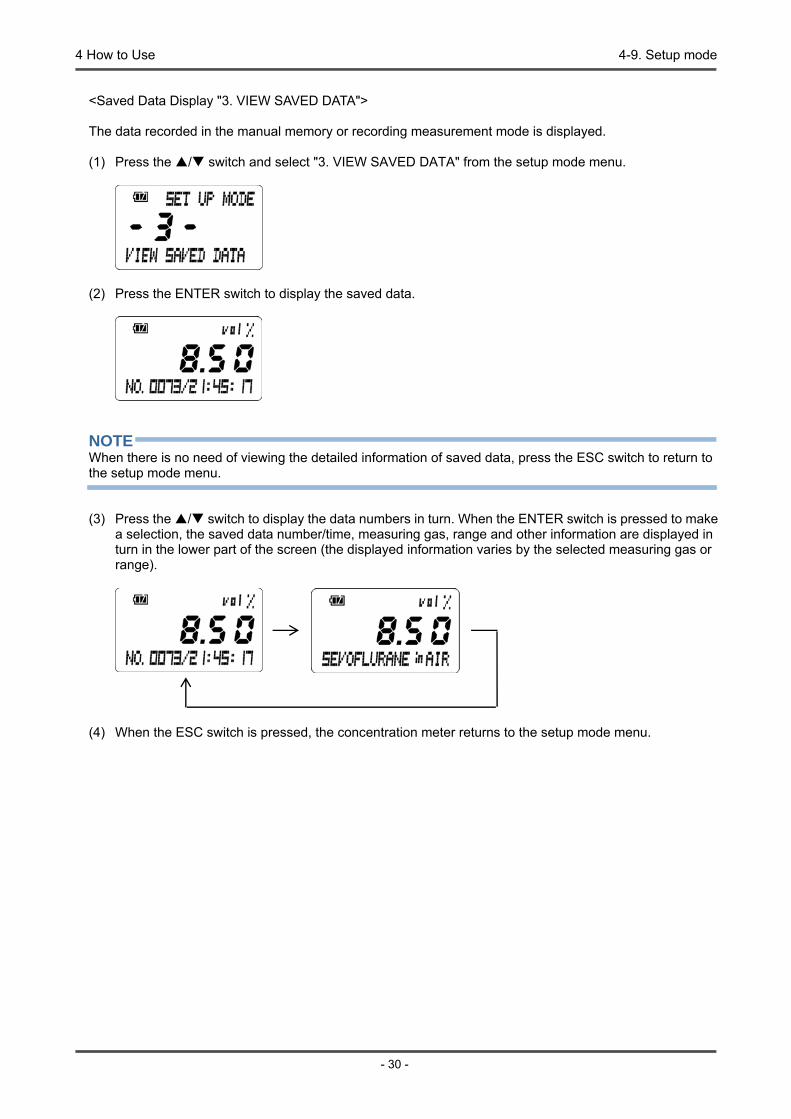
<Saved Data Display "3. VIEW SAVED DATA">
The data recorded in the manual memory or recording measurement mode is displayed.
(1) Press the / switch and select "3. VIEW SAVED DATA" from the setup mode menu.
(2) Press the ENTER switch to display the saved data.
NOTE When there is no need of viewing the detailed information of saved data, press the ESC switch to return to the setup mode menu.
(3) Press the / switch to display the data numbers in turn. When the ENTER switch is pressed to makea selection, the saved data number/time, measuring gas, range and other information are displayed inturn in the lower part of the screen (the displayed information varies by the selected measuring gas orrange).
(4) When the ESC switch is pressed, the concentration meter returns to the setup mode menu.

4 How to Use 4-9. Setup mode
- 31 -
<Saved Data Clear "4. CLEAR SAVED DATA">
The data recorded in the manual memory or recording measurement mode can be deleted.
(1) Press the / switch and select "4. CLEAR SAVED DATA" from the setup mode menu.
(2) When the ENTER switch is pressed, a confirmation screen asking for permission to delete the saveddata appears.
NOTE When there is no need of deleting saved data, press the ESC switch to return to the setup mode menu. When saved data clear is executed, all the data recorded up to that time will be deleted.
(3) Press the ENTER switch. When deletion is completed, DATA CLEAR is displayed in the upper rightsection of the screen.
(4) When the ENTER or ESC switch is pressed, the concentration meter returns to the setup mode menu.

4 How to Use 4-9. Setup mode
- 32 -
<Switch to Measuring Mode "6. START MEAS.">
The measuring mode can be entered from the setup mode.
(1) Press the / switch and select "6. START MEAS." from the setup menu.
(2) When the ENTER switch is pressed, a confirmation screen asking for permission to enter themeasuring mode appears.
NOTE When there is no need of entering the measuring mode, press the ESC switch to return to the setup mode menu.
(3) When the ENTER switch is pressed, the concentration meter enters the measuring mode.

4 How to Use 4-10. Recording measurement mode (pump suction type only)
- 33 -
4-10. Recording measurement mode(pump suction type only)
NOTE The recording measurement mode is unavailable for the handy aspirator manual draw-in type.
The concentration meter enables automatic measurement and data recording at specified time intervals. While pump is not performed, the concentration meter is put into the power-saving state. The recording measurement can be performed for a few hours up to four days. See the following for the recording measurement flow.
The recording measurement mode allows setting measuring and base gases, recording measurement interval and pump suction time, checking the memory free space and starting recording measurement. This mode can be entered by pressing the POWER switch while holding down the /REC. switch. Every time the switch is pressed, various menu screens are displayed in turn.
Power ON
Power-saving standby stateRecorded
Condition input RepeatedPump suction time Pump suction time
Start Recording measurement interval Recording measurement interval
Power-saving standby state
Recorded Recorded
Power ON Press the POWER switch while holding down the /REC. switch.
Start-up procedures =>P19
Recording measurement mode
Measuring gas setting Set a measuring gas.
Measuring gas setting => P35
Recording measurement interval setting Set a time interval for recording measurement.
Recording measurement interval setting => P36

4 How to Use 4-10. Recording measurement mode (pump suction type only)
- 34 -
Pump suction time setting Set a pump suction time during recording measurement.
Recording measurement start => P38
Memory free space display Display a memory free space.
Pump suction time setting ⇒P37
Recording measurement start Start recording measurement.
DANGER The purpose of the specification targeting anesthetic gas (halothane, isoflurane, sevoflurane,
desflurane and enflurane) for measurement is to measure the gas concentration of volatileanesthetic which occurs from anesthetic vaporizer during the manufacturing or inspection.Please do not use it for anesthetic gas concentration in the administration to human andanimals nor anesthetic gas measurement for interference gas including laughter gas andaspirated air.
Before using our product for measurement, please confirm that the measurement gas type isselected correctly.
In case there are interference gases which are not selected as a measurement gas, you will notget the correct measurement, so please do not use it in that circumstance.

4 How to Use 4-10. Recording measurement mode (pump suction type only)
- 35 -
<Measuring Gas Setting>
A measuring gas can be selected.
(1) Press the / switch and select measuring gas setting from the recording measurement mode menu.The measuring and base gases, range and other information are displayed in turn on the concentrationmeter (the displayed information varies by the selected measuring gas or range).
(2) Press the ENTER switch.
NOTE When there is no need of changing the setting, press the ESC switch to return to the recording measurement mode menu.
(3) The SPE number (a number allocated to a combination of measuring and base gases, measuringrange, etc.) in the upper right section of the screen blinks. It changes to another every time the /switch is pressed.
(4) Select a desired SPE number and press the ENTER switch to confirm it.The setting is completed when the SPE number stops blinking. When the selection is confirmed bypressing the ENTER switch, the concentration meter returns to the recording measurement modemenu.

4 How to Use 4-10. Recording measurement mode (pump suction type only)
- 36 -
<Recording Measurement Interval Setting "REC. INTERVAL">
A recording measurement interval can be selected from 5 sec, 10 sec, 30 sec, 60 sec, 5 min, 10 min, 30 min and 60 min.
(1) Press the / switch and select recording measurement interval setting from the recordingmeasurement mode menu.
(2) When the ENTER switch is pressed, the recording measurement interval (numerical value and unit)blinks.
NOTE When there is no need of changing the setting, press the ESC switch to return to the recording measurement mode menu.
(3) Press the / switch to select a time interval of recording measurement and press the ENTER switchto confirm it.(Input example: 10 minutes)
(4) The setting is completed when the numerical value and unit stop blinking.When the ENTER switch is pressed to confirm the measurement interval, the concentration meterreturns to the recording measurement mode menu.

4 How to Use 4-10. Recording measurement mode (pump suction type only)
- 37 -
<Pump Suction Time Setting "PUMPING TIME">
A pump suction time can be selected from 10 sec, 30 sec, 60 sec, 300 sec and CONTINUOUS.
(1) Press the / switch and select pump suction time setting from the recording measurement modemenu.
(2) When the ENTER switch is pressed, the pump suction time (numerical value and unit) blinks.
NOTE When there is no need of setting the pump suction time, press the ESC switch to return to the recording measurement mode menu.
(3) Press the / switch to select a pump suction time and press the ENTER switch to confirm it.(Input example: 60 seconds)
(4) The setting is completed when the numerical value and unit stop blinking.When the ENTER switch is pressed to confirm the pump suction time, the concentration meter returnsto the recording measurement mode menu.
CAUTION When the concentration meter is used in an environment where measuring gas continuously exsists,
set the pump suction time setting to “continuous” and the continuous operating time should be less than 2 hours. If the pump suction time setting is set to “continuous” and then used for more than 2 hours, or if the pump suction time setting is not set to “continuous”, the symptom that the indication value decreases is caused.

4 How to Use 4-10. Recording measurement mode (pump suction type only)
- 38 -
<Recording Measurement Start "RECORDING MEAS.">
Recording measurement can be started.
(1) Press the / switch and select recording measurement start from the recording measurement modemenu.
(2) When the ENTER switch is pressed, recording measurement is started.The following screens are displayed in turn on the concentration meter during recording measurement.
<Display until 1 Minute before Next Measurement> The last recorded measurement result and the time to perform the next measurement (in minutes) are displayed alternately.
<Display from 60 to 2 Seconds before Next Measurement> The last recorded measurement result and the time to perform the next measurement (in seconds) are displayed alternately.
<Display from 2 to 0 Seconds before Next Measurement> The last recorded measurement result blinks. The display content will be updated when a new measurement result is saved.
NOTE If the maximum data amount (256 points) is exceeded, the concentration meter displays "RECORD FULL" and rejects saving of further data. To save data newly, delete the saved data in the display/setting mode (see "4-8. Setup mode" for details).
4 How to Use 4-11. How to exit
- 39 -
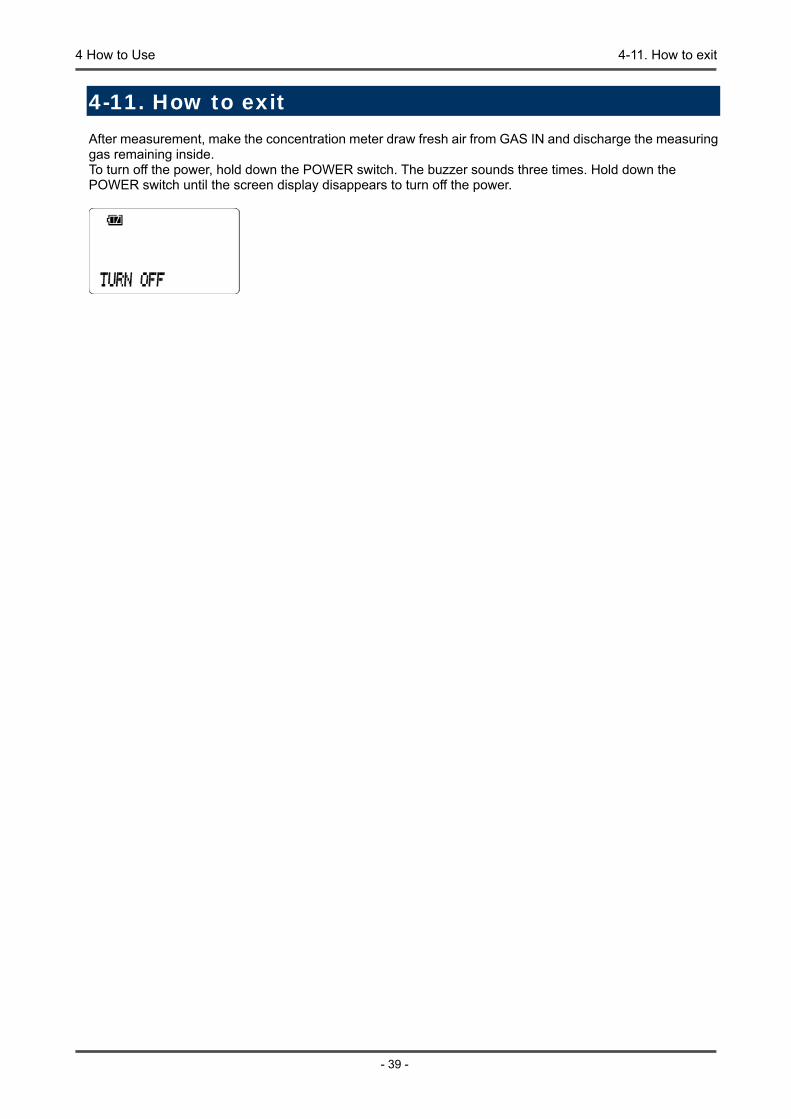
4-11. How to exitAfter measurement, make the concentration meter draw fresh air from GAS IN and discharge the measuring gas remaining inside. To turn off the power, hold down the POWER switch. The buzzer sounds three times. Hold down the POWER switch until the screen display disappears to turn off the power.

5 Operations and Functions 5-1. CAUTION display
- 40 -
5
Operations and Functions
5-1. CAUTION displayThe concentration meter is equipped with a self-diagnosis function. When the caution display appears on the concentration meter, it means that a minor abnormality is found by the self-diagnosis function.
Caution display: Appears when a minor abnormality is found in the concentration meter operation by automatic check function.
Display operation: Displays the caution detail on the screen to notify users of it. Caution type: Low battery voltage, low contrast, low UV intensity, calibration failure,
out-of-specification temperature, out-of-specification pressure
Determine the causes and take appropriate actions. If the unit has problems and the caution display appears frequently, contact RIKEN KEIKI immediately.
<Display Operation>
LCD display Provides the normal and caution displays alternately.
Display example1
Normal display Caution display for low contrast
Display example2
Normal display Caution display for Out-of-specification pressure (approx.80-115kPa)
Alternate display
Alternate display

5 Operations and Functions 5-1. CAUTION display
- 41 -
Display example3
Normal display Caution display for Out-of-specification pressure (approx. -20 - +50ºC)
NOTE The concentration meter continues measurement with the caution display. However, if the caution
display appears, promptly take an appropriate remedial measure to restore the normal condition. See "8. Troubleshooting" for caution details and appropriate actions.
Alternate display
5 Operations and Functions 5-2. ERROR display
- 42 -
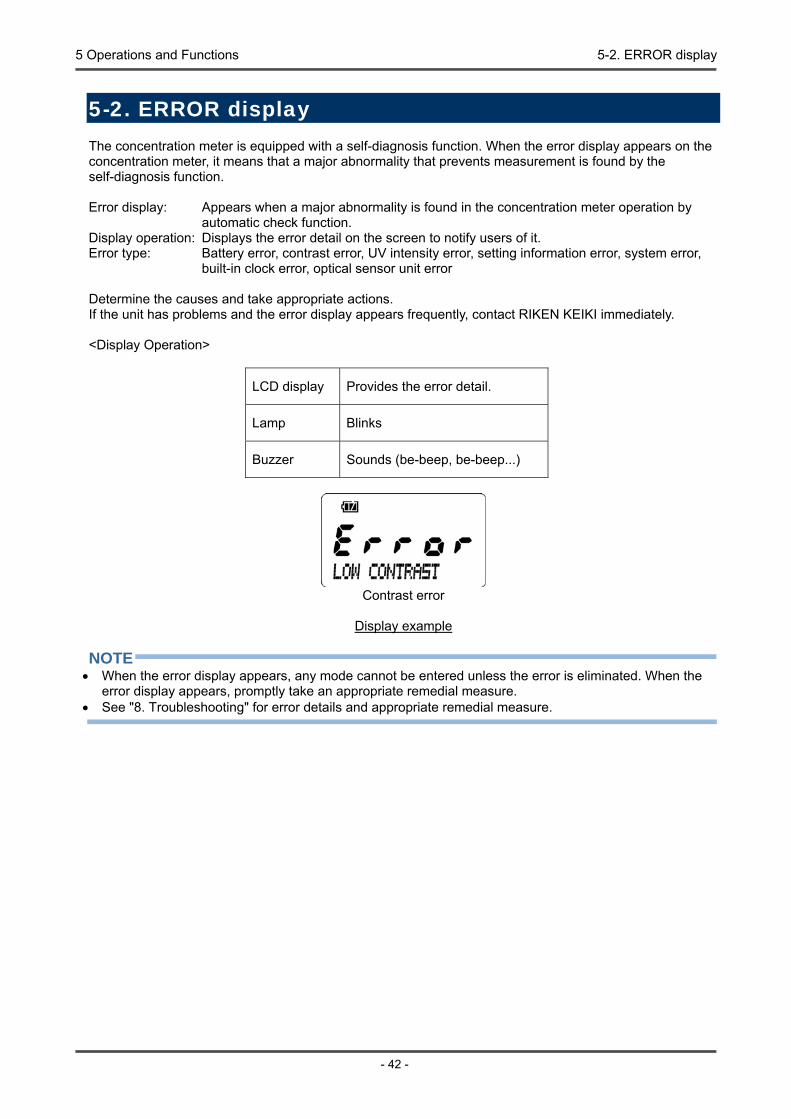
5-2. ERROR displayThe concentration meter is equipped with a self-diagnosis function. When the error display appears on the concentration meter, it means that a major abnormality that prevents measurement is found by the self-diagnosis function.
Error display: Appears when a major abnormality is found in the concentration meter operation by automatic check function.
Display operation: Displays the error detail on the screen to notify users of it. Error type: Battery error, contrast error, UV intensity error, setting information error, system error,
built-in clock error, optical sensor unit error
Determine the causes and take appropriate actions. If the unit has problems and the error display appears frequently, contact RIKEN KEIKI immediately.
<Display Operation>
LCD display Provides the error detail.
Lamp Blinks
Buzzer Sounds (be-beep, be-beep...)
Contrast error
Display example
NOTE When the error display appears, any mode cannot be entered unless the error is eliminated. When the
error display appears, promptly take an appropriate remedial measure. See "8. Troubleshooting" for error details and appropriate remedial measure.

6 Maintenance 6-1. Maintenance intervals and items
- 43 -
6
Maintenance
To maintain the performance of the concentration meter and improve the reliability, perform regular maintenance and check.
6-1. Maintenance intervals and items Daily maintenance: Perform maintenance before beginning to work. Regular maintenance: Perform maintenance once or more every year to maintain the performance.
Maintenance item Maintenance content Daily maintenance
Regular maintenance
Battery level check Check that the battery level is sufficient.
Concentration display check
Draw a specified reference gas and check that the displayed concentration value indicates the reference calibration value. If the reading is incorrect, perform reference gas calibration using a reference gas.
Checking the operation of the main unit
See the pilot indicator to check for abnormalities.
Checking the operation of the pump (pump suction type only)
See the pump operation status indicator to check for abnormalities.
Span adjustment Check the sensitivity using a calibration gas and perform span adjustment as needed.
* It is recommended that the sensitivity of the instrument be confirmed periodically (at least once a year) toassume the correct operation. If any problem is found, or If you would like to have it calibrated, pleasecontact any of our agents.

6 Maintenance 6-2. Calibration
- 44 -
6-2. CalibrationPerform span adjustment of sensors using a calibration gas at least once a year. Request RIKEN KEIKI to perform span adjustment.
6-3. How to cleanClean the concentration meter if it becomes extremely dirty. The concentration meter must be turned off while cleaning it. Use a waste cloth to remove dust. Do not use water or organic solvent for cleaning because they may cause malfunctions.
NOTE When the concentration meter gets wet, water may remain in the buzzer sound opening or clearances. Drain water as follows: (1) Wipe away moisture on the concentration meter thoroughly using a dry towel, cloth, etc.(2) While holding the concentration meter firmly, shake it about ten times with the buzzer sound opening
facing downward.(3) Wipe away moisture coming out from the inside thoroughly using a towel, cloth, etc.(4) Place the concentration meter on a dry towel, cloth, etc. and let it stand at normal temperatures.
CAUTION When cleaning the concentration meter, do not splash water over it or use organic solvents such as alcohol and benzene on it. The surface of the concentration meter may be discolored or damaged.

6 Maintenance 6-4. Parts replacement
- 45 -
6-4. Parts replacement<Replacement of Regular Replacement Parts>
List of recommended regular replacement parts
No. Item Part number Recommended maintenance
interval
Recommended replacement
interval
Quantity (pieces per unit)
Remarks
1 Pump unit (RP-12)
4181 0610 30 6 months 2 years (*) 1 * Assuming 500hours of use peryear
2 Alkaline dry battery (AA)
2753 3007 80 - - 3
3
Lithium ion battery pack (for BUL-8000(F), BUL-8000(F1))
- -About 500 cycles of charging and
discharging 1
When BUL-8000(F), BUL-8000(F1) (option) is used
4 Rubber cap 4775 5614 50 - 2 years 1
When BUL-8000(F), BUL-8000(F1) (option) is used
5 Handy aspirator 0904 0276 70 - 5 years 1
When the handy aspirator specification type is used
NOTE The above replacement intervals are recommendation only. The intervals may change depending on the operating conditions. These intervals do not mean the warranty periods either. The result of the regular maintenance may determine when to replace the parts.
The operation of most of the periodical replacement parts must be checked after replacement by a qualified service engineer. For the stable operation of the unit and safety, ask a qualified service engineer to take care of replacement of the parts that require operation check. Please contact RIKEN KEIKI.

7 Storage and Disposal 7-1. Procedures to store the concentration meter or leave it for a long time
- 46 -
7
Storage and Disposal
7-1. Procedures to store the concentration meter orleave it for a long time
The concentration meter must be stored under the following environmental conditions. In a dark place under the normal temperature and humidity away from direct sunlight In a place where gases, solvents or vapors are not present
Store the concentration meter in a shipping carton, if any, in which the product was delivered. Store the concentration meter away from dust, etc. if the shipping carton is not available.
NOTE If the concentration meter with a lithium ion battery unit is not used for a long time, it is recommended to
store it after discharging the batteries until the battery level icon shows one battery mark or so. If theconcentration meter is stored with the batteries fully charged, the batteries get deteriorated morequickly and may have shorter life.
If the concentration meter with a dry battery unit is not used for a long time, store it after removing thebatteries. Battery leaks may result in fire or injury. If the concentration meter is not used for a short time,store it without removing the batteries.
7-2. Procedures to use the concentration meter again
CAUTION If the concentration meter is not used for a long time, turn on the power at least once every six months and check that the pump draws in air (about three minutes). The concentration meter, when not activated for a long time, may cease to work because of hardening of the grease in the pump motor.
CAUTION When using a stopped or stored concentration meter again, never fail to perform a calibration. For information on readjustment including calibration, please contact RIKEN KEIKI.

7 Storage and Disposal 7-3. Disposal of products
- 47 -
7-3. Disposal of productsWhen the concentration meter is disposed of, it must be treated properly as an industrial waste in accordance with the local regulations.
When disposing of the concentration meter in EU member states, sort the batteries as specified.Handle the removed batteries according to the classified refuse collection system and recycling systembased on the regulations of EU member states.
Removing batteries See Section 4-2 "Preparation for start-up" and take out the batteries.
When BUL-8000(F), BUL-8000(F1) (option) is used
Model Type BUL-8000(F) BUL-8000(F1)
Lithium ion battery
NOTE BUL-8000(F), BUL-8000(F1) (option) contains batteries. Crossed-out recycle dustbin mark
This symbol mark is indicated on the products which contain the batteries which fall under EU Battery Directive 2006/66/EC. Such batteries need to be disposed of as specified by the latest Directive. This symbol mark indicates that the batteries need to be separated from the ordinary waste and disposed of appropriately.
WARNING Dispose of the batteries in accordance with procedure specified by the local authority.

8 Troubleshooting
- 48 -
8
Troubleshooting
The troubleshooting does not explain the causes of all the malfunctions which occur on the concentration meter. This simply helps to find the causes of malfunctions which frequently occur. If the concentration meter shows a symptom which is not explained in this manual, or still has malfunctions even though remedial actions are taken, please contact our sales department.
<Troubles on the Unit> Symptoms Causes Actions
The power cannot be turned on.
The battery level is too low.
Alkaline battery unit: Turn off the power and replace all the three dry batteries with new ones in a non-hazardous area.
Lithium ion battery unit: Turn off the power and charge the batteries in a non-hazardous area.
The POWER switch was not pressed long enough.
For power-on, keep the POWER switch pressed until a beep is heard.
Improper installation of the battery unit
Check whether the battery unit is properly attached to the main unit.
Abnormal operations Disturbances by sudden static electricity noise, etc.
Turn off and restart the concentration meter.
Key operations are disabled.
Disturbances by sudden static electricity noise, etc.
Turn off the power, and remove the battery unit and install it again in a non-hazardous area and then turn on the power to perform operations.
Low battery voltage caution is displayed. (CAUTION) LOW BATTEERY
The battery level is low.
Alkaline battery unit: Turn off the power and replace the dry batteries with new ones in a non-hazardous area.
Lithium ion battery unit: Turn off the power and charge the batteries in a non-hazardous area.
Low contrast caution is displayed. (CAUTION) LOW CONTRAST
The contrast of interferometric sensor has been decreased due to contamination.
Replacement or repair of the interferometric sensor is recommended. Request RIKEN KEIKI for the replacement or repair.
Low UV intensity caution is displayed. (CAUTION) LOW BRIGHTNESS
The UV intensity of interferometric sensor has been dropped.
Replacement or repair of the interferometric sensor is recommended. Request RIKEN KEIKI for the replacement or repair.
Condensation occurred inside the product (light source sensor).
Draw dry air to dry the sensor.

8 Troubleshooting
- 49 -
Reference calibration caution is displayed. (CAUTION) CHECK REF. CAL
Zero drift may have occurred.
Perform reference gas calibration using a specified reference gas (see the measuring gas specifications for the specified reference gas).
Condensation occurred inside the product (light source sensor).
Draw dry air to dry the sensor.
Out-of-specification temperature caution is displayed. (CAUTION) OUT of SPEC. TEMP
The built-in temperature sensor detected a temperature exceeding the specified range.
Use the concentration meter within the specified temperature range -20 - +50ºC.
Out-of-specification pressure caution is displayed. (CAUTION) OUT of SPEC. PRES
The built-in pressure sensor detected an abnormal pressure.
Use the concentration meter under the atmospheric pressure approx.80-115kPa.
Built-in clock error is displayed. (ERROR) CLOCK
An abnormal time setting for the internal clock was detected.
Make a setting of date/time. If the symptom like this recurs frequently, contact RIKEN KEIKI.
Battery error is displayed. (ERROR) LOW BATTERY
The battery level is too low to perform measurement.
Alkaline battery unit: Turn off the power and replace the dry batteries with new ones in a non-hazardous area.
Lithium ion battery unit: Turn off the power and charge the batteries in a non-hazardous area.
Contrast error is displayed. (ERROR) LOW BRIGHTNESS
The contrast of interferometric sensor has been decreased so much due to contamination that measurement cannot be performed.
Request RIKEN KEIKI for the replacement or repair of interferometric sensor.
UV intensity error is displayed. (ERROR) LOW BRIGHTNESS
An abnormality occurred in the system.
Request RIKEN KEIKI for the replacement or repair of interferometric sensor.
Optical sensor unit error (ERROR) OPTOCAL UNIT
An abnormality occurred in communication signals from the optical sensor unit.
Turn off and restart the concentration meter. If the symptom like this recurs frequently, the interferometric sensor needs to be repaired. Request RIKEN KEIKI for the repair.
Setting information error is displayed. (ERROR) SETTING
The data set in the setup mode is damaged.
Check the setting in the setup mode. If the setting disagrees with the displayed content, set the data again.
System error is displayed. (ERROR) SYSTEM
An abnormality occurred in the system.
Request the dealer or Riken Keiki local representative for repair.
The batteries cannot be charged. (Rechargeable battery unit only)
The charger is not connected properly.
Connect the AC plug and DC plug of the AC powered charger properly.
A charging circuit abnormality occurred.
Request the dealer or Riken Keiki local representative for repair.
The batteries have been fully charged.
When fully charged batteries are charged again, the charging indicator lamp does not go on.

8 Troubleshooting
- 50 -
<Troubles in Reading> Symptoms Causes Actions
Incorrect reading
Drifting of sensor output Perform reference gas calibration.
Measuring and base gases were not selected correctly.
Select measuring and base gases correctly.
Presence of interference gas
If an interference gas (other than measuring and base gases) is included, correct measurement cannot be performed by the concentration meter. Remove the interference gas and perform measurement again.
GAS IN/GAS OUT is not at atmospheric pressure.
The concentration meter can perform correct measurement under the atmospheric pressure only. Keep GAS IN/GAS OUT at the atmospheric pressure and then perform measurement again.
Bended or clogged suction tube or exhaust tube
Fix the defective parts.
Condensation is formed inside the suction tube.
Fix the defective parts.
9 Product Specifications
- 51 -
9
Product Specifications
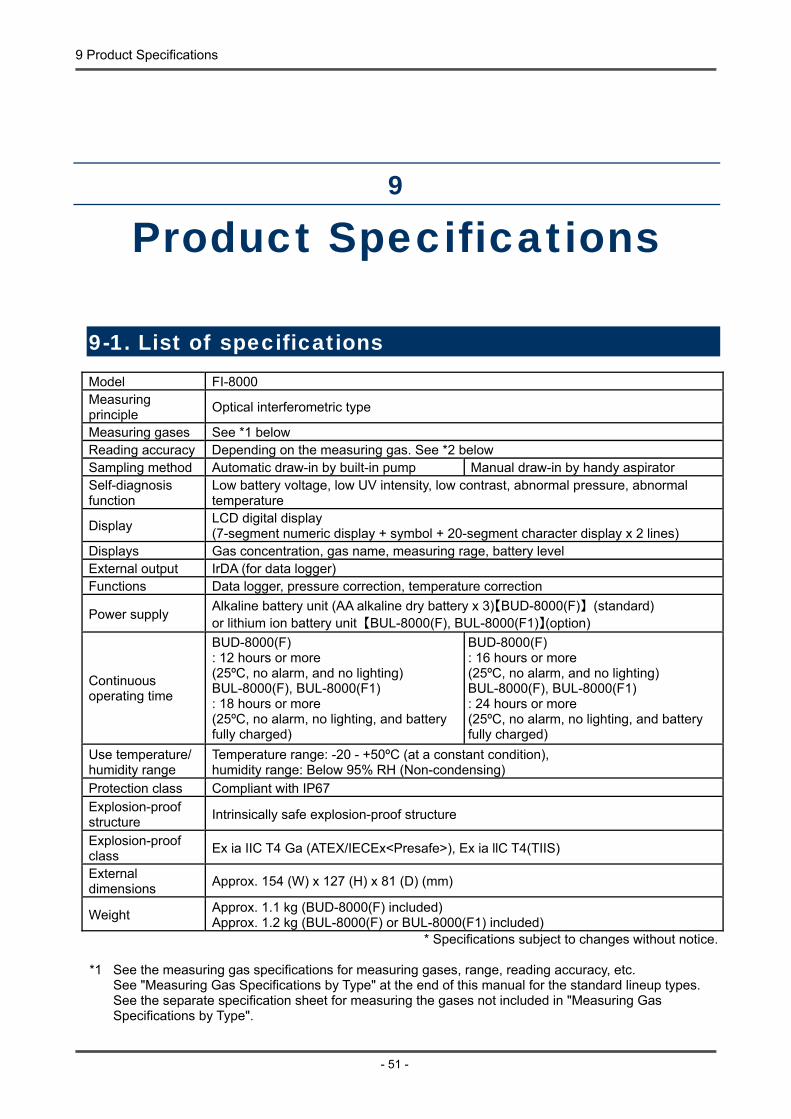
9-1. List of specificationsModel FI-8000Measuring principle
Optical interferometric type
Measuring gases See *1 below Reading accuracy Depending on the measuring gas. See *2 below Sampling method Automatic draw-in by built-in pump Manual draw-in by handy aspirator Self-diagnosis function
Low battery voltage, low UV intensity, low contrast, abnormal pressure, abnormal temperature
Display LCD digital display (7-segment numeric display + symbol + 20-segment character display x 2 lines)
Displays Gas concentration, gas name, measuring rage, battery level External output IrDA (for data logger) Functions Data logger, pressure correction, temperature correction
Power supply Alkaline battery unit (AA alkaline dry battery x 3)【BUD-8000(F)】 (standard) or lithium ion battery unit 【BUL-8000(F), BUL-8000(F1)】(option)
Continuous operating time
BUD-8000(F) : 12 hours or more (25ºC, no alarm, and no lighting) BUL-8000(F), BUL-8000(F1) : 18 hours or more (25ºC, no alarm, no lighting, and battery fully charged)
BUD-8000(F) : 16 hours or more (25ºC, no alarm, and no lighting) BUL-8000(F), BUL-8000(F1) : 24 hours or more (25ºC, no alarm, no lighting, and battery fully charged)
Use temperature/ humidity range
Temperature range: -20 - +50ºC (at a constant condition), humidity range: Below 95% RH (Non-condensing)
Protection class Compliant with IP67 Explosion-proof structure
Intrinsically safe explosion-proof structure
Explosion-proof class
Ex ia IIC T4 Ga (ATEX/IECEx<Presafe>), Ex ia llC T4(TIIS)
External dimensions
Approx. 154 (W) x 127 (H) x 81 (D) (mm)
Weight Approx. 1.1 kg (BUD-8000(F) included) Approx. 1.2 kg (BUL-8000(F) or BUL-8000(F1) included)
* Specifications subject to changes without notice.
*1 See the measuring gas specifications for measuring gases, range, reading accuracy, etc.See "Measuring Gas Specifications by Type" at the end of this manual for the standard lineup types. See the separate specification sheet for measuring the gases not included in "Measuring Gas
Specifications by Type".

9 Product Specifications
- 52 -
*2 Reading accuracy is calculated with the formula below.(The calculated value is the reading accuracy right after the reference gas calibration.
Reading Accuracy=±(Reading - REF CAL Value)X 0.03
(Example)
Measuring gas : Halothane
Base gas
Measuring range
REF CAL value
:
:
:
Oxygen
0.00-6.00vol%
1.57vol% (See Page 52 “Measuring gas specifications by TYPE”)
Reading accuracy : ±(Reading - REF CAL value) X 0.03
=±(4.23 - 1.57) X 0.03
=± 0.0798
If the Reading is 4.23vol% with the gas specification mentioned above

9 Product Specifications
- 53 -
9-2. List of accessories
Standard accessories
Alkaline battery unit (BUD-8000(F)) Alkaline dry battery: 3 Gas sampling hose: 1 Shoulder strap: 1 Handy aspirator: 1 (manual draw-in type only) Absorbing tube (contains calcium chloride) and absorbing tube fixing belt
(anesthetic gas specification only) Operating manual Measuring gas specifications
(attached when measuring gases are not included in "Measuring Gas Specificationsby Type" at the end of this manual)
Product warranty
Optional accessories
Lithium ion battery unit (BUL-8000(F), FI-8000(F1)) AC powered charger
See "Measuring Gas Specifications by Type" at the end of this manual for the FI-8000 specification.

10 Definition of Terms
- 54 -
10
Definition of Terms
vol% Gas concentration indicated in the unit of one-hundredth of the volume
LEL An acronym for Lower Explosive Limit. LEL refers to the lowest concentration of a combustible gas in air capable of causing explosion when ignited.
g/m3 A unit used to represent the mass of concentration measurement target gas contained in 1 m3.
Measuring gas Of the draw-in gases, the ones targeted for concentration measurement.
Base gas Of the draw-in gases, the ones other than measuring gases.
Reference gas A gas used as a reference of refractive index in performing measurement (see the measuring gas specifications).
Reference gas calibration value
A value that should be read in measuring a reference gas (see the measuring gas specifications).

11 Detection Principle
- 55 -
11
Detection Principle
The refractive index of gases is determined by the types of composing gases and the mix ratio. When a mixed gas consists of two different gases and the types are known, the mix ratio (concentration) can be obtained by measuring the refractive index.
The optical interferometric sensor used for the concentration meter forms an "interference fringe" that moves in proportion to changes in refractive index on the image sensor. Then the interference fringe is captured by the image sensor and converted into a refractive index after calculating the move amount of interference fringes with a high degree of accuracy through the phase analysis processing. The "concentration" display of various mixed gases is enabled by inputting the data such as type and refractive index of "measuring gas" and "base gas" that compose a mixed gas to the "refractive index" calculated with high accuracy. The sensitivity of optical interferometric sensor depends on the length of the chamber that flows gases. Because the chamber length is physically unchangeable, high accuracy is maintained over a long period of time.
Schematic view of optical interferometric sensor
Chamber Prism
Plane parallel mirror
Lens
LED light source
Half mirror LED light source
Mirror
Image sensor

- 56 -
FI-8000 Measuring Gas Specifications by Type
TYPE - 24 – 50 Anesthetic gas TYPE - 48 – 52 Fumigation gas
NOTE Measuring gases vary by the type of the concentration meter. The type of
FI-8000 can be checked with the nameplate attached to the side of the main unit.(See the right figure for the nameplate location.)
How to identify the type.
Measuring gases, range, reading accuracy, etc. are included in the measuring gas specifications.When the anesthetic or fumigation gas specification is used, see "Measuring Gas Specifications byType" at the end of this manual. When the customized specification is used, see the separatemeasuring gas specifications.
<Draw-in Type> A Manual draw-in by handy aspiratorP Automatic draw-in by built-in pump
< Chamber Length >05 5mm24 24mm48 48mm
< Measuring Gas > 50 Anesthetic gas 52 Fumigation gas 99 Customized
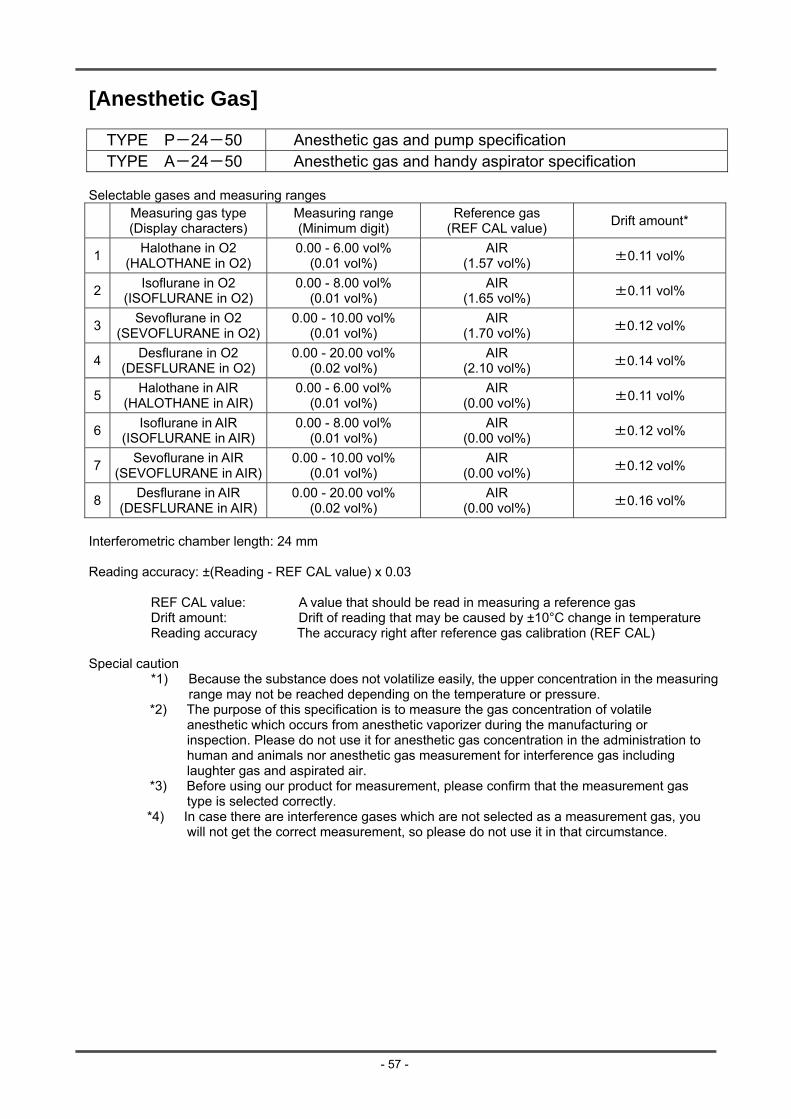
- 57 -
[Anesthetic Gas]
TYPE P-24-50 Anesthetic gas and pump specification TYPE A-24-50 Anesthetic gas and handy aspirator specification
Selectable gases and measuring ranges Measuring gas type (Display characters)
Measuring range (Minimum digit)
Reference gas (REF CAL value)
Drift amount*
1 Halothane in O2
(HALOTHANE in O2) 0.00 - 6.00 vol%
(0.01 vol%) AIR
(1.57 vol%) ±0.11 vol%
2 Isoflurane in O2
(ISOFLURANE in O2) 0.00 - 8.00 vol%
(0.01 vol%) AIR
(1.65 vol%) ±0.11 vol%
3 Sevoflurane in O2
(SEVOFLURANE in O2) 0.00 - 10.00 vol%
(0.01 vol%) AIR
(1.70 vol%) ±0.12 vol%
4 Desflurane in O2
(DESFLURANE in O2) 0.00 - 20.00 vol%
(0.02 vol%) AIR
(2.10 vol%) ±0.14 vol%
5 Halothane in AIR
(HALOTHANE in AIR) 0.00 - 6.00 vol%
(0.01 vol%) AIR
(0.00 vol%) ±0.11 vol%
6 Isoflurane in AIR
(ISOFLURANE in AIR) 0.00 - 8.00 vol%
(0.01 vol%) AIR
(0.00 vol%) ±0.12 vol%
7 Sevoflurane in AIR
(SEVOFLURANE in AIR) 0.00 - 10.00 vol%
(0.01 vol%) AIR
(0.00 vol%) ±0.12 vol%
8 Desflurane in AIR
(DESFLURANE in AIR) 0.00 - 20.00 vol%
(0.02 vol%) AIR
(0.00 vol%) ±0.16 vol%
Interferometric chamber length: 24 mm
Reading accuracy: ±(Reading - REF CAL value) x 0.03
REF CAL value: A value that should be read in measuring a reference gas Drift amount: Drift of reading that may be caused by ±10°C change in temperature Reading accuracy The accuracy right after reference gas calibration (REF CAL)
Special caution *1) Because the substance does not volatilize easily, the upper concentration in the measuring
range may not be reached depending on the temperature or pressure. *2) The purpose of this specification is to measure the gas concentration of volatile
anesthetic which occurs from anesthetic vaporizer during the manufacturing or inspection. Please do not use it for anesthetic gas concentration in the administration to human and animals nor anesthetic gas measurement for interference gas including laughter gas and aspirated air.
*3) Before using our product for measurement, please confirm that the measurement gastype is selected correctly.
*4) In case there are interference gases which are not selected as a measurement gas, youwill not get the correct measurement, so please do not use it in that circumstance.

- 58 -
[Fumigation Gas]
TYPE P-48-52 Fumigation gas and pump specification TYPE A-48-52 Fumigation gas and handy aspirator specification
Selectable gases and measuring ranges Measuring gas type (Display characters)
Measuring range (Minimum digit)
Reference gas (REF CAL value)
Drift amount*
1 Methyl bromide in AIR
(CH3Br in AIR) 0 - 200 g/m3 (0.2 g/m3)
AIR (0.0 g/m3)
±5.0 g/m3
2 Methyl iodide in AIR
(CH3I in AIR) 0 - 200 g/m3 (0.2 g/m3)
AIR (0.0 g/m3)
±5.0 g/m3
3 Sulfuryl fluoride in AIR
(SO2F2 in AIR) 0 - 200 g/m3
(0.5g/m3) AIR
(0.0 g/m3) ±7.0 g/m3
4 Propylene oxide in AIR
(PO in AIR) 0.000 - 10.000 vol%
(0.005 vol%) AIR
(0.000 vol%) ±0.100 vol%
5 Methyl bromide in AIR
(CH3Br in AIR) 0.000 - 5.000 vol%
(0.005 vol%) AIR
(0.000 vol%) ±0.110 vol%
6 Phosphine in AIR
(PH3 in AIR) 0.0 – 50.0 g/m3
(0.1g/m3) AIR
(0.0 g/m3) ±2.1 g/m3
7 Hydrogen Cyanide in AIR
(HCN in AIR) 0.0 – 200.0 g/m3
(0.1g/m3) AIR
(0.0 g/m3) ±5.5 g/m3
8
Interferometric chamber length: 48 mm
Reading accuracy: ±(Reading - REF CAL value) x 0.03
REF CAL value: A value that should be read in measuring a reference gas Drift amount: Drift of reading that may be caused by ±10°C change in temperature Reading accuracy The accuracy right after reference gas calibration (REF CAL)
Special caution *1) Measuring gases are highly toxic.
Carefully handle the gases discharged from the gas outlet (GAS OUT) and take sufficient safety measures.

- 59 -