preso remote user guide - cretaceous softwarecretaceoussoftware.com/presoremote/preso remote 1.2...
TRANSCRIPT
Preso Remote User Guide
Version 1.2
Cretaceous Software
November 2010
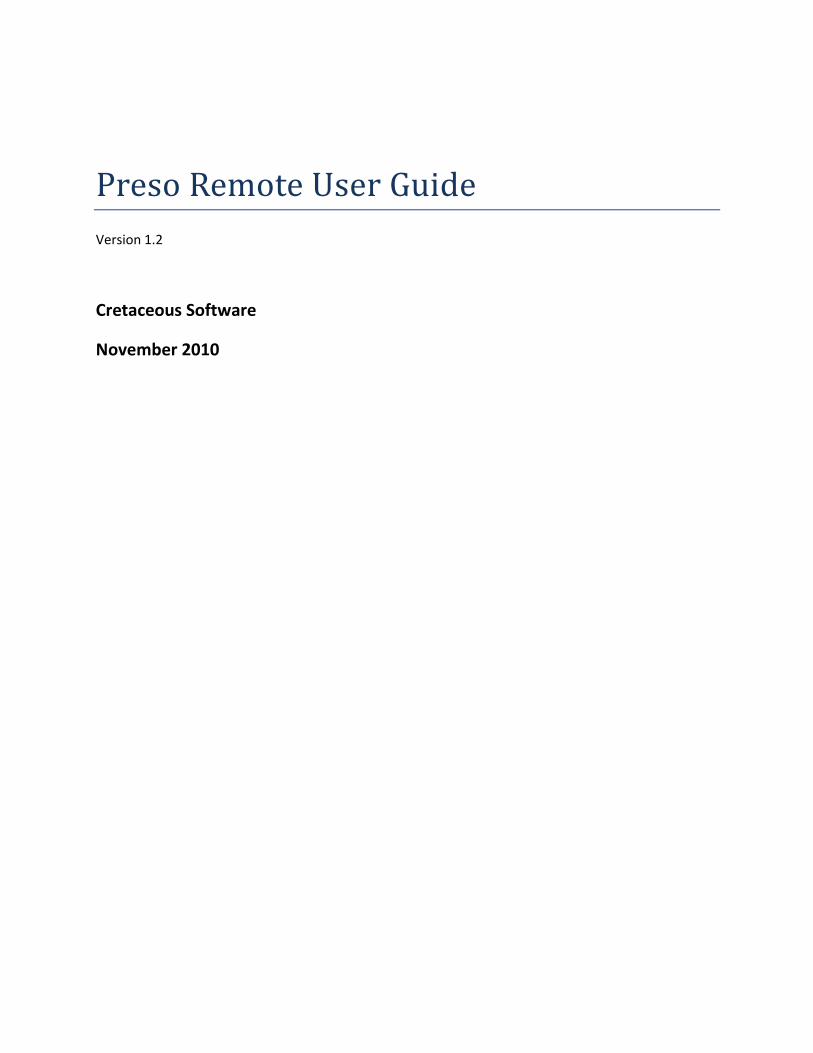
Introduction The Preso Remote iPhone application will allow you to move back and forth through a MS PowerPoint
presentation by swiping the surface of your iPhone. The interface is simple—swipe down and you move
to the next slide, swipe up and you move to the previous slide.
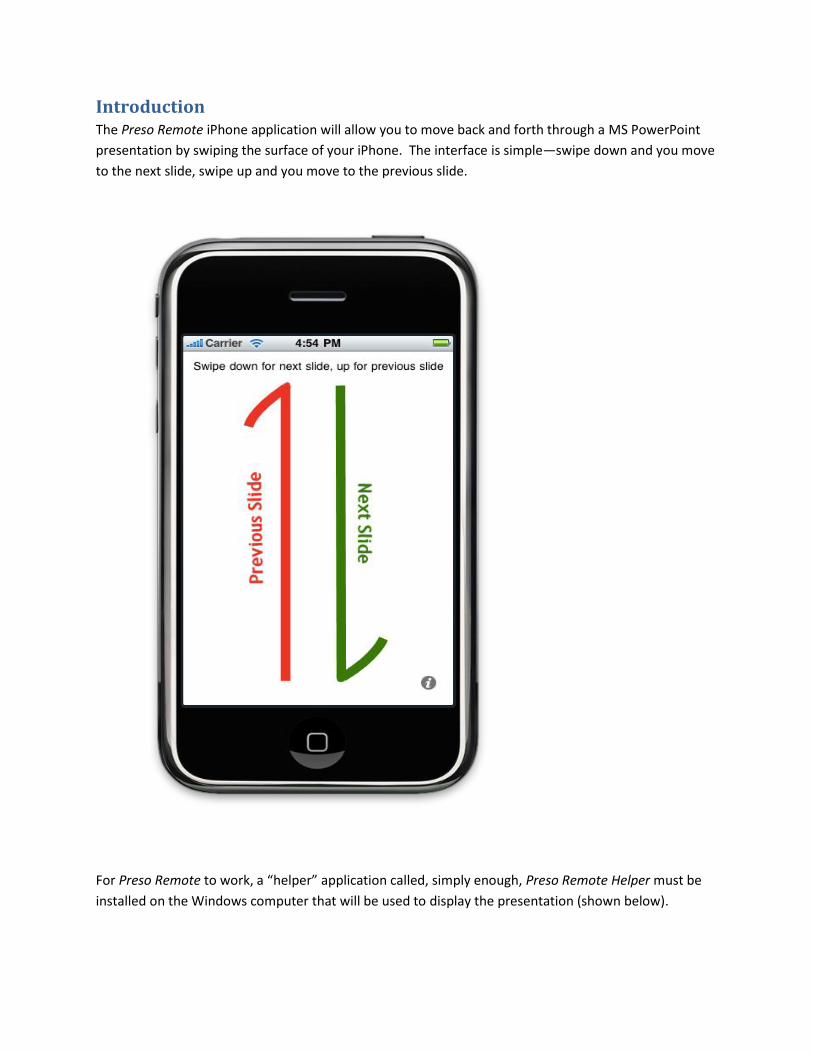
For Preso Remote to work, a “helper” application called, simply enough, Preso Remote Helper must be
installed on the Windows computer that will be used to display the presentation (shown below).
To use PresoRemote follow these steps:
1. Load the presentation you want to display into MS Powerpoint and move to the page you intend
to start with.
2. Start up the presentation remote helper application (Preso Remote Helper).
3. Once you’re ready to begin the presentation, press the “Start Presenting” button on Preso
Remote Helper.
4. Bring up the Preso Remote iPhone application, if it hasn’t already been started.
5. Start swiping! You should now have remote control of your presentation.
6. Once you’re done, press the “Stop Presenting” button on Preso Remote Helper. Please keep in
mind, the helper application places a load on your computer even when no presentation is in
use, so you should always let it know when you’re done with the presentation. This will help
ensure that it doesn’t unnecessarily slow down other applications running on your computer.
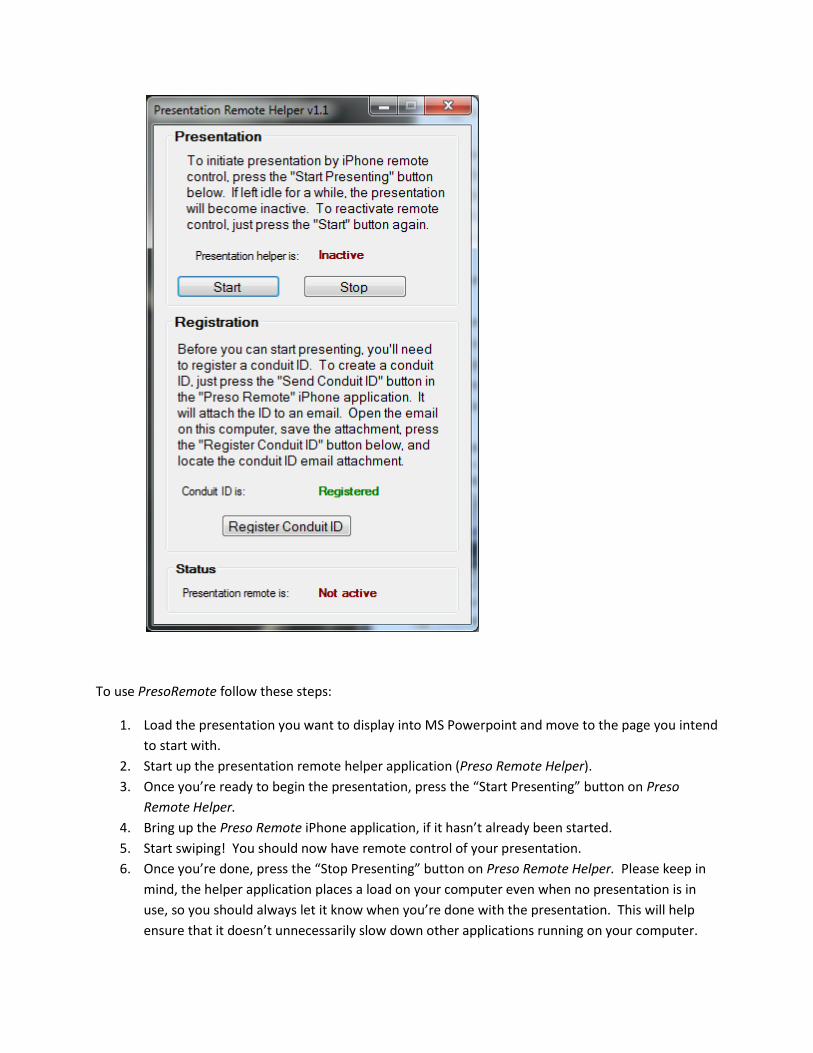
If the presentation helper hasn’t yet been started, Preso Remote will let you know that it’s waiting.
IMPORTANT
Please note that you must use the version of the helper application that matches the version of Preso
Remote on your iPod or phone. For instance, if you are using version 1.2 of Preso Remote, you will have
to download and install version 1.2 of the Preso Remote helper application as well.
ALERT
Some advanced features of Preso Remote are not compatible with the Windows aero feature. If you are
using Windows Vista or Windows 7, you may need to turn of the aero feature. This is particularly true
for users of Microsoft Office 2010. Many Web sites provide instructions for turning off aero. One
example is shown below.
http://www.howtogeek.com/howto/windows-vista/disable-aero-on-windows-vista/
Setup Before Preso Remote can be used, you’ll need to take some preparatory steps. The iPhone app and the
helper application talk to one another through what known as a conduit, which makes it possible for
them to communicate through most firewalls and other barriers. In brief, setting up Preso Remote
consists of the following:
1. Install Preso Remote on your iPhone or iPod Touch.
2. Install Preso Remote Helper on the Windows computer that will be used to display
presentations.
3. Set up a conduit.
Setting up a Conduit To create a conduit, follow the steps described in this section.
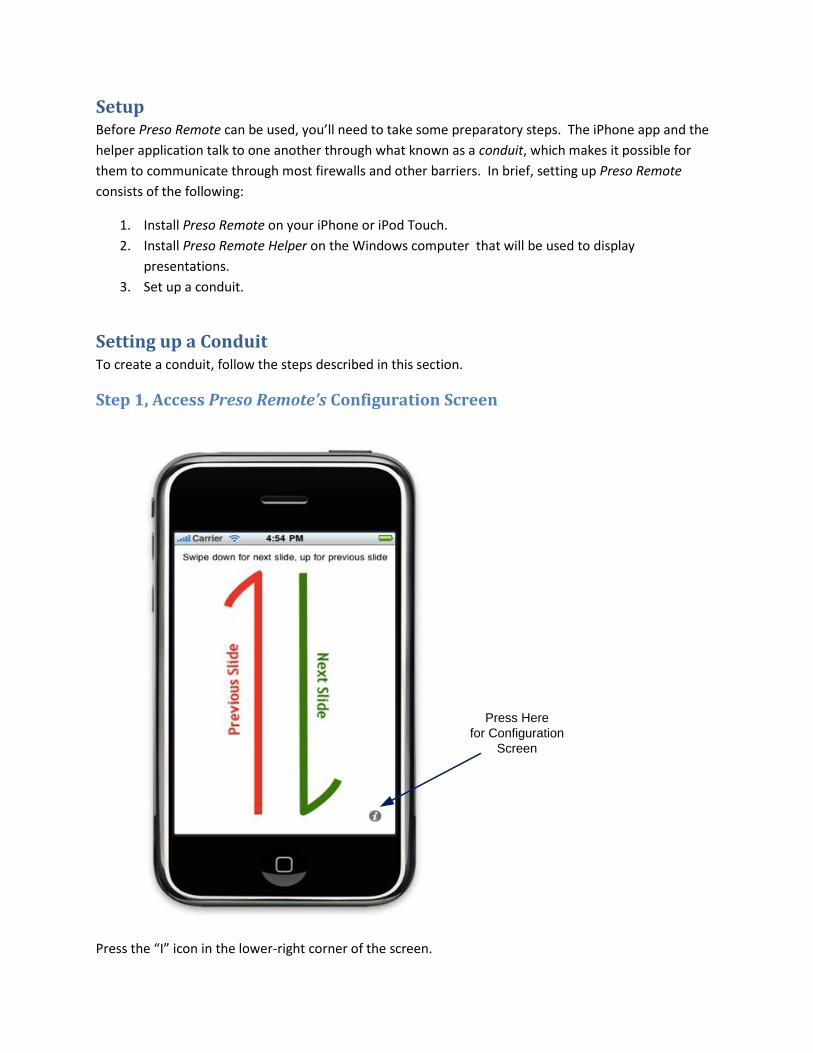
Step 1, Access Preso Remote’s Configuration Screen
Press Here
for Configuration
Screen
Press the “I” icon in the lower-right corner of the screen.
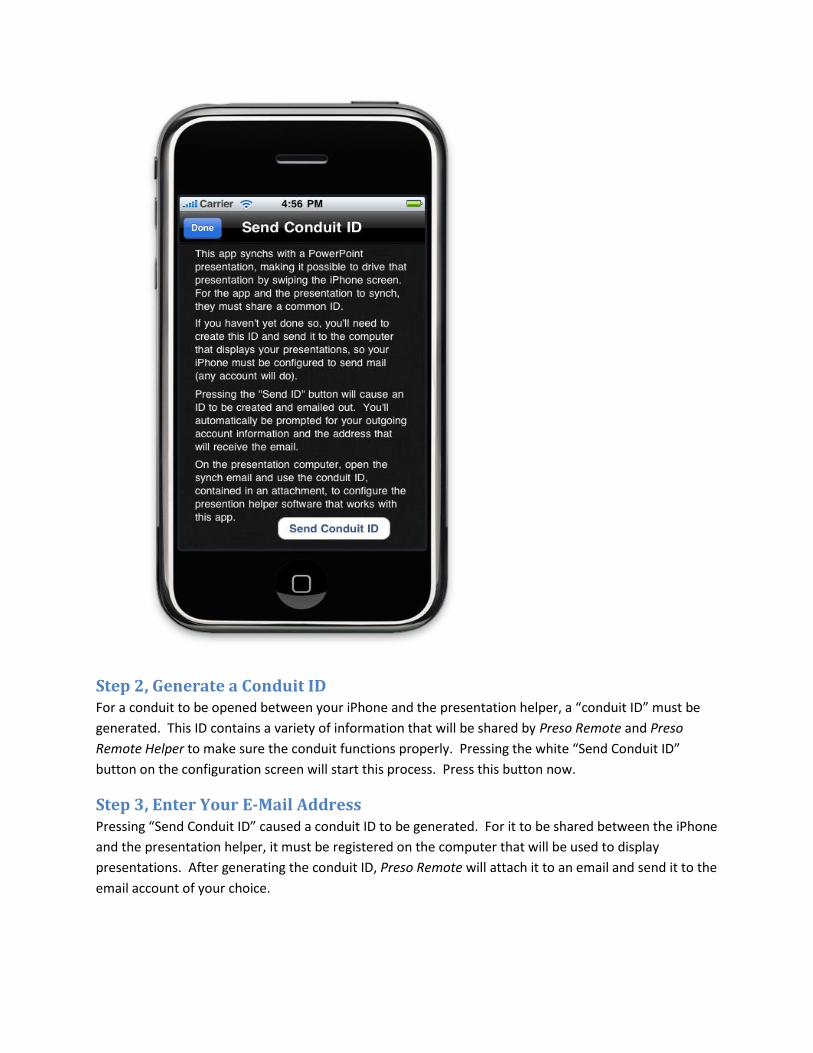
Step 2, Generate a Conduit ID For a conduit to be opened between your iPhone and the presentation helper, a “conduit ID” must be
generated. This ID contains a variety of information that will be shared by Preso Remote and Preso
Remote Helper to make sure the conduit functions properly. Pressing the white “Send Conduit ID”
button on the configuration screen will start this process. Press this button now.
Step 3, Enter Your E-Mail Address Pressing “Send Conduit ID” caused a conduit ID to be generated. For it to be shared between the iPhone
and the presentation helper, it must be registered on the computer that will be used to display
presentations. After generating the conduit ID, Preso Remote will attach it to an email and send it to the
email account of your choice.
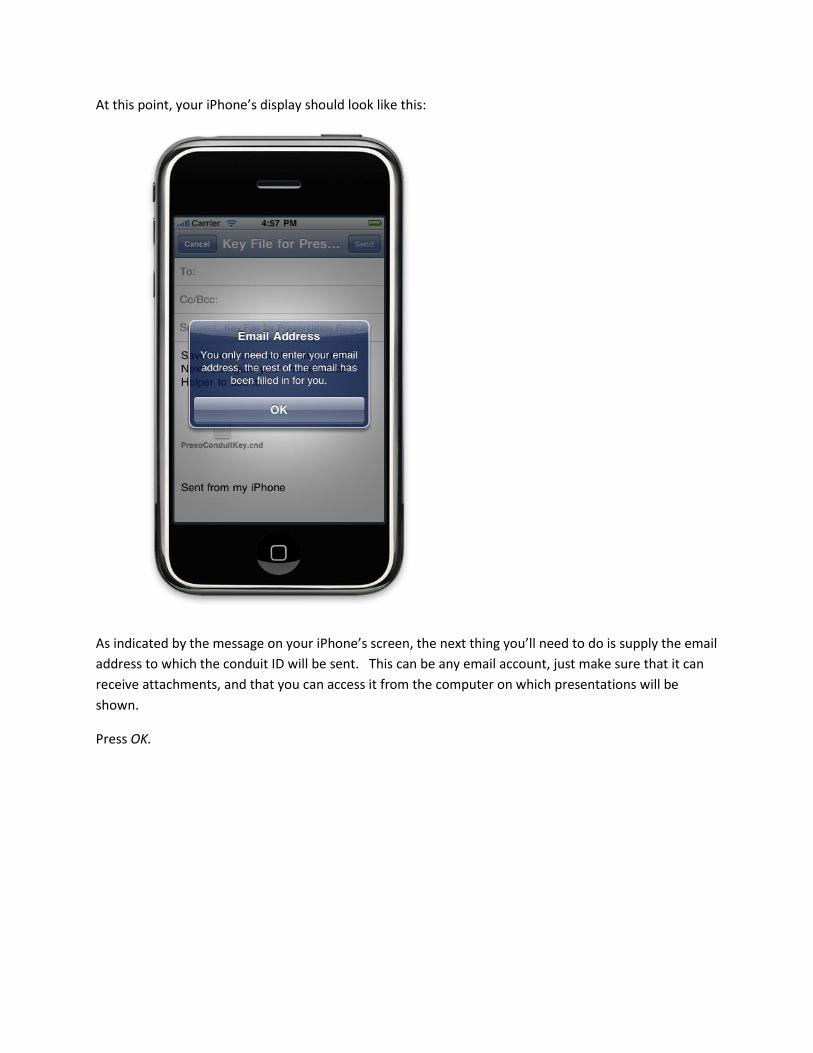
At this point, your iPhone’s display should look like this:
As indicated by the message on your iPhone’s screen, the next thing you’ll need to do is supply the email
address to which the conduit ID will be sent. This can be any email account, just make sure that it can
receive attachments, and that you can access it from the computer on which presentations will be
shown.
Press OK.
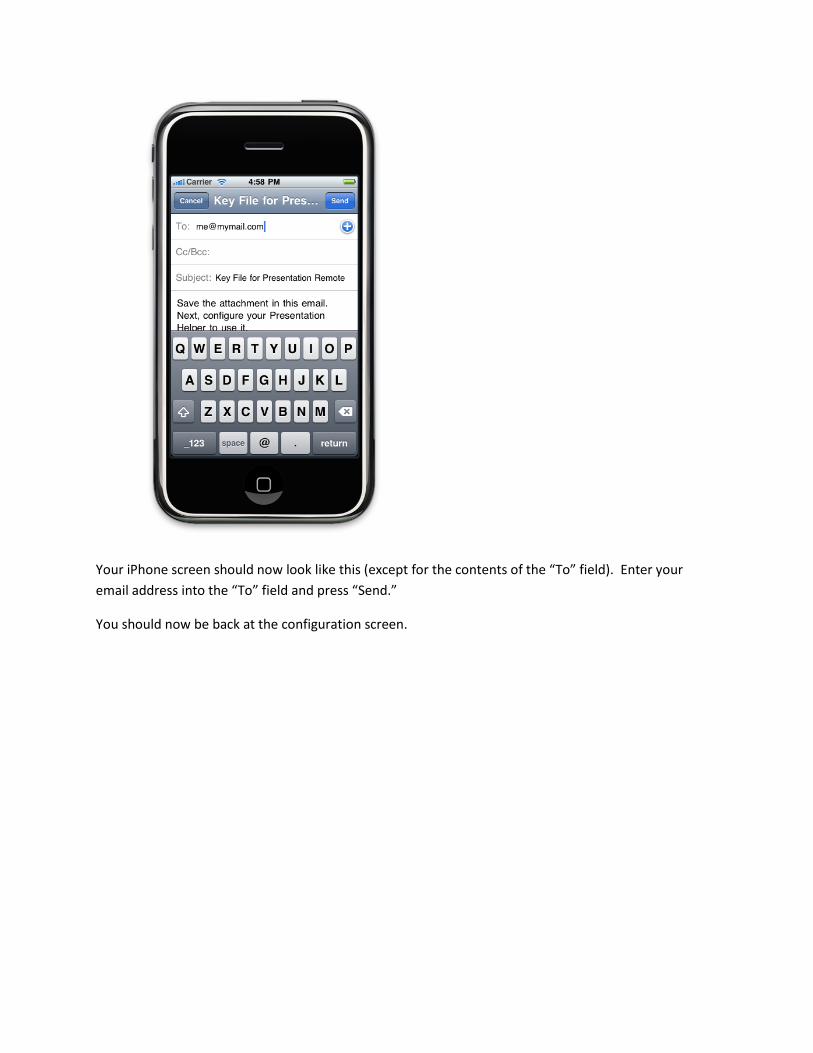
Your iPhone screen should now look like this (except for the contents of the “To” field). Enter your
email address into the “To” field and press “Send.”
You should now be back at the configuration screen.
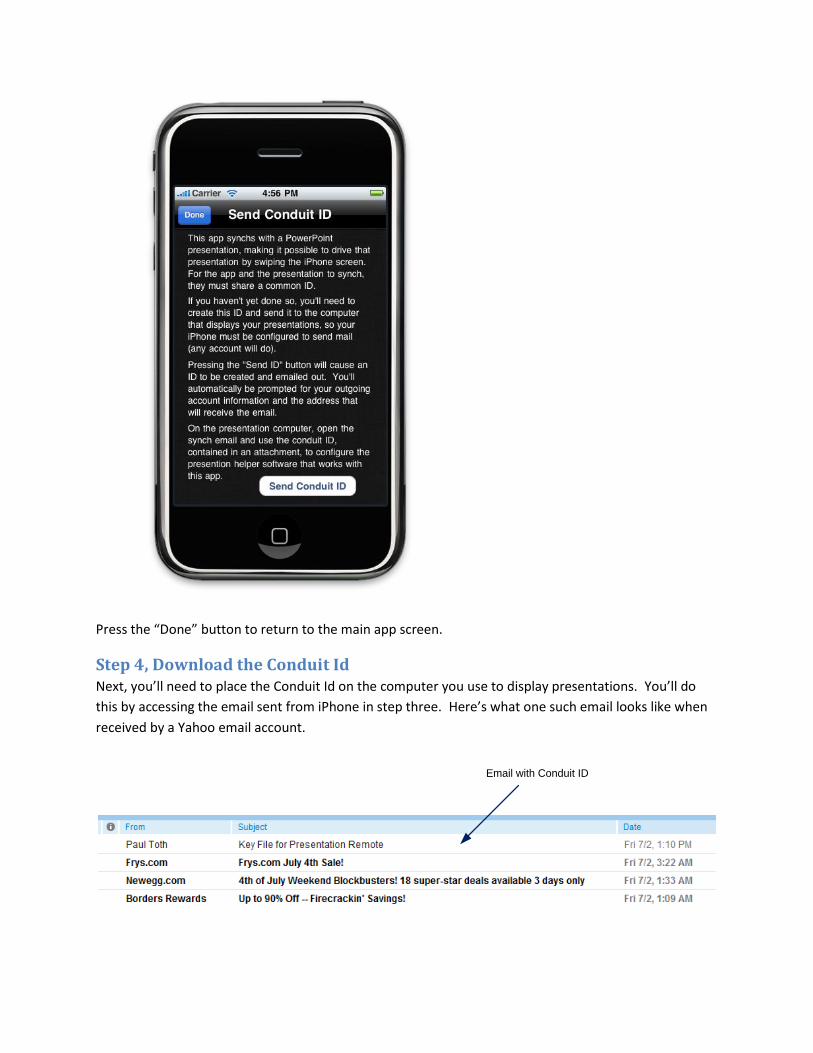
Press the “Done” button to return to the main app screen.
Step 4, Download the Conduit Id Next, you’ll need to place the Conduit Id on the computer you use to display presentations. You’ll do
this by accessing the email sent from iPhone in step three. Here’s what one such email looks like when
received by a Yahoo email account.
Email with Conduit ID
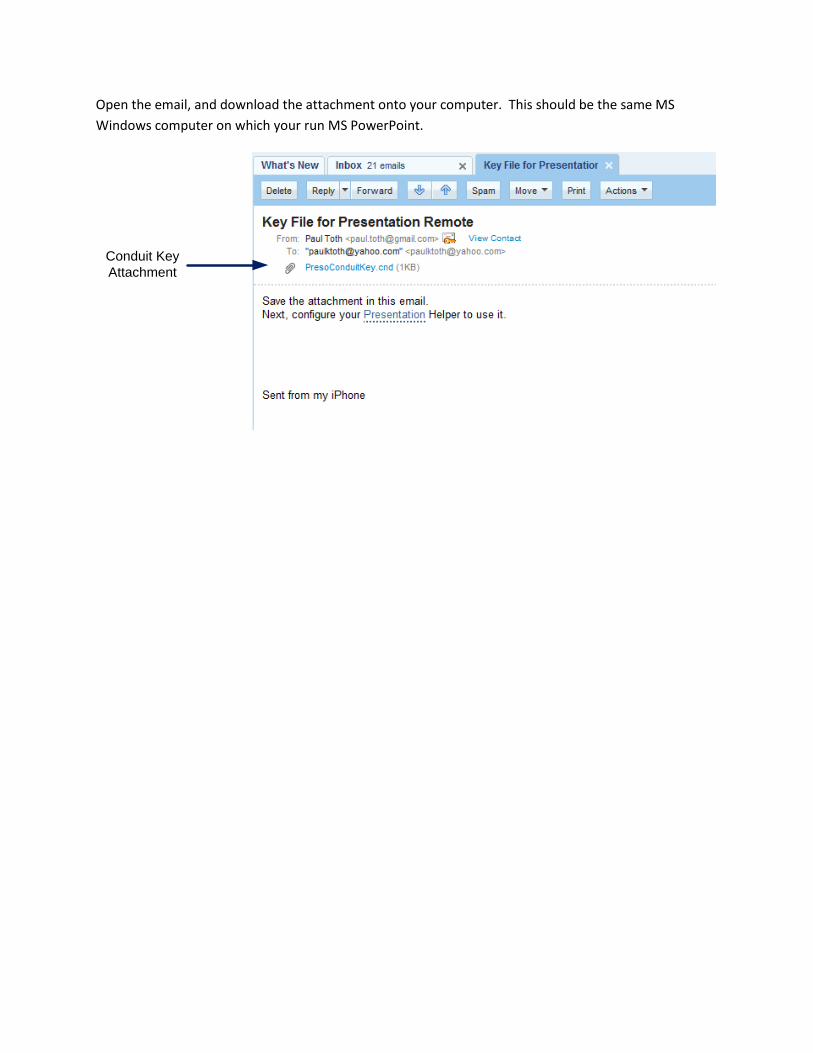
Open the email, and download the attachment onto your computer. This should be the same MS
Windows computer on which your run MS PowerPoint.
Conduit Key
Attachment
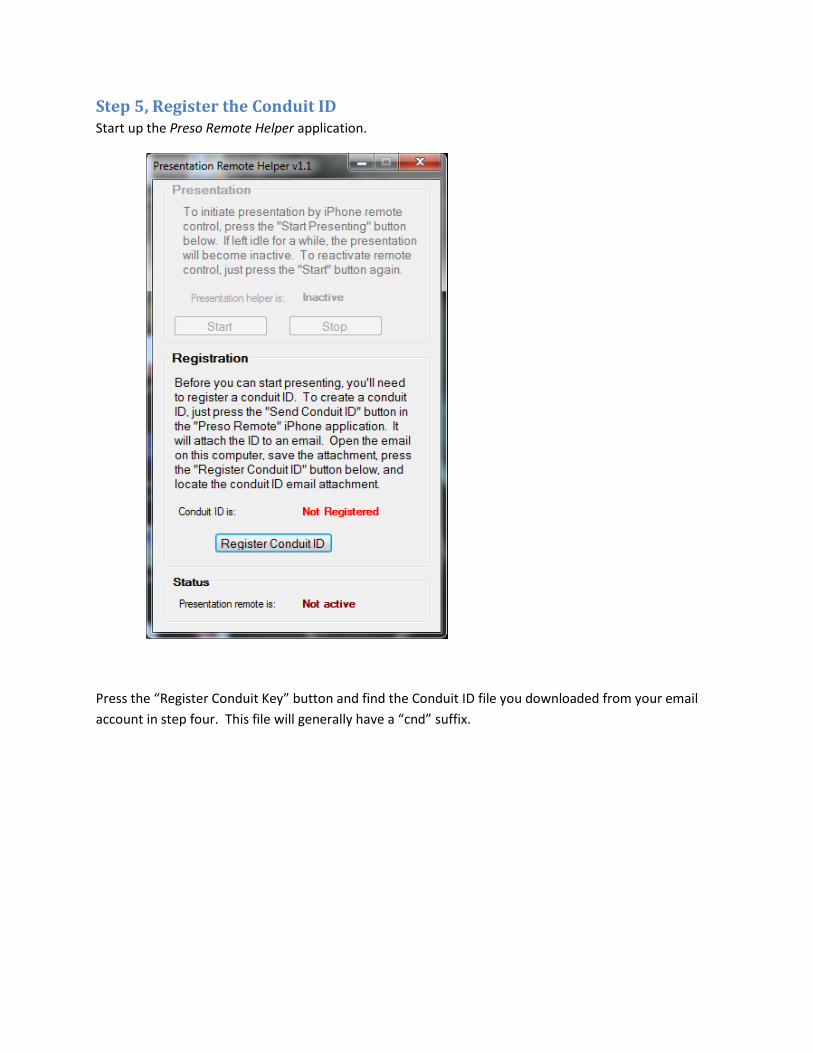
Step 5, Register the Conduit ID Start up the Preso Remote Helper application.
Press the “Register Conduit Key” button and find the Conduit ID file you downloaded from your email
account in step four. This file will generally have a “cnd” suffix.
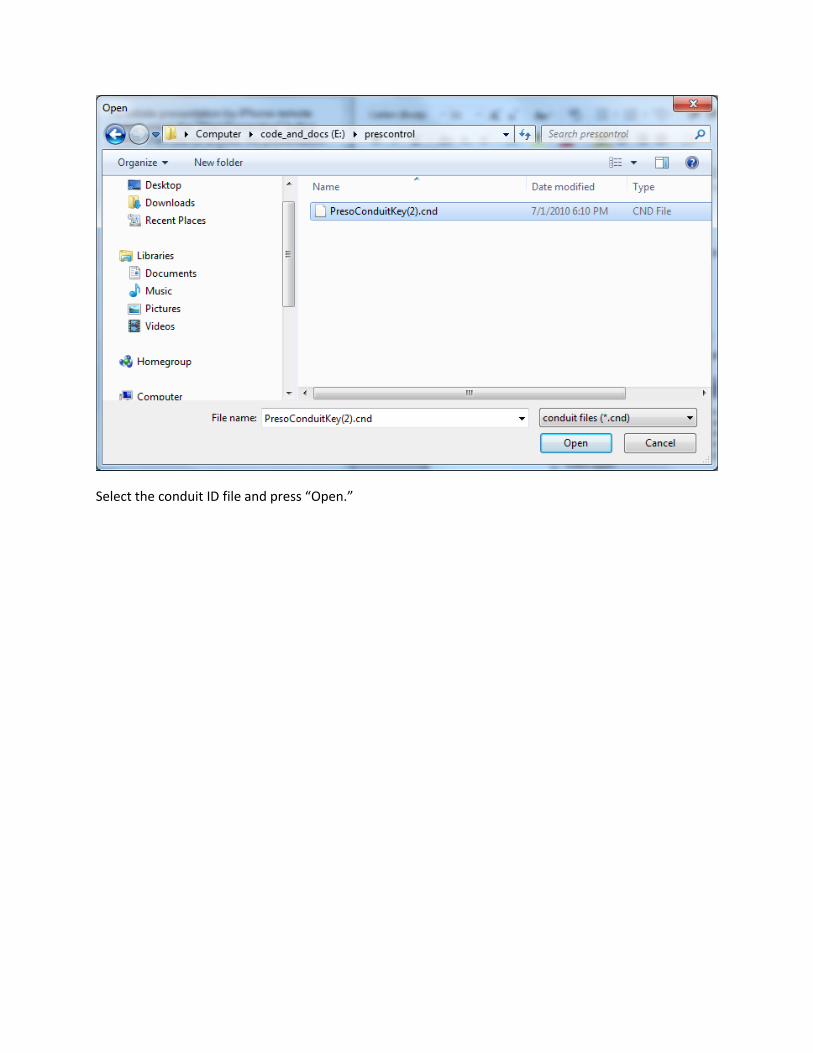
Select the conduit ID file and press “Open.”
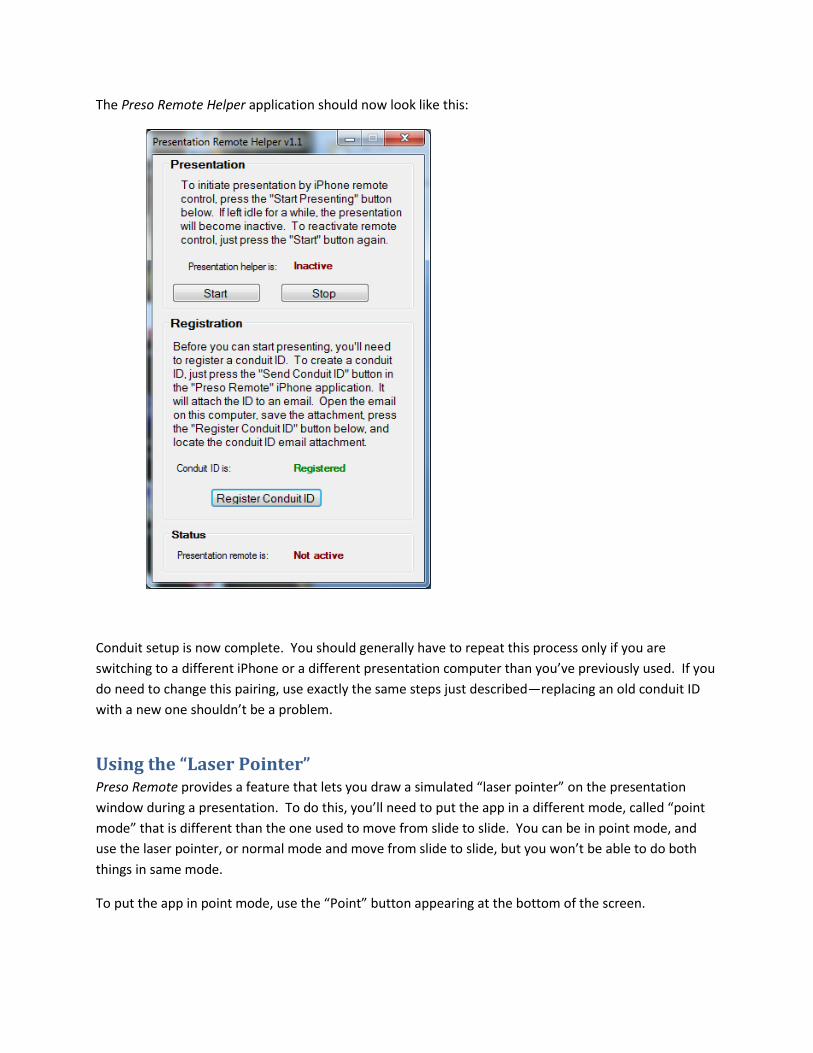
The Preso Remote Helper application should now look like this:
Conduit setup is now complete. You should generally have to repeat this process only if you are
switching to a different iPhone or a different presentation computer than you’ve previously used. If you
do need to change this pairing, use exactly the same steps just described—replacing an old conduit ID
with a new one shouldn’t be a problem.
Using the “Laser Pointer” Preso Remote provides a feature that lets you draw a simulated “laser pointer” on the presentation
window during a presentation. To do this, you’ll need to put the app in a different mode, called “point
mode” that is different than the one used to move from slide to slide. You can be in point mode, and
use the laser pointer, or normal mode and move from slide to slide, but you won’t be able to do both
things in same mode.
To put the app in point mode, use the “Point” button appearing at the bottom of the screen.
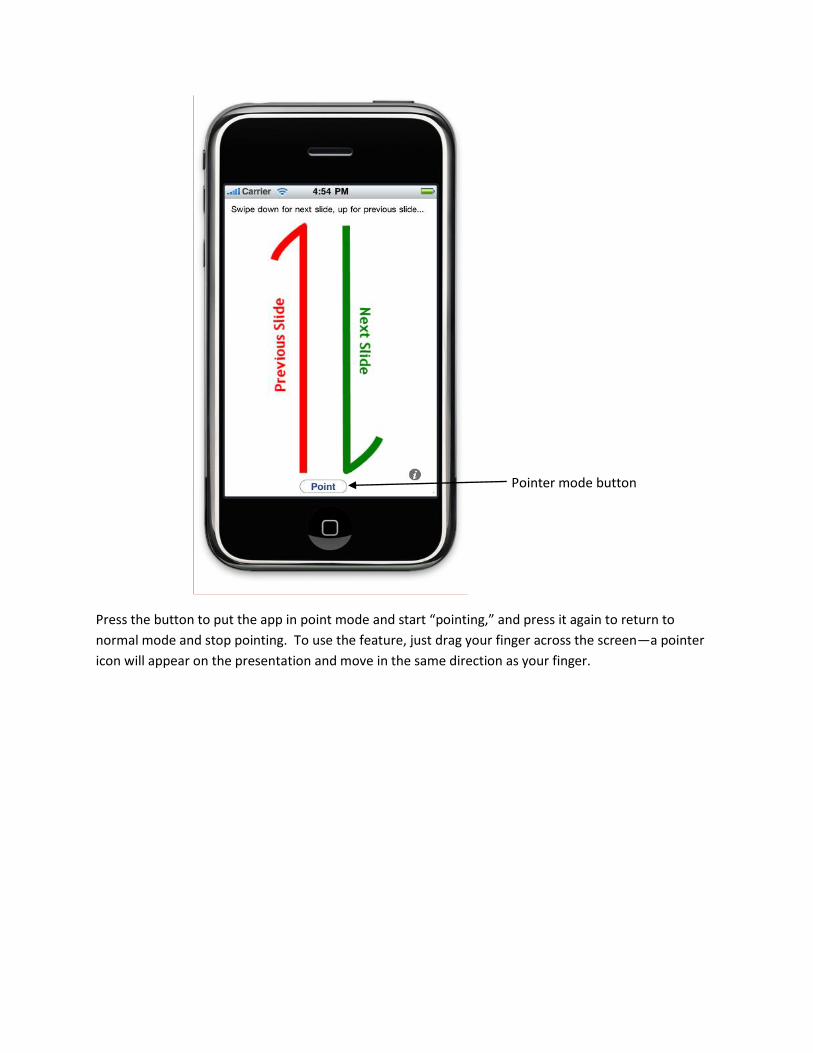
Press the button to put the app in point mode and start “pointing,” and press it again to return to
normal mode and stop pointing. To use the feature, just drag your finger across the screen—a pointer
icon will appear on the presentation and move in the same direction as your finger.
Pointer mode button
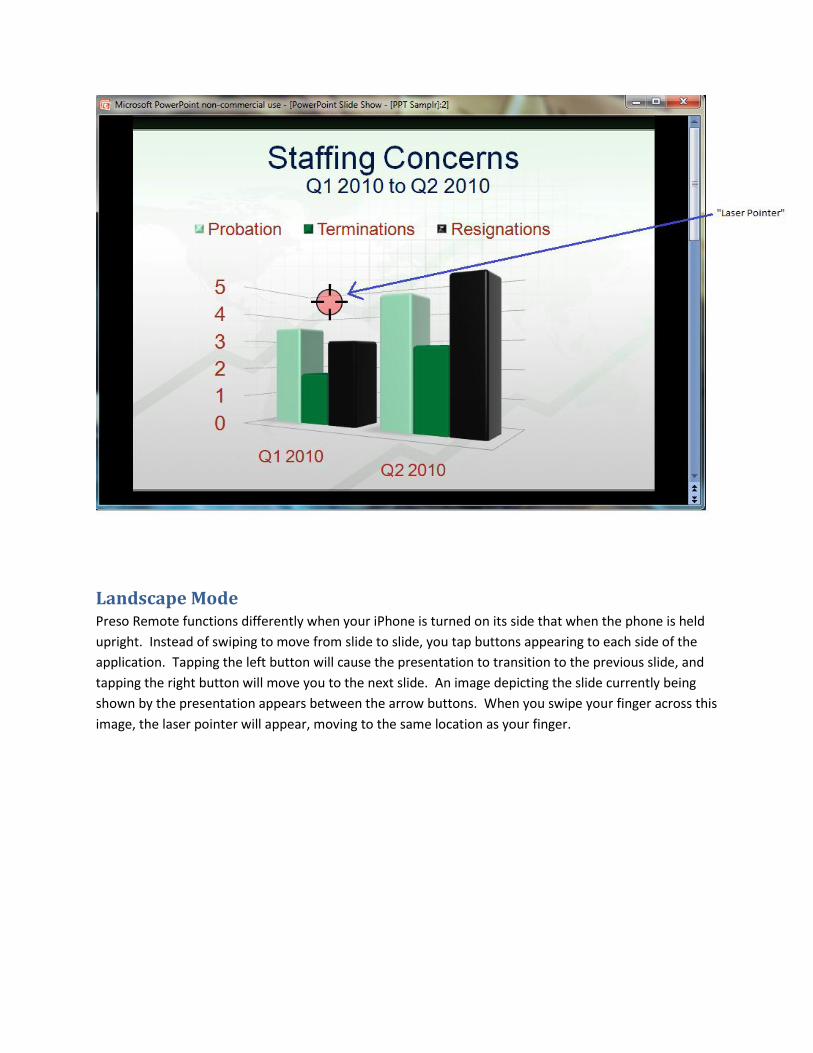
Landscape Mode Preso Remote functions differently when your iPhone is turned on its side that when the phone is held
upright. Instead of swiping to move from slide to slide, you tap buttons appearing to each side of the
application. Tapping the left button will cause the presentation to transition to the previous slide, and
tapping the right button will move you to the next slide. An image depicting the slide currently being
shown by the presentation appears between the arrow buttons. When you swipe your finger across this
image, the laser pointer will appear, moving to the same location as your finger.

When you flip the phone back into its upright position, it will automatically return to “normal” mode.
In-App Help To receive help while you’re in the application, hold the phone upright and double tap. This will cause a
short sequence of simple help screens to appear. To move between help screens, tap the arrows on the
bottom of the screen. Tapping the “Done” button will cause the help screens to disappear.
Controlling Slide Transitions with Gestures Preso Remote provides an alternative method of transitioning between the slides of a presentation. To
move to the previous slide hold your phone and gesture sharply upward, giving the phone an abrupt
“shake.” To move to the previous slide gesture sharply downward. The gestures do not have to be
large, a few inches of motion will do, but they do have to be forceful enough for the phone to detect a
shaking motion rather than the sort of motions that occur during routine handling.