pre-trip class a tractor trailercdltmds.com/pdf/pre-trip_class_a_tractor_trailer.pdf · page 1 of...
TRANSCRIPT

Page 1 of 14
CLASS A PRE-TRIP INSPECTION STUDY GUIDE
TRACTOR
FRONT OF VEHICLE Chock the vehicle or make sure it’s on level ground before you begin your pre-trip inspection.
Check to see for any evident damage to the chassis or frame of the vehicle and that the vehicle is not
leaning left or right, if it is there may be suspension problems, load problems or a bad tire. Check under the vehicle for any fresh oil, coolant, grease, or fuel leaks.
Check that all external lights and reflective equipment are clean and functional. Light and reflectors
checks include: • Clearance lights (red on rear, amber elsewhere). • Headlights (high and low beams). • Tailgates. • Turn signals. • Four-way flashers. • Brake lights. • Red reflectors (on rear and amber reflectors elsewhere). • Proper color. NOTE: Checks of brake, turn signal and four-way flasher functions must be done separately. NOTE: you must go inside the vehicle and have the examiner stay outside while you turn all your lights on.
ENGINE COMPARTMENT (Engine Off)
LEAKS/HOSES: Check for puddles on the ground, dripping fluids
on underside of engine and transmission Inspect hoses for cuts, bubbles, or leaks. Also check that they are not dry rotted and that the clamps/fixtures are properly secured.
OIL: Indicate where the dipstick is located. Check that the oil level
is within safe operating range and it’s at the appropriate level and no oil leaks is evident. • IDLING 5-20 psi • OPERATING 40-60 PSI • LOW, DROPPING, FLUCTUATING: STOP IMMEDIATELY!
COOLANT LEVEL: Inspect reservoir sight glass, make sure it’s
at the appropriate level, secure and has no evident leaks. (DO NOT open reservoir sight glass or radiator caps when hot or when the vehicle has been running for some time.)
POWER STEERING FLUID: Indicate where the power steering fluid dipstick is located. Check for
adequate power steering fluid level in the chamber and that the chamber is secure and no evident leaks. Also make sure the power steering pump is properly mounted, no cracks, leaks and the belt is NOT missing, cut, dry rotted, loose or has no more than ¾ of an inch of play. State that the pump is gear driven if no belt.
‘ Miami School 3790 NW 11th St. Miami, Fl 33126
305-649-5344
‘ La Belle School 250 E. Cowboy Way La Belle, Fl 33935
863-675-0755

Page 2 of 14
ENGINE COMPARTMENT BELTS: Check the following belts for snugness (up to ¾ inch play at center of belt), cracks, frays, not dry, rotted and that the clamps/fixtures are properly secured. Power steering belt, Water pump gear/belt, Alternator gear/ belt and Air compressor gear/ belt. Also check that all components having these belts are operating properly, are not damaged or leaking, and are mounted securely. If any of the components listed above are not belt driven, you must tell the examiner which component (s) are not belt driven. WINDSHIELD WASHER FLUID: Check for adequate windshield
washer fluid level in the dispenser and that the dispenser is secure and no evident leaks.
ELECTRICAL WIRING: Check for cracked, worn electrical
wiring/insulation. EXHAUST SYSTEM: Check exhaust from engine compartment all
the way to the end of the exhaust system. Check to make sure it’s properly secured and that it does not have any: 1) Loose, broken or missing exhaust pipes, mufflers, tailpipes, or vertical stacks. 2) Loose, broken, or missing brackets, clamps, bolts, or nuts. 3) Exhaust system parts rubbing against fuel system parts, tires, parts that are leaking or other moving parts of vehicle. DO NOT TOUCH ANY PART OF EXHAUST SYSTEM EXCEPT THE GUARD PLATE UNLESS YOU ARE CERTAIN THE TRUCK HAS COOLED DOWN.
LOWER AND SECURE HOOD, CAB OR ENGINE COMPARTMENT DOOR BEFORE CONTINUING.
CAB CHECK/ENGINE START
CLUTCH/GEARSHIFT: Check the clutch and gears are not sticking. Push in clutch and try every
gear position to test that nothing is getting stuck. Also a good idea to test brake pedal and accelerator pedal for sticking as well.
SAFE START: Start up your truck (make sure gear shifter is in neutral, engage the clutch, turn the key to
the on position and let the computer set – the needles on the gauges will go up to the right, then return back down to the left- crank the engine) release the clutch slowly.
ABS LIGHT: Make sure it illuminates after truck is turned on, and then shuts off after a few seconds.
GAUGES: Go ahead and check your gauges on the vehicle now and make sure they are at normal operating
range. The following steps should help you determine if they are working properly: 1: Oil pressure gauge: IDLING 5-20 PSI • OPERATING 40-60 PSI • LOW, DROPPING,
FLUCTUATING. STOP IMMEDIATELY! 2: Temperature gauge: Between 170- 190 degrees. 3: Ammeter/Voltmeter: Between 12-14. 4: RPM gauge is working properly. 5: Speedometer is working properly. 6: Air pressure gauge(s) - between 100-125 P.S.I.
Page 3 of 14
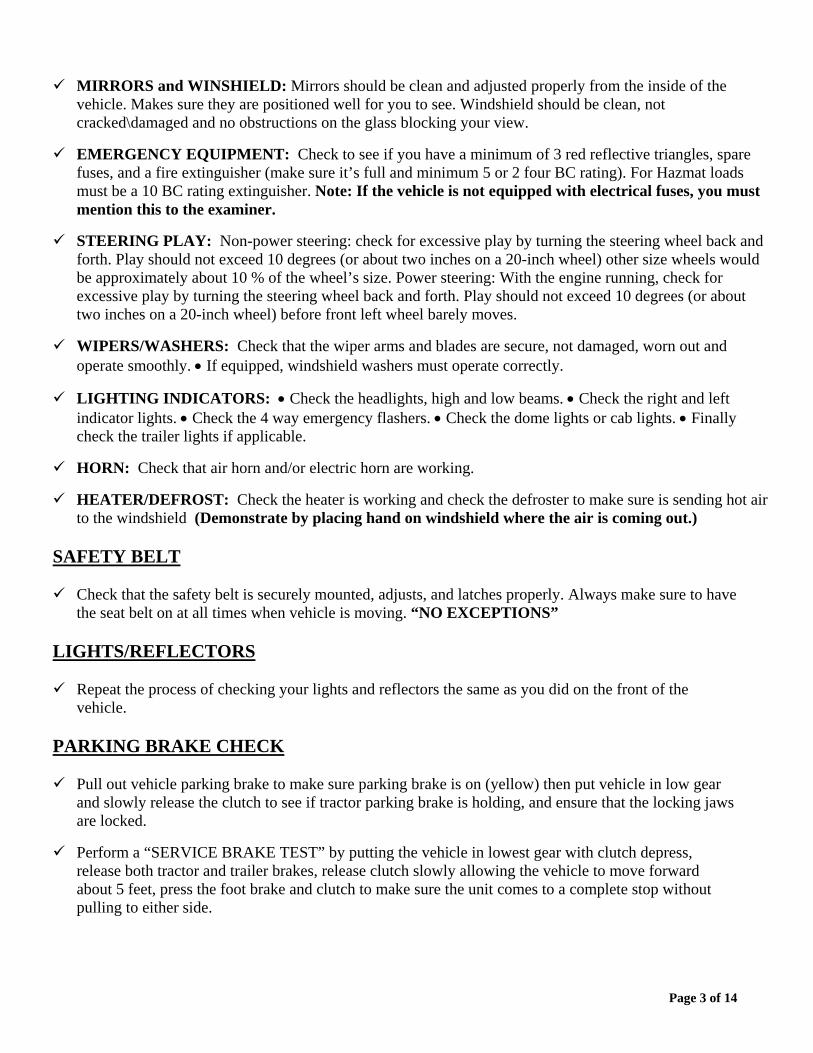
MIRRORS and WINSHIELD: Mirrors should be clean and adjusted properly from the inside of the vehicle. Makes sure they are positioned well for you to see. Windshield should be clean, not cracked\damaged and no obstructions on the glass blocking your view. EMERGENCY EQUIPMENT: Check to see if you have a minimum of 3 red reflective triangles, spare
fuses, and a fire extinguisher (make sure it’s full and minimum 5 or 2 four BC rating). For Hazmat loads must be a 10 BC rating extinguisher. Note: If the vehicle is not equipped with electrical fuses, you must mention this to the examiner. STEERING PLAY: Non-power steering: check for excessive play by turning the steering wheel back and
forth. Play should not exceed 10 degrees (or about two inches on a 20-inch wheel) other size wheels would be approximately about 10 % of the wheel’s size. Power steering: With the engine running, check for excessive play by turning the steering wheel back and forth. Play should not exceed 10 degrees (or about two inches on a 20-inch wheel) before front left wheel barely moves. WIPERS/WASHERS: Check that the wiper arms and blades are secure, not damaged, worn out and
operate smoothly. • If equipped, windshield washers must operate correctly. LIGHTING INDICATORS: • Check the headlights, high and low beams. • Check the right and left
indicator lights. • Check the 4 way emergency flashers. • Check the dome lights or cab lights. • Finally check the trailer lights if applicable. HORN: Check that air horn and/or electric horn are working.
HEATER/DEFROST: Check the heater is working and check the defroster to make sure is sending hot air
to the windshield (Demonstrate by placing hand on windshield where the air is coming out.)
SAFETY BELT Check that the safety belt is securely mounted, adjusts, and latches properly. Always make sure to have
the seat belt on at all times when vehicle is moving. “NO EXCEPTIONS”
LIGHTS/REFLECTORS Repeat the process of checking your lights and reflectors the same as you did on the front of the
vehicle.
PARKING BRAKE CHECK Pull out vehicle parking brake to make sure parking brake is on (yellow) then put vehicle in low gear
and slowly release the clutch to see if tractor parking brake is holding, and ensure that the locking jaws are locked.
Perform a “SERVICE BRAKE TEST” by putting the vehicle in lowest gear with clutch depress,
release both tractor and trailer brakes, release clutch slowly allowing the vehicle to move forward about 5 feet, press the foot brake and clutch to make sure the unit comes to a complete stop without pulling to either side.

Page 4 of 14
AIR BRAKE CHECK (air brake equipped vehicles only) Failure to perform an air brake check will result in an automatic failure of the vehicle inspection test.
Air brake safety devices vary, however, this procedure is designed to see that any safety device operates correctly as air pressure drops from normal to low air condition. For safety purposes, in areas where an incline is present, you will use wheel chocks during the air brake check. The proper procedures for inspecting the air brake system is referred to as: “LEAKS • ALARM • BUTTON • TEST or (LAB TEST)
LEAKS • ALARM • BUTTON • TEST or (LAB TEST) NOTE: Make sure your vehicle is safely chocked so it will not roll backwards or forwards. STEP ONE: With the engine running, build the air pressure to governed cut-out (100 – 125PSI).
STEP TWO: Turn off the engine (chock the wheels, if necessary), and then turn the key back on so the
gauges work. Release the brake. Fully apply the foot brake and time the pressure drop. The air pressure loss should be less than 4 PSI in one minute for a tractor with a trailer. STEP THREE: (Explain what you are about to do before you do it) Begin fanning off the air pressure by
rapidly pumping and releasing the foot brake pedal. Low air warning devices (buzzer, light flag) should activate before air pressure drops below 60 PSI. STEP FOUR: (Explain what you are about to do before you do it) Continue to fan off the air
pressure. At approximately 20 - 40 PSI on a tractor-trailer combination vehicle, the tractor protection valve and emergency/parking brake valve should close (pop out). On other combination vehicle types the emergency/parking brake valve should close (pop out).

Page 5 of 14
4 Point Air Brake Check Visual Aid
Step 1
Start the engine and build the air Pressure to governed cut-out (120 - 125 PSI).
Check that the compressor shuts off between 120 - 125 PSI.
You should not hear any leaks or the sound of air coming from any part of the air - brake system.
Step 2
4 PSI in one minute for a tractor with a trailer.
Step 3
Fan off the air pressure by rapidly applying and releasing the foot brake.
Check that the low air pressure warning light and or alarm goes off at approximately 60 PSI.
Step 4
Continue to fan off the air pressure.
Note: When at normal air pressure level, check the parking brake by putting on the brake. Put the truck into gear and slowly engage the clutch to see if the parking brake holds. Put on the trailer brakes. Try to drive away. If the unit moves, there is a defect or air is not reaching the trailer brakes.
Turn off the engine then turn the key back on so the gauges work.
Release the brake.
Fully apply the foot brake and time the pressure drop.
The air pressure loss should be less than: Should listen for air leaks!
0
30
60 90
120
150Air Pressure
kPa0
30
60 90
120
150Air Pressure
kPa
0
30 60 90
120
150 Air Pressure
kPa 0
30 60 90
120
150 Air Pressure
kPa
Brake Release
Parking Brakes
Parking Brake
Trailer Supply
Brake Release
Parking Brakes
Brake Release
Parking Brakes
At approximately 20 to 40 PSI the tractor protection valve should go from the normal to the emergency position. The trailer brakes should lock.
0
30
60 90
120
150Air Pressure
kPa0
30
60 90
120
150Air Pressure
kPa
---- POP --- --- POP ---
0
30 60 90
120
150Air Pressure
kPa0
30 60 90
120
150Air Pressure
kPa
Parking Brake
Trailer Supply

Page 6 of 14
EXTERNAL INSPECTION VEHICLE
STEERING SYSTEM
STEERING BOX/HOSES: Check that the steering box is securely mounted and not leaking. Look for any missing nuts, bolts and cotter keys. • Check for power steering fluid leaks. • Check power steering hose(s) for damaged, leaks, cracked, or rotted. STEERING LINKAGE: Check that the connecting links, arms and rods from the steering box to the
wheel are not worn or cracked. • Check that joints and sockets are not worn or loose and that there are no missing nuts, bolts or cotter keys. PITMAN ARM: Check that is not cracked, bent, or welded. Also check the crown bolt that connects it to
the draglink to make sure it’s secured by a carter pin. DRAGLINK: Check that is not cracked, bent, or welded. Also check the crown bolt that connects it to the
upper steering arm to make sure it’s secured by a carter pin. STEERING COLUMN: Check that is not bent, cracked, or welded (manufacturer’s welding is acceptable
on the steering column). Also check the universal joints that connect the steering column to the steering box and make sure it’s properly greased and secure. UPPER and lower STEERING ARM: Check to see if they are well secured, not cracked, bent, or welded.
TIE ROD: Check to see that it’s well secured, not cracked, bent, or welded.
FOR PROPER PARTS TERMINALOGY REFER TO FIGURE 2.1
Figure: 2.1

Page 7 of 14
FRONT SUSPENSION OF VEHICLE
CHASSIS\FRAME: Check to see it’s well secured, not cracked, bent, or welded.
SPRINGS/AIR/TORQUE: Look for missing, shifted, cracked, or
broken leaf springs. • Look for broken or distorted coil springs. • If vehicle is equipped with torsion bars, torque arms, or other types suspension components, check that they are not damaged, cracked, bent or welded and are mounted securely. • Air ride suspension should be checked for damage and leaks. FRONT & REAR MOUNTS: Look for cracked, bent, welded or
broken spring hangers. Missing or damaged bushings, and broken, loose or missing bolts, u-bolts or other axle mounting parts. • The mounts should be checked at each point where they are secured to the vehicle frame and axle(s). • Check the u-bolts for cracks and that they are not shiny around the nuts, which might indicate that they are loose. SHOCK ABSORBER: Check to see that shock absorbers are secure, and that there is no evident fluid
leaks. NOTE: Be prepared to perform the same suspension components inspection on every axle (power unit and trailer, if equipped).
REAR SUSPENSION OF VEHICLE
Repeat the process of checking it the same as in front of the vehicle. With the exception that you must check the torque rods and air bags (if the vehicle is equipped with air ride suspension).
TORQUE ROD: Check to see it’s not cracked, bent, or
welded and that they are not worn out. AIR BAGS: Check to see they have no cuts, bubbles, or
leaks and they are in good condition. NOTE: Wherever there is an air bag, there will be shock absorbers.
Figure: 2.3
Figure: 2.2Figure: 2.4

Page 8 of 14
FRONT BRAKES OF VEHICLE SLACK ADJUSTER & PUSH ROD: Check for broken, loose or missing parts. For manual slack
adjusters, pull out the slack adjuster to make sure it, along with the push rod has from ½ inch to no more than 1 inch of play. Remember that with the exception of the front brakes on the steering axle you must chock your truck on level ground and release your parking brakes or the spring inside your brake chamber will not allow you to pull the slack adjuster. Make sure there are no cracks dents, or bents & no pins missing. BRAKE CHAMBER: Check to see that the brake chambers are not, cracked, dented, are mounted
securely and that it has no air leaks.
BRAKE HOSES/LINES: Check to see that they have no cracks, worn, bubbles, or leaking hoses, lines and couplings. Also that they are attached securely.
DRUM BRAKE: Check for cracks, dents, holes, worn or welded, loose or
missing bolts and properly secure. (The drum is worn when you see an inch or more stress crack on it) and make sure it’s free of any debris or grease. Brake linings (where visible) should not be worn dangerously thin. BRAKE LININGS AND PADS: On some brake drums, there are
openings where the brake linings and pads can be seen from outside the drum. For this type of drum, check that a visible amount of brake lining and pad is showing. Remember that you may not be able to see the pads, lining, and drums because most trucks have a protective cover over them. You must tell your examiner this and proceed to tell him what you would check for. NOTE: BE PREPARED TO PERFORM THE SAME BRAKE COMPONENTS INSPECTION ON
EVERY AXLE (POWER UNIT AND TRAILER, IF EQUIPPED).
REAR BRAKES OF TRACTOR
Repeat the process of checking the rear brakes of the tractor the same way as in the front brakes of the tractor.
Remember that with the exception of the front brakes on the steering axle you must chock your truck on level ground and release your parking brakes or the spring inside your brake chamber will not allow you to pull the slack adjuster.
Page 9 of 14
FRONT WHEELS OF VEHICLE
RIMS: Check both inside and outside rim to make sure it’s not cracked, bent, and welded. Also make sure the outside rim is clean.
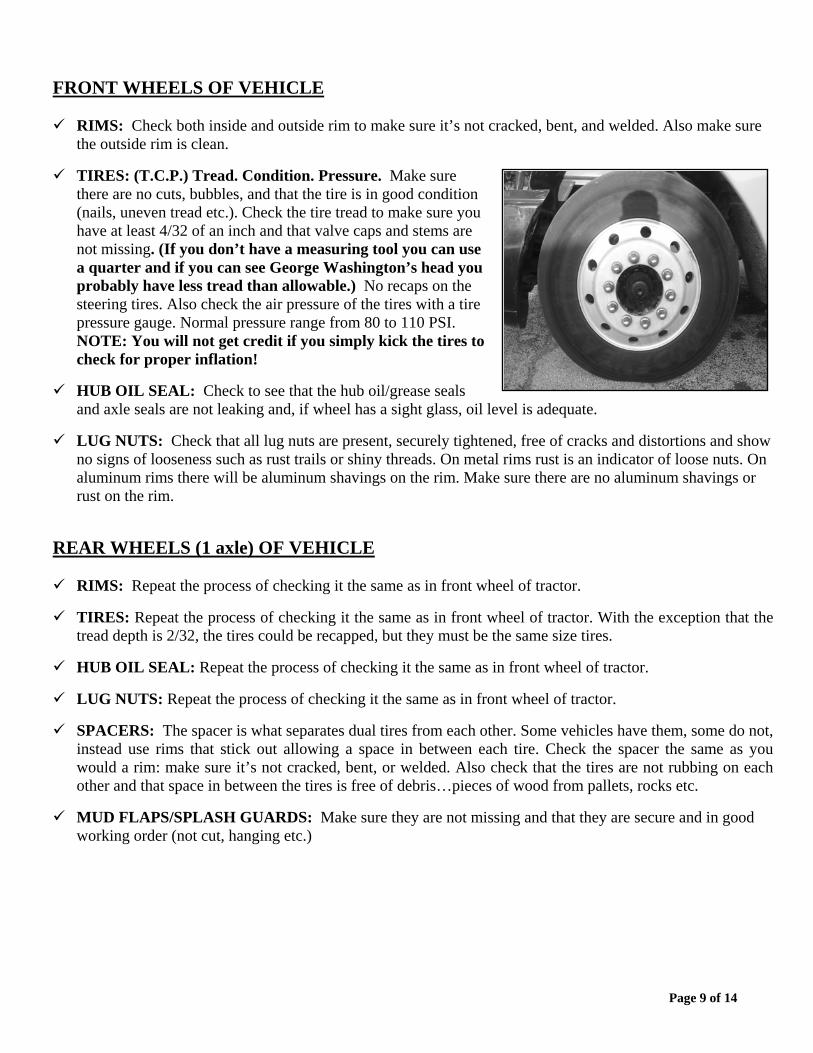
TIRES: (T.C.P.) Tread. Condition. Pressure. Make sure
there are no cuts, bubbles, and that the tire is in good condition (nails, uneven tread etc.). Check the tire tread to make sure you have at least 4/32 of an inch and that valve caps and stems are not missing. (If you don’t have a measuring tool you can use a quarter and if you can see George Washington’s head you probably have less tread than allowable.) No recaps on the steering tires. Also check the air pressure of the tires with a tire pressure gauge. Normal pressure range from 80 to 110 PSI. NOTE: You will not get credit if you simply kick the tires to check for proper inflation! HUB OIL SEAL: Check to see that the hub oil/grease seals
and axle seals are not leaking and, if wheel has a sight glass, oil level is adequate. LUG NUTS: Check that all lug nuts are present, securely tightened, free of cracks and distortions and show
no signs of looseness such as rust trails or shiny threads. On metal rims rust is an indicator of loose nuts. On aluminum rims there will be aluminum shavings on the rim. Make sure there are no aluminum shavings or rust on the rim.
REAR WHEELS (1 axle) OF VEHICLE
RIMS: Repeat the process of checking it the same as in front wheel of tractor.
TIRES: Repeat the process of checking it the same as in front wheel of tractor. With the exception that the
tread depth is 2/32, the tires could be recapped, but they must be the same size tires. HUB OIL SEAL: Repeat the process of checking it the same as in front wheel of tractor.
LUG NUTS: Repeat the process of checking it the same as in front wheel of tractor.
SPACERS: The spacer is what separates dual tires from each other. Some vehicles have them, some do not,
instead use rims that stick out allowing a space in between each tire. Check the spacer the same as you would a rim: make sure it’s not cracked, bent, or welded. Also check that the tires are not rubbing on each other and that space in between the tires is free of debris…pieces of wood from pallets, rocks etc. MUD FLAPS/SPLASH GUARDS: Make sure they are not missing and that they are secure and in good
working order (not cut, hanging etc.)

Page 10 of 14
SIDE OF VEHICLE
DOORS/MIRRORS and MOUNT: Check that doors are not damaged and that they open and close properly from the inside and outside. Hinges should be secure with seals intact. Check doors opening mechanism and locks are working properly. Check that the windows open and close and that they are clean, not broken, and have no obstructions of view. Make sure rubber seal around the doors is not missing or damaged. Check that mirrors and mirror’s brackets are not damaged and are mounted securely with no loose fittings. Check that the mirrors are clean and not broken. FUEL TANK: Check that tank(s) are secure, cap(s) are tight, and that there are no leaks from tank(s) or
lines. Check the straps to make sure they are secure and they have rubber lining to prevent metal against metal contact, which could damage a tank(s). Open the fuel cap and check that it has the rubber gasket for tight closing of the cap and that it has a chain to prevent the loss of the cap. Also check that you have fuel and that the amount fuel you have is accurately displayed on the fuel gauge inside your tractor.
BATTERY/BOX: Open battery compartment to inspect the vehicles batteries. Make sure the cables are not
stripped or damaged and that the connections are secure and free of battery acid. Battery connections should not show signs of excessive corrosion. Check that all the batteries are fastened down tightly to prevent excessive movement of the battery. (If the battery is loose and shakes excessively this will shorten the life of that battery.) If applicable check the water level of your battery and cell caps are present, although most new batteries are maintenance free. Close compartment and make sure the straps are secure and the battery box is in good condition. DRIVE SHAFT: Check to see that the drive shaft is not bent, cracked or
welded. Couplings/ Universal joints should be properly greased and secure and free of foreign objects. EXHAUST SYSTEM: Check system for damage and signs of leaks such
as rust or carbon soot. System should be connected tightly and mounted securely. FRAME: Look for cracks, broken welds, holes or other damage to the
longitudinal frame members, cross members, box and floor.
REAR OF VEHICLE MUD FLAPS/SPLASH GUARDS: If equipped, check that splashguards or mud flaps are not damaged and
are mounted securely. DOORS/TIES/LIFTS: Check that doors and hinges are not damaged and that they open, close, and latch
properly from the outside. • Ties, straps, chains, and binders must also be secure. • If equipped with a cargo lift, look for leaking, damaged or missing parts and explain how it should be checked for correct operation. • Lift must be fully retracted and latched securely.
UNDER VEHICLE
DIFFERENTIAL: Make sure it’s not cracked, bent, or welded. Check that the bolts are secure and there
are no leaks.

Page 11 of 14
VEHICLE/COUPLING
AIR LINES: Listen for air leaks. Check that air hoses are not cut, chafed, spliced. or worn (steel braid should not show through). Check the rubber o-rings on the glad hands to make sure it’s not damaged or dry rotted.
ELECTRIC LINES: Check to see if the electrical lines are not
tangled, pinched, or dragging against tractor parts. Make sure that the airlines are connected properly on both the tractor and the trailer end. CATWALK & STEPS: Check that the catwalk is solid, clear of
objects, and securely bolted to tractor frame. Make sure that it’s free of debris/grease etc., so that you can prevent a potential slip and fall accident.
MOUNTING BOLTS: Look for loose or missing mounting brackets,
clamps, bolts, or nuts. Both the fifth wheel and the slide mounting must be solidly attached. • On other types of coupling systems (i.e. ball hitch, pintle hook, etc.), inspect all coupling components and mounting brackets for missing or broken parts.
LOCKING JAWS: Look into fifth wheel gap and check that locking
jaws are fully closed around the kingpin. • On other types of coupling systems (i.e. ball hitch, pintle hook, etc.), inspect the locking mechanism for missing or broken parts and make sure it is locked securely. • If present, safety cables or chains must be secure and free of kinks and excessive slack. PLATFORM (5th WHEEL): Check for cracks or breaks in the
platform structure, which supports the fifth wheel skid plate. Make sure the fifth wheel skid plate its properly greased and that there are no cracks or evident damage. RELEASE ARM 5th WHEEL: If equipped, make sure the release arm
is in the engaged position and the safety latch is in place. Make sure the release arm is not missing or broken and is in the locked position with whatever type of locking mechanism it may have. KINGPIN/APRON/GAP: Check that the kingpin is not bent. • Make
sure the visible part of the apron is not bent, cracked, or broken. • Check that the trailer is laying flat on the fifth wheel skid plate (no gap). PIVOT: Make sure the pivot is in good working condition and that the pin is not loose or coming out.
LOCKING PINS 5th WHEEL: If equipped, look for loose or missing pins in the slide mechanism of the
sliding fifth wheel. If air powered, check for leaks. • Make sure locking pins are fully engaged. • Check that the fifth wheel is positioned properly so that the tractor frame will clear the landing gear during turns.

Page 12 of 14
FRONT OF TRAILER
AIR/ELECTRICAL CONNECTIONS: Check that trailer air connectors are sealed and in good condition. • Make sure glad hands are locked in place, free of damage or air leaks. • Make sure the trailer electrical plug is firmly seated and locked in place.
HEADER BOARD: If equipped, check the header board to see that it is secure, free of damage, and strong
enough to contain cargo. • If equipped, the canvas or tarp carrier must be mounted and fastened securely. • On closed trailers, check the front area for signs of damage such as cracks, bulges or forklift holes and that the rivets are all in place. Also remember to check the rubber o-rings on the trailer end where the glad hands go check for damage, dry rot etc.
LIGHTS and REFLECTORS: Repeat the process of checking your lights and reflectors the same as you
did on the front of your vehicle.
SIDE OF TRAILER LANDING GEAR: Check that the landing gear is fully raised has no
missing parts, crank handle is secure, and the support frame is not damaged or welded. Check the feet of the landing gear to make sure it’s not damaged and in good working condition. Also check that the landing goes up and down in both the high and low range. Make sure handle is secured, not missing any bolts and it has a safety latch to rest on while vehicle is in motion. • If power operated, check for air hydraulic leaks. DOOR/TIES/LIFTS: If equipped, check that doors are not damaged. •
Check that doors are secured with bolts and rivets and the hinges are in good order and doors swing open and close. • Also make sure you have the door ties, loops, chains, etc. that will keep your doors securely open when docking. • Make sure there is nothing in the trailer that doesn’t belong. • If equipped with a cargo lift, look for leaking, damaged or missing parts and explain how it should be checked for correct operation. FRAME: Look for cracks, broken welds, holes or other damage to the frame, cross members, box and
floor. TANDEM RELEASE ARM/LOCKING PINS: If equipped, make sure the locking pins are locked in
place and release arm is secured. Make sure the release handle is in and in the lock position (depending on the locking mechanism) that the pins are sticking out of their holes and no evident damage. LIGHTS and REFLECTORS: Repeat the process of checking your lights and reflectors the same as you
did on the front of your vehicle. Don’t forget that reflective tape must be on both sides of the trailer and clean. MUD FLAPS\SPLASH GUARDS: Make sure they are not missing and that they are secure and in good
working order (NOT CUT, HANGING etc.)

Page 13 of 14
REAR OF TRAILER
LIGHTS and REFLECTORS: Repeat the process of checking your lights and reflectors the same as you did on the front and sides of the trailer. If equipped with reflective tape it must be not damaged and clean.
DOOR and TIES: Make sure your doors are secured with bolts and rivets. That the hinges are in good
order and doors swing open and close. Also make sure you have the door ties, loops, chains, etc. that will keep your doors securely open when docking. Make sure there is nothing in the trailer that doesn’t belong. LIFT GATE: If the vehicle is equipped with a lift gate you must check to make sure the lift gate is closed
and locked and that you have placed the safety chains on it. • So that in the event that there is a hydraulic leak or malfunction that will cause the lift gate to drop it will not cause damage to property or someone.
REAR BRAKES OF TRAILER
Repeat the process of checking it the same as in front of the vehicle.
Remember that with the exception of the front brakes on the steering axle you must chock your truck on level ground and release your parking brakes or the spring inside your brake chamber will not allow you to pull the slack adjuster.
REAR WHEELS (1 axle) OF TRAILER
RIMS: Repeat the process of checking it the same as in front of the
vehicle. TIRES: Repeat the process of checking it the same as in front of the
vehicle. With the exception that the tread depth is 2/32, the tires could be recapped, but they must be the same size tires. LUG NUTS: Repeat the process of checking it the same as in front of
the vehicle. HUB OIL SEAL: Repeat the process of checking it the same as in
front of the vehicle. SPACERS: The spacer is what separates dual tires from each other.
Some vehicles have them, some do not, instead use rims that stick out allowing a space in between each tire. Check the spacer the same as you would a rim, make sure it’s not cracked, bent, or welded. Also check that the tires are not rubbing on each other and that space in between the tires is free of debris, pieces of wood from pallets, rocks etc.
SUSPENSION OF TRAILER Repeat the process of checking it the same as in front of the vehicle.
Page 14 of 14
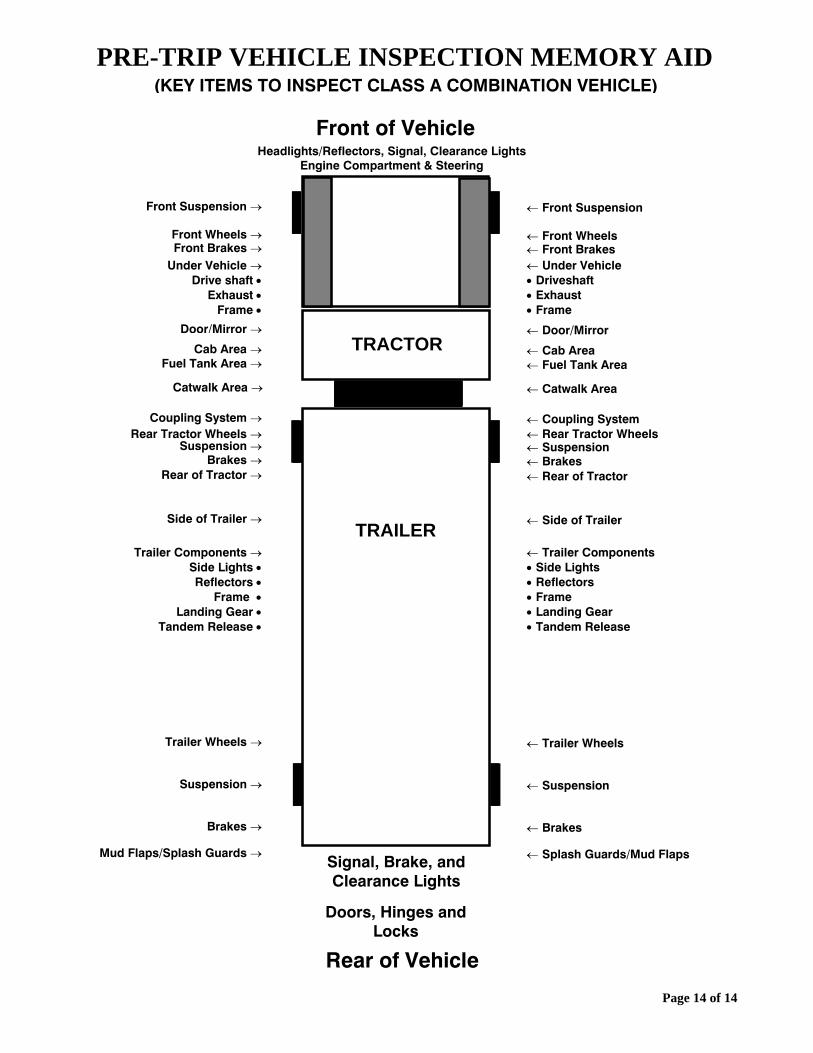
PRE-TRIP VEHICLE INSPECTION MEMORY AID
(KEY ITEMS TO INSPECT CLASS A COMBINATION VEHICLE)
Pre-Trip
Memory Aid Class A Vehicles
Signal, Brake, and Clearance Lights
Doors, Hinges and Locks
Headlights/Reflectors, Signal, Clearance Lights Engine Compartment & Steering
Front Suspension →
Front Wheels →Front Brakes →
Cab Area →Fuel Tank Area →
Coupling System →Rear Tractor Wheels →
Suspension →Brakes →
Rear of Tractor →
Side of Trailer →
Trailer Wheels →
Suspension →
Brakes →
Rear of Vehicle
Front of Vehicle
Trailer Components →Side Lights •Reflectors •
Frame •Landing Gear •
Tandem Release •
Mud Flaps/Splash Guards →
Door/Mirror →TRACTOR
TRAILER
Catwalk Area →
← Front Suspension
← Front Wheels ← Front Brakes
← Cab Area ← Fuel Tank Area
← Coupling System
← Suspension ← Brakes ← Rear of Tractor
← Side of Trailer
← Trailer Wheels
← Suspension
← Brakes
← Trailer Components • Side Lights • Reflectors • Frame • Landing Gear • Tandem Release
← Splash Guards/Mud Flaps
← Door/Mirror
← Catwalk Area
← Rear Tractor Wheels
Under Vehicle →Drive shaft •
Exhaust •Frame •
← Under Vehicle • Driveshaft • Exhaust • Frame