pc repair and troubleshooting guide
TRANSCRIPT

8/3/2019 PC Repair and Troubleshooting Guide
http://slidepdf.com/reader/full/pc-repair-and-troubleshooting-guide 1/70
A typical PC contains the following hardware:
Case Power Supply Motherboard
CPU Memory Hard Disk
Floppy Disk CD-ROM Video Adapter
Sound Card Modem Mouse
Keyboard Monitor .
There are many other possible hardware components, such as a
DVD, CD-RW, Zip drive or network card. There are also manysubcomponents of a PC, such as the cooling fan, printer port or
reset switch to name a few. This article focuses on the basic PC
hardware. The hardware in the list above is nearly universal to a basic PC.
While a PC is built up from hardware components, the hardwareis only half of the equation. The other vital part of a PC is the
software. Without software, the hardware is useless; and vice
versa.
The fundamental software for a PC is called an "operating
system". Without an operating system or "OS", a PC can't domuch. The operating system tells the components of a PC what
to do and when to do it. Windows, MAC OS, Linux and Unix
are all examples of operating systems.

8/3/2019 PC Repair and Troubleshooting Guide
http://slidepdf.com/reader/full/pc-repair-and-troubleshooting-guide 2/70
The Parts of a Personal Computer
The Case
The case is the box that houses the PC. All of the hardware, except for the peripherals, is housed inside the case. Th
are two common styles of cases: "desktop" and "tower." The desktop case usually sits under the monitor and is rougthe size of two or three shoe boxes side by side. The tower case stands upright on one end and is usually placed onfloor. Tower cases can be the same size as a desktop case but often range up much larger. Another, less common, cstyle is the "rack mount" case which slides in and out of an equipment rack.
The Power Supply
Where the power cord connects to the back of the PC is the power supply. The power supply converts AC current f
the wall outlet to the appropriate DC voltages for the various components of the computer.
The power supply has a fan built into it to keep itself and the PC cool. Most PC's have at least one additional coofan, often mounted directly on the CPU. The power supply or its internal fan can wear out. Fortunately, the entire is easily replaced.
The Motherboard
The motherboard is the largest and most fundamental component of a PC. Every other hardware componensomehow attached to the motherboard. The motherboard is the common link for every component to communicate work together.

8/3/2019 PC Repair and Troubleshooting Guide
http://slidepdf.com/reader/full/pc-repair-and-troubleshooting-guide 3/70
The motherboard has a series of slots, sockets and connectors for connecting the various components of a PC. memory, accessory cards, and CPU are installed directly onto the motherboard in most cases. The drives peripherals communicate with the motherboard through wired connections.
It is becoming increasingly common for motherboards to integrate features that used to require separate acces
cards. Most motherboards integrate drive controllers and communication ports; and with greater frequency integrate sound, video and network features as well.
There are a wide range of motherboards to choose from. They differ in features, speed, capacity and the Csupported. They also differ in size, shape and layout, this is commonly referred to as the "form factor".
The CPU
The CPU, which stands for Central Processing Unit, is the brain of the PC. It is often referred to as the "processor"chip". The CPU directs, coordinates and communicates with the hardware components and performs all of"thinking". What a CPU actually does is perform mathematical calculations. It is the software that people write
translates those calculations into useful functions for us.
The speed of the CPU, generally speaking, is the number of calculations it can perform in one second. It is mcomplicated than that, but it is a reasonable way to think of the speed. A 500 MHz (megahertz) CPU performs ab500,000,000 mathematical calculations per second.
As the speed of new CPUs increase, the difference is becoming less obvious to computer users. A CPU that is twicfast as another one will not result in a PC running twice as fast. The CPU has to wait for other, slower components for the user too. The CPU spends a lot of time sitting idle, waiting for something to do.
CPUs have something called a "cache" or memory cache. The memory cache is where information is stored thatCPU is likely to need soon. This memory is in addition to the normal memory installed in a PC. The difference is the cache is built right onto the CPU (and/or very near the CPU), and it is much faster than conventional memCache memory was developed to reduce the time the CPU had to wait while information was retrieved fromstandard memory.

8/3/2019 PC Repair and Troubleshooting Guide
http://slidepdf.com/reader/full/pc-repair-and-troubleshooting-guide 4/70
The RAM Memory
The memory chips store information, temporarily, for short term use. A PC's memory is an entirely different thfrom the hard disk "memory". The hard disk stores information "permanently" for long term use.
A PC's memory only contains information when the PC is on. When the PC is turned off, the information inmemory chips disappears. The information in memory is similar to a thought, it gets replaced when you start thinkabout something else. Hard disk memory is like writing down the information and storing it in a filing cabinet.
The Hard Disk Drive
A hard disk (also called a "hard drive") is much like a filing cabinet. The programs and data are stored on the hard and the computer accesses them as needed. When the computer accesses the hard drive, it is reading the stoinformation into memory. That memory is the temporary workspace. The original file on the hard disk is undisturbed. When the computer stores information, it writes the data to the hard disk. That process results in thefile being replaced or modified with the new information. If you save data to a new file, or install new software,information is written to the disk in an available, unused portion of the disk.
The Floppy Disk Drive
The floppy disk drive is a device that records data onto a removable storage disk called a floppy disk. Floppy dialso called "floppies", are the most basic storage medium for data. However their limited capacity, typically megabytes, makes them of limited use.
A floppy disk can be used to copy files from one PC to another PC or for making backup copies of files.
Replacing a floppy drive is very easy and inexpensive to do, should the need arise.

8/3/2019 PC Repair and Troubleshooting Guide
http://slidepdf.com/reader/full/pc-repair-and-troubleshooting-guide 5/70
The CD-ROM
The CD-ROM drive is a device that reads information or music off of a compact disk (CD). CD-ROM standsCompact Disc Read Only Memory. Most software is distributed on CDs because of their low cost and large capa(650MB or more).
The CD is spun at high speed inside the drive while a laser is directed at the surface to read the data or music. The ROM speed is referenced as 12X or 12 speed (or any other number). This simply means that it spins the CD that mtimes faster than the original industry specification. So, a 48X CD-ROM spins the CD up to 48 times faster thanoriginal specification. Faster is better.
Many PCs are now built with a CD-RW drive, which stands for Compact Disc, Read-Write. Unlike a standard CROM, you can write data onto a CD with a CD-RW drive. CD-R disks allow you to write to the CD once and reaan unlimited number of times. With the use of RE-writable CDs (CD-RWs) you can reuse the disk and rewrite ovagain many times.
The speeds of a CD-RW are expressed like this, 4X 4X 32X. This means it can write to the CD up to 4 times the sspeed, rewrite the CD up to 4 times spec speed and read the CD up to 32 times the spec speed.
The Graphics Card or Video Card
The video adapter card or graphics adapter translates information into graphics and text that appear on the monscreen.
The graphics adapter plugs into a slot on the motherboard or is incorporated directly into the electronics ofmotherboard. Most motherboards now include a slot specifically designed for the graphics adapter called the AGP (Advanced Graphics Port).
Modern graphics adapters usually incorporate some memory right on the card to improve their performance. To furimprove the performance of the video output, a second graphics accelerator card can be used in tandem withgraphics adapter.

8/3/2019 PC Repair and Troubleshooting Guide
http://slidepdf.com/reader/full/pc-repair-and-troubleshooting-guide 6/70
The Sound Card
Most PCs are typically equipped for multimedia. They can play sounds, music, and speech. The sound card procethe information and outputs the signal to the speakers.
The sound card plugs into a slot on the motherboard or is incorporated directly into the the motherboard. With a bsound card a microphone, speakers, joystick and an auxiliary sound source can be connected to it. More advancards may offer additional input and output features.
The Modem
The modem is a device that enables the PC to use a telephone line to communicate with other PCs and devices. name comes from "MOdulation DEModulation".
The modem plugs into a slot on the motherboard or is incorporated directly into the electronics of the motherboarconverts data into signals that can be transmitted over the telephone line and receives data to convert back for the
to use.

8/3/2019 PC Repair and Troubleshooting Guide
http://slidepdf.com/reader/full/pc-repair-and-troubleshooting-guide 7/70
The Mouse
The mouse is a user input device that enables you to communicate with your PC. By moving the mouse and presthe two or three buttons, you can highlight and select images on the screen to give directions to your PC. Some m
offer a wheel to aid in the scrolling of a window without having to move the mouse.
A mouse is usually connected by a wire but wireless mice are also available. Wired mice may use a serial, PS/2 USB port. Other variations of mice available include the trackball and touchpad.
The mouse detects movement either as a ball underneath the mouse rolls along your desk
The Keyboard
The keyboard is the primary user input device. It enables you to communicate with your computer. While the mousalso a fundamental device to control the PC, the keyboard goes one step further by allowing you to enter specinformation as opposed to simply pointing and clicking.
The keyboard connects to the computer through a wire, although wireless keyboards are also available. Variationthe classic keyboard include the addition of action specific buttons, most commonly for Internet features, and skeyboards which angle the two halves of the keyboard to reduce stress on your wrists as you type.

8/3/2019 PC Repair and Troubleshooting Guide
http://slidepdf.com/reader/full/pc-repair-and-troubleshooting-guide 8/70
The Monitor
Monitors obviously display what is going on in your computer. They can run at various resolutions and refresh ra640x480 is the default resolution for the Windows operating systems (this is a low resolution where objects applarge and blocky). 640x480 just means that 640 pixels are fit across the top of your monitor and 480 up and doMost users prefer higher resolutions such as 800x600 or 1024x768 all the way up to 1600x1200 (and highergraphics professionals). The higher resolutions make objects smaller, but clearer (because more pixels are fit inscreen). You can fit more objects on a screen when it is in a higher resolution. Larger monitors are better for runat the higher resolutions. If you run a high resolution on a small monitor, the text may be hard to read because osmall size, despite the clarity.
The refresh rate is how fast the monitor can refresh (redraw) the images on the screen. The faster it can do thissmoother your picture will be and the less "flicker" you will see.
The monitor has a lot to do with the quality of the picture produced by your video card, but it doesn't actual "produthe graphics - the video card does all this processing. But, if your video card is producing a bright detailed pictureyour monitor is dim and blurry, the picture will come out the same way.
C H A P T E R 2222

8/3/2019 PC Repair and Troubleshooting Guide
http://slidepdf.com/reader/full/pc-repair-and-troubleshooting-guide 9/70
OUTCOME: Students will map out and disassemble the PC.Through a hands on approach students become familiar with thecomponents and the architecture of the PC. Their map of the PCwill be used in the reassembly of the PC. Through this activity
students will become familiar with the organization of thedigital computer system.
MATERIALS: Paper, pencil, Paper cup, toolkit, clear table (tolay out all the components), operating PC, have alreadydocumented BIOS, CMOS.

8/3/2019 PC Repair and Troubleshooting Guide
http://slidepdf.com/reader/full/pc-repair-and-troubleshooting-guide 10/70
ACTIVITIES:
TEACHER STUDENT
*Teacher will give a demo sheet.
(see worksheet attached)
* Teacher will instruct the students
On the purposes of this lesson
* Each student will work in groups of twoor three (max three)
*Students will be given appox. Three tofour periods to complete this task.
*Teacher must check the students map of the computer before they
Are to proceed.
*Students will add notes to their
Personal journal.
*Students will take off the computer cover and draw a detailed map as to how thecomputer is put together. All thecomponents must be described andsketched before the students can proceed.
*Once the teacher has graded your map
then slowly disassemble the PC in theorder specified on the worksheet?
*Now using your map lay the parts out onthe table in an organized fashion as to howthe computer fits together.
*Follow the instructions on the worksheetlabeled "ASSEMBLY".
*Final operation check by your teacher.

8/3/2019 PC Repair and Troubleshooting Guide
http://slidepdf.com/reader/full/pc-repair-and-troubleshooting-guide 11/70
Disassembling the Computer
It’s Not A Race
If you are familiar with the procedure of disassembling a computer, then you can skip this section. If you abeginner and actually want to learn something, then document well, and learn or re-affirm your knowledge aeverything you see inside. Given a screwdriver, a 10-year old could probably have the computer apart in a half-houso. If you're using this section as a lab or learning assignment, and you have your computer apart in the same time 10-year old, then that's the level you'll be at. But if you take a slow relaxed approach, discuss, question and reseaeach component as it's removed, you'll learn alot. Read the sections on What's Inside and What You See, fall backyour own knowledge, use the Internet, your books and resource material. It's impossible to retain all the informatso one of the most important computer skills you can learn is how to research and use your resources to find what need. Here's an example of some questions to think about or discuss as you proceed:
Should I document everything I do or everything I remove?

8/3/2019 PC Repair and Troubleshooting Guide
http://slidepdf.com/reader/full/pc-repair-and-troubleshooting-guide 12/70
Am I taking the best ESD precautions available to me right now. When you remove an expansion card what kind of card is it? What kind of expansion slot did it come fro
How many bits wide is that slot? What is the bus speed? What does the card do? If there's any wires attachethe card, what's the other end attached to and what are the wires or cables for. What kind of port is on the of the card?
When removing a drive, what kind of drive is it? Is there information documented right on the drive itsWhat kind of power connector does it use? Are there jumper settings on the drive? What for? Are any driconnected together or do they all have their own cable? Does it matter which cable I hook up whreassemble? What are some of the things I know about this particular type of drive?
When removing wires or cables, what are the cables for? Which connectors are actually being used and wcould the other ones be for? Are they following the pin-1 rule? Is pin-1 actually designated on the devicecable is attached to? Is it designated in more than one way?
Am I still taking proper ESD precautions and is my antistatic strap still hooked up? Look at the motherboard again when there's not so much in the way. Can you point out the CPU? How ab
the BIOS chip, the battery, cache RAM, keyboard connector? Is it an AT, Baby AT, or ATX format? Is themath coprocessor? Where is it? Is the system memory supplied on SIMMs or DIMMs? How many pins onmemory module? How many memory slots are thee for each bank of system memory? Is the CPU installed
ZIF socket or a friction socket? Are there any jumpers on the motherboard? Is there any information screened on the board itself?
This is just an example of the questions you should be asking yourself. Try to come up with lots more. Even if younot prepared to actually take your computer apart at this time, just take the cover off and ask yourself these questias you visualize the various steps involved. Remember, not all questions can be answered by a single resource. Lin your notes, check out your manuals and resource material, ask questions.
ESD
Read the section on Electrostatic Discharge and always take ESD precautions. Remember, if you can feel a stshock its probably close to 3000 volts. Some ICs can be affected by as little as 30 volts.
Always use an antistatic wrist strap. Keep a supply of antistatic bags to place components in as they are removed. Leaving the computer plugged in is a recommended procedure. However, make sure it's switched off
remember that the cable going to the remote switch on the front of the case carries AC current at house volt
Also, ATX motherboards have power to them all the time, even when the switch is off. Before beginninremove a power supply or an ATX motherboard, always make sure your computer is unplugged.
Before Beginning
You want to make sure you have what you need. Your wrist strap is attached to the computer, you don't want to hto run to the other side of the room or to another room to get something. Forget about the strap and your computer mfollow you.
Have a pen and paper ready. Documentation is real important. After you've changed a few jumpers or remoor replaced a few cables and cards, you probably will have to put some back the way they were. If you h

8/3/2019 PC Repair and Troubleshooting Guide
http://slidepdf.com/reader/full/pc-repair-and-troubleshooting-guide 13/70
documentation, putting things back together can be a simple reverse process. This is true of softwtroubleshooting as well.
Make sure you have the tools you need and they're all close by and handy. Be sure to have a container to keep the screws in so you have them when you want to put things back togeth Make sure you have the resource material, drivers or software that you may need. If possible, enter the CMOS setup and record the information available. At least record the floppy and h
drive configuration and any settings that may be different from the default. You want to be careful noremove the battery and lose these settings, but stuff happens.
Disassembly is major surgery, do a full backup of the system. Programs that you have the original disks foralways be replaced, but any upgrades for those programs and any programs that have been downloaded fthe Internet may or may not still be available. Bookmarks, e-mail addresses, phone and fax numbers, diaconnections, DNS settings and networking protocols can be a real pain to replace. Even the best techniccannot guarantee your data, so back it up. Also, in Windows9x, all the IRQ, I/O addresses, and DMA settcan be found (and printed) from the Device Manager in Control Panel. In Windows98 check Start/Programs/Accessories/System Tools/System Information.
Close all programs, shut down Windows, and turn off your computer. Then remove the cables from the bacthe case.
One other thing: you have to use a little common sense. Don't necessarily follow this information to the leit's only meant to be a guide. If you think it would be easier to remove some expansion cards before removthe drive bay, then do it. If you can better access the data cables after the drive is out, then do it that way. would be easier to disconnect the power cables and remove the power supply before accessing DIMMSIMMs ….. I think you get the point.
Removing the Cover
The standard way of removing tower cases used to be to undo 4-6 screws on the back of the case, slide the cover babout an inch and lift it off. Manufacturers are beginning to come up with trickier and more intricate methodassembling these cases all the time. If there is no manual, then a little time taken for careful inspection may border. Here are some things to remember:
Don't Force Anything. If it has to be forced, it will probably break. If there are no screws on the back ofcase for the cover, check the plastic faceplate on the front. Some pry off to reveal screws or release le(remember, careful inspection). If everything on the front has its own bezel around it (including the LEDs) maybe the plastic front pops off (or maybe the case slides off the front).
If you notice a separation between the sides and the top, then they must come off separately. My favorite Acase allows you to remove two screws from the back, then slide the side panel to the rear an inch and rem
it. The other side removes the same way. It's a good, solid, well built case.

8/3/2019 PC Repair and Troubleshooting Guide
http://slidepdf.com/reader/full/pc-repair-and-troubleshooting-guide 14/70
Make sure any screws removed are for the cover. You don't want to unscrew the power supply by accident have it fall inside your computer. That's a bad thing.
After the case is removed, place it in a safe place, where it won't get knocked of a table, kicked or steppedand bent.
Removing Adapter Cards
Again, documentation is very important. Yes, that 16-bit ISA card will probably work in any 16-bit ISA but there may be a reason it's in that particular one. Document the type of card and which slot it comes from
Check the card for any cables or wires that might be attached and decide if it would be easier to remove t before or after you remove the card.
Undo the screw that holds the card in place. Grab the card by its edges, front and back, and gently rock it lengthwise to release it. Do not wiggle it sid
side as you can break the card, the slot, or the solder. Sometimes it helps to grasp the inside corner of the with one hand and place a finger from the other hand under the associated port out the back of the compute pry up the one end of the card.
Once the card is removed, you may want to record any jumper settings you see, just in case one is accidentdislodged. Try to store the card in an antistatic bag. If you don't plan on replacing the card then a cover sho be installed over the slot opening.
Removing Drives
Removing drives is not that difficult. They usually have a power connector and a data cable attached from the deto a controller card or a connector on the motherboard. CD-ROMs may have an analog cable connected to the socard.
The power will be attached using one of two connectors, a large Molex connector or a smaller Berg connefor the floppy drive. The Molex connector may need to be wiggled slightly from side to side while applygentle pressure outwards. The Berg connector may just pull straight out or it may have a small tab that ha be lifted with a tiny flat screwdriver.
The data cables need to be documented. Remember the pin one rule. Know where each one goes before pull it out and record its orientation (which side is the stripe on, where is pin 1?). Pull data cables gently
carefully. In other words, don't yank them off, and pull level and in the direction of the pins.

8/3/2019 PC Repair and Troubleshooting Guide
http://slidepdf.com/reader/full/pc-repair-and-troubleshooting-guide 15/70
Now you need to do a little more inspection, can the entire drive bay be removed? Does that particular dcome out the back of the bay or does it slide out the front before the bay is removed. If a bay is removable, may have to remove some screws or unclip a lever then slide the bay back and off. If the bay is not removathere should be access ports on the other side of the case that allow for access to those screws (there shouldI've seen some that you just about have to remove the motherboard to access these screws). Now you remove the screws and slide the drive out the back of the bay. If the drive slides out the front of the case, remove the screws and gently slide it forward.
Removing the Memory Modules
Memory modules are one of the chips that can be damaged by as little as 30 volts. Be careful of ESD and handle thonly by the edges. SIMMs and DIMMs are removed differently:
SIMM - gently push back the metal tabs holding the SIMM in the socket. Tilt the SIMM away from the tab
about a 45% angle. It should now lift out. Put each SIMM in its own protective bag. DIMM- There are plastic tabs on the end of the DIMM socket. Push the tabs down and away from the socThe DIMM should lift slightly. Now you can grab it by the edges and place it in a separate antistatic bag.
Removing the Power Supply
Make sure it's unplugged.

8/3/2019 PC Repair and Troubleshooting Guide
http://slidepdf.com/reader/full/pc-repair-and-troubleshooting-guide 16/70
All power connectors should be removed, including the connection to the motherboard and any auxiliary fWatch the little plastic tabs on ATX connectors (you'ld rather not break them). AT power supplies have a piece power connector that may be labeled P-8 and P-9. Make note of the orientation. The black wires sho be in the middle, black to black.
Remove the connection to the remote power switch at the front of the case. Orientation of the colored wirethis switch is critical. If you remove them, make sure you document well, and during re-assembly plugcomputer into a fused surge protector before turning it on (this could save your motherboard and componfrom melting if you've reconnected improperly). If you're putting the same power supply back, it's betteremove the entire switch and leave the connectors entact. The remote switch on an ATX form factor attachethe motherboard.
Remove the four screws at the back of the case and gently slide the power supply out of the case. Wremoving these screws, hold onto the power supply. You don't want it falling into the case.
Removing the Motherboard
Document and remove all wire attachments to the motherboard. (Some of these have Pin 1 designations also Most cases have a removable panel that the motherboard is attached to. By removing a couple of screws
panel can be taken off and you can gain much better access to the motherboard. Again, a little investigation save a lot of trouble.
There is usually 2 or 3 screws holding down newer motherboards. Make sure you've got the right ones remove them.
Motherboards sit on plastic or brass standoffs that keep the traces and solder from touching the metal case grounding out. Once the screws are removed you can lift the motherboard out. In other cases, the motherbohas to be slid horizontally towards the bottom of the case to unclip the plastic standoffs and then lifted out.
Place the motherboard in an antistatic bag.

8/3/2019 PC Repair and Troubleshooting Guide
http://slidepdf.com/reader/full/pc-repair-and-troubleshooting-guide 17/70
Assembling A PC: Same Way, Only Backwards
When it comes time to put a computer back together, it's usually just a matter of reversing the order in which you t
it apart. Again, you're going to visualize each step because there may be an easier way. Is it easier to install motherboard or the power supply first? Are the RAM DIMMs (or SIMMs) easier to access before, or after the posupply is in. If the motherboard pops out the back on a tray, then install the CPU and the RAM before replacingtray. If you install the power supply first, then you may be able to clip the power connectors on as you installmotherboard and tray.
Tools When putting the computer back together (or disassembling it for that matter), there are some basic tools that yfind handy. Of course, you'll need your ESD protection equipment and a phillips screwdriver (keep a flat-hscrewdriver nearby, too. A small flashlight and a magnifying glass may come in handy, as well as needle nose pliA useful device for any kind of computer work is a small srewdriver with a phillips head on one end and a flat-head
the other (I have no idea what the proper name is for the tool). Once again, you're not in a race. A good carpemeasures twice, and cuts once. When working on computers you want to double-check everything you instalconnect. Before you start, make sure you have taken all your ESD precautions. As you continue, make a conscieffort to remain aware of these precautions.
The Power Supply
A fairly basic installation, just lineup the holes and screw it on. Don't plug it in yet. Remember, the cable going toremote switch on the front of the case carries 110 volts AC. If you took the wires off the switch, make sure connect them just as they were before (I hope you documented). A wrong connection here can burn up your PC. Ayour power supply is installed, do not plug it in, you may not be able to tell if the switch is on or off and you d
want to turn the power supply on without a load.
The Ram
DIP memory modules are the hardest to install. Luckily, it's not done much anymore. SIMMs are inserted at about degree angle then stoand up until they clip into place. If they don't clip in properly, maybe you have thembackwards. They'll usually have a key cut into one side. DIMMs are keyed on the edge connector side, they can obe inserted one way. Once they are lined up, push them down until the locking tabs on the side come up. You have to support the motherboard from underneath if it looks as though its going to flex too much. COAST modulesalso keyed on the bottom and insert much like an adapter card (Coast On A STick memory is cache SRAM).
The CPU
8/3/2019 PC Repair and Troubleshooting Guide
http://slidepdf.com/reader/full/pc-repair-and-troubleshooting-guide 18/70
Luckily, CPU sockets aren't friction fit anymore. If you have a PGA Central Processor (Pentium MMX or CeleCyrix or AMD), it will fit into a ZIFF (zero insertion force) socket. Pin#1 on the chip has to be lined up with pin#1the socket. This can be indicated on the socket with an arrow, a #1 silk-screened on the board, or a flattened corUsually the CPU will indicate pin#1 with a flattened corner (and, or a dot on top, and, or an arrow on the botcenter of the chip). Unclip and lift the handle, insert the chip, lower the handle and clip it in. If it's a Pentium II Pentium III, it will fit into a Slot 1 socket. These are rectangular in shape and have 242 pins in two rows. Thekeyed, and the cartridge should only fit in one way. Check any documentation that came with the motherboardCPU, and refer to your notes.
The Motherboard
Most PC cases will allow you to remove the metal tray that the motherboard attaches to by removing 2 or mscrews. If you didn't do that during disassembly then you should familiarize yourself with it now. The plastic standon the motherboard are to keep the solder-side of the board from touching the metal case and shorting out. Usuallybetter to install the RAM and CPU first to avoid the possibility of flexing the board and cracking solder connectiontraces. Orient the motherboard properly and either clip in, or slide in the standoffs until the mounting screw holes up. Insert the screws that hold the board in place. The screws need to be snug, but do not twist them into
motherboard. You may be able to connect the power to the system board as you install the tray. A power supply wibaby-AT form factor will have two motherboard connectors (P8 and P9). These connectors are keyed but careversed. Make sure the black wires on the two connectors are beside each other. Clip the keyed edge in at an anthen straighten the connector up and slide it on. ATX power connectors slide in until the tab clicks. Once motherboard and tray are secured in place, you can re-install the wires for the front of the case (refer to ydocumentation).
At this point, you can install the video card. Do a final check on everything installed. Re-check all installations connections, attach and plug in the monitor. Turn the computer on. Watch for lights on the front panel. How far dthe BIOS POST routine get? Are there any error messages? Is this expected?
One thing that I don't like to do is to completely re-assemble a computer and then just turn it on. If it doesn't work athat point, then you have to tear it all apart again to find the problem. Once you've installed the power supply,motherboard, CPU and RAM, install the video card, hook up the keyboard and cables and start your computer. Of course, there's no drives installed and some expansion cards are missing, so you're going to get errors. But if itrecognizes your video card, counts the memory and allows access to you CMOS setup program, then you knoweverything installed to that point is working. Now, turn your computer on after installing each new device. If you gan unexpected error, then it should be due to the last device you installed.
CPUs have something called a "cache" or memory cache. The memory cache is where information is stored thatCPU is likely to need soon. This memory is in addition to the normal memory installed in a PC. The difference is the cache is built right onto the CPU (and/or very near the CPU), and it is much faster than conventional mem
Cache memory was developed to reduce the time the CPU had to wait while information was retrieved fromstandard memory.

8/3/2019 PC Repair and Troubleshooting Guide
http://slidepdf.com/reader/full/pc-repair-and-troubleshooting-guide 19/70
PC Boot Process
8/3/2019 PC Repair and Troubleshooting Guide
http://slidepdf.com/reader/full/pc-repair-and-troubleshooting-guide 20/70
Introduction to the Microsoft Office 2003 Super Bible eBook 2
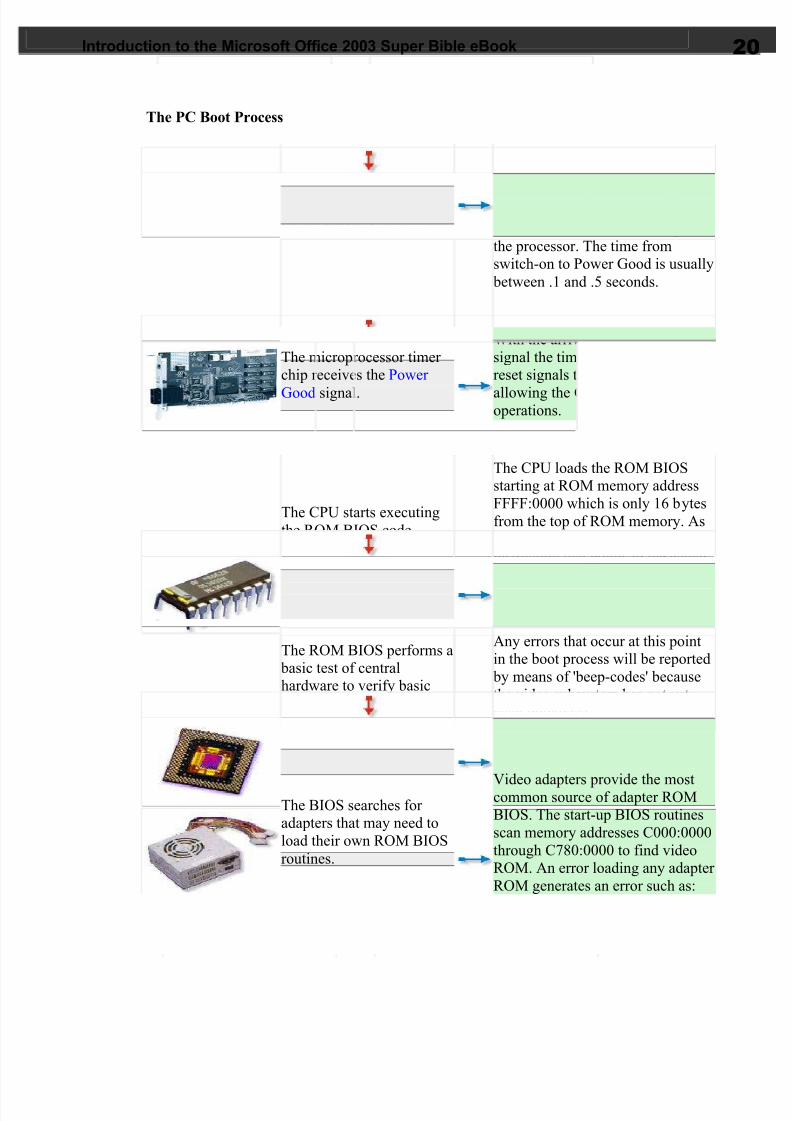
The PC Boot Process
Power supply switched on.
The power supply performs a self-test. When all voltages and current
levels are acceptable, the supplyindicates that the power is stableand sends the Power Good signal tothe processor. The time fromswitch-on to Power Good is usually between .1 and .5 seconds.
The microprocessor timer chip receives the Power
Good signal.
With the arrival of the Power Good signal the timer chip stops sendingreset signals to the processor
allowing the CPU to beginoperations.
The CPU starts executingthe ROM BIOS code.
The CPU loads the ROM BIOSstarting at ROM memory addressFFFF:0000 which is only 16 bytesfrom the top of ROM memory. Assuch it contains only a JMP (jump)instruction that points to the actualaddress of the ROM BIOS code.
The ROM BIOS performs a basic test of centralhardware to verify basicfunctionality.
Any errors that occur at this pointin the boot process will be reported by means of 'beep-codes' becausethe video subsystem has not yet been initialized.
The BIOS searches for adapters that may need toload their own ROM BIOSroutines.
Video adapters provide the mostcommon source of adapter ROMBIOS. The start-up BIOS routinesscan memory addresses C000:0000through C780:0000 to find videoROM. An error loading any adapter ROM generates an error such as:

8/3/2019 PC Repair and Troubleshooting Guide
http://slidepdf.com/reader/full/pc-repair-and-troubleshooting-guide 21/70
Introduction to the Microsoft Office 2003 Super Bible eBook 2
XXXX ROM Error
where XXXX represents thesegment address of the failed
module.
The ROM BIOS checks tosee if this is a 'cold-start' or a 'warm-start'
To determine whether this is awarm-start or a cold start the ROMBIOS startup routines check thevalue of two bytes located atmemory location 0000:0472. Anyvalue other than 1234h indicatesthat this is a cold-start.
If this is a cold-start theROM BIOS executes a fullPOST (Power On Self Test). If this is a warm-startthe memory test portion of the POST is switched off.
The POST can be broken downinto three components:The Video Test initializes the videoadapter, tests the video card andvideo memory, and displaysconfiguration information or anyerrors.The BIOS Identification displaysthe BIOS version, manufacturer,and date.
The Memory Test tests the memorychips and displays a running sumof installed memory.
Errors the occur during the POSTcan be classified as either 'fatal' or 'non-fatal'. A non-fatal error willtypically display an error messageon screen and allow the system tocontinue the boot process. A fatalerror, on the other hand, stops the
process of booting the computer and is generally signaled by aseries of beep-codes.

8/3/2019 PC Repair and Troubleshooting Guide
http://slidepdf.com/reader/full/pc-repair-and-troubleshooting-guide 22/70

8/3/2019 PC Repair and Troubleshooting Guide
http://slidepdf.com/reader/full/pc-repair-and-troubleshooting-guide 23/70
Introduction to the Microsoft Office 2003 Super Bible eBook 2
most of the 512 bytes of theMBR.
the user to select the specific fixeddisk to load in the next step of the process
Partition Table
The partition loader (or Boot Loader) examines the partition table for a partition marked as active.The partition loader thensearches the very firstsector of that partition for aBoot Record.
The Boot Record is also 512 bytesand contains a table that describesthe characteristics of the partition(number of bytes per sectors,number of sectors per cluster, etc.)and also the jump code that locatesthe first of the operating systemfiles (IO.SYS in DOS).
Boot Record
The active partition's bootrecord is checked for avalid boot signature and if found the boot sector codeis executed as a program.
The boot sector's loader check the
root directory of the active partitionto ensure that the first two filesfound (DOS 6 or earlier) areIO.SYS and MSDOS.SYS (or their equivalent).
IO.SYS
If found in the first positionon the active partition,IO.SYS is loaded into thehighest region of
contiguous DOS memoryand the control of the boot process is handed over to it.
IO.SYS locates MSDOS.SYS (which immediately follows it ondisk in DOS 6 or earlier) and loadsit into low memory, overwriting the
ROM BIOS initialization code thathad been loaded there earlier in the boot process.
CONFIG.SYS
IO.SYS reads
CONFIG.SYS (if present).
If loading CONFIG.SYS, DEVICE statements are processed first in theorder they appear. Then anyINSTALL statements are processedin the order they appear. TheSHELL statement is then processedloading the named program as theCommand Line Interpreter for DOS. If no SHELL statement is present COMMAND.COM is usedas the default shell.

8/3/2019 PC Repair and Troubleshooting Guide
http://slidepdf.com/reader/full/pc-repair-and-troubleshooting-guide 24/70
Introduction to the Microsoft Office 2003 Super Bible eBook 2
COMMAND.COM
COMMAND.COM isloaded into memory. It sits between the user and DOS
as the command lineinterpreter. If AUTOEXEC.BAT is present, COMMAND.COMloads it and executes thecommands it contains.
If AUTOEXEC.BAT is not found
COMMAND.COM executes itsinternal DATE and TIME commands.
AUTOEXEC.BAT
AUTOEXEC.BAT containsa list of software routinesand environmental
variables that are run atstart-up.
DOS Prompt
If everything goes well
COMMAND.COM nowdisplays the DOS prompt and awaits the userscommands.
Using the prompt command inAUTOEXEC.BAT and theANSI.SYS driver loaded byCONFIG.SYS the DOS prompt can be customized in a number of ways. The standard DOS prompt isis created with the command:
PROMPT $P$G.
With the ANSI.SYS driver loadedthe following command displays atwo color DOS prompt:
PROMPT$E[31m$p$g$E[0m$e[32;40m

8/3/2019 PC Repair and Troubleshooting Guide
http://slidepdf.com/reader/full/pc-repair-and-troubleshooting-guide 25/70Building skills for success
Regardless of how complex your particular computer or peripheral device might be, a dependable troubleshooting procedure can be broken down into four basic steps: define your symptoms, identify and isolate the potential source (or location)of your problem, repair or replace the suspected sub-assembly,and re-test the unit thoroughly to be sure that you have solvedthe problem. If you have not solved the problem, start againfrom Step #1. This is a “universal” procedure that you can applyto any sort of troubleshooting—not just for personal computer equipment.
C H A P T E R 4444
+ + + +
In This Chapter
Who Should Readthis Book
How this Book isOrganized
Of Special Note for the eBook
Conventions Used inthis Book
+ + + +

8/3/2019 PC Repair and Troubleshooting Guide
http://slidepdf.com/reader/full/pc-repair-and-troubleshooting-guide 26/70
DEFINE YOUR SYMPTOMS
When a PC breaks down, thecause might be as simple as a loose wireor connector, or as complicated as an ICor sub-assembly failure. Before youopen your tool box, you must have afirm understanding of all the symptoms.Think about the symptoms carefully— for example:
Is the disk or tape inserted properly?
Is the power or activity LED lit? Does this problem occur onlywhen the computer is tapped or moved?
By recognizing and understandingyour symptoms, it can be much easier totrace a problem to the appropriateassembly or component. Take the timeto write down as many symptoms as you can. This note-taking might seem tedious now, butonce you have begun our repair, a written record of symptoms and circumstances will help tokeep you focused n the task at hand. It will also help to jog your memory if you must explainthe symptoms to someone else at a later date. As a professional troubleshooter, you mustoften log problems or otherwise document your activities anyway.
IDENTIFY AND ISOLATE
Before you try to isolate a problem within a piece of computer hardware, you mustfirst be sure that the equipment itself is causing the problem. In many circumstances, this will be fairly obvious, but some situations might appear ambiguous (i.e., there is no power, noDOS prompt, etc.). Always remember that a PC works because of an intimate mingling of hardware and software. A faulty or improperly configured piece of software can causeconfusing system errors.
When you are confident that the failure lies in your system’s hardware, you can beginto identify possible problem areas. Because this book is designed to deal with sub-assemblytroubleshooting, start your diagnostics there. The troubleshooting procedures throughout this book will guide you through the major sections of today’s popular PC components and peripherals, and aid you in deciding which sub-assembly might be at fault. When you have

8/3/2019 PC Repair and Troubleshooting Guide
http://slidepdf.com/reader/full/pc-repair-and-troubleshooting-guide 27/70
identified a potential problem area, you can begin the actual repair process and swap thesuspect sub-assembly.
REPLACE
Because computers and their peripherals are designed as collections of subassemblies,it is almost always easier to replace a sub-assembly outright, rather than attempt totroubleshoot the sub-assembly to its component level. Even if you had the time,documentation, and test equipment to isolate a defective component, many complex parts are proprietary, so it is highly unlikely that you would be able to obtain replacement componentswithout a significant hassle. The labor and frustration factor involved in such an endeavor isoften just as expensive as replacing the entire sub-assembly to begin with (perhaps even moreexpensive). On the other hand, manufacturers and their distributors often stock a selection of sub-assemblies and supplies. You might need to know the manufacturer’s part number for thesub-assembly to obtain a new one.
During a repair, you might reach a roadblock that requires you to leave your
equipment for a day or two, or maybe longer. This generally happens after an order has been placed for new parts, and you are waiting for those parts to come in. Make it a point toreassemble your system as much as possible before leaving it. Gather any loose parts in plastic bags, seal them shut, and mark them clearly. If you are working with electroniccircuitry, be sure to use good-quality anti-static boxes or bags for storage. Partial re-assembly(combined with careful notes) will help you remember how the unit goes together later on.
Another problem with the fast technological progress we enjoy is that parts rarelystay on the shelf long. That video board you bought last year is no longer available, is it?How about that 4X CD-ROM drive you put in some time back? Today, there’s somethingnewer and faster in its place. When a PC fails and you need to replace a broken device,chances are that you’ll need to upgrade simply because you cannot obtain an identicalreplacement device. From this standpoint, upgrading is often a proxy of troubleshooting andrepair.
RE-TEST
When a repair is finally complete, the system must be reassembled carefully beforetesting it. All guards, housings, cables, and shields must be replaced before final testing. If symptoms persist, you will have to reevaluate the symptoms and narrow the problem toanother part of the equipment. If normal operation is restored (or greatly improved), test thecomputer’s various functions. When you can verify that the symptoms have stopped duringactual operation, the equipment can be returned to service. As a general rule, it is wise to letthe system run for at least 24 hours to ensure that the replacement sub-assembly will not fail prematurely. This is known as letting the system burn in.

8/3/2019 PC Repair and Troubleshooting Guide
http://slidepdf.com/reader/full/pc-repair-and-troubleshooting-guide 28/70
Do not be discouraged if the equipment still malfunctions. Perhaps you missed a jumper setting or DIP switch, or maybe software settings and device drivers need to beupdated to accommodate the replacement sub-assembly. If you get stuck, simply walk away,clear your head, and start again by defining the current symptoms. Never continue with arepair if you are tired or frustrated—tomorrow is another day. Even the most experienced
troubleshooters get overwhelmed from time to time. You should also realize that there might be more than one bad assembly to deal with. Remember that a PC is just a collection of assemblies, and each assembly is a collection of parts. Normally, everything works together, but when one assembly fails, it might cause one or more interconnected assemblies to fail aswell.

8/3/2019 PC Repair and Troubleshooting Guide
http://slidepdf.com/reader/full/pc-repair-and-troubleshooting-guide 29/70
How can I install Windows XP Pro on my computer?
As a Microsoft Windows XP Professional support professional, one of your tasks may be to install the
operating system.

8/3/2019 PC Repair and Troubleshooting Guide
http://slidepdf.com/reader/full/pc-repair-and-troubleshooting-guide 30/70
Introduction to the Microsoft Office 2003 Super Bible eBook 3
Step #1: Plan your installation
When you run the Windows XP Professional Setup program, you must provideinformation about how to install and configure the operating system. Thorough planning can make your installation of Windows XP Professional more efficient byhelping you to avoid potential problems during installation. An understanding of theconfiguration options will also help to ensure that you have properly configured your system.
I won't go into that part right now but here are some of the most important things youshould take into consideration when planning for your XP installation:
Check System Requirements Check Hardware and Software Compatibility Determine Disk Partitioning Options Choose the Appropriate File System: FAT, FAT32, NTFS Decide on a Workgroup or Domain Installation Complete a Pre-Installation Checklist
After you made sure you can go on, start the installation process.
Step #2: Beginning the installation process
You can install Windows XP in several methods - all are valid and good, it all dependsupon your needs and your limitations.
Manual installations usually come in 3 flavors: Boot from CD - No existing partition is required. Boot from the 6 Setup Boot Disks, then insert the CD - No existing partition is
required (see the Create Setup Boot Disks for Windows XP page). Boot from an MS-DOS startup floppy, go to the command prompt, create a
4GB FAT32 partition with FDISK, reboot, format the C partition you'vecreated, then go to the CD drive, go into the I386 folder, and run theWINNT.EXE command.
Run an already installed OS, such as Windows NT 4.0 Server. From within NT4.0 go to the I386 folder in the W2K installation CD and run theWINNT32.EXE command.
If you want to upgrade a desktop OS such as Windows 98 into Windows 2000Professional you can follow the same procedure as above (You cannot upgradeWindows 98 into W2K Server).
There are other non-manual installation meth

8/3/2019 PC Repair and Troubleshooting Guide
http://slidepdf.com/reader/full/pc-repair-and-troubleshooting-guide 31/70
Introduction to the Microsoft Office 2003 Super Bible eBook 3
ods, such as using an unattended file along with a uniqueness database file, usingSysprep, using RIS or even running unattended installations from within the CD itself, but we won't go into that right now.
It doesn't matter how you run the setup process, but the moment it runs - all setup
methods look alike.
Step #3: The text-based portion of the Setup program
The setup process begins loading a blue-looking text screen (not GUI). In that phaseyou will be asked to accept the EULA and choose a partition on which to install XP,and if that partition is new, you'll be asked to format it by using either FAT, FAT32 or NTFS.
1. Start the computer from the CD.
2. You can press F6 if you need to install additional SCSI adapters or other mass-storage devices. If you do you will be asked to supply a floppy disk with thedrivers and you CANNOT browse it (or a CD for that matter). Make sure youhave one handy.

8/3/2019 PC Repair and Troubleshooting Guide
http://slidepdf.com/reader/full/pc-repair-and-troubleshooting-guide 32/70
Introduction to the Microsoft Office 2003 Super Bible eBook 3
3. If you want, you can press F2 to run the ASR sequence. For that you need agood backup created by the Windows XP backup program, and the ASR floppydisk. If you plan to install a new copy of XP - don't do anything.

8/3/2019 PC Repair and Troubleshooting Guide
http://slidepdf.com/reader/full/pc-repair-and-troubleshooting-guide 33/70
Introduction to the Microsoft Office 2003 Super Bible eBook 3
4. Setup will load all the needed files and drivers.
5. Select To Setup Windows XP Professional Now. If you want, and if you have a previous installation of XP, you can try to fix it by pressing R. If not, just pressENTER.

8/3/2019 PC Repair and Troubleshooting Guide
http://slidepdf.com/reader/full/pc-repair-and-troubleshooting-guide 34/70
Introduction to the Microsoft Office 2003 Super Bible eBook 3
6. Read and accept the licensing agreement and press F8 if you accept it.
7. Select or create the partition on which you will install Windows XPProfessional. Depending upon your existing disk configuration choose one of the following:
If the hard disk is unpartitioned, you can create and size the partition on which you will install Windows XP Professional.

8/3/2019 PC Repair and Troubleshooting Guide
http://slidepdf.com/reader/full/pc-repair-and-troubleshooting-guide 35/70
Introduction to the Microsoft Office 2003 Super Bible eBook 3

8/3/2019 PC Repair and Troubleshooting Guide
http://slidepdf.com/reader/full/pc-repair-and-troubleshooting-guide 36/70
Introduction to the Microsoft Office 2003 Super Bible eBook 3
If the hard disk is already partitioned, but has enoughunpartitioned disk space, you can create an additional partitionin the unpartitioned space.
If the hard disk already has a partition that is large enough, youcan install Windows XP Professional on that partition. If the partition has an existing operating system, you will overwritethat operating system if you accept the default installation path.However, files other than the operating system files, such as program files and data files, will not be overwritten.
If the hard disk has an existing partition, you can delete it tocreate more unpartitioned space for the new partition. Deleting
an existing partition erases all data on that partition.
If you select a new partition during Setup, create and size only the partition on whichyou will install Windows XP Professional. After installation, use Disk Management to partition the remaining space on the hard disk.
8. Select a file system for the installation partition. After you create the partitionon which you will install Windows XP Professional, you can use Setup toselect the file system with which to format the partition. Windows XPProfessional supports the NTFS file system in addition to the file allocationtable (FAT) and FAT32 file systems. Windows Server 2003, Windows XP
Professional, Windows 2000, and Windows NT are the only Microsoftoperating systems that you can use to gain access to data on a local hard disk that is formatted with NTFS. If you plan to gain access to files that are on alocal Windows XP Professional partition with the Microsoft Windows 95 or Windows 98 operating systems, you should format the partition with a FAT or FAT32 file system. We will use NTFS.

8/3/2019 PC Repair and Troubleshooting Guide
http://slidepdf.com/reader/full/pc-repair-and-troubleshooting-guide 37/70
Introduction to the Microsoft Office 2003 Super Bible eBook 3
9. Setup will then begin copying necessary files from the installation point (CD,local I386 or network share).
10. Note: If you began the installation process from an MS-DOS floppy, make sureyou have and run SMARTDRV from the floppy, otherwise the copying processwill probably last more than an hour, perhaps even more. With SMARTDRV
(or if setup was run by booting from CD) the copying will probably last a fewminutes, no more than 5 max.

8/3/2019 PC Repair and Troubleshooting Guide
http://slidepdf.com/reader/full/pc-repair-and-troubleshooting-guide 38/70
Introduction to the Microsoft Office 2003 Super Bible eBook 4
11. The computer will restart in graphical mode, and the installation will continue.

8/3/2019 PC Repair and Troubleshooting Guide
http://slidepdf.com/reader/full/pc-repair-and-troubleshooting-guide 39/70
Introduction to the Microsoft Office 2003 Super Bible eBook 4
Step #4: The GUI-based portion of the Setup program
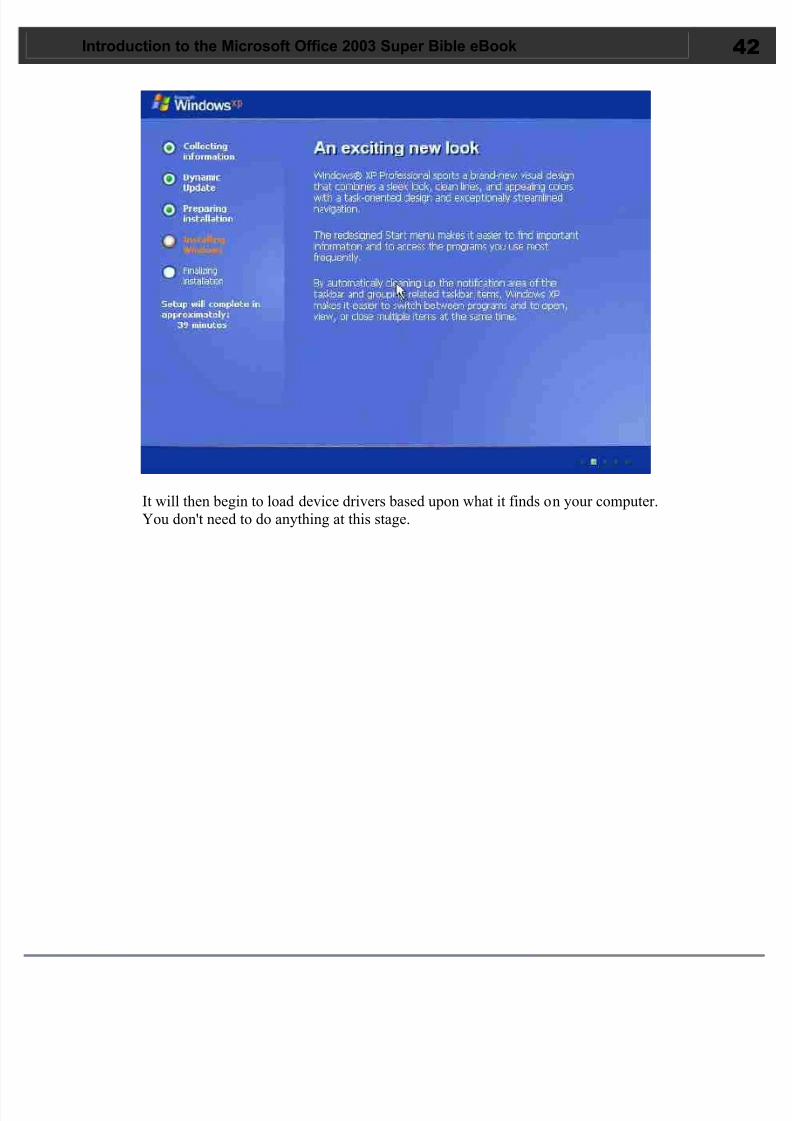
The setup process reboots and loads a GUI mode phase.
8/3/2019 PC Repair and Troubleshooting Guide
http://slidepdf.com/reader/full/pc-repair-and-troubleshooting-guide 40/70
Introduction to the Microsoft Office 2003 Super Bible eBook 4
It will then begin to load device drivers based upon what it finds on your computer.You don't need to do anything at this stage.

8/3/2019 PC Repair and Troubleshooting Guide
http://slidepdf.com/reader/full/pc-repair-and-troubleshooting-guide 41/70
Introduction to the Microsoft Office 2003 Super Bible eBook 4
1. Click Customize to change regional settings, if necessary.
Current System Locale - Affects how programs display dates,times, currency, and numbers. Choose the locale that matchesyour location, for example, French (Canada).
Current Keyboard Layout - Accommodates the specialcharacters and symbols used in different languages. Your keyboard layout determines which characters appear when you press keys on the keyboard.
If you don't need to make any changes just press Next.

8/3/2019 PC Repair and Troubleshooting Guide
http://slidepdf.com/reader/full/pc-repair-and-troubleshooting-guide 42/70
Introduction to the Microsoft Office 2003 Super Bible eBook 4
If you do need to make changes press Customize and add your System Locale etc.

8/3/2019 PC Repair and Troubleshooting Guide
http://slidepdf.com/reader/full/pc-repair-and-troubleshooting-guide 43/70
Introduction to the Microsoft Office 2003 Super Bible eBook 4
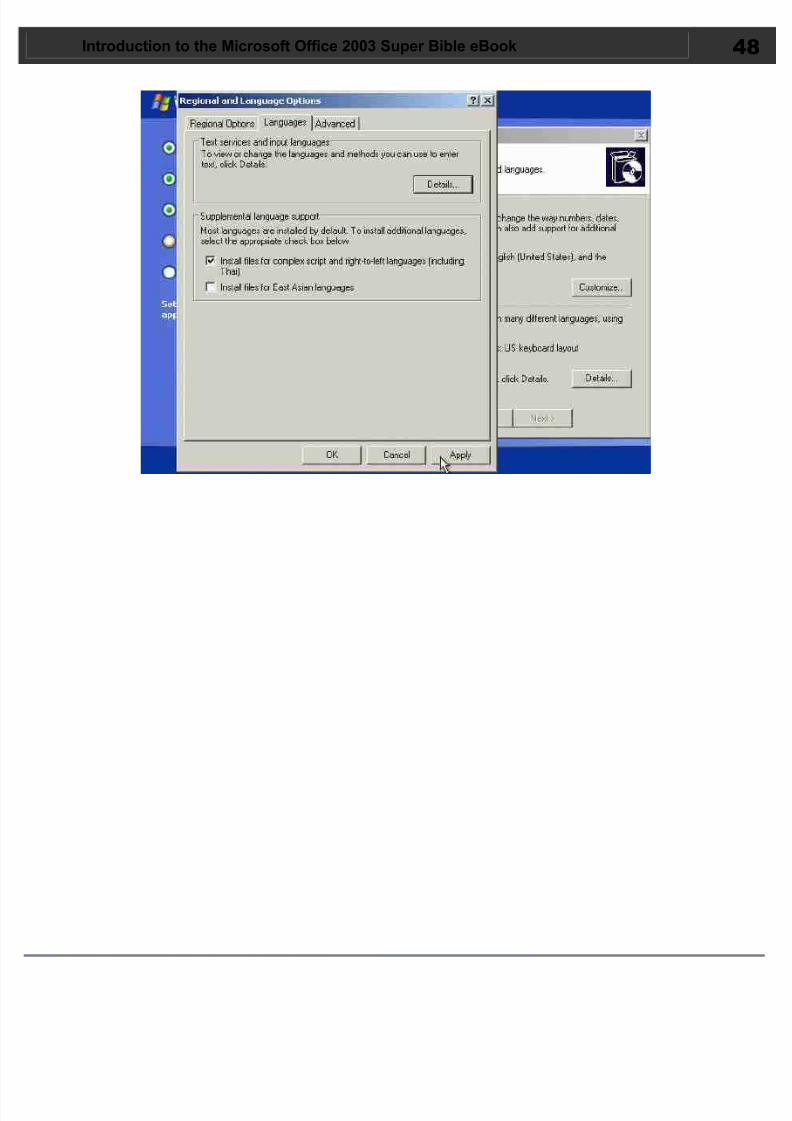
Note for Hebrew users: Unlike W2K, it is SAFE and it is OK for you to installHebrew language support at this phase.
To install Hebrew support:
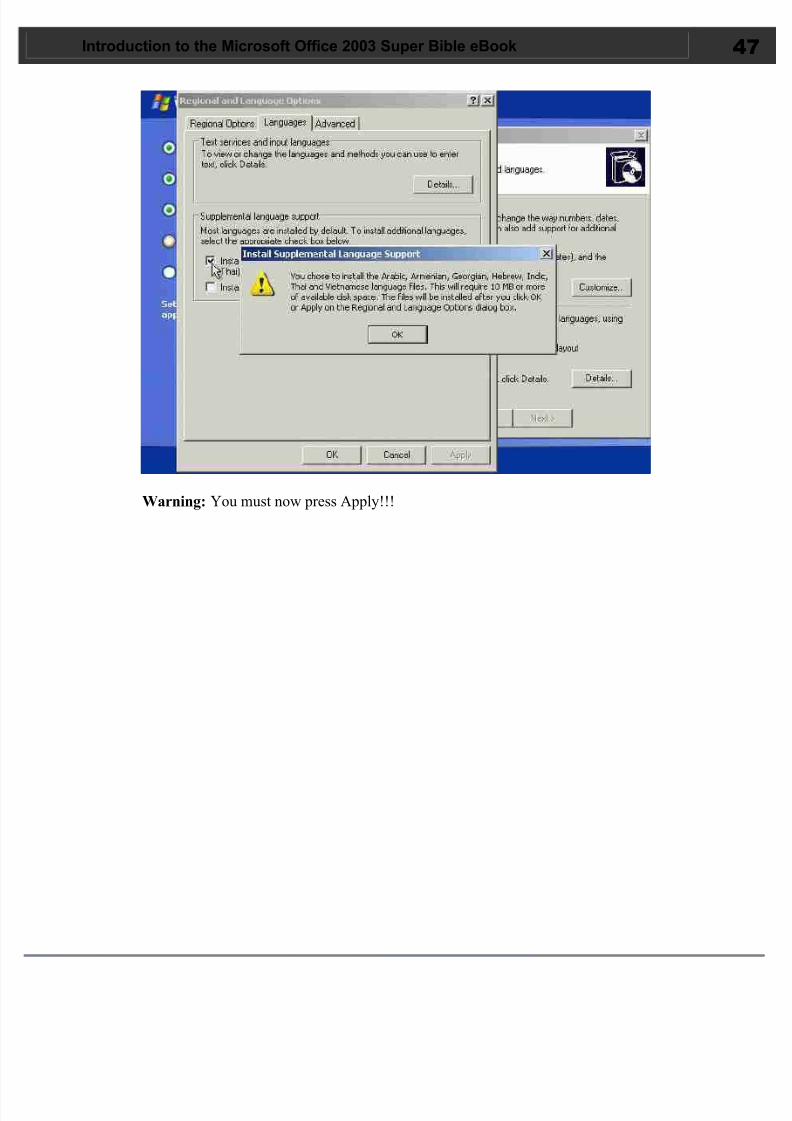
After pressing Customize go to the Languages tab and select the "Install files for complex script and right-to-left languages".

8/3/2019 PC Repair and Troubleshooting Guide
http://slidepdf.com/reader/full/pc-repair-and-troubleshooting-guide 44/70
Introduction to the Microsoft Office 2003 Super Bible eBook 4
A warning message will appear. Press Ok.
8/3/2019 PC Repair and Troubleshooting Guide
http://slidepdf.com/reader/full/pc-repair-and-troubleshooting-guide 45/70
Introduction to the Microsoft Office 2003 Super Bible eBook 4
Warning: You must now press Apply!!!
8/3/2019 PC Repair and Troubleshooting Guide
http://slidepdf.com/reader/full/pc-repair-and-troubleshooting-guide 46/70
Introduction to the Microsoft Office 2003 Super Bible eBook 4

8/3/2019 PC Repair and Troubleshooting Guide
http://slidepdf.com/reader/full/pc-repair-and-troubleshooting-guide 47/70
Introduction to the Microsoft Office 2003 Super Bible eBook 4
Setup will copy the necessary files from the installation point.
You can now go to the Regional Options tab and select Israel in the Location drop-
down list, and Hebrew in the Standards and Formats drop-down list. Click Ok.

8/3/2019 PC Repair and Troubleshooting Guide
http://slidepdf.com/reader/full/pc-repair-and-troubleshooting-guide 48/70
Introduction to the Microsoft Office 2003 Super Bible eBook 5
2. Type your name and organization.

8/3/2019 PC Repair and Troubleshooting Guide
http://slidepdf.com/reader/full/pc-repair-and-troubleshooting-guide 49/70
Introduction to the Microsoft Office 2003 Super Bible eBook 5
3. Type the product key.

8/3/2019 PC Repair and Troubleshooting Guide
http://slidepdf.com/reader/full/pc-repair-and-troubleshooting-guide 50/70
Introduction to the Microsoft Office 2003 Super Bible eBook 5
4. Type the computer name and a password for the local Administrator account.The local Administrator account resides in the SAM of the computer, not inActive Directory. If you will be installing in a domain, you need either a pre-assigned computer name for which a domain account has been created, or theright to create a computer account within the domain.

8/3/2019 PC Repair and Troubleshooting Guide
http://slidepdf.com/reader/full/pc-repair-and-troubleshooting-guide 51/70
Introduction to the Microsoft Office 2003 Super Bible eBook 5
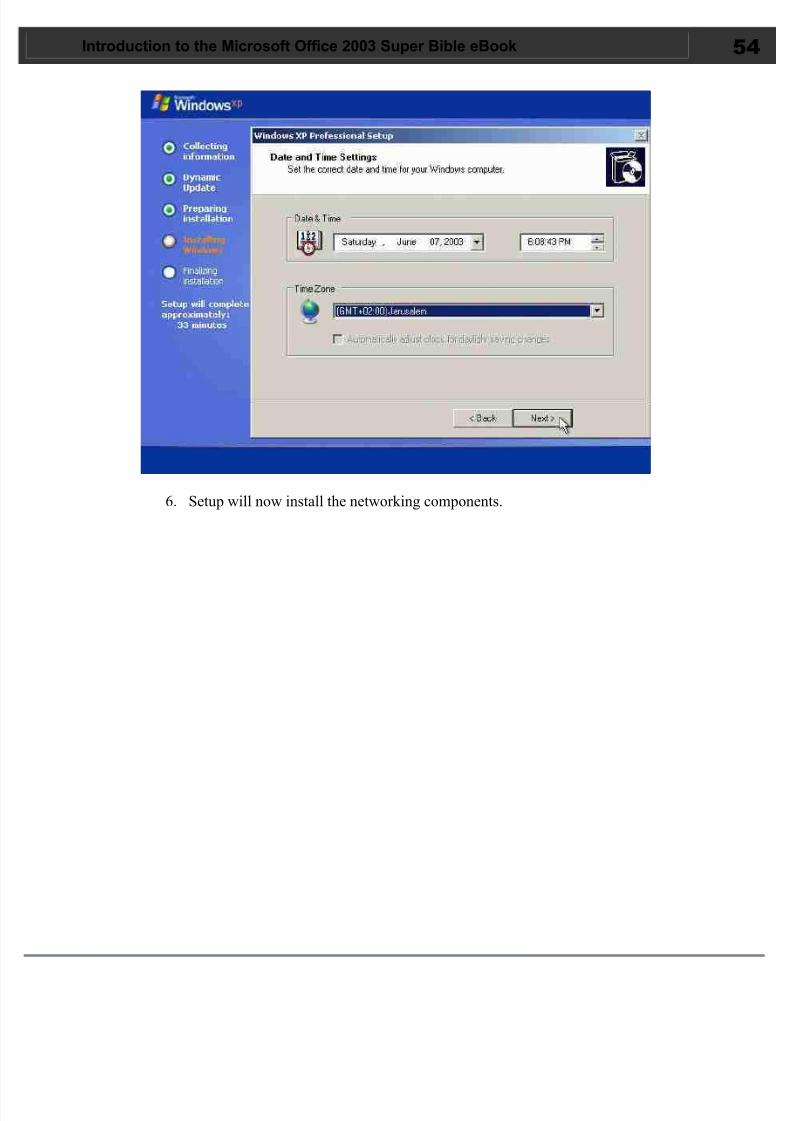
5. Select the date, time, and time zone settings.
8/3/2019 PC Repair and Troubleshooting Guide
http://slidepdf.com/reader/full/pc-repair-and-troubleshooting-guide 52/70
Introduction to the Microsoft Office 2003 Super Bible eBook 5
6. Setup will now install the networking components.

8/3/2019 PC Repair and Troubleshooting Guide
http://slidepdf.com/reader/full/pc-repair-and-troubleshooting-guide 53/70
Introduction to the Microsoft Office 2003 Super Bible eBook 5
After a few seconds you will receive the Networking Settings window. BTW, if youhave a NIC that is not in the HCL (see the What's the HCL? page) and XP cannotdetect it, or if you don't have a NIC at all, setup will skip this step and you willimmediately go to the final phase of the setup process.
Press Next to accept the Typical settings option if you have one of the followingsituations:
You have a functional DHCP on your network. You have a computer running Internet Connection Sharing
(ICS). You're in a workgroup environment and do not plan to have any
other servers or Active Directory at all, and all other workgroupmembers are configured in the same manner.

8/3/2019 PC Repair and Troubleshooting Guide
http://slidepdf.com/reader/full/pc-repair-and-troubleshooting-guide 54/70
Introduction to the Microsoft Office 2003 Super Bible eBook 5
Otherwise select Custom Settings and press Next to customize your network settings.

8/3/2019 PC Repair and Troubleshooting Guide
http://slidepdf.com/reader/full/pc-repair-and-troubleshooting-guide 55/70
Introduction to the Microsoft Office 2003 Super Bible eBook 5
7. One thing you CAN do (you don't have to do it, it's your call - read more aboutit on the Increase Internet Connection Speed in Windows XP page) is touninstall the Qos Packet Scheduler. Click it and press the Uninstall button. If you want to keep it you can simply remove the mark from the QoS check-box.In anyway you can later install or uninstall it if you want.

8/3/2019 PC Repair and Troubleshooting Guide
http://slidepdf.com/reader/full/pc-repair-and-troubleshooting-guide 56/70
Introduction to the Microsoft Office 2003 Super Bible eBook 5

8/3/2019 PC Repair and Troubleshooting Guide
http://slidepdf.com/reader/full/pc-repair-and-troubleshooting-guide 57/70
Introduction to the Microsoft Office 2003 Super Bible eBook 5
Keep the TCP/IP, Client for Microsoft Networks and the File and Print Sharing optionsselected.
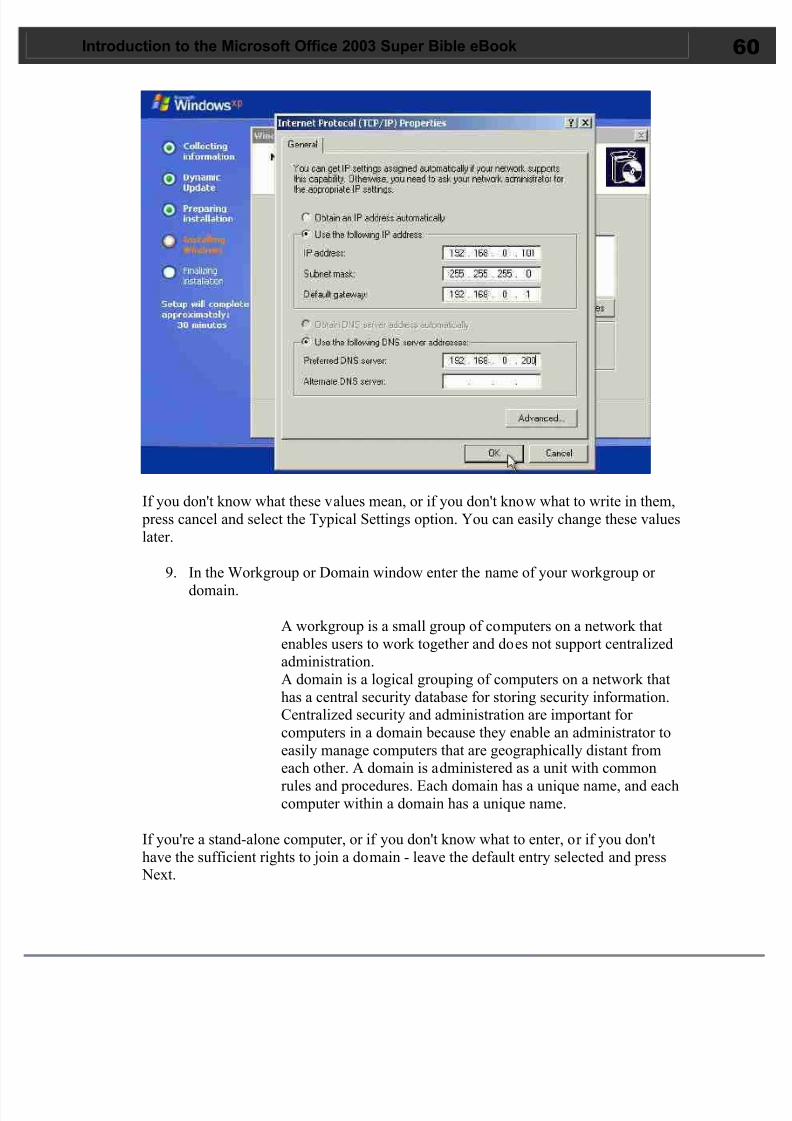
8. Highlight the TCP/IP selection and press Properties.
In the General tab enter the required information. You must specify the IP address of the computer, and if you don't know what the Subnet Mask entry should be - you cansimply place your mouse pointer over the empty area in the Subnet Mask box and click it. The OS will automatically select the value it thinks is good for the IP address you provided.
8/3/2019 PC Repair and Troubleshooting Guide
http://slidepdf.com/reader/full/pc-repair-and-troubleshooting-guide 58/70
Introduction to the Microsoft Office 2003 Super Bible eBook 6
If you don't know what these values mean, or if you don't know what to write in them, press cancel and select the Typical Settings option. You can easily change these valueslater.
9. In the Workgroup or Domain window enter the name of your workgroup or
domain.
A workgroup is a small group of computers on a network thatenables users to work together and does not support centralizedadministration.
A domain is a logical grouping of computers on a network thathas a central security database for storing security information.Centralized security and administration are important for computers in a domain because they enable an administrator toeasily manage computers that are geographically distant fromeach other. A domain is administered as a unit with common
rules and procedures. Each domain has a unique name, and eachcomputer within a domain has a unique name.
If you're a stand-alone computer, or if you don't know what to enter, or if you don'thave the sufficient rights to join a domain - leave the default entry selected and press Next.

8/3/2019 PC Repair and Troubleshooting Guide
http://slidepdf.com/reader/full/pc-repair-and-troubleshooting-guide 59/70
Introduction to the Microsoft Office 2003 Super Bible eBook 6
If you want to join a domain (NT 4.0 domain of W2K/2003 Active Directory domain)enter the domain's name in the "Yes, make this computer a member of the followingdomain" box.

8/3/2019 PC Repair and Troubleshooting Guide
http://slidepdf.com/reader/full/pc-repair-and-troubleshooting-guide 60/70
Introduction to the Microsoft Office 2003 Super Bible eBook 6
To successfully join a domain you need the following:
The person performing the installation must have a user accountin Active Directory. This account does not need to be thedomain Administrator account.
and
The computer must have an existing computer account in theActive Directory database of the domain that the computer is joining, and the computer must be named exactly as its domainaccount is named.
or
The person performing the installation must have appropriate
permission to create a domain account for the computer duringinstallation.
Also, you need to have connectivity to the domain's domain controllers (only to thePDC if on an NT 4.0 domain) and a fully functional DNS server (only in AD domains).Read the Joining a Domain in Windows XP Pro and Requirements when Joining aDomain pages for more on this issue.

8/3/2019 PC Repair and Troubleshooting Guide
http://slidepdf.com/reader/full/pc-repair-and-troubleshooting-guide 61/70
Introduction to the Microsoft Office 2003 Super Bible eBook 6
Enter the Active Directory domain name (in the form of xxx.yyy, for example:DPETRI.NET) or the NetBIOS name of the NT 4.0 domain (in the form of xxx, for example: DPETRI). Press Next.
Note: If you provide a wrong domain name or do not have the correct connectivity to
the domain's DNS server you will get an error message.
A username/password window will appear. Enter the name and password of thedomain's administrator (or your own if you're the administrator on the target domain).
Note: Providing a wrong username or password will cause this phase to fail.
10. Next the setup process will finish copying files and configuring the setup. Youdo not need to do anything.

8/3/2019 PC Repair and Troubleshooting Guide
http://slidepdf.com/reader/full/pc-repair-and-troubleshooting-guide 62/70
Introduction to the Microsoft Office 2003 Super Bible eBook 6
8/3/2019 PC Repair and Troubleshooting Guide
http://slidepdf.com/reader/full/pc-repair-and-troubleshooting-guide 63/70
Introduction to the Microsoft Office 2003 Super Bible eBook 6
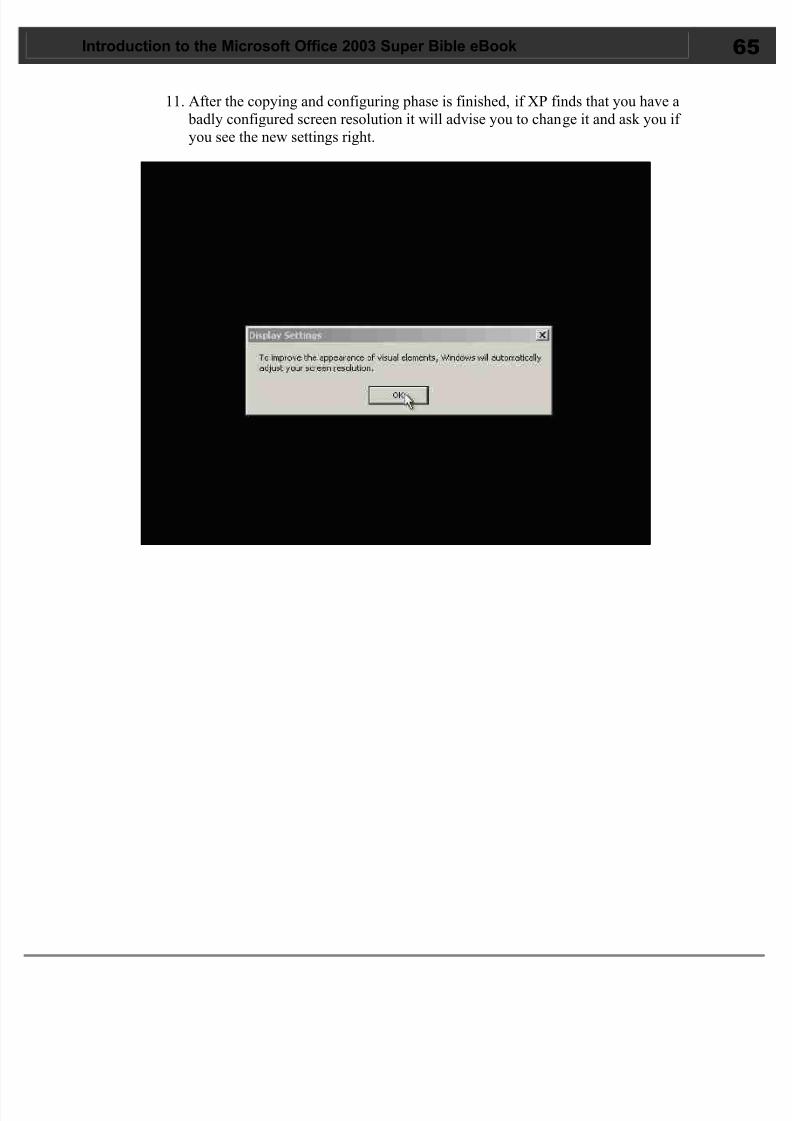
11. After the copying and configuring phase is finished, if XP finds that you have a badly configured screen resolution it will advise you to change it and ask you if you see the new settings right.

8/3/2019 PC Repair and Troubleshooting Guide
http://slidepdf.com/reader/full/pc-repair-and-troubleshooting-guide 64/70
Introduction to the Microsoft Office 2003 Super Bible eBook 6
BTW, the minimum supported screen resolution in XP is 800X600.
12. Setup finishes and boots Windows XP.

8/3/2019 PC Repair and Troubleshooting Guide
http://slidepdf.com/reader/full/pc-repair-and-troubleshooting-guide 65/70
Introduction to the Microsoft Office 2003 Super Bible eBook 6
13. A Welcome screen is the first thing you see. The computer checks your Internetconnectivity (required for the mandatory Activation and voluntary Registration processes).

8/3/2019 PC Repair and Troubleshooting Guide
http://slidepdf.com/reader/full/pc-repair-and-troubleshooting-guide 66/70
Introduction to the Microsoft Office 2003 Super Bible eBook 6
8/3/2019 PC Repair and Troubleshooting Guide
http://slidepdf.com/reader/full/pc-repair-and-troubleshooting-guide 67/70
Introduction to the Microsoft Office 2003 Super Bible eBook 6
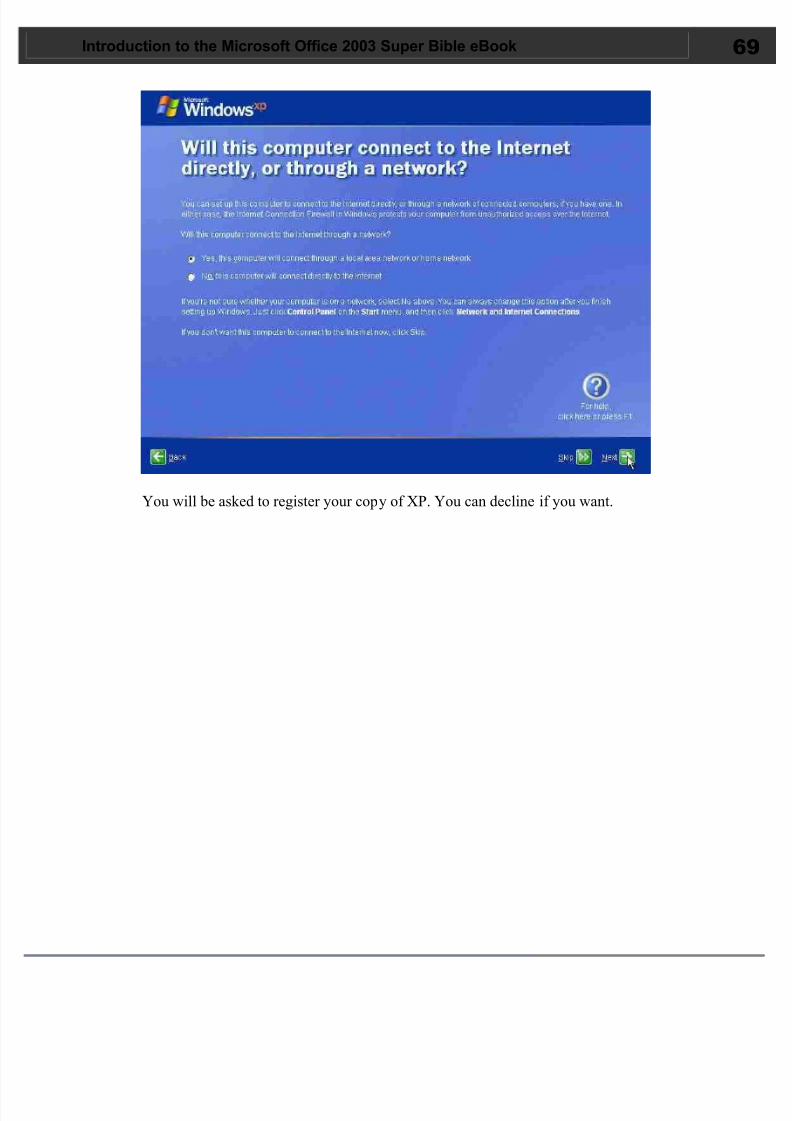
You will be asked to register your copy of XP. You can decline if you want.

8/3/2019 PC Repair and Troubleshooting Guide
http://slidepdf.com/reader/full/pc-repair-and-troubleshooting-guide 68/70
Introduction to the Microsoft Office 2003 Super Bible eBook 7
14. XP will ask you for the default username that will log onto this computer. Youcan enter as many as 5 users, but you can create more after the installation isfinished.
BTW, the Administrator is not shown as a valid logon option (read more about it on
the Add the Administrator's Account to the Welcome Screen in XP Pro page).

8/3/2019 PC Repair and Troubleshooting Guide
http://slidepdf.com/reader/full/pc-repair-and-troubleshooting-guide 69/70
Introduction to the Microsoft Office 2003 Super Bible eBook 7
15. That's it! you're done!

8/3/2019 PC Repair and Troubleshooting Guide
http://slidepdf.com/reader/full/pc-repair-and-troubleshooting-guide 70/70
Introduction to the Microsoft Office 2003 Super Bible eBook 7