parts and accessories installation instructions - bmw etk
TRANSCRIPT

046 0436 Z
Parts and Accessories Installation Instructions
Towing hitch retrofit kit (removable ball head)BMW 3 Series (E 46/2/3/4/C)
The installation time is approx. 5 -5.5 hours, but this may vary depending on the condition of the car and the equipment in it.
Retrofit kit No. 71 60 0 004 237
71 60 0 007 024
71 60 0 007 026
71 60 0 142 614
71 60 0 301 739
71 60 9 410 800
Retrofit kit No. 71 60 0 004 237Installation Instructions No. 01 29 9 410 801 Issue date: 03.2003

Contents
Section Page
Important information. . . . . . . . . . . . . . . . . . . . . . . . . . . . . . . . . . . . . . . . . . . . . . . . . . . . . . . . . . . . . . . . . . 3
1. Preparations. . . . . . . . . . . . . . . . . . . . . . . . . . . . . . . . . . . . . . . . . . . . . . . . . . . . . . . . . . . . . . . . . . . . . . . . . . 4
2. Installation and cabling diagram E46/2/4 . . . . . . . . . . . . . . . . . . . . . . . . . . . . . . . . . . . . . . . . . . . . . . . . . 5
3. Installation and cabling diagram E46/3 . . . . . . . . . . . . . . . . . . . . . . . . . . . . . . . . . . . . . . . . . . . . . . . . . . . 6
4. Installation and cabling diagram E46/C . . . . . . . . . . . . . . . . . . . . . . . . . . . . . . . . . . . . . . . . . . . . . . . . . . 7
5. Towing hitch wiring harness connection overview. . . . . . . . . . . . . . . . . . . . . . . . . . . . . . . . . . . . . . . . . 8
6. To install and connect the towing hitch wiring harness . . . . . . . . . . . . . . . . . . . . . . . . . . . . . . . . . . . . 10
7. To install the towing hitch (E46/2/4/C only) . . . . . . . . . . . . . . . . . . . . . . . . . . . . . . . . . . . . . . . . . . . . . . 14
8. To install the towing hitch (E46/3 only) . . . . . . . . . . . . . . . . . . . . . . . . . . . . . . . . . . . . . . . . . . . . . . . . . . 17
9. To install the towing hitch socket . . . . . . . . . . . . . . . . . . . . . . . . . . . . . . . . . . . . . . . . . . . . . . . . . . . . . . . 21
10. To affix the nose weight label and information label . . . . . . . . . . . . . . . . . . . . . . . . . . . . . . . . . . . . . . . 22
11. To install the storage box for the ball head . . . . . . . . . . . . . . . . . . . . . . . . . . . . . . . . . . . . . . . . . . . . . . . 23
12. Concluding work . . . . . . . . . . . . . . . . . . . . . . . . . . . . . . . . . . . . . . . . . . . . . . . . . . . . . . . . . . . . . . . . . . . . . 24
13. Towing hitch circuit diagram. . . . . . . . . . . . . . . . . . . . . . . . . . . . . . . . . . . . . . . . . . . . . . . . . . . . . . . . . . . . 25
EN/2Retrofit kit No. 71 60 4,237, see title page for other part numbersInstallation Instructions No. 01 29 9 410 801 Issue date: 03.2003

Important information
The retrofit kit is for use within the BMW dealership organisation only.
If the towing hitch is retrofitted in the Federal Republic of Germany, it must be subjected to an acceptance test pursuant to § 19 of the Road Traffic Act and entered in the vehicle registration document. If the car is or is to be registered outside the Federal Republic of Germany, the appropriate national regulations apply.
Installation information
On cars with the M aerodynamics package (SA 715 and SA 716) the frame and the cover for the bumper trim must also be ordered (see EPC for part numbers).
All work is shown on a LHD model. Some of the connections are on the other side on RHD models.
If the specified PIN chambers are occupied, bridges, double crimps or twin-lead terminals must be used.
Completely remove the underseal or body sealing compound on the car near the support areas for the towing hitch.
Then treat the bare metal body areas with a primer approved by BMW.
Target group
The target group for these installation instructions is specialist personnel trained on BMW cars with specialist knowledge of vehicle electrical systems.
Work:
All servicing, repair and installation work on BMW cars is completed at your own risk.
All work is to be carried out using current BMW
- Repair manuals
- Circuit diagrams
in a rational order using the prescribed tools (special tools) and observing current health and safety regulations.
Information on operation
Care and maintenance instructions are set out in the enclosed supplementary owner’s manual for the towing hitch.
Required tools and equipment
Philips screwdriver
Flat screwdriver
Ring spanner, 13 mm
Open-ended spanners, 8 mm and 13 mm
Torx wrench Tx50
1/2 inch reversible ratchet
1/2 inch sockets, 10 mm, 13 mm and 16 mm
Compass saw / Pneumatic saw
1/2 torque wrench
EN/3Retrofit kit No. 71 60 4,237, see title page for other part numbersInstallation Instructions No. 01 29 9 410 801 Issue date: 03.2003

1. Preparations
0
TIS instruction No.Conduct a brief test
Disconnect the negative pole of the battery 12 00 ...
The following components must be removed first of all:Glove compartment 51 17 360
A pillar trim in the right footwell 51 43 075
Left footwell trim 51 45 185
Light switch centre 61 31 033
Front right door sill strip 51 47 000
Rear right door sill trim 51 47 030
B pillar trim at the bottom right 51 43 150
Rear seat bench 52 24 005
Rear seat backrest 52 24 010
Boot trim on the right. 51 47 161
Boot sill trim 51 46 050
Boot trim in front of the spare wheel trough (E46/3 only) 51 47 131
Rear bumper 51 12 000
Rear impact absorbers (no longer required) 51 12 742
Rear right side trim (E46/C only) 51 43 012
EN/4Retrofit kit No. 71 60 4,237, see title page for other part numbersInstallation Instructions No. 01 29 9 410 801 Issue date: 03.2003

2. Installation and cabling diagram E46/2/4
0
Legend0
1 Towing hitch socket holder
2 Right tail light
3 Left tail light
4 Trailer module
5 Earth post X498
6 Fuse holder A46
7 Positive battery post
8 Light switch centre
1
67 5 4 2
8 3046 0437 Z
EN/5Retrofit kit No. 71 60 4,237, see title page for other part numbersInstallation Instructions No. 01 29 9 410 801 Issue date: 03.2003

3. Installation and cabling diagram E46/3
0
Legend0
1 Towing hitch socket holder
2 Right tail light
3 Left tail light
4 Trailer module
5 Earth post X498
6 Fuse holder A46
7 Positive battery post
8 Light switch centre
67 54 2
8 3
1
046 0438 Z
EN/6Retrofit kit No. 71 60 4,237, see title page for other part numbersInstallation Instructions No. 01 29 9 410 801 Issue date: 03.2003

4. Installation and cabling diagram E46/C
0
Legend0
1 Towing hitch socket holder
2 Right tail light
3 Left tail light
4 Trailer module
5 Earth post X498
6 Fuse holder A46
7 Positive battery post
8 Light switch centre
67 54 2
8 3
1
046 0439 Z
EN/7Retrofit kit No. 71 60 4,237, see title page for other part numbersInstallation Instructions No. 01 29 9 410 801 Issue date: 03.2003

5. Towing hitch wiring harness connection diagram
0
0
Item Description SignalCable colour / Cross-section
Connection location in the car Abbreviation / Slot
A Towing hitch wiring harness --- --- --- ---
A1 13-pin black plug --- --- To the towing hitch socket holder X630
A2 15-pin black plug --- --- To the trailer module X609
A3 Cable eyelets 6 mm Terminal 31 BR2,5 mm2
In the boot on the right on the earth post X498
A4 Connection contact Terminal 30 RT/BL2,5 mm2
To fuse holder A46 X10015PIN 7
A5 Connection contact---
BL/BR/GE0.35 mm2
To light switch centre X12PIN 9
A6 Connection contact Reversing light
BL/GE0.75
To the joint connector box above the fuse holder A46
X428
A7 Cable eyelets 6 mm Terminal 30 RT/VI4,0 mm2
To positive battery postFuse F107
X9
A1
A4
A8A9
A11A12
A3
A2F 46 00 74 2W
A5
A6 A7 A10
A
EN/8Retrofit kit No. 71 60 4,237, see title page for other part numbersInstallation Instructions No. 01 29 9 410 801 Issue date: 03.2003

5. Towing hitch wiring harness connection diagram
0
0
* The connection cables A8 - A12 are to be connected to the corresponding outfeed cables from plugs X318 and X319 using the enclosed insulating-piercing connectors.
Item Description SignalCable colour / Cross-section
Connection location in the car Abbreviation / Slot
A8* Connection cable Terminal 58 r
GR/GE0.5 mm2
To the plug on the right tail lightE46/4 to 09/01 and all E46/2/3/CE46/4 from 09/01
X318PIN 5PIN 5
A9* Connection cable Terminal 54 SW/BL0.75 mm2
To the plug on the right tail lightE46/4 to 09/01 and all E46/2/3/CE46/4 from 09/01
X318PIN 6PIN 8
A10* Connection cable Terminal 49 r
BL/BR0.75 mm2
To the plug on the right tail lightE46/4 to 09/01 and all E46/2/3/CE46/4 from 09/01
X318PIN 2PIN 7
A11* Connection cable Terminal 58 l
GR/VI0.5 mm2
To the plug on the left tail lightE46/4 to 09/01 and all E46/2/3/CE46/4 from 09/01
X319PIN 2PIN 8
A12* Connection cable Terminal 49 l
BL/GN0.75 mm2
To the plug on the left tail lightE46/4 to 09/01 and all E46/2/3/CE46/4 from 09/01
X319PIN 5PIN 6
A1
A4
A8A9
A11A12
A3
A2F 46 00 74 2W
A5
A6 A7 A10
A
EN/9Retrofit kit No. 71 60 4,237, see title page for other part numbersInstallation Instructions No. 01 29 9 410 801 Issue date: 03.2003

6. To install and connect the towing hitch wiring harness
0
0
0
0
0
Remove the plastic stopper on the right and thread the wiring harness (1) into the interior.
Insert the rubber grommet and secure the wiring harness (1) to the car using cable holders (3).
0
E46/2/4 with PDC only (SA 508)
Undo the screws (1) and remove the PDC holders (2).
0
Secure the trailer module (1) to the PDC holder using two plastic nuts (2).
Install the PDC holder again.
Connect branch A2 to the trailer module (1).
0
E46/2/4 without PDC only (SA 508)
Push speed nuts on to the trailer module (1).
Secure the trailer module (1) to the body support using self-tapping screws (2).
Connect branch A2 to the trailer module (1).
F46 71 004
1 2
3
F46 71 005
2
1
1
2
2
F46 71 006
1
A2
2
F46 71 007
EN/10Retrofit kit No. 71 60 4,237, see title page for other part numbersInstallation Instructions No. 01 29 9 410 801 Issue date: 03.2003

6. To install and connect the towing hitch wiring harness
0
0
0
0
0
E46/3 with PDC (SA 508), on-board monitor (SA 602) or navigation system (SA 606/609) only
Bolt the trailer module (1) to the video module holder using two plastic nuts (2).
Lay branch A2 to the trailer module (1) and connect it there.
0
E46/3 without PDC (SA 508), on-board monitor (SA 602) or navigation system (SA 606/609) only
Secure the video module holder (1) with speed nuts, hexagonal screws (2) and plastic nuts (3).
0
Bolt the trailer module (1) to the video module holder (3) using two plastic nuts (2).
Lay branch A2 to the trailer module (1) and connect it there.
0
E46/C only
Undo the screws (1) and pull the retaining plate (2) downwards.
F46 0080 2W
A2
1
2
F46 0081 2W
32
1
F46 0082 2W
A2
1
2
3
F46 0331 2W
21 1
EN/11Retrofit kit No. 71 60 4,237, see title page for other part numbersInstallation Instructions No. 01 29 9 410 801 Issue date: 03.2003

6. To install and connect the towing hitch wiring harness
0
0
0
0
0
Attach the trailer module (1) to the retaining plate (2) and secure it with two plastic nuts (3).
Connect branch A2 to the trailer module (1).
0
E46/2/4/C only
Connect branch A3 to earth post X498.
0
E46/3 only
Connect branch A3 to earth post X498.
0
All cars
Connect branches A8 – A12 to the right and left tail lights (2) to the cables of the same colour using insulation-piercing connectors (1).00
Lay branches A4 - A7 along the standard wiring harness to the glove compartment.
F46 0332 2W
12
A2
3
X498
A3
F46 71 008
F46 0079 2W
X498
A3
F 46 71 009
1
2
2
32
1
A8-A12
046 0433 Z
EN/12Retrofit kit No. 71 60 4,237, see title page for other part numbersInstallation Instructions No. 01 29 9 410 801 Issue date: 03.2003

6. To install and connect the towing hitch wiring harness
0
0
0
0
0
Remove the fuse holder (1) downwards and take off the joint connector box (2).
Connect branch A6 to joint connector X428.
0
Remove the plastic cover from the fuse holder.
Connect branch A7 to the battery positive post of fuse F107.
0
Lay branch A4 to the fuse holder (1).
Connect branch A4 to PIN 7 of the fuse holder (1)
Insert the blade terminal fuse (20 A) into slot No. 44.
0
Lay branch A5 to the installation site of the light switch centre.
Connect branch A5 to PIN 9 in plug X12.
A6
X428
F46 71 0101
2
F107
A7
F46 71 011
1A4
F46 71 012
X12
A5
F46 71 015
EN/13Retrofit kit No. 71 60 4,237, see title page for other part numbersInstallation Instructions No. 01 29 9 410 801 Issue date: 03.2003
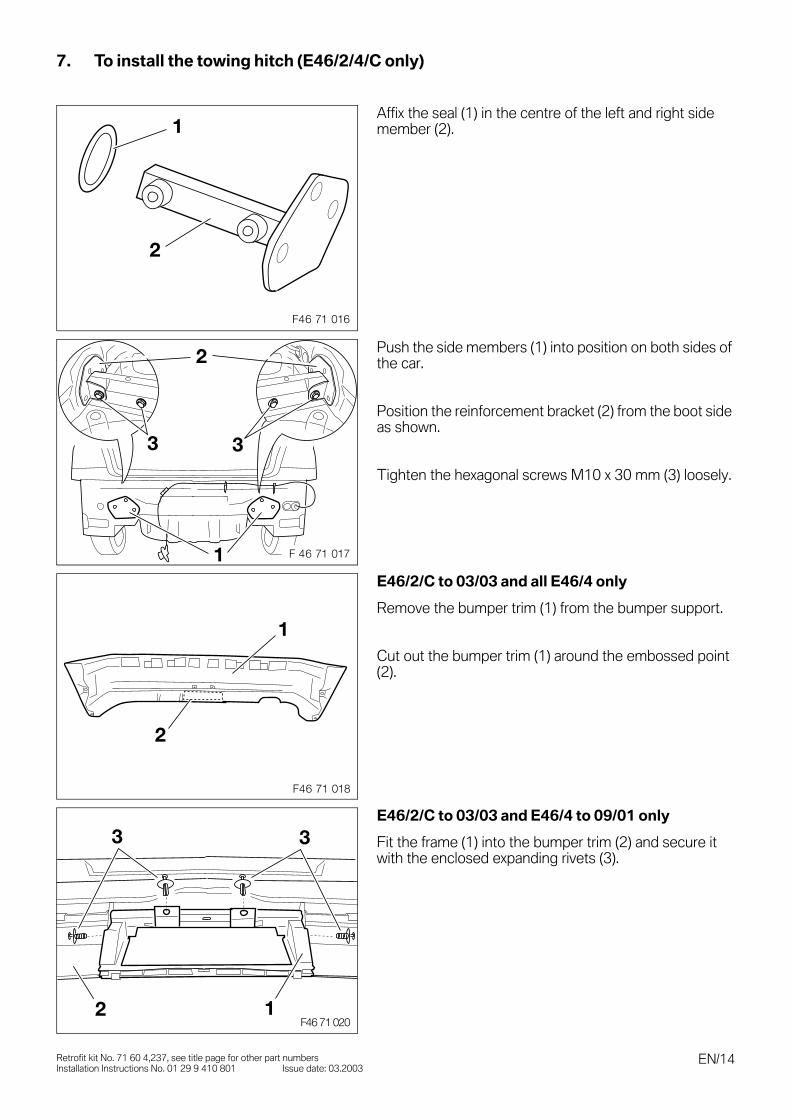
7. To install the towing hitch (E46/2/4/C only)
0
0
0
0
0
Affix the seal (1) in the centre of the left and right side member (2).
0
Push the side members (1) into position on both sides of the car.
Position the reinforcement bracket (2) from the boot side as shown.
Tighten the hexagonal screws M10 x 30 mm (3) loosely.
0
E46/2/C to 03/03 and all E46/4 only
Remove the bumper trim (1) from the bumper support.
Cut out the bumper trim (1) around the embossed point (2).
0
E46/2/C to 03/03 and E46/4 to 09/01 only
Fit the frame (1) into the bumper trim (2) and secure it with the enclosed expanding rivets (3).
1
2
F46 71 016
1
2
3 3
F 46 71 017
1
2
F46 71 018
12
3 3
F46 71 020
EN/14Retrofit kit No. 71 60 4,237, see title page for other part numbersInstallation Instructions No. 01 29 9 410 801 Issue date: 03.2003

7. To install the towing hitch (E46/2/4/C only)
0
0
0
0
0
E46/2/4/C after 03/03 only
Remove the bumper trim (1) from the bumper support.
Cut out the bumper trim (1) around the embossed point (2).
0
Fit the frame (3) into the bumper trim (1) and secure it with the enclosed expanding rivets (2).
0
E46/4 from 09/01 only
Fit the frame (1) into the bumper trim (2) and secure it with the enclosed expanding rivets (3).
0
All E46/2/4/C
Place the towing hitch (1) into the bumper support (2) and tighten the screws with a torque of 41 Nm.
Assemble the support (2) and bumper trim.
��� ���� �
21
2 2
3
��� ���� �
1
046 0434 Z
2
1
33
12
F46 71 019
3
EN/15Retrofit kit No. 71 60 4,237, see title page for other part numbersInstallation Instructions No. 01 29 9 410 801 Issue date: 03.2003

7. To install the towing hitch (E46/2/4/C only)
0
0
0
Fit the heat shield (1) into the bumper trim in the cut-out of the exhaust tail pipes and secure it with expanding rivets (3).
Place the edge guard (2) on the heat shield (1).
Align the bumper on the car. Tighten the screws and nuts in the following order
- Hexagonal nuts M10 with washers Torque 59 Nm
- Hexagonal screw M10 x 30 mm Torque 59 Nm
0
E46/2/4/C after 03/03 only
Secure the frame (1) using plastic nuts (2).
1
F46 0167 2W3 2
1
2��� ���� �
EN/16Retrofit kit No. 71 60 4,237, see title page for other part numbersInstallation Instructions No. 01 29 9 410 801 Issue date: 03.2003

8. To install the towing hitch (E46/3 only)
0
0
0
0
0
Affix the seal (1) in the centre of the left and right side member (2).
0
Push the side members (1) into position on both sides of the car.
Position the reinforcement bracket (2) from the boot side as shown.
Tighten the hexagonal screws M10 x 30 mm (3) loosely.
0
Cut out the template (2) and affix it to the bumper trim (1).
Saw out the bumper trim along the dotted line.
Mark the holes (3) using the template (2) and drill them with 6.5 mm drill bit.
0
Turn over the bumper trim (1) and cut it out along the dotted line.
1
2
F46 71 016
1
2
3 3
F 46 71 017
1
F46 0168 2W
33 2
1
F46 0169 2W
EN/17Retrofit kit No. 71 60 4,237, see title page for other part numbersInstallation Instructions No. 01 29 9 410 801 Issue date: 03.2003

8. To install the towing hitch (E46/3 only)
0
0
0
0
0
The figure shows the bumper trim (1) after completing all the sawing work.
0
Insert the right diffuser holder (1) on the bumper trim (2).
Mark the holes (3) on the bumper trim (2) and drill them with a 5 mm drill bit.
0
Insert the left diffuser holder (1) on the bumper trim (2).
Mark the holes (3) on the bumper trim (2) and drill them with a 5 mm drill bit.
0
Insert the diffuser holders into the bumper trim (1) and secure them with hexagonal self-tapping screws (2) and speed nuts.
1
F46 0170 2W
2
F46 0171 2W
3 31
2
F46 0172 2W
3 31
1
F46 0173 2W
2
EN/18Retrofit kit No. 71 60 4,237, see title page for other part numbersInstallation Instructions No. 01 29 9 410 801 Issue date: 03.2003

8. To install the towing hitch (E46/3 only)
0
0
0
0
0
Place speed nuts (2) on the right diffuser (1).
0
Place the right and left diffusers on top of each other and connect them with a hexagonal self-tapping screw (1).
0
Place the diffusers (2) on to the bumper trim (1) and secure them to the bumper trim (1) with expanding rivets (3).
0
Place the towing hitch (1) into the bumper support (2) and tighten the screws with a torque of 41 Nm.
Assemble the support (2) and bumper trim.
21
F46 0174 2W
��� ���� �
1
1
F46 0176 2W
32
3
12
F46 71 019
3
EN/19Retrofit kit No. 71 60 4,237, see title page for other part numbersInstallation Instructions No. 01 29 9 410 801 Issue date: 03.2003

8. To install the towing hitch (E46/3 only)
0
0
Fit the heat shield (1) into the bumper trim in the cut-out of the exhaust tail pipes and secure it with expanding rivets (3).
Place the edge guard (2) on the heat shield (1).
Align the bumper on the car. Tighten the screws and nuts in the following order
- Hexagonal nuts M10 with washers Torque 59 Nm
- Hexagonal screw M10 x 30 mm Torque 59 Nm
1
F46 0167 2W3 2
EN/20Retrofit kit No. 71 60 4,237, see title page for other part numbersInstallation Instructions No. 01 29 9 410 801 Issue date: 03.2003

9. To install the trailer socket
0
0
Place the trailer socket (1) and intermediate section (2) to the trailer plug A1 and secure it to the towing hitch (5) with Philips screws (3) and nuts (4).
2 1A1
5
3 4
F46 71 021
EN/21Retrofit kit No. 71 60 4,237, see title page for other part numbersInstallation Instructions No. 01 29 9 410 801 Issue date: 03.2003

10. To affix the nose weight label and information label
0
0
0
Affix the nose weight label (1) to the boot sill trim (2).
0
Affix the label (1) with instructions for use in the spare wheel trough (2).
F46 71 022
1
2
1
F46 71 023
2
EN/22Retrofit kit No. 71 60 4,237, see title page for other part numbersInstallation Instructions No. 01 29 9 410 801 Issue date: 03.2003

11. To install the storage box for the ball head
0
0
Place the polystyrene mounting (1) for the ball head (2) in the spare wheel trough and secure it with the metal holder (3).
The ball head (2) must always be secured with the Velcro fastening (4).
F46 71 024
1
2
3
4
EN/23Retrofit kit No. 71 60 4,237, see title page for other part numbersInstallation Instructions No. 01 29 9 410 801 Issue date: 03.2003

12. Concluding work
- Fit the ball head as set out in the enclosed instructions for use and ensure that the head moves easily and is secure.
- Connect the negative pole of the battery.
- Check the light signals on the trailer socket.
- Assemble the car again following the instructions to dismantle it in reverse order.
- Conduct a brief test.
This towing hitch retrofit kit does not require coding.
EN/24Retrofit kit No. 71 60 4,237, see title page for other part numbersInstallation Instructions No. 01 29 9 410 801 Issue date: 03.2003

13. Towing hitch circuit diagram
E46/4 to 09/01 and all E46/2/3/C only0Scs
X9
X31
8
30
F10
750
A
4,0 rt/vi
0,75 bl/rt
bl/br/ge
1,0 ge/rt
0,5 gr/vi
0,75 bl/gn
0,75 bl/br
0,50 gr/ge
0,75 sw/bl
0,75 bl/ge
8A
HM
-LM0.35
139
X60
9
X60
9
X49
8
X63
0
73
5
12
4
0,75 gr/rt
1,0 sw/ws
0,75 gr/sw
61
4
56
7
0,75 bl/ge
2,5
rt/b
l
2,5 br
1,0 br2,5 br 15
83
13
49l
55
58l
49l
49r
58r
54
49r
58r
5458
l
58l
49l
49r
58r
54
31
49l
5549
r
A6
A3
58r
5458
lS
_RS
+31
31309
11
X12
1210
149
X10
015
F44
20A
A46
X42
8S
_RS
+
7
X31
9
25
62
5
F 4
6 0
0 7
3 2
W
EN/25Retrofit kit No. 71 60 4,237, see title page for other part numbersInstallation Instructions No. 01 29 9 410 801 Issue date: 03.2003

13. Towing hitch circuit diagram
E46/4 from 09/01 only0
X9
X31
8
30
F10
750
A
4,0 rt/vi
0,75 bl/rt
bl/br/ge
1,0 ge/rt
0,5 gr/vi
0,75 bl/gn
0,75 bl/br
0,50 gr/ge
0,75 sw/bl
0,75 bl/ge
8A
HM
-LM0.35
139
X60
9
X60
9
X49
8
X63
0
73
5
12
4
0,75 gr/rt
1,0 sw/ws
0,75 gr/sw
61
4
56
7
0,75 bl/ge
2,5
rt/b
l
2,5 br
1,0 br2,5 br 15
83
13
49l
55
58l
49l
49r
58r
54
49r
58r
5458
l
58l
49l
49r
58r
54
31
49l
5549
r
A6
A3
58r
5458
lS
_RS
+31
31309
11
X12
1210
149
X10
015
F44
20A
A46
X42
8S
_RS
+
7
X31
9
75
88
6
F 0
46
04
40
Z
EN/26Retrofit kit No. 71 60 4,237, see title page for other part numbersInstallation Instructions No. 01 29 9 410 801 Issue date: 03.2003

13. Towing hitch circuit diagram
Legend
Cable colours
A3 Light switch centre
A6 Trailer module
A46 Fuse holder
X9 Terminal 30
X12 Light switch centre
X428 Reversing signal connector
X498 Terminal 31 connector
X609 Trailer module
X630 13-pin trailer socket
X318 Right tail light
X319 Left tail light
X10015 Fuse holder I A46
RT red
SW black
GN green
BR brown
GE yellow
WS white
BL blue
VI violet
GR grey
EN/27Retrofit kit No. 71 60 4,237, see title page for other part numbersInstallation Instructions No. 01 29 9 410 801 Issue date: 03.2003