partial disassembly of the alignment devices on each me11transfer plate, me1/1 chamber and me1/2...
TRANSCRIPT

Partial Disassembly of the alignment devices
on each ME11transfer plate, ME1/1 chamberand ME1/2 chamber.
(6 on +Z and 6 on –Z side of the CMS)
Disassembly Steps by point.• Access with the cherry picker to the position, 20’.• Open the cover of the ME11transfer plate Patch Panel, four M4 slotted countersunk
(flat) head screws, 10’.• Unplug two Radial ASPDs cables, and one Radial proximity cables, 15’.• Open two covers of the ME11 transfer plate, five M4 slotted countersunk (flat) head
screws each, 10’.• Unplug Z and RPhi proximity sensor cables and temperature sensor cables of the
transfer plate, 20’. • Unplug of the two ME1/2 ASPDs cables, and un-routing cables on the ME1/2. 25’. • Disassembly ME1/2 chamber ASPDs. Two M6 slotted screws and two pins. 20’.• Disassembly ME11 Z and RPhi proximity sensor and temperature piece of the
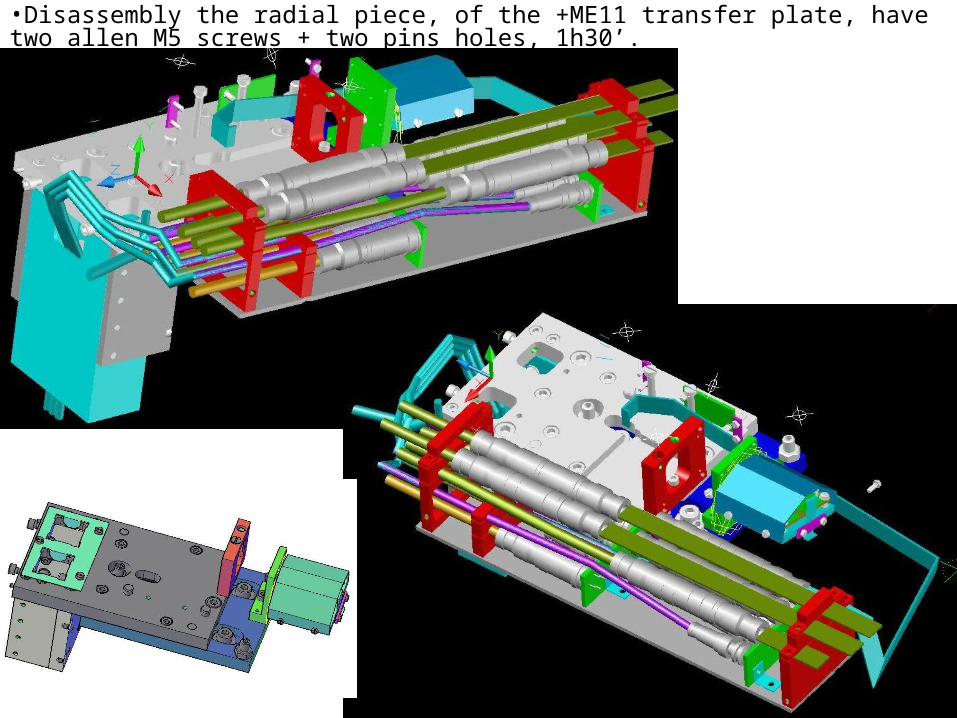
transfer plate, have two allen M5 screws + two pins holes, 20’. • Unplug R proximity sensor cable of the ME1/1 chamber device, 10’. • Disassembly ME11 chamber device, have two allen M6 screws + two pins holes, 25’. • Disassembly the radial piece, of the +ME11 transfer plate, have two allen M5 screws
+ two pins holes. Back access too much complicate due to a lot of cables/tubes running around. 1h30’.
• Close the covers of the ME11 transfer plate and the Patch Panel and sealing all remaining devices on this area. 35’
• Descend with the cherry picker. 10’
• Total 5H20’

Assembly Steps• Access with the cherry picker to the position, 20’.• Open the covers of the ME11 transfer plate and the Patch Panel and the sealing.
Five M4 slotted countersunk (flat) head screws each, 15’.• Assembly the radial piece, of the ME11 transfer plate, have two allen M5 screws +
two pins holes, . Back access too much complicate due to a lot of cables/tubes running around. 2h15’.
• Assembly ME1/1 chamber device, have two allen M6 screws + two pins holes, 35’. • Plug R proximity sensor cable of the ME1/1 chamber device, 15’. • Assembly ME1/1 Z and RPhi proximity sensor and temperature piece of the transfer
plate, have two allen M5 screws + two pins holes, 25’. • Plug Z and RPhi proximity sensor cables and temperature sensor cables of the
transfer plate, 25’. • Assembly ME1/2 chamber ASPDs. Two M6 slotted screws and two pins. 30’.• Plug the two ME1/2 ASPDs cables, and re-routing cables on the ME1/2. 35’. • Close two covers of the ME11 transfer plate, five M4 slotted countersunk (flat) head
screws each,15’.• Plug two Radial ASPDs cables, and one Radial proximity cable, 20’.• Close the cover of the +ME11transfer plate PP, four M4 slotted countersunk (flat)
head screws, 15’.• Sealing all devices on this area until the start of the next LHC running. 25’• Descend with the cherry picker. 10’
• Total 7H00’

•Open the cover of the ME11transfer plate PP, four M4 slotted countersunk (flat) head screws, 10’.


•Open two covers of the +ME11 transfer plate, five M4 slotted countersunk (flat) head screws each, 10’.


• Disassembly ME1/2 chamber ASPDs. Two M6 slotted screws and two pins. 20’.


•Disassembly ME11 Z and RPhi proximity sensor and temperature piece of the transfer plate, have two allen M5 screws + two pins holes, 20’.


•Disassembly ME11 chamber device, have two allen M6 screws + two pins holes, 25’.

•Disassembly the radial piece, of the +ME11 transfer plate, have two allen M5 screws + two pins holes, 1h30’.


The accessibility to the back side of the ME11transfer plate it is not easy…