page 14 lubrication system - fresh breeze€¦ · essential to check.the red line of the start ......
TRANSCRIPT

Page 14 Lubrication System.doc
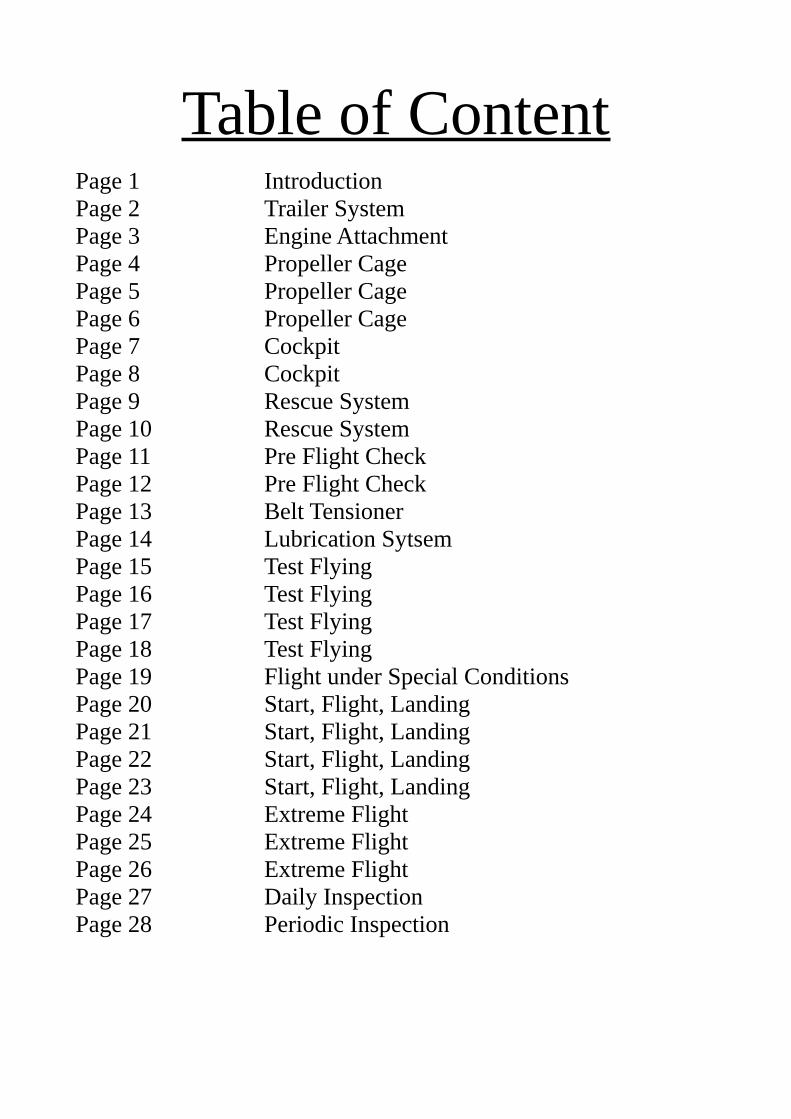
Table of ContentPage 1 IntroductionPage 2 Trailer SystemPage 3 Engine AttachmentPage 4 Propeller CagePage 5 Propeller CagePage 6 Propeller CagePage 7 CockpitPage 8 CockpitPage 9 Rescue SystemPage 10 Rescue SystemPage 11 Pre Flight CheckPage 12 Pre Flight CheckPage 13 Belt TensionerPage 14 Lubrication SytsemPage 15 Test FlyingPage 16 Test FlyingPage 17 Test FlyingPage 18 Test FlyingPage 19 Flight under Special ConditionsPage 20 Start, Flight, LandingPage 21 Start, Flight, LandingPage 22 Start, Flight, LandingPage 23 Start, Flight, LandingPage 24 Extreme FlightPage 25 Extreme FlightPage 26 Extreme FlightPage 27 Daily InspectionPage 28 Periodic Inspection

INTRODUCTIONPrior to operation of this paramotor the pilot should familiar. themselves with this manual. It contains in addition to the essential legal information also information from the manufacter of the Paramotor.The owner needs to become familiar with all aspect of operation and maintenance prior to use of this motor.The pilot is responsible for compliance with the laws and rules to their own country regarding flight restrictions and maintenance as well what is contained in this manual.Additional laws have to consider like insurances. Aerobatics aren´t allowed with this paramotor.Legally basics of the operation of ultralightparamotors are written in the accompanying law. All of the aspects in the law have to consider by operation.
Information regarding important updates tothis model will be made available via your importer and published in the relevant national flying magazines under: http://www.freshbreeze.de/en/service/dfgdfg.html
The X-ONE is built and proved for paragliders according to the requirements for airworthinesss. (registrated under DGAC)
All paragliders which are registrated under DGAC in France have a type ertification and therefore legal to fly as well in Germany. All of them can be used for a flight with any motor/trike under 120 kg.
The document „Fiche D´Identification ULM De Class 1“ have to fill in from the pilot with his name and the serial number of the paraglider. The document have to signed and stamped from manufaturer of the glider.
PLEASE NOTE
Do not make any flights in turbulent weather conditions. A paraglider in principle receives its shape only by the internal pressure. This can be established only when normal air flow conditions prevail.
You need to fly with increased caution when thunderstorms are near by or forecasted.
Under no circumstances a pilot should fly too close to the storm front.
Land if ever in doubt.
Other areas in your country will also have flight restrictions and laws of entry. These include for example military zones, controlled aircraft - and populated areas.
Seek information about an area before taking flight as well as the appropriate licensing.

It is possible to upgrade the X-ONE with a Trailerkit. Then youcan utilize the trike as a sporttrailerIt enable the legal use on public roads. This kit contains:
Draw Bar Light Bar Road Tires
It is necessary to remove the draw bar before flying. There is an easy way to disassemle. The safety ring and both bolts have to remove.Then you pull out the draw bar with a downward movement.
The additional weight of the road tires are round about 12 kg(13,2 lb) So please use the road tires only for the transportation on the road.
The tires be plugged into the axis and assured with safety pins.

You can remove the engine from the trike easily.
The engine frame has two hooks where you can attach the motor on the engine support.
The engine will secured on both sides with the belt.
The front section can be adjust in the length. The screw will untighten and the front section can slide in or outside.
Please consider that the guiding bolt is placed inthe frame.

If the engine has been attached to the trike all cable and hoses shall be connected.
1 = Battery Cable2 = Cockpit3 = Fuel Pump4 = Puel Pipe
The battery is guarded with a 15 A fuse type "Mini"
1
2
3 4

Fixing cage for Propeller in140 cm
You can disassemble the propeller for an easy tranport The cage bracket´s are located underthe engine and …
… sideways right and left on the engine support.
The cage will fixed with velcros.

The aluminium tube with a rubber cord and hooks protect the glider lines against accidental contact with the propeller on the bottom.
These hooks will rest in the eye which are located in the hub of the back wheel.
The X-ONE 4T have a propeller withthree baldes and a diameter of 140 cm. He is fixed with 6 screws (M8 x 40). The tightening torque amount 20Nm.

Cockpit with possible technical configuration
rev counter
toggle switch up
starter
volt meter
water temperature
hours counter
altimeter
The cockpit can be equipped entirely different. . Depending on which engine is used .Very useful are engine RPM and temperature instruments.

The X-One can be equipped with a throw by hand system or rocket rescue chute which have a ballistic trigger mechanism.The installation of the chute can be done at the right or left side. According to that the V-lines should be laying like in the picture is demonstrated.
The handle must be unlockedonly for flight and are used only in an emergency situation.
The gilder will hinged in this carabiner. The brake line should berun here by the lower pulley,so thatthe brake handle can reached in flight at any time.
The start aid line is hooked in theA-line. An additional ring is attached o the top of the A riser.
The correct lengh of the start aid line is essential to check.The red line of the start aid line must sag slightly when the strap is pulled 90° to the push rod.This must be explained/set by an expierienced instructor.
All lines from the glider should be placed in the holder before take off.

Seat beltThe trike has a 4-point seat belt system. The belthas 4 buckles and can herewith adjust for differnt body sizes. One central buckle to open the hole system is positioned in the amount of belly upon my torso
For start the engine open the red cover and set the toggle switch up.
The electric starter is activated by pressing the button. The engine have to started in the neutral position of the throttle lever.
To switch off the engine close the red cover.

The following points should be attend before every start Cage secure; Assured to the frame with velcro Is the cage in a correct shape and propeller clearence Propellerhub without any tolerances Fuel with minimum 95 Octane Ventilated gas cap screwed on the fuel tank? Check glider and all lines Pilotsuspension and straps witout any stress All rubbermount check for fissures Full throttle test (7800 1/min 4T),(7100 1/min Hyper ThoriX) Kill switch test Coolingsstyem, expansion tank; Level and leaky Fuel system; level and leaky Engine secured with webbingstraps Oil level (4T)
The following points should be attend each 10 h Fuelfilter and dirt inside Check exhaust spring Exhaust for fissures Check rubber elements from the air filter for fissures
The following points should attend each 25 h (4T)After the first 25 h control valve for tappet clearance; Thereafter all 50 h Intake valve: 0,05 mm up to 0,15 mm Outlet valve: 0,2 mm up to 0,3 mm
Oilchange Castrol Edge full systethic 0W-40(900ml)BulliX 4T by FB, Castrol Edge, (it´s better to change it more often then it´s declared) GLIDERTHE GLIDER SHOULD BE CHECKED ALL 2 YEARS. SEND TO THE MANUFACTURERMOTORTHE ENGINE SHOULD BE CHECKED EACH YEAR ALIKE HOW MUCH HOURS IT´SUSE (This is only possible by Fresh Breeze or our authorized sales partners)
!!!WITHOUT THESE CHECKS NO WARRENTY OR OTHER CLAIMS! PLEASE USEONLY FRESH BREEZE GENUINE SPARPARTS.THIS WILL TAKEN POSSESSION
ALL SAFETY AND STIFFNESS WHICH IS REQUIERED FROM DULV!!!
BE SURE TO FOLLOW THIS SAFETY ADVICE EVERY TIME YOU USE FRESHBREEZE MOTORS !
• USE YOUR ENGINE CAREFULLY. DISREGARDING ANY SAFETY ADVICES AND INCAUTIOUS BEHAVIOUR MAY LEAD TO SERIOUS INJURIES. • NEVER COME CLOSE OR GRAP INTO THE SPINNING PROPELLER. HIGH RISK OF SERIOUS INJURIES. • THE ENGINE MAY NOT BE STARTED WHEN IT IS STANDING ON THE GROUND. HIGH RISK OF SERIOUS INJURIES. • NEVER TOUCH HOT PARTS (ENGINE, EXHAUST). HIGH RISK OF BURNING.

Engine 1 Cylinder 4 stroke with balance countershaft Cooling Watercooled with integrated pump Enginecase Aluminium .Cylinder Aluminimum with nikasil coated Bore / stroke 75 / 56,5 mm .Capacity 249,6 ccm Power 23 kw at 7800 1/min .Cylinderhead 4 valve per cylinder,2 overhead camshaft Crankshaft Forged steel . Piston Aluminium forged Rod Steel forged .Lubrication Integrated dry pump with diaphragm pump Ignition Digital ignition with rev limiter . Sparc plug NGK C8E 16 M 10 x 1 12 Nm Fuel system Electronic fuel injection .Gearbox Drive belt with centrifugal clutch Poly-V belt 775 8PK Engine weight 15 kg incl. E-Starter .Weight trike total 93 kg without paraglider
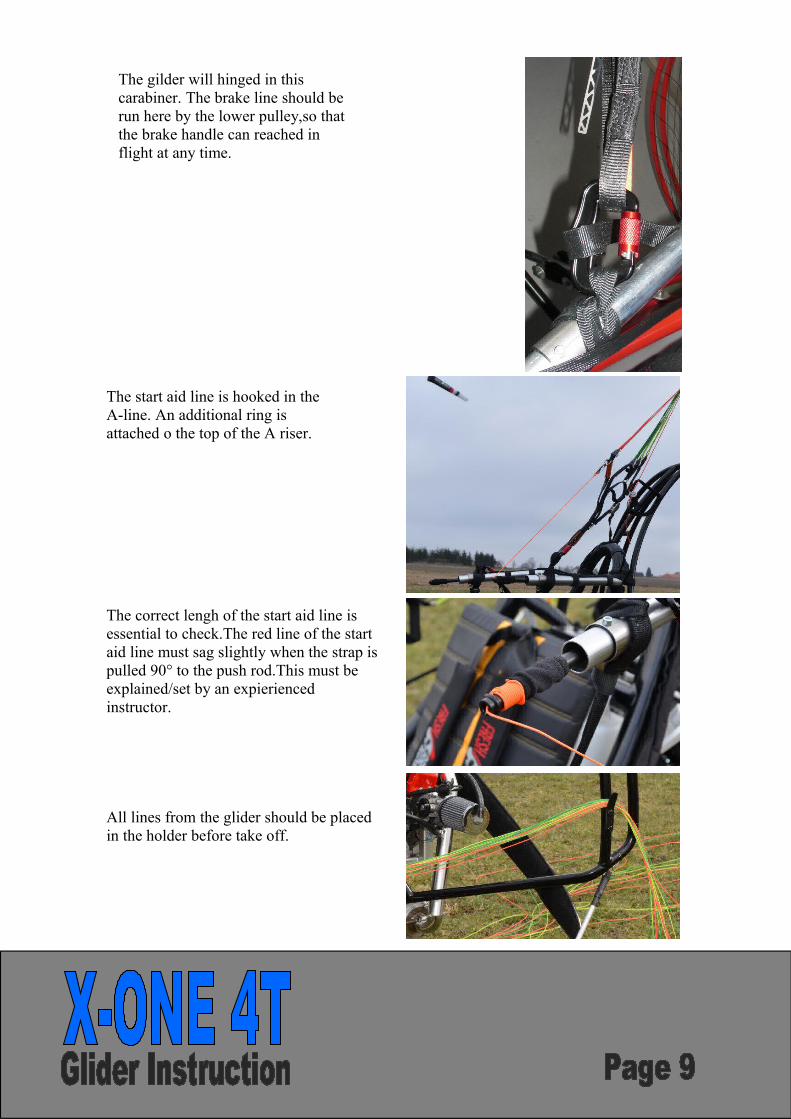
With 6 mm allen key open the clamping of the hub mounting...
…and with 10 mm allen key turn right the exccentric cam to tighten the belt.(8PK 775 Optibelt) For loosen the belt turn left. Subsuquently tighten the clamping of the hub mounting.

The oil drain plug owns on the the upper end a magnet. This attracts metal shavings and must be cleaned at each oil change. This screw is tightened to 26 Nm. (M 14 x 1.5)
With every second oil change, clean this filter. Be aware that the filter will be returned correct so that it gets its functional. This screw is tightened to 26 Nm. The oil volume is 900 ml, the best oil is Castrol Edge Full Synthetic 0W-40 or BulliX 4T Full Synthetic 0W-40
Oil level warm
Oil level warm
Oil drain plug
TO PUT IN OPERATION AND TEST-FLYINGParaglider spread for visual inspection
SPREADING
Place the paraglider with the upper surface against the ground and spread ihim out so that the leading edge is slightly curved.
Carefully separate all the lines and take care that no lines are underneath the canopy nor tangled are in any way.
PRE-FLIGHT INSPECTION
What to check before every take-off carefully:
Are there any fissures or damages at the glider?
Are all lines untangled?
Are the brake lines clear and proper connected with the brake handle?
Are the brake lines configured correctly?
Are the shackles proper locked and secured with the rigging-lines and at the riser?
Is the glider dry?
Are the risers undamaged and all stittchings okay?
Is the rescue handle released?
7-POINT-CHECK
Immidiatley before the take-off we recommend the 6-POINT-CHECK:
1) Is the glider spread out in a slight curve and are all of the cell-openings clear?
2) Are all the lines untangled and take care that no lines are underneath the canopy
3) Are your clothes and helmet closed, can something fall out your pockets, is the safty belt secured properly ?
4) Are brake handles within reach of the pilot ?
5) Guarentee the weather conditions (wind direction and wind strenght) a harmless flight?
6) Are the air and start areas free?
7) Are the strabs unter the seatbord closed?
YOUR FIRST FLIGHT
IMPORTANT NOTE!
Your first flights should perform during calm weather and on a familiar airfield.
At the beginning lead your trike gently and dosed therewith you can slowly get accustomedthe reaction of the glider.
ATTENTION! DANGER OF ACCIDENT!
Do not overestimate yourself. Do not be mislead through an esy paraglider or the behavior of other pilots to reckless behavior.

ADJUST THE MAIN BRAKE LINES
IMPORTANT NOTICE!
Before test-flying it´s necessary that an expert checks the main brake lines.
PROPER MODIFICATION
Properly installed brake lines have only little free motion.This means that the brakes starts beneath immediately until the trailing edge of the canopy begins to move downwards .This modification will be done on ground.
TOO LONG
If the brake lines are too long, the paraglider reacts slowly and it is difficult to land. It´s possible to compensate the problem during the flight by doing the brake lines one turn around your hand. After the landing please adjust the brake lines correct
Recommendation:
To flaire out, brake evenly. For drop down down the glider drag the lines the whole range. This procedure makes it easier to lay down the glider behind your trike while there is head wind. Attention Danger Of Accident!
If the brake lines are too short there are this following dangers:
The risk of early stall
The glider has a bad take-off behavior, it exist the risk of constant stall
The glider shows an extreme flight behaviour

CRUISEThe torque effect can compensated by means of the trimmer.Even with this trim´s you can control the speed.The cruise conrtol can be adjusted by means of the small lever to hold the desired rpm.
LANDINGThe landing should always be against the wind.Close the trims and reduce the engine speed. Take the brake handless, Start with thebraking in ~5-8 m height. If the brakes started too early you can land with engine support.The glider should after landing fall behind the trike.
Engine StopIdle running.Switch off engine (Main Switch „Off“).Only leave the trike when the propeller not urning any more
GROUNDHANDLINGWhen maneuvering the trike on the ground, do not hit the cage with his hand down The cage is not designed for this load direction
FLIGHTS UNDER SPECIAL CONDITIONS
RAIN:Basically belongs to every conscientious flight preparation the look of the weathersituation, so that "really" no flights in rain should be necessary.Nevertheless, each pilot can fall into worse unpredictable weather conditions.In general: No flights in the rain, as soon as possible to land!In very light rain the flight can be continued at first. The increasingly becoming wetglider is correspondingly heavier and therefore must flown faster to generate thenecessary lift. The stall speed increases accordingly. A stall is possible!Therefore: Cautious flying, avoid abrupt maneuvers, do not fly too slow for landing.In heavy rain always land, perform in need a safety landing.Store away the glider only dry, they rot otherwise. A wet glider also starts slower andworse!
WIND: Generally, each start and each landing must be performed whenever possibleinto the wind. The glider will always turn into the wind. Must be rolled diagonally to thewind, use the leeward brake line slightly to hold the glider in the right direction.Must be landed in strong wind use the foot pedal brake. It prevent a back pulling effectof the trike. After touch down wind the brake line one time around your hand.You will get a more efficience brake.In turbulences do not fly at maximum speed. The reduced angle of attack allow a collapse of the glider in case of wind gusts. Close the trim´s.Flights are not permitted at snowfall and have to stopped if necessary.Extreme temperatures: Restrictions in "normal" temperatures between -10 and +35 ° Cdoes not exist. “START PILOT” could simplify at low temperatures to start the engine.However, the cooling water must be mixed according to the manufacturers instructionsof the engine with antifreeze. In warm weather please have special attention to theengine temperatures. The power consumption and flight speed increases in result forlonger take off and landing roll distance.

START, FLIGHT, LANDING:
Here are some supplements that goes beyond the description of the first flight
If the glider falls too far on the side, do not continue the take off procedure.It is better to cancel two times the start than one time to get up side down.If the glider is already collapsed while pulling up try to get clear by pumping the brakelines.Take off only with a complete opend glider and in center of the trike.
Experienced pilots can ride with in no wind a full circles with less than 50 m diameter.The glider is herwith over the pilot.
FLYING UNDER TURBULENT CONDITIONS
Note!Take care crossing your own vortexes!Though the tendency to collapse is significantly reduced due to the high wing loadof the X-ONE, in turbulent air you should fly it with the trim system set to slow.The stabilizing effect of the increased pressure inside the wing at higher speeds ismore than counteracted by the smaller angle of attack.
Use both brake lines in turbulent air and keep them slightly pulled down (20%), andkeep the canopy above you and centred with active work at the brake lines. Thisreduces the risk of a collapse.
If the canopy collapses anyway on one side, keep the direction with the brake lines(and, if necessary, fly away from any obstacles). Only if you fly stable “pump” thebrake on the collapsed side to re-open the wing quicker. You may have to do itforcefully due to the high wing load.
If you fly into very thermal conditions fly slowly but don’t pull the brake too much tostay away from a dynamic stall. If you leave such a thermal area pull the brakelines to avoid a forward shooting canopy and the potential risk of a front collapse.You may give more gas as well to increase the angle of attack.
Note!If the canopy collapses on one side brake the other side until the X-ONE is flyingstraight forward. But better use less than too much brake input!

LANDING WITH ENGINE SHUT OFF
In principle landing with the engine shut off is the same as if it is still running –always facing the wind. But the speed should be kept up high enough for a propflaring. So hold the brake lines up until you are roughly 2 m high. You should winthem 1 times around your hand to have more brake travel. In 2m altitude start to appliedbrake continuously. Just at touch down the brake lines should be completely pulldown.If due to the wind the canopy doesn’t fall down behind the trike you may release thebrake for a moment, wind them 1time more around the hand and pull it again. Youmay repeat this procedure until the glider comes down.If the canopy pulls too much to the side the trike may finally roll over. Thereforekeep the canopy centered as good as possible behind the trike.If the wind is quite strong it may help to get the canopy down by not braking toomuch with the front wheel. Then the trike may roll back with the wind a little bit.
LANDING WITH THE HELP OF THE ENGINE
As the wing load of the X-ONE is quite high compared with a backpack motor, theglider should not be flown too slow prior to touch down. We recommend to keepthe brake wide open until you reach roughly 2 m, and then pull it continuouslydown until you touch the ground. At this time the brake should be fully applied.
Please make sure that the brake line is perfectly adjusted to your X-ONE so youdon’t loose brake travel when landing.
You may use the engine to adjust the descent rate. Control altitude and speed withbrake lines and gas.
Caution! Accident risk!
Being close to the ground watch your air speed carefully, don’t fly too slow: Alwaysmuch faster than your stall speed!

RAPID DESCENTSThere are many situations when you need to lose altitude rapidly to avoid potentialdangers e.g. pulled up from a cumulus cloud, an approaching cold front, a storm frontetc. Below we explain various ways to make a rapid descent which can becarried out safely with the X-ONE if the pilot has the necessary knowledge and ifthey are correctly executed.NOTE!With all rapid descent methods, the trim system should be completely set to slowand the rpm's reduced to idle.All of the manoeuvres are more dynamic than when you fly with a backpack systemor even without a motor due too the high wing load.DEEP SPIRALThe spiral dive is the classic method for making a rapid descent with a sink rate ofup to 14 m/s in normal flight situations, and up to 20 m/s in extreme flightsituations. It is particularly suitable where there is a high ascent rate and little wind.Spiral dives with a sink rate above 14 m/s are not tested on certification; thisexceeds the manufacturers limits.STARTING THE MANOEUVREWhilst flying at full speed, start to apply the brake on one side. This will steer theparaglider into a turn with a strong bank. You can tell that you are in a spiral dive ifyou are being pressed hard against your seat (high centrifugal force).When you are in a spiral dive, you should steer very carefully because theparaglider will react immediately. Banking and rate of turn increase if brakingefficiency increases. Look down before and during a spiral dive so that you alwaysknow how far you are away from the ground!RECOVERYRecover from the spiral dive slowly and carefully. If you release the brakes tooquickly, the increased speed can cause the wing to climb, become unsettled, orpartly collapse.Due to the reduced possibility when flying in a trike to use weight-shifting, you mustalways recover actively from the spiral dive with the outside brake.
Caution! Accident risk!Very high turn speeds can be reached with spiral dives, with high G-loads.So be careful when you try this!Do not continue the spiral dive too long; you could lose consciousness.Never attempt this with less than 150 to 200 meters ground-clearance.Spiral dives combined with other methods like B-stall or "big ears" are notpossible with the X-ONE without any changes and are not allowed at all.

Seite 26 Extremflug.doc
INSTRUCTIONS FOR EXTREME FLYING AND DANGEROUS SITUATIONSExtreme flying with a motor trike and full gas are extremely dangerous andtherefore cannot be tested. They must be avoided at all costs. Problems do not arise during a normal flight. However, pilot error during the flightor extreme wind conditions may force the wing into an unusual flying position. Thismay require the pilot to make corrections during flight to which he may not be usedto. In this section we explain how to correct extreme situations if they do arise. Themanoeuvres described below are based on the legal take-off weight as describedin the technical data section.NOTE!These instructions do not replace safety training or specialised literature. Werecommend that you undertake special safety training which will prepare you forextreme situations.Always keep within the recommended limits. Do not perform aerobatics or extremeflying manoeuvres. This will prevent accidents caused by over-loading the glider.DEEP STALLVarious things can cause a paraglider to deep stall, e.g. shrinkage of the C and Dlines as a result of dampness or flying in the rain. The airflow from the front of theglider gradually breaks away towards the back and the canopy sags, with the gliderremaining upright. Paragliders are particularly susceptible to deep stalls if the wingloading is too low. C and D lines which are too short, for example, can often be recognised because launch behaviour deteriorates. You can recognise a deep stall because there is less flight noise than normal. In addition, your sink rate will increase (6-8 m/s).RECOVERYThe XWing couldn’t be deep-stalled at all during our test flights. The usual recoveryprocedure would be to decrease the angle of attack be shortening the A- and B-lines.But this would require huge forces at the X-ONE. Better would be to decreasethe angle of attack be pulling both trim levers back.
Caution! Accident risk!A wet canopy or flying in the rain increases the weight of the canopy and maycause a stall. You are not allowed to fly under these circumstances..
FRONTSTALLStrong turbulence can cause part or all of the leading edge of the glider to fold ortuck under. Normally the glider will immediately recover into its normal flight position.RECOVERYIf the XWing does not immediately recover from a frontal tuck, brake quickly andstrongly with both steering-lines (brake lines) to reinflate the glider.Any weather condition which causes a front stall is much outside the allowed andsafe weather conditions. If you get into such weather land as soon as possible don´tcontinue before the weather got quieter!

ASYMMETRICAL TUCKSIn turbulent air, one side of the paraglider may collapse. Some of the cells deflateand the paraglider may collapse or spin.During test flights the glider should self-recovered on release of the A-risers which werepulled down to initiate the collapse. It turned less than 90° and stabilised itself.RECOVERY • Counter-brake slightly on the side of the paraglider that is still inflated to stop it turning away and to stabilise it. • Counter-brake just enough that the paraglider continues to fly straight ahead. • If the wing has not yet self-recovered, pump with the brake on the side that has collapsed in order to open it, making use of the full brake travel.
Caution! Accident risk!
Counter-braking too strongly can result in a stall on the inflated side.
FULL STALLA full stall could occur if full brake is applied during the flight. The paraglider slowsdown, surges backwards and deflates. If the brakes are held down, the canopycomes up over the pilot again. The result is an almost vertical descent with a sinkrate of about 8-12m/s.The delivered configutation X-ONE with all gliders is so far not been tested in flights. It is a very dynamic maneuver with high descent speed and high surface loading. We don´t recommend this manoeuver.RECOVERYFully release the brakes within 3 seconds. If you release the brakes too slowly, theparaglider may spin. The spin stops automatically when the brakes are releasedcompletely. Is a recovery impossible: ignite salvation!
Caution! Accident risk!
If the canopy has gone backwards, you must hold the brakes down or the canopycan surge forward and in an extreme case end up underneath the pilot. Hold thebrakes down until the canopy is above you again.

SPINSpins occur when one side of the canopy stalls. The other side still continues to flyforward, while the stalled side turns in the opposite direction.
RECOVERY
Quickly release the brakes.
Note!
If the spin does not stop:
1. Check whether you have released the brakes fully.
2. Is the spin still doesn’t stop, use your recovery system.
Caution! Accident risk!
In strong turbulence, always keep far enough away from rock faces and otherobstacles. You need time and enough height to recover from extreme situations.

DAILY INSPECTIONThe safety of an aircraft depends on his regular, diligent inspection and maintenance.We want to point out that all technical mistakes can be recognize in a Pre-Flight-Check. It is in your own interest to check your trike every day with great care.
1. Engine: Pay attention to spills.2. Check propeller for tightness and damage and clearance3. Check the frame for cracking, paying particular attention to the areas of the clutch and the engine mount.4. Note oil and coolant level according to engine manual.5. Lubrication, cooling and fuel system for leaks and connections6. Electrical connections, spark plug, throttle cables7. cable control of foot or throttle lever
NOTE:A turning the engine by hand for testing purposes is not possible due to the
built-in centrifugal clutch on the propeller.
8. Check Paraglider - All lines without knots or damage. No deformation, cracks or visible external damage9. Check the entire pilot suspension10. Check chassis for damage and rubber parts of the suspension11. Check front brake and tire12. Pedals free and cable o.k.?13. Belts for Engine support14. Check seat boards and belts for strength and damage15. Tires and air pressure ( front and rear wheel 1,8-2,5 bar)16. Rear Glass Axle: Check for damages17. Cable on Rear Glass Axle o.k.?

PERIODIC INSPECTION Before every flight the responsible pilot has to do a visual check around the whole trike. The pilot will learn all expertises in the education and special details at the instruction of the trike.
Every 25 hours Visual inspection oft he screw connections Control the clearence of all movable parts especially wheel suspension and spring elements
etc. Lubricate all parts where:
a) metal touch on metal machine oil b) metal touch on plastic silicone spray
Check the wheel brakes Ckeck the belt tension Ckeck the accelerator cable Check all belts, bucklings and pulleys Visual check welding seams to fissures Check all rubber/metal connections (rubber mounts) to fissures Check the cooling system level Check harness und connections Check the sealings oft he cooling system (water loosing, leakage)
Every 100 hoursLike the 25 hours inspection and in addition:
change the spark plug
INSPECTION OBLIGATIONS
The trike has to check one time a year. This is set by law. (LuftGerPV §15)In § 2 section 1 is declared that this time interval of 12 month can be extended in individual case if there are new technical developments.