operational & instruction manual model: ultra 3800flt
TRANSCRIPT

OPERATIONAL & INSTRUCTION
MANUAL
Model: Ultra 3800FLT
(220v-240V 2Ø)
Voltage Supply to Machine:
L1 to L2: ___________ L1 to Ground: ____________ L2 to Ground ___________
UltraSonic LLC
1200 Ferris Road
Amelia, Ohio 45102
Tel: 513-502-9746
Fax: 513-436-1527
[email protected] www.ultrasonicllc.com
UltraSonic LLC. Model Ultra 3800FLT
2
SAFETY REQUIREMENTS
All personnel must read this user guide before attempting to operate, maintain, or service
the UltraSonic LLC Cleaning Equipment.
HAZARDS
High voltages are present, ALWAYS disconnect unit from power source before
attempting any maintenance or service procedure.
Hot water; do not place unprotected hands in tank. Use baskets with lifting
mechanism to insert or remove parts from tank.
Read MSDS sheet for cleaning agents recommended for the system. Note the
requirements for personal protection listed on the MSDS.
Make sure equipment is properly installed in accordance with all electrical codes.
Never operate this equipment in an ungrounded condition.
Never attempt to perform maintenance when cleaning solution is hot.
Never open equipment or attempt service/warranty related repairs without first
contacting UltraSonic LLC for safe and proper procedures.
SAFE OPERATION
Do not immerse hands or other body parts in the ultrasonic tank. Cleaning agents and
contaminants can cause skin irritation and exposure to high intensity ultrasonic
energy should be avoided.
Do not operate system using volatile, explosive, combustible or acidic liquids (pH
less than 7). Unauthorized cleaning agents, not approved by UltraSonic LLC, will
invalidate warranty and may cause damage to system.
Parts may be gently rested on the rack on the bottom of the tank. Avoid
dropping parts on this which may result in tank damage and void your
warranty.
Do not operate the system unless the tank is full. Operating at less than full capacity
may result in damage and void the warranty.

UltraSonic LLC. Model Ultra 3800FLT
3
Do not open up machine, dissemble any part(s), move or remove any components or
electrical devices.
Do not connect the equipment to any other power supply than what is specified.
(220v-240V 2Ø 3800FLT)
The generators contain high voltages and should be maintained in a clean, dry
environment at all times.
Do not move the cleaning system without draining the tank and disconnecting the unit
from the power supply.
Operating temperatures of the solution requires protective clothing and equipment to
protect against the possibility of scalds following accidental spills.
Make sure that the sound levels experienced in your environment are known, and
wear hearing protection if necessary. Ultrasonic energy produced by the system is
measurable by sound meters and OSHA sound restrictions may apply.
Do not leave the ultrasound on or leave parts in the tank longer than necessary. This
can result in erosion of the part surface and/or the bottom of the tank.
Do not allow moisture to build up inside the unit, this can cause electrical shorts and
corrosion of the ultrasonic transducers.
INSTALLATION & INITIAL SETUP
Receiving- Inspect packaging and unit carefully to ensure there has been no damage
in shipping. If there is damage, contact the carrier immediately to process a
claim.
Place the unit in a well-ventilated area on a flat level surface.
Lock the casters in place and use the leveling devices located on each side of the unit
if surface is not level.
Both filter elements are already in their designated canisters. To change filter
elements, a 15/16" wrench is required. (Not provided).
Make sure drain valves are closed and then add water and cleaning agent (typically
10% of approved soap per tank volume for general purpose cleaning) to the main
tank. When the main tank is full the water will cascade into the weir tank; continue
adding solution until the level in the overflow tank is 3” above the low water control

UltraSonic LLC. Model Ultra 3800FLT
4
switch.
Use only UltraSonic LLC approved cleaning agents and be sure you use the proper,
recommended concentrations (typically 10% of approved soap per tank volume for
general purpose cleaning).
• Check your power supply before connecting unit. The system is designed to operate
on (220v-240V 2Ø 3800FLT) Have certified electrician connect power supply. The
unit may require a Buck/Boost Transformer depending on incoming power.
Incoming Power above 240 volts will void Machine Warranty.
Flip rocker switch POWER ON/up button, Heater Control & Ultrasonic lights will
display green.
Operating temperature is pre-set @ 150°F on the TEMP CONTROL. Initial heat-up
time using cold water is approximately two hours. For automatic heating see
Programmer – Heat
When operating temperature of 150°F is reached, set Ultrasonic Timer to 15 minutes
and push green Cycle start button. This process, known as degassing, will remove air
from the bath, which is required for effective cleaning. During this degassing phase,
some squeaking sounds may occur, this is normal.
Unit is now ready to clean parts, see NORMAL OPERATION procedures.
Fill out WARRANTY REGISTRATION form, page 14 (serial # plate located on
back panel Touch Screen Control Box) and send back to UltraSonic LLC to ensure
activation of your warranty.
Operation Instructions

UltraSonic LLC. Model Ultra 3800FLT
5
Control Panel
Control Panel Functions

UltraSonic LLC. Model Ultra 3800FLT
6
Machine Power: P. Machine On/Off Power
Navigation Functions: 1. Cycle Start – Starts Pre-set Timers for Ultrasonic and Agitation
2. Stop – Stops Ultrasonic and Agitation
3. Heater – Manual Start/Stop (Overrides 7-Day Temperature Timer)
4. Ultrasonic – Manual Start/Stop Ultrasonic Timer
5. Agitation – Manual Start/Stop Agitation Timer
6. Filtration- Manual Start/Stop Filtration Timer
7. Auxiliary- Manual Start/Stop Timer
8. Up – Agitation Table
9. Down – Agitation Table
10. Menu – Machine Timers and Settings (See Program Settings)
11. Up – Navigation for Programing
12. Down – Navigation for Programing
Light Functions: A. Alarm – Red Light Indicates Low Water or Overload
B. Agitation – Green Light Indicates Activation
C. UltraSonic – Green Light Indicates Activation
D. Heat – Green Light Indicates Activation only when Heating Element
is Working
E. Display Panel – Shows Machine Functions
Operation Instructions

UltraSonic LLC. Model Ultra 3800FLT
7
Control Panel Button/Light Functions:
• Cycle Start Button: After pressed Starts the UltraSonic and Agitation timers and
Will run according to timer settings (Green Lamp), when
Finished the Filtration timer will run according to timer
Setting (Yellow Lamp), when cycle is complete or in rest
(Red Lamp).
• Stop Button: After pressed Stops Ultrasonic, Agitation and Filtration
Operation and resets Timers
• Arrow UP Button: Moves Agitation to Up Position
• Arrow DOWN Button: Moves Agitation to Down Position
• Alarm Light: Indicates Low Water or Over Load
(Press Menu Button to reset)
• Heat Light: Indicates when Water Heater is ON.
• Ultrasonic Light: Indicates when Ultrasonic is ON.
• Agitation Light: Indicates when Agitation is ON.
• Heat Button: Manual Start/Stop Heating
• Ultrasonic Button: Manual Start/Stop Ultrasonic Operation
• Agitation Button: Manual Start/Stop Agitation Operation
• Filtration Button: Manual Start/Stop filtration Operation
• Aux Button: Manual Start/Stop Auxiliary Operation
• Menu Button: Menu select and Save Setting
• Menu Down Button: Reduce Value/Move back in Menu
• Menu Up Button: Increase Value/Move forward in Menu
Control Panel Button/Light Functions:
• Cycle Start Button: After pressed Starts the UltraSonic and Agitation timers and
Will run according to timer settings (Green Lamp), when
Finished the Filtration timer will run according to timer
Setting (Yellow Lamp), when cycle is complete or in rest
(Red Lamp).
• Stop Button: After pressed Stops Ultrasonic, Agitation and Filtration
Operation and resets Timers
• Arrow UP Button: Moves Agitation to Up Position
• Arrow DOWN Button: Moves Agitation to Down Position
• Alarm Light: Indicates Low Water or Over Load
(Press Menu Button to reset)
• Heat Light: Indicates when Water Heater is ON.
• Ultrasonic Light: Indicates when Ultrasonic is ON.

UltraSonic LLC. Model Ultra 3800FLT
8
• Agitation Light: Indicates when Agitation is ON.
• Heat Button: Manual Start/Stop Heating
• Ultrasonic Button: Manual Start/Stop Ultrasonic Operation
• Agitation Button: Manual Start/Stop Agitation Operation
• Filtration Button: Manual Start/Stop filtration Operation
• Aux Button: Manual Start/Stop Auxiliary Operation
• Menu Button: Menu select and Save Setting
• Menu Down Button: Reduce Value/Move back in Menu
• Menu Up Button: Increase Value/Move forward in Menu
Display panel: • SONIC: Display Ultrasonic Timer
• AGIT: Display Agitation Timer
• FILT: Display Filtration Timer
• TEMP: Display Actual Temperature/Set Temperature
Menu Operation:
• Press Menu Button: To select different Menu option press up button until
desired Menu. To return back to a Menu selection press
down button to return. To select desired Menu Option press
Menu Button until edit position is reached then use Up and
Down Buttons to edit selection,
press Menu button to save settings.
• Temperature Set: Press Menu Button until Temp Control, Press Menu Button
again until Temp Set, press Up/Down Buttons to set
Temperature, press Menu Button to Save.
Press UP Button to move to next setting.
• Ultrasonic Timer Set: In Menu Press UP Button until Ultrasonic Set
press Menu Button until Timer use Up/Down Buttons
to set time, press Menu Button to Save.
Press UP Button to move to next setting.
• Agitation Control Set: In Menu Press UP Button until Agitation Control
press Menu Button until Timer On/Off use Up/Down
Buttons to set ON or OFF, Press Menu Button to reach
Timer and use Up/Down Buttons to set time, press Menu
Button to Save. Press UP Button to move to next setting.
• Filtration Control Set: In Menu Press UP Button until Filtration Control press
Menu Button until Timer On/Off use Up/Down Buttons
to set ON or OFF, Press Menu Button to reach Timer and
UltraSonic LLC. Model Ultra 3800FLT
9
use Up/Down Buttons to set time, press Menu Button to
Save. Press UP Button to move to next setting.
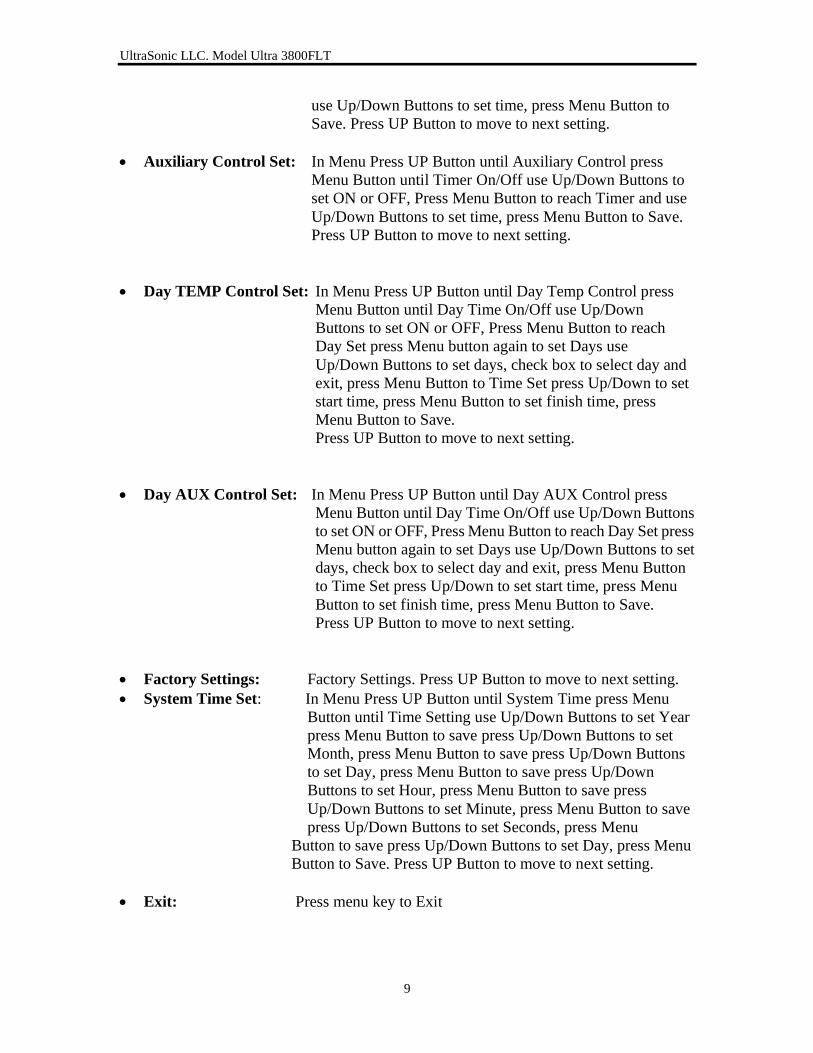
• Auxiliary Control Set: In Menu Press UP Button until Auxiliary Control press
Menu Button until Timer On/Off use Up/Down Buttons to
set ON or OFF, Press Menu Button to reach Timer and use
Up/Down Buttons to set time, press Menu Button to Save.
Press UP Button to move to next setting.
• Day TEMP Control Set: In Menu Press UP Button until Day Temp Control press
Menu Button until Day Time On/Off use Up/Down
Buttons to set ON or OFF, Press Menu Button to reach
Day Set press Menu button again to set Days use
Up/Down Buttons to set days, check box to select day and
exit, press Menu Button to Time Set press Up/Down to set
start time, press Menu Button to set finish time, press
Menu Button to Save.
Press UP Button to move to next setting.
• Day AUX Control Set: In Menu Press UP Button until Day AUX Control press
Menu Button until Day Time On/Off use Up/Down Buttons
to set ON or OFF, Press Menu Button to reach Day Set press
Menu button again to set Days use Up/Down Buttons to set
days, check box to select day and exit, press Menu Button
to Time Set press Up/Down to set start time, press Menu
Button to set finish time, press Menu Button to Save.
Press UP Button to move to next setting.
• Factory Settings: Factory Settings. Press UP Button to move to next setting.
• System Time Set: In Menu Press UP Button until System Time press Menu
Button until Time Setting use Up/Down Buttons to set Year
press Menu Button to save press Up/Down Buttons to set
Month, press Menu Button to save press Up/Down Buttons
to set Day, press Menu Button to save press Up/Down
Buttons to set Hour, press Menu Button to save press
Up/Down Buttons to set Minute, press Menu Button to save
press Up/Down Buttons to set Seconds, press Menu
Button to save press Up/Down Buttons to set Day, press Menu
Button to Save. Press UP Button to move to next setting.
• Exit: Press menu key to Exit
UltraSonic LLC. Model Ultra 3800FLT
10
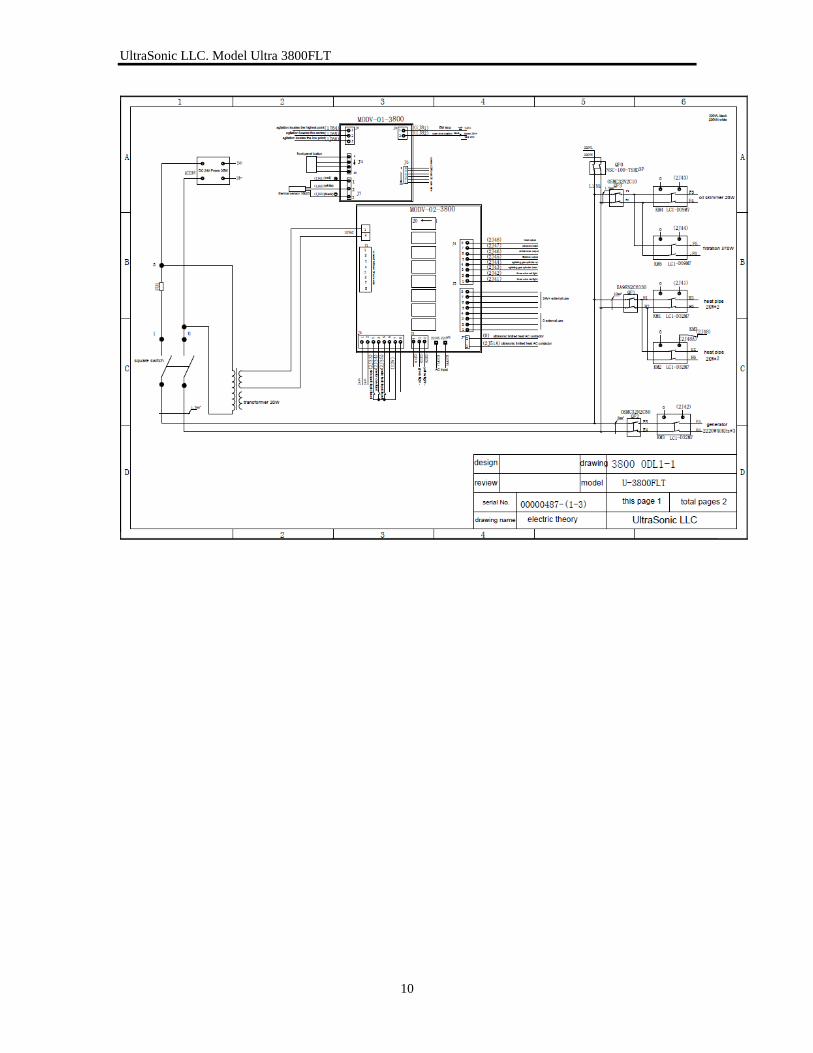
UltraSonic LLC. Model Ultra 3800FLT
11
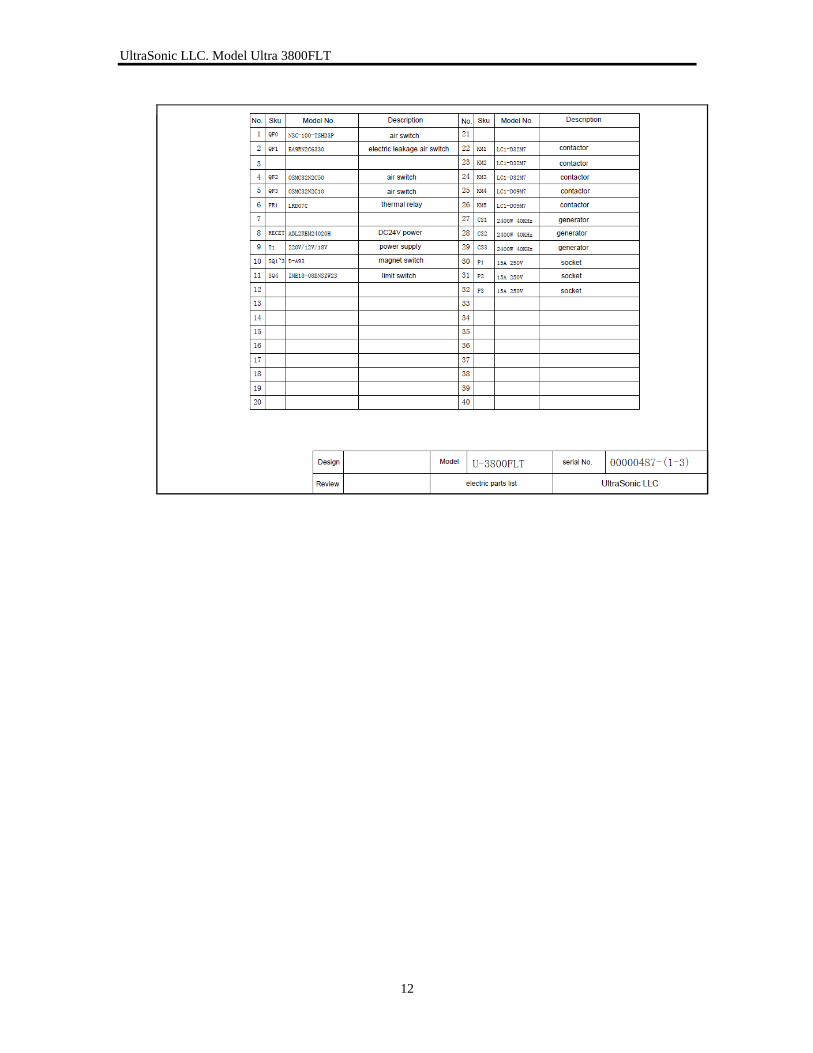
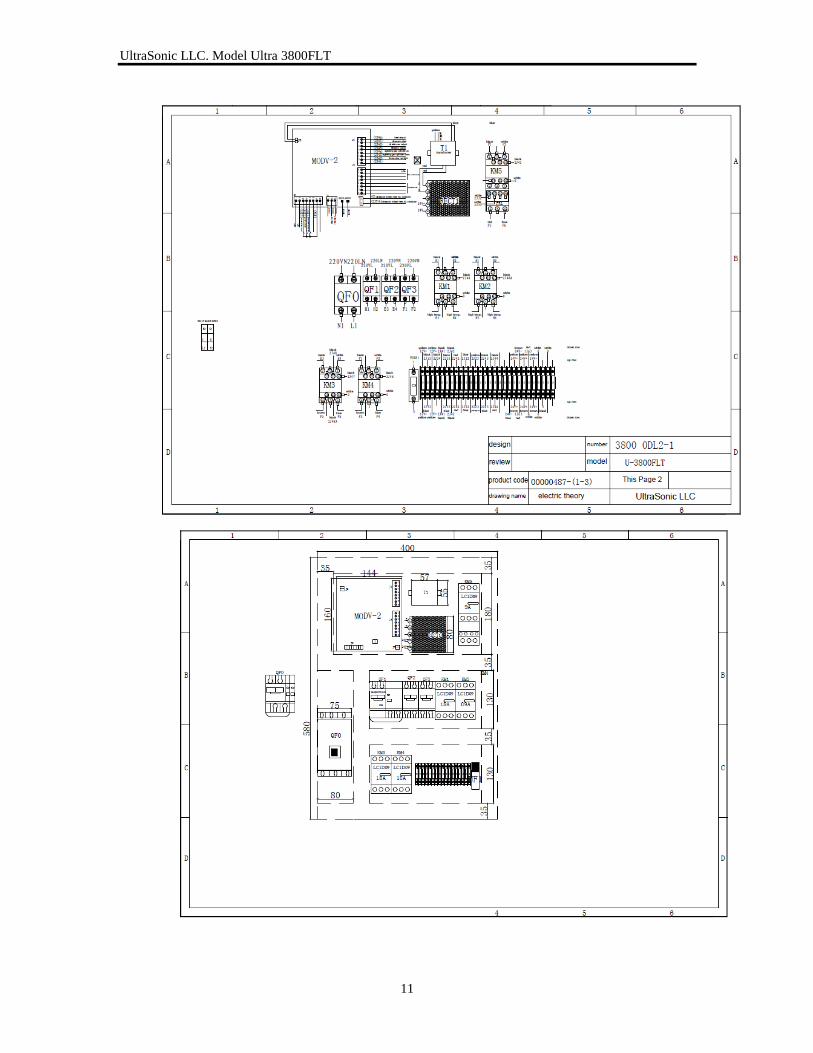
UltraSonic LLC. Model Ultra 3800FLT
12

UltraSonic LLC. Model Ultra 3800FLT
13

UltraSonic LLC. Model Ultra 3800FLT
14
NORMAL OPERATION
Make sure solution is at operating temperature.
Arrange parts in baskets & lower basket into solution.
Push green Cycle Start button.
Close lid when not loading/unloading parts.
When ultrasound turns OFF, Filtration will turn on automatically to skim off any
surface oils & contaminants into the weir tank.
Remove basket. NOTE: Parts are hot, use proper protective equipment to prevent
exposure.
MAINTENANCE
Preventative - There is a minimum of preventive maintenance required. The overall
environment around the unit needs to be kept clean, dry and dust free.
Routine - Filter Element should be replaced when the pressure gauge indicates rise in
pressure or the flow from the spray bar located in the front of the main tank is slowed.
Most users regularly replace their filter each month to avoid any decrease of flow.
Solution should be replaced regularly to avoid a drop in cleaning performance that
will result from too many contaminants in the solution. NOTE: Canister and solution
are hot and may be contaminated; protective clothing and equipment should be used
to prevent any exposure. To change filter elements, remove solution from
front/cleaning tank until water level is below spray bar. Remove cover in back of
machine to access filter canister using a 15/16" wrench to loosen and remove canister.
Insert filter element into the canister. Carefully reattach canister to housing (be
careful not to damage O-rings), hand tighten the canister in place to ensure a tight fit,
use wrench to snug canister, do not over tighten.
NOTE: Consult your UltraSonic LLC representative for recommended schedule for
filter and solution changes based on your application.
EQUIPMENT CLEANING

UltraSonic LLC. Model Ultra 3800FLT
15
Push Power OFF button (all control lights should be OFF).
DISCONNECT UNIT FROM POWER SUPPLY.
Wait a minimum of 30 minutes before draining contaminated solution from the tanks
(this enables heating element to cool and prevent damage)
Drain both tanks, NOTE: Solution is hot and may be contaminated; protective
clothing and equipment should be used to prevent any exposure.
Remove and clean metal pre-filter located in rear tank.
Rinse the inside of the tanks with clean, clear water.
Wipe down the inside of tanks with a clean, soft cloth. Do not use any abrasive pads
or cleaners. These kinds of cleaners can scratch the tank surface and void warranty.
Wipe work and outside surfaces with a dry, clean, soft cloth.
When discarding contaminated solution and filters follow all local, state and
federal environmental and regulatory requirements.
Follow installation instructions listed earlier for refilling and start up procedures.
MAXIMIZING ULTRASONIC PERFORMANCE
Temperature - Temperature has a dramatic effect on the cleaning performance and
time needed to clean a part. The recommended temperature range is 140F to 150F.
Temperatures above can decrease the ultrasonic action. Consideration needs to be
given to the cleaning agent used when determining the proper temperature. NOTE:
Always check the MSDS for the cleaning agent and note its boiling point or flash
point. Operation near or above the boiling point/flash point is hazardous and can
cause noxious fumes.
Cleaning Agent - Cleaning agents can enhance or decrease the performance of the
ultrasonic action and speed of cleaning. Always use UltraSonic LLC recommended
cleaning agents at their proper concentrations.
Degassing - Liquids containing air and dissolved gases can interfere with the
formation of cavitation bubbles necessary for ultrasonic cleaning. Follow the
procedure in the installation section to ensure liquid is ready for cleaning.

UltraSonic LLC. Model Ultra 3800FLT
16
Part Exposure - In order for a surface to be cleaned, it must be exposed to the liquid.
This requires proper placement of the parts in the parts basket. Do not overload
baskets with small parts that prevent the middle layers from getting proper exposure
to the liquid. Also, improper placement of parts with blind holes or cavities can result
in air pockets, where no cleaning action occurs. In general, clean large numbers of
parts a few at a time using shorter cleaning cycles.
Contaminated Solution - As contaminants build up in the solution the ultrasonic
performance drops. The cavitation bubbles waste their energy imploding on the
contaminants and not on the part surface. It is important that you change the solution
on a regular basis.
Parts Materials and Contamination - Certain materials absorb ultrasonic energy,
generally these are soft materials like rubber, fabric, gaskets and heavy grease.
Ultrasonics is extremely effective with a hard surface to impact against. Therefore,
parts contaminated with heavy amounts of grease or soft materials should be pre-
cleaned prior to exposure to the ultrasonic tank.

UltraSonic LLC. Model Ultra 3800FLT
17
SERVICE & WARRANTY PROCEDURES
NOTE: DO NOT OPEN EQUIPMENT OR ATTEMPT ANY SERVICE OR
WARRANTY RELATED WORK BEFORE CALLING ULTRASONIC LLC
(513) 502-9746.
SPECIAL NOTE: PLEASE RETAIN ORIGINAL
SHIPPING CRATE
Our service tech will help troubleshoot any problem and instruct user on the safe and
proper procedures for repairs.
SUPPLIES AND SPARE PARTS
For ordering supplies, accessories, or spare parts:
Visit our website, www.ultrasonicllc.com
Call to place your order, 513-502-9746.

UltraSonic LLC. Model Ultra 3800FLT
18
WARRANTY
UltraSonic LLC Cleaning Equipment is guaranteed to be free from defects in materials
and workmanship for one (1) year from the date of shipment under normal use and
operating conditions.
UltraSonic LLC shall repair or replace, at its option, any component covered by this
warranty which is determined by UltraSonic LLC to be defective in material or
workmanship within the one (1) year warranty period.
This warranty is limited to the original purchaser and is not transferable. Freight charges
for equipment returned are the responsibility of the user.
Total liability for any reason whatsoever, shall not in any case exceed the cost of repair or
replacement of the defective part. Such repair or replacement shall be the exclusive
remedy available in connection with this warranty. In no case shall UltraSonic LLC be
responsible for any incidental or consequential damages.
This warranty does not apply to:
Equipment or components subjected to misuse, improper installation, alteration,
modification, neglect or accident.
Use of unauthorized cleaning agents, not approved by UltraSonic LLC.
Normal wear such as cavitation erosion of tank and transducer surfaces.
Non-compliance with all procedures as outlined in the Operational & Instruction
Manual.
Parts having a useful life less than one (1) year, e.g. bulbs, fuses or similar parts.
Claims or estimates of performance and production specifications.
Applicability of use for a particular purpose unless specifically contained in writing
by UltraSonic LLC.
Except as specifically provided herein; UltraSonic LLC grants no other warranty, either
expressed or implied. UltraSonic LLC shall in no event be liable for damages of any
kind as a result of or relating to the sale or use of the products whether such damages are
direct, indirect, special, incidental or consequential
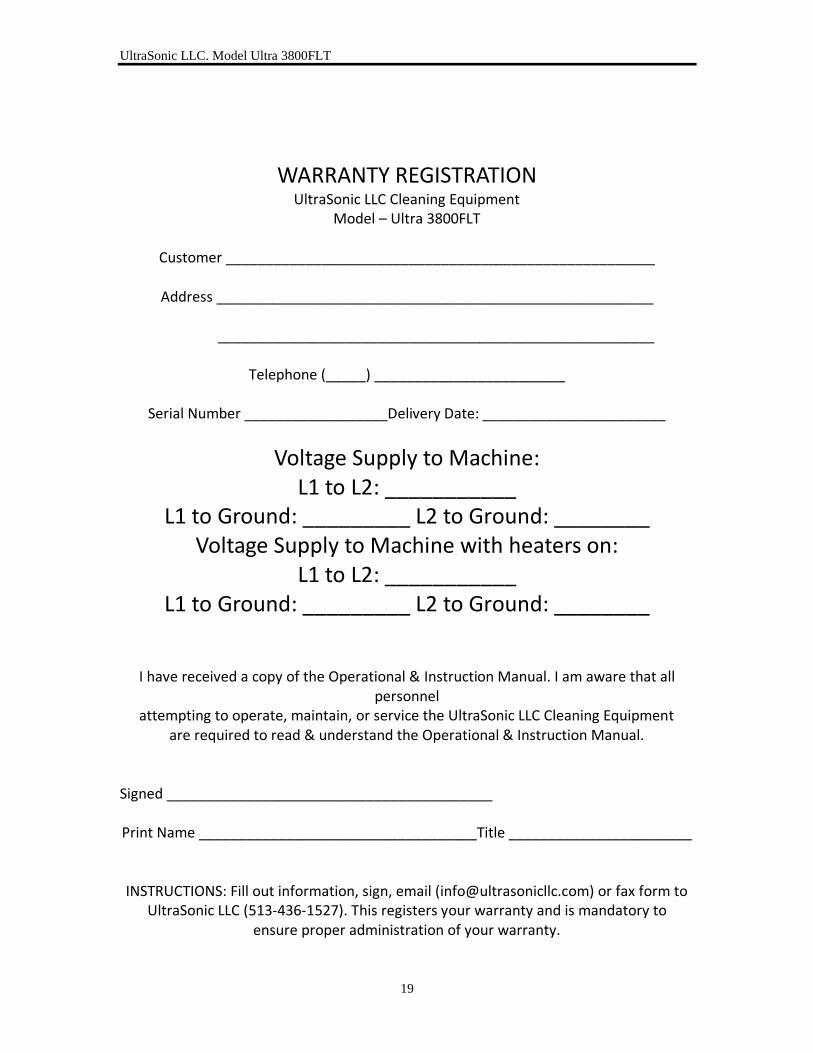
UltraSonic LLC. Model Ultra 3800FLT
19
WARRANTY REGISTRATION UltraSonic LLC Cleaning Equipment
Model – Ultra 3800FLT
Customer ______________________________________________________
Address _______________________________________________________
_______________________________________________________
Telephone (_____) ________________________
Serial Number __________________Delivery Date: _______________________
Voltage Supply to Machine: L1 to L2: ___________
L1 to Ground: _________ L2 to Ground: ________ Voltage Supply to Machine with heaters on:
L1 to L2: ___________ L1 to Ground: _________ L2 to Ground: ________
I have received a copy of the Operational & Instruction Manual. I am aware that all personnel
attempting to operate, maintain, or service the UltraSonic LLC Cleaning Equipment are required to read & understand the Operational & Instruction Manual.
Signed _________________________________________
Print Name ___________________________________Title _______________________
INSTRUCTIONS: Fill out information, sign, email ([email protected]) or fax form to UltraSonic LLC (513-436-1527). This registers your warranty and is mandatory to
ensure proper administration of your warranty.