operating instructions2 for customers in the u.s.a. and canada safety information owner’s record...
TRANSCRIPT

En
terta
inm
en
t Ro
bo
t AIB
OER
S-3
11
/3
12
English
Français
Deutsch
© 2001 Sony Corporation
Operating Instructions
4-657-307-11(1)
Printed in Japan * 4 6 5 7 3 0 7 1 1 (1)*

2
For Customers in the U.S.A. andCanadaSafety InformationOwner’s RecordThe model number and serial number are located inside the cover of the unitand on the side of the supplied AC adapter. Record the serial number in thespace provided below. Refer to the model and serial number whenever youcall upon your Sony AIBO Customer Link.Model No. ERS-311/312Serial No. ___________
Warning• To prevent fire or shock hazard, do not expose the robot to rain or moisture.• To avoid electrical shock, do not open the enclosure. Refer servicing to
qualified personnel only. (Contact the AIBO Customer Link.) (page 8)• Periodically examine the AC adapter for conditions that may result in the
risk of fire, electrical shock, or injury to persons (such as damage to thecords, blades, housing) and in the event of such conditions, the AC adaptershould not be used until properly repaired or replaced.
• Not Intended for Children Under 8 Years.• Vérifiez périodiquement si l’adaptateur secteur ne présente pas des
conditions susceptibles de provoquer un incendie, des décharges électriquesou des blessures aux personnes (comme des dommages aux câbles, auxoreilles ou au boîtier) et, en présence de telles conditions, l’adaptateursecteur ne peut plus être utilisé avant son réparation ou remplacement.
• Cet appareil n’est pas destiné aux enfants de moins de 8 ans.

3
DISPOSAL OF LITHIUM ION BATTERYLITHIUM ION BATTERYDISPOSE OF PROPERLYYou can return your unwanted lithium ion batteries to your nearest SonyService Center.
NoteIn some areas the disposal of lithium ion batteries in household or business trash may beprohibited.
For the Sony AIBO Customer Link call 1-800-427-2988 in the United States orcontact us via email at [email protected].! Do not handle damaged or leaking lithium ion battery.! Danger of explosion if the battery is incorrectly replaced. Replace only with the ERA-
301B1. Use of another battery may present a risk of fire or explosion. Discard usedbatteries according to the manufacturer’s instructions.
! The battery pack used in this device may present a fire or chemical burn hazard ifmistreated. Do not disassemble, heat above 140°F (60°C) or incinerate. Dispose ofused battery promptly. Keep away from children. Do not disassemble and do notdispose of in fire.
RECYCLING LITIUM-ION RECHARGEABLE BATTERIESLitium-ion rechargeable batteries are recyclable.You can help preserve our environment by returning your usedrechargeable batteries to the collection and recycling location nearest you.
For more information regarding recycling of rechargeable batteries, call toll free1-800-822-8837, or visit http://www.rbrc.org/
Caution: Do not handle damaged or leaking litium-ion batteries.3
En

4
Regulatory InformationThis equipment has been tested and found to comply with the limits for a ClassB digital device, pursuant to Part 15 of the FCC Rules. These limits aredesigned to provide reasonable protection against harmful interference in aresidential installation. This equipment generates, uses, and can radiate radiofrequency energy and, if not installed and used in accordance with theinstructions, may cause harmful interference to radio communications.However, there is no guarantee that interference will not occur in a particularinstallation. If this equipment does cause harmful interference to radio ortelevision reception, which can be determined by turning the equipment offand on, the user is encouraged to try to correct the interference by one or moreof the following measures:• Reorient or relocate the receiving antenna.• Increase the separation between the equipment and receiver.• Connect the equipment into an outlet on a circuit different from that to
which the receiver is connected.• Consult the dealer or an experienced radio/TV technician for help.You are cautioned that any changes or modifications not expressly approved inthis manual could void your authority to operate this equipment.The shielded interface cable recommended in this manual must be used withthis equipment in order to comply with the limits for a digital device pursuantto Subpart B of Part 15 of FCC Rules.

5
For Customers in Europe andAustraliaSafety Information
WARNING• To prevent fire or shock hazard, do not expose the robot to rain or moisture.• To avoid electrical shock, do not open the enclosure. Refer servicing to
qualified personnel only. (Contact the AIBO Customer Link.) (page 8)• Periodically examine the AC adapter for conditions that may result in the
risk of fire, electric shock, or injury to persons (such as damage to the cords,blades, housing) and in the event of such conditions, the AC adapter shouldnot be used until properly replaced.
• The robot is not intended or recommended for children under 8 years old.• The robot must be used only with the recommended AC adapter (ERA-
201P1).• The AC adapter is not a toy.• Small parts can be swallowed.• If the external flexible cable or cord is damaged, it must be replaced or
repaired only by the manufacturer, an authorised service agent or a similarqualified person in order to avoid a hazard.
• All material for fastening or packing purposes are not part of the robot andshould be disregarded for children’s safety.
• For information regarding AC adapter, station, and lithium ion battery pack,please refer to the manuals provided separately.

6
DISPOSAL OF LITHIUM ION BATTERY! Do not handle damaged or leaking lithium ion batteries.! Danger of explosion if the battery is incorrectly replaced. Replace only with
the ERA-301B1. Discard used batteries according to the manufacturer’sinstructions.
! The battery pack used in this device may present a fire or chemical burnhazard if mistreated. Do not disassemble, heat above 60 °C(140 °F ) or incinerate. Dispose of used battery promptly. Keep away fromchildren. Do not disassemble and do not dispose of in fire.
Voor de Klanten in Nederland (For customers in theNetherlands)Gooi de batterij niet weg, maar lever hem in als KCA.
Regulatory InformationThis product has been tested and found to conform to the following SafetyStandards.
Toy Directive 88/378/EEC, EN50088/96 + A1/96 + A2/97, EN71-1/98, DINEN 71-2/01.94, DIN EN 71-3/03.95
EMC Directive 89/336/EECEMI EN55022/98, EN55014/93 + A1/97+A2/99, EN50081-1/92EMS : EN55024/98, EN55014-2/97, EN61000-3-2/95, EN61000-3-3/95,EN50082-1/97

7
AC Adapter and Lithium Ion Batteries have been tested all together as asystem and found to conform to the following Safety Standards.
LVD 73/23/EEC + 93/68/EECEN60950/92 + A1/93 + A2/93 + A3/95 + A4/97 + A11/97EN60065/98EN61558-1/97 + A1/98EN61558-2-7/97
CE (EMC) Marking Conformity Remarks
a) This equipment complies with EN55022. Class B digital for use in following areas : residential, business, and light-industrial.b) This product conforms with the following European Directive: 89/336/EEC (EMC directive)
Sony Corporation6-7-35 Kitashinagawa, Shinagawa-ku, Tokyo 141-0001 JAPANPlease keep all information for future reference.

8
Customer SupportHow can you contact the AIBO Customer Link?In the U.S.A. and Canada:
Call 1-800-427-2988 (U.S.A.)Email address: [email protected]
In Europe:English line: +44(0)-20-7365-2937German line: +49(0)-69-9508-6309French line: +33(0)-1-5569-5117Email address: [email protected]
In Australia:+1300-36-2426 (toll free within Australia)Email address: [email protected]
In Hong Kong:+852-2345-2966Email address: [email protected]
In Singapore:+65-473-8500E-mail address: [email protected]
2001 Sony Corporation. Reproduction in whole or in part withoutwritten permission is prohibited. All rights reserved.

9

10

11

12

13

14
Table of Contents
Introduction
What is AIBO? ............................................................................... 18
ERS-311/312 .................................................................................. 19
Checking the supplied accessories ................................................. 21
Index to parts and controls .............................................................22AIBO exterior .......................................................................... 22
AIBO’s inner unit .................................................................... 24
Stand ........................................................................................ 26
Charging the battery pack
Inserting the battery pack ............................................................... 28
Charging the battery pack ..............................................................30
Playing with AIBO
Inserting or removing a “Memory Stick” ....................................... 36Inserting a “Memory Stick” ..................................................... 36
Removing the “Memory Stick” ............................................... 38
Starting up AIBO ...........................................................................39

15
When not playing with AIBO ........................................................ 41Pausing AIBO .......................................................................... 41
Setting the volume level of the musical tone ................................. 42
Replacing the battery pack .............................................................44
Additional information
Notes on use ................................................................................... 48On handling AIBO ................................................................... 48
Moisture condensation ............................................................. 49
On handling the AC adapter .................................................... 50
On handling the battery pack ................................................... 50
On cleaning .............................................................................. 50
Troubleshooting .............................................................................51Clinic mode ............................................................................. 51
Changing AIBO to clinic mode ............................................... 51
Check list for clinic mode ........................................................ 52
Symptoms and remedies .......................................................... 55
Limited warranty (for the U.S.A. only) .......................................... 59
Service procedure (for the U.S.A. only) ........................................ 62
Specifications ................................................................................. 63
Index ............................................................................................... 66

16

17
Intro
du
ction
Introduction
This chapter introduces you to the Entertainment Robot AIBOERS-311/312.

18
What is AIBO?“AIBO” is the name given to the Sony entertainment robot.Developed to encourage human and robot interaction,AIBO creates and introduces you to new pleasures andlifestyles.
The name “AIBO” is coined from the words “A.I.(Artificial Intelligence),” “eye” and “robot.” In Japanese,the word “aibou” means “partner” or “pal.”
For the newest information on AIBO, go to the following homepage:http://www.aibo.com/

19
Intro
du
ction
ERS-311/312To comfortably coexist with people, AIBO ERS-311/312 was designed withfour legs, a head, and a tail, and a total of fifteen internal motors that enable itto walk, sit, or lie down in a natural way. It can also use its horn light toexpress emotions.
“OPEN-R” is the standard interface for the entertainment robotsystem that Sony is actively promoting. This interface expandsthe capability of the entertainment robot through a flexiblecombination of hardware and interchangeable software to suitvarious applications. AIBO ERS-311/312 conforms to theOPEN-R version 1.1.1.
“AIBO,” the AIBO logo , “OPEN-R,” and the OPEN-R logo areregistered trademarks of Sony Corporation. “Memory Stick,”“ ,” and “ ” are trademarks of Sony Corporation. In thismanual, the “ ” mark has been omitted.

20
AIBO-ware “Memory Sticks”To play with AIBO ERS-311/312, you must provide it with optional AIBO-ware “Memory Stick,” a variety of which are available, depending on how youwant to enjoy your AIBO. Without AIBO-ware, AIBO is just like a bodywithout a mind. AIBO-ware loaded from a “Memory Stick” works as AIBO’smind and determines its character and functions.• An AIBO-ware “Memory Stick” is a “Memory Stick” created just for AIBO,
containing application software for operating AIBO.• Before purchasing an AIBO-ware “Memory Stick,” make sure the AIBO-
ware is compatible with your AIBO model.
AIBO
AIBO-ware “Memory Stick”(not supplied)You can select different AIBO-ware,depending on the way you want toenjoy AIBO. For example, there isAIBO-ware for raising AIBO or forgiving it a different character.
Note
If you start up AIBO without inserting an AIBO-ware “Memory Stick,” AIBO entersclinic mode in which its sensors and other parts are checked (page 51).

21
Intro
du
ction
Checking the supplied accessoriesCheck to make sure you have the following items before you play with AIBO.
xAC adapter ERA-201P1 (1)
xAC adapter conversionplug* (1)
xLithium ion battery packERA-301B1 (1)
xStand (1)
xPink ball (1)
xDocumentation• AIBO Operating Instructions• Congratulations on becoming a new
AIBO owner
* Keep cards with magnetic data strips or magnetic recording media awayfrom the AC adapter conversion plug. The data on such magnetic media maybe erased by the magnet within the conversion plug.

22
Index to parts and controlsAIBO exterior
Notes
• Do not attach stickers on AIBO’s color camera (6) or distance sensor (5).• Do not attach stickers onto or insert anything into AIBO’s joints or other movable
parts.• When lifting AIBO, firmly grasp it by its back (page 39). Never lift it by its head,
ears, collar, legs, or tail.• The gray area between AIBO’s chin and collar is not a switch. Do not insert your
fingers into this area as they may get caught and cause damage to AIBO.

23
Intro
du
ction
1 Mode indicator (located behindthe horn)Shows AIBO’s operation mode.
2 Horn lightLights up in various colors to indicateAIBO’s emotional state.
3 HeadA switch within AIBO’s head detectsmovement whenever you gently pushAIBO’s head upward or downward.
4 Stereo microphoneAllows AIBO to pick up surroundingsounds.
5 Distance sensorAIBO uses this sensor to measure thedistance between it and an object.
6 Color cameraAllows AIBO to recognize theobjects by color, shape, andmovement.
7 SpeakerEmits various musical tones andsound effects.
8 Paw switchesLocated on the bottom of each paw.
9 Back light• Lights up green when AIBO is in
active mode.• Flashes green when AIBO is
preparing for pause mode.• Lights up orange when the internal
battery pack is being charged.• Flashes orange when an error has
occurred during charging.• Turns off when AIBO is in pause
mode or the battery pack iscompletely charged.
q; Pause buttonPress to activate AIBO or to pauseAIBO.
qa Tail switchUsed for giving AIBO commands.This switch can be pushed in fourdirections. The commands giventhrough the tail vary with the AIBO-ware used.
Movable in four directions
Front Right
Back
Left

24
AIBO’s inner unitThe illustration shows AIBO with its cover removed.
Note
Do not touch the charging terminal with your hand. Doing so may soil the terminal andcause poor contact.
Shutter for charging terminal
*
Serial numbersticker (insidethe battery packcompartment)

25
Intro
du
ction
1 Charging terminalConnect the supplied AC adapter herewith the supplied AC adapterconversion plug. When AIBO isplaced on the supplied stand with anoptional Energy Station Coreinstalled, this terminal directlytouches AIBO’s internal battery packto charge it.
2 VOLUME switchUsed to adjust the volume of thespeaker in four levels including mute.
3 “Memory Stick” accessindicatorLights up while AIBO is accessingthe “Memory Stick.” During thistime, the Z button and the BATT Zlatch are deactivated. When thisindicator is lit, do not attempt toremove the “Memory Stick.”
4 RESERVED switchThis switch is reserved for functionsto be added in the future.
5 BATT Z latchFlip this latch towards AIBO’s tail toremove the battery pack.
6 “Memory Stick” insertion slotInsert the AIBO-ware “MemoryStick” (not supplied) into this slot.
7 Battery pack insertion slotInsert the supplied or an optionallithium ion battery pack into this slot.
8 Z buttonPress this button to remove the“Memory Stick.”
* Emergency release holeWhen the “Memory Stick” or batterypack cannot be removed because of amechanical problem, etc., insert apointed object into this hole andpush. Do not use anything thatbreaks easily such as a toothpick.Do not use this hole under normalcircumstances.

26
Stand
1 StandPlace AIBO on the stand while it is inpause mode or while it is charging.
2 Decoration plateRemove this plate when the optionalEnergy Station Core is attached to thestand.
Note
The supplied stand is for use with AIBO ERS-311/312 only.

27
Ch
argin
g th
e battery p
ack
Charging the battery pack
This chapter explains how to charge AIBO’s battery pack.

28
Inserting the battery packThe battery pack supplied with AIBO comes partially charged. It isrecommended that you charge the battery pack fully before you play withAIBO. To charge the battery pack, first insert it as described below.
1 Grasp AIBO securely by the body, turn it upside down, andremove its cover by pushing the mark towards AIBO’s tail.
Notes
• Lift AIBO by the body, not by its extremities. Do not hold AIBO by its collar.Your finger may get caught between the collar and AIBO’s head or body.
• AIBO’s surface is very smooth. Be careful not to drop AIBO while lifting it.• Do not touch the charging terminal with your hand. Doing so may soil the
terminal and cause poor contact.• Use only the supplied battery pack type ERA-301B1.

29
Ch
argin
g th
e battery p
ack2 Insert the supplied battery pack in the direction of the arrow until
it clicks into place, and then replace the cover.
For details on how to remove the battery pack, see page 44.
Push here.

30
Charging the battery packYou can use the supplied AC adapter and the conversion plug to charge thebattery pack while it is inserted into AIBO. It is recommended that you chargethe battery pack at room temperature (10° to 30°C (50° to 86°F)). At roomtemperature, it takes about 2 hours to fully charge the battery pack.
1 Connect the AC adapter to the AC adapter conversion plugsecurely.
AC adapterconversion plug
AC adapter

31
Ch
argin
g th
e battery p
ack2 Open the charging terminal shutter on the cover (1) and connect
the conversion plug to the charging terminal (2).The conversion plug attaches by magnet.
Note
Do not remove the cover when attaching the conversion plug. Removing the covermay prevent the conversion plug from connecting properly to the terminal.
3 With the conversion plug attached, place AIBO on the stand asshown below.Be sure to draw the AC adapter cord through thegroove and out from the back of the stand.

32
4 Connect the AC adapter to a wall outlet.When AIBO is connected to the AC adapter, it will not enter active mode evenwhen you press the pause button.
While chargingThe back light lights up orange.
When charging has finishedThe back light turns off.
Back light

33
Ch
argin
g th
e battery p
ackNotes
• If the back light flashes orange while you are charging the battery pack, check thatthe battery pack is inserted correctly. If the flashing of the back light persists, contactAIBO Customer Link (page 8).
• If you connect the AC adapter to AIBO while it is in active mode, AIBO will changeto pause mode automatically and charging of the battery pack starts.
• When you remove the AC adapter conversion plug from AIBO, be sure to grasp theplug as you pull it out.
• After removing the conversion plug, be sure to close the charging terminal shutter.
xUsing the Energy Station Core ERA-301P2 (not supplied)When the optional Energy Station Core isattached to the stand, you can charge AIBO’sinternal battery pack merely by placing AIBOon the stand.
Energy Station Core

34

35
Playing w
ith AIB
OPlaying with AIBO
This chapter explains procedures that are necessary for playingwith AIBO, such as inserting the AIBO-ware “Memory Stick,”adjusting the volume of the musical tones, and replacing thebattery pack. Note that optional AIBO-ware is required in orderto play with AIBO.
36
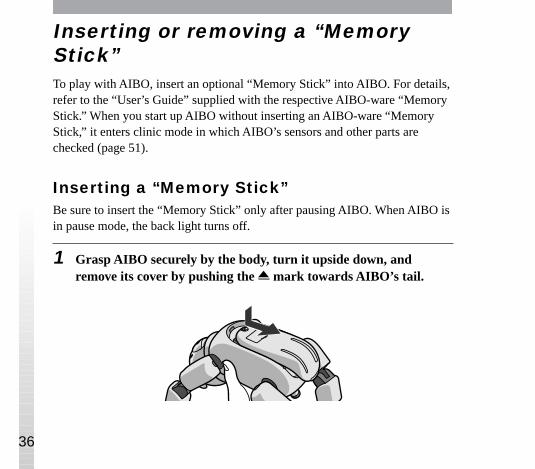
Inserting or removing a “MemoryStick”To play with AIBO, insert an optional “Memory Stick” into AIBO. For details,refer to the “User’s Guide” supplied with the respective AIBO-ware “MemoryStick.” When you start up AIBO without inserting an AIBO-ware “MemoryStick,” it enters clinic mode in which AIBO’s sensors and other parts arechecked (page 51).
Inserting a “Memory Stick”Be sure to insert the “Memory Stick” only after pausing AIBO. When AIBO isin pause mode, the back light turns off.
1 Grasp AIBO securely by the body, turn it upside down, andremove its cover by pushing the mark towards AIBO’s tail.

37
Playing w
ith AIB
ONotes
• Lift AIBO by the body, not by its extremities. Do not hold AIBO by its collar.Your finger may get caught between the collar and AIBO’s head or body.
• AIBO’s surface is very smooth. Be careful not to drop AIBO while lifting it.• Do not touch the charging terminal with your hand. Doing so may soil the
terminal and cause poor contact.
2 Insert the “Memory Stick,” and replace the cover.With the ▼ mark pointed downward and the rounded corner facing the tail,insert the “Memory Stick” into the “Memory Stick” insertion slot until itclicks into place.
Rounded corner

38
Removing the “Memory Stick”Before removing the “Memory Stick” from AIBO, press the pause button onAIBO’s back to make AIBO pause, and then remove the cover to confirm thatthe “Memory Stick” access indicator is turned off.Press the Z button on AIBO’s inner unit, and then remove the “MemoryStick.”
Note
The “Memory Stick” cannot be removed while the “Memory Stick” access indicatorlights up red. Do not try to remove the “Memory Stick” by force during this time.
“Memory Stick” access indicator

39
Playing w
ith AIB
OStarting up AIBO
1 Place AIBO on the floor as shown below.Place it on a flat, non-slippery surface, such as a carpet with a short nap.
Notes
• If you place AIBO on a slippery floor or a carpet with a long nap, it may tend tofall often, fail to go forward, or have a tendency to jam up.
• Be sure to place AIBO on the floor as shown above. This will prevent AIBOfrom moving unexpectedly and being damaged when you press and release thepause button to start AIBO.

40
2 Push and release the pause button on AIBO’s back.AIBO’s pause mode is canceled and the back light lights up green. Wait for awhile until AIBO starts to move under the control of the inserted AIBO-ware“Memory Stick.”
Note
If an abnormality occurs or if you catch your finger in one of AIBO’s joints, pressthe pause button on AIBO’s back.
For details on playing with AIBO from this point onRefer to the “User’s Guide” supplied with the AIBO-ware.
41
Playing w
ith AIB
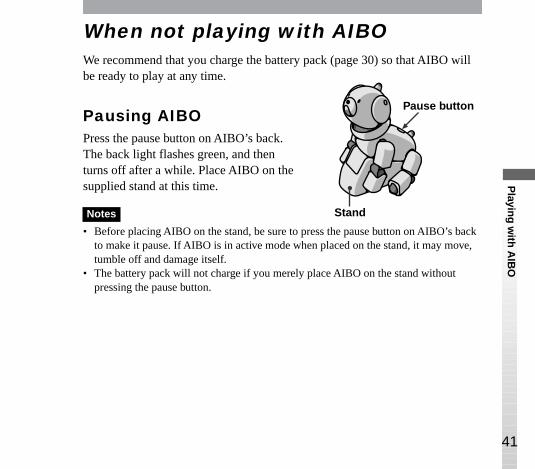
OWhen not playing with AIBOWe recommend that you charge the battery pack (page 30) so that AIBO willbe ready to play at any time.
Pausing AIBOPress the pause button on AIBO’s back.The back light flashes green, and thenturns off after a while. Place AIBO on thesupplied stand at this time.
Notes
• Before placing AIBO on the stand, be sure to press the pause button on AIBO’s backto make it pause. If AIBO is in active mode when placed on the stand, it may move,tumble off and damage itself.
• The battery pack will not charge if you merely place AIBO on the stand withoutpressing the pause button.
Pause button
Stand

42
Setting the volume level of themusical toneBefore setting the volume level, be sure to press the pause button on the backto make AIBO pause.
1 Grasp AIBO’s body securely, turn it upside down, and remove itscover by pushing the mark towards AIBO’s tail.
Notes
• Lift AIBO by the body, not by its extremities. Do not hold AIBO by it collar.Your finger may get caught between the collar and AIBO’s head or body.
• AIBO’s surface is very smooth. Be careful not to drop AIBO while lifting it.• Do not touch the charging terminal with your hand. Doing so may soil the
terminal and cause poor contact.

43
Playing w
ith AIB
O2 Slide the VOLUME switch to adjust the volume level, then replace
the cover.To increase the volume level, slide the switch towards the + position; todecrease the volume level, slide it towards the – position. When you releasethe switch, it returns to the center position.There are four volume levels, including mute. Each time you slide the switchthe level increases or decreases by one level.

44
Replacing the battery packIt is possible to use the supplied AC adapter and the conversion plug to chargethe battery pack while it is still inserted into AIBO. You can also change thebattery pack in AIBO with another pack that has been charged.
Note
Use only the supplied battery pack type ERA-301B1.
1 Press the pause button and wait until the back light turns off.
Note
While AIBO is accessing the “Memory Stick,” the “Memory Stick” accessindicator lights up red. During this time, the BATT Z latch and Z button aredeactivated and the battery pack and “Memory Stick” cannot be removed until thedata-saving procedure has been completed. Do not try to remove the “MemoryStick” by force during this time.
Back light

45
Playing w
ith AIB
O2 Grasp AIBO securely by the body, turn it upside down, and
remove its cover by pushing the mark towards AIBO’s tail.
Notes
• Lift AIBO by the body, and not by its extremities. Do not hold AIBO by itscollar. Your finger may get caught between the collar and AIBO’s head or body.
• AIBO’s surface is very smooth. Be careful not to drop AIBO while lifting it.• Do not touch the charging terminal with your hand. Doing so may soil the
terminal and cause poor contact.
3 Flip the BATT Z latch towards AIBO’s tail to remove the batterypack.
BATT Z latch

46
Notes
• When removing the battery pack, be sure to hold it securely so that it does notfall.
• When the “Memory Stick” access indicator lights up, the battery pack is locked.Removing it forcibly at this time may damage AIBO.
4 Insert the charged battery pack in the direction of the arrow untilthe pack clicks into place, then replace the cover.
5 Place AIBO on the floor as shown below.
Note
Be sure to place AIBO on the floor as shown to theright. This will prevent AIBO from movingunexpectedly and being damaged when you press andrelease the pause button to start AIBO.
Push here.

47
Ad
ditio
nal in
form
ation
Additional information
This chapter provides notes on usage, a troubleshooting guide,and other information concerning AIBO.

48
Notes on useTo prevent AIBO and its accessories from being damaged, observe thefollowing precautions.
On handling AIBO• Do not use AIBO in places subject to vibrations, on an incline, or at a place
where it might fall.• Do not press down hard on AIBO with your hand or elbow.• Do not drop or shake AIBO as this may damage AIBO or cause data saved
to the “Memory Stick” to be lost.• Do not touch the charging terminal directly with your hand. Doing so may
soil the terminal and cause poor contact.• Lift AIBO by the body, and not by its extremities, such as the head, ears,
collar, tail or legs. Do not swing or twist AIBO.• Do not leave AIBO in very hot places, such as a car parked in the sun, as this
may deform or damage it.• Do not allow foreign things, such as paper clips, to get into AIBO or its
joints.• Do not use AIBO outdoors. If you do, moisture or other foreign matter may
enter AIBO and cause damage.• Do not use AIBO on concrete or other hard surface as this may damage
AIBO.• Do not allow AIBO to get wet.• Do not use force to interfere with any of AIBO’s movements.

49
Ad
ditio
nal in
form
ation
• Do not touch the lens of the color camera or distance sensor directly withyour hand.
• Do not apply stickers to the color camera or the distance sensor.• Do not point the color camera at the sun, whether AIBO is turned on or off,
as this may damage the camera.• Do not oil AIBO’s joints or other movable parts.• Do not apply stickers to AIBO’s movable parts or insert anything between
them as this may interfere with AIBO’s movement.• Do not disassemble or modify AIBO.• When transporting AIBO, put it in a cushioned box like the one it came in to
protect its body, head, tail and legs from damage.• Do not use AIBO in a place subject to strong electromagnetic waves or X-
rays.• Do not place a card with a magnetic strip or a magnetic recording medium
close to the AC adapter conversion plug. The magnet inside the conversionplug may erase the data recorded on the magnetic medium.
• The AIBO-ware applications designed for ERS-110/111 cannot be used withERS-311/312.
• ERS-311/312 may not operate with some AIBO-ware applications designedfor ERS-210. And even if operable, there may be limits on some of thefunctions.
Moisture condensationIf AIBO is brought directly from a cold place to a warm place, moisture maycondense on AIBO’s inside or outside surface, causing damage. If moisturecondensation has occurred, wait for about one hour before operating AIBO.

50
On handling the AC adapter• Be sure to use only the supplied AC adapter to charge AIBO’s battery pack.
Using any other adapter may cause damage to AIBO.• Do not connect the AC adapter to electronic transformers designed for use
by travelers, as this may cause AIBO to heat up or become damaged.
On handling the battery pack• Do not expose the battery pack to temperatures above 45 °C (113 °F), such
as in a car parked in the sun.• Be careful not to let foreign matter like dust or sand get into the terminals.• If you are not going to play with AIBO for a long period, remove the battery
pack from AIBO and store it in a dry, cool place.• The battery pack is constantly discharging even when it is not in use. Charge
the battery pack right before using AIBO.• Do not drop the battery pack or place heavy object on it. Do not apply
strong pressure or physical shock to the battery pack.
On cleaning• Clean AIBO with a clean, dry, soft cloth.• Do not use volatile solvents that may damage AIBO’s surface finish.• When cleaning with chemical fabric, see its instructions.

51
Ad
ditio
nal in
form
ation
TroubleshootingBefore contacting the AIBO Customer Link regarding a problem, werecommend that you use clinic mode to check AIBO’s balance and sensors,and refer to “Symptoms and remedies” (page 55).
Clinic modeIf you start up AIBO without inserting an AIBO-ware “Memory Stick,” AIBOenters clinic mode in which its sensors and other parts are checked. The modeindicator turns off at this time. If afterwards the problem persists, contact theAIBO Customer Link (page 8).
Changing AIBO to clinic mode
1 Remove the AIBO-ware “Memory Stick” from AIBO (page 36).
2 Place AIBO on the floor as shown below, and then press the pausebutton on its back (page 40).AIBO enters clinic mode and repeats the followingsequence of actions: stands up, sits down, liesdown.

52
Check list for clinic mode
Item Procedure
Head switch(inside the head)
Horn lightMode indicator
Back lightPausebutton
Tail switch
Operation of the tailswitch and AIBO’soverall balance
1 Push the tail switch to AIBO’s right for threeseconds.AIBO does the following sequence of actions: walksforward, walks backward, kicks with its right hindleg, kicks with its left hind leg. AIBO’s horn lightlights up in three colors during this time. AIBO thenresumes the repetition of the original sequence ofactions: stands up, sits down, lies down.
2 Push the tail switch to AIBO’s left for threeseconds.AIBO does the following sequence of actions: sits,waves with its right front paw, waves with its leftfront paw, raises both front paws. AIBO’s horn lightlights up in three colors during this time.
Front Right
Back
Left

53
Ad
ditio
nal in
form
ation
Item Procedure
Sensitivity of thepaw switches
1 Rotate the tail switch once.AIBO lies down with all legs sprawled out.
2 Touch a paw switch.AIBO pulls in the touched paw.
3 Rotate the tail switch again.AIBO resumes the repetition of the originalsequence of actions again: stands up, sits down, liesdown.
You canrotate ineitherdirection
Sensitivity ofAIBO’s head switch
1 Push the head gently to make AIBO look down.The horn light lights up green.
2 Push the head gently to make AIBO look up.The horn light lights up orange.
Sensitivity of thecolor camera
1 Move the supplied pink ball close to the colorcamera (AIBO’s mouth).When the camera detects the ball, the horn lightlights up blue.If the ball is too close or too far, the camera may notbe able to detect it. Adjust the distance between theball and the camera.

54
Item Procedure
Sensitivity of thedistance sensor
1 Rotate the tail switch once.AIBO lies down with all legs sprawled out.
2 Place your hand or other object over the distancesensor (AIBO’s nose).When the distance sensor detects the object, a beepis emitted. (When the volume level of the musicaltone is set to mute, no beep is emitted.) The pitch ofthe beep changes depending on the distancebetween the object and the sensor. If the object istoo close or too far, the sensor may not be able todetect it. Adjust the distance between the object andthe sensor.
3 Rotate the tail switch again.AIBO resumes the repetition of the originalsequence of actions: stands up, sits down, liesdown.
Pick-up mode 1 Pick AIBO up from the floor.AIBO stops moving, its legs become loose and themode indicator turns on. If you pick it up tooslowly, the legs may not become loose. In this case,keep holding AIBO and push the tail switch awayfrom AIBO’s head for three seconds.
2 Place AIBO on the floor or push up the tailswitch towards AIBO’s head for three seconds.AIBO resumes the repetition of the originalsequence of actions: stands up, sits down, liesdown.
You canrotate ineitherdirection

55
Ad
ditio
nal in
form
ation
Symptoms and remediesIf you experience any of the following difficulties, use this table to help youremedy the problem. Should any problem persist, contact the AIBO CustomerLink (page 8).
Symptom Cause/Remedy
AIBO does not move. AIBO has been picked up from the floor or anobject is caught in one of AIBO’s joints.c Place AIBO on the floor and push the tail
switch towards AIBO’s head for threeseconds. AIBO stops moving whenever it ispicked up from the floor (the mode indicatorlights up) or an object is caught in one ofAIBO’s joint (the mode indicator flashes).
The battery pack is drained.c Charge the battery pack (page 30). When the
battery pack is completely drained, the backlight turns off and AIBO stops moving.
AIBO’s ear came off. c Align the center of AIBO’s microphone withthe center of the ear hole, and then insert thetabs on the back of AIBO’s ear into thegrooves on both sides of the microphone untilthe ear snaps into place.
Grooves

56
Symptom Cause/Remedy
AIBO does not react torelease of the pausebutton.
The battery pack is not inserted.c Insert the battery pack (page 28). Restart
AIBO by pressing the pause button again.The battery pack is drained.c Charge the battery pack or replace with the
charged one.The AC adapter is connected to the chargingterminal of AIBO.c Disconnect the AC adapter and press the
pause button again.
When you press the pausebutton, the back lightflashes in orange andgreen alternately, and thebeep sound is emitted.
Heat may have built up in the battery pack.c Wait for a while until the battery pack
becomes cool.
AIBO continues to emit asad melody and does notmove when the pausebutton is released.
• The insertion of a “Memory Stick” without anyAIBO-ware.
• The insertion of a “Memory Stick” that is notintended for AIBO ERS-311/312.
It takes a long time forAIBO to start moving.
AIBO is loading the data from the “MemoryStick.” Wait for a while.

57
Ad
ditio
nal in
form
ation
Symptom Cause/Remedy
AIBO tries to walk but itdoes not go forward.
The floor may be slippery or the nap of thecarpet is long.c Place AIBO on a surface that is not too
slippery, such as a carpet with a short nap.
AIBO falls often. The floor may be too slippery, inclined orunstable.c Place AIBO on a flat surface that is not too
slippery.
After picking AIBO up, itstops moving.
AIBO stops moving whenever it is picked upfrom the floor.c Check that the mode indicator is on, place
AIBO on the floor, and then push up the tailswitch towards the head for three seconds.
The mode indicator is onor flashing and AIBOemits musical tones, but itdoes not walk.
AIBO stops moving whenever it is picked upfrom the floor or an object is caught in one ofAIBO’s joints.c Place AIBO on the floor, and then push up the
tail switch towards the head for threeseconds.
The back light flashes inorange.
There may be a problem with the battery pack.c Check that the battery pack is inserted
correctly. If the flashing of the back lightpersists, contact AIBO Customer Link (page8).

58
Symptom Cause/Remedy
AIBO does not chase thesupplied ball.
When no AIBO-ware “Memory Stick” isinserted, AIBO responds to the ball, but does notchase it.
The back light does notturn off when you pressthe pause button to makeAIBO pause.
The internal application may not be terminatednormally.c Remove the battery pack (page 44). Re-insert
the battery pack and press the pause buttonagain (page 41). If the BATT Z latch isinoperable, use the emergency release hole(page 25).
AIBO soon asks forcharging even with afully charged batterypack.
When the battery pack’s operating time hasbecome noticeably short, it may have reached itsend of life. Replace it with a new battery pack(page 44).
No musical tone isemitted from AIBO.
AIBO’s musical tone is muted.c Adjust the volume level (page 42).

59
Ad
ditio
nal in
form
ation
Limited warranty (for the U.S.A. only)
SONY ELECTRONICS INC. (“SONY”) warrants this Product and its accessoriesagainst defects in material or workmanship as follows:
1. PRODUCTS: For a period of one (1) year from the date of purchase, SONY will, atits option, either repair or replace the defective parts and/or the Product (i.e., AIBO)with new or rebuilt replacements. After this one (1) year period, you must pay all partsand labor charges.
2. ACCESSORIES: For a period of thirty (30) days from the date of purchase, SONYwill, at its option, either repair or replace defective parts and/or accessories (i.e., ACadapter and battery pack) with new or rebuilt replacements. After this thirty (30) dayperiod, you must pay all parts and labor charges.
3. REPAIRS: For a period equal to the longer of (a) the remainder of the originallimited warranty period on the original Product or accessory, or (b) for 90 days after thedate of repair/replacement of Products or for 30 days after the date of repair/replacement of accessories, SONY will repair or replace defective parts, accessoriesand/or Products used in the repair or replacement of Products or accessories under thisLimited Warranty with new or rebuilt replacements.
To obtain warranty service, you must first obtain an event number from AIBO CustomerLink (page 8). You will need to return the Product and all accessories to SONY in theoriginal carton, using the original packaging materials. All supplied accessories mustbe returned with the Product. SONY is not responsible for any damage during shipmentarising from the failure to properly pack the Product or accessory being returned toSONY or from any damage caused by or resulting from the carrier’s handling. Forinformation on returning your Product or accessories for warranty repair, please contactthe AIBO Customer Link.This warranty does not cover customer instruction, installation or set up adjustments.

60
This warranty does not cover the cost of removal or reinstallation, cosmetic damage ordamage due to acts of God, accident, misuse, abuse, negligence of, or to any part of theProduct. This warranty does not cover lost profits, lost sales, loss of use of the Product,or other consequential loss or damage due to improper operation or maintenance,installation, connection to improper voltage supply, or attempted repair by anyone otherthan a facility authorized by SONY to service the Product. This warranty does notcover Products sold AS IS or WITH ALL FAULTS, or consumables (such as fuses).This warranty does not apply when the malfunction results from use of the Product inconjunction with accessories, products or ancillary or peripheral equipment notmanufactured by SONY, and where it is determined by SONY that there is no fault withthe Product itself.
SONY will pay shipping charges for all in-warranty service. However, if no trouble isfound with the Product or accessory, if the trouble is from a non-covered charge or if itis determined that the warranty period has expired, you will be billed for the cost ofshipping and handling.
This warranty is valid only in the United States.
Proof of purchase in the form of a bill of sale or receipted invoice which is evidence thatthe unit is within the Limited Warranty period must be presented to obtain warrantyservice.
This warranty is invalid if the factory applied serial number has been altered or removedfrom the Product.
61
Ad
ditio
nal in
form
ation
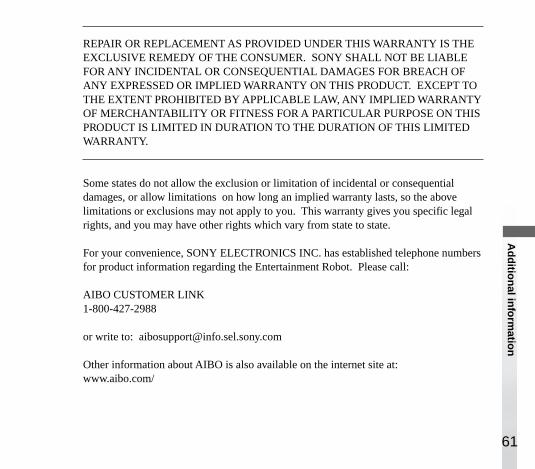
REPAIR OR REPLACEMENT AS PROVIDED UNDER THIS WARRANTY IS THEEXCLUSIVE REMEDY OF THE CONSUMER. SONY SHALL NOT BE LIABLEFOR ANY INCIDENTAL OR CONSEQUENTIAL DAMAGES FOR BREACH OFANY EXPRESSED OR IMPLIED WARRANTY ON THIS PRODUCT. EXCEPT TOTHE EXTENT PROHIBITED BY APPLICABLE LAW, ANY IMPLIED WARRANTYOF MERCHANTABILITY OR FITNESS FOR A PARTICULAR PURPOSE ON THISPRODUCT IS LIMITED IN DURATION TO THE DURATION OF THIS LIMITEDWARRANTY.
Some states do not allow the exclusion or limitation of incidental or consequentialdamages, or allow limitations on how long an implied warranty lasts, so the abovelimitations or exclusions may not apply to you. This warranty gives you specific legalrights, and you may have other rights which vary from state to state.
For your convenience, SONY ELECTRONICS INC. has established telephone numbersfor product information regarding the Entertainment Robot. Please call:
AIBO CUSTOMER LINK1-800-427-2988
or write to: [email protected]
Other information about AIBO is also available on the internet site at:www.aibo.com/

62
Service procedure (for the U.S.A. only)
1. Contact the AIBO Customer Link. The E-mail address [email protected] and its toll free number is1-800-427-2988.
2. If the AIBO Customer Link determines that your unit needs repair, followthe procedure described below.a. The AIBO Customer Link will give you the event number, which is valid for ten
days.b. Following the procedure described on the label attached to the box, put AIBO and
the designated accessories into the original box. If you did not keep the originalbox, the AIBO Customer Link will send a new box to you free of charge within thewarranty period. The actual shipping and material cost will be charged to you afterthe warranty period.
c. Mark your event number on the top of the box and send it to the designatedaddress. The AIBO Customer Link will designate the shipping method and pay theshipping charges within the warranty period; after the warranty period, you mustpre-pay the shipping charges.
d. As soon as the repair is completed, your AIBO will be sent back to you. After thewarranty period has expired, the actual shipping cost will be charged to youtogether with the repair cost.
3. Please understand that the AIBO Customer Link only accepts creditcards for all the charges of repair, shipping and material after thewarranty period has expired.
User registrationAll users are registered based on information from the purchaser.If a different person takes over this unit, please inform the “AIBO Customer Link”of the change.

63
Ad
ditio
nal in
form
ation
Specifications
AIBOCPU 64-bit RISC processor
Main memory
32MB
Supplied application media
“Memory Stick” for AIBO
Movable parts
Head: 3 degrees of freedom
Leg: 3 degrees of freedom ×4
(15 degrees of freedom intotal)
Inputs Charging terminal
Input switches
VOLUME switch
RESERVED switch
Video input 100,000-pixel CMOS imagesensor
Audio input Stereo microphones
Audio output Speaker
Internal sensors
Infrared distance sensor
Acceleration sensor
Switches in the head, on thetail, and on the paws
Inclination sensor
Vibration sensor
Power consumption
Approx. 5 W (in normalmode)
Operable duration
Approx. 2.5 hours (whenoperated with a fully-chargedERA-301B1, in normalmode)
Dimensions Approx. 177 × 280 × 240 mm(7 × 11 1/
8 × 9 1/
2 inches) (w/
h/d)
Mass Approx. 1.5 kg (3 lb 5 oz)(including the battery packand the “Memory Stick”)
Operating temperature
5° C to 35° C (41° F to 95° F)
Operating humidity
10 % to 80 % (notcondensed)
Operating wet-bulb temperature
Less than 29° C (84° F )

64
Storage temperature
–10° C to 60° C (–4° F to140° F)
Storage humidity
10 % to 90 % (notcondensed)
Storage wet-bulb temperature
Less than 29° C (84° F )
StandDimensions Approx. 109 × 97 × 228 mm
(4 3/8 × 3 7/
8 × 9 inches) (w/h/
d)
Mass Approx. 180 g (6 oz)(including the battery packand the “Memory Stick”)
AC adapterInput 120 V AC, 50 - 60 Hz, 0.75 A
(U.S.A. and Canada)
100 - 240V AC, 50 - 60 Hz,0.85 - 0.46 A (othercountries)
Output 16 V DC, 2.5 A
Operating temperature
5˚C to 35˚C (41˚F to 95˚F)(temperature gradient lessthan 10˚C (50˚F)/hour)
Operating humidity
20% to 80% (not condensed),provided that humidity is lessthan 65% at 35˚C (95˚F)(wet-bulb temperature: lessthan 29˚C (84˚F))
Storage temperature
–20˚C to 60˚C (–4˚ F to 140˚F) (temperature gradient lessthan 10˚C (50˚F)/hour)
Storage humidity
10% to 90% (not condensed)
Dimensions Approx. 60 × 30 × 120 mm(w/h/d) (Approx. 2 3/
8 × 1 3/
16
× 4 3/4 inches)
Mass Approx. 325 g (11.5 oz.)
Cord length DC cord: Approx. 1.8 m (707/
8 inches)
AC power cord: 1.8 m (70 7/8
inches)

65
Ad
ditio
nal in
form
ation
Lithium ion battery packBattery used Lithium ion type battery
Main output voltage
7.4 V DC
Capacity 1700 mAh
Operating temperature
5°C to 40°C (41°F to 104°F)(temperature gradient lessthan 10°C (50°F)/hour)
Operating humidity
10% to 80% (not condensed)
Operating wet-bulb temperature
Less than 29°C (84°F)
Storage temperature
–20°C to 60°C (–4°F to140°F) (temperature gradientless than 10°C (50°F)/hour)
Storage humidity
10% to 90% (not condensed)
Storage wet-bulb temperature
Less than 35°C (95°F)
Dimensions Approx. 72 × 53.6 × 21 mm(Approx. 2 7/
8 × 2 1/
8 × 27/
32
inches ) (w/h/d)
Mass Approx. 112 g (4 oz)
Design and specifications are subjectto change without notice.
Supplied accessoriesSee page 21.

66
Index
AAC adapter .................................. 21, 30AC adapter conversion plug ..... 21, 30AIBO
Cleaning ...................................... 50Handling ..................................... 48Pausing ........................................ 41Starting up .................................. 39
AIBO Customer Link ............. 8, 61, 62AIBO-ware ......................................... 20
BBack light ..................................... 23, 32BATT Z latch ............................... 25, 45Battery pack
Charging ..................................... 30Handling ..................................... 50Inserting ...................................... 28Insertion slot ............................... 25Replacing .................................... 44
CCharging terminal ...................... 25, 31Clinic mode........................................ 51Color camera ..................................... 23
DDecorative plate ................................ 26Distance sensor ................................. 23
EEmergency release hole ................... 25Energy Station Core .......................... 33
HHead ................................................... 23Head switch ....................................... 52Horn light .......................................... 23
M“Memory Stick”
Access indicator ................... 25, 38Inserting ...................................... 36Insertion slot ............................... 25Z button ................................ 25, 38Removing .................................... 38
Mode indicator .................................. 23
PPause button .......................... 23, 40, 41Pause mode ............................ 36, 40-42Paw switches ..................................... 23

67
Ad
ditio
nal in
form
ation
SShutter for charging terminal ... 24, 31Speaker ............................................... 23Stand ............................................. 21, 26Stereo microphone ............................ 23
TTail switch .......................................... 23
VVolume level ...................................... 42VOLUME switch ......................... 25, 43

Informations de sécuritéAVERTISSEMENT• Pour prévenir tout risque d’incendie ou d’électrocution, n’exposez pas ce
robot à la pluie ni à l’humidité.• Pour éviter tout risque d’électrocution, n’ouvrez pas le boîtier. Confiez
l’entretien de ce robot exclusivement à un personnel qualifié. (Consultez laliaison clients AIBO.) (page 5)
• Vérifiez périodiquement si l’adaptateur secteur ne présente pas desconditions susceptibles de provoquer un incendie, des décharges électriquesou des blessures aux personnes (câbles, lames ou boîtier endommagés) et, enprésence de telles conditions, l’adaptateur secteur ne peut plus être utiliséavant son remplacement.
• Ce robot n’est pas destiné ou n’est pas recommandé pour les enfants demoins de 8 ans.
• Le robot doit uniquement être utilisé avec l’adaptateur secteur recommandé(ERA-201P1).
• L’adaptateur secteur n’est pas un jouet.• Les petites pièces peuvent être avalées.• Si le câble flexible externe ou le cordon est endommagé, il doit être
remplacé ou réparé par le fabricant, un agent d’entretien habilité ou toutepersonne de qualification similaire, afin de prévenir tout danger.
• Tous les matériaux destinés à attacher et emballer AIBO ne font pas partiedu robot et ne doivent pas être laissés à la portée des enfants.
• Pour plus d’informations concernant l’adaptateur secteur, la station et labatterie ion lithium, veuillez vous référer aux manuels fournis séparément.
2
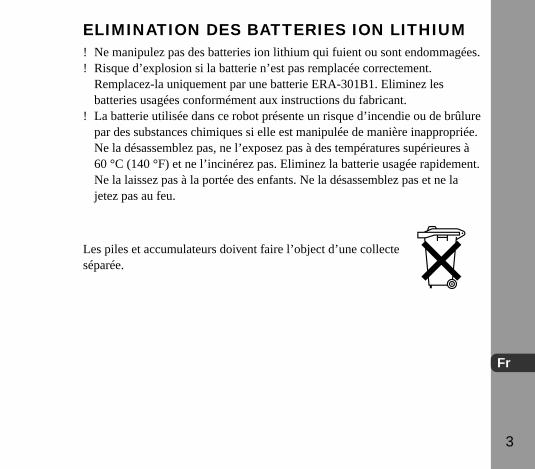
ELIMINATION DES BATTERIES ION LITHIUM! Ne manipulez pas des batteries ion lithium qui fuient ou sont endommagées.! Risque d’explosion si la batterie n’est pas remplacée correctement.
Remplacez-la uniquement par une batterie ERA-301B1. Eliminez lesbatteries usagées conformément aux instructions du fabricant.
! La batterie utilisée dans ce robot présente un risque d’incendie ou de brûlurepar des substances chimiques si elle est manipulée de manière inappropriée.Ne la désassemblez pas, ne l’exposez pas à des températures supérieures à60 °C (140 °F) et ne l’incinérez pas. Eliminez la batterie usagée rapidement.Ne la laissez pas à la portée des enfants. Ne la désassemblez pas et ne lajetez pas au feu.
3
Les piles et accumulateurs doivent faire l’object d’une collecteséparée.
Fr

4
Informations sur les réglementationsCe produit a été testé et jugé conforme aux normes de sécurité suivantes.
Directive sur les jouets 88/378/EEC, EN50088/96 + A1/96 + A2/97, EN71-1/98, DIN EN71-2/01.94, DIN EN71-3/03.95
Directive EMC 89/336/EECEMI EN55022/98, EN55014/93 + A1/97 + A2/99, EN50081-1/92EMS : EN55024/98, EN55014-2/97, EN61000-3-2/95, EN61000-3-3/95,EN50082-1/97
L’adaptateur secteur et la batterie ion lithium ont été testés ensemble en tantque système et se sont révélés conformes aux normes de sécurité suivantes:
LVD 73/23/EEC + 93/68/EECEN60950/92 + A1/93 + A2/93 + A3/95 + A4/97 + A11/97EN60065/98EN61558-1/97 + A1/98EN61558-2-7/97
Remarques concernant la conformité du marquage (EMC)
a) Cet appareil est conforme à EN55022 Classe B numérique pour une utilisation dansles zones suivantes : résidentielle, commerciale et industrielle légère.
b) Ce produit est conforme à la Directive européenne suivante : 89/336/EEC (Directive EMC)

5
Sony Corporation6-7-35 Kitashinagawa, Shinagawa-ku, Tokyo 141-0001 JAPANVeuillez conserver toutes ces informations pour référence.
Assistance clientèleComment contacter la liaison clients AIBO?Aux États-Unis et au Canada
+1-800-427-2988 (U.S.A.)Adresse E-mail: [email protected]
En EuropeContact français : +33(0)-1-5569-5117Contact anglais : +44(0)-20-7365-2937Contact allemand : +49(0)-69-9508-6309Adresse E-mail : [email protected]
En Australie+1300-36-2426 (appel gratuit en Australie)Adresse E-mail: [email protected]
A Hong Kong+852-2345-2966Adresse E-mail : [email protected]
A Singapour+65-473-8500Adresse E-mail : [email protected]
©2001 Sony Corporation. Toute reproduction totale ou partielle sansautorisation écrite préalable est interdite. Tous droits réservés.

6
Table des matières
Introduction
Présentation d’AIBO ...................................................................... 10
ERS-311/312 .................................................................................. 11
Vérification des accessoires fournis ............................................... 13
Index des composants et commandes ............................................ 14Apparence d’AIBO .................................................................. 14
Intérieur d’AIBO ..................................................................... 16
Support .................................................................................... 18
Charge de la batterie
Insertion de la batterie .................................................................... 20
Charge de la batterie ....................................................................... 22
Jouer avec AIBO
Insérer ou retirer un “Memory Stick” ............................................ 28Insérer un “Memory Stick” ..................................................... 28
Retirer le “Memory Stick” ....................................................... 30
Démarrage d’AIBO ........................................................................ 31

7
Lorsque vous ne jouez pas avec AIBO ........................................... 33Mettre AIBO en pause ............................................................. 33
Réglage du niveau sonore des tonalités musicales ......................... 34
Remplacement de la batterie .......................................................... 36
Informations complémentaires
Remarques sur l’utilisation ............................................................ 40Manipulation d’AIBO ............................................................. 40
Condensation d’humidité ......................................................... 41
Manipulation de l’adaptateur secteur ...................................... 42
Manipulation de la batterie ...................................................... 42
Nettoyage ................................................................................. 42
Dépannage ...................................................................................... 43Mode clinique .......................................................................... 43
Passage d’AIBO en mode clinique .......................................... 43
Liste de contrôle pour le mode clinique .................................. 44
Symptômes et remèdes ............................................................ 47
Spécifications ................................................................................. 51
Index ............................................................................................... 54

8

9
Int ro
du
ction
Introduction
Ce chapitre vous présente le robot de compagnie AIBOERS-311/312.

10
Présentation d’AIBO“AIBO” est le nom donné au robot de compagnie conçu parSony. Développé pour encourager l’interaction entrel’homme et le robot, AIBO crée et vous initie à denouveaux plaisirs et à de nouveaux modes de vie.
Le nom “AIBO” est un acronyme formé avec les mots“A.I.” (Artificial Intelligence, intelligence artificielle enfrançais), “eye” (yeux) et “robot”. En japonais, le terme“aibô” signifie “partenaire” ou “copain”.
Consultez la page d’accueil: http://www.aibo/com/ pour prendre connaissancedes nouveautés concernant AIBO.

11
Int ro
du
ction
ERS-311/312Pour vivre en harmonie, l’AIBO ERS-311/312 a été conçu avec quatre pattes,une tête et une queue et un total de quinze moteurs internes qui lui permettentde marcher, de s’asseoir ou de se coucher de manière naturelle. Il peut aussiutiliser sa corne lumineuse pour exprimer ses émotions.
“OPEN-R” est l’interface standard du robot de compagnie pourlequel Sony mène une campagne active. Cette interface étendles capacités du robot de compagnie par le biais d’unecombinaison flexible de matériel et de logicielsinterchangeables en vue de diverses applications. L’AIBOERS-311/312 est conforme à OPEN-R version 1.1.1.
“AIBO”, le logo aibo , “OPEN-R” et le logo OPEN-R sont desmarques de fabrique de Sony Corporation. “Memory Stick”, “ ”et “ ” sont des marques de fabrique de Sony Corporation. Le symbole “TM”a été omis dans ce manuel.

12
“Memory Stick” d’AIBO-warePour jouer avec un AIBO ERS-311/312, il doit être doté d’un “Memory Stick”AIBO-ware en option, dont une variété est disponible, selon la manière dontvous souhaitez jouer avec votre AIBO. Le AIBO-ware chargé à partir d’un“Memory Stick” sert d’esprit à l’AIBO et détermine son caractère et sesfonctions.• Un “Memory Stick” AIBO-ware est un “Memory Stick” créé uniquement
pour AIBO, contenant un logiciel d’application pour son fonctionnement.• Avant d’acheter un “Memory Stick” AIBO-ware, vérifiez que l’AIBO-ware
est compatible avec votre modèle AIBO.
AIBO
“Memory Stick” AIBO-ware(non fourni)Vous pouvez sélectionner différentsAIBO-ware, selon la manière dontvous souhaitez jouer avec AIBO. Parexemple, il y a un AIBO-ware quipermet d’éduquer AIBO ou pour luidonner un caractère différent.
Remarque
Si vous démarrez AIBO sans insérer de “Memory Stick” AIBO-ware, AIBO passe enmode clinique de contrôle de ses capteurs et autres pièces (page 43).

13
Int ro
du
ction
Vérification des accessoires fournisAssurez-vous de la présence des éléments suivants dans la boîte avant de joueravec AIBO.
xAdaptateur secteurERA-201P1 (1)
xFiche de conversion del’adaptateur secteur* (1)
xBatterie ion lithiumERA-301B1 (1)
xSupport (1)
xBalle rose (1)
xDocumentation• Instructions relatives au fonctionnement
d’AIBO• Félicitations pour le nouveau
propriétaire d’un AIBO
* Conservez des cartes avec bande magnétique ou supports d’enregistrementmagnétiques loin de la fiche de conversion de l’adaptateur secteur. Lesdonnées sur de tels supports pourraient être effacées par l’aimant dans lafiche de conversion.

14
Index des composants et commandesApparenced’AIBO
Remarques• Ne collez pas d’autocollants sur la caméra couleur (6) ou le capteur de distance
(5) d’AIBO.• Ne collez pas d’autocollants et n’insérez rien dans les articulations d’AIBO ou toute
autre pièce mobile.• Saisissez fermement AIBO par le dos (page 31) pour le soulever. Ne le prenez jamais
par sa tête, ses oreilles, son collier, ses jambes ou sa queue.• La zone grise entre le menton d’AIBO et le collier n’est pas un commutateur.
N’insérez pas les doigts dans cette zone, car ils pourraient être coincés et causer desdommages à AIBO.

15
Int ro
du
ction
1 Indicateur de mode (situéderrière la corne)Indique le mode de fonctionnementd’AIBO.
2 Corne lumineuseS’allume en différentes couleurs pourindiquer l’état émotionnel d’AIBO.
3 TêteUn commutateur dans le tête d’AIBOdétecte le mouvement quand vouspoussez légèrement la tête d’AIBOvers le haut ou le bas.
4 Microphone stéréoPermet à AIBO de collecter les sonsenvironnants.
5 Capteur de distanceAIBO utilise ce capteur pour mesurersa distance à un objet.
6 Caméra couleurPermet à AIBO de reconnaître lesobjets par leur couleur, leur forme etleurs mouvements.
7 Haut-parleurEmet différentes tonalités musicaleset des effets sonores.
8 Commutateurs de pattePlacés sur le dessous de chaque patte.
9 Rétro-éclairage• S’allume en vert quand AIBO est en
mode actif.• Clignote en vert quand AIBO se
prépare pour le mode pause.• S’allume en orange pendant la
charge de la batterie interne.• Clignote en orange si une erreur est
survenue pendant la charge.• S’éteint quand AIBO est en mode
pause ou quand la batterie estentièrement chargée.
q; Touche pauseAppuyez pour activer AIBO ou pourle mettre en mode pause.
qa Commutateur de queueSert à donner des ordres à AIBO. Ilpeut être poussé dans quatredirections. Les ordres donnés via laqueue varient selon l’AIBO-wareutilisé.
Déplacement dans quatredirections
Avant Droite
Arrière
Gauche

16
Intérieur d’AIBOL’illustration montre AIBO, son couvercle retiré.
Remarque
Ne touchez pas la borne de charge avec les doigts. Elle pourrait être salie, ce quientraînerait un mauvais contact.
Volet de la borne de charge
*
Autocollantde numérode série(dans lelogement dela batterie)

17
Int ro
du
ction
1 Borne de chargeRaccordez-y l’adaptateur secteurfourni avec la fiche de conversion del’adaptateur secteur fournie. QuandAIBO est placé sur le support fourniavec une station d’alimentationcentrale en option installée, cetteborne touche directement la batterieinterne d’AIBO pour la charger.
2 Curseur VOLUMEAjuste le volume du haut-parleur àquatre niveaux, assourdissement ycompris.
3 Témoin d’accès “Memory Stick”S’allume quand AIBO accède au“Memory Stick”. Pendant ce temps,la touche Z et le verrou BATT Zsont désactivés. N’essayez pas deretirer le “Memory Stick” quand cetémoin est allumé.
4 Commutateur RESERVEDCe commutateur est réservé pour desfonctions à ajouter dans l’avenir.
5 Verrou BATT ZBasculez ce verrou vers la queued’AIBO pour retirer la batterie.
6 Fente d’insertion pour “MemoryStick”Insérez le “Memory Stick” AIBO-ware (non fourni) dans cette fente.
7 Fente d’insertion de batterieInsérez la batterie ion lithium fournieou une batterie en option dans cettefente.
8 Touche ZAppuyez pour retirer le “MemoryStick”.
* Trou de libération d’urgenceQuand le “Memory Stick” ou labatterie ne peuvent pas être retirés àcause d’un problème mécanique etc.,insérez un objet pointu dans ce trou etpoussez. N’utilisez pas d’objetpouvant se casser comme un cure-dent. N’utilisez pas ce trou ensituation normale.

18
Support
1 SupportPlacez AIBO sur le support quand ilest en mode pause ou pendant lacharge.
2 Plaque décorativeRetirez cette plaque quand la stationd’alimentation centrale en option estfixée au support.
Remarque
Le support fourni est prévu uniquementpour l’AIBO ERS-311/312.

19
Charge de la batterie
Charge de la batterie
Ce chapitre explique comment charger la batterie d’AIBO.

20
Insertion de la batterieLa batterie fournie avec AIBO est partiellement chargée. Il est recommandé dela charger complètement avant de jouer avec AIBO. Pour la charger, insérez-lad’abord comme indiqué ci-dessous.
1 Saisissez fermement AIBO par le corps, retournez-le et retirez soncouvercle en poussant la marque vers sa queue.
Remarques
• Soulevez AIBO en le saisissant par le corps, et non par ses extrémités. Ne tenezpas AIBO par son collier. Vos doigts pourraient être coincés entre le collier et latête ou le corps d’AIBO.
• La surface d’AIBO est très lisse. Prenez garde de ne pas faire tomber AIBO en lesoulevant.
• Ne touchez pas la borne de charge avec les doigts. Elle pourrait être salie, ce quientraînerait un mauvais contact.
• Utilisez uniquement la batterie ERA-301B1 fournie.

21
Charge de la batterie
2 Insérez la batterie fournie dans le sens de la flèche jusqu’au déclicde mise en place, puis remettez le couvercle en place.
Voir la page 36 pour les détails sur le retrait de la batterie.
Poussez ici.

22
Charge de la batterieVous pouvez utiliser l’adaptateur secteur et la fiche de conversion fournis pourcharger la batterie quand elle est insérée dans AIBO. Il est recommandé decharger la batterie à température ambiante (10 à 30˚C (50 à 86˚F)). Atempérature ambiante, la charge complète exige environ 2 heures.
1 Raccordez fermement l’adaptateur secteur à la fiche deconversion de l’adaptateur secteur.
Fiche de conversionde l’adaptateursecteur Adaptateur secteur

23
Charge de la batterie
2 Ouvrez le volet de la borne de charge sur le couvercle (1) etraccordez la fiche de conversion à la borne de charge (2).La fiche de conversion se fixe par aimant.
Remarque
Ne retirez pas le couvercle quand la fiche de conversion est attachée. Cela pourraitempêcher son raccordement correct à la borne.
3 La fiche de conversion fixée, placez AIBO sur le support commeindiqué ci-dessous.N’oubliez pas de passer le cordon de l’adaptateursecteur par la cannelure et de le sortir à l’arrière dusupport.

24
4 Branchez l’adaptateur secteur sur une prise murale.Quand AIBO est raccordé à l’adaptateur secteur, il ne passera pas en modeactif même si vous appuyez sur la touche pause.
Pendant la chargeLe rétro-éclairage s’allume en orange.
Quand la charge est terminéeLe rétro-éclairage s’éteint.
Rétro-éclairage

25
Charge de la batterie
Remarques
• Si le rétro-éclairage clignote en orange pendant la charge de la batterie, vérifiez si labatterie est insérée correctement. Si le clignotement persiste, contactez la liaisonclients AIBO (page 5).
• Si vous raccordez l’adaptateur secteur à AIBO quand il est en mode actif, AIBOpassera automatiquement en mode pause et la charge de la batterie commencera.
• En retirant la fiche de conversion de l’adaptateur secteur d’AIBO, saisissez bien lafiche pour la retirer.
• Après le retrait de la fiche de conversion, refermez bien le volet de la borne decharge.
xEmploi de la station d’alimentation centrale ERA-301P2 (nonfournie)
Quand la station d’alimentation centrale enoption est fixée au support, la batterie interned’AIBO peut être chargée en plaçantsimplement AIBO sur le support.
Station d’alimentation centrale

26
27
Jouer avec AIB
O
Jouer avec AIBO
Ce chapitre explique les procédures requises pour jouer avecAIBO, telles qu’insertion du “Memory Stick” AIBO-ware,ajustement du volume des tonalités musicales et remplacementde la batterie. Notez que l’AIBO-ware en option est nécessairepour jouer avec AIBO.

28
Insérer ou retirer un “Memory Stick”Pour jouer avec AIBO, insérez un “Memory Stick” en option dans AIBO. Voirle Guide de l’utilisateur fourni avec le “Memory Stick” AIBO-ware concernépour les détails. Si vous démarrez AIBO sans insérer de “Memory Stick”AIBO-ware, AIBO passe en mode clinique de contrôle de ses capteurs etautres pièces (page 43).
Insérer un “Memory Stick”Insérez le “Memory Stick” seulement après avoir mis AIBO en pause. Lerétro-éclairage s’éteint quand AIBO est en mode pause.
1 Saisissez fermement AIBO par le corps, retournez-le et retirez soncouvercle en poussant la marque vers sa queue.

29
Jouer avec AIB
ORemarques
• Soulevez AIBO en le saisissant par le corps, et non par ses extrémités. Ne tenezpas AIBO par son collier. Vos doigts pourraient être coincés entre le collier et latête ou le corps d’AIBO.
• La surface d’AIBO est très lisse. Prenez garde de ne pas faire tomber AIBO enle soulevant.
• Ne touchez pas la borne de charge avec les doigts. Elle pourrait être salie, ce quientraînerait un mauvais contact.
2 Insérez le “Memory Stick” et remettez le couvercle en place.La marque ▼ pointée vers le bas et le coin arrondi face à la queue, insérez le“Memory Stick” dans la fente d’insertion pour “Memory Stick” jusqu’audéclic de mise en place.
Coin arrondi

30
Retirer le “Memory Stick”Avant de retirer le “Memory Stick” d’AIBO, appuyez sur la touche pause surle dos d’AIBO pour le mettre en pause, puis retirez le couvercle pourconfirmer que le témoin d’accès “Memory Stick” est éteint.Appuyez sur la touche Z à l’intérieur d’AIBO, puis retirez le “MemoryStick”.
Remarque
Le “Memory Stick” ne peut pas être retiré quand le témoin d’accès “Memory Stick” estallumé en rouge. N’essayez pas de retirer le “Memory Stick” de force pendant cetemps.
Témoin d’accès “Memory Stick”

31
Jouer avec AIB
ODémarrage d’AIBO
1 Placez AIBO sur le sol comme indiqué ci-dessous.Placez-le sur une surface plane et non glissante, comme une moquette rase.
Remarques
• Si vous placez AIBO sur un sol glissant ou une moquette à longs poils, il auratendance à tomber souvent, à ne pas avancer ou à se bloquer.
• Placez bien AIBO sur le sol comme indiqué ci-dessus. Vous éviterez ainsiqu’AIBO ne bouge de façon imprévue et ne subisse de dommages quand vousappuyez et libérez la touche pause pour le démarrer.

32
2 Pressez et relâchez la touche pause sur le dos d’AIBO.Le mode pause d’AIBO est annulé et le rétro-éclairage s’allume en vert.Attendez un peu qu’AIBO se mette à bouger sous le contrôle du “MemoryStick” AIBO-ware inséré.
Remarque
Appuyez sur la touche pause sur le dos d’AIBO si une anomalie a lieu ou si vouscoincez le doigt dans une articulation d’AIBO.
Pour les détails pour jouer avec AIBO à partir de maintenantVoir le Guide de l’utilisateur fourni avec l’AIBO-ware.

33
Jouer avec AIB
OLorsque vous ne jouez pas avecAIBONous vous recommandons de charger la batterie (page 22) pour qu’AIBO soitprêt à jouer à tout moment.
Mettre AIBO en pauseAppuyez sur la touche pause sur le dosd’AIBO.Le rétro-éclairage clignote en vert, puiss’éteint un moment. Placez AIBO sur lesupport à ce moment-là.
Remarques
• Avant de placer AIBO sur le support, n’oubliez pas d’appuyer sur la touche pause surson dos pour le mettre en pause. Si AIBO est en mode actif quand il est placé sur lesupport, il peut bouger, se renverser et s’endommager.
• La batterie ne se chargera pas si vous placez simplement AIBO sur le support sansappuyer sur la touche pause.
Touche pause
Support

34
Réglage du niveau sonore destonalités musicalesAppuyez sur la touche pause sur le dos d’AIBO pour le mettre en pause avantde régler le niveau sonore.
1 Saisissez fermement AIBO par le corps, retournez-le et retirez soncouvercle en poussant la marque vers sa queue.
Remarques
• Soulevez AIBO en le saisissant par le corps, et non par ses extrémités. Ne tenezpas AIBO par son collier. Vos doigts pourraient être coincés entre le collier et latête ou le corps d’AIBO.
• La surface d’AIBO est très lisse. Prenez garde de ne pas faire tomber AIBO en lesoulevant.
• Ne touchez pas la borne de charge avec les doigts. Elle pourrait être salie, ce quientraînerait un mauvais contact.

35
Jouer avec AIB
O2 Faites glisser le curseur VOLUME pour ajuster le niveau sonore,
puis remettez le couvercle en place.Pour augmenter le niveau sonore, glissez le curseur vers la position +; pour lediminuer, glissez-le vers la position –. A sa libération, le curseur revient enposition centrale.Il y a quatre niveaux sonores, assourdissement y compris. A chaqueglissement du curseur, le niveau sonore augmente ou diminue d’un niveau.

36
Remplacement de la batterieIl est possible d’utiliser l’adaptateur secteur et la fiche de conversion fournispour charger la batterie quand celle-ci est toujours insérée dans AIBO. Vouspouvez aussi remplacer la batterie dans AIBO par une batterie chargée.
Remarque
Utilisez uniquement la batterie ERA-301B1 fournie.
1 Appuyez sur la touche pause et attendez que le rétro-éclairages’éteigne.
Remarque
Quand AIBO accède au “Memory Stick”, le témoin d’accès “Memory Stick”s’allume en rouge. Pendant ce temps, le verrou BATT Z et la touche Z sontdésactivés, et la batterie et “Memory Stick” ne peuvent pas être retirés jusqu’àl’achèvement de la procédure de sauvegarde des données. N’essayez pas de retirerle “Memory Stick” de force pendant ce temps.
Rétro-éclairage

37
Jouer avec AIB
O2 Saisissez fermement AIBO par le corps, retournez-le et retirez son
couvercle en poussant la marque vers sa queue.
Remarques
• Soulevez AIBO en le saisissant par le corps, et non par ses extrémités. Ne tenezpas AIBO par son collier. Vos doigts pourraient être coincés entre le collier et latête ou le corps d’AIBO.
• La surface d’AIBO est très lisse. Prenez garde de ne pas faire tomber AIBO enle soulevant.
• Ne touchez pas la borne de charge avec les doigts. Elle pourrait être salie, ce quientraînerait un mauvais contact.
3 Basculez le verrou BATT Z vers la queue d’AIBO pour retirer labatterie.
Verrou BATT Z

38
Remarques
• Au retrait de la batterie, tenez-la fermement pour qu’elle ne tombe pas.• Quand le témoin d’accès “Memory Stick” est allumé, la batterie est bloquée. La
retirer de force à ce moment-là peut endommager AIBO.
4 Insérez la batterie fournie dans le sens de la flèche jusqu’au déclicde mise en place, puis remettez le couvercle en place.
5 Placez AIBO sur le sol comme indiqué ci-dessous.
Remarque
Placez bien AIBO sur le sol comme indiqué à droite.Vous éviterez ainsi qu’AIBO ne bouge de façonimprévue et ne subisse de dommages quand vousappuyez et libérez la touche pause pour le démarrer.
Poussez ici.

39
Informations com
plémentaires
Informations complémentaires
Ce chapitre présente des remarques sur l’utilisation d’AIBO, unguide de dépannage et d’autres informations concernant AIBO.

40
Remarques sur l’utilisationPrenez les précautions suivantes pour empêcher toute détérioration d’AIBO etde ses accessoires.
Manipulation d’AIBO• Ne pas utiliser AIBO à des emplacements soumis à des vibrations, sur un
plan incliné ou à un endroit où il pourrait tomber.• Ne pas appuyer fort sur AIBO avec la main ou le coude.• Ne pas faire tomber et ne pas secouer AIBO car cela peut l’endommager ou
provoquer la perte des données sauvegardées dans le “Memory Stick”.• Ne pas toucher directement la borne de charge de la main. Cela pourrait la
salir et provoquer un mauvais contact.• Soulever AIBO en le saisissant par le corps, et non par ses extrémités,
comme la tête, les oreilles, le collier, la queue ou les pattes. Ne pas balancerni tordre AIBO.
• Ne pas laisser AIBO à un emplacement surchauffé comme une voiture garéeen plein soleil, car il pourrait se déformer ou se détériorer.
• Ne laisser aucun corps étranger, comme des trombones, pénétrer dans AIBOou ses articulations.
• Ne pas utiliser AIBO en extérieur. Sinon, de l’humidité ou des matièresétrangères pourraient pénétrer dans AIBO et l’abîmer.
• Ne pas utiliser AIBO sur du béton ou une autre surface dure, car celapourrait l’abîmer.
• Empêcher qu’AIBO soit mouillé.• Ne pas exercer de force pour interférer avec des mouvements d’AIBO.• Ne pas toucher la lentille de la caméra couleur ou le capteur de distance
directement avec la main.

41
Informations com
plémentaires
• Ne pas coller d’autocollants sur la caméra couleur ou le capteur de distance.• Ne pas pointer la caméra couleur en direction du soleil, qu’AIBO soit sous
tension ou non, car elle pourrait être endommagée.• Ne pas huiler les articulations ou d’autres parties mobiles d’AIBO.• Ne pas appliquer d’autocollants sur les pièces mobiles d’AIBO et ne rien
insérer entre elles, car cela pourrait gêner les mouvements d’AIBO.• Ne pas désassembler ou trafiquer AIBO.• Au transport d’AIBO, le placer dans une boîte capitonnée comme celle dans
laquelle il a été livré pour protéger son corps, sa tête, sa queue et ses pattescontre tout dommage éventuel.
• Ne pas utiliser AIBO à un emplacement soumis à de puissantes ondesélectromagnétiques ou des rayons X.
• Ne pas placer une carte avec bande magnétique ou un supportd’enregistrement magnétique près de la fiche de conversion de l’adaptateursecteur. L’aimant à intérieur de la fiche de conversion pourrait effacer lesdonnées enregistrées sur le support magnétique.
• Les applications AIBO-ware conçues pour l’ERS-110/111 ne sont pasutilisables avec l’ERS-311/312.
• L’ERS-311/312 peut ne pas fonctionner avec certaines applications AIBO-ware conçues pour l’ERS-210. Et même s’il est opérable, il peut y avoir deslimites pour certaines fonctions.
Condensation d’humiditéSi AIBO est amené directement d’un endroit froid à un endroit chaud, del’humidité pourra se condenser à l’intérieur et à l’extérieur d’AIBO,provoquant des dommages. En cas de condensation d’humidité, attendreenviron une heure avant de faire fonctionner AIBO.

42
Manipulation de l’adaptateur secteur• Utiliser uniquement l’adaptateur secteur fourni pour charger la batterie
d’AIBO. L’emploi d’un autre adaptateur pourrait endommager AIBO.• Ne pas brancher l’adaptateur secteur sur des transformateurs électroniques
conçus pour les voyageurs, car cela pourrait provoquer une surchauffe ou ladégradation d’AIBO.
Manipulation de la batterie• Ne pas exposer la batterie à des températures supérieures à 45˚C (113˚F),
comme par exemple dans une voiture garée en plein soleil.• Ne pas laisser des matières étrangères comme la poussière ou le sable
pénétrer dans les bornes.• Si AIBO doit rester inutilisé pendant une période prolongée, en retirer la
batterie et la ranger à un endroit sec et frais.• La batterie se décharge en continu même si elle n’est pas utilisée. La charger
juste avant d’utiliser AIBO.• Ne pas faire tomber la batterie ni placer d’objet lourd dessus. Ne pas la
soumettre à une forte pression ni à un choc physique.
Nettoyage• Nettoyer AIBO avec un chiffon propre, sec et doux.• Ne pas utiliser de solvant volatil susceptible d’endommager la finition
d’AIBO.• Lire les instructions en cas de nettoyage avec un chiffon imprégné de produit
chimique.

43
Informations com
plémentaires
DépannageAvant de contacter la liaison clients AIBO pour un problème, nous vousrecommandons d’utiliser le mode clinique pour contrôler l’équilibre et lescapteurs d’AIBO, et de consulter “Symptômes et remèdes” (page 47).
Mode cliniqueSi vous démarrez AIBO sans insérer de “Memory Stick” AIBO-ware, AIBOpasse en mode clinique où ses capteurs et autres pièces sont contrôlés. Letémoin de mode s’éteint à ce moment-là. Si le problème persiste par la suite,contactez la liaison clients AIBO (page 5).
Passage d’AIBO en mode clinique
1 Retirez le “Memory Stick” AIBO-ware d’AIBO (page 28).
2 Placez AIBO sur le sol comme indiqué ci-dessous, puis appuyezsur la touche pause sur son dos (page 32).AIBO passe en mode clinique et répète laséquence d’actions suivante: se lever, s’asseoir etse coucher.

44
Liste de contrôle pour le mode clinique
Article Procédure
Commutateur dela tête (dans latête)
Corne lumineuse
Commutateurde la queue
Fonctionnement ducommutateur de laqueue et équilibred’ensemble d’AIBO
1 Poussez le commutateur de la queue vers ladroite d’AIBO pendant trois secondes.AIBO effectue la séquence d’actions suivante:marche en avant, marche en arrière, donne un coupde la patte arrière droite, donne un coup de la pattearrière gauche. La corne lumineuse d’AIBOs’allume en trois couleurs pendant ce temps. AIBOrépète alors la séquence d’actions d’origine: selever, s’asseoir et se coucher.
2 Poussez le commutateur de la queue vers lagauche d’AIBO pendant trois secondes.AIBO effectue la séquence d’actions suivante: ils’asseoit, fait signe de la patte avant droite, faitsigne de la patte avant gauche, lève les deux pattesavant. La corne lumineuse d’AIBO s’allume en troiscouleurs pendant ce temps.
Rétro-éclairage
Touchepause
Témoin demode
AvantDroite
Arrière
Gauche

45
Informations com
plémentaires
Article Procédure
Sensibilité descommutateurs depatte
1 Tournez une fois le commutateur de la queue.AIBO se couche avec les quatre pattes étendues.
2 Appuyez sur un commutateur de patte.AIBO rétracte la patte touchée.
3 Tournez à nouveau le commutateur de la queue.AIBO répète à nouveau la séquence d’actionsd’origine: se lever, s’asseoir et se coucher.
Vous pouvezle tournerdansn’importequelledirection.
Sensibilité ducommutateur de latête d’AIBO
1 Appuyez légèrement sur la tête pour fairebaisser la tête à AIBO.La corne lumineuse s’allume en vert.
2 Appuyez légèrement sur la tête pour fairerelever la tête à AIBO.La corne lumineuse s’allume en orange.
Sensibilité de lacaméra couleur
1 Amenez la balle rose fournie près de la caméracouleur (bouche d’AIBO).Quand la caméra détecte la balle, la cornelumineuse s’allume en bleu.Si la balle est trop proche ou trop loin, la camérapeut ne pas la détecter. Ajustez la distance entre laballe et la caméra.

46
Article Procédure
Sensibilité ducapteur de distance
1 Tournez une fois le commutateur de la queue.AIBO se couche avec les quatre pattes étendues.
2 Placez votre main ou un autre objet sur lecapteur de distance (nez d’AIBO).Quand le capteur de distance détecte l’objet, un bipretentit. (Quand le niveau sonore de la tonalitémusicale est assourdi, aucun bip ne retentit.) Lahauteur du bip change selon la distance entre l’objetet le capteur. Si l’objet est trop proche ou tropéloigné, le capteur peut ne pas le détecter. Ajustez ladistance entre l’objet et le capteur.
3 Tournez à nouveau le commutateur de la queue.AIBO répète alors la séquence d’actions d’origine:se lever, s’asseoir et se coucher.
Vouspouvez letournerdansn’importequelledirection.
Mode de ramassage 1 Ramassez AIBO sur le sol.AIBO s’arrête de bouger, ses pattes se desserrent etle témoin de mode s’allume. Si vous le ramasseztrop lentement, les pattes peuvent ne pas sedesserrer. Dans ce cas, continuez à tenir AIBO etpoussez le commutateur de la queue loin de la têted’AIBO pendant trois secondes.
2 Placez AIBO sur le sol ou poussez lecommutateur de la queue vers la tête d’AIBOpendant trois secondes.AIBO répète alors la séquence d’actions d’origine:se lever, s’asseoir et se coucher.

47
Informations com
plémentaires
Symptômes et remèdesSi vous rencontrez l’un des problèmes suivants, utilisez ce tableau pour yremédier. Si le problème persiste, contactez la liaison clients AIBO (page 5).
Symptôme Cause/remède
AIBO ne bouge pas. AIBO a été ramassé au sol ou un objet est coincédans une de ses articulations.c Placez AIBO sur le sol et poussez le
commutateur de la queue vers sa tête pendanttrois secondes. AIBO s’arrête de bouger quandil est ramassé au sol (le témoin de modes’allume) ou quand un objet est coincé dansune de ses articulations (le témoin de modeclignote).
La batterie est épuisée.c Chargez la batterie (page 22). Quand la
batterie est complètement épuisée, le rétro-éclairage s’éteint et AIBO s’arrête de bouger.
Une oreille d’AIBO s’estdétachée.
c Alignez le centre du microphone d’AIBO surle centre du trou de l’oreille, puis insérez lesergots à l’arrière de l’oreille d’AIBO dans lescannelures des deux côtés du microphonejusqu’à ce que l’oreille s’emboîte.
Cannelures

48
Symptôme Cause/remède
AIBO ne réagit pas à lalibération de la touchepause.
La batterie n’est pas insérée.c Insérez-la (page 20). Redémarrez AIBO en
appuyant à nouveau sur la touche pause.La batterie est épuisée.c Chargez-la ou remplacez-la par une batterie
chargée.L’adaptateur secteur est raccordé à la borne decharge d’AIBO.c Déconnectez l’adaptateur secteur et appuyez
à nouveau sur la touche pause.
A la pression de la touchepause, le rétro-éclairageclignote alternativementen orange et vert, et unbip retentit.
Il peut y avoir accumulation de chaleur dans labatterie.c Attendez un moment que la batterie
refroidisse.
AIBO continue à émettreune mélodie triste et nebouge pas à la libérationde la touche pause.
• Insertion d’un “Memory Stick” sans AIBO-ware
• Insertion d’un “Memory Stick” non prévupour l’AIBO ERS-311/312
Il faut beaucoup de tempsà AIBO pour commencerà bouger.
AIBO charge les données du “Memory Stick”.Attendez un moment.

49
Informations com
plémentaires
Symptôme Cause/remède
AIBO essaie de marchermais n’avance pas.
Le sol est glissant ou les poils de la moquettesont trop longs.c Placez AIBO sur une surface pas trop
glissante, comme une moquette rase.
AIBO tombe souvent. Le sol est trop glissant, en pente ou instable.c Placez AIBO sur une surface plane pas trop
glissante.
Après avoir ramasséAIBO, il s’arrête debouger.
AIBO s’arrête de bouger chaque fois qu’il estramassé au sol.c Vérifiez que le témoin de mode est allumé,
placez AIBO sur le sol, puis poussez lecommutateur de la queue vers la tête pendanttrois secondes.
Le témoin de mode estallumé ou clignote etAIBO émet des tonalitésmusicales, mais nemarche pas.
AIBO s’arrête de bouger chaque fois qu’il estramassé au sol ou qu’un objet est coincé dansune de ses articulations.c Placez AIBO sur le sol, puis poussez le
commutateur de la queue vers la tête pendanttrois secondes.
Le rétro-éclairage clignoteen orange.
Il peut y avoir un problème de batterie.c Vérifiez que la batterie est insérée
correctement. Si le clignotement du rétro-éclairage persiste, contactez la liaison clientsAIBO (page 5).

50
Symptôme Cause/remède
AIBO ne poursuit pas laballe fournie.
Quand aucun “Memory Stick” AIBO-ware n’estinséré, AIBO répond à la balle mais ne lapoursuit pas.
Le rétro-éclairage nes’éteint pas à la pressionde la touche pause pourmettre AIBO en pause.
L’application interne peut ne pas être terminéenormalement.c Retirez la batterie (page 36). Réinsérez la
batterie et appuyez à nouveau sur la touchepause (page 33). Si le verrou BATT Z estinopérable, utilisez le trou de libérationd’urgence (page 17).
AIBO demanderapidement la chargemême si la batterie estentièrement chargée.
Quand le temps de fonctionnement de labatterie est devenu remarquablement court, ellea peut-être atteint la fin de sa durée de service.Remplacez-la par une batterie neuve (page 36).
Aucune tonalité musicalen’est émise par AIBO.
Les tonalités musicales d’AIBO sont assourdies.c Ajustez le niveau sonore (page 34).

51
Informations com
plémentaires
Spécifications
AIBOCPU (unité centrale)
Processeur RISC 64 bits
Mémoire centrale
32 Mo
Support d’application fourni
“Memory Stick” pour AIBO
Parties mobiles
Tête: 3 degrés de liberté
Pattes: 3 degrés de liberté × 4(15 degrés de liberté au total)
Entrées Borne de charge
Commutateurs d’entrée
Curseur VOLUME
Commutateur RESERVED
Entrée vidéo Capteur d’image CMOS100.000 pixels
Entrée audio Microphones stéréo
Sortie audio Haut-parleur
Capteurs internes
Capteurs de distanceinfrarouges
Capteur d’accélération
Commutateurs sur la tête, surla queue et sur les pattes
Capteur d’inclinaison
Capteur de vibration
Consommation d’énergie
Env. 5 W (en mode normal)
Durée de fonctionnement
Env. 2,5 heures (sur batterieERA-301B1 entièrementchargée, en mode normal)
Dimensions Env. 177 × 280 × 240 mm(7 × 11 1/8 × 9 1/2 pouces)(l/h/p)
Poids Env. 1,5 kg (3 livres5 onces)(batterie et “MemoryStick” inclus)
Température de fonctionnement
5 à 35˚C (41 à 95˚F)
Humidité de fonctionnement
10 à 80%(pas de condensation)
Température de fonctionnement authermomètre mouillé
Moins de 29˚C (84˚F)

52
Température de stockage
–10 à 60˚C (–4 à 140˚F)
Humidité de stockage
10 à 90%(pas de condensation)
Température de stockage au thermomètremouillé
Moins de 29˚C (84˚F)
SupportDimensions Env. 109 × 97 × 228 mm
(4 3/8 × 3 7/8 × 9 pouces) (l/h/p)
Poids Env. 180 g (6 onces) (batterieet “Memory Stick” inclus)
Adaptateur secteurEntrée Secteur de 120 V, 50 - 60 Hz,
0,75 A (États-Unis et Canada)
Secteur 100 - 240 V,50 - 60 Hz, 0,85 - 0,46 A(autres pays)
Sortie 16 V CC, 2,5 A
Température de fonctionnement
5 à 35˚C (41 à 95˚F) (gradientthermique inférieur à 10˚C(50˚F)/heure)
Humidité de fonctionnement
20 à 80% (pas decondensation), à conditionque l’humidité soit inférieureà 65% à 35˚C (95°F)(Température au thermomètremouillé: moins de 29˚C(84˚F))
Température de stockage
–20 à 60˚C (–4 à 140˚F)(gradient thermique inférieurà 10˚C (50˚F)/heure)
Humidité de stockage
10 à 90%(pas de condensation)
Dimensions Env. 60 × 30 × 120 mm(2 3/8 × 1 3/16 × 4 3/4 pouces)(l/h/p)
Poids Env. 325 g (11,5 onces)
Longueur du cordonCordon CC: Env. 1,8 m(70 7/8 pouces)
Cordon secteur: 1,8 m(70 7/8 pouces)

53
Informations com
plémentaires
Batterie ion lithiumBatterie utilisée
Batterie de type ion lithium
Tension de sortie principale
7,4 V CC
Capacité 1700 mAh
Température de fonctionnement
5 à 40˚C (41 à 104˚F)(gradient thermique inférieurà 10˚C (50˚F)/heure)
Humidité de fonctionnement
10 à 80%(pas de condensation)
Température de fonctionnement authermomètre mouillé
Moins de 29˚C (84˚F)
Température de stockage
–20 à 60˚C (–4 à 140˚F)(gradient thermique inférieurà 10˚C (50˚F)/heure)
Humidité de stockage
10 à 90%(pas de condensation)
Température de stockage au thermomètremouillé Moins de 35˚C (95˚F)
Dimensions Env. 72 × 53,6 × 21 mm(2 7/8 × 2 1/8 × 27/32 pouces)(l/h/p)
Poids Env. 112 g (4 onces)
La conception et les spécificationssont modifiables sans préavis.
Accessoires fournisVoir la page 13.

54
Index
AAdaptateur secteur ..................... 13, 22AIBO
Démarrage .................................. 31Manipulation .............................. 40Nettoyage .................................... 42Pause ............................................ 33
AIBO-ware ......................................... 12
BBatterie
Charge ......................................... 22Fente d’insertion ........................ 17Insertion ...................................... 20Manipulation .............................. 42Remplacement ........................... 36
Borne de charge .......................... 17, 23
CCaméra couleur ................................. 15Capteur de distance .......................... 15Commutateur de la queue ............... 15Commutateur de la tête ................... 44Commutateurs de patte ................... 15Corne lumineuse ............................... 15Curseur VOLUME ...................... 17, 35
FFiche de conversion de l’adaptateursecteur ......................................... 13, 22
HHaut-parleur ...................................... 15
LLiaison clients AIBO ........................... 5
M“Memory Stick”
Fente d’insertion ........................ 17Insertion ...................................... 28Retrait .......................................... 30Témoin d’accès .................... 17, 30Touche Z ............................... 17, 30
Microphone stéréo ............................ 15Mode clinique .................................... 43Mode pause ........................... 28, 32-34
NNiveau sonore ................................... 34
PPlaque décorative ............................. 18

55
Informations com
plémentaires
RRétro-éclairage ............................ 15, 24
SStation d’alimentation centrale ....... 25Support ......................................... 13, 18
TTémoin de mode ............................... 15Tête .................................................... 15Touche pause ......................... 15, 32, 33Trou de libération d’urgence ........... 17
VVerrou BATT Z ........................... 17, 37Volet pour borne de charge ....... 16, 23

SicherheitsinformationenACHTUNG• Um Feuergefahr und die Gefahr eines elektrischen Schlags zu vermeiden,
setzen Sie den Roboter weder Regen noch sonstiger Feuchtigkeit aus.• Um einen elektrischen Schlag zu vermeiden, öffnen Sie das Gehäuse nicht.
Überlassen Sie Wartungsarbeiten stets nur qualifiziertem Fachpersonal.Wenden Sie sich bitte an die AIBO-Kundendienst-Hotline. (Seite 5)
• Überprüfen Sie den Netzadapter bitte regelmäßig auf Defekte, wie zumBeispiel Beschädigungen an den Kabeln, den Stiften oder am Gehäuse.Solche Beschädigungen können zu Feuergefahr, der Gefahr eineselektrischen Schlags oder Verletzungen führen. Ist der Netzadapterbeschädigt, darf er nicht mehr benutzt und muss ausgetauscht werden.
• Dieser Spielroboter ist nicht für Kinder unter 8 Jahren gedacht und wird fürKinder unter 8 Jahren nicht empfohlen.
• Der Roboter darf ausschließlich mit dem empfohlenen Netzadapter (ERA-201P1) verwendet werden.
• Der Netzadapter ist kein Spielzeug.• Es besteht die Gefahr, dass Kinder kleine Teile verschlucken.• Wenn das externe Netz- oder Anschlusskabel beschädigt wird, muss es
ausgetauscht oder repariert werden. Wenden Sie sich dazu nur an denHersteller, seinen autorisierten Kundendienst oder ähnliches Fachpersonal,um potenzielle Gefahren zu vermeiden.
2

• Die zu Befestigungs- und Verpackungszwecken verwendeten Materialiensind nicht Teil des Spielroboters. Diese Materialien stellen einSicherheitsrisiko für Kinder dar.
• Informationen zum Netadapter, zur Station und zum Lithium-Ionen-Akkufinden Sie in den gesondert erhältlichen Anleitungen.
ENTSORGUNG DES LITHIUM-IONEN-AKKUS! Berühren Sie beschädigte oder auslaufende Lithium-Ionen-Akkus nicht.! Bei einem falschen oder falsch eingelegten Akku besteht Explosionsgefahr.
Tauschen Sie den Akku nur gegen einen Akku ERA-301B1 aus. EntsorgenSie gebrauchte Akkus nach den Angaben des Herstellers.
! Bei unsachgemäßem Gebrauch des Akkus besteht Feuergefahr oder dieGefahr von Verätzungen. Zerlegen Sie den Akku nicht, erhitzen Sie ihn nichtüber 60 °C und versuchen Sie nicht, ihn zu verbrennen. Zerlegen Sie Akkusnicht und werfen Sie sie nicht ins Feuer.
3
De

4
Gesetzliche VorschriftenDieses Gerät wurde geprüft und erfüllt folgende Sicherheitsstandards:
Spielzeug-Richtlinie 88/378/EEC, EN50088/96 + A1/96 + A2/97, EN71-1/98,DIN EN71-2/01.94, DIN EN71-3/03.95
EMV-Richtlinie 89/336/EWGEMI EN55022/98, EN55014/93+A1/97+A2/99, EN50081-1/92EMS: EN55024/98, EN55014-2/97, EN61000-3-2/95, EN61000-3-3/95,EN50082-1/97
Netadapter und Lithium-Ionen-Akkus wurden zusammen als System geprüftund erfüllen folgende Sicherheitsstandards:
LVD 73/23/EWG + 93/68/EWGEN60950/92 + A1/93 + A2/93 + A3/95 + A4/97 + A11/97EN60065/98EN61558-1/97 + A1/98EN61558-2-7/97
Hinweise zur Konformität mit dem CE-Zeichen (EMV)
a) Dieses Gerät entspricht der europäischen Norm EN55022 Klasse B (digital) für dieVerwendung in folgenden Gebieten: Wohngebiete, Gewerbegebiete undLeichtindustriegebiete.
b) Dieses Gerät erfüllt die folgende europäische Richtlinie: 89/336/EWG (EMV-Richtlinie)

5
Sony Corporation6-7-35 Kitashinagawa, Shinagawa-ku, Tokyo 141-0001 JAPANBitte bewahren Sie alle Informationen zum späteren Nachschlagen auf.
KundendienstEuropa:
Für Deutschland: +49(0)-69-9508-6309Für Großbritannien: +44(0)-20-7365-2937Für Frankreich: +33(0)-1-5569-5117E-Mail: [email protected]
©2001 Sony Corporation. Die Reproduktion ganz oder auszugsweise istohne schriftliche Genehmigung untersagt. Alle Rechte vorbehalten.

6
Inhaltsverzeichnis
AIBO stellt sich vor
Was ist AIBO? ................................................................................10
ERS-311/312 ..................................................................................11
Überprüfen des mitgelieferten Zubehörs .......................................13
Bezeichnung der Teile ....................................................................14AIBOs Äußeres ....................................................................... 14
AIBOs Innenleben ................................................................... 16
Ständer ..................................................................................... 18
Laden des Akkus
Einlegen des Akkus ........................................................................20
Laden des Akkus ............................................................................22
Spielen mit AIBO
Einsetzen und Entnehmen des Memory Stick ................................ 28Einsetzen eines Memory Stick ................................................ 28
Entnehmen des Memory Stick................................................. 30
Starten von AIBO ...........................................................................31

7
Wenn Sie nicht mit AIBO spielen .................................................. 33Pause für AIBO........................................................................ 33
Einstellen der Lautstärke ................................................................ 34
Austauschen des Akkus ..................................................................36
Weitere Information
Hinweise zum Umgang mit AIBO .................................................40Umgang mit AIBO .................................................................. 40
Feuchtigkeitskondensation ...................................................... 41
Umgang mit dem Netzadapter ................................................. 42
Umgang mit dem Akku ........................................................... 42
Reinigung ................................................................................ 42
Störungssuche ................................................................................ 43Klinikmodus ............................................................................ 43
AIBO in den Klinikmodus schalten ........................................ 43
Checkliste für den Klinikmodus .............................................. 44
Fehlersuchtabelle ..................................................................... 47
Technische Daten ...........................................................................51
Index ............................................................................................... 54

8

9
AIB
O stellt sich
vor
AIBO stellt sich vor
Dieses Kapitel gibt eine Einführung zum Spielroboter AIBOERS-311/312.

10
Was ist AIBO?„AIBO“ ist der Name eines Spielrobotors von Sony, derneue Konzepte der Interaktion zwischen Mensch undRoboter verwirklichen soll. AIBO erschließt Ihnen völligneue Spiel- und Unterhaltungsmöglichkeiten.
Der Name „AIBO“ wurde aus den Begriffen „AI“(Artificial Intelligence = Künstliche Intelligenz), demenglischen „Eye“ (Auge, ausgesprochen wie „Ai“) unddem „BO“ von RoBOter gebildet. Außerdem bedeutet dasWort „Aibo“ im Japanischen „Freund“ oder „Partner“.
Die aktuellsten Informationen zu AIBO finden Sie auf der folgenden Website:http://www.aibo.com/

11
AIB
O stellt sich
vor
ERS-311/312Damit man ihn gleich auf den ersten Blick sympathisch findet, wurde AIBOERS-311/312 als Vierbeiner mit Kopf und Schwanz ausgestattet. Insgesamt 15interne Servomotoren helfen ihm beim Laufen, Hinsetzen oder Hinlegen mitnatürlich wirkenden Bewegungen. Eine Hörnchenlampe ermöglicht es AIBOzudem, seine Gefühle auszudrücken.
„OPEN-R“ ist eine Standardschnittstelle für dasSpielrobotersystem, das Sony aktiv unterstützt. Ziel dieserSchnittstelle ist es, die Funktionen und Merkmale vonSpielrobotern mit Hilfe einer flexiblen Kombination vonHardware und austauschbarer Software für unterschiedlicheAnwendungsmöglichkeiten zu erweitern. AIBO ERS-311/312entspricht OPEN-R Version 1.1.1.
„AIBO“, das AIBO-Logo , „OPEN-R“ und das OPEN-R-Logo sindeingetragene Marken der Sony Corporation. „Memory Stick“,„ “ und „ “ sind Marken der Sony Corporation. In diesemHandbuch sind die Marken nicht mit dem Zeichen „TM“ markiert.

12
Memory Sticks mit AIBO-wareUm das Repertoire an Spielmöglichkeiten mit AIBO ERS-311/312auszuschöpfen, benötigen Sie einen Memory Stick mit AIBO-ware (nichtmitgeliefert). Sie haben eine Auswahl an verschiedenen solcher mit Softwaregeladener Memory Sticks je nachdem, was Sie mit AIBO vorhaben, wie Sieihn großziehen und mit ihm spielen möchten, was für einen Charakter erannehmen soll. Ohne AIBO-ware ist AIBO lediglich ein Körper ohne Geist.• Memory Sticks mit AIBO-ware enthalten Applikationsprogramme und
wurden speziell für AIBO konzipiert.• Vergewissern Sie sich vor dem Kauf eines Memory Sticks, dass die
enthaltene AIBO-ware für Ihr spezielles AIBO-Modell geeignet ist.
AIBOMemory Stick mit AIBO-ware(nicht mitgeliefert)Sie haben die Auswahl ausunterschiedlicher AIBO-ware,darunter Programme zumGroßziehen von AIBO oderSoftware, die AIBO einen anderenCharakter verleiht.
Hinweis
Wenn Sie AIBO ohne eingelegten Memory Stick starten, schaltet er in denKlinikmodus, in welchem sich alle seine Sensoren und weitere Teile einer Untersuchungunterwerfen lassen (Seite 43).

13
AIB
O stellt sich
vor
Überprüfen des mitgeliefertenZubehörsVergewissern Sie sich bitte, dass alle folgenden Teile mitgeliefert wurden,bevor Sie mit AIBO zu spielen beginnen.
xNetzadapter ERA-201P1 (1)
xAdapterstecker* für denNetzadapter (1)
xLithium-Ionen-AkkuERA-301B1 (1)
xStänder (1)
xRosaroter Ball (1)
xDokumentation• Bedienungsanleitung zu AIBO• Glückwunsch dem stolzen Besitzer des
neuen AIBO
* Halten Sie Karten mit Magnetstreifen und sonstige magnetischenSpeichermedien vom Adapterstecker fern. Andernfalls kann der Magnet imStecker gespeicherte Daten löschen.

14
Bezeichnung der TeileAIBOs Äußeres
Hinweise
• Bringen Sie keine Aufkleber an AIBOs Farbkamera (6) oder Distanzsensor (5) an.• Bringen Sie keine Aufkleber an AIBOs Gelenken oder anderen beweglichen Teilen an
und führen Sie auch keine Fremdkörper ein.• Wenn Sie AIBO anheben, fassen Sie ihn stets um den Körper (Seite 31) und nicht
etwa an Kopf, Halsband, Beinen oder Schwanz.• Der graue Bereich zwischen AIBOs Kinn und Halsband ist kein Schalter. Stecken Sie
hier keine Finger ein. Sie könnten sich verklemmen und AIBO beschädigen.

15
AIB
O stellt sich
vor
1 Modusanzeige (hinter demHörnchen)Zeigt AIBOs Betriebsmodus an.
2 HörnchenlampeLeuchtet in verschiedenen Farben,um AIBOs Stimmung anzuzeigen.
3 KopfsensorEin Sensor in AIBOs Kopf spürt,wenn man seinen Kopf sanft nachoben oder unten drückt.
4 StereomikrofonMit dem Mikrofon nimmt AIBOGeräusche aus seiner Umgebungwahr.
5 DistanzsensorDieser Sensor vermittelt AIBO einGefühl für seinen Abstand zu anderenGegenständen.
6 FarbkameraErmöglicht es AIBO, Objekte nachFarbe, Form und Bewegung zuerkennen.
7 LautsprecherErzeugt Tonkombinationen undToneffekte.
8 PfotenschalterDiese befinden sich an der Unterseitealler vier Pfoten.
9 Rückenlampe• Leuchtet grün, wenn AIBO aktiv ist.• Blinkt grün, wenn AIBO sich aufden Pausemodus vorbereitet.
• Leuchtet orangerot, wenn der Akkuin AIBO geladen wird.
• Blinkt orangerot, wenn während desLadens ein Fehler auftritt.
• Erlischt, wenn sich AIBO imPausemodus befindet oder derAkkuladevorgang beendet ist.
q; PausetasteZum Aktivieren oder Anhalten vonAIBO.
qa Schalter am SchwanzDer Schwanz läßt sich in vierRichtungen drücken, um AIBOBefehle zu geben. Die möglichenBefehle sind abhängig von derverwendeten AIBO-ware.
Beweglich in vier Richtungen
Vorne Rechts
Hinten
Links

16
AIBOs InnenlebenDie Abbildung zeigt AIBO mit geöffneter Bauchklappe.
Hinweis
Berühren Sie den Ladekontakt nicht mit der Hand. Ein verschmutzter Kontakt kann zueiner Beeinträchtigung der Verbindung führen.
Verschlussklappe fürLadekontakt
*
Serien-nummer-Aufkleber(im InnerndesAkkufachs)

17
AIB
O stellt sich vor
1 LadekontaktSchließen Sie hier das mitgelieferteNetzteil mit dem mitgeliefertenAdapterstecker an. DieserLadekontakt steht in direkterVerbindung mit AIBOs internemAkku, um diesen zu laden, wennAIBO auf dem mitgelieferten Ständermit installierter Ladestation (nichtmitgeliefert) sitzt.
2 LautstärkereglerStellen Sie hier dieLautsprecherlautstärke in vier Stufen,einschließlich Stummschaltung, ein.
3 Memory Stick-AnzeigeLeuchtet, wenn AIBO auf denMemory Stick zugreift. In einemsolchen Fall sind die Freigabetaste Zund der Akkuriegel BATT Zgesperrt. Versuchen Sie nicht, denMemory Stick zu entnehmen, wenndiese Anzeige leuchtet.
4 RESERVED-SchalterDieser Schalter ist für künftigeFunktionen reserviert.
5 Akkuriegel „BATT Z“Zum Entnehmen des Akkus klappenSie diesen Riegel inSchwanzrichtung.
6 Einschub für Memory StickSetzen Sie hier den Memory Stickmit AIBO-ware (nicht mitgeliefert)ein.
7 AkkufachSetzen Sie hier den mitgeliefertenoder einen zusätzlich erhältlichenLithium-Ionen-Akku ein.
8 Freigabetaste Z
Drücken Sie diese Taste, um denMemory Stick zu entnehmen.
* NotfreigabeSollte aus mechanischen oderanderen Gründen ein normalesAuswerfen von Memory Stick und/oder Akku nicht möglich sein,drücken Sie einen spitzen Gegenstandin diese Öffnung. Verwenden Sieeinen robusten Gegenstand (z.B.aufgebogene Büroklammer) undnicht etwa einen Zahnstocher oderähnlich instabile Gegenstände.

18
Ständer
1 StänderSetzen Sie AIBO hier auf, wenn ersich im Pausemodus befindet odersein Akku aufgeladen wird.
2 DekorationsscheibeEntfernen Sie diese Scheibe, wennSie die Energiestation am Ständeranbringen.
Hinweis
Der mitgelieferte Ständer eignet sich ausschließlich für den AIBO ERS-311/312.

19
Laden des Akkus
Laden des Akkus
Dieser Abschnitt beschreibt die Bedienungsanleitung zumLaden des Akkus in AIBO.

20
Einlegen des AkkusDer mit AIBO mitgelieferte und noch ungebrauchte Akku ist nur teilweiseaufgeladen. Laden Sie ihn vor dem ersten Gebrauch vollständig auf. Als ersteslegen Sie den Akku wie nachfolgend beschrieben in AIBO ein.
1 Fassen Sie AIBO um den Körper und drehen Sie ihn auf denRücken. Entfernen Sie die Bauchklappe, indem Sie dieMarkierung in Richtung von AIBOs Schwanz drücken.
Hinweise
• Wenn Sie AIBO anheben, fassen Sie ihn stets um den Körper und nicht etwa anKopf, Halsband, Beinen oder Schwanz. Achten Sie darauf, die Finger nichtzwischen AIBOs Halsband und Kopf oder Körper einzuklemmen.
• AIBOs Außenflächen sind relativ glatt. Vermeiden Sie, dass AIBO nichtversehentlich aus den Händen rutscht.
• Berühren Sie den Ladekontakt nicht mit der Hand. Ein verschmutzter Kontaktkann zu einer Beeinträchtigung der Verbindung führen.
• Verwenden Sie ausschließlich den mitgelieferten Akku des Typs ERA-301B1.

21
Laden des Akkus
2 Legen Sie den mitgelieferten Akku in Pfeilrichtung bis zumEinrasten ein und schließen Sie wieder die Bauchklappe.
Einzelheiten zum Entnehmen des Akkus siehe Seite 36.
Hier drücken.

22
Laden des AkkusDas Laden erfolgt über den mitgelieferten Netzadapter und denAdapterstecker, wenn der Akku in AIBO eingelegt ist. Sorgen Sie fürZimmertemperatur (10 °C bis 30 °C). Die Ladedauer beträgt ca. 2 Stunden.
1 Bringen Sie den Adapterstecker sicher am Netzadapter an.
Adapterstecker
Netzadapter

23
Laden des Akkus
2 Öffnen Sie die Verschlussklappe in der Bauchklappe (1)undverbinden Sie den Adapterstecker mit dem Ladekontakt (2).Der Adapterstecker wird mit Magnetkraft gesichert.
Hinweis
Zum Anbringen des Adaptersteckers die Bauchklappe nicht entfernen. Andernfallsist eine korrekte Verbindung von Stecker und Ladekontakt nicht gewährleistet.
3 Mit angebrachtem Adapterstecker setzen Sie AIBO nun wiegezeigt auf den Ständer.Führen Sie das Netzkabel sauber durch dieEinsparung an der Rückseite des Ständers.

24
4 Schließen Sie den Netzadapter an eine Steckdose an.Solange AIBO an den Netzadapter angeschlossen ist, kann er selbst durchDrücken der Pausetaste nicht aktiviert werden.
Während des LadensDie Rückenlampe leuchtet orangerot.
Nach Ende des LadevorgangsDie Rückenlampe erlischt.
Rückenlampe

25
Laden des Akkus
Hinweise
• Wenn die Rückenlampe orangerot blinkt, prüfen Sie bitte, ob der Akku korrekteingelegt ist. Sollte das Blinken auch bei korrekt eingelegtem Akku nicht aufhören,kontaktieren Sie bitte die AIBO-Kundendienst-Hotline (Seite 5).
• Wenn Sie den Netzadapter anschließen, während sich AIBO im aktiven Modusbefindet, wechselt AIBO automatisch auf Pausemodus und das Laden des Akkusbeginnt.
• Zum Trennen des Adaptersteckers von AIBO, greifen Sie den Stecker sicher undziehen ihn ab.
• Schließen Sie nach dem Abziehen des Adaptersteckers wieder die Verschlussklappedes Ladekontakts.
xEnergiestationskern ERA-301P2 (Sonderzubehör)Wenn dieser Stationskern am Ständerangebracht wird, können Sie AIBOs internenAkku laden, indem Sie AIBO einfach auf denStänder setzen.
Energiestationskern

26

27
Spielen m
it AIB
O
Spielen mit AIBO
Dieses Kapitel beschreibt die Vorbereitungen und Prozedurenzum Spielen mit AIBO. Hierzu gehören das Einlegen desMemory Sticks mit AIBO-ware, das Einstellen der Lautstärkeund das Auswechseln des Akkus. Denken Sie bitte daran, dasszum Spielen mit AIBO ein Memory Stick mit AIBO-ware(Sonderzubehör) erforderlich ist.

28
Einsetzen und Entnehmen desMemory StickZum Spielen mit AIBO benötigt dieser einen Memory Stick mit AIBO-ware(Sonderzubehör). Einzelheiten über die Möglichkeiten, die die jeweiligeAIBO-ware bietet, entnehmen Sie bitte der Gebrauchsanleitung desbetreffenden Memory Stick. Wenn Sie AIBO ohne eingelegten Memory Stickstarten, schaltet er in den Klinikmodus, in welchem sich alle seine Sensorenund weitere Teile einer Untersuchung unterworfen lassen (Seite 43).
Einsetzen eines Memory StickSorgen Sie dafür, dass sich AIBO im Pausemodus befindet, bevor Sie einenMemory Stick einsetzen. Im Pausemodus ist die Rückenlampe erloschen.
1 Fassen Sie AIBO um den Körper und drehen Sie ihn auf denRücken. Entfernen Sie die Bauchklappe, indem Sie dieMarkierung in Richtung von AIBOs Schwanz drücken.

29
Spielen m
it AIB
OHinweise
• Wenn Sie AIBO anheben, fassen Sie ihn stets um den Körper und nicht etwa anKopf, Halsband, Beinen oder Schwanz. Achten Sie darauf, die Finger nichtzwischen AIBOs Halsband und Kopf oder Körper einzuklemmen.
• AIBOs Außenflächen sind relativ glatt. Vermeiden Sie, dass AIBO nichtversehentlich aus den Händen rutscht.
• Berühren Sie den Ladekontakt nicht mit der Hand. Ein verschmutzter Kontaktkann zu einer Beeinträchtigung der Verbindung führen.
2 Setzen Sie den Memory Stick ein und schließen Sie dieBauchklappe.Setzen Sie den Memory Stick wie gezeigt mit der Pfeilmarke ▼ nach untenund der abgerundeten Ecke zum Schwanz hin weisend bis zum Einrasten inden Memory Stick-Einschub ein.
Abgerundete Ecke

30
Entnehmen des Memory StickSorgen Sie dafür, dass sich AIBO im Pausemodus befindet, entfernen Sie dieBauchklappe und vergewissern Sie sich, dass die Memory Stick-Anzeigeerloschen ist.Drücken Sie Freigabetaste Z in AIBOs Innenleben und entnehmen Sie denMemory Stick.
Hinweis
Bei rot leuchtender Memory Stick-Anzeige ist die Freigabetaste gesperrt. Versuchen Sienicht, den Memory Stick gewaltsam zu entnehmen.
Memory Stick-Anzeige

31
Spielen m
it AIB
OStarten von AIBO
1 Setzen Sie AIBO wie gezeigt auf den Boden.Sorgen Sie für eine ebene, rutschfeste Fläche — vorzugsweise einenkurzhaarigen Teppichboden.
Hinweise
• Rutschige Böden oder Langhaarteppiche führen dazu, dass AIBO hinfällt, nichtvorwärts kommt oder sich verheddert.
• AIBO unbedingt wie oben gezeigt auf den Boden setzen. Andernfalls sindunvorhersehbare Bewegungen möglich, wenn Sie AIBO mit der Pausetastestarten.

32
2 Drücken Sie die Pausetaste auf AIBOs Rücken, so dass dieseausrastet.Der Pausemodus wird beendet und die Rückenlampe leuchtet grün. Nach einerkurzen Weile beginnt AIBO sich zu bewegen, und zwar gemäß dem Programmder AIBO-ware im Memory Stick.
Hinweis
Wenn ein Fehler auftriff oder Sie Ihre Finger in seinen Gelenken einklemmen,drücken Sie die Pausetaste auf seinem Rücken.
Für Einzelheiten zum Spielen mit AIBOMachen Sie sich bitte mit der Gebrauchsanleitung der AIBO-ware vertraut.

33
Spielen m
it AIB
OWenn Sie nicht mit AIBO spielenSie sollten stets dafür sorgen, dass der interne Akku vollständig geladen ist(Seite 22), damit Sie jederzeit wieder mit AIBO spielen können.
Pause für AIBODrücken Sie die Pausetaste auf AIBOsRücken. Die Rückenlampe blinkt grünund erlischt dann. Setzen Sie AIBO aufden mitgelieferten Stand.
Hinweise
• Bevor Sie AIBO auf den Ständer setzen, vergewissern Sie sich bitte, dass er sich imPausemodus befindet. Wenn Sie AIBO im aktiven Modus auf den Ständer setzen,kann er sich bewegen, fallen und sich verletzen.
• Der Akku wird nicht geladen, wenn Sie AIBO ohne vorheriges Drücken derPausetaste auf den Ständer setzen.
Pausetaste
Ständer

34
Einstellen der LautstärkeBevor Sie die Lautstärke einstellen, sorgen Sie dafür dass AIBO sich imPausemodus befindet. Drücken Sie hierzu die Pausetaste auf seinem Rücken.
1 Fassen Sie AIBO um den Körper und drehen Sie ihn auf denRücken. Entfernen Sie die Bauchklappe, indem Sie dieMarkierung in Richtung von AIBOs Schwanz drücken.
Hinweise
• Wenn Sie AIBO anheben, fassen Sie ihn stets um den Körper und nicht etwa anKopf, Halsband, Beinen oder Schwanz. Achten Sie darauf, die Finger nichtzwischen AIBOs Halsband und Kopf oder Körper einzuklemmen.
• AIBOs Außenflächen sind relativ glatt. Vermeiden Sie, dass AIBO nichtversehentlich aus den Händen rutscht.
• Berühren Sie den Ladekontakt nicht mit der Hand. Ein verschmutzter Kontaktkann zu einer Beeinträchtigung der Verbindung führen.

35
Spielen m
it AIB
O2 Schieben Sie den Lantstärkeregler auf den gewünschten
Lautstärkepegel und bringen Sie die Bauchklappe wieder an.Zum Erhöhen der Lautstärke schieben Sie den Regler in Plusrichtung (+), zumVerringern in Minusrichtung (–). Bei Loslassen des Reglers kehrt er inMittelstellung zurück.Es stehen vier Lautstärkestufen zur Verfügung, einschließlichStummschaltung. Bei jedem Schieben des Reglers wird der Pegel um eineStufe erhöht bzw. verringert.

36
Austauschen des AkkusDer in AIBO eingelegte Akku lässt sich ohne weiteres über den Netzadaptermit Adapterstecker laden. Darüber hinaus besteht die Möglichkeit, einenerschöpften Akku gegen einen voll geladenen Akku auszutauschen.
Hinweis
Verwenden Sie ausschließlich den mitgelieferten Akku des Typs ERA-301B1.
1 Drücken Sie die Pausetaste und warten Sie, bis die Rückenlampeerlischt.
Hinweis
Wenn AIBO auf die AIBO-ware im Memory Stick zugreift, leuchtet die MemoryStick-Anzeige rot. In einem solchen Fall sind die Freigabetaste Z und derAkkuriegel BATT Z gesperrt. Versuchen Sie nicht, den Akku zu entnehmen, wenndiese Anzeige leuchtet.
Rückenlampe

37
Spielen m
it AIB
O2 Fassen Sie AIBO um den Körper und drehen Sie ihn auf den
Rücken. Entfernen Sie die Bauchklappe, indem Sie dieMarkierung in Richtung von AIBOs Schwanz drücken.
Hinweise
• Wenn Sie AIBO anheben, fassen Sie ihn stets um den Körper und nicht etwa anKopf, Halsband, Beinen oder Schwanz. Achten Sie darauf, die Finger nichtzwischen AIBOs Halsband und Kopf oder Körper einzuklemmen.
• AIBOs Außenflächen sind relativ glatt. Vermeiden Sie, dass AIBO nichtversehentlich aus den Händen rutscht.
• Berühren Sie den Ladekontakt nicht mit der Hand. Ein verschmutzter Kontaktkann zu einer Beeinträchtigung der Verbindung führen.
3 Klappen Sie den Akkuriegel BATT Z in Schwanzrichtung undentnehmen Sie den Akku.
Akkuriegel BATT Z

38
Hinweise
• Achten Sie darauf, dass der Akku beim Herausnehmen nicht aus der Handrutscht und herunterfällt.
• Wenn die Memory Stick-Anzeige leuchtet, ist der Akkuriegel BATT Z gesperrt.Wenn Sie gewaltsam versuchen, den Akku zu entnehmen, kann AIBObeschädigt werden.
4 Setzen Sie den frischen Akku in Pfeilrichtung bis zum Einrastenein und schließen Sie wieder die Bauchklappe.
5 Setzen Sie AIBO wie gezeigt auf den Boden.
Hinweis
Setzen Sie AIBO unbedingt wie gezeigt auf denBoden. Andernfalls sind unvorhersehbareBewegungen möglich, wenn Sie AIBO mit derPausetaste starten.
Hier drücken.

39
Weitere Inform
ation
Weitere Information
Dieses Kapitel enthält Hinweise zum Umgang mit AIBO, Hinweisezur Störungsbehebung und andere Information zu AIBO.

40
Hinweise zum Umgang mit AIBOUm Beschädigungen an AIBO und seinem Zubehör zu vermeiden, beachtenSie bitte die folgenden Hinweise.
Umgang mit AIBO• Verwenden Sie AIBO nicht an Orten, an denen er Vibrationen ausgesetzt ist,
auf einer schiefen Ebene oder an Plätzen, von denen er herunterfallenkönnte.
• Drücken Sie nicht mit der Hand oder dem Ellenbogen nicht zu fest aufAIBO.
• Lassen Sie AIBO nicht fallen und schütteln Sie ihn nicht. Andernfalls könnte erbeschädigt werden oder Daten auf dem Memory Stick könnten verloren gehen.
• Berühren Sie den Ladekontakt nicht mit der Hand. Ein verschmutzterKontakt kann zu einer Beeinträchtigung der Verbindung führen.
• Wenn Sie AIBO anheben, fassen Sie ihn stets um den Körper und nicht etwaan Kopf, Halsband, Beinen oder Schwanz. Schwingen oder verdrehen SieAIBO nicht.
• Schützen Sie AIBO vor hohen Temperaturen, wie sie z.B. in einem in derSonne geparkten Fahrzeug entstehen können. Andernfalls könnte AIBO sichverformen oder anderweitig beschädigt werden.
• Achten Sie darauf, dass keine Fremdkörper, z.B. Büroklammern, in AIBOoder seine Gelenke geraten.
• Verwenden Sie AIBO nicht im Freien. Andernfalls könnten Feuchtigkeit undFremdkörper in AIBO hineingeraten und Beschädigungen verursachen.
• Lassen Sie AIBO nicht auf einem Betonboden oder einem anderen sehrharten Boden herumlaufen. Auf einem solchen Boden könnte AIBObeschädigt werden.
• Schützen Sie AIBO vor Feuchtigkeit.• Versuchen Sie niemals, AIBOs Bewegungen zu manipulieren oder zu
unterdrücken.

41
Weitere Inform
ation• Berühren Sie nicht das Objektiv der Farbkamera oder den Distanzsensor mit
der Hand.• Kleben Sie nichts auf die Farbkamera oder den Distanzsensor.• Richten Sie die Farbkamera nicht direkt in die Sonne, egal ob AIBO ein-
oder ausgeschaltet ist. Andernfalls könnte die Kamera beschädigt werden.• Ölen oder schmieren Sie nicht AIBOs Gelenke oder andere bewegliche Teile
ein.• Kleben Sie nichts auf AIBOs Gelenke und führen Sie nichts in die Gelenke
ein. Andernfalls könnte AIBOs Beweglichkeit beeinträchtigt werden.• Zerlegen oder verändern Sie AIBO nicht.• Wenn AIBO transportiert werden muss, verpacken Sie ihn in seinen
Originalkarton oder einen gleichwertig gepolsterten Karton, damit es nichtzu Beschädigungen an Körper, Kopf, Schwanz oder Beinen kommt.
• Schützen Sie AIBO vor starken elektromagnetischen Wellen oderRöntgenstrahlen.
• Halten Sie Karten mit Magnetstreifen und sonstige magnetischeSpeichermedien vom Adapterstecker fern. Andernfalls kann der Magnet imStecker gespeicherte Daten löschen.
• Die AIBO-ware-Anwendungen für den ERS-110/111 können mit dem ERS-311/312 nicht verwendet werden.
• Die AIBO-ware-Anwendungen für den ERS-210 sind mit dem ERS-311/312nicht gewährleistet. Es können gewisse Funktionseinschränkungen bestehen.
FeuchtigkeitskondensationWird AIBO direkt von einem kalten an einen warmen Ort gebracht, kann sichin seinem Innern oder an der Außenseite Feuchtigkeit niederschlagen und zuBeschädigungen führen. Warten Sie in einem solchen Fall etwa eine Stundelang, bevor Sie AIBO aktivieren.

42
Umgang mit dem Netzadapter• Verwenden Sie zum Laden von AIBOs Akku ausschließlich den
mitgelieferten Netzadapter. Bei anderen Netzteilen kann es zu Schäden anAIBO kommen.
• Verbinden Sie den Netzadapter nicht mit Elektrotransformatoren, wie siez.B. auf Reisen verwendet werden. Andernfalls könnte sich AIBO erhitzenoder anderweitig beschädigt werden.
Umgang mit dem Akku• Setzen Sie den Akku keinen Temperaturen über 45 °C aus, wie sie z.B. in
einem in der Sonne geparkten Fahrzeug auftreten können.• Schützen Sie die Kontakte vor Fremdkörpern wie Staub oder Sand.• Wenn Sie längere Zeit nicht mit AIBO spielen, nehmen Sie den Akku heraus
und bewahren ihn kühl und trocken auf.• Der Akku entlädt sich auch bei Nichtbenutzung. Laden Sie den Akku vor
dem Spielen stets vollständig auf.• Lassen Sie den Akku nicht fallen, und stellen Sie keine schweren
Gegenstände darauf. Drücken Sie nicht zu fest auf den Akku und schützenSie ihn vor Stößen.
Reinigung• Reinigen Sie AIBO mit einem sauberen, trockenen, weichen Tuch.• Verwenden Sie keine flüchtigen Lösungsmittel. Diese könnten AIBOs
Oberfläche angreifen.• Beim Reinigen mit einem Chemietuch lesen Sie dessen Gebrauchsanleitung.

43
Weitere Inform
ationStörungssucheBevor Sie bei einem Prolemfall die AIBO-Kundendienst-Hotline anrufenschalten Sie AIBO bitte in den Klinikmodus, damit seine Sensoren undanderen Teile einer gründlichen Untersuchung unterworfen werden, undkonsultieren Sie die Fehlersuchtabelle (Seite 47).
KlinikmodusWenn Sie AIBO ohne eingelegten Memory Stick mit AIBO-ware starten,schaltet AIBO in den Klinikmodus, in dem sich alle Sensoren und anderenTeile ausgiebig prüfen lassen. Die Modusanzeige bleibt dabei ausgeschaltet.Kontaktieren Sie die AIBO-Kundendienst-Hotline (Seite 5), wenn sich einProblem nicht beheben läßt.
AIBO in den Klinikmodus schalten
1 Entnehmen Sie den Memory Stick mit AIBO-ware aus dem AIBO(Seite 28).
2 Setzen Sie AIBO wie gezeigt auf den Boden und drücken Sie diePausetaste auf seinem Rücken (Seite 32).AIBO schaltet in den Klinikmodus und führtwiederholt die folgenden Bewegungen der Reihenach aus: Aufstehen, Hinsetzen, Hinlegen.

44
Checkliste für den Klinikmodus
Prüfpunkt Vorgehensweise
Kopfsensor(im Kopf)
HörnchenlampeModusanzeige
Rückenlampe
Pausetaste
Bedienung desSchalter amSchwanz undAIBOsGleichgewicht
1 Drücken Sie den Schalter am Schwanz 3Sekunden lang nach rechts.AIBO führt die folgenden Bewegungen der Reihenach aus: läuft vorwärts, läuft rückwärts, tritt mitrechtem Hinterbein, tritt mit linkem Hinterbein.Während dieser Zeit leuchtet AIBOsHörnchenlampe in drei Farben. Anschließend führtAIBO wieder die Grundbewegungen aus:Aufstehen, Hinsetzen, Hinlegen.
2 Drücken Sie den Schalter am Schwanz 3Sekunden lang nach links.AIBO führt die folgenden Bewegungen der Reihenach aus: setzt sich hin, winkt mit der rechten Pfote,winkt mit der linken Pfote, hebt beide Vorderbeine.Während dieser Zeit leuchtet AIBOsHörnchenlampe in drei Farben.
Rechts
Links
VorneHinten
Schalter am Schwanz

45
Weitere Inform
ationPrüfpunkt Vorgehensweise
Sensitivität derPfotenschalter
1 Drehen Sie den Schalter am Schwanz einmal.AIBO legt sich hin und streckt alle Viere von sich.
2 Berühren Sie einen Pfotenschalter.AIBO zieht die berührte Pfote ein.
3 Drehen Sie den Schalter am Schwanz erneut.AIBO führt wieder die Grundbewegungen aus:Aufstehen, Hinsetzen, Hinlegen.
Drehrichtungist egal
Sensitivität vonAIBOs Kopfsensor
1 Drücken Sie sanft den Kopf, so dass AIBO nachunten schaut.Die Hörnchenlampe leuchtet grün.
2 Drücken Sie sanft den Kopf, so dass AIBO nachoben schaut.Die Hörnchenlampe leuchtet orangerot.
Sensitivität derFarbkamera
1 Bringen Sie den rosaroten Ball nahe an dieFarbkamera (AIBOs Maul).Wenn die Kamera den Ball erkennt, leuchtet dieHörnchenlampe blau.Bei zu großer oder zu geringer Nähe des Balls wirddieser evtl. nicht von der Kamera erkannt. ÄndernSie in einem solchen Fall den Abstand zwischenBall und Kamera.

46
Prüfpunkt Vorgehensweise
Sensitivität desDistanzsensors
1 Drehen Sie den Schalter am Schwanz einmal.AIBO legt sich hin und streckt alle Viere von sich.
2 Halten Sie Ihre Hand oder einen anderenGegenstand vor den Distanzsensor (AIBOs Nase).Bei Erkennung des Objekts erfolgt ein Signalton(außer bei auf Stummschaltung gesetztemLautstärkeschalter). Die Höhe des Signaltons istabhängig vom Abstand zwischen Objekt undSensor. Bei zu großer oder zu geringer Nähe desObjekts wird dieses evtl. nicht erkannt. Ändern Siein einem solchen Fall den Abstand zwischen Objektund Sensor.
3 Drehen Sie den Schalter am Schwanz erneut.AIBO führt wieder die Grundbewegungen aus:Aufstehen, Hinsetzen, Hinlegen.
Aufhebemodus 1 Nehmen Sie AIBO vom Boden auf.AIBO stoppt jede Bewegung, seine Beine werdenlocker und die Modusanzeige leuchtet auf. WennSie AIBO zu langsam aufheben, bleiben seine Beinestarr. Halten Sie AIBO in einem solchen Fall, unddrücken Sie den Schalter am Schwanz 3 Sekundenlang in Gegenrichtung von AIBOs Kopf.
2 Setzen Sie AIBO wieder auf den Boden oderdrücken Sie den Schalter am Schwanz 3Sekunden lang in Richtung AIBOs Kopf.AIBO führt wieder die Grundbewegungen aus:Aufstehen, Hinsetzen, Hinlegen.
Drehrichtungist egal

47
Weitere Inform
ationFehlersuchtabelleWenn eine Funktionsstörung auftritt, versuchen Sie bitte zunächst den Fehleranhand der folgenden Tabelle zu beheben. Sollte Ihnen dies nicht gelingen,kontaktieren Sie bitte die AIBO-Kundendienst-Hotline (Seite 5).
Symptom Ursache/Abhilfe
AIBO bewegt sich nicht. AIBO wurde aufgehoben oder ein Fremdkörperversperrt seine Gelenke.c Setzen Sie AIBO auf den Boden und drücken
Sie den Schalter am Schwanz 3 Sekunden langin Richtung AIBOs Kopf. AIBO bewegt sichnicht, sobald er aufgehoben wird(Modusanzeige leuchtet) oder einFremdkörper in die Gelenke gerät(Modusanzeige blinkt).
Akku erschöpft.c Laden Sie den Akku (Seite 22). Bei vollständig
erschöpftem Akku erlischt die Rückenlampeund AIBO bewegt sich nicht mehr.
AIBO hat ein Ohrverloren.
c Richten Sie die Mitte von AIBOs Mikrofon mitder Mitte des Ohrlochs aus und drücken Siedie Zungen an der Hinterseite des Ohrs in dieAussparungen zu beiden Seiten desMikrofons, bis das Ohr sicher einrastet.
Aussparungen

48
Symptom Ursache/Abhilfe
AIBO reagiert nicht aufdie Freigabe derPausetaste.
Es ist kein Akku eingelegt.c Legen Sie den Akku ein (Seite 20) und
drücken Sie die Pausetaste erneut.Der Akku ist erschöpft.c Laden Sie den Akku oder tauschen Sie ihn
gegen einen frischen aus.Der Netzadapter ist an den Ladekontakt vonAIBO angeschlossen.c Trennen Sie den Netzadapter und drücken Sie
die Pausetaste erneut.
Bei Drücken derPausetaste blinkt dieRückenlampeabwechselnd orangerotund grün, gefolgt voneinem Signalton.
Der Akku ist zu heiß geworden.c Lassen Sie den Akku abkühlen.
AIBO singt eine traurigeMelodie und bewegt sichnicht, wenn Sie diePausetaste freigeben.
• Ein Memory Stick ohne AIBO-ware isteingelegt.
• Ein Memory Stick, der sich nicht für AIBOERS-311/312 eignet, ist eingelegt.
AIBO braucht sehr lange,bis er sich bewegt.
AIBO liest die Daten vom Memory Stick ein.Haben Sie Geduld.

49
Weitere Inform
ationSymptom Ursache/Abhilfe
AIBO versucht zu laufen,kommt aber nicht vomFleck.
Der Boden ist rutschig oder der Teppich zuweich.c Sorgen Sie für einen geeigneten Boden, z.B.
einen kurzhaarigen Teppich.
AIBO fällt oft hin. Der Boden ist zu glatt, geneigt oder unstabil.c Sorgen Sie für eine waagerechte, nicht zu
glatte Bodenfläche.
AIBO bewegt sich nicht,wenn Sie ihn aufheben.
Dies ist immer der Fall, wenn AIBO aufgehobenwird.c Vergewissern Sie sich, dass die Modusanzeige
leuchtet, setzen Sie AIBO auf den Boden unddrücken Sie den Schalter am Schwanz 3Sekunden lang in Richtung AIBOs Kopf.
Die Modusanzeigeleuchtet oder blinkt undAIBO gibt Tonfolgen vonsich, aber er läuft nicht.
AIBO bewegt sich nicht, wenn er aufgehobenwird oder Fremdkörper seine Gelenkeversperren.c Setzen Sie AIBO auf den Boden und drücken
Sie den Schalter am Schwanz 3 Sekundenlang in Richtung AIBOs Kopf.
Die Rückenlampe blinktorangerot.
Der Akku ist möglicherweise defekt.c Vergewissern Sie sich davon, dass der Akku
korrekt eingelegt ist. Wenn das Blinken nichtaufhört, kontaktieren Sie bitte die AIBO-Kundendienst-Hotline (Seite 5).

50
Symptom Ursache/Abhilfe
AIBO jagt denmitgelieferten Ball nicht.
Wenn eine von AIBOs Anwendungen imeingelegten Memory Stick läuft, jagt er den Ballnicht. Aber er reagiert darauf.
Die Rückenlampe erlischtnicht, wenn Sie diePausetaste drücken, umAIBO in den Pausemoduszu schalten.
Möglicherweise liegt ein Fehler an der internenAnwendung vor.c Entnehmen Sie den Akku (Seite 36). Setzen Sie
den Akku wieder ein und drücken Sie diePausetaste nochmals (Seite 33). Wenn sich derAkku nicht über den Akkulösehebel BATT Zauswerfen lässt, führen Sie einen spitzenGegenstand in die Notfriegabe ein (Seite 17).
AIBO bittet trotz vollaufgeladenem Akkubereits nach kurzer Zeitum Aufladung.
Wenn die Betriebsdauer des Akkus sehr kurzwird, hat der Akku in der Regel das Ende seinerNutzungsdauer erreicht. Tauschen Sie ihn gegeneinen neuen aus (Seite 36).
AIBO gibt keineTonfolgen von sich.
AIBO ist stummgeschaltet.c Erhöhen Sie den Lautstärkepegel (Seite 34).

51
Weitere Inform
ationTechnischeDaten
AIBOCPU RISC-Prozessor (64 Bit)
Hauptspeicher
32 MB
Mitgelieferter Anwendungsdatenträger
Memory Stick für AIBO
Bewegliche Teile
Kopf: 3 Bewegungspunkte
Beine: 3 Bewegungspunkte× 4
(Insgesamt: 15Bewegungspunkte)
Eingang Ladekontakt
Eingangsschalter
VOLUME (Lautstärke)
RESERVED (reserviert)
Videoeingang
CMOS-Bildsensor(100.000 Pixel)
Audioeingang
Stereomikrofone
Audioausgang
Lautsprecher
Interne Sensoren
Infrarot-Distanzsensor
Beschleunigungssensor
Drucksensoren in Kopf,Schwanz und Pfoten
Neigungssensor
Vibrationssensor
Leistungsaufnahme
ca. 5 W (im normalen Modus)
Betriebsdauer
ca. 2,5 Stunden (beivollständig geladenem AkkuERA-301B1, im normalenModus)
Abmessungen
ca. 177 × 280 × 240 mm(B/H/T)
Gewicht ca. 1,5 kg (einschl. Akku undMemory Stick)
Betriebstemperatur
5 °C bis 35 °C
Luftfeuchtigkeit bei Betrieb
10 % bis 80 % (nichtkondensierend)
Feuchtkugeltemperatur bei Betrieb
unter 29 °C

52
Lagertemperatur
–10 °C bis 60 °C
Luftfeuchtigkeit bei Lagerung
10 % bis 90 % (nichtkondensierend)
Feuchtkugeltemperatur bei Lagerung
unter 29 °C
StänderAbmessungen
ca. 109 × 97 × 228 mm(B/H/T)
Gewicht ca. 180 g (einschl. Akku undMemory Stick)
NetzadapterEingangsspannung
100-240 V, 50-60 Hz
0,85-0,46 A
Ausgangsspannung
16 V Gleichstrom, 2,5 A
Betriebstemperatur
5 °C bis 35 °C
(Temperaturschwankungenunter 10 °C/Stunde)
Luftfeuchtigkeit bei Betrieb
20 % bis 80 % (nichtkondensierend). Bei einerTemperatur von 35 °C mussdie Luftfeuchtigkeit unter65 % liegen(Feuchtkugeltemperatur:unter 29 °C).
Lagertemperatur
–20 °C bis 60 °C
(Temperaturschwankungenunter 10 °C/Stunde)
Luftfeuchtigkeit bei Lagerung
10 % bis 90 % (nichtkondensierend)
Abmessungen
ca. 60 × 30 × 120 mm(B/H/T)
Gewicht ca. 325 g
Kabellänge Gleichstromkabel: ca. 1,8 m
Netzkabel: 1,8 m

53
Weitere Inform
ationLithium-Ionen-AkkuTyp Lithium-Ionen-Akku
Durchschnittliche Ausgangsspannung
7,4 V Gleichstrom
Kapazität 1700 mAh
Betriebstemperatur
5 °C bis 40 °C
(Temperaturschwankungenunter 10 °C/Stunde)
Luftfeuchtigkeit bei Betrieb
10 % bis 80 % (nichtkondensierend)
Feuchtkugeltemperatur bei Betrieb
unter 29 °C
Lagertemperatur
–20 °C bis 60 °C
(Temperaturschwankungenunter 10 °C/Stunde)
Luftfeuchtigkeit bei Lagerung
10 % bis 90 % (nichtkondensierend)
Feuchtkugeltemperatur bei Lagerung
unter 35 °C
Abmessungen
ca. 72 × 53,6 × 21 mm(B/H/T)
Gewicht ca. 112 g
Änderungen, die dem technischenFortschritt dienen, bleibenvorbehalten.
Mitgeliefertes ZubehörSiehe Seite 13.

54
Index
AAdapterstecker für denNetzadapter ............................... 13, 22
AIBOPause ........................................... 33Reinigung ................................... 42Umgang ...................................... 40Starten ......................................... 31
AIBO-Kundendienst-Hotline ............ 5AIBO-ware ......................................... 12Akku
Austauschen ............................... 36Einlegen ...................................... 20Einschub ...................................... 17Laden ........................................... 22Umgang ...................................... 42
Akkuriegel BATT Z ................... 17, 37
DDekorationsscheibe .......................... 18Distanzsensor .................................... 15
EEnergiestationkern ........................... 25
FFarbkamera ........................................ 15
HHörnchenlampe ................................ 15
KKlinikmodus ...................................... 43Kopf .................................................... 15Kopfsensor ......................................... 44
LLadekontakt ................................. 17, 23Lautsprecher ...................................... 15Lautstärke .......................................... 34Lautstärkeregler .......................... 17, 35
MMemory Stick
Anzeige ................................. 17, 30Einschub ...................................... 17Einsetzen ..................................... 28Entnehmen ................................. 30Freigabetaste Z .................... 17, 30
Modusanzeige ................................... 15

55
Weitere Inform
ationN
Notfreigabe ........................................ 17Netzteil ......................................... 13, 22
PPausetaste .............................. 15, 32, 33Pausemodus .......................... 28, 32-34Pfotenschalter .................................... 15
RRückenlampe ............................... 15, 24
SSchalter am Schwanz ....................... 15Ständer ......................................... 13, 18Stereomikrofon .................................. 15
VVerschlussklappe fürLadekontakt ............................... 16, 23


Designer of AIBO ERS-311/312Créateur d’AIBO ERS-311/312Designer für AIBO ERS-311/312Katsura MoshinoArtist/Illustrator/Visual CreatorBorn in 1968, Katsura Moshino began doing illustration and artwork forthe night club scene in the mid-80s. He has produced cutting-edge andhighly original work in Japan and abroad in a wide variety of areas,including CD jackets, music magazines, advertising, product design,package design, and music video production. His published collectionsinclude “Moshino’s Works for Girls Studio” (Kawade Shobo).
Katsura MoshinoArtiste/Illustrateur/Créateur visuelNé en 1968, Katsura Moshino commence à faire des illustrations et travaux artistiques pour lascène d’une boîte de nuit au milieu des années 1980. Il a produit des travaux de pointe trèsoriginaux au Japon et à l’étranger dans une grande variété de domaines, incluant les pochettesCD, les magazines musicaux, la publicité, la conception de produits, la conceptiond’emballages et la production de vidéo musicales. Il a publié des collections incluant“Moshino's Works for Girls Studio” (Kawade Shobo).
Katsura MoshinoKünstler, Illustrator, Visual CreatorJahrgang 1968, begann Katsura Moshino seine Künstlerkarriere in der Mitte der 80er Jahremit Arbeiten und Illustrationen für die Nightclub-Szene. Seither hat er sich durch eine Reihehoch individueller Projekte sowohl in Japan als auch im Ausland einen Namen gemacht.Moshinos Betätigungsfeld erstreckt sich vom Design für CD-Hüllen über Musikmagazine,Werbung, Produktdesign, Verpackungsdesign bis hin zur Produktion von Musikvideos. Zuseinen Publikationen zählt „Moshino’s Works for Girls Studio“ (Kawade Shobo).

En
terta
inm
en
t Ro
bo
t AIB
OER
S-3
11
/3
12
English
Français
Deutsch
© 2001 Sony Corporation
Operating Instructions
4-657-307-11(1)
Printed in Japan * 4 6 5 7 3 0 7 1 1 (1)*