online event management system - american … · event management system page 1 of 63 online event...
TRANSCRIPT

Event Management System
Page 1 of 63
Online Event Management System
Table of Contents
Introduction .................................................................................................................................................................. 2 Who uses this system ............................................................................................................................................... 2 What you can do using this system .......................................................................................................................... 2 Accessing the Online Event Management system ................................................................................................... 2 Finding Helpful Information .................................................................................................................................... 5
Event Search................................................................................................................................................................. 6 Purpose of Event Search........................................................................................................................................... 6 Step-by-step.............................................................................................................................................................. 7 Introduction .............................................................................................................................................................. 7
Event Home Page ......................................................................................................................................................... 9 Introduction .............................................................................................................................................................. 9 Abbreviated instructions........................................................................................................................................... 9 Step-by-step............................................................................................................................................................ 10 Club Secretary or Event Superintendent ................................................................................................................ 14
Introduction ........................................................................................................................................................ 14 Abbreviated instructions..................................................................................................................................... 14 Step-by-step........................................................................................................................................................ 14
Event Chairperson/Committee Information ........................................................................................................... 16 Introduction ........................................................................................................................................................ 16 Abbreviated instructions..................................................................................................................................... 16 Step-by-step........................................................................................................................................................ 17
Disaster Plan........................................................................................................................................................... 19 Introduction ........................................................................................................................................................ 19 Abbreviated instructions..................................................................................................................................... 20 Step-by-step........................................................................................................................................................ 20
Competition Setup.................................................................................................................................................. 24 Introduction ........................................................................................................................................................ 24 Abbreviated instructions..................................................................................................................................... 24 Step-by-step........................................................................................................................................................ 25
Judges Panel ............................................................................................................................................................... 26 General introduction and information .................................................................................................................... 26 Using the Search Interfaces.................................................................................................................................... 27
Introduction ........................................................................................................................................................ 27 Abbreviated directions ....................................................................................................................................... 27 Panes and columns ............................................................................................................................................. 27 Reset button........................................................................................................................................................ 29 The Trash Can .................................................................................................................................................... 30
Event Search........................................................................................................................................................... 30 Available Judges..................................................................................................................................................... 34 Using the Assignments interfaces .......................................................................................................................... 36 Judge Assignments ................................................................................................................................................. 41 Event Assignments ................................................................................................................................................. 46 Breed Assignments................................................................................................................................................. 49

Event Management System
Page 2 of 63
Unassigned ............................................................................................................................................................. 52 Contract Status ....................................................................................................................................................... 54 Appendix ................................................................................................................................................................ 56
Java Runtime document: How to Install Java .................................................................................................... 56 Frequently Asked Questions .............................................................................................................................. 59
Introduction
Who uses this system If you are the Superintendent, Event Chair, or Event Secretary of a dog club affiliated with the American Kennel Club (AKC), you will find the Online Event Management System a helpful tool in planning your upcoming event.
What you can do using this system Use the Online Event Management System for a number of activities, including the following.
♦ Modify Superintendent identification or event secretary contact information, as well as, event chairman and committee member information.
♦ Submit your event application and accompanying Emergency and Disaster Plan. ♦ View and manage your event’s judging panel using the AKC database to assign
judges you selected to use for your event. ♦ Assign breeds and check for judging conflicts after you select or add your
event’s intended judges. ♦ Using real-time online reports, monitor your event’s approval by the AKC event
operator. ♦ Assign judges and confirm their contract status while viewing the judging
panel for other events. When you process your event application or confirm judges on your judges panel, this information immediately becomes available to you in the form of online reports and to dog fanciers with access to the AKC Web site.
Only AKC Event Operations can enter a new event, new date, or new location into the database. Your club must request, in writing, to hold a new sanctioned event or a traditional event at a new place or date. You can find forms online through links on the AKC Downloadable Forms page (www.akc.org/pdfs/masterform.cfm#show_events).
Once your show information is in the database, you or your club’s representative can return to Online Event Management and update the information as needed, as well as work through the creation of an approved judges panel.
Accessing the Online Event Management system To access the Online Event Management System from the home page of the AKC Web site, complete the following steps.
1. Click “Events” at the top of the page. The left side bar changes to provide links to Event information.

Event Management System
Page 3 of 63
Figure 1 – Accessing Events links.
2. Click “Online Plans” in the “AKC Events” list, circled in Figure 1. The login page displays.

Event Management System
Page 4 of 63
Figure 2 – Log in
3. Type the Account Login and Password that AKC provided to your club, along with your Name and Email address.
4. Click the Login button. The Event Management page displays, similar to the one illustrated in Figure 3.
Figure 3 – The Event Management page.
Click the Enter Here button corresponding to the function you want to use. The Event Information Management tool displays if you select the button on the left, the Quick Submit or Judge Panels Planning Application displays if you select the buttons on the right;. Here, determine whether to manage your event’s information, or your judging panel by clicking the appropriate Enter Here button (see Figure 4). The Event Search, Quick Submit or Judge Panel Planning Application page opens (see Event Search, Quick Submit or Judges Panel for more information).
Event Management System
Page 5 of 63
Finding Helpful Information System help
♦ Online documentation, available on all pages, is a good place to start for those who are familiar with the system but may need to jog their memory about a particular function (click here for the online documentation). ♦ A full user guide, available as a PDF file (requiring Acrobat Reader, available free from Adobe), provides in-depth information about system functions, including specific steps to take to complete various tasks.
Process flow chart
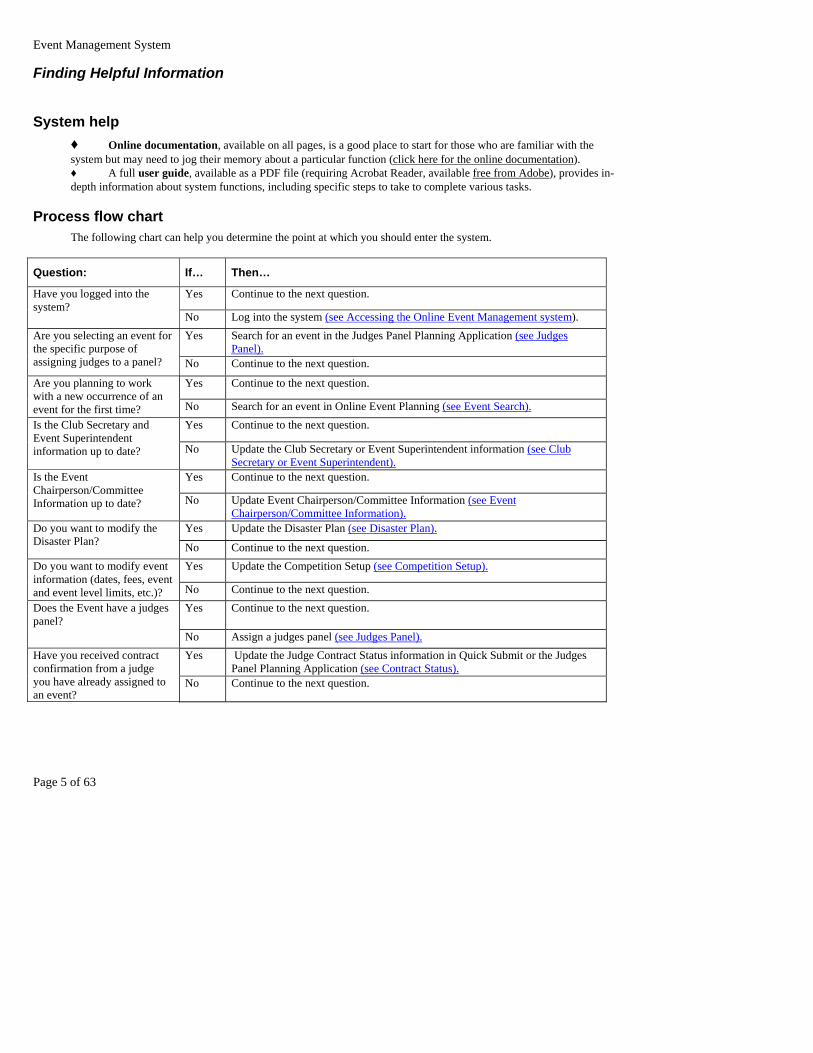
The following chart can help you determine the point at which you should enter the system.
Question: If… Then…
Yes Continue to the next question. Have you logged into the system? No Log into the system (see Accessing the Online Event Management system).
Yes Search for an event in the Judges Panel Planning Application (see Judges Panel).
Are you selecting an event for the specific purpose of assigning judges to a panel? No Continue to the next question.
Yes Continue to the next question. Are you planning to work with a new occurrence of an event for the first time? No Search for an event in Online Event Planning (see Event Search).
Yes Continue to the next question. Is the Club Secretary and Event Superintendent information up to date? No Update the Club Secretary or Event Superintendent information (see Club
Secretary or Event Superintendent). Yes Continue to the next question. Is the Event
Chairperson/Committee Information up to date? No Update Event Chairperson/Committee Information (see Event
Chairperson/Committee Information).Yes Update the Disaster Plan (see Disaster Plan).Do you want to modify the
Disaster Plan? No Continue to the next question. Yes Update the Competition Setup (see Competition Setup).Do you want to modify event
information (dates, fees, event and event level limits, etc.)? No Continue to the next question.
Yes Continue to the next question. Does the Event have a judges panel?
No Assign a judges panel (see Judges Panel).Yes Update the Judge Contract Status information in Quick Submit or the Judges
Panel Planning Application (see Contract Status).Have you received contract confirmation from a judge you have already assigned to an event?
No Continue to the next question.

Event Management System
Page 6 of 63
Question: If… Then…
Yes Continue to the next question. Have you selected an Event to which you wish to assign judges? No Select one or more events using the Judges Panel Planning Application (see
Event Search).Yes Continue to the next question
Have you selected judges you wish to assign to an event or events? No Select one or more judge names in the Judges Panel Planning Application (see
Available Judges).Yes View and modify all assignments, breeds and classes (see Event Assignments).Do you want to modify judge
panel assignments while viewing all judge names assigned to all classes and breeds for an event?
No Continue to the next question.
Yes Assign selected judges to classes within a selected event (see Judge Assignments).
Do you wish to assign a particular judge to a class or breed? No Continue to the next question.
Yes Assign an approved judge to classes within a selected event (see Breed Assignments).
Do you wish to assign an approved judge for a specific class or breed? No Continue to the next question.
Yes View unassigned classes or breeds and assign judges (see Unassigned). Do you wish to view only classes or breeds which have no assigned judge, and assign one?
No Continue to the next question.
Yes View classes or breeds by the associated judge, and select the contract status (see Contract Status).
Do you wish to adjust a particular judge’s contract status for a specific class or breed?
No Table complete.
Event Search
Purpose of Event Search After logging in, use Event Search to select the specific event you wish to modify or update. The Event
Search page displays, with a list of events that match your search displays, see Figure 4.

Event Management System
Page 7 of 63
Figure 4 – The Events Seach page.
Step-by-step
Figure 5 – Enter the Online Event Management System
1. Click Enter Here (See Figure 5). The Event Search screen displays(see Figure 6). 2. Click on the name of the event you want to modify. The Event Home page opens. (See Figure 8).
Introduction
After you enter the Event Management Application the Events Search page displays. It contains a list of all of the events that meet the criteria for the club you indicated, including associated information (Location, Event Type, Event Date, and Closing Date).
It is similar to the illustration in Figure 6.

Event Management System
Page 8 of 63
Figure 6 – The Events Search page. The square in this illustration indicates the linked event names that meet the criteria provided in the Event Search page.
The Events Search contains the following columns of information. 1. Name – the name of the event, linked to its Event Home page, where you can access event information
and the Judge Panel Planning Application. 2. Location – the city and state where the event is scheduled to be held. 3. Event Type – abbreviations indicating competitions (classes and breeds) offered at the event. 4. Event Date – the date the event opens. 5. Closing Date – the last date that exhibitors may enroll in the event. Click on an
event name to open the associated Event Home page (see Figure 8).
Event Management System
Page 9 of 63
Event Home Page
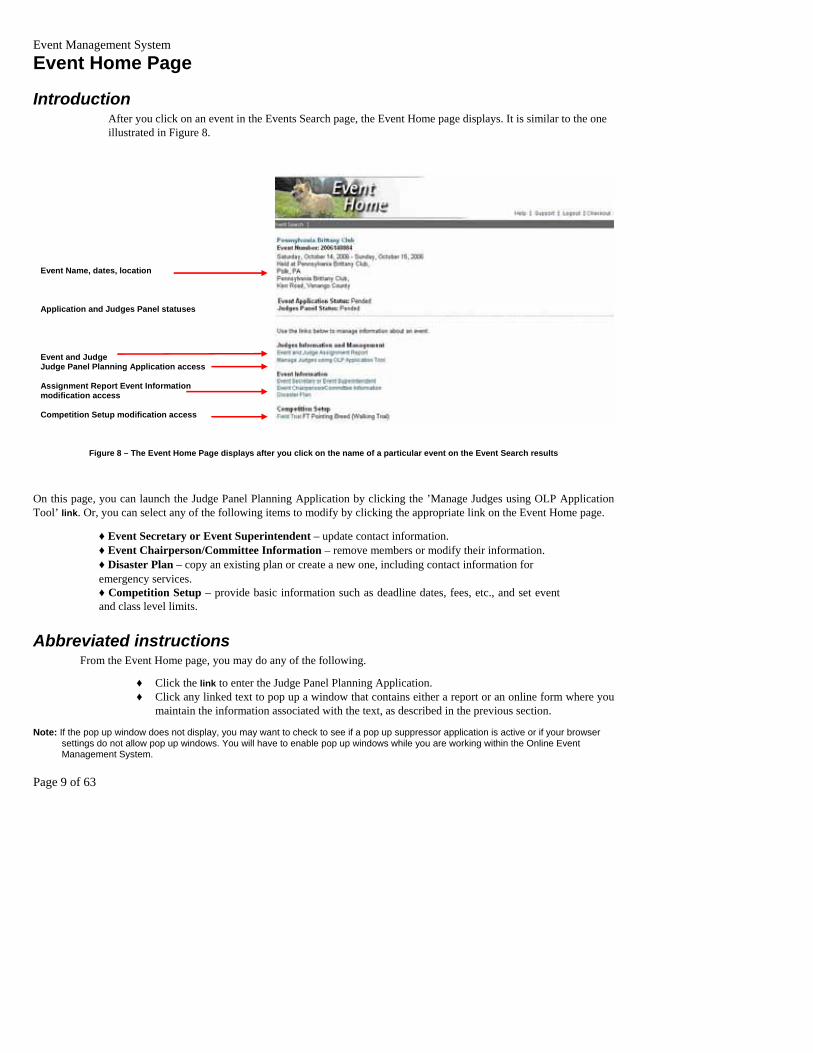
Introduction After you click on an event in the Events Search page, the Event Home page displays. It is similar to the one illustrated in Figure 8.
Event Name, dates, location Application and Judges Panel statuses Event and Judge Judge Panel Planning Application access
Assignment Report Event Information modification access
Competition Setup modification access
Figure 8 – The Event Home Page displays after you click on the name of a particular event on the Event Search results
On this page, you can launch the Judge Panel Planning Application by clicking the ’Manage Judges using OLP Application Tool’ link. Or, you can select any of the following items to modify by clicking the appropriate link on the Event Home page.
♦ Event Secretary or Event Superintendent – update contact information. ♦ Event Chairperson/Committee Information – remove members or modify their information. ♦ Disaster Plan – copy an existing plan or create a new one, including contact information for emergency services. ♦ Competition Setup – provide basic information such as deadline dates, fees, etc., and set event and class level limits.
Abbreviated instructions From the Event Home page, you may do any of the following.
♦ Click the link to enter the Judge Panel Planning Application. ♦ Click any linked text to pop up a window that contains either a report or an online form where you
maintain the information associated with the text, as described in the previous section.
Note: If the pop up window does not display, you may want to check to see if a pop up suppressor application is active or if your browser settings do not allow pop up windows. You will have to enable pop up windows while you are working within the Online Event Management System.
Event Management System
Page 10 of 63
For more information, please see the Step-by-step instructions in the manual.
Step-by-step
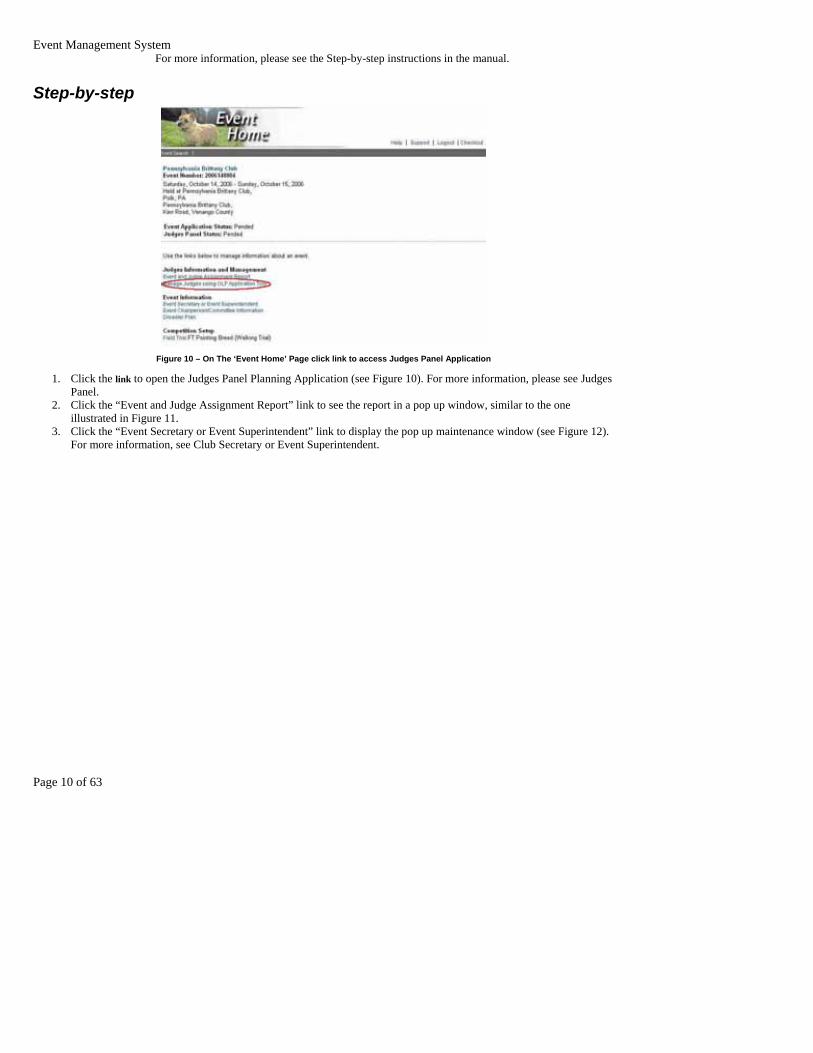
Figure 10 – On The ‘Event Home’ Page click link to access Judges Panel Application
1. Click the link to open the Judges Panel Planning Application (see Figure 10). For more information, please see Judges Panel.
2. Click the “Event and Judge Assignment Report” link to see the report in a pop up window, similar to the one illustrated in Figure 11.
3. Click the “Event Secretary or Event Superintendent” link to display the pop up maintenance window (see Figure 12). For more information, see Club Secretary or Event Superintendent.

Event Management System
Page 11 of 63
Figure 11 – The Event and Judge Assignment Report
Figure 12 – Manage Event Secretary and Superintendent Information.

Event Management System
Page 12 of 63
4. Click the “Event Chairperson/Committee Information” link to display the pop up maintenance window (see Figure 13). For more information, see Event Chairperson/Committee Information.
5. Click the “Disaster Plan” link to display the pop up maintenance window, as illustrated in Figure 14. For more information about this form, see Disaster Plan.
Figure 13 – Manage Event Chairperson/Committee Information.
Figure 14 – Manage Disaster Plan

Event Management System
Page 13 of 63
Figure 15 – A Competition Setup page, with the Manage Plans link specific to FT Events
Figure 16 – A Competition Setup page, with the Specialty link
6. Click one of the competition types to display a maintenance window appropriate for the competition, as illustrated in Figure 15. In this window, click the links to view (and often modify) the information described by the link text. For example, click the Specialty link in Figure 16, to display a form such as the one illustrated in Figure 17.
Figure 17 – A Competition Setup form to designate a specialty breed
Check box to associate the breed with the event, and Click ‘Save Changes’ to commit changes for the Specialty Event and Approved Breeds

Event Management System
Page 14 of 63
7. Set a particular breed as a specialty breed in the form available through the Designated Specialty link in an
All Breed Competition Setup window (similar to Figure 17). The breed names must be associated to the event by AKC Event Operations.
Figure 18 – Three buttons to access help, log out of the system, and process your event modifications.
8. Click the Help button at the top right of the title area, below the Web page navigation bar, to access online help. (See Figure 18.)
9. Click the Logout button to log out. (See Figure 18.) 10. Click the Checkout button to begin putting your event modifications into the database. (See Figure 18.)
Club Secretary or Event Superintendent
Introduction The AKC sends correspondence about a club’s event to the club secretary and event superintendent. Keep the contact information up to date in the Club Secretary or Event Superintendent section.
Abbreviated instructions Once you click the Club Secretary or Event Superintendent link on the Event Home page, a new browser window opens, presenting two drop down lists.
♦ Select either Superintendent or Secretary from the top drop down list. Superintendent is the default; you must select Secretary to modify that information.
♦ Complete or update the associated online form.
♦ Save the information. For more information, please see the Step-by-step instructions.
Step-by-step Modify the Superintendent information
1

Event Management System
Page 15 of 63
2 3
4
Figure 19 – The Manage Event Secretary/Superintendent Information form.
1 Select “Superintendent” from the drop down list. (See Modify the Secretary information, following these steps, for information about changing the Event Secretary information.)
2 Change superintendents by selecting a different AKC-licensed superintendent from the Superintendent drop down list.
3 Click the Enter Selection button to close the form and save the new superintendent name. 4 Click the Cancel button to close the form without making any changes. Modify the Secretary information
Figure 20 – Manage Event Secretary Contact Information.
1 Click the down arrow button in the top drop down list. 2 Select “Secretary.” The online form for the secretary contact displays, and is similar to the one illustrated and labeled
in Figure 21. 3 Complete the modified or new Name, Address, and Contact information, and add a comment if necessary. You must
enter something in the fields marked with a double asterisk. 4 Click the Update Information button to save the modifications and close the pop up window. 5 Click the Close button to close the pop up window without saving modifications.
Name

Event Management System
Page 16 of 63
Address 3
Contact information
Comments
Figure 21 – The Change Event
Secretary form.
Event Chairperson/Committee Information
Introduction You can modify, update, or remove show committee member names and associated information such as telephone numbers and addresses using the Event Chairperson/Committee link.
Abbreviated instructions Once you click on the Event Chairperson/Committee link on the Event Home page, a new browser window opens and displays the event committee chairperson information, as illustrated in Figure 24.

Event Management System
Page 17 of 63
Figure 22– The Manage Event Committee Information popup form.
♦ Locate the name with the information that you wish to modify. ♦ Click “Modify” to the right of the name to display an online form where you can
change the associated information. ♦ Click “Delete” to the right of the name to remove it from the list. ♦ Click the Close button to save the information after completing or updating
the associated online form.
Step-by-step Delete a member
1. Click “Delete” to the right of the name you wish to remove from the list. A dialog box displays to verify your instruction (see Figure 25). Click the OK button to delete the name or Cancel to close the verification box without taking any action.
Figure 23– The Verify Deletion dialog box displays after you Click Delete

Event Management System
Page 18 of 63
Add a Committee Member If your event does not have the required five members serving on the Event Committee, your Manage Event Committee Information pop up window will be similar to the one illustrated in Figure 23, without Member names listed.
Name
Address
Contact information
Comments
Figure 24 – The Modify Committee Information Displays in a popup window
1 Click “Add Committee Member” to add a new member. A form similar to the one illustrated in 2 Complete or modify the Name, Address, and Contact information, and add comments in the Other Info text box
as needed. The double asterisk indicates required fields. 3 Click the OK button to add the member. 4 Click Cancel to close the form without taking action. Edit member information 1 If you need to edit the Event Chair Person name or associated information, click “Edit” to display an online form,
similar to the one illustrated in Figure 28. 2 Complete or modify the Name, Address, and Contact information, and add comments in the Other Info text box
as needed. The double asterisk indicates required fields. 3 Click the Update Member button to close the form and save the modifications. 4 Click the Cancel button to close the form without saving modifications.

Event Management System
Page 19 of 63
Figure 25 – The Change Chairperson Information Displays in a popup window
Disaster Plan
Introduction The AKC requires you to have a Disaster Plan when you hold an event. You need to know who to contact if there is an emergency, such as a fire or a serious injury to either humans or dogs.
Using the Disaster Plan, pull together contacts and telephone numbers and determine the services you want on site. Fill the form out piecemeal, if necessary, as you gather the information The Event Report contains this information.
Note: Your Event cannot be fully processed before the AKC receives your completed Disaster Plan.

Event Management System
Page 20 of 63
Abbreviated instructions
Figure 26 – The Disaster Plan Displays in a popup window
♦ Click on “Disaster Plan” on the Event Home page. A pop up window containing the form for the disaster plan displays, as
illustrated in Figure 26. ♦ Complete the information in the form. The double asterisk (**) indicates Required information. ♦ Click the Update Information button to save the changes, or click the Close button to close it without saving your
changes.
Note: If you decide to copy an existing plan, the information in the copied plan will replace all existing Disaster Plan information stored for the active event. For more information, see the Disaster Plan Step-by-step instructions in the manual.
Step-by-step Copy existing plan 1 If you have an existing plan that you wish to copy, click the Copy button at the top of the form. The Disaster Plan Copy form displays, similar to the one illustrated in Figure 30. If no results display, or if the event with the plan that you wish to copy is missing from the list, conduct a search for events in an alternative city by typing the city name into the text box and clicking the Search button. 2 Click the linked Event Name with the disaster plan you want to copy. The Disaster Plan Copy pop up window displays, providing an opportunity to check the information in the plan. It will be similar to the one illustrated in Figure 31.

Event Management System
Page 21 of 63
3 Click the Copy Information button to copy the plan to the active event, or Cancel to close the pop up and return to the Manage Disaster Plan online form. If you copy the plan to the active event, the copied information replaces all information in the existing plan for the active event.
Figure 28 – The Disaster Plan Copy popup window
Provide a new plan
Event Management System
Page 22 of 63
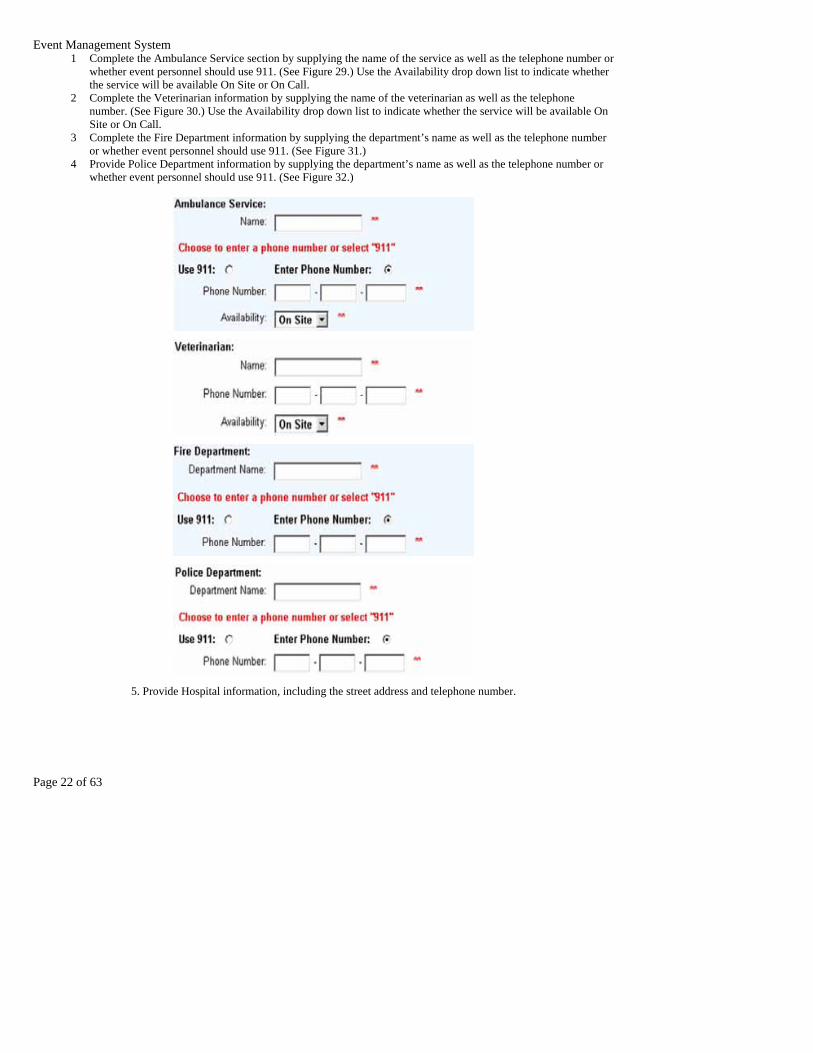
1 Complete the Ambulance Service section by supplying the name of the service as well as the telephone number or whether event personnel should use 911. (See Figure 29.) Use the Availability drop down list to indicate whether the service will be available On Site or On Call.
2 Complete the Veterinarian information by supplying the name of the veterinarian as well as the telephone number. (See Figure 30.) Use the Availability drop down list to indicate whether the service will be available On Site or On Call.
3 Complete the Fire Department information by supplying the department’s name as well as the telephone number or whether event personnel should use 911. (See Figure 31.)
4 Provide Police Department information by supplying the department’s name as well as the telephone number or whether event personnel should use 911. (See Figure 32.)
5. Provide Hospital information, including the street address and telephone number.

Event Management System
Page 23 of 63
1 You may provide complete Event Chairman contact information that includes mailing addresses (street and email) and secondary telephone numbers, although the only required fields are the name and daytime telephone number. 2 You may provide complete Emergency Response Coordinator contact information, including mailing addresses (street and email) and secondary telephone numbers, although the only required fields are the Coordinator’s name and daytime telephone number. (See Figure 33.) 3 Provide your name and select your Club title from the drop down list to complete the “Your Information” section of the Disaster plan. 4 Click the Update Information button to save your work on the Disaster Plan, which may include your modifications to an existing plan or a copied plan. Click the Close button to close the form without saving your work.

Event Management System
Page 24 of 63
Figure 34 – The Update Information and Close buttons.
Competition Setup
Introduction You cannot create an event or change an event’s location or date. That information is controlled by AKC Event Operations. Events build a seniority based on longevity of both location and date, so changing either negates an event’s seniority. However, you can enter or modify basic event information in the Competition Setup window.
Here, you can change:
♦ basic event information such as deadline dates, fees, etc. ♦ classes/stakes/tests offered ♦ event and class level limits.
Abbreviated instructions ♦ Click on linked report names below the Judges Information heading to view reports summarizing
judging assignments. ♦ Click on links below the Event Information heading to display online forms in pop up windows.
Using those forms, you can set fees and deadlines and select event settings and types. ♦ Please see the Step-by-step instructions in the manual for more information.

Event Management System
Page 25 of 63
Step-by-step
Figure 35 – The Competition Setup Window
Figure 36 – The Competition Setup Window for Conformation Event
Access Judges Information reports
1. Click the Event and Judge Assignment Report link in the Manage Your Event section (designated “Reports” in Figure 35) to display a report summarizing current event judges and their assigned classes
View and modify Event Information 1 View and modify Competition Type Information by clicking on the Event Information link. An online form
displays in a pop up window, as illustrated in Figure 37. 2 Modify or view this information: Entry Fee, Fee for Additional Entries, Event Setting, Time Zone, First
Date/Time Entries will be Accepted, Last Date/Time Entries will be Accepted, Special Event Type designation. 3 Click the Update Information button to save the information. Click Cancel to close the window without making
changes. 4 Click the Designated Specialty link in the Event Information section to access the Competition Setup for the
specialty class, as illustrated in Figure 36..

Event Management System
Page 26 of 63
Figure 37 – The Event Information Pop up
Judges Panel
General introduction and information Judges Panel Planning provides access to the AKC database of judges and events, and gives you methods to assign those judges to classes at your events.
Figure 38 – The Judge Panel Planning Application link
Open the main window of the Judge Panel Planning Application by clicking the Enter Here button, found on the Event Management and on the Event Home pages (see Figure 38).
The Judge Management Application Tool opens in a separate window. The tool’s tabs, illustrated in Figure 39, provide access to judges, events, classes, and assignments.

Event Management System
Page 27 of 63
Figure 39 - The tabs for the Judge Panel Planning Application window
Note: If you enter Judge Panel Planning through the Event Management page, the application opens on the Event Search tab. If you enter through the Event Home page, the application opens on the Judge Assignments tab, presenting that Event and its associated judges.
You may select one or more events and one or more judge’s names using the first two tabs, Event Search and Available Judges. Please see Using the Search interfaces for general information about these tabs. The remaining tabs contain different methods to assign those judges to classes within the selected events. You can find more information about those tabs in Using the Assignments interfaces.
Note: The first time you access this tool, your browser may inform you that you need to download and install the Java runtime environment. If you want to know more about Java or how to install the runtime environment, please see Appendix 0.
Using the Search Interfaces
Introduction The Event Search tab provides two primary methods to find events: by the event number or by the event name and/or location. These are similar to the three methods you use in the Available Judges tab to find judge names, that is: judge number, name, or home state.
This section of help contains general information about working within the Event Search and Available Judges tabs. In this help, we refer to the discrete sections of each of these two tabs as a “pane.”
Abbreviated directions Before assigning judges to event classes, you must select one or more events containing the classes you want to work with and one or more judges. Using only one of the two panes at the top left of the Event Search and Available Judges tabs, provide enough information to find one or more events and judges.
If you know the identifying number of a particular event or judge, type it into the text box in the upper left pane and click the Search by Event Number or Search by Judge Number button next to the text box.
If you know more general information, like name or state, you may provide that information in the middle left pane and click the appropriate button (Advanced Search to find events or Search by Name for judges).
Note: The asterisk serves as a “wildcard” character, representing letters of names or digits of numbers that are unknown. For example, typing “Rob*” in the Last Name text box in the Available Judges search could return judges with the names Robinson, Robby, Robertson, Roberts, and Robbins. Typing “Rob*n” would then return only Robinson and Robertson.
Regardless of the method you use, the names found display in the Search Results area of each tab. Select appropriate names and use the buttons on the right of the search results to move them to and from the active list.
Please see Using the Search interfaces in the manual for more information.
Panes and columns The Event Search tab has five panes: Event Number, Event Name, Search Results, Recently Managed Events, and Events to Manage. Available Judges also has five panes with functionality similar to Event Search: Judge Number, Judge Name, Search Results, Recent Judges, and Judges to Assign. These are illustrated in the following table.
The Panes in the Search Tabs Event Search Available Judges

Event Management System
Page 28 of 63
< Event Number Judge Number >
< Event Name Judge Name >
< Search Results > <Events Judge names >
< Recently Managed Events Recent Judges >
< The “active pane” > (on the right of each tab) < Events to Manage Judges to Assign >
The Events to Manage and Judges to Assign panes contain the event and judge names that you have selected to work with in the assignment tabs, so, for the purpose of discussing the general use of the search tabs, we will refer to the Events to Manage and Judges to Assign panes as the “active” panes.
If you accessed the Judge Panel Planning Application through an Event’s Home page in Online Event Planning, the Judge Panel application opens with the Event and its associated judges loaded and ready for you to modify. In this case, the application opens on the Judge Assignments tab. The Recently Managed Events and Recent Judges panes contain lists of events and judges that you worked with during previous sessions. For the purpose of discussing the general use of the search tabs, we will refer to these panes collectively as the “recent events/judges” panes.
In the three panes that do not take search criteria, actual event and judge names display as a result of searches and selections. Those names have associated information: events have a Number, Type, Begin Date, State and Name; judges have a Name, Number and State. This information displays as columns in the results, recent, and active panes.
Resizing panes Resize panes by clicking and dragging a pane divider. First, place your mouse pointer over the boundary of the pane you want to resize. The pointer changes shape, usually to a broken double-headed arrow, indicating that you can click your mouse button and drag the edge of the pane to a new position (see Figure 46). Other panes resize to fit.
Figure 40 - Resizing the panes in a search tab. The mouse pointer is circled

Event Management System
Page 29 of 63
Moving data between panes Once you have a list of judges or events in the Search Results pane, pick specific ones to work with and move them to the active list (in the pane on the right) using the mouse or transfer buttons.
♦ Double click a name. It will move to the active list or from the active list. ♦ Select a name or group of names and use the arrow buttons to move them. Click on the desired event
or judge name to select it; the background changes color to indicate the selection. Make multiple selections by holding down your Control key (or, if you are using an Apple computer, your Command key) as you click on each name.
After making your selection, click any of the arrow buttons, located to the right of the Search Results list, for the following activity:
♦ > moves selected names to the active pane ♦ >> moves all names to the active pane ♦ < removes selected names from the active pane ♦ << removes all names from the active pane.
Manipulating columns (sizing, moving) Column headers provide the label identifying the type of information in the column. You can click on a column header and drag it to a new position. Other columns automatically reorder to accommodate the new placement.
You can click on the dividing line between two column headers and drag it to the left or right, resizing the column located to the left of the line.
Reset button
Figure 41 – There is a search criteria Reset button in both Event Search and Available Judges tabs
The Reset button provides a quick method to clear search criteria and begin designing a new search. Click it when you no longer need the set of events or judge names that you have retrieved and are ready to retrieve and review a new set.

Event Management System
Page 30 of 63
The Trash Can Click the Trash button to remove all of the selected names from search results.
Note: Clicking the trash button to remove names does not delete anything from the database, but only removes the selected names from search results.
Event Search Introduction
The Event Search tab lets you locate and select one or more events to which you wish to assign judges. The flexibility of this feature lets you view assignments on a number of levels. You also can work with a cluster of Events that use the same judges for multiple days.
The names in the Event Search active list display in ascending event date order.
Abbreviated instructions Locate specific types of events being held at specific geographical locations through Event Search.
♦ Set the criteria for searching for particular events. ♦ Search for events. ♦ Select events you want to maintain. ♦ Move the event names into the active pane. ♦ Repeat the process using different searches until you finish building your
Events to Manage list. This section contains information specific to the Event Search tab. For further information about conducting a search in this tab, please see Using the Search interfaces.
Note: If you select events for which you are not approved, you will not be able to assign judges to them, even though the events will display in the Assignment tabs.
Step-by-step 1. Search for an event using one of two methods: Search by Event Number or through a complex search
using criteria (see Figure 42).
Event Management System
Page 31 of 63
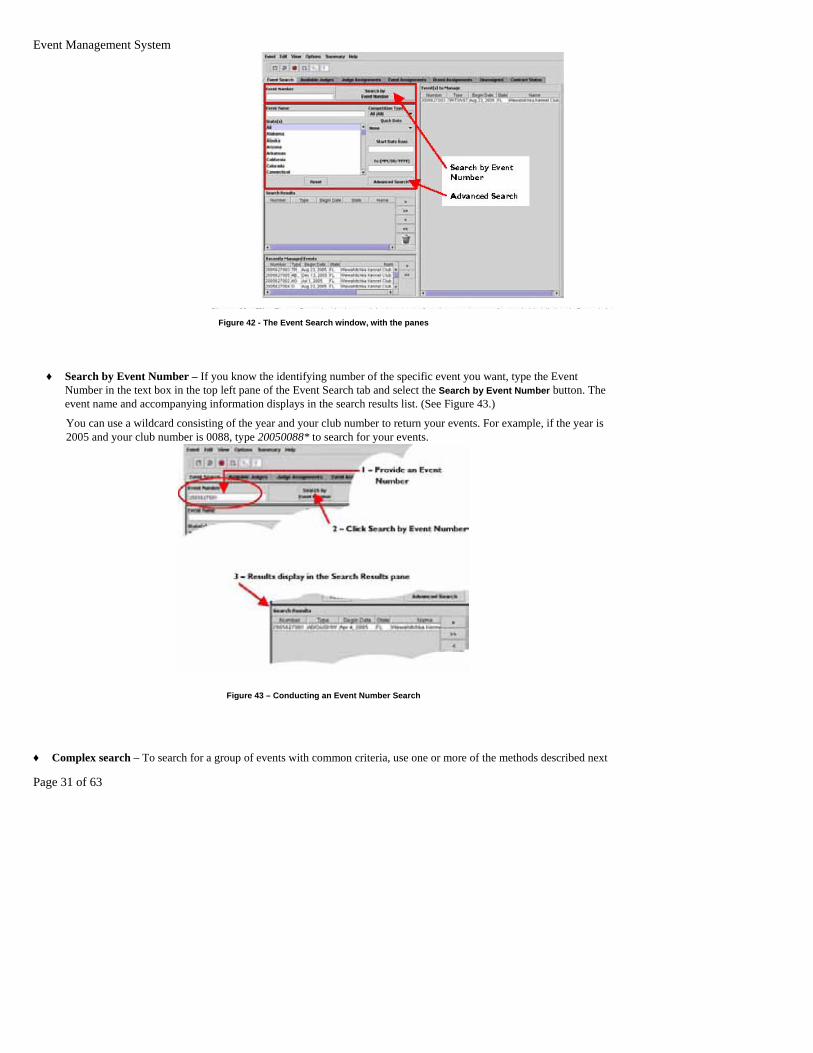
Figure 42 - The Event Search window, with the panes
♦ Search by Event Number – If you know the identifying number of the specific event you want, type the Event Number in the text box in the top left pane of the Event Search tab and select the Search by Event Number button. The event name and accompanying information displays in the search results list. (See Figure 43.)
You can use a wildcard consisting of the year and your club number to return your events. For example, if the year is 2005 and your club number is 0088, type 20050088* to search for your events.
Figure 43 – Conducting an Event Number Search
♦ Complex search – To search for a group of events with common criteria, use one or more of the methods described next

Event Management System
Page 32 of 63
to set the search criteria, then click the Advanced Search button. The names of all events meeting the criteria display in search results. If the events retrieved are not what you want, select the Reset button and enter modified search criteria. (See Figure 44.)
Note: The more criteria you provide, the smaller the results list..
Figure 44 – Conducting a search using search Criteria
• Search by Event Name – If you know the name of the event you want to manage, type it into the Event Name text box.
You can use the asterisk “wildcard” to represent the letters of names that you aren’t sure you know how to spell. For example, if you know that the event name begins with a “P” and has “Invitational” as part of the name, you can type “P* Invitational”
into the Event Name text box. The names of all events that start with a “P” and have “Invitational” as the last word display in search results. You can also simply use “Invitational” to retrieve all Event names that include that word.
• Search by State – Select a state name from the list of states to force results from a specific state.
Note: Use the State(s) search in conjunction with other search criteria to reduce the number of rows of data retrieved. State(s) search cannot be used by itself.
� Search by Competition Type – Select a Competition Type from the drop down list, forcing the lookup of events of only that competition type. � Search by Date – Date searches are exclusive, so you may either conduct a Quick Date search or look for events occurring between two dates. Events falling within the date range indicated will display in the results list.

Event Management System
Page 33 of 63
Figure 45 – The Competition Type dropdown list
Note: You may choose extended dates (beyond a year in the future), but you must first talk to the AKC Event Planning department personnel.
� . Quick Date – Select a quick date method from the drop down list, choosing a date span that’s relative to the current date. The system populates the “Start Date From … To (MM/DD/YYYY)” text boxes to correspond to the selected date range. � . Start Date From … To (MM/DD/YYYY) – Narrow the results to contain only events with dates falling within the range you provide in these two text boxes.
Figure 46 – The Quick Datedrop down list
2. Select one or more event(s) to manage.
Click on an event to select it. Select more than one by clicking on each while pressing the Control key (or the

Event Management System
Page 34 of 63
Command key on an Apple). Select a group of events listed together by clicking on the first one then clicking on the last one while pressing the Shift key. If you plan to work with all events in the search results, you can skip this step.
3. Move selected events into the Event(s) to Manage pane.
♦ By mouse, double click an event in the results pane to move it into the Event(s) to Manage pane. ♦ Move event names as a group.
� Click the > button to move selected event names to the Event(s) to Manage pane. � Click the >> button to move all event names to the Event(s) to Manage
pane. ♦ Remove names from the Event(s) to Manage pane.
� Click the < button to remove selected events from the Event(s) to Manage pane into search results. � Click the << button to move all events from the Event(s) to Manage pane into search results.
Available Judges Introduction
The Available Judges search lets you locate and create a pool of judges that you can use to make assignments to specific types of event classes. For general information about conducting a search for judge names, please see Using the Search interfaces.
The names in the Judges(s) to Assign pane are displayed in alphabetical order by last name, first name.
Abbreviated instructions ♦ Set the criteria for searching for particular judge names. ♦ Search for judge names ♦ Select the name or names of one or more judges that you want. ♦ Move the names into the active pane. ♦ Repeat the process using different searches until you complete your Judge(s)
to Assign list. Step-by-step
This section contains information specific to the Available Judges tab.
1. Search for judge names using one of two methods: Search for a judge’s number or conduct an advanced search based on certain criteria.

Event Management System
P
Figure 47 – The Available Judges search window, with the panes for the two types of search
highlighted: Search by Judge Number or Search by Name
♦ Search by Judge Number – If you know the identifying number of a specific judge, type it in the text box in the top left pane of the Event Search tab and select the Search by Judge Number button. The judge’s name and accompanying information displays in the search results list. (See Figure 48.)
Figure 48 – The Search by Judge Number Search
♦ Search by Judge Name – If you know the names of the judge you want to use, type them into the Last Name and First Name text boxes, as appropriate, and click the Search by Name button. You can provide one or both names.
age 35 of 63

Event Management System
Page 36 of 63
You can also use the asterisk, a “wildcard character” that represents the letters of names that you aren’t sure you know how to spell. For example, if you know that the judge’s name is Robertson or Robinson or Robbins, you can type “Rob*” into the Last Name text box. The names of all judges with last names that begin with “Rob” display in the Search Results pane. (See Figure 55.)
Figure 49 – Conducting a Search for Judges using name and state criteria
♦ Search by State – Select a State from the list of states to augment the name search method of finding judge names. The names of all judges from the selected state display in the Search Results pane. You must use this search criteria in conjunction with another search method, such as by last name.
2. Select one or more judge(s) to assign.
Click on a judge name to select it. Select more than one name by clicking on each while pressing the Control key (or Command key on an Apple). Select a group of names listed together by clicking on the first name then clicking on the last name while pressing the Shift key. If you plan to work with all names in the search results, you can skip this step.
3. Move names into the Judges to Assign pane using one or more of the following methods.
♦ By mouse: double click a name in the results pane to move it into the Judges to Assign pane.
♦ As selected • Click the > button to move selected judge names to the Judges to Assign list. • Click the >> button to move all judge names to the Judges to Assign list. ♦ Remove
names � Click the < button to remove selected judge names from the Judges to Assign list. � Click the << button to remove all judge names from the Judges to Assign list.
Using the Assignments interfaces Introduction
This section contains general information about working within the Event, Judge, Breed, Unassigned, and Contract Status assignment tabs.
You must have selected at least one judge and one event to work with in these assignment windows. Find out about selecting events and judges in the Using the Search interfaces, Event Search, and Available Judges sections of the manual.

Event Management System
Page 37 of 63
Find further information about using the individual assignment tabs in these sections: Judge Assignments, Event Assignments, Breed Assignments, Unassigned, and Contract Status.
Abbreviated instructions When populated, each of the assignment tabs contains a table with columns and rows.
usually selected judges
Column headers are selected events
Grid cells contain judge information
Row headers are most often event classes
Figure 50 – A representative assignment tab window, labeled.
A drop down list displays above the table, the contents of which depend on the active tab.
♦ The names of your selected judges are in the Selected Judge drop down list that displays above the Judge Assignments, Event Assignments, Unassigned, and Contract Status tabs, along with two radio buttons indicating contract status.
♦ The names of the shows, trials, and tests associated with the events you selected are in the Selected Judging Class drop down list in the Breed Assignment tab.
The Events you selected in Events to Search display as column headers across the top of the table. With the exception of the Breed Assignments tab, judging classes associated with the events display as row headers down the left side of the table, gathered into collapsible groups corresponding to classes (breeds, groups, etc.). In Breed Assignments, appropriate names from your selected judges list displays down the left side. They are certified to judge the shows, trials, and tests that you selected in the drop down list.
The rest of the table contains blocks of information about the judge assigned to the corresponding event and class. Each

Event Management System
Page 38 of 63
block includes two radio buttons that you can use to assign a different judge, who would be either the one selected in the Selected Judge drop down list or (in Breed Assignments) the judge named in the row header.
Note: Radio buttons are the round elements you click on to indicate a selection on a Web form. They’re called that because, like a car radio’s push buttons, only one button can be active at any given time, so you can select only one item in a group with radio buttons. A selected radio button has a black dot in it. A check box, on the other hand, is a square that usually displays an “X” when you click on it. You can select any number of items in a group using check boxes, or none. Throughout these assignment tabs, you will use radio buttons to pick the event to work with, modify judge choice, and indicate a judge’s Contract Status.
When you want to assign a judge to an event and class in all tabs except Breed Assignment, follow these steps. (See Breed Assignments for specific information.)
♦ Select the judge from the Selected Judge drop down list. Page 41 of 69 Online Event Management
System

Event Management System
Page 39 of 63
♦ Select the Event you want to work with by clicking on the Select radio button in the appropriate Event column header. The column will change color to indicate that it is selected.
♦ Scroll to the show, trial, or test you wish to assign the judge to and click the Assign Selected Judge radio button.
How to manipulate columns Use your mouse to manipulate the column display on the assignment tabs.
♦ If you move your mouse pointer to the line between the column heads – the blocks containing the event name – it changes into an arrow with two points. Click and drag the edge to make the column larger or smaller. The other columns automatically resize to take up the available space.
♦ If you click on a column head, you can drag it from side to side and move the entire column. ♦ If you click on the Remove button in the column head, the column is removed from the display. The other
columns automatically resize to take up the available space. If you have made assignments or assignment changes in the column without saving them, a prompt displays to give you the opportunity to save, cancel, or continue without saving.
Column headers
Figure 51 – The column header for the assignment tab tables, labeled
Events from the Event(s) to Manage pane of the Event Search tab display across the top of the table grid in all of the assignment tabs. Please see Figure 57 for a closer look at one example.
♦ The AKC assigns the event number when it approves the event. ♦ The Club name is a hyperlink. If you click on it, information about the club
displays in a pop up window. ♦ The event date indicates when the event starts. ♦ Competition types scheduled for inclusion in the event are hyperlinks. If you
click on one, the rows collapse or expand to bring that class or breed into view. ♦ The Remove button only removes the column from the tab view. It does not affect the record of the
event in the AKC database. If you make changes in the column and click Remove without first saving your changes, a prompt displays to verify that you want to remove the column without saving the modifications. To continue, you can removing the column without saving, save the modifications and remove the column, or cancel the command.
Judges’ names Judges’ names display in the Selected Judge drop down list (see Figure 58) and are from the list you created in the Available Judges tab. You may select a judge’s name and view or modify the associated Contract Status, noting the radio buttons for “Pending” and “Confirmed.”

Event Management System
Page 40 of 63
Names from the same list also display in the row header column of the Breed Assignments tab, as well as in the bodies of the tables in all of the other assignment tabs. If no judge is associated with the event and class, the block is similar to the one illustrated on the left in Figure 59. Once a judge is assigned, this block is similar to the one illustrated on the right in Figure 59.
Click the Assign Selected Judge radio button to choose the judge named in the Selected Judge drop down list. Data brought into the information block with the judge’s name and AKC identification number are:
♦ Judging Contract – indicates whether the show has a contract with the judge; values are Approved or Pending and can be selected here ♦ Judging Approval – indicates the judge’s status for judging the selected class; values are Approved, Provisional, or Ineligible
♦ Eligibility – shows violations of AKC business rules, other than conflicts (for example, assigning the same judge to BIS, GROUP, and a breed in the same group); values are No errors or Has Errors
♦ Conflicts – indicates whether the judge is in conflict (30 days, 200 mile) with another event; values are No Conflicts or Has Conflicts.
Figure 53 – Assigned judge blocks. The illustration on the right shows that noJudge has been assigned to the
associated event and class, the left shows that there are errors with the assigned judge’s eligibility
Each event has shows, trials, and tests associated with it by AKC Event Operations and the previous year’s information, and as modified through the Online Event Management System’s Competition Setup function.
Collapsing and expanding row headers Shows, trials, and tests display in the row header column on the left of the screen for the Event, Judge, Breed, Unassigned, and Contract Status assignments tabs.
You can collapse and expand Breeds/Classes/Tests/Trials row headers to make it easier to work in a tab. As pictured in Figure 60, folder icons represent row header classifications (such as “O” for “Obedience”). Click on a collapsed header, which looks like a closed folder, to “open” it. This causes the rows immediately below the folder to expand, displaying the contents of the classification (for example, “Obedience Novice A”).
Most assignment tabs have classes, breeds, tests, and trials down the left side of the window.
• A collapsed row header looks like a closed file folder.
• An expanded row header looks like an open file folder and
• Sub-items can be classes within a more inclusive designation, such as various breeds in the overall designation “Sporting

Event Management System
Page 41 of 63
Figure 54 – Click on a folder icon to collapse and expand the row headers
Judge Assignments Introduction
When you have a judge in mind for a particular class or breed, the Judge Assignments tab lets you select that judge’s name and displays only the classes or breeds for which the selected judge is eligible.
You must already have selected events and judge names in the Events and Assigned Judges tabs. (See Event Search and Available Judges for more information.)
Abbreviated Instructions ♦ Select the name of the judge you want to assign from the Selected Judge drop down list
located under the tab bar. (The list consists of judges you selected in the Available Judges tab.)
♦ Indicate the Event you wish to manage by clicking the Select to work radio button in the column headers.
♦ Assign the Selected Judge to a class by clicking the Assign Selected Judge radio button in the appropriate assigned judge block. If there is a problem with the judge’s Approval or Eligibility statuses, or if the system recognizes a conflict, the designation of the problem displays as a link. Click on it to see a pop up window with additional information.
Note: By viewing these statuses in real time, you can immediately see what a specific Judge is approved for, thus speeding the Judge assignment process. If the selected Judge has conflicts, you can select another Judge until you find one that lists no problems.
♦ Scroll through the event and click Assign Selected Judge to assign the selected judge to additional classes. ♦ Save your results.
Note: Save executes a more comprehensive review of the judges, so you should review the results and make corrections as needed until the Event has a set of judges approved for the Event and class.
Step-by-step This section assumes that you have already chosen your event (see Event Search) and that you have chosen at least one judge to work with (see Available Judges).
Select a judge

Event Management System
Page 42 of 63
1. Click the Judge Assignments tab as shown in Figure 61 to select it.
Figure 55 – Choose the Judge Assignments tab by clicking on it
2. Locate the Selected Judge drop down list (see Figure 56).
Figure 56 – The Selected Judge drop down menu
3. From the drop down list, select the name of the judge you wish to assign (see Figure 57). 4. Repeat steps 1 through 3 when you wish to select another judge to assign.

Event Management System
Page 43 of 63
Assign a judge 1 After you select a judge to assign from the Selected Judge drop down list, choose the event by clicking the Select to work radio button in the column header of the event with which you wish to work. It should look similar to Figure 59. The color of the column changes to indicate the active event. 2 Assign the judge to the classes/breeds. Click the Selected Judge radio button. The display changes to reflect the new selection, as illustrated in Figure 59.
Figure 57 – The Selected Judge drop down menu opened with Judge names
Follow steps 1-3 when you wish to select another judge to assists
Figure 58 – Indicate the Event with which you wish to work

Event Management System
Page 44 of 63
Figure 59 – Click the Assign Selected Judge radio button to assign the selected Judge
The fields below the judges’ names change immediately to reflect the four different statuses. (Please see Judge Assignments for more information.)
Now, you can scroll through the event and click to assign the selected judge to additional breeds or classes. Select and assign another judge as necessary.
Save your work 1 Save the results by selecting Save from the Event menu or by clicking on the Save button (circled in the illustration shown in Figure 60). 2 The program saves your assignments, and indicates this by highlighting the associated column header as illustrated in Figure 61.

Event Management System
Page 45 of 63
Figure 60 – Click the Save button to save your work
Figure 61 – A highlighted column header Indicates the Event undergoing processing
Problems with an assignment When the system recognizes a problem with a selected judge, it will present that information in the status display as illustrated in Figure 62.
Event Management System
Page 46 of 63
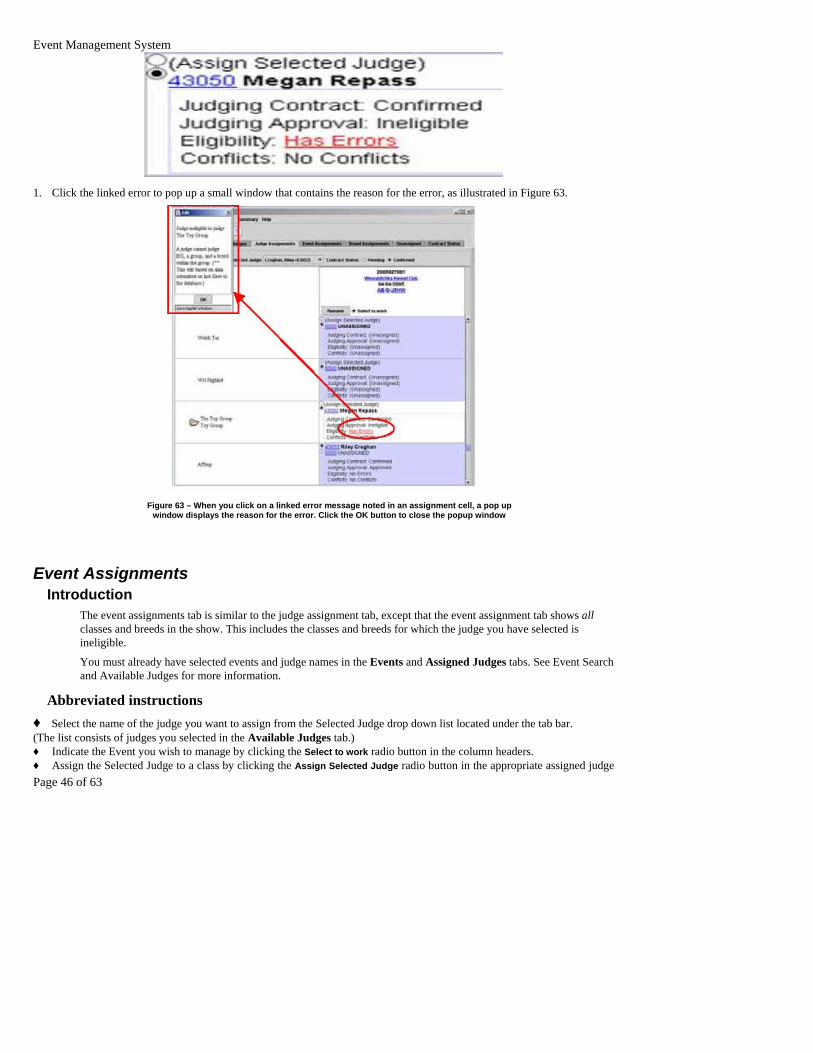
1. Click the linked error to pop up a small window that contains the reason for the error, as illustrated in Figure 63.
Figure 63 – When you click on a linked error message noted in an assignment cell, a pop up
window displays the reason for the error. Click the OK button to close the popup window
Event Assignments Introduction
The event assignments tab is similar to the judge assignment tab, except that the event assignment tab shows all classes and breeds in the show. This includes the classes and breeds for which the judge you have selected is ineligible.
You must already have selected events and judge names in the Events and Assigned Judges tabs. See Event Search and Available Judges for more information.
Abbreviated instructions ♦ Select the name of the judge you want to assign from the Selected Judge drop down list located under the tab bar. (The list consists of judges you selected in the Available Judges tab.) ♦ Indicate the Event you wish to manage by clicking the Select to work radio button in the column headers. ♦ Assign the Selected Judge to a class by clicking the Assign Selected Judge radio button in the appropriate assigned judge

Event Management System
Page 47 of 63
block. If there is a problem with the judge’s Contract, License, or Edit statuses, or if the system recognizes defined Conflicts, the designation of the problem displays as a link. Click on it to see a pop up window with additional information.
Note: By viewing these statuses in real time, you can immediately see what a specific Judge is approved for, thus speeding the Judge assignment process. If the selected Judge has conflicts, you can select another Judge until you find one that lists no problems.
♦ Scroll through the event and click Assign Selected Judge to assign the selected judge to additional classes. ♦ Save your results.
Note: Save executes a more comprehensive review of the judges, so you should review the results and make corrections as needed until the Event has a set of judges approved for the Event and class.
Step-by-step 1. Click the Event Assignments tab and click the Select to work radio button to work with a particular event. Your
screen will be similar to the one illustrated in Figure 64. 2. Choose the name of the judge to assign by clicking the Selected Judges drop down menu, which contains the list of
judges you selected in the Available Judges tab. The open list will be similar to the one circled in Figure 65. Comment [m1]: Many of the 'Step by Step' sections without graphics have thier number lists misaligned. Recommend Selcting list, turning off Numbering , then turn it back on. That is what was done on this list.
Figure 64 – The Event Assignments tab

Event Management System
Page 48 of 63
Figure 65 – The expanded Selected Judge dropdown list
Repeat this step whenever you want to assign a different judge.
1 Scroll to the class or breed over which you want the judge to officiate, and click the “Assign Selected Judge” radio button in the assignment area, as indicated in Figure 66. 2 The name of the Selected Judge displays in place of the “Assign Selected Judge” radio button title, as indicated in Figure 67.
Figure 66 – The Click the Assign Selected Judge radio button, indicated here by an arrow, in the desired
class assignment cell, Indicated by a circle

Event Management System
Page 49 of 63
If there are problems with the selected Judge, you can select another name in the drop down list until the selected Judge passes this initial approval process.
Repeat these steps to assign different judges to different classes.
Click Save after you assign judges. Remember to review the assignments after you save, to see if the process uncovered additional issues. Alternatively, you can reset all of the values on the tab to the previously saved values using the Reset command on the Event menu or the Reset button on the button bar. (Both are illustrated in Figure 68.)
Figure 67 – This newly assigned Judge has eligibility errors.
Figure 68 – Two methods to reset unsaved Judge Assignments the Event menu command (Illustrated
on the left) and the reset button (Illustrated on the right).
You can assign Judges to several Events at one time, although you must save your work with one event before selecting another event and assigning judges to its classes and breeds. This is common practice when there is a cluster of Events that requires Judges for multiple days.
Breed Assignments Introduction

Event Management System
Pa
In the Breed Assignments tab, select an approved judge for a specific class or breed. Unique among the assignment tabs, this provides a Selected Judging Class drop down list that contains classes and breeds associated with an event rather than a list of Selected Judges. Once you select a class or breed, the names of approved judges display in the row header column.
This function is most useful to use to add a judge for a specific breed or class. You must already have selected events and judge names in the Events and Assigned Judges tabs. (See Event Search and Available Judges for more information.)
Note: The table is blank if your Available Judges list does not include the name of at least one person who is approved to judge the selected breed or class.
Like the Judge Assignments and the Event Assignment options, notice that the fields below the judge’s name have been updated (in real time) to reflect four different statuses.
Abbreviated instructions ♦ Select a judging class from the Selected Judging Class drop down list. The name of the class
displays in the column header row and the names of judges display in the row header column on the left.
♦ Select the event with the class to which you wish to assign a judge. ♦ Scroll to the row headed by the judge’s name you want to assign, and assign the judge. ♦ Examine the associated judge information (Contract status, License status,
etc.) and correct or reassign a different judge, if necessary ♦ Repeat until the assignments are done. ♦ Save your work.
Step-by-step 5. Click on the Breed Assignments tab (circled in Figure 69) and select the radio button associated with the
Event to which you wish to assign judges.
Figure 69 – Click the Breed Assignments tab to view assignments by Judge and breed or class.
ge 50 of 63

Event Management System
P
Figure 70 – Select a Class of Breed from the Selected Judging Class Drop down list
6. Select a judging class that you want to work with for the events from the Selected Judging Class drop down menu (circled in Figure 71). Once you select the event type, the Judge Panel Planning Breed Assignments tab window automatically refreshes to display the judging class judges (as indicated in Figure 72).
Note: The table is empty if your Available Judges list does not include the name of at least one person who is approved to judge the selected breed or class.
age 51 of 63
Figure 71 – Once you click on a class In the drop down list, the name of the class displays in the column header row, as indicated here. Judges in the list previously selected through the “Available Judges” tab display in the row header column on the left.

Event Management System
Page 52 of 63
The top line of each grid cell contains the name of the judge displaying in the row header, the second line and subsequent information all describe the judge currently assigned to the event. The darkened radio button indicates the selected and assigned name. Fields below the names update in real time to reflect the usual four statuses.
Figure 72 – The intersection of a Judge name and event contains Information as Illustrated here
Scroll the display until you see the name you wish to assign to this event’s Selected Judging Class. Click the radio button next to the name to select it. After automatically refreshing, the display lists the selected judge’s name and current contract status, license status, edit status, and conflicts, as illustrated in Figure 72.
7. Save your results. Repeat as needed, beginning with Step 3 to assign judges to the same judging class for the other events, or with Step 1 to select a different judging class.
Unassigned Introduction
Unassigned assignments, available through the Unassigned tab in Judges Panel Planning, lets you assign judges by looking at only those classes in a selected event that are currently unassigned.
You must already have selected events and judge names in the Events and Assigned Judges tabs. (See Event Search and Available Judges for more information.)
Abbreviated instructions ♦ Select a name from the Selected Judge drop down list. The rows display only the classes or breeds that the Selected Judge may judge. ♦ Select the event with the class to which you wish to assign the judge. ♦ Scroll to the row headed by the class or breed name you want to assign to the judge, and assign the judge. ♦ Examine the associated judge information (Contract status, License status, etc.) and correct or reassign a different judge, if necessary
♦ Repeat until the assignments are done.
♦ Save your work.
Step-by-step 1. Click on the Unassigned tab (circled in Figure 73) and select the radio button associated with the Event to which you
wish to assign judges. 2. Select a judge you want to work with from the Selected Judges drop down menu (circled in Figure 74). 3. Assign the judge. Scroll the display until you see the name of the breed or class to which you wish to assign the
selected judge. Click the radio button next to the “Assign Selected Judge” option in the class and event grid cell. After automatically refreshing, the display lists the selected judge’s name and current contract status, license status, edit

Event Management System
Page 53 of 63
status, and conflicts. 4. Save your results and repeat as needed.
Figure 73 – Click the Unassigned tab to view and modify classes without assigned judges
Figure 74 – Select a Judge name from the Selected Judges drop down list

Event Management System
Page 54 of 63
Contract Status Introduction
Contract Status, available through the Contract Status tab in Judges Panel Planning, lets you view a selected judge’s assigned classes or breeds and easily change the contract status for each judge. The names of the breeds or classes display in the row headers. The names of judges selected to judge those breeds or classes display in the table grid along with the two Contract Status choices, Pending or Confirmed, and radio selection buttons.
You must already have selected events and judge names in the Events and Assigned Judges tabs. (See Event Search and Available Judges for more information.)
Abbreviated instructions ♦ Select a judge name from the Selected Judges drop down list.
♦ Select the event with the class for which you wish to view or modify the judge’s Contract Status.
♦ Scroll to the row headed by the class or breed and assign or reassign the named judge’s Contract Status.
♦ Click the appropriate radio button beside the Contract status you wish to activate for this judge.
♦ Save your work. ♦ Repeat until complete.
Step-by-step 1. Click the Contract Status tab (circled in Figure 75), and click the “Select to work” radio button for the Event with the
contract status that you want to modify. 2. Select a judge name from the Selected Judges drop down menu (circled in Figure 76). Once you select a judge name,
the Contract Status tab window automatically refreshes to display the judging class judges (as indicated in Figure 77).
Figure 75 – Click the Contract Assignments tab to view assignments by Judge and event breed or class.

Event Management System
Page 55 of 63
Figure 76 – Select a name from the Selected Judges drop down list
Figure 77 – The name of all of the breeds and classes to which the Selected Judge is assigned displays in the header row: Contract Status buttons display with the Judge’s name. Select a name
from the Selected Judges drop down list.

Event Management System
Page 56 of 63
1 If necessary, scroll to the row containing the breed or class with the name of the assigned judge whose Contract Status you wish to view or modify. 2 Modify the Contract Status, if desired. Click the radio button next to “Pending” or “Confirmed” to change the Contract Status. 3 Save your results. Repeat as necessary.
Figure 78 – The Intersection of an event and class contains Contract Status Information as Illustrated
Appendix
Java Runtime document: How to Install Java Introduction
The Java environment is necessary to run the Judge Panel Planning application. This section of the Online Event Management System manual guides you through installing the Java plug-in. You can read more about Java at http://www.java.com. In most cases, you will be prompted to install Java the first time you run the JPP application.
Note: You may already have the Java plug-in installed, but need an update to run the Judge Panel Planning Application. In this case, you will need to uninstall your old version and install the current plug-in, as described here. Use your operating system’s standard method to remove the Java program application.
1. The automatic Java installer will pop-up a window as shown in Figure 79, asking you if you want to install the Java plug-in.
Figure 79
Note: Sometimes, there are unexpected shutdowns or other issues during application installs. To avoid losing work you may have in other programs, you should switch to them now and save your work. (The Windows shortcut to switch programs is Alt+Tab.)

Event Management System
Page 57 of 63
1 Click the Yes button to begin the installation. You will see a window pop-up that looks like Figure 80. 2 Click the radio button next to “I accept the terms in the license agreement,” as illustrated in Figure 81. The Next> button should darken; click it to continue installing Java. 3 You should see a window similar to the one illustrated in Figure 82. The “Typical” option is selected as the default. If it is not, click the radio button to the left of it to select it. Click the Next> button. 4 After you click on next in set-up dialog box, a status box with a progress indicator displays while the installation proceeds (see Figure 83). 5 When the install successfully completes, the InstallShield Wizard Completed dialog box displays (see Figure 84). Click the Finish button to close the dialog box.
Figure 80
Figure 81

Event Management System
Page 58 of 63
Figure 82
Figure 83

Event Management System
Page 59 of 63
Figure 84
The Judge Panel Planning Application window displays, in most cases. Under certain circumstances, you may see a prompt to restart your computer (as illustrated in Figure 85). In this case, please save your work and close other programs that you have running before you click the Yes button.
Figure 85
7. Once your computer reboots, launch your web browser and begin again.
Frequently Asked Questions Events
What elements of an event may I manage?
Manage the names of individuals connected to the event, such as committee members and judges, as well as competition types, disaster planning, and logistical information. As always, your event is not processed until you submit credit card payment to the AKC.
How do I find an event to manage?
There are three methods you can use in the Event Search tab of the Judge Panel Planning window. Search by event number, search by event name/competition type/date/state, or browse Recently Managed Events.
How do I add or remove an event? AKC personnel must create any completely new events, however, previously held events remain in the system. If you are planning an event that has been held previously, then the event is corresponded within the system

Event Management System
Page 60 of 63
once results processing completes. Once it is corresponded it is available for your modification. Events that are being held for the first time must be processed by AKC personnel.
How do I add or remove a judge?
AKC personnel must add a judge to the database of judges, which you access through the Available Judges tab of the Judge Panel Planning window.
Index
A Access
Judge Panel Planning · 6, 12 Online Event Management · 3 Ambulance Service in Disaster Plan · 25 Assign judges select to assign · 40 Assign Judges general information · 40 Assign Selected Judge radio button · 43 Assigning judges by breed, Step-by-step · 53 by event, Step-by-step · 50 by unassigned breeds and classes, Step-by-step · 56 Contract Status, Step-by-step · 58 Event and Judge Assignment Report · 14 Event search in Judge Panel Planning · 33 Judge search · 38 Summary of Conformation Assignment report · 28 Assignment tabs Breed Assignments · 53 Contract Status · 43, 57 Eligibility for selected class · 43 Event Assignments · 49 Judge Assignments · 44 Judge conflicts · 43 Judging Approval status for selected class · 43 manipulate columns · 42 manipulate row headers · 43 Unassigned · 56 understanding column headers · 42 Available Judges searching for in Judge Panel Planning, general
information · 30
B
Breed Assignments Step-by-step · 53 Breed Assignments tab · 53
C
Change information add Committee Member to list, Step-by-step · 20 add Committee Member, Step-by-step · 21 Club Secretary · 7, 14, 17 Committee Member, Step-by-step · 21 Competition Setup · 27 Competition Setup, Step-by-step · 28 Disaster Plan · 22 Event Chairperson/Committee · 19 Event Chairperson/Committee, Step-by-step · 19 Event Superintendent · 7, 14, 17 Event Superintendent, Step-by-step · 17 Event, Step-by-step · 13 Events · 12 remove Committee Member from list, Step-by-step · 19 Secretary, Step-by-step · 18
Club Secretary change information about · 7, 14, 17 Collapse row headers in Judge Assignment tabs · 43 Columns, manipulate in Judge Assignment tabs · 42
Columns, understanding headers in Judge Assignment tabs · 42
Committee add member name, Step-by-step · 20, 21 delete member name, Step-by-step · 19 edit member information, Step-by-step · 21 Committee member add name to list · 20 add name, Step-by-step · 20, 21 delete name from list · 19 edit information, Step-by-step · 21 edit member
information · 21 remove name, Step-by-step · 19 Competition Setup access, for specialty class · 29 change information · 27

Event Management System
Page 61 of 63
Competition Type view and modify · 29 Conflicts for judges · 43 Conformation, Judges assigned to (report) · 28 Contract Status Step-by-step · 58 Contract Status tab · 57 Copy existing Disaster Plan, Step-by-step · 23 Create new Disaster Plan, Step-by-step · 25
D
Designated Specialty · 29 Disaster Plan change information about · 22 copy existing Plan · 23 create new Plan · 25 create, Step-by-step · 25 Update button · 27
E
Eligibility for selected class · 43 Emergency Response Coordinator in Disaster Plan · 26 Entries first date/time accepted · 29 last date/time accepted · 29 Entry Fee view or modify · 29 Event List of· 10 modify information · 12
Modify information, Step-by-step · 13 search (Online Event Management) · 9 search by Competition Type, in Judge Panel Planning · 36 search by criteria, in Judge Panel Planning · 35 search by date, in Judge Panel Planning · 36 search by name, in Judge Panel Planning · 35 search by state, in Judge Panel Planning · 36 Search for · 8 search for in Judge Panel Planning · 30 search for, results · 10 search, in Judge Panel Planning · 33 select to manage, in Judge Panel Planning · 37 Step-by-step List of Events · 11 Step-by-step search in Judge Panel Planning · 34 Event Assignments Step-by-step · 50 Event Assignments tab · 49 Event Chairman in Disaster Plan · 26 Event Chairperson add name to list · 20 change information about · 19 delete name from list · 19 edit member information · 21 Event Committee add member name · 21 change information about · 19 Event Information change Competition Type · 29 Event management change Club Secretary · 7, 14, 17 change Disaster Plan · 22 change Event Chairperson/Committee · 19 change Event Chairperson/Committee, Step-by-step · 19 change Event Superintendent · 7, 14, 17 Event Management · 5 Create new event · 3 Event Home page · 12 Modify event information · 12 Modify event information, Step-by-step · 13 View Event Report · 13, 28 Event Number search by, in Judge Panel Planning · 34 Event search Online Event Management System · 8 Step-by-step, Online Event Management · 9 Event Search in Judge Panel Planning, general information · 30 Event Search, Judge Panel Planning · 33 Event Secretary change information, Step-by-step · 18 Event Setting view or modify · 29 Event Superintendent change information about · 7, 14, 17 change information about, Step-by-step · 17 Event Type Special designation · 29 Expans row headers in Judge Assignment tabs · 43
F
Fee for Additional Entries view or modify · 29 Find Event by Competition Type, in Judge Panel Planning · 36 by criteria, in Judge Panel Planning · 35 by date, in Judge Panel Planning · 36 by Event Number, in Judge Panel Planning · 34 by name, in Judge Panel Planning · 35 by state, in Judge Panel Planning · 36 Find Judge by Judge Number · 38 by name · 39 by state · 39 Fire Department in Disaster Plan · 25
H
Help · 6 Hospital information in Disaster Plan · 26
I
Install Java · 61
J
Java and running Judge Panel Planning the first time · 30 install · 61 Judge search · 38 search by name · 39 search by state · 39 select to assign · 40 Judge Assignment assign a judge · 46 problems, view · 48 Save assignments · 47 Select a judge to assign · 45 Step-by-step · 44 Judge assignments general information · 29 Judge Assignments tab · 44 Judge Number search by · 38 Judge Panel Planning assign Judges, Step-by-step · 38 assignments, general information · 40 Launch application · 6, 29 Launch application from Event Home · 12 search for an Event, Step-by-step · 34 search for Event · 30 search for Judges · 30 using the interface, general information · 30 Judge Search, Judge Panel Planning · 38
Judges assign by eligible classes or breeds · 44 assigning, general information · 40 assignment tabs, manipulate columns · 42 assignment tabs, understanding column headers · 42 change contract status · 43, 57 Conflicts · 43 display and assign only eligible classes or breeds · 44 Eligibility for selected class · 43 Event and Judge Assignment Report · 14 Judging Approval status for selected class · 43 names, in assignment interface · 43 search for in Judge Panel Planning · 30 status for selected class · 43 Step-by-step assignments in general · 38 Step-by-step, assign a Judge · 46 Step-by-step, Breed Assignment · 53 Step-by-step, Contract Status · 58 Step-by-step, Event Assignment · 50 Step-by-step, Judge Assignment · 44 Step-by-step, Save Judge assignments · 47 Step-by-step, Select a Judge to assign · 45 Step-by-step, Unassigned assignment · 56 Step-by-step, view Judge assignment issues ·

Event Management System
Page 62 of 63
48 Summary of Conformation Assignment report, Step-bystep · 28 view all classes or breeds · 49 view and assign for all event classes or breeds · 49 view and assign for specific classes or breeds · 53 view and assign for unassigned event classes or breeds · 56 view by classes or breeds · 53 view classes or breeds without assigned judges · 56 view contract status · 43, 57 Judging Approval · 43 Judging Contract Status · 43
Log in· 5
M
Manage events select to manage, in Judge Panel Planning · 37 Manipulating columns in Judge Panel Planning · 32 Moving between panes in Judge Panel Planning · 32
O
Online Event Management Event search · 8 List of Events · 10 Modify event information · 12 Step-by-step Event search · 9 Step-by-step List of Events · 11
P
Police Department in Disaster Plan · 25 Problems with judge assignments, view Step-by-step · 48
R
Reports Event and Judge Assignment Report · 14 Event Report · 28 refresh Event and Judge Assignment Report · 14 Summary of Conformation · 28 View Event Report · 13 Reset button in Judge Panel Planning · 33 search criteria, in Judge Panel Planning · 33 Resizing panes in Judge Panel Planning · 32 Row headers collapse and expand in assignment tabs · 43
S
Save judge assignments, Step-by-step · 47 Search for Event · 8 for event by Competition Type in Judge Panel Planning · 36 for event by Date in Judge Panel Planning · 36 for event by state in Judge Panel Planning · 36 for event in Judge Panel Planning · 35 for Event in Judge Panel Planning · 30 for event name in Judge Panel Planning · 35 for Events in Judge Panel Planning · 33 for Events in Judge Panel Planning, Step-by-step · 34 for events, results · 11 for Events, results · 10 for judge by state · 39 for judge name · 39 for Judges · 38 for Judges in Judge Panel Planning · 30 for Judges in Judge Panel Planning, Step-by-step · 38 search for events (Online Event Management) · 9 Secretary change information, Step-by-step · 18 Select events to manage in Judge Panel Planning · 37 judge names to assign · 40 Selected Judge names in Judge Panel Planning · 43 Step-by-step add Committee Member name · 21 add Committee Member name to list · 20 Assign a Judge · 46 assign Judges · 38 Breed Assignments · 53 change Event Secretary information · 18 change Event Superintendent · 17 Contract Status · 58 Disaster Plan, copy existing · 23 Disaster Plan, create new · 25 display Summary of Conformation Assignment report ·
28 edit Committee Member information · 21 Event Assignments · 50 Event Home page · 13 Event search results · 11 Judge Assignments · 44 remove Committee Member name from list · 19 Save assigned judges · 47 search for events (Online Event Management) · 9

Event Management System
Page 63 of 63
Select a Judge to assign · 45 Unassigned judge assignments · 56 View issues with assigned judges · 48 Step-by-Step change Competition Setup · 28 Summary of Conformation Assignment report · 28
T
Time Zone view or modify · 29 Trash can button in Judge Panel Planning · 33
U
Unassigned assignments tab · 56 Unassigned judge assignments Step-by-step · 56 Update button for Disaster Plan · 27
V
Veterinarian in Disaster Plan · 25 View issues with judge assignments, Step-by-step · 48
W
Wildcard to search for Event names in Judge Panel Planning · 35 to search for Events in Judge Panel Planning · 34 to search for Judge names · 39 Workflow · 7
Y
Your information in Disaster Plan · 27