new lab windows 7 - xp mode (brought to you by rmroberts.com)
TRANSCRIPT

New Lab Windows 7 - XP Mode
(Brought to you by RMRoberts.com)
After completing this laboratory activity, you will be able to:
Download, install and configure Windows 7 XP Mode
Download, install and configure Virtual PC.
Explain the advantages of Windows 7 XP Mode.
In this laboratory activity, you will install, configure and run Window 7 XP Mode.
XP Mode is a new free add-on feature first introduced in Windows 7. When
installing and configuring XP Mode on a Windows 7 operating system, you are
actually installing and configuring two programs. The first program is Microsoft
virtual PC, and the second is a fully functional edition of Windows XP. After
installing XP Mode, you can run Windows XP applications inside the Windows 7
desktop.
Windows7 - XP Mode is not a dual boot system. A dual boot system consists of
two separate partitions each with a separate edition of an operating system
installed. For example, a dual boot system might have a complete XP or Vista
Professional Edition, and a complete Windows 7 Professional Edition installed on
the same computer. During the startup, the user chooses which operating
system to boot to. In contrast to a dual boot system, Windows 7 XP Mode
allows the user to simultaneously run both operating systems. The Windows XP
operating system is run inside a virtual PC configuration on the Windows 7
system.
A virtual PC program emulates a complete hardware system inside another
hardware system. The virtual PC program simulates its own set of virtual
hardware components such as hard disk drive, network adapter, memory, etc.
After installing the Windows 7 - XP Mode feature, the user can share files,
programs, and even hardware devices such as a printer between the two
operating systems. The fact that Windows 7 XP Mode allows files programs and
hardware devices to be shared makes Windows 7 compatible with older
programs and hardware devices that might not have drivers that support
Windows 7 operating system. The main advantages to using the XP Mode
feature is the fact that it can correct compatible issues with older programs and

hardware devices designed for Windows XP and not directly supported under
Windows 7.
Note: Windows 7 XP Mode will prove to be a real asset to a student who is
preparing for technical career supporting computers and network or A+
certification. Once Windows 7 XP Mode is installed on your home computer, you
can not only have Windows XP operating system at your fingertips, but also add
an edition of Windows Vista using the same virtual PC program. The
configuration will allow you to compare all three major operating systems and
better prepare you as a computer technician.
Not all computers support Virtual PC and XP Mode. The computer must have
firmware (BIOS) and a CPU that will support Virtual PC. Older or legacy
hardware will not support the XP Mode and Virtual CP feature.
Materials Required
1 Windows 7 Professional or Ultimate editions (Not Home Editions)
Internet access
XPMuser password __________________________ The acronym XPM
represent XP Mode.
Configure for automatic updates (Yes or No) __________
Note: These exact steps and screen captures may change as Microsoft updates
and streamlines the XP Mode installation process. Also because you may be
using a computer workstation shared by other students, the XP Mode may
already be installed on your workstation. If this is the case, it is still important to
read and follow the steps in the XP Mode laboratory activity.
1. ___ Report to your assigned workstation, boot the computer and verify that
it is in proper working order.
2. ___ Go to Microsoft XP Mode website located at
http://www.microsoft.com/windows/virtual-pc/download.aspx
or conduct an Internet search using the key terms “Microsoft Windows 7 XP
Mode download”

XP Mode Site Select Edition You will select your Windows 7 edition and the appropriate language. You then
either run or save the downloaded program. To identify which version of
Windows 7 you are running you can right-click on Computer located off the Start
menu list and then select Properties.
After the download is complete, you will see a familiar dialog box prompting you
to run the completed download.
3. ____ After selecting the Windows 7 edition you will scroll down and see all four

major steps to the installation process similar to the screen capture below.
Instructions
The instructions will not appear until after you select the appropriate operating
system and language. Note: XP Mode is not available for Windows 7 Home
Editions. You must select Professional edition or higher.
Step 1 prompts you to either email the instructions or print out the instructions.
You can also bookmark the URL for later reference.
Step 2 you download the 500 MB Windows XP Mode file.
Step 3 you download the Windows Virtual PC program.
Step 4 you update the Windows XP Mode program.
The entire process is quite simple and intuitive. You can save the XP Mode and
the Virtual PC program to your download files and then run both or simply run
both without the need to download and save each. After each download is
complete you will see the usual Windows dialog box prompting you to install the
download. You must restart your computer after installing the XP Mode and
Virtual PC programs.
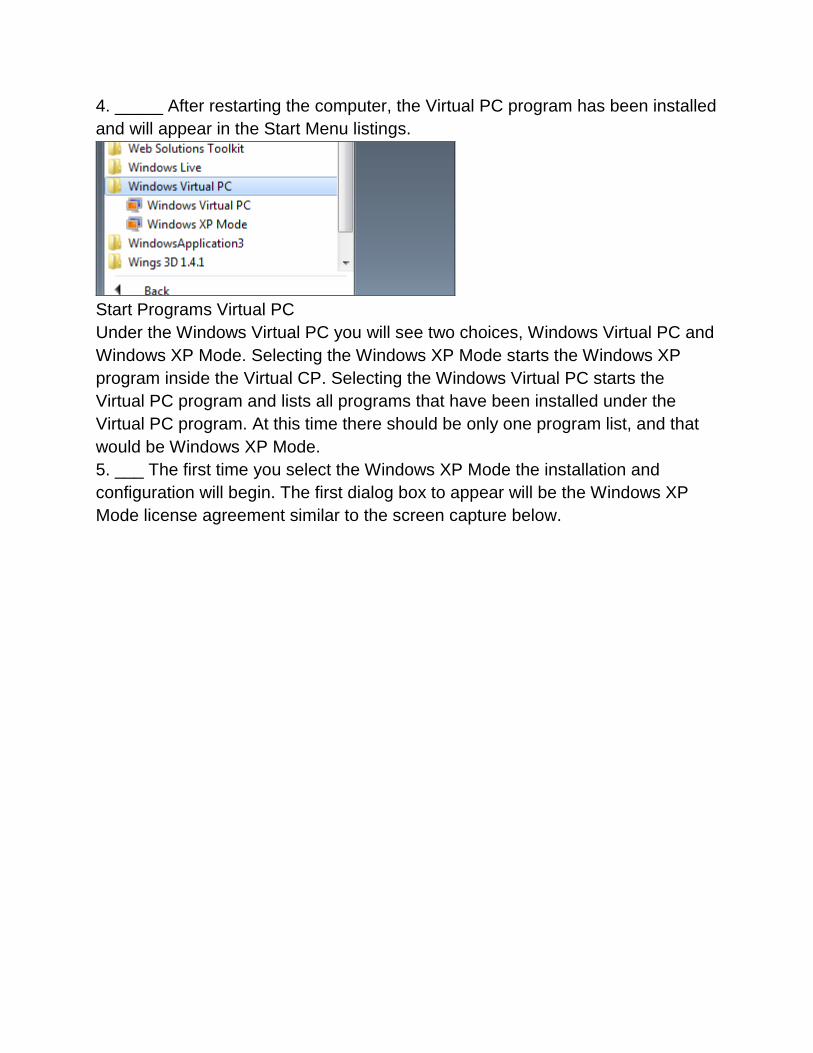
4. _____ After restarting the computer, the Virtual PC program has been installed
and will appear in the Start Menu listings.
Start Programs Virtual PC
Under the Windows Virtual PC you will see two choices, Windows Virtual PC and
Windows XP Mode. Selecting the Windows XP Mode starts the Windows XP
program inside the Virtual CP. Selecting the Windows Virtual PC starts the
Virtual PC program and lists all programs that have been installed under the
Virtual PC program. At this time there should be only one program list, and that
would be Windows XP Mode.
5. ___ The first time you select the Windows XP Mode the installation and
configuration will begin. The first dialog box to appear will be the Windows XP
Mode license agreement similar to the screen capture below.

Windows XP Mode License Agreement
You must select the box identified as “I accept the license terms” and then the
“Next” button to proceed.
6. ___ The next dialog box to appear is the Installation folder and credentials.
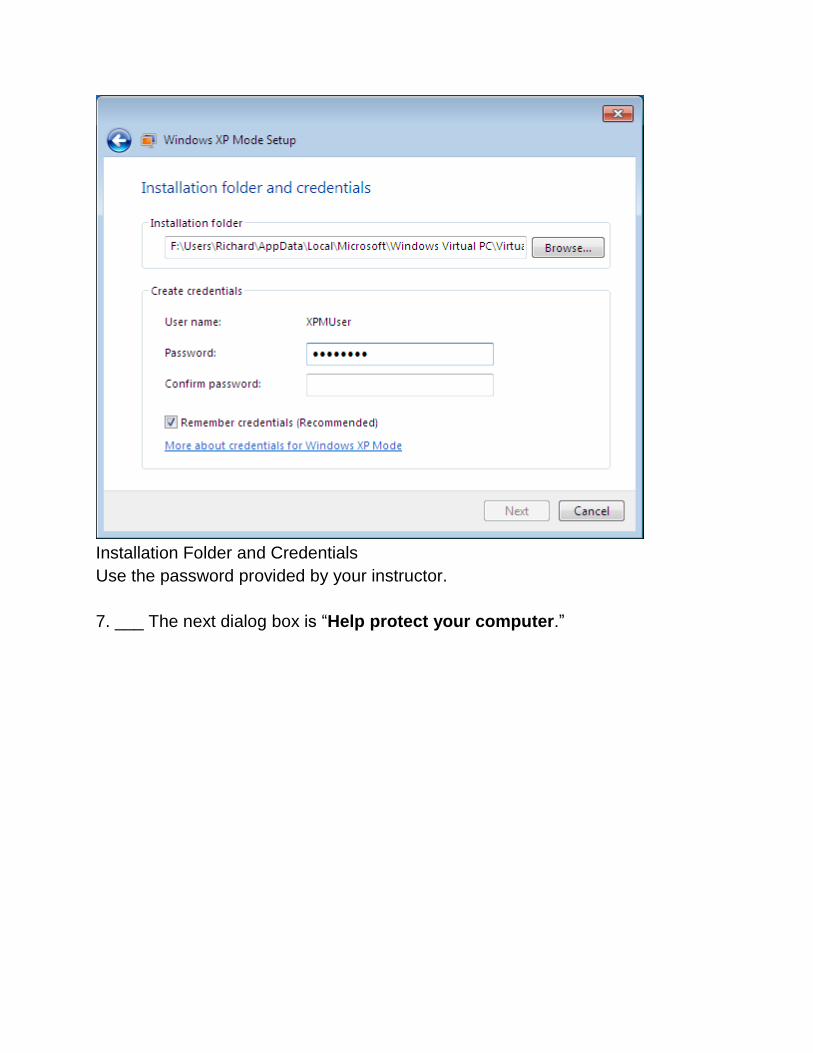
Installation Folder and Credentials
Use the password provided by your instructor.
7. ___ The next dialog box is “Help protect your computer.”

Help Protect Your Computer
Selecting the green shield option which will turn on “Automatic Updates now”
which is the preferred option. Select the option identified by your instructor before
beginning the laboratory activity. The instructor may prefer you to choose the
“Not right now” to save laboratory time or if you are going to remove the program
on a shared computer.
8. ___ The next dialog box prompts you to setup a shared drive in the Windows
XP Mode.
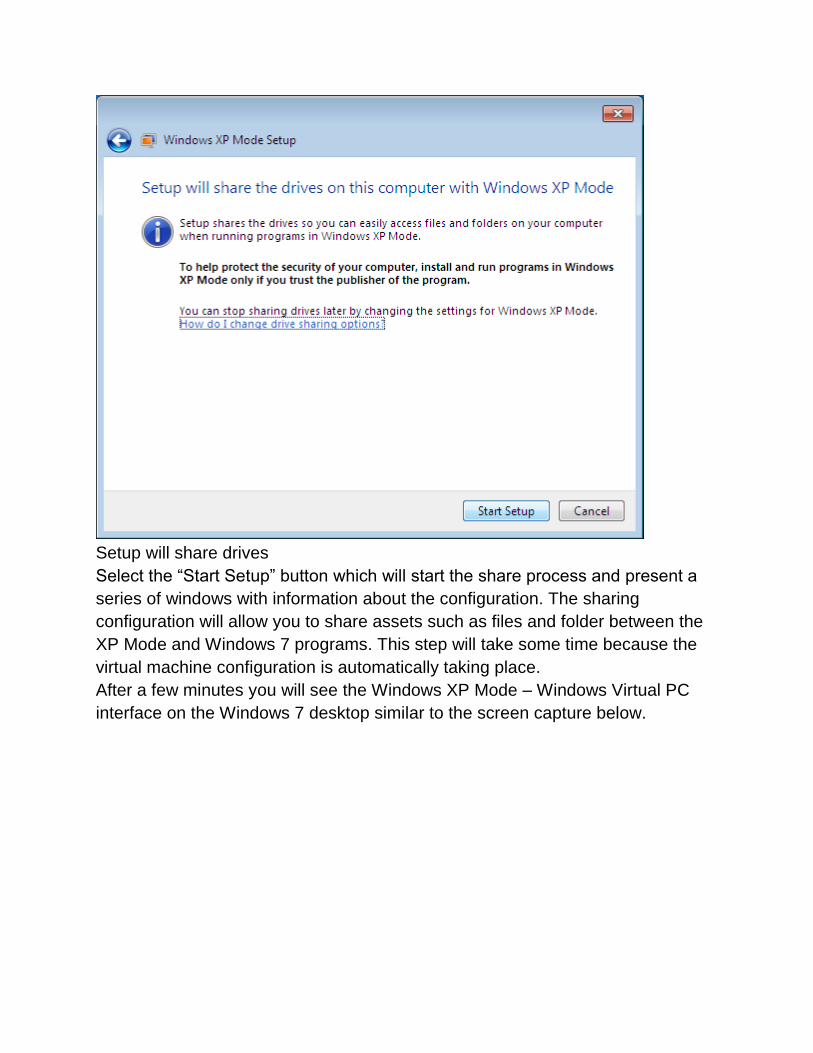
Setup will share drives
Select the “Start Setup” button which will start the share process and present a
series of windows with information about the configuration. The sharing
configuration will allow you to share assets such as files and folder between the
XP Mode and Windows 7 programs. This step will take some time because the
virtual machine configuration is automatically taking place.
After a few minutes you will see the Windows XP Mode – Windows Virtual PC
interface on the Windows 7 desktop similar to the screen capture below.

XP Mode on Desktop
You have now created a virtual machine. You are running a complete version of
Windows XP operating system inside a version of Windows7 through the Virtual
PC program.
9. ___ Call your instructor to inspect your laboratory activity before attempting to
use the Windows XP Mode program.
10. ___ After your instructor checks your laboratory activity; select the Action
menu item that appears at the top of the Windows XP Mode screen. The Action
menu option presents four additional menu options, View Full Screen, Sleep,
Restart, and Close.

XP Mode Action Menu Items
Select the Close option at this time. Selecting the Close option will put the XP
Mode and Virtual PC program into hibernation. The Windows XP Mode window
will now close.
11. ___ To open the Windows XP Mode program select Start | All Programs |
Windows Virtual PC | Windows XP Mode.
Start Programs Windows Virtual PC.
The Windows XP Mode program will start and appear on the Windows 7desktop
inside the Virtual PC program.
12. ____ Now select the “Settings…” option located under the “Tools” menu, This
action will open the Windows XP Mode – Windows Virtual PC Settings dialog box
located under the
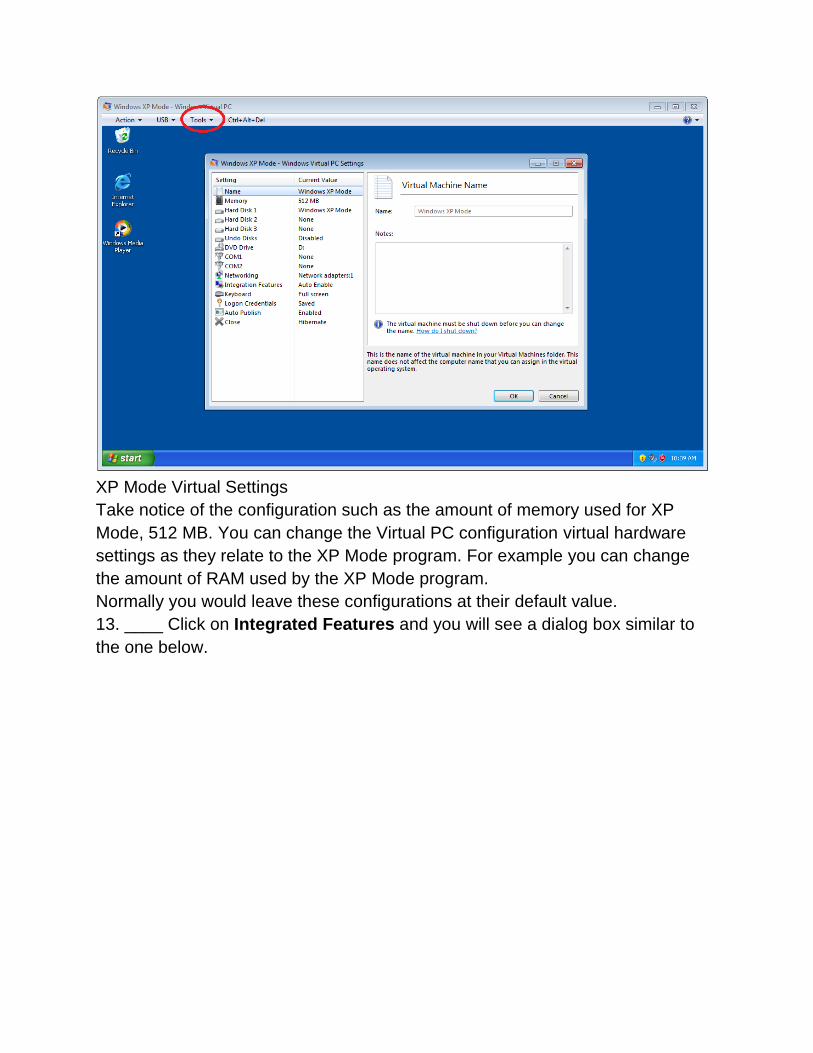
XP Mode Virtual Settings
Take notice of the configuration such as the amount of memory used for XP
Mode, 512 MB. You can change the Virtual PC configuration virtual hardware
settings as they relate to the XP Mode program. For example you can change
the amount of RAM used by the XP Mode program.
Normally you would leave these configurations at their default value.
13. ____ Click on Integrated Features and you will see a dialog box similar to
the one below.

XP Mode Integrated Features
The Integrated Features allows you to select and configure which hardware
features are shared between the original Windows 7 machine and the XP Mode
virtual machine.
14. ___ Now you will select the option to view the XP Mode program in full
screen mode. Under the Action menu item select the View Full Screen option.
The Windows XP Mode will now use the entire desktop screen to display the XP
Mode program. To reduce the XP Mode back to the original screen size, select
the reduce icon located at the top of the screen tool bar. Selecting the X icon will
close the Virtual machine.
15. ___ To learn more about all the available configuration options, select the
blue link “More about Integrated Features” and a dialog box containing
information pertaining to Windows Virtual PC will appear..

Windows Virtual PC Help
You can select any topic from the left directory and the related information will
appear on the right. Take a few minutes to look over the information.
16. ___ Before closing out the laboratory activity perform the following challenge.
Open the Word program located in the XP Mode program and try a short note
and save it to the documents folder in the XP Mode program. Copy the document
and then navigate you way to the Windows 7 Documents folder and paste a copy
of the Word document inside the Windows 7 Documents folder.
17. ___ Return all materials and then complete the review questions.
Review Questions
1. What is the cost of the Windows XP Mode program?
2. What program besides Windows XP must you download to configure XP Mode
on your Windows 7 computer?
3. Which editions of Windows 7 is XP Mode NOT compatible with?
4. How large is the XP Mode download file?
5. Why might a computer not support the Virtual PC and Windows XP Mode

programs?
6. What is the main advantage to using the XP Mode feature?
Review Question Answers
1. What is the cost of the Windows XP Mode program? Free.
2. What program besides Windows XP must you download to configure XP Mode
on your Windows 7 computer? Virtual PC.
3. Which editions of Windows 7 is XP Mode NOT compatible with? Home
Editions
4. How large is the XP Mode download file? 500 MB
5. Why might a computer not support the Virtual PC and Windows XP Mode
programs? The computer firmware and CPU may not support the Virtual PC
features.
6. What is the main advantage to using the XP Mode feature? Overcome
compatible issues with older programs and hardware devices designed for
Windows XP and not directly supported under Windows 7.