national rural livelihood mission -...
TRANSCRIPT

1
National Rural Livelihood Mission
TRAINING MANUAL
For Master Trainers
Capacity Building for
Community
Resource Persons
On
Community Managed Sustainable Agriculture

2
Rationale :
NRLM Aajeevika - National Rural Livelihoods Mission (NRLM) was launched by the Ministry of Rural Development (MoRD), Government of India in June 2011. Aided in part through investment support by the World Bank, the Mission aims at creating efficient and effective institutional platforms of the rural poor enabling them to increase household income through sustainable livelihood enhancements and improved access to financial services.
NRLM has set out with an agenda to cover 7 Crore rural poor households, across 600 districts,
6000 blocks, 2.5 lakh Gram Panchayats and 6 lakh villages in the country through self-managed
Self Help Groups (SHGs) and federated institutions and support them for livelihoods collectives
in a period of 8-10 years. In addition, the poor would be facilitated to achieve increased access to
their rights, entitlements and public services, diversified risk and better social indicators of
empowerment. NRLM believes in harnessing the innate capabilities of the poor and
complements them with capacities (information, knowledge, skills, tools, finance and
collectivization) to participate in the growing economy of the country.
NRLM promotes SHGs with exclusive women membership. The idea is to reach out to all family members through women. Process of formation of SHGs which includes: organising the women into affinity based groups, developing group norms, practicing Panchasutra (regular meetings, regular savings, regular inter-loaning, timely repayment and up-to-date books of accounts), and leadership development. From six to twenty four months the focus would be on capacity building, micro investment plan (MIP), strengthening the existing livelihoods of the members, linkages with banks and setting up primary federation. Beyond twenty four months, the focus would be more on visioning/planning, promoting new livelihoods, new products and creating social capital.
Capacity building:
Capacity building is the key component in CMSA. Financial support is only in the form of
capacity building and transfer of technology. Components of capacity building includes, life
cycles of pests and on enabling climatic condition for disease prevalence and spreading, farming
systems, sustainable use of resources, maximizing output from a unit land area, effective
utilization of inputs like Seed, organic fertilizers, sun light, water, land etc. Conservation of
Renewable Natural Resources and Genetic bio diversity both flora and fauna, and SRI in Paddy
received special attention. Massive capacity building programs were organized to build the
capacities of various stake holders.
Extension support:
The transfer of technology is through community based local best practicing farmers. Farmers
field school (FFS) is the key activity for transfer of technology and sharing of best practices.
Farmers upgrade knowledge by sharing, observations and experiments. 20-25 farm families
formed into a group known as “Sasyamithra Sanghas” and these sanghas are assisted by a Village
activist (a practicing farmer) and a Cluster activist (for a group of five villages, he is also a
practicing farmer) who facilitate the knowledge sharing processes.
Support for building Human Resources:
CMSA is focusing on building community best practitioners in technology transfer. They are
known as “Community Resource Persons (CRPs)”. There are 103 state level CRPs in 22 districts.
These CRPs provide extension support to farmers. These practicing farmers are role models, who
3
have adopted CMSA practices successfully in their fields and improved their net incomes. They
were extensively trained in all aspects of sustainable agriculture.
Background: The Green Revolution increased agricultural production for many farmers in India and achieved
significant gains in terms of food security. However, many of the small-farm holders in rain-fed and
resource poor areas did not benefit much from Green Revolution technology and credit. Of the small-
farm holders who have been using chemical fertilizers and pesticides, many are caught in the debt
trap due to the high cost of those fertilizers, lack of credit, poor access to markets, and lack of
investible surplus. This has resulted in low profitability agriculture, and many smallholders have
dropped out of the sector. The spate of suicides among farmers in recent years has been an
unfortunate consequence.
To address these issues, an alternative approach to manage agriculture known as community
managed sustainable agriculture (CMSA)
Over 300,000 farmers have adopted CMSA in Andhra Pradesh alone, covering 1.36 million acres of
farmland—5.1 per cent of the net cropped area in the state—in just over four years
This is being tested and practiced in the state of Andhra Pradesh in India. The CMSA approach
replaces the use of chemical pesticides with a combination of physical and biological measures—
including eco-friendly bio- pesticides—and complements it by adopting biological and agronomic soil
fertility improvement measures leading to reduced use of chemical fertilizers. This has significantly
reduced the cost of cultivation, the need for large amounts of credit, and indebtedness that results.
These transformational changes have been achieved without any reduction in the productivity
and yields for the participating farmers. Initial results from CMSA in Andhra Pradesh show a
significant net increase in farmers’ incomes in addition to significant health and ecological benefits.
CMSA uses an institutional platform of community organizations and their federations to plan,
implement, manage, and monitor the program and provide a single window approach for delivery
of livelihood improvement services and enterprises, exclusively for small-farm holders. Over
300,000 farmers have adopted CMSA in Andhra Pradesh alone, covering 1.36 million acres of
farmland—5.1 per cent of the net cropped area in the state—in just over four years.2 There is a
potential of scaling up this approach to the whole of India as CMSA is showing trends of being
economically viable and ecologically friendly. The newly set up National Mission o n Sustainable
Agriculture in India is considering adopting CMSA as one of the key strategies at the national level.
As this approach challenges the dominant high input subsidized model for agricultural inputs and
relies more on the efforts of communities, it is likely totrigger a debate on the new paradigm
for agriculture for small holder rain-fed
This learning note describes CMSA program and its approach, the institutional model supporting
it and implementation process. The paper also analyses the initial results of economic and
environmental impact of CMSA, distills the key lessons learned from the Andhra Pradesh
experience, and draws possible implications for future.

4
The Context
Agriculture is vital to the economy of Andhra Pradesh, but farming in the state has been fraught with a
number of challenges. Sixty percent of the workforce depends on agriculture in the state and
generates a quarter of the state GDP. Since adoption of the Green Revolution in the seventies,
Andhra Pradesh continues to be one of India’s major producers of rice, cotton, groundnut and lentils.
However, agricultural growth rate and growth rates of yield of major crops had begun to decline in the
nineties 3. A number of factors contributed to this – the high cost of conventional 4 agriculture which is
input intensive, the lack of access to institutional credit, insufficient irrigation and inadequate state-run
extension services. Farmers across the state were in distress5, but small and marginal landholders
(82 per cent of landholdings in the state); especially in rainfed (56 per cent of net sown area) areas were
affected the most.
Conventional agriculture is input intensive and costly. Investments are needed in HYVs, pesticides,
fertilizer and irrigation to ensure a good harvest. In Andhra Pradesh farmers spend as much as 35 per
cent of their total cultivation expenditure on pesticides and fertilizers alone (figure 1), whereas the all
India average is 30 per cent. State provided irrigation reaches less than 28 per cent of the total cropped
area in the state, leaving a majority of farmers to invest in their own irrigation facilities or risk the
uncertainty of rains.
Growth Rates aggregate value of crop outputs in AP were 3.87 from 1966-67 to 1979-80 and dropped to 2.66 for the period 1980-81 to 1991-92. It dropped further to 2.39 per cent per annum from 1990-91 till 2001-02. Human Development Report 2007, Andhra Pradesh
In this paper conventional agriculture refers to continued use of chemical pesticides and chemical fertilizers
A number of news reports and studies document the cases of farmer suicides and cases of high incidence of debt and crop failure in the state. See References listed at the end of this paper.
failure continued even after pesticides, HYV seed and fertilizer were used 6. During 2002-03 the
average annual income from agriculture and related sources for farmers with small holdings (1-
2hectares) was US$440, whereas average expenditure on cultivation during the same period
was US$286, leaving the farmer with only US$154 to invest in farming and household expenses
during the year.7
To meet the high cost of cultivation farmers have been under pressure to borrow. The estimated
prevalence of indebtedness among farmer households in the state was very high at 82 percent8 and,
the average outstanding loan for farmers with small landholdings was more than twice the
national average. 9 The main purpose of these loans was to meet current expenditure in farming, 10
which means that income from farming was insufficient to meet the associated expenditure.

5
Community Managed Sustainable Agr iculture—the Technologies and
Pract ices
CMSA technologies and practices are a mixture of scientifically proven methods, indigenous
knowledge and traditional wisdom and are deployed in a sequence which farmers learn during their
training. The first stage of adoption of CMSA is based on the IPM technology practiced in many parts
of the world. Farmers undertake pest prevention and management training. They learn the
diagnostic skills to observe, document and understand the behavior and life cycles of pests and the
role of natural predators.
Subsequently the farmers begin replacing chemical pesticides with a combination of physical methods
such as pheromone traps and sticker plates, and biological methods such as bio-pesticides like Neem
extracts. 16 In the third stage of CMSA, pest management through physical and biological means is
complemented by measures to increase soil fertility. Farmers are encouraged to replace the use of
conventional chemical fertilizers. This includes use of microbial formulations, intensive use of
composting techniques, vermiculture and use of bio-fertilizers
The guiding principles of CMSA are in box 1 on the right. A generic list of the technology options for CMSA is given in Table1 on the following page.
THE GUIDING PRIN CIPLES OF CMSA
Observation and documentation of pest and predator behavior, pest incidence on the
farms
Replace chemical pesticides with physical methods of pest management complemented
by botanical formulations and bio pesticides
Aim to manage pest populations; not to eliminate pests;
Focus on balancing predator and pest populations;
Enhance and maintain soil health through mulching, green manure and vermicompost
Reduce usage of synthetic(inorganic) fertilizers and later stop using it
Increase diversity and intensity of crops
Identify appropriate cropping systems – inter-cropping, multi-cropping, crop rotations;
Preserve local varieties and land race
Maintain local land races and crop genetic diversity
Pheromone traps are part of the biochemical pesticides which are naturally occurring substances that control pests by non-toxic mechanisms. Insect sex pheromones interfere with mating. Additionally, various scented plant extracts attract insect pests to traps. Bio pesticides on the other hand are certain types of pesticides derived from such natural materials as plants, bacteria, animal wastes, and certain minerals.

6
TABLE 1 SUSTAINABLE TECHNOLOGIES PRACTICED BY CMSA FARMERS
Pest Management
Soil Fertility Management
Crop
Management
Stage 1 CMSA (Non Pesticide Management) Step 1:
Observations and Diagnostics Observe and document pest and predator behavior
Understand pest life cycle
Step 2: Physical methods of Pest Management
Summer plowing
Bonfires and pheromone traps Sticker plates
Bird perches
Step 3: Biological Methods of
Pest Management
Trap crops along perimeter or in rows
Step 4: Bio-pesticides Agniastram – chilli, garlic, neem and cow urine
Brahmastram – neem leaves, custard apple, castor, papaya,
bitter gourd, and cow urine
C C
Continue use of chemical fertilizers in the initial
sStages
BBegin use of manure & Compost
BBegin application of microbial formulations
Panchagavya – cow dung,
cow urine, milk,
ghee and yogurt
Jeevamrutham – j
aggery, sugarcane juice, cow urine and
dung
CCrop Rotation
Stage 2 CMSA - Sustainable Agriculture Same as above Reduce and then Replace
chemical fertilizers with Soil fertility management through:
Application of tank silt
Green manure crops Green leaf manure
Mulching
Vermicomposting Inoculation with Nitrogen fixing bacteria like Azospirillum and Azotobacter
Biomass plantation on bunds
Azolla application for
rice
Inter-cropping & Multi- cropping
CMSA practices are scaled up and intensified by replacing conventional fertilizers with tank silt, green
manure crops, soil inoculation with Azospirillum and Azotobacter – nitrogen fixing bacteria, and,
vermicomposting. Farmers take on inter-cropping or multi-cropping to maintain soil fertility and reduce
pest

7
Table of contents- Background .................................................................. 3
The Context ....................................................................4
Module 1 Natural Resouurce Managmnet...............9
Session 1...-............................................................................10
Session 2-...............................................................................15
Session 3................................................................................21
Session 4...............................................................................28
Session 5...............................................................................35
Session 6-.............................................................................38
Session 7..............................................................................48
Session 8..............................................................................53
Session 9...............................................................................64
Module 2 Plant nutrition................................................78
Session 1................................................................................79
Session 2................................................................................83
Session 3................................................................................92
Module 3 All about seed................................................ 115
Session 1- Basic fundamentals of seed............................116
Module 4 Post harvest management..............................129
S-1 – Stored grain pest........................................................130
Module 5 Weed control......................................................144
Session 1- Controlling weeds and vertebrate pests........145
Module 6 Non chemical pest managmnet......................157
Session 1 Understanding insect pests...............................158
Session 2 Pest surveillance and concept of ETL..............174

8
Session 3- Ill effect of pesticides.............................................178
Session 4 – Non- negotiable of paddy................................. 182
Module 7 Desease management..........................................183
Session 1- Understanding diseases........................................184
Session 2- Non chemical disease control.............................191
Module 8 – Extension methodologies......................................
Session 1 CRP strategy.................................................................................206
Session 2 Farmers field school.....................................................................211
Session 3- Human mediated disemination................................................. 218
Module 9 – Other areas
Session 1- 36X36 model of growing crops and CCE ............................... 225
Session 2- SRI Paddy, SWI wheat............................................ ............235
Annexures
Using this manual- Trainers guide............................................256
List of training tools- PPTs, References, Videos.......................261
Training schedule...........................................................................

9
Module 1
Natural Resource Management
Module

10
Module 1 NRM
Session 1—Definition of weather and climate Duration - 60 mts
Introduction :
Climate of a country, region, state determines what are the crops can be grown, when and what soil type. Weather determines the effect of rainfall, temperature, humidity, sunshine etc the crop growth on a farmers field. This is the reason we need to understand the difference between climate and weather. Since Indian agriculture is predominantly dependent on Monsoon it is imperative to understand the phenomena of Monsoon and its effect on crop production. Further depending on weather, soil type India has been divided into homogenous agro climatic zones to facilitate planning for crop production
Difference between weather and climate:
Weather is the state of the atmosphere, to the degree that it is hot or cold, wet or dry, calm or stormy, clear or cloudy. Therefore weather is something people often communicate about.
Learning outcomes :
At the end of the session participants will be able to Know the difference between weather and
climate Why it is important to know the elements
of weather for your day to day work How Monsoon affects cropping systems and
crop production What is meant by Agro-climatic zones and
Agro-ecological zones- their significance What are the basic natural resources of any
country. Soil, water, climate, flora and fauna constitutes the natural resources
Identify the soil types in the state/region that you work and its characteristics

11
Weather generally refers to day-to-day temperature and precipitation activity, whereas climate is the term for the statistics of atmospheric conditions over longer periods of time
Weather is driven by air pressure (temperature and moisture) differences between one place and another. These pressure and temperature differences can occur due to the sun angle at any particular spot, which varies by latitude from the tropics.. Weather systems in the mid-latitudes, such as extratropical cyclones, are caused by instabilities of the jet stream flow. Because the Earth's axis is tilted relative to its orbital plane, sunlight is incident at different angles at different times of the year. On Earth's surface, temperatures usually range ±40 °C (−40 °F to 100 °F) annually. Over thousands of years, changes in Earth's orbit can affect the amount and distribution of solar energy received by the Earth, thus influencing long-term climate and global climate change.
Surface temperature differences in turn cause pressure differences. Higher altitudes are cooler than lower altitudes due to differences in compressional heating.
Weather forecasting is the application of science and technology to predict the state of the atmosphere for a future time and a given location. Human attempts to control the weather have occurred throughout human history, and there is evidence that human activities such as agriculture and industry have modified weather patterns.
Monsoon phenomena in India
Monsoon in India is among the several geographically distributed observations of the global monsoons. In the subcontinent, it is one of oldest weather observations, an economically important weather pattern and the most anticipated weather event and unique weather phenomenon. Yet it is only partially understood and notoriously difficult to predict. Due to its effect on agriculture, flora and fauna and the general weather of India, Bangladesh, Pakistan, Sri Lanka, etc., among other economic, social and environmental effects, a Monsoon is one of the most anticipated, followed and studied weather phenomenon of the Indian subcontinent. It has significant impact on the overall well-being of sub-continent residents and has even been dubbed the"real finance minister of India"
Definition
Monsoon, is generally defined as a system of winds characterized by a seasonal reversal of its direction, lacks a consistent detailed definition. Some examples are given below: Indian Meteorological Department defines it as the seasonal reversals of the wind direction along the shores of the Indian Ocean, especially in the Arabian Sea, that blow from the southwest during one half of the year and from the northeast during the other half.[6] Observed initially by sailors in the Arabian sea[9] traveling between Africa, India and South-East Asia, Monsoon is a major weather phenomenon in India (and the subcontinent) for the influence it casts on the lives of its inhabitants since centuries. Monsoon in India can be categorized into two branches based on their spatial spread over the sub-continent:

12
NE Monsoon clouds over Tamil Nadu
Arabian Sea Branch Bay of Bengal Branch
Alternatively, it can be categorized into two segments based on the direction of rain bearing winds:
South-West Monsoon (SW Monsoon) North-East Monsoon (NE Monsoon)
Based on the time of the year that these winds bring rain to India, they can also be categorised in two rain periods called:
the Summer monsoon (June to September) the Winter monsoon, (October to December)
The complexity of Monsoon as a weather phenomenon of India is not yet completely understood, making it difficult to accurately predict its behaviour in terms of quantity, temporal and spatial distribution of the accompanying precipitation. These are the most monitored components of Monsoon determining the water availability in India for any given year.
Monsoon cloud

13
Process of Monsoon creation
A: Sea breeze, B: Land breeze
It is a highly developed science of Data gathering
• Data analysis important for agriculture • Forecasting services • Satellite imagery • It is global science • Data modeling
What are essential weather elements
• Temperature – recorded twice every day Min and Max • Wind direction • Wind speed • Sun shine hours – important for crop growth • Relative humidity

14
• Rainfall in past 24 hours
How these are useful to farmers daily weather forecast
• Plan field operations – tillage, seedbed preparation • Sowing • Fertilizer application
Spraying
• • Harvesting • Threshing, drying • Irrigation
India exhibits a variety of landscapes and climatic conditions those are reflected in the evolution of different soils and vegetation. There also exists a significant relationship among the soils, land form and climate.

15
Module 1 NRM
Session 2—Climate change Duration 45 mts
Introduction:
Climate change is the variation in global or regional climates over time. It reflects changes in the variability or average state of the atmosphere over time scales ranging from decades to millions of years. These changes can be caused by processes internal to the Earth, external forces (e.g. variations in sunlight intensity) or, more recently, human activities.
In recent usage, especially in the context of environmental policy, the term "climate change" often refers only to changes in modern climate, including the rise in average surface temperature known as global warming
• Climatic vulnerabilities are drought, flood, cyclone, heat wave, cold wave etc.
• Interventions include resource conservation practices and technologies for natural resource management,
• Efficient use of resources and inputs for improved crop, livestock and fisheries production
• Enhancing resilience is the key to achieve sustainability in agriculture especially in the context of climate vulnerability
Learning outcomes
At the end of this session participants will be able to :
Understand the effects of climate change
How it affects the livelihood of farmers
What are effect of change parameters
What are the resilient farming practices to mitigate the effect of climate change

16
Background :
What is climate change and how it affects farmer’s livelihood
• Unusual weather conditions and its effect on farming
• Unseasonal rainfall, hail storm, drought, flooding all are climate change effects
• Sudden high temperature during growing period
Drought
Climate resilient agriculture

17
• Sudden drought during critical period of growth
Climate resilient Agriculture • Scientists are working all over the world to tackle climate change which is real • New varieties which are drought resistant, • Mature even in high temperature during crop growth • Resistant to pests and diseases • Shorter duration crops to escape mid-season drought • Selecting crops which are climate resilient
Some of the best practices to mitigate effects of climate change
Rejuvenation of farming in cyclone and flood prone coastal
• Agro-ecosystems through land shaping
• Community paddy nursery as a • contingency measure for delayed planting
• Direct seeded rice for promoting • water use efficiency
• Drum seeding of rice for water and timeliness in planting
• Drought tolerant paddy cultivars to tackle deficit rainfall situations

18
• Rejuvenation of farming incyclone and flood prone coastal• Agro-ecosystems through land shaping• Community paddy nursery as a
contingency measure for delayed planting
• Direct seeded rice for promotingwater use efficiency
• Drum seeding of rice for water and timeliness in planting
• Drought tolerant paddy cultivars to tackle deficit rainfall situations
Some of best practices to mitigate effects of climate change
CMSA capacity building 6

19
• Individual farm ponds for
improving livelihoods of small
farmers
• Jalkund - low cost rainwater
harvesting structures
• Check dam - storing excess-runoff
in streams
• Recharge of wells to improve shallow aquifers
• Integrated Farming System modules
CMSA capacity building 8
• Improved planting methods for enhancing water use efficiency and crop productivity • Zero till drill wheat to escape terminal heat stress • In situ incorporation of biomass and crop residues for improving soil health • Village level seed banks to combat seed shortages • Fodder cultivars to tackle fodder scarcity
Some specific recommendations for unusual rain during March April 2015
• Telangana • Areas affected: Nizamabad, Adilabad, Ranga Reddy, Mahabubnagar • Crops and damage: Turmeric, Safflower, Onion, Chillies and Rabi sorghum affected • Advisory:
– Provide surface drainage in standing crop - Quick drying of harvested rhizomes and bulbs
– Postpone harvesting of maize crop.
• Andhra Pradesh • Areas affected: Coastal districts • Crops and damage: Rice fallow pulses and rabi maize affected • Advisory: • Harvest green cobs

20
• Drain out excess water from fields in standing maize • Shift harvested cobs for safe drying
CMSA capacity building 13

21
Module 1 NRM
Session 3 Cropping systems Duration 45 mts
Introduction:
Cropping systems and crop rotation have developed over time immemorial by farmers for food security and marketable surplus depending on weather, soil, food need and many other factors. Research on the subject also has been quite wide and guided farmers for profitable cropping systems which gives maximum yield from a piece of land at the same time protect natural resources.
Cropping system: is an important component of a farming system. It represents cropping pattern used on a farm and their interaction with farm resources, other farm enterprises and available technology which determine their make up.
t
Polyculture practices in Andhra Pradesh
Replacing a natural ecosystem with a few specifically chosen plant varieties reduces the genetic
diversity found in wildlife and makes the organisms susceptible to widespread disease. The Great Irish
Famine (1845–1849) is a well-known example of the dangers of monoculture. In practice, there is no
single approach to sustainable agriculture, as the precise goals and methods must be adapted to each
Learning outcomes :
At the end of the session participants will be
able to :
Review the various cropping systems that
are followed in India depending on Agro
climatic zones
Employ the principles of crop rotation for
sustainable agriculture and maintenance
of natural resources
Practice crop rotation schemes
22
individual case. There may be some techniques of farming that are inherently in conflict with the
concept of sustainability,
but there is widespread misunderstanding on impacts of some practices. Today the
growth of local farmers' markets offer small farms the ability to sell the products that they have
grown back to the cities that they got the recycled compost from. By using local recycling this will
help move people away from the slash-and-burn techniques that are the characteristic feature of
shifting cultivators are often cited as inherently destructive, yet slash-and-burn cultivation has been
practiced in the Amazon for at least
6000 years.
of the system without degradation of the natural resources.
What are the benefits of cropping systems?
1. Maintain and enhance soil fertility. Some crops are soil exhausting while others help restore
soil fertility. However, a diversity of crops will maintain soil fertility and keep production level
high.
2. Enhanced crop growth. Crops may provide mutual benefits to each other for. for example,
reducing lodging, improving winter survival, or even acting as windbreaks to improve growth.
3. Minimize spread of disease. The more divers the species of plants and the longer period before
the soil is reseeded with the same crop, the more likely disease problems will be avoided.
4. Control weeds. Crops planted at different times of the year have different weed species
associated with them. Rotating crops helps prevent build up of any one serious weed species. The
more different growth cycles the crops have in your rotation, the fewer weeds will be able to adapt
to the field conditions.
5. Inhibit pest and insect growth. Changing crops each year to unrelated species can dramatically
reduce the population of pests and insects. Corp, crop rotation frequently eliminates their food source
and changes the habitat available to them.
6. Increase soil cover. Growing a diversity of crops helps keep field sizes smaller, which increases
soil cover, improves solar radiation capture and reduces erosion.
7. Use resources more efficiently. Having a diverse group of crops helps to more efficiently use the
available resources, natural resources, such as nutrients, sunlight and water in the soil, are evenly
shared by plants over the growing period, minimizing the risk for nutrient deficiencies and drought.
Other resources, such as labor, animal draft power, and machinery are also utilized more efficiently as
the time and effort spent planting and harvesting crops are more spread out over the harvesting period.
8. Reduce risk for crop failure. Having a diverse group of corps helps prevent total crops equally. It
also reduces food security concerns, as well as the amount of money required to finance production.
9. Improved food and financial security. Choosing an appropriate and diverse number of crops
will lead to a moue regular food production throughout the year. With a lower risk for crop failure,
there is a greater reliability on feed production and income generation.
Organic farming is the form of agriculture that relies on techniques such as crop rotation,
green manure, compost and biological pest control to maintain soil productivity and control

23
pests on a farm. Organic farming excludes or strictly limits the use of manufactured fertilizers,
pesticides (which include herbicides, insecticides and fungicides), plant growth regulators such as
hormones, livestock antibiotics, food
additives, and genetically modified organisms.
"Organic agriculture is a production system that sustains the health of soils, and people. It
relies on ecological processes, biodiversity and cycles adapted to local conditions, rather than the use
of inputs with adverse effects. Organic agriculture combines tradition, innovation and science to
benefit the shared environment and promote fair relationships and a good quality of life for all
involved.
Seasons of India
• Kharif or rainy season – main cropping season depending on monsoon rainfall and /or irrigation
• Rabi or winter season – either on residual soil moisture or irrigated. Example – rabi sorghum in peninsular India
• Ziad or summer season – has to be irrigated, large tracts under summer rice where water is available
• CS depends on seasonal variations with temperature, day length, humidity, rainfall etc
Seasons of India and cropping systems
• Kharif or rainy season – main cropping season depending on monsoon rainfall and /or irrigation
• Rabi or winter season – either on residual soil moisture or irrigated. Example – rabi sorghum in peninsular India
• Ziad or summer season – has to be irrigated, large tracts under summer rice where water is available
Factors for selection of a CS • CS depends on seasonal variations with temperature, day length, humidity, rainfall etc • Crops to be chosen where pests and disease incidents are ecologically controllable ( without chemical ) • Rotation of selected crops to be followed • Infrastructure requirement supporting a system

24
• Which crop will yield maximum- yield, input required, pest control, suit local land type, weather , income security, market
• Is the CS compatible with farmer’s skill, • Farming system compatibility • Input level affordability • Farmer’s economic viability • Access to Market, infrastructure such as road transport etc
Some of the cropping systems in India
• Rice based cropping systems • Kharif cereals other than rice • Maize based cropping systems • Sorghum based cropping systems • Millet based systems • Groundnut based systems • Winter cropping systems wheat- cow pea • Rabi sorghum based cropping systems

25

26

27
Strip crop - A ray of hope for dry land farmers
Ragi as a strip crop in groundnut
.

28
Module 1. NRM- All about soil
Introduction:
What is soil?
Life-supporting upper surface of earth that is the basis of all agriculture. It contains minerals and gravel from the chemical and physical weathering of rocks, decaying organic matter (humus), microorganism, insects, nutrients, water, and air.
Soils differ according to the climate, geological structure, and rainfall of the area and are constantly being formed and removed by natural, animal, and human activity
Composition of soil:
Soil composition is an important aspect of nutrient management. While soil minerals and organic matter hold and store nutrients, soil water is what readily provides nutrients for plant uptake. Soil air, too, plays an integral role since many of the microorganisms that live in the soil need air to undergo the biological processes that release additional nutrients into the soil.The basic components of soil are minerals, organic matter, water and air.
Session 4 —Soil physical properties -Duration 60 mts
At the end of this session the participants will be able to :
List basic textural classes of soil, definition of texture and structure and why they are important
Recall how they influence water holding capacity, erosion, infiltration ease of cultivation
Influence texture and structure
formation of a soil, what are structures
found in a soil
A soil profile – why it is important
How to get a crumb structure- what is needed , role of organic matter
Tillage and structure – role of moisture
How texture influence structure
formation of a soil, what are structures
found in a soil

29
Mineral matter obtained by the disintegration and decomposition of rocks
A. Organic matter obtained by the decay of plant residues, animal remains and microbial tissues B. Water obtained from the atmosphere and the reactions in soil (chemical, physical and microbial) C. Air or gases from atmosphere, reactions of roots, microbes and chemicals in the soil D. Organisms both big (worms, insects) and small (microbes)
Soil Minerals:
Soil minerals play a vital role in soil fertility since mineral surfaces serve as potential sites for nutrient
storage. However, different types of soil minerals hold and retain differing amounts of nutrients. The mineral portion of soil is divided into three particle-size classes: sand, silt, and clay.
Texture Characteristics
Sand Gritty Sand is visible to the naked eye, consists of particles with low surface area, and permits excessive drainage.
Silt Buttery Silt is not visible to the naked eye and increases the water holding capacity of soil.
Clay Sticky Clay has a high surface area, high water holding capacity, many small pores, and possesses charged surfaces to attract and hold nutrients.
Soil organic matter includes:
o Living organisms (soil biomass)
o The remains of microorganisms that once inhabited the soil
o The remains of plants and animals
Organic compounds that have been decomposed within the soil and, over thousands of years, reduced to complex and relatively stable substances

30
Functions of organic matter:
o Act as binding agent for mineral particles
o Producing friable surface soils
o Increase the amount of water that a soil may hold
o Provides food for organisms that inhibits the soil
o Humus is an integral component of organic matter
Colour of soil:
Soil colour gives an indication of the various processes going-on in the soil as well as the type of minerals in the soil.
Red colour in the soil is due to the abundance of iron oxide under oxidised conditions (well-drainage) in the soil
Dark colour is generally due to the accumulation of highly decayed organic matter
Yellow colour is due to hydrated iron oxides and hydroxide
Black nodules are due to manganese oxides
Gray hues indicate poor aeration
Soil organisms:
Any organism inhabiting the soil during part or all of its life. Soil organisms, which range in size from microscopic cells that digest decaying organic material to small mammals that live primarily on other soil organisms, play an important role in maintaining fertility, structure, drainage, and aeration of soil. They also break down plant and animal tissues, releasing stored nutrients and converting them into forms usable by plants. Some soil organisms are pests. Among the soil organisms that are pests of crops are nematodes, slugs and snails, symphylids, beetle larvae, fly larvae, caterpillars, and root aphids. Some soil organisms cause rots, some release substances that inhibit plant growth, and others are hosts for organisms that cause animal diseases.Since most of the functions of soil organisms are beneficial, earth

31
with large numbers of organisms in it tends to be fertile; one square metre of rich soil can harbour as many as 1,000,000,000 organisms.
Nutrient cycling
Soil structure
Microflora (bacteria + fungi)
Catabolise organic matter. Mineralise and immobilise nutrients.
Produce organic compounds that bind aggregates. Hyphae entangle particles onto aggregates.
Microfauna(Pot worms, snails, slugs, millipedes)
Regulate bacterial and fungal populations. Alter nutrient turnover.
May affect aggregate structure through interactions with microflora.
Mesofauna(nemotodes, mites, spring tails)
Regulate fungal and microfaunal populations. Alter nutrient turnover. Fragment plant residues.
Produce fecal pellets. Create biopores. Promote humification.
Macrofauna(burrowing animals, such as
snakes, lizards, gophers, badgers, rabbits,
hares, mice, and moles)
Fragment plant residues. Stimulate microbial activity.
Mix organic and mineral particles. Redistribute organic matter and microorganisms. Create biopores. Promote humification. Produce fecal pellets.

32
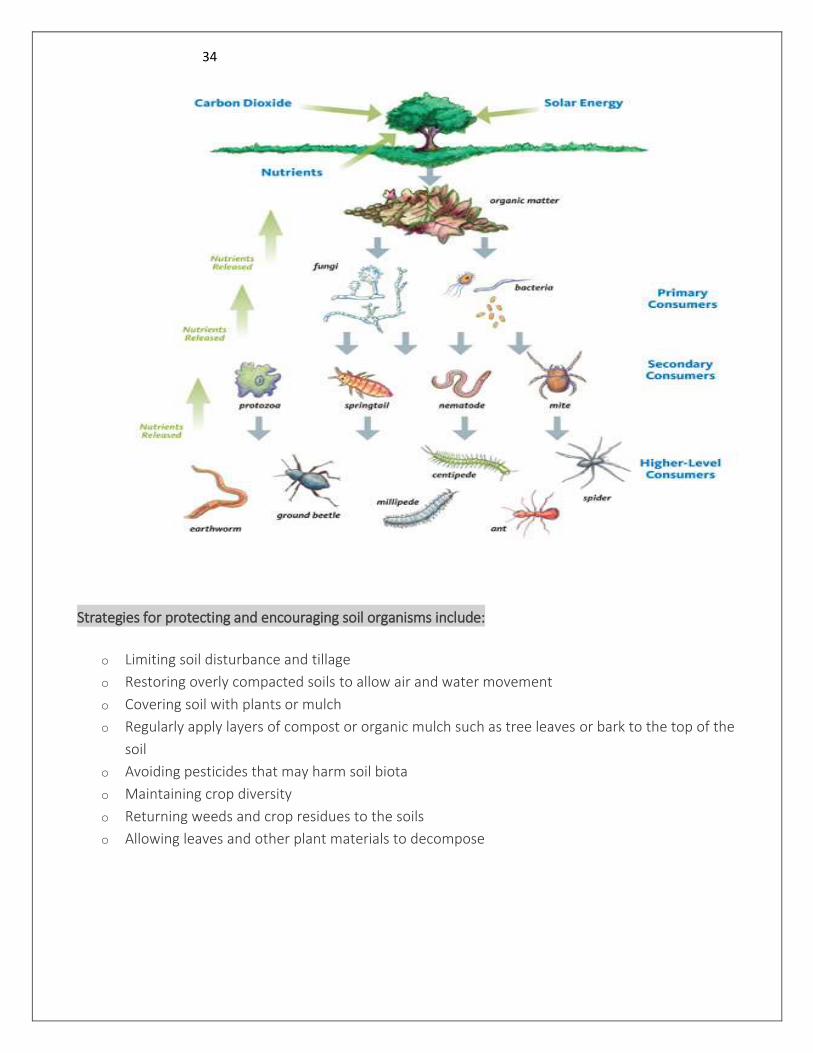
Functions of soil organisms:
Soil organisms are responsible for performing vital functions in the soil. Soil organisms make up the diversity of life in the soil. This soil biodiversity is an important but poorly understood component of terrestrial ecosystems. Soil biodiversity is comprised of the organisms that spend all or a portion of their life cycles within the soil or on its immediate surface (including surface litter and decaying logs)

33
Humus formation: When a leaf falls it cannot be eaten by most animals. After the water-soluble components of the leaf are leached out, fungi and other microflora attack its structure, making it soft and pliable. Now the litter is palatable to a wide variety of invertebrates, which fragment it into a mulch.
The multipedes, wood lice, fly larvae, springtails, and earthworms leave the litter relatively unchanged organically, but they create a suitable substrate for the growth of the primary decomposers that break it into simpler chemical compounds. There is also a group called secondary decomposers (some creatures, such as the springtails, are in both groups), which break it down even further.
So the organic matter of leaves is constantly being digested and redigested by waves of increasingly smaller organisms. Eventually the humic substance that remains may be as little as one-fourth of the original organic matter of the litter. Gradually this humus is mixed into the soil by burrowing animals (such as moles, rabbits, etc.) and by the action of the earthworms.
Soil food web:
The soil food web is the community of organisms living all or part of their lives in the soil. A food web is a series of conversions (represented by arrows) of energy and nutrients as one organism eats another
All food webs are fueled by the primary producers:
the plants, lichens, moss, photosynthetic bacteria, and algae that use the sun’s energy to fix carbon dioxide from the atmosphere. Most other soil organisms get energy and carbon by consuming the organic compounds found in plants, other organisms, and waste by-products. A few bacteria, called chemoautotrophs, get energy from nitrogen, sulfur, or iron compounds rather than carbon compounds or the sun.
As organisms decompose complex materials, or consume other organisms, nutrients are converted from one form to another, and are made available to plants and to other soil organisms. All plants – grass, trees, shrubs, agricultural crops – depend on the food web for their nutrition.
34
Strategies for protecting and encouraging soil organisms include:
o Limiting soil disturbance and tillage
o Restoring overly compacted soils to allow air and water movement
o Covering soil with plants or mulch
o Regularly apply layers of compost or organic mulch such as tree leaves or bark to the top of the
soil
o Avoiding pesticides that may harm soil biota
o Maintaining crop diversity
o Returning weeds and crop residues to the soils
o Allowing leaves and other plant materials to decompose

35
Module 1-NRM- All about Soil Sessesion 5-Soil structure Duration – 45 mts
Soil structure:
Describes the arrangement of the solid parts of the soil and of the pore space located between them. It is
determined by how individual soil granules clump or bind together and aggregate, and therefore, the
arrangement of soil pores between them. Soil structure has a major influence on water and air
movement, biological activity, root growth and seedling emergence.
Massive structure

36
M
Blocky structure
37
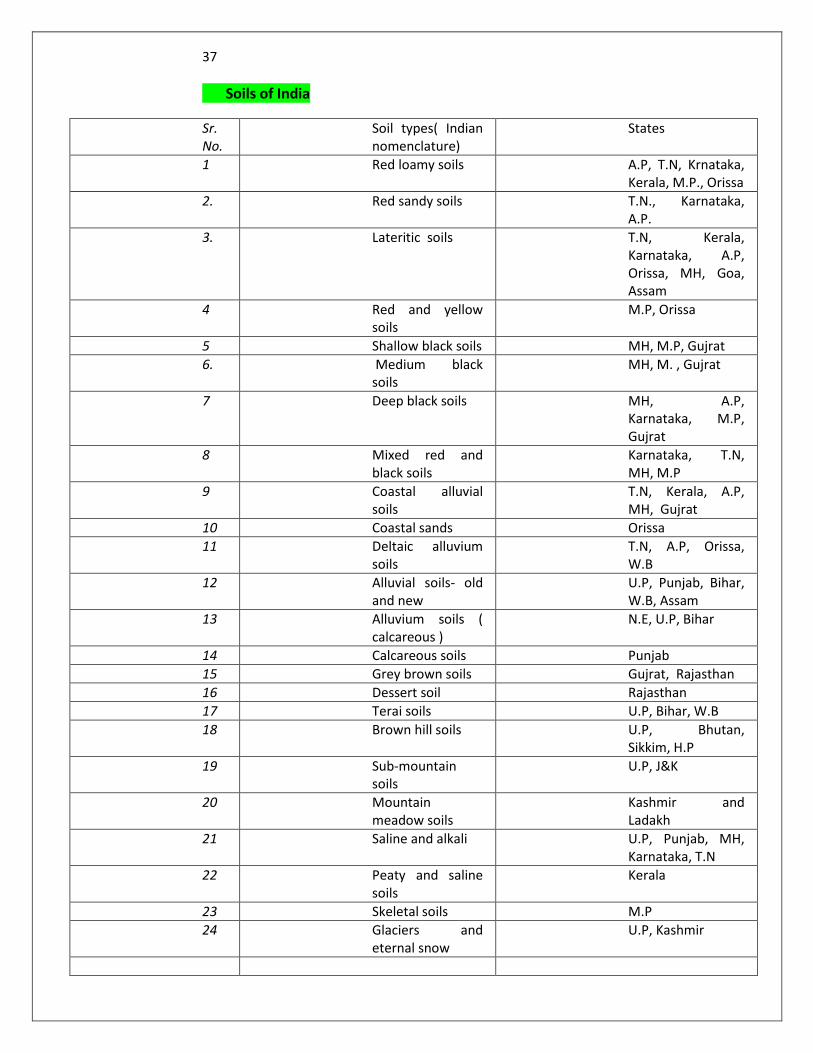
Soils of India
Sr. No.
Soil types( Indian nomenclature)
States
1 Red loamy soils A.P, T.N, Krnataka, Kerala, M.P., Orissa
2. Red sandy soils T.N., Karnataka, A.P.
3. Lateritic soils T.N, Kerala, Karnataka, A.P, Orissa, MH, Goa, Assam
4 Red and yellow soils
M.P, Orissa
5 Shallow black soils MH, M.P, Gujrat
6. Medium black soils
MH, M. , Gujrat
7 Deep black soils MH, A.P, Karnataka, M.P, Gujrat
8 Mixed red and black soils
Karnataka, T.N, MH, M.P
9 Coastal alluvial soils
T.N, Kerala, A.P, MH, Gujrat
10 Coastal sands Orissa
11 Deltaic alluvium soils
T.N, A.P, Orissa, W.B
12 Alluvial soils- old and new
U.P, Punjab, Bihar, W.B, Assam
13 Alluvium soils ( calcareous )
N.E, U.P, Bihar
14 Calcareous soils Punjab
15 Grey brown soils Gujrat, Rajasthan
16 Dessert soil Rajasthan
17 Terai soils U.P, Bihar, W.B
18 Brown hill soils U.P, Bhutan, Sikkim, H.P
19 Sub-mountain soils
U.P, J&K
20 Mountain meadow soils
Kashmir and Ladakh
21 Saline and alkali U.P, Punjab, MH, Karnataka, T.N
22 Peaty and saline soils
Kerala
23 Skeletal soils M.P
24 Glaciers and eternal snow
U.P, Kashmir

38
Module 1-NRM-All about Soil Session 6- Tillage and Tilth Duration 30 mts
Tillage and tilth
• Objectives if tillage
– To loosen the soil, granulate for plant growth
– Kill weeds and incorporate plant residues
– Incorporate fertilizer
– Conserve moisture and prevent soil erosion

39
• Primary tillage to break the massive soil structure
• Secondary tillage to prepare the seedbed
• Granulate the soil
• Main aim is to modify the structure for conducive to root growth
• To get the granular or crumb structure

40
What is tilth
• Tilth is the condition of a soil which favoursgood contact of the seed to come with soil particles
• This will happen when a granular structure is obtained after tillage
• Tilth can be impaired if the tillage is done on too wet soil or very dry soil
• Therefore moisture content of a soil at a given time is very important to achieve a good tilth
Tillage implements
• Choice of implements will depend upon the depth and texture of the soil– HOW
• Ploughs
• Harrows
• Sub soiler
• Rotovators
• Ridgers
• BBF implements etc.

41
Tractor drean tillage implements
Bullock drawn tillage implements

42
Soil erosion and wind erosion
2CMSA training
Inter row cultivationCultivation withBullock drawn implement
Forming ridge and furrow

43
Reversible Mould boardPlough
Harrowng operation
Disc harrow to breakThe clods
Duck foot tynes First tillage on black soil10CMSA training

44
13CMSA training
Soil erosion on red soil Wind erosion
Sheet erosion on black soil
Why we need to know the depth of the soil and know the soil Horizon:
Depth of the top soil may vary from few centimetres to few meters depending on the type of soil. For example black soils generally are deep soil, where as red soils are shallow soils. The depth of the top layer which supports the root growth, anchorage etc will determine what sort of implements can be used for primary tillage and seedbed preparation and how much water a soil can hold. Water holding Capacity will be determined by depth as well as texture of soil. Study of soil profile will show the development of different layers of soil formation and the depth of the top soil. Therefore it is important to know the soil profile in a farmers field.
Soil horizon A cross-section of soil top, revealing horizons

45
Modeule 1- NRM- All about Soil
The most important effect of pH in the soil is on ion solubility, which in turn affects microbial and plant
growth. A pH range of 6.0 to 6.8 is ideal for most crops because it coincides with optimum solubility of
the most important plant nutrients. Some minor elements (e.g., iron) and most heavy metals are more
soluble at lower pH. This makes pH management important in controlling movement of heavy metals
(and potential groundwater contamination) in soil.
Factors that affect soil pH:
o Some rocks and sediments produce soils that are more acidic than others: quartz-rich sandstone is acidic; limestone is alkaline
o Some types of vegetation, particularly conifers, produce organic acids, which can contribute to lower soil pH values
Duration 15 mts
• It’s simply a measure of the relative amount of H+ ions
• In the soil, it is driven by the ionization of
water: H2O H+ + OH-
• We us pH to measure the acidity or the alkalinity (basicity) of a solution (a soil solution)
What is pH?:
16CMSA training

46
o In humid areas such as the eastern US, soils tend to become more acidic over time because rainfall washes away basic cations and replaces them with hydrogen
o Addition of certain fertilizers to soil can also produce hydrogen ions. Liming the soil adds calcium, which replaces exchangeable and solution H+ and raises soil pH.
• Chemical bonding
• pH
• Nutrient Availability
• Cation Exchange Capacity (CEC)
Soil Chemistry
15CMSA training

47
Possible pH Ranges Under Natural Soil Conditions
black walnut: 6.0-8.0
Most desirable
carrot: 5.5-7.0
cucumber: 5.5-7.0
spinach: 6.0-7.5
tomato: 5.5-7.5
white pine: 4.5-6.0
Verystrong Strong Moderate Slight Slight Moderate Strong
Verystrong
Neutral
Acid Basic
3 4 5 6 7 8 9 10 111 2 12 13 14
Most agricultural soils
Extreme pH range for most mineral soils
cranberry:4.2-5.0
apple: 5.0-6.5
18CMSA training

48
Module 1 NRM- All about soil
Introduction:
Crops need water for transpiration and evaporation
The plant roots suck or extract water from the soil to live and grow. The main part of this water does not remain in the plant, but escapes to the atmosphere as vapour through the plant's leaves and stem. This process is called transpiration. Transpiration happens mainly during the day time.
Water from an open water surface escapes as vapour to the atmosphere during the day. The same happens to water on the soil surface and to water on the leaves and stem of a plant. This process is called evaporation . The water need of a crop thus consists of transpiration plus evaporation. Therefore, the crop water need is also called "evapotranspiration".
The water need of a crop is usually expressed in mm/day, mm/month or mm/season
Session 7- Moisture requirement of a crop Duration – 45 mts
Learning outcomes:
At the this session the participants will be able to :
Relate the importance of crop cover
List some of the soil moisture definitions
Distinguish between transpiration and evapotranspiration
What are suitable soils for irrigation
How to conserve moisture
Tillage practices for moisture conservation
Mulching to conserve moisture
Vegetative barriers for conserving water

49
Suppose the water need of a certain crop in a very hot, dry climate is 10 mm/day. This means that each
day the crop needs a water layer of 10 mm over the whole area on which the crop is grown (Fig. 5). It
does not mean that this 10 mm has to indeed be supplied by rain or irrigation every day.
It is, of course, still possible to supply, for example, 50 mm of irrigation water every 5 days. The
irrigation water will then be stored in the root zone and gradually be used by the plants: every day 10
mm.
Importance of crop cover • Initial stage – germination to early crop growth- soil has less than 10% cover • Crop development stage – 70-80% cover • Mid -season stage – from Crop development to flowering • Soil moisture level has to be above the critical level which may lower yield • Irrigation applied to field capacity • This should take care of the net return
Some soil- moisture definitions- to understand moisture availability
• Saturation – When all the pores are filled with water • Field capacity- when the maximum of water that is retained after allowing free drainage • Permanent wilting points ( PWP)- When a crop permanently wilts even when water is applied –
symptoms of PWP……. • Available water capacity (AWC)- Moisture content between field capacity and wilting point • Crop rooting behavior is important- greater the root growth lesser is the sensitivity to soil
Suitable soil for irrigation
• Ideal soil would be a deep soil, without any water table, high water holding capacity • such a s alluvial soils, black soils • High infiltration rate ( light soils ) • Low salt content • Loam and clay soils are best • Certain soils irrigation may not be economic all sandy soils where water drains out fast • Heavy soil will require surface and soil drainage- drainage is also important with irrigation • Light soils may waste water • In rice field – 60-70% is lost due to deep percolation( half of all water goes to rice in India) • Selection of proper soil is therefore important • Water is lost due to evaporation and transpiration ( Evapo-transpiration )
Conservation of water
• Agronomic measure – 1-6% slope • Conserve in-situ rainfall – some are… • Contour farming- operations such as tillage, sowing , intercultural along the contour creates barriers
across slope • Creating ridges and furrows • Reduce run-off, soil erosion, absorb more water
Other methods are

50
• Intercropping – legume with cereals cover the soil, reduce erosion, increase productivity • Strip cropping- accepted all over the world towards soil erosion • Contour strip cropping- maintain fertility, shortens length of the slope, reduce velocity • Biological barriers – increase absorption of water • Main crop with erosion resistant strips – maize with lantana, maize with cowpea 2:1 ratio
Mulching
• Important agronomic practice to prevent soil erosion • Reduces evaporation, improve soil structure • Conserve moisture • Organic mulch @ 4 t/ha reduces run-off 37-15% and 18-5.4 ton soil loss • Example – 2 t/ha mulch material • Crop mulch in hilly areas – ginger, colocasia, turmeric, lantana camera • Grass mulch in rabi • Recycling sunhemp in situ one moth after sowing increased yield of wheat as next crop • Weed cover, pruning of agro-forestry plants , thinned crop after planting over-population • Leucaena – 2t/ha incorporate after 30 days of maize • Timely sowing, • Quick crop canopy development and manipulation to cover the bare soil as quickly as possible • Not leaving a bare soil when monsoon comes • Try to have a crop canopy cover soon • Dry seeding techniques before rains ( ICRISAT experience in black soil) •

51

52

53
Module1-NRM- All about soil
Session 8 -Soil and water conservation Duration – 45 mts
PRINCIPLES
The Extent of Erosion
The lower rainfall in semi-arid areas compared with that in humid climates does not mean a corresponding low level of soil erosion by water. Indeed rainfall erosion can be higher in semi-arid areas than in any other climatic zone. This is partly because the rainfall of semi-arid areas has a high proportion of convective thunderstorm rain of high intensity and high erosive power. It is also because there is poor protective vegetative cover, especially at the beginning of the rainy season.
Some of the soils common in semi-arid areas are particularly vulnerable, either because they have poor resistance to erosion (high erodibility), or because of their chemical and physical properties). Gully erosion can be severe in semi-arid climates and the benefit/cost of gully control needs to be considered. Soil Conservation and Water Conservation Introduction
There are always strong links between measures for soil conservation and measures for water conservation, and this applies equally in semi-arid areas. Many measures are directed primarily to one or the other, but most contain an element of both. Reduction of surface run-off by structures or by changes in land management will also help to reduce erosion. Similarly, reducing erosion will usually involve preventing splash erosion, or formation of crusts, or breakdown of structure, all of which will increase infiltration, and so help the water conservation.
Integrated Programmes
The subsistence farmer cannot afford to respond to philosophical or emotional appeals to care for the soil, and this means that conservation measures must have visible short-term benefits to the farmer. For the subsistence farmer the benefit he would most appreciate might be increased yields per unit of land, or perhaps better production per unit of labour, or perhaps improved reliability of yield.
The advantages are:
A village group can tackle jobs too big for an individual or family;
it generates a sense of community care for the land
work groups are a good forum for extension workers to encourage improve farming

54
BIOLOGICAL SOIL CONSERVATION
Conservation Tillage
This umbrella term can include reduced tillage, minimum tillage, no-till, direct drill, mulch tillage, stubble-mulch farming, trash farming, strip tillage, plough-plant (for details see Mannering and Fenster 1983). In countries with advanced soil conservation programmes, particularly the USA and Australia, the concept of conservation tillage is the main theme. It is less applicable to low input level crop production, or subsistence agriculture.
The principles are equally effective in any conditions - to maximize cover by returning crop residues and not inverting the top soil, and by using a high crop density of vigorous crops. Conservation tillage also has the advantage of reducing the need for terraces or other permanent structures. However there are several disadvantages which hinder the application of conservation tillage in semi-arid conditions:
dense plant covers may be incompatible with the well-tested strategy of using low plant populations to suit low moisture availability;
crop residues may be of value as feed for livestock; planting through surface mulches is not easy for ox-drawn planters although there may be no
problem with hand jab planters.
Deep Tillage
One of the reasons for low yields in semi-arid areas is the limited amount of moisture available to crop roots. The available moisture will be increased if the rooting depth is increased and it has been shown that in some cases deep tillage can help, deep tillage is beneficial for some crops but not all, and on some soils but not all. Also deep tillage requires greater draught power which is usually in short supply in semi-arid areas.
Ripping or subsoiling can be beneficial, either to increase the porosity of the soil, or to break a pan which is reducing permeability.
Conservation Farming
Like conservation tillage, this title covers many different farming techniques. It includes any farming practice which improves yield, or reliability, or decreases the inputs of labour or fertilizer, or anything else leading towards improved land husbandry, which we have defined as the foundation of good soil conservation.
Sometimes there is a long history of traditional farming and soil conservation practices which have been tested and developed over periods of time which are long enough to include all the likely variations of climate. These traditional practices should give the best long-term result, bearing in mind

55
that the farmer's interpretation of 'best' may be based on reliability rather than maximum yield. But the semi-arid areas are changing rapidly, and the traditional patterns may be no longer relevant. As Jones (1985) says "while tradition may incorporate the wisdom of centuries of practical experience, it may also be inappropriate where recent demographic pressures have already compelled changes - for instance, the abandonment of bush fallowing or migration onto different types of soil or into more arid areas. There is also the point that the agricultural scientist very often still lacks the recipe for certain success; and you cannot require farmers to adopt new practices that are only 50 percent successful." Possible new techniques should have the same basic characteristics as traditional practices, they should be easy to understand, simple to apply, have low inputs of labour or cash, and must show a high success rate i.e. a high rate of return.
Some of the techniques are:
Farming on a grade is well established in India (Swaminathan 1982).Cultivations and planting are done on a gentle gradient, sometimes together with graded channel terraces. This encourages infiltration but permits surplus run-off at low velocities. Sometimes this may be combined with simple practices to encourage infiltration such as returning crop residues. This seldom provides a complete solution because of the problem of disposal of the surface run-off when it does occur.
Strip cropping is most useful on gentle slopes, where it may reduce erosion to acceptable levels without any banks or drains.
Rotations are another well established and simple practice. The object may be to improve fertility by the use of legumes or to help control pest or disease.
Mixed cropping and interplanting are widely applied traditional techniques. A combination of crops with different planting times and different length of growth periods spreads the labour requirement of planting and of harvesting, and also allows mid-season change of plan according to the rain in the early part of the season (Swaminathan 1982). Another possible advantage may arise from the use of legumes to improve the nitrogen status for the cereal crop. Variations on the theme of mixed cropping, intercropping, and relay cropping are being investigated in the Farming Systems Programme at ICRISAT (1986).
Surface mulching has the advantage of providing protective cover at a time when crop cover is not practical. It improves infiltration, and may also beneficially reduce soil temperature. Possible dis- advantages are:
the amount of crop residue required may be more than is available from low-level production;
problems of pest, disease, or nitrogen lock-up; the lack of implements which can plant or drill through the mulch; organic mulches are liable to be rapidly oxidized in high temperatures.
Timeliness of farming operations is always important, particularly where the rainfall is erratic, and yields can be dramatically affected by planting or cultivating at the right time. Common problems are

56
having to wait for rain to soften the ground because it is too hard to plough when dry, and perhaps then not being able to plant because the ground is too wet. Or a family with only one ox having to wait to borrow another one - hence the interest in the one-ox plough shown in Plate 4.4. Or having to wait for a month after the rains start to get the oxen back into condition for ploughing after a hard dry season. The essence of Farming Systems Research is to look at the whole farming operation to identify the constraints or bottle-necks before starting component research on parts of the system.
Some other techniques should be mentioned, but are beyond the scope of this book, so references are given for the interested reader.
Deep planting of varieties which can germinate from 15 cm deep, and so delay germination until good rains have fallen.Alternatively, soaking seed before planting when it is desirable to accelerate germination.
Dry seeding where the onset of rains can be predicted (India, Virmani 1979). Improved ox-drawn implements (Ethiopia, ILCA 1985. Kenya, Muchiri and Gichuki
1983).
Improved Water Use Efficiency
Other desirable characteristics are a short growing season, drought resistance, and drought avoidance. The latter means the ability of the plant to adjust its growth habit according to the available moisture, for example, by tillering when moisture is available or going dormant when moisture is short, or only carrying through to ripening a proportion of the seed heads available.
Supplementary irrigation can be important because the provision of small quantities of water at critical times can have good results, for example to allow earlier planting, life-saving irrigation to carry crops through dry periods, or to increase the availability of soluble plant nutrients.
In high rainfall areas a common objective is to lead unavoidable surface run-off safely off the land using drains and ditches. In semi-arid regions the objective is more likely to be to slow down the run-off to non- scouring velocities and to encourage infiltration or deposition of silt, without diverting the run-off. This requires simple low-cost structures quite different from the classical system of diversion drains, graded channel terraces, and disposal waterways. That is a high-technology layout of carefully designed structures, and the design procedures are set out in Hudson (1981). The approach is not suitable for semi-arid regions where it is unlikely that there will be suitably trained staff. Simpler techniques are required which can be laid out by village extension workers, or the farmers themselves.
There are several well-tested methods for laying out lines either on a level contour or on a predetermined gradient. The A-frame has been widely and successfully used in Africa and in South America, and so has the water tube. In Kenya the line level is preferred. These and other simple levell- ing devices have been compared by Collett and Boyd (1977). Where large areas of gently sloping land are to be laid out, a simple pendulum device can be mounted on a tractor and this has been successfully used in Northern Territory of Australia (Fitzgerald 1977). Whatever method is used to lay out the lines, it is a good idea to make a permanent mark if a tractor or oxen are available. The temporary markers used when laying out the lines are easily lost or disturbed if there is a delay

57
between surveying and construction. Also if channels or earth banks are going to be made by hand, the labour requirement can be reduced by ripping or ploughing by tractor or animals.
Any system of lines, banks, or bunds on the contour has the import- ant by-product of encouraging cultivation on the contour. This alone can result in a reduction of run-off and soil loss of up to 50 percent.
Low-cost Measures
The discussion of terracing and conventional conservation works clearly points to the use of simple
and easily applied measures. The first of these should always be farming on the contour. This alone can reduce soil loss to approximately half of what it would be with cultivation up and down the slope. We have already seen that although rainfall in semi-arid areas will be less in total, it can still include very damaging storms, and so it will usually be beneficial to have some form of structure which will slow down the surface run-off, encourage the deposition of suspended material, and reduce the concentration of surface run-off in minor depressions.
Some applications of stone lines have the primary objective of water harvesting rather than soil conservation. Run-off from uncropped land higher up the slope runs down onto the cropland, and is spread by the permeable stone lines along with the run-off which starts on the cropland.

58

59

60

61

62

63

64
Module 1-NRM- All about Soil
Session-9-WATER HARVESTING AND USE
Duration – 60 mts
This section describes methods where surface run-off is collected and stored in dams, tanks, or cisterns, for later use.
HARVESTING METHODS
The subject may be considered in terms of:
· the purpose of the stored water, whether for domestic use, stock watering, supplementary or full irrigation;
· the type and quantity of storage; small amounts for domestic use or stock watering; below ground in cisterns or lined ponds or above ground in tank structures; larger quantities for irrigation, usually in ponds or reservoirs;
· whether the catchment is in its natural state or treated in some way to increase the run-off.
Stored systems nearly always modify the natural situation in some way, so there must therefore be some element of design. Factors to be considered in the design are:
· the amount of required water, which can be calculated from estimates of the numbers of people or stock and their daily requirements, or from the area and requirement of crop;
· rainfall, its frequency probability, and intensity, which combined with surface conditions will determine the run-off, and hencewhether some change is required to increase the run-off (discussed in Section 6.2);
· losses of the stored water through evaporation, seepage, or' leakage.
TREATMENT OF CATCHMENTS
WATER STORAGE
The harvesting and use of water by storing it in dams, tanks, and other constructed containers is too big a subject for detailed treatment here. This section reviews the principles of the more common types of storage, and for more detail readers are referred to manuals listed with the references.
Small Earth Dams

65
Small earth dams are probably the most common type of man-made storage, and on favourable sites are effective and economical. They do require some care in design and construction, and they need regular maintenance, but there is a wealth of information and advice available in books and manuals at all levels (Hudson 1975).
i. Planning earth dams
The first step in planning a dam is to define quite clearly the purpose of the dam, so that design requirements can be identified. For example, if a cattle-watering point is required in order to make use of grazing in a particular area, this means there is no point in looking for a site outside the defined area. If the water has to be available throughout the year, this means there must be a minimum depth so that water is always available after allowing for evaporation, but, on the other hand, the amount of water required for stock-watering will be much less than for an irrigation storage dam. When the purpose is irrigation this means the required amount of storage is defined, and also the period when the water must be available. When the purpose is clear, the consideration of the other following factors will be easy.
Site location
This is usually dictated by the purpose, as in the above example of providing water in a particular grazing area. When the purpose is irrigation, the location will be dictated by the answers to questions such as:
· "Can the scheme be anywhere in the district, or is there a particular piece of land to be irrigated, and which the dam has to be near?"
· "Is it a gravity scheme where the dam must be above the land? or can we pump from below?"
· "Could we have the dam site upstream and bring the water down in the stream?"
· "If the dam is at some distance from the scheme, would the supply canal have to be lined?"
Capacity
In order to plan the capacity of the dam, we need to ask "How much water will be used from the dam, and how much will the demand fluctuate through the year? What is the maximum demand? What are the consequences if the supply dries up? Is a carry-over from one year to the next necessary or desirable? What will the losses be from evaporation and from seepage?"
The shape of the valley influences how much will be stored for a given height of dam wall. The ideal site has a long throwback, that is the surface of the stored water goes a long way back upstream giving a big capacity. It will also have steep valley sides at the dam site so that the earth wall is short. A valley with gently sloping sides means a long and expensive wall. If

66
evaporation is high, it is better to have deep water and a small surface area rather than a large surface area of shallow water. Sites with a good basin storage are often found where the stream passes from a wide valley through a narrow gorge, or where the streambed changes from a flat to a steeper gradient, or at the confluence of two streams so that there are two storage basins for one wall.
Soils
The site must have suitable soil conditions for constructing an earth dam. The soil of the basin should not be porous, and the site for the wall should be free from boulders and termite mounds. Suitable soil for constructing the wall should be available nearby. The best kinds of soil for different parts of the wall are discussed under The Embankment or Dam Wall, and Construction Sequence. Certain soils are unsuitable for the construction of dams; these include:
· saline, alkaline, or sodic soils, or any soils with abnormal chemistry;
· peat or other soils high in organic matter;
· heavy clays subject to swelling, shrinking, and cracking;
· light sands;
· soils containing a high proportion of fine silt.
Spillways
Few dams on streams and rivers can be built big enough to store all the run-off, and some provision is required to pass on the surplus flood water after the dam has filled. The spillway is the channel or pipe or waste-weir designed to do this. The cost of small earth dams is greatly increased if spillways have to be built of concrete or similar materials, so a major factor in site selection is looking for sites where the overflow can be safely discharged over grass-covered spillways.
a. Cut spillways
For small conservation dams one solution is open channel spillways cut into the bank at the side of the dam wall (Figure 6.2). These are cheap and effective, but there is a risk of erosion if the water flows too quickly. If it is possible to maintain a good grass cover, this greatly reduces the required size of spillway, but grassed channels do require careful design and construction and may be difficult to establish and maintain in areas of poor rainfall. It is wise to limit the maximum size of catchments for dams with grassed spillways to 500 ha in semi-arid areas.
The most vulnerable point on cut spillways is where the water rejoins the stream. To prevent erosion at this point (A in Figure 6.2) the stream bank must be cut back to a gentle slope and

67
planted with grass like the rest of the spillway. Alternatively, a concrete or masonry drop structure may be provided at this point.
It is undesirable for grass spillways to be constantly saturated. This makes them more vulnerable to erosion because the types of grass which are best for spillways do not like continually wet conditions. So if a stream is likely to have a small constant flow, or one which continues a considerable time after each storm, a trickle flow outlet should be provided. This can take the form of a small brick-lined or concrete channel set in the spillway, or it can be a small diameter pipe going through the dam wall, preferably on the opposite side of the stream from the spillway.
If it is not practical to protect a cut spillway with grass, it may be necessary to protect it, or perhaps the most vulnerable parts, with stone pitching or concrete.
b. Natural spillways
These are used where the site conditions make it possible to divert the flood flow into a naturally existing waterway or channel. Figure 6.3. shows an example where the flood is diverted over a crest into the adjacent valley. The crest should be approximately level between A and B so that the flow is spread out, and the slope down to the stream should be gentle and have enough grass cover so that there is no risk of erosion.
c. Mechanical spillways
These use pipes to pass the flood through the embankment. It would not be practical to have the pipe large enough to pass the maximum peak flow, so temporary flood storage is provided above the pipe outlet. This fills up during the height of the flood, and discharges through the pipe after the peak flow has passed (Figure 6.4). An emergency spillway is also provided for the exceptional floods. The capacity of mechanical pipe spillways is shown in Table 6.1. Drop inlets are often used at the entry to pipe spillways, partly to ensure a good discharge through the pipe and partly so that the pipe can be buried below the dam wall, as in Figure 6.5.
The embankment or dam wall
a. Impermeable core
Seepage through or under the dam wall must be prevented, or reduced to the point where it is not important. Unless the whole wall can be built of impervious material, a central impermeable core of compacted clay is required as shown in Figure 6.6. The width can suit the method of construction. If the trench is excavated by hand, and the core material is placed by hand, the core can be as little as 1 m wide, but if done by machine it will have to be at least as wide as the machine. The excavated material from the trench can be used in the downstream side of the wall. The important points in constructing the core are as follows:

68
· it must be taken down to, and bedded into, an impervious layer so that there is no risk of seepage below it;
· it must be continued up to slightly above the full supply level along the whole length of the wall and at both ends;
· the material used for the core must have enough clay so that it is plastic and workable when wet. For dams which will remain full for most of the time, so the core will not dry out, a pure clay can be used, but for smaller dams which may dry up, a pure clay might shrink and crack, so a sandy clay will be better;
· the material must be properly placed and compacted. The best way is to place the clay in thin layers, add enough water to make it plastic and to 'puddle' it, that is, to compact it by labourers ramming it with poles. Another good method is to drive cattle, oxen, or buffaloes up and down over each layer of clay. When using earth-moving machinery, the soil should be placed by a scraper in thin layers, and compacted when wet by wheeled tractors or by sheepfoot rollers. Placing the soil by bulldozer is not satisfactory, nor is compaction by tracked tractors.
b. Side slopes
The embankment walls must slope inwards at an angle which will be stable at all times. Saturated soil is less stable than dry soil, so the water side of the wall has to be flatter than the downstream side. For most soils the slopes should be not steeper than 3:1 on the upstream side and 2:1 on the downstream. For soils approaching the ideal mixture of grain sizes and which are carefully placed and well compacted, the slopes could be increased to 2:1 upstream and 11/2:1 downstream. Soils which will be difficult to compact should have slopes of 3:1 or 4:1. For small dams the slope does not make much difference to the total costs, so if there is any doubt a flatter slope should be used.
c. Crest width
The top of the dam wall must be wide enough for both the construc- tion equipment and for any traffic if the wall is going to be used as a bridge. Unnecessary width will add to the volume of earth-work required. If the wall will only carry foot traffic and bicycles, 2 m will be enough, but for vehicles a minimum of 3 m should be allowed.
d. Settlement
No matter how carefully the earth is placed and compacted, there will be settlement over the years, and an allowance must be made for this. For average soils with reasonable compaction 10 percent should be added to the finally required height. This means that the newly built wall will be convex along the top as the allowance for settlement will be greater in the middle than at the ends. Embankments built without consolidation, for example those built by bulldozers, are not recommended, but if this method of construction is unavoidable the allowance for settlement should be 20 percent.

69
Construction sequence
a. Site preparation
The limits of the wall at ground level should be staked out, and all trees, shrubs, and roots removed. Next the grass, grass roots, and topsoil should be dozed off to a depth of about 100 mm. This material should be stockpiled just clear of the site on the down stream side as it will be used at the end of the job to give a dressing of topsoil over the whole wall.
b. Borrow areas
The areas from which soil is to be taken for the embankment should be within the area to be flooded as this increases the capacity, and also avoids bare areas which would be liable to erosion. The borrow area should be near the wall to reduce the haul distance, but not closer than 10 m or seepage under the wall may be increased. The topsoil should be bulldozed off the borrow areas, and stockpiled like the topsoil from the dam wall site.
c. Outlet pipes
It is always difficult to consolidate earth placed around a pipe already in position. The best method is to put the pipe in undisturbed soil under the dam wall, as shown in Figure 6.5. The joints in the pipes must be made carefully and checked for watertightness as leakage would threaten the security of the dam. The staunching rings both hold the pipe in place and also prevent seepage along the pipe. They are cast directly against undisturbed earth, that is without using formwork. If the wall is to have a clay core, the pipe can pass through the core trench, with a concrete curtain wall as shown in Figure 6.5.
d. Building the embankment
The rules for placing the soil of the embankment are the same as for the core, that is, it should be placed in thin layers, and well compacted. Adding water may assist the compaction, but this is a refinement not usually necessary on small dams. Placing soil by bulldozer is always undesirable, because it will not be properly compacted.
e. Finishing works
The embankment should be given a thin cover of the topsoil removed from the site of the embankment and from the borrow pits, and then planted or sown with a suitable grass. The crest and the downstream slope should have a good tough dryland creeping grass, and the upstream side one which will tolerate occasional drowning. The spillway and training wall should also be carefully grassed, and given other protection as required, such as stone pitching. It is always sound practice to fence off the embankment and spillway, and if cattle will water at the dam it is preferable to fence off the whole dam and to pipe water to a drinking trough below the dam wall.

70
Small Weirs
Weirs are structures of concrete, brick, or masonry, where the water flows over the top when the storage is full. They may be more suitable than earth dams in some situations, for example:
· when the permanent flow is too big to pass through a spillway;
· when the object is to raise the water level so that part of the flow can be diverted into a canal, but storage is not required;
· when the object is gully control, or to trap sediment.
The main types of weir are shown in Figure 6.7. Gravity weirs depend solely on weight for their stability. A symmetrical section (Figure 6.7a) can be used, but the section in Figure 6.7b gives the same height with less material and . For weirs not built in steps (Figure 6.7c), the back slope is at 2 horizontal to 3 verticaThe crest width depends on the wall height as follows:
· wall height up to 1 m, crest width 0.3 m;
· wall height 1-1.5 m, crest width 0.4 m;
· wall height 1.5-2 m, crest width 0.5 m.
The weir can be entirely concrete, as in Figure 6.7c, formed by pouring concrete into wooden shuttering. Alternatively, masonry can be used to form the outside layer and act as the shuttering, as in Figure 6.7d. Brickwork can also be used as shuttering as in Figure 6.7e. Another kind of gravity weir is the rock-fill dam (Figure 6.7f), in which a pile of rocks and boulders gives the stability, and a concrete skin makes it watertight.
The large amount of material necessary for gravity weirs can be reduced by slab-and-buttress weirs (Figure 6.7g), or arch weirs (Figure 6.7h) In the slab-and-buttress, the vertical slab is held up against the pressure of water by the buttress, and in the arch weir the pressure of water is resisted by the buttresses at each end. Both these kinds of weir can be built of concrete, brick, or masonry, and can be built up to a height of about lm without design calculations. An engineer should be called in for larger weirs, or in cases where failure would cause serious damage.
i. Construction
The essential requirement for all weirs is a solid rock foundation extending the full width of the stream channel. Building weirs on poor foundations or on a rock bar which only goes halfway across may be possible, but should be left to engineers.
The first step is to clean off thoroughly all dirt and soil, chip off any loose or cracked rock, and if the surface is worn smooth by the water it should be roughened by chipping. To get a good bond between the foundation and the concrete, a grout (cement and water mixed to the consistency of thick cream) is brushed into the rock surface. Brick masonry shuttering is built

71
using a mortar mix of six sand to one cement (by volume) and all joints should be completely filled with mortar. The concrete of a gravity weir does not require great strength, but this should be obtained by the use of an economical mix of good materials, rather than the use of poor materials. The cement should be fresh, and the sand should be clean and free from soil, dirt, and organic matter. River sand is quite suitable if clean; if not, it should be washed. Coarse stone aggregate must be clean and free from soil and dirt. Ideally, it should be a graded mixture of stones from 2 mm to 50 mm. River washed pebbles and gravel are suitable if clean.
A suitable mix is 1 part cement by volume, 3 parts sand, 6 parts stone. The quantities required per cubic metre of concrete are 0.15 m3 cement, 0.5 m3 sand, 1 m3 stone, and 70 l of water. The order of mixing is not the same for mechanical mixers and mixing by hand. For mechanical mixers the stone is put in first, then the sand, then the cement, and then the water. For hand mixing, the cement and sand are throughly mixed dry, then the stone, and finally the water.
New concrete should not be allowed to dry out too quickly as this causes shrinkage, cracking, and loss of strength. It should be 'cured' for at least seven days, that is, kept moist by covering with wet sacks. The most common causes of poor quality concrete are:
· using sand or stone contaminated with soil,
· using too much water, and
· not curing properly.
Sand Dams
It is not necessary for water storage to be in the form of free water open to the atmosphere. Sand can store substantial quantities of water in the voids between the particles if they are not filled by smaller particles. A coarse sand of uniform size could store up to 45 percent of its volume as water within the sand. The sand in river beds usually has a mixture of grain sizes but may hold up to 30 percent water, of which about half would drain under gravity. The fact that apparently dry sand river beds contain water at accessible depths is known and exploited by all dwellers of the deserts, both human and animal.
The volume of sand trapped behind a weir will depend on choosing a suitable site, and the storage capacity can be increased over a period of time. If the weir is built progressively in stages of about one metre, the flood will deposit coarse sand behind the weir, but the silt and clay will be carried over the weir by the flood. A second stage can then be added to the weir to trap a second layer and so on progressively to the required height (Plates 6.7 and 6.8). This technique has been used on rivers in the Kalahari desert in Namibia and Botswana in southern Africa, and some of the schemes supply sufficient water for small townships by pumping from a number of linked well points.
There are a number of advantages to storage in this manner:
· once the water level has sunk to 1 m below the sand surface the evaporation loss is negligible;

72
· the risk of waterborne diseases such as malaria and bilharzia, or contamination by animals, is greatly reduced;
· by installing a pipe through the weir, a supply of clean piped water can be supplied downstream from the weir.
This practice is also used in Latin America where silt trap dams are known as 'trincheras', and in Mexico large traps are encountered called 'atajadizos'.
In India, the use of off-stream scorage is widespread in what are called 'tanks'. It is quite common for them to have sophisticated water control as in the inundation tanks and khadins described in Section 5.3.5, and the tanks are frequently multi-purpose, being for combinations of domestic use, stock consumption, fish production, and irrigation. Deep water pools are sometimes provided within the tank so that fish can survive between rainy seasons, with no fishing permitted in these sanctuary pools.
ii. Rectangular tanks
This is the best shape for gently sloping land and can give S/E ratios of 1.5 to 2.5 (Figure 6.8). Catch drains pick up surface run-off, and when the reservoir is full any surplus is spilled safely through overflows in the catch drains. These are also called tank-dams. Small sizes for stock watering can be built economically using either a drag-line excavator, or a small farm tractor and scoop, or by hand.
iii. Ring tanks
On flat, or nearly flat ground, better S/E ratios are obtained from round tanks rather than square tanks (Figure 6.9). Because of the geometry of this shape, the S/E ratio increases with size, being about 1.5 for a 50 m diameter tank holding about 35 000 m3 to 4.5 for 200 m diameter holding 200 000 m3 .
iv. Turkeys nest tank
· if the surface soil is relatively impermeable, but overlies a more porous material, or
· where it is convenient to be able to distribute the water by gravity.
The S/E ratio is poor, from 0.2 at 200 m3 to 0.4 at about 5000 m3, and the main use is as an alternative to corrugated-iron storage tanks for small quantities of pumped water used for stockwatering.

73
LOSSES OF STORED WATER The main causes of loss of stored water are seepage through a leaking basin or dam wall, and evaporation from the surface. Many methods have been developed for controlling both, but few are economically attractive.
Seepage Losses
Losses from seepage can, to some extent, be reduced by site selection, avoiding sands and gravels. The Australian experience suggests that it is often cheaper to build a new storage tank on another site than to try to correct seepage in an existing tank (Laing 1975).
A cheap method which sometimes works is to increase the compaction of the reservoir basin by working it while moist, either by driving wheeled tractors round in the basin, or herding livestock. Sheep in Australia and cattle in Africa have been used to puddle the soil surface in the same way as compacting the clay core of an earth dam (Section 6.3.l.iv). Part of this effect may be the result of droppings from the animals, and the practice of carting in additional quantities of manure to be worked into the surface is reported from South Africa and Missouri.
Other chemical additives are used. One type relies on defloccula- tion to disperse the aggregates and seal the pores. Sodium salts or polyphosphates are used. A colloidal clay marketed under the trade name 'Bentonite' has a flocculating effect from its sodium salt content, and also disperses to fine particles which have a sealing effect. Chemical additives are usually only economic if cheap local supplies are available. The amount required varies according to the soil and should be determined from soil tests for example a well-graded soil will require about 5 kg of Bentonite per m2 up to 20 kg on sandy soils.
The surface membranes, discussed in Section 6.3, for improving run-off from catchments are all possible solutions to reducing seepage from dams, with the same general conclusion. Thin cheap membranes like the polyethylenes are not sufficiently robust or long lasting, while the stronger and more durable materials like butyl rubber are too expensive.
Evaporation Losses
To some extent evaporation losses can be reduced by management. If the surface area can be reduced by increasing the depth, this will both reduce the evaporating surface and also lower the incoming radiation and the heating effect. The surface area can also be reduced by storing the water in a compartmented reservoir, and pumping the water from one compartment to another as the water is used, so that there are some full compartments and some empty, instead of a single shallow sheet when the reservoir is partly full.
Shading the water surface can substantially reduce the evaporation. Crow and Manges (1967) showed that a plastic mesh which gave only 6 percent shade reduced the evaporation by 26 percent, while a mesh which gave a 47 percent shade reduced evaporation by 44 percent. However, suspending nets or branches over the water surface is expensive, and no floating mesh has yet been successful.
DEVELOPING GROUNDWATER

74
Storage of water within the soil profile was discussed in Chapter 5, and storage using structures and in sand rivers was discussed in Section 6.3. This section is about deep storage and extraction.
Groundwater Recharge
The possible sources of water for recharge are spate flows in streams and rivers, run-off collected by furrows or channels, and run-off stored in tanks or dams.
The conditions required for recharge to be practical are:
· adequate surface infiltration for the water to be absorbed, and permeability so that it can move below the surface;
· good water storage capacity. For rock this is defined as the specific yield, or the volume of water which drains from the rock under gravity. It is expressed as a percentage of the total rock volume, and is similar to the porosity of soils. In rocks it depends on the amount of weathering, joints, cracks, and fissures;
· good hydraulic conductivity is required: the rate at which water can be abstracted from or recharged into the rock depends upon its hydraulic conductivity.
Two problems which may occur with recharge are salinity and silting. Storm run-off and flood water in streams and rivers are usually low in salts because of the dilution, although there are cases of semi-arid saline soils where even the flood run-off is saline. The more common problem of salinity is where raising the water table brings up saline groundwater to within the reach of wells or plant roots.
Silting may be a problem because the flash run-off in semi-arid areas usually carries a heavy sediment load which is likely to block the soil surface and reduce infiltration. Siltation tanks are commonly used to reduce this problem, for example, in the systems of recharging groundwater in the San Joaquin Valley in California.
Methods of recharge
The methods of water spreading for groundwater recharge, either by carrying run-off to an infiltration zone, or it may happen almost accidently by seepage through the bottom of canal. Accidental seepage from canals may be beneficial where a rise in the water table is helpful, but it can also lead to undesirable results by causing waterlogging or salinity problems.
If there are aquifers, such as gravel beds, at moderate depth below the soil surface the basin method may be employed. This consists of excavating basins to a depth which extends into the aquifer, so that the basin may be filled from a canal and then left to seep into the aquifer, and then filled again. The inundation tanks or khadins are primarily intended for wetting the soil profile in the floor of the tank, but they have a subsidiary recharge effect, which improves the yield of shallow wells downstream from the tank. When the basins are specially built for groundwater recharge, it will be necessary to avoid them being choked by sediment in the water. Silt-trap tanks may be used, or another method is periodically to remove a shallow layer from the soil surface in the basin.
Another variation, when the aquifer is too far below the surface for the basin system, is to discharge the water into shafts or wells excavated into the aquifer. In this case it is more difficult to correct the effects of choking by sediment, although it can be done by back-wash pumping. A better solution is to use water which is free from sediment.

75
Shallow wells are a very common way of using groundwater. In India a common design is a stone-lined circular well up to 10 or 15 metres in diameter and similar depth, or rectangular wells of similar capacity. This large capacity is required because both the clay soil and the underlying rock have a low hydraulic conductivity. The well is emptied each day by domestic use, stock watering, and small-scale irrigation, and isreplenished overnight. This traditional method has been successfully operated for centuries when the water was lifted by hand or ox-power, but in some districts the widespread introduction of first diesel-engined pumps and more recently electic motors has meant that the water can be removed much more quickly. This has led to searches for increased capacity and delivery. In the Deccan Plateau, a common device is to drill small bores (30-50 mm) radially and horizontally outwards in an attempt to tap more faults and fissures in the rock. The same technique of increasing the yield of wells is used in Iran where the horizontal collectors are shafts or galleries driven by hand labour.
Rain fed sustainable Agriculture (RFSA)
RFSA refers to radical soil and moisture conservation works which include Conservation furrows for every four mts, trenches all around the field, farm pond, trees on conservation furrows etc. The main objective is to harvest rain water in-situ. Mounting cropping pattern in these fields with 5:1 and 7:1 ratio, including perennial Red gram, Castor, leafy vegetables, fruit plants and trees on conservation furrows. Following are the major components in RFSA
Conservative or deep furrows for every four meters. Trench around the field. Farm ponds.
What is the conservative furrow?
Any furrow which is made deep across the slope at a distance of every four metres is called a conservation or deep furrow. It should be measmed as 1.0 metres width at the surface 0.3 metres width at the bottom and 0.5 metres depth.
Importance of a Conservative furrows:
As there is a conservative furrow in the agriculture field, every drop of rain water is
Not wasted and the entire rain water sinks in the soil. This results in increasing the level of
Ground water. Though there is much gap between one rain and the other, plants grow healthy due to the wet condition of the soil. It protects from erosion of fertile soil. Since different varieties of crops are grown in the middle of the conservative furrow, there is a lot of possibility for food security.

76
Formation of a conservative furrows:
Some gradient should be given to the conservation furrows if it black soil. Removal of soil must be done after digging from the upper measurement to thebottom of the pit till certain slope is formed.Below the slope the removed soil should be pouned in the shape of trapezium leavingthe burn equal to the depth of the pit.Measurements should be taken to the pit that is dug instead the bund.
What kind of crops are to be grown?
Small farmers in our state mostly depend on Rain fed Agriculture. Most of the small
Farmers grow crops like Maize, Sorgham and Bazra as single crops and they incur heavy
Loss when the conditions are unfavorable. Hence there should be rapid changes in the
Field of agriculture. Farmers should focus on poly crops instead of mono crops. Mixed crops means growing pulses like deep rooted red grams between two main crops like Maize and
Sorgham. If we grow mixed crops like this at least one crop yields good though the
Climatic conditions are unfavorable between every two conservative furrows for every four meters three furrows of Green or black grams, one furrow of Red gram, 2 furrows
Sesame, 2 furrows of Maize ete are to be grown as mixed crops. The fertility of soilincreases due to these pulses. Deep rooted crops like Redgram (Pulses) can easily resist the conditions of famine. Maize and sesame cause a lot of food security. The Budget for conservative furrows in one acre of land.
Planting of trees on Conservative furrows:
Shadow giving plants like Glyrisidin, Subabul, Kanuga, Munaga may be planted if theslope of the soil is in the east-west direction. If the slope of the soil is in the North-Southdirection plants which give less shadow (i.e casurine, Teak and custard) may be grown.On the swellings of the conservative furrow plants like papaya, Karivepa (Curry leaf tree)may be planted for every 3 metres distance. Between these 3 metres length for every 1.5metres length the seeds of either perennial red gram or castor must be sown. Betweenevery 12 to 12 metres length plants like Mango, Jack tree, wood apple tree etc. may begrown.

77
Digging a Trench around the field:
Digging trenches (ditch) around the agricultural field is useful for preserving the rain water. Trenches that are dug along the agricultural fields are known as ditches or trenches. The soil that comes out by digging of the trenches. The soil that comes out by digging of the trenches is used to build banks of trench. A trench also helps in sinking water into the soil. Like this a trench yields good results. If more water is accumulated in a trench or ditch, it should be directed to a soak pit. Soak pits should be built at the end of the trenches (ditches) according to the nature of the slope
Plantation on the banks of trenches:
On the banks of the trenches thorny plants like Teak, Aloe, wood apple, plum tree,
Soap-nut, Kalimi, Gorintaku, Gatchakaya, Chillakampa, Mangala Girikampa, Boganvillia may be planted. In addition to the above plants. Glyricydia, and Subabul also may be planted. Besides the above plants serve as living fence they can prevent the speed of the wind. These plants are useful to protect the mixed crops from cattle. After 4 or 5 years these plants give us more income by selling timber and wood.
Advantages:
To prevent soil from erosion. After filling the trench (ditch) rain water is not allowed to flow out of the bund ofthe clay
(soil) removed from the ditch It helps water to sink As fruit bearing plants are planted in and around the ditch (trench), they grow welland they
are used for the protection of natural fertility of soil and conservation water. Develops greenery
It increasing ground water, and developing moisture.

78
Construction of the side trenches:
We must dig the trenches as per the measurements already fixed. Width and depthalso
must be as per norms. Removed soil must be poured under the slope / beyond the boundary. While digging the trench and making the bank the same depth and height should
bemaintained along the ditch. (Trench). In every pit that is dug we must leave clay flacks (Thandlu) at a distance of 15 to 20metres
with a width of 30 cm. The clay balls of the bundle must be broken and smashed and we must make a base ofthe
bund with the clay. On the clay bundles (banks) the seeds of stelo Hemota, local grass seeds, perennialRed
gram, seeds of caster, and creepers of vegetables may be sown. This can prevent erosion of the clay bank (clay bundle)
Per one acre of land the length of the ditch / trench will be 280 metres. We must utilize the trench / ditch as a live fence. Thorny plants and famine resistantplant
and drought resistant plants must be planted on the trench.
Farm pond:
Small water ponds used for storing excessive rain water coming out of their fields.
Advantages:
Used as drinking water for cattle and labourours in summer. Providing essential water for fruit bearing plants and Kanuga plants. Decreasing the speed of the flowing water and eradicating erosion of soil. Providing essential water to the vegetable plants in Rain fed region. Providing water for spraying kernels Helps in developing fishi culture or Aqua culture in farm ponds.
Formation of farm ponds: Basing on the physical conditions these ponds may be constructed in the shape of a square
or cube Pond must be dug in the required length and depth as per the measurement of thebottom. After words measurement from upper surface to the bottom of the farm pond it shouldbe
dug by removing soil till certain slope is formed. Leaving inlet and outlet, putting apart the burm of the pond equally deep, the removedsoil
should be placed in the shape of trepizium and sectioning must be done with thesoil.

79
According to the types of soil side slope may be from 1 ½ :1 to 1:1. There should be no hindrance for water either by removing soil from the farm pond
orflowing of excess water after the pond is filled. The clay balls of the bank should be broken and smashed to form a smooth base or tomake
base like structure. In the direction of water of the farm pond at the bottom of a trench should beconstructed
with pebble stones measuring 9”. The slope through which water comes into the pond and the slope through whichwater
goes out from the pond should be constructed as Revitment with pebble stones If the pond is constructed for drinking water facility for cattle the inlet side slope(inlet)
should be 4:1
Tank Silt:
Removal of Tank Silt and shifting of the tank silt to the lands cultivated by S.C, S.T,small
farmers. Where there is possibility for removing silt from tanks and shifting of the silt to thelands
cultivates by farmers. Tractors be used for the transport of silt. Transportcharges will be paid in case of the silt is shifted to the lands of SC / ST, small farmers.
Machines like JCB, proclainer should not be used. We must register day wise reports on tractor usage. We must register the names of
thebenefited farmers and drivers and take their signature at an appropriate place. Labourers will be paid for removing the tank silt and the driver of the vehicle will bepaid
for shifting the silt.
Fruit Gardens:
The main aim of the scheme is to show income resources to scheduled castes,scheduled
tribe and the farmers below poverty line by planting fruit bearing trees. It is to conserve Environment in draught prone areas by growing fruit bearing trees
onpermanent basis. Improving health security.
Size of pits: 0.6 X 0.6 X 0.6 metres pits – 25 per one acre.
Selection of Seedlings:

80
Primary root and scion should be thickly attached. There should be no new twigs on the top the primary root. Grafting should be done above 15 to 20 cms height above the stalk Grafting should be done only on healthy plants which are free from diseases.
Distance between plants: Multi storied fields Measuring 36 X 36
12 metres
6 metres
3 metres
Mango Orange Custard apple
Sapota Lemon Drum stick
Muk berry
Guava Papaya
Cashew Plantain
Soak Pits: The pits dug in the cultivated land to store water are called soak pits. The soak pitshould be dug at the end of the field in the direction of the slope. The excessive rainywater should be diverted to the soak pit to prevent wastage of water.
How to dig the Pit?
The soak pit should be dug as per the following measurements.Upper surface: 8 X 8 metres length and width 2, metre depth.Bottom: 4 X 2 metres length and width.The soak pit enables to increase ground water levels. The water in the soak pit can beused to save the crops under the conditions of drought or famine.
Advantages:
Small soak pits are needed in rain fed agricultural lands, drought prone areas and theplaces where moderate rain fall is common. If silt is removed every year, the waterstorage capacity will not be decreased. The fertility of the soil increased if the silted soilis spread as a layer in the same

81
field. Farmers may be benefited by planting creepers likeridge (anyular) gourd, snake gourds pumpkins, cucumbers etc on the bank of the soak(water) pits.

82
Run off collection tanks

83

84
MODULE 2- Plant Nutrition

85
Module-2- Plant nutrition
Introduction:
Plant nutrition is the study of the chemical elements and compounds that are necessary for plant growth, and also of their external supply and internal metabolism. In 1972, E. Epstein defined two criteria for an element to be essential for plant growth:
in its absence the plant is unable to complete a normal life cycle; or
that the element is part of some essential plant constituent or metabolite.
There are 14 essential plant nutrients which plants take from soil. Recent studies indicate that more thirty elements are absorbed by plants. Carbon hydrogen and oxygen are absorbed from the air and water, while other nutrients l. Plants must obtain the following mineral nutrients from the growing media: The nutrients must be in a available form to be taken up by plants. Therefore the supply and availability is important criteria for plants to uptake essential nutrients from soil.
the primary macronutrients: nitrogen (N), phosphorus (P), potassium (K) the three secondary macronutrients: calcium (Ca), sulfur (S), magnesium (Mg) the micronutrients/trace minerals: boron (B), chlorine (Cl), manganese (Mn), iron (Fe), zinc
(Zn), copper (Cu), molybdenum (Mo), nickel (Ni)
The macronutrients are consumed in larger quantities and are present in plant tissue in quantities from 0.2% to 4.0% (on a dry matter weight basis). Micro nutrients are present in plant tissue in quantities measured in parts per million, ranging from 5 to 200 ppm, or less than 0.02% dry weight.[3]
Session 1- Major and minor plant nutrients Duration – 60 mts
Learning outcome:
At the end of the session participants will be able to :
Define the essential elements required by plants
Thier supply and availability in the soil
Distinguish between macro and micro elements
List the role of essential elements
Illustrate the deficiency symptoms of essential elements

86
Most soil conditions across the world can provide plants with adequate nutrition and do not require fertilizer for a complete life cycle. However, humans can artificially modify soil through the addition of fertilizer to promote vigorous growth and increase yield. The plants are able to obtain their required nutrients from the fertilizer added to the soil. A colloidal carbonaceous residue, known as humus, can serve as a nutrient reservoir. Even with adequate water and sunshine, nutrient deficiency can limit growth.
Nutrient uptake from the soil is achieved by cation exchange, where root hairs pump hydrogen ions (H+) into the soil through proton pumps. These hydrogen ions displace cations attached to negatively charged soil particles so that the cations are available for uptake by the root.
The root, especially the root hair, is the most essential organ for the uptake of nutrients. The structure and architecture of the root can alter the rate of nutrient uptake. Nutrient ions are transported to the center of the root, the stele in order for the nutrients to reach the conducting tissues, xylem and phloem. The Casparian strip, a cell wall outside of the stele but within the root, prevents passive flow of water and nutrients, helping to regulate the uptake of nutrients and water. Xylem moves water and inorganic molecules within the plant and phloem accounts for organic molecule transportation. Water potential plays a key role in a plants nutrient uptake. If the water potential is more negative within the plant than the surrounding soils, the nutrients will move from the region of higher solute concentration--in the soil--to the area of lower solute concentration: in the plant.
Nutrients are moved inside a plant to where they are most needed. For example, a plant will try to supply more nutrients to its younger leaves than to its older ones. When nutrients are mobile, symptoms of any deficiency become apparent first on the older leaves. However, not all nutrients are equally mobile. Nitrogen, phosphorus, and potassium are mobile nutrients, while the others have varying degrees of mobility. When a less mobile nutrient is deficient, the younger leaves suffer because the nutrient does not move up to them but stays in the older leaves. This phenomenon is helpful in determining which nutrients a plant may be lacking.
Many plants engage in symbiosis with microorganisms. Two important types of these relationship are 1.) with bacteria such as rhizobia, that carry out biological nitrogen fixation, in which atmospheric nitrogen (N2) is converted into ammonium (NH4); and 2.) with mycorrhizal fungi, which through their association with the plant roots help to create a larger effective root surface area. Both of these mutualistic relationships enhance nutrient uptake.[4]
Though nitrogen is plentiful in the Earth's atmosphere, relatively few plants harbor nitrogen fixing bacteria, so most plants rely on nitrogen compounds present in the soil to support their growth. These can be supplied by mineralization of soil organic matter or added plant residues, nitrogen fixing bacteria, animal waste, or through the application of fertilizers.

87
Nutrient Functions
Carbon (C): Carbon forms the backbone of many plants biomolecules
Hydrogen (H2)
Hydrogen also is necessary for building sugars and building the plant
Oxygen (O2) Oxygen by itself or in the molecules of H2O or CO2 are necessary for plant cellular respiration.
Nitrogen (N) Plant convert Nitrogen to make proteins essential to new cell growth
Phosphorus (P)
Necessary for photosynthesis and works as catalyst for energy transfer within the plant. Phosphorus helps build strong roots and is vital for flower and seed production.
Potassium (K)
Activates the manufacture and movement of sugars and starches, as well as growth by cell division
Magnesium (Mg)
K is found as a central atom in the chlorophyll molecule and is essential to the absorption of light energy. Magnesium aids in the utilization of nutrients, neutralizes acids and toxic compounds produced by the plant.
Calcium (Ca) Ca is fundamental to cell manufacture and growth
Sulphur(S) Component of plant proteins and plays a role in root growth and chlorophyll supply
Iron (Fe) Key catalyst in chlorophyll production and is used in photosynthesis
Manganese (Mg)
Works with plant enzymes to reduce nitrates before producing proteins.
Zinc (Zn) Is a catalyst and must be present in minute amounts for plant growth
Copper (C) Catalyst for several enzymes

88
Boron (B) Necessary for cells to divide and protein formation
Molybdenum (Mn)
Helps in forming proteins and aids the plant's ability to fix nitrogen from the air
Chlorine (Cl2)
Necessary for osmosis and ionic balance
89
Module 2- Plant Nutrition
Introduction:
Rampant misuse of chemical fertilizers have brought serious problems of water pollution and soil degradation. The philosophy of CMSA is to totally shun use of chemical plant nutrients replacing with organic manures, bio mass incorporation, aerobic farm compost such as NADEP and use of bio inoculants for meeting the need of crops .
Soil fertility Management without chemicals:
Soil is a living systems and soil fertility is the key to agriculture productivity. Soil fertility management is a package of complex practices that should act upon three aspects: Soil, Microbes in the soil and plants. Following are the broad ecological principles of soil fertility management:
Supply of organic matter:
Each type of soil organism occupies a different niche in the web of life and favours a different substrata and nutrient source. Most soil organisms relay on organic matter for food; thus a rich supply and varied source of organic matter will generally support a wider variety of organisms
Increase plant varieties:
Session2 - Soil fertility managmnet without chemical fertilizer
Duration 60 mts
Learning outcomes :
At the end of this session participants will be able to:
List the biofertilizers and inoculants
How to prepare NADEP
And various other organic manures for plant nutrition

90
Crops should be mixed and their spatial – temporal distribution varied to create a greater diversity of niches and resources that stimulate soil bio diversity. Wider variety of organisms, improve nutrient cycling and natural process of pest and disease control
Protect the habitat of soil organisms:
The activity of soil biodiversity can be stimulated by improving soil living conditions such as aeration, temperature, moisture, and nutrient quantity and quality
Following are different practices for managing soil fertility: o Composting
o Green manuring
o Green leaf manuring
o Dabholkar method of green manuring
o Inoculants
o Bio fertilisers
o Azolla
o Tank silt application
o Mulching
o Mixed cropping
Composting:
Composting is a process where microorganisms break down organic matter to produce humus like substance called compost. Supplies organic matter and nutrient content. Controlled process ensure organic material is broken down and nutrients mineralized into plants available form
• Destruction of pathogens
• Small particles for easier application
Nadep method of composting:
The process basically involves placing select layers of different in a simple, mud sealed structure designed with brick and mud water. This system permits conversion of approximately one Kg of animal dung into 40 Kg of rich compost.
Construction of Nadep compost pit:
This method requires construction of a tank admeasuring 3m x 1.8 m or 3.6 m x 1.5 internally with 25 cm thick perforated brick wall all around in mud or cement mortar to a height of 0.9 m above ground. The above ground-perforated structure facilitates passage of air for aerobic decomposition. The floor of the tank is laid with bricks. The tank is covered above with a thatched roof. This prevents loss of nutrients by seepage or evaporation and the contents are not exposed to sun and rain.

91
Filling of Nadep compost pit:
The ingredients for making compost are agro-wastes, animal dung and soil in the ratio of 45:5:50 by weight.
The ingredients are added in layers starting with vegetable matter followed by dung and soil in that order.
Each layer can be about 45 kg vegetable matter, 5 kg of dung mixed in 70 l of water and 50 kg of soil so that 15 layers will fill the tank.
Tree loppings and green manure crops can also be used to fill up the tank if sufficient farm wastes are not available at time. The nutrients produced in the manure are absorbed by the soil layers thus preventing their loss.
About 22-50 lts of water is to be sprinkled twice a week after the tank is loaded.
The material loaded has to be left in the tank for about 100 to 120 days for complete decomposition of the material. One tank can be used three times a year. With production of 3 tons to 3.5 tons of compost produced per cycle about 9 to 10 tons of compost can be made annually from one tank.
The compost can be stored for future use, preferably in a thatched shed after air drying and maintaining it at about 20% moisture level by sprinkling water when ever needed. By following the procedures suggested above, the compost could be preserved for about 6 to 8 months. It is advisable to sprinkle cultures like Trichoderma, Azatobacter and PSB in layers to enhance the speed of composting process.
A NADEP

92
Green manuring: Green manuring is the plowing under or soil incorporation of any green manure crops while they are green or soon after they flower. Green manures are forage or leguminous crops that are grown for their leafy materials needed for soil conservation.The most important green manure crops are sunnhemp, dhaincha, clusterbeans and Sesbania rostrata.
Green manure crops and addition of Nitrogen to soil:
Crop Sowing months Seed rate kg/ha Nitrogen to soil (kg/Acre)
Black gram
June-July 8-9 27-28
Cow pea April-July 18-22 30-35
Dhanchia April-July 32-40 33-42
Green gram
June- July 12-16 27-34
Horse gram
June -July
10-12
48-54
Green leaf manuring: Application of green leaves and twigs of trees, shrubs and herbs collected from elsewhere is known as green leaf manuring. Forest tree leaves are the main sources for green leaf manure. Plants growing in wastelands, field bunds etc., are another source of green leaf manure. The important plant species useful for green leaf manure are neem, mahua, wild indigo, Glyricidia, Karanji (Pongamia glabra) calotropis, avise(Sesbania grandiflora), subabul and other shrubs.
Nutrient content of green leaf manure:
Plant Nutrient content (%) on air dry basis
N P K
Gliricidia 2.76 0.28 4.6
Pongamia 3.31 0.44 2.39
Neem 2.83 0.28 0.35
Gulmohur 2.76 0.46 0.50
Calotrophis 2.06 0.54 0.31

93
Dhabolkar method of Green manuring:
This method was developed by Sri Dabholkar of Maharashtra to convert unproductive lands. In this method, 20-25 kg of mixed seed from 5 categories (4 crops in each category i.e total 20-21 crops) mentioned below are sown: 1. Cereals (Coarse cereals and millets) 2. Pulses (Black gram, Green gram, Chickpea, Bean) 3. Oilseeds (Sesame, Groundnut, Sunflower, Castor) 4. Legumes (Sesbania, Sunhemp, Horse gram etc.) 5. Spices (Mustard, Coriander, Methi, Ajwain)
In this mix, pulses, oilseeds, cereals/millets, green manure crop seeds are added @ 6kg each whereas spices are added @ ½ kg each. After 40-45 days of sowing, the entire biomass is incorporated into the soil. This has to be repeated two more times for best results. In this way, the top soil gets replenished with all plant nutrients and also help in buildup of humus. It is essential that enough moisture is ensured for the growth and decomposition of green manure crops
Inoculants:
Drava jeevamrutham:Can be used as a fertilizer for each plant for every week, which boosts the plant growth and gives good yield. We need to use the prepared one within one week of preparation. Please note that once we use Jeevamrutham, we shouldn’t water the plants for 12 hrs.
How to Prepare:
Requirements for 10liters of jeevamrutham
1. 1/2 litre Cow Urine
2. 1/2 K.g Cow Dung
3. 100 gms Jaggery
4. 100 gms Basin Powder/ Black-eyed peas or cow peas Powder
5. 2 tb spn of Top soil
Procedure:
1. In 2 and 1/2 litre water mix cow dung, urine Jaggery and basin powder. Stir the contents with stick. Make sure no lumps are there in the liquid.
2. In this add 7 litres of water so that will get 10 litres of liquid. 3. Keep this container outside under the shade/ under the tree. place some cotton cloth over it.

94
4. Stir the liquid in the container every day in morning and evening for about 15 minutes. 5. Jeevamrutham will be prepared in 48 hrs, Can use directly to plants.
Ghana jeevamrutham: Required material:
o Dung – 100 Kgs
o Cattle urine – required amount
o Dung – 2Kgs
o Pulse flour – 2 Kgs
o Virgin soil - fistful
Preparation: Mix all materials by adding urine. Keep this mixture under shade for seven days. After drying store in gunny bags upto six months.
Application:
Take 20 Kgs of Ghana jeevamrutham and add 100kgs of dried compost grind it and apply in the field.
VERMIWASH:
Take 10 lit of mud pot or plastic container for preparation of vermiwash. Arrange a tap for it at the bottom. Then place 10 cm gravel or broken bricks at the bottom. Spread coconut husk upto 4 cm. on this. Place partially decomposed agriculturalwaste material and dung and moisten the material with water. After wetting the material for 2 days, release two dozen earthworms. In 2 weeks the wastes get transformed into black compost. At this stage pour 3 litres of water. After 24 hrs, 2 litVermiwash can be collected through the tap. Continue this method for one week, remove the compost from the container and it can be used as manure. Again refill the container as explained above and prepare vermiwash.
Method of application: o 10 lit. Vermiwash is mixed in 100 liters of water and sprayed on an acre of crop. o Vermiwash can be used on all crops, nurseries and fruit crops. o Can be sprayed 1-2 times during crop duration to get good results. o By spraying Vermiwash controls micronutrient deficiencies to some extent.
Bio fertilisers:
Biofertilizers are defined as preparations containing living cells or latent cells of efficient strains of microorganisms that help crop plants’ uptake of nutrients by their interactions in the rhizosphere when applied through seed or soil. They accelerate certain microbial processes in the soil which augment the extent of availability of nutrients in a form easily assimilated by plants
Group Examples

95
N2 fixing bio fertilizers
Free living Azatobactor , Nostoc
Symbiotic Rhyzobium, Anabena
Associative symbiotic Azospirillum
P solubilizing bio fertilisers
Bacteria Bacillus, Psudomonas
Fungi Pencillium, Aspergillus
P mobilizing bio fertilisers
Arbuscular mycoryzha
Glomus
Ectomycoryzha Laccaria
Orchid mycoryzha Pezizella
Plant growth promoting ryzho bactria
Pseudomonas Pseudomonas
Application of bio fertilisers:
Seed treatment: One packet of the inoculant is mixed with 200 ml of rice kanji to make a slurry. The seeds required for an acre are mixed in the slurry so as to have a uniform coating of the inoculant over the seeds and then shade dried for 30 minutes. The shade dried seeds should be sown within 24 hours. One packet of the inoculant (200 g) is sufficient to treat 10 kg of seeds.
Seedling root dip: This method is used for transplanted crops. Two packets of the inoculant is mixed in 40 litres of water. The root portion of the seedlings required for an acre is dipped in the mixture for 5 to 10 minutes and then transplanted.
Main field application: Four packets of the inoculant is mixed with 20 kgs of dried and powdered farm yard manure and then broadcasted in one acre of main field just before transplanting.
Rhizobium: For all legumes Rhizobium is applied as seed inoculant.

96
Azospirillum/Azotobacter: In the transplanted crops, Azospirillum is inoculated through seed, seedling root dip and soil application methods. For direct sown crops, Azospirillum is applied through seed treatment and soil application.
Phosphobacteria: Inoculated through seed, seedling root dip and soil application methods as in the case of Azospirillum.
Combined application of bacterial biofertilizers: Phosphobacteria can be mixed with Azospirillum and Rhizobium. The inoculants should be mixed in equal quantities and applied as mentioned above.
Azolla:
Azolla is a free-floating water fern that floats in water and fixes atmospheric nitrogen in association with nitrogen fixing blue green alga Anabaena azollae. Azolla fronds consist of sporophyte with a floating rhizome and small overlapping bi-lobed leaves and roots. Azolla is used as biofertilizer for wetland rice and it is known to contribute 40-60 kg N ha-1 per rice crop.
The important factor in using Azolla as a biofertilizer for rice crop is its quick decomposition in soil and efficient availability of its nitrogen to rice. In tropical rice soils the applied Azolla mineralizes rapidly and its nitrogen is available to the rice crop in very short period. The common species of Azolla are A. microphylla, A. filiculoides, A. pinnata, A. caroliniana, A. nilotica, A. rubraand A. mexicana.
Method of inoculation of Azolla to rice crop:
The Azolla biofertilizer may be applied in two ways for the wetland paddy.
In the first method, fresh Azolla biomass is inoculated in the paddy field before transplanting and incorporated as green manure. This method requires huge quantity of fresh Azolla.
In the other method, Azolla may be inoculated after transplanting rice and grown as dual culture with rice and incorporated subsequently.
A. Azolla biomass incorporation as green manure for rice crop
Collect the fresh Azolla biomass from the Azolla nursery plot. Prepare the wetland well and maintain water just enough for easy incorporation. Apply fresh Azolla biomass (15 t ha-1) to the main field and incorporate the Azolla by using
implements or tractor.
B. Azolla inoculation as dual crop for rice
Select a transplanted rice field. Collect fresh Azolla inoculum from Azolla nursery. Broadcast the fresh Azolla in the transplanted rice field on 7th day after planting (500 kg / ha).

97
Maintain water level at 5-7.5cm. A second bloom of Azolla will develop 8 weeks after transplanting which may be incorporated
again. By the two incorporations, 20-25 tonnes of Azolla can be incorporated in one hectare rice field.
Mulching:
The principle requires the farmer to cover the land under cultivation with a mulching material.
Mulching protects soil from evaporation of surface moisture, preserve and add to organic
matter in soils in addition to improving soil properties.
Tank silt application:
10-20 cartloads of tank silt is applied per acre during last plough.Following are the advantages of tank silt:
o Silt and clay particles due to their smaller size provide the nutrients to soil o Microorganisms are also high in number o Helps in forming small pores and retain water
Note: If the tanks are saline then the soil should not be used. Tank silt should be used based on the availability in the last ploughing.
Mixed cropping:
Growing two or more crops together on the same field (grain and bean). Direct production increase compared to mono cropping, due to better ground cover, optimum use of sunlight, more efficient root growth and extra nitrogen (when using N fixers)

98
Module – 2 Plant nutrition
Session -3- Plant nutrient deficiency symptoms
Duration – 45 mts Introduction:
Plants, like all other living things, need food for their growth and development. Plants require 16 essential
elements. Carbon, hydrogen, and oxygen are de- rived from the atmosphere and soil water. The remaining 13
essential elements (nitrogen, phosphorus, potassium, calcium, magnesium, sulfur, iron, zinc, manganeses- their
function in plants, symptoms of their deficiencies, and recommended nutrient levels in plant tissues of selected
crops.
: Plant Nutrient Management in Hawaii’s Soils, Approaches for Tr
Learning outcome At the end of this session participants will be able to
Identify the symptoms of deficiency of an element

99
Deficiency Symptoms
Plants, like all other living things, need food for their growth and development. Plants require 16 essential elements.
Carbon, hydrogen, and oxygen are de- rived from the atmosphere and soil water. The remaining 13 essential

100
elements (nitrogen, phosphorus, potassium, calcium, magnesium, sulfur, iron, zinc, man-their function in plants,
symptoms of their deficiencies, and recommended nutrient levels in plant tissues of selected crops.
Nitrogen
Deficiency symptoms
• Stunted growth may occur because of reduction in cell division.
• Pale green to light yellow color (chlorosis) appear- ing first on older leaves, usually starting at the tips.
Depending on the severity of deficiency, the chloro- sis could result in the death and/or dropping of the older leaves. This is caused by the translocation of N from older tissues
• Reduced N lowers the protein content of seeds and vegetative parts. In severe cases, flowering is greatly
reduced.
• N deficiency causes early maturity in some crops, which results in a significant reduction in yield and quality.
Phosphorus
Deficiency symptoms
• Because P is needed in large quantities during the early stages of cell division, the initial overall symp- tom is
slow, weak, and stunted growth.
• P is relatively mobile in plants and can be transferred to sites of new growth, causing symptoms of dark to blue-
green coloration to appear on older leaves of some plants. Under severe deficiency, purpling of leaves and
stems may appear.
• Lack of P can cause delayed maturity and poor seed and fruit development.
Potassium
Deficiency symptoms
• The most common symptom is chlorosis along the edges of leaves (leaf margin scorching). This occurs first in
older leaves, because K is very mobile in the plant.
• Because K is needed in photosynthesis and the syn- thesis of proteins, plants lacking K will have slow and
stunted growth.
• In some crops, stems are weak and lodging is com- mon if K is deficient.
• The size of seeds and fruits and the quantity of their production is reduced
Symptoms of plant nutrient deficiencies and toxicities
–

101
Nitrogen deficient potato plant (left) is chlorotic; plant at right is normal.
Nitrogen deficient corn; yellowing proceeds down the midrib of older leaves.
Nitrogen deficient soybean; lower leaves turn uniformly pale green, then yellow.

102
Nitrogen deficient cucumber fruit is misshapen and chlorotic.
Severe nitrogen deficiency in citrus.
Deficiency symptoms
• Stunted growth may occur because of reduc- tion in cell division.
• Pale green to light yellow color (chlorosis) ap- pearing first on older leaves, usually starting at
the tips. Depending on the severity of deficiency, the chlorosis could result in the death and/or dropping of the
older leaves. This is caused by the translocation of N from the older to the younger tissues.
• Reduced N lowers the protein content of seeds
and vegetative parts. In severe cases, flower- ing is greatly reduced.
• N deficiency causes early maturity in some crops, which results in a significant reduction in
yield and quality.

103
Phosphorus deficient sugarbeet plants are stunted, with dark green leaves.
Phosphorus deficient corn; lower leaves become reddish-purple.
Phosphorus deficient tomato leaves have purple interveinal tissue on their undersides.
Deficiency symptoms
• Because P is needed in large quantities during the early stages of cell division, the initial over-
all symptom is slow, weak, and stunted growth.
• P is relatively mobile in plants and can be trans- ferred to sites of new growth, causing symp-
toms of dark to blue-green coloration to appear on older leaves of some plants. Under severe deficiency,
purpling of leaves and stems may appear.
• Lack of P can cause delayed maturity and poor

104
Phosphorus deficient potato plants are stunted, with dark green leaves.
Potassium deficient banana; older leaves become chlorotic, then necrotic, and the tip of the midrib bends
downward.

105
Calcium deficient celery;
young leaves are necrotic and the growing point dies.
Calcium deficient corn leaves fail to unfold.

106
Magnesium deficient soybean; interveinal chlorosis of older leaves.
Magnesium deficient corn; interveinal chlorosis of older leaves.

107
Magnesium deficient sweet potato leaves become reddish-purple.
Magnesium deficient tomato; interveinal chlorosis of older leaves.
Deficiency symptoms
• Because Mg is a mobile element and part of the chlorophyll molecule, the deficiency symp-
tom of interveinal chlorosis first appears in older leaves. Leaf tissue between the veins may be yellowish,
bronze, or reddish, while the leaf veins remain green. Corn leaves appear yel- low-striped with green veins,
while crops such as potatoes, tomatoes, soybeans, and cabbage show orange-yellow color with green veins.
• In severe cases, symptoms may appear on
younger leaves and cause premature leaf drop. • Symptoms occur most frequently in acid soils and soils receiving high amounts of K fertilizer
or Ca.

108
Sulphur deficient banana; young leaves are uniformly chlorotic.
Sulphur deficient tomato; young leaves are uniformly chlorotic.

109
Sulphur deficient sorghum; young leaves are uniformly chlorotic.
Deficiency symptoms
• Younger leaves are chlorotic with evenly, lightly colored veins. In some plants (e.g., citrus) the older
leaves may show symptoms first. However, defi- ciency is not commonly found in most plants.
• Growth rate is retarded and maturity is delayed.
• Plant stems are stiff, thin, and woody.
• Symptoms may be similar to N deficiency and are
most often found in sandy soils that are low in
organic matter and receive moderate to heavy rainfall.
AP
S

110
Boron deficient radish plants are stunted, with distorted leaves.
Boron deficient potato leaves have light brown edges; crinkling around the center of the leaf blade causes an -
cupped shape; the plant’s growing point dies.

111
Boron deficient papaya fruits develop bumps.
Boron deficient tomato leaves are chlorotic, with some curling.
Deficiency symptoms
• Generally, B deficiency causes stunted growth, first showing symptoms on the growing point and
younger leaves. The leaves tend to be thick- ened and may curl and become brittle.
• In many crops, the symptoms are well defined and crop-specific, such as:
• peanuts: hollow hearts
• celery: crooked and cracked stem
• beets: black hearts
• papaya: distorted and lumpy fruit
• carnation: splitting of calyx
• Chinese cabbage: midribs crack, turn brown
• cabbage, broccoli, and cauliflower:pith in hollow stem

112
Copper deficient corn leaf tips bend and droop.
Copper deficient onion leaves have white tips and twist in spirals or right angles.

113
Copper deficient tomato leaves are stunted and deformed.
Deficiency symptoms
• Reduced growth, distortion of the younger leaves, and possible necrosis of the apical meristem.
• In trees, multiple sprouts occur at growing points, resulting in a bushy appearance. Young leaves becomes bleached, and
eventually there
is defoliation and dieback of twigs.
• In forage grasses, young leaf tips and growing points are affected first. The plant is stunted and chlorotic.
Chlorine deficient tomato;
leaf edges roll upward.

114
Chlorine deficient sugar beet; young leaves are chlorotic.
Deficiency symptoms
• Chlorosis of younger leaves and wilting of the plant. Atmosphere and rain water
Iron deficient soybean; young leaves have interveinal chlorosis.
Deficiency symptoms
Interveinal chlorosis in younger leaves. The youngest leaves maybe white, because Fe, like
Mg, is involved in chlorophyll production.
• Usually observed in alkaline or over-limed soils.

115
Manganese deficient tomato;
expanded young leaves have green veins with interveinal chlorosis.
Manganese deficient corn; young leaves are olive-green and slightly streaked.
Manganese deficient orange; leaves develop a mottled pattern of light and dark green.

116
Deficiency symptoms
• Symptoms first appear as chlorosis in young tissues. Unlike Fe chlorosis symptoms, in dicots Mn chlorosis
shows up as tiny yellow spots.
• In monocots, greenish-grey specks appear at the lower base of younger leaves. The specks may eventually
become yellowish to yellow-orange.
• In legumes, necrotic areas develop on the cotyledons, a symptom known as marsh spots.
Molybdenum deficient grapefruit leaves have interveinal chlorosis.
Molybdenum deficient tomato leaves have interveinal chlorosis.
Deficiency symptoms
• Deficiency symptoms resemble those of N be- cause the function of Mo is to assimilate N in the
plant. Older and middle leaves become chlorotic, and the leaf margins roll inwards.
• In contrast to N deficiency, necrotic spots appear at the leaf margins because of nitrate accumulation.
• Deficient plants are stunted, and flower forma- tion may be restricted.
• Mo deficiency can be common in nitrogen-fixing legumes.

117
Zinc deficient mango shoots have shortened internodes, resulting in leaf rosetting.
Zinc deficient corn. Young leaves have interveinal, chlorotic stripes on both sides of the midrib.
Deficiency symptoms
Interveinal chlorosis occurs on younger leaves, similar to Fe deficiency. However, Zn deficiency
is more defined, appearing as banding at the basal part of the leaf, whereas Fe deficiency results in interveinal chlorosis
along the entire length of the leaf.
• In vegetable crops, color change appears in the
younger leaves first. The new leaves are usually

118
abnormally small, mottled, and chlorotic.
• In citrus, irregular interveinal chlorosis occurs with small, pointed, mottled leaves. Fruit formation is
significantly reduced.
• In legumes, stunted growth with interveinal chlorosis appears on the older, lower leaves. Dead
tissue drops out of the chlorotic spots.

119
Boron toxicity in bean.
Plants are stunted and become yellow and necrotic.
Boron toxicity in green onion.
Phosphorus deficiency symptoms in corn and guava.

120
Potassium deficiency symptoms in soybean and alfalfa.

121
Module 3 All about Seed

122
Module -3- All about seed
Session 1-Seed and food crop
Duration – 60 mts
Introduction:
Seeds and planting materials are the fundamental ingredients for agriculture to happen; research shows that in general productivity of any crop would be effectively increased by 20 – 25% using quality seeds alone keeping other cultural and management practices the same. The price of seed is always substantially higher than the grains; therefore seed based economy has a special relevance in rural development
There exists a huge gap between the supply and demand of high quality, disease free seeds and other biological planting materials in the country as a whole.
The seed replacement ratio in India is on the lower side resulting in declining productivity, which is conspicuously evident in case of paddy.
The science related technology of seed production has marched ahead considerably but the reach of knowledge to the farmers, is still unfortunately inadequate; the knowledge dissemination process still by and large is dominated by the dealers and traders who are associated with agri-input business.
Learning outcomes
At the end of this session the participants will be able to :
Differentiate between a crop for seed and food
How to select seed for planting
Quality aspects of seed
What is seed replacement ratio
Seed treatment before sowing
Seed storage at farm lelevel
Seed production systems
Some of the basic facts of seed laws

123
What is a seed
A cross section of a seed
6
Botanically ‘seed’ is a fertilized ovule in a plant, which when mature can be planted to advance the
generation. In simple term ‘seed’ is a planting material for growing a crop. Hence any seed which is planted (in soil mostly) germinates to grow into another plant. Not always seed is planted to grow a crop. For example potato tuber which is planted to grow a potato crop is not a ‘true’ seed – it is the modified stem which is planted and is a vegetative way to take a crop. True potato seed can be obtained for planting but needs specific climatic requirement and can not be produced everywhere. Tissue culture is one sophisticated laboratory and green housed based system which gives vegetative propagation of disease and virus free planting material for plantation crop and floriculture – such as flower seedlings, banana, spices etc. Therefore there are various ways of propagating a crop depending on the crop type, climate, agro-ecological zone. For our purpose we will confine to true seed as it is called, such as, paddy, wheat, mustard, maize, vegetables, cotton, millets to name a few.
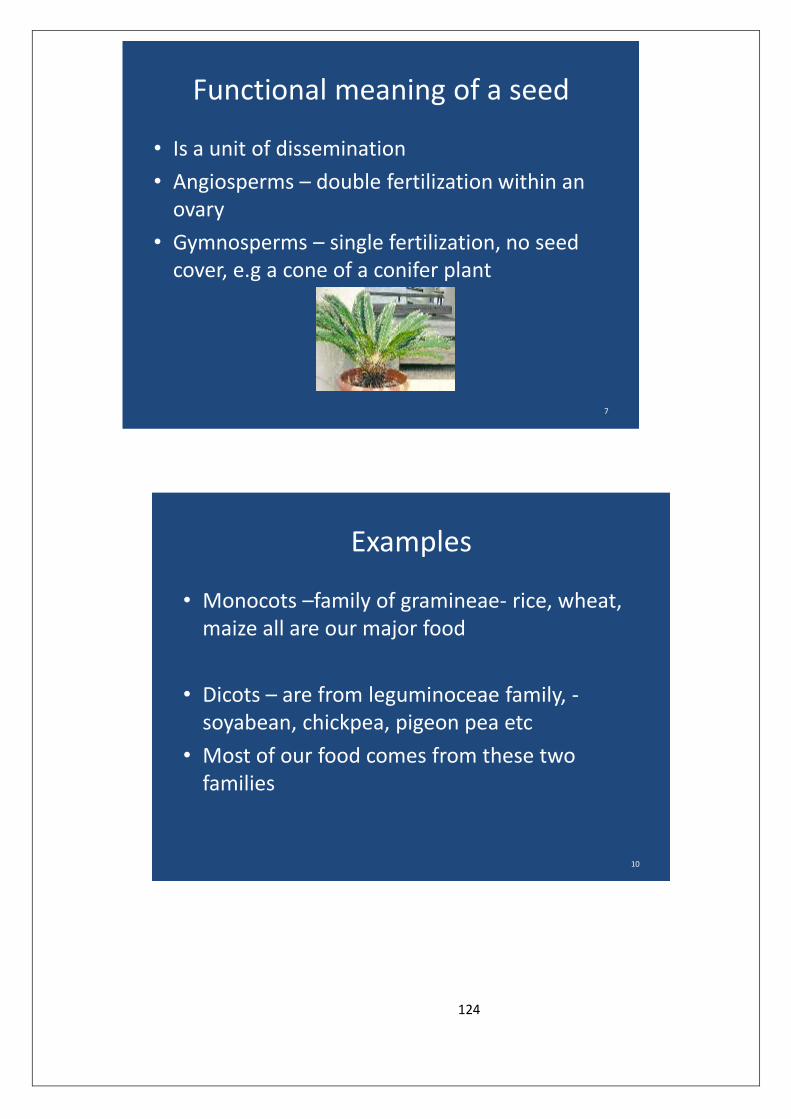
124
Functional meaning of a seed
• Is a unit of dissemination
• Angiosperms – double fertilization within an ovary
• Gymnosperms – single fertilization, no seed cover, e.g a cone of a conifer plant
7
Examples
• Monocots –family of gramineae- rice, wheat, maize all are our major food
• Dicots – are from leguminoceae family, -soyabean, chickpea, pigeon pea etc
• Most of our food comes from these two families
10

125
12
Difference between a crop grown for seed and crop grown for food
One must understand the major difference between a seed crop and food crop. For example paddy grown for food (which we consume as a major staple) will not qualify as a seed, which goes to the market for
Germination
• Seed is a living element
• By germination seed multiplies its own cell to next generation
• Seed to a plant that we grow
• ( germination video )
11

126
growing a crop. Though scientifically seed from paddy grown for food can be planted again and it will give crop.
The major difference is that a seed crop by law has to be genetically pure with characteristics described for a particular variety. This require the seed to be a class called `Foundation seed’ to be obtained from designated public research institutions such as Agricultural Universities, State Research Centres, ICAR, etc. and the crop should be grown with specified quality control with regular inspection from authorized certified agencies – such as State Seed Certification Department . Only when a crop grown for Foundation seed gets a certificate, it can be sold as Certified seed to the market with a `Tag’ stamped by Seed Certification Agency. Therefore the prime concern is genetic purity which a crop for food may not be maintained and usually have a mixture of other varieties. This is an elaborate process during the production of seed. A seed company must ensure this purity if it wants the stamp of authorized certification.
Majority of seed sold in the market is treated with chemicals to prevent insect damage, hence can not be used for food if the seed is not sold (exception is paddy as it can be sold without chemical treatment and if a lot is not sold can be sold as food). Seeds are also sold with polymer coating which makes it unfit as food.
20

127
Quality of seed
• Genetic or physical
• Improved varieties with incorporation of better genes (? )- acceptable to market, consumer
• Physical – weed seed, chaff, dirt, germination, viability, vigor, other varieties, moisture etc
• Quality control is most important for any seed production program or trade
• Require high level of technology and complex business operation
22
24

128
Maize flower( picture )
• Tassel – male flower
• Ears- female flower
• Papaya – dioecious – has to be planted close for pollination
27
28

129
33
Factor influencing seed development
• Dormancy- a few days to several years of sleeping to preserve a species of desirable characters
• Sometimes dormancy has to be broken for cultivation
• Viability- ability to grow, viable, remain viable for long time , lotus – 3000 years
• Vigor- seed vigor to grow to a crop
• A seed may germinate but not be viable or vigorous
35

130
37
Analytical purity
• Intact seed of a specific species• No contamination• Pure seed – analytical laboratory• Normally expressed as % of pure seed• Germination• Vigour• Viability• Seed size – actual, uniformity test weight, 1000/100
seed mass• Seed health – disease pest• Moisture content at harvesting, at germination
39

131
Factor that affect seed quality• Seed lot planted
• Agronomical practices
• Plant protection
• Isolation distance – why ?
• Roguing during growth stages
• Weed control
• Method and time of harvest
• Regular inspection
• Verify genetic purity
• GOT – standard practice, sample etc
• Population density
• Pollinating agent40
Post harvest quality control
• Moisture level and its importance• Seed drying temperature• Cleaning, sorting• Seed treatment• Seed storage, at godowns, standard laid out• Sampling methods for testing and analysis• Seed testing Lab a must• Proper labeling• Follow up test for germination – when it is done
41

132
Seed standards by Law
Crop Pure Seed
InertMattter %
OtherSeed max
Total Weed seeds
Germination
ObjectWeed seed
ODV Moisture
Hybridmaize
98 2 10/kg None 90 None 10/kg
12
Hybrid paddy
98 2 20/kg 20/kg 80 5/kg 0.2% 13
68
IPR, PPV and FRA
• Intellectual property rights – this breeders right where he can register his variety
• Protection of Plant variety and farmers rights – came in 2002. This is an act where a registered variety cannot be stolen and used. The right remains active for 15 years
69
133
Basic principles and concepts of seed quality control
Seed is the basic input for agriculture and quality seed is the key to boost production of crops. It is important genetic purity is maintained in the full seed chain – from breeders seed to certified seed which is sold to the farmers.
The concept of seed quality
Seed quality is the sum of all the attributes which makes a seed different from grain (see the first chapter).
The main attributes are – genetic purity, physical purity, germination, dormancy, moisture, seed health, vigour, should be of uniform size and lustrous /color.
Genetic purity
This is the most important attribute which must be at least 98% stipulated under seed law. This governs the yield potential as well as resistant disease, pests, drought, etc. The standards at each stage has been prescribed. The genetic purity of breeder seed must be 100% and maintained through generation.
Physical purity
The seed lot after harvesting is not fit for sowing as it has lot of impurities. There will be soil, stones, inert material, chaff, broken seed, leaves, husks, other foreign material, weed seed, other crop seeds, etc. No amount of clean and sanitized cultivation can totally avoid these impurities. Therefore seeds after harvest must be cleaned and processed before it can be sold. The standards for physical purity is also stipulated.
Germination
This is one attribute can play havoc when the seed is planted by the farmer and often can be the cause for dispute. This is affected by various factors and hence seeds to be monitored on a regular basis with prescribed standard procedures.
Moisture
The viability of a seed revolves round the moisture content. Should not be too high or too low. It should be at desirable level (10-14%) which can be attained by drying. This also determines type of packing material and storage.
Seed health
Mainly pertains to infections by fungi or pest affected. This will affect germination, seed color, seed size and carry forward the disease to next generation (with seed borne fungus). Therefore at the time of harvest seed must be inspected thoroughly for any such disease or pest. During storage disease or pest will affect the seed quality – specially when the seed is not sold and is carried forward to next season.
Seed vigour
This is an attribute which determines how well a seed will grown after germination. 100% germination does not mean all the seeds will grow in to plant. If the seed is less vigorous many seeds will die after germination. Seed vigour is tested at the laboratory before a seed lot is approved for final packing.

134
Factors affecting seed quality
Can be broadly grouped in four categories. 1. Genetical factor, 2. Ecological factor, 3. Agronomic practices, 4. Harvesting and post-harvesting handling.
Genetic purity may decline over years specially when the same source of seed is used continuously over the years. The growth of the plant and seed quality is strongly influenced by environmental factors. Similarly Agronomic practices are of utmost important when raising a crop. Post harvest handling is equally important to get rid of all the physical impurities ensure clean, genetically pure quality seed for certification and final dispatch to market. Even in improper storage seed quality can deteriorate fast making it unsuitable for sale. In every step of drying, handling, processing the stipulated parameters must be followed to ensure top quality seed.
Parameters of a quality seed
Improved variety/hybrid
High genetic purity
High physical purity
High germination
High vigour
Free from seed-borne pathogens
Safe moisture content
Pilot scheme for seed crop insurance
Initiated in rabi – 1999-2000 as a pilot in 12 States, 10 crops (pp 155)
To provide financial security
To estimate new undertakings
To bring modern seed production techniques
Plant protection of Variety and Farmers Right Act (PPV & FRA)
This important legislation came by parliament 30 Oct 2001. Features are:
Stimulate investment in research and development – both public and private sector
To facilitate the growth of seed industries through domestic and foreign investment to ensure high quality seeds and planting materials to Indian farmers.
Salient features are:
Extends to all categories of plants
In order to have legislative protection a variety must be new distinct uniform and stable.
Period of protection shall be 18 years for trees and vines, 15 years for other crops
Compulsory licensing in the public interest
Farmers will have their traditional variety to save, use, exchange, share and sell their products of the protected variety. Farmer cannot sell any branded seed of the protected variety.
A PPV & FRA authority has been set up with necessary executive powers.

135
Module 4- Post Harvest Managmnet

136
Module 4- Post harvest management:
Introduction:
One of the main causes of food insufficiency in East Africa is the high prevalence of storage pests.
Grains, dry legume seeds and tubers are excellent food not only to humans but also to lots of other
creatures. Food stores are excellent breeding sites for all those pests. A farmer has to take adequate
measures about food storage
to conserve his/her
crops to be able to feed the
family even during longer
droughts.
The main storage pests, apart from rodents, are beetles and moths.
Some pests such as grain borers, weevils and Angoumois grain moths are able to feed on whole,
Sesion 1- Storing grains and seed
Duration – 45 mts
Learning outcome
At the end of this session participants will be able to
Storing Seeds and Grains -
Principles of Preventive
Storage Protection
Additives are useful to protect
stored produce from pest attack
Pests that attack stored grain
How to preserve grains in villages without chemicals

137
healthy grains, they are considered primary pests. Secondary pests such as flour beetles can attack
only broken grain, moist and thus soft grain, grain damaged by primary pests or processed products
such as flour.
Contamination by fungi also causes direct losses and poses a threat to human and animal health by
producing poisons known as mycotoxins, which contaminate food and feed.
Beetles: Weevils, Grain Borers, Bruchids, Khapra Beetles
The main beetle pests of storage are bruchids (e.g. cowpea seed beetles and bean bruchid), grain
borers (e.g. the larger and the lesser grain borers), weevils (e.g. grain weevils), flour beetles,
Khapra beetles beetles and dried fruit.
The larvae and some adult beetles feed in the seeds and grain, leaving them full of small holes.
Sometimes a fine dust is found around the holes, being the excrements of these beetles. Beetle
damage renders grains and seeds unsuitable for human and, in case of heavy attack, even for
animal consumption.
Cowpea bruchids (Callosobruchus spp.)
Cowpea seed beetle (Callosobruchus maculatus). Adult female on cowpea (Vigna unguiculata) seeds.
Cowpea bruchids (Callosobruchus spp.) are the most common and widespread insect pests in storage. Adults are 2 to 3.5 mm long. They are major pests of pulses (cowpeas, pigeon peas, soybean, geen gram and lentils). They attack both pods in the field and seeds in storage. They attack nearly mature and dried pods. Infested stored seeds can be recognised by the round exit holes and the white eggs on the seed surface. Post-harvest losses are highly variable, but losses can be over 90%. What to do:
Pods should be harvested as soon as they mature and the seeds sun dried before stored in clean beetle-proof containers. A coating of edible oils or of inert clay can prevent further development of bruchids in the stored seeds. Some farmers in East Africa use wood ash in grain stored for food or seed for planting, or chillies or smoke from cooking fire to preserve seeds for planting. Other farmers store unthreshed pods as a strategy to minimise grain damage by bruchids (Minja et al. 1999).
(

138
The bean bruchid (Acanthoscelides obtectus)
Bean bruchid (Acanthoscelides obtectus) on soybean
This beetle, also known as the dry bean weevil, is about 3 to 5 mm long, oval in shape, grey and
reddish brown with yellowish and dark patches of hairs on the wing cases. The wing cases are
short and do not cover completely the abdomen.
This beetle is a major pest of beans. Attack by this beetle often starts in the field. Female beetles
lay eggs on the ripening pods on the crop or among stored beans. The larvae bore the way into the
seed and feed inside. The presence of mature larvae or pupae can be recognised by the small
circular windows on the bean seeds. The life cycle is completed inside the seed and the adult
beetle emerges by pushing the window, which falls off leaving a neat round hole about 2 mm in
diameter.
What to do:
Intercropping maize with cowpeas, and not harvesting crops late significantly reduced infestation
by the bean bruchid (Acanthoscelides obtectus) and cowpea bruchids in Kenya ).
The larger grain borer (Prostephanus truncatus)
Larger grain borer (Prostephanus truncatus). The adult beetle is 3 to 4.5 mm long.
The larger grain borer is a serious pest of stored maize and dried cassava roots, and will attack maize on the cob, both before and after harvest. What to do: Use botanicals or plant parts to protect stored cassava. There are reports in Kenya, that the larger grain borer can be effectively repelled by storing cassava or grains with a fairly large amount of dried lantana or eucalyptus leaves (Personal communication, field officer of Meru herbs). Neem is also reported to be effective.

139
Lesser grain borer (Rhyzopertha dominica). Adults are 2 to 3 mm in length and reddish-brown in
colour (shown on wheat grains).
This is a tiny beetle (2-3 mm long) with a slim and cylindrical shape and red-brown to black in
colour. The thorax bears rows of teeth on its upper front edge and the head is turned down
underneath the thorax so that it cannot be seen from above. Eggs are laid loose among the cereal
grains. The larvae are mobile. Both larvae and adult bore through the stored produce usually
causing characteristic round tunnels (up to 1 mm diameter).
In later stages of infestation these beetles may also hollow out the grains. Pupation usually takes
place within the eaten grain. The lesser grain borer is primarily a pest of cereal grains, other seeds,
cereal products and dried cassava. It will be controlled by any method that controls the larger grain
borer.
Grain weevils (Sitophilus spp.)
The adults are small (2.5 to 4.0 mm long), brown weevils with a long, narrow snout. Female lays
eggs inside the grain. The larva (grub) lives and feeds inside the grain hollowing it out. The adult
attacks whole or damaged grains causing irregularly shaped holes. Grain weevils attack grains either
in the field before harvest or in the store.
Rice weevil (Sitophilus oryzae)
The rice weevil (Sitophilus oryzae) is a major pest of rice, maize and other cereals
in store.
Flour beetles (Tribolium castaneum, T. confusum)

140
The adults are elongated beetles, 3 to 4 mm long, red brown to dark brown in colour. The wing
cases are marked with finely punctured lines. Larvae and adults are secondary pests and attack
cereals and cereals products, groundnuts, nuts, spices, coffee, cocoa, dried fruits and
occasionally pulses. Infestation leads to persistent unpleasant odours of the products.
Khapra beetle (Trogoderma granarium)
The adults are oval beetles, 2 to 3 mm long, dark brown in colour often with blurry reddish
markings. The larvae are very hairy. They are common in hot dry areas. Damage is done only by
larvae feeding on cereal grains and products, groundnuts, oilseed cakes, nuts, pulses, etc.
Dried fruit beetles(Carpophilus spp.)
They are slightly flattened ovate to oblong beetles, 2 to 5 mm in length. The wing cases are short,
leaving part of the abdomen exposed. They are light brown to black in colour, but several species
have yellow or red markings on the wing cases. They are secondary pests; presence of these
beetles is an indicator of damp, mouldy conditions. Adults and larvae cause damage on poorly
dried cereal grains, cocoa, copra, oilseeds, dried fruit, vegetables, herbs and mouldy produce.
Moths
The potato tuber moth (Phthorimaea operculella)
Pupae of the potato tuber moth on potato tuber.
This moth is the most serious pest of potatoes in the region. It occurs in Africa wherever potatoes
are grown, and it also attacks tobacco, eggplants and tomatoes.
Caterpillars of the potato tuber moth are up to 12 mm long and feed as leafminers, causing silver
blotches on leaves, and bore into the petiole or a young shoot or main leaf vein and later into the
tuber. This causes wilting of plants. When eggs are laid on tubers, caterpillars begin feeding on the
tubers immediately upon hatching making long irregular black tunnels, which are filled with excreta
(faeces), where disease-causing microorganisms grow.
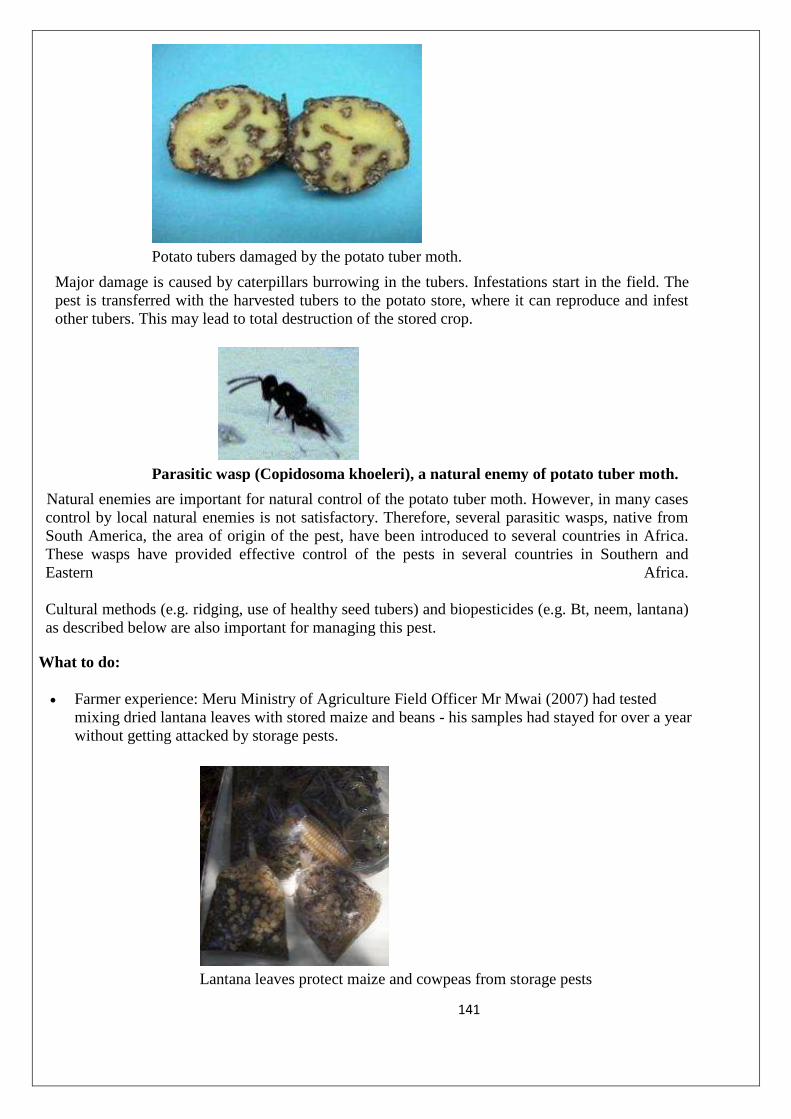
141
Potato tubers damaged by the potato tuber moth.
Major damage is caused by caterpillars burrowing in the tubers. Infestations start in the field. The
pest is transferred with the harvested tubers to the potato store, where it can reproduce and infest
other tubers. This may lead to total destruction of the stored crop.
Parasitic wasp (Copidosoma khoeleri), a natural enemy of potato tuber moth.
Natural enemies are important for natural control of the potato tuber moth. However, in many cases
control by local natural enemies is not satisfactory. Therefore, several parasitic wasps, native from
South America, the area of origin of the pest, have been introduced to several countries in Africa.
These wasps have provided effective control of the pests in several countries in Southern and
Eastern Africa.
Cultural methods (e.g. ridging, use of healthy seed tubers) and biopesticides (e.g. Bt, neem, lantana)
as described below are also important for managing this pest.
What to do:
Farmer experience: Meru Ministry of Agriculture Field Officer Mr Mwai (2007) had tested
mixing dried lantana leaves with stored maize and beans - his samples had stayed for over a year
without getting attacked by storage pests.
Lantana leaves protect maize and cowpeas from storage pests
142
Use healthy, clean seed, since infested seed tubers are the main cause of re-infestation in the
field.
Avoid planting in rough soil. Plant as deeply as possible (10 cm deep) and ridge at least 3 times
during the growing season. Experiments in Sudan showed that increasing the sowing depth from
2.5 cm practiced by farmers to 7.6 cm, significantly reduced damage by the cutworms and the
potato tuber moth and resulted in an increase of 3.7 t/ha in marketable yield (Siddig, 1987).
Compact hilling is very important to prevent moths reaching the tubers to lay eggs. For
caterpillars it would also be difficult to reach the tubers, and emerging moths from infested
tubers will be killed, since they are not able to penetrate so deep into the soil.
Provide enough water to prevent soil cracks.
Mulch the plants with rice straw and/or with leaves. Mulching with neem leaves during the last 4
weeks before harvest significantly reduced insect damage in Sudan (Ali, 1993).
Intercrop potatoes with hot pepper, onions or peas.
Harvest the crop immediately as it matures, as tubers left in fields for longer periods are highly
infested.
At harvesting, ensure that the tubers are not exposed to moths before they are properly protected
in the store. All harvested tubers have to be bagged and removed before late afternoon every
day.
Destroy all infested potatoes immediately and remove all plant residues from the field.
Caterpillars pupate in the tubers and dry stems left in the field.
Destroy all volunteer potato plants before planting new potato crops.
Use alternative pesticides to protect potatoes in store. Neem can be applied to reduce damage by
the potato tuber moth. For instance, in India a four months protection was achieved when
harvested potatoes and the covering material was sprayed with 5 and 10% enriched neem seed
extract (Saxena, 1995). In Sudan spraying neem seed and leaf extracts (1 kg/40 l water) and then
placing tubers in jute sacks reduced post harvest losses by the potato tuber moth compared with
traditional methods such as leaving the tuber unprotected or covering them with banana leaves
only (Siddig, 1987). Salem (1991) showed that a neem seed extract was effective for control of
the potato tuber moth on potatoes in a store in Egypt. Storage loss after 6 months in potatoes
treated with 100ppm neem oil was 25% (compared to 10% with the insecticide carbaryl). Adults
from larvae treated with neem oil were deformed. Work in Yemen confirmed the beneficial
effect of neem. Neem oil and sunflower oil halted the development of caterpillars of the potato
tuber moth in storage. However, caution is needed since the oil seemed to interfere with potato
respiration, leaving the potatoes very soft with dark tissue (Kroschel, 1995).
A Bt (Bacillus thuringiensis) preparation in powder form mixed with fine sand (1:25) dusted was
very effective in controlling this pest in the store in Yemen and Kenya (Kroschel, 1995) Tuber
infestation was also reduced by bedding the potatoes in the leaves of the Peruvian pepper tree
(Schinus molle), also known as mpilipili in Swahili, and Eucalyptus sp. (Kroschel, 1995).
Where this pest is present potatoes should be stored in layers with branches of lantana (Kenya
Institute Organic Farming), which repels tuber moth but does not actually kill it. Also
application of plenty of wood ash or diatomite earth may prevent rapid build up of tuber moth
Grain moths

143
Angumois grain moth on maize. The moth is small, pale brown, 5-7 mm long with wings folded,
wingspan 1-1.6 cm
Angoumois grain moth (Sitotroga cerealella)
The moths of the Angoumois grain moth are small (about 1 cm long with a wing span of 10 to 18
mm), yellowish or straw-coloured, and have a fringe along the posterior margins of the wings. They
can be observed flying around infested stores.
Female moths lay ovoid and pinkish eggs at night in clumps on the outside of cereal grains, in
cracks, grooves or holes made by other insects. Eggs are initially white turning red near hatching.
The larvae are caterpillars of dirty white colour and about 8 mm long when fully grown. Caterpillars
penetrate into and feed inside whole grains. They prepare a round exit hole for the moth, leaving the
outer seed wall only partially cut as a flap over the hole, resembling a trap door.
The adult pushes its way out through this "window" leaving the trap door hinged to the grain.
Infested grains can be recognised by the presence of these small windows. The adult lifespan may
be up to 15 days, and one female can lay over 100 eggs.
They are pests of whole cereal grains like paddy, sorghum, maize and wheat. Damage is similar to
that caused by weevils. This moth may also infest the crop in the field prior to harvest, and damage
can reach serious levels, before the grains are stored.
Storage moth (Ephestia cautella).
Storage moths or tropical warehouse moth (Ephestia cautella, Corcyra cephalonica, Plodia
interpunctella)
The main storage moths are the tropical warehouse moth (Ephestia cautella), the rice moth
(Corcyra cephalonica), and the Indian meal moth (Plodia interpunctella). These storage moths are
small (15 to 20 mm wingspan), greyish brown in colour with an indistinct pattern.
The moth of the Indian meal moth is distinctive with the outer half of the forewings a coppery-red
separate from the creamy inner half by dark grey bands.
Female moths lay eggs through holes in the bags. Larvae are elongated whitish caterpillars about 2

144
cm long. They feed on the seed germ, moving about freely in the stored foodstuff. They cause
extensive damage in cereal flowers and other milled products, but also in whole grains, mainly
feeding on the germ. They also attack nuts, groundnuts, dry fruit, cocoa, copra and other foodstuff.
The dense white cocoons of the pupae are often seen attached to the bag surfaces. Infestations are
characterised by aggregations of kernels, frass, cocoon and dirt caused by webbing, which
contaminates the foodstuff reducing its quality.
Fungi
Storage fungi include species of Aspergillus and Penicilium.
Storage fungi require a relative humidity of at least 65%, which is equivalent to equilibrium
moisture content of 13% in cereal grain. Storage fungi grow at temperatures of between 10°C to
40°C. Infection with certain species of fungi may already occur in the field, reducing considerably
the storage life of grains.
Infection with storage fungi can cause:
Loss of nutrients.
Discolouration of the grain.
Reduction of germination capacity.
Caking of grains.
Increase in the temperature of the stored goods up to spontaneous combustion.
Mouldy smell and taste.
Production of mycotoxins. These are toxic substances produced by various fungi under certain
conditions, which remain in the stored product as residues. They are highly poisonous to both
human and animals. The best-known mycotoxins are aflatoxin, ochratoxin, patulin and citrin.
Aflatoxins, which are produced by Aspergilum flavus are regarded as very dangerous substance
causing liver cancer.
Damage caused by fungi is often neglected until it has reached an advanced stage. However, it is
very important to prevent growth of fungi, since it is the only way of avoiding mycotoxins.
Mycotoxins are very stable and cannot be destroyed by boiling, pressing and processing. This
means that infected produce has to be destroyed. Mycotoxins can be found in the stored product as
soon as 24 hours after infection with fungus.
To prevent contamination by fungi, the produce must be properly dried, and any source of
moisture in the store should be avoided.
Storing Seeds and Grains - Principles of Preventive Storage Protection
1. Choice of variety and selection of healthy seeds
Select the most suitable seeds for planting. Indigenous seeds have been developed for hundreds of
generations and are well adapted to the areas where they are grown, whereas some modern
varieties are higher yielding but may be more susceptible to pests. There is a widespread
perception that modern, high-yielding varieties of maize may be more susceptible to storage pests.
These varieties often have open cob husks, allowing insects and birds to easily attack maize in the
field, whereas some of the traditional varieties have closed husks, thus effectively protecting the
crop from insect attack. The same have been observed with some sorghum varieties. Therefore, the
increased yield offered by some varieties should be weighed against the susceptibility to storage
pests, the expected period of storage and the price to be expected for grain of a particular damage
level. Efforts are going on to develop high yielding varieties with resistance to storage pests

145
Select the best seeds for next years planting avoiding damaged and sick looking seeds.
2. Choosing harvest time
If planting and harvesting is planned so that harvest falls in the dry season, there are no special
problems with drying the crop. Care should be taken when cultivating new high yielding and early
ripening varieties, since the harvest may fall in the wetter part of the year, and this may create
problems of storage.
Some storage pests (e.g. bean beetles, cowpea bruchids, the larger grain borer and some moths)
infest beans and grains in the field only when the crop is almost dry. Timely harvest can therefore
ensure that these pests are not carried into the store along with the beans or grain. Thus, timely
harvesting (avoiding late harvesting) significantly reduced infestation by the bean bruchid and
cowpea bruchids in Kenya (Olubayo and Port, 1997). As a rule, do not leave crops in the field
when they are ready for harvest, this increases the chances of infestation by some storage pests
3. Drying
Drying is an important procedure in storage protection. It prevents seed form germinating and
prevents attack by fungi. Some fungi can cause cracking of seed thereby making the seeds more
susceptible to pest attack. All seed must be dried to 12-13 % moisture in order to be stored safely.
To make sure the seed is properly dried put one seed or kernel in the mouth and chew. If it cannot
easily be cracked it is dry enough - if it crushes between the teeth it is not dry enough. This is
known as the tooth test..
Heat used for drying the produce will also kill larvae and chase away adults of insect storage pests.
Care should be taken to avoid overheating since excessive heat can damage seed or grains. Care
should be taken not to exceed the following temperatures: beans: 35 °C - seeds: 43 °C - cereals: 60
°C.
The following methods of drying are possible:
Seed can be spread out in the sun on a hard clean surface to dry for several days in dry weather,
until a seed cannot be bitten into when putting it in the mouth. The thickness of the layers of
cobs, panicles, pods or grains must not exceed 5 cm, and the seed must be turned regularly in
order to ensure good and even aeration. In the evening, the produce must be put in a pile and
covered.
Simple driers. Several designs of solar driers are available.
4. Sorting and cleaning the produce
Check whether the produce is infested by taking samples. Pay particular attention to cracks and gaps
where insects may hide. If the produce is infested, ensure it is stored separately (quarantine) and
treated in order to prevent the pests infesting clean produce. In case of heavy infestation discard
the produce. In case the produce is slightly attacked, heating to no more than 50°C can kill moths
and weevils; use a thermometer, as heating to any higher temperature will destroy the
germination capacity the seeds
Removal of infested grains or cobs and pests can also be done by hand, sieving, winnowing or
moving the grain (shaking, restacking). When using methods that merely separate the pests from
the stored product, ensure that the pests removed from the produce are killed to avoid
reinfestation.

146
5. Store location
Site stores away from any potential source of infestation. The grain and tuber moths are good
flyers and adults from infested stores often infest growing crops in the field. Separations of stores
from fields may help to reduce attack.
6. Characteristic of store
A good seed store must be airy, shady, cool and dry. Temperature variations should be as small
as possible, because it encourages condensation of water, which promotes fungal development.
Crops in the store should be protected against dampness rising from the ground, and the site
should be safe from flooding in the rainy season. The roof should have no leaks. Keep the
temperature and humidity as low as possible (perform controlled ventilation). There are
indications that storing grain in a dry place may help reduce infestation of grain moths.
Prevent pest entry by sealing the store (windows, doors, ventilation facilities) with insect-proof
gauze. In Malawi, plastering stores with mud to reduce water uptake was found to be effective
(Golob and Muwalo, 1984).
Hermetic, airtight storage at low humidity gives good protection against storage pests. However,
to avoid mould growth care should be taken to ensure that the produce is dry. This is particularly
applicable for long-term storage in warm dry areas. It is advisable however, not to store seed
grain for more than a few months. In conditions where the relative humidity is high, airtight
storage is not recommended due to the risk of mould growth.
Hermetic storage is useful for storing small amount of seeds or grains (e.g. to be used for
replanting); they can be stored in a strong airtight container with a close fitting lid (glass,
ceramic, strong plastic can be useful). Ceramic pots that do not have lids must be covered very
carefully or topped up with dry soot, ashes or fine dry soil.
Storage hygiene
Always keep the store and its surroundings clean. It has been said: "the most important, economic
and effective tool for storage hygiene is the broom". Before newly harvested crops are stored, the
store should be carefully prepared well ahead of time. Old stored products should be removed
and the room completely cleaned up. The whole building should be well aired and if possible
fumigated or disinfected (see store fumigation and disinfection below). The walls roof and floor
should be both watertight and rat proof, and small holes and cracks, which are potential breeding
places for storage insects, should be sealed.
Inspecting the store
Periodic inspection (weekly to fortnightly) and removal of any infested produce is essential. Check
for droppings and footprints of birds and rodents. Look for flying moths at dusk. Brush stacks of
bags with a stick or broom to disturb and discover resting moths. Lift bags in order to detect moth
cocoons along the line where bags touch each other.
When looking for beetles, pay particular attention to cracks, bag seams and ears where they often
hide. Empty individual bags in a thin layer onto a sheet and examine the contents for beetles and
larvae. This should be done in the shade so that the insects do not flee immediately.
Insects can be also be sieved out using a box sieve with a mesh of 1 to 2 mm. Identify the insect
found in order to perform the correct treatment. These measures should prevent the breeding of
carry-over insects from former crops. The surroundings should also be cleared to discourage easy
re-infestation by insects and rodents.

147
Infection with fungi can be detected by the mouldy smell, which is noticeable even before any
visual changes to the product can be seen. Pay attention to water marks on bags, which can be still
noticed after the bags have dried.
Store fumigation
Farmers in the Philippines as well as in Benin lit fires in which powdered chilli pepper is burnt
underneath grain stores once a month to keep away storage pests. One disadvantage is that the
smoke is very sharp and uncomfortable for human eyes and respiratory system.
Store disinfection
After the store has been cleaned completely and all old deposits of dust (possibly containing insect
eggs) has been removed, it is good practice to dust the whole store with diatomite earth, lime or
ashes as a further prevention of problems. Where larger grain borer has attacked the wood in the
construction, the wood should be treated with any of the approved wood preservatives or thoroughly
sprayed with kerosene, oil mixture to get rid of any surviving grain borers.
Modernised granary
Raised modernised granary with a high iron sheet roof
with old oil smeared on the lower side of the support poles
to prevent termite attack.
Traditional granary
Raised traditional granary with several
layers of thick grass and old oil smeared
on the lower part of support poles to
prevent termite attack.
Additives are useful to protect stored produce from pest attack
The use of mineral substances such as fine sand, clay dust, lime and wood ash cause invisible
injuries to the stored food pest leading to dehydration. They also fill the spaces between the grains,
making difficult for the pest movement and respiration. When using mineral substances the
amounts required are around 50 to 100 g per kg of stored product, except for sand, of which larger
amounts are required.
The addition of ashes, fine sand, lime, diatomite earth, and mineral or vegetable oils is particularly
useful for protecting small farm seed storage, or for storing small amounts for replanting.
However, this is not always practical for large quantities of seed in terms of labour required. For
larger amounts of grains and seeds it is often more practical to simply mix the seed with any strong

148
smelling plant material available to repel insects. Some plants such as pyrethrum and derris can
actually kill storage insects.
Wood ash
Wood ash either alone or mixed with powdered chilli pepper is an efficient method of pest
control. However, ashes may have an effect on the taste of the treated product. The success of
this method depends on the amount of ashes being added. Ashes at 2 to 4 % by weight of grain
is said to give 4 to 6 months protection if the moisture content of the grain is below 11%. Ashes
from casuarinas, derris, mango and tamarind are particularly suitable. Any other ash mixed with
powdered pyrethrum, Mexican marigold or syringa seeds will increase the protection against
insects. Ashes do not control the larger grain borer.
Lime
Mixing seeds with 0.3% lime have given good results in weevil control.
Sand
In districts where fine sand is easily available it can be used for protection of stored products. It is
best used with bigger seeds, the intention being that all the spaces between the larger seeds should
be filled by sand, which can easily be removed again by sieving. The more sand used the better,
but at least equal amounts of sand and seed should be used.
Bt. (Bacillus thuringiensis)
Bt in powder form mixed with fine sand is effective against potato tuber moth. It may also be
effective against grain moths as well. For more information see on potato datasheet
Vegetables oils
Oils of coconut, castor bean, cottonseed, groundnut, maize, mustard, safflower, neem and soybean
affect egg laying, and egg and larval development of stored pests. The addition of vegetable oil is
particularly useful in protecting legumes against pulse beetles (bruchids). Losses in pulses can be
prevented with the addition of 5 ml oil per kg of grain/seed. To be effective the seed must be
coated properly with oil. Sunflower oil is not very effective. The effect of oil treatment decreases
with time, so seeds stored this way should be treated again at any new sign of infestation. Small
seeds may loose some of their germination capacity after oil treatment. If neem seed oil or any
other non-food oil is used the bitter taste can be removed by immersing the seed in hot water for a
few minutes before food preparation.
Admixture of plant parts
Traditionally many different types of plant parts are used against store products pests.
Examples of plant materials that help protecting the stored grain/seed:
Plant names Plant parts Treatment
Aloe Whole plant
Parts dried, ground and dust mixed with the grain
Chilli peppers
Ripe, dried
pods with
Whole pods mixed with grain or dusted as powder on beans

149
The dosages of plant substances required are generally around 50 g per kg of
stored product (Gwinner et al., 1990).
ashes, dung or fine clay
Pyrethrum Flower heads
Pick on hot days. Dry in the shade. Crush to powder and mix with grain/seed.
Sunnhemp (Crotolaria)
Seeds Mix seed between gaps in stored larger size grains.
Datura (thornapple)
Leaves and stems (careful - seed are very poisonous)
Dry and mix with produce
Derris All parts Stored produce dusted or sprayed
Eucalyptus Leaves Layered or mixed with stored produce
Lantana sp. Leaves Crushed and placed among seeds
Syringa (Melia Azedarach)
Leaves, ripe seeds
Dried, powdered, mixed with stored grain using 2% if powder from seed, 4% if powder from leaves
Mexican Marigold
Whole plants
Add dried plants in layers, or mix in powdered plant or place 3-5 cm layer of crushed plants in base of grain bins
Spearmint Whole plant
4% leaf powder will give good protection for more than 4 months
Neem Leaves, crushed seeds and their extracts and oils
-

150
Module 5- Weed Control

151
Module 5- Weed control
Session 1 Weed control and vertebrate pests Duration 30 mts
What are weeds• Weeds are unwanted plants which compete
with cultivated plants for water ,nutrients , lights and Space.
6/7/2015 16N.A.KITTUR
What are Weeds
Picture

152
Definitions of weeds
• Anything that grows where they are not supposed to grow- what does it mean
• They compete with main crop for moisture, nutrients, light etc.
• Thus they reduce the crop yield• They are also act as alternate host for insects, pests,
diseases• They release harmful substance also in the also in the
soil• Crop loss can be 15-30 in farmers field• Reneder harvesting difficult
Control measures
• Mechanical - by equipment, hand and other mechanical equipment
• Cultural – by manipulation crop canopy
• Chemical- by herbicides

153
Characteristics of weeds
• Produce enormous quantity of seed- parthenium, wild oats 250/plant, wild amaranthus- 11 million
• On an average annual weeds produce 16500/plant
• They can survive drought stress
• Can germinate under stress conditions
• Grow at a faster rate than crops
• They are viable for very long time-upto 50 years
• How parthenium came to INDIA ?
Classification of weeds
• Most weeds are Antophyta ( angiosperms )
• Dicots and monocots
• Out of 250,000 sp of plants around 250 are regarded as weeds
• They are annual, biennial, perennial
• Most important are annuals as they compete with crops ( PICS )
• Perennials – Cynodon dactylon, S. spontaneum, cyprus rotunda( mutha )

154
Classification of weeds
• Most weeds are Antophyta ( angiosperms )
• Dicots and monocots
• Out of 250,000 sp of plants around 250 are regarded as weeds
• They are annual, biennial, perennial
• Most important are annuals as they compete with crops ( PICS )
• Perennials – Cynodon dactylon, S. spontaneum, cyprus rotunda( mutha )

155
Crop-weed competition
• Germinate same time as the crop and compete from day 1
• Initially both grow without competition• As both grow competition become fierce• Critical period is 15-60 DAS• Once the crop canopy covers the soil surface
there is very little damage – sorghum, cowpea, millets
• Weeds must be at low level during this critical period

156
Managing weeds
• Understand weed biology
• Prevention - cultural practices, clean seed, weed free seed ( post harvest), clean manure, control weed along irrigation canals as water spreads to fields
Eradication
• Complete removal by physical means
• May be costly as labour requirement can be very high
• Required with high value crops such as vegetables

157
Control
• Physical
• Chemical, cultural, biological
• Physical – hand pulling, hoeing, tillage, mowing, burning, flooding, smothering
• Implements require energy, back-breaking, labour intensive, time consuming, costly
• Tillage equipment behind a tractor – hoes, cultivators, tynes etc
Cultural
• Use quality seed with good germination so that crop growth is vigorous, faster
• Plant population in a row is higher
• Quick canopy coverage
• Some crops are ideal – Sudan grass, Sorghum, cowpea competes well
• Close row crops are better competitor
• Crop rotation to break the cycle

158
Chemical
• Large scale use of chemicals
• They are called herbicides as they kill weeds
• They are selective – do not kill the crop but kill the weeds
• Using biotechnology – e.g. roundup ready herbicide of Monsanto
Biological control
• Using natural enemies
• May be highly host specific
• Controlling Lantana by Teleonemia scruplosa
• Parthenium - Mexican beetle
• Aquatic vegetation – by Chinese carp
• Prickly pear – by Cochneal insects in Maharashtra and Tamil nadu

159
Integrated weed management ( IWD)
• Is an integrated approach just like IPM
• Combination of cultural, biological and chemical
• Again very crop specific
• Weeds also can add biomass into soil provided they are well integrated and decomposed before the next sowing

160
Crop weed competition

161
Vertebrrate pests:
Crops are also damaged by vertebrates
• Rabbits
• Rodents
• Nilgai – an antelope family
• Wild boar/pig
14CMSA training
From base of HimalayaTo KarnatakaPopulation in India around 1 lakhLarge scale damage in gangetic planCan be legally hunted in U.P
Nilgai
16CMSA training
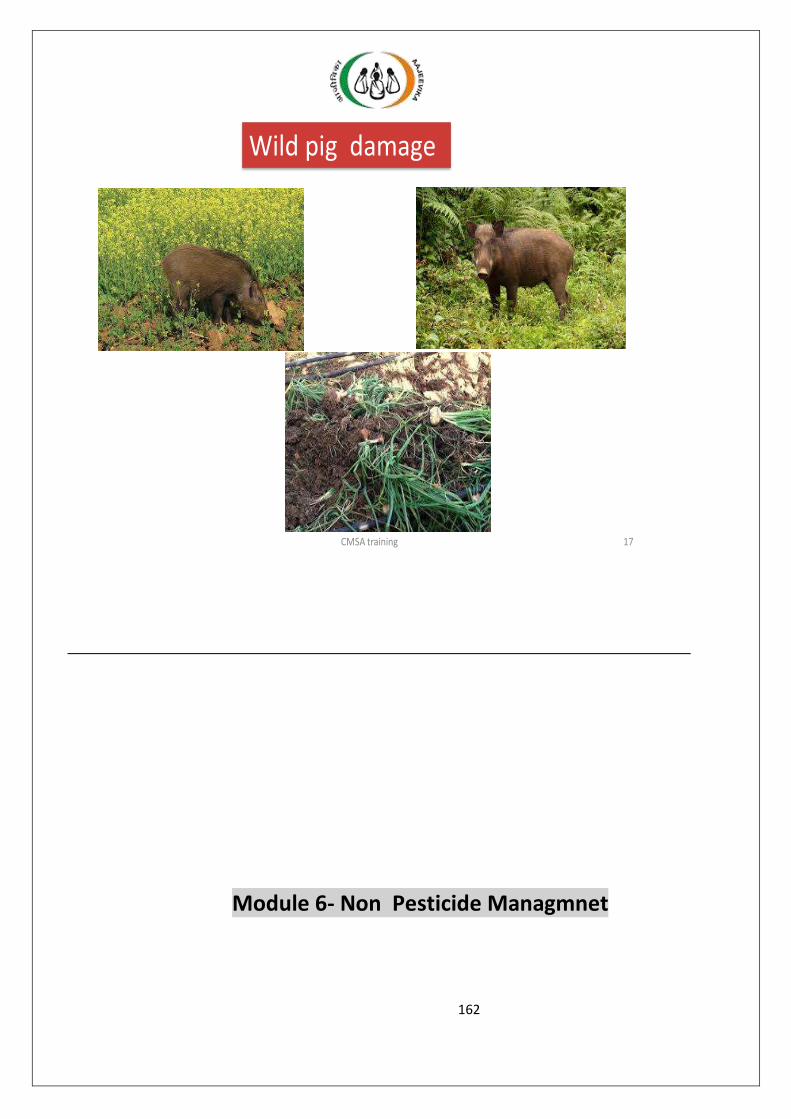
162
Wild pig damage
17CMSA training
Module 6- Non Pesticide Managmnet

163

164
Module 6- Non pesticide management
Session 1- Understanding insect pests
Duration-60 mts
Introduction:
Pests can be defined as .. WHAT IS PEST ? It is any living plant or animal which affects the normal growth of the cultivated crop for its survival and multiplication .Such as
Insects, Mites, Fungi, Bacteria, Virus , Weeds ,Nematodes, Rodents, Birds and Mamals.
Learning out come:
At the end of the session participants will be able to :
Define pests
Define insect pests
List the damage they cause
Demonstrate the life cycle of major pests
List some of the major insects of crops

165
What are pests and also friends• Pest• Insect• Type of damage caused by Insects• Classification of Pesticides• Insecticides • Natural Enemies / Farmers Friends
• Classification of Insecticides• Toxicity of Insecticides• Insecticide Application technology• Types of Nozzle• Factors affecting the rate of Insecticides• GOOD SPRAY SOLUTION FOR BETTER RESULT.• HSE
6/7/2015 N.A.KITTUR 2
PEST (hanikarak jeev or kantak)
WHAT IS PEST ?
It is any living plant or animal which affects
the normal growth of the cultivated crop for its
survival and multiplication .Such as
Insects, Mites, Fungi, Bacteria, Virus , Weeds
Nematodes, Rodents, Birds and Mamals.
6/7/2015 3N.A.KITTUR

166
Damage to plants
• Insects –
• Fungi/Bacteria
• Weeds
• Nutrients
Biotic Abiotic
•Weather.
•Rains.
•Temperature.
6/7/2015 4N.A.KITTUR
Damage plants by feeding on them . Holes. spots
Quality of Produce affected.
Reduction in yields.
Add to cultivation of cost.
Pest
Damage caused by Pests6/7/2015 5N.A.KITTUR

167
Insects• Out of 9,10,000species of animals 6,40,000 are
insects (73%)..
They are the largest group of animals in the Animal Kingdom
6/7/2015 6N.A.KITTUR
Insect
What is Insects ?
• They have definite characterstics ,like
• Body is divided into three parts Head ,Thorax ,Abdomen.
• They have 3 pairs of Legs and 2 pairs of wings.
• They under go Metamorphosis Egg ,Larvae Pupa and Adult.
6/7/2015 7N.A.KITTUR

168
Type of damage caused by Insects• Direct damage
• Sucking – Suck the sap of leaves and stem and cause Curling ,Yellowing ,Reddening and growth is affected. Aphids ,Jassids ,Thrips ,White Flies.
6/7/2015 8N.A.KITTUR
ChewingChew leaf stem or root portion causing holes ,
Skeletonize or destroy leaves. Ex. Grass Hopper,Beetles
6/7/2015 9N.A.KITTUR

169
Boring and Mining cause damage by boring or mining into the plants. Ex Stem Borer, leaf Miners.
6/7/2015 10N.A.KITTUR
• Indirect Damage –Some Insects transmits Virus
diseases from infected plant to healthy plants.
Some insects Secrets Honey dew like substance on which sooty mould developes interfering with Photosynthesis.
6/7/2015 11N.A.KITTUR

170
What are Mites • Mites are also insects and cause similar damage
as sucking insects but have four pairs legs and generally suck sap causing symptoms like reddening, bronzing and curling of leaves.
6/7/2015 12N.A.KITTUR
What are Nematodes• Nematodes are minute threadlike worms ,plant
nematodes generally live in the soil in large numbers infesting roots .Galls and Curling of plant part.
• Rodents – feed and destroy all type of grains at every stage right from the field to godown,warehouse, shops hotels and home.
6/7/2015 13N.A.KITTUR

171
Natural Enemies / Farmers Friends
6/7/2015 15N.A.KITTUR
AREA & PRODUCTION
N.A.KITTUR 176/7/2015
Definition of insect pest:
Any insect that can directly or indirectly injure, cause damage to any plant
Classification of Pests:
Pests are broadly classified into two categoriesbased on their feeding habits:
A. Sucking pests
B. Fruit and Shoot borers

172
Sucking Pests:
Sucking pests suck sap from the plant. Following are the important sucking pests:
Thrips (Thysanoptera) Plant/Leaf bugs, Lace Bugs Bug-like Insects Plant hoppers - Psyllids, Aphids, Whiteflies Mealybugs Scales Mites (Acarina) Spider mites, Eriophyid mites
Damage due to sucking pests:
Following are major damages due to sucking pests:
Plant distortion when they feed on juvenile tissues. Cells are damaged and as the leaves
and stems continue to expand they become distorted
Honeydew is a clear, watery excrement that is produced mainly by insects that feed in plant phloem bundles. Honeydew often promotes the growth of sooty molds. Cell feeding often produces tiny spots or speckles of yellow
Dead Spots - some sucking pests dissolve tissues within leaves or stems and this results in
dead spots, even on expanded plant parts.
Salivary secretions can clog vascular bundles, thereby stunting, discolouring or killing
plant parts outward from the clogged area
Tar spots - Sucking pests remove lots of liquids and little nutrients, they produce two types of diagnostic excrement –Tar spots are dark, shiny spots of resinous-like material
Sucking Pest life cycle:
Sucking pests complete their life cycles in four stages:
Adult: Winged fly. Duration is three to five days. Very active but can’t cause damage to plants.
Egg: Lays small eggs. Egg stage completes in 3-5 stages. Non movable. No damage
Nymph: Most active. Nymph stage completes in 7 – 10 days. Cause damage to plants.

173
Fruit and shoot borers:
Fruit and Shoot borers bores into young shoots and fruits. Following are the major fruit and shoot borers:
Brinjal fruit and shoot borer
Bhendi fruit and shoot borer
Cotton boll worms
Damage of Fruit and Shoot borers:
Larval feeding inside shoots result in wilting of the young shoot
The damaged shoots ultimately wither and drop off.
Reduce the fruit number and size
Destruction of fruit tissue – Unfit for marketing
Life cycle:
Fruit and shoot borers complete their life cycle in four stages:
Egg: Spherical in shape and creamy white in colour, present singly. This stage completes in 2-3 days.
Larva:Shows colour variation from greenish to brown. This stage completes in 40 - 50 days. Very active and damage plants
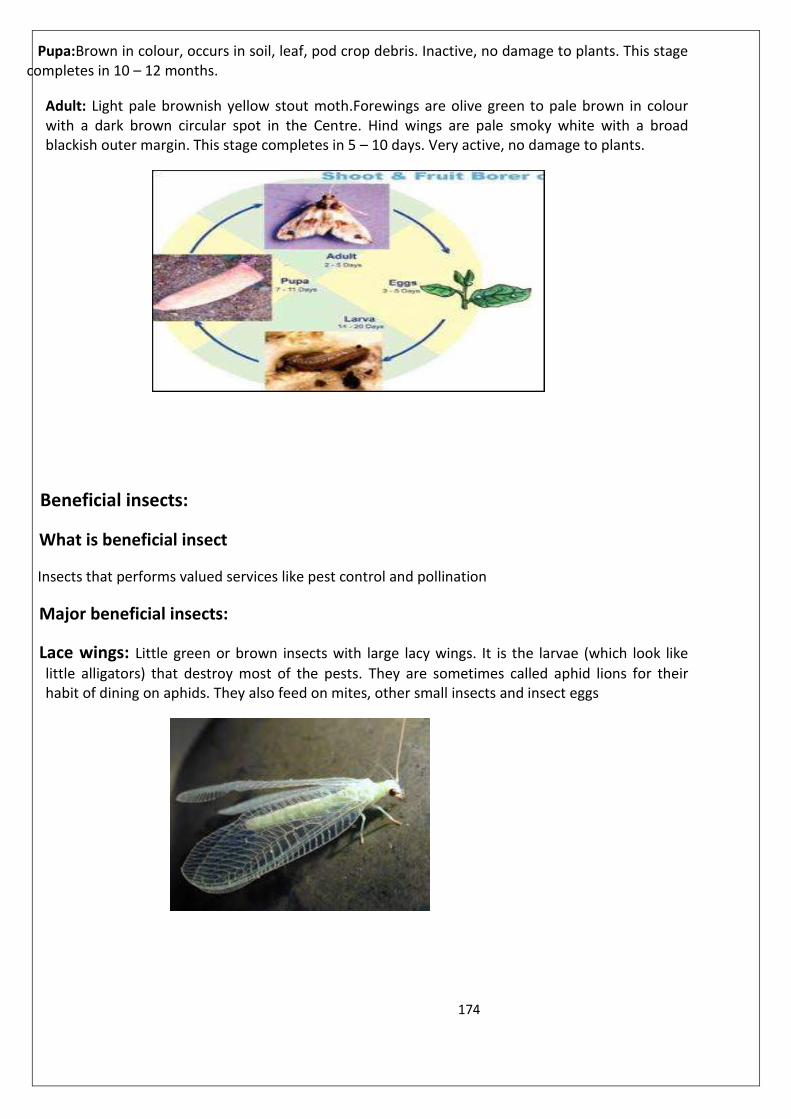
174
Pupa:Brown in colour, occurs in soil, leaf, pod crop debris. Inactive, no damage to plants. This stage completes in 10 – 12 months.
Adult: Light pale brownish yellow stout moth.Forewings are olive green to pale brown in colour with a dark brown circular spot in the Centre. Hind wings are pale smoky white with a broad blackish outer margin. This stage completes in 5 – 10 days. Very active, no damage to plants.
Beneficial insects:
What is beneficial insect
Insects that performs valued services like pest control and pollination
Major beneficial insects:
Lace wings: Little green or brown insects with large lacy wings. It is the larvae (which look like
little alligators) that destroy most of the pests. They are sometimes called aphid lions for their habit of dining on aphids. They also feed on mites, other small insects and insect eggs

175
Lady bird beetle: Young larvae, black with orange markings, eat more pests than the adults, and they can't fly. Yellowish eggs are laid in clusters usually on the undersides of leaves
Hover flies: Also known as syrphid fly, hover fly or flower fly. Adults look like little bees that hover over and dart quickly away. They lay eggs (white, oval, laid singly or in groups on leaves) which hatch into green, yellow, brown, orange, or white half-inch maggots that look like caterpillars. They raise up on their hind legs to catch and feed on aphids, mealybugs and others.
Wasps: The eggs then hatch, and the young feed on the pests from the inside, killing them. Braconid wasps feed on moth, beetle and fly larvae, moth eggs, various insect pupae and adults. If you see lots of white capsules on the backs of a caterpillar, these are the braconid cocoons--leave the dying caterpillar alone
Ichneumonid wasps control moth, butterfly, beetle and fly larvae and pupae.
Trichogramma wasps lay their eggs in the eggs of moths, killing them and turning them black.
Tachinid flies: Parasites of caterpillars. Adults are 1/3 to 1/2 inch long. White eggs are deposited on foliage or on the body of the host. Larvae are internal parasites, feeding within the body of the host, sucking its body fluids to the point the pest dies.

176
Damsel bugs: Predators as adults and larvae, feeding on caterpillar and other pests
Ground beetles: Adults consume gross hopper eggs, eggs, aphids, caterpillars, and other soft bodied insects. Adults also may feed on pollen and nectar.
Plants that attract beneficial insects:
Beneficial insect Plants attract
Lace wings Coriander, Sun flower,
Lady bug Coriander, Marigold

177
There are certain plant species which attracts beneficial insects. Following table shows beneficial insects and plants attracts them:
Hover flies Coriander, Marigold
Wasp Coriander, Marigold
Tachinid flies Buck wheat

178
Module 6- Non pesticide management
Session 2 Concept of ETl and surveillance
Duration 30 mts
Introduction
Pest Surveillance
One of the basic requirements in managing pests is constant vigil and surveillance, monitoring of biotic
and abiotic components of the crop ecosystem to assess or predict pest outbreaks. Implicit in this
concept is the principle of economic threshold level, the point at which pest control is initiated.
The use of precise monitoring techniques coupled with accurate economic threshold levels allows the
most effective and efficient use of pesticides. The approach is essential to minimize costs, to maintain
stability of the agroecosystem, and to reduce the amount of pesticides released into the environment.
However, pest surveillance should not be concerned with pest incidence only. It should be used as a tool
to determine the factors which actually cause pest occurrence.
Uses of pest surveillance
1. Surveillance is important for predicting pest outbreaks.
2. The degree of success of the plant protection measures will largely depend upon an effective pest
surveillance and monitoring programs.
3. By sampling immature stages of insect/pests, it is possible to forecast the numbers of pests expected
in the later stages and spray dates are determined so that the first larvae are destroyed.
Surveillance methods
a) Systematic sampling
Taking samples in the alternate rows and beds, depending upon the size of the plot and the number of
rows, it can easily be decided about the rows and beds in which the sampling can be done.
b) Diagonal fashion

179
The person should start taking samples from one corner and walk diagonally taking samples from alternate
beds. Once the samples are taken in one diagonal line, samples should be taken from the nearest other
corner. The percentage of pest incidence and the number of pests per plant are to be calculated.
Figure 7. Surveillance crew in a groundnut field. Figure 8. A pheromone trap in groundnut.
Figure 9. Observation for thrips on groundnut. Figure 10. Surveillance data sheet.

30
Protection Levels
o Economic protection
Followed for trials protected to avoid moderate or bulk damage. These trials are sprayed only
when severe infestation cause economic damage affecting the progress of further research.
o No protection
Related to trials which are not sprayed at all.
Timing of spray application
Pesticides are frequently applied as a prophylactic or on a fixed calendar schedule irrespective of the
occurrence or level of the pest population. However, fewer applications are needed if they are timed
more accurately and this will reduce selection pressure for resistance. A routine pest assessment is
required, preferably aided by a pest forecast of the probable level of infestation, to avoid fixed
schedules.
i) Economic injury level. It is the lowest population density that will cause economic
damage. ii)
ii) Economic threshold. The population density at which control measures should be
applied to prevent the increasing pest population from reaching the economic
injury level.
Apart from counting the number of insects in a crop, various trapping techniques can be used to
sample populations, e.g., pheromone traps, light traps, and attractant (such as fishmeal) traps.
Time of sampling and the stage of the life cycle sampled are most important. Detection of
eggs is most important to avoid delay in taking the appropriate control measure.
Some larvae are very difficult to find untilthey reach the third or fourth instar while others feed
inside plant parts. A pesticide application should be done early, at the start of an infestation of first
instar larvae, otherwise less control is achieved.

Module-6-NPM Session 3 Ill effects of pesticides
Duration – 60 mts
Efffects can be classified as follows:
Acute effects (direct, short-term)
Chronic effects (indirect, long-term)
Acute effects (direct, short-term):
5 million agriculture workers suffer poisoning every year, and about 20.000 are killed by pesticides (accidental).Very often caused by Organophosphates (Parathion). Poisoning can occur by farm application and by eating contaminated food.
Chronic effects (indirect, long-term):
Even very low levels of pesticide can cause health problems, as they can accumulate within the organism.Pesticides exposure have been linked to:
A. Neurological problems (OP)
B. Cancer
C. Reproductive problems (endocrine disruptors, OP)
A. Neurological problems:
Many Organo Phosphates (OP) interfere with the neurological system. OP have been linked with depression, cognitive problems especially in children, poor learning capacity.
B. Cancer:
Many pesticide are clearly recognized as carcinogenic, substances that can greatly increase the chances of suffering cancer (Vinson et al 2011). The risk of lymphoma and leukaemia increased significantly in exposed children when their mother was exposed during pregnancy. Therisk of brain cancer was correlated with paternal exposure either before or after birth.The incidence of brain cancer was influenced by the father's exposure to pesticides.
C. Reproductive problems:
Certain pesticides mimic hormones, these are endocrine disruptors. Data suggests that endocrine disrupting chemicals could be implicated in the rise of human reproductive abnormalities. Reduced male fertility, testicular cancer, low sperm numbers and quality have all been linked to long-term exposure of some pesticides.

The indirect toxicity related to two principles:
Bioaccumulation – the tendency for a compound to accumulate in
an organisms's tissues (especially in fatty tissues for fat soluble
organochlorines such as DDT) and
Bio magnification – an increase in concentration up the food chain.
Movement of Pesticides in the environment:
Pesticide residues can move very far distances in air, in water (rivers, lakes, sea), in groundwater (aquifers, wells), in trophic web (zooplancton, etc)
Pesticide atmospheric transport:

From coastal banana plantations in the Caribbean to high mountain cloud forest in Costa Rica.
Same as natural reserves can be polluted, so organic products grown without chemicals.
Environmental Impacts:
A. Loss of biodiversity:
Global amphibian decline
Declined in bee populations
B. Fisheries losses:
Endangered Pacific salmon
C. Groundwater pollution
D. Loss of biological control of pests:

Pesticides might harm pest’s natural enemies. Chinese scientists have recently shown that the majority of 14 commonly used insecticides had a drastic lethal effect on a beneficial wasp that helps pest control in rice (Wang et al., 2008). Even after 7 days after insecticide application, residues were killing this beneficial wasp.
E. Resistance to pesticides:
In the beginning, most pests were sensitive to DDT but a few were resistant. The resistant forms survived and reproduced. In the end, most pests were resistant to DDT

Module 6- NPM
Session 4-Non Negotiables for Paddy and other frainfed crops:
Duration-45 mts Deep summer ploughing: Summer ploughing exposes the pupae surviving inside the soil.
Depth of ploughing should be more than 6 inches.
Exposed pupae will die due to excess heat (or) eaten away by birds
When: May – June Immediately after the first showers
Why: To expose Pupae or larva to scorching sun and birds
How: Deep plough upto six inch depth
Community bonfires: Immediately after the first shower (one inch rain fall) mass bonfires in
the fields attract adults of Red hairy caterpillars particularly
When:Immediately after the first rains – evening between 6 -7 PM
Why:Adult insects will attract to the fire and will die
How: All farmers in area should go for fires in their fields on the same day
Seed treatment:
A. Take 2 lts. of Cow urine, 1 kg of cow dung and 1kg of live soil (putta matti) mix
thoroughly with seeds and dry in shade for 1 hour, later these seeds can be
sown in nursery bed
B. Dip the paddy seedlings in solution consists of 2 lts of cow urine, 1 kg. of cow
dung, 1 kg of soil, 105 gms of Acetofida and10 lts. Water
When: Before Sowings
Why: Prevent seed borne pests and diseases
How: Bheejamruth or any other botanical extract recommended for seed
treatment
Clipping of the tips: Cut seedling tips while transplanting into the main field. This will
prevent Stem borer attack as Stem borer lays eggs on the tips of the leaves.
When:Just before transplanting
Why: To prevent stem borer attack
How: Cut the tips of the plants
Alleys: Leaving 1 feet path at every 2 mts interval in East –West direction will
avoid attack of Hoppers
When: During transplanting

Why: Prevent white fly infestation How: 1 feet path at every 2 mts interval in East –West direction
White and Yellow sticky traps: Arrange 15-20 Yellow and White sticky traps per acre. Green
leaf hoppers and thrips stick to these traps. Clean these traps once in two days and add
sticky material to traps for effective trapping. Height of these traps should be the same with
the plant height
When: After transplantation Why: Reduce sucking pests How: Paste glue or castor oil on white and yellow plates keep them at plant height
Bird perches: Arrange 10-15 bird perches per acre immediately after transplanting and
remove these at grain filling stage (60 days after transplanting). Bird perches will attract
birds and birds will eat pests. Broad costing of yellow rice will attract more birds. Height of
bird perches should be more than the height of plants
When: 10 -15 days after transplantation Why: Birds will sits on the perches and will eat larvae How: Place 10 -15 perches per acre above the plant height
Pheromone traps: Keeping 5-10 Pheromone traps in zigzag way to mass trapping of Stem
borers. Lure has to be changed once in a month or after the expiry date
When: One month after transplantation Why: To prevent stem borer How: Place 10 -15 pheromone traps per acre above the plant height
Application of Botanical extracts: If all the above mentioned principles are followed
religiously, there will not be any need to apply botanical extracts. However list of pests and
botanical extracts
NPM for Rain fed Crops:
Deep summer ploughing: Summer ploughing exposes the pupae surviving inside the soil.
Depth of ploughing should be more than 6 inches. Exposed pupae will die due to excess heat
(or) eaten away by birds
When: May – June Immediately after the first showers Why: To expose Pupae or larva to scorching sun and birds How: Deep plough upto six inch depth
Community bonfires: Immediately after the first shower (one inch rain fall) mass bonfires in
the fields attract adults of Red hairy caterpillars particularly
When: Immediately after the first rains – evening between 6 -7 PM Why: Adult insects will attract to the fire and will die How: All farmers in area should go for fires in their fields on the same day
Growing of trap crops: Grow yellow flower Marigold (tall growing plants are preferred) and
Castor around field, ensure flowering before main crop completes vegetative stage
When: Along with main crop sowings

Why: To attract pests – these plants will provide space for laying eggs
How: Crisscross – cover entire field
Border crop: Sow 3 rows of tall growing Jowar or Bajra or Maize (without any gap in the
row). This will provide enabling environment for friendly insects and it also prevents
When: Along with main crop sowings Why: To attract friendly insects, prevent pesticide drift from neighbouring fields How: Two rows around the field
Seed treatment: Take ½ lt. of Cow urine, 250 gms of cow dung and 250 gms. of living Soil
(putta matti) mix thoroughly and mix to 5-6 kg seeds, after thorough mixing dry in shade
When: Before Sowings Why: Prevent seed borne pests and diseases How: Bheejamruth or any other botanical extract recommended for seed treatment
White and Yellow sticky traps: Arrange 15-20 Yellow and White sticky traps per acre. Green
leaf hoppers and thrips stick to these traps. Clean these traps once in two days and add
sticky material to traps for effective trapping. Height of these traps should be the same with
the plant height
When: After transplantation Why: Reduce sucking pests How: Paste glue or castor oil on white and yellow plates keep them at plant height
Bird perches: Arrange 10-15 bird perches per acre immediately after transplanting and
remove these at grain filling stage (60 days after transplanting). Bird perches will attract
birds and birds will eat pests. Broad costing of yellow rice will attract more birds. Height of
bird perches should be more than the height of plants
When: 10 -15 days after transplantation Why: Birds will sits on the perches and will eat larvae How: Place 10 -15 perches per acre above the plant height
Pheromone traps: Keeping 5-10 Pheromone traps in zigzag way to mass trapping of Stem
borers. Lure has to be changed once in a month or after the expiry date
When: One month after sowing Why: To prevent pests like fruit and shoot borer in Brinjal and diamond back moth in cabbage How: Place 10 -15 pheromone traps per acre above the plant height
Application of botanical extracts: If all the above mentioned principles are followed
religiously, there will not be any need to apply botanical extracts. However list of pests and
botanical extracts

Module 7- Disease management

Module 7- Disease
Management
Session-1- Understanding disease
Duration-45 mts
What is disease?
The term disease is usually used for the destruction of live plants
Causative organisms:
Plant diseases are caused by microorganisms such as fungi, bacteria and viruses
Disease triangle:
In order for a disease to develop, there must be a suitable host plant, an infectious pathogen
(microorganism that causes the disease), and a suitable environment.
Learning outcome
At the end of the session participants will be able to:
Define disease
What ccauses disease in plants
Varioous sympotoms of disease
Major dideases of crop lants
Non chemical contro of disease

Dissemination of Diseases:
Any environmental factor that favors the growth of parasites or disease transmitters or that is unfavorable to the growth of the plants will lead to increases in the likelihood of infection and the amount of destruction caused by parasitic disease. Parasitic diseases are spread by dissemination of the agent itself (bacteria and viruses) or of the reproductive structures (the spores of fungi). Wind, rain, insects, humans, and other animals may provide the means for dissemination. Symptoms of Diseases: Most names for plant diseases are descriptive of the physical appearance of the affected plant. Fungal diseases: Most plant diseases – around 85 percent – are caused by fungal or fungal-like organisms. Following are symptoms of a fungal disease:
Birds-eye spot on berries (anthracnose)
Damping off of seedlings (phytophthora)
Leaf spot (septoria brown spot)
Chlorosis (yellowing of leaves)
Bacterial diseases:
Following are the major symptoms of bacterial diseases:
Leaf spot with yellow halo
Fruit spot
Canker
Crown gall
Sheperd’s crook stem ends on woody plants
Viral diseases:
Following are the symptoms of Viral diseases:
Mosaic leaf pattern
Crinkled leaves
Yellowed leaves
Plant stunting
Symptoms of Major diseases:
Blight: Blights are the general and rapid destruction of the growing succulent tissues like leaves, shoots, twigs and blossoms. The blighted tissue often gives the appearance of tissue being burnt with fire.

Leaf spot:These are the localized lesions produced on the leaves of the host plants as a result of pathogen infection
Blasts:
Necrotic lesions are visible on the leaves, nodes, and at the base of heads (in case of rice).
There is rapid browning and death of the tissues.
Cankers: The localized necrotic lesions are sunken and surrounded by successive layers of
cork cells.
Scab: These are the localized lesions which are due to the slightly raised and cracked outer
layer of the fruits, leaves or tubers etc. the cracked tissue becomes dry and corky

Anthracnose:
It is a type of disease in which dark necrotic, sunken lesions are produced on mainly leaves,
fruits and stem. The fungal pathogens produce their spores in the asexual fruiting body
called acervulus.
Blotch: These are usually large, irregular shaped spots on the surface of the plant leaves,
stem or flowers. At initial stages, when new leaf arises these may appear as small red or
purple colour, circular spots on upper surface and later on lower. On maturity the spots on
the upper surface are usually glossy dark purple and those on the lower are chestnut brown
color.
Dieback: It is the progressive and extensive death of the shoots and roots that starts from
the tip of the shoots

Damping off: The young or seedlings collapse at the back due to pathogen attack before or
after the germination. Older plants are seldom killed by damping off but there is definite
reduction in size and growth pattern and hence yield is reduced.
Root rot: The disintegration and decay of the tissues of roots by various fungal pathogens
Galls: Abnormal growths (swollen/raised tissues) formed by the interaction of the certain
fungi on the host leaves, stems, roots or flowers
Warts: Hard, benign protuberances (called warty excrescences) produced on the stems or
tubers and caused by fungal or viral pathogen

Leaf curling: Easily distinguishable symptoms like distortion, discoloration and curling of the
leaves due to fungal pathogen (Taphrina deformans). In the early stages the leaf show red
colouration, thicker and softer than normal mature leaves
Wilt: In case of fungal attack the vascular bundle is blocked out by the pathogen and results
in the loss in turgidity and drooping of the leaves and shoots of the plant. Wilting due to
pathogen attack is permanent. Most common vascular wilts are caused
by Fusarium and Verticillium
Rusts:This is a disease characterized by rusty appearance on the leaves and stems of the host
plant

Smuts: It is a disease characterized by masses of dark, powdery spores
Mildew: Presence of whitish mycelium and fructification covering the areas on leaves, stems
or fruits. If the whitish mycelium is present on the upper surface it is called Powdery
Mildew and if it present on the lower surface of the leaf it will be Downy Mildew
Downy Mildew Powdery Mildew
Ergot:The grains in the heads of the cereals are replaced by black or purple coloured
sclerotia (ergot fruiting body) of ergot fungus Claviceps purpurea, just before the harvest

Module-7-Disease management
Selection of Seed:
Seed should be free from diseases and should select resistant varieties
Incorporating weeds:
Weeds and other voluntary plants should incorporate into soil
Reduce/no chemical fertilizer usage:
Reduce (or) avoid chemical fertilizers to prevent diseases. Avoid application of Nitrogenous
fertilizer during cloudy days
Crop rotation:
Rotate crops particularly with pulses to prevent disease spread
Sanitation of Field:
For all crops and numerous diseases of these crops, straw is the primary source of future inoculum. Incorporating this residue into the soil by tillage hastens the destruction of the pathogen by beneficial fungi and bacteria. In addition, diseased plant material which is buried under the soil surface prevents future movement of the spores by wind.
Planting Dates and Rates:
Susceptible cultivars of some crops may escape significant damage from disease by planting at a time which avoids exposure to inoculum and thus severe infection. Certain diseases can be controlled by early seeding. The aphids that transmit this disease do not arrive in significant numbers until early summer. Younger plants, which would have been seeded later, are more attractive as food to aphids.
Botanical extracts for Pest and Disease Management
5% Neem Seed Kernal Extract: “Azadiractin” present in the Neem will effect on different stages of the pest life cycle.
It will act through stomach and contact
Required materials: Neem seeds – 5Kgs
Surf – 100grs
Session 2-Non chemical Disease Management
Duration – 60 mts

Preparation: 5Kgs of Neem seeds dried under shade with good quality can be powdered
This powder canbe packed in cloth and keep in 10lts of water for 10-12 hrs
Extract the decoction by pressing the cloth pack for 10-15mints
Filter this solution through a thin cloth
Add 100grs of surf to the filtered solution
Add 100lts of water to the solution and spray it in 1acre during evening time
Note: 10-15Kg of Neem powder is required (depending on the crop stage and pest intensity)
Shouldn’t store the solution
Depending on the crop stage and intensity increase the dosage
This solution can be used in all crops and nurseries
This solution can be used in orchards to get better yields
Instead of surf we can use soap nut of 500grs
Uses of Neem Seed Kernel Extract: It affects egg and larva stages. Larvae can feed on the leaves, as the leaves tastes
bitter
“Azadiractin”, which is present in the Neem, affects the lifecycle of the pests. The pest
will die as larvae or pupae
This solution will not affect human health, friendly insects and environment
“Lemonades” present in Neem will help in keeping the crop healthy
Chillie Garlic Extract:
Alkaloids viz Capsaicin and Allesis present in chillies and garlic will act through contact.
These will create tingling to the insect and insect will fall from the tree and die
Materials required:
1. Green Chillies - 3 Kgs
2. Garlic - 1/2Kg
3. Kerosene - 250ml
4. Surf - 100gr
Methodology:
1. Grind the chillies after removing the petioles and add 10lts of water to it. Keep this solution throughout the night.
2. Grind the 1/2 kg garlic and add 250 ml kerosene keep it for a night
3. Next day morning filter the chilli solution through a thin cloth
4. Do the same for garlic solution

5. Mix chilli solution, garlic solution and surf powder thoroughly and make a mixture
6. Add 100 lts of water to the above solution. This can be applied for one acre
Precaution: Apply oil to your body while preparing this decoction
Cover your body while spraying
Apply this solution only one or two times in a cropping season
Dont store the solution
10% Vitex extracts:
Take 10Kg of Vitex leaves and boil it for 30mints and make it cool. Add some soap nut
solution to it. Add 1000 – 150 lits of water to it and is can be used for one acre. This will
prevent many diseases in Paddy and other crops.
Agniasthram:
Can be Use against stem and fruit borers Take 10 L cow urine in a big container. Add 1 Kg ground Tobacco leaves, 5 Kg ground Neem leaves, 1 or 2 Kg of ground green
chillies, ½ Kg ground Garlic and boil till it simmers. Let the contents cool for 48 hours. Filter through a cloth and mix 2- 3 L of the decoction with 100 L of water before spraying in the field.
Neemasthram:
Can be Use against small and sap sucking pests Mix 5 Kg of ground Neem leaves or 5 Kg of dry leaves or fruits into 100 L water. Add 5 L cow urine and 1 kg cow dung to this mixture and mix well. Let it ferment for 24 hrs and filter througha cloth. Spray in the fields.
Brahmaasthrm:
Required Material:
Cow urine 10 to 15 liters
Neem leaves 3 kgs
Custard apple leaves 2kgs
Castor leaves2kgs
Pomgamia leaves 2kgs
Lantena leaves 2kgs
Papaya leaves 2kgs
Dattura leaves 2kgs
Guava leaves 2kgs
Bitter gourd leaves 2kgs

Preparation:
Take any of the five varieties leaves of mentioned above
Take 10 -15 ltrs of cow in a vessel
Grind any of the 5 leaves separate leaves
Add these in to the vessel and boil them for 5 times.
Allow it to cool for 48 hours
Then add 2 to 2.5 ltrs of brahmasthram to 100 liters of water to spray on once acre.
Botanical extracts for Disease Management:
Dried Ginger – Milk Extract:
Can be Use against all kinds of diseases
Dried Ginger Powder : 200 gm
Water : 2 L
Cow or Buffalo Milk : 5 L
Buttermilk can be substituted for milk
Mix dried ginger powder with 2 L water and boil till the contents become to a liter. Boil milk in another container. Cool both the contents and mix. This makes a decoction
Note:
This decoction should be used on the same day and cannot be stored
Mix the decoction in 200 L of water and spray per acre of crop
Sour Butter milk solution:
Fermented butter milk is mixed in water and sprayed. Good results can be obtained when sprayed in early stages of cotton.
Cow Dung Urine Asetofida solution:
Mixing of 200grs of Asafoetida in cowdung and urine make it strong fungicide.This
solution is effective against Blast in Paddy.
It is also effective against Bacterial diseases in Paddy
Presence of Sulphor in Asafoetida make this solution as fungicide
Panchagavya:
Panchagavya is a growth regulator produced from a combination of five products obtained from the cow along with a few other bioproducts. Collect fresh cow dung (5 kg), mix it with ghee (1 litre) and keep it in a plastic barrel separately for three days. On the same day, mix the other ingredients, namely cow urine (three litres), cow’s milk (two litres), curd (two

litres), yellow banana (400 gm, without skin), coconut water (three litres), jaggery (one kilo dissolved in three litres water) in a plastic barrel separately. Filter the jaggery solution before adding it to the other ingredients. On the third day, mix the contents of both the barrels and leave them aside for seven days. Stir the contents with a wooden stick twice aday. After seven days, filter the product with a khada or terracot (TC) cloth and store it in closed containers. (Pierce small holes in the cap of the containers to prevent bursting.) This is diluted @ 300 ml/10 litres water and sprayed.
Seed treatment
Seed borne infestation of insects and diseases pose devastating consequences to crop production. The concept of seed treatment is the use and application of biological and chemical agents that basically can control or contain primary soil and seed borne infestation. This helps to improve crop safety which in turn leads to good establishment of healthy and vigorous plants which results in better yields. The benefit of seed treatment leads to increased germination and ensures uniform seedling emergence. As already seen it protects seeds and seedlings from early season diseases and insect pests thereby improving crop emergence and growth. Treating seeds with Rhizobiumalso enhances the nitrogen fixing capability of legume crops and their productivity. Overall seed treatment leads to improved plant population and thus higher productivity. It is estimated that 80% of the seeds sown in our country is untreated as against 100% seed treatment practice in developed countries. Seed treatment also gives protection to the emerged seedlings from sucking insect pests.
General Seed Treatment Techniques:
• Smear all types of seeds with a paste of ash and water and dry it under the sun before sowing.
This will control the seed borne diseases and enhance seed vigour and germination percentage
• Treat the seeds with butter milk (125 ml / kg of seeds) to prevent fungal diseases in crops
• Mix the seeds of cereals, legumes and cotton in cactus (Euphorbia neriifolia) milksolution (100 ml in 1 litre of water) and dryin darkness for 8 hours before sowing. Thiswill enhance the protection from stem borerlarvae, termites and other pests
Mix Vitex, Tulsi and Pongam leaves extract (pound 3 kgs of each leaves and extract) with fresh cow dung solution and soak 25 kg of paddy seeds tied in a gunny bag in this solution for 12 hours. Seeds should be shade dried for half an hour before sowing. This will produce healthy and disease resistant Seedlings.
Note: 3 kgs of each of the leaves should be collected and pound. This should be added to 1 litre of water and the extract is filtered. Thisshould be added to fresh cow dung extract (5 kg cow dung in 15 litres of water)

Seed Treatment for Improved Germination:
Dry seeds in bright sun light (between 12.00 p.m. to 1.00 p.m.) for half an hour before sowing to improve the germination and seedling vigour
Soaking the seeds in cow dung extract enhances the germination capacity. Take ½ kg of fresh cow dung and 2 litres of cow’s urine and dilute with 5 litres of water. Soak 10 - 15 kg of seeds that are previously soaked in water for 10 - 12 hours, in this cow dung extract for 5 - 6 hours. Dry the seeds in shade before sowing in the nursery
Botanical extracts for Seed treatment:
Beejamruth:
Ingredients:
Cow dung 5 kg
Cow urine 5 lit
Cow milk 1 lit
Lime 250 gm
Water 100 lit
Mix all the ingredients and keep overnight. Sprinkle the formulation on seeds to be sown, then dry in the shade before sowing.
Seed treatment with Cow Urine:
Required materials: Cow urine – 2 lts (preferably buffalo’s urine which can effectively control fungal
diseases)
Cow dung: 1 Kg
Mond or live soil: 1 Kg
Mix all the above mentioned materials with seeds and allow them for drying up to one
hour.
Note: This method is suitable for the crops with seed rate of 30-60Kgs, e.g., Ground nut
Seed treatment with raw milk for viral diseases:
For any variety of seed spraying of cow milk and water mix with 1:9 ratio and drying
under shade will be beneficial
Cow dung urine solution for fungal diseases:
Large number of microbes present in the cow dung and urine which are useful for
controlling many fungal diseases
Nutrients present in the solution are useful for effective plant growth
This can be applied for two to three in a crop period
Required material:

Cow dung – 5Kgs
Cow urine – 5lts
Lime – 150grs
Preparation: Store 5Kg cow dung, 5lts of cow urine and 5lts of water in a tub
Cover the tub and allow the solution for fermentation for 4days
Stir the solution with a stick every day
After 4days filter the solution and add 150grs of lime to it
Add 100lts of water to the solution to spray it in 1 acre
Precautions: As this solution is thick use a mesh or gunny bag to filter the solution(first time)
After that add water and filter through a thin cloth
We can store the solution for 1 or 2 days (farmers experience)
Note: This solution will improve the resistance power of the crops
Spraying of this solution will improve the drought resistant capacity
Trap crops
Trap crop is a crop which attracts pests more than the main crop. Pests prefer trap crops for feed or oviposition. Pests are either prevented from reaching the main crop or concentrated in certain parts of the field away from the main crop. The principle of trap crop relies on pest preference for certain crops or stages of crop growth. Two preliminary techniques used in trap crops are:
A. Selection of more preferred species
B. Planting of the same crop before the main crop so that preferred stage of the
development will arrive earlier than the main crop
Advantage of trap crops:
Lessens the usage of pesticides 1. Preserves natural enemies
2. Enhance biodiversity
3. Increase productivity
Types of trap crops:
Trap crops can be classified based on spatial distribution and characteristics of trap crop.
Based on characteristics of trap crop: A. Conventional trap crop: It is most common practice. These plants are preferred fro
oviposition Growing of trap crops next to the main crops. Ex: Castor and marigold in
Ground nut crop
B. Dead end Trap cropping: Trap crops which are highly attractive to insects but they or
their offsprings can’t survive. Ex:Indian mustered for Cabbage diamond back moth.
Sun hemp for bean pod borer
Based on spatial distribution:
A. Perimeter trap cropping: Growing trap crops around the main crop.
B. Sequential trap cropping: Growing trap crops earlier or simultaneously than the main
crop to attract the pest. Ex. Indian mustard as a trap crop for diamnon back month in Cabbage
C. Multiple trap cropping: Planting of several species simultaneously as trap crops for
attracting pests
D. Push – Pull trap cropping: Growing combination of trap crop and repellent crops ex. Marigold and Onion in Chillies
Examples of trap crops:
S.No Name of the main crop Trap crop Pest
1 Cotton Marigold Heliothis
Bhendi Pod borers
2 Ground nut Cow pea Leaf folder
Castor Tobacco caterpillar
3 Red gram Soya bean/ Green gram
Thrips
4 Sun flower Mari gold Heliothis
Castor Tobaccocater pillar
5 Bengal gram Mari gold Heliothis
6 Cabbage Indian Mustard Diamond back moth

7 Cotton Alfa alfa Laygus bug
8 Garlic Basil and Mari gold
Thrips
9 Carrot Onion and garlic Carrot root fly
10 Cabbage Radish Flee beetle
Tips for successful trap cropping:
A. Select a trap crop that is more attractive to pest than the main crop
B. Monitor trap crops regularly
C. Immediately destroy the eggs that are found on the trap crop
Module-8 Extension
Session -1-CRP Strategy
Community Resource Persons (CRP) strategy for scaling up in other states
Community Resource Persons (CRPs), Community professionals in CMSA:
Following are the characteristics of CMSA CRPs: 1. CRPs are farmers who practice (best practitioners) CMSA and demonstrate that it is
profitable and practicable to other farmers. 2. Should have at least one year experience 3. Should practice all non-negotiables in her/his field 4. Should posses patience, courage and in depth knowledge on sustainable agriculture 5. Should able to convince farmers on sustainable agriculture methods 6. Should have interest to visit other mandals and districts 7. Should able to write and read, this can be relaxed in case of extra ordinary persons 8. Should use local language and dialects 9. Should be able to learn new concepts from observations during their visits 10. Should be able to clarify farmer’s doubts from own experiences
Deployment of CRPs and community professionals in villages:
Team of two or three CRPs and one cluster activist (total four to five members) will be deployed to inoculate CMSA methods. This team works for 30 days at a stretch and cover five villages. They will work as a team in all five villages during their visit. They will attach to these five villages for a season. They share responsibilities among themselves. Another team will takeover in the next season. About 2 teams required to cover a block and around 24 teams required to cover 12 blocks simultaneously.
CRP round:
CRP round consists of 30 days field visit; in each round they will cover five villages simultaneously. They will demonstrate CMSA methods for one year, after that local VOs and project will take over. There will be six rounds in a calendar year i.e every alternate month, CRPs will make visits. CRP primarily works for community mobilisation and CA will organise farmer field schools and over a period of time enrol all small and medium farmers into Farmer field schools.
Village level action plan:
The team of CRPs and community professionals will develop village level action plan during their first visit. Action plan indicates CMSA methods to be implemented in the village based on the problems identified, and road map for rolling out of CMSA methods. The village action plan will be developed by considering the following (suggestive list) and by interacting with farmers, SHG members etc.

A. Cropping pattern
B. Agro climatic zone
C. Rain fall
D. Water resources
E.Soils – Identification of problems
F. Flora and fauna available in the village
G. Opportunities for rain water conservation
H. Scope for integrated farming systems
I. Availability of fodder
J. Income from live stock
CRPs will develop individual house hold plans based on the land holdings and irrigation facilities:
A. For Rain fed: Rain water harvesting/ conservation with CF/Trenches/Farm ponds/Trees on CFs and trenches - Poly cropping with red gram and trees
B. Irrigated farmers: ½ Acre model – SRI and 36X36
C. For land less: ½ Acre irrigated land on lease/ Bakc yard poultry, Roof top garden
D. Kitchen gardens (36X36 models) with low cost drip for all families
Entry point activities:
CRPs and community professionals will launch CMSA by taking up
following entry point activities:
Establishment of 36X36 models (Kitchen gardens)
Farmer field schools
Inventory of local resources
Screening of films on CMSA methods
Identification of local best practices
Establishment of 36X36 models

Screening of films
Nadep compost pits / Ghana jeevamrutham
Expected outcomes:
CRPs will have predetermined outcomes for one year. They will start
with village level action plan and end with Crop cutting experiments to
show case the benefits of CMSA methods:
1st and 2nd round Visit:
Village level action plan
Formation of VO subcommittee
Entry point activities
Organisation of Farmers into FFS groups
Conducting Farmer Field Schools
NPM shop
Individual house hold plans
3rd and 4th round visits:
Demonstration of Non negotiables for Pest management (NPM)
Demonstration of soil fertility management methods like Nadep compost pits, dung
based inoculants
Demonstration of ½ Acre model
Demonstration of rain water harvesting methods
Demonstration of System of Rice / Wheat intensification (SRI/SWI)
Demonstration of botanical extracts
Demonstration of 36X36 models
Conduct Farmer field schools

Estimation of yield increase through crop cut experiments
Incomes increase by 25% to 50%
Organise field days (Crop cut experiments) to show case the benefits of CMSA
methods
Establishment of custom hiring centre
5th and 6th round visit:
Organise field days (Crop cut experiments) to show case the benefits of CMSA
methods
Capacity building programs for subcommittees
Capacity building for Community professionals
Demonstration of CMSA (NPM and soil fertility) in Rabi season crops
Demonstration of 36X36 models
Estimation of yield increase through crop cut experiments
Incomes increase by 25% to 50%
Organise field days (Crop cut experiments) to show case the benefits of CMSA
methods
Establishment of custom hiring centre
Exposure visits:
CMSA unit will facilitate exposure visits of SHG women (one member
from each SHG) to CMSA villages. They will be trained in class room and
get exposure to CMSA methods in the fields.
Training needs:
CRPs and Para professionals (CA/VA) need training on different CMSA
methods and Hindi for at least two months, before their deployment.
Class room trainings will be done in Hyderabad and they will trained in

field in Medak, warnagal, Nalgonda and Ranga reddy. They will be
trained on videography and dissemination
Coordination and Monitoring of CRP visits:
State anchor person from NRLM unit, SERP will coordinate the CRP visits and Monitoring of
CRP visits will be done by Block livelihoods manager of the SRLM.
Capacity building material:
Flip charts, Manuals, video films, hand outs need to be developed for capacity building of farmers and para professionals of the state. Capacity building material will be developed by SERP in English and concerned SRLMs need to translate materials into their local language.
Deployment of Project resource persons:
Experienced APMs/DPMs will be identified as Project Resource Persons (PRP). Project
resource persons will be deployed at block level for coordinating with CRPs and
Paraprofessionals. PRPs will work for one year to handhold VOs and project team.
Responsibilities of SRLM:
Following are the pre requisites for initiating CMSA activities:
Formation of Village organisation and release of CIF
Appointment of block level livelihood manager
Identification of community professionals (Identification criteria attached in the
annexure)
Exposure visits should be done as proposed in the above
Procurement of pico projectors
Collect local vegetable seeds like vegetables, drum stick, Papaya etc ( Documentation
of characteristics like resistant varieties, duration etc)
List of Small and Marginal farmers to be enrolled for CMSA

Session 2-Farmer Field School
What is farmer Field School? Farmer Field School (FFS) is a group of farmers who get together to study a particular topic. The topics covered vary from conservation agriculture, organic agriculture, animal husbandry and soil husbandry, to income generating activities such as apiculture. FFS provides an opportunity for learning by doing. FFS is a forum where farmers and trainers debate observations, experiences and present new information from outside the community.
Why FFS?
Empowers farmers with knowledge and skills
Enable the farmer to take informed decisions
Enable farmers to think innovatively
Encourage farmers to take up experiments
Essential elements of FFS:
The group: The group (sasyamithra sangha) comprises of individuals (20-25 in Number) who have a common interest, forming the core of a Farmer Field School.
The Field:The field is the teacher. It provides most of the training materials like plants, pests and other facilities. In most cases, communities provide a study site with a shaded area for follow-up discussions.
The Facilitator: The facilitator is a technically competent personwho leads group members through the hands-onexercises. The facilitator can be an extension agentor a Farmer Field School graduate.
Curriculum: The curriculum follows the natural cycle of the subject, be it crop, animal, soil, or handicrafts. This allows all aspects of the subject to be covered in parallel with what is happening in the FFS field.
Approach: Farmers field school (FFS) is the key activity for transfer of technology and sharing of best practices. Farmers upgrade knowledge by sharing, observations and experiments. 20-25 farm families formed into a group known as “Sasyamithra Sanghas” and these sanghas are assisted by a community activist.

In this paradigm, the farmers are encouraged to experiment, innovate and their innovations are shared among other farmers. Respect is accorded to farmers own initiatives. This approach is different from the mainstream attitude where the farmer is a passive recipient of ‘knowledge’ produced in formal agriculture research stations or universities. It is a very liberating approach and the momentum in our programme is fuelled by countless innovations of farmers and the pride they take in their ‘research’ efforts.
Characteristics of FFS approach:
Farmers: Farmers are experts conducting their own fieldstudies. Training is based on comparison of activitiesthat they conduct.
The Field: The field is the learning place where farmersworking in small groups collect data, analyze andmake decisions based on their analyses then presentthe decisions to other farmers for refinement.
Extension workers: They are facilitators not teachers. Once the farmers know what to do the extension workers takes a back seat only offering guidance when need be.
The Curriculum: This is integrated to include crop husbandry, animal husbandry, land husbandry and other areasin relation to ecology, economics, sociology and education.
Training:Training is related to the seasonal cycle of the practice being investigated such as land preparation, cropping, harvesting, livestock feeds and so on.
Meetings: These are held at regular intervals depending on what activities need to be done.
Learning materials:These are generated by farmers and are consistent with local conditions. Even illiterate farmers can prepare and fuse simple diagrams to illustrate the points they want to make and actions to be taken
Group dynamics: Training includes communication skills building, problem solving and leadership and discussion methods. Farmers implement their own decisions in their own fields.
Agro Ecosystem Analysis:
Purposes of AESA are: Promote learning by discovery and learnerstowards their own analysis. Guide farmers to critically analyze and make better decisions on their own fields.
Why AESA? It improves decision-making skills, through afield situation analysis by observing, drawingand discussing. Improves decision-making skills by presenting small group decisions for critique in the large group

Data collection: Date: Day:
Name of the farmer where FFS is being organised: Attendance:
S.No. Name of the FFS group
No of farmers attended
General information: Variety:
Date planted:
Age of crop:
Spacing:
Fertilizer:
Weather: Time of observation:
Plant population:
Germination %:
Measurement:
Length of leaves:
Width of leaves:
No. of leaves:
No. of diseased leaves:
No. of dead leaves:
Length of plant:
No. of pods:

Observations
Soil moisture:
Diseases:
Insect pests:
Plant health:
Deficiency:
Weeds:
Predators:
Crop related information: Name of the crop: Stage: Crop age: No of tillers / branches: Weather information: Cloudy / Sunny / humid / Temperature (high /low) Friendly insects:
S.No Name of the friendly insect
No of friendly insects on 20 Plants
Harmful insects:

S.No Name of the harmful insect
No of friendly insects on 20 Plants
Diseases:
S.No Name of the disease
No of plants affected in a sq mt
Field days: During the period of running the FFS, 1-2 field days are organized where the rest of the farming community is invited to share what the group has learned in the FSS. Farmers themselves facilitate during this day.
Experiments: There are many field experiments that could be carried out by farmers during an FFS. It will depend on the situation which experiments are the most appropriate. The facilitator will consider the questions asked by farmers during the first meetings and based on this select, together with the farmers, one or more field experiments. Here are some examples of experiments that are often used during field schools:
Crop compensation: Simulate insect damage by cutting parts of the leaves or by removing shoots or tillers. This type of experiment demonstrates that crop plants can compensate for some damage, by producing new leaves or shoots. Farmers who experience this will be more confident to tolerate some damage.
Use of traps: Set up some traps to study insect populations. For example light traps, yellow
sticky traps, or pitfall traps. This can be used to monitor pest populations, but it could also be
used as an experiment to see if pests can be controlled with the traps (e.g. control flea
beetles in Chinese kale with yellow sticky traps).
Field cages: Discover how natural enemies can keep pest populations under control. Set up
two or more field cages; one with only pests (e.g. Brown Plant Hoppers on rice), and one
with pests and natural enemies (e.g. Brown Plant Hoppers together with some spiders).

se of botanical pesticides and bio-pesticides:Study how botanical pesticides (e.g. Neem) or
bio-pesticides (Bt, NPV, Steinernema, Trichoderma) can be used to manage pest populations.
For example set up small experiments where Neem is compared with plots that are
unsprayed.
Mulching: Compare plots with and without mulching and see how this has an effect on the
development of plants, insects, and diseases.
Plant spacing:Compare different levels of plant spacing and see how the crop plants
develop under different conditions. The differences in plant density have an effect on the
micro-climate and we can learn how this has an effect on development of pests and
diseases
Fertilizer experiments:Set up small plots with different levels of fertilizer use. Compare use
of synthetic fertilizer (NPK) with organic fertilizers (compost or manure).
Release of natural enemies: Use predators or parasitoids that are available from pest
management centers (PMC) and release them in the IPM plots. Use for example: earwigs,
assassin bugs or Trichogramma wasps.
Compare crop varieties: Compare different varieties of the same crop and study how they
differ. Pay special attention to differences in pest resistance or tolerance
Intercropping: Compare monoculture with multiple cropping systems. Try intercropping
with plants that are known to stimulate natural enemies (e.g. beans or other flowering
plants) or use plants that repel insects (e.g. citronella).
Discussion points:
1 2. 3.
Decisions taken 1 2.

3
Experiments details: 1. Short term experiments: 2. Long term experiments:
Glimpses of FFS
11

Module -8
Session 3-Knowledge dissemination
Human Mediated dissemination
Digital Green initiative
Dissemination, an element in the Diffusion component of the Digital Green system, is the process of communicating and spreading information to the community by showing the locally produced video film on the subject in a structured and systematic manner.
DISSEMINATION MODEL: o Video dissemination mediators (CSPs) are selected to showcase videos in an
interactive learning format using a shared TV and DVD player or pico projector unit in
their communities.
o During on-demand screenings, CSPs pause, rewind, and forward the videos to ensure
that the audience grasps the content and remains interested.
o A CSP’s performance should be assessed based on the agreements made in the
business model with the community. Certain parameters may include: the number
meetings that a CSP conducts, the attendance of farmers, the interests and questions
that the audience expresses, and the adoption of practices in farmers’ fields.

o CSPs are supported and monitored by the existing extension system of the partner.
o Weekly/monthly meeting/training sessions are used to review progress and feedback
from the prior week as well as “teacher training” exercises are provided to build the
capacities of CSPs. The impact of the Digital Green system is monitored and evaluated
in part by maintaining a farmers’ database. This information is inputted by the
partner staff into an online and offline system developed by Digital Green system
engineers called COCO (Connect Online – Connect Offline). Refer to Section 7000
Reporting for a reference to the COCO manual. Using COCO, the entered information
can be organized, analyzed and presented through graphs and charts on Digital
Green’s Analytics dashboards. Partners can watch and monitor dissemination related
information on: the progress of farmers over the course of time as they participate in
video screenings, express interests or questions, and adopt practices or technologies
in their fields.
o Deployment of dissemination set in village
o Video disseminations require some hardware assets, which are placed in the village
under custody and control of the community.
This equipment, together referred to as dissemination equipment, includes:
o TV/DVD unit or pico projector with speakers, and white screen.
o Invertor and battery for TV/DVD set (Not necessary for pico projectors)
o Extension board, voltage stabilizers.
o Connecting cables (AV, Power)
The dissemination equipment is transferred to a designated person on behalf of group/group cluster after the following prerequisites: o Clear understanding on the date on which the disseminations will begin in the
community
o Appreciation of dissemination activities by the community with a documented, well-
defined commitment and ownership for conducting disseminations on a regular,
sustained basis
o Responsibility of safe custody, maintenance, upkeep, and housing of equipment
Dissemination equipment deployed in the village is typically shared by multiple groups. The number of groups sharing one dissemination set will depend on the number of groups in a village, number of screenings each group/cluster has decided to attend every week, and the geographic proximity of other group members/village. Effort should be made to optimize the utilization of each dissemination set by covering as many groups with it as possible while maintaining sustained, regular screenings for each group.
Documentation: (a) Meeting note highlighting the decision, (b) decision on custody, upkeep and ownership of set, and (c) handing over/receipt of set to individual/group
SCREENING PLANNING, SCHEDULING AND ROTATION
Screenings should be scheduled and planned during the monthly meeting with Video Dissemination CSPs, Sub-location field professional/executive and initially with a staff

member from Digital Green for each village/cluster. Planning incorporates the following factors:
o Number of screenings per week which each group has committed to attend
o The content/subject chosen on the basis of seasonality and demand from community
o Subject(s) that field partner want to promote
o Existing extension program of partner organization in the region
Documentation: Monthly dissemination schedule that indicates village name, date of dissemination, name of CSP, and subjects of video to be screened and name of participants involved in the planning process
CONDUCTING SCREENING
PRE-REQUISITES o CSP must review the video for his/her-self prior to showing it in village and
understand the topic completely.
o Place and time of dissemination is finalized by community and CSP.
o Identify the place of dissemination which has space to accommodate the size of the
audience.
o Charge the battery of the invertor if necessary.
SCREENING PROCESS o Screenings conducted in intimate groups of 20 - 25 members.
o CSP makes the necessary arrangements and connections, checks the TV/DVD or pico
projector and ensures an appropriate audio level prior to the arrival of the group
o CSP takes the attendance of members
o CSP announces dos and don’ts: e.g., switching off mobiles, maintaining silence during
shows, asks small children to either leave or not make noise, to watch attentively, etc
o Audience members are encouraged to ask questions at the end of the film and avoid
questions and discussions during the film.
o CSP gives brief introduction on the subject of video and explains how it is applicable
to the group members/village’s context
o CSP puts the TV/projector on and starts the screening
o S/he makes sure that audio/visuals are correctly adjusted and all the members can
watch and listen to the video and audio properly
o At appropriate intervals when the process explanation and clarifications are required,
CSP must "pause" the video and explain the materials used, quantity and process
steps or highlight the important points.
o CSP is required to bring value to the information. Simply narrating what is shown will
not motivate the audience!
o CSP must ask questions and encourage members to ask questions to make the event
participatory and interactive. CSP should ask members to repeat/explain the process
and details like quantities of ingredients used etc. to check if they have correctly
understood the details and remember them.
o Members may also ask questions related to the subject shown in video. CSPs make
their best effort to provide answers to all the questions asked by members. S/he must
provide only correct answers, in case s/he does not have answer or s/he is not
confident about the answer, s/he must not provide a wrong/incorrect answer.
Instead, s/he should note down such questions and seek a trustworthy answer from a

CRP/Field professional/Subject matter specialist to provide the answer to members
during a subsequent screening.
o If required, CSP may screen the video once again without pause/break and reconfirm
the understanding of the process/video to the group.
o Further, CSP will ask some of the following questions to members:
A. Did you enjoy the video?
B. Can anyone recall its contents?
C. What questions do you have after watching the video?
D. Are any members in the group already practicing the technique in the
video?
E. Who is interested in taking up the practice?
F. Who has started using the technique(s), practices shown in any of the
previous shows?
G. What are members’ other areas of interest (field crops, vegetables, fruits,
poultry, dairy etc.)?
o CSP records the questions asked, interest expressed by members along with their
names, to adopt the demonstrated technique, etc. as per the dissemination reporting
format. Interest is defined as the claim made by a member of the audience to adopt a
practice, while adoption is the actual implementation of that practice.
o Generally, the entire process, including question/answer and discussion should take
about 1.5–2 hours.
o CSP should not rush to close the meeting, if there are good interests observed in
subject/discussion by members, and even otherwise.
TIPS: o Videos should NOT be shown in a passive manner – where the videos are just being
played without any interaction. Dissemination screening should be participatory and
interactive where the CSP is actively involved in assessing participant engagement
and posing questions to maintain a high-degree of involvement by the group.
o CSP should have prior knowledge of the subject and should view the video prior to
the dissemination of the subject matter
o Remote of DVD player/TV/Projector should be handled carefully without much
fidgeting and disturbance to the dissemination environment. CSPs should practice
these functions in advance.
o CSP should record the names of farmers, asked questions, interest etc. during the
discussion or immediately thereafter, to avoid errors.
o CSP should keep a torch handy because screenings usually take place in the evening
post sunset and power cuts in villages are fairly common. The torch may be required
during handling of equipment, while recording data, etc.
Documentation: Dissemination report. If dissemination does not take place as per schedule/plan, CSP should record the reasons for variance.
ADOPTION

Increasing the adoption of best farming practices that sustainably improve the livelihoods of farmers is a key objective of any agriculture extension program. It is important that the operations team keep full attention on all supporting activities to ensure high degree of adoption by community members/beneficiaries.
Each video produced under Digital Green program will have a minimum of one specific adoptable technique/practice/process/message, which should be clearly identified and mentioned on each document/record of video like storyboard, list of video, DVD etc., wherever the video title is mentioned. A video should ideally trigger the adoption of specifically identified practice/process/technique. During the follow-up and recording of adoption, field staff will look for the specific adoptable element of a video.
Follow-up for adoption: o CSP will note down the names of group members, who explicitly express interest to
adopt the technique/practices shown in the video, at the end of each screening.
o S/he will discuss with the member to know when they want to practice the technique
in their field and if they need any help in practicing the process for the first time. CSP
will visit the member on the scheduled day/time to help the member take up the
practice in case s/he needs the CSP’s help.
o CSP will also visit the members who showed inclination for adoption at the screening,
to encourage and support them to actually adopt the technique/practice
o This information should also reach the sub-location head for further action, if
required.
Recording adoption: o After the screening CSP will ask if members have adopted the practice
o S/he will note down the names of members who have informed about an adoption
o S/he will also note the practice that has been adopted.
o S/he will visit each of the adoption sites during daytime and check whether the
members have actually adopted the process/technique and whether they have
followed the process correctly.
o S/he will provide guidance for further steps and corrections to the members, if
required.
o S/he will record the adoptions with name, date and scale of adopted process/practice
(size of land, quantity, volume, etc.)
o Random sampling should also be done by partner professionals and Digital Green
staff to validate.

Initiation
MobilizationSituational Awareness
Training
Production
Topic Identification
Storyboarding Shooting Editing
Diffusion
Dissemination Adoption Reporting

Human mediated dissemination
Adoptions by farmers
Process Quality and MIS

Module 9- on other areas Session 1-36X36 model and CCE
36X36 model
Sufficient space should be given between fruit plants, Redgram, Castor, drumstick etc. In between fruit plants, tuber crops, vegetables etc should be grown in blocks. Care should be taken that all the plants get enough sunlight for photosynthesis. Crop arrangement should also be in such a way that monocots and dicots are placed adjacent to each other. Mono cot and dicot crops should be rotated in the blocks. Companion crops such as Maize and Cucmber, Citrus and osmium, Tomato and Carrot should be grown close to each other. Entire field should be covered either with creepers or with mulch. Creepers can be allowed to grow on the fruit plants.
1. Four corners : Fruit plants such as Mango, Cashew etc
2. For every 9 mts from Mango or cashew etc fruit plants such as Seethaphal , drumstick
etc can be grown in all directions
3. For every 4.5 ft there should be an irrigation channel across the model
4. For every 90 cmsP.Red gram and P.Castor alternatively can be grown starting from
Mango or Cashew etc
5. On Red gram – creepers such as Bitter gourd can be allowed to grow
6. On Castor - Creepers like beans can be grown
7. Between two fruit plants or Red gram/Castor – vegetables such as Tomato, Chillies,
Onion etc can be grown
8. Along the irrigation channels Creepers such as cucumber, bitter gourd etc can be
grown
9. Along the border green leaf manure crops such as Gliricidea, Subabul, Casiasemiaetc
can be grown

36X36 model
• Seven tier intensive cropping model
• Model developed based on principles of photo candle requirement and companion crops
• Tool to achieve nutritional security at the households level
• Crop arrangement should also be in such a way that monocots and dicots are placed adjacent to each other
• Mono cot and dicot crops should be rotated in the blocks
• Companion crops such as Maize and Cucmber, Citrus and osmium, Tomato and Carrot should be grown close to each other.
Crop Cutting and Yield Assessment in CMSA based SWI
Yield assessment is conducted during the crop cutting in order to assess the yield of a particular plot. Agriculture department also follow few of the following processes and normally consider 10% of the sample plots out of total plots for yield assessment during crop cutting. There are three methods being followed while assessing yield of wheat.
(1) 10 meter X 10 meter (1 sample) As per the standards of CCEs – 10X10mt is not
recommended. We may delete this
(2) 5 meter X 5 meter (1 sample)
(3) 1 meter X 1 meter (5 samples)
(4) Entire crop has to be taken as sample, where the plot size is very small (less than 50
feet X 50 feet)
Prerequisites for crop cutting
1. Complete crop cutting process before noon
2. Crop should be ready for harvest (deep ripening)
3. Orient the team on CCE procedure
4. Rectangle shape made of string or bamboo or plastic pipes (bamboo or plastic pipes
are preferred)
5. Mat / Dari, where the wheat plants need to be kept, threshed, winnowing to separate
grain, chaffy grains,straws and other foreign matters
6. Bag for weighing
7. Sieve to get clean gain
8. Wheat Threshing Machine(Wheat grains are separated from rest of the wheat plants)
9. Digital Moisture Meter

10. Digital Weighing Machine
11. Measurement Tape
12. Documentation Register, Pen, etc.
13. Video camera to shoot the process
14. Display charts – methods adopted (non negotiables adopted)
15. Display – botanical extracts used, dung based inoculants used, pheromone traps etc
(small samples)
16. Printed copy of data collection format
These are the following participants to be present during crop cutting.
Compulsory Members
1. Owner of the plot (i.e., SHG member, her husband, and any other relatives) – CMSA
and Non CMSA fields
2. CMSA SHG members / Women farmers
3. Non CMSA SHG members
4. VO members
5. External CRPs (2 nos.)
6. DPM-Livelihood, Block Project Manager, Area Coordinator / ADO
7. State Project Manager / Assistant State Project Manager
Optional Members
1. Sarpanch and other PRI members
2. Rural Agriculture Extension Officer / Block Agriculture Officer / District Agriculture
Officer
3. CEO – Janpad Panchayat / Block Development Officer
4. CEO – Zila Panchayat / Project Director - DRDA
Method I - 10 meter X 5 meter (1 sample) :
Prepare a 10 meter X 5 meter (rectangular shape) made of either string or bamboo or plastic pipes.
1. Go to the average growth area & put the rectangular frame.
2. Bamboo or plastic pipe made rectangle is preferred to bring more accuracy or avoid
inconsistency.
3. The rectangle made of string or bamboo or plastic pipe has to hold by 4 or more
persons and put in the field (just on the sample selected).
4. Care should be taken that correct nos. of plants should be falling under the rectangle.
5. Cut all the wheat plants coming under the rectangle and transfer to the Mat / Dari
spread adjacent / nearer to the plot
6. Threshing of the wheat plants to separate grains from plants &panicles through a
wheat thresher

7. Winnowing to separate grains from chaffy grains, straws and other foreign matters
8. Use the digital moisture meter to record the moisture percentage
9. Weigh the entirewheat grains in digital weighing machine
10. Count the 1000 wheat grain & weigh in the digital weighing machine
11. Weigh the straws in the digital weighing machine
12. Discount the excess moisture percentage to keep the moisture level at 14%. The
calculation process is as follows;
Let’s say –Weight of the grain is 100 gm, moisture % is 24 % The moisture percentage has to be brought down to 14 % In order to make it 14 %; we have to subtract = 24 % - 14 % = 10 % The weight of the wheat grain is 90 gm = 100 gm – (10 % of 100 gm) = 90 gm
13. Take the weight and calculate to find out the yield of the plot, per acre and per
hectare. The method of calculation is mentioned below (with an example);
10 meter X 5 meter = 50 m2 In 50 m2, Yield is (after discounting moisture %) = 40000 gm = 40 Kg In 4000 m2, Yield is = 3200000 gm = 3200 Kg = 3.2 ton / acre In 10000 m2, Yield is = 8000000 gm = 8000 Kg = 8 ton / hectare If farmer has cultivated SWI in 0.25 acre of land, hence the production will be 0.8 ton
Same process to be followed for the control plot where wheat cultivated through conventional practices
Method II - 5 meter X 5 meter (3 samples) :
1. In a plot, leave 1 meter from each side
2. Take 3 samples of dimension 5 meter X 5 meter
3. Care should be taken to select three samples from poor, average and good category
4. The rectangular shape of 5 meter X 5 meter has to be made either in string or
bamboo or plastic pipes.
5. Bamboo or plastic pipes made rectangle is preferred to bring more accuracy or avoid
inconsistency.
6. The rectangle made of string or bamboo or plastic pipes has to hold by 4 or more
persons and put in the field (just on the sample selected).
7. 3 samples should be taken as per the category mentioned
8. Care should be taken that correct nos. of plants should be falling under the rectangle.
9. Cut all the wheat plants coming under the rectangle and transfer to the Mat / Dari
spread adjacent / nearer to the plot
10. Threshing of the wheat plant to separate grains from plants & panicles through a
wheat thresher
11. Winnowing to separate wheat grains from chaffy grains, straws and other foreign
matters
12. Use the digital moisture meter to record the moisture percentage
13. Weigh the entire grains in digital weighing machine
14. Count the 1000 wheat grain & weigh in the digital weighing machine
15. Weigh the straws in the digital weighing machine

16. Discount the excess moisture percentage to keep the moisture level at 14%. The
calculation process is as follows;
Let’s say – Weight of the grain is 100 gm, moisture % is 24 % The moisture percentage has to be brought down to 14 % In order to make it 14 %; we have to subtract = 24 % - 14 % = 10 % The weight of the grain is 90 gm = 100 gm – (10 % of 100 gm) = 90 gm
17. Take the weight and calculate to find out the yield of the plot, per acre and per
hectare. The method of calculation is mentioned below (with an example);
Sample 1 (poor) - 5 meter X 5 meter = 25 m2= 10000 gm Sample 2 (average) - 5 meter X 5 meter = 25 m2 = 20000 gm Sample 3 (good) - 5 meter X 5 meter = 25 m2 = 30000 gm In 75 m2 of land, Yield is (after discounting moisture %) = 60000 gm = 60 Kg In 25 m2, Yield is (after discounting moisture %) = (60000 gm / 75 m2) X 25 m2= 20000 gm = 20 Kg In 4000 m2, Yield is = 3200000 gm = 3200 Kg = 3.2 ton / acre In 10000 m2, Yield is = 8000000 gm = 8000 Kg = 8 ton / hectare If farmer has cultivated SWI in 0.25 acre (or 1000 m2) of land, hence the production will be 0.8 ton
Same process to be followed for the control plot where wheat cultivated through conventional practices
Method III - 1 meter X 1 meter (5 samples) :
1. In a plot, leave 1 meter from each side
2. Take 5 samples of dimension 1 meter X 1 meter
3. Care should be taken to select five samples from 2 poor, 2 average and 1 good
category
4. The rectangular shape of 1 meter X 1 meter has to be made either in string or
bamboo or plastic pipes.
5. Bamboo or plastic pipes made rectangle is preferred to bring more accuracy or avoid
inconsistency.
6. The rectangle made of string or bamboo or plastic pipes has to hold by 4 persons and
put in the field (just on the sample selected).
7. 5 samples should be taken as per the category mentioned
8. Care should be taken that correct nos. of wheat plants should be falling under the
rectangle.
9. Cut all the wheat plants coming under the rectangle and transfer to the Mat / Dari
spread adjacent / nearer to the plot
10. Threshing of the wheat plant to separate grains from plants & panicles through a
wheat thresher
11. Winnowing to separate wheat grains from chaffy grains, straws and other foreign
matters
12. Use the digital moisture meter to record the moisture percentage
13. Weigh the entire grains in digital weighing machine
14. Count the 1000 wheat grain & weigh in the digital weighing machine
15. Weigh the straws in the digital weighing machine
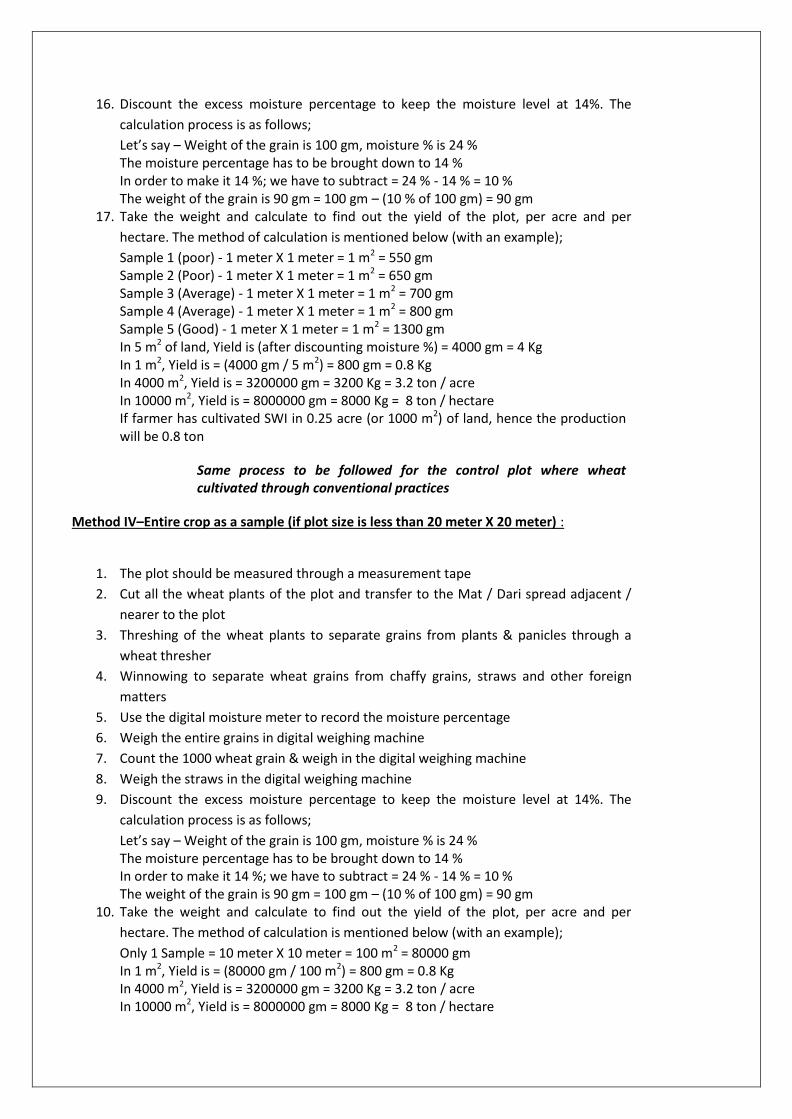
16. Discount the excess moisture percentage to keep the moisture level at 14%. The
calculation process is as follows;
Let’s say – Weight of the grain is 100 gm, moisture % is 24 % The moisture percentage has to be brought down to 14 % In order to make it 14 %; we have to subtract = 24 % - 14 % = 10 % The weight of the grain is 90 gm = 100 gm – (10 % of 100 gm) = 90 gm
17. Take the weight and calculate to find out the yield of the plot, per acre and per
hectare. The method of calculation is mentioned below (with an example);
Sample 1 (poor) - 1 meter X 1 meter = 1 m2 = 550 gm Sample 2 (Poor) - 1 meter X 1 meter = 1 m2 = 650 gm Sample 3 (Average) - 1 meter X 1 meter = 1 m2 = 700 gm Sample 4 (Average) - 1 meter X 1 meter = 1 m2 = 800 gm Sample 5 (Good) - 1 meter X 1 meter = 1 m2 = 1300 gm In 5 m2 of land, Yield is (after discounting moisture %) = 4000 gm = 4 Kg In 1 m2, Yield is = (4000 gm / 5 m2) = 800 gm = 0.8 Kg In 4000 m2, Yield is = 3200000 gm = 3200 Kg = 3.2 ton / acre In 10000 m2, Yield is = 8000000 gm = 8000 Kg = 8 ton / hectare If farmer has cultivated SWI in 0.25 acre (or 1000 m2) of land, hence the production will be 0.8 ton
Same process to be followed for the control plot where wheat cultivated through conventional practices
Method IV–Entire crop as a sample (if plot size is less than 20 meter X 20 meter) :
1. The plot should be measured through a measurement tape
2. Cut all the wheat plants of the plot and transfer to the Mat / Dari spread adjacent /
nearer to the plot
3. Threshing of the wheat plants to separate grains from plants & panicles through a
wheat thresher
4. Winnowing to separate wheat grains from chaffy grains, straws and other foreign
matters
5. Use the digital moisture meter to record the moisture percentage
6. Weigh the entire grains in digital weighing machine
7. Count the 1000 wheat grain & weigh in the digital weighing machine
8. Weigh the straws in the digital weighing machine
9. Discount the excess moisture percentage to keep the moisture level at 14%. The
calculation process is as follows;
Let’s say – Weight of the grain is 100 gm, moisture % is 24 % The moisture percentage has to be brought down to 14 % In order to make it 14 %; we have to subtract = 24 % - 14 % = 10 % The weight of the grain is 90 gm = 100 gm – (10 % of 100 gm) = 90 gm
10. Take the weight and calculate to find out the yield of the plot, per acre and per
hectare. The method of calculation is mentioned below (with an example);
Only 1 Sample = 10 meter X 10 meter = 100 m2 = 80000 gm In 1 m2, Yield is = (80000 gm / 100 m2) = 800 gm = 0.8 Kg In 4000 m2, Yield is = 3200000 gm = 3200 Kg = 3.2 ton / acre In 10000 m2, Yield is = 8000000 gm = 8000 Kg = 8 ton / hectare

If farmer has cultivated SWI in 0.25 acre (or 1000 m2) of land, hence the production will be 0.8 ton
Same process to be followed for the control plot where wheat cultivated through conventional practices, but the sample should be 10 meter X 10 meter
Data to be collected from crop cutting experiments:
Data to be collected during crop cut experiment: Name of the District: Name of the Block: Name of the functionary:
S.No Component CMSA Non CMSA
1 Name of the village
2 Name of the farmer and social status (SC/ST/BC/Minority/OC)
3 Survey no; where crop cutting experiment done
4 Type of soil (Red/Black cotton/Sandy/Laterite etc)
5 Date of crop cutting experiment
6 Area in Acres where crop cut is done
7 Name of the crop
8 Variety
9 Date of sowing
10 Plant population in 1X1mt
11 No of effective tillers per hill
12
Area of crop cut experiment (5X5 or 1X1mts etc)
13 Yield obtained in 5X5 mts or 1X1 mts in Kgs
14 Yield estimated per acre in qtls (for 5X5 mts – multiply the weight with 160)
15 1000 grain weight – wet
16 1000 grain weight – Dry
17 Total extent of area in acres
18 Crop cutting experiment done by (Name and designation)

Data required for analysis: General details:
S.No Component CMSA Non CMSA
1 Name of the Variety (Hybrid/Local/Bt/any other specify)
2 Source of Irrigation (Rain fed/ Canal /Bore well/Tank/lift/open well any other – Specify)
3 Method of sowing (Broad casting, hand sowing, drill sowing, dibbling, Transplanting)
4 Pests observed in this season
5 Diseases observed in this season
6 Cropping pattern (crops grown in Rabi and Khairff)
7 Rainfall in mm in the season
8 Any other observations
Soil fertility management:
Methods adopted to manage soil fertility
Cost incurred in Rs./Acre
CMSA 1. 2. 3.
1. 2. 3.
Non CMSA
1. 2. 3.
1. 2. 3.
Total cost in Rs./Acre
Pest management:
Pests and diseases observed
Methods adopted to control pests and diseases
Cost incurred in Rs. /Acre
CMSA 1. 2. 3.
1. 2. 3.
1. 2. 3.
Non CMSA
1. 2. 3.
1. 2. 3.
1. 2. 3.
Total cost in Rs. /Acre

Income details:
Expected yield in qtls
(1)
Rate/qtl in Rs. (2)
Gross income in rs.
(3)
Cost of cultivation in Rs. (pest management and soil fertility management)
(4)
Net income in Rs. (3-4)
Non CMSA

Glimpses of CCEs

Module 9 –Other areas
Session 2
System of Rice Intensification
Important features of SRI:
SRI is not a variety or hybrid – It is a method of cultivation
Low seed requirement - Only 2 Kg/ Acre
Low water requirement – Alternate wetting and drying
Transplantation of tender / young seedlings
Transplanting at wider space - 25cmX25cm
Incorporating weeds into the soil while weeding
Raising Nursery:
The nursery bed can be raised in a 48 sq yard plot for transplantation in one acre. A bed
width of 4 ft. is ideal and length can be decided by the farmer depending on the situation. As
the roots of the 8-12 days seedlings grow up to 3 inches depth it is necessary to prepare
raised bed of 5-6 inches height. The nursery bed can be prepared with application of FYM
and soil alternately in four layers.
1st Layer: 1 inch thick well decomposed FYM
2nd layer: 11/2 Inch soil

3rd layer: 1 inch thick well decomposed FYM
4th Layer: 21/2 Inch soil
All these layers should be mixed well, as the FYM helps in easy penetration of
roots. To prevent soil erosion, the bed on all sides should be made secure with
wooden reapers/ planks or paddy straw rope or anything of that sort. To drain
excess water appropriate channels should be provided on all sides.
Seed Preparation and broad casting:
Soak the seeds for 12hrs in Water. Drain the water and transfer wet seed into a gunny bag. Leave it for 24hrs. White root called radicle breaks open the outer coat and start emerging out of the seed at this stage sprouted seed is taken to nursery bed for sowing. To ensure uniform broadcasting, divide the whole seed lot into 4 parts and broadcast four times thinly spread over the bed. Spread well decomposed FYM or Paddy straw over the sown seed thinly. The seeds or not to be directly exposed to sun. Straw can be removed once the seeds germinate. Depending on t requirement, Water ing should be done twice daily

Preparation of main field:
Field should be evenly levelled and there should not be standing water in the field during
transplantation. In SRI method, seedlings are widely spaced (10 x10 inch or 25 x 25cm) and
only one seedling is transplanted per hill (3-4 seedlings per hill in conventional system).SRI
method can accommodate only 16 hills /sq. metre as against 33-40 hills/ square meter in
conventional method.Markers need to be run over the prepared field lengthwise and
widthwise. Transplanting at the marked intersection gives the required 25 x 25 cm spacing.

Transplantation:
Young, 8-12 days old seedlings are transplanted inSRI method. Care should be taken to see
that the plantdoes not experience shock during transplanting.In SRI method, a metalsheet is
inserted 4-5 inches below the seed bed and the seedlings along with soil are lifted without
any disturbance to their roots.Transplanting should be done as quickly as possible,
preferably within half an hour to minimise trauma to the roots.Single seedlings with seed
and soil are transplanted by using index finger and thumb and gently placing them at the
intersection of markings.Lightirrigation should be given on the next day of transplantation.

Irrigation and Water Management:
In SRI, irrigation is given to wet the soil, just enough to saturate the soil with
moisture.Subsequent irrigation is suggested when the soil develops fine
cracks.Irrigation interval depends on soil type and weather conditions.This method
helps in better growth and spread of roots.Regular wetting and drying of soil results in
increased microbial activity in the soil and easy availability of nutrients to plants.

Weed management:
Absence of standing water provides a congenial environment for weeds to proliferate in
SRI.If these weeds are incorporated into the soil, they serve as green manure.First weeding
should be done 10-12 days after transplanting.Later, depending on the need, weeding can be
done once every 10 days.Different models of manually operated weeders are being
developed for effective weed management in SRI.Weeds can be incorporated by moving the
weeder between the rows.


Annexures and Appendices:
Annexure 1
Using this Manual Objectives
The manual is intended to support capacity building for agriculture,
animal husbandry and Non Traditional Fore4st Products ( NTFP ). It
includes a strong focus on the role of international trade and trade
policies in achieving national sustainable development strategies. It
forms part of a larger series of capacity building modules being prepared
under various NRLM initiatives which address a range of issues.
This manual is a tool for trainers who will be training
grassroots community resource persons in every block,
district state who are NRLM partners in sustainable
development. It is designed to assist them in preparing and
delivering training courses for CRPs in every block, state
eventually. The objective is to provide an understanding of:
• the importance of capacity building at block level
• the objectives of capacity building for agriculture,
animal husbandry and NTFP which are key areas of
livelihood for millions of small and marginal farmers.;
• processes that can be tailored to the needs of community resource persons
Note to facilitators/Trainers:
The following outline provides:
• basic information for the trainers;
• suggested sequencing for the introduction of material; and
• supporting tools for handling each session.
Within this framework the trainer should take into account:
❏ the needs and existing knowledge and skills of participants
on the subjects mentioned earlier which will determine

during the needs assessment which precedes the design and
delivery of capacity building activities;
❏ the need for the session structure to be flexible enough to
accommodate participants’ questions, suggestions and
general discussion on issues which they identify as most
relevant to them; and
Session presentation timings are indicative only. In particular, time taken
for group discussions and other training activities can vary enormously
depending on the depth of treatment, the background of the participants
and the size of the group. Some prior knowledge of this is essential in
planning an effective session and appropriate learning outcomes.
Identifying participant needs
The trainer needs to spend some time at the beginning of the session
identifying the needs and expertise of participants and their
expectations of the session. Depending on the size of the group this
can be done either by:
o asking participants to introduce themselves, and identify their
present practices and their major areas of
o quickly running through a shortened questionnaire , seeking a
show of hands to indicate major interest areas of their
Their experience level, knowledge level and their
problems that they face in their routine activities in their
farm.
session timings need to include some provision for discussion of
these materials if they have not been distributed prior to the
course.
Preparations and general tips
In preparation for the workshop it is important to make an analysis of the participants,
among others in relation to their level of prior knowledge of the topics to be discussed
Prior to the training workshop a learning needs assessment (LNA) may also be carried out
in order to specifically assess the current level of knowledge and understanding of current
practices followed by the participants..

In addition to the “formal” evaluation by the end of the workshop, it is good also to have a
mid-term evaluation, e.g., by the end of day one. This can be done fairly informally, by asking
participants to do a quick stock-taking of the day and note down their gains of the day:
“What are some key points you learned today?
Andragogy Tools for Training of farmers
Adults learn in a different way ( Malcom Knowels . 1968) as need an enabling environment where they feel comfortable and they can relax, express their need, experience they have and state their problems . They look for solutions rather than theories and principles and concepts – which are typically a child learns in a school. ( Pedagogy ). Farmers across states and districts differ in cropping systems they follow, soils they cultivate water they give to their crops from monsoon rains, pests and disease they need to control. Added to these production problems they also face problem of getting investment and inputs, market uncertainties as middlemen control their lives as well a s access to knowledge and services . All these factors need learning programs for farmers to be designed differently keeping in mind the following principles of Andragogy.
The principles are : Andragogy is the art and science of helping adults learn:
Adults desire and enact a tendency toward self-directedness as they mature
Adults’ experiences are a rich resource for learning. They learn more effectively
through experimental activities such as problem solving
Adults are aware of specific learning needs generated by real life
Adults are competency-based learners who wish to apply knowledge to immediate
circumstances
A climate of mutual respect is most important for learning: trust, support, and caring
are essential components. Learning is pleasant and this should be
emphasized
Life experiences and knowledge, Goal- oriented ,Relevancy- oriented ,Practical
Ability to assess gaps between where one is now and where one wants and needs to
be
Learners want to perform a task, solve a problem, live in a more satisfying way
Learning must have relevance to real-life tasks
Learning is organized around life/work situations rather than subject matter units
How to design a learning program with Andragogy Tool Kit
Trainers who will conduct any such program must be sensitized first so that they are aware that Pedagogic approach will have limited success in adoption of a technology. This Manual will try to include instructions before an actual program is launched.

Instructions for the Trainer.
Once you have a technology developed and tested and ready to be transferred the next step is to take this to at farm level by various means – Extension, media, PRI techniques, and learning programs.. Design a program by taking the following steps.
1. Know your audience first- characterize the participants by collecting
information ( sample sheet – annexure .. ) as much a sin advance possible.
2. Study them carefully as there will be variation in age, education, livelihood
patterns, socio-economic conditions, cropping pattern, input availability ands
supplier, production constraints such as water scarcity, pests and disease
control, harvesting, marketing problems and alternate methods available.
3. Select tools for delivery of the program
4. Decide on contents for the program
5. Use participatory methods while delivery of the program and include
interactive sessions
6. Use principles and concepts as and when required on the subject
7. Ask questions to elicit information and provide answers
8. If you do not have an answer make sure that you provided the answer ASAP.
9. Avoid starting a session with direct lectures on a subject as much as possible
10. Promise continuous hand holding and feedback.
Example :
A session on plant nutrition
At the very beginning ask the audience the following
What are the nutrients required for a plant to grow.
Do they understand that some nutrients are required more in quantity than others
such as NPK VS cu, b, zn, mb etc.
Follow this with concept of macro and micro nutrients
Ask question on fertilizers and manures that they use regularly
How they apply , when they apply and what dose they give ( calculation )
Follow this with nutrient contents of fertilizers and manures
Describe what happens when a fertilizer is applied – case of Urea in soil
Explain the misuse of fertilizers specially Urea
Describe how they can grow a crop without chemical fertilizers and still maintain yield
level
Formulate an action plan for adopting of alternate methods seek voluntary
participation

Annexur II
List of PPTs, refrence material and videos
Theme Session Title PPT Reference Video
NRM
S-1 Weather and climate
S- 1 Weather and Cimate -Agroclimate zones - Copy.pptx
X
S=2 Climate change
Climate resilient Agriculture_ YPs training_11 May.pptx
Smart practices & technologies.doc
X
S-3 Cropping systems
S-3 Cropping Systems and crop rotation.pptx
X
S-4 Soil- physical properties
Our Living Soil.pptx S-4 Soil structure-and texture_DG_delhi.pptx
Soil horizon.docx Shorter version soils.docx
X
S-5 Soil structure
S-4 Soil structure-and texture_DG_delhi.pptx
P-6_Soils of India.pptx
X
S-6 Tillage and tilth and pH
P-5_ Tillage and tilth.pptx
Soil horizon.docx
X
S-7 Moisture reqm
P-7_Moisture requirement of a crop.pptx
P-7_Moisture requirement of a crop.rtf
Crops need water for transpiration and evaporation.docx
X
S-8 Soil and water conservation
P-8_Soil and Water Conservation.pptx
P-8_Soil and Water Conservation.rtf
X
S-9 Water harvesting
P-9_Watershed managmnet.pptx
RFSA.pptx
X
Plant Nutrition
S=1 Major and micro nutrients P-12_Forms
available, behavioour in soils.pptxNitrogen _ 30
Oct.pptxPhosphorus and
Potassium_30Oct.pptx
Plant nutrition for content.docx
X

S-2 Soil fertility W.O chemicals BIO FERTILIZERS
.pptx
Shorter version soils.docx
Yes
S-3 Deficiency symptoms
Deficiency symptoms.pptx
P-11_Deficiency Symptoms of nutrients in plants.pptx
Pl. Nutrients_deficiency.docx
X
Seed
S-1 All about seed, quality..... S-8 All about
seed_skdg.pptxLecture on -Seed
Characteristics.pptxP-16 seed selection
and storage at farmer level.pptx
All about seed_ revised_24 Dec_2014 (2).docx
Seed Storage-Dr. Veeru Patil_IFSSA.ppt
X
Post harvest
S-1 Stored grain pests
Poster-15- _Post Harvest Pest managment.pptx
Stored grain pests-biovison file.docx
X
Weed
S-1 Weed control, vertebrate pests P-18 Weed
control.pptx
11. Weed.pdf (Command Line)
X
NPM
S-1 Understanding pests
X
S-2 Surveillance and ETL
Surveillance PPT.pptx
SKILL DEVELOPMENT SERIES NO-15.doc
X
S-3 Ill effect of pesticides
NPM training manual Level -I_2003.docx
Satyameba jayte
S-4 NPM practices
managing insect-pests without chem pesticides.pptx
Yes
Disease S=1 Understanding diseases
disease.pptx
X

S-2 Non chemical disease control
NPM training manual Level -I_2003.doc
X
Misc
CRP CRP strategy
CRP strategy for scaling up in other states.doc
X
SRI SRI of paddy SRI Wheat
SRI_jk_20 June.docx
Yes
Model 36X36
36X36 model.pptx
36 X36 model planting_jk_20 June.docx
X
CCE Crop cutting expts
CCEs.ppt
Crop Cutting and Yield Assessment in CMSA based SWI (1).docx
Yes
FFS Farmers field school
Farmer Field School.ppt
Farmer Field School_jk_20 June.docx
X
DG Human mediated dissemination Human mediated
dissimenation.pptx
Human Mediated dissimenation_jk_20 June.docx
Yes
Annexure
Botanical extracts
Booklet for NPM level 2 and Botanical extracts.docx
Yes