mwclearcase plug-in user’s guide - nxp semiconductors · overview learning more about clearcase 6...
TRANSCRIPT

CodeWarrior™ Development Tools
mwClearCase Plug-in User’s Guide
Revised: 29 January 2008
Freescale™ and the Freescale logo are trademarks of Freescale Semiconductor, Inc. CodeWarrior is a trademark or reg-istered trademark of Freescale Semiconductor, Inc. in the United States and/or other countries. All other product or ser-vice names are the property of their respective owners.
Copyright © 2006–2008 by Freescale Semiconductor, Inc. All rights reserved.
Information in this document is provided solely to enable system and software implementers to use Freescale Semicon-ductor products. There are no express or implied copyright licenses granted hereunder to design or fabricate any inte-grated circuits or integrated circuits based on the information in this document.
Freescale Semiconductor reserves the right to make changes without further notice to any products herein. FreescaleSemiconductor makes no warranty, representation or guarantee regarding the suitability of its products for any partic-ular purpose, nor does Freescale Semiconductor assume any liability arising out of the application or use of any productor circuit, and specifically disclaims any and all liability, including without limitation consequential or incidental dam-ages. “Typical” parameters that may be provided in Freescale Semiconductor data sheets and/or specifications can anddo vary in different applications and actual performance may vary over time. All operating parameters, including “Typ-icals”, must be validated for each customer application by customer's technical experts. Freescale Semiconductor doesnot convey any license under its patent rights nor the rights of others. Freescale Semiconductor products are not de-signed, intended, or authorized for use as components in systems intended for surgical implant into the body, or otherapplications intended to support or sustain life, or for any other application in which the failure of the Freescale Semi-conductor product could create a situation where personal injury or death may occur. Should Buyer purchase or useFreescale Semiconductor products for any such unintended or unauthorized application, Buyer shall indemnify and holdFreescale Semiconductor and its officers, employees, subsidiaries, affiliates, and distributors harmless against allclaims, costs, damages, and expenses, and reasonable attorney fees arising out of, directly or indirectly, any claim ofpersonal injury or death associated with such unintended or unauthorized use, even if such claim alleges that FreescaleSemiconductor was negligent regarding the design or manufacture of the part.
How to Contact Us
Corporate Headquarters Freescale Semiconductor, Inc.
7700 West Parmer Lane
Austin, TX 78729
U.S.A.
World Wide Web http://www.freescale.com/codewarrior
Technical Support http://www.freescale.com/support

3mwClearCase Plug-in User’s Guide
Table of Contents
1 Overview 5About the mwClearCase Plug-in . . . . . . . . . . . . . . . . . . . . . . . . . . . . . . . . . . . . . 5
System Requirements . . . . . . . . . . . . . . . . . . . . . . . . . . . . . . . . . . . . . . . . . . . . . . 5
Learning More About ClearCase . . . . . . . . . . . . . . . . . . . . . . . . . . . . . . . . . . . . . 6
2 Setting Up the mwClearCase Plug-in 7Obtaining the mwClearCase Plug-in . . . . . . . . . . . . . . . . . . . . . . . . . . . . . . . . . . 7
Installing the mwClearCase Plug-in . . . . . . . . . . . . . . . . . . . . . . . . . . . . . . . . . . . 8
Activating the mwClearCase Plug-in . . . . . . . . . . . . . . . . . . . . . . . . . . . . . . . . . . 8
Deactivating the mwClearCase Plug-in . . . . . . . . . . . . . . . . . . . . . . . . . . . . . . . 15
3 Using the mwClearCase Plug-in 17Preparation . . . . . . . . . . . . . . . . . . . . . . . . . . . . . . . . . . . . . . . . . . . . . . . . . . . . . 17
The Project Window . . . . . . . . . . . . . . . . . . . . . . . . . . . . . . . . . . . . . . . . . . . . . . 17
The Project Window and the Plug-in . . . . . . . . . . . . . . . . . . . . . . . . . . . . . . 18
mwClearCase Plug-in Command Locations. . . . . . . . . . . . . . . . . . . . . . . . . . . . 19
The IDE’s VCS Menu . . . . . . . . . . . . . . . . . . . . . . . . . . . . . . . . . . . . . . . . . . 19
The Project Window’s Context Menu . . . . . . . . . . . . . . . . . . . . . . . . . . . . . . 20
The Editor Window’s VCS Menu . . . . . . . . . . . . . . . . . . . . . . . . . . . . . . . . . 21
mwClearCase Plug-in Command Reference . . . . . . . . . . . . . . . . . . . . . . . . . . . 22
About. . . . . . . . . . . . . . . . . . . . . . . . . . . . . . . . . . . . . . . . . . . . . . . . . . . . . . . 24
Add . . . . . . . . . . . . . . . . . . . . . . . . . . . . . . . . . . . . . . . . . . . . . . . . . . . . . . . . 24
Add... . . . . . . . . . . . . . . . . . . . . . . . . . . . . . . . . . . . . . . . . . . . . . . . . . . . . . . . 26
Checkin . . . . . . . . . . . . . . . . . . . . . . . . . . . . . . . . . . . . . . . . . . . . . . . . . . . . . 28
Checkout . . . . . . . . . . . . . . . . . . . . . . . . . . . . . . . . . . . . . . . . . . . . . . . . . . . . 30
Connect . . . . . . . . . . . . . . . . . . . . . . . . . . . . . . . . . . . . . . . . . . . . . . . . . . . . . 31
Difference . . . . . . . . . . . . . . . . . . . . . . . . . . . . . . . . . . . . . . . . . . . . . . . . . . . 31
Disconnect. . . . . . . . . . . . . . . . . . . . . . . . . . . . . . . . . . . . . . . . . . . . . . . . . . . 32
Get . . . . . . . . . . . . . . . . . . . . . . . . . . . . . . . . . . . . . . . . . . . . . . . . . . . . . . . . . 32
History. . . . . . . . . . . . . . . . . . . . . . . . . . . . . . . . . . . . . . . . . . . . . . . . . . . . . . 33
Properties. . . . . . . . . . . . . . . . . . . . . . . . . . . . . . . . . . . . . . . . . . . . . . . . . . . . 35
Status . . . . . . . . . . . . . . . . . . . . . . . . . . . . . . . . . . . . . . . . . . . . . . . . . . . . . . . 37

Table of Contents
4 mwClearCase Plug-in User’s Guide
Synchronize Selection . . . . . . . . . . . . . . . . . . . . . . . . . . . . . . . . . . . . . . . . . .38
Synchronize Status . . . . . . . . . . . . . . . . . . . . . . . . . . . . . . . . . . . . . . . . . . . .39
Undo Checkout . . . . . . . . . . . . . . . . . . . . . . . . . . . . . . . . . . . . . . . . . . . . . . .39
Variables . . . . . . . . . . . . . . . . . . . . . . . . . . . . . . . . . . . . . . . . . . . . . . . . . . . .40
4 Tutorial 43Creating a Default Plug-in Configuration . . . . . . . . . . . . . . . . . . . . . . . . . . . . . .43
Checking out a File . . . . . . . . . . . . . . . . . . . . . . . . . . . . . . . . . . . . . . . . . . . . . . .45
Checking out a Project . . . . . . . . . . . . . . . . . . . . . . . . . . . . . . . . . . . . . . . . . . . .46
Checking in a File . . . . . . . . . . . . . . . . . . . . . . . . . . . . . . . . . . . . . . . . . . . . . . . .47
Checking in a Project . . . . . . . . . . . . . . . . . . . . . . . . . . . . . . . . . . . . . . . . . . . . .48
Index 49

5mwClearCase Plug-in User’s Guide
1Overview
This chapter is an overview of the CodeWarrior™ ClearCase plug-in tool, also known as the mwClearCase plug-in. This tool allows the CodeWarrior™ Integrated Development Environment (IDE) to interact with a ClearCase® version-control system.
This chapter has these topics:
• About the mwClearCase Plug-in
• System Requirements
• Learning More About ClearCase
About the mwClearCase Plug-inThe mwClearCase plug-in lets you perform these tasks from within the CodeWarrior IDE:
• Execute common ClearCase commands
• View the ClearCase status of projects and files
By using the mwClearCase plug-in, you avoid having to run a separate program in order to work with a ClearCase system.
System RequirementsTo use the mwClearCase plug-in, make sure you meet the requirements listed in Table 1.1.
Table 1.1 System Requirements for the mwClearCase Plug-in
Component Requirement
Computer IBM®-compatible PC
Processor Pentium® class
Memory 128 MB minimum
Operating system Windows® 98, Windows® ME,
Windows NT®, Windows® 2000, or Windows® XP

OverviewLearning More About ClearCase
6 mwClearCase Plug-in User’s Guide
Learning More About ClearCaseThis document explains how to use the features of the mwClearCase plug-in. It does not cover software-configuration management concepts or the ClearCase product itself.For information of this type, refer to the ClearCase product documentation.
ClearCase® system ClearCase for Windows version 3.2 or later
CodeWarrior IDE Version 5.1.1 or later (Windows-hosted version only)
Table 1.1 System Requirements for the mwClearCase Plug-in (continued)
Component Requirement

7mwClearCase Plug-in User’s Guide
2Setting Up the mwClearCase Plug-in
This chapter explains how to obtain, install, activate, and deactivate themwClearCase plug-in.
The chapter has these topics:
• Obtaining the mwClearCase Plug-in
• Installing the mwClearCase Plug-in
• Activating the mwClearCase Plug-in
• Deactivating the mwClearCase Plug-in
Obtaining the mwClearCase Plug-inTo obtain the latest version of the mwClearCase plug-in, follow these steps:
1. Exit the CodeWarrior IDE.
2. Go to Freescale’s CodeWarrior Development Tools page by clicking the URL below (or by typing it into your web browser).
www.codewarrior.com
Your browser starts and displays the CodeWarrior Development Tools page.
3. From the menu on the left of this page, select Downloads > Version Control Tools.
The Version Control Tools page appears.
4. Follow the instructions on this page to download the .zip file that contains the mwClearCase plug-in.
5. Exit the web browser.
You now have a local copy of the .zip file that contains the latest version of the mwClearCase plug-in.

Setting Up the mwClearCase Plug-inInstalling the mwClearCase Plug-in
8 mwClearCase Plug-in User’s Guide
Installing the mwClearCase Plug-inThis section explains how to install the mwClearCase plug-in.
NOTE Some CodeWarrior products ship with the mwClearCase plug-in pre-installed. To update the pre-installed plug-in to the latest version, complete the steps in “Obtaining the mwClearCase Plug-in” on page 7, then complete the steps in this section.
To install the mwClearCase plug-in, follow these steps:
1. Use WinZip to decompress the mwClearCase .zip archive.
WinZip extracts these files from the archive:
• mwClearCase.pdf
• mwClearCase_Release_Notes_win32i.txt
• VCSClearCase.dll
2. Copy the VCSClearCase.dll file to this directory, where CodeWarrior represents the path to your CodeWarrior installation:
CodeWarrior\Bin\Plugins\version control\
The mwClearCase plug-in is now installed.
NOTE Be sure to read the mwClearCase_Release_Notes_win32i.txt file for the latest information about the mwClearCase plug-in.
Activating the mwClearCase Plug-inBefore you can use the mwClearCase plug-in, you must first activate and configure it. You use the VCS Setup settings panel in the CodeWarrior IDE to complete these tasks. Figure 2.1 shows the VCS Setup settings panel. Table 2.1 explains each item in this panel.
This section has these tasks:
• Opening the VCS Setup Settings Panel
• Creating a Default mwClearCase Plug-in Configuration
• Creating a Project-specific mwClearCase Plug-in Configuration
Setting Up the mwClearCase Plug-inActivating the mwClearCase Plug-in
9mwClearCase Plug-in User’s Guide
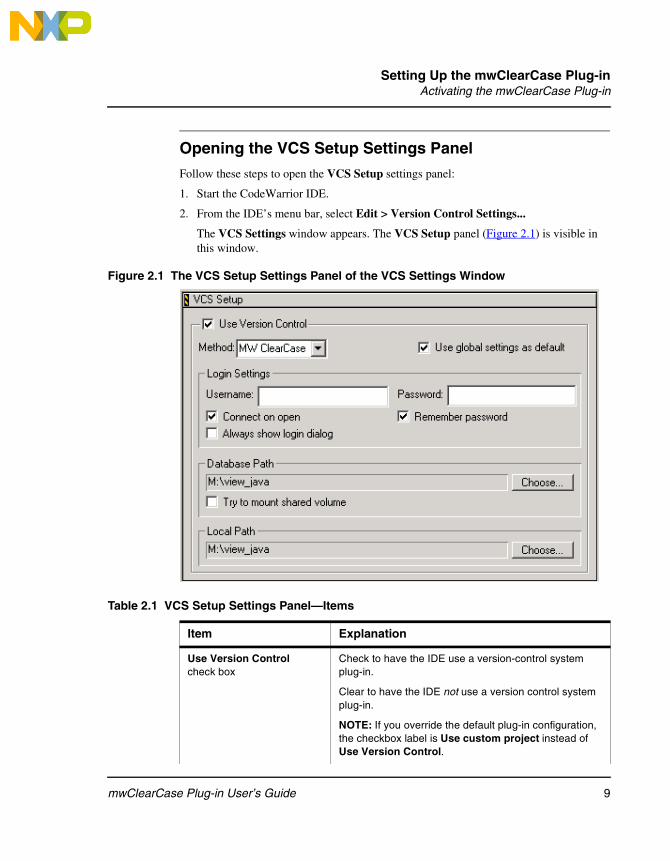
Opening the VCS Setup Settings Panel
Follow these steps to open the VCS Setup settings panel:
1. Start the CodeWarrior IDE.
2. From the IDE’s menu bar, select Edit > Version Control Settings...
The VCS Settings window appears. The VCS Setup panel (Figure 2.1) is visible inthis window.
Figure 2.1 The VCS Setup Settings Panel of the VCS Settings Window
Table 2.1 VCS Setup Settings Panel—Items
Item Explanation
Use Version Controlcheck box
Check to have the IDE use a version-control system plug-in.
Clear to have the IDE not use a version control system plug-in.
NOTE: If you override the default plug-in configuration, the checkbox label is Use custom project instead of Use Version Control.

Setting Up the mwClearCase Plug-inActivating the mwClearCase Plug-in
10 mwClearCase Plug-in User’s Guide
Methodmenu
Select the version control system that you want to activate. For example, select MW ClearCase to activate the mwClearCase plug-in.
Use global settings as defaultcheck box
Check to use the default mwClearCase plug-in configuration.
Clear to specify your own plug-in configuration.
NOTE: This check box appears if no projects were open at the time you opened the VCS Settings window.
Login Settingsgroup box
Groups login-related items into a ClearCase view. The bulleted items below explain each item in this group.
NOTE: For the plug-in to connect to ClearCase successfully, you must enter the login settings exactly as specified below.
• Usernametext box
Leave this text box blank.
• Passwordtext box
Leave this text box blank.
• Connect on opencheck box
Always check this check box.
• Remember password check box
Always check this check box.
• Always show login dialogcheck box
Never check this check box.
Database Pathgroup box
Groups items that pertain to the location of the ClearCase view that the plug-in uses. The bulleted items below explain each of these items.
• Choose...button
Click to open the Select an Access Path dialog box.
Use this dialog box to select the directory that contains the ClearCase view that you want to use. You can specify an absolute, compiler-relative, or system-relative path. Also, if a project is open, you can specify a project-relative path.
NOTE: You must specify the same ClearCase view for Database Path and for Local Path (explained below).
Table 2.1 VCS Setup Settings Panel—Items (continued)
Item Explanation

Setting Up the mwClearCase Plug-inActivating the mwClearCase Plug-in
11mwClearCase Plug-in User’s Guide
You can configure mwClearCase plug-in settings in two different ways:
• Default configuration—the settings that you specify become default settings for projects that use the mwClearCase plug-in. You can override these default settings for individual projects.
• Project-specific configuration—the settings that you specify apply to the current project only. These settings override any default settings from the default configuration.
Creating a Default mwClearCase Plug-in Configuration
This section explains how to create a default configuration. The IDE applies this default configuration to all projects for which you do not specify a custom configuration.
• Database Pathtext box
Shows the name of the selected ClearCase view.
This text box is read-only.
• Try to mount shared volumecheck box
Never check this check box.
Local Pathgroup box
Groups items that pertain to the location of the ClearCase view that the plug-in uses.
The bulleted items below explain each of these items.
NOTE: You must specify the same ClearCase view for Local Path and for Database Path (explained above).
• Choose...button
Click to open the Select an Access Path dialog box.
Use this dialog box to select the same ClearCase view that you selected for Database Path (explained above).
You can specify an absolute, compiler-relative, or system-relative path. Also, if a project is open, you can specify a project-relative path.
NOTE: You must specify the same ClearCase view for Local Path and for Database Path (explained above).
• Pathtext box
Shows the selected local path.
This text box is read-only.
Table 2.1 VCS Setup Settings Panel—Items (continued)
Item Explanation

Setting Up the mwClearCase Plug-inActivating the mwClearCase Plug-in
12 mwClearCase Plug-in User’s Guide
NOTE The default configuration is for your convenience; the IDE does not require it. For example, if all of your projects use the same ClearCase settings, you can create a default configuration that the IDE applies to all projects. If, however, each of your projects uses different ClearCase settings, you can instead specify project-specific configurations. See “Creating a Project-specific mwClearCase Plug-in Configuration” on page 13 for more information.
To create the default mwClearCase plug-in configuration, follow these steps:
1. Start the CodeWarrior IDE.
2. Close any open projects.
3. Choose Edit > Version Control Settings...
The VCS Settings window appears. The VCS Setup panel (Figure 2.1 on page 9) is visible in this window.
4. Check the Use Version Control check box.
The IDE enables the Method menu and the Use global settings as default check box.
5. Select MW ClearCase from the Method menu.
The IDE enables additional items in the VCS Setup panel.
6. Check Use global settings as default check box.
This setting makes the current plug-in configuration the default configuration.
NOTE Because no CodeWarrior project is open, the VCS Setup panel displays the Use global settings as default check box. If a project is open, the VCS Setup panel does not display this check box.
7. Specify the path to the ClearCase view.
a. Click the Choose... button in the Database Path group box.
The Select an Access Path dialog box appears.
b. Use the dialog box to select the directory that contains the ClearCase view that you want to make the default view.
NOTE If you are using a dynamic view, you must start the view before its directory appears in the Select an Access Path dialog box. See the ClearCase documentation for instructions on how to start a dynamic view.
If you are using a snapshot view, its directory appears in the Select an Access Path dialog box automatically.
Setting Up the mwClearCase Plug-inActivating the mwClearCase Plug-in
13mwClearCase Plug-in User’s Guide
c. Click the OK button.
The selected path appears in the read-only text box to the left of theChoose... button.
8. Specify the local path that you want to make the default local path.
a. Click the Choose... button in the Local Path group box.
The Select an Access Path dialog box appears.
b. Use this dialog box to select the same ClearCase view that you selected in step 7..
NOTE You must select the same view for Local Path and Database Path.
c. Click the OK button.
The selected path appears in the read-only text box to the left of theChoose... button.
9. Click the OK button.
The VCS Settings window closes. The IDE activates the mwClearCase plug-in globally and adds the VCS menu to its menu bar.
See “Using the mwClearCase Plug-in” on page 17 for instructions on using each feature of the plug-in.
Creating a Project-specific mwClearCase Plug-in Config-uration
A project-specific plug-in configuration applies to the current CodeWarrior project. This configuration does not apply to any other project.
To create a project-specific plug-in configuration, follow these steps:
1. Start the CodeWarrior IDE.
2. Open or bring forward the CodeWarrior project to which you want to assign a custom plug-in configuration.
3. Choose Edit > Version Control Settings...
The VCS Settings window appears. The VCS Setup panel (Figure 2.1 on page 9) is visible in this window.
NOTE Because a project is open, the VCS Settings panel does not display the Use global settings as default check box. This happens because the IDE assigns the plug-in configuration to the current project.
4. Check the Use Version Control check box.

Setting Up the mwClearCase Plug-inActivating the mwClearCase Plug-in
14 mwClearCase Plug-in User’s Guide
NOTE If you defined a default plug-in configuration, this check box is labeled Use custom project instead of Use Version Control. In this case, the new plug-in configuration overrides the default plug-in configuration.
5. Select MW ClearCase from the Method menu.
The IDE enables additional items in the VCS Setup panel.
6. Specify the path to the ClearCase view that contains the open project and itssource files.
a. Click the Choose... button in the Database Path group box.
The Select an Access Path dialog box appears.
b. Use the dialog box to select the directory of the ClearCase view that contains the open project.
NOTE If you are using a dynamic view, you must start the view before its directory appears in the Select an Access Path dialog box. See the ClearCase documentation for instructions on how to start a dynamic view
If you are using a snapshot view, its directory appears in the Select an Access Path dialog box automatically.
c. Click the OK button.
The selected path appears in the read-only text box to the left of theChoose... button.
7. Specify the local path.
a. Click the Choose... button in the Local Path group box.
The Select an Access Path dialog box appears.
b. Use this dialog box to select the same ClearCase view that you selected in step 6..
NOTE You must select the same view for Local Path and Database Path.
c. Click the OK button.
The selected path appears in the read-only text box to the left of theChoose... button.
d. Click the OK button.
The selected path appears in the read-only text box to the left of theChoose... button.
Setting Up the mwClearCase Plug-inDeactivating the mwClearCase Plug-in
15mwClearCase Plug-in User’s Guide
8. Click the OK button.
The VCS Settings window closes. The IDE activates the mwClearCase plug-in for the current project.
NOTE The VCS menu appears in the IDE’s menu bar when you select a project for which you activated the plug-in. This menu disappears when you select a project for which you did not activate the plug-in.
Refer to “Using the mwClearCase Plug-in” on page 17 for instructions on how to use each feature of the mwClearCase plug-in.
Deactivating the mwClearCase Plug-inTo deactivate the mwClearCase plug-in, follow these steps:
1. Start the CodeWarrior IDE.
2. If you are deactivating the default plug-in configuration, close all projects.
If you are deactivating the plug-in configuration for a specific CodeWarrior project, open or bring forward that project.
3. Choose Edit > Version Control Settings...
The VCS Settings window appears. The VCS Setup panel (Figure 2.1 on page 9) is visible in this window.
4. Select None from the Method menu.
5. If you are deactivating the default plug-in configuration, clear the Use global settings as default check box.
NOTE Because no CodeWarrior project is open, the VCS Setup panel displays the Use global settings as default check box. If a project is open, the VCS Setup panel does not display this check box.
6. Clear the Use Version Control check box.
The IDE disables the rest of the items in the VCS Setup panel.
NOTE If the default plug-in configuration exists, this check box is labeled Use custom project instead of Use Version Control.
7. Click the OK button.
The VCS Settings window closes. The IDE deactivates the plug-in and removes the VCS menu from its menu bar.

Setting Up the mwClearCase Plug-inDeactivating the mwClearCase Plug-in
16 mwClearCase Plug-in User’s Guide
NOTE If no projects were open when you clicked the OK button., the IDE deactivates the default plug-in configuration.
If a project was open, the IDE deactivates the plug-in for just that project.
17mwClearCase Plug-in User’s Guide
3Using the mwClearCase Plug-in
This chapter explains how to use the mwClearCase plug-in.
The chapter has these topics:
• Preparation
• The Project Window
• mwClearCase Plug-in Command Locations
• mwClearCase Plug-in Command Reference
PreparationBefore you can use the mwClearCase plug-in with a CodeWarrior™ project, you must create a ClearCase view that contains your project. Also, if you use a dynamic ClearCase view, you must start this view before you can use it with the plug-in. Refer to the ClearCase documentation for instructions on how to accomplish these tasks.
After you set up your ClearCase view, open a CodeWarrior project in the CodeWarrior IDE. If you created the default plug-in configuration or assigned a custom configuration to the project, you can now use the mwClearCase plug-in with this project.
See “Creating a Default mwClearCase Plug-in Configuration” on page 11 and “Creating a Project-specific mwClearCase Plug-in Configuration” on page 13 for instructions on how to configure the mwClearCase plug-in.
The Project WindowTo use the mwClearCase plug-in, you must understand how the plug-in interacts with the project window of a CodeWarrior project. The project window:
• shows you the ClearCase status of each file in the project and of the project itself
• lets you apply ClearCase commands to files in the project and to the project itself
• shows the results of ClearCase commands

Using the mwClearCase Plug-inThe Project Window
18 mwClearCase Plug-in User’s Guide
The Project Window and the Plug-inAfter you activate the mwClearCase plug-in, a new column appears in the project window. If you created a default plug-in configuration, the new column appears in all project windows. Otherwise, the new column appears in the current project window.This column contains icons that signify the check out status of each file in the project.In addition, an icon in the lower-left corner of the project window indicates the check out status of the project file itself (the .mcp file).
Figure 3.1 shows the project window of a project that has an active mwClearCaseplug-in configuration.
Table 3.1 explains how to interpret each check out status icon.
Figure 3.1 A Project Window with an Active mwClearCase Plug-in Configuration
Table 3.1 Check Out Status Icons: Interpretation
Icon Check Out Status
File has not been added to ClearCase.File is writable.
File has not been added to ClearCase.File is read-only.
File has not been checked out of ClearCase.File is read-only.
Check Out
File Check OutProject Check Out Status Icon
Status Column
Status Icons

Using the mwClearCase Plug-inmwClearCase Plug-in Command Locations
19mwClearCase Plug-in User’s Guide
mwClearCase Plug-in Command LocationsThe mwClearCase plug-in lets you apply common ClearCase commands to a CodeWarrior project and to its files. This section explains how to find and use these commands in the CodeWarrior IDE.
The mwClearCase plug-in makes ClearCase commands available in these places:
• The IDE’s VCS Menu
• The Project Window’s Context Menu
• The Editor Window’s VCS Menu
The IDE’s VCS MenuThe VCS menu is in the CodeWarrior IDE’s menu bar.
This menu appears in the menu bar if at least one of these conditions is true:
• You created the default plug-in configuration.
• You assigned a plug-in configuration to a project, and this project is both open and in the foreground.
The VCS menu includes every mwClearCase command that the plug-in supports.Other menus include just a subset of the supported ClearCase commands.
The IDE enables individual commands in the VCS menu depending on the check out status of the current project or currently selected project file.
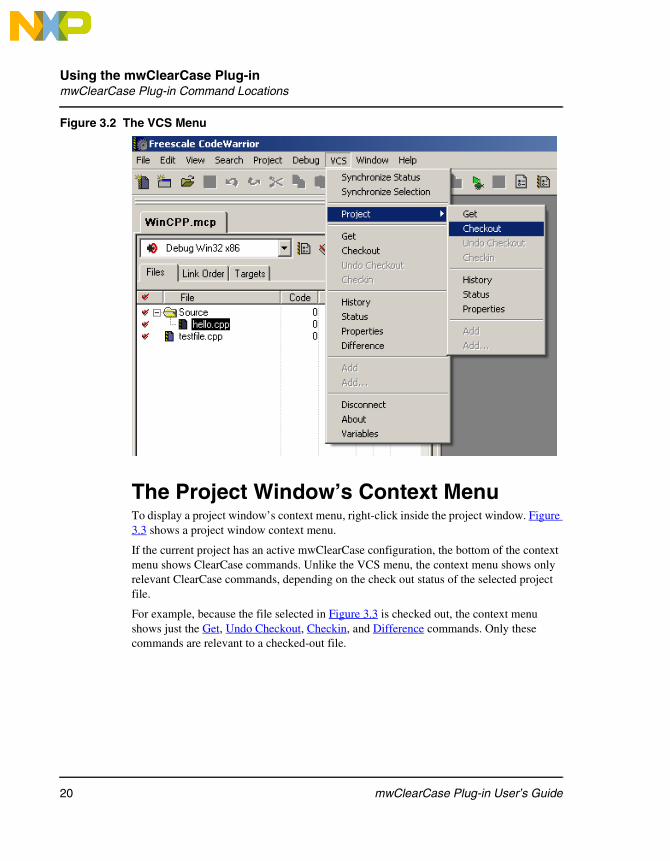
Figure 3.2 shows the VCS menu.
File has not been checked out of ClearCase.File is writable.
File has been checked out of ClearCase.File is writable.
Table 3.1 Check Out Status Icons: Interpretation (continued)
Icon Check Out Status
Using the mwClearCase Plug-inmwClearCase Plug-in Command Locations
20 mwClearCase Plug-in User’s Guide
Figure 3.2 The VCS Menu
The Project Window’s Context MenuTo display a project window’s context menu, right-click inside the project window. Figure 3.3 shows a project window context menu.
If the current project has an active mwClearCase configuration, the bottom of the context menu shows ClearCase commands. Unlike the VCS menu, the context menu shows only relevant ClearCase commands, depending on the check out status of the selected project file.
For example, because the file selected in Figure 3.3 is checked out, the context menu shows just the Get, Undo Checkout, Checkin, and Difference commands. Only these commands are relevant to a checked-out file.

Using the mwClearCase Plug-inmwClearCase Plug-in Command Locations
21mwClearCase Plug-in User’s Guide
Figure 3.3 The Project Window’s Context Menu
The Editor Window’s VCS MenuIf the mwClearCase plug-in is active for a project, the editor window toolbar includes a VCS menu.
A checkout status icon identifier the editor window’s VCS menu. The icon that appears corresponds to the check out status of the file shown in the editor window. Table 3.1 on page 18 explains how to interpret each check out status icon. Figure 3.4 shows a CodeWarrior editor window.
Click the check out status icon in the editor window toolbar to display a menu of ClearCase commands. Unlike the VCS menu, the editor’s VCS menu contains only relevant ClearCase commands, depending on the check out status of the open file.
For example, because the file in Figure 3.4 is checked out, the menu shows just the Get, Undo Checkout, Connect, and Difference commands. Only these commands are relevant to a checked-out file.
ClearCaseCommands

Using the mwClearCase Plug-inmwClearCase Plug-in Command Reference
22 mwClearCase Plug-in User’s Guide
Figure 3.4 The Editor Window’s VCS Menu
mwClearCase Plug-in Command ReferenceThis section explains the purpose and effect of each command that the mwClearCase plug-in supports.
There are four supported categories of ClearCase commands:
• File Commands
These commands apply to the selected files in the selected project.
You issue file commands from the IDE’s VCS menu, from a project’s context menu, and from an editor window’s VCS menu.
• Project Commands
These commands apply to the selected project.
You issue project commands from the Project submenu of the IDE’s VCS menu.
• Miscellaneous Commands
These commands are not ClearCase commands. The miscellaneous commands perform a variety of actions. See the reference entry for each miscellaneous command for more information.
Table 3.2 lists supported commands, along with their locations and types.

Using the mwClearCase Plug-inmwClearCase Plug-in Command Reference
23mwClearCase Plug-in User’s Guide
Table 3.2 mwClearCase Plug-in: Supported Commands
Command Command Locations Command Types
VCS Menu
Project Window Context Menu
Editor Window Menu
File Project Miscellaneous
About • •
Add • • • • •
Add... • • • •
Checkin • • • • •
Checkout • • • • •
Connect • •
Difference • • • •
Disconnect • •
Get • • • • •
History • • •
Properties • • •
Status • • •
Synchronize Selection
• •
Synchronize Status
• •
Undo Checkout
• • • • •
Variables • •

Using the mwClearCase Plug-inmwClearCase Plug-in Command Reference
24 mwClearCase Plug-in User’s Guide
About
Select this command to display the mwClearCase plug-in’s About box. This box shows the version number of the plug-in, along with other identification information.
Select VCS > About to display the About box (Figure 3.5).
NOTE The About command is available in just the IDE’s VCS menu.
Figure 3.5 About Box for the mwClearCase Plug-in
Add
You can apply this command to a file or a project.
If applied to a file, the Add command adds the selected file to ClearCase.
If applied to an open project, the Add command adds the project file (that is, the .mcp file) to ClearCase.
Adding a File
To add a file to ClearCase, follow these steps:
1. Start the CodeWarrior IDE.
2. Open the project that contains the file you want to add to ClearCase.
The CodeWarrior IDE displays the project window for this project.
3. In the project window, click the name of the file you want to add.
The IDE highlights this file name.
Using the mwClearCase Plug-inmwClearCase Plug-in Command Reference
25mwClearCase Plug-in User’s Guide
TIP To add several files at once, first highlight the name of each file you want to add, then issue the Add command.
4. Select VCS > Add.
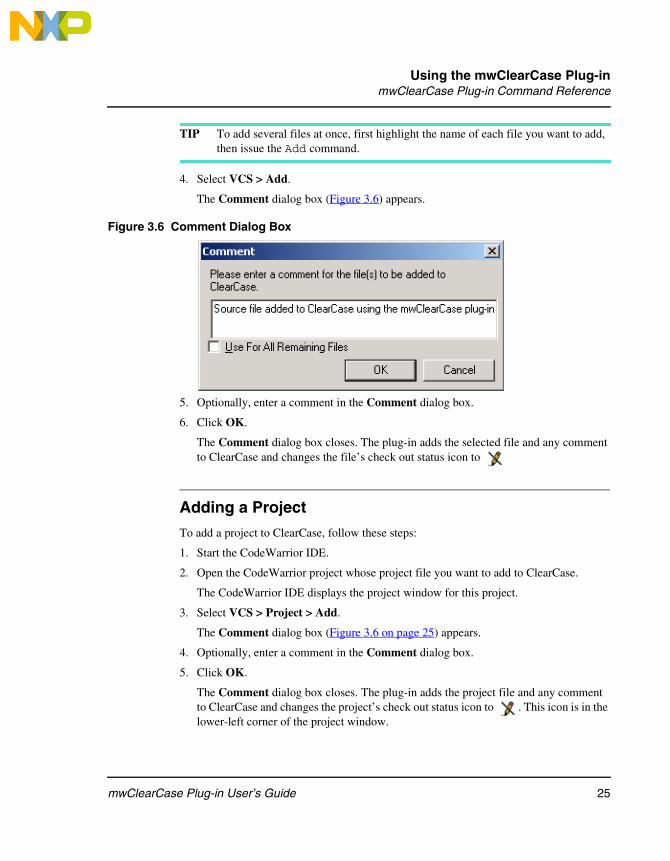
The Comment dialog box (Figure 3.6) appears.
Figure 3.6 Comment Dialog Box
5. Optionally, enter a comment in the Comment dialog box.
6. Click OK.
The Comment dialog box closes. The plug-in adds the selected file and any comment to ClearCase and changes the file’s check out status icon to
Adding a Project
To add a project to ClearCase, follow these steps:
1. Start the CodeWarrior IDE.
2. Open the CodeWarrior project whose project file you want to add to ClearCase.
The CodeWarrior IDE displays the project window for this project.
3. Select VCS > Project > Add.
The Comment dialog box (Figure 3.6 on page 25) appears.
4. Optionally, enter a comment in the Comment dialog box.
5. Click OK.
The Comment dialog box closes. The plug-in adds the project file and any comment to ClearCase and changes the project’s check out status icon to . This icon is in the lower-left corner of the project window.

Using the mwClearCase Plug-inmwClearCase Plug-in Command Reference
26 mwClearCase Plug-in User’s Guide
Add...
This command applies to a file or a project.
If applied to a file, the Add... command adds the selected file to ClearCase.
If applied to an open project, the Add... command adds the project file (that is, the project’s .mcp file) to ClearCase.
NOTE The Add... command is different from the Add command. The Add... command gives you more control over how a file gets added to ClearCase.
See “Add” on page 24 for an explanation of the Add command.
Adding a File using the Add... Command
To add a file to ClearCase using the Add... command, follow these steps:
1. Start the CodeWarrior IDE.
2. Open the project that contains the file you want to add to ClearCase.
The CodeWarrior IDE displays the project window for this project.
3. In the project window, click the name of the file you want to add.
The IDE highlights this file name.
TIP To add several files at once, first highlight the name of each file you want to add, then issue the Add... command.
4. Select VCS > Add...
The Comment dialog box (Figure 3.7) appears.

Using the mwClearCase Plug-inmwClearCase Plug-in Command Reference
27mwClearCase Plug-in User’s Guide
Figure 3.7 Comment Dialog Box
5. Optionally, enter a comment in the Comment dialog box.
6. Click OK
The Comment dialog box closes. The ClearCase Add File dialog box(Figure 3.8) appears.
Figure 3.8 ClearCase Add File Dialog Box
7. Use the ClearCase Add File dialog box to select the ClearCase file-addition options you want.
8. Click OK
The ClearCase Add File dialog box closes. The plug-in adds the selected file and any comment to ClearCase and changes the file’s check out status icon to .

Using the mwClearCase Plug-inmwClearCase Plug-in Command Reference
28 mwClearCase Plug-in User’s Guide
Adding a Project using the Add... Command
To add a project to ClearCase using the Add... command, follow these steps:
1. Start the CodeWarrior IDE.
2. Open the CodeWarrior project whose project file you want to add to ClearCase.
The CodeWarrior IDE displays the project window for this project.
3. Select VCS > Project > Add...
The Comment dialog box (Figure 3.6 on page 25) appears.
4. Optionally, enter a comment in the Comment dialog box.
5. Click OK
The Comment dialog box closes. The ClearCase Add File dialog box (Figure 3.8 on page 27) appears.
6. Use the ClearCase Add File dialog box to select the ClearCase file addition options you want.
7. Click OK
The ClearCase Add File dialog box closes. The plug-in adds the project file and any comment to ClearCase and changes the project’s check out status icon to . This icon is in the lower-left corner of the project window.
Checkin
This command applies to a file or a project.
If applied to a file, the Checkin command checks in the changes made to the selected file into ClearCase.
If applied to a project, the Checkin command checks the changes made to the project file (that is, to the .mcp file) into ClearCase.
Checking in a File
To check in a file, follow these steps:
1. Start the CodeWarrior IDE.
2. Open the project that contains the file you want to check in.
The CodeWarrior IDE displays the project window for this project.

Using the mwClearCase Plug-inmwClearCase Plug-in Command Reference
29mwClearCase Plug-in User’s Guide
3. In the project window, click the name of the file you want to check in.
The IDE highlights this file name.
TIP To check in several files at once, first highlight the name of each file you want to check in, then issue the Checkin command.
4. Select VCS > Checkin.
5. The Comment dialog box (Figure 3.9) appears.
Figure 3.9 Comment Dialog Box
6. Optionally, enter a comment in the Comment dialog box.
7. Click OK.
The Comment dialog box closes. The plug-in checks in the selected file and changes its check out status icon to .
NOTE If you try to check in a file that has not changed, the check in fails. In this case, apply the Undo Checkout command to the file.
Checking in a Project
To check a project into ClearCase, follow these steps:
1. Start the CodeWarrior IDE.
2. Open the CodeWarrior project whose project file you want to check in.
The CodeWarrior IDE displays the project window for this project.
3. Select VCS > Project > Checkin.
The Comment dialog box (Figure 3.9 on page 29) appears.
Using the mwClearCase Plug-inmwClearCase Plug-in Command Reference
30 mwClearCase Plug-in User’s Guide
4. Optionally, enter a comment in the Comment dialog box.
5. Click OK.
The Comment dialog box closes. The plug-in checks the project file and any comment into ClearCase and changes the project’s check out status icon to . This icon is in the lower-left corner of the project window.
NOTE If you try to check in a project file that has not changed, the check in fails. In this case, apply the Undo Checkout command to the project file.
Checkout
This command applies to a file or a project.
If applied to a file, the Checkout command creates a modifiable copy of the file in the plug-in’s ClearCase view.
If applied to a project, the Checkout command creates a modifiable version of the project file (that is, of the .mcp file) in the plug-in’s ClearCase view.
See “Checkin” on page 28 for instructions on how to check in a file that you checked out.
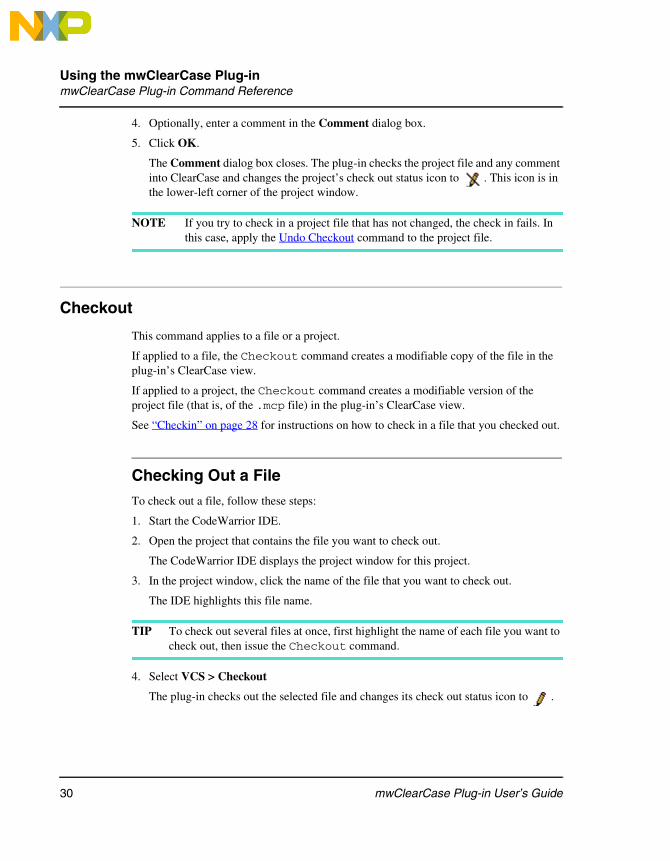
Checking Out a File
To check out a file, follow these steps:
1. Start the CodeWarrior IDE.
2. Open the project that contains the file you want to check out.
The CodeWarrior IDE displays the project window for this project.
3. In the project window, click the name of the file that you want to check out.
The IDE highlights this file name.
TIP To check out several files at once, first highlight the name of each file you want to check out, then issue the Checkout command.
4. Select VCS > Checkout
The plug-in checks out the selected file and changes its check out status icon to .

Using the mwClearCase Plug-inmwClearCase Plug-in Command Reference
31mwClearCase Plug-in User’s Guide
Checking Out a Project
To check out a project, follow these steps:
1. Start the CodeWarrior IDE.
2. Open the project that you want to check out.
The CodeWarrior IDE displays the project window for this project.
3. Select VCS > Project > Checkout.
The plug-in checks out the project (that is, the project’s .mcp file) and changes the project’s check out status icon to . This icon appears in the lower-left corner of the project window.
Connect
Although this command appears in the IDE’s VCS menu, it is redundant. When necessary, the mwClearCase plug-in automatically connects to the ClearCase view specified in its configuration.
Difference
This command applies to a single file only. You cannot apply it to multiple files, to a project, or recursively.
The Difference command displays the differences between the copy of the selected file in the plug-in’s ClearCase view and the latest version of this file in ClearCase.
To use the Difference command, follow these steps:
1. Start the CodeWarrior IDE.
2. Open the project that contains the file to which you want to apply the Difference command.
The CodeWarrior IDE displays the project window for this project.
3. In the project window, click the name of the file to which to apply the Difference command.
The IDE highlights this file name.
Using the mwClearCase Plug-inmwClearCase Plug-in Command Reference
32 mwClearCase Plug-in User’s Guide
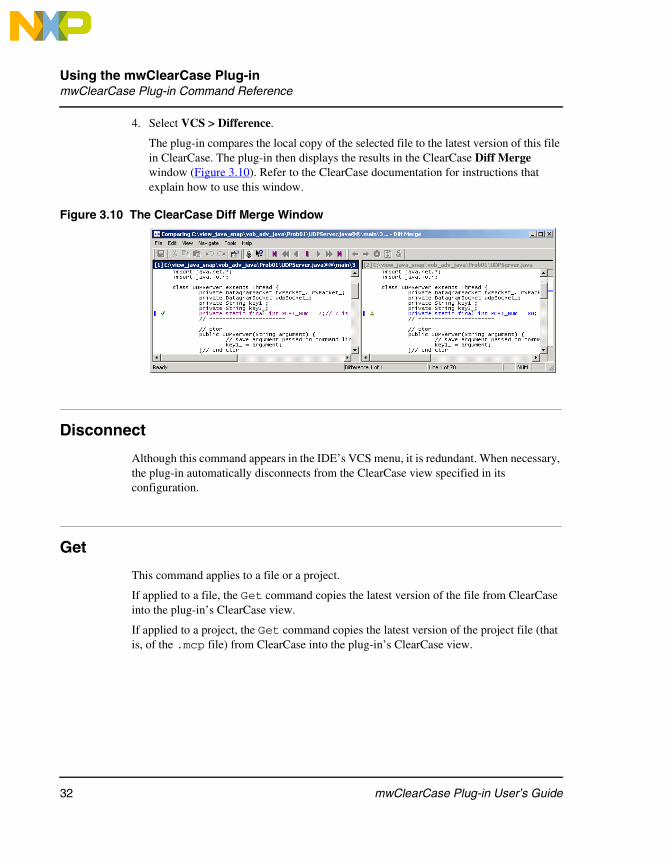
4. Select VCS > Difference.
The plug-in compares the local copy of the selected file to the latest version of this file in ClearCase. The plug-in then displays the results in the ClearCase Diff Merge window (Figure 3.10). Refer to the ClearCase documentation for instructions that explain how to use this window.
Figure 3.10 The ClearCase Diff Merge Window
Disconnect
Although this command appears in the IDE’s VCS menu, it is redundant. When necessary, the plug-in automatically disconnects from the ClearCase view specified in its configuration.
Get
This command applies to a file or a project.
If applied to a file, the Get command copies the latest version of the file from ClearCase into the plug-in’s ClearCase view.
If applied to a project, the Get command copies the latest version of the project file (that is, of the .mcp file) from ClearCase into the plug-in’s ClearCase view.

Using the mwClearCase Plug-inmwClearCase Plug-in Command Reference
33mwClearCase Plug-in User’s Guide
Getting a File
To get the latest version of a file, follow these steps:
1. Start the CodeWarrior IDE.
2. Open the project that contains the file for which you want to get the latest version.
The CodeWarrior IDE displays the project window for this project.
3. In the project window, click the name of the file for which to get the latest version.
The IDE highlights this file name.
TIP To get the latest version of several files at once, first highlight the name of each file, then issue the Get command.
4. Select VCS > Get.
The plug-in copies the latest version of the selected file into the plug-in’sClearCase view.
Getting a Project
To get the latest version of a project, follow these steps:
1. Start the CodeWarrior IDE.
2. Open the project for which you want to get the latest version.
The CodeWarrior IDE displays the project window for this project.
3. Select VCS > Project > Get.
The plug-in copies the latest version of the project (that is, of the project’s .mcp file) from ClearCase into the plug-in’s ClearCase view.
History
This command applies to a file or to a project. You cannot apply it recursively.
If applied to a file, the History command lists each revision and check-in comment made to the file since it was first added to ClearCase.
If applied to a project, the History command lists each revision and check-in comment made to the project’s .mcp file since it was first added to ClearCase.

Using the mwClearCase Plug-inmwClearCase Plug-in Command Reference
34 mwClearCase Plug-in User’s Guide
Displaying the Revision History of a File
To display the revision history of a file, follow these steps:
1. Start the CodeWarrior IDE.
2. Open the project that contains the file for which you want to obtain a revision history.
The CodeWarrior IDE displays the project window for this project.
3. In the project window, click the name of the file for which to you want to obtain a revision history.
The IDE highlights this file name.
TIP To get the revision history of several files at once, first highlight the name of each file, then issue the History command.
4. Select VCS > History.
The plug-in displays the file’s revision history in the ClearCase History Browser window (Figure 3.11).
Figure 3.11 The ClearCase History Browser Window
Using the mwClearCase Plug-inmwClearCase Plug-in Command Reference
35mwClearCase Plug-in User’s Guide
Displaying the Revision History of a Project
To display the revision history of a project, follow these steps:
1. Start the CodeWarrior IDE.
2. Open the project for which you want to obtain a revision history.
The CodeWarrior IDE displays the project window for this project.
3. Select VCS > History.
The plug-in displays the revision history of the project’s .mcp file in the ClearCase History Browser window (Figure 3.11 on page 34).
Properties
This command applies to a single file or a project. You cannot apply it to multiple filesor recursively.
The Properties command displays the ClearCase property dialog box for the selected file or project.
Displaying the Properties of a File
To display a file’s properties, follow these steps:
1. Start the CodeWarrior IDE.
2. Open the project that contains the file whose properties you want to display.
The CodeWarrior IDE displays the project window for this project.
3. In the project window, click the name of the file whose properties you want to display.
The IDE highlights this file name.
4. Select VCS > Properties.
The plug-in displays the file’s properties in the ClearCase Properties dialog box (Figure 3.12).

Using the mwClearCase Plug-inmwClearCase Plug-in Command Reference
36 mwClearCase Plug-in User’s Guide
Figure 3.12 The ClearCase Properties Dialog Box
NOTE Refer to the ClearCase documentation for instructions on how to use the ClearCase Properties Dialog Box.
Displaying the Properties of a Project
To display a project’s properties, follow these steps:
1. Start the CodeWarrior IDE.
2. Open the project whose properties you want to display.
The CodeWarrior IDE displays the project window for this project.
3. Select VCS > Project > Properties.
The plug-in displays the project’s properties (that is, the properties of the project’s .mcp file) in the ClearCase Properties dialog box (Figure 3.12 on page 36).
NOTE Refer to the ClearCase documentation for instructions on how to use the ClearCase Properties Dialog Box.

Using the mwClearCase Plug-inmwClearCase Plug-in Command Reference
37mwClearCase Plug-in User’s Guide
Status
This command applies to a file or a project. You cannot apply it recursively.
The Status command reports the ClearCase status of the selected file or project.
Displaying the Status of a File
To display the status of a file, follow these steps:
1. Start the CodeWarrior IDE.
2. Open the project that contains the file for which you want to obtain status.
The CodeWarrior IDE displays the project window for this project.
3. In the project window, click the name of the file for which to you want to obtain status.
The IDE highlights this file name.
TIP To get the status of several files at once, first highlight the name of each file, then issue the Status command.
4. Select VCS > Status.
The plug-in displays the file’s status in the VCS Messages window (Figure 3.11).
Figure 3.13 The Status Window

Using the mwClearCase Plug-inmwClearCase Plug-in Command Reference
38 mwClearCase Plug-in User’s Guide
Displaying the Status of a Project
To display the status of a project, follow these steps:
1. Start the CodeWarrior IDE.
2. Open the project for which you want to obtain status.
The CodeWarrior IDE displays the project window for this project.
3. Select VCS > Project > Status.
The plug-in displays the status of the project (that is, of the project’s .mcp file) in the VCS Messages window (Figure 3.13 on page 37).
Synchronize Selection
This command applies to a file or to files in a project. You cannot apply it to a projector recursively.
This command verifies that the check out status icon displayed in the project window for the selected file matches the status of that file in ClearCase. If there is a discrepancy, the plug-in displays the correct check out status icon.
The mwClearCase plug-in can display the wrong check out status icon if you change the check out status of a file outside of the CodeWarrior IDE (for example, by using the Rational ClearCase Explorer program). You can use the Synchronize Selection command to correct discrepancies that might occur.
To issue the Synchronize Selection command, follow these steps:
1. Start the CodeWarrior IDE.
2. Open the project that contains the file for which to synchronize status.
The CodeWarrior IDE displays the project window for this project.
3. In the project window, click the name of the file for which to synchronize status.
The IDE highlights this file name.
TIP To synchronize the status of several files at once, first highlight the name of each file, then issue the Synchronize Selection command.
4. Select VCS > Synchronize Selection.
The plug-in verifies that the check out status icon displayed for the selected file is correct. If not, the plug-in displays the correct check out status icon.

Using the mwClearCase Plug-inmwClearCase Plug-in Command Reference
39mwClearCase Plug-in User’s Guide
Synchronize Status
This command applies to all files in a project and to the project itself. You cannot apply it to an individual file or recursively.
This command updates the check out status icon of each file in the project and of the project file itself (that is, of the project’s .mcp file).
The mwClearCase plug-in can sometimes display incorrect check out status icons. For example, if you change the check out status of a file or project outside of the CodeWarrior IDE (for example, by using the Rational ClearCase Explorer program), the plug-in might display incorrect status icons. Use the Synchronize Status command to correct discrepancies that might occur.
To issue the Synchronize Status command, follow these steps:
1. Start the CodeWarrior IDE.
2. Open the project whose status you want to synchronize.
The CodeWarrior IDE displays the project window for this project.
3. Select VCS > Synchronize Status.
The plug-in updates the check out status icon for each file for which it finds a discrepancy.
Undo Checkout
This command applies to a file or project.
If applied to a checked out file, the Undo Checkout command changes the ClearCase status of the file to “not checked out.” All changes made to the file are lost.
If applied to a checked out project, the Undo Checkout command changes the ClearCase status of the project file (that is, of the project’s .mcp file) to “not checked out.” All changes made the project file are lost.
Undoing a File Check Out
To undo a file check out, follow these steps:
1. Start the CodeWarrior IDE.
2. Open the project that contains the file for which to undo the check out.
The CodeWarrior IDE displays the project window for this project.
Using the mwClearCase Plug-inmwClearCase Plug-in Command Reference
40 mwClearCase Plug-in User’s Guide
3. In the project window, click the name of the file for which to undo the check out.
The IDE highlights this file name.
TIP To undo the check out for several files at once, first highlight the name of each file, then issue the Undo Checkout command.
4. Select VCS > Undo Checkout.
The plug-in undoes the check out of the selected file and changes its check out status icon to .
Undoing a Project Check Out
To undo a project check out, follow these steps:
1. Start the CodeWarrior IDE.
2. Open the project for which to undo the check out.
The CodeWarrior IDE displays the project window for this project.
3. Select VCS > Project > Undo Checkout.
The plug-in undoes the check out of the selected project and changes its check out status icon to . This icon appears in the lower-left corner of the project window.
Variables
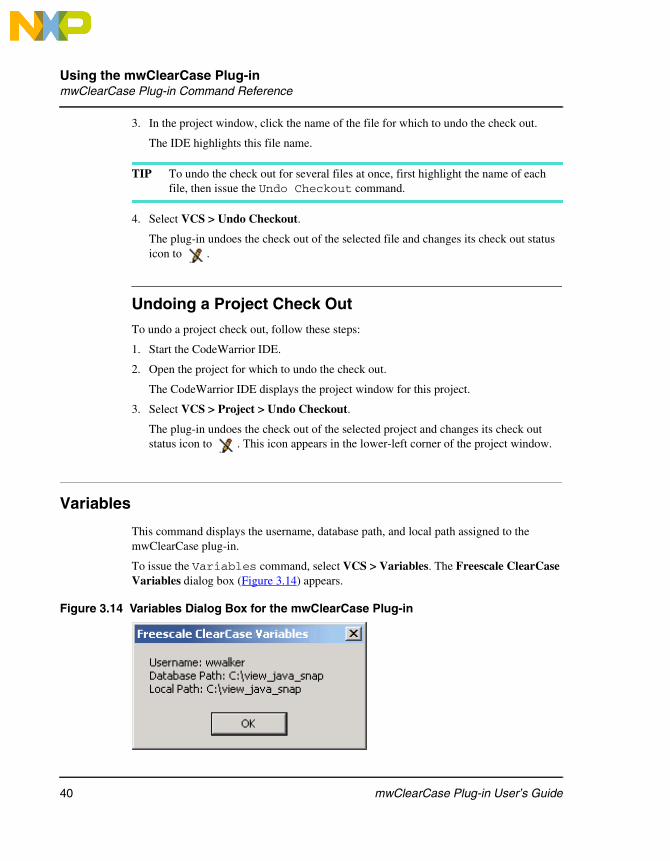
This command displays the username, database path, and local path assigned to the mwClearCase plug-in.
To issue the Variables command, select VCS > Variables. The Freescale ClearCase Variables dialog box (Figure 3.14) appears.
Figure 3.14 Variables Dialog Box for the mwClearCase Plug-in

Using the mwClearCase Plug-inmwClearCase Plug-in Command Reference
41mwClearCase Plug-in User’s Guide

Using the mwClearCase Plug-inmwClearCase Plug-in Command Reference
42 mwClearCase Plug-in User’s Guide

43mwClearCase Plug-in User’s Guide
4Tutorial
This chapter has a multi-part tutorial. The purpose of this tutorial is to show you how to
• create a default configuration for the mwClearCase plug-in
• use the plug-in to perform common ClearCase tasks from within theCodeWarrior™ IDE.
NOTE To complete the sections in this tutorial, you must have a ClearCase view available. Also, if you use a dynamic ClearCase view, you must start this view before starting the tutorial.
The tutorial has these lessons:
• Creating a Default Plug-in Configuration
• Checking out a File
• Checking out a Project
• Checking in a File
• Checking in a Project
Creating a Default Plug-in ConfigurationAlthough you can create a custom plug-in configuration for every CodeWarrior project, you might find it more convenient to create a default plug-in configuration. The default configuration works for all of your CodeWarrior projects.
To create a default plug-in configuration, follow these steps:
1. Start the CodeWarrior IDE.
2. Close any open projects.
3. Select Edit > VCS Settings...
The VCS Settings window appears. The VCS Setup panel (Figure 4.1) is visible inthis window.

TutorialCreating a Default Plug-in Configuration
44 mwClearCase Plug-in User’s Guide
Figure 4.1 The VCS Setup Panel of the VCS Settings Window
4. Check the Use Version Control check box.
The Method menu and the Use global settings as default check box activate.
5. Select MW ClearCase from the Method menu.
The IDE activates additional items in the VCS Setup panel.
6. Check Use global settings as default check box.
This setting makes this plug-in configuration the default configuration. The IDE uses this configuration for each CodeWarrior project you open that does not have a custom plug-in configuration.
7. Leave the Username text box empty.
8. Check the Connect on open check box.
9. Check Remember password check box.
The plug-in enables the Password text box.
10. Leave the Password text box empty.
11. Clear the Always show login dialog check box.
12. Assign a ClearCase view to the default plug-in configuration.
a. Click the Choose... button in the Database Path group box.
The Select an Access Path dialog box appears.

TutorialChecking out a File
45mwClearCase Plug-in User’s Guide
b. Use this dialog box to select the ClearCase view that you want to use for the rest of this tutorial.
c. Leave the Try to mount shared volume check box unchecked.
d. Click OK.
The full path to the selected ClearCase view appears in the read-only text box to the left of the Choose... button.
13. Assign a local path to the default plug-in configuration.
a. Click the Choose... button in the Local Path group box.
The Select an Access Path dialog box appears.
b. Use this dialog box to select the same ClearCase view that you selected for Database Path.
NOTE You must select the same ClearCase view for Database Path and for Local Path. Otherwise, the mwClearCase plug-in will not work.
c. Click OK.
The full path to the selected ClearCase view appears in the read-only text box to the left of the Choose... button.
14. Click OK.
The VCS Settings window closes. The IDE activates the mwClearCase plug-in globally and adds the VCS menu to the IDE’s menu bar.
You have finished creating the default mwClearCase plug-in configuration.
Checking out a File Now that you created a default plug-in configuration, you can use the plug-in to check out files from a CodeWarrior project while remaining inside the IDE.
To check out a file, follow these steps:
1. Start the CodeWarrior IDE.
2. Open one of the CodeWarrior projects in the ClearCase view selected in the last section of this tutorial.
The IDE displays the project window of the selected project.

TutorialChecking out a Project
46 mwClearCase Plug-in User’s Guide
3. Select VCS > Synchronize Status.
The project window displays the check out status icon for each file in the project and for the project itself.
Figure 4.2 shows the project window for a CodeWarrior project. Table 3.1 on page 18 explains how to interpret each of the check out status icons.
Figure 4.2 A CodeWarrior Project Window
4. In the project window, click the name of one of the files in the project.
The project window highlights this file name.
5. Select VCS > Checkout.
The plug-in does these things:
a. Copies the latest version of the selected file into its ClearCase view.
b. Makes the file writable and marks it “checked out.”
c. Changes the file’s check out status icon to .
The selected file is now checked out. You can now use the CodeWarrior editor to modify the file.
Checking out a ProjectTo check out a project (that is, a project’s .mcp file), follow these steps:
1. Start the CodeWarrior IDE.
2. Open the project that you want to check out.
The IDE displays the project window for this project.

TutorialChecking in a File
47mwClearCase Plug-in User’s Guide
3. Select VCS > Project > Checkout.
The plug-in does these things:
a. Copies the latest version of the project’s .mcp file into its ClearCase view.
b. Makes the .mcp file writable and marks it “checked out.”
c. Changes the project’s check out status icon to . This icon is in the lower-left
corner of the project window.
The project is now checked out. You can change the project’s configuration as necessary.
Checking in a FileAfter you finish changing a file that you previously checked out, you can check it back in.
To check a file in to ClearCase, follow these steps:
1. Start the CodeWarrior IDE.
2. Open the CodeWarrior project that contains the file you want to check in.
The IDE displays the project window of the selected project.
3. In the project window, click the name of the file you want to check in.
The project window highlights this file name.
4. Select VCS > Checkin.
The plug-in displays the Comment dialog box (Figure 4.3).
Figure 4.3 Comment Dialog Box

TutorialChecking in a Project
48 mwClearCase Plug-in User’s Guide
5. Optionally, enter a check in comment.
6. Click OK.
The plug-in instructs ClearCase to do these things:
a. Create a new version of the file being checked in.
b. Mark the file “not checked out.”
The plug-in then changes the file’s check out status icon to .
NOTE If you check out a file, do not change it, and then check it back in, the Check in command fails. Use the Undo Checkout command in this case.
Checking in a ProjectAfter you finish changing a project’s configuration, you can check it back in.
To check a project into ClearCase, follow these steps:
1. Start the CodeWarrior IDE.
2. Open the CodeWarrior project that you want to check in.
The IDE displays the project window of the selected project.
3. Select VCS > Project > Checkin.
The plug-in displays the Comment dialog box (Figure 4.3 on page 47).
4. Optionally, enter a checkin comment.
5. Click OK
The plug-in instructs ClearCase to do these things:
a. Create a new version of the project file being checked in.
b. Mark the project file “not checked out.”
The plug-in then changes the projects’s check out status icon to . This icon is in the lower-left corner of the project window
NOTE If you check out a project, do not change it, and then check it back in, the Check in command fails. Use the Undo Checkout command in this case.

49mwClearCase Plug-in User’s Guide
Index
Aabout
ClearCase 6the mwClearCase plug-in 5
about command 24activating the mwClearCase plug-in 8–15add command 24add... command 26Always show login dialog configuration
option 10
Ccheck out status icons
in a project window 17interpretation 18
checkin command 28checkout command 30ClearCase
learning more about 6command locations 19–22
editor window 21project window context menu 20VCS menu 19
commandsabout 24add 24add... 26checkin 28checkout 30connect 31difference 31disconnect 32get 32history 33project window context menu 20properties 35status 37synchronize selection 38synchronize status 39undo checkout 39variables 40
commands supported by the plug-in 22–40configuration options
Always show login dialog 10Connect on open 10Database Path 10Local Path 11Login Settings 10Method 10Password 10Remember password 10Try to mount shared volume 11Use global settings as default 10Use Version Control 9Username 10
connect command 31Connect on open configuration option 10creating a project-specific plug-in
configuration 13–15creating the default plug-in configuration 11–13
DDatabase Path configuration option 10deactivating the mwClearCase plug-in 15–16default plug-in configuration, creating 11–13difference command 31disconnect command 32
Ggeneral ClearCase information 6get command 32
Hhistory command 33how to
activate the mwClearCase plug-in 8–15check in a file 47–48check in a project 48check out a file 45–46check out a project 46–47create a default plug-in configuration 11–13,
43–45

50 mwClearCase Plug-in User’s Guide
create a project-specific plug-in configuration 13–15
deactivate the mwClearCase plug-in 15–16install the mwClearCase plug-in 8interpret the check out status icons 18obtain the mwClearCase plug-in 7
Iinformation about ClearCase 6installing the mwClearCase plug-in 8
Llearning about ClearCase 6Local Path configuration option 11location of commands 19–22Login Settings configuration option 10
Mmeaning of check out status icons 18menu, VCS 19Method configuration option 10more information about ClearCase 6mwClearCase
and project window 18mwClearCase plug-in
about 5activating 8–15
for a specific project 13–15globally 11–13
command locations 19–22editor window 21project window context menu 20VCS menu 19
command reference 22–40commands
about 24add 24add... 26checkin 28checkout 30connect 31difference 31disconnect 32
get 32history 33properties 35status 37synchronize selection 38synchronize status 39undo checkout 39variables 40
deactivating 15–16installing 8obtaining 7overview 5–6preparation 17project window
check out status icons 17project window context menu commands 20setting up 7–16system requirements 5tutorial 43–48
checking in a file 47–48checking in a project 48checking out a file 45–46checking out a project 46–47default plug-in configuration,
creating 43–45using 17–40
Oobtaining the mwClearCase plug-in 7overview of the mwClearCase plug-in 5–6
PPassword configuration option 10plug-in preparation 17plug-in tutorial 43–48preparation 17project specific plug-in configuration,
creating 13–15project window
and mwClearCase plug-in 18check out status icons 17context menu 20context menu and ClearCase commands 20
project window context menu 20

51mwClearCase Plug-in User’s Guide
properties command 35
RRemember password option 10requirements for using the mwClearCase plug-
in 5
Ssetting up the mwClearCase plug-in 7–16settings panels
VCS Setup 9status command 37synchronize selection command 38synchronize status command 39system requirements 5
Ttasks
activating the mwClearCase plug-in 8–15creating a default plug-in configuration 11–
13creating a project-specific plug-in
configuration 13–15deactivating the mwClearCase plug-in 15–
16installing the mwClearCase plug-in 8obtaining the mwClearCase plug-in 7
Try to mount shared volume configuration option 11
tutorialchecking in a file 47–48checking in a project 48checking out a file 45–46checking out a project 46–47default plug-in configuration, creating 43–
45
Uundo checkout command 39Use global settings as default configuration
option 10Use Version Control configuration option 9Username configuration option 10
using the mwClearCase plug-in 17–40
Vvariables command 40VCS menu 19VCS Setup settings panel
explanation of options 9–11figure 9options
Always show login dialog 10Connect on open 10Database Path 10Local Path 11Login Settings 10Method 10Password 10Remember password 10Try to mount shared volume 11Use global settings as default 10Use Version Control 9Username 10

52 mwClearCase Plug-in User’s Guide