oracle® enterprise repository · clearcase integration: clearcase web interface overview this...
TRANSCRIPT

Oracle® Enterprise RepositoryIBM® Rational® ClearCase® and IBM Rational ClearQuest® Integration Guide
10g Release 3 (10.3)
July 2009
Copyright (c) 2008, 2009, Oracle and/or its affiliates. All rights reserved. 1 of 21

Oracle Enterprise Repository IBM Rational ClearCase and IBM Rational ClearQuest Integration Guide, 10g Release 3 (10.3)
Copyright © 2008, 2009, Oracle. All rights reserved.
Primary Author: Vimmika Dinesh
Contributing Author: Jeff Schieli, Sharon Fay, Dennis Chin, Scott Spieker, Phil Reed, Adam Wallace
The Programs (which include both the software and documentation) contain proprietary information; they are provided under a license agreement containing restrictions on use and disclosure and are also protected by copyright, patent, and other intellectual and industrial property laws. Reverse engineering, disassembly, or decompilation of the Programs, except to the extent required to obtain interoperability with other independently created software or as specified by law, is prohibited.
The information contained in this document is subject to change without notice. If you find any problems in the documentation, please report them to us in writing. This document is not warranted to be error-free. Except as may be expressly permitted in your license agreement for these Programs, no part of these Programs may be reproduced or transmitted in any form or by any means, electronic or mechanical, for any purpose.
If the Programs are delivered to the United States Government or anyone licensing or using the Programs on behalf of the United States Government, the following notice is applicable:
U.S. GOVERNMENT RIGHTS Programs, software, databases, and related documentation and technical data delivered to U.S. Government customers are "commercial computer software" or "commercial technical data" pursuant to the applicable Federal Acquisition Regulation and agency-specific supplemental regulations. As such, use, duplication, disclosure, modification, and adaptation of the Programs, including documentation and technical data, shall be subject to the licensing restrictions set forth in the applicable Oracle license agreement, and, to the extent applicable, the additional rights set forth in FAR 52.227-19, Commercial Computer Software--Restricted Rights (June 1987). Oracle USA, Inc., 500 Oracle Parkway, Redwood City, CA 94065.
The Programs are not intended for use in any nuclear, aviation, mass transit, medical, or other inherently dangerous applications. It shall be the licensee's responsibility to take all appropriate fail-safe, backup, redundancy and other measures to ensure the safe use of such applications if the Programs are used for such purposes, and we disclaim liability for any damages caused by such use of the Programs.
Oracle, JD Edwards, PeopleSoft, and Siebel are registered trademarks of Oracle Corporation and/or its affiliates. Other names may be trademarks of their respective owners.
The Programs may provide links to Web sites and access to content, products, and services from third parties. Oracle is not responsible for the availability of, or any content provided on, third-party Web sites. You bear all risks associated with the use of such content. If you choose to purchase any products or services from a third party, the relationship is directly between you and the third party. Oracle is not responsible for: (a) the quality of third-party products or services; or (b) fulfilling any of the terms of the agreement with the third party, including delivery of products or services and warranty obligations related to purchased products or services. Oracle is not responsible for any loss or damage of any sort that you may incur from dealing with any third party.
Copyright (c) 2008, 2009, Oracle and/or its affiliates. All rights reserved. 2 of 21

Oracle Enterprise Repository
Connector for IBM Rational ClearCase and IBM Rational ClearQuest
● ClearCase Integration: ClearCase Web Interface ● ClearCase Integration: File Stores
�❍ Using File Stores ● ClearQuest Integration
Copyright (c) 2008, 2009, Oracle and/or its affiliates. All rights reserved. 3 of 21

ClearCase Integration: ClearCase Web Interface
Overview
This document explains the proper procedure to follow in order to setup a ClearCase repository, which will allow ClearCase files to be linked to assets for future use/download.
Important Note
Webshpere 5.x Apache Plug-In
When using an HTTP server (such as Apache, IIS, IBM HTTP Server, etc.) to connect to a Websphere 5.x server using the mod_was_ap20_http.so or mod_was_ap20_http.dll plug-in, a configuration change must be applied to the plugin-cfg.xml document used with this connector:
● Each time the crtplugininst application is run to regenerate the plugin-cfg.xml document for use on the HTTP server(s) the Config element will contain a value of AcceptAllContent="false" by default. This parameter will need to be changed to true to allow deltaV requests to be passed between the HTTP Server and the Websphere application server hosting the Oracle Enterprise Repository. This restriction only applies to an HTTP server using the Websphere plug-in to connect the two servers.
WebLogic 8.1 Tuxedo Plug-In
When using the Weblogic Tuxedo Plugin, there is a requirement of 8.1 SP3 being applied to both the application server as well as the Tuxedo Plug-In on the Apache server. This required feature was applied with change request #CR084303.
Prerequisites/Requirements
● The application server must support the UTF-8 character set to allow ClearCase and Oracle Enterprise Repository to function properly together.
● Make sure the application server has access to the ClearCase server. ● CCWeb and/or ClearTool must be installed and enabled on the application server machine (see your ClearCase
documentation for details).
Enabling UTF-8 Support
Enabling the UTF-8 character set is accomplished in the following manners based on the server employed.
● Weblogic 7.x/8.x�❍ You may specify the character set for all deployed Weblogic Web applications deployed on a Weblogic
Server instance by setting the system properties client.encoding.override and file.encoding equal to the
Copyright (c) 2008, 2009, Oracle and/or its affiliates. All rights reserved. 4 of 21

name of the character set. Set this system property in the environment variable called JAVA_OPTIONS. For example: JAVA_OPTIONS=-Dclient.encoding.override=UTF-8 -Dfile.encoding=UTF-8 These values can also be supplied as part of the startup options for the domain.
● Websphere 5.x�❍ Change the Generic JVM Arguments for the server to include the following parameter: -Dclient.encoding.
override=UTF-8
● Tomcat 5.0.25�❍ Change the URIEncoding value in the Connector element within the server.xml file in the CATALINA_HOME/
conf directory:
<Connector port="8080" URIEncoding="UTF-8" ...
Note: The ability to browse into the ClearCase server and view files/directory structure/etc. from within the Oracle Enterprise Repository application is provided via Files Stores integration.
Important Notes
1. Construct a view in CCWeb.
2. Create the link based on that view constructed in CCWeb.
3. Add the link within the File Information section of the asset within the Asset Editor.
4. Select the Test button to verify that the link is valid.
5. It should also be possible to access the link by pasting the URL into a browser address window. If this is not possible the link itself may be in error, or there may be a problem with the network connection to the ClearCase server.
Creating and Configuring Repository and Assets
Configure an Artifact Store
This procedure is performed in the Oracle Enterprise Repository Asset Editor screen.
1. Open the Actions menu.
2. Click Configure Artifact Store
3. Click Add
4. Fill in the appropriate information.
Copyright (c) 2008, 2009, Oracle and/or its affiliates. All rights reserved. 5 of 21
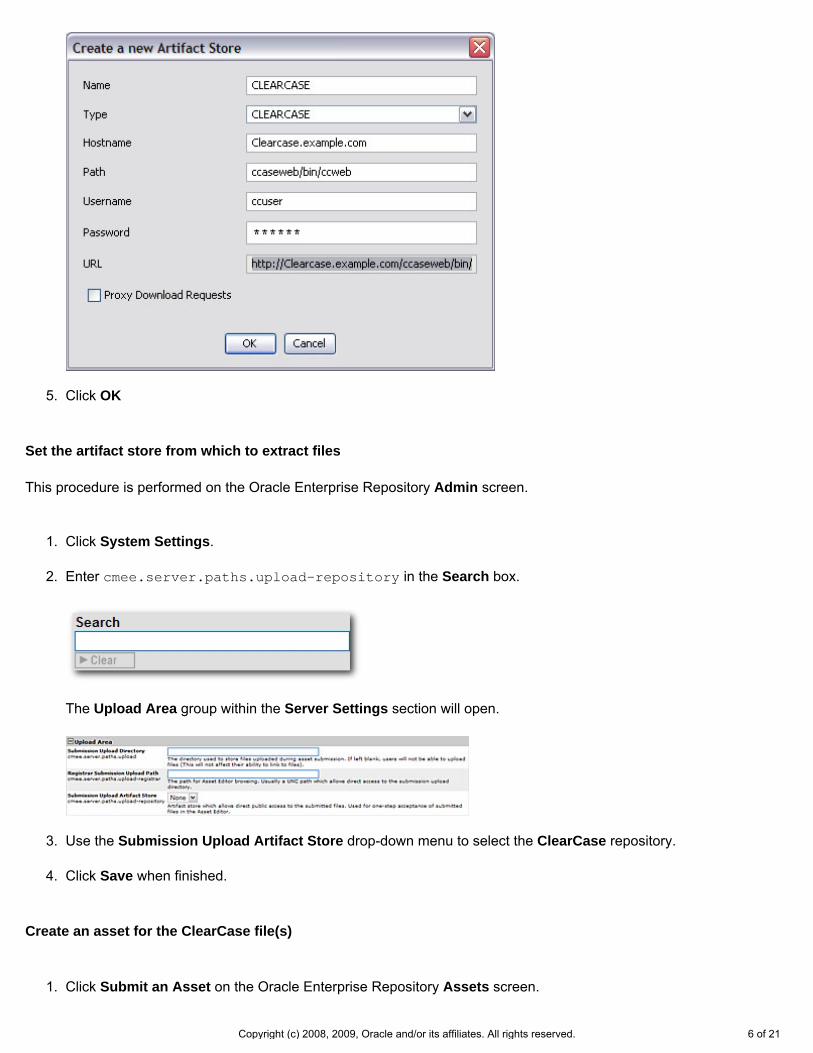
5. Click OK
Set the artifact store from which to extract files
This procedure is performed on the Oracle Enterprise Repository Admin screen.
1. Click System Settings.
2. Enter cmee.server.paths.upload-repository in the Search box.
The Upload Area group within the Server Settings section will open.
3. Use the Submission Upload Artifact Store drop-down menu to select the ClearCase repository.
4. Click Save when finished.
Create an asset for the ClearCase file(s)
1. Click Submit an Asset on the Oracle Enterprise Repository Assets screen.
Copyright (c) 2008, 2009, Oracle and/or its affiliates. All rights reserved. 6 of 21

�❍ New assets may also be created via the File menu in the Asset Editor.
2. Select an Asset Type from the drop-down menu.
3. Enter a name for the new asset in the Name text box.
4. Enter a brief description in the Description field.
Note: The asset detail will not appear on Oracle Enterprise Repository Assets screen until the registration process is completed.
Link the ClearCase file to the asset
1. Open the asset in the Asset Editor.
2. Locate the File Information section (typically on the General tab).
3. Click Add.
4. Create a name and/or description.
5. Click Edit.
6. Select the Repository File radio button.
Copyright (c) 2008, 2009, Oracle and/or its affiliates. All rights reserved. 7 of 21

7. Select ClearCase in the Host drop-down.
�❍ The path should populate with information configured in artifact store section:■ http://clearcase.example.com/ccaseweb/bin/ccweb/test.txt?dir=//usr/vobs/geneva&elem=test.
txt&cmd=view&user=ccuser&password=ccuser
8. Populate the file name field with the path of the view from CCWeb and the file name.
9. Click View to test the file.
Extract the asset and the ClearCase file(s)
1. On the Oracle Enterprise Repository Assets screen, use Search to locate the newly created asset.
2. Click the asset to open its Asset Detail Display.
3. Click Use/Download.
(ClearCase files should be available for download along with the asset.)
Copyright (c) 2008, 2009, Oracle and/or its affiliates. All rights reserved. 8 of 21

ClearCase Integration: File Stores
File Stores allow Oracle Enterprise Repository to integrate with underlying proprietary repositories. File Stores allow integration with Rational ClearCase.
The File Store integration with Rational ClearCase allows an asset registrar to browse the ClearCase Repository. The registrar can select a specific branch and version of a file to be used when the asset is extracted. In addition, the config spec for a file can be made available for use with WSAD or XDE.
The Rational ClearCase client must be installed and configured on the application server in order to use File Stores with Rational ClearCase. All connections to ClearCase use the ClearTool application in the ClearCase client and share a common set of ClearCase authentication credentials.
Adding the File Stores Feature to Oracle Enterprise Repository
1. Download the Oracle Enterprise Repository installation package from the Oracle download website.
2. Unzip the downloaded file to a temporary directory.
3. Using a SQL tool appropriate for your database, run the SQL script located in the temporary directory to add the File Store Artifact Store to your Oracle Enterprise Repository database.
4. Click the Admin link on the Oracle Enterprise Repository menu bar.
5. On the Admin screen, click System Settings.
6. Enable the property registry.advanced.filestores.enabled. A new section called File Store will appear, to which the application will automatically navigate.
Copyright (c) 2008, 2009, Oracle and/or its affiliates. All rights reserved. 9 of 21

7. Set Advanced Access File Stores = true.
8. Click Save.
9. Refresh the Admin screen to make the File Store section appear in the list on the left, before Basic Access Settings.
Creating a File Store
1. Download the Clearcase Zip file for Oracle Enterprise Repository from the Oracle Downloads page at http://www.oracle.com/bea/index.html.
2. Install the Rational ClearCase client on the application server hosting Oracle Enterprise Repository.
3. Locate the cleartool.exe file on the application server. The entire file path to cleartool.exe will be necessary. It will be used with a File Store parameter called cleartool.path.
4. In the ClearCase client on the application server, create a view to be used by Oracle Enterprise Repository. A recommended practice is to include the word Flashline in the name of the view. The access path for the view will be used with a File Store parameter called view.dir.
5. Mount all desired ClearCase VOBs to the created view. Each VOB will require the creation of a different File Store. The name of the VOB will be the beginning of a File Store parameter called vob.path.
6. Locate a temporary directory on the application server. The full path to the temporary directory will be used with a File Store parameter called tmp.dir.
7. Click the Admin link in the Oracle Enterprise Repository menu bar.
8. On the Admin screen, locate the File Stores section.
9. Click Create New to create a new File Store.
The Create New File Store dialog box opens.
Copyright (c) 2008, 2009, Oracle and/or its affiliates. All rights reserved. 10 of 21
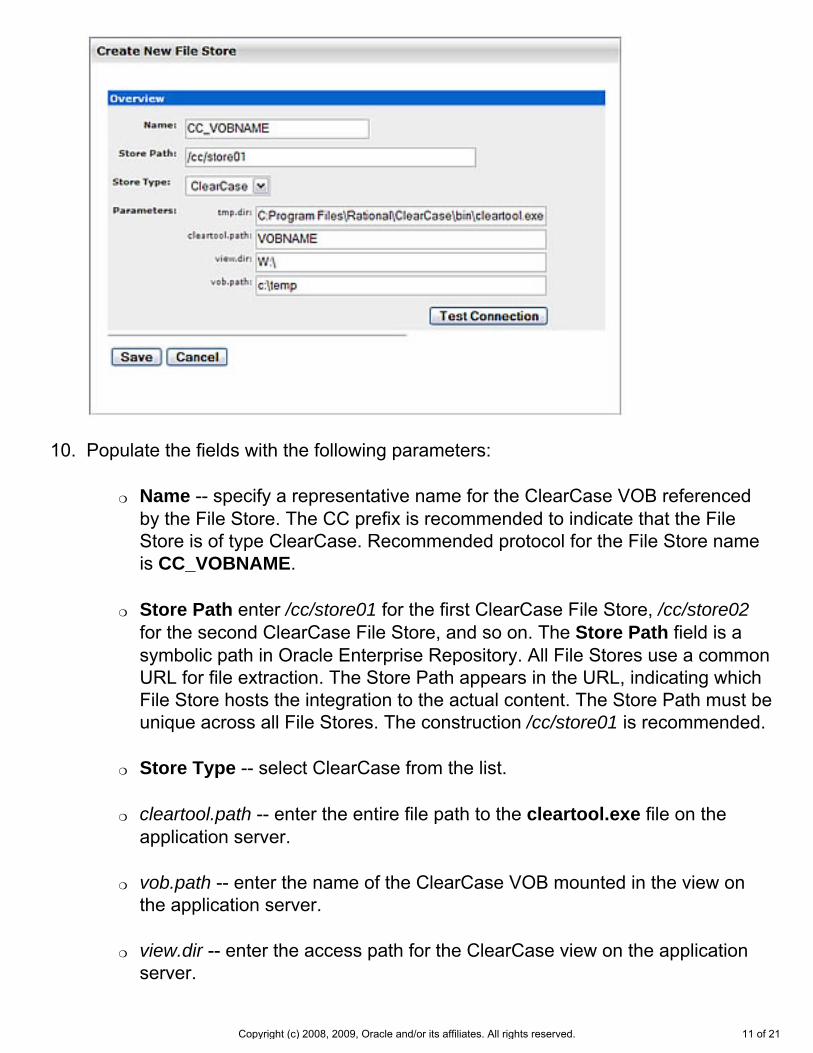
10. Populate the fields with the following parameters:
�❍ Name -- specify a representative name for the ClearCase VOB referenced by the File Store. The CC prefix is recommended to indicate that the File Store is of type ClearCase. Recommended protocol for the File Store name is CC_VOBNAME.
�❍ Store Path enter /cc/store01 for the first ClearCase File Store, /cc/store02 for the second ClearCase File Store, and so on. The Store Path field is a symbolic path in Oracle Enterprise Repository. All File Stores use a common URL for file extraction. The Store Path appears in the URL, indicating which File Store hosts the integration to the actual content. The Store Path must be unique across all File Stores. The construction /cc/store01 is recommended.
�❍ Store Type -- select ClearCase from the list.
�❍ cleartool.path -- enter the entire file path to the cleartool.exe file on the application server.
�❍ vob.path -- enter the name of the ClearCase VOB mounted in the view on the application server.
�❍ view.dir -- enter the access path for the ClearCase view on the application server.
Copyright (c) 2008, 2009, Oracle and/or its affiliates. All rights reserved. 11 of 21

�❍ tmp.dir -- enter the temporary directory on the application server.
11. Click the Test Connection button to test the connection to the ClearCase client. If the connection is properly configured, then the message Test Succeeded will appear.
12. Click the Save button to save the File Store for use with Artifact Stores.
Configuring an Artifact Store For a File Store
This procedure is performed in the Asset Editor screen.
1. Select Configure Artifact Stores on the Actions menu.
2. In the Configure Artifact Stores dialog box, click Add.
The Create a new Artifact Store pop-up opens.
3. Enter a name for the artifact store. CC_VOBNAME is the recommended protocol.
4. In the Type list, select FileStore as the Artifact Store type.�❍ FileStore accesses the list of File Stores created on the Oracle Enterprise
Repository Admin screen.
5. Enter a Store Path by clicking on the Elipses button (next to the Store Path field) and selecting the name of the File Store to be used by this Artifact Store.
Copyright (c) 2008, 2009, Oracle and/or its affiliates. All rights reserved. 12 of 21

6. When finished, click OK.
A separate Artifact Store must be created for each File Store.
Adding a File to an Asset Using the File Store's Artifact Store
This procedure is performed in the Asset Editor.
1. Select the asset to which the file is to be added.
2. Click the Add button in the File Information section on the Overview tab.
3. In the dialog box enter a name (and description, if necessary).
4. Click Edit.
5. In the Edit URL dialog box, click the Artifact Store File option button.
6. From the Store list, select the repository for the File Store (CC_VOBNAME).
7. Next to the File Name box, browse the ClearCase repository.
8. When browsing, the top level will be the branches in the VOB. Select a branch. The branchname format is Branchname/Version. The version LATEST refers to the information that is currently checked in. Generally the highest number before LATEST is the desired version. In the image below, /main/server_preed_release/6 is version six of the branch /main/server_preed_release. The name in the folder area (store01) refers to the Store Path for the designated File Store.
Copyright (c) 2008, 2009, Oracle and/or its affiliates. All rights reserved. 13 of 21

9. The second level displays the folders within the selected Branchname/Version pair.
10. The third level displays the versions of the selected folder.
11. Subsequently, every selected folder will be followed by a desired version. The last two browsed levels will be:
1. The selected filename 2. The version of that file
12. The Select button will populate the File Name field on the Edit URL window.
13. Click View to test the URL.
Copyright (c) 2008, 2009, Oracle and/or its affiliates. All rights reserved. 14 of 21

Using File Stores
Overview
A File Store allows the user to see all versions of all files contained in the store. At this time File Stores work only with ClearCase.
Viewing a File in a Store
This procedure is performed in the Asset Editor screen.
1. Select an asset.
2. Click the Overview tab.
3. Click Add in the File Information section.
Copyright (c) 2008, 2009, Oracle and/or its affiliates. All rights reserved. 15 of 21
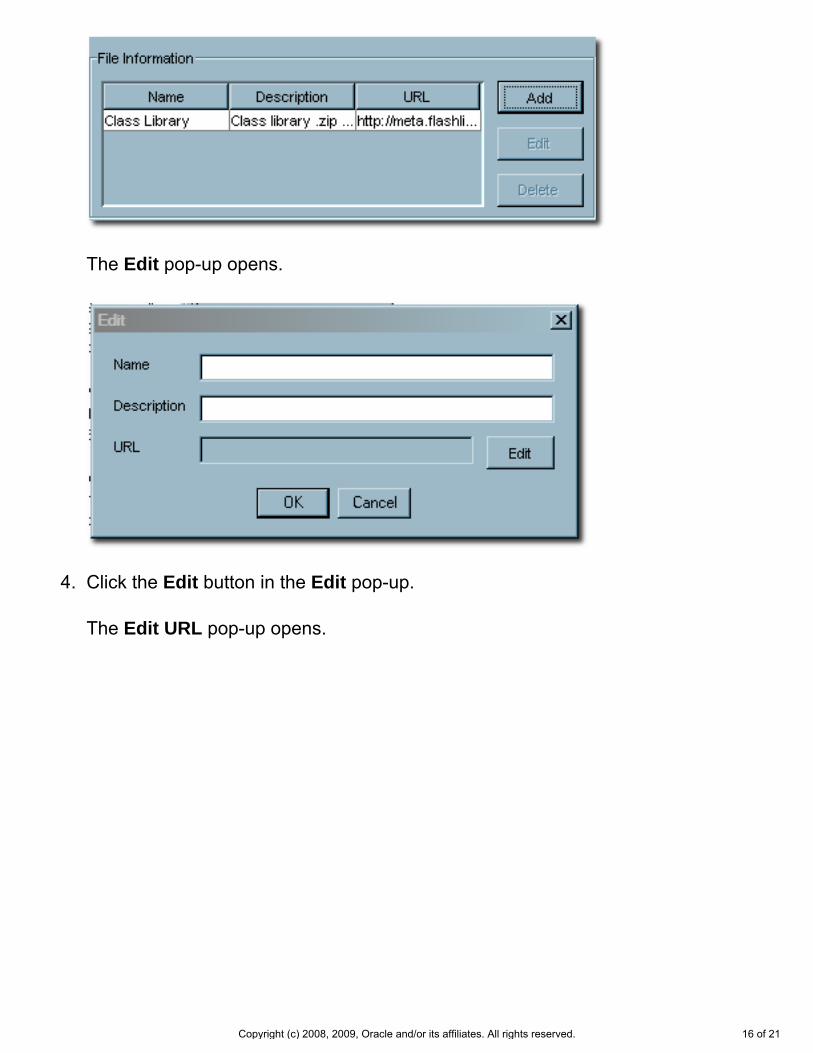
The Edit pop-up opens.
4. Click the Edit button in the Edit pop-up.
The Edit URL pop-up opens.
Copyright (c) 2008, 2009, Oracle and/or its affiliates. All rights reserved. 16 of 21

5. In the Edit URL dialog box, select Repository File.
6. Select a file store from the Host drop-down list.
7. Click Browse to locate a file, or enter the filename in the File Name text box.
8. Click View to view the file.
Copyright (c) 2008, 2009, Oracle and/or its affiliates. All rights reserved. 17 of 21

9. Click OK when finished.
Copyright (c) 2008, 2009, Oracle and/or its affiliates. All rights reserved. 18 of 21

ClearQuest Integration
Table of Contents
● ClearQuest Integration�❍ Adding ClearQuest �❍ Configuring a ClearQuest Artifact Store �❍ Adding a file to an Asset Using the ClearQuest Artifact Store
ClearQuest Integration
Integrating ClearCase/ClearQuest with your system enables you to use a ClearCase/ClearQuest store in Oracle Enterprise Repository. Typically, an URL used to reach a file in ClearCase resembles the following:
● http://server.host.com:port/clearcasePath/fileName?dir=vobStructure&elem=fileName&cmd=view&user=username&password=password
Adding ClearQuest
To add ClearCase/ClearQuest to your instance of Oracle Enterprise Repository:
1. Download the Oracle Enterprise Repository installation package (clearquest.zip) from the Oracle download site.
2. Unzip the download file to a temporary directory.
3. Using a SQL tool appropriate for your database, run the SQL script located in the temporary directory to add ClearQuest to your Oracle Enterprise Repository database.
4. Restart the application server.
Configuring a ClearQuest Artifact Store
1. Click the Assets link in the Oracle Enterprise Repository menu bar.
Copyright (c) 2008, 2009, Oracle and/or its affiliates. All rights reserved. 19 of 21
2. On the Assets screen, click Edit/Manage Assets to launch the Asset Editor.
3. Open the Actions menu.
4. Click Configure Artifact Stores.
5. In the Configure Artifact Stores dialog box, click Add.
6. On the Create a new Artifact Store screen, enter a name for the artifact store file.�❍ (Recommended: ClearQuest.)
7. In the Type list, select ClearQuest.�❍ Accesses the ClearQuest web interface.
8. Enter a hostname for the server.
9. For the Path, enter: logon/url/default.asp.
10. (Optional) Enter a username.
11. (Optional) Enter a password.
12. When finished, click OK.
Adding a File to an Asset Using the ClearQuest Artifact Store
To add a file to an asset using a ClearCase/ClearQuest artifact store:
1. Launch the Asset Editor
2. Select the appropriate asset.
3. Navigate to the File Information section on the asset's Overview tab.
4. Click Add.
5. In the dialog box, enter a name and description, if necessary.
6. Click Edit
7. In the Edit URL dialog box, select the Artifact Store File option button.
8. From the Store drop-down list, select ClearQuest Repository.
Copyright (c) 2008, 2009, Oracle and/or its affiliates. All rights reserved. 20 of 21
9. Click the Browse button (next to the File Name box) to edit a ClearQuest shortcut.
10. Click the button to Launch ClearQuest Web interface and create a shortcut to a ClearQuest resource.
11. In the ClearQuest Web interface use the Operation -> Create a Shortcut link to run the wizard to generate a shortcut in ClearQuest.
12. Copy and paste everything following the question mark (?) in the resulting shortcut to the Launch ClearQuest Web shortcut screen.
13. Click OK to populate the File Name with the shortcut portion.
14. Click View to test the URL.�❍ This should open the ClearQuest interface to the resource to which the shortcut was
assigned.
Copyright (c) 2008, 2009, Oracle and/or its affiliates. All rights reserved. 21 of 21