mplab® connect configurator cli user’s...
TRANSCRIPT

2017-2019 Microchip Technology Inc. DS50002629D
MPLAB®Connect Configurator CLIUser’s Guide

DS50002629D-page 2 2017-2019 Microchip Technology Inc.
Note the following details of the code protection feature on Microchip devices:• Microchip products meet the specification contained in their particular Microchip Data Sheet.
• Microchip believes that its family of products is one of the most secure families of its kind on the market today, when used in the intended manner and under normal conditions.
• There are dishonest and possibly illegal methods used to breach the code protection feature. All of these methods, to our knowledge, require using the Microchip products in a manner outside the operating specifications contained in Microchip’s Data Sheets. Most likely, the person doing so is engaged in theft of intellectual property.
• Microchip is willing to work with the customer who is concerned about the integrity of their code.
• Neither Microchip nor any other semiconductor manufacturer can guarantee the security of their code. Code protection does not mean that we are guaranteeing the product as “unbreakable.”
Code protection is constantly evolving. We at Microchip are committed to continuously improving the code protection features of ourproducts. Attempts to break Microchip’s code protection feature may be a violation of the Digital Millennium Copyright Act. If such actsallow unauthorized access to your software or other copyrighted work, you may have a right to sue for relief under that Act.
Microchip received ISO/TS-16949:2009 certification for its worldwide headquarters, design and wafer fabrication facilities in Chandler and Tempe, Arizona; Gresham, Oregon and design centers in California and India. The Company’s quality system processes and procedures are for its PIC® MCUs and dsPIC® DSCs, KEELOQ® code hopping devices, Serial EEPROMs, microperipherals, nonvolatile memory and analog products. In addition, Microchip’s quality system for the design and manufacture of development systems is ISO 9001:2000 certified.
QUALITYMANAGEMENTSYSTEMCERTIFIEDBYDNV
== ISO/TS16949==
Information contained in this publication regarding device applications and the like is provided only for your convenience and may besuperseded by updates. It is your responsibility to ensure that your application meets with your specifications. MICROCHIP MAKES NOREPRESENTATIONS OR WARRANTIES OF ANY KIND WHETHER EXPRESS OR IMPLIED, WRITTEN OR ORAL, STATUTORY OROTHERWISE, RELATED TO THE INFORMATION, INCLUDING BUT NOT LIMITED TO ITS CONDITION, QUALITY, PERFORMANCE,MERCHANTABILITY OR FITNESS FOR PURPOSE. Microchip disclaims all liability arising from this information and its use. Use of Micro-chip devices in life support and/or safety applications is entirely at the buyer’s risk, and the buyer agrees to defend, indemnify and holdharmless Microchip from any and all damages, claims, suits, or expenses resulting from such use. No licenses are conveyed, implicitly orotherwise, under any Microchip intellectual property rights unless otherwise stated.
TrademarksThe Microchip name and logo, the Microchip logo, AnyRate, AVR, AVR logo, AVR Freaks, BitCloud, chipKIT, chipKIT logo, CryptoMemory, CryptoRF, dsPIC, FlashFlex, flexPWR, Heldo, JukeBlox, KeeLoq, Kleer, LANCheck, LINK MD, maXStylus, maXTouch, MediaLB, megaAVR, MOST, MOST logo, MPLAB, OptoLyzer, PIC, picoPower, PICSTART, PIC32 logo, Prochip Designer, QTouch, SAM-BA, SpyNIC, SST, SST Logo, SuperFlash, tinyAVR, UNI/O, and XMEGA are registered trademarks of Microchip Technology Incorporated in the U.S.A. and other countries.ClockWorks, The Embedded Control Solutions Company, EtherSynch, Hyper Speed Control, HyperLight Load, IntelliMOS, mTouch, Precision Edge, and Quiet-Wire are registered trademarks of Microchip Technology Incorporated in the U.S.A.Adjacent Key Suppression, AKS, Analog-for-the-Digital Age, Any Capacitor, AnyIn, AnyOut, BodyCom, CodeGuard, CryptoAuthentication, CryptoAutomotive, CryptoCompanion, CryptoController, dsPICDEM, dsPICDEM.net, Dynamic Average Matching, DAM, ECAN, EtherGREEN, In-Circuit Serial Programming, ICSP, INICnet, Inter-Chip Connectivity, JitterBlocker, KleerNet, KleerNet logo, memBrain, Mindi, MiWi, motorBench, MPASM, MPF, MPLAB Certified logo, MPLIB, MPLINK, MultiTRAK, NetDetach, Omniscient Code Generation, PICDEM, PICDEM.net, PICkit, PICtail, PowerSmart, PureSilicon, QMatrix, REAL ICE, Ripple Blocker, SAM-ICE, Serial Quad I/O, SMART-I.S., SQI, SuperSwitcher, SuperSwitcher II, Total Endurance, TSHARC, USBCheck, VariSense, ViewSpan, WiperLock, Wireless DNA, and ZENA are trademarks of Microchip Technology Incorporated in the U.S.A. and other countries.SQTP is a service mark of Microchip Technology Incorporated in the U.S.A.Silicon Storage Technology is a registered trademark of Microchip Technology Inc. in other countries.GestIC is a registered trademark of Microchip Technology Germany II GmbH & Co. KG, a subsidiary of Microchip Technology Inc., in other countries. All other trademarks mentioned herein are property of their respective companies.© 2017-2019, Microchip Technology Incorporated, All Rights Reserved.ISBN: 978-1-5224-4540-1

MPLAB® CONNECTCONFIGURATOR CLI
USER’S GUIDE
2017-2019 Microchip Technology Inc. DS50002629D-page 3
Table of Contents
Preface ........................................................................................................................... 7Introduction............................................................................................................ 7Document Layout .................................................................................................. 7Conventions Used in this Guide ............................................................................ 9The Microchip Website........................................................................................ 10Development Systems Customer Change Notification Service .......................... 10Customer Support ............................................................................................... 10Document Revision History ................................................................................. 11
Chapter 1. Overview1.1 Introduction ................................................................................................... 13
1.1.1 Terms and Abbreviations .......................................................................... 131.2 INI File Description ....................................................................................... 13
1.2.1 HUB_VID_LIST Section (Hub Vendor ID) ................................................. 131.2.2 HUB_RESET_DELAY Section .................................................................. 131.2.3 HCE_DEV_INFO Section (Hub Controller Information) ............................ 141.2.4 PCIE_RESTART Section .......................................................................... 14
1.3 Logging ......................................................................................................... 141.4 Version ......................................................................................................... 141.5 Help .............................................................................................................. 151.6 Known Limitations ........................................................................................ 15
Chapter 2. USB Devices2.1 Command Line Arguments for USB Devices ............................................... 172.2 Prerequisites ................................................................................................ 212.3 Programming SPI Flash Firmware ............................................................... 22
2.3.1 Hub Filter Installed as Hub Class Filter ..................................................... 222.3.2 Device-Specific Hub Filter Approach ......................................................... 222.3.3 Time-Optimized Production Line Programming Method ............................ 232.3.4 Erasing SPI Flash ...................................................................................... 23
2.4 Single-Device Configuration File Programming ........................................... 232.4.1 Configuration File Programming ................................................................ 232.4.2 Programming OTP and Lock OTP – USB57xx and USB70xx Family ....... 242.4.3 Programming the Configuration File and USB Serial String ...................... 242.4.4 Programming the Configuration File and Different USB Serial String ....... 242.4.5 Programming the Configuration File and Verifying Programmed Configura-
tion Item ................................................................................................. 252.4.6 Programming the Configuration File and NCM MAC Addresses USB49xx,
USB70xx and USB72xx Families .......................................................... 252.4.7 Disable Auto Reprogram Option – USB57xx, USB58xx/USB59xx, USB49xx,
USB471x, USB70xx, and USB72xx ...................................................... 26
MPLAB® Connect Configurator CLI User’s Guide
DS50002629D-page 4 2017-2019 Microchip Technology Inc.
2.5 Batch Programming (Automated Execution) ................................................ 262.5.1 Mass Programming Configuration File (Single MCHP Device Connected) ...
262.5.2 Mass Programming Configuration File (Multiple MCHP Devices Connected)
272.5.3 Mass Programming Configuration File and USB Serial String ...................272.5.4 Mass Programming Configuration File and Different USB Serial String ....292.5.5 Mass Programming Configuration File and Verifying Programmed Configura-
tion Item .................................................................................................302.5.6 Mass Programming the Configuration File OTP and NCM MAC Address .30
2.6 Verification of Hub Configuration Items ........................................................ 322.6.1 Supported Parameters ...............................................................................332.6.2 Getting the Value of Parameter Before and After Programming ................342.6.3 Getting the Value of Any Parameter ..........................................................342.6.4 Comparing the Value of a Parameter with a Known Value ........................34
2.7 Dump Memory .............................................................................................. 342.7.1 Configuration Memory ................................................................................342.7.2 SPI Memory ...............................................................................................34
2.8 Changing Vendor ID/Product ID of the Hub ................................................. 35Chapter 3. LAN78xx Devices
3.1 Command Line Arguments for LAN78xx ...................................................... 373.2 Single-Device EEPROM Programming ........................................................ 38
3.2.1 EEPROM Programming .............................................................................383.2.2 Programming EEPROM and USB Serial/MAC Address ............................393.2.3 Programming EEPROM and Verifying Programmed Configuration Item ...39
3.3 Single-Device OTP Programming ................................................................ 403.3.1 OTP Programming .....................................................................................403.3.2 Programming OTP and USB Serial/MAC Address ....................................403.3.3 Programming OTP and Verifying Programmed Configuration Item ...........41
3.4 Batch Programming (Automated Execution) ................................................ 413.4.1 Mass EEPROM/OTP Programming (Single Device Connected) ...............413.4.2 Mass Programming EEPROM/OTP and USB Serial String .......................423.4.3 Mass Programming EEPROM/OTP and MAC Address .............................433.4.4 Mass Programming EEPROM/OTP with MAC Address and Serial Number .
443.4.5 Mass OTP Programming and Verifying Programmed Configuration Item .45
3.5 Verification of LAN Configuration Items ....................................................... 453.5.1 Getting the Value of Parameter Before and After Programming ................483.5.2 Getting the Value of a Parameter ..............................................................483.5.3 Comparing the Value of a Parameter with a Known Value ........................48
3.6 Dump Memory .............................................................................................. 483.6.1 OTP Memory ..............................................................................................483.6.2 EEPROM Memory .....................................................................................48
3.7 Changing Vendor ID/Product ID of the LAN78xx ......................................... 49Chapter 4. LAN74xx Devices
4.1 Command Line Arguments for LAN74xx ...................................................... 514.2 Single-Device EEPROM Programming ........................................................ 52
4.2.1 EEPROM Programming .............................................................................524.2.2 Programming EEPROM and MAC Address ...............................................52

Table of Contents
2017-2019 Microchip Technology Inc. DS50002629D-page 5
4.2.3 Programming EEPROM and Verifying Programmed Configuration Item .. 524.3 Single-Device OTP Programming ................................................................ 53
4.3.1 OTP Programming .................................................................................... 534.3.2 Programming OTP and USB Serial/MAC Address .................................... 534.3.3 Programming OTP and Verifying Programmed Configuration Item .......... 54
4.4 Batch Programming (Automated Execution) ................................................ 544.5 Verification of LAN Configuration Items ....................................................... 54
4.5.1 Getting the Value of Parameter Before and After Programming ............... 574.5.2 Getting the Value of a Parameter .............................................................. 574.5.3 Comparing the Value of a Parameter with a Known Value ....................... 57
4.6 Dump Memory .............................................................................................. 574.6.1 OTP Memory ............................................................................................. 574.6.2 EEPROM Memory ..................................................................................... 57
Appendix A. Programming TimeA.1 USB Devices ................................................................................................ 59A.2 LAN78xx and LAN74xx Devices .................................................................. 59
Appendix B. Serial Number SuppressionB.1 Why Is It Required? ..................................................................................... 61B.2 When Is It Needed? ..................................................................................... 61B.3 How to Execute SerialNumSuppression.bat File? .............................. 61
Appendix C. Changing Filename ExtensionC.1 Introduction .................................................................................................. 63C.2 Showing or Hiding File Name Extensions .................................................... 63
Appendix D. Finding Hub Index or Path - USB HubsD.1 Introduction .................................................................................................. 65D.2 Index Method ............................................................................................... 65
D.2.1 Usage of Index in /id Command ............................................................. 65D.2.2 Listing the Hubs or Finding the Index of a Hub ......................................... 66
D.3 Port Chain Method ....................................................................................... 66D.3.1 Usage of Port Chain in /devpath Command .......................................... 67D.3.2 Finding the Port Chain of a Hub ............................................................... 69
Appendix E. Troubleshooting and Error CodesE.1 Troubleshooting ........................................................................................... 71E.2 Error Codes .................................................................................................. 71
Appendix F. HFC Device InstallationF.1 Internal HFC Device Enabled by Default ..................................................... 73
F.1.1 SKUS ........................................................................................................ 73F.1.2 HFC Driver Installation .............................................................................. 73F.1.3 HFC Driver Uninstallation .......................................................................... 75
F.2 Internal HFC Device Disabled by Default ..................................................... 76F.2.1 SKUS ........................................................................................................ 76F.2.2 VSM Driver ................................................................................................ 76
Appendix G. LAN78xx and LAN74xx Driver InstallationG.1 LAN78xx Driver Installation ......................................................................... 79G.2 LAN74xx Driver Installation ......................................................................... 79

MPLAB® Connect Configurator CLI User’s Guide
DS50002629D-page 6 2017-2019 Microchip Technology Inc.
Appendix H. Finding Index of LAN/PCIe DeviceH.1 Using Index for LAN Commands ................................................................. 81H.2 Listing the LAN78xx/LAN74xx Devices or Finding the Index of
LAN78xx/LAN74xx ................................................................................. 81Appendix I. Calculating Checksum for Input File
I.1 Introduction .................................................................................................... 83Appendix J. Merging Two Configuration Files
J.1 Introduction ................................................................................................... 85Worldwide Sales and Service .....................................................................................88

MPLAB® CONNECTCONFIGURATOR CLI
USER’S GUIDE
2017-2019 Microchip Technology Inc. DS50002629D-page 7
Preface
INTRODUCTIONThis chapter contains general information that will be useful to know before using MPLAB® Connect Configurator CLI. Items discussed in this chapter include:• Document Layout• Conventions Used in this Guide• The Microchip Website• Development Systems Customer Change Notification Service• Customer Support• Document Revision History
DOCUMENT LAYOUTThis document describes how to use the MPLAB Connect Configurator CLI USB253x/USB4604, USB57xx, USB58xx, USB59xx, USB49xx, USB471x, USB70xx, USB72xx, LAN78xx, LAN74xx and other families of Microchip USB products. The manual layout is as follows:• Chapter 1. “Overview” – This chapter shows a brief description of the MPLAB
Connect Configurator CLI.• Chapter 2. “USB Devices” – This chapter shows information on the USB hub
device configuration pages of the MPLAB Connect Configurator CLI.• Chapter 3. “LAN78xx Devices” – This chapter shows information on the
LAN78xx device configuration pages of the MPLAB Connect Configurator CLI.• Chapter 4. “LAN74xx Devices” – This chapter shows information on the
LAN74xx device configuration pages of the MPLAB Connect Configurator CLI.• Appendix A. “Programming Time” – This appendix shows details and program-
ming time for using the MPLAB Connect Configurator CLI.• Appendix B. “Serial Number Suppression” – This appendix shows instructions
on serial number suppression for the MPLAB Connect Configurator CLI.
NOTICE TO CUSTOMERS
All documentation becomes dated, and this manual is no exception. Microchip tools and documentation are constantly evolving to meet customer needs, so some actual dialogs and/or tool descriptions may differ from those in this document. Please refer to our website (www.microchip.com) to obtain the latest documentation available.
Documents are identified with a “DS” number. This number is located on the bottom of each page, in front of the page number. The numbering convention for the DS number is “DSXXXXXA”, where “XXXXX” is the document number and “A” is the revision level of the document.
For the most up-to-date information on development tools, see the MPLAB® IDE online help. Select the Help menu, and then Topics to open a list of available online help files.

MPLAB® Connect Configurator CLI User’s Guide
DS50002629D-page 8 2017-2019 Microchip Technology Inc.
• Appendix C. “Changing Filename Extension” – This appendix shows instruc-tions for changing filename extensions for the MPLAB Connect Configurator CLI.
• Appendix D. “Finding Hub Index or Path - USB Hubs” – This appendix shows instructions for finding the hub index or path in the MPLAB Connect Configurator CLI.
• Appendix E. “Troubleshooting and Error Codes” – This appendix shows the troubleshooting information for the MPLAB Connect Configurator CLI.
• Appendix F. “HFC Device Installation” – This appendix shows instructions for installing HFC devices for the MPLAB Connect Configurator CLI.
• Appendix G. “LAN78xx and LAN74xx Driver Installation” – This appendix shows instructions for installing the LAN78xx and LAN74xx drivers for the MPLAB Connect Configurator CLI.
• Appendix H. “Finding Index of LAN/PCIe Device” – This appendix shows instructions for finding the index of a LAN device for the MPLAB Connect Configu-rator CLI.
• Appendix I. “Calculating Checksum for Input File” – This appendix shows instructions for calculating the checksum for an input file for the MPLAB Connect Configurator CLI.
• Appendix J. “Merging Two Configuration Files” – This appendix shows instructions for merging two configuration files for the MPLAB Connect Configura-tor CLI.
Preface
2017-2019 Microchip Technology Inc. DS50002629D-page 9
CONVENTIONS USED IN THIS GUIDEThis manual uses the following documentation conventions:
DOCUMENTATION CONVENTIONSDescription Represents Examples
Arial font:Italic characters Referenced books MPLAB® IDE User’s Guide
Emphasized text ...is the only compiler...Initial caps A window the Output window
A dialog the Settings dialogA menu selection select Enable Programmer
Quotes A field name in a window or dialog
“Save project before build”
Underlined, italic text with right angle bracket
A menu path File>Save
Bold characters A dialog button Click OKA tab Click the Power tab
N‘Rnnnn A number in verilog format, where N is the total number of digits, R is the radix and n is a digit.
4‘b0010, 2‘hF1
Text in angle brackets < > A key on the keyboard Press <Enter>, <F1>Courier New font:Plain Courier New Sample source code #define START
Filenames autoexec.bat
File paths c:\mcc18\h
Keywords _asm, _endasm, static
Command-line options -Opa+, -Opa-
Bit values 0, 1
Constants 0xFF, ‘A’
Italic Courier New A variable argument file.o, where file can be any valid filename
Square brackets [ ] Optional arguments mcc18 [options] file [options]
Curly brackets and pipe character: { | }
Choice of mutually exclusive arguments; an OR selection
errorlevel {0|1}
Ellipses... Replaces repeated text var_name [, var_name...]
Represents code supplied by user
void main (void){ ...}

MPLAB® Connect Configurator CLI User’s Guide
DS50002629D-page 10 2017-2019 Microchip Technology Inc.
THE MICROCHIP WEBSITEMicrochip provides online support via our website at www.microchip.com. This website is used as a means to make files and information easily available to customers. Acces-sible by using your favorite Internet browser, the website contains the following infor-mation:• Product Support – Data sheets and errata, application notes and sample
programs, design resources, user’s guides and hardware support documents, latest software releases and archived software
• General Technical Support – Frequently Asked Questions (FAQs), technical support requests, online discussion groups, Microchip consultant program member listing
• Business of Microchip – Product selector and ordering guides, latest Microchip press releases, listing of seminars and events, listings of Microchip sales offices, distributors and factory representatives
DEVELOPMENT SYSTEMS CUSTOMER CHANGE NOTIFICATION SERVICEMicrochip’s customer notification service helps keep customers current on Microchip products. Subscribers will receive e-mail notification whenever there are changes, updates, revisions or errata related to a specified product family, or development tool of interest.To register, access the Microchip website at www.microchip.com, click on Customer Change Notification and follow the registration instructions.
CUSTOMER SUPPORTUsers of Microchip products can receive assistance through several channels:• Distributor or Representative• Local Sales Office• Field Application Engineer (FAE)• Technical SupportCustomers should contact their distributor, representative or field application engineer (FAE) for support. Local sales offices are also available to help customers. A listing of sales offices and locations is included in the back of this document.Technical support is available through the website at: http://www.microchip.com/support

Preface
2017-2019 Microchip Technology Inc. DS50002629D-page 11
DOCUMENT REVISION HISTORY
Revision Section/Figure/Entry CorrectionDS50002629D
(05-22-19)Appendix I. “Calculating Checksum for Input File”
New section
Appendix J. “Merging Two Configuration Files”
New section
All Added “USB72xx” and changed “USB4715” to “USB471x”.Minor text changes throughout.
DS50002629C(09-12-18)
Section 1.2.4 “PCIE_RESTART Section”
New section
Chapter 2. “USB Devices” Added supporting information for USB70xx devices. Added Table 2-1.
Chapter 3. “LAN78xx Devices”
Added Table 3-1.
Chapter 4. “LAN74xx Devices”
Added a chapter covering LAN74xx devices.
Appendix A. “Programming Time”
Formerly Chapter 2. This part has been included in the appendices.
All Changed “MPLAB Connect CLI” to “MPLAB Connect Configurator CLI.” Made minor text changes throughout the document.
DS50002629B (07-12-17)
Tool name changed from “Connect Configurator” to “Connect” throughout the docu-ment.
DS50002629A (05-22-17)
Initial Microchip release

MPLAB® Connect Configurator CLI User’s Guide
DS50002629D-page 12 2017-2019 Microchip Technology Inc.
NOTES:

MPLAB® CONNECTCONFIGURATOR CLI
USER’S GUIDE
2017-2019 Microchip Technology Inc. DS50002629D-page 13
Chapter 1. Overview
1.1 INTRODUCTIONThe MPLAB® Connect Configurator CLI application is a programming tool for USB253x/USB4604, USB57xx, USB58xx, USB59xx, USB49xx, USB471x, USB70xx, USB72xx, LAN78xx, LAN74xx, and other families of Microchip USB and Ethernet prod-ucts.
1.1.1 Terms and Abbreviations• MPLABConnect – MPLAB Connect Configurator• HFC – Hub Feature Controller (Internal USB Device)/ Hub Controller Endpoint
(Internal USB Device)• NCM – Networking Control Module
1.2 INI FILE DESCRIPTIONThis section is only applicable for USB and PCIE hub products.
1.2.1 HUB_VID_LIST Section (Hub Vendor ID)The application populates list of hubs connected to the computer with unique index numbers. By default, Microchip hubs are moved to lower index’s based on the Vendor ID (VID) during the initial process of application. To move other hubs to lower index position when listing the hubs, a Vendor ID needs to be specified in the HUB_VID_LIST section of INI file. See Example 1-1.
1.2.2 HUB_RESET_DELAY Section
1.2.2.1 RESTART_DELAY
RESTART_DELAY is the time delay for the device enumeration once the device is restarted. The device is restarted in the application with RESTART_DELAY timeout for specific commands. The application waits for the device enumeration up to the value specified in the RESTART_DELAY variable. See Example 1-2.
EXAMPLE 1-1: INI FILE NAME: CONNECT.INI[HUB_VID_LIST]; Microchip VIDHUB_VID1=0x0424; Other VID's Section; Add as HUB_VID'n+1' = VID in "0x" format; "HUB_VID2=0x8085"; Maximum five VID's can be added here.; So the maximum is HUB_VID5= 0xXXXX;
EXAMPLE 1-2: RESTART_DELAY VARIABLERESTART_DELAY = 10000; In Milliseconds

MPLAB® Connect Configurator CLI User’s Guide
DS50002629D-page 14 2017-2019 Microchip Technology Inc.
1.2.3 HCE_DEV_INFO Section (Hub Controller Information)HCE is nothing but the internal HFC device. The internal HFC device is a WinUSB class USB device. By default, the tool supports Microchip default Vendor ID and Product ID of the HFC device (not the Vendor ID and Product ID of HUB).If the Vendor ID and Product ID (PID) of HFC device need to be changed, add the HFC Product ID to the HCE_DEV_INFO section in the INI file.To get the WinUSB handle from the HFC, the Product ID (PID) of the HFC is required. The PID of the HFC is taken from the [HCE_DEV_INFO] list. The Product IDs in Example 1-3 are the default values.
1.2.4 PCIE_RESTART Section
1.2.4.1 PCIE_RESTART_RESCAN
If PCIE_RESTART_RESCAN is TRUE, then the MPLAB Connect Configurator CLI tool would try to restart the selected PCIe device after programming. The tool should be opened with administrator rights to restart the device. If PCIE_RESTART_RESCAN is FALSE, then the tool does not need to be opened with administrator rights.The default value of PCIE_RESTART_RESCAN option is TRUE.
1.3 LOGGINGA detailed log file named MPLABConnect.log is automatically created in the same path as where the application is running.Logging levels can be selected using the following commands:• /s0 (or) /s – Suppress the command window and no log messages would be
updated in MPLABConnect.log file for that operation.• /s1 – Suppress the command window and short description for operation per-
formed would be updated in the log file.• /s2 – Suppress the command window and detailed description for operation per-
formed would be updated in the log file.By default, a detailed description would be logged if any one of these options was not given.
1.4 VERSIONThe version number of the tool can be found using the following command:>MPLABConnect.exe/version
EXAMPLE 1-3: HCE_DEV_INFO[HCE_DEV_INFO]HCE_PID1 = 0x2530;HCE_PID2 = 0x2740;HCE_PID3 = 0x274E;HCE_PID4 = 0x274F;; VID of the HFC will be taken from "HUB_VID_LIST" section
Note: Only 15 maximum entries are allowed. Maximum value is HFC_PID15 = 0x1234.If the PIDs of the HFC device are different, then the value needs to be added to the [HCE_DEV_INFO] list.

Overview
2017-2019 Microchip Technology Inc. DS50002629D-page 15
1.5 HELPHelp regarding the command line arguments can be obtained using the following com-mands.For USB and LAN help:>MPLABConnect.exe /help or >MPLABConnect.exe /?
For USB help:>MPLABConnect.exe /hu
For LAN help:>MPLABConnect.exe /hl
1.6 KNOWN LIMITATIONSPlease refer to the release notes for more information on supported operating systems, SKUs, and USB controllers as well as known limitations.

MPLAB® Connect Configurator CLI User’s Guide
DS50002629D-page 16 2017-2019 Microchip Technology Inc.
NOTES:

MPLAB® CONNECTCONFIGURATOR CLI
USER’S GUIDE
2017-2019 Microchip Technology Inc. DS50002629D-page 17
Chapter 2. USB Devices
2.1 COMMAND LINE ARGUMENTS FOR USB DEVICESMPLAB® Connect Configurator CLI allows users to access, configure, and program Microchip USB Devices. Table 2-1 lists and summarizes all the command line argu-ments supported for USB Devices.
TABLE 2-1: CLI OPTIONS FOR USB DEVICESCLI Option SKU Supported Description
Driver Installation/Uninstallation/i USB Devices Install VSM hub class filter driver.
See Section F.2.2.1.1 “Hub Class Filter Driver Installation”.
/u USB Devices Uninstall VSM hub class filter driver. See Section F.2.2.1.2 “Hub Class Fil-ter Driver Uninstallation”.
/iw USB Devices HFC driver Installation. See Section F.1.2.2 “Manual HFC Driver Installation”.
/uw USB Devices HFC driver uninstallation. See Section F.1.3 “HFC Driver Unin-stallation”.
/iv USB Devices Install VSM as device-specific driver. See Section F.2.2.2 “Hub Device-Specific Filter Driver”.
Methods to Access Hub/l USB Devices To list the hubs or to find the index
of a hub. See Section D.2.2 “Listing the Hubs or Finding the Index of a Hub”.
/id <index> USB Devices Access hub using specific index. See Section D.2 “Index Method”.
/devpath "VVVV/PPPP/port-chain"
USB Devices Access hub using device path. See Section D.3 “Port Chain Method”.
Program Configuration Memory/p <config_file.cfg> USB Devices Programming configuration file.
See Section 2.4.1 “Configuration File Programming”.

MPLAB® Connect Configurator CLI User’s Guide
DS50002629D-page 18 2017-2019 Microchip Technology Inc.
/p <config_file.cfg> /pser <serial_string>
USB Devices Programming configuration and same USB serial string for USB2 and USB3.1 Gen1 Hubs/ USB49xx – primary and secondary hubs. See Section 2.4.3 “Programming the Configuration File and USB Serial String”.
/p <config_file.cfg> /pser1 <serial_string1> /pser2 <seri-al_string2>
USB Devices Programming configuration and USB serial string for USB2 and USB3.1 Gen1 Hubs/ USB49xx – primary and secondary hubs. See Section 2.4.4 “Programming the Configuration File and Different USB Serial String”.
/p <config_file.cfg> /pmac <mac_address>
USB49xx, USB70xx, USB72xx
Programming configuration file and same MAC address for both NCM1 and NCM2. See Section 2.4.6.1 “Programming Same MAC addresses for NCM1 and NCM2”.
/p <config_file.cfg> /pmac1 <macaddress1> /pmac2 <macaddress2>
USB49xx, USB70xx, USB72xx
Programming configuration file and different MAC address for NCM1 and NCM2. See Section 2.4.6.2 “Programming Different MAC Addresses for NCM1 and NCM2”.
/p <config_file.cfg> /pser <serial_string> /pmac1 <mac-address1> /pmac2 <macad-dress2>
USB49xx, USB70xx, USB72xx
Programming configuration file, serial string and different MAC address for NCM1 and NCM2. See Section 2.4 “Single-Device Configuration File Program-ming”.
/p <config_file.cfg> /pser1 <serial_string1> /pser2 <seri-al_string2> /pmac <macad-dress>
USB49xx, USB70xx, USB72xx
Programming configuration file, different serial string for USB2 and USB3.1 Gen1 Hubs/ USB49xx – primary and secondary hub. Same MAC address for both NCM1 and NCM2. See Section 2.4 “Single-Device Con-figuration File Programming”.
/p <config_file.cfg> /pser1 <serial_string1> /pser2 <seri-al_string2> /pmac1 <macad-dress1> /pmac2 <macaddress2>
USB49xx, USB70xx, USB72xx
Programming configuration file, different serial string for USB2 and USB3.1 Gen1 Hubs/ USB49xx – primary and secondary hub, differ-ent MAC address for NCM1 and NCM2. See Section 2.4 “Single-Device Con-figuration File Programming”.
/p <config_file.cfg> /pl USB57xx, USB70xx Program OTP and lock OTP mem-ory. See Section 2.4.2 “Programming OTP and Lock OTP – USB57xx and USB70xx Family”.
TABLE 2-1: CLI OPTIONS FOR USB DEVICES (CONTINUED)CLI Option SKU Supported Description

USB Devices
2017-2019 Microchip Technology Inc. DS50002629D-page 19
/p <config_file.cfg> /dar USB57xx,USB58xx/USB59xx, USB49xx,
USB471x, USB70xx and USB72xx
Disable auto reprogram option. See Section 2.4.7 “Disable Auto Reprogram Option – USB57xx, USB58xx/USB59xx, USB49xx, USB471x, USB70xx, and USB72xx”.
Programming SPI Flash Firmware/pspi <firmware_filename.bin> USB Devices Programming SPI flash firmware
without erasing pseudo-OTP memory. See Section 2.3 “Programming SPI Flash Firmware”.
/pspi <firmware_file-name.bin> /e
USB Devices Programming SPI flash firmware and erase pseudo-OTP memory. See Section 2.3 “Programming SPI Flash Firmware”.
/pspi <firmware_file-name.bin> [/e] /p <config_-file.cfg>
USB Devices Programming SPI flash firmware and configuration file. See Section 2.3 “Programming SPI Flash Firmware”.
/pspi <firmware_file-name.bin> [/e] /p <config_-file.cfg> /pser <serial_string>
USB Devices Programming SPI flash firmware, configuration file and same serial string for USB2 and USB3.1 Gen1 Hubs/ USB49xx – primary and secondary hub. See Section 2.3 “Programming SPI Flash Firmware”.
/pspi <firmware_file-name.bin> [/e] /p <config_-file.cfg> /pser <serial_string> /pmac <mac_address>
USB49xx, USB70xx, USB72xx
Programming SPI flash firmware, configuration file, same serial string for USB2 and USB3.1 Gen1 Hubs/ USB49xx – primary and secondary hub, same MAC address for both NCM1 and NCM2. See Section 2.3 “Programming SPI Flash Firmware”.
/pspi <firmware_file-name.bin> [/e] /p <config_-file.cfg> /pser1 <serial_string1> /pser2 <seri-al_string2>
USB Devices Programming SPI flash firmware, configuration file and different serial string for USB2 and USB3.1 Gen1 Hubs/ USB49xx – primary and secondary hub. See Section 2.3 “Programming SPI Flash Firmware”.
/pspi <firmware_file-name.bin> [/e] /p <config_-file.cfg> /pmac1 <macaddress1> /pmac2 <macaddress2>
USB49xx, USB70xx, USB72xx
Programming SPI flash firmware, configuration file and different MAC address for NCM1 and NCM2. See Section 2.3 “Programming SPI Flash Firmware”.
TABLE 2-1: CLI OPTIONS FOR USB DEVICES (CONTINUED)CLI Option SKU Supported Description

MPLAB® Connect Configurator CLI User’s Guide
DS50002629D-page 20 2017-2019 Microchip Technology Inc.
/pspi <firmware_file-name.bin> [/e] /p <config_-file.cfg> /pser1 <serial_string1> /pser2 <seri-al_string2> /pmac <mac_ad-dress>
USB49xx, USB70xx, USB72xx
Programming SPI flash firmware, configuration file and different serial string for USB2 and USB3.1 Gen1 Hubs/ USB49xx – primary and secondary hub, different MAC address for NCM1 and NCM2. See Section 2.3 “Programming SPI Flash Firmware”.
Verification of Hub Configuration Items/cv "<ConfigItem1> : <Value>, <ConfigItem2>: <Value>"
USB Devices Comparing the value of a parame-ter with a known value. See Section 2.6.4 “Comparing the Value of a Parameter with a Known Value”
/cv "<ConfigItem1>, <Config-Item2> "
USB Devices Getting the value of a parameter before and after programming. See Section 2.6.2 “Getting the Value of Parameter Before and After Programming”.
Batch Programming/bp < config_filename.cfg> USB Devices Mass programming configuration
file. See Section 2.5.1 “Mass Programming Configuration File (Single MCHP Device Con-nected)”.
/bp < config_filename.cfg> /pser [/alpha_prefix <string>] /start_val <decimal> /inc_val <decimal> /max_val <deci-mal>
USB Devices Mass programming configuration file and same USB serial string for USB2 and USB3.1 Gen1 Hubs/ USB49xx – primary and secondary hub. See Section 2.5.3 “Mass Programming Configuration File and USB Serial String”.
/bp < config_filename.cfg> /pser1 [/alpha_prefix1 <string>] /start_val1 <decimal> /inc_val1<decimal> /max-_val1 <decimal> /pser2 [/alpha_prefix2 <string>] /start_val2 <decimal> /inc_val2 <decimal> /max-_val2 <decimal>
USB Devices Mass programming configuration file and different USB serial string for USB2 and USB3.1 Gen1 Hubs/USB49xx – primary and sec-ondary hub. See Section 2.5.4 “Mass Program-ming Configuration File and Dif-ferent USB Serial String”.
/bp < config_filename.cfg> /pmac /mac_start_val <macad-dress> /mac_inc_val <deci-mal> /mac_max_val <macaddress>
USB49xx, USB70xx, USB72xx
Mass programming configuration file and same MAC address for both NCM1 and NCM2. See Section 2.5.6.1 “Program same MAC address for both NCM1 and NCM2”.
TABLE 2-1: CLI OPTIONS FOR USB DEVICES (CONTINUED)CLI Option SKU Supported Description

USB Devices
2017-2019 Microchip Technology Inc. DS50002629D-page 21
2.2 PREREQUISITES1. Refer to Appendix F. “HFC Device Installation” to install the HFC driver.
One-time installation is required per system. This step can be skipped if the HFC driver is already installed.
2. Hub filter driver installation is required if the internal HFC is disabled by default in the hub. This step can be skipped if either the HFC is enabled by default or the hub class filter driver is already installed.Refer to Section F.2 “Internal HFC Device Disabled by Default” for more details.
3. Find out the hub index by executing the command MPLABConnect.exe /l.Refer to Section D.2 “Index Method” for more details.
4. As an option, the port chain method can also be used to identify a device. Exe-cute the command MPLABConnect.exe /lp to get the port chain of the hub.Refer to Section D.3 “Port Chain Method” for more details.
/bp < config_filename.cfg> /pmac1 /mac_start_val1 <macad-dress> /mac_inc_val1 <deci-mal> /mac_max-_val1 <macaddress> /pmac2 /mac_start_val2 <macad-dress> /mac_inc_val2 <decimal> /mac_max_val2 <macad-dress>]
USB49xx, USB70xx, USB72xx
Mass programming configuration file and different MAC address for NCM1 and NCM2. See Section 2.4.6.2 “Programming Different MAC Addresses for NCM1 and NCM2”.
Dump Configuration/SPI Memory/rotp USB Devices Dump configuration memory. See
Section 2.7.1 “Configuration Memory”.
/rspi USB Devices Dump SPI flash memory. See Section 2.7.2 “SPI Memory”.
/rspi /cfg USB Devices Dump SPI flash memory and con-figuration memory. See Section 2.7.2.2 “SPI Flash Firm-ware and Configuration Dump”.
Miscellaneous/mcf USB Devices To merge two configuration files/ccs USB Devices To calculate checksum for the
given input file
TABLE 2-1: CLI OPTIONS FOR USB DEVICES (CONTINUED)CLI Option SKU Supported Description

MPLAB® Connect Configurator CLI User’s Guide
DS50002629D-page 22 2017-2019 Microchip Technology Inc.
2.3 PROGRAMMING SPI FLASH FIRMWARE
2.3.1 Hub Filter Installed as Hub Class FilterOne of the following commands can be used for SPI flash firmware programming if either the HFC is enabled by default or the hub filter is installed as hub class filter.
>MPLABConnect.exe /pspi < firmware_filename.bin> [/e] [/p <config_-
file.cfg>] [/p <config_file.cfg> /pser <serial_string>] /id <index>
• Program SPI flash firmware. Do not erase existing Pseudo-OTP configurations.>MPLABConnect.exe /pspi < firmware_filename.bin> /id <index>
- /id <index> is the index of the hub to be programmed.• Program SPI flash firmware. Erase existing Pseudo-OTP configurations.>MPLABConnect.exe /pspi < firmware_filename.bin> /id <index> /e
- /e is the option to erase existing Pseudo-OTP configurations.• Program SPI flash firmware with a new configuration file. Do not erase existing
Pseudo-OTP configurations.>MPLABConnect.exe /pspi < firmware_filename.bin> /p <config_-
file.cfg> /id <index>
- /p <config_file.cfg> is the configuration file to be programmed into Pseudo OTP.
- /id <index> is the index of the hub to be programmed.• Program SPI flash firmware with the new configuration file. Erase existing
Pseudo-OTP configurations.>MPLABConnect.exe /pspi < firmware_filename.bin> /p <config_-
file.cfg> /id <index> /e
- /e is the option to erase existing Pseudo-OTP configurations.• Program SPI flash firmware with the new configuration file. Program USB serial
string.>MPLABConnect.exe /pspi < firmware_filename.bin> /p <config_-
file.cfg> /pser <serial_string> /id <index>
- /pser <serial_string> is the USB2.0 and USB3.1 Gen1 Hub/USB49xx – primary and secondary hub serial string to be programmed.
2.3.2 Device-Specific Hub Filter Approach1. For the device-specific hub filter approach, append the command /iv with all
generic commands mentioned in Section 2.3.1 “Hub Filter Installed as Hub Class Filter”.For example:
>MPLABConnect.exe /pspi < firmware_filename.bin> /id <index> /iv
2. If the hub firmware is already executing from an external SPI Flash, the MPLAB® Connect Configurator CLI tool would reset the hub and force it to boot from the internal ROM. In this case, it may take time for USB enumeration if the driver must reload. Driver loading time is based on PC performance. The default time-out value is 15 seconds. If the device is not enumerated after the 15-second tim-eout, then the tool would come out of the programming with the error code.The default timeout value can be overridden using the following command:
>MPLABConnect.exe /pspi < firmware_filename.bin> /id <index> /d

USB Devices
2017-2019 Microchip Technology Inc. DS50002629D-page 23
<Time_in_Milliseconds>
- /d <Time_in_Milliseconds> is the timeout value.3. After programming, a reset would be done automatically for the device to boot
from SPI flash ROM.
2.3.3 Time-Optimized Production Line Programming MethodIt may take longer for USB253x/USB4604 family hubs to program both the SPI firm-ware and configuration file. This is because the MPLAB Connect Configurator CLI forces re-enumeration of the hub after programming the firmware to the SPI flash before it programs the configuration file. To minimize total programming time, do the following:
1. Install the hub filter driver as class filter.2. Program SPI flash firmware and erase existing Pseudo-OTP configurations.>MPLABConnect.exe /pspi < firmware_filename.bin> /id <index> /e
- /e is the option to erase existing Pseudo-OTP configurations.3. Program the configuration file generated by MPLAB Connect Configurator CLI
tool.>MPLABConnect.exe /p <config_file.cfg> /id <index>
4. Read the entire SPI flash firmware memory and Pseudo-OTP configuration memory. This would generate a Read_SPI_MM_DD_YYYY_HH_MM_SS.bin file.
>MPLABConnect.exe /rspi /cfg /id <index>
5. Read_SPI_MM_DD_YYYY_HH_MM_SS.bin would be created in the same run-ning directory based on current date and time. The newly read bin file would have the binary data of firmware and configuration memory. This bin file can be used to program the SPI flash firmware along with the configuration file in production line.
>MPLABConnect.exe /pspi < Read_SPI_MM_DD_YYYY_HH_MM_SS.bin > /id
<index>
2.3.4 Erasing SPI FlashThe SPI flash firmware contents can be erased using the following command:
>MPLABConnect.exe /pspi DisableSPIFlash.bin /id <index>
- DisableSPIFlash.bin binary file can be found in the released package.The default DisableSPIFlash.bin binary file size is 64 KB. Extend the size of this binary file to 72KB/128KB/256KB/264KB by appending 0xFF for required size.
2.4 SINGLE-DEVICE CONFIGURATION FILE PROGRAMMINGConfiguration file can be programmed to OTP (when the code executes from ROM) or Pseudo-OTP (when the code executes from the SPI flash). Before conducting OTP/Pseudo-OTP programming, follow Steps 1, 2, and 3 in Section 2.2 “Prerequisites”.
2.4.1 Configuration File Programming1. The following command can be used to program OTP/Pseudo-OTP if either the
internal HFC is enabled by default or the hub filter is installed as class filter:>MPLABConnect.exe /p < config_filename.cfg> [/id <index>]

MPLAB® Connect Configurator CLI User’s Guide
DS50002629D-page 24 2017-2019 Microchip Technology Inc.
- /p <config_filename.cfg> is used to program the configuration file into OTP/Pseudo-OTP memory.
- /id <index> is the index of the hub to be programmed.For device-specific filter approach:
>MPLABConnect.exe /p < config_filename.cfg> [/id <index>] /iv
2. After programming, a device reset would be done automatically.
2.4.2 Programming OTP and Lock OTP – USB57xx and USB70xx Family
Once the OTP programming is successful, the OTP memory can be locked using the command /pl to avoid further programming. This support is only applicable to the USB57xx and USB70xx Family. This cannot be performed if the device is running from SPI flash.
For example:
>MPLABConnect.exe /p < config_filename.cfg> [/id <index] /pl
2.4.3 Programming the Configuration File and USB Serial String1. The following command can be used to program the configuration file along with
a serial number if either the internal HFC is enabled by default or the hub filter is installed as class filter.
>MPLABConnect.exe /p < config_filename.cfg> [/id <index>] /pser
<serial_string>
- /p <config_filename.cfg> is used to program the configuration file into OTP/Pseudo-OTP memory.
- /id <index> is the index of the hub to be programmed.- /pser <serial_string> is the USB serial number in a string descriptor.
Use the following for a device-specific filter approach:
>MPLABConnect.exe /p < config_filename.cfg> [/id <index>] /pser <serial_string> /iv
2. After programming, a device reset would be done automatically.
2.4.4 Programming the Configuration File and Different USB Serial String
1. The following command can be used to program configuration file along with a primary hub serial number and a secondary hub serial number if either the inter-nal HFC is enabled by default or the hub filter is installed as class filter.
>MPLABConnect.exe /p < config_filename.cfg> [/id <index>] /pser1
<serial_string1> /pser2 <serial_string2>
- /p <config_filename.cfg> is used to program the configuration file into OTP/Pseudo-OTP memory.
Note: For USB57xx, USB58xx, USB59xx, USB70xx, and USB72xx families, same serial numbers are programmed for USB 2.0 and USB 3.1 Gen1.For USB49xx, same serial numbers are programmed for both primary and secondary hub. Refer to Section 2.4.4 “Programming the Configuration File and Different USB Serial String” to program different serial numbers

USB Devices
2017-2019 Microchip Technology Inc. DS50002629D-page 25
- /id <index> is index of the hub to be programmed.- /pser1 <serial_string1> is the USB2.0/ USB49xx – primary hub serial
number in the string descriptor.- /pser2 <serial_string2> is the USB3.1 Gen1/ USB49xx – secondary hub
serial number in the string descriptor.Use the following for a device-specific filter approach:
>MPLABConnect.exe /p < config_filename.cfg> [/id <index>] /pser1
<serial_string1> /pser2 <serial_string2> /iv
2. After programming, a device reset would be done automatically.
2.4.5 Programming the Configuration File and Verifying Programmed Configuration Item
1. Verification is done once the configuration file is programmed and the device is reset. Sometimes the device enumeration may take long after reset due to the time spent on driver loading for the device. The default timeout value is 15 sec-onds. If the device is not enumerated after the 15-second timeout, then the tool would terminate the programming process and display an error code. The default timeout can be overridden using the command /d.
2. Program the configuration file and verify configuration items like Vendor ID, Prod-uct ID, and others.
>MPLABConnect.exe /p < config_filename.cfg> [/id <index>] [/cv
<configuration item names>] [/d <Delay_In_Milliseconds>]
- /p <config_filename.cfg> is used to program the configuration file into OTP/Pseudo-OTP memory.
- /id <index> is the index of the hub to be programmed.- /cv <configuration item names> is the command to verify the mentioned
configuration items. Refer to Section 2.6 “Verification of Hub Configura-tion Items” for more details.
2.4.6 Programming the Configuration File and NCM MAC Addresses USB49xx, USB70xx and USB72xx Families
2.4.6.1 PROGRAMMING SAME MAC ADDRESSES FOR NCM1 AND NCM2
1. The following command can be used to program the configuration file along with NCM MAC address if either the internal HFC is enabled by default or the hub filter is installed as class filter.
>MPLABConnect.exe /p < config_filename.cfg> [/id <index>] /pmac
<mac_address>
- /p <config_filename.cfg> is used to program the configuration file into OTP/Pseudo-OTP memory.
- /id <index> is the index of the hub to be programmed.- /pmac <mac_address> is the NCM MAC address.
Use the following for a device-specific filter approach:
>MPLABConnect.exe /p < config_filename.cfg> [/id <index>] /pmac
<mac_address> /iv
2.4.6.2 PROGRAMMING DIFFERENT MAC ADDRESSES FOR NCM1 AND NCM2
1. The following command can be used to program the configuration file along with

MPLAB® Connect Configurator CLI User’s Guide
DS50002629D-page 26 2017-2019 Microchip Technology Inc.
NCM MAC address if either the internal HFC is enabled by default or the hub filter is installed as class filter.
>MPLABConnect.exe /p < config_filename.cfg> [/id <index>] /pmac1
<mac_address1> /pmac2 <mac_address2>
- /p <config_filename.cfg> is used to program the configuration file into OTP/Pseudo-OTP memory.
- /id <index> is the index of the hub to be programmed.- /pmac1 <mac_address1> is the NCM1 MAC address.- /pmac2 <mac_address2> is the NCM2 MAC address.
Use the following for a device-specific filter approach:
>MPLABConnect.exe /p < config_filename.cfg> [/id <index>] /pmac1
<mac_address1> /pmac2 <mac_address2> /iv
2.4.7 Disable Auto Reprogram Option – USB57xx, USB58xx/USB59xx, USB49xx, USB471x, USB70xx, and USB72xx
If the programmed content does not match with input file, the tool, by default, would automatically try to program the input file for the second time. If programming fails for the second time, the tool would display an error.
This command is used to disable auto reprogram of input file if there is an error:
>MPLABConnect.exe /p < config_filename.cfg> /dar
2.5 BATCH PROGRAMMING (AUTOMATED EXECUTION)This option is used for programming devices one after the other in Batch mode. This is used for mass programming.
Before batch programming, follow Steps 1, 2, and 3 in Section 2.2 “Prerequisites”.
2.5.1 Mass Programming Configuration File (Single MCHP Device Connected)
1. The following command can be used to program configuration file if either the internal HFC is enabled by default or the hub filter is installed as class filter. See Figure 2-1.
>MPLABConnect.exe /bp < config_filename.cfg> [/id <index>]
- /bp <config_filename.cfg> is used to program the configuration file into OTP/Pseudo-OTP memory in Continuous mode.
- /id <index> is the index of the hub to be programmed.For device-specific filter approach:
>MPLABConnect.exe /bp < config_filename.cfg> [/id <index>] /iv
Note: Auto reprogram is only applicable if the device is booting from ROM.

USB Devices
2017-2019 Microchip Technology Inc. DS50002629D-page 27
FIGURE 2-1: MASS PROGRAMMING CONFIGURATION FILE (SINGLE MCHP DEVICE IS CONNECTED)
2. Press <CTRL+C> to abort the programming.3. After each programming, colored status would be displayed in the command line.
- GREEN – programming successful- RED – programming failed
4. After each programming, a device reset would be done automatically.
2.5.2 Mass Programming Configuration File (Multiple MCHP Devices Connected)
This method must be used if more than one Microchip hub is connected to the machine.
1. The following command can be used to program the configuration file if either the internal HFC is enabled by default or the hub filter is installed as class filter.
>MPLABConnect.exe /bp < config_filename.cfg> [/devpath
"VVVV/PPPP/portchain"]
- /bp <config_filename.cfg> is used to program the configuration file into OTP/Pseudo-OTP memory in Continuous mode.
- /devpath "VVVV/PPPP/portchain" is the port chain of the hub to be pro-grammed.For device-specific filter approach:
>MPLABConnect.exe /bp < config_filename.cfg> [/id <index>] /iv
2. Press <CTRL+C> to abort the programming.3. After each programming, colored status would be displayed in the command line.
- GREEN – programming successful- RED – programming failed
4. After each programming, a device reset would be done automatically.
2.5.3 Mass Programming Configuration File and USB Serial String1. The following command can be used to program the configuration file along with
different serial numbers if either the internal HFC is enabled by default or the hub filter is installed as class filter. See Figure 2-2.
>MPLABConnect.exe /bp < config_filename.cfg> [/id <index>] /pser
[/alpha_prefix <string>] [/start_val <decimal>] [/inc_val <deci-
mal>] [/max_val <decimal>]

MPLAB® Connect Configurator CLI User’s Guide
DS50002629D-page 28 2017-2019 Microchip Technology Inc.
- /bp <config_filename.cfg> is used to program the configuration file into OTP/Pseudo-OTP memory in Continuous mode.
- /id <index> is the index of the hub to be programmed.- /alpha_prefix <string> is the string to be prepended with all serial num-
bers. This is an optional argument. For example, MCHP , TESTDEVICE.- /start_val <decimal> is the suffix start value of the serial string.- /inc_val <decimal> is the value to be incremented for each serial string.- max_val <decimal> is the maximum value of the serial string to be pro-
grammed. After the specified maximum value, the tool would stop the pro-gramming.For example:
>MPLABConnect.exe /bp < config_filename.cfg> [/id <index>] /pser [/alpha_prefix <string>] [/start_val <decimal>] [/inc_val <deci-mal>] [/max_val <decimal>] /iv
FIGURE 2-2: MASS PROGRAMMING CONFIGURATION FILE AND USB SERIAL STRING
Use the following for a device-specific filter approach:
>MPLABConnect.exe /bp < config_filename.cfg> [/id <index>] /pser <serial_string> /iv
2. Press <CTRL+C> to abort the programming.3. After each programming, colored status would be displayed in the command line.
- GREEN – programming successful- RED – programming failed
4. After each programming, a device reset would be done automatically.
Note: For the USB57xx, USB58xx/USB59xx, USB70xx and USB72xx families, the same serial numbers are programmed for USB 2.0 and USB 3.1 Gen1.For the USB49xx family, the same serial numbers are programmed for pri-mary hub and secondary hub.

USB Devices
2017-2019 Microchip Technology Inc. DS50002629D-page 29
2.5.4 Mass Programming Configuration File and Different USB Serial String
1. The following command can be used to program configuration file along with dif-ferent serial numbers for primary and secondary hub if either the internal HFC is enabled by default or the hub filter is installed as class filter.
>MPLABConnect.exe /bp < config_filename.cfg> [/id <index>] /pser1 [/alpha_prefix1 <string>] /start_val1 <decimal> /inc_val1<decimal> /max_val1 <decimal> /pser2 [/alpha_prefix2 <string>] /start_val2 <decimal> /inc_val2<decimal> /max_val2 <decimal>
- /bp <config_filename.cfg> is used to program the configuration file into OTP/Pseudo-OTP memory in Continuous mode.
- /id <index> is the index of the hub to be programmed.- /alpha_prefix1 <string> is the string to be prepended with all USB2.0
Hub/USB49xx – primary hub numbers. For example, MCHP, TESTDEVICE.- /start_val1 <decimal> is the suffix start value of the USB2.0
Hub/USB49xx – primary hub string.- /inc_val1 <decimal> is the value to be incremented for each USB2.0
Hub/USB49xx – primary hub string.- /max_val1 <decimal> is the maximum value of the USB2.0 Hub/USB49xx –
primary hub string to be programmed.- /alpha_prefix2 <string> is the string to be prepended with all USB3.1
Gen1 Hub/ USB49xx – secondary hub numbers. For example, MCHP , TEST-DEVICE.
- /start_val2 <decimal> is the suffix start value of the USB3.1 Gen1 Hub/ USB49xx – secondary hub string.
- /inc_val2 <decimal> is the value to be incremented for USB3.1 Gen1 Hub/ USB49xx – secondary hub serial string.
- /max_val2 <decimal> is the maximum value of the USB3.1 Gen1 Hub/ USB49xx – secondary hub to be programmed.After the specified maximum value, the tool would stop the programming.
For example:
>MPLABConnect.exe /bp < config_filename.cfg> [/id <index>] /pser1 [/alpha_prefix1 <string>] /start_val1 <decimal> /inc_val1<decimal> /max_val1 <decimal> /pser2 [/alpha_prefix2 <string>] /start_val2 <decimal> /inc_val2<decimal> /max_val2 <dec-imal> /iv
Use the following for a device-specific filter approach:
>MPLABConnect.exe /bp < config_filename.cfg> [/id <index>] /pser1 [/alpha_prefix1 <string>] /start_val1 <decimal> /inc_val1<decimal> /max_val1 <decimal> /pser2 [/alpha_prefix2 <string>] /start_val2 <decimal> /inc_val2<decimal> /max_val2 <dec-imal> /iv
2. Press <CTRL+C> keys to abort the programming.3. After each programming, colored status would be displayed in the command line.
- GREEN – programming successful- RED – programming failed
4. After each programming, a device reset would be done automatically.

MPLAB® Connect Configurator CLI User’s Guide
DS50002629D-page 30 2017-2019 Microchip Technology Inc.
2.5.5 Mass Programming Configuration File and Verifying Programmed Configuration Item
1. Verification would be done once the configuration file is programmed and the device is reset. Sometimes the device enumeration may take long after reset due to the time spent on driver loading for the device. The default timeout value is 15 seconds. If the device is not enumerated after the 15-second timeout, the tool would come out of the programming with the error code. The default timeout can be overridden using the command /d.Program configuration file and verify configuration items like Vendor ID, Product ID, and others.
>MPLABConnect.exe /bp < config_filename.cfg> [/id <index>] [/cv <configuration item names>] [/d <Delay_In_Milliseconds>]
- /bp <config_filename.cfg> is used to program the configuration file into OTP/Pseudo-OTP memory.
- /id <index> is the index of the hub to be programmed.- /cv <configuration item names> is the command to verify the mentioned
configuration items. Refer to Section 2.6 “Verification of Hub Configura-tion Items” for more details.
2. Press <CTRL+C> keys to abort the programming.
2.5.6 Mass Programming the Configuration File OTP and NCM MAC Address
2.5.6.1 PROGRAM SAME MAC ADDRESS FOR BOTH NCM1 AND NCM2
1. The following command can be used to program the configuration file along with NCM MAC address if either the internal HFC is enabled by default or the hub filter is installed as class filter.
>MPLABConnect.exe /bp < config_filename.cfg> [/id <index>] /pmac
/mac_start_val <macaddress> /mac_inc_val <decimal> /mac_max_val
<macaddres>
- /bp <config_filename.cfg> is used to program the configuration file into OTP/Pseudo-OTP memory in Continuous mode
- /id <index> is the index of the hub to be programmed.- /mac_start_val <macaddress> is the start MAC address.- /mac_inc_val <decimal> is the value to be incremented for each MAC
address.- /mac_max_val <macaddress> is the maximum value of the MAC address to
be programmed. After the specified maximum value, the tool would stop the programming.
For example:
>MPLABConnect.exe /bp config_filename.cfg /id 0 /pmac /mac_start_val "01:02:03:04:05:06" /mac_inc_val 1 /mac_max_val "01:02:03:04:05:09"
Use the following for a device-specific filter approach:

USB Devices
2017-2019 Microchip Technology Inc. DS50002629D-page 31
>MPLABConnect.exe /bp < config_filename.cfg> [/id <index>] [/pmac /mac_start_val <macaddress> /mac_inc_val <decimal> /mac_max_val <macaddress>] /iv
2. Press <CTRL+C> to abort the programming.3. After each programming, colored status would be displayed in the command line.
- GREEN – programming successful- RED – programming failed
4. After each programming, a device reset would be done automatically.
2.5.6.2 PROGRAMMING DIFFERENT MAC ADDRESSES FOR NCM1 AND NCM2
1. The following command can be used to program the configuration file along with NCM1 and NCM2 MAC addresses if either the internal HFC is enabled by default or the hub filter is installed as class filter.
>MPLABConnect.exe /bp < config_filename.cfg> [/id <index>] /pmac1 /mac_start_val1 <macaddress> /mac_inc_val1 <decimal> /mac_max_val1
<macaddress>] /pmac2 /mac_start_val2 <macaddress>/mac_inc_val2
<decimal> /mac_max_val2 <macaddress>
- /bp <config_filename.cfg> is used to program the configuration file into the configuration file memory in Continuous mode
- /id <index> is the index of the hub to be programmed.- /mac_start_val1 <macaddress> is the start NCM1 MAC address.- /mac_inc_val1 <decimal> is the value to be incremented for each NCM1
MAC address.- /mac_max_val1 <macaddress> is the maximum value of the NCM1 MAC
address to be programmed. - /mac_start_val2 <macaddress> is the start NCM2 MAC address.- /mac_inc_val2 <decimal> is the value to be incremented for each NCM2
MAC address.- /mac_max_val2 <macaddress> is the maximum value of the NCM2 MAC
address to be programmed. After the specified maximum value, the tool would stop the programming.
For example:
>MPLABConnect.exe /bp config_filename.cfg /id 0 /pmac1 /mac_start_val1 "01:02:03:04:05:06" /mac_inc_val1 1 /mac_max_val1 "01:02:03:04:05:09" /pmac2 /mac_start_val2 "01:02:03:04:05:10" /mac_inc_val2 1 /mac_max_val2 "01:02:03:04:05:14"
Use the following for a device-specific filter approach:
>MPLABConnect.exe /bp < config_filename.cfg> [/id <index>] /pmac1 /mac_start_val1 <macaddress> /mac_inc_val1 <decimal> /mac_max_val1 <macaddress>] /pmac2 /mac_start_val2 <macaddress>/mac_inc_val2 <decimal> /mac_max_val2 <macaddress> /iv
2. Press <CTRL+C> to abort the programming.3. After each programming, colored status would be displayed in the command line.
- GREEN – programming successful- RED – programming failed
4. After each programming, a device reset would be done automatically.

MPLAB® Connect Configurator CLI User’s Guide
DS50002629D-page 32 2017-2019 Microchip Technology Inc.
2.6 VERIFICATION OF HUB CONFIGURATION ITEMSThe following configuration parameters can be read from a device to compare and ver-ify correct operation (/cv):
Configuration items supported for USB hubs:
1. vid2. pid3. did4. usbvcd5. languageid6. manufacturer7. product8. serial
Configuration items supported by USB57xx, USB58xx/USB59xx,USB70xx and USB72xx:
1. usb3vid2. usb3pid3. usb3did4. usb3vcd5. usb3languageid6. usb3manufacturer7. usb3product8. usb3serial
Configuration items supported by USB49xx:
1. secondary_vid2. secondary_pid3. secondary_did4. secondary_usbvcd5. secondary_languageid6. secondary_manufacturer7. secondary_product8. secondary_serial

USB Devices
2017-2019 Microchip Technology Inc. DS50002629D-page 33
2.6.1 Supported ParametersTable 2-2 specifies the supported configuration items.
TABLE 2-2: SUPPORTED PARAMETERSParameterNote 1 Description
vid This is a 16-bit value that uniquely identifies the vendor of the USB2 user device (idVendor: assigned by USB-Interface).
pid This is a 16-bit value that the vendor can assign to uniquely identify this particular product for USB2 user device (idProd-uct).
did This is a 16-bit device release number for USB2 user device in BCD format (bcdDevice).
usbvcd This is a USB2 specification release number in BCD format (bcdUSB).
languageid This is the language ID of the USB2 HUB.manufacturer This is the manufacturer string of the USB2 HUB.product This is the product string of the USB2 HUB.serial This is the serial string of the USB2 HUB.usb3vid This is a 16-bit value that uniquely identifies the vendor of the
USB3 user device (idVendor: assigned by USB-Interface).usb3pid This is a 16-bit value that the vendor can assign to uniquely
identify this particular product for USB3 user device (idProd-uct).
usb3did This is a 16-bit device release number for a USB3 user device in BCD format (bcdDevice).
usb3vcd This is a USB3 specification release number in BCD format (bcdUSB).
usb3languageid This is the language ID of the USB3 HUB.usb3manufacturer This is the manufacturer string of the USB3 HUB.usb3product This is the product string of the USB3 HUB.usb3serial This is the serial string of the USB3 HUB.secondary_vid This is a 16-bit value that uniquely identifies the vendor of the
USB2 secondary hub.secondary_pid This is a 16-bit value that the vendor can assign to uniquely
identify this particular product for USB2 secondary hub.secondary_did This is a 16-bit device release number for USB2 secondary
hub in BCD format.secondary_usbvcd This is the USB2 specification release number for secondary
hub in BCD format.secondary_languageid This is the language ID of the USB2 secondary hub.secondary_manufacturer This is the manufacturer string of the USB2 secondary hub.secondary_product This is the product string of the USB2 secondary hub.secondary_serial This is the serial string of the USB2 secondary hub.Note 1: Only these configuration items are supported when using /cv command.

MPLAB® Connect Configurator CLI User’s Guide
DS50002629D-page 34 2017-2019 Microchip Technology Inc.
2.6.2 Getting the Value of Parameter Before and After ProgrammingTo display the configuration items before and after programming:
>MPLABConnect.exe /p < config_filename.cfg> /cv "vid,pid" /id <index>
>MPLABConnect.exe /bp < config_filename.cfg> /cv "vid,pid" /id <index>
2.6.3 Getting the Value of Any Parameter/cv command can also be used to verify the configuration parameters without pro-gramming.
For example:
>MPLABConnect.exe /cv "vid,pid,did,usbvcd,languageid,manufac-turer,product,serial" /id <index>
>MPLABConnect.exe /cv "vid,pid" /id <index>
2.6.4 Comparing the Value of a Parameter with a Known ValueTo compare and verify the configuration items, the following format should be used:
/cv "<ConfigItem1> : <Value>, <ConfigItem2> : <Value>" /id <index>
For example:
>MPLABConnect.exe /p < config_filename.cfg> /cv
"vid:0x424,pid:0x2534" /id 0
>MPLABConnect.exe /cv "vid:0x424,pid:0x2534,serial:123456" /id 0
2.7 DUMP MEMORY
2.7.1 Configuration MemoryThis option is used to dump the configuration memory (OTP/Pseudo-OTP) of the hub.
Hub class filter approach:
>MPLABConnect.exe /rotp /id <index>
Device-specific filter approach:
>MPLABConnect.exe /rotp /id <index> /iv
For example:
MPLABConnect.exe /rotp /id 0
2.7.2 SPI Memory
2.7.2.1 SPI FLASH FIRMWARE DUMP
This option is used to dump the SPI flash firmware memory of the hub.
Hub class filter approach:
>MPLABConnect.exe /rspi /id <index>
Device-specific filter approach:
>MPLABConnect.exe /rspi /id <index> /iv
USB Devices
2017-2019 Microchip Technology Inc. DS50002629D-page 35
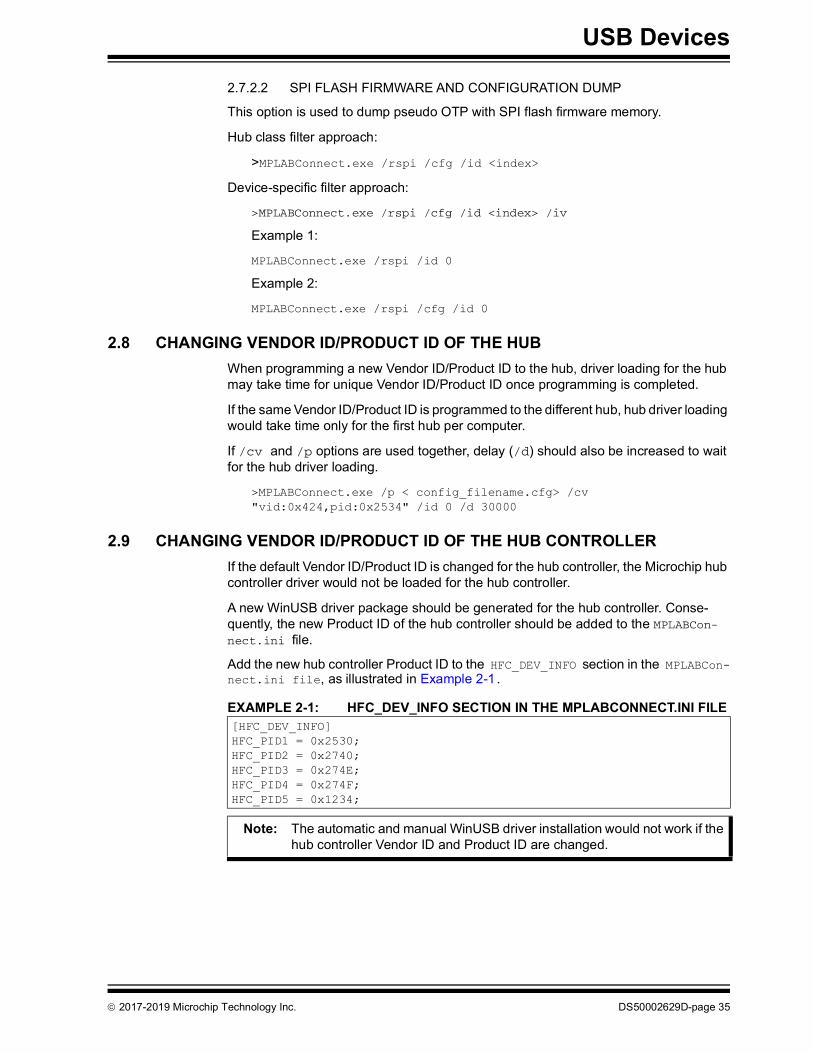
2.7.2.2 SPI FLASH FIRMWARE AND CONFIGURATION DUMP
This option is used to dump pseudo OTP with SPI flash firmware memory.
Hub class filter approach:
>MPLABConnect.exe /rspi /cfg /id <index>
Device-specific filter approach:
>MPLABConnect.exe /rspi /cfg /id <index> /iv
Example 1:
MPLABConnect.exe /rspi /id 0
Example 2:
MPLABConnect.exe /rspi /cfg /id 0
2.8 CHANGING VENDOR ID/PRODUCT ID OF THE HUBWhen programming a new Vendor ID/Product ID to the hub, driver loading for the hub may take time for unique Vendor ID/Product ID once programming is completed.
If the same Vendor ID/Product ID is programmed to the different hub, hub driver loading would take time only for the first hub per computer.
If /cv and /p options are used together, delay (/d) should also be increased to wait for the hub driver loading.
>MPLABConnect.exe /p < config_filename.cfg> /cv "vid:0x424,pid:0x2534" /id 0 /d 30000
2.9 CHANGING VENDOR ID/PRODUCT ID OF THE HUB CONTROLLERIf the default Vendor ID/Product ID is changed for the hub controller, the Microchip hub controller driver would not be loaded for the hub controller.
A new WinUSB driver package should be generated for the hub controller. Conse-quently, the new Product ID of the hub controller should be added to the MPLABCon-nect.ini file.
Add the new hub controller Product ID to the HFC_DEV_INFO section in the MPLABCon-nect.ini file, as illustrated in Example 2-1.
EXAMPLE 2-1: HFC_DEV_INFO SECTION IN THE MPLABCONNECT.INI FILE[HFC_DEV_INFO]HFC_PID1 = 0x2530;HFC_PID2 = 0x2740;HFC_PID3 = 0x274E;HFC_PID4 = 0x274F;HFC_PID5 = 0x1234;
Note: The automatic and manual WinUSB driver installation would not work if the hub controller Vendor ID and Product ID are changed.

MPLAB® Connect Configurator CLI User’s Guide
DS50002629D-page 36 2017-2019 Microchip Technology Inc.
NOTES:

MPLAB® CONNECTCONFIGURATOR CLI
USER’S GUIDE
2017-2019 Microchip Technology Inc. DS50002629D-page 37
Chapter 3. LAN78xx Devices
3.1 COMMAND LINE ARGUMENTS FOR LAN78XXLAN78xx devices are USB 3.0 Gigabit Ethernet Controller. LAN74xx devices use EEPROM or OTP to store various configuration data. The EEPROM controller supports 256/512 byte EEPROM. The OTP is 512 bytes in size. MPLAB® Connect Configurator CLI allows access to LAN74xx – EEPROM/OTP. Table 3-1 lists all the command line arguments supported for LAN78xx devices.
TABLE 3-1: CLI OPTIONS FOR LAN78XX DEVICES
CLI Option SKU Supported Description
/pl < myfile.ini or .bin> [/id <index>] [/eel] LAN78xx Section 3.2.1 “EEPROM Pro-gramming”
/pl < myfile.ini or .bin> [/id <index>] /pser<serial_string>
LAN78xx Section 3.2.2.1 “Programming EEPROM with a Serial Number (Override Serial Number)”
/pl < myfile.ini or .bin> [/id ] /pmac LAN78xx Section 3.2.2.2 “Programming EEPROM with a MAC Address (Override MAC Address)”
/pl < myfile.ini or .bin> [/id <index>] /pmac<mac addr> /pser <serial_num>
LAN78xx Section 3.2.2.3 “Programming EEPROM with a MAC Address (Override MAC Address) and a Serial Number (Override Serial Number)”
/pl < myfile.ini or .bin> [/id <index>] / [/cvl<configuration item names>] [/d <Delay_In_-Milliseconds>]
LAN78xx Section 3.2.3 “Programming EEPROM and Verifying Pro-grammed Configuration Item”
/pl < myfile.ini or .bin> [/id ] /o LAN78xx Section 3.3.1 “OTP Program-ming”
/pl < myfile.ini or .bin> [/id ] /o /pser LAN78xx Section 3.3.2 “Programming OTP and USB Serial/MAC Address”
/pl < myfile.ini or .bin> [/id ] /o /pmac LAN78xx Section 3.3.2.2 “Programming OTP with a MAC Address (Override MAC Address)”
/pl < myfile.ini or .bin> [/id <index>] /o /pmac<mac addr> /pser <serial_num>
LAN78xx Section 3.3.2.3 “Programming OTP with a MAC Address (Override MAC Address) and a Serial Number (Override Serial Number)”
/pl < myfile.ini or .bin> /o [/id ] / [/cvl ] [/d ] LAN78xx Section 3.3.3 “Programming OTP and Verifying Programmed Configuration Item”
/bpl < myfile.ini or .bin> [/id ] /o LAN78xx Section 3.4.1 “Mass EEPROM/OTP Programming (Single Device Connected)”

MPLAB® Connect Configurator CLI User’s Guide
DS50002629D-page 38 2017-2019 Microchip Technology Inc.
3.2 SINGLE-DEVICE EEPROM PROGRAMMING1. Refer to Appendix G. “LAN78xx and LAN74xx Driver Installation” to install
LAN78xx driver for Windows. One-time installation is required per system. This step can be skipped if the LAN78xx driver is already installed.
2. Find out the LAN adapter index by executing the command MPLABConnect.exe /le. Refer to Section H.2 “Listing the LAN78xx/LAN74xx Devices or Finding the Index of LAN78xx/LAN74xx” for more details.
3.2.1 EEPROM Programming1. The following command can be used to program EEPROM.>MPLABConnect.exe /pl < myfile.ini or .bin> [/id <index>] [/eel]
- /pl < myfile.ini/bin > is used to program the configuration file into OTP memory.
/bpl < myfile.ini or .bin> [/id <index>] /o/pser [/alpha_prefix <string>] [/start_val <decimal>] [/inc_val<decimal>] [/max_val <decimal>]
LAN78xx Section 3.4.2 “Mass Program-ming EEPROM/OTP and USB Serial String”
/bpl < myfile.ini or .bin> [/id <index>] /o[/pmac XX:XX:XX:XX:XX:XX] [ /inc_mac < decimal>] [max_mac <hex>]/bpl < myfile.ini/bin >
LAN78xx Section 3.4.3 “Mass Program-ming EEPROM/OTP and MAC Address”
/bpl < myfile.ini or .bin> [/id <index>] /o[/pmac XX:XX:XX:XX:XX:XX] [ /inc_mac < decimal>] [max_mac <hex>]/pser [/alpha_prefix <string>] [/start_val <decimal>] [/inc_val<decimal>] [/max_val <decimal>]
LAN78xx Section 3.4.4 “Mass Program-ming EEPROM/OTP with MAC Address and Serial Number”
/bpl < myfile.ini or .bin> /o [/id <index>] /[/cvl <configuration item names>] [/d <Delay_In_Milliseconds>]
LAN78xx Section 3.4.5 “Mass OTP Pro-gramming and Verifying Pro-grammed Configuration Item”
/pl < config_filename.bin> /cvl "macaddr" /id<index>
LAN78xx Section 3.5.1 “Getting the Value of Parameter Before and After Programming”
/bpl < config_filename.bin> /cvl "macaddr" /id<index>
LAN78xx Section 3.5.1 “Getting the Value of Parameter Before and After Programming”
/cvl "macaddr,languageid,manufac-turer,product,serial"/id <index>
LAN78xx Section 3.5.2 “Getting the Value of a Parameter”
/cvl "macaddr,enselfpower" /id <index> LAN78xx Section 3.5.2 “Getting the Value of a Parameter”
/cvl "<ConfigItem1> : <Value>, <Config-Item2> : <Value>" /id <index>
LAN78xx Section 3.5.3 “Comparing the Value of a Parameter with a Known Value”
/rl /id <index> /o LAN78xx Section 3.6.1 “OTP Memory”/rl /id <index> LAN78xx Section 3.6.2 “EEPROM Mem-
ory”
TABLE 3-1: CLI OPTIONS FOR LAN78XX DEVICES (CONTINUED)
CLI Option SKU Supported Description
Note: Application should have administrator rights.

LAN78xx Devices
2017-2019 Microchip Technology Inc. DS50002629D-page 39
- /id <index> is the index of the LAN adapter to be programmed.- /eel is used to erase EEPROM content.
2. After programming, a device reset would be done automatically.
3.2.2 Programming EEPROM and USB Serial/MAC Address
3.2.2.1 PROGRAMMING EEPROM WITH A SERIAL NUMBER (OVERRIDE SERIAL NUMBER)
>MPLABConnect.exe /pl < myfile.ini or .bin> [/id <index>] /pser <serial_string>
- /pl < myfile.ini/bin> is used to program the configuration file into OTP memory.
- /id <index> is the index of the LAN adapter to be programmed.- /pser <serial_string> is the USB serial number in USB string descriptor.
3.2.2.2 PROGRAMMING EEPROM WITH A MAC ADDRESS (OVERRIDE MAC ADDRESS)
>MPLABConnect.exe /pl < myfile.ini or .bin> [/id <index>] /pmac <mac addr>
- /pl < myfile.ini/bin> is used to program the configuration file into OTP memory.
- /id <index> is the index of the LAN adapter to be programmed.- /pmac <mac addr> is the Ethernet MAC address for LAN78xx with colon sep-
arated (XX:XX:XX:XX:XX).
3.2.2.3 PROGRAMMING EEPROM WITH A MAC ADDRESS (OVERRIDE MAC ADDRESS) AND A SERIAL NUMBER (OVERRIDE SERIAL NUMBER)
>MPLABConnect.exe /pl < myfile.ini or .bin> [/id <index>] /pmac <mac addr> /pser <serial_num>
After programming, a device reset would be done automatically.
3.2.3 Programming EEPROM and Verifying Programmed Configuration Item
1. Verification would be done once the EEPROM is programmed and the device is reset. Sometimes device enumeration may take long after reset due to the time spent on driver loading for the device. The default timeout value is 15 seconds. If the device is not enumerated after the 15-second timeout, the tool would come out of the programming with the error code. The default timeout can be overrid-den using the command /d.
2. Program EEPROM and verify configuration items like Vendor ID, Product ID, and others.
>MPLABConnect.exe /pl < myfile.ini or .bin> [/id <index>] / [/cvl <configuration item names>] [/d <Delay_In_Milliseconds>]
- /pl < myfile.ini/bin> is used to program the configuration file into OTP memory.
- /id <index> is the index of the LAN adapter to be programmed.- /cvl <configuration item names> is the command to verify the mentioned
configuration items. Refer to Section 3.5 “Verification of LAN Configura-tion Items” for more details.
- /d <Delay_In_Milliseconds> is the timeout for device reset. The device

MPLAB® Connect Configurator CLI User’s Guide
DS50002629D-page 40 2017-2019 Microchip Technology Inc.
would be restarted once the programming is complete. Application would start to scan the LAN devices again after the timeout specified in this argument.
3.3 SINGLE-DEVICE OTP PROGRAMMING
3.3.1 OTP Programming1. Refer to Appendix G. “LAN78xx and LAN74xx Driver Installation” to install
LAN78xx driver for Windows. One-time installation is required per system. This step can be skipped if the LAN78xx driver is already installed.
2. Find out the LAN adapter index by executing the command MPLABConnect.exe /le. Refer to Section H.2 “Listing the LAN78xx/LAN74xx Devices or Finding the Index of LAN78xx/LAN74xx” for more details.
3. The following command can be used to program OTP:>MPLABConnect.exe /pl < myfile.ini or .bin> [/id <index>] /o
- /pl < myfile.ini/bin > is used to program the configuration file into OTP memory.
- /id <index> is the index of the LAN adapter to be programmed.- /o – Memory selects to OTP.
4. After programming, a device reset would be done automatically.
3.3.2 Programming OTP and USB Serial/MAC AddressReplace Step 3 in Section 3.3.1 “OTP Programming” with the following:
3.3.2.1 PROGRAMMING OTP WITH A SERIAL NUMBER (OVERRIDE SERIAL NUMBER)
>MPLABConnect.exe /pl < myfile.ini or .bin> [/id <index>] /o /pser <serial_string>
- /pl < myfile.ini/bin> is used to program the configuration file into OTP memory.
- /id <index> is the index of the LAN adapter to be programmed.- /o – Memory selects to OTP.- /pser <serial_string> is the USB serial number in string descriptor.
3.3.2.2 PROGRAMMING OTP WITH A MAC ADDRESS (OVERRIDE MAC ADDRESS)
>MPLABConnect.exe /pl < myfile.ini or .bin> [/id <index>] /o /pmac <mac addr>
- /pl <myfile.ini//bin> is used to program the configuration file into OTP memory.
- /id <index> is the index of the LAN adapter to be programmed.- /o – Memory selects to OTP.- /pmac <mac addr> is the Ethernet MAC address for LAN78xx with colon
separated (XX:XX:XX:XX:XX).
Note: Application should have administrator rights.

LAN78xx Devices
2017-2019 Microchip Technology Inc. DS50002629D-page 41
3.3.2.3 PROGRAMMING OTP WITH A MAC ADDRESS (OVERRIDE MAC ADDRESS) AND A SERIAL NUMBER (OVERRIDE SERIAL NUMBER)
>MPLABConnect.exe /pl < myfile.ini or .bin> [/id <index>] /o /pmac <mac addr> /pser <serial_num>
After programming, a device reset would be done automatically.
3.3.3 Programming OTP and Verifying Programmed Configuration Item
1. Refer to Appendix G. “LAN78xx and LAN74xx Driver Installation” to install LAN78xx driver for Windows. One-time installation is required per system. This step can be skipped if the LAN78xx driver is already installed.
2. Find out the LAN adapter index by executing the command MPLABConnect.exe /le.Refer to Section H.2 “Listing the LAN78xx/LAN74xx Devices or Finding the Index of LAN78xx/LAN74xx” for more details.
3. Verification would be done once the OTP is programmed and the device is reset. Sometimes the device enumeration may take long after reset due to the time spent on driver loading for the device. The default timeout value is 15 seconds. If the device is not enumerated after the 15-second timeout, then the tool would come out of the programming with the error code. The default timeout can be overridden using the command /d.
4. Program OTP and verify configuration items like Vendor ID, Product ID, and oth-ers.
>MPLABConnect.exe /pl < myfile.ini or .bin> /o [/id <index>] / [/cvl <configuration item names>] [/d <Delay_In_Milliseconds>]
- /pl < myfile.ini/bin> is used to program the configuration file into OTP memory.
- /id <index> is index of the LAN adapter to be programmed.- /o – Memory selects to OTP- /cvl <configuration item names> is the command to verify the mentioned
configuration items. Refer to Section 3.5 “Verification of LAN Configura-tion Items” for more details.
3.4 BATCH PROGRAMMING (AUTOMATED EXECUTION)This option is used for programming devices one after the other in Batch mode. This is used for mass programming.
3.4.1 Mass EEPROM/OTP Programming (Single Device Connected)1. Refer to Appendix G. “LAN78xx and LAN74xx Driver Installation” to install
LAN78xx driver for Windows. One-time installation is required per system. This step can be skipped if the LAN78xx driver is already installed.
Note: Application should have administrator rights.

MPLAB® Connect Configurator CLI User’s Guide
DS50002629D-page 42 2017-2019 Microchip Technology Inc.
2. Find out the LAN adapter index by executing the command MPLABConnect.exe /le.
Refer to Section H.2 “Listing the LAN78xx/LAN74xx Devices or Finding the Index of LAN78xx/LAN74xx” for more details.
3. The following command can be used to program EEPROM/OTP:>MPLABConnect.exe /bpl < myfile.ini or .bin> [/id <index>] /o
- /pl < myfile.ini/bin > is used to program the configuration file into OTP memory.
- /id <index> is the index of the LAN adapter to be programmed.- /o – Memory selects to OTP. If this argument is not given, default memory
selects to EEPROM.4. After programming, a reset would be done automatically for the device.5. Press <CTRL+C> to abort the programming.6. After each OTP programming, colored status would be displayed in the com-
mand line. - GREEN – OTP programming successful- RED – OTP programming failed
7. After each OTP programming, a device reset would be done automatically.
3.4.2 Mass Programming EEPROM/OTP and USB Serial String1. Refer to Appendix G. “LAN78xx and LAN74xx Driver Installation” to install
LAN78xx driver for Windows. One-time installation is required per system. This step can be skipped if the LAN78xx driver is already installed.
2. Find out the LAN adapter index by executing the command MPLABConnect.exe /le.Refer to Section H.2 “Listing the LAN78xx/LAN74xx Devices or Finding the Index of LAN78xx/LAN74xx” for more details.
3. The following command can be used to program EEPROM/OTP along with a dif-ferent serial number.
> MPLABConnect.exe /bpl < myfile.ini or .bin> [/id <index>] /o /pser [/alpha_prefix <string>] [/start_val <decimal>] [/inc_val <decimal>] [/max_val <decimal>]
- /bpl < myfile.ini/bin > is used to program the configuration file into OTP memory in Continuous mode.
- /id <index> is the index of the LAN adapter to be programmed.- /o – Memory selects to OTP. If this argument is not given, default memory
selects to EEPROM.- /pser - Selects Serial Number mode.- /alpha_prefix <string> is the string to be prepended with all serial num-
bers. For example, MCHP , TESTDEVICE. If the alpha_prefix <string> is not required, then the NULL string should be passed to this argument. For example, /alpha_prefix ""
- /start_val <decimal> is the suffix start value of the serial string.- /inc_val <decimal> is the value to be incremented for each serial string.
Note: Application should have administrator rights.
Note: Application should have administrator rights.

LAN78xx Devices
2017-2019 Microchip Technology Inc. DS50002629D-page 43
- max_val <decimal> is the maximum value of the serial string to be pro-grammed. After the specified maximum value, the tool would stop the pro-gramming.For example:>MPLABConnect.exe /bpl config_filename.bin /id 0 /o /pser /alpha_prefix Mchp /start_val 0 /inc_val 2 /max_val 6
4. Press <CTRL+C> to abort the programming.5. After each OTP programming, colored status would be displayed in the com-
mand line. - GREEN – OTP programming successful- RED – OTP programming failed
6. After each OTP programming, a device reset would be done automatically.
3.4.3 Mass Programming EEPROM/OTP and MAC Address1. Refer to Appendix G. “LAN78xx and LAN74xx Driver Installation” to install
LAN78xx driver for Windows. One-time installation is required per system. This step can be skipped if the LAN78xx driver is already installed.
2. Find out the LAN adapter index by executing the command MPLABConnect.exe /le.Refer to Section H.2 “Listing the LAN78xx/LAN74xx Devices or Finding the Index of LAN78xx/LAN74xx” for more details.
3. The following command can be used to program OTP along with a different MAC address.
>MPLABConnect.exe /bpl < myfile.ini or .bin> [/id <index>] /o [/pmac XX:XX:XX:XX:XX:XX] [ /inc_mac < decimal>] [max_mac <hex>]
- /bpl < myfile.ini/bin > is used to program the configuration file into OTP memory in Continuous mode.
- /id <index> is the index of the LAN adapter to be programmed.- /o – Memory selects to OTP. If this argument is not given, default memory
selects to EEPROM.- /pmac XX:XX:XX:XX:XX:XX – MAC address to be programmed.- /inc_mac <decimal> is the value to be incremented for each MAC address.- /max_mac <hex> is the maximum value of the MAC address to be pro-
grammed. After the specified maximum value, the tool would stop the pro-gramming.For example:>MPLABConnect.exe /bpl config_filename.bin /id 0 /pmac "00:11:22:33:44:55" /o /inc_mac 1 /max_mac 0x60
4. Press <CTRL+C> to abort the programming.5. After each OTP programming, colored status would be displayed in the com-
mand line.- GREEN – OTP programming successful- RED – OTP programming failed
6. After each OTP programming, a device reset would be done automatically.
Note: Application should have administrator rights.

MPLAB® Connect Configurator CLI User’s Guide
DS50002629D-page 44 2017-2019 Microchip Technology Inc.
3.4.4 Mass Programming EEPROM/OTP with MAC Address and Serial Number
1. Refer to Appendix G. “LAN78xx and LAN74xx Driver Installation” to install LAN78xx driver for Windows. One-time installation is required per system. This step can be skipped if the LAN78xx driver is already installed.
2. Find out the LAN adapter index by executing the command, MPLABConnect.exe /le. Refer to Section H.2 “Listing the LAN78xx/LAN74xx Devices or Finding the Index of LAN78xx/LAN74xx” for more details.
3. The following command can be used to program OTP along with a different MAC address:
>MPLABConnect.exe /bpl < myfile.ini or .bin> [/id <index>] /o [/pmac XX:XX:XX:XX:XX:XX] [ /inc_mac < decimal>] [max_mac <hex>] /pser [/alpha_prefix <string>] [/start_val <decimal>] [/inc_val <decimal>] [/max_val <decimal>]
- /bpl < myfile.ini/bin> is used to program the configuration file into OTP memory in Continuous mode.
- /id <index> is the index of the LAN adapter to be programmed.- /o – Memory selects to OTP. If this argument is not given, default memory
selects to EEPROM.- /pmac XX:XX:XX:XX:XX:XX – MAC address to be programmed- /inc_mac <decimal> is the value to be incremented for each MAC address.- max_mac <hex> is the maximum value of the MAC address to be pro-
grammed. After the specified maximum value, the tool would stop the pro-gramming.
- /pser – selects serial number mode.- /alpha_prefix <string> is the string to be prepended with all serial num-
bers. For example, MCHP , TESTDEVICE. If the alpha_prefix <string> is not required, then the NULL string should be passed to this argument. For example, /alpha_prefix ""
- /start_val <decimal> is the suffix start value of the serial string.- /inc_val <decimal> is the value to be incremented for each serial string.- max_val <decimal> is the maximum value of the serial string to be pro-
grammed. After the specified maximum value, the tool would stop the pro-gramming.For example:
>MPLABConnect.exe /bpl config_filename.bin /id 0 /pmac "00:11:22:33:44:55" /o /inc_val 1 /max_val 0x60 /pser /alpha_prefix Mchp /start_val 0 /inc_val 2 /max_val 6
4. Press <CTRL+C> to abort the programming.5. After each OTP programming, colored status would be displayed in the com-
mand line.- GREEN – OTP programming successful- RED – OTP programming failed
6. After each OTP programming, a device reset would be done automatically.
Note: Application should have administrator rights.

LAN78xx Devices
2017-2019 Microchip Technology Inc. DS50002629D-page 45
3.4.5 Mass OTP Programming and Verifying Programmed Configuration Item
1. Refer to Appendix G. “LAN78xx and LAN74xx Driver Installation” to install LAN78xx driver for Windows. One-time installation is required per system. This step can be skipped if the LAN78xx driver is already installed.
2. Find out the LAN adapter index by executing the command MPLABConnect.exe /le.Refer to Section H.2 “Listing the LAN78xx/LAN74xx Devices or Finding the Index of LAN78xx/LAN74xx” for more details.
3. Verification would be done once the OTP is programmed and the device is reset. Sometimes the device enumeration may take long after reset due to the time spent on driver loading for the device. The default timeout value is 15 seconds. If the device is NOT enumerated after the 15-second timeout, the tool would come out of the programming with the error code. The default timeout can be overridden using the command /d.
4. Program OTP and verify configuration items like Vendor ID, Product ID, and oth-ers.
>MPLABConnect.exe /bpl < myfile.ini or .bin> /o [/id <index>] /
[/cvl <configuration item names>] [/d <Delay_In_Milliseconds>]
- /bpl < myfile.ini/bin> is used to program the configuration file into OTP memory.
- /id <index> is the index of the LAN adapter to be programmed.- /o – Memory selects to OTP. If this argument is not given, the default memory
selects to EEPROM.- /cvl <configuration item names> is the command to verify the mentioned
configuration items. Refer to Section 3.5 “Verification of LAN Configura-tion Items” for more details.
5. Press <CTRL+C> to abort the programming.
3.5 VERIFICATION OF LAN CONFIGURATION ITEMSTable 3-2 lists the supported configuration items which can be read from a device to compare and verify correct operation (/cvl)
Note: Application should have administrator rights.
TABLE 3-2: SUPPORTED PARAMETERSParameter Description
macaddr A 6-byte MAC address. Bytes are separated by a colon.usb2vid A 16-bit value that uniquely identifies the vendor of the USB2
user device (idVendor: assigned by USB-Interface)usb2pid A 16-bit value that the vendor can assign that uniquely identi-
fies this particular product for USB2 user device (idProduct)usb2did A 16-bit device release number for USB2 user device in BCD
format (bcdDevice)usb3vid A 16-bit value that uniquely identifies the vendor of the USB3
user device (idVendor: assigned by USB-Interface)usb3pid A 16-bit value that the vendor can assign that uniquely identi-
fies this particular product for USB3 user device (idProduct)usb3did A 16-bit device release number for USB3 user device in BCD
format (bcdDevice)

MPLAB® Connect Configurator CLI User’s Guide
DS50002629D-page 46 2017-2019 Microchip Technology Inc.
langid Language ID of the devicemanufacturer Manufacturer string of the deviceproduct Product string of the deviceserial Serial string of the deviceconfigstring Configuration string of the deviceinterfacestring Interface string of the deviceenremwakeup Remote wakeup feature of the device
0 – Device does not support the remote wakeup1 – Device supports the remote wakeup
enselfpower The power method of the device0 – Bus power1 – Self power
FSmaxpower Affects the values of the USB configuration descriptor. Maxi-mum power consumption in mA for USB 2.0 operation (between 2 mA and 500 mA for BusPower; between 2 mA and 100 mA for SelfPower).
HSmaxpower
SSmaxpower Affects the values of the USB configuration descriptor. Maxi-mum power consumption in mA for USB 3.0 operation (between 8 mA and 896 mA for BusPower; between 8 mA and 100 mA for SelfPower).
FSinterruptEPinterval Full-speed interrupt polling interval. The values are in decimal and in the range 0–255.The default value is 1.
HSinterruptEPinterval High-speed interrupt polling interval. The values are in deci-mal and in the range 0–16.The default value is 4.
SSinterruptEPinterval Super speed interrupt polling interval.The values are in deci-mal and in the range 0–16. The default value is 16.
LED3Enable The LED3 status of PHYLED2Enable The LED2 status of PHYLED1Enable The LED1 status of PHYLED0Enable The LED0 status of PHYLED1Function The LED mode for LED 1LED0Function The LED mode for LED 0LED3Function The LED mode for LED 3LED2Function The LED mode for LED 2LED1Behavior The hex value of LED Link/pulse behaviorLED2Behavior The hex value of LED Link/pulse behaviorGPIOEnable Hex values of GPIO groups (0x0FFF)
1 – Disable GPIO0 – Enable GPIO
GPIOBuffer Hex values of GPIO groups (0x0FFF)0 – Open-drain1 – push/pull
GPIODirection Hex values of GPIO groups (0x0FFF)0 – Output1 – Input
GPIOData Hex values of GPIO groups (0x0FFF)0 – low1 – high
TABLE 3-2: SUPPORTED PARAMETERS (CONTINUED)Parameter Description

LAN78xx Devices
2017-2019 Microchip Technology Inc. DS50002629D-page 47
GPIOWake Hex values of GPIO groups (0x0FFF)0 – The GPIO cannot wake up the device.1 – The GPIO can trigger a wakeup event.
GPIOWakePolarity Hex values of GPIO groups (0x0FFF)0 – Wakeup/interrupt is triggered when GPIO is driven low.1 – Wakeup/interrupt is triggered when GPIO is driven high.
GPIOPMEEnableNote 2 This shows the status of the assertion of the GPIO5 pin, as a result of a Wakeup (GPIO) pin, Magic Packet, or PHY Link Up. The host processor may use the GPIO5 pin to asynchronously wakeup, in a manner analogous to a PCI PME pin.0 – The device does not support GPIO PME signaling.1 – The device supports GPIO PME signaling.
GPIOPMEConfiguration This shows the status of whether the GPIO PME is signaled on the GPIO pin as a level or a pulse.0 – GPIO PME is signaled via a level.1 – GPIO PME is signaled via a pulse.
GPIOPMELength When GPIOPMEConfiguration is set to 1 (pulse), this bit determines the duration of the pulse.0 – GPIO PME pulse length is 1.5 ms.1 – GPIO PME pulse length is 150 ms.
GPIOPMEPolarity This shows the level of the signal or the polarity of the pulse used for GPIO PME signaling.0 – GPIO PME signaling polarity is low.1 – GPIO PME signaling polarity is high.
GPIOBufferTypeNote 3 This shows the output buffer type for GPIO.0 – Open drain driver/open source1 – Push-pull driver
GPIOPMEWOLSelectNote 4 This shows whether WOL wakeup events or linkup wakeup events.0 – WOL event wakeup supported1 – PHY linkup wakeup supported
PMEMagicPacketEnable When GPIOPMEWOLSelect is set to 0 (WOL), this flag enables/disables Magic Packet detection and wakeup.0 – Magic Packet event wakeup disabled1 – Magic Packet event wakeup enabled
PMEPerfectDAEnable When GPIOPMEWOLSelect is set to 0 (WOL), this flag enables/disables Perfect DA detection and wakeup.0 – Perfect DA event wakeup disabled1 – Perfect DA event wakeup enabled
Note 1: Only these configuration items are supported when using /cvl command.2: When this bit is 0, the remaining GPIO PME parameters are ignored.3: Buffer Type = 0, Polarity = 0 implies Open Drain. Buffer Type = 0, Polarity = 1
implies Open Source.4: If WOL is selected, the PME Magic Packet Enable and PME Perfect DA Enable bits
determine the WOL event(s) that would cause a wakeup.
TABLE 3-2: SUPPORTED PARAMETERS (CONTINUED)Parameter Description

MPLAB® Connect Configurator CLI User’s Guide
DS50002629D-page 48 2017-2019 Microchip Technology Inc.
3.5.1 Getting the Value of Parameter Before and After ProgrammingTo display the configuration items before and after programming:>MPLABConnect.exe /pl < config_filename.bin> /cvl "macaddr" /id <index>>MPLABConnect.exe /bpl < config_filename.bin> /cvl "macaddr" /id <index>
3.5.2 Getting the Value of a Parameter/cvl command can also be used to verify the configuration parameters without pro-gramming:>MPLABConnect.exe /cvl "macaddr,languageid,manufacturer,prod-uct,serial" /id <index>>MPLABConnect.exe /cvl "macaddr,enselfpower" /id <index>
3.5.3 Comparing the Value of a Parameter with a Known ValueTo compare and verify the configuration items, the following format should be used:/cvl "<ConfigItem1> : <Value>, <ConfigItem2> : <Value>" /id <index>
For example:>MPLABConnect.exe /pl < config_filename.bin> /cvl "usb2vid:0x424,usb2pid:0x7800" /id 0>MPLABConnect.exe /cvl "usb2vid:0x424,usb2pid:0x7800,serial:123456" /id 0
3.6 DUMP MEMORY
3.6.1 OTP MemoryThis option is used to dump OTP memory of the LAN78xx.>MPLABConnect.exe /rl /id <index> /o
For example: MPLABConnect.exe /rl /id /o
3.6.2 EEPROM MemoryThis option is used to dump EEPROM Flash Memory of the LAN78xx.>MPLABConnect.exe /rl /id <index>
For example: MPLABConnect.exe /rl /id 0
LAN78xx Devices
2017-2019 Microchip Technology Inc. DS50002629D-page 49
3.7 CHANGING VENDOR ID/PRODUCT ID OF THE LAN78XXThe Microchip-provided LAN78xx driver is supported only for Microchip Vendor ID and Product ID.The user should create their own driver corresponding to the desired Vendor ID and Product ID. The inf files in the directory “\Drivers\LAN78xxDriver\x64\Driver” and “\Drivers\LAN78xxDriver\x86\Driver” should be modified to support the new Vendor ID and Product ID.Once the inf is changed, the Microsoft regular driver generation and certification must be followed.When programming new Vendor ID/Product ID to the LAN78xx, driver loading for the LAN78xx may take time for unique Vendor ID/Product ID once programming is com-pleted.If the same Vendor ID/Product ID is programmed to the different LAN78xx, LAN78xx driver loading would take time only for the first hub per computer.If /cvl and /pl options are used together, delay (/d) also should be increased to wait for the hub driver loading.>MPLABConnect.exe /pl < config_filename.bin> /cvl "usb2vid:0x424,usb2pid:0x7800" /id 0 /d 30000

MPLAB® Connect Configurator CLI User’s Guide
DS50002629D-page 50 2017-2019 Microchip Technology Inc.
NOTES:

MPLAB® CONNECTCONFIGURATOR CLI
USER’S GUIDE
2017-2019 Microchip Technology Inc. DS50002629D-page 51
Chapter 4. LAN74xx Devices
4.1 COMMAND LINE ARGUMENTS FOR LAN74XXLAN74xx devices provide PCIe 3.1 Gigabit Ethernet Controller. LAN74xx devices use EEPROM or OTP to store various configuration data. The EEPROM controller supports 256/512 byte EEPROM. The OTP is 512 bytes in size. MPLAB® Connect Configurator CLI allows access to LAN78xx – EEPROM/OTP. Table 4-1 lists all the command line arguments supported for LAN74xx devices.
TABLE 4-1: CLI OPTIONS FOR LAN74XX DEVICESCLI Option SKU Supported Description
/pl < myfile.bin> [/id <index>] [/eel]
LAN74xx Section 4.2.1 “EEPROM Program-ming”
/pl < myfile.bin> [/id ] /pmac LAN74xx Section 4.2.2.2 “Programming EEPROM with a MAC Address (Override MAC Address)”
/pl < myfilebin> [/id <index>] / [/cvl<configuration item names>] [/d <Delay_In_Millisec-onds>]
LAN74xx Section 4.2.3 “Programming EEPROM and Verifying Programmed Configuration Item”
/pl < myfile.bin> [/id ] /o LAN74xx Section 4.3.1 “OTP Programming”/pl < myfile.bin> [/id ] /o /pmac LAN74xx Section 4.3.2.2 “Programming OTP
with a MAC Address (Override MAC Address)”
/pl < myfile.bin> /o [/id ] / [/cvl ] [/d ]
LAN74xx Section 4.3.3 “Programming OTP and Verifying Programmed Configu-ration Item”
/pl < config_filename.bin> /cvl "macaddr" /id<index>
LAN74xx Section 4.5.1 “Getting the Value of Parameter Before and After Pro-gramming”
/bpl < config_filename.bin> /cvl "macaddr" /id <index>
LAN74xx Section 4.5.1 “Getting the Value of Parameter Before and After Pro-gramming”
/cvl "macaddr,lan-guageid,manufacturer,prod-uct,serial"/id <index>
LAN74xx Section 4.5.2 “Getting the Value of a Parameter”
/cvl "macaddr,enselfpower" /id <index>
LAN74xx Section 4.5.2 “Getting the Value of a Parameter”
/cvl "<ConfigItem1> : <Value>, <Confi-gItem2> : <Value>" /id <index>
LAN74xx Section 4.5.3 “Comparing the Value of a Parameter with a Known Value”
/rl /id <index> /o LAN74xx Section 4.6.1 “OTP Memory” /rl /id <index> LAN74xx Section 4.6.2 “EEPROM Memory”

MPLAB® Connect Configurator CLI User’s Guide
DS50002629D-page 52 2017-2019 Microchip Technology Inc.
4.2 SINGLE-DEVICE EEPROM PROGRAMMING1. Refer to Appendix G. “LAN78xx and LAN74xx Driver Installation” to install
LAN74xx driver for Windows. One-time installation is required per system. This step can be skipped if the LAN74xx driver is already installed.
2. Find out the PCIe adapter index by executing the command MPLABConnect.exe /le. Refer to Section H.2 “Listing the LAN78xx/LAN74xx Devices or Finding the Index of LAN78xx/LAN74xx” for more details.
4.2.1 EEPROM Programming1. The following command can be used to program EEPROM.>MPLABConnect.exe /pl < myfile.bin> [/id <index>] [/eel]
- /pl < myfile.bin > is used to program the configuration file into OTP mem-ory.
- /id <index> is the index of the LAN adapter to be programmed.- /eel is used to erase EEPROM content.
2. After programming, a device reset would be done automatically.
4.2.2 Programming EEPROM and MAC Address
4.2.2.1 PROGRAMMING EEPROM WITH A SERIAL NUMBER (OVERRIDE SERIAL NUMBER)
- This option is not supported in LAN74xx family devices.
4.2.2.2 PROGRAMMING EEPROM WITH A MAC ADDRESS (OVERRIDE MAC ADDRESS)
>MPLABConnect.exe /pl < myfile.bin> [/id <index>] /pmac <mac addr>
- /pl < myfile.bin> is used to program the configuration file into OTP mem-ory.
- /id <index> is the index of the LAN adapter to be programmed.- /pmac <mac addr> is the Ethernet MAC address for LAN74xx with colon sep-
arated (XX:XX:XX:XX:XX).
4.2.2.3 PROGRAMMING EEPROM WITH A MAC ADDRESS (OVERRIDE MAC ADDRESS) AND A SERIAL NUMBER (OVERRIDE SERIAL NUMBER)
- This option is not supported in LAN74xx family devices.
4.2.3 Programming EEPROM and Verifying Programmed Configuration Item
1. Verification would be done once the EEPROM is programmed and the device is reset. Sometimes device enumeration may take long after reset due to the time spent on driver loading for the device. The default timeout value is 15 seconds. If the device is not enumerated after the 15-second timeout, the tool would come
Note: The tool should be opened with administrator rights to use Online LAN74xx configuration page to automatically restart the device after programming. Otherwise, the tool need not be opened with administrator rights. Refer to Section 1.2.4 “PCIE_RESTART Section”.
Note: The tool should be opened with administrator rights to use Online LAN74xx configuration page to automatically restart the device after programming. Otherwise, the tool need not be opened with administrator rights. Refer to Section 1.2.4 “PCIE_RESTART Section”.

LAN74xx Devices
2017-2019 Microchip Technology Inc. DS50002629D-page 53
out of the programming with the error code. The default timeout can be overrid-den using the command /d.
2. Program EEPROM and verify configuration items like subsystem Vendor ID, sub-system ID, and others.
>MPLABConnect.exe /pl < myfile.bin> [/id <index>] / [/cvl <config-uration item names>] [/d <Delay_In_Milliseconds>]
- /pl < myfile.bin> is used to program the configuration file into OTP mem-ory.
- /id <index> is the index of the LAN adapter to be programmed.- /cvl <configuration item names> is the command to verify the mentioned
configuration items. Refer to Section 4.5 “Verification of LAN Configura-tion Items” for more details.
- /d <Delay_In_Milliseconds> is the timeout for device reset. The device would be restarted once programming is completed. Application would start to scan the LAN devices again after the timeout specified in this argument.
4.3 SINGLE-DEVICE OTP PROGRAMMING
4.3.1 OTP Programming1. Refer to Appendix G. “LAN78xx and LAN74xx Driver Installation” to install
LAN74xx driver for Windows. One-time installation is required per system. This step can be skipped if the LAN74xx driver is already installed.
2. Find out the LAN adapter index by executing the command MPLABConnect.exe /le. Refer to Section H.2 “Listing the LAN78xx/LAN74xx Devices or Finding the Index of LAN78xx/LAN74xx” for more details.
3. The following command can be used to program OTP:>MPLABConnect.exe /pl < myfile.bin> [/id <index>] /o
- /pl < myfile.bin > is used to program the configuration file into OTP mem-ory.
- /id <index> is the index of the LAN adapter to be programmed.- /o – Memory selects to OTP.
4. After programming, a device reset would be done automatically.
4.3.2 Programming OTP and USB Serial/MAC Address
4.3.2.1 PROGRAMMING OTP WITH A SERIAL NUMBER (OVERRIDE SERIAL NUMBER)
- This option is not supported in LAN74xx family devices.
4.3.2.2 PROGRAMMING OTP WITH A MAC ADDRESS (OVERRIDE MAC ADDRESS)
>MBPLABConnect.exe /pl < myfile.bin> [/id <index>] /o /pmac <mac addr>
- /pl < myfile.bin> is used to program the configuration file into OTP mem-ory.
- /id <index> is the index of the LAN adapter to be programmed.
Note: The tool should be opened with administrator rights to use Online LAN74xx configuration page to automatically restart the device after programming. Otherwise, the tool need not be opened with administrator rights. Refer to Section 1.2.4 “PCIE_RESTART Section”.

MPLAB® Connect Configurator CLI User’s Guide
DS50002629D-page 54 2017-2019 Microchip Technology Inc.
- /o – Memory selects to OTP.- /pmac <mac addr> is the Ethernet MAC address for LAN74xx with colon sep-
arated (XX:XX:XX:XX:XX).
4.3.2.3 PROGRAMMING OTP WITH A MAC ADDRESS (OVERRIDE MAC ADDRESS) AND A SERIAL NUMBER (OVERRIDE SERIAL NUMBER)
- This option is not supported in LAN74xx family devices.
4.3.3 Programming OTP and Verifying Programmed Configuration Item
1. Refer to Appendix G. “LAN78xx and LAN74xx Driver Installation” to install LAN74xx driver for Windows. One-time installation is required per system. This step can be skipped if the LAN74xx driver is already installed.
2. Find out the LAN adapter index by executing the command MPLABConnect.exe /le.
Refer to Section H.2 “Listing the LAN78xx/LAN74xx Devices or Finding the Index of LAN78xx/LAN74xx” for more details.
3. Verification would be done once the OTP is programmed and the device is reset. Sometimes the device enumeration may take long after reset due to the time spent on driver loading for the device. The default timeout value is 15 seconds. If the device is not enumerated after the 15-second timeout, then the tool would come out of the programming with the error code. The default timeout can be overridden using the command /d.
4. Program OTP and verify configuration items like Vendor ID, Product ID, and oth-ers.
>MPLABConnect.exe /pl < myfile.bin> /o [/id <index>] / [/cvl <con-figuration item names>] [/d <Delay_In_Milliseconds>]
- /pl < myfile.bin> is used to program the configuration file into OTP mem-ory.
- /id <index> is index of the LAN adapter to be programmed.- /o – Memory selects to OTP- /cvl <configuration item names> is the command to verify the mentioned
configuration items. Refer to Section 4.5 “Verification of LAN Configura-tion Items” for more details.
4.4 BATCH PROGRAMMING (AUTOMATED EXECUTION)- This option is not supported in LAN74xx family devices.
4.5 VERIFICATION OF LAN CONFIGURATION ITEMSTable 4-2 lists the supported configuration items which can be read from a device to compare and verify correct operation (/cvl).
Note: Application should have administrator rights.
TABLE 4-2: SUPPORTED PARAMETERSParameter Description
macaddr This is a 6-byte MAC address. Bytes are separated by a colon.
susbsystemvid This is a 16-bit value that uniquely identifies the vendor of the PCIE user device.

LAN74xx Devices
2017-2019 Microchip Technology Inc. DS50002629D-page 55
subsystemid This is a 16-bit value that the vendor can assign that uniquely identifies this particular product for PCIE user device.
auxcurrent This field reports the 3.3 Vaux auxiliary current requirements for the PCI function.
meSupport This field indicates the power states in which the function may generate a PME.
LED3Enable The LED3 status of phyLED2Enable The LED2 status of phyLED1Enable The LED1 status of phyLED0Enable The LED0 status of phyLED1Function The LED mode for LED 1LED0Function The LED mode for LED 0LED3Function The LED mode for LED 3LED2Function The LED mode for LED 2LED0CombineEnable The status of LED 0 Combine Enable.LED0 The status of LED 0.LED0Polarity The polarity status of LED 0 signal.LEDRate The Blink/Pulse-stretch rate of LED.LEDPulsing The pulse status of LED.LEDActivity The Activity output status of LED.ClkPowerEnable This field indicates that the device tolerates the removal of any
reference clock(s) via the “clock request” (CLKREQ#) mecha-nism when the Link is in the L1 and L2/L3 Ready Link states.
LTRSupport This field indicates support for the optional Latency Tolerance Reporting (LTR) mechanism.
OBFFSupport This field indicates the OBFF mechanism.ASPMControl This field indicates that when core enters the L1 entry.L0Latency Hex values of ASPM L0 Entrance Latency:
000 – 1 µs001 – 2 µs010 – 3 µs011 – 4 µs100 – 5 µs101 – 6 µs110 or 111 – 7 us
L1Latency Hex values of ASPM L1 Entrance Latency000 – 1 µs001 – 2 µs010 – 4 µs011 – 8 µs100 – 16 µs101 – 32 µs110 or 111 – 64 µs
L1PMSubstates Hex value of L1 PM substates:1 – Port supports L1 PM substates.0 – Port does not support L1 PM substates.
PciPmL2 Hex value of PCI-PM L1.2 support:1 – PCI-PM L1.2 is supported.0 – PCI-PM L1.2 is not supported.
TABLE 4-2: SUPPORTED PARAMETERS (CONTINUED)Parameter Description

MPLAB® Connect Configurator CLI User’s Guide
DS50002629D-page 56 2017-2019 Microchip Technology Inc.
PciPmL1 Hex value of PCI-PM L1.1 support:1 – PCI-PM L1.1 is supported.0 – PCI-PM L1.1 is not supported.
ASPML2 Hex value of ASPM L1.2 support:1 – ASPM L1.2 is supported.0 – ASPM L1.2 is not supported.
ASPML1 Hex value of ASPM L1.1 support:1 – ASPM L1.1 is supported.0 – ASPM L1.1 is not supported.
macSpeedDetect 1 – Automatic Speed Detection (ASD). When set, the MAC ignores the setting of the MAC Configuration (CFG) field and automatically determines the speed of operation. The MAC samples the RX_CLK input to accomplish speed detection and reports the last determined speed via the MAC Configura-tion (CFG) field.0 – The setting of the MAC Configuration (CFG) field deter-mines operational speed.
macConfiguration 0 – MII Mode – 10 Mbps1 – MII Mode – 100 Mbps2,3 – RGMII/GMII Mode – 1000 Mbps
macDuplexDetection 1 – The MAC ignores the setting of the Duplex mode (DPX) bit and automatically determines the Duplex operational mode. The MAC uses a PHY.0 – The setting of the Duplex mode (DPX) bit determines Duplex operation.
macDuplexPolarity This field indicate the polarity of the FDUPLEX PHY LED.0 – DUPLEX asserted low indicates the PHY is in Full-duplex mode.1 – DUPLEX asserted high indicates the PHY is in Full-duplex mode.
macDuplexMode 0 – MAC is in Half-duplex mode.1 – MAC is in Full-duplex mode.
macEEEEnable 1 – Enables Energy Efficient Ethernet operation in the MAC.0 – Energy Efficient Ethernet operation is disabled.
macEEETxClkStopEnable 1 – The MAC will halt the GMII GTX_CLK to the PHY during TX LPI.0 – Disabled
macRgmiiTxDelayEnable 0 – RGMII TXC Delay mode is disabled.1 – RGMII TXC Delay mode is enabled.
macRgmiiRxEnable 0 – RGMII RXC Delay mode is disabled.1 – RGMII RXC Delay mode is enabled.
macRefClk25EnableGroup The generation of a 25 MHz reference clock on the REF-CLK_25 pin1 – Enabled0 – Disabled
macClk125EnableGroup 1 – The device internally generates a 125 MHz clock for RGMII operation on the TXC pin.0 – The device receives a 125 MHz clock from the CLK125 pin.
Note 1: Only these configuration items are supported when using /cvl command.
TABLE 4-2: SUPPORTED PARAMETERS (CONTINUED)Parameter Description

LAN74xx Devices
2017-2019 Microchip Technology Inc. DS50002629D-page 57
4.5.1 Getting the Value of Parameter Before and After ProgrammingTo display the configuration items before and after programming:>MPLABConnect.exe /pl < config_filename.bin> /cvl "macaddr" /id <index>
4.5.2 Getting the Value of a Parameter/cvl command can also be used to verify the configuration parameters without pro-gramming:>MPLABConnect.exe /cvl "macaddr,subsystemvid" /id <index>
>MPLABConnect.exe /cvl "macaddr,auxcurrent" /id <index>
4.5.3 Comparing the Value of a Parameter with a Known ValueTo compare and verify the configuration items, the following format should be used:/cvl "<ConfigItem1> : <Value>, <ConfigItem2> : <Value>" /id <index>
For example:>MPLABConnect.exe /pl < config_filename.bin> /cvl "subsystem-vid:0x424,subsystemid:0x7430"/id 0>MPLABConnect.exe /cvl "subsystemvid:0x424, subsys-temid:0x7430,serial:123456" /id 0
4.6 DUMP MEMORY
4.6.1 OTP MemoryThis option is used to dump OTP memory of the LAN74xx.
>MPLABConnect.exe /rl /id <index> /o
For example: MPLABConnect.exe /rl /id /o
4.6.2 EEPROM MemoryThis option is used to dump EEPROM Flash Memory of the LAN74xx.
>MPLABConnect.exe /rl /id <index>
For example: MPLABConnect.exe /rl /id 0

MPLAB® Connect Configurator CLI User’s Guide
DS50002629D-page 58 2017-2019 Microchip Technology Inc.
NOTES:

MPLAB® CONNECTCONFIGURATOR CLI
USER’S GUIDE
2017-2019 Microchip Technology Inc. DS50002629D-page 59
Appendix A. Programming Time
A.1 USB DEVICESApproximate programming time for different USB family hubs is specified in Table A-1. This programming duration may vary depending on the OS (Windows 7, 8,1, or 10) and architecture (32 bit or 64 bit).
A.2 LAN78XX AND LAN74XX DEVICESEEPROM programming 256 bytes in LAN78xx and LAN74xx devices takes about to 2 seconds to 3 seconds with an EHCI controller and around 7 seconds to 8 seconds with an xHCI controller.On the other hand, OTP programming 256 bytes in LAN78xx and LAN74xx devices takes about to 2 sec-onds to 3 seconds with an EHCI controller and around 7 seconds to 8 seconds with an xHCI controller.
TABLE A-1: APPROXIMATE PROGRAMMING TIME FOR USB DEVICES
USB Device Family
Device Booting From SPI Device Booting From ROMConfiguration
Programming Time(in seconds)
SPI Firmware Programming Time
(in seconds)
Configuration Programming Time
(in seconds)
SPI Firmware Programming Time
(in seconds)USB253x/USB4604 0.5 14 1 5USB57xx 1 10 1 4USB58xx 1 10 0.6 4USB49xx 8 25 7 13USB70xx 10 25 7 13USB72xx 9 26 7 13

MPLAB® Connect Configurator CLI User’s Guide
DS50002629D-page 60 2017-2019 Microchip Technology Inc.
NOTES:

MPLAB® CONNECTCONFIGURATOR CLI
USER’S GUIDE
2017-2019 Microchip Technology Inc. DS50002629D-page 61
Appendix B. Serial Number Suppression
B.1 WHY IS IT REQUIRED?When programming the serial number to the hub, driver loading may take time for unique serial numbers. If serial number suppression is enabled, it forces the USB driver stack to ignore the serial number of the device. Therefore, it does not take long to load the driver for the device.
B.2 WHEN IS IT NEEDED?In CLI application, suppression is required for the following arguments:1. /cv – if compare and verify option is present2. /pser – if programming serial number option is present
B.3 HOW TO EXECUTE SERIALNUMSUPPRESSION.BAT FILE?1. Open command prompt as “Run as administrator.”2. Run batch file as SerialNumSuppression.bat <VVVV> <PPPP> <DDDD>
- VVVV – Vendor ID of the Hub- PPPP – Product ID of the Hub- DDDD – Device ID of the Hub
For example: >SerialNumSuppression.bat 0424 2534 1234
Note 1: Four digits must be there, if not there pad zeros.2: Give without "0x" format (Ex: 0424, 0x0424 is invalid).

MPLAB® Connect Configurator CLI User’s Guide
DS50002629D-page 62 2017-2019 Microchip Technology Inc.
NOTES:

MPLAB® CONNECTCONFIGURATOR CLI
USER’S GUIDE
2017-2019 Microchip Technology Inc. DS50002629D-page 63
Appendix C. Changing Filename Extension
C.1 INTRODUCTION
The following method can be used to change the filename extension to *.cfg if it was *.bin:1. Make sure that filename extensions (.bin) are visible.
To do this, see Section C.2 “Showing or Hiding File Name Extensions”.2. Right-click the file you want to change.
A context menu displays.3. Click Rename.4. Delete the old file name extension (.bin).5. Type .cfg as the new extension.6. Press <Enter>.
The Rename dialog displays, as in Figure C-1, warning you that changing the file name extension might cause the file to stop working properly. If you are certain that the extension you typed works with the program you're using, proceed to the next step.
7. Click Yes to confirm the change.
FIGURE C-1: RENAME DIALOG
C.2 SHOWING OR HIDING FILE NAME EXTENSIONS1. Click the Start button.2. Click Control Panel.3. Click Appearance and Personalization.4. Clicking Folder Options.5. Click the View tab.6. Under Advanced Settings, do either of the following as needed, as in Figure C-2:
a) To show file name extensions, clear the “Hide extensions for known file types” check box, and then click OK.
b) To hide file name extensions, select the “Hide extensions for known file types” check box, and then click OK.
Note: The MPLAB® Connect Configurator CLI tool supports only the configuration files which have the extension of *.cfg.
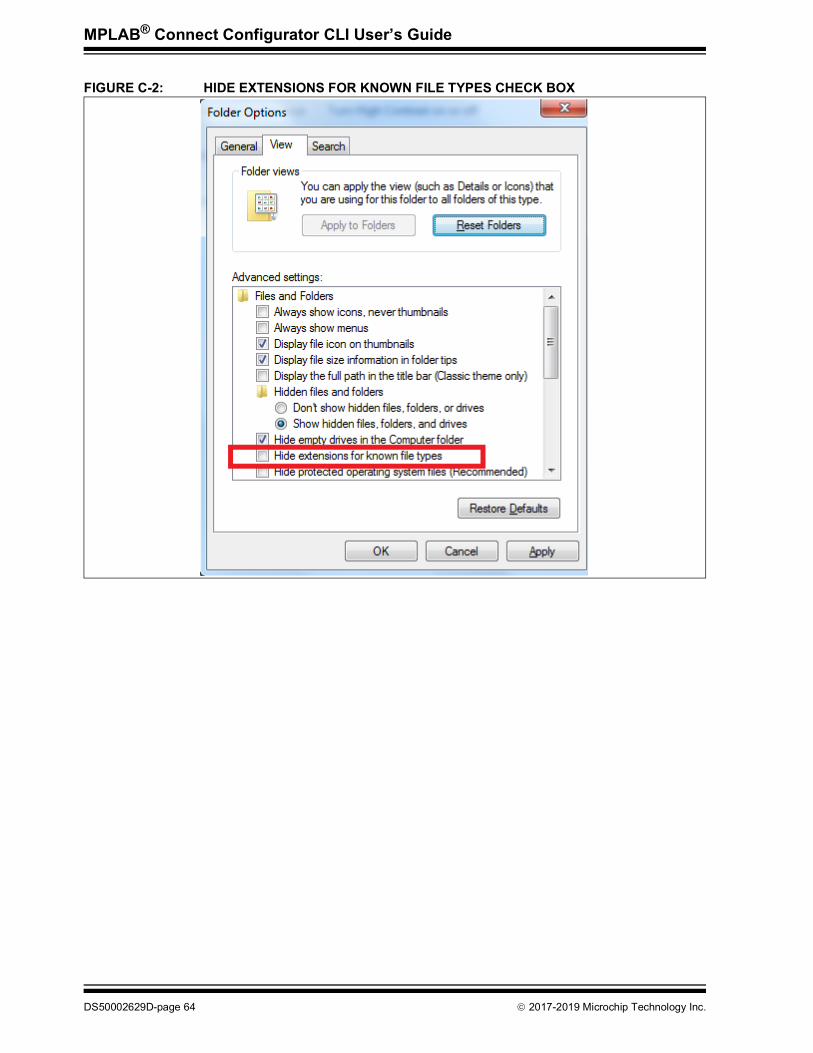
MPLAB® Connect Configurator CLI User’s Guide
DS50002629D-page 64 2017-2019 Microchip Technology Inc.
FIGURE C-2: HIDE EXTENSIONS FOR KNOWN FILE TYPES CHECK BOX

MPLAB® CONNECTCONFIGURATOR CLI
USER’S GUIDE
2017-2019 Microchip Technology Inc. DS50002629D-page 65
Appendix D. Finding Hub Index or Path - USB Hubs
D.1 INTRODUCTIONOne of the following methods can be selected to find the hub location:• Index Method• Port Chain Method
D.2 INDEX METHOD
D.2.1 Usage of Index in /id CommandThe index of the hub must be mentioned along with /id command, to program a specific hub/device. Refer to Section D.2.2 “Listing the Hubs or Finding the Index of a Hub” to find an index of the hub.Example 1:>MPLABConnect.exe /rotp /id <index> (See Figure D-1.)
FIGURE D-1: EXAMPLE 1
Example 2:>MPLABConnect.exe /p <config_filename.cfg> /id <index>
(See Figure D-2.)
Note: Index and port chain methods cannot be used together.

MPLAB® Connect Configurator CLI User’s Guide
DS50002629D-page 66 2017-2019 Microchip Technology Inc.
FIGURE D-2: EXAMPLE 2
D.2.2 Listing the Hubs or Finding the Index of a HubIndex of the hub can be found by using the command below:>MPLABConnect.exe /l
Application populates a list of hubs connected to the computer with unique index numbers. By default, Microchip hubs are moved to lower index's based on the Vendor ID (VID) during the initial process of appli-cation. This is similar to a tree view listing of the USB devices under the root controller for easy identification of the hub of interest. (See Figure D-3.)
FIGURE D-3: LISTING THE HUBS
D.3 PORT CHAIN METHODPort chain is the format used to select the device for programming. The port chain format is generated by the MPLAB® Connect Configurator CLI based on the USB device tree in the computer. This unique identi-fication for the particular hub remains the same even though any external hubs are connected/disconnected from the device tree. This method can be used for all commands wherever the index method is used.
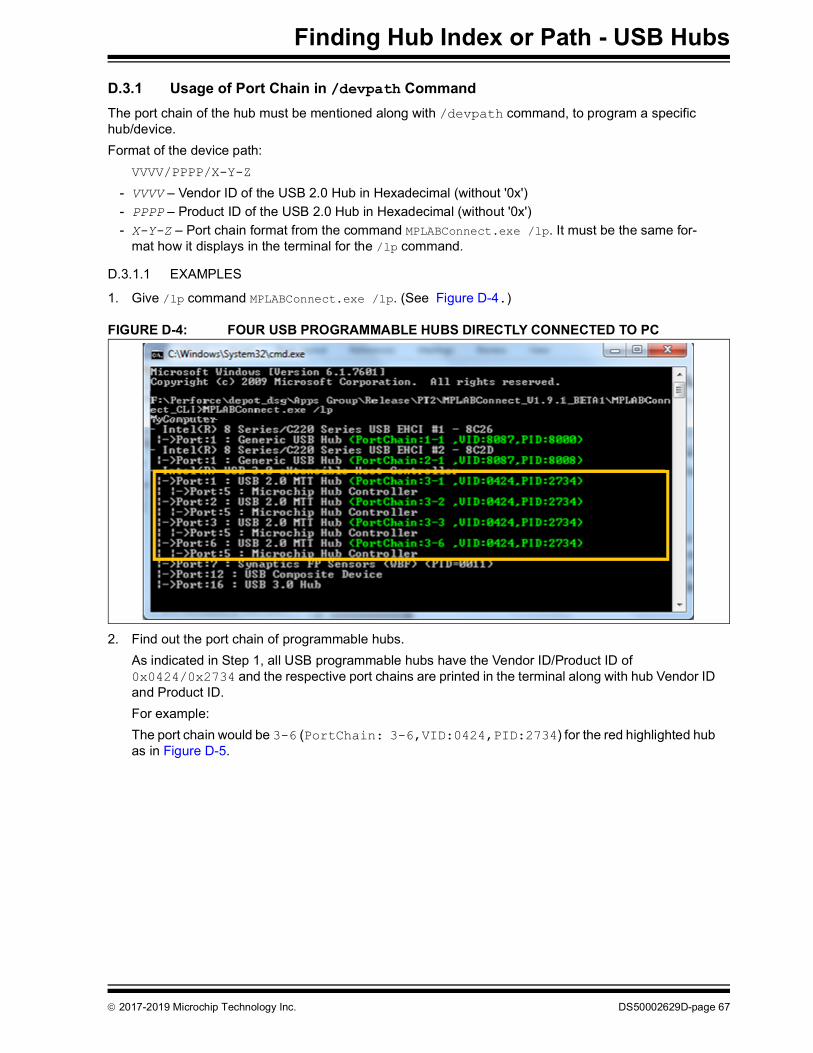
Finding Hub Index or Path - USB Hubs
2017-2019 Microchip Technology Inc. DS50002629D-page 67
D.3.1 Usage of Port Chain in /devpath CommandThe port chain of the hub must be mentioned along with /devpath command, to program a specific hub/device.Format of the device path:
VVVV/PPPP/XYZ
- VVVV – Vendor ID of the USB 2.0 Hub in Hexadecimal (without '0x')- PPPP – Product ID of the USB 2.0 Hub in Hexadecimal (without '0x')- X-Y-Z – Port chain format from the command MPLABConnect.exe /lp. It must be the same for-
mat how it displays in the terminal for the /lp command.
D.3.1.1 EXAMPLES
1. Give /lp command MPLABConnect.exe /lp. (See Figure D-4.)
FIGURE D-4: FOUR USB PROGRAMMABLE HUBS DIRECTLY CONNECTED TO PC
2. Find out the port chain of programmable hubs.As indicated in Step 1, all USB programmable hubs have the Vendor ID/Product ID of 0x0424/0x2734 and the respective port chains are printed in the terminal along with hub Vendor ID and Product ID.For example:The port chain would be 36 (PortChain: 36,VID:0424,PID:2734) for the red highlighted hub as in Figure D-5.

MPLAB® Connect Configurator CLI User’s Guide
DS50002629D-page 68 2017-2019 Microchip Technology Inc.
FIGURE D-5: PORT CHAIN
3. Create the device path using port chain.For example:The device path would be 0424/2734/36 (VendorID/ProductID/Portchain) for the high-lighted as in Figure D-6.
FIGURE D-6: DEVICE PATH
4. Mention the device path as CLI arguments along with the keyword /devpath.For example:>>MPLABConnect.exe /p myconfig.cfg /devpath 0424/2734/31
The following CLI commands were created based on port chain command /lp as specified in Step 1.To program SPI firmware and erase existing configuration data:>>MPLABConnect.exe /pspi myfirmware.bin /devpath 0424/2734/31 /e /d 15000
To program configuration file:>> MPLABConnect.exe /p mycfg.cfg /devpath 0424/2734/32
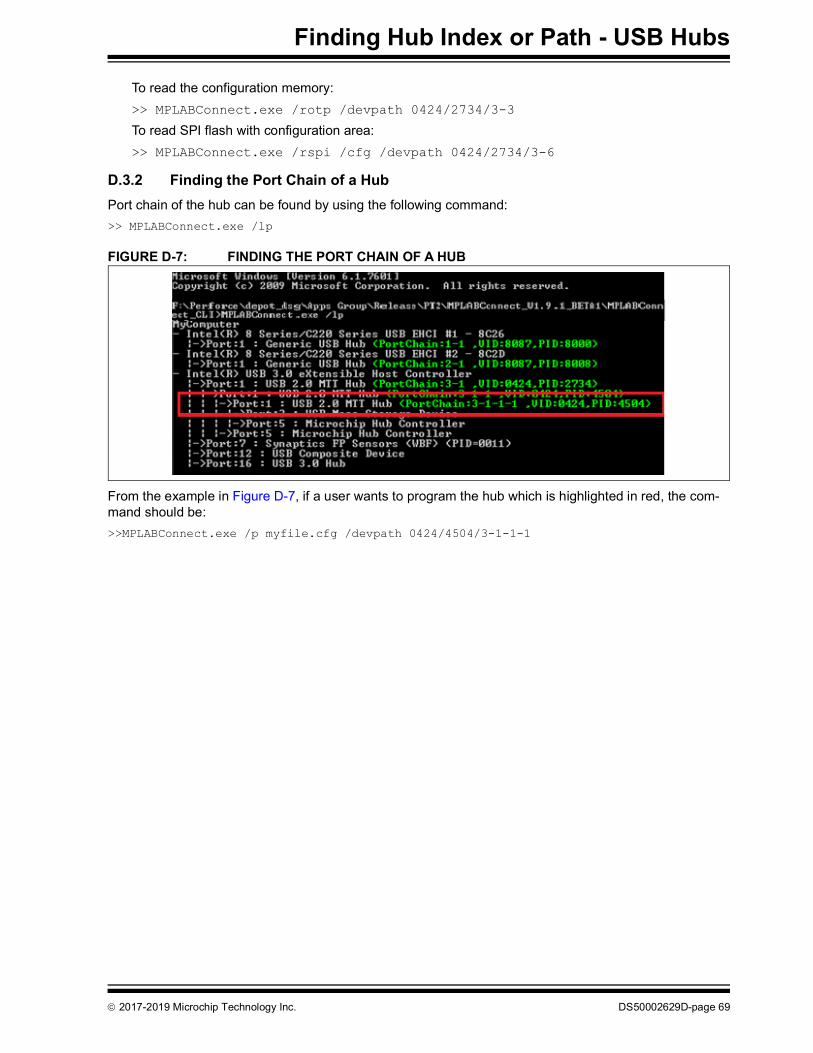
Finding Hub Index or Path - USB Hubs
2017-2019 Microchip Technology Inc. DS50002629D-page 69
To read the configuration memory:>> MPLABConnect.exe /rotp /devpath 0424/2734/33
To read SPI flash with configuration area:>> MPLABConnect.exe /rspi /cfg /devpath 0424/2734/36
D.3.2 Finding the Port Chain of a HubPort chain of the hub can be found by using the following command:>> MPLABConnect.exe /lp
FIGURE D-7: FINDING THE PORT CHAIN OF A HUB
From the example in Figure D-7, if a user wants to program the hub which is highlighted in red, the com-mand should be:>>MPLABConnect.exe /p myfile.cfg /devpath 0424/4504/3111

MPLAB® Connect Configurator CLI User’s Guide
DS50002629D-page 70 2017-2019 Microchip Technology Inc.
NOTES:

MPLAB® CONNECTCONFIGURATOR CLI
USER’S GUIDE
2017-2019 Microchip Technology Inc. DS50002629D-page 71
Appendix E. Troubleshooting and Error Codes
E.1 TROUBLESHOOTINGReview the log file for debugging failures. The error codes are described in Section E.2 “Error Codes” below. If debug assistance is required, save the log file and notify Microchip support.
E.2 ERROR CODESGeneral descriptions of the error codes are listed in Table E-1.
TABLE E-1: LIST OF ERROR CODESError Code Description
0x0000 Success; no errors0x0001 The specified device was not found.0x0002 Argument passed to the API is invalid.0x0003 Device handle passed to the API is not valid.0x0004 API of the WinUSB library failed.0x0005 System reboot is required.0x0006 Error in installing VSM filter driver0x0007 Operation is successful but requires reboot.0x0008 Bin file size is invalid.0x0009 Error while reading.cfg/.bin file0x0011 Error in installing WinUSB driver0x0012 Invalid argument0x0013 Error when VSM Class Filter is not installed.0x0014 Error when application does not have administrator rights.0x0015 Error if VSM command is failed due to power state of the device.0x0016 Error not supported0x0017 Error if the memory of the device reached maximum size.0x0018 Error if configuration content programmed does not match input configuration.0x1000 Could not load the binary file0x1001 Reading from SPI flash failed0x1002 File size did not match.0x1003 SPI pass-through Write command failed.0x1004 SPI pass-through Enter command failed.0x1005 SPI flash could not be detected or was not present.0x1008 SPI pass-through Exit command failed.0x1009 SPI pass-through Read command failed.0x100A Unsupported SPI flash detected.0x100B SPI flash read back and compare failed with programmed binary.0x100E SRAM programming failed.0x100F SPI flash erase signature failed.0x1011 Could not load the Json file

MPLAB® Connect Configurator CLI User’s Guide
DS50002629D-page 72 2017-2019 Microchip Technology Inc.
0x1012 Could not load the .ini file0x1013 Flex register field was not programmed.0x1014 SPI flash access is not supported for the device.0x2000 Cannot enable I2C pass-through interface0x2002 I2C transfer failed.0x3000 Maximum number of configurations exceeded0x4000 Communication at the specified baud rate will be error prone.0x4001 Cannot set USB2534 UART registers (probably command failure)0x4002 Transmit failed without transmitting any data0x4003 Transmit failed after transmitting some data0x4004 Receive failed due to buffer overrun; reduce baud rate0x4005 Receive failed due to unexpected Rx FIFO status0x4006 Receive failed since worker thread creation failed0x4007 UART Rx is pending due to Asynchronous mode.0x4009 UART Receive command failed by the firmware.0x400B UART Receive timeout0x5000 Invalid GPIO pin number0x6000 Access denied. Application does not have admin rights.0x6001 LAN78xx adapter is busy.0x6002 General failure in LAN78xx commands0x6003 Physical EEPROM is absent. OTP blank0x6004 EEPROM absent and OTP has free space0x6005 EEPROM absent and no free space in OTP0x6006 EEPROM present and no free space in OTP0x6007 EEPROM present and OTP is blank0x6008 EEPROM present and OTP has invalid signature0x6009 EEPROM absent and OTP has invalid signature0x600A EEPROM absent0x600B EEPROM is present and highest priority goes to EEPROM.0x7000 Ping operation failed.0x7001 Parameter passed to the API is invalid.0x7002 Cannot restart LAN74xx device. Requires admin rights0xFFFF Unknown error occurred.
TABLE E-1: LIST OF ERROR CODES (CONTINUED)Error Code Description

MPLAB® CONNECTCONFIGURATOR CLI
USER’S GUIDE
2017-2019 Microchip Technology Inc. DS50002629D-page 73
Appendix F. HFC Device Installation
F.1 INTERNAL HFC DEVICE ENABLED BY DEFAULTTo find the internal HFC device enumeration, connect the hub to the computer and open device manager and verify as follows:a) Microchip USB hub with internal HFC enabled before installing HFC driver:Internal HFC enumerates as either Hub Controller or Bridge device in device manager. Figure F-1 and Figure F-2 show that the internal HFC is enumerated without the HFC Windows driver in device manager.
FIGURE F-1: HUB CONTROLLER WITHOUT HFC WINDOWS DRIVER
FIGURE F-2: BRIDGE DEVICE WITHOUT HFC WINDOWS DRIVER
F.1.1 SKUS• USB57xx• USB (8)4604• USB49xx• USB471x• USB70xx, USB72xxThe HFC driver is a customized WinUSB driver. HFC driver installation is required for the internal HFC device before programming. The HFC driver is used for programming the OTP (One-Time Programmable memory)/Pseudo-OTP and SPI flash firmware by communicating with the HFC device.
F.1.2 HFC Driver Installation
F.1.2.1 AUTOMATIC HFC DRIVER INSTALLATION
The HFC driver would be installed automatically for the HFC from Windows update once the hub is inserted into the host. The internet connection and Windows update must be enabled for the automatic driver instal-lation.1. The Driver Software Installation dialog would display as shown below in Figure F-3, Figure F-4, and
Figure F-5 if the automatic installation is started.

MPLAB® Connect Configurator CLI User’s Guide
DS50002629D-page 74 2017-2019 Microchip Technology Inc.
FIGURE F-3: DRIVER SOFTWARE INSTALLATION
FIGURE F-4: DRIVER SOFTWARE INSTALLATION
FIGURE F-5: DRIVER SOFTWARE INSTALLATION
Note: If the Driver Software Installation wizard does not start, click Scan for hardware changes as in Figure F-6.

HFC Device Installation
2017-2019 Microchip Technology Inc. DS50002629D-page 75
FIGURE F-6: SCAN FOR HARDWARE CHANGES
2. If the driver installation is completed successfully, the device would appear in device manager as in Figure F-7.
FIGURE F-7: DEVICE IN THE DEVICE MANAGER
F.1.2.2 MANUAL HFC DRIVER INSTALLATION
The HFC driver can be installed manually as one time before programming (one time only per system). This does not require reboot of the system.If the automatic HFC driver installation is successful, manual HFC driver installation is not required.Install the HFC driver using the following command:>MPLABConnect.exe /iw
F.1.3 HFC Driver UninstallationIf the driver was installed manually, uninstall the HFC driver using the following command:>MPLABConnect.exe /uw
Note 1: If the HFC driver was installed manually using one of the version of MPLAB® Connect Con-figurator CLI application, then the same MPLAB Connect Configurator CLI version must be used for uninstallation.
2: Application must have an Admin privilege to execute command line options /iw and /uw.

MPLAB® Connect Configurator CLI User’s Guide
DS50002629D-page 76 2017-2019 Microchip Technology Inc.
F.2 INTERNAL HFC DEVICE DISABLED BY DEFAULTConnect the hub to the computer, after installing the HFC driver (either by manual or automatic from web) as mentioned in Section F.1.2 “HFC Driver Installation”. If the internal HFC is enabled by default in the USB Hub, the “Microchip Hub Controller” would be visible in the device manager as in Figure F-8 and Figure F-9.
FIGURE F-8: INTERNAL HUB FEATURE CONTROLLER IS ENABLED
FIGURE F-9: INTERNAL HUB FEATURE CONTROLLER IS ENABLED
F.2.1 SKUS• USB2534• USB58x7/USB59x7
F.2.2 VSM DriverThe VSM driver is required for enabling the internal HFC device (HFC – Hub Feature Controller) and the WinUSB driver is used for accessing the hub by communicating with the HFC device.The VSM hub filter driver installation can be done in two ways:1. Hub class filter2. Device-specific filter
F.2.2.1 HUB CLASS FILTER DRIVER
This command has to be executed once for installing both the WinUSB driver and the VSM hub class filter driver.
F.2.2.1.1 Hub Class Filter Driver Installation(One time only per system)>MPLABConnect.exe /i
Once installed, system reboot is required. After reboot, programming can be done any number of times. Installation is not required for each new device insertion and removal.If the Hub class filter is installed, then the device-specific filter (/iv command while programming) method should not be used.
F.2.2.1.2 Hub Class Filter Driver UninstallationThe following command can be used for uninstalling the VSM hub class filter driver:>MPLABConnect.exe /u
Once uninstalled, system reboot is required.This command can be used for uninstalling the WinUSB driver, if the driver was installed manually.

HFC Device Installation
2017-2019 Microchip Technology Inc. DS50002629D-page 77
>MPLABConnect.exe /uw
F.2.2.1.3 AdvantageThis option is useful for users who prefer using batch programming Section 2.5 “Batch Programming (Automated Execution)” since it saves time by eliminating the need for installing the driver with each new device insertion
F.2.2.1.4 DisadvantageSystem reboot is required once.
F.2.2.2 HUB DEVICE-SPECIFIC FILTER DRIVER
The WinUSB driver installation is required for the device. Refer to Section F.1.2 “HFC Driver Installation” for details.Device-specific VSM filter driver should be installed using /iv command while programming.If the VSM filter driver is not installed as Hub Class filter, then the device-specific filter driver installation is required for each new device insertion and removal.Example:>MPLABConnect.exe /p <config_filename.cfg> /id <index> /iv>MPLABConnect.exe /pspi <firmware_filename.bin> /id <index> /iv
The device-specific VSM filter driver would be uninstalled when application exits from the operation.System reboot is not required when the driver is installed or uninstalled.
F.2.2.2.1 AdvantageSystem reboot is not required when installing/uninstalling the drivers since it does not install the filter driver for all the hubs in the system.
F.2.2.2.2 DisadvantageIncreased programming time for each device since driver installation occurs every time when hub is enu-merated.
Note: Application must have an Admin privilege to execute command line options /i, /u, and /iv.

MPLAB® Connect Configurator CLI User’s Guide
DS50002629D-page 78 2017-2019 Microchip Technology Inc.
NOTES:

MPLAB® CONNECTCONFIGURATOR CLI
USER’S GUIDE
2017-2019 Microchip Technology Inc. DS50002629D-page 79
Appendix G. LAN78xx and LAN74xx Driver Installation
G.1 LAN78XX DRIVER INSTALLATIONTo install the LAN78xx driver:1. Run the install.exe application from the directory \Drivers\LAN78xxDriver\.2. Accept EULA to proceed to the driver installation.3. Once the driver installation is successful, make sure the LAN78xx device is listed in the Device Man-
ager.
G.2 LAN74XX DRIVER INSTALLATIONTo install the LAN74xx driver:1. Run the install.exe application from the directory \Drivers\LAN74xxDriver.2. Accept EULA and proceed to the driver installation.3. Once the driver installation is successful, make sure the LAN74xx device is listed in the device man-
ager.

MPLAB® Connect Configurator CLI User’s Guide
DS50002629D-page 80 2017-2019 Microchip Technology Inc.
NOTES:

MPLAB® CONNECTCONFIGURATOR CLI
USER’S GUIDE
2017-2019 Microchip Technology Inc. DS50002629D-page 81
Appendix H. Finding Index of LAN/PCIe Device
H.1 USING INDEX FOR LAN COMMANDSThe index of the LAN device must be mentioned along with /id command to program a specific device. Refer to Section H.2 “Listing the LAN78xx/LAN74xx Devices or Finding the Index of LAN78xx/LAN74xx” to find an index of the hub.Example 1:>MPLABConnect.exe /pl /id <index>
H.2 LISTING THE LAN78XX/LAN74XX DEVICES OR FINDING THE INDEX OF LAN78XX/LAN74XX
Index of the LAN78xx/LAN74xx can be found using the below command, with administrator rights:>MPLABConnect.exe /le (See Figure H-1.)
FIGURE H-1: ADMINISTRATOR COMMAND PROMPT
Application populates a list of connected LAN78xx/LAN74xx devices to the computer with unique index numbers.

MPLAB® Connect Configurator CLI User’s Guide
DS50002629D-page 82 2017-2019 Microchip Technology Inc.
NOTES:

MPLAB® CONNECTCONFIGURATOR CLI
USER’S GUIDE
2017-2019 Microchip Technology Inc. DS50002629D-page 83
Appendix I. Calculating Checksum for Input File
I.1 INTRODUCTIONThe following command can be used to calculate checksum for the given input file. The tool computes exclu-sive or (XOR) of all bytes in the given input file. See Figure I-1.
>MPLABConnect.exe /ccs <config_file.cfg>
FIGURE I-1: CALCULATING CHECKSUM
- /ccs <config_file.cfg> – configuration file for which checksum to be calculated.Supported file extension are .bin and .cfg.Example:Input file content: 80 bf 80 30 04 02 34 12 ff
Checksum: 80^bf^80^30^04^02^34^12^ff = 0x50

MPLAB® Connect Configurator CLI User’s Guide
DS50002629D-page 84 2017-2019 Microchip Technology Inc.
NOTES:

MPLAB® CONNECTCONFIGURATOR CLI
USER’S GUIDE
2017-2019 Microchip Technology Inc. DS50002629D-page 85
Appendix J. Merging Two Configuration Files
J.1 INTRODUCTIONThe following command can be used to merge two configuration files. See Figure J-1.
>MPLABConnect.exe /ccs <config_file.cfg>
FIGURE J-1: MERGING TWO CONFIGURATION FILES
Supported file extension is .cfg. Merged configuration will be saved under file name "bMerge.cfg" in cur-rent running folder.

MPLAB® Connect Configurator CLI User’s Guide
DS50002629D-page 86 2017-2019 Microchip Technology Inc.
NOTES:

2017-2019 Microchip Technology Inc. DS50002629D-page 87
NOTES:

DS50002629D-page 88 2017-2019 Microchip Technology Inc.
AMERICASCorporate Office2355 West Chandler Blvd.Chandler, AZ 85224-6199Tel: 480-792-7200 Fax: 480-792-7277Technical Support: http://www.microchip.com/supportWeb Address: www.microchip.comAtlantaDuluth, GA Tel: 678-957-9614 Fax: 678-957-1455Austin, TXTel: 512-257-3370 BostonWestborough, MA Tel: 774-760-0087 Fax: 774-760-0088ChicagoItasca, IL Tel: 630-285-0071 Fax: 630-285-0075DallasAddison, TX Tel: 972-818-7423 Fax: 972-818-2924DetroitNovi, MI Tel: 248-848-4000Houston, TX Tel: 281-894-5983IndianapolisNoblesville, IN Tel: 317-773-8323Fax: 317-773-5453Tel: 317-536-2380Los AngelesMission Viejo, CA Tel: 949-462-9523Fax: 949-462-9608Tel: 951-273-7800 Raleigh, NC Tel: 919-844-7510New York, NY Tel: 631-435-6000San Jose, CA Tel: 408-735-9110Tel: 408-436-4270Canada - TorontoTel: 905-695-1980 Fax: 905-695-2078
ASIA/PACIFICAustralia - SydneyTel: 61-2-9868-6733China - BeijingTel: 86-10-8569-7000 China - ChengduTel: 86-28-8665-5511China - ChongqingTel: 86-23-8980-9588China - DongguanTel: 86-769-8702-9880 China - GuangzhouTel: 86-20-8755-8029 China - HangzhouTel: 86-571-8792-8115 China - Hong Kong SARTel: 852-2943-5100 China - NanjingTel: 86-25-8473-2460China - QingdaoTel: 86-532-8502-7355China - ShanghaiTel: 86-21-3326-8000 China - ShenyangTel: 86-24-2334-2829China - ShenzhenTel: 86-755-8864-2200 China - SuzhouTel: 86-186-6233-1526 China - WuhanTel: 86-27-5980-5300China - XianTel: 86-29-8833-7252China - XiamenTel: 86-592-2388138 China - ZhuhaiTel: 86-756-3210040
ASIA/PACIFICIndia - BangaloreTel: 91-80-3090-4444 India - New DelhiTel: 91-11-4160-8631India - PuneTel: 91-20-4121-0141Japan - OsakaTel: 81-6-6152-7160 Japan - TokyoTel: 81-3-6880- 3770 Korea - DaeguTel: 82-53-744-4301Korea - SeoulTel: 82-2-554-7200Malaysia - Kuala LumpurTel: 60-3-7651-7906Malaysia - PenangTel: 60-4-227-8870Philippines - ManilaTel: 63-2-634-9065SingaporeTel: 65-6334-8870Taiwan - Hsin ChuTel: 886-3-577-8366Taiwan - KaohsiungTel: 886-7-213-7830Taiwan - TaipeiTel: 886-2-2508-8600 Thailand - BangkokTel: 66-2-694-1351Vietnam - Ho Chi MinhTel: 84-28-5448-2100
EUROPEAustria - WelsTel: 43-7242-2244-39Fax: 43-7242-2244-393Denmark - CopenhagenTel: 45-4450-2828 Fax: 45-4485-2829Finland - EspooTel: 358-9-4520-820France - ParisTel: 33-1-69-53-63-20 Fax: 33-1-69-30-90-79 Germany - GarchingTel: 49-8931-9700Germany - HaanTel: 49-2129-3766400Germany - HeilbronnTel: 49-7131-72400Germany - KarlsruheTel: 49-721-625370Germany - MunichTel: 49-89-627-144-0 Fax: 49-89-627-144-44Germany - RosenheimTel: 49-8031-354-560Israel - Ra’anana Tel: 972-9-744-7705Italy - Milan Tel: 39-0331-742611 Fax: 39-0331-466781Italy - PadovaTel: 39-049-7625286 Netherlands - DrunenTel: 31-416-690399 Fax: 31-416-690340Norway - TrondheimTel: 47-7288-4388Poland - WarsawTel: 48-22-3325737 Romania - BucharestTel: 40-21-407-87-50Spain - MadridTel: 34-91-708-08-90Fax: 34-91-708-08-91Sweden - GothenbergTel: 46-31-704-60-40Sweden - StockholmTel: 46-8-5090-4654UK - WokinghamTel: 44-118-921-5800Fax: 44-118-921-5820
Worldwide Sales and Service
05/14/19