isma configurator
TRANSCRIPT
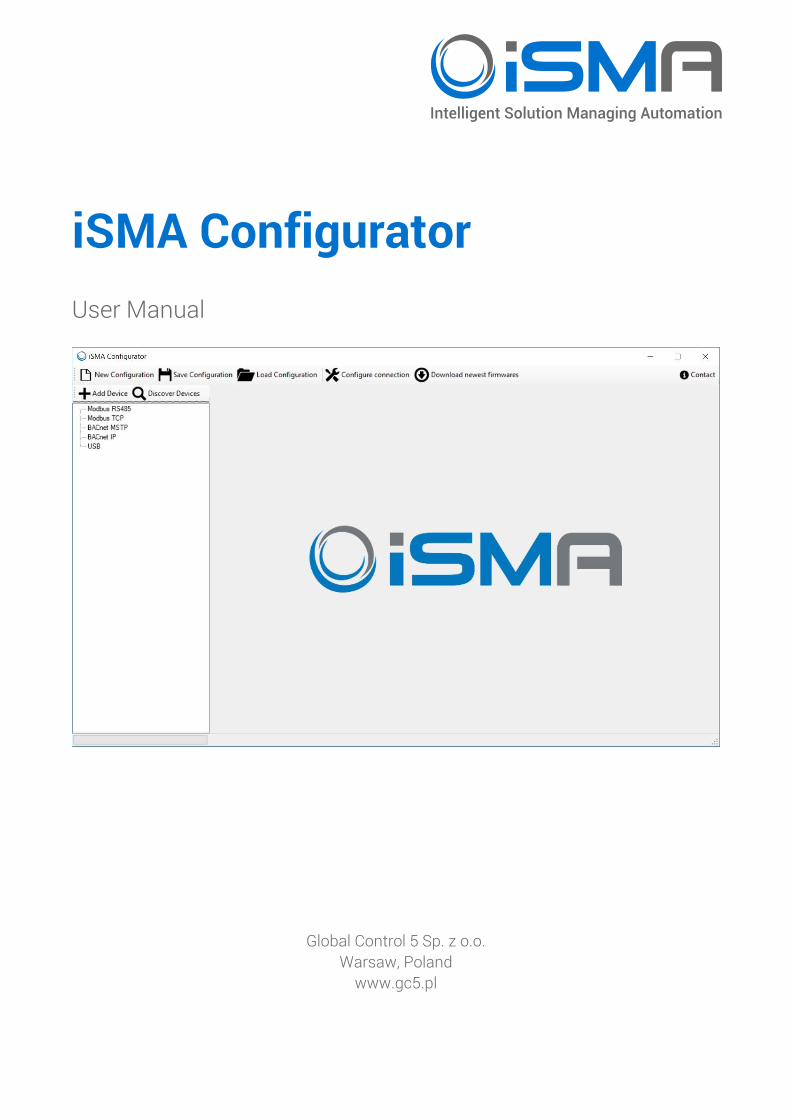
iSMA Configurator User Manual
Global Control 5 Sp. z o.o. Warsaw, Poland
www.gc5.pl
iSMA Configurator
Version 2.0 www.gc5.pl Page 2 / 43
Table of content
1 Introduction............................................................................................................................... 3
1.1 Revision history ........................................................................................................... 3
1.2 Software requirements ............................................................................................... 3
1.3 General purpose of iSMA Configurator software .................................................. 3
1.4 Naming and its definition ........................................................................................... 7
1.5 Internet access and firmware availability ............................................................... 8
2 How to connect iSMA-Configurator to devices ............................................................... 10
2.1 Direct Ethernet connection ..................................................................................... 10
2.2 Connection to RS485 bus ....................................................................................... 10
2.3 Connection to USB ................................................................................................... 14
3 Main functions ....................................................................................................................... 16
3.1 Upgrade ....................................................................................................................... 17
3.2 Resetting the Module ............................................................................................... 18
3.3 Reload Settings .......................................................................................................... 19
3.4 Default Settings ......................................................................................................... 20
4 Device configurations ........................................................................................................... 21
5 Projects .................................................................................................................................... 22
6 Discovering the Devices ....................................................................................................... 23
6.1 Discovering Devices for Modbus via RS485 ........................................................ 24
6.2 Discovering Devices for Modbus via TCP/IP ....................................................... 28
6.3 Discovering Devices via RS485 connected to IP Gateway................................ 30
6.4 Discovering Devices for BACnet via RS485 ......................................................... 33
6.5 Discovering Devices for BACnet IP ........................................................................ 35
7 Adding and removing the devices manually .................................................................... 40
iSMA Configurator
Version 2.0 www.gc5.pl Page 3 / 43
1 Introduction
1.1 Revision history
Rev Date Description
1.0 21.12.2017 • First edition
Table 1 - Revision History
1.2 Software requirements
Windows compatibility – iSMA Configurator is an application intended for Windows only, and
it can be run on Windows 7, 8 and 10.
There is no need to install any additional software or drivers in order to run iSMA Configurator.
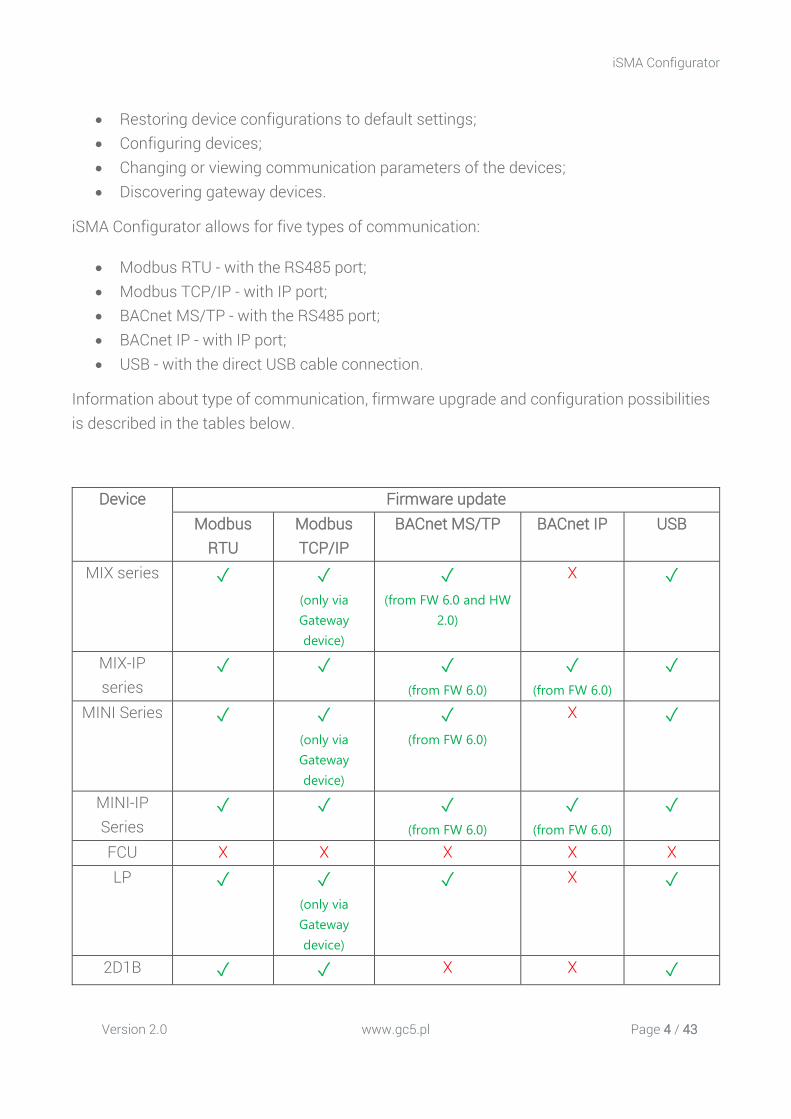
1.3 General purpose of iSMA Configurator software
The iSMA Configurator software is designed to perform configuration, firmware update and
diagnosis of the non-programable iSMA devices. The iSMA Configurator can communicate
with configurable modules via RS485, TCP/IP or USB COM Port. The software is free and can
be obtained from your distribution partner or downloaded from the support server at
www.support.gc5.pl.
iSMA Configurator allows for the following actions:
• Downloading the latest firmware versions to your PC from Global Control 5 Sp. z o.o. server;
• Uploading new firmware on devices; • Creating/saving/loading the list of discovered devices (Project); • Resetting devices; • Reloading device settings;
iSMA Configurator
Version 2.0 www.gc5.pl Page 4 / 43
• Restoring device configurations to default settings; • Configuring devices; • Changing or viewing communication parameters of the devices; • Discovering gateway devices.
iSMA Configurator allows for five types of communication:
• Modbus RTU - with the RS485 port; • Modbus TCP/IP - with IP port; • BACnet MS/TP - with the RS485 port; • BACnet IP - with IP port; • USB - with the direct USB cable connection.
Information about type of communication, firmware upgrade and configuration possibilities is described in the tables below.
Device Firmware update Modbus
RTU Modbus TCP/IP
BACnet MS/TP BACnet IP USB
MIX series ✓ ✓
(only via
Gateway
device)
✓
(from FW 6.0 and HW
2.0)
X ✓
MIX-IP series
✓ ✓ ✓
(from FW 6.0) ✓
(from FW 6.0) ✓
MINI Series ✓ ✓
(only via
Gateway
device)
✓
(from FW 6.0) X ✓
MINI-IP Series
✓ ✓ ✓
(from FW 6.0) ✓
(from FW 6.0) ✓
FCU X X X X X LP ✓ ✓
(only via
Gateway
device)
✓ X ✓
2D1B ✓ ✓ X X ✓
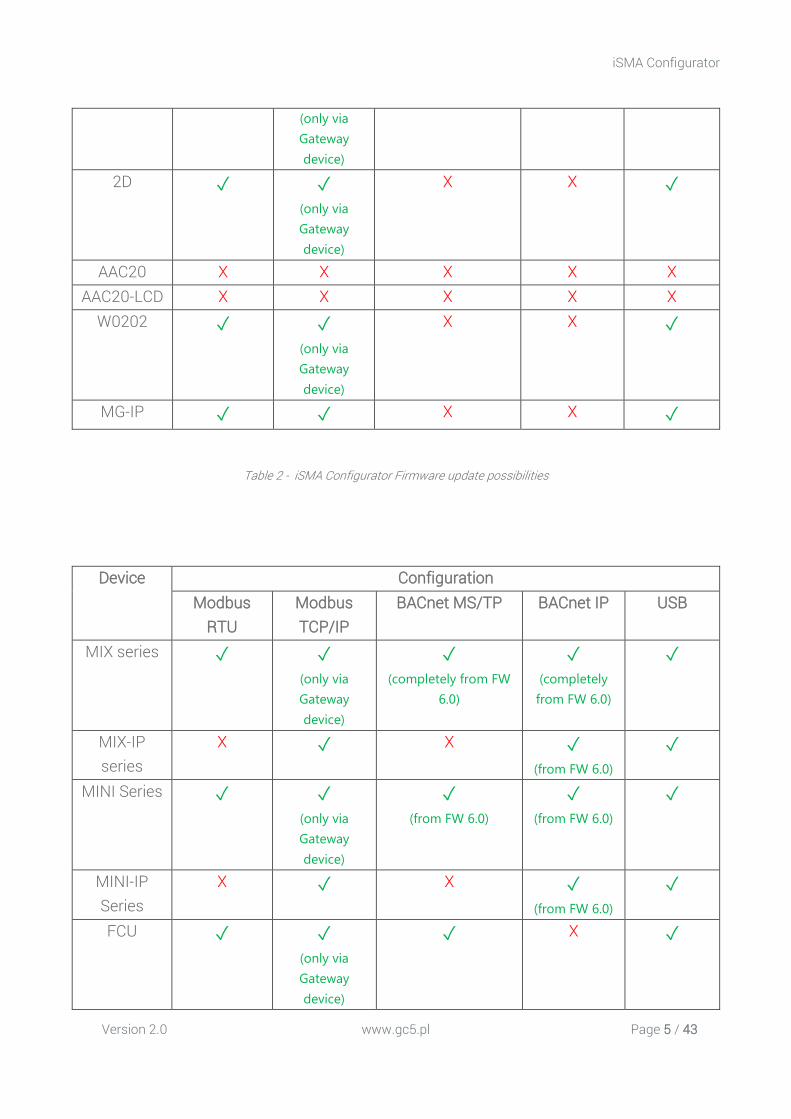
iSMA Configurator
Version 2.0 www.gc5.pl Page 5 / 43
(only via
Gateway
device) 2D ✓ ✓
(only via
Gateway
device)
X X ✓
AAC20 X X X X X AAC20-LCD X X X X X
W0202 ✓ ✓
(only via
Gateway
device)
X X ✓
MG-IP ✓ ✓ X X ✓
Table 2 - iSMA Configurator Firmware update possibilities
Device Configuration Modbus
RTU Modbus TCP/IP
BACnet MS/TP BACnet IP USB
MIX series ✓ ✓
(only via
Gateway
device)
✓
(completely from FW
6.0)
✓
(completely
from FW 6.0)
✓
MIX-IP series
X ✓ X ✓
(from FW 6.0) ✓
MINI Series ✓ ✓
(only via
Gateway
device)
✓
(from FW 6.0) ✓
(from FW 6.0) ✓
MINI-IP Series
X ✓ X ✓
(from FW 6.0) ✓
FCU ✓ ✓
(only via
Gateway
device)
✓ X ✓
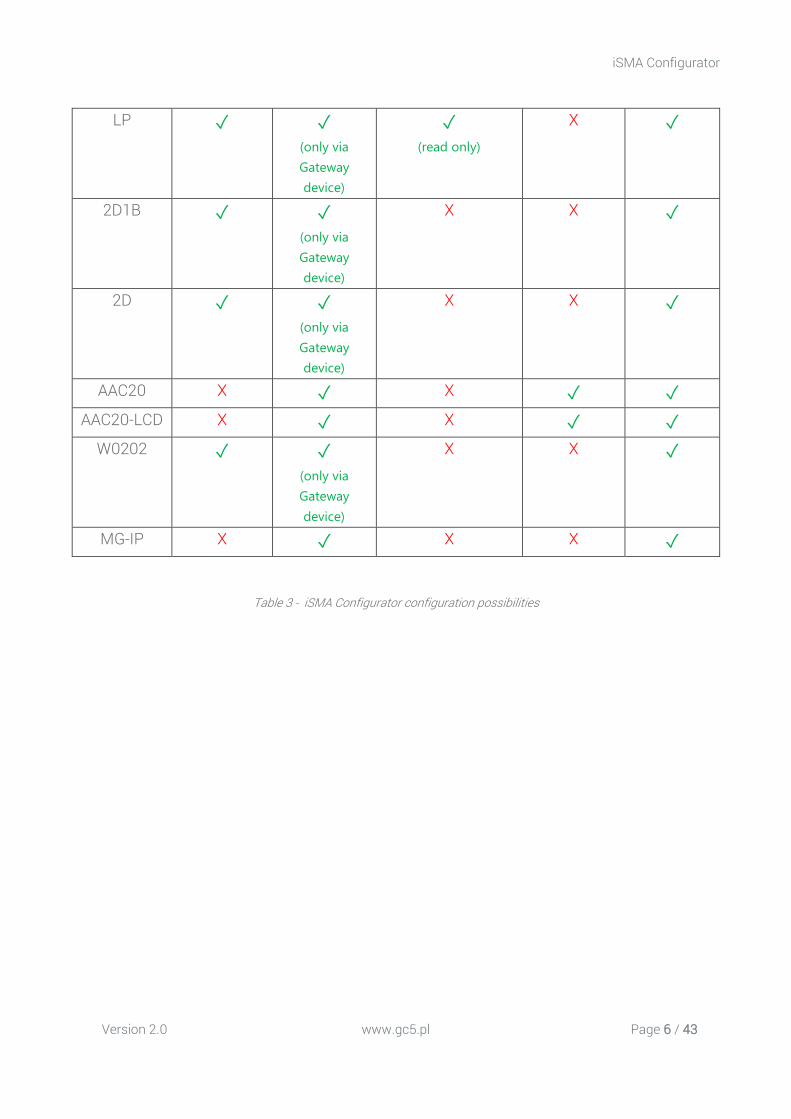
iSMA Configurator
Version 2.0 www.gc5.pl Page 6 / 43
LP ✓ ✓
(only via
Gateway
device)
✓
(read only) X ✓
2D1B ✓ ✓
(only via
Gateway
device)
X X ✓
2D ✓ ✓
(only via
Gateway
device)
X X ✓
AAC20 X ✓ X ✓ ✓ AAC20-LCD X ✓ X ✓ ✓
W0202 ✓ ✓
(only via
Gateway
device)
X X ✓
MG-IP X ✓ X X ✓
Table 3 - iSMA Configurator configuration possibilities
iSMA Configurator
Version 2.0 www.gc5.pl Page 7 / 43
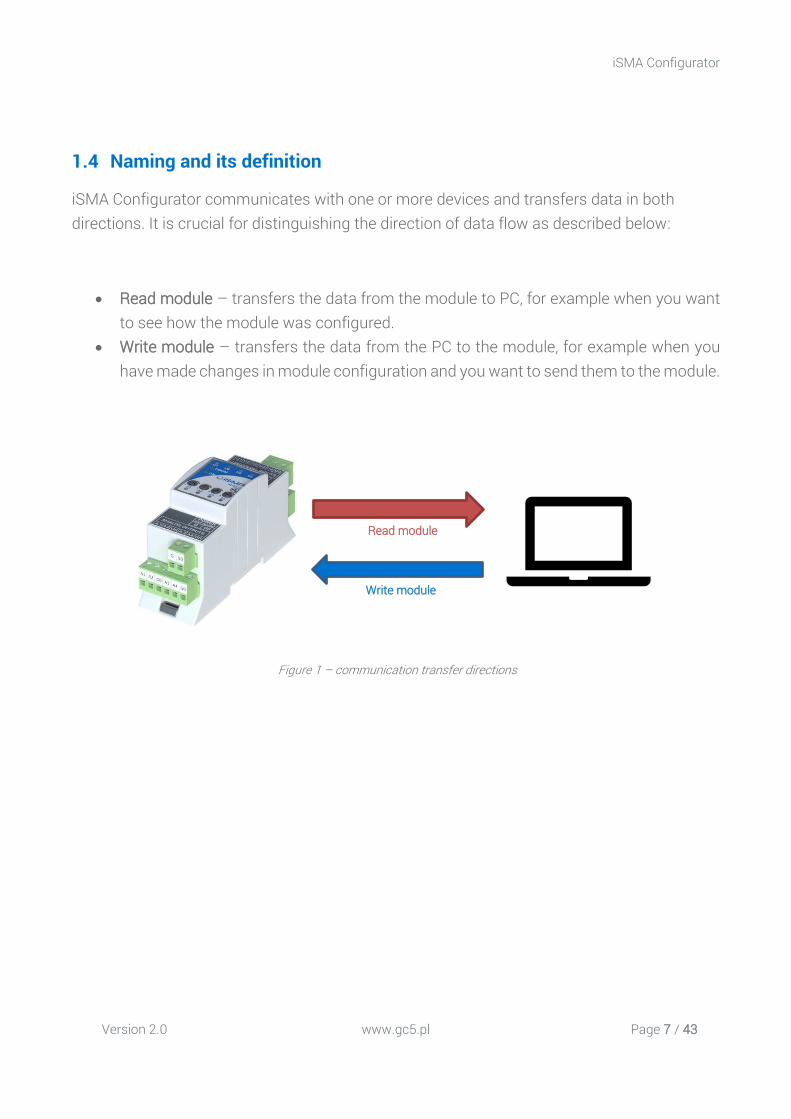
1.4 Naming and its definition
iSMA Configurator communicates with one or more devices and transfers data in both directions. It is crucial for distinguishing the direction of data flow as described below:
• Read module – transfers the data from the module to PC, for example when you want to see how the module was configured.
• Write module – transfers the data from the PC to the module, for example when you have made changes in module configuration and you want to send them to the module.
Figure 1 – communication transfer directions
Write module
Read module
iSMA Configurator
Version 2.0 www.gc5.pl Page 8 / 43
1.5 Internet access and firmware availability
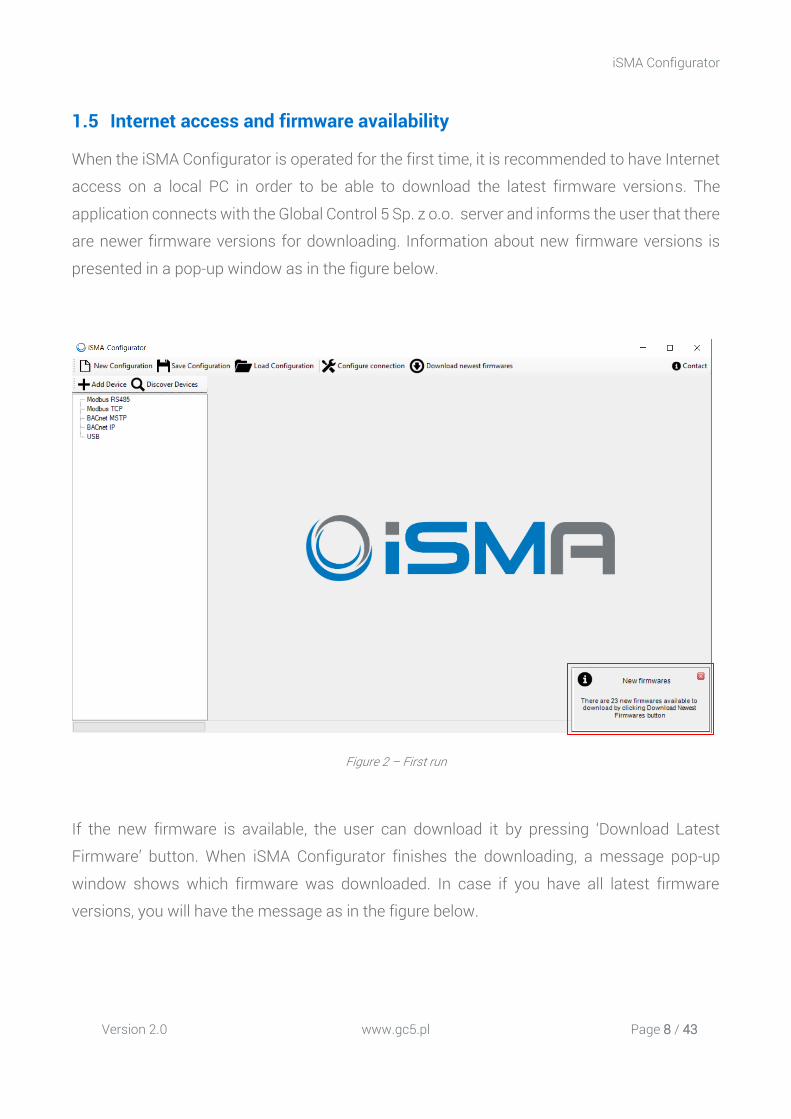
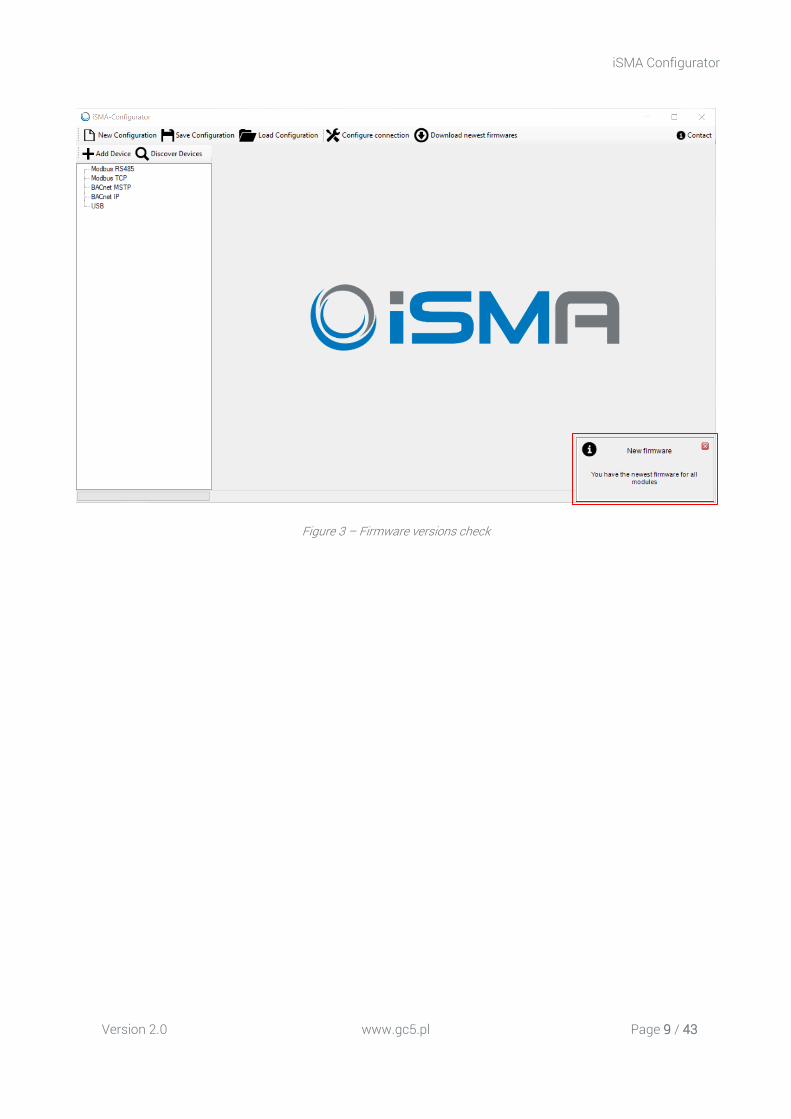
When the iSMA Configurator is operated for the first time, it is recommended to have Internet
access on a local PC in order to be able to download the latest firmware versions. The
application connects with the Global Control 5 Sp. z o.o. server and informs the user that there
are newer firmware versions for downloading. Information about new firmware versions is
presented in a pop-up window as in the figure below.
Figure 2 – First run
If the new firmware is available, the user can download it by pressing ‘Download Latest
Firmware’ button. When iSMA Configurator finishes the downloading, a message pop-up
window shows which firmware was downloaded. In case if you have all latest firmware
versions, you will have the message as in the figure below.
iSMA Configurator
Version 2.0 www.gc5.pl Page 9 / 43
Figure 3 – Firmware versions check
iSMA Configurator
Version 2.0 www.gc5.pl Page 10 / 43
2 How to connect iSMA-Configurator to devices
There are three general ways to connect iSMA-Configurator to the configurable devices:
1. Direct Ethernet connection 2. RS 485 bus 3. USB cable
2.1 Direct Ethernet connection
In case of direct Ethernet connection the iSMA-Configurator used devices IP addres to
connect to it. To be able to add or discovery the device you must first be within the device IP
range. In order to make new device configurations, user must change its computer IP so that
is within the same IP range. As the device’s default IP is 192.168.1.123 when shipped, user
can use, for example 192.168.1.11.
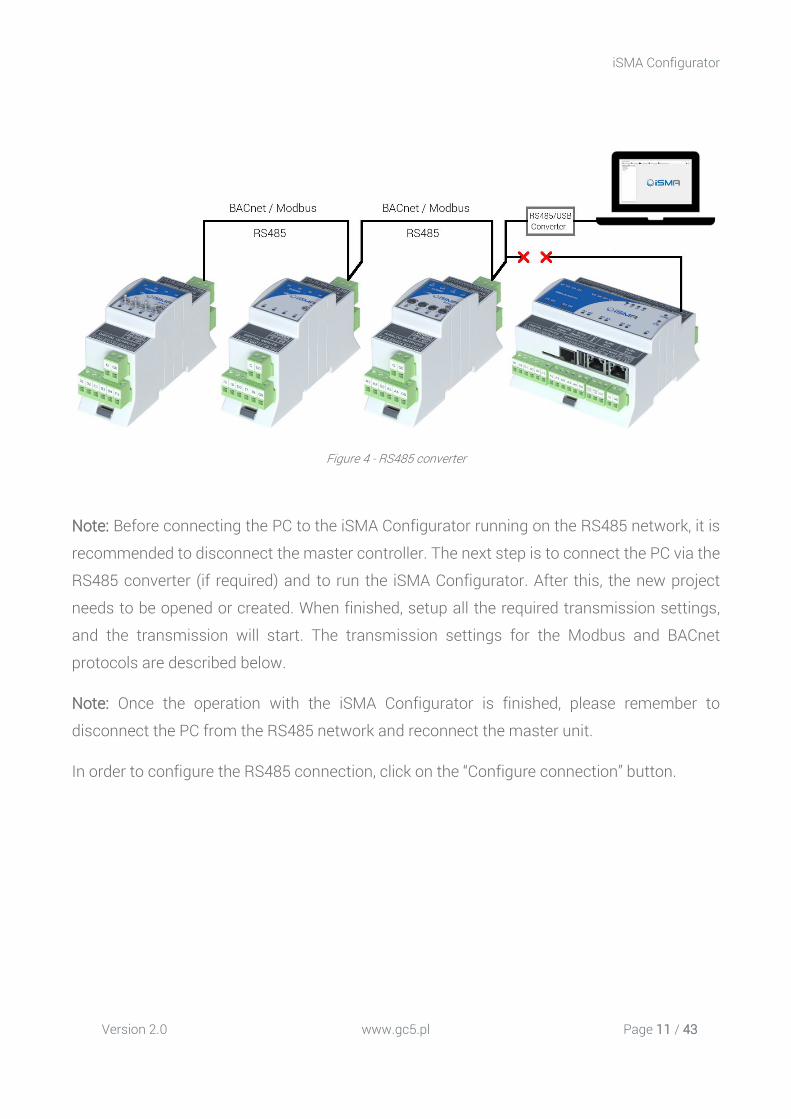
2.2 Connection to RS485 bus
Connecting the iSMA Configurator to the RS485 bus is recommended on a site where all the
devices are linked together. The RS485 network needs to be connected to the PC with the
iSMA Configurator software running. If the PC is not equipped with the RS485 communication
port, a converter is required. Global Control 5 Sp. z o.o. company recommends using a iSMA-
B-CVT-RS485 converter, sold separately.
iSMA Configurator
Version 2.0 www.gc5.pl Page 11 / 43
Figure 4 - RS485 converter
Note: Before connecting the PC to the iSMA Configurator running on the RS485 network, it is
recommended to disconnect the master controller. The next step is to connect the PC via the
RS485 converter (if required) and to run the iSMA Configurator. After this, the new project
needs to be opened or created. When finished, setup all the required transmission settings,
and the transmission will start. The transmission settings for the Modbus and BACnet
protocols are described below.
Note: Once the operation with the iSMA Configurator is finished, please remember to
disconnect the PC from the RS485 network and reconnect the master unit.
In order to configure the RS485 connection, click on the “Configure connection” button.
iSMA Configurator
Version 2.0 www.gc5.pl Page 12 / 43
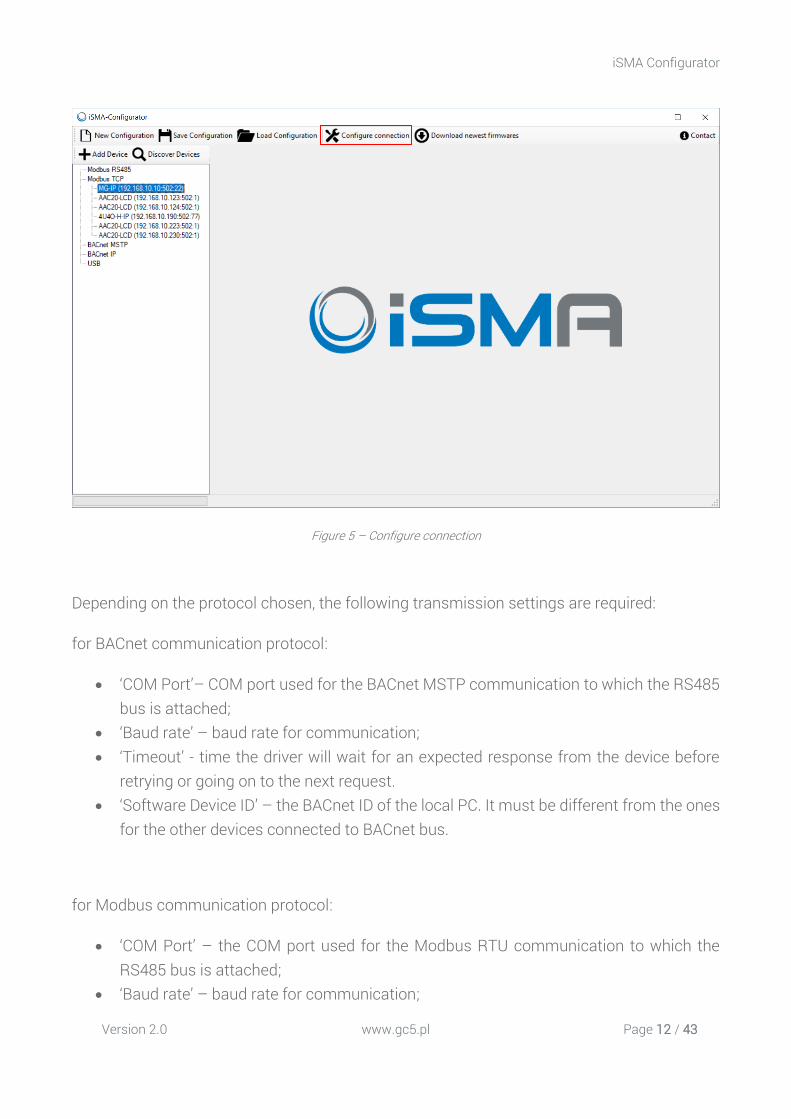
Figure 5 – Configure connection
Depending on the protocol chosen, the following transmission settings are required:
for BACnet communication protocol:
• ‘COM Port’– COM port used for the BACnet MSTP communication to which the RS485 bus is attached;
• ‘Baud rate’ – baud rate for communication; • ‘Timeout’ - time the driver will wait for an expected response from the device before
retrying or going on to the next request. • ‘Software Device ID’ – the BACnet ID of the local PC. It must be different from the ones
for the other devices connected to BACnet bus.
for Modbus communication protocol:
• ‘COM Port’ – the COM port used for the Modbus RTU communication to which the RS485 bus is attached;
• ‘Baud rate’ – baud rate for communication;

iSMA Configurator
Version 2.0 www.gc5.pl Page 13 / 43
• ‘Parity Bits’ – defining parity bits; available options: None, Even, Odd.
Figure 6 – Modbus / BACnet RS485 Configurations
iSMA Configurator
Version 2.0 www.gc5.pl Page 14 / 43
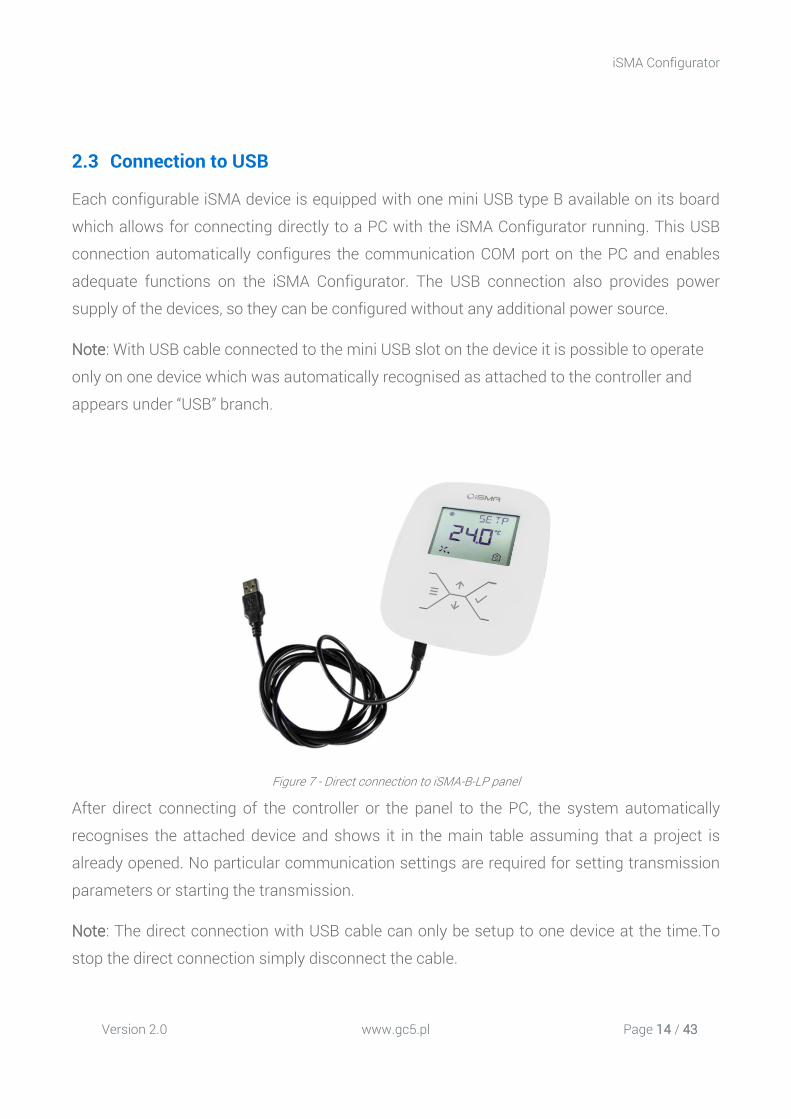
2.3 Connection to USB
Each configurable iSMA device is equipped with one mini USB type B available on its board
which allows for connecting directly to a PC with the iSMA Configurator running. This USB
connection automatically configures the communication COM port on the PC and enables
adequate functions on the iSMA Configurator. The USB connection also provides power
supply of the devices, so they can be configured without any additional power source.
Note: With USB cable connected to the mini USB slot on the device it is possible to operate
only on one device which was automatically recognised as attached to the controller and
appears under “USB” branch.
Figure 7 - Direct connection to iSMA-B-LP panel
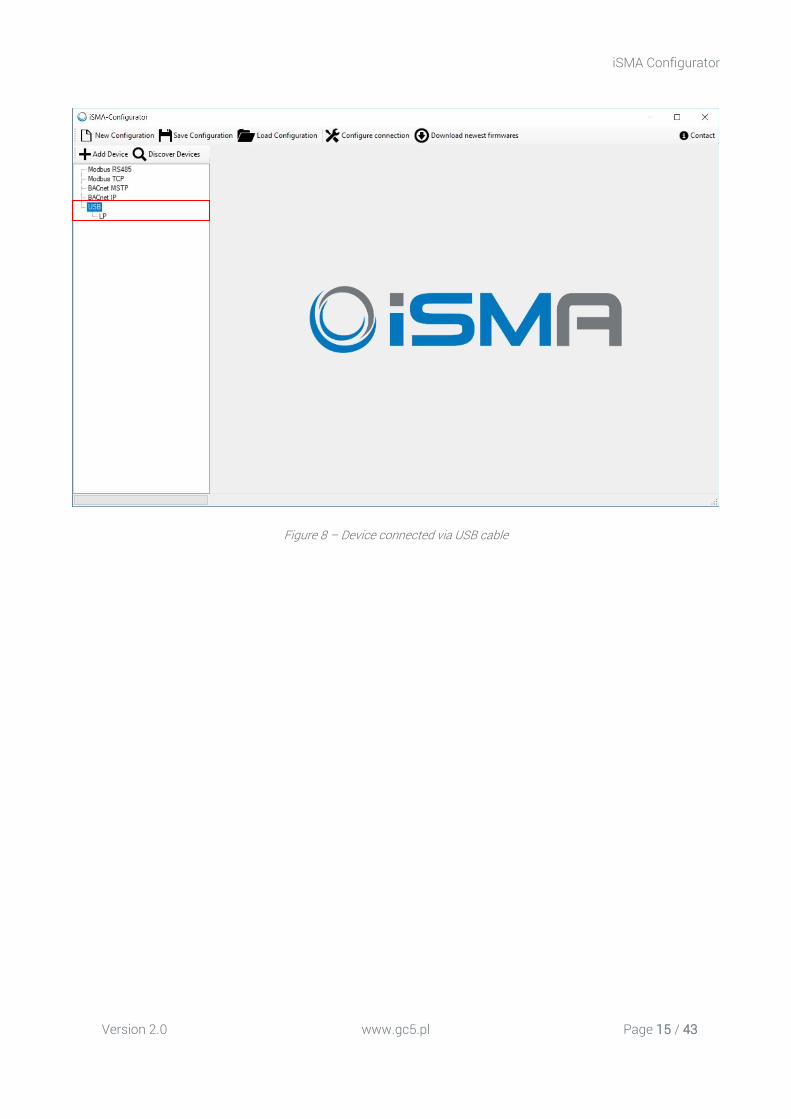
After direct connecting of the controller or the panel to the PC, the system automatically
recognises the attached device and shows it in the main table assuming that a project is
already opened. No particular communication settings are required for setting transmission
parameters or starting the transmission.
Note: The direct connection with USB cable can only be setup to one device at the time.To
stop the direct connection simply disconnect the cable.
iSMA Configurator
Version 2.0 www.gc5.pl Page 15 / 43
Figure 8 – Device connected via USB cable
iSMA Configurator
Version 2.0 www.gc5.pl Page 16 / 43
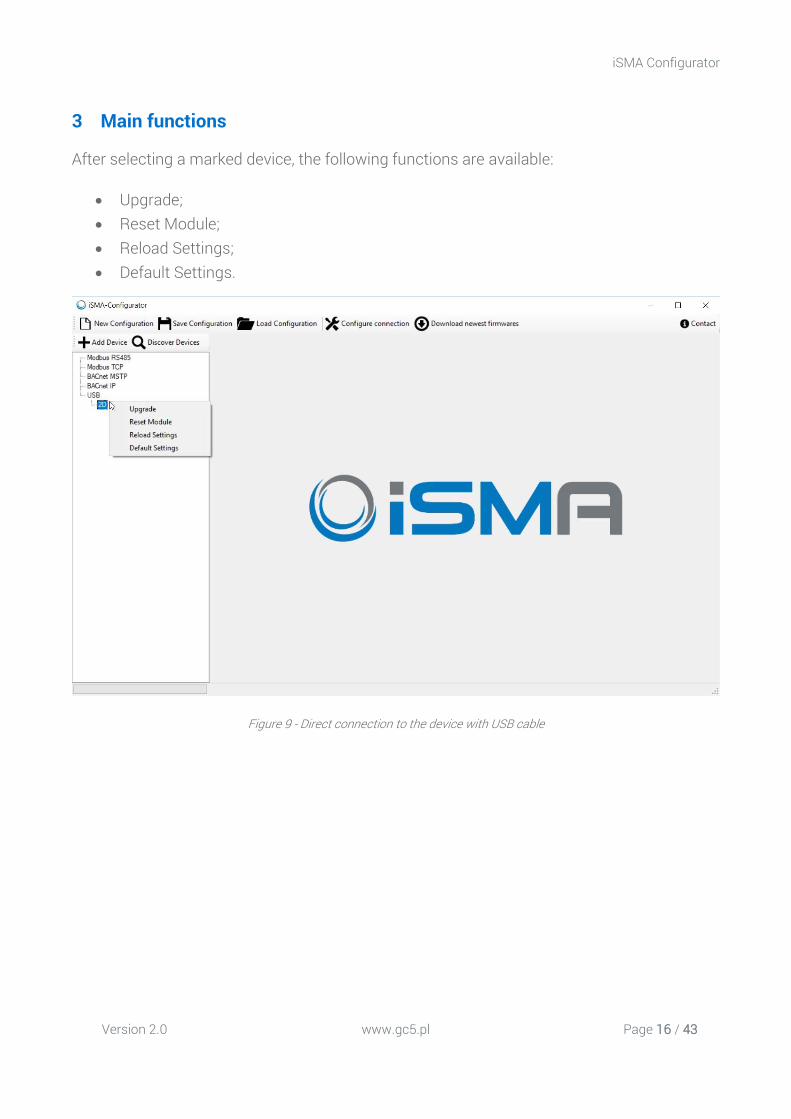
3 Main functions
After selecting a marked device, the following functions are available:
• Upgrade; • Reset Module; • Reload Settings; • Default Settings.
Figure 9 - Direct connection to the device with USB cable
iSMA Configurator
Version 2.0 www.gc5.pl Page 17 / 43
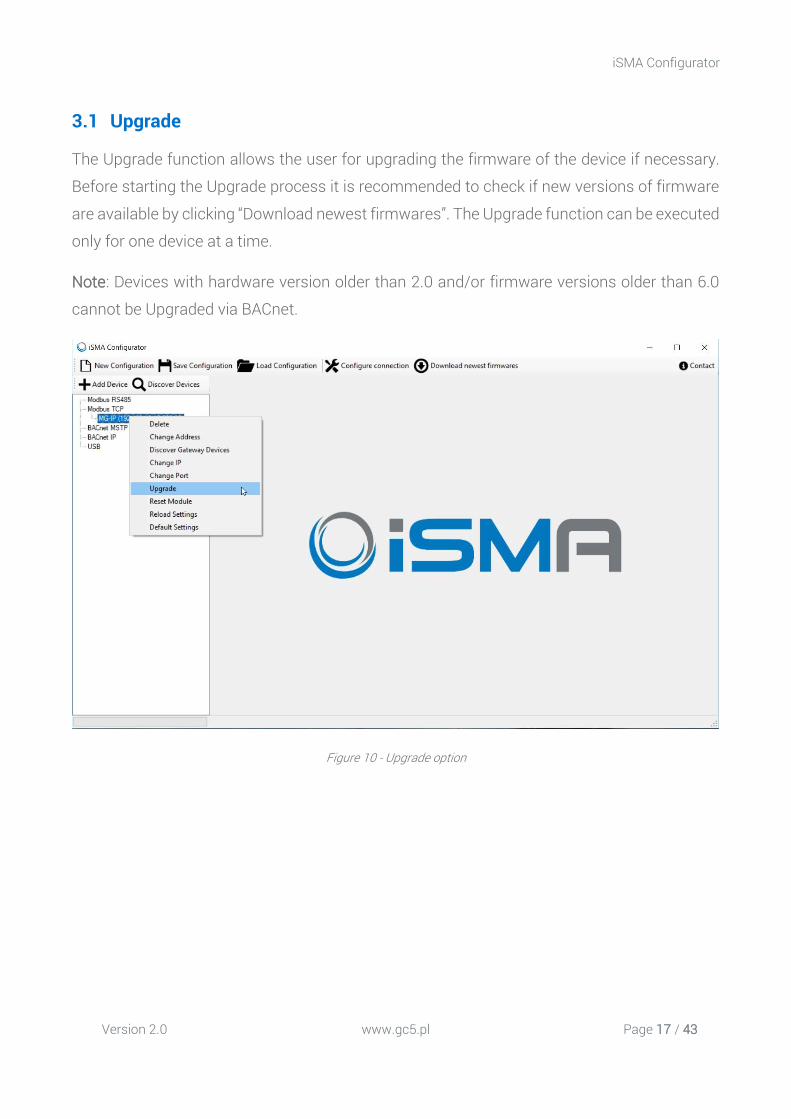
3.1 Upgrade
The Upgrade function allows the user for upgrading the firmware of the device if necessary.
Before starting the Upgrade process it is recommended to check if new versions of firmware
are available by clicking “Download newest firmwares”. The Upgrade function can be executed
only for one device at a time.
Note: Devices with hardware version older than 2.0 and/or firmware versions older than 6.0
cannot be Upgraded via BACnet.
Figure 10 - Upgrade option

iSMA Configurator
Version 2.0 www.gc5.pl Page 18 / 43
3.2 Resetting the Module
Resetting the module should be the first action that the user performs in case of problems
with the controller or application functionality in general. The restarting procedure forces the
application to start the execution of the program from the beginning and initiates reading raw
values for inputs.
Note: It is recommended to restart the application before contacting the technical support.
Figure 11 – Resetting the device
iSMA Configurator
Version 2.0 www.gc5.pl Page 19 / 43
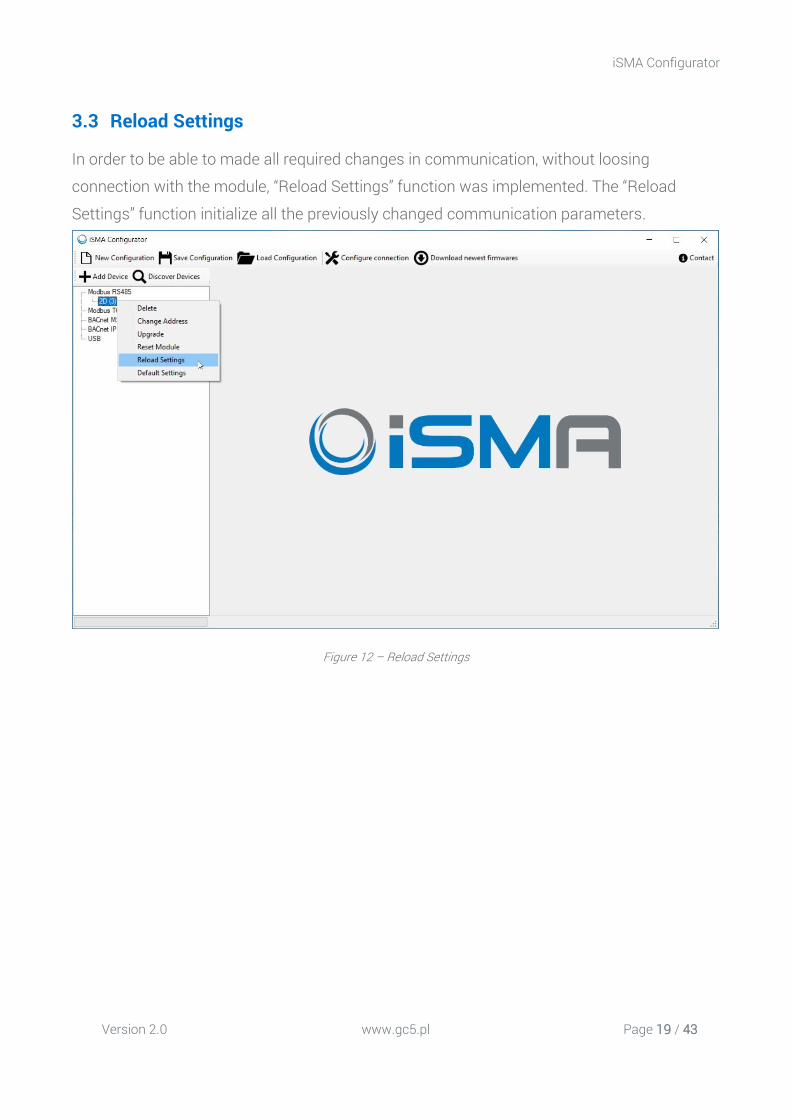
3.3 Reload Settings
In order to be able to made all required changes in communication, without loosing
connection with the module, “Reload Settings” function was implemented. The “Reload
Settings” function initialize all the previously changed communication parameters.
Figure 12 – Reload Settings
iSMA Configurator
Version 2.0 www.gc5.pl Page 20 / 43
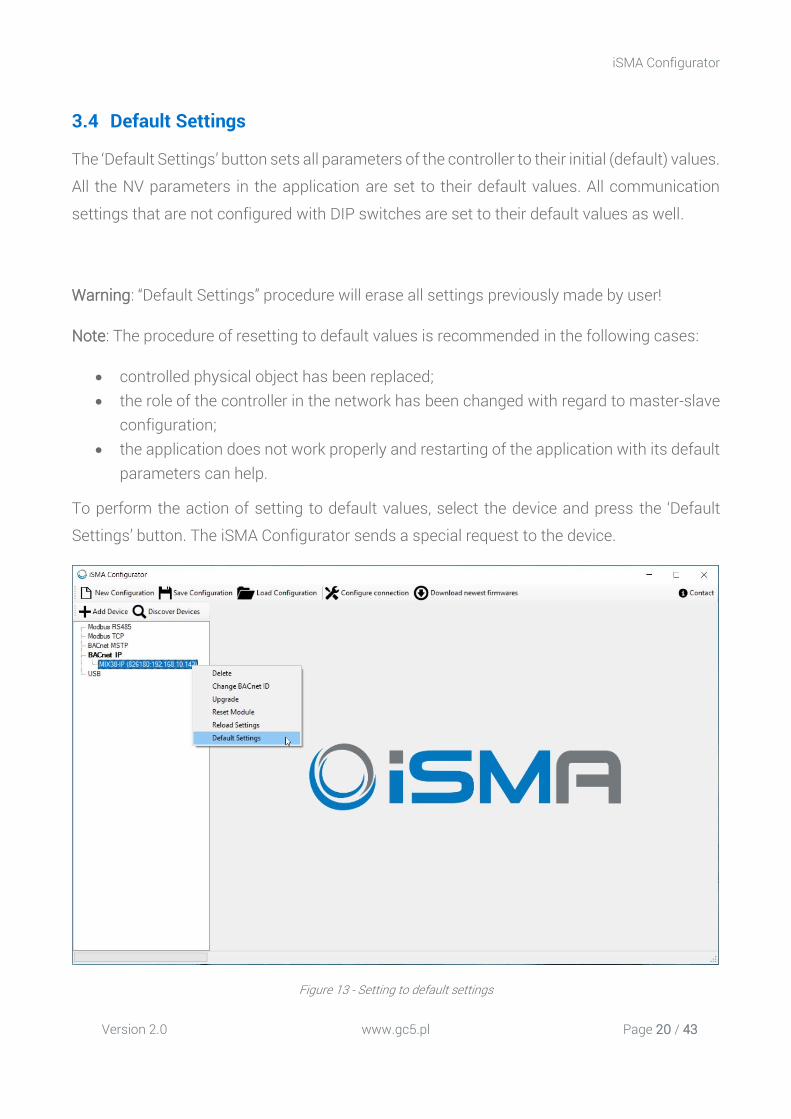
3.4 Default Settings
The ‘Default Settings’ button sets all parameters of the controller to their initial (default) values.
All the NV parameters in the application are set to their default values. All communication
settings that are not configured with DIP switches are set to their default values as well.
Warning: “Default Settings” procedure will erase all settings previously made by user!
Note: The procedure of resetting to default values is recommended in the following cases:
• controlled physical object has been replaced; • the role of the controller in the network has been changed with regard to master-slave
configuration; • the application does not work properly and restarting of the application with its default
parameters can help.
To perform the action of setting to default values, select the device and press the ‘Default
Settings’ button. The iSMA Configurator sends a special request to the device.
Figure 13 - Setting to default settings
iSMA Configurator
Version 2.0 www.gc5.pl Page 21 / 43
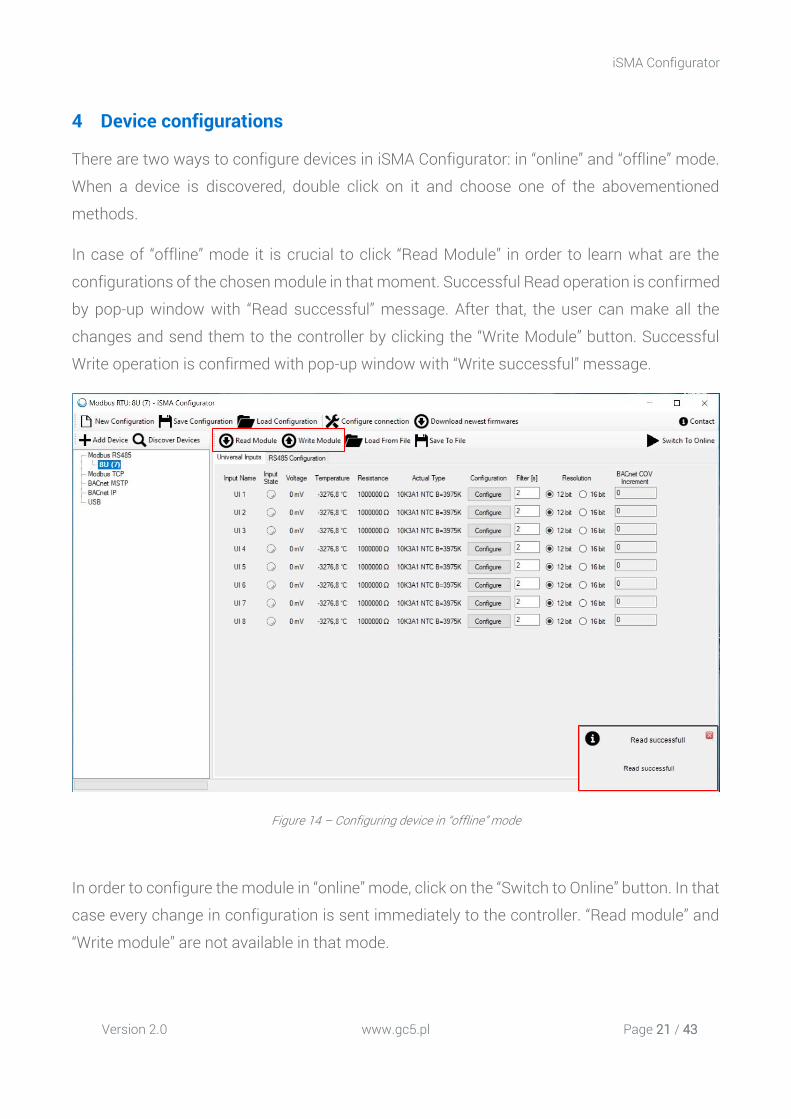
4 Device configurations
There are two ways to configure devices in iSMA Configurator: in “online” and “offline” mode.
When a device is discovered, double click on it and choose one of the abovementioned
methods.
In case of “offline” mode it is crucial to click “Read Module” in order to learn what are the
configurations of the chosen module in that moment. Successful Read operation is confirmed
by pop-up window with “Read successful” message. After that, the user can make all the
changes and send them to the controller by clicking the “Write Module” button. Successful
Write operation is confirmed with pop-up window with “Write successful” message.
Figure 14 – Configuring device in “offline” mode
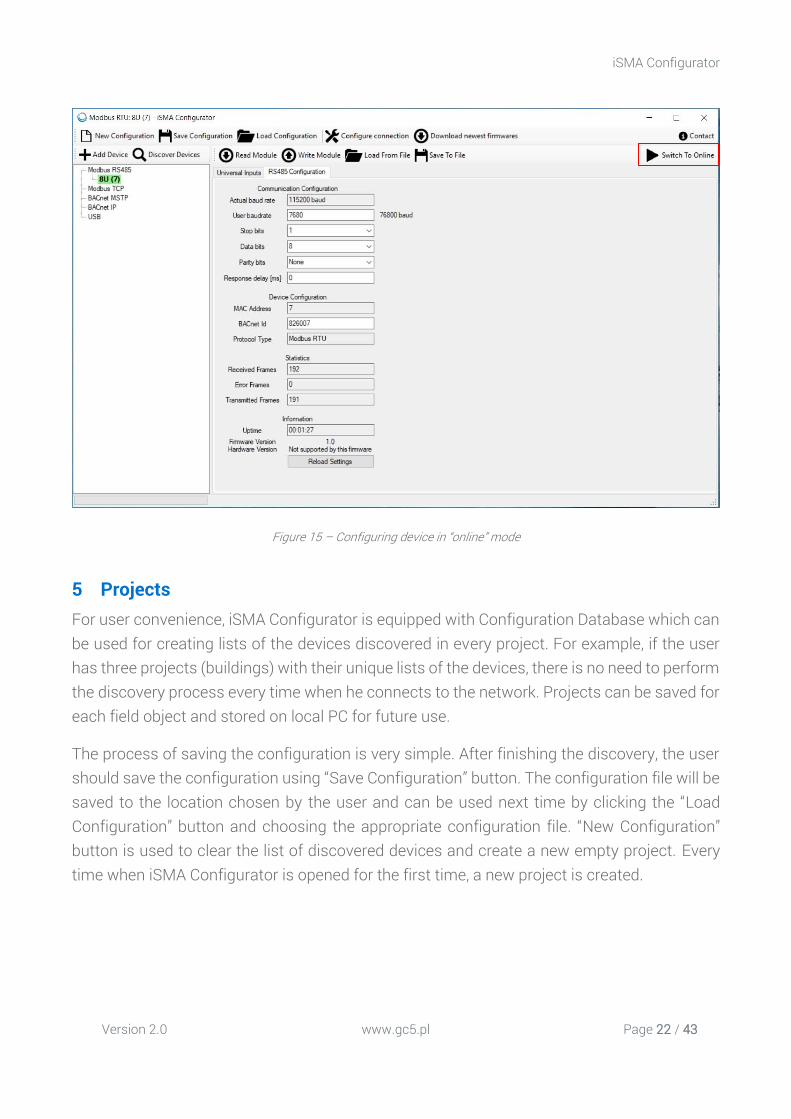
In order to configure the module in “online” mode, click on the “Switch to Online” button. In that
case every change in configuration is sent immediately to the controller. “Read module” and
“Write module” are not available in that mode.
iSMA Configurator
Version 2.0 www.gc5.pl Page 22 / 43
Figure 15 – Configuring device in “online” mode
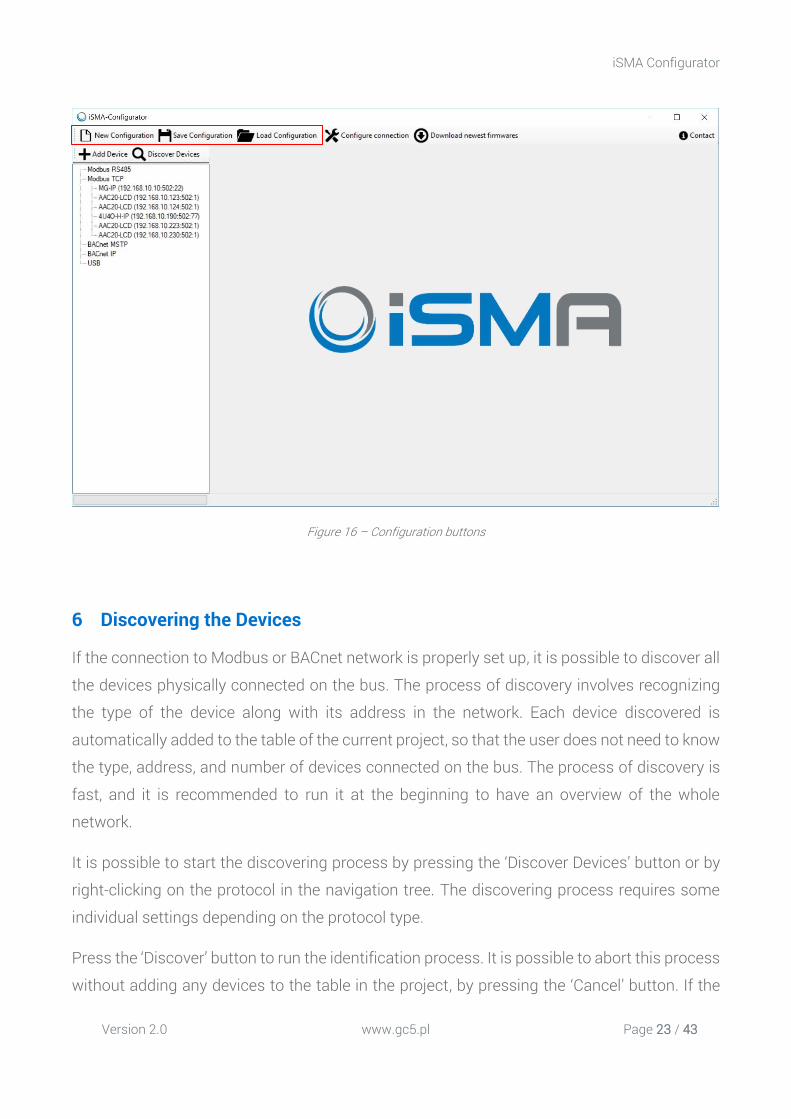
5 Projects For user convenience, iSMA Configurator is equipped with Configuration Database which can be used for creating lists of the devices discovered in every project. For example, if the user has three projects (buildings) with their unique lists of the devices, there is no need to perform the discovery process every time when he connects to the network. Projects can be saved for each field object and stored on local PC for future use.
The process of saving the configuration is very simple. After finishing the discovery, the user should save the configuration using “Save Configuration” button. The configuration file will be saved to the location chosen by the user and can be used next time by clicking the “Load Configuration” button and choosing the appropriate configuration file. “New Configuration” button is used to clear the list of discovered devices and create a new empty project. Every time when iSMA Configurator is opened for the first time, a new project is created.
iSMA Configurator
Version 2.0 www.gc5.pl Page 23 / 43
Figure 16 – Configuration buttons
6 Discovering the Devices
If the connection to Modbus or BACnet network is properly set up, it is possible to discover all
the devices physically connected on the bus. The process of discovery involves recognizing
the type of the device along with its address in the network. Each device discovered is
automatically added to the table of the current project, so that the user does not need to know
the type, address, and number of devices connected on the bus. The process of discovery is
fast, and it is recommended to run it at the beginning to have an overview of the whole
network.
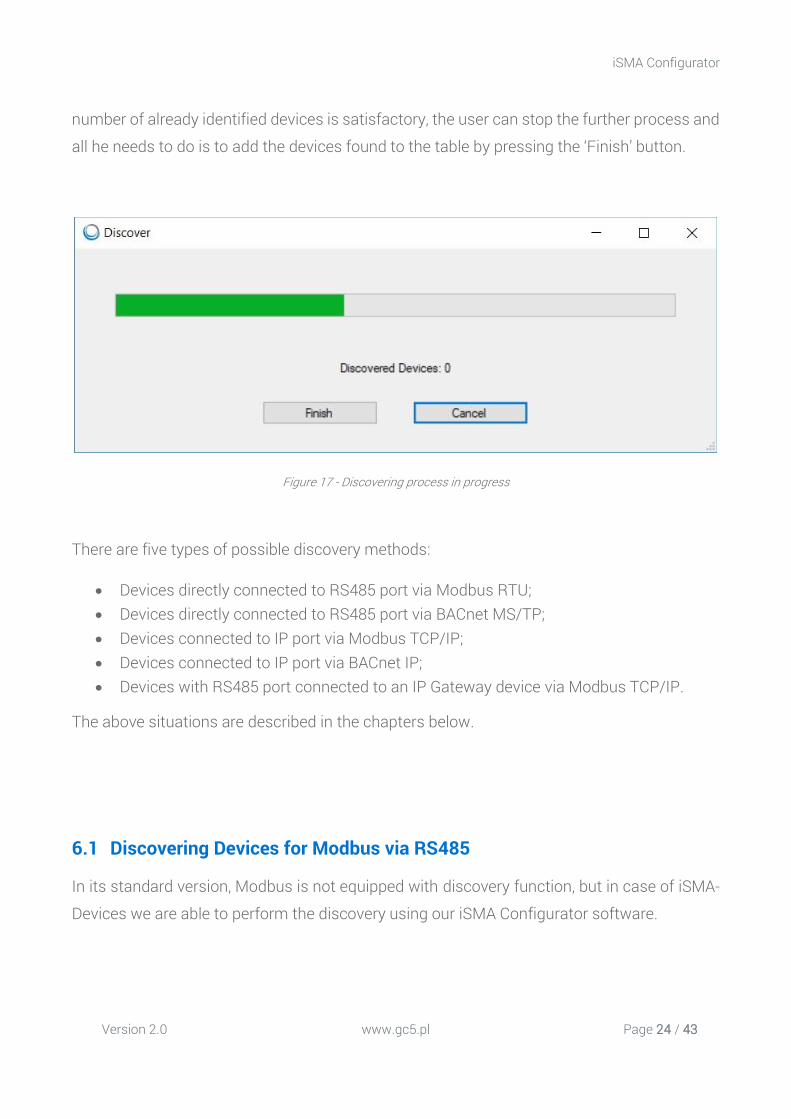
It is possible to start the discovering process by pressing the ‘Discover Devices’ button or by
right-clicking on the protocol in the navigation tree. The discovering process requires some
individual settings depending on the protocol type.
Press the ‘Discover’ button to run the identification process. It is possible to abort this process
without adding any devices to the table in the project, by pressing the ‘Cancel’ button. If the
iSMA Configurator
Version 2.0 www.gc5.pl Page 24 / 43
number of already identified devices is satisfactory, the user can stop the further process and
all he needs to do is to add the devices found to the table by pressing the ‘Finish’ button.
Figure 17 - Discovering process in progress
There are five types of possible discovery methods:
• Devices directly connected to RS485 port via Modbus RTU; • Devices directly connected to RS485 port via BACnet MS/TP; • Devices connected to IP port via Modbus TCP/IP; • Devices connected to IP port via BACnet IP; • Devices with RS485 port connected to an IP Gateway device via Modbus TCP/IP.
The above situations are described in the chapters below.
6.1 Discovering Devices for Modbus via RS485
In its standard version, Modbus is not equipped with discovery function, but in case of iSMA-
Devices we are able to perform the discovery using our iSMA Configurator software.
iSMA Configurator
Version 2.0 www.gc5.pl Page 25 / 43
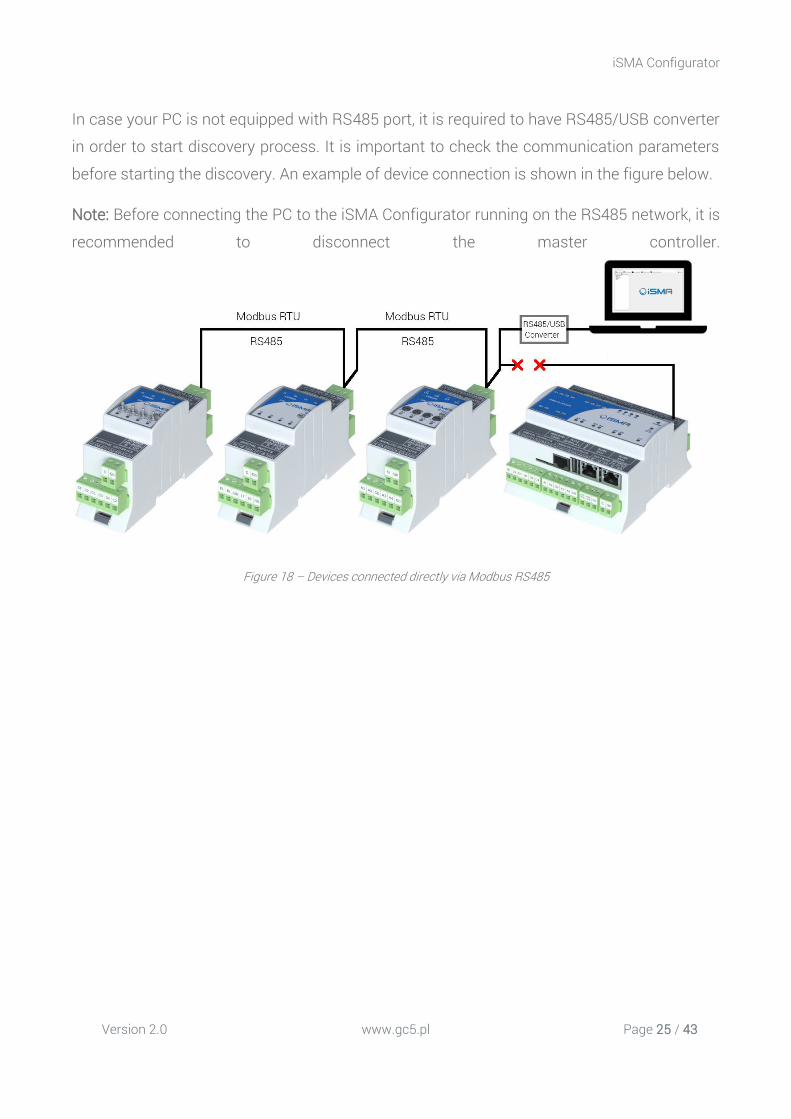
In case your PC is not equipped with RS485 port, it is required to have RS485/USB converter
in order to start discovery process. It is important to check the communication parameters
before starting the discovery. An example of device connection is shown in the figure below.
Note: Before connecting the PC to the iSMA Configurator running on the RS485 network, it is
recommended to disconnect the master controller.
Figure 18 – Devices connected directly via Modbus RS485

iSMA Configurator
Version 2.0 www.gc5.pl Page 26 / 43
Figure 19 – Modbus RS485 Configuration parameters
Before beginning the discovery process, it is necessary to setup the range of the addresses.
The iSMA Configurator starts searching for the first device with the given address in the ‘Start
Address’ field until reaching the last device with the address specified in the ‘Stop Address’
field. The time spent on discovering varies depends on the range of the devices and on the

iSMA Configurator
Version 2.0 www.gc5.pl Page 27 / 43
network's baud rate. To reduce the detecting time, it is recommended to adjust the range
accordingly.
Figure 20 – Address range for device detection
After the discovery process is finished, devices appear in the navigation tree, under RS485
branch. Device types and their Modbus addresses are identified automatically.
iSMA Configurator
Version 2.0 www.gc5.pl Page 28 / 43
Figure 21 - Devices discovered via Modbus RS485
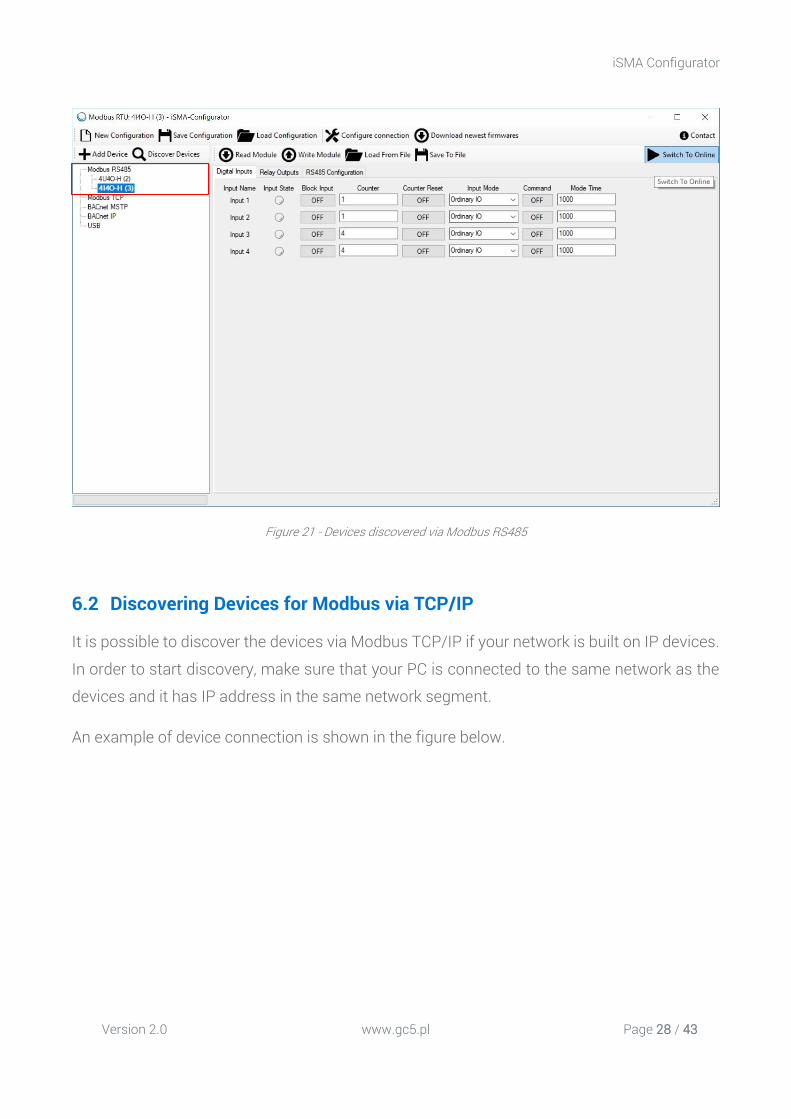
6.2 Discovering Devices for Modbus via TCP/IP
It is possible to discover the devices via Modbus TCP/IP if your network is built on IP devices.
In order to start discovery, make sure that your PC is connected to the same network as the
devices and it has IP address in the same network segment.
An example of device connection is shown in the figure below.
iSMA Configurator
Version 2.0 www.gc5.pl Page 29 / 43
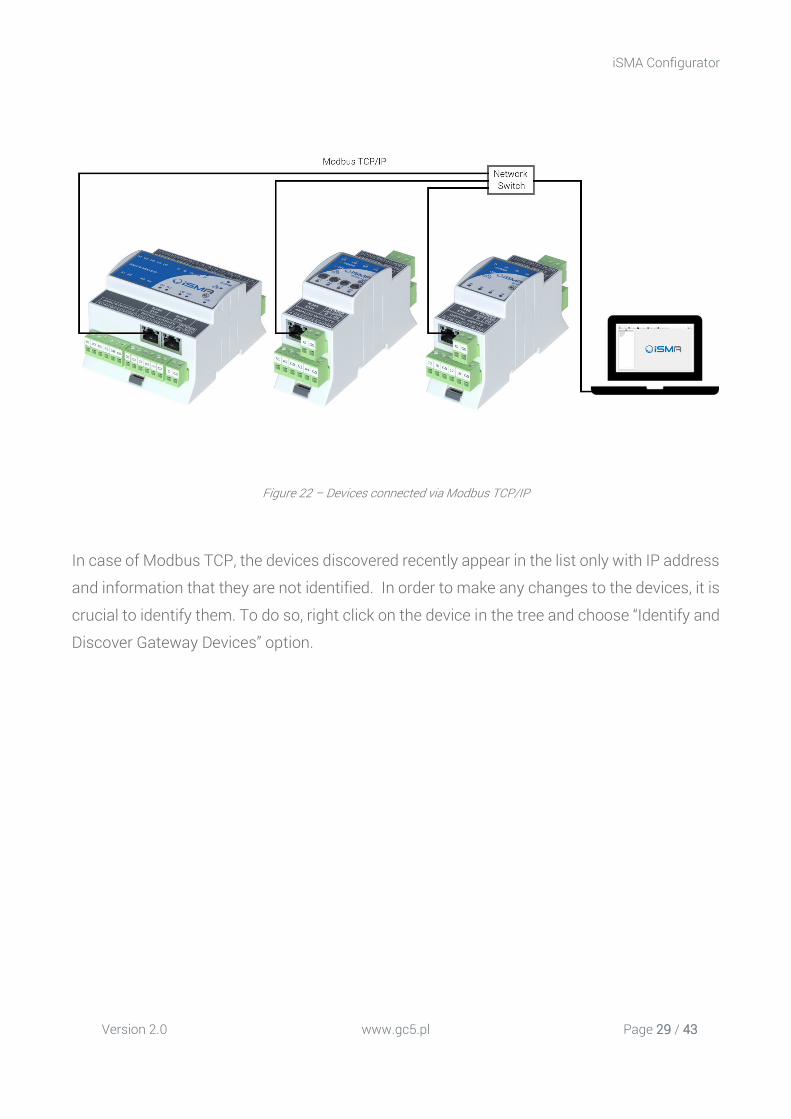
Figure 22 – Devices connected via Modbus TCP/IP
In case of Modbus TCP, the devices discovered recently appear in the list only with IP address
and information that they are not identified. In order to make any changes to the devices, it is
crucial to identify them. To do so, right click on the device in the tree and choose “Identify and
Discover Gateway Devices” option.

iSMA Configurator
Version 2.0 www.gc5.pl Page 30 / 43
Figure 23 - Devices discovered via Modbus TCP
6.3 Discovering Devices via RS485 connected to IP Gateway
It is a common practice to have one IP Gateway device in the network and a couple of other
connected via RS485. In that case, your PC with iSMA Configurator should be connected to
the same network as Gateway device and have an IP address in the same network segment.
Make sure that RS485 configuration parameters in the Gateway device are set accordingly so
that it is possible to discover the Modbus devices connected to the bus.
iSMA Configurator
Version 2.0 www.gc5.pl Page 31 / 43
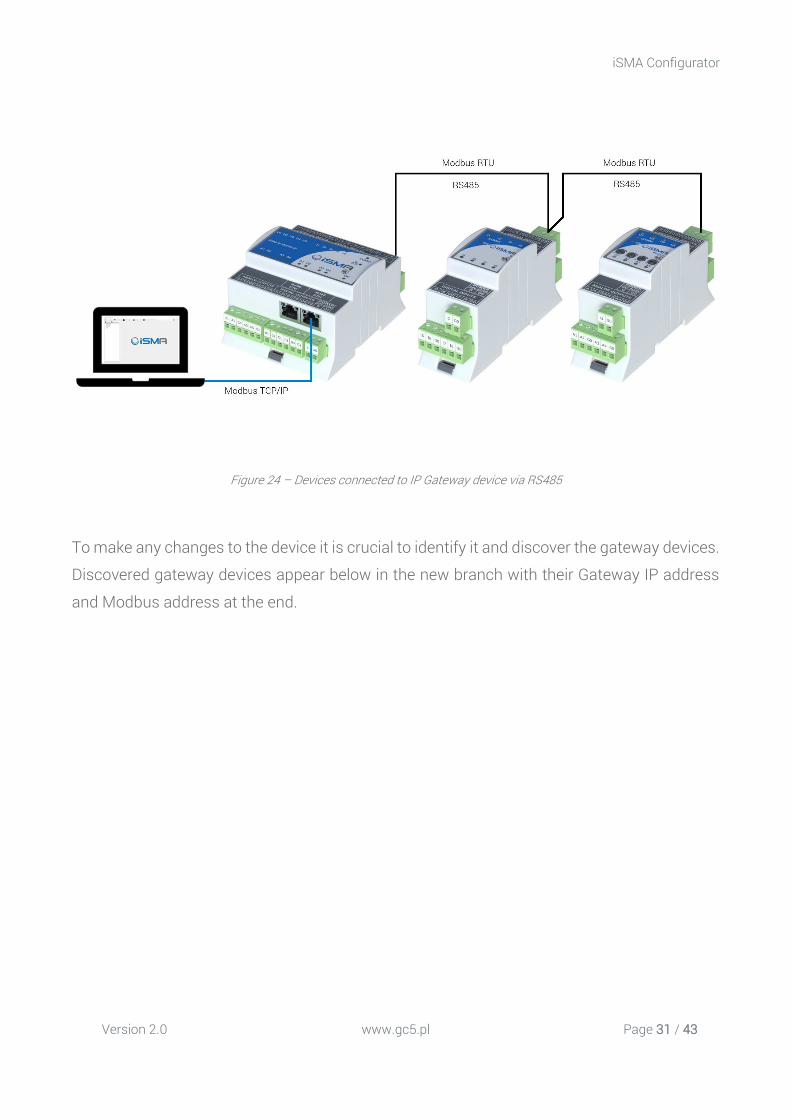
Figure 24 – Devices connected to IP Gateway device via RS485
To make any changes to the device it is crucial to identify it and discover the gateway devices.
Discovered gateway devices appear below in the new branch with their Gateway IP address
and Modbus address at the end.
iSMA Configurator
Version 2.0 www.gc5.pl Page 32 / 43
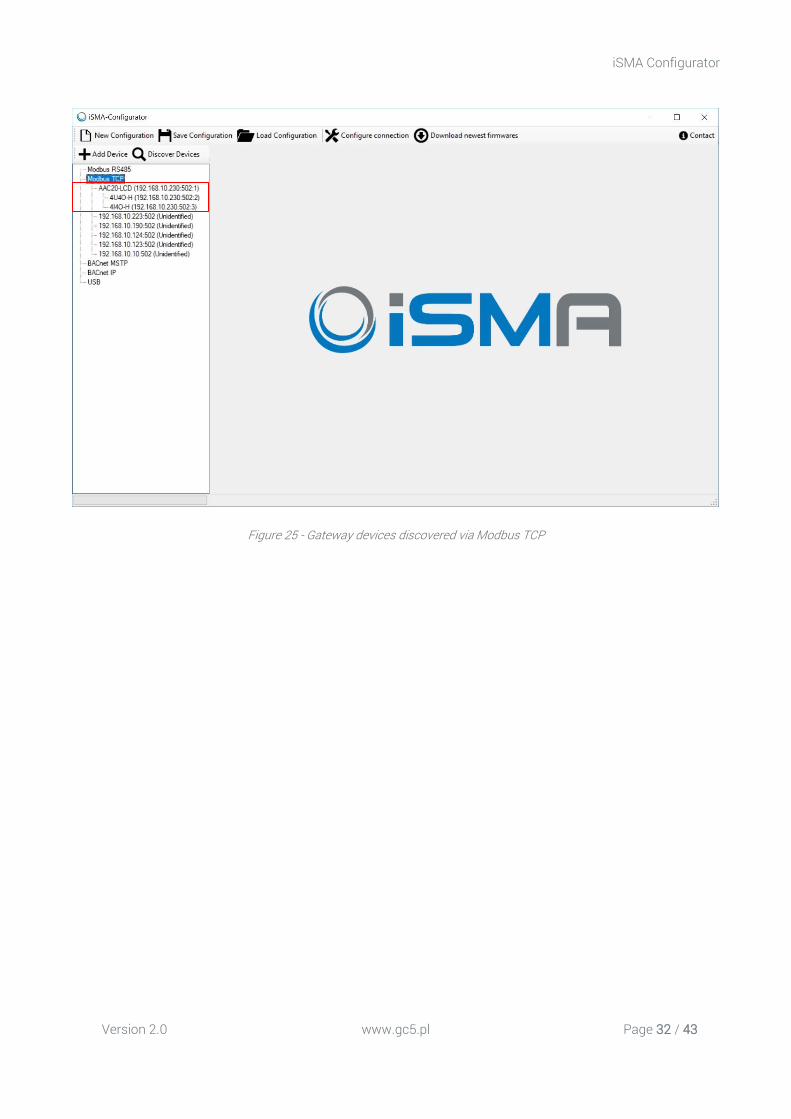
Figure 25 - Gateway devices discovered via Modbus TCP
iSMA Configurator
Version 2.0 www.gc5.pl Page 33 / 43
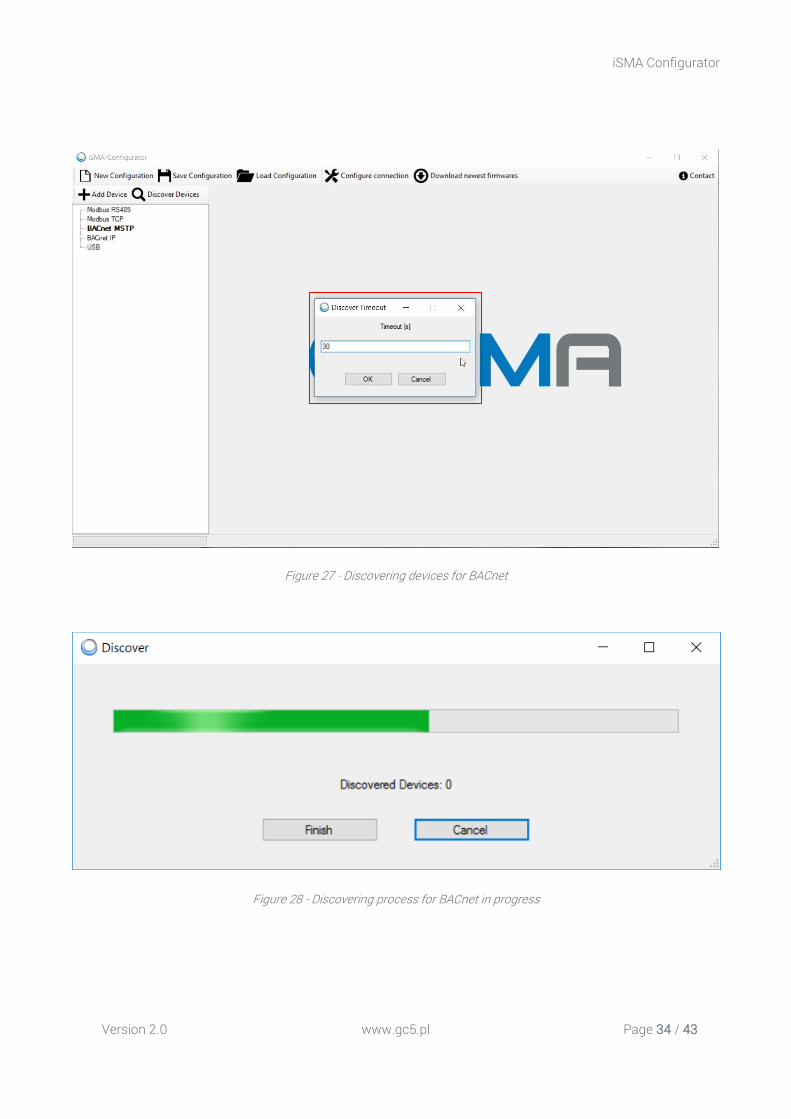
6.4 Discovering Devices for BACnet via RS485
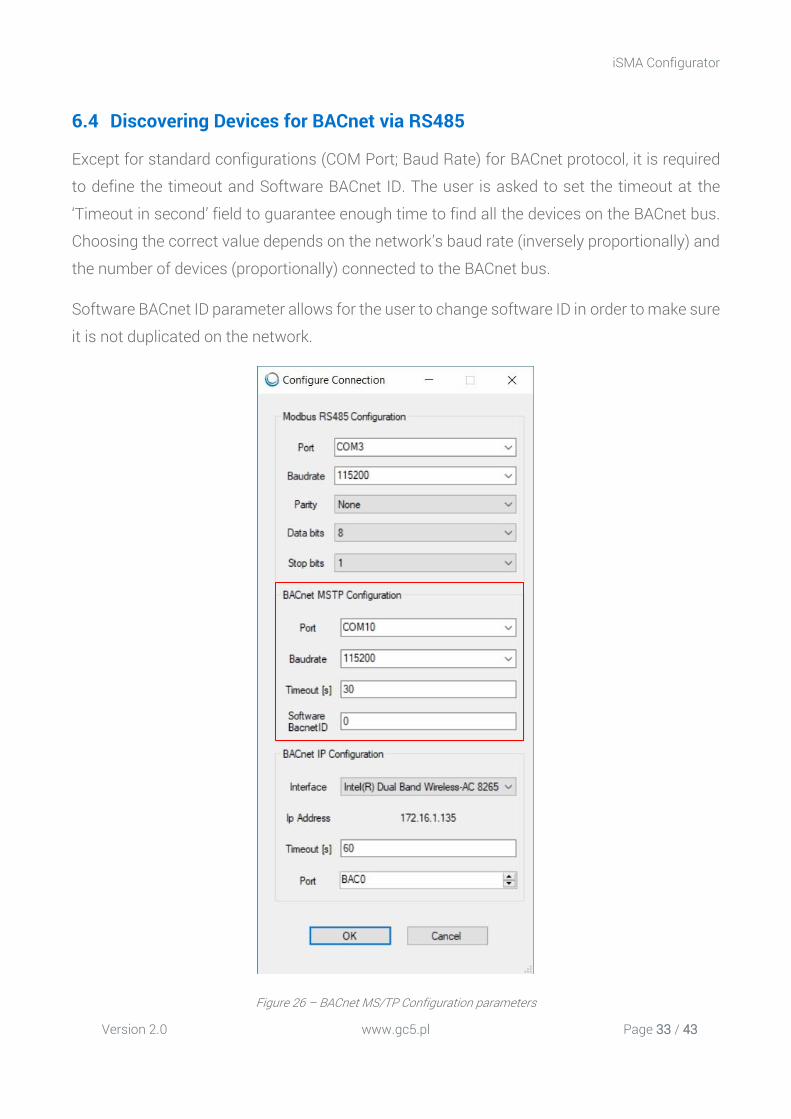
Except for standard configurations (COM Port; Baud Rate) for BACnet protocol, it is required
to define the timeout and Software BACnet ID. The user is asked to set the timeout at the
‘Timeout in second’ field to guarantee enough time to find all the devices on the BACnet bus.
Choosing the correct value depends on the network’s baud rate (inversely proportionally) and
the number of devices (proportionally) connected to the BACnet bus.
Software BACnet ID parameter allows for the user to change software ID in order to make sure
it is not duplicated on the network.
Figure 26 – BACnet MS/TP Configuration parameters
iSMA Configurator
Version 2.0 www.gc5.pl Page 34 / 43
Figure 27 - Discovering devices for BACnet
Figure 28 - Discovering process for BACnet in progress
iSMA Configurator
Version 2.0 www.gc5.pl Page 35 / 43
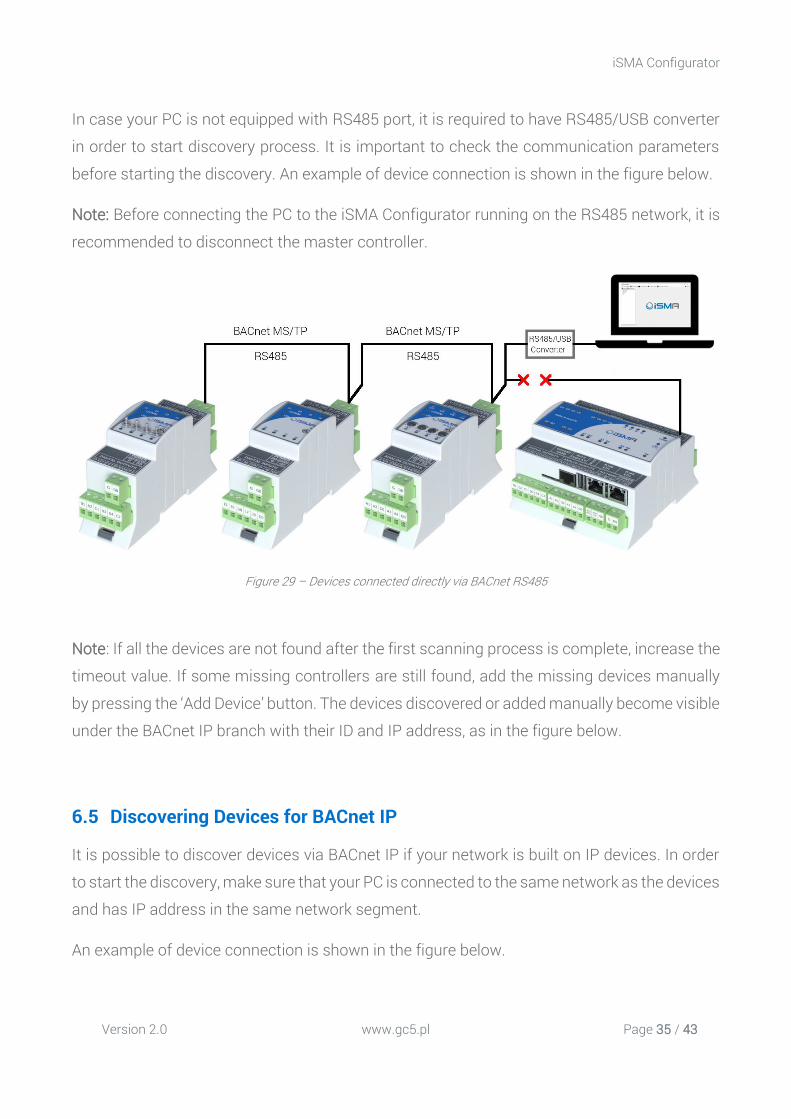
In case your PC is not equipped with RS485 port, it is required to have RS485/USB converter
in order to start discovery process. It is important to check the communication parameters
before starting the discovery. An example of device connection is shown in the figure below.
Note: Before connecting the PC to the iSMA Configurator running on the RS485 network, it is
recommended to disconnect the master controller.
Figure 29 – Devices connected directly via BACnet RS485
Note: If all the devices are not found after the first scanning process is complete, increase the
timeout value. If some missing controllers are still found, add the missing devices manually
by pressing the ‘Add Device’ button. The devices discovered or added manually become visible
under the BACnet IP branch with their ID and IP address, as in the figure below.
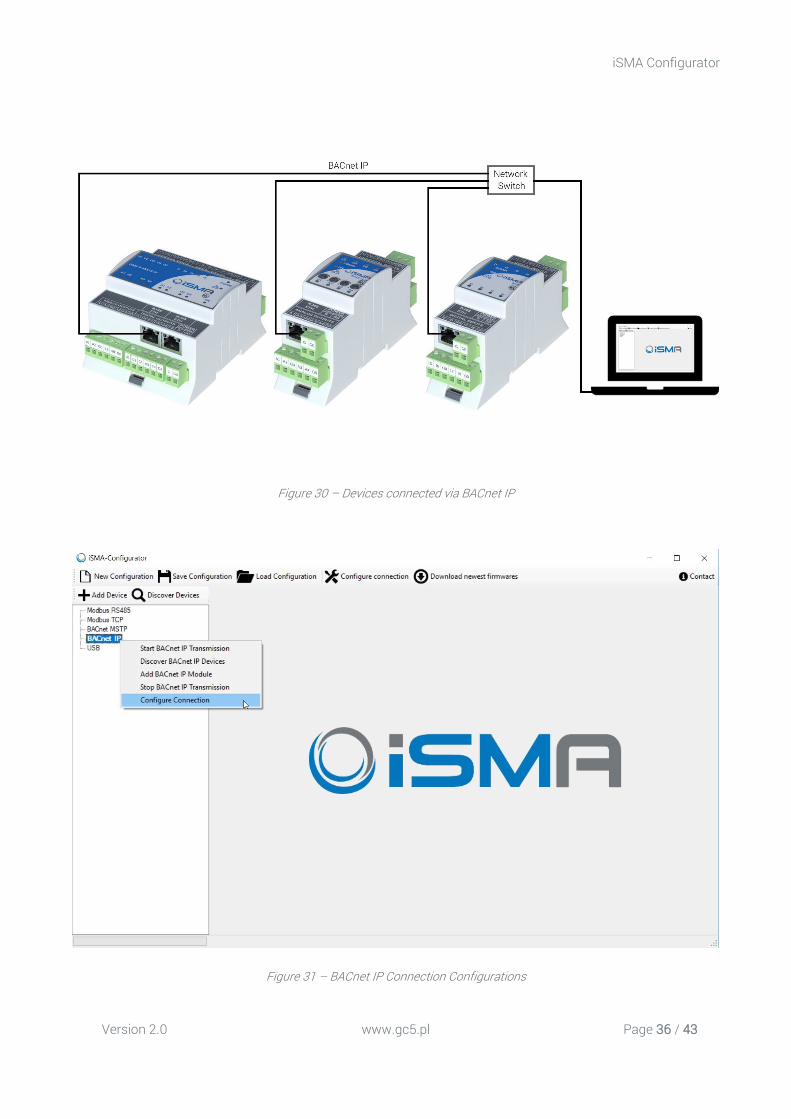
6.5 Discovering Devices for BACnet IP
It is possible to discover devices via BACnet IP if your network is built on IP devices. In order
to start the discovery, make sure that your PC is connected to the same network as the devices
and has IP address in the same network segment.
An example of device connection is shown in the figure below.
iSMA Configurator
Version 2.0 www.gc5.pl Page 36 / 43
Figure 30 – Devices connected via BACnet IP
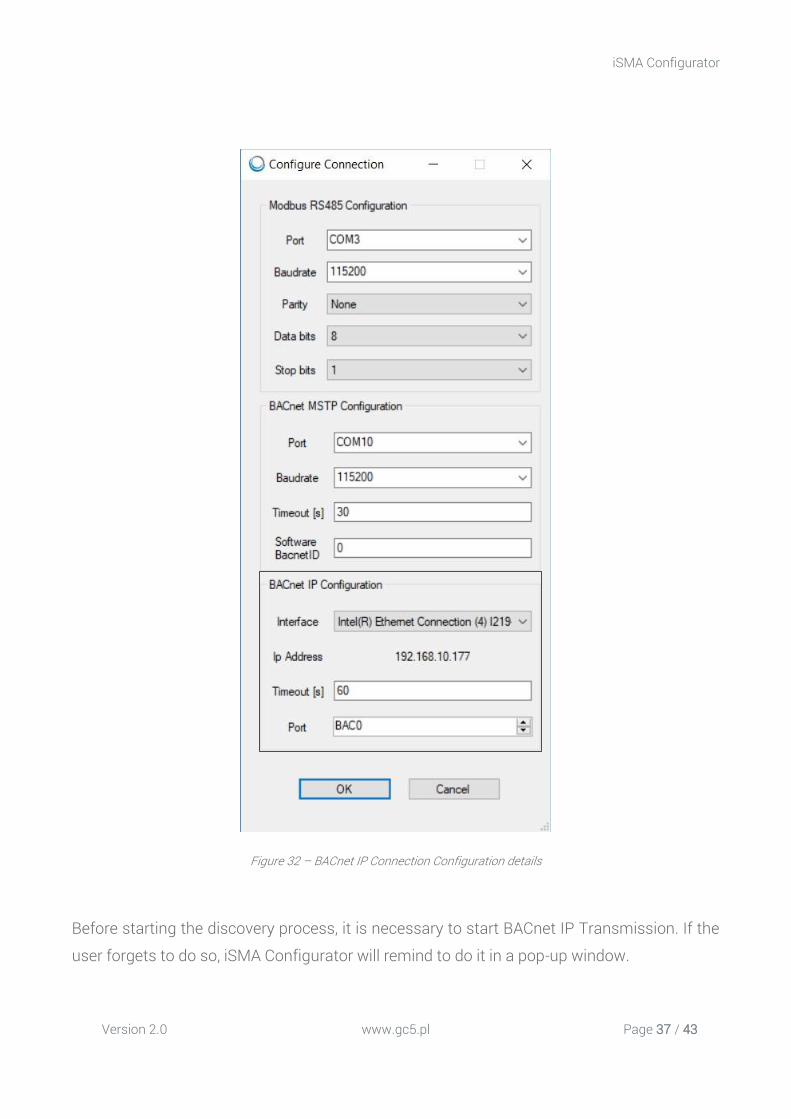
Figure 31 – BACnet IP Connection Configurations
iSMA Configurator
Version 2.0 www.gc5.pl Page 37 / 43
Figure 32 – BACnet IP Connection Configuration details
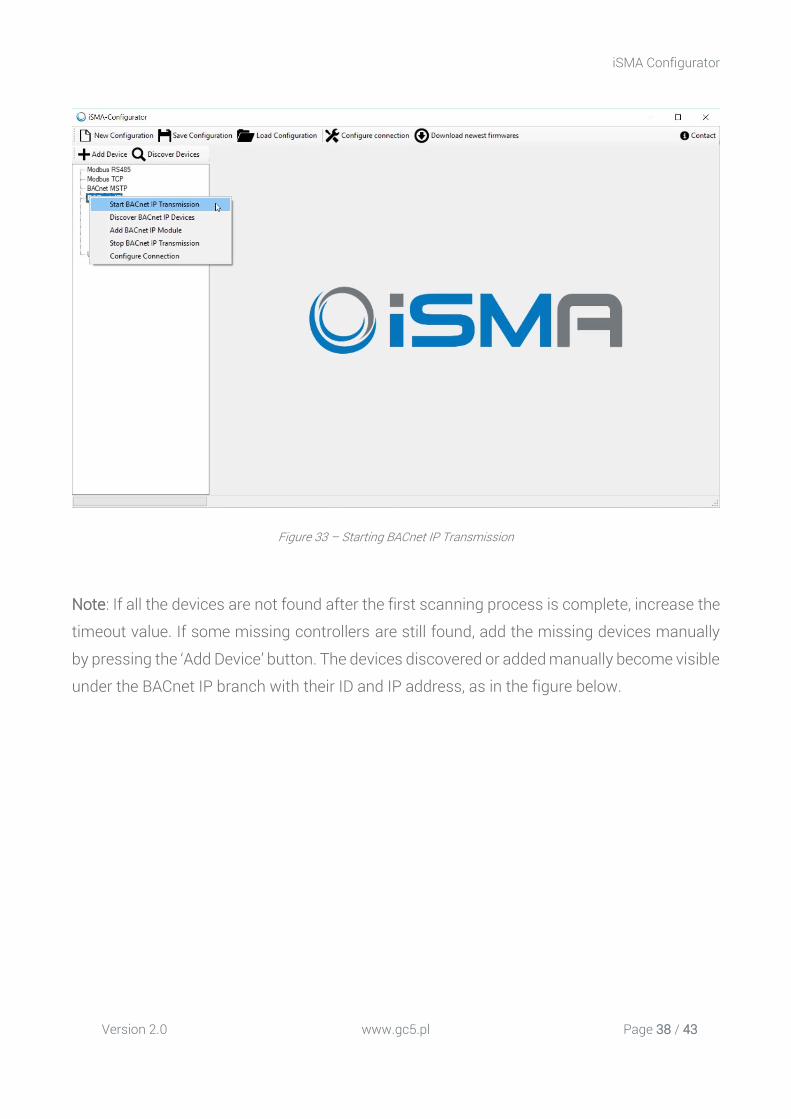
Before starting the discovery process, it is necessary to start BACnet IP Transmission. If the
user forgets to do so, iSMA Configurator will remind to do it in a pop-up window.
iSMA Configurator
Version 2.0 www.gc5.pl Page 38 / 43
Figure 33 – Starting BACnet IP Transmission
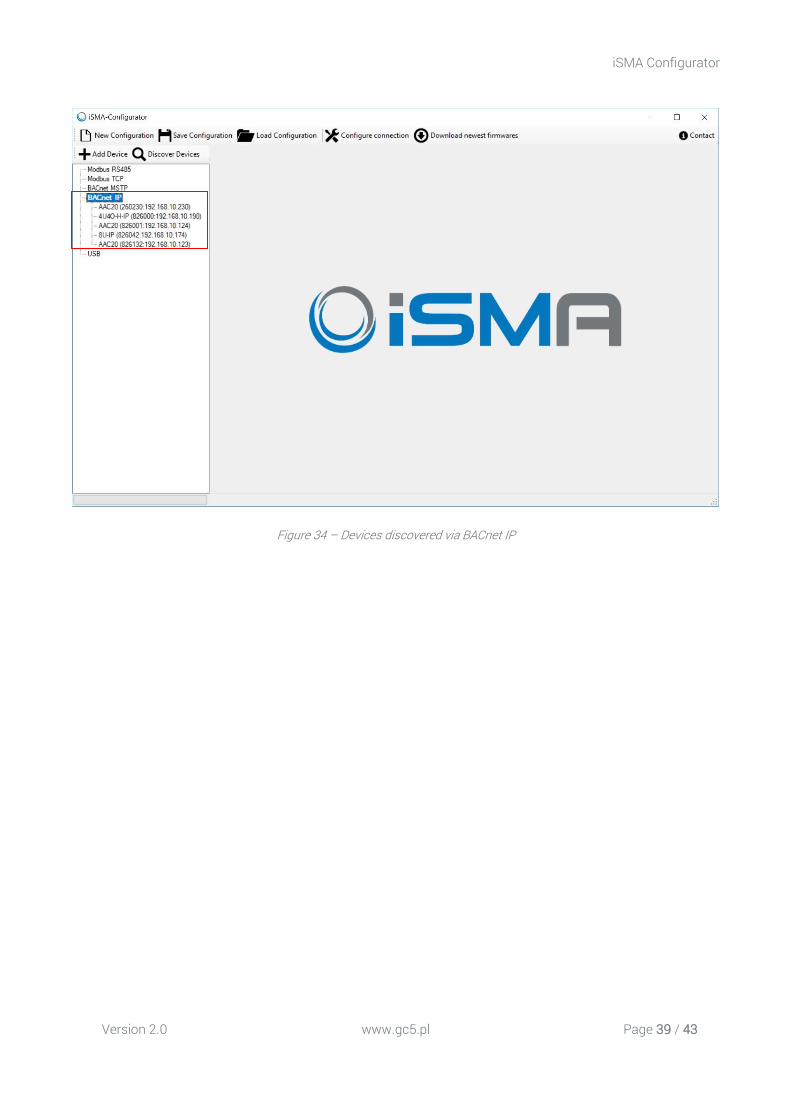
Note: If all the devices are not found after the first scanning process is complete, increase the
timeout value. If some missing controllers are still found, add the missing devices manually
by pressing the ‘Add Device’ button. The devices discovered or added manually become visible
under the BACnet IP branch with their ID and IP address, as in the figure below.
iSMA Configurator
Version 2.0 www.gc5.pl Page 39 / 43
Figure 34 – Devices discovered via BACnet IP
iSMA Configurator
Version 2.0 www.gc5.pl Page 40 / 43
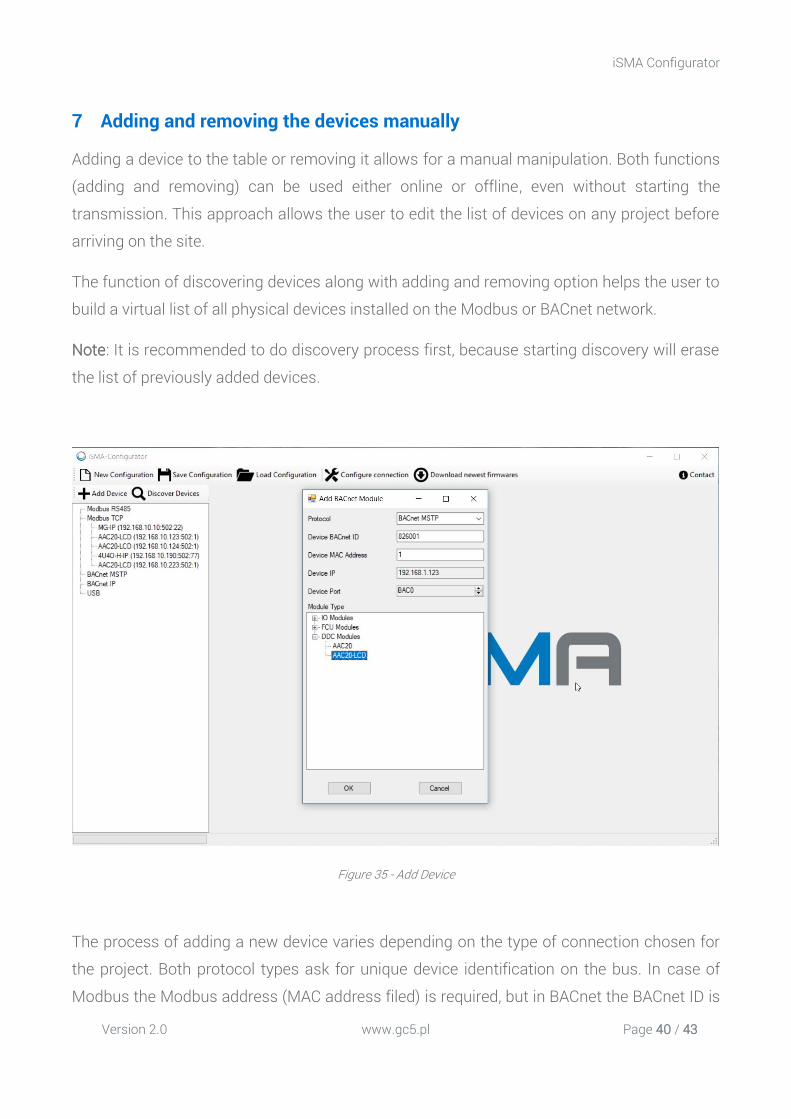
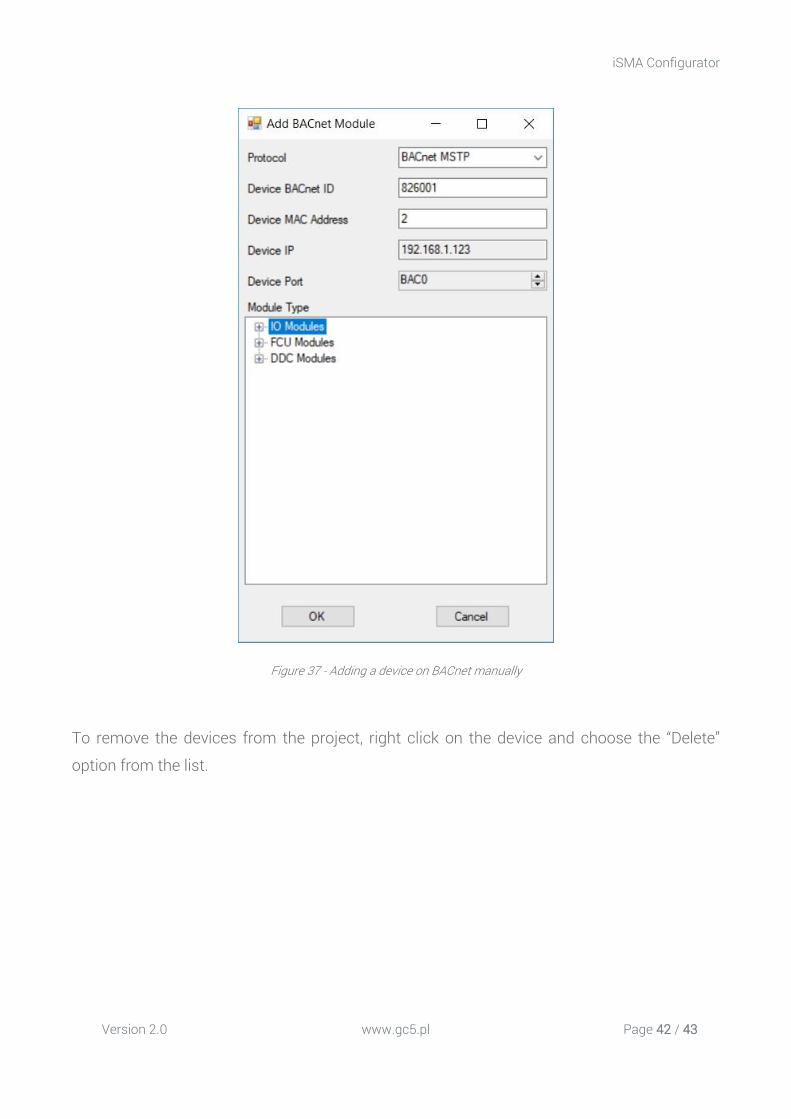
7 Adding and removing the devices manually
Adding a device to the table or removing it allows for a manual manipulation. Both functions
(adding and removing) can be used either online or offline, even without starting the
transmission. This approach allows the user to edit the list of devices on any project before
arriving on the site.
The function of discovering devices along with adding and removing option helps the user to
build a virtual list of all physical devices installed on the Modbus or BACnet network.
Note: It is recommended to do discovery process first, because starting discovery will erase
the list of previously added devices.
Figure 35 - Add Device
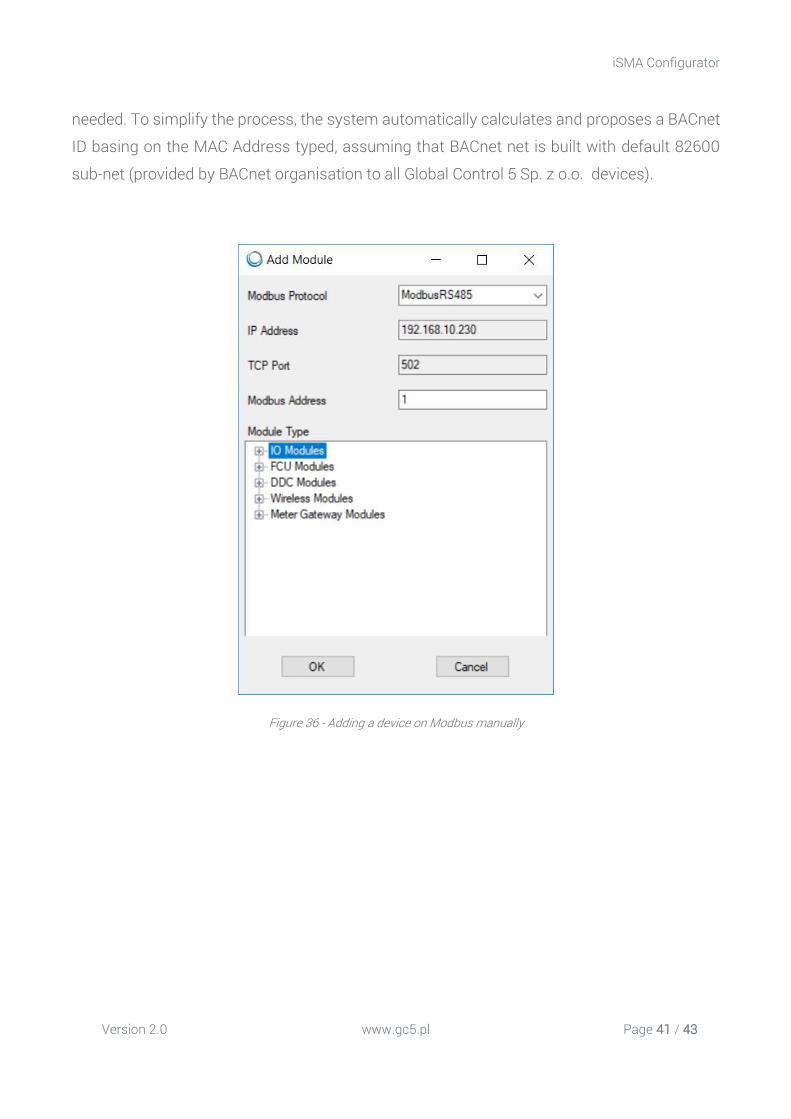
The process of adding a new device varies depending on the type of connection chosen for
the project. Both protocol types ask for unique device identification on the bus. In case of
Modbus the Modbus address (MAC address filed) is required, but in BACnet the BACnet ID is
iSMA Configurator
Version 2.0 www.gc5.pl Page 41 / 43
needed. To simplify the process, the system automatically calculates and proposes a BACnet
ID basing on the MAC Address typed, assuming that BACnet net is built with default 82600
sub-net (provided by BACnet organisation to all Global Control 5 Sp. z o.o. devices).
Figure 36 - Adding a device on Modbus manually
iSMA Configurator
Version 2.0 www.gc5.pl Page 42 / 43
Figure 37 - Adding a device on BACnet manually
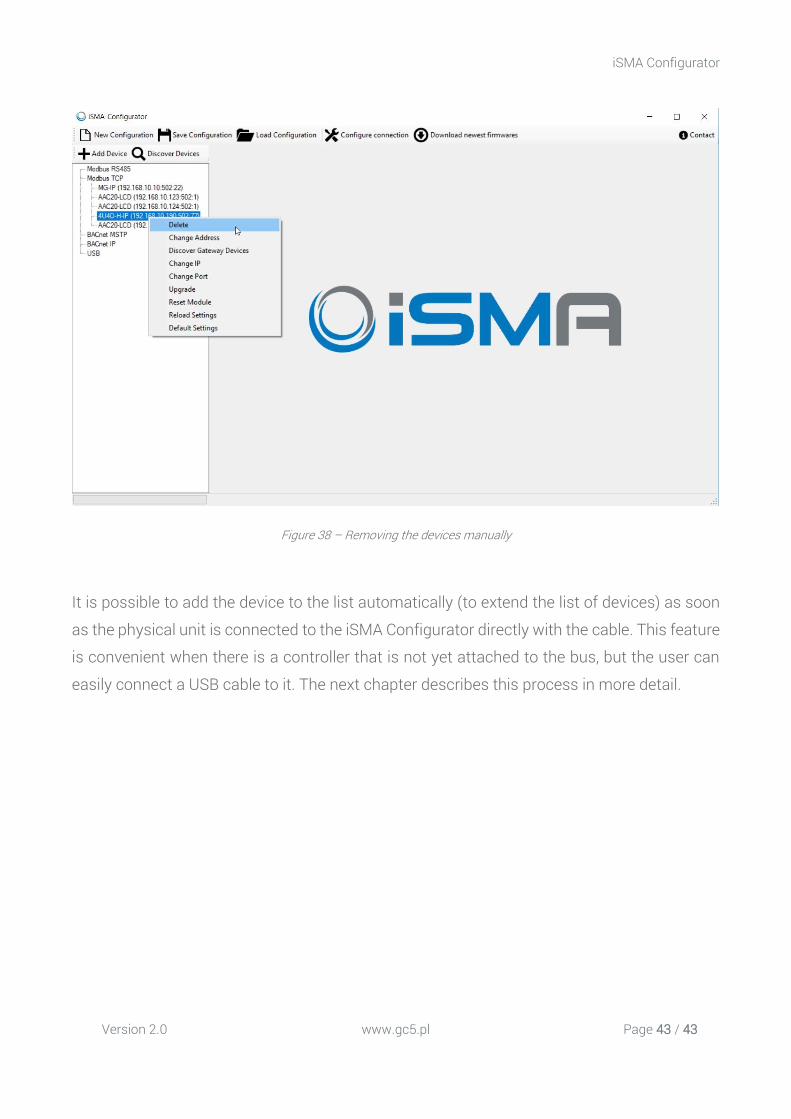
To remove the devices from the project, right click on the device and choose the “Delete”
option from the list.
iSMA Configurator
Version 2.0 www.gc5.pl Page 43 / 43
Figure 38 – Removing the devices manually
It is possible to add the device to the list automatically (to extend the list of devices) as soon
as the physical unit is connected to the iSMA Configurator directly with the cable. This feature
is convenient when there is a controller that is not yet attached to the bus, but the user can
easily connect a USB cable to it. The next chapter describes this process in more detail.