motion sensor light control - lowes holidaypdf.lowes.com/useandcareguides/016963510524_use.pdf ·...
TRANSCRIPT
© 2012 HeathCo LLC 204081-01A
Model SH-5105
Motion SensorLight Control
TEST
2 Shells
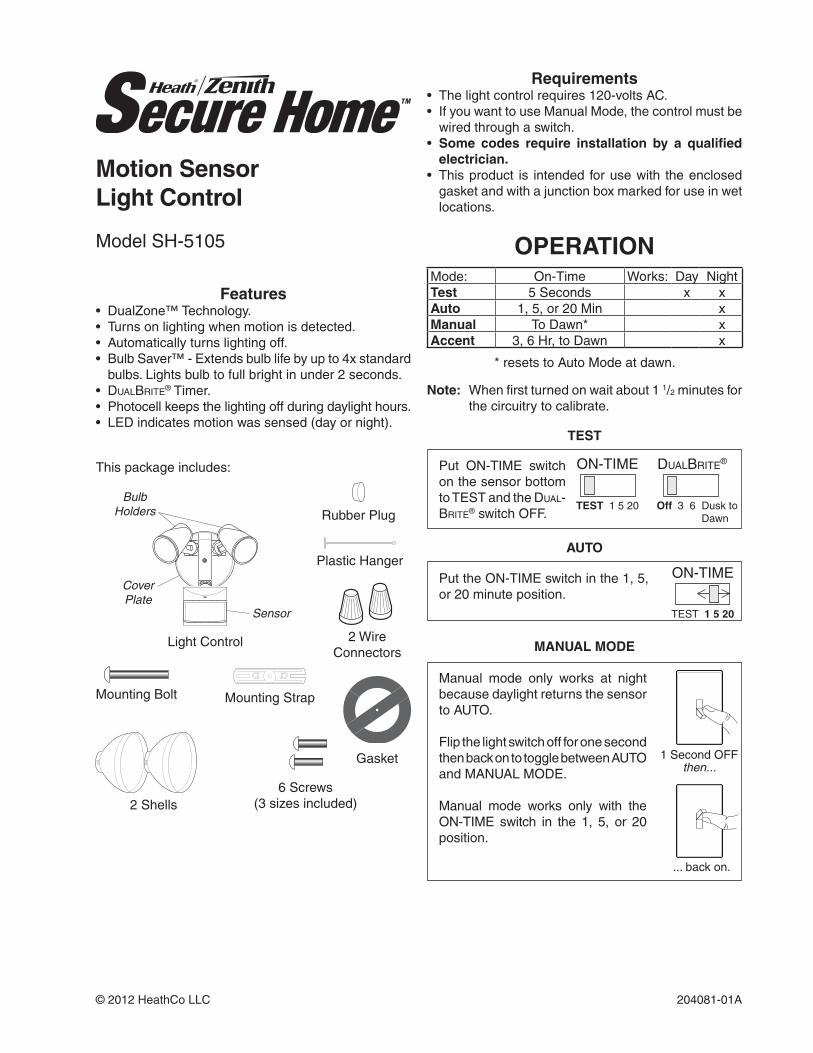
Features• DualZone™Technology.• Turnsonlightingwhenmotionisdetected.• Automaticallyturnslightingoff.• BulbSaver™-Extendsbulblifebyupto4xstandard
bulbs.Lightsbulbtofullbrightinunder2seconds.• DualBrite®Timer.• Photocellkeepsthelightingoffduringdaylighthours.• LEDindicatesmotionwassensed(dayornight).
TEST 1 5 20
ON-TIME
Off 3 6 Duskto Dawn
DualBrite®Put ON-TIME switchonthesensorbottomtoTESTandtheDual-Brite®switchOFF.
OPERATION
*resetstoAutoModeatdawn.
ON-TIME
TEST 1 5 20
...backon.
1SecondOFFthen...
PuttheON-TIMEswitchinthe1,5,or20minuteposition.
Manual mode only works at nightbecausedaylightreturnsthesensortoAUTO.
FlipthelightswitchoffforonesecondthenbackontotogglebetweenAUTOandMANUALMODE.
Manual mode works only with theON-TIME switch in the 1, 5, or 20position.
Note:Whenfirstturnedonwaitabout11/2minutesforthecircuitrytocalibrate.
Thispackageincludes:
LightControl
Sensor
Cover Plate
Bulb Holders
PlasticHanger
RubberPlug
Gasket
6Screws(3sizesincluded)
MountingStrapMountingBolt
2WireConnectors
Requirements• Thelightcontrolrequires120-voltsAC.• IfyouwanttouseManualMode,thecontrolmustbe
wiredthroughaswitch.• Some codes require installation by a qualified
electrician.• Thisproduct is intended forusewith theenclosed
gasketandwithajunctionboxmarkedforuseinwetlocations.
Mode: On-Time Works: Day NightTest 5Seconds x xAuto 1,5,or20Min xManual ToDawn* xAccent 3,6Hr,toDawn x
AUTO
MANUAL MODE
2 204081-01
INSTALLATION
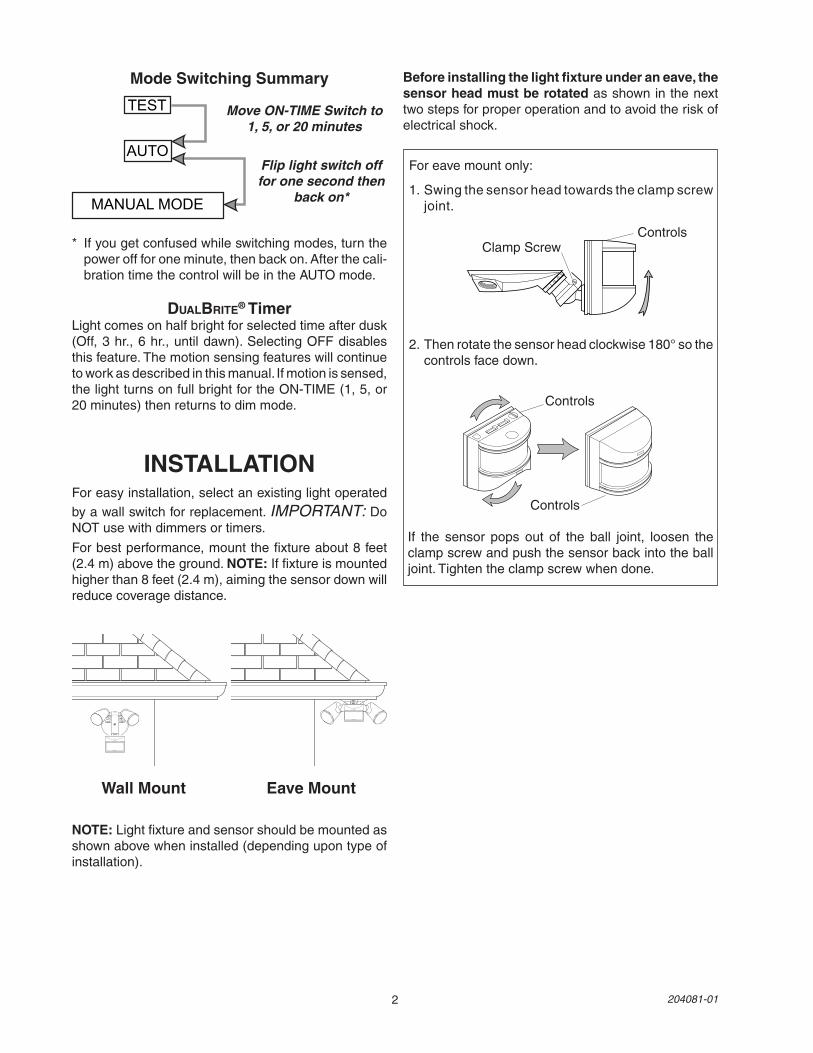
Foreavemountonly:
1.Swingthesensorheadtowardstheclampscrewjoint.
If the sensor pops out of the ball joint, loosen theclampscrewandpushthesensorbackintotheballjoint.Tightentheclampscrewwhendone.
2.Thenrotatethesensorheadclockwise180°sothecontrolsfacedown.
DualBrite® TimerLightcomesonhalfbrightforselectedtimeafterdusk(Off,3hr.,6hr.,untildawn).SelectingOFFdisablesthisfeature.Themotionsensingfeatureswillcontinuetoworkasdescribedinthismanual.Ifmotionissensed,thelightturnsonfullbrightfortheON-TIME(1,5,or20minutes)thenreturnstodimmode.
Move ON-TIME Switch to 1, 5, or 20 minutes
Mode Switching Summary
Flip light switch off for one second then
back on*MANUAL MODE
AUTO
TEST
* Ifyougetconfusedwhileswitchingmodes,turnthepoweroffforoneminute,thenbackon.Afterthecali-brationtimethecontrolwillbeintheAUTOmode.
ControlsClampScrew
Controls
ControlsForeasyinstallation,selectanexistinglightoperatedbyawallswitchforreplacement.IMPORTANT:DoNOTusewithdimmersortimers.
Forbestperformance,mountthefixtureabout8feet(2.4m)abovetheground.NOTE:Iffixtureismountedhigherthan8feet(2.4m),aimingthesensordownwillreducecoveragedistance.
Before installing the light fixture under an eave, the sensor head must be rotatedasshowninthenexttwostepsforproperoperationandtoavoidtheriskofelectricalshock.
NOTE: Lightfixtureandsensorshouldbemountedasshownabovewheninstalled(dependingupontypeofinstallation).
Wall Mount Eave Mount
3204081-01
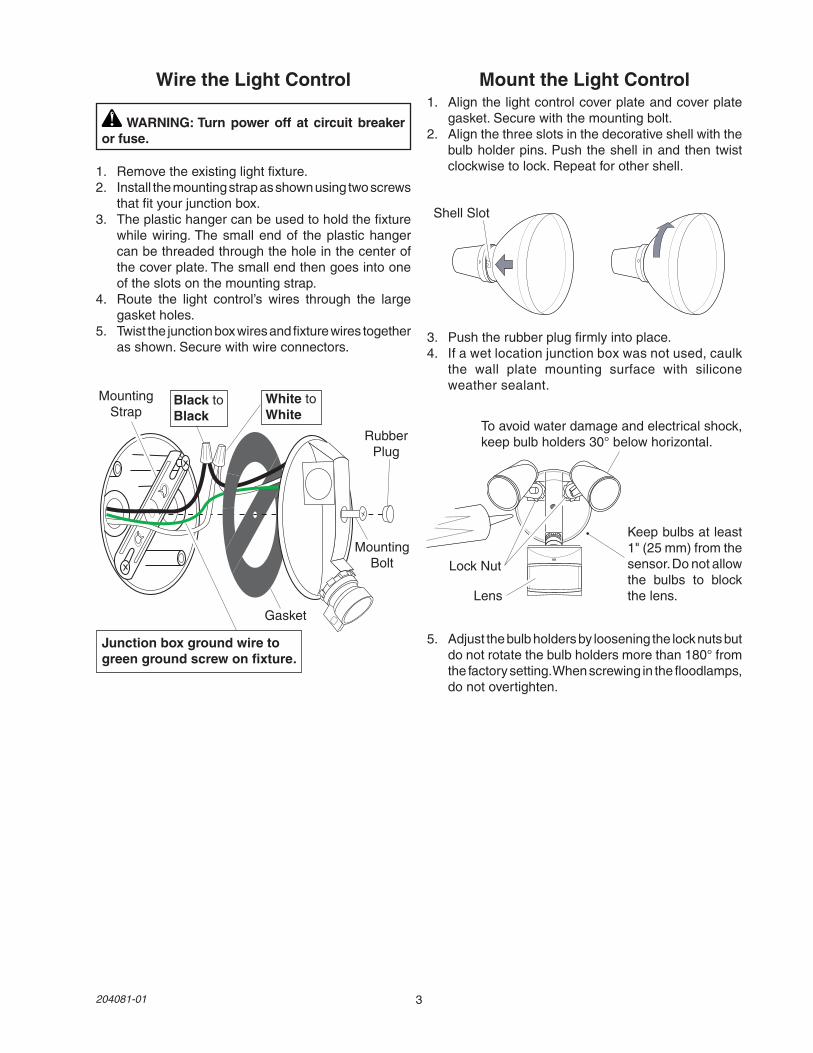
1. Removetheexistinglightfixture.2. Installthemountingstrapasshownusingtwoscrews
thatfityourjunctionbox.3. Theplastichangercanbeusedtoholdthefixture
whilewiring.Thesmallendof theplastichangercanbethreadedthroughtheholeinthecenterofthecoverplate.Thesmallendthengoesintooneoftheslotsonthemountingstrap.
4. Route the light control’s wires through the largegasketholes.
5. Twistthe junctionboxwiresandfixturewirestogetherasshown.Securewithwireconnectors.
White to White
Black to Black
Junction box ground wire to green ground screw on fixture.
Gasket
MountingStrap
MountingBolt
RubberPlug
Mount the Light Control1. Alignthelightcontrolcoverplateandcoverplate
gasket.Securewiththemountingbolt.2. Alignthethreeslotsinthedecorativeshellwiththe
bulbholderpins.Pushtheshell inandthentwistclockwisetolock.Repeatforothershell.
LockNut
Toavoidwaterdamageandelectricalshock,keepbulbholders30°belowhorizontal.
5. Adjustthebulbholdersbylooseningthelocknutsbutdonotrotatethebulbholdersmorethan180°fromthefactorysetting.Whenscrewinginthefloodlamps,donotovertighten.
Keepbulbsatleast1"(25mm)fromthesensor.Donotallowthe bulbs to blockthelens.Lens
3. Pushtherubberplugfirmlyintoplace.4. Ifawetlocationjunctionboxwasnotused,caulk
the wall plate mounting surface with siliconeweathersealant.
Wire the Light Control
WARNING: Turn power off at circuit breaker or fuse.
Shell Slot
4 204081-01
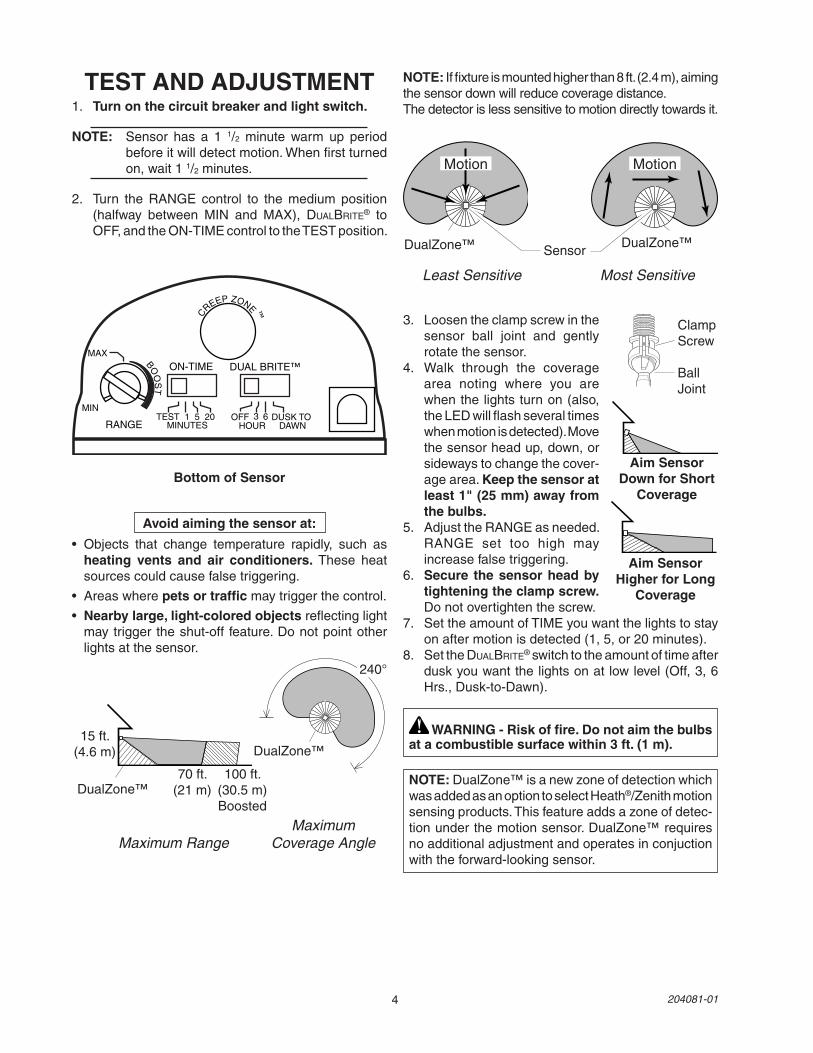
3. Loosentheclampscrewinthesensor ball joint and gentlyrotatethesensor.
4. Walk through the coveragearea noting where you arewhenthelightsturnon(also,theLEDwillflashseveraltimeswhenmotionisdetected).Movethesensorheadup,down,orsidewaystochangethecover-agearea.Keep the sensor at least 1" (25 mm) away from the bulbs.
5. AdjusttheRANGEasneeded.RANGE set too high mayincreasefalsetriggering.
6. Secure the sensor head by tightening the clamp screw. Donotovertightenthescrew.
7. SettheamountofTIMEyouwantthelightstostayonaftermotionisdetected(1,5,or20minutes).
8. SettheDualBrite®switchtotheamountoftimeafterduskyouwantthelightsonatlowlevel(Off,3,6Hrs.,Dusk-to-Dawn).
ClampScrew BallJoint
Aim Sensor Down for Short
Coverage
Aim Sensor Higher for Long
Coverage
WARNING - Risk of fire. Do not aim the bulbs at a combustible surface within 3 ft. (1 m).
Bottom of Sensor
Avoid aiming the sensor at:
•Objects that change temperature rapidly, such asheating vents and air conditioners.These heatsourcescouldcausefalsetriggering.
•Areaswherepets or trafficmaytriggerthecontrol.
•Nearby large, light-colored objectsreflectinglightmaytriggertheshut-off feature.Donotpointotherlightsatthesensor.
MAX
MIN
RANGE
ON-TIME DUAL BRITE™
TEST 1 5 20MINUTES
OFF 3 6 DUSK TODAWNHOUR
C
REEP ZONE ™
BOO
ST
Maximum Maximum Range Coverage Angle
MotionMotion
15ft.(4.6m)
70ft. 100ft. (21m) (30.5m) Boosted
Sensor
240°
Least Sensitive Most Sensitive
NOTE:Iffixtureismountedhigherthan8ft.(2.4m),aimingthesensordownwillreducecoveragedistance.Thedetectorislesssensitivetomotiondirectlytowardsit.
DualZone™
DualZone™
DualZone™ DualZone™
NOTE:DualZone™isanewzoneofdetectionwhichwasaddedasanoptiontoselectHeath®/Zenithmotionsensingproducts.Thisfeatureaddsazoneofdetec-tionunderthemotionsensor.DualZone™requiresnoadditionaladjustmentandoperatesinconjuctionwiththeforward-lookingsensor.
TEST AND ADJUSTMENT1. Turn on the circuit breaker and light switch.
NOTE: Sensor has a 1 1/2 minute warm up periodbeforeitwilldetectmotion.Whenfirstturnedon,wait11/2minutes.
2. Turn the RANGE control to the medium position(halfway between MIN and MAX), DualBrite® to OFF,andtheON-TIMEcontroltotheTESTposition.
5204081-01
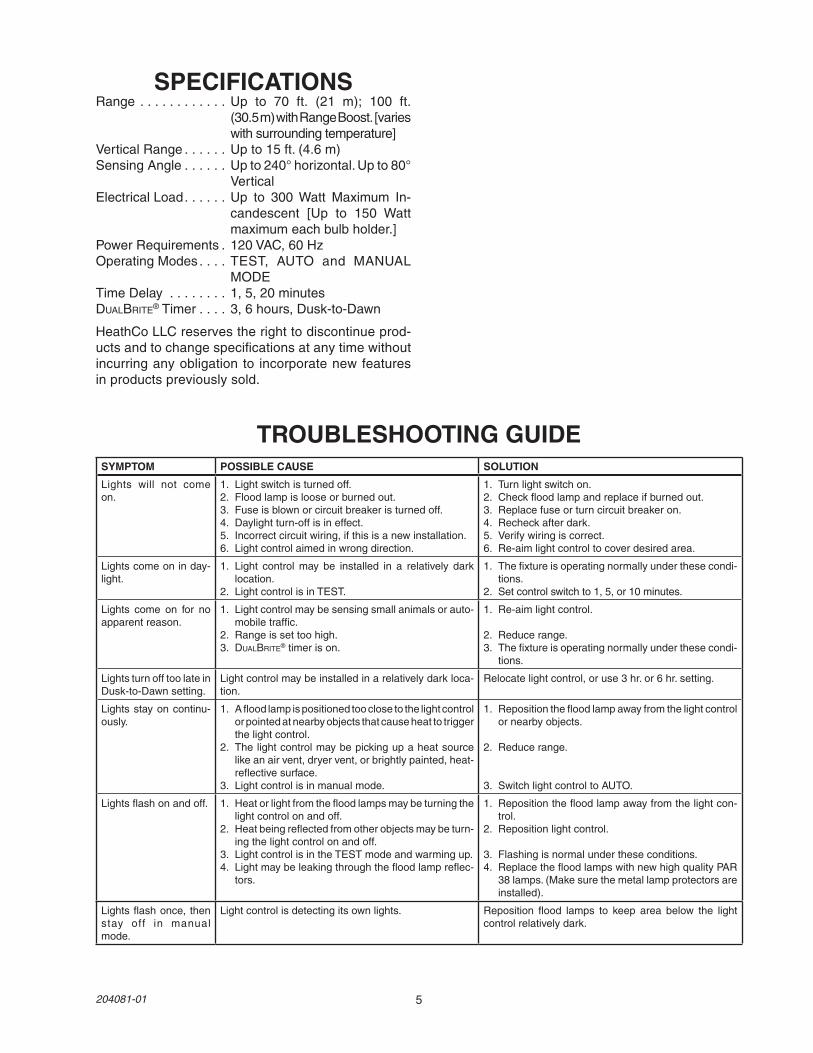
SPECIFICATIONSRange............Up to 70 ft. (21 m); 100 ft.
(30.5m)withRangeBoost.[varieswithsurroundingtemperature]
VerticalRange......Upto15ft.(4.6m)SensingAngle......Upto240°horizontal.Upto80°
VerticalElectricalLoad......Up to 300 Watt Maximum In-
candescent [Up to 150 Wattmaximumeachbulbholder.]
PowerRequirements.120VAC,60HzOperatingModes....TEST, AUTO and MANUAL
MODETimeDelay ........1,5,20minutesDualBrite®Timer....3,6hours,Dusk-to-Dawn
HeathCoLLCreservestherighttodiscontinueprod-uctsandtochangespecificationsatanytimewithoutincurringanyobligationto incorporatenewfeaturesinproductspreviouslysold.
TROUBLESHOOTING GUIDESYMPTOM POSSIBLE CAUSE SOLUTION
Lights will not comeon.
1. Lightswitchisturnedoff.2. Floodlampislooseorburnedout.3. Fuseisblownorcircuitbreakeristurnedoff.4. Daylightturn-offisineffect.5. Incorrectcircuitwiring,ifthisisanewinstallation.6. Lightcontrolaimedinwrongdirection.
1. Turnlightswitchon.2. Checkfloodlampandreplaceifburnedout.3. Replacefuseorturncircuitbreakeron.4. Recheckafterdark.5. Verifywiringiscorrect.6. Re-aimlightcontroltocoverdesiredarea.
Lightscomeoninday-light.
1. Light control may be installed in a relatively darklocation.
2. LightcontrolisinTEST.
1. Thefixtureisoperatingnormallyunderthesecondi-tions.
2. Setcontrolswitchto1,5,or10minutes.
Lights come on for noapparentreason.
1. Lightcontrolmaybesensingsmallanimalsorauto-mobiletraffic.
2. Rangeissettoohigh.3. DualBrite®timerison.
1. Re-aimlightcontrol.
2. Reducerange.3. Thefixtureisoperatingnormallyunderthesecondi-
tions.
LightsturnofftoolateinDusk-to-Dawnsetting.
Lightcontrolmaybeinstalledinarelativelydarkloca-tion.
Relocatelightcontrol,oruse3hr.or6hr.setting.
Lightsstayoncontinu-ously.
1. Afloodlampispositionedtooclosetothelightcontrolorpointedatnearbyobjectsthatcauseheattotriggerthelightcontrol.
2. Thelightcontrolmaybepickingupaheatsourcelikeanairvent,dryervent,orbrightlypainted,heat-reflectivesurface.
3. Lightcontrolisinmanualmode.
1. Repositionthefloodlampawayfromthelightcontrolornearbyobjects.
2. Reducerange.
3. SwitchlightcontroltoAUTO.
Lightsflashonandoff. 1. Heatorlightfromthefloodlampsmaybeturningthelightcontrolonandoff.
2. Heatbeingreflectedfromotherobjectsmaybeturn-ingthelightcontrolonandoff.
3. LightcontrolisintheTESTmodeandwarmingup.4. Lightmaybeleakingthroughthefloodlampreflec-
tors.
1. Repositionthefloodlampawayfromthelightcon-trol.
2. Repositionlightcontrol.
3. Flashingisnormalundertheseconditions.4. ReplacethefloodlampswithnewhighqualityPAR
38lamps.(Makesurethemetallampprotectorsareinstalled).
Lightsflashonce, thenstay off in manualmode.
Lightcontrolisdetectingitsownlights. Reposition flood lamps to keep area below the lightcontrolrelativelydark.
6 204081-01
TWO YEAR LIMITED WARRANTYThisisa“LimitedWarranty”whichgivesyouspecificlegalrights.Youmayalsohaveotherrightswhichvaryfromstatetostateorprovincetoprovince.Foraperiodoftwoyearsfromthedateofpurchase,anymalfunctioncausedbyfactorydefectivepartsorworkmanshipwillbecorrectedatnochargetoyou.Not Covered -Repairservice,adjustmentandcalibrationduetomisuse,abuseornegligence,lightbulbs,batteries,andotherexpendableitemsarenotcoveredbythiswarranty.Unauthorizedserviceormodifica-tionoftheproductorofanyfurnishedcomponentwillvoidthiswarrantyinitsentirety.Thiswarrantydoesnotincludereimbursementforinconvenience,installation,setuptime,lossofuse,unauthorizedservice,orreturnshippingcharges.ThiswarrantycoversonlyHeathCoLLCassembledproductsandisnotextendedtootherequipmentandcomponentsthatacustomerusesinconjunctionwithourproducts.THIS WARRANTY IS EXPRESSLY IN LIEU OF ALL OTHER WARRANTIES, EXPRESS OR IMPLIED,INCLUDINGANYWARRANTY,REPRESENTATIONORCONDITIONOFMERCHANTABILITYORTHATTHEPRODUCTSAREFITFORANYPARTICULARPURPOSEORUSE,ANDSPECIFICALLYINLIEUOFALLSPECIAL,INDIRECT,INCIDENTAL,ORCONSEQUENTIALDAMAGES.REPAIRORREPLACEMENTSHALLBETHESOLEREMEDYOFTHECUSTOMERANDTHERESHALLBENOLIABILITYONTHEPARTOFHEATHCOLLCFORANYSPECIAL,INDIRECT,INCIDENTAL,ORCONSEQUENTIALDAMAGES,INCLUDINGBUTNOTLIMITEDTOANYLOSSOFBUSINESSORPROF-ITS,WHETHERORNOTFORESEEABLE.Somestatesorprovincesdonotallowtheexclusionorlimitationofincidentalorconsequentialdamages,sotheabovelimitationorexclusionmaynotapplytoyou.Please keep your dated sales receipt, it is required for all warranty requests.
TECHNICAL SERVICEPlease call 1-800-858-8501 (English speaking only) for assistance before returning
product to store.Ifyouexperienceaproblem,followthisguide.YoumayalsowanttovisitourWebsiteat:www.hzsupport.com. Iftheproblempersists,call*forassistanceat1-800-858-8501(Englishspeakingonly),8:00AMto5:00PMCST(M-F).Youmayalsowrite*to:HeathCo LLCP.O.Box90045BowlingGreen,KY42102-9045ATTN:TechnicalService*IfcontactingTechnicalService,pleasehavethefollowinginformationavailable:ModelNumber,DateofPur-chase,andPlaceofPurchase.
No Service Parts Available for this ProductPlease keep your dated sales receipt, it is required for all warranty requests.
7204081-01© 2012 HeathCo LLC 204081-01 S
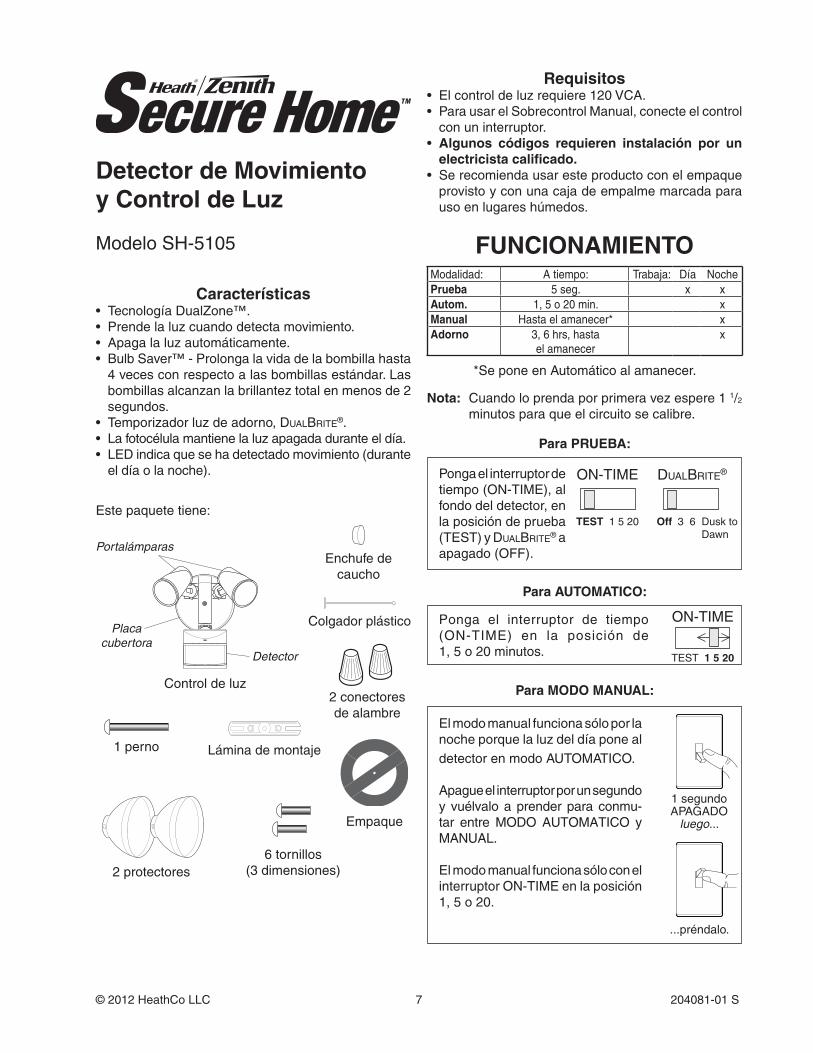
FUNCIONAMIENTOModalidad: Atiempo: Trabaja: Día NochePrueba 5seg. x xAutom. 1,5o20min. xManual Hastaelamanecer* xAdorno 3,6hrs,hasta
elamanecerx
Modelo SH-5105
Detector de Movimientoy Control de Luz
Para PRUEBA:
2protectores
Características• TecnologíaDualZone™.• Prendelaluzcuandodetectamovimiento.• Apagalaluzautomáticamente.• BulbSaver™-Prolongalavidadelabombillahasta
4vecesconrespectoalasbombillasestándar.Lasbombillasalcanzanlabrillanteztotalenmenosde2segundos.
• Temporizadorluzdeadorno,DualBrite®.• Lafotocélulamantienelaluzapagadaduranteeldía.• LEDindicaquesehadetectadomovimiento(durante
eldíaolanoche).
TEST 1 5 20
ON-TIME
Off 3 6 Duskto Dawn
DualBrite®Pongaelinterruptordetiempo(ON-TIME),alfondodeldetector,enlaposicióndeprueba(TEST)yDualBrite® a apagado(OFF).
*SeponeenAutomáticoalamanecer.
ON-TIME
TEST 1 5 20
...préndalo.
1segundoAPAGADO
luego...
Ponga el interruptor de tiempo (ON-TIME) en la posición de 1,5o20minutos.
ElmodomanualfuncionasóloporlanocheporquelaluzdeldíaponealdetectorenmodoAUTOMATICO. Apagueelinterruptorporunsegundoyvuélvaloaprenderparaconmu-tar entre MODO AUTOMATICO yMANUAL.
ElmodomanualfuncionasóloconelinterruptorON-TIMEenlaposición 1,5o20.
Nota:Cuandoloprendaporprimeravezespere11/2 minutosparaqueelcircuitosecalibre.
Estepaquetetiene:
Controldeluz
Detector
Placa cubertora
Portalámparas
Colgadorplástico
Enchufedecaucho
Empaque
6tornillos(3dimensiones)
Láminademontaje1perno
2conectoresdealambre
Requisitos• Elcontroldeluzrequiere120VCA.• ParausarelSobrecontrolManual,conecteelcontrol
conuninterruptor.• Algunos códigos requieren instalación por un
electricista calificado.• Serecomiendausaresteproductoconelempaque
provistoyconunacajadeempalmemarcadaparausoenlugareshúmedos.
Para AUTOMATICO:
Para MODO MANUAL:
8 204081-01
Mueva el interruptor de tiempo (ON-TIME) a 1, 5
o 20 minutos
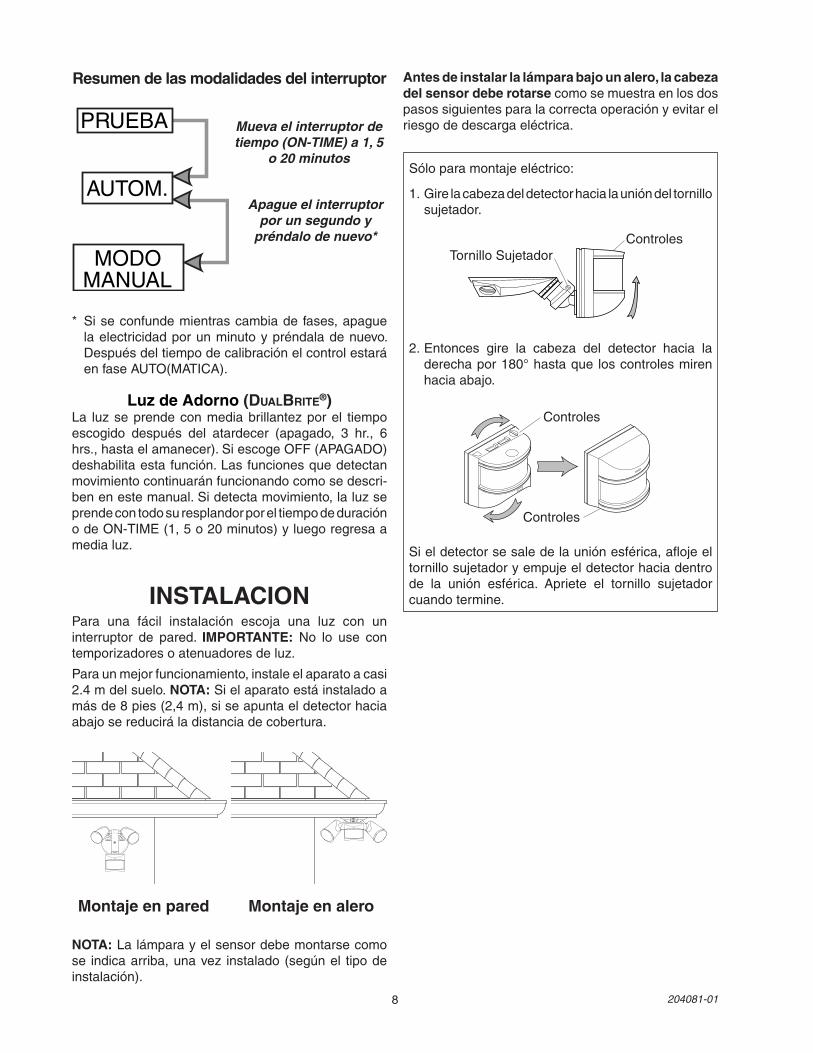
Resumen de las modalidades del interruptor
Apague el interruptor por un segundo y
préndalo de nuevo*
PRUEBA
AUTOM.
MODOMANUAL
* Siseconfundemientrascambiadefases,apaguelaelectricidadporunminutoypréndaladenuevo.DespuésdeltiempodecalibraciónelcontrolestaráenfaseAUTO(MATICA).
Luz de Adorno (DualBrite®)La luzseprendeconmediabrillantezporel tiempoescogido después del atardecer (apagado, 3 hr., 6hrs.,hastaelamanecer).SiescogeOFF(APAGADO)deshabilitaestafunción.Lasfuncionesquedetectanmovimientocontinuaránfuncionandocomosedescri-benenestemanual.Sidetectamovimiento,laluzseprendecontodosuresplandorporeltiempodeduraciónodeON-TIME(1,5o20minutos)yluegoregresaamedialuz.
INSTALACION
Sóloparamontajeeléctrico:
1.Girelacabezadeldetectorhacialaunióndeltornillosujetador.
Sieldetectorsesaledelauniónesférica,aflojeeltornillosujetadoryempujeeldetectorhaciadentrode la unión esférica. Apriete el tornillo sujetadorcuandotermine.
2. Entonces gire la cabeza del detector hacia laderechapor180°hastaqueloscontrolesmirenhaciaabajo.
Controles
Controles
Controles
TornilloSujetador
Para una fácil instalación escoja una luz con uninterruptor de pared. IMPORTANTE: No lo use contemporizadoresoatenuadoresdeluz.
Paraunmejorfuncionamiento,instaleelaparatoacasi2.4mdelsuelo. NOTA:Sielaparatoestáinstaladoamásde8pies(2,4m),siseapuntaeldetectorhaciaabajosereduciráladistanciadecobertura.
Montaje en pared Montaje en alero
NOTA:Lalámparayelsensordebemontarsecomose indicaarriba,unavez instalado(segúnel tipodeinstalación).
Antes de instalar la lámpara bajo un alero, la cabeza del sensor debe rotarsecomosemuestraenlosdospasossiguientesparalacorrectaoperaciónyevitarelriesgodedescargaeléctrica.
9204081-01
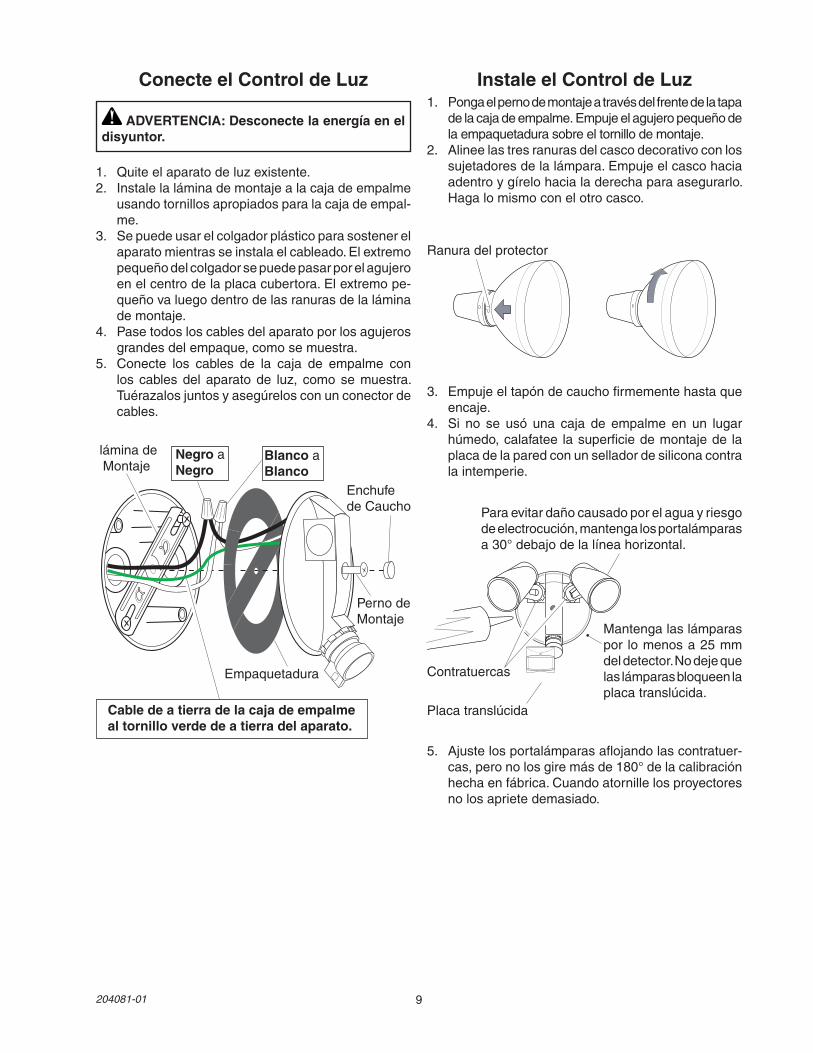
Blanco a Blanco
Negro a Negro
Cable de a tierra de la caja de empalme al tornillo verde de a tierra del aparato.
Empaquetadura
láminadeMontaje
PernodeMontaje
EnchufedeCaucho
1. Quiteelaparatodeluzexistente.2. Instalelaláminademontajealacajadeempalme
usandotornillosapropiadosparalacajadeempal-me.
3. Sepuedeusarelcolgadorplásticoparasostenerelaparatomientrasseinstalaelcableado.Elextremopequeñodelcolgadorsepuedepasarporelagujeroenelcentrodelaplacacubertora.Elextremope-queñovaluegodentrodelasranurasdelaláminademontaje.
4. Pasetodosloscablesdelaparatoporlosagujerosgrandesdelempaque,comosemuestra.
5. Conecte los cables de la caja de empalme conlos cablesdel aparatode luz, comosemuestra.Tuérazalosjuntosyasegúrelosconunconectordecables.
Conecte el Control de Luz
ADVERTENCIA: Desconecte la energía en el disyuntor.
Instale el Control de Luz1. Pongaelpernodemontajeatravésdelfrentedelatapa
delacajadeempalme.Empujeelagujeropequeñodelaempaquetadurasobreeltornillodemontaje.
2. Alineelastresranurasdelcascodecorativoconlossujetadoresdelalámpara.Empujeelcascohaciaadentroygírelohacialaderechaparaasegurarlo.Hagalomismoconelotrocasco.
Contratuercas
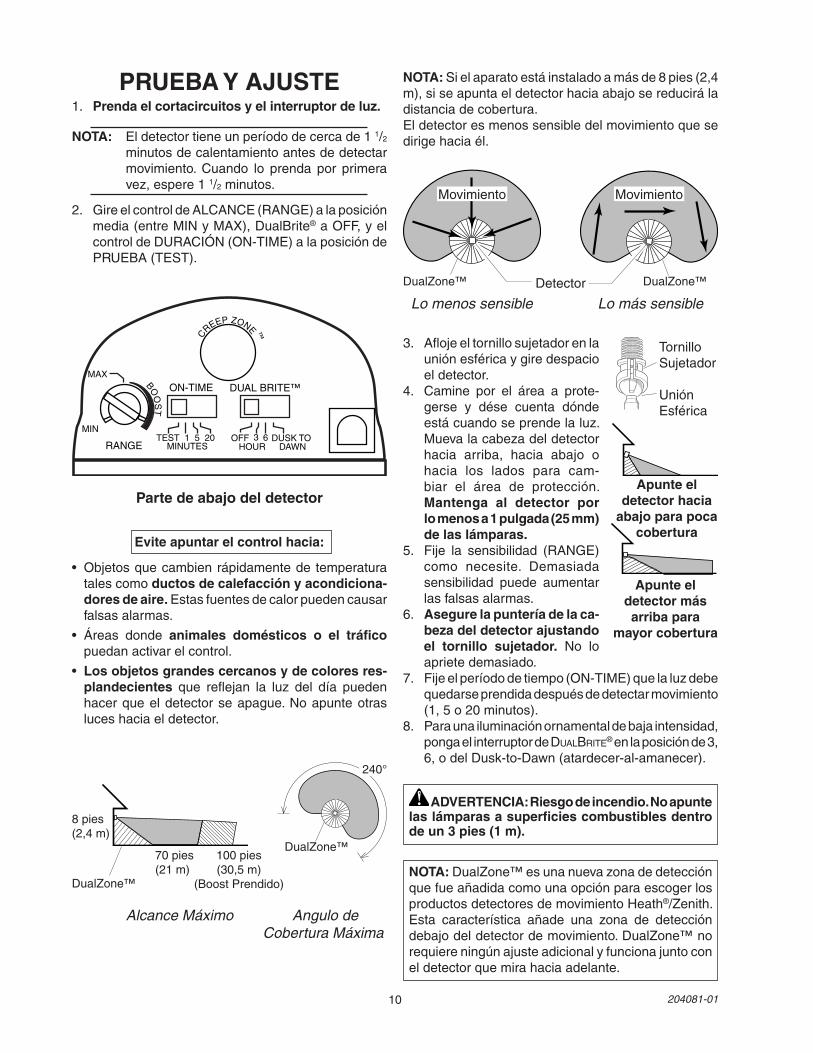
Paraevitardañocausadoporelaguayriesgodeelectrocución,mantengalosportalámparasa30°debajodelalíneahorizontal.
5. Ajustelosportalámparasaflojandolascontratuer-cas,peronolosgiremásde180°delacalibraciónhechaenfábrica.Cuandoatornillelosproyectoresnolosaprietedemasiado.
Mantengalaslámparaspor lomenosa25mmdeldetector.Nodejequelaslámparasbloqueenlaplacatranslúcida.
Placatranslúcida
3. Empujeeltapóndecauchofirmementehastaqueencaje.
4. Si no se usó una caja de empalme en un lugarhúmedo,calafatee lasuperficiedemontajede laplacadelaparedconunselladordesiliconacontralaintemperie.
Ranuradelprotector
10 204081-01
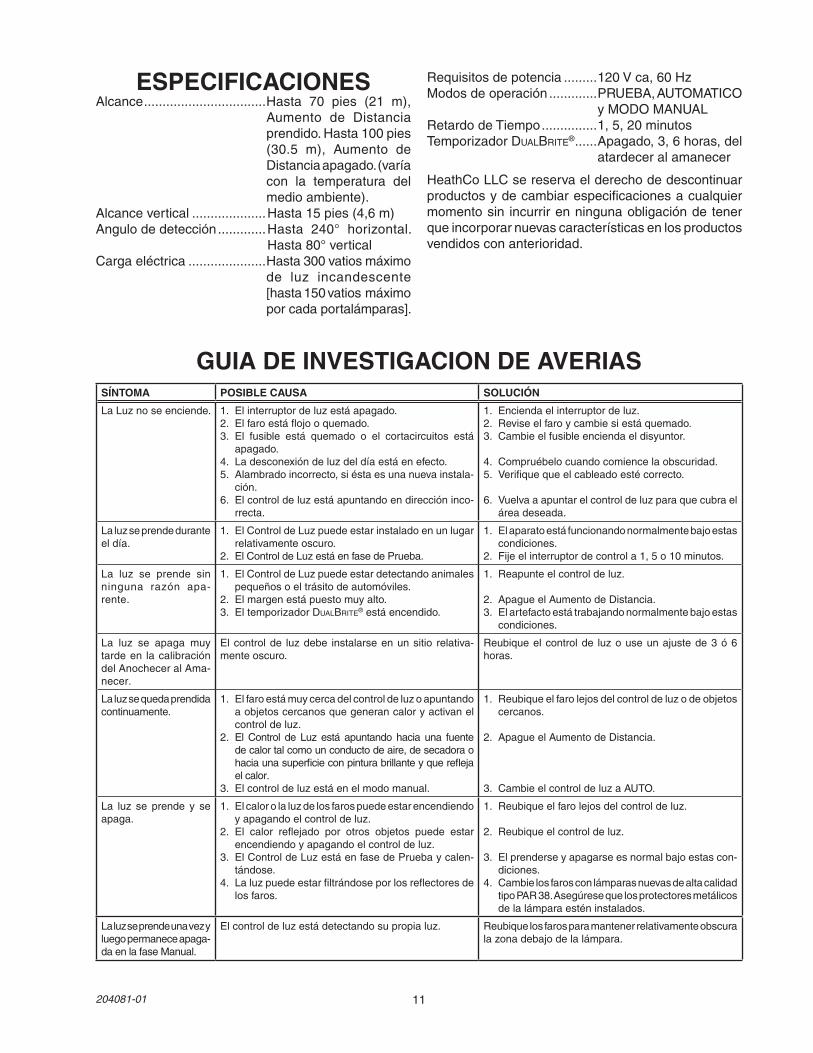
NOTA:Sielaparatoestáinstaladoamásde8pies(2,4m),siseapuntaeldetectorhaciaabajosereduciráladistanciadecobertura.Eldetectoresmenossensibledelmovimientoquesedirigehaciaél.
3. Aflojeeltornillosujetadorenlauniónesféricaygiredespacioeldetector.
4. Camine por el área a prote-gerse y dése cuenta dóndeestácuandoseprendelaluz.Muevalacabezadeldetectorhacia arriba, hacia abajo ohacia los lados para cam-biar el área de protección.Mantenga al detector por lo menos a 1 pulgada (25 mm) de las lámparas.
5. Fije la sensibilidad (RANGE)como necesite. Demasiadasensibilidad puede aumentarlasfalsasalarmas.
6. Asegure la puntería de la ca-beza del detector ajustando el tornillo sujetador. No lo aprietedemasiado.
7. Fijeelperíododetiempo(ON-TIME)quelaluzdebequedarseprendidadespuésdedetectarmovimiento(1,5o20minutos).
8. Paraunailuminaciónornamentaldebajaintensidad,pongaelinterruptordeDualBrite®enlaposiciónde3,6,odelDusk-to-Dawn(atardecer-al-amanecer).
Parte de abajo del detector
Evite apuntar el control hacia:
•Objetosquecambienrápidamentedetemperaturatalescomoductos de calefacción y acondiciona-dores de aire.Estasfuentesdecalorpuedencausarfalsasalarmas.
•Áreas donde animales domésticos o el tráfico puedanactivarelcontrol.
•Los objetos grandes cercanos y de colores res-plandecientes que reflejan la luz del día puedenhacerqueeldetectorseapague.Noapunteotrasluceshaciaeldetector.
Lo menos sensible Lo más sensibleDetector
MovimientoMovimiento
ADVERTENCIA: Riesgo de incendio. No apunte las lámparas a superficies combustibles dentro de un 3 pies (1 m).
TornilloSujetador UniónEsférica
Apunte el detector hacia
abajo para poca cobertura
Apunte el detector más arriba para
mayor cobertura
Alcance Máximo Angulo de Cobertura Máxima
MAX
MIN
RANGE
ON-TIME DUAL BRITE™
TEST 1 5 20MINUTES
OFF 3 6 DUSK TODAWNHOUR
C
REEP ZONE ™
BOO
ST
240°
8pies(2,4m)
70pies 100pies(21m) (30,5m) (BoostPrendido)DualZone™
DualZone™
NOTA:DualZone™esunanuevazonadedetecciónquefueañadidacomounaopciónparaescogerlosproductosdetectoresdemovimientoHeath®/Zenith.Esta característica añade una zona de deteccióndebajodeldetectordemovimiento.DualZone™norequiereningúnajusteadicionalyfuncionajuntoconeldetectorquemirahaciaadelante.
DualZone™
DualZone™
PRUEBA Y AJUSTE1. Prenda el cortacircuitos y el interruptor de luz.
NOTA: Eldetectortieneunperíododecercade11/2 minutosdecalentamientoantesdedetectarmovimiento. Cuando lo prenda por primeravez,espere11/2minutos.
2. GireelcontroldeALCANCE(RANGE)alaposiciónmedia(entreMINyMAX),DualBrite®aOFF,yelcontroldeDURACIÓN(ON-TIME)alaposicióndePRUEBA(TEST).
11204081-01
ESPECIFICACIONESAlcance.................................Hasta 70 pies (21 m),
Aumento de Distanciaprendido.Hasta100pies(30.5 m), Aumento deDistanciaapagado.(varíacon la temperatura delmedioambiente).
Alcancevertical....................Hasta15pies(4,6m)Angulodedetección.............Hasta 240° horizontal.
Hasta80°verticalCargaeléctrica.....................Hasta300vatiosmáximo
de luz incandescente[hasta150vatiosmáximoporcadaportalámparas].
Requisitosdepotencia.........120Vca,60HzModosdeoperación.............PRUEBA,AUTOMATICO
yMODOMANUALRetardodeTiempo...............1,5,20minutosTemporizadorDualBrite®......Apagado,3,6horas,del
atardeceralamanecer
HeathCoLLCsereservaelderechodedescontinuarproductosydecambiarespecificacionesacualquiermomentosin incurrirenningunaobligacióndetenerqueincorporarnuevascaracterísticasenlosproductosvendidosconanterioridad.
GUIA DE INVESTIGACION DE AVERIASSÍNTOMA POSIBLE CAUSA SOLUCIÓN
LaLuznoseenciende. 1. Elinterruptordeluzestáapagado.2. Elfaroestáflojooquemado.3. El fusible está quemado o el cortacircuitos está
apagado.4. Ladesconexióndeluzdeldíaestáenefecto.5. Alambradoincorrecto,siéstaesunanuevainstala-
ción.6. Elcontroldeluzestáapuntandoendireccióninco-
rrecta.
1. Enciendaelinterruptordeluz.2. Reviseelfaroycambiesiestáquemado.3. Cambieelfusibleenciendaeldisyuntor.
4. Compruébelocuandocomiencelaobscuridad.5. Verifiquequeelcableadoestécorrecto.
6. Vuelvaaapuntarelcontroldeluzparaquecubraeláreadeseada.
Laluzseprendeduranteeldía.
1. ElControldeLuzpuedeestarinstaladoenunlugarrelativamenteoscuro.
2. ElControldeLuzestáenfasedePrueba.
1. Elaparatoestáfuncionandonormalmentebajoestascondiciones.
2. Fijeelinterruptordecontrola1,5o10minutos.
La luz se prende sinninguna razón apa-rente.
1. ElControldeLuzpuedeestardetectandoanimalespequeñosoeltrásitodeautomóviles.
2. Elmargenestápuestomuyalto.3. EltemporizadorDualBrite®estáencendido.
1. Reapunteelcontroldeluz.
2. ApagueelAumentodeDistancia.3. Elartefactoestátrabajandonormalmentebajoestas
condiciones.
La luz se apaga muytardeen lacalibracióndelAnocheceralAma-necer.
Elcontrolde luzdebe instalarseenunsitio relativa-menteoscuro.
Reubiqueelcontrolde luzouseunajustede3ó6horas.
Laluzsequedaprendidacontinuamente.
1. Elfaroestámuycercadelcontroldeluzoapuntandoaobjetoscercanosquegenerancaloryactivanelcontroldeluz.
2. El Control de Luz está apuntando hacia una fuentedecalortalcomounconductodeaire,desecadoraohaciaunasuperficieconpinturabrillanteyquereflejaelcalor.
3. Elcontroldeluzestáenelmodomanual.
1. Reubiqueelfarolejosdelcontroldeluzodeobjetoscercanos.
2. ApagueelAumentodeDistancia.
3. CambieelcontroldeluzaAUTO.
La luz se prende y seapaga.
1. Elcalorolaluzdelosfarospuedeestarencendiendoyapagandoelcontroldeluz.
2. El calor reflejado por otros objetos puede estarencendiendoyapagandoelcontroldeluz.
3. ElControldeLuzestáenfasedePruebaycalen-tándose.
4. Laluzpuedeestarfiltrándoseporlosreflectoresdelosfaros.
1. Reubiqueelfarolejosdelcontroldeluz.
2. Reubiqueelcontroldeluz.
3. Elprenderseyapagarseesnormalbajoestascon-diciones.
4. CambielosfarosconlámparasnuevasdealtacalidadtipoPAR38.Asegúresequelosprotectoresmetálicosdelalámparaesténinstalados.
Laluzseprendeunavezyluegopermaneceapaga-daenlafaseManual.
Elcontroldeluzestádetectandosupropialuz. Reubiquelosfarosparamantenerrelativamenteobscuralazonadebajodelalámpara.
12 204081-01
GARANTÍA LIMITADA A 2 AÑOSEstaesuna“GarantíaLimitada”queledaaUd.derechoslegalesespecíficos.Ustedpuedetambiéntenerotrosderechosquevaríandeestadoaestadoodeprovinciaaprovincia.Porunperíodode2añosdesdelafechadecompra,cualquiermalfuncionamientoocasionadoporpartesdefectuosasdefábricaomanodeobraserácorregidosincargoparaUd.No cubierto -Serviciodereparación,ajusteycalibracióndebidoalmaluso,abusoonegligencia,bombi-llas,baterías,uotraspartesfungiblesnoestáncubiertasporestagarantía.LosServiciosnoautorizadosomodificacionesdelproductoodecualquiercomponentequeseproveeinvalidaránestagarantíaensutotalidad.Estagarantíanoincluyereembolsoporinconveniencia,instalación,tiempodeinstalación,perdidadeuso,servicionoautorizado,ocostosdetransportederetorno.EstagarantíacubresolamentelosproductosensambladosporHeathCoLLCynoseextiendeaotrosequi-posocomponentesqueelconsumidorusajuntoconnuestrosproductos.ESTAGARANTÍAESTÁEXPRESAMENTEENLUGARDEOTRASGARANTÍAS,EXPRESADASOSO-BREENTENDIDAS, INCLUYENDO CUALQUIER GARANTÍA, REPRESENTACIÓN O CONDICIÓN DECOMERCIABILIDADOQUELOSPRODUCTOSSEADAPTENPARACUALQUIERPROPÓSITOOUSOENPARTICULAR,YESPECIFICAMENTEENLUGARDETODOSLOSDAÑOSESPECIALES,INDIREC-TOS,INCIDENTALESYCONSECUENTES.LAREPARACIÓNOELREEMPLAZODEBERÍASERLAÚNICASOLUCIÓNDELCLIENTEYNOHABRÁRESPONSABILIDADPORPARTEDEHEATHCOLLCPORCUALQUIERDAÑOESPECIAL,INDIRECTO,INCIDENTALOCONSECUENTE,INCLUIDOSPERONOLIMITADOSACUALQUIERPÉRDIDADENE-GOCIOOGANACIASSEANONOPREVISIBLES.Algunosestadosoprovinciasnopermitenlaexclusiónolimitacióndedañosincidentalesoconsecuentes,demodoquelalimitaciónoexclusiónarribaindicadapuedequenoseapliqueaUd.Por favor guarde su recibo de venta fechado; se lo requiere para cualquier solicitud de garantía.
SERVICIO TÉCNICOFavor de llamar al 1-800-858-8501 (sólo para hablar en inglés) para pedir ayuda antes
de devolver el producto a la tienda.Sitienealgúnproblema,sigaestaguía.UstedpuedetambiénvisitarnuestrositioWeb:www.hzsupport.com. Sielproblemacontinúa,llameal1-800-858-8501(sóloparahablareninglés),de8:00AMa5:00PMCST(L-V).Ustedpuedetambiénescribira:HeathCo LLCP.O.Box90045BowlingGreen,KY42102-9045ATTN:TechnicalService(ServicioTécnico)*SisellamaalServicioTécnico,porfavortenerlistalasiguienteinformación:NúmerodeModelo,FechadecomprayLugardecompra.
No hay piezas de servicio disponibles para este producto.Por favor guarde su recibo de venta fechado; se lo requiere para cualquier solicitud de garantía.
13204081-01©2012HeathCoLLC 204081-01F
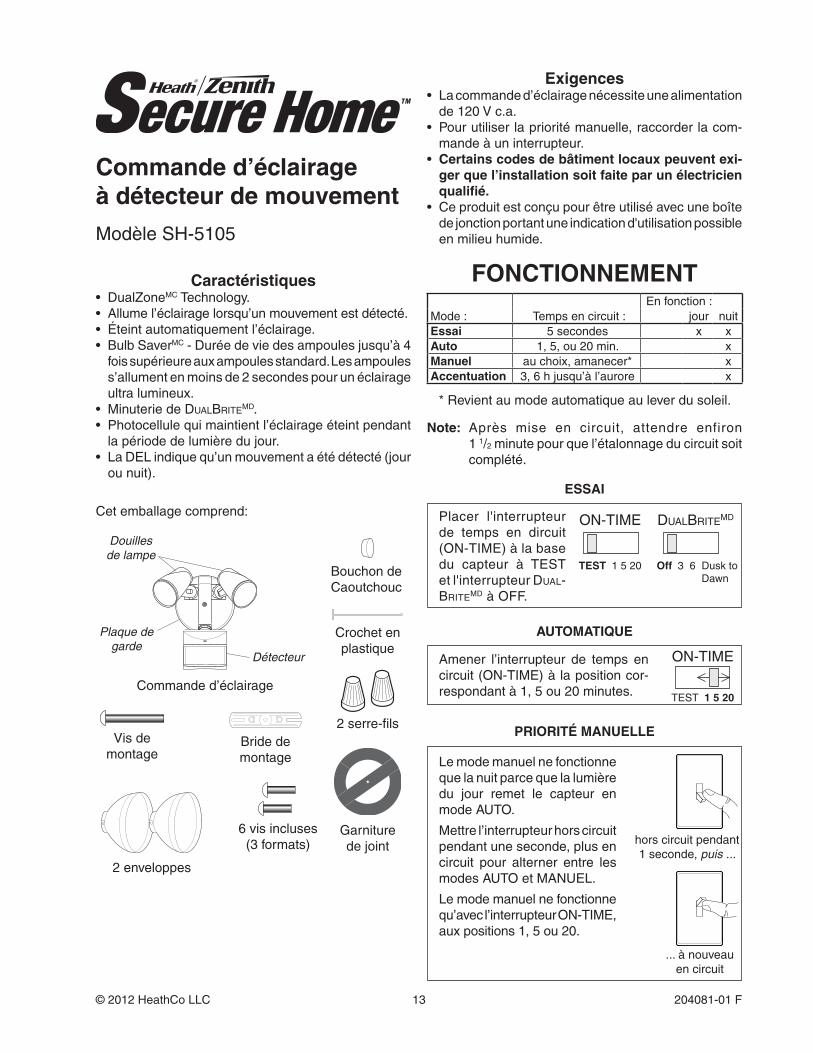
Exigences• Lacommanded’éclairagenécessiteunealimentation
de120Vc.a.• Pourutiliserlaprioritémanuelle,raccorderlacom-
mandeàuninterrupteur.• Certains codes de bâtiment locaux peuvent exi-
ger que l’installation soit faite par un électricien qualifié.
• Ceproduitestconçupourêtreutiliséavecuneboîtedejonctionportantuneindicationd'utilisationpossibleenmilieuhumide.
Caractéristiques• DualZoneMCTechnology.•Allumel’éclairagelorsqu’unmouvementestdétecté.•Éteintautomatiquementl’éclairage.• BulbSaverMC-Duréedeviedesampoulesjusqu’à4
foissupérieureauxampoulesstandard.Lesampouless’allumentenmoinsde2secondespourunéclairageultralumineux.
• MinuteriedeDualBriteMD.•Photocellulequimaintientl’éclairageéteintpendant
lapériodedelumièredujour.•LaDELindiquequ’unmouvementaétédétecté(jour
ounuit).
Commande d’éclairage à détecteur de mouvement
ModèleSH-5105
ESSAI
2enveloppes
TEST 1 5 20
ON-TIME
Off 3 6 Duskto Dawn
DualBriteMDPlacer l'interrupteurde temps en dircuit(ON-TIME)àlabasedu capteur à TESTetl'interrupteurDual-BriteMDàOFF.
FONCTIONNEMENT
*Revientaumodeautomatiqueauleverdusoleil.
ON-TIME
TEST 1 5 20
...ànouveauencircuit
horscircuitpendant1seconde,puis ...
Amener l’interrupteur de temps encircuit(ON-TIME)àlapositioncor-respondantà1,5ou20minutes.
Lemodemanuelnefonctionnequelanuitparcequelalumièredu jour remet le capteur enmodeAUTO.
Mettrel’interrupteurhorscircuitpendantuneseconde,plusencircuit pour alterner entre lesmodesAUTOetMANUEL.
Lemodemanuelnefonctionnequ’avecl’interrupteurON-TIME,auxpositions1,5ou20.
Note:Après mise en circuit, attendre enfiron 1 1/2minutepourquel’étalonnageducircuitsoitcomplété.
Cetemballagecomprend:
Commanded’éclairage
Détecteur
Plaque de garde
Douilles de lampe
Crochetenplastique
BouchondeCaoutchouc
Garniture dejoint
6visincluses (3formats)
Bridedemontage
Visdemontage
2serre-fils
AUTOMATIQUE
PRIORITÉ MANUELLE
Enfonction:Mode: Tempsencircuit: jour nuitEssai 5secondes x xAuto 1,5,ou20min. xManuel auchoix,amanecer* xAccentuation 3,6hjusqu’àl’aurore x
14 204081-01
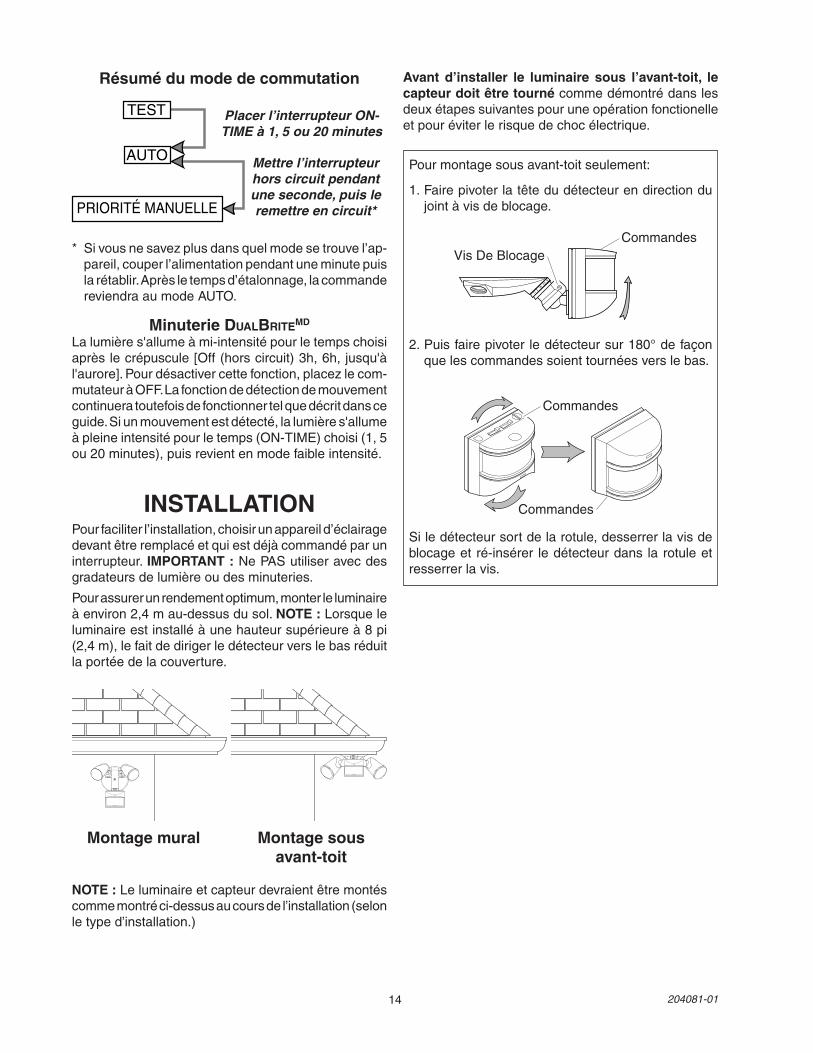
Placer l’interrupteur ON-TIME à 1, 5 ou 20 minutes
Résumé du mode de commutation
Mettre l’interrupteur hors circuit pendant une seconde, puis le remettre en circuit*PRIORITÉ MANUELLE
AUTO
TEST
* Sivousnesavezplusdansquelmodesetrouvel’ap-pareil,couperl’alimentationpendantuneminutepuislarétablir.Aprèsletempsd’étalonnage,lacommandereviendraaumodeAUTO.
Minuterie DualBriteMD
Lalumières'allumeàmi-intensitépourletempschoisiaprèslecrépuscule[Off(horscircuit)3h,6h,jusqu'àl'aurore].Pourdésactivercettefonction,placezlecom-mutateuràOFF.Lafonctiondedétectiondemouvementcontinueratoutefoisdefonctionnertelquedécritdansceguide.Siunmouvementestdétecté,lalumières'allumeàpleineintensitépourletemps(ON-TIME)choisi(1,5ou20minutes),puisrevientenmodefaibleintensité.
INSTALLATION
Pourmontagesousavant-toitseulement:
1.Fairepivoterlatêtedudétecteurendirectiondujointàvisdeblocage.
Siledétecteursortdelarotule,desserrerlavisdeblocageetré-insérer ledétecteurdans larotuleetresserrerlavis.
2. Puisfairepivoter ledétecteursur180°defaçonquelescommandessoienttournéesverslebas.
Commandes
Commandes
Commandes
VisDeBlocage
Pourfaciliterl’installation,choisirunappareild’éclairagedevantêtreremplacéetquiestdéjàcommandéparuninterrupteur.IMPORTANT :NePASutiliseravecdesgradateursdelumièreoudesminuteries.
Pourassurerunrendementoptimum,monterleluminaireàenviron2,4mau-dessusdusol.NOTE :Lorsqueleluminaireestinstalléàunehauteursupérieureà8pi(2,4m),lefaitdedirigerledétecteurverslebasréduitlaportéedelacouverture.
Montage mural Montage sous avant-toit
NOTE :Leluminaireetcapteurdevraientêtremontéscommemontréci-dessusaucoursdel’installation(selonletyped’installation.)
Avant d’installer le luminaire sous l’avant-toit, le capteur doit être tournécommedémontrédanslesdeuxétapessuivantespouruneopérationfonctionelleetpouréviterlerisquedechocélectrique.
15204081-01
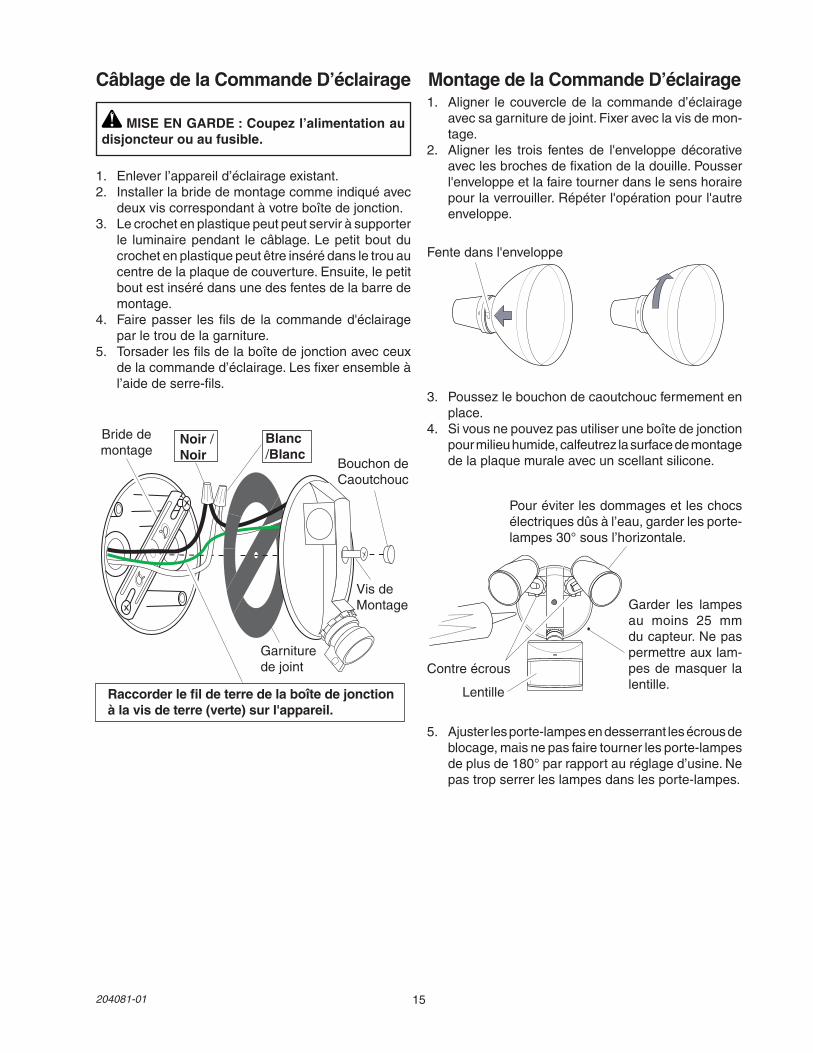
Montage de la Commande D’éclairage1. Aligner lecouverclede lacommanded’éclairage
avecsagarnituredejoint.Fixeraveclavisdemon-tage.
2. Aligner les trois fentesde l'enveloppedécorativeaveclesbrochesdefixationdeladouille.Pousserl'enveloppeetlafairetournerdanslesenshorairepourlaverrouiller.Répéterl'opérationpourl'autreenveloppe.
Bridedemontage
Garnituredejoint
Noir / Noir
Blanc /Blanc
VisdeMontage
BouchondeCaoutchouc
Raccorder le fil de terre de la boîte de jonction à la vis de terre (verte) sur l'appareil.
1. Enleverl’appareild’éclairageexistant.2. Installerlabridedemontagecommeindiquéavec
deuxviscorrespondantàvotreboîtedejonction.3. Lecrochetenplastiquepeutpeutserviràsupporter
le luminairependant lecâblage.Lepetitboutducrochetenplastiquepeutêtreinsérédansletrouaucentredelaplaquedecouverture.Ensuite,lepetitboutestinsérédansunedesfentesdelabarredemontage.
4. Fairepasser lesfilsde lacommanded'éclairageparletroudelagarniture.
5. Torsaderlesfilsdelaboîtedejonctionavecceuxdelacommanded’éclairage.Lesfixerensembleàl’aidedeserre-fils.
Fentedansl'enveloppe
3. Poussezlebouchondecaoutchoucfermementenplace.
4. Sivousnepouvezpasutiliseruneboîtedejonctionpourmilieuhumide,calfeutrezlasurfacedemontagedelaplaquemuraleavecunscellantsilicone.
Garder les lampesau moins 25 mmducapteur.Nepaspermettreauxlam-pesdemasquer lalentille.
Pouréviterlesdommagesetleschocsélectriquesdûsàl’eau,garderlesporte-lampes30°sousl’horizontale.
Lentille
Contreécrous
5. Ajusterlesporte-lampesendesserrantlesécrousdeblocage,maisnepasfairetournerlesporte-lampesdeplusde180°parrapportauréglaged’usine.Nepastropserrerleslampesdanslesporte-lampes.
Câblage de la Commande D’éclairage
MISE EN GARDE : Coupez l’alimentation au disjoncteur ou au fusible.
16 204081-01
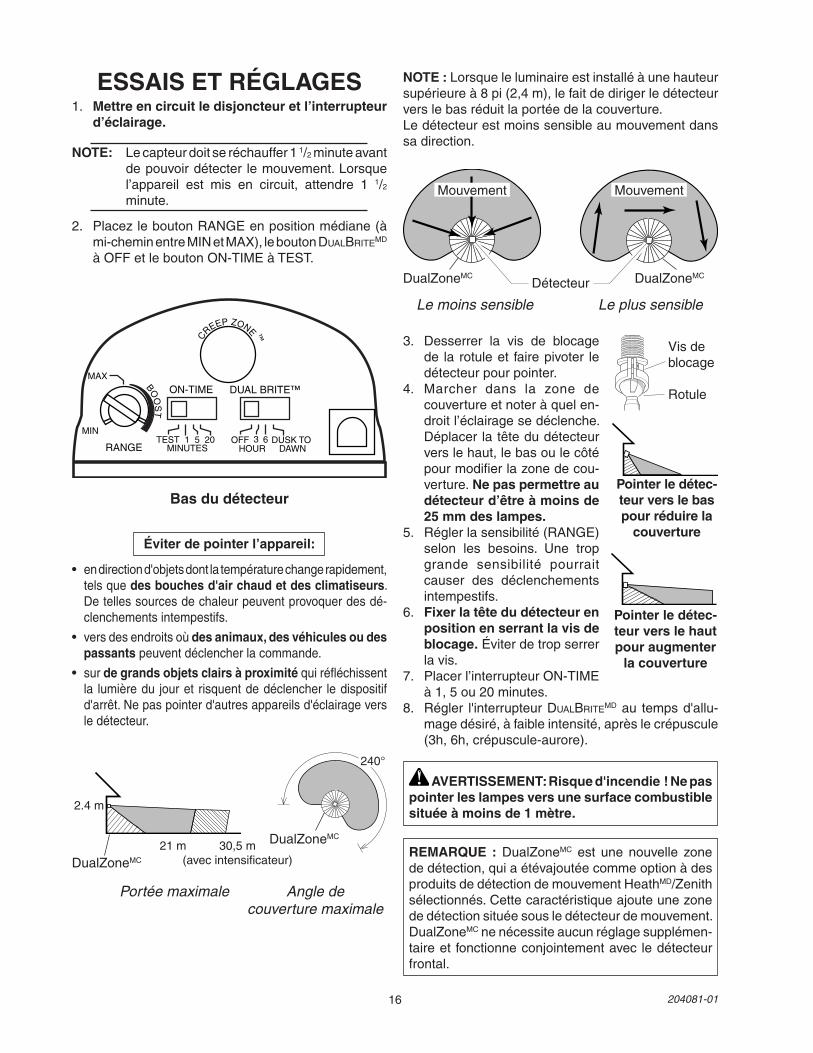
NOTE :Lorsqueleluminaireestinstalléàunehauteursupérieureà8pi(2,4m),lefaitdedirigerledétecteurverslebasréduitlaportéedelacouverture.Ledétecteurestmoinssensibleaumouvementdanssadirection.
3. Desserrer la vis de blocagede larotuleet fairepivoter ledétecteurpourpointer.
4. Marcher dans la zone decouvertureetnoteràquelen-droitl’éclairagesedéclenche.Déplacerlatêtedudétecteurverslehaut,lebasoulecôtépourmodifierlazonedecou-verture. Ne pas permettre au détecteur d’être à moins de 25 mm des lampes.
5. Réglerlasensibilité(RANGE)selon les besoins. Une tropgrande sensibilité pourraitcauser des déclenchementsintempestifs.
6. Fixer la tête du détecteur en position en serrant la vis de blocage.Éviterdetropserrerlavis.
7. Placerl’interrupteurON-TIMEà1,5ou20minutes.
8. Régler l'interrupteurDualBriteMDau tempsd'allu-magedésiré,àfaibleintensité,aprèslecrépuscule(3h,6h,crépuscule-aurore).
Bas du détecteur
Éviter de pointer l’appareil:
•endirectiond'objetsdontlatempératurechangerapidement,telsquedes bouches d'air chaud et des climatiseurs.Detellessourcesdechaleurpeuventprovoquerdesdé-clenchementsintempestifs.
•versdesendroitsoùdes animaux, des véhicules ou des passantspeuventdéclencherlacommande.
•surde grands objets clairs à proximitéquiréfléchissentla lumièredu jouret risquentdedéclencher ledispositifd'arrêt.Nepaspointerd'autresappareilsd'éclairageversledétecteur.
Détecteur
Mouvement Mouvement
AVERTISSEMENT: Risque d'incendie ! Ne pas pointer les lampes vers une surface combustible située à moins de 1 mètre.
Visdeblocage
Rotule
Pointer le détec-teur vers le bas pour réduire la
couverture
Pointer le détec-teur vers le haut pour augmenter
la couverture
Portée maximale Angle de couverture maximale
Le moins sensible Le plus sensible
2.4m
240°
MAX
MIN
RANGE
ON-TIME DUAL BRITE™
TEST 1 5 20MINUTES
OFF 3 6 DUSK TODAWNHOUR
C
REEP ZONE ™
BOO
ST
21m 30,5m (avecintensificateur)DualZoneMC
REMARQUE : DualZoneMC est une nouvelle zonededétection,quiaétévajoutéecommeoptionàdesproduitsdedétectiondemouvementHeathMD/Zenithsélectionnés.Cettecaractéristiqueajouteunezonededétectionsituéesousledétecteurdemouvement.DualZoneMCnenécessiteaucunréglagesupplémen-taireetfonctionneconjointementavecledétecteurfrontal.
DualZoneMC
DualZoneMC DualZoneMC
ESSAIS ET RÉGLAGES1. Mettre en circuit le disjoncteur et l’interrupteur
d’éclairage.
NOTE: Lecapteurdoitseréchauffer11/2minuteavantdepouvoirdétecter lemouvement.Lorsquel’appareil est mis en circuit, attendre 1 1/2 minute.
2. PlacezleboutonRANGEenpositionmédiane(àmi-cheminentreMINetMAX),leboutonDualBriteMD àOFFetleboutonON-TIMEàTEST.
17204081-01
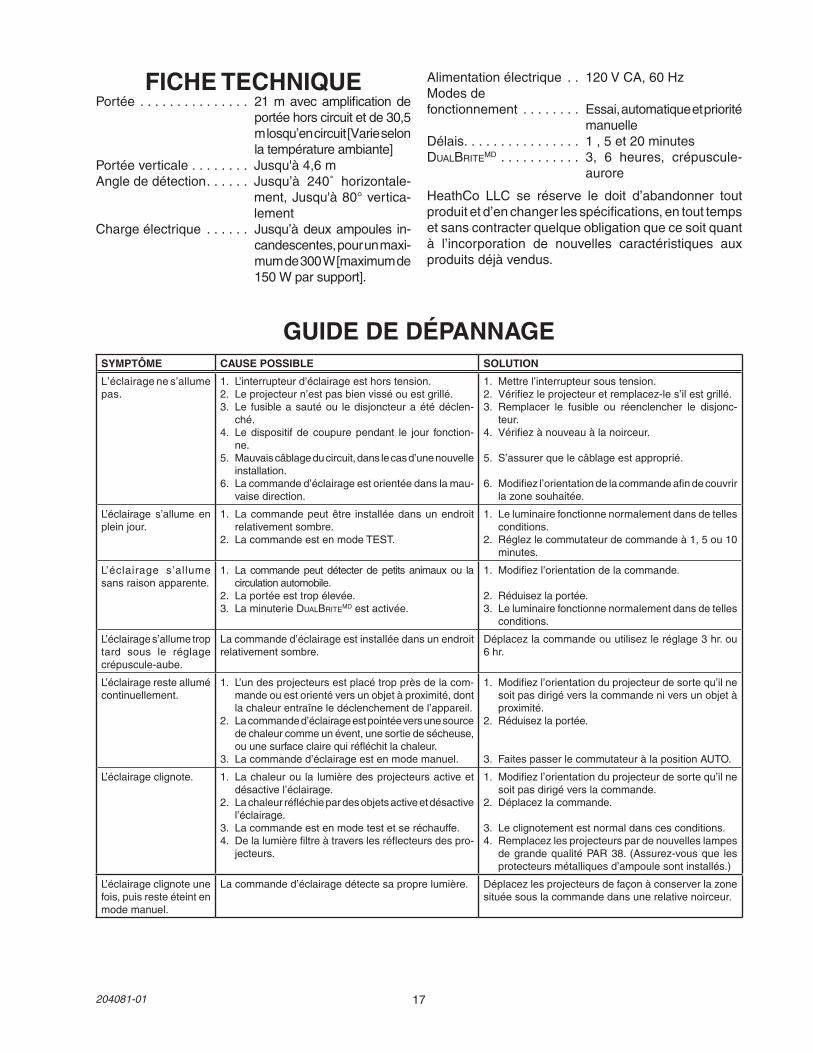
FICHE TECHNIQUEPortée ............... 21mavecamplificationde
portéehorscircuitetde30,5mlosqu’encircuit[Varieselonlatempératureambiante]
Portéeverticale........ Jusqu'à4,6mAnglededétection...... Jusqu’à 240˚ horizontale-
ment,Jusqu'à80°vertica-lement
Chargeélectrique ...... Jusqu’àdeuxampoules in-candescentes,pourunmaxi-mumde300W[maximumde150Wparsupport].
Alimentationélectrique.. 120VCA,60HzModes defonctionnement........ Essai,automatiqueetpriorité
manuelleDélais................ 1,5et20minutesDualBriteMD........... 3, 6 heures, crépuscule-
aurore
HeathCo LLC se réserve le doit d’abandonner toutproduitetd’enchangerlesspécifications,entouttempsetsanscontracterquelqueobligationquecesoitquantà l’incorporation de nouvelles caractéristiques auxproduitsdéjàvendus.
GUIDE DE DÉPANNAGESYMPTÔME CAUSE POSSIBLE SOLUTION
L’éclairagenes’allumepas.
1. L’interrupteurd’éclairageesthorstension.2. Leprojecteurn’estpasbienvisséouestgrillé.3. Le fusibleasautéou ledisjoncteuraétédéclen-
ché.4. Ledispositif de coupurependant le jour fonction-
ne.5. Mauvaiscâblageducircuit,danslecasd’unenouvelle
installation.6. Lacommanded’éclairageestorientéedanslamau-
vaisedirection.
1. Mettrel’interrupteursoustension.2. Vérifiezleprojecteuretremplacez-les’ilestgrillé.3. Remplacer le fusible ou réenclencher le disjonc-
teur.4. Vérifiezànouveauàlanoirceur.
5. S’assurerquelecâblageestapproprié.
6. Modifiezl’orientationdelacommandeafindecouvrirlazonesouhaitée.
L’éclairage s’allume enpleinjour.
1. Lacommandepeutêtre installéedansunendroitrelativementsombre.
2. LacommandeestenmodeTEST.
1. Leluminairefonctionnenormalementdansdetellesconditions.
2. Réglezlecommutateurdecommandeà1,5ou10minutes.
L’éclairage s’allumesansraisonapparente.
1. Lacommandepeutdétecterdepetitsanimauxou lacirculationautomobile.
2. Laportéeesttropélevée.3. LaminuterieDualBriteMDestactivée.
1. Modifiezl’orientationdelacommande.
2. Réduisezlaportée.3. Leluminairefonctionnenormalementdansdetelles
conditions.
L’éclairages’allumetroptard sous le réglagecrépuscule-aube.
Lacommanded’éclairageestinstalléedansunendroitrelativementsombre.
Déplacezlacommandeouutilisezleréglage3hr.ou6hr.
L’éclairageresteallumécontinuellement.
1. L’undesprojecteursestplacétropprèsdelacom-mandeouestorientéversunobjetàproximité,dontlachaleurentraîneledéclenchementdel’appareil.
2. Lacommanded’éclairageestpointéeversunesourcedechaleurcommeunévent,unesortiedesécheuse,ouunesurfaceclairequiréfléchitlachaleur.
3. Lacommanded’éclairageestenmodemanuel.
1. Modifiezl’orientationduprojecteurdesortequ’ilnesoitpasdirigéverslacommandeniversunobjetàproximité.
2. Réduisezlaportée.
3. FaitespasserlecommutateuràlapositionAUTO.
L’éclairageclignote. 1. Lachaleuroula lumièredesprojecteursactiveetdésactivel’éclairage.
2. Lachaleurréfléchiepardesobjetsactiveetdésactivel’éclairage.
3. Lacommandeestenmodetestetseréchauffe.4. Delalumièrefiltreàtraverslesréflecteursdespro-
jecteurs.
1. Modifiezl’orientationduprojecteurdesortequ’ilnesoitpasdirigéverslacommande.
2. Déplacezlacommande.
3. Leclignotementestnormaldanscesconditions.4. Remplacezlesprojecteurspardenouvelleslampes
degrandequalitéPAR38. (Assurez-vousque lesprotecteursmétalliquesd’ampoulesontinstallés.)
L’éclairageclignoteunefois,puisresteéteintenmodemanuel.
Lacommanded’éclairagedétectesaproprelumière. Déplacezlesprojecteursdefaçonàconserverlazonesituéesouslacommandedansunerelativenoirceur.
18 204081-01
GARANTIE LIMITÉE DE 2 ANSIls’agitd’une«Garantielimitée»quivousconfèredesdroitsjuridiquesspécifiques.Vouspouvezégalementjouird’autresdroits,variablesd’uneprovinceàl’autre.Pendantunepériodede2ansàcompterdeladated’achat,touteanomaliedefonctionnementimputableàunvicedematériauoudemain-d’oeuvreseracorrigéegratuitement.Exclusions de la garantie -Réparations,réglageetcalibragedusàunemauvaiseutilisation,unmauvaistraitementouà lanégligence.Lesampoules, lespilesetdesautresarticlesnondurablesnesontpascouvertsparcettegarantie.Leservicenonautoriséoulamodificationduproduitoud’unoul’autredesescomposantsfournisinvalideratotalementlaprésentegarantie.Cettegarantien’inclutpasleremboursementpourledérangement,l’installation,leréglage,laperted’utilisation,leservicenonautoriséoulesfraisd’ex-péditionpourlerenvoidelamarchandise.LagarantienecouvrequelesproduitsassemblésHeathCoLLCetnes’étendpasauxautreséquipementsetcomposantsqueleclientpourraitutiliserconjointementavecnosproduits.CETTE GARANTIETIENT EXPRESSÉMENT LIEU DETOUTES AUTRES GARANTIES, EXPLICITESOUIMPLICITES,YCOMPRISDETOUTEGARANTIEDEREPRÉSENTATIONOUDECONDITIONDECONVENANCEÀLACOMMERCIALISATIONOUÀL’EFFETQUELESPRODUITSCONVIENNENTÀUNBUTOUÀUNEUTILISATIONPARTICULIÈRE,ETSPÉCIFIQUEMENTDETOUSDOMMAGESSPÉCIAUX,DIRECTS,INDIRECTSOUSECONDAIRES.LEREMPLACEMENTOULARÉPARATIONCONSTITUENTLESEULRECOURSDUCLIENTETHEA-THCOLLCNEPOURRAÊTRETENUERESPONSABLEDETOUSDOMMAGESSPÉCIAUX,DIRECTS,INDIRECTSOUSECONDAIRES,YCOMPRIS,SANSS’YLIMITER,LESPERTESCOMMERCIALESETPERTESDEPROFIT,QU’ELLESSOIENTPRÉVISIBLESOUNON.Certainesprovincesn’autorisentpasl’exclusionoulalimitationdesdommagesindirectsousecondaires,etlalimitationoul’exclusionci-dessuspourraitnepass’appliqueràvous.Veuillez conserver le reçu portant la date d’achat; vous en aurez besoin pour toutes vos demandes liées à la garantie.
SERVICE TECHNIQUEVeuillez faire le 1 800 858-8501 (service en anglais seulement) pour obtenir de l’aide
avant de retourner l’article au magasin.Encasdeproblème,suivezceguide.VouspouvezaussivisiternotresiteWebàwww.hzsupport.com.Sileproblèmepersiste,composez*le1800858-8501(serviceenanglaisseulement),entre8h00et17h00,HNC,dulundiauvendredi.Vouspouvezaussiécrireau:HeathCo LLCP.O.Box90045BowlingGreen,KY42102-9045ATTN:TechnicalService(Servicetechnique)*Lorsd’unappelauservicetechnique,veuillezavoirlesrenseignementssuivantsàportéedemain:numérodumodèle,dated’achatetendroitdel’achat.
Aucune pièce de rechange n’est disponible pour ce produit.Veuillez conserver le reçu portant la date d'achat; vous en aurez besoin pour toutes vos demandes liées à la garantie.

19204081-01
Notes / Notas ___________________________________________________________________________________________________________________________________________________________________________________________________________________________________________________________________________________________________________________________________________________________________________________________________________________________________________________________________________________________________________________________________________________________
20 204081-01
Staple Purchase Receipt Here
Engrape aquí el recibo de compra
Agrafez le reçu d’achat ici
PLEASE KEEP YOUR DATED SALES RECEIPT,IT IS REQUIRED FOR ALL WARRANTY REQUESTS.
POR FAVOR GUARDE SU RECIBO DE VENTA FECHADO; SE LOREQUIERE PARA CUALQUIER SOLICITUD DE GARANTÍA.
VEUILLEZ CONSERVER LE REÇU PORTANT LA DATE D'ACHAT; VOUS EN AUREZ BESOIN POUR TOUTES VOS DEMANDES
LIÉES À LA GARANTIE.
Purchase InformationInformación de la compraRenseignements d’achat
Model #: _________________ Date of Purchase: _____________Nº de modelo / N° de modèle Fecha de compra / Date d’achat