module for adobe photoshop™ - inèdit · open the file “neotextil installer.mpkg” ( m a c v...
TRANSCRIPT

neoColorations 6.9
Module for Adobe Photoshop™
User Guide
July 2013
Inèdit Software S.L.
neoColorations 6.9 User Manual

INDEX
1. Introduction
2. Starting neoColorations
3. Opening a library
4. Importing a library
5. Creating a new library
6. Color management
7. Creating colorways
8. Asigning colors from a library
9. Asigning colors from a color picker
10. Custom color libraries
11. Custom separations
12. Exchange colors of separations
13. Print colorways
14. Print multiple colorways
15. Export colorways information
16. Export technical cards
17. Edit technical cards information
18. Asign colors from an spectrophotometer
19. Colorway protection with or without password
20. Save documents
21. Keyboard options
neoColorations 6.9 User Manual

1. INTRODUCTION
What is neoColorations?
It is a module that allows users to create colorways from a multichannel document. You will be able to create multiple colorways of the same design and to export a single or multiple colorways to a document with customized presentations, to print them afterwards.
Technical Requirements
Macintosh:Multicore Intel processor or equivalentMac Os X v10.5.8 or higher4GB minimum RAM memory (16GB recommended).Adobe Photoshop CS4, CS5, 32bits.
Windows:Multicore Intel processor or equivalent.Microsoft® Windows XP with Service Pack 3, Windows 7 with Service Pack 1 or Windows 8.4GB minimum RAM memory (16GB recommended).Adobe Photoshop CS4 to CS6, 32bits.
Installation
O p e n t h e fi l e “ n e o Te x t i l I n s t a l l e r . m p k g ” ( M a c v e r s i o n ) o r “neoTextil_6.7_Multi.exe” (PC version), and follow the instructions. The first time you use this module you will be required to enter a code.
You can run the module in Demo mode to test it.
neoColorations 6.9 User Manual

2. STARTING neoColorations
nèoColorations works with multi-channel files, so each separation must come in a separate channel.
If we have the separations in different documents, we must go the Channels tab in Photoshop and select Merge Channels.
neoColorations 6.9 User Manual

Once the image is ready, we open it with the module from File - Automate - neoColorations ...
neoColorations 6.9 User Manual

When your design is opened in neoColorations, the window looks like this:
In the module, on the upper left area, we find small scale previews of the Colorways, with different configuration options. In the middle there is a big Image preview. The list of Separations will be placed wherever you want them, and the Color Libraries are on the right.
neoColorations 6.9 User Manual

3. OPENING A COLOR LIBRARY
On the buttons situated at the bottom left of the window, select the button. By activating it you open the color libraries manager, situated on the top
right side of the window.
The unfolded menu allows to Open a library, and we will choose any with the extension .vdb .csv .txt
We can have more than one color library opened at the same time, and select them in the pulldown menu.
neoColorations 6.9 User Manual

neoColorations 6.9 User Manual

4. IMPORTING A COLOR LIBRARY
Hitting the button on the side of each color library, we can Import libraries. They are files in semicolon separated values, of .csv .txt format.
neoColorations 6.9 User Manual

5. CREATING A COLOR LIBRARY
From the library menu, select the button New to create a customized library.
Select any existing color library that will serve as layout for the new library, and click on Open, on the right bottom of the window.
A small window will pop-up, where you can give it a name:
neoColorations 6.9 User Manual

You can include as many colors from other libraries as you like, selecting and dragging them to the new space. When the color is in the space, this will become highlighted, and then you must click the key ⌘(mac) or ctrl(pc) so that it stays.
Colors from the designs can also become part of the new library. Just select them with the color picker, and they will show on the bottom right part of the window.Then drag it as explained before.
One last option to include colors on a library is selecting them from the preview colorways on the right, and proceed with the dragging.
neoColorations 6.9 User Manual

6. COLOR MANAGEMENT
Double click on a colorway to open the Colorway options window.
With the Color setups options you can determine the space and profile that you need.
If you choose to Assign profile, click on the button and choose the one you want from the list that unfolds.
neoColorations 6.9 User Manual

The Preserve Color numbers option maintains the colors in a new profile. The colors will change to the new profile if the option is not selected.
For example:
If you convert the value RGB (255,0,0) from the profile ‘A’ to ‘B’ it changes to a new value RGB (233,5,0) keeping the same coloration.
If you assign the value RGB (255,0,0) from the profile ‘A’ to ‘B’, the value RGB is the same but the color will change.
The Convert to profile option opens a new window to choose a new destination space.
neoColorations 6.9 User Manual

Using the options in the Proofer Setup -printer simulation- you determine the color space options on the printer, so that neoColorations can show the color samples:
Ticking on Use coloration profile the simulation parameters will be automatically updated.
If you select Show proof colors you can see the printer simulation on the screen.
Once the changes are done, if you need to keep the same parameters on all new colors, just select Set as default.
To save all changes click Ok.
neoColorations 6.9 User Manual
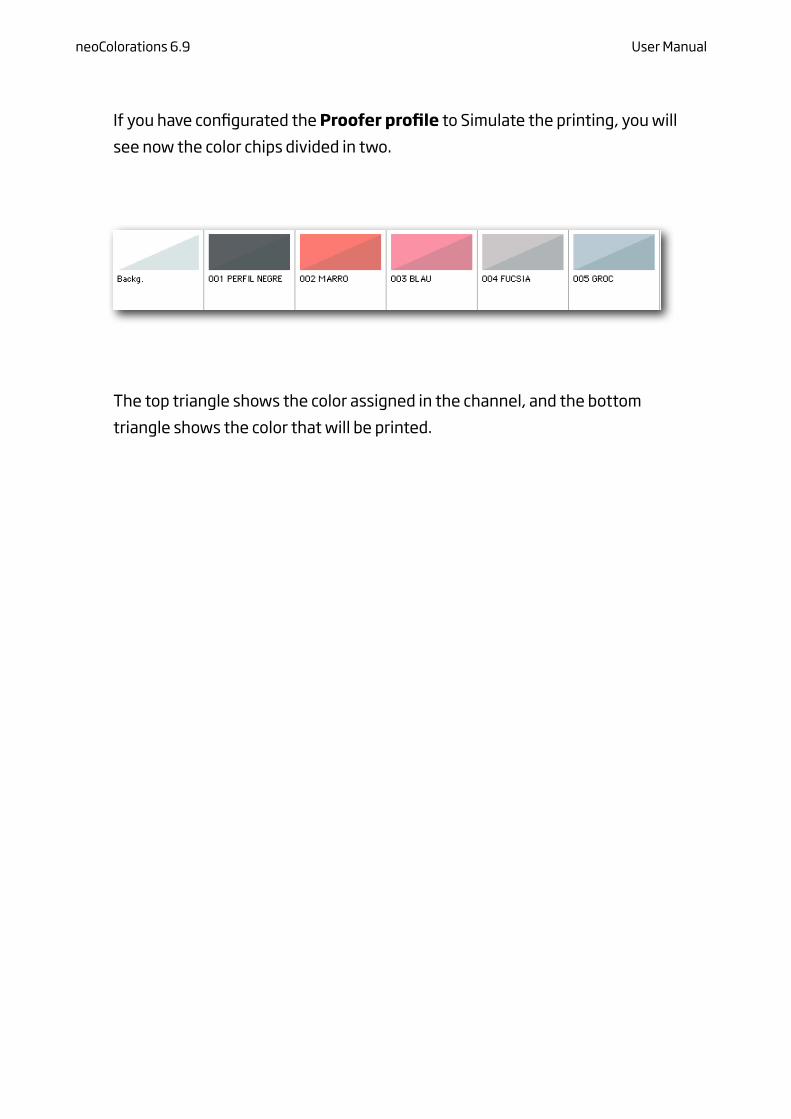
If you have configurated the Proofer profile to Simulate the printing, you will see now the color chips divided in two.
The top triangle shows the color assigned in the channel, and the bottom triangle shows the color that will be printed.
neoColorations 6.9 User Manual

7. CREATING COLORWAYS
Select New from the colorways menu, or press ⌘+N to create a new colorway. .
Double-click on the name of a colorway to edit it.
Double-click on a colorway and the Colorway options dialog box appears. There you can assign a name, simulate production and adjust the fabric density, dark colors predominance and the ink level.
neoColorations 6.9 User Manual

neoColorations 6.9 User Manual

8. ASIGNING COLORS FROM A LIBRARY
There are several methods to assign a color to a separation from the library of colors:
1- Select the color from the library and drag it on the color of the separation.
2- Select the color from the library and press Ctrl + click on the separation (Mac) or use the secondary mouse button (PC).
3- Use the keyboard to select the color from the library and press Alt+Intro.
If you have a library with degraded colors, the most intense color will be applied. If you want to apply a lighter tone, select it twhile pressing the Alt key.
neoColorations 6.9 User Manual

9. ASSIGNING COLORS FROM A COLOR PICKER
Double-click on a color of a separation and you will access the Channel Options window.
Double-clicking on the new color patch, and the Color picker will pop up:
neoColorations 6.9 User Manual

You can choose from nèoColorations or Photoshop color pickers. Access the Preferences window from the button on the bottom left part of the main window:
neoColorations 6.9 User Manual

10. CUSTOMIZE COLOR LIBRARIES
Click on the following button from the options under any library.
From the layout options, choose the one you want to use. Notice that the extension of layouts is .lyt
An example of CMYK presentation in the library of colors:
Note:In the Layouts folder you can select the Standard_ColorLibrary _small.lyt presentation if you are not sure what other library to choose. As its name indicates, it is a model layout.
neoColorations 6.9 User Manual
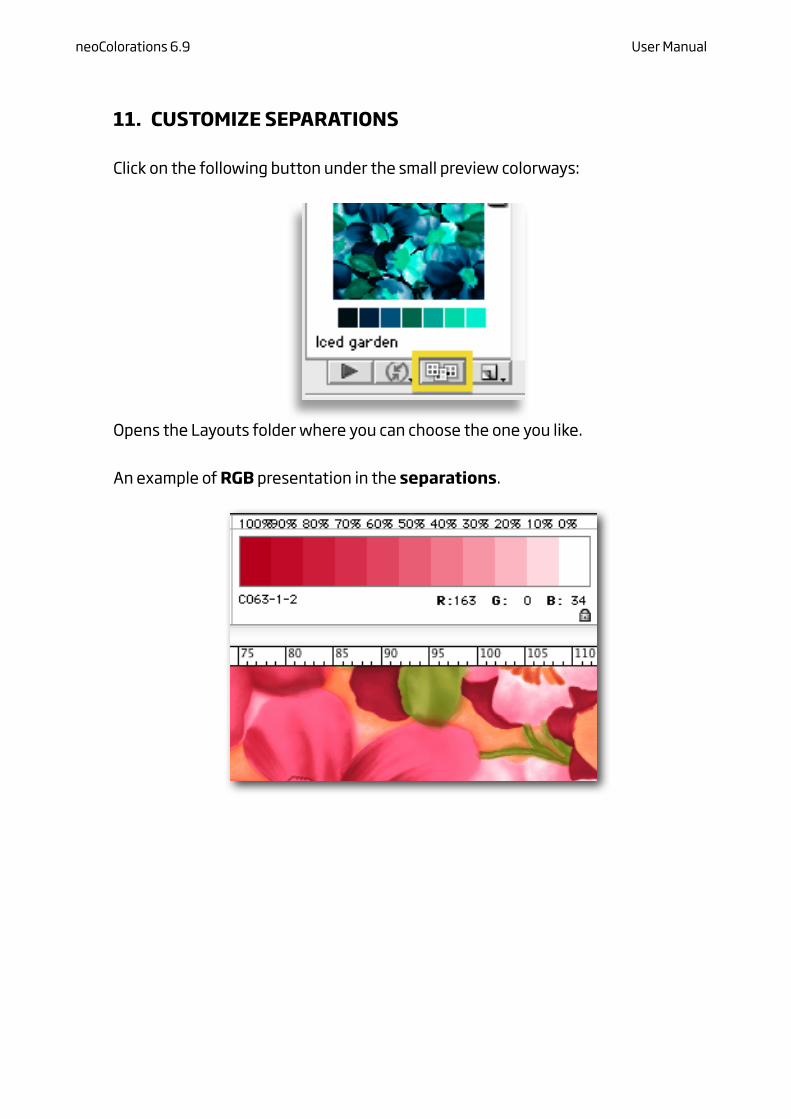
11. CUSTOMIZE SEPARATIONS
Click on the following button under the small preview colorways:
Opens the Layouts folder where you can choose the one you like.
An example of RGB presentation in the separations.
neoColorations 6.9 User Manual

12. EXCHANGE COLORS FROM SEPARATIONS
Drag the color of one separation onto the other by pressing the ⌘(Mac) key or the Ctrl (PC) key to exchange the separations.
13. PRINT COLORWAYS
Select the button to generate Colorways.
neoColorations 6.9 User Manual

Set the values in the different groups of the Colorway window: Adjustments, Colorways, Size and Color Samples.
In Size, a short list with options of the size of the design preview unfolds:
The Color Library options are to set the position and size where we want the color patches in the design, or we even if want them -Export box ticked or not-.
The Options button opens up a window to select position of the Color Library:
And clicking on Change we are taken back to the list of library files with extension .lyt, in case we want to change them.
In the final section of the printable colorway there are several options to save the document:
neoColorations 6.9 User Manual

With the above option the program generates an open document in Photoshop, at the same that saves a copy in the hard disk.
The next highlighted options will generate a background document .psd that can be used both with Photoshop and neoStampa.
A job .xjb can also be generated which is for the exclusive use with nèoStampa:
neoColorations 6.9 User Manual

14.PRINT MULTIPLE COLORWAYS
Select the button to generate Colorways, and go to the Colorations section:
Choose the option Multicolorations and set as many Columns and Lines as you want to define the separation, giving values to Separation H and Separation V.
Take into account that you need to have the first small preview selected in order to view all the colorways. This means that if you have the second preview selected, and you have 4 colorways, only the two last ones will be generated.
The following image illustrates how a preview may look like:
neoColorations 6.9 User Manual
neoColorations 6.9 User Manual

15. EXPORT AND IMPORT COLORWAYS INFORMATION
In the New menu select the option Save to save or export a file with information about the chosen colorways in .ccl format file (only will be exported the selected colorways).
Select the option Load to load the Colorways files in .ccl format.
Select the option Save All to save a file with information about all the colorways in .ccl format in the same document.
neoColorations 6.9 User Manual

16. CREATE AND EXPORT TECHNICAL CARDS
A Technical card is used to prepare and present several colorways in a customized way, vary the size of the color chips, the size of the colorways and enter the company logo.
Select the button to open a Layout. The next dialog is situated on the left of the scren:
Clicking on the Change button you will access the computer’s location with Templates:
neoColorations 6.9 User Manual

When you select a colorway from the preview window, the options for Coloration in this dialogue become active. You can change the colorations within the layout.
Clicking on channels, a window pops up where you can manipulate colors both in the designs or only in the samples:
neoColorations 6.9 User Manual

Finally, there are several options to generate the job, which were explained before in this manual, on section 13.
neoColorations 6.9 User Manual

17. EDIT TECHNICAL CARD’S INFORMATION
In the New menu select the option Information that shows a layout with the image information that will appear in the layout.
The option Template opens an .id layout with information about the user.
neoColorations 6.9 User Manual

18. ASSIGN COLORS WITH AN SPECTROPHOTOMETER
Select the button Preferences to have access to the following dialog:
In Spectrophotometer, you can choose the Device to read a color directly on textile or on paper. You also have the option to make readings with UV filter.
neoColorations 6.9 User Manual

You will have to calibrate the white reference only the first time.
Connect the Spectrophotometer and place the cursor on a color chip and double-click at the same time you press the ⌘+ Alt key (on a Mac) or the Ctrl+Alt key (on a PC) place the reader in a white space and press Absolute.
The readings can be Simple or Triple.When you select Simple the device will read the color reference directly on the color.
The Triple option makes three readings and provides an average value based on them.
Place the reader on the color surface you want to read:
neoColorations 6.9 User Manual

19. PROTECTION OF COLORWAYS
Using the Colorway Option menu you can protect one or more colorways. Double click on a colorway to open the following window:
If you select Lock Protection and hit ok, another window will open to create a password.
You have two options:
1) Soft lock - To leave the fields empty.
neoColorations 6.9 User Manual

You will just need to click on Unlock to desactivate.
2) Hard lock- To desactivate the lock you need to enter the previously chosen password.
neoColorations 6.9 User Manual

20. SAVE DOCUMENTS
Select Preferences, and in the section Save, select the option Save the document before exiting.
A back-up copy of the colorways is automatically saved every 30 seconds. If by any chance the program Photoshop shuts down unexpectedly, when you enter again into the module the following message box appears:
neoColorations 6.9 User Manual

21. KEYBOARD OPTIONS
Left arrow: Select previous separation.Left arrow+Shift: Add previous separation to the selection.Right arrow: Select next separationRight arrow+Shift: Add next separation to the selection.
Shortcuts for the selection of colorways:
Up arrow: Select previous colorway.Up arrow+Shift: Add previous colorway to the selection.Down arrow: Select next colorway.Dow arrow+Shift: Add next colorway to the selection.Page Up: Move up one page.Page Down: Move down one page.Home: Display the top of the library.End: Display the bottom of the library.Left arrow+Alt: Select previous color.Left arrow+Alt+Shift: Add previous color to the selection.Right arrow+Alt: Select next color.Right arrow+Alt+Shift: Add next color to the selection.Up arrow+Alt: Select previous color.Up arrow+Alt+Shift: Add previous color to the selection.Down arrow+Alt: Select next color.Down arrow+Alt+Shift: Add next color to the selection.Page Up+Alt: Move up one page.Page Down+Alt: Move down one page.Home+Alt: Display the top of the library.End+Alt: Display the bottom of the library.
neoColorations 6.9 User Manual

Assign a color from the library to the chosen channel of the colorway:
Alt+Intro: Assign the color to the separation and select next separation of the same colorway.Alt+Shift+: Assign the color to the separation and select the same separation of the next colorway.Ctrl or ⌘+ N: New colorway.Ctrl or ⌘+ D: Duplicate the selected colorways.Del/ Sup: Delete the selected colorways.Ctrl or ⌘ + I: Information.Ctrl or ⌘+ K: Preferences.Ctrl or ⌘+ Alt+N: New color of library.Ctrl or ⌘+ Alt+X: Cut the selected colors of library.Ctrl or ⌘+ Alt+C: Copy the chosen colors of library.Ctrl or ⌘+ Alt+Shift+C: Add to the copy the selected colors of library.Ctrl or ⌘+ Alt+V: Paste the chosen colors of library.Ctrl or ⌘+ Alt+D: Duplicate the selected colors of library.Alt+Del / Sup: Delete the chosen colors of library.
Others:
Ctrl or. + '+': Increase preview.Ctrl or. + '-': Decrease preview.Ctrl or. + Shift+ '+': Select next separation.Ctrl or. + Shift + '-': Select previous separation.Ctrl or. + Z: Undo an action.Ctrl or. + and: Redo an action.
neoColorations 6.9 User Manual