microsoft sharepoint 2013 sharepoint 2013 app model · pdf filemicrosoft sharepoint 2013...
TRANSCRIPT
Microsoft SharePoint 2013
SharePoint 2013
App Model Prepared by: Omar M. Daya
SharePoint 2013 App Model 2
References: http://www.msdn.com / http://technet.microsoft.com
Table of Contents SharePoint App Model .............................................................................................................................. 3
Understanding the App Url ..................................................................................................................... 4
Note ............................................................................................................................................................. 5
Create a public and private test certificate ................................................................................. 18
To create a test .pfx certificate file ................................................................................................. 18
To create a corresponding test .cer file........................................................................................ 19
Generate an issuer ID .......................................................................................................................... 20
Configure SharePoint 2013 for server-to-server app use and configure trust for your
app ............................................................................................................................................................. 20
Turn off the HTTPS requirement for OAuth during development ..................................... 22
Create a provider-hosted app by using Microsoft Office Developer Tools for Visual
Studio 2012 ............................................................................................................................................. 23
Create an App for SharePoint 2013 project ............................................................................... 24
Run the app ............................................................................................................................................ 24
SharePoint 2013 App Model 3
References: http://www.msdn.com / http://technet.microsoft.com
Basically, there are three development strategies that you could use, 2 of them you are
already familiar with.
1- Farm Solutions
2- Sand-boxed Solution
3- Apps
The aim behind this change is to be able to tackle the cloud and to be able to deploy
and use solutions from within the cloud.
Looking at Apps and Sand-boxed solutions, you can say that with time Microsoft is going
to drop the Sand boxed solutions. It is left their only for backward compatibility.
So whatever you can do in a sandboxed solution in version 2010 is still applicable here.
But if you developing a solution from scratch and a Farm solution is not possible then
you should consider SharePoint apps.
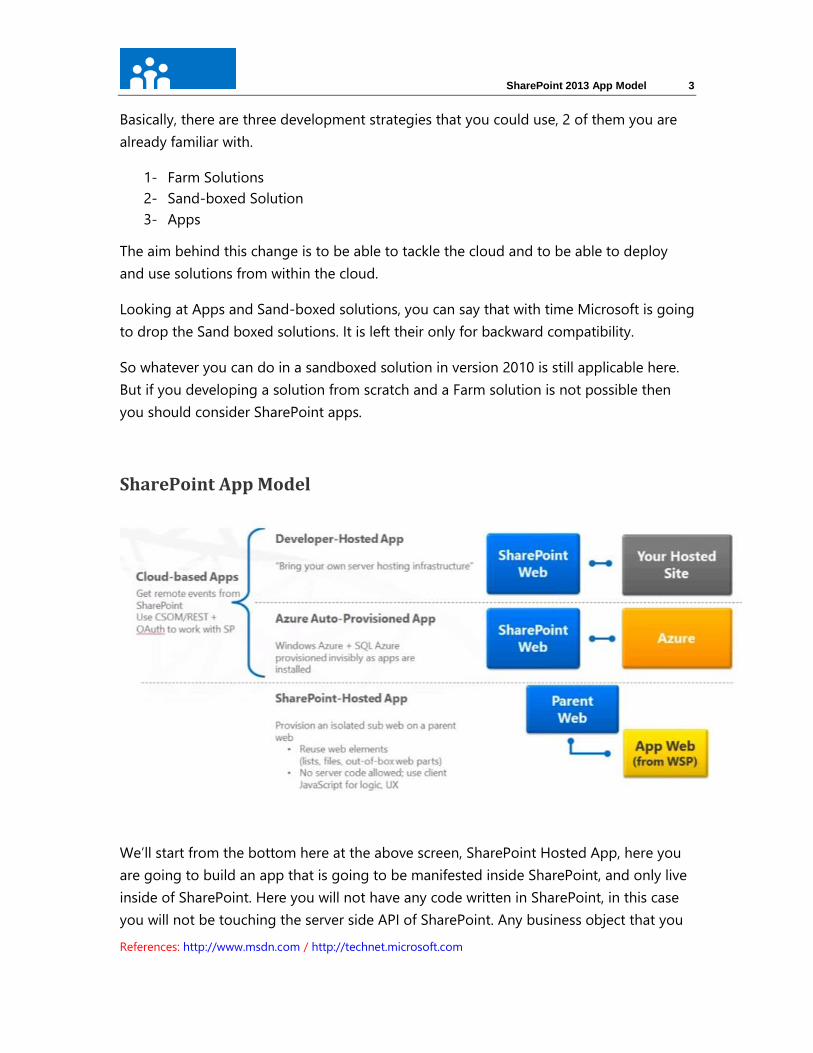
SharePoint App Model
We’ll start from the bottom here at the above screen, SharePoint Hosted App, here you
are going to build an app that is going to be manifested inside SharePoint, and only live
inside of SharePoint. Here you will not have any code written in SharePoint, in this case
you will not be touching the server side API of SharePoint. Any business object that you
SharePoint 2013 App Model 4
References: http://www.msdn.com / http://technet.microsoft.com
App has to do must be done in the client. So you will have an aspx page that renders the
App through-out a client code.
In addition to this option, you have 2 other options that we call the cloud hosted apps.
The word cloud means that this App is located outside of SharePoint.
The first one is called Developer-Hosted App, which is also known as the Provider-
Hosted App, here my app is going to have a SharePoint footprint, which could be as a
link in the apps page that redirects you to another web-application. This web-application
could be hosted in IIS, here you can use any infrastructure and any technology that you
want. The App is going to talk back to SharePoint using Client Side Object Model, Rest
services, and is going to be given permissions to talk back to SharePoint using the OAuth
Protocol.
The Second option The Azure Auto-Provisioned App also known as Auto-Hosted App,
in this scenario I can create an app in SharePoint and that App is going to include a web
project, and an optional SQL project and when you deploy your app to SharePoint, it will
create the link inside SharePoint in the Apps page but will send the deployed project to
Azure. The app can be written in Java, ASP.net, PHP and deployed and running in Azure
instead of running in SharePoint.
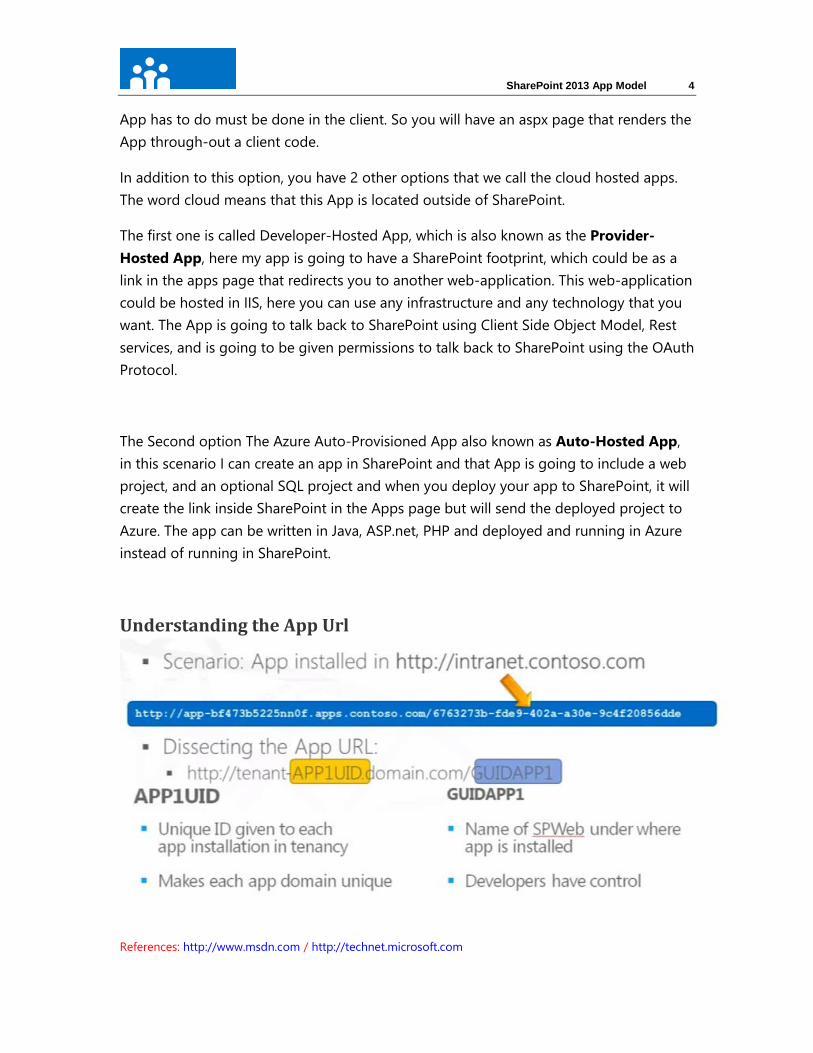
Understanding the App Url
SharePoint 2013 App Model 5
References: http://www.msdn.com / http://technet.microsoft.com
Let’s say I have a portal under http://intranet .contoso.com and I go to the market place
to get an app and install it. What SharePoint does, it creates an SPWeb under the Current
SPWeb that you are trying to install the App from. Technically speaking, The App is
going to be installed inside the child SPWeb called the App web. This web you will not
be able to get to it the same way you usually get to a traditional sub-web. Microsoft
allowed the ability to get to this web using a specific naming convention, the reason for
that is strictly for isolation.
Dissecting the App url, after configuring your site to host apps:
http://tenant-App1UID.domain.com/GUIDApp1
in office 365 tenant is going to be your company account. And the domain.com at the
end of it.
The App1UID is a unique id for example if you look at the above highlighted in blue area,
specific to the App that you installed.
In addition you are going to see the extra guid at the end. This guid is the name of the
app, and it is going to be defined by the name that the developer creates.
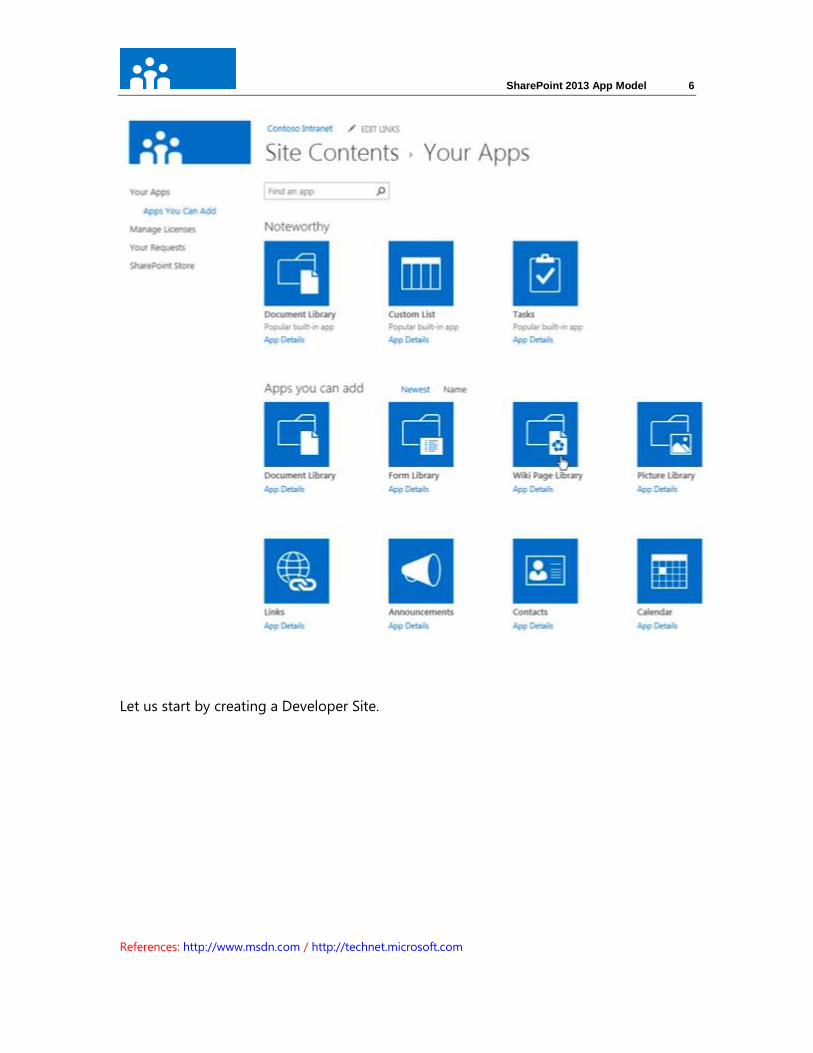
Now let’s navigate to our SharePoint portal?
Note
All the things that you used to access as lists and libraries, in version 2013 are called
Apps, that you can access to, are now located under site content as Apps.
SharePoint 2013 App Model 6
References: http://www.msdn.com / http://technet.microsoft.com
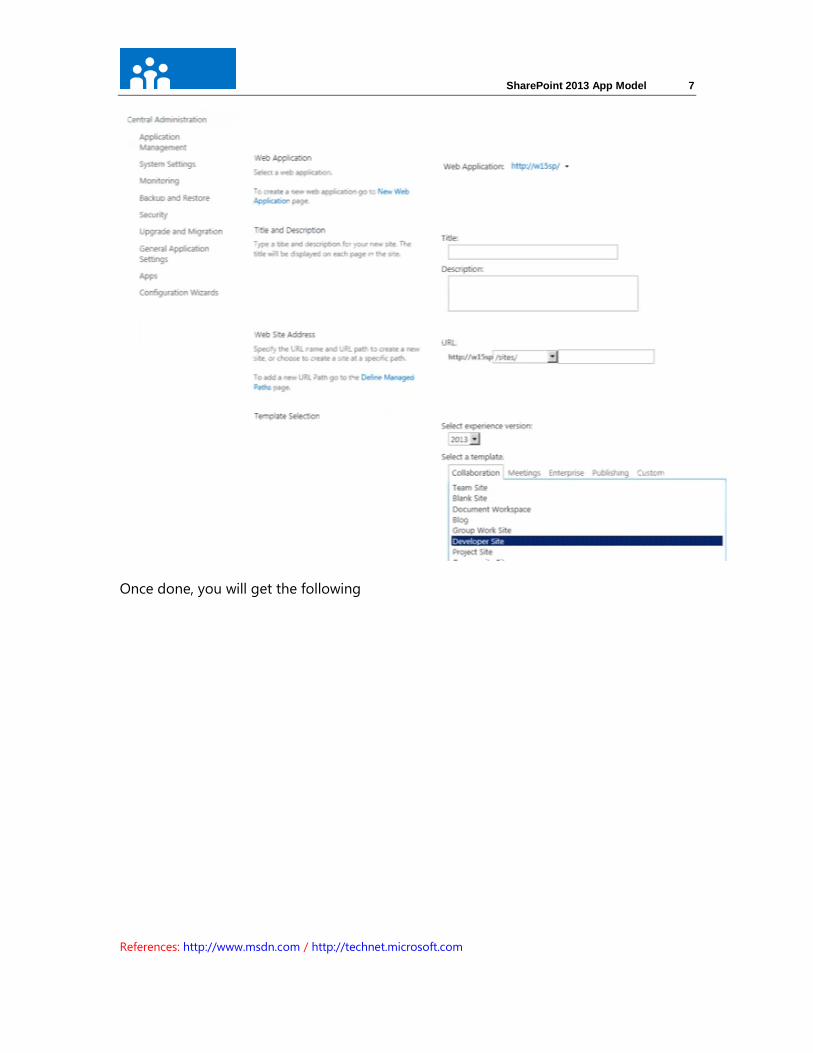
Let us start by creating a Developer Site.
SharePoint 2013 App Model 7
References: http://www.msdn.com / http://technet.microsoft.com
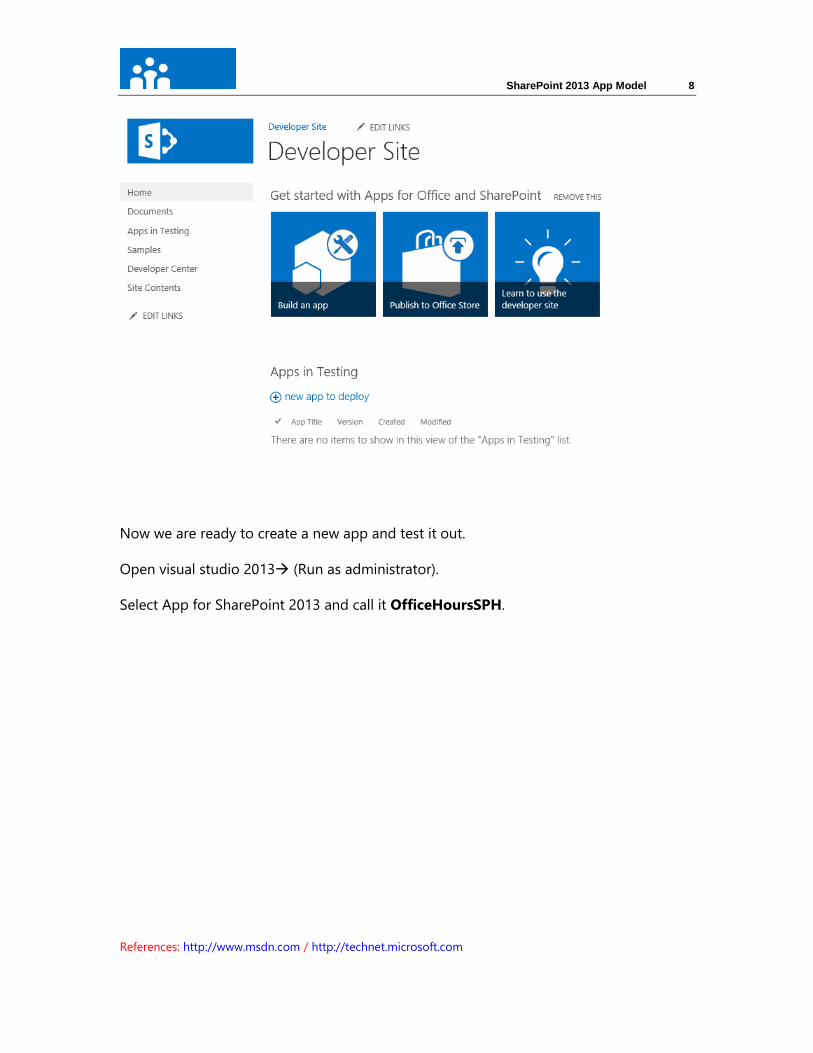
Once done, you will get the following
SharePoint 2013 App Model 8
References: http://www.msdn.com / http://technet.microsoft.com
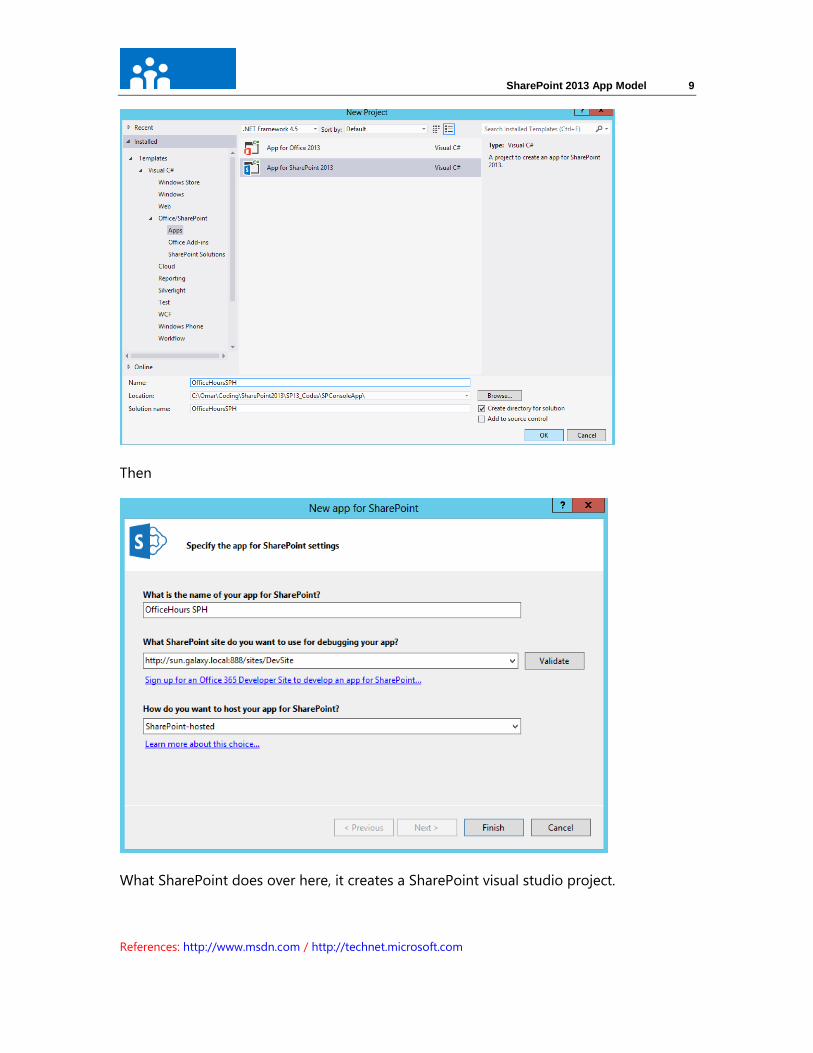
Now we are ready to create a new app and test it out.
Open visual studio 2013 (Run as administrator).
Select App for SharePoint 2013 and call it OfficeHoursSPH.
SharePoint 2013 App Model 9
References: http://www.msdn.com / http://technet.microsoft.com
Then
What SharePoint does over here, it creates a SharePoint visual studio project.
SharePoint 2013 App Model 10
References: http://www.msdn.com / http://technet.microsoft.com
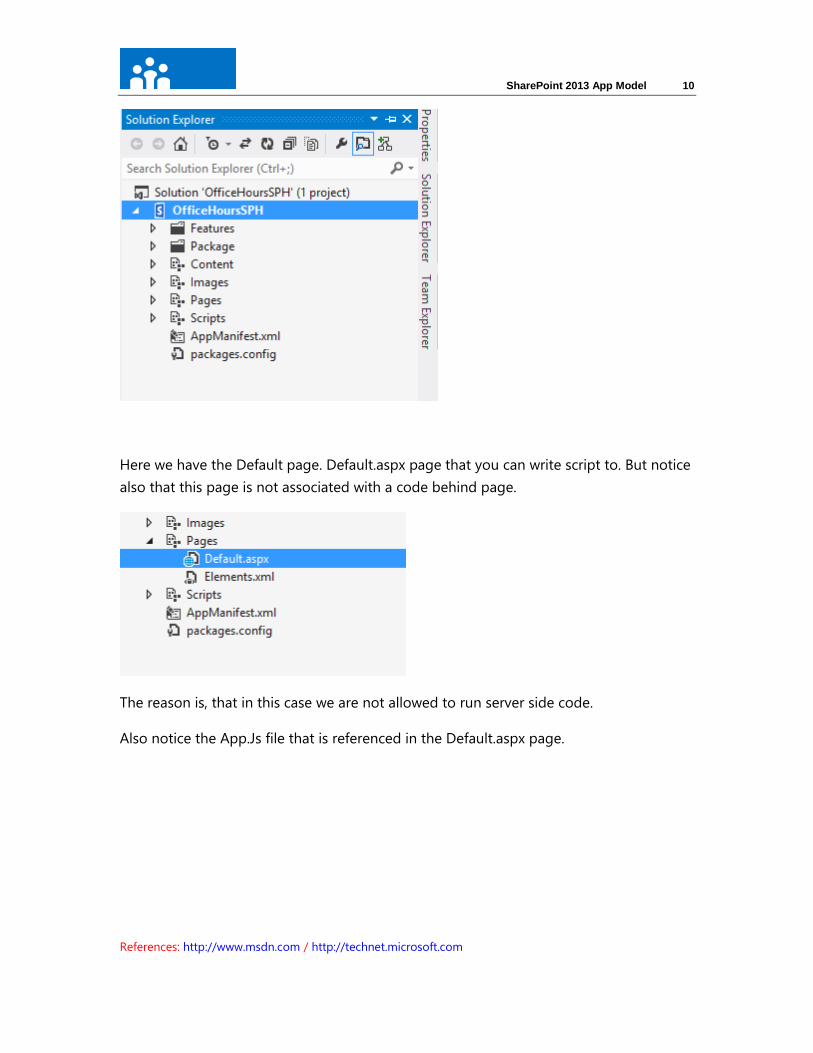
Here we have the Default page. Default.aspx page that you can write script to. But notice
also that this page is not associated with a code behind page.
The reason is, that in this case we are not allowed to run server side code.
Also notice the App.Js file that is referenced in the Default.aspx page.
SharePoint 2013 App Model 11
References: http://www.msdn.com / http://technet.microsoft.com
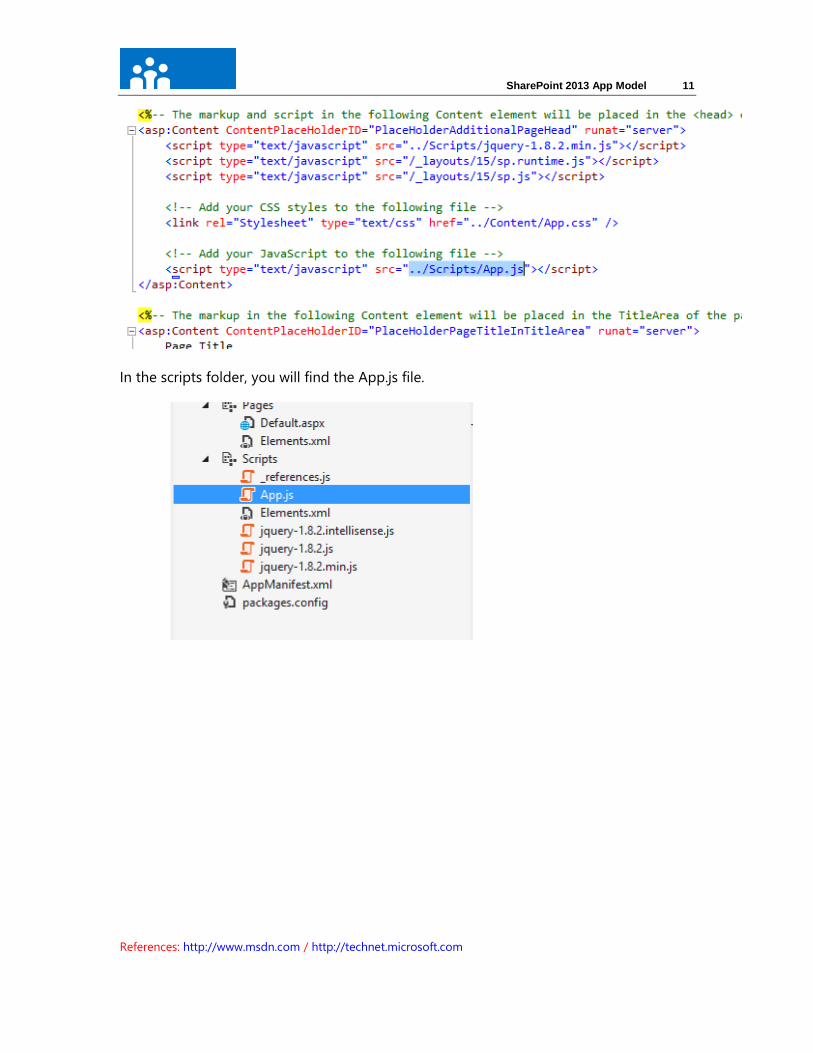
In the scripts folder, you will find the App.js file.
SharePoint 2013 App Model 12
References: http://www.msdn.com / http://technet.microsoft.com
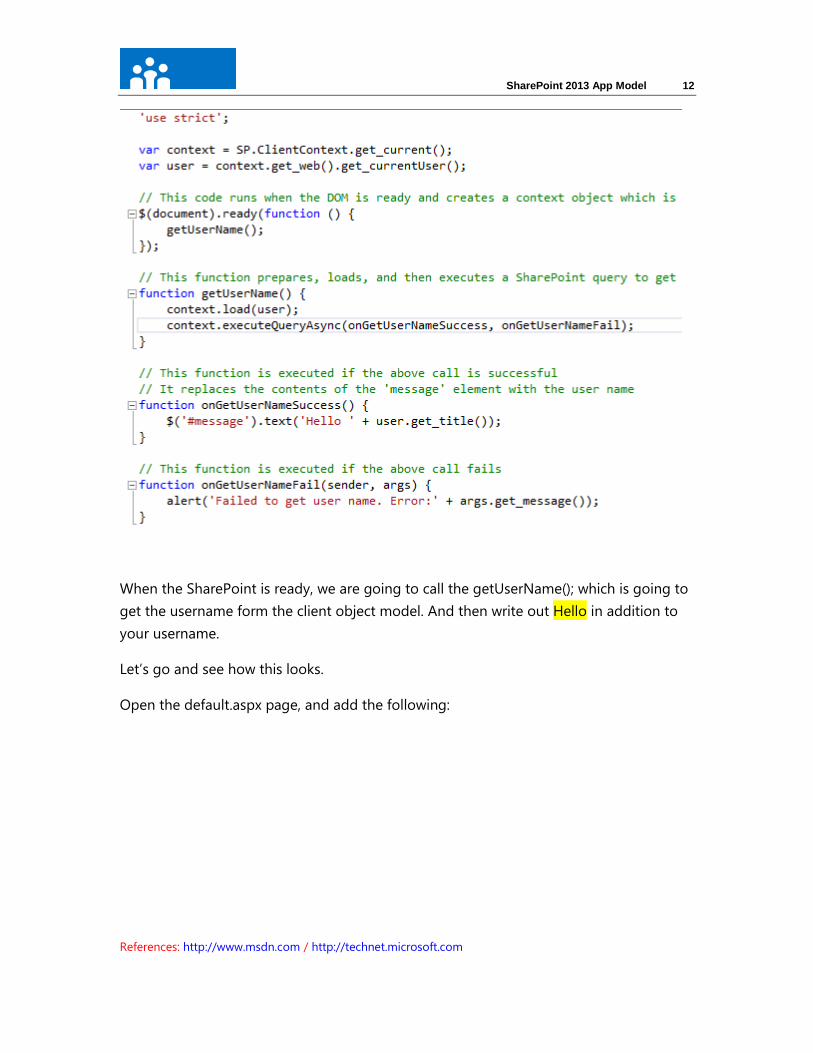
When the SharePoint is ready, we are going to call the getUserName(); which is going to
get the username form the client object model. And then write out Hello in addition to
your username.
Let’s go and see how this looks.
Open the default.aspx page, and add the following:
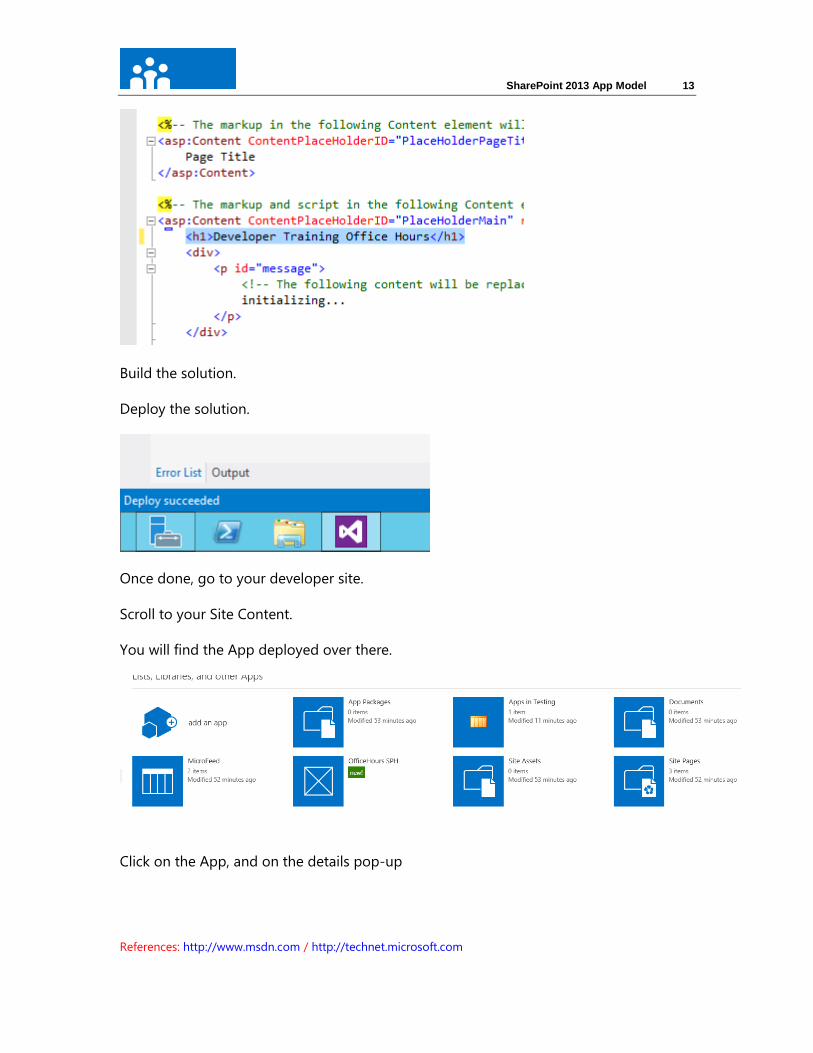
SharePoint 2013 App Model 13
References: http://www.msdn.com / http://technet.microsoft.com
Build the solution.
Deploy the solution.
Once done, go to your developer site.
Scroll to your Site Content.
You will find the App deployed over there.
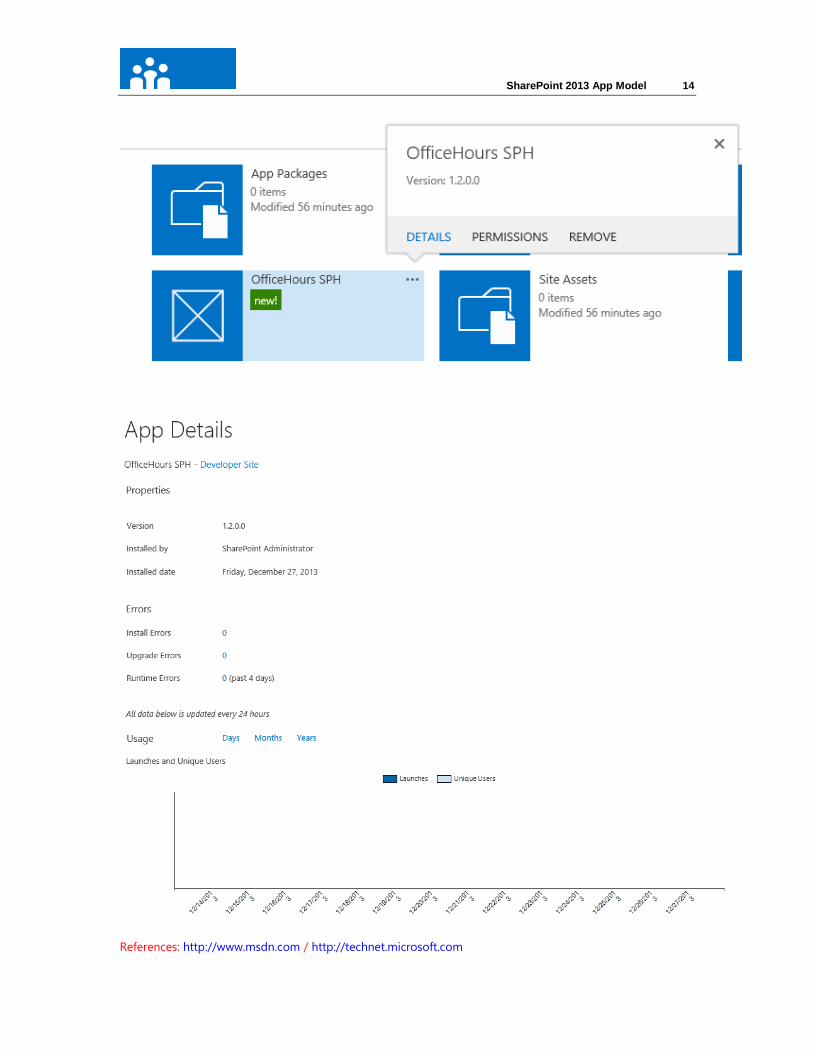
Click on the App, and on the details pop-up
SharePoint 2013 App Model 14
References: http://www.msdn.com / http://technet.microsoft.com
SharePoint 2013 App Model 15
References: http://www.msdn.com / http://technet.microsoft.com
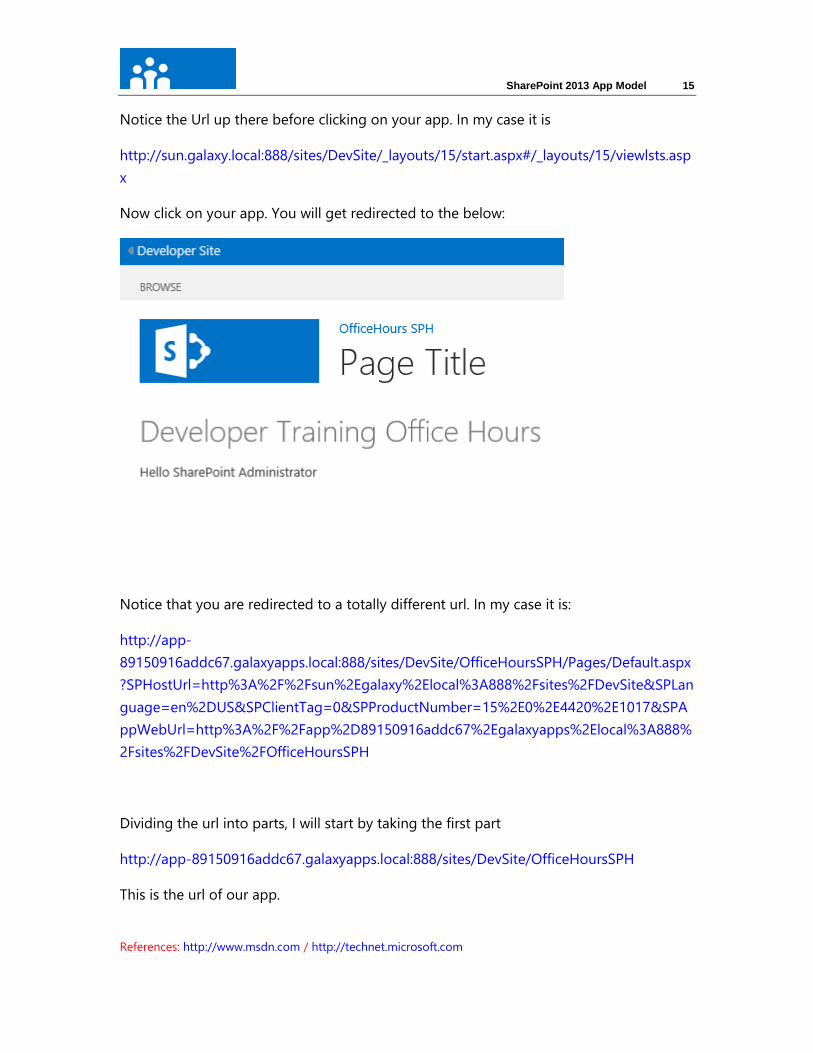
Notice the Url up there before clicking on your app. In my case it is
http://sun.galaxy.local:888/sites/DevSite/_layouts/15/start.aspx#/_layouts/15/viewlsts.asp
x
Now click on your app. You will get redirected to the below:
Notice that you are redirected to a totally different url. In my case it is:
http://app-
89150916addc67.galaxyapps.local:888/sites/DevSite/OfficeHoursSPH/Pages/Default.aspx
?SPHostUrl=http%3A%2F%2Fsun%2Egalaxy%2Elocal%3A888%2Fsites%2FDevSite&SPLan
guage=en%2DUS&SPClientTag=0&SPProductNumber=15%2E0%2E4420%2E1017&SPA
ppWebUrl=http%3A%2F%2Fapp%2D89150916addc67%2Egalaxyapps%2Elocal%3A888%
2Fsites%2FDevSite%2FOfficeHoursSPH
Dividing the url into parts, I will start by taking the first part
http://app-89150916addc67.galaxyapps.local:888/sites/DevSite/OfficeHoursSPH
This is the url of our app.
SharePoint 2013 App Model 16
References: http://www.msdn.com / http://technet.microsoft.com
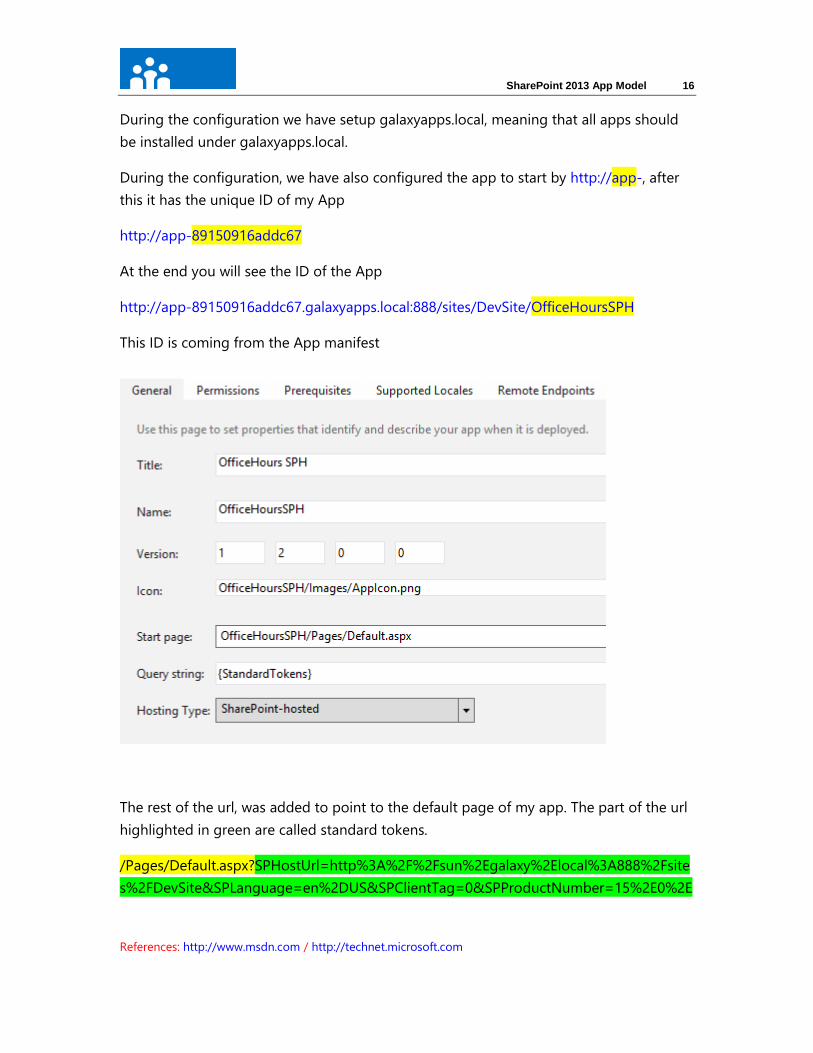
During the configuration we have setup galaxyapps.local, meaning that all apps should
be installed under galaxyapps.local.
During the configuration, we have also configured the app to start by http://app-, after
this it has the unique ID of my App
http://app-89150916addc67
At the end you will see the ID of the App
http://app-89150916addc67.galaxyapps.local:888/sites/DevSite/OfficeHoursSPH
This ID is coming from the App manifest
The rest of the url, was added to point to the default page of my app. The part of the url
highlighted in green are called standard tokens.
/Pages/Default.aspx?SPHostUrl=http%3A%2F%2Fsun%2Egalaxy%2Elocal%3A888%2Fsite
s%2FDevSite&SPLanguage=en%2DUS&SPClientTag=0&SPProductNumber=15%2E0%2E
SharePoint 2013 App Model 17
References: http://www.msdn.com / http://technet.microsoft.com
4420%2E1017&SPAppWebUrl=http%3A%2F%2Fapp%2D89150916addc67%2Egalaxyapp
s%2Elocal%3A888%2Fsites%2FDevSite%2FOfficeHoursSPH
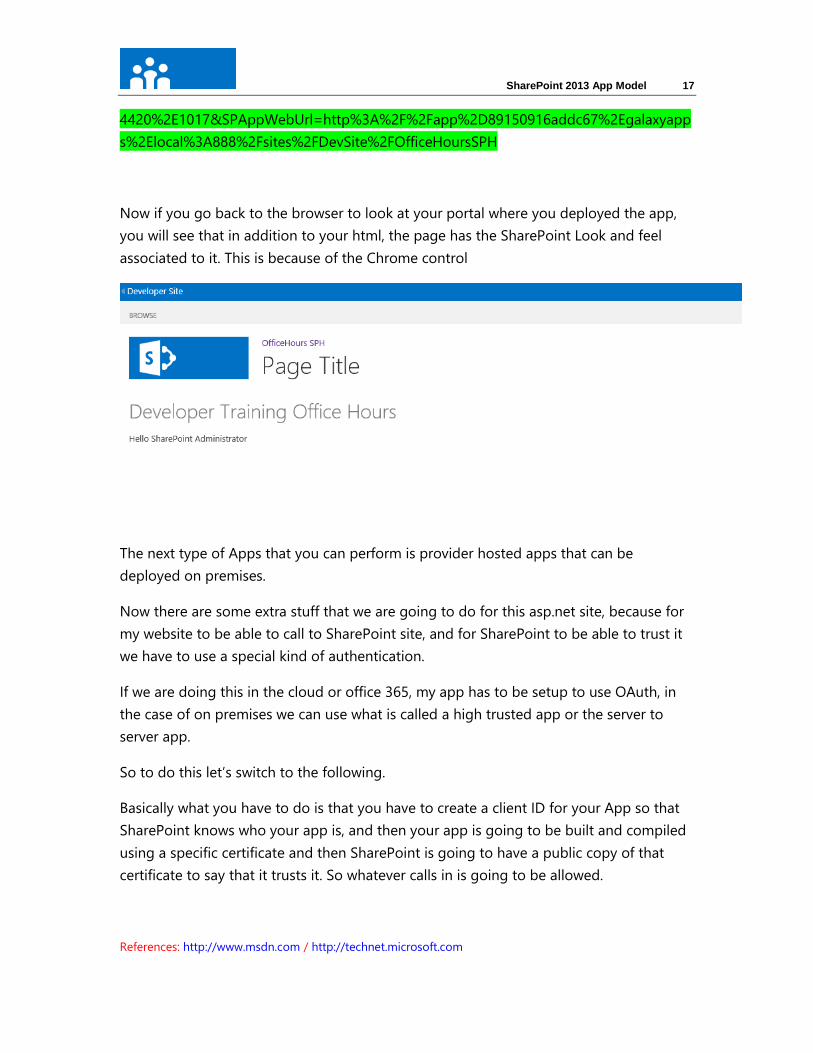
Now if you go back to the browser to look at your portal where you deployed the app,
you will see that in addition to your html, the page has the SharePoint Look and feel
associated to it. This is because of the Chrome control
The next type of Apps that you can perform is provider hosted apps that can be
deployed on premises.
Now there are some extra stuff that we are going to do for this asp.net site, because for
my website to be able to call to SharePoint site, and for SharePoint to be able to trust it
we have to use a special kind of authentication.
If we are doing this in the cloud or office 365, my app has to be setup to use OAuth, in
the case of on premises we can use what is called a high trusted app or the server to
server app.
So to do this let’s switch to the following.
Basically what you have to do is that you have to create a client ID for your App so that
SharePoint knows who your app is, and then your app is going to be built and compiled
using a specific certificate and then SharePoint is going to have a public copy of that
certificate to say that it trusts it. So whatever calls in is going to be allowed.
SharePoint 2013 App Model 18
References: http://www.msdn.com / http://technet.microsoft.com
Create a public and private test certificate
This example creates and exports a test certificate by using the Create Self Signed Certificate
option in IIS. You’ll need a commercial certificate issued by a Certificate Authority when you
publish your app.
Alternatively, you can also use the MakeCert test program to generate a test X.509 certificate.
For more information about how to use MakeCert, see Signing and checking code with
Authenticode.
You’ll create a test .pfx certificate file first, and then a corresponding test .cer file.
Note
For more information about .pfx and .cer files, see Software Publisher Certificate.
To create a test .pfx certificate file
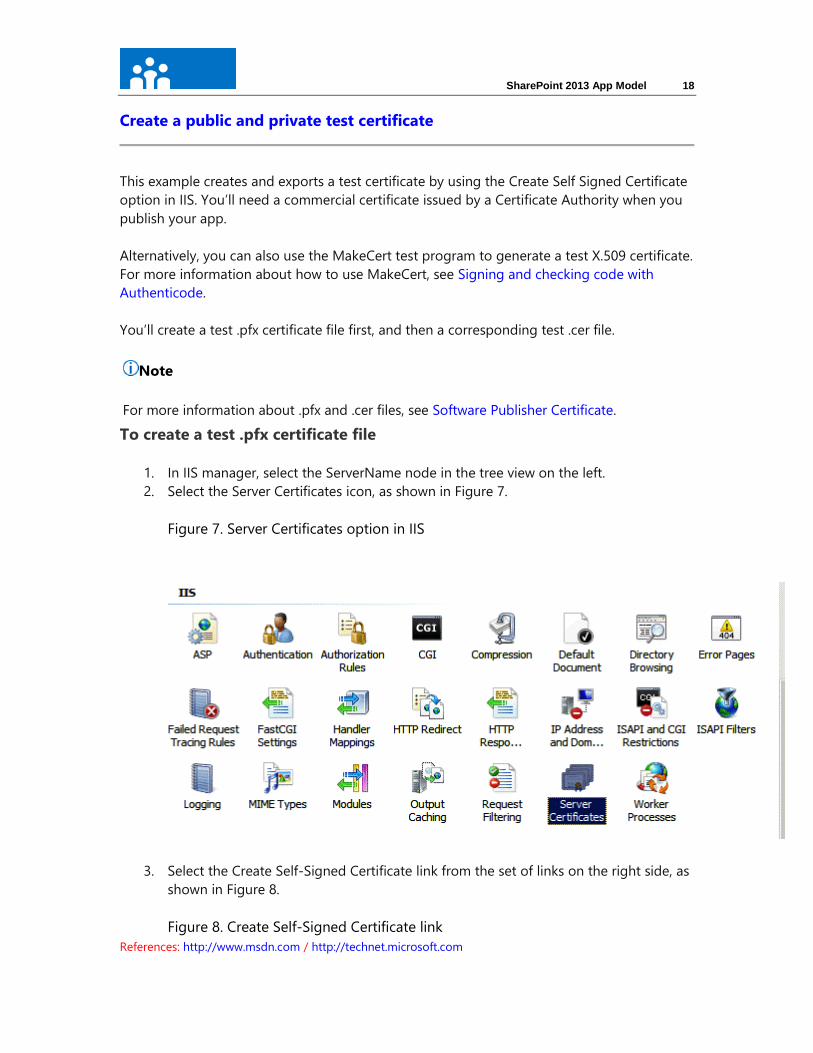
1. In IIS manager, select the ServerName node in the tree view on the left.
2. Select the Server Certificates icon, as shown in Figure 7.
Figure 7. Server Certificates option in IIS
3. Select the Create Self-Signed Certificate link from the set of links on the right side, as
shown in Figure 8.
Figure 8. Create Self-Signed Certificate link
SharePoint 2013 App Model 19
References: http://www.msdn.com / http://technet.microsoft.com
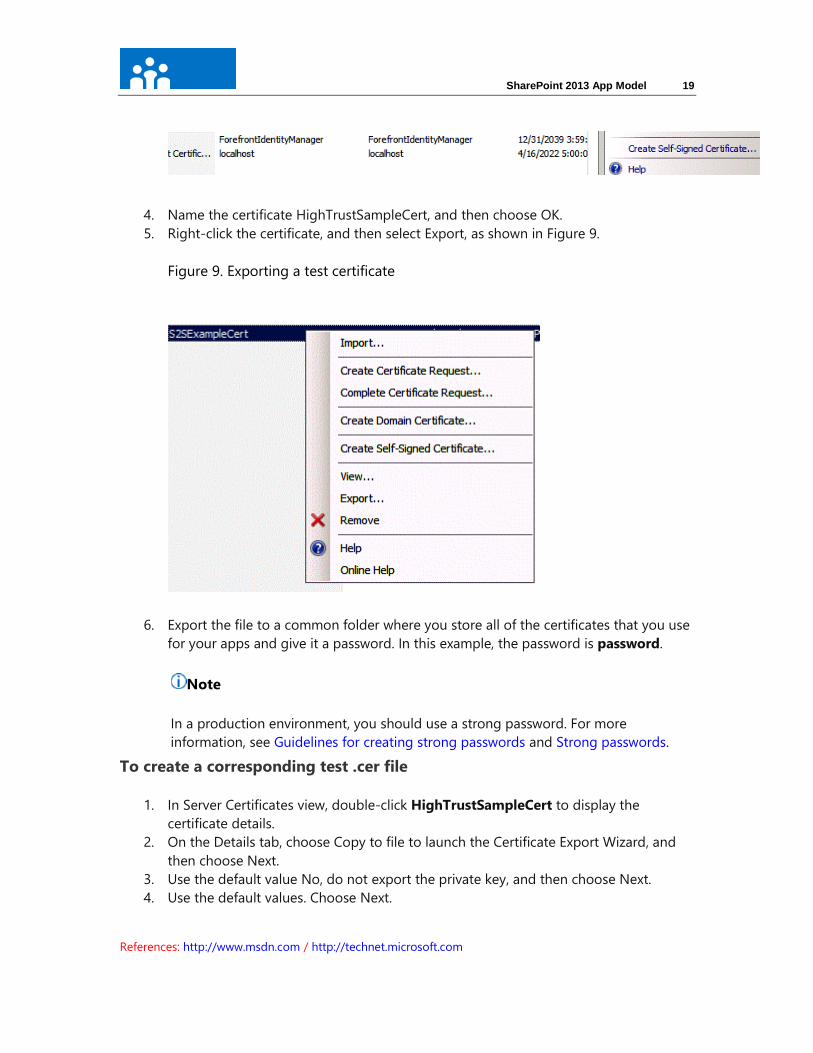
4. Name the certificate HighTrustSampleCert, and then choose OK.
5. Right-click the certificate, and then select Export, as shown in Figure 9.
Figure 9. Exporting a test certificate
6. Export the file to a common folder where you store all of the certificates that you use
for your apps and give it a password. In this example, the password is password.
Note
In a production environment, you should use a strong password. For more
information, see Guidelines for creating strong passwords and Strong passwords.
To create a corresponding test .cer file
1. In Server Certificates view, double-click HighTrustSampleCert to display the
certificate details.
2. On the Details tab, choose Copy to file to launch the Certificate Export Wizard, and
then choose Next.
3. Use the default value No, do not export the private key, and then choose Next.
4. Use the default values. Choose Next.
SharePoint 2013 App Model 20
References: http://www.msdn.com / http://technet.microsoft.com
5. Choose Browse, name the certificate HighTrustSampleCert, and then save it in a
location you choose. The certificate is saved as a .cer file.
6. Choose Finish.
Note
The .pfx file must be accessible to the computer where Visual Studio is running. The .pfx file
must be deployed to the web server that is hosting your web application, in the same file
path as the computer running Visual Studio. Alternatively, the path can be adjusted in the
web.config file, as shown the Modify Web.config procedure in Creating a provider-hosted
app.
The .cer file must be accessible to the server running SharePoint.
Generate an issuer ID
Next, you generate an issuer ID, which is a GUID. There are many GUID generators online
that you can use, or you can use the built-in GUID generator in Microsoft Visual Studio 2012.
The issuer ID and the certificate together identify the issuer of the app. The issuer ID must
have a one-to-one correspondence with the certificate, so whenever you create a new
certificate for a high-trust app, you must create a new issuer ID to associate with it, and if you
use the same certificate for more than one app, you must associate the same issuer ID with it.
You can also use the following Windows PowerShell command to create a GUID.
SCR
[System.Guid]::NewGuid().ToString()
Configure SharePoint 2013 for server-to-server app use and configure trust
for your app
1. Open the SharePoint Management Shell as an administrator.
Note
If you haven’t configured app isolation (which is listed as a prerequisite for this
article), you must configure it now, before you proceed.
2. On the computer where you installed SharePoint 2013, run the following Windows
PowerShell cmdlets to configure trust for your app:
SharePoint 2013 App Model 21
References: http://www.msdn.com / http://technet.microsoft.com
Note
You can run these steps once for each development server and share the issuer ID
and the certificate that you create for each app that you have in development.
1. Get the .cer file that you want to use with your app.
Windows PowerShell
$publicCertPath = "common folder:\HighTrustSampleCert.cer"
2. Get the issuer ID of your app. Currently, all the letters in the issuer ID GUID
must be lowercase.
Windows PowerShell
$issuerId = [System.Guid]::NewGuid().ToString()
3. Get the SharePoint 2013 URL where you will be installing your app.
Windows PowerShell
$spurl ="http://ContosoSharePoint.com"
4. Get the website where you are installing your app.
Note
If you're doing remote development where Visual Studio 2012 and
SharePoint 2013 are not installed on the same computer, the root site
collection must be created from a Developer Site template. It's required. If
Visual Studio 2012 and SharePoint 2013 are installed on the same computer,
it isn’t required.
5. Windows PowerShell
$spweb = Get-SPWeb $spurl
6. Get the current authentication realm for your SharePoint site.
Windows PowerShell

SharePoint 2013 App Model 22
References: http://www.msdn.com / http://technet.microsoft.com
$realm = Get-SPAuthenticationRealm -ServiceContext
$spweb.Site
7. Get the file that corresponds to the .cer file you’re using for the app.
Windows PowerShell
$certificate = Get-PfxCertificate $publicCertPath
8. Add the certificate to SharePoint’s list of trusted root certificate authorities.
Windows PowerShell
New-SPTrustedRootAuthority -Name "unique name for the
certificate" -Certificate $certificate
9. Get the issuer ID together with the realm value.
Windows PowerShell
$fullIssuerIdentifier = $issuerId + '@' + $realm
10. Create a trusted security token service. This fetches metadata from your app
(for example, the certificate) and establishes trust with it, so that SharePoint
2013 can accept tokens that are issued by your app.
Windows PowerShell
New-SPTrustedSecurityTokenIssuer -Name $issuerId -
Certificate $certificate -RegisteredIssuerName
$fullIssuerIdentifier –IsTrustBroker
Note
The –Name parameter must be unique. You cannot reuse a previously used
value. If you do, errors will be thrown.
11. Run the iisreset command to make your new issuer ID valid. The issuer ID will
become valid after 24 hours if you do not run iisreset.
Turn off the HTTPS requirement for OAuth during development
Note
SharePoint 2013 App Model 23
References: http://www.msdn.com / http://technet.microsoft.com
The following step is optional. However, we recommend that you develop and test with
HTTPS turned on. Turning off HTTPS might cause you as a developer to miss certain issues
when building an app that would occur during a production deployment where HTTPS is
required.
OAuth now requires SharePoint to run HTTPS, not only for your service but also for
SharePoint 2013. You’ll get a 403 (forbidden) message when attempting to make a call to
SharePoint by using a test certificate.
On the computer where you have SharePoint 2013 installed, you can turn off the HTTPS
requirement during development by using the following Windows PowerShell cmdlets.
Windows PowerShell
Copy
$serviceConfig = Get-SPSecurityTokenServiceConfig
$serviceConfig.AllowOAuthOverHttp = $true
$serviceConfig.Update()
Remember to turn the HTTPS requirement back on later by using the following Windows
PowerShell cmdlets.
Windows PowerShell
Copy
$serviceConfig = Get-SPSecurityTokenServiceConfig
$serviceConfig.AllowOAuthOverHttp = $false
$serviceConfig.Update()
Create a provider-hosted app by using Microsoft Office Developer Tools for
Visual Studio 2012
In this step, you create a provider-hosted app using Microsoft Visual Studio 2012.
Note
As stated in the Prerequisites for creating high-trust apps section, this article assumes you
know how to create a provider-hosted app for SharePoint. For more information, , see How
to: Create a basic provider-hosted app for SharePoint.
SharePoint 2013 App Model 24
References: http://www.msdn.com / http://technet.microsoft.com
Create an App for SharePoint 2013 project
1. In Visual Studio 2012, choose File, New, Project.
2. In the New Project wizard, expand the Visual C# node, and then expand the
Office/SharePoint node.
3. Choose Apps, and then choose to create an App for SharePoint 2013 project.
4. Name the project HighTrustSampleApp.
5. Save the project in a location you choose, and then choose OK.
6. Select the Provider-hosted hosting option, and then choose the Next button.
7. Under How do you want your app to authenticate?, choose Use a certificate.
8. Click the Browse button next to the Certificate location box and navigate to the
location of the self-signed certificate (.pfx file) that you created. Type the password
for this certificate in the Password box. Type the issuer ID in the Issuer ID box.
9. In the wizard, choose Finish. Much of the configuration is done when the solution
opens. Two projects are created in the Visual Studio 2012 solution, one for the app
for SharePoint and the other for the ASP.NET web application.
Run the app
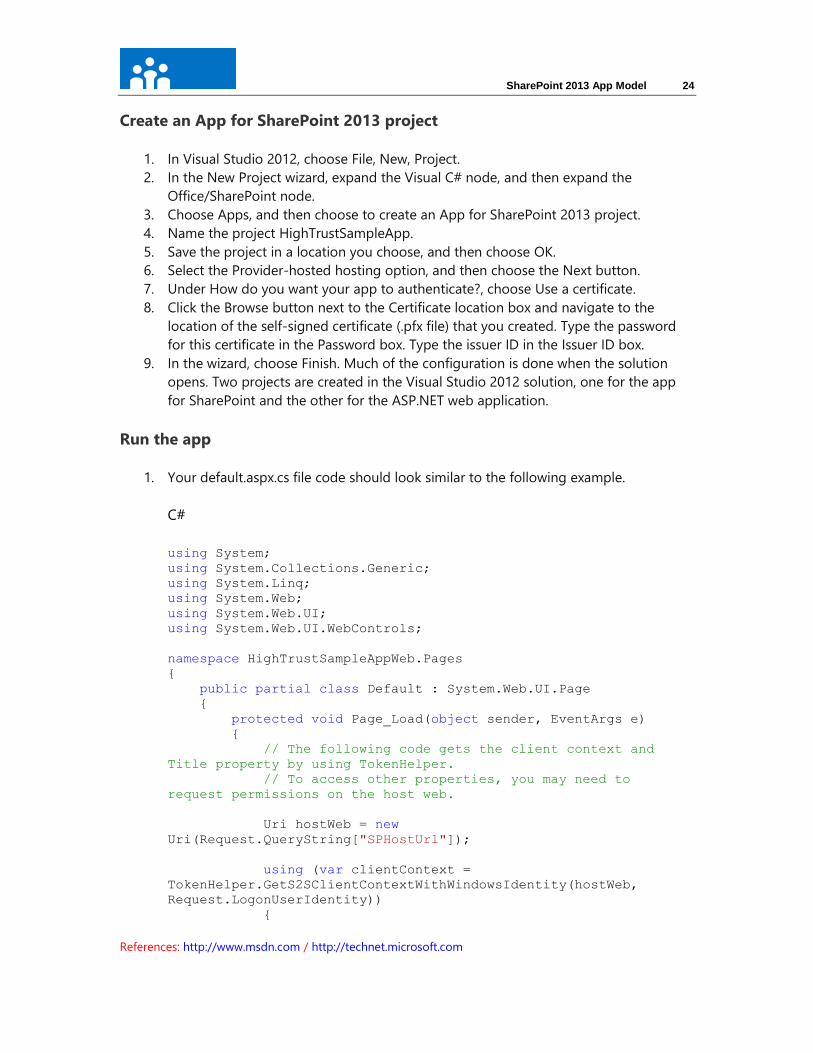
1. Your default.aspx.cs file code should look similar to the following example.
C#
using System;
using System.Collections.Generic;
using System.Linq;
using System.Web;
using System.Web.UI;
using System.Web.UI.WebControls;
namespace HighTrustSampleAppWeb.Pages
{
public partial class Default : System.Web.UI.Page
{
protected void Page_Load(object sender, EventArgs e)
{
// The following code gets the client context and
Title property by using TokenHelper.
// To access other properties, you may need to
request permissions on the host web.
Uri hostWeb = new
Uri(Request.QueryString["SPHostUrl"]);
using (var clientContext =
TokenHelper.GetS2SClientContextWithWindowsIdentity(hostWeb,
Request.LogonUserIdentity))
{

SharePoint 2013 App Model 25
References: http://www.msdn.com / http://technet.microsoft.com
clientContext.Load(clientContext.Web, web =>
web.Title);
clientContext.ExecuteQuery();
Response.Write(clientContext.Web.Title);
}
}
}
}
2. To test the app for SharePoint and its remote web application, press F5 in Visual
Studio 2012. The web application will be deployed to IIS Express at localhost. The app
for SharePoint will be installed to the target SharePoint website. You’ll be prompted
by SharePoint to grant the permissions that the app for SharePoint requests. The Site
Contents page of your target SharePoint website will open and you’ll see the new
app listed there.
Launch the app. The remote web application opens to the page you specified for the
Start Page in the AppManifest.xml file. Your app should look similar to Figure 10.
Figure 10. Sample app calling SharePoint Server and retrieving the web title
Thank you…